

Ingredient No-Bake Pumpkin Oreo Balls for Halloween
No-Bake Pumpkin Shaped Oreo Balls: A Cozy Halloween Treat
Welcome to my kitchen! It’s that magical time of year when the leaves turn golden, the air turns crisp, and every corner of the world is filled with the pumpkin-spiced goodness that makes our hearts sing. Today, I’m sharing a delightfully easy and mouthwatering recipe for No-Bake Pumpkin Shaped Oreo Balls that will elevate your fall festivities. Whether you’re throwing a Halloween party, looking for a cozy treat to enjoy with a warm cup of cider, or simply indulging your sweet tooth, these adorable pumpkin creations are a must-try.
I don’t know about you, but there’s something special about treats that come together without the need for an oven. This recipe is not only a breeze to whip up but can also be a fun activity to share with friends or the little ones in your life. Imagine rolling those Oreo balls and shaping them into little pumpkins—it’s as delightful as it sounds!
So, grab your favorite apron, cue the upbeat music, and let’s get started on this pumpkin-shaped adventure!
A Sweet Memory with a Twist
Growing up, my family made baking a weekend tradition. I can vividly remember the warmth of the kitchen, the sound of laughter, and the scent of freshly baked goodies wafting through the air. One particular Halloween, my mom decided to shake things up by trying a new recipe that used Oreos—my all-time favorite cookie! We dubbed them “Oreo ghosts” as they were rolled into ghost shapes with white chocolate coating. That lovely experience inspired me to create a pumpkin version, which became a hit at our family gatherings.
Every bite of these No-Bake Pumpkin Shaped Oreo Balls reminds me of those sweet childhood memories spent in the kitchen. I loved the way my family would gather around the table, excited to decorate our treats with colorful sprinkles and edible eyes. Now, whenever I make these pumpkin balls, I think back to that sunny Halloween, filled with laughter and chocolate smudges on our cheeks.
Ingredients
Here’s what you’ll need to create these adorable pumpkin Oreo balls:
-
Oreo Cookies (36 cookies)
- Chef Insight: Classic Oreos work best for this recipe, but feel free to experiment with other flavored varieties. Mint Oreos add a surprising twist!
-
Cream Cheese (8 oz)
- Substitution Tip: If you’re looking for a lighter option, you can use reduced-fat cream cheese. Just make sure it’s softened for easier mixing.
-
Orange Candy Melts (1 cup)
- Chef Hack: If you can’t find orange candy melts, you can mix white and yellow candy melts in equal parts to create an orange hue.
-
Green Sprinkles or Candy (for decoration)
- Quick Insight: You can use mini chocolate chips or green M&Ms instead of sprinkles for a fun pop of color.
-
Gel Food Coloring (optional)
- Recommendation: For the perfect shade of orange, use gel food coloring to tint your white chocolate if you prefer a homemade touch.
-
Styrofoam (or similar) block for shaping
- Chef Note: This is optional, but it makes it much easier to shape and display the pumpkin balls while they set!
Step-by-Step Instructions
-
Crush the Oreos: Place the Oreo cookies in a food processor and pulse until finely crushed. If you don’t have a food processor, you can also place them in a zip-top bag and crush them with a rolling pin. This part is a great way to get the kids involved!
-
Mix in the Cream Cheese: In a large bowl, combine the crushed Oreos with the softened cream cheese. Use a spatula or your hands to mix until the mixture is well combined and forms a dough. This is the perfect time to get your hands a little dirty—trust me, it’s worth it!
-
Chill the Mixture: Cover the mixture and refrigerate for about 30 minutes. Chilling helps the mixture firm up, making it easier to shape the balls.
-
Shape the Pumpkin Balls: Once chilled, take small portions of the mixture and roll them into about 1-inch balls. Place them onto a baking sheet lined with parchment paper. If you want to make them more pumpkin-like, gently press the top of each ball to form a slight indentation.
-
Melt the Orange Candy Coating: Following the package instructions, melt the orange candy melts in a microwave-safe bowl, stirring every 30 seconds to avoid burning. If you’re using food coloring, this is where you’d add it!
-
Coat the Pumpkin Balls: Dip each ball in the melted orange coating. Let any excess chocolate drip off, and then transfer it back onto the baking sheet.
-
Add the Green Toppers: While the orange coating is still wet, place a green sprinkle or candy on the top to serve as the pumpkin stem.
-
Let Them Set: Allow the no-bake pumpkin balls to cool until the candy coating has hardened. You can speed this process up by placing them in the refrigerator.
Serving Suggestions
Once your No-Bake Pumpkin Shaped Oreo Balls are set, it’s time to serve! You can arrange them on a festive platter, perhaps sprinkled with a few autumn-themed decorations like faux leaves or mini pumpkins. Don’t forget to leave some room for little hands to come in and grab their favorites!
For an extra touch, you could place each pumpkin ball on a lollipop stick to create fun pumpkin pops that are easy to grab and enjoy.
Recipe Variations
Here are a few creative twists on my No-Bake Pumpkin Shaped Oreo Balls:
-
Spiced Pumpkin Flavor: Add a teaspoon of pumpkin pie spice to the Oreo mixture for an extra layer of fall flavor.
-
Chocolate Drizzle: After the orange coating has set, drizzle some melted dark or white chocolate over them for a decorative touch.
-
Nut Butter Swirl: Mix a tablespoon of almond or peanut butter into the Oreo and cream cheese dough for a unique, nutty flavor.
-
Different Shapes: Instead of pumpkins, you can shape these into ghosts or acorns. Just adjust the decoration accordingly!
Chef’s Notes
As someone who cherishes cozy moments in the kitchen, I’ve experimented a lot with these pumpkin Oreo balls over the years. They started as just a fun Halloween treat, but they’ve evolved into a go-to recipe for family gatherings, holiday parties, and even cozy game nights. I love how versatile they are—you can dress them up, or keep it simple!
I also remember one time forgetting to add the green decorations, and they still turned out delicious! It reminded me that perfection isn’t necessary in cooking; what truly matters is the love and joy shared around the meal.
FAQs and Troubleshooting
Q: My chocolate coating is too thick. What can I do?
A: If your candy melts feel thick, try adding a small teaspoon of vegetable oil to thin it out. This will make it easier to dip and create a nice even coating.
Q: Can I use regular cream cheese?
A: Absolutely! Just ensure that it’s softened so that it mixes well with the Oreo crumbs.
Q: How long will these last?
A: Properly stored in an airtight container in the fridge, these treats should last about a week. They’re perfect to make ahead for parties!
Q: What do I do if the pumpkin balls fall apart?
A: If your balls are too crumbly, try adding a little more cream cheese to the mixture. If they feel too soft, a spell in the refrigerator will help firm them up.
Now it’s time to gather your ingredients and bring the magic of fall into your kitchen. I can’t wait to hear how you enjoy these No-Bake Pumpkin Shaped Oreo Balls! Happy cooking and happy memories!
Print
No-Bake Pumpkin Shaped Oreo Balls
- Total Time: 45 minutes
- Yield: 24 balls 1x
- Diet: Vegetarian
Description
Delightfully easy No-Bake Pumpkin Shaped Oreo Balls, perfect for Halloween parties and cozy treats.
Ingredients
- 36 Oreo Cookies
- 8 oz Cream Cheese, softened
- 1 cup Orange Candy Melts
- Green Sprinkles or Candy (for decoration)
- Gel Food Coloring (optional)
- Styrofoam block for shaping (optional)
Instructions
- Crush the Oreos: Place the Oreo cookies in a food processor and pulse until finely crushed.
- Mix in the Cream Cheese: In a large bowl, combine the crushed Oreos with the softened cream cheese.
- Chill the Mixture: Cover the mixture and refrigerate for about 30 minutes.
- Shape the Pumpkin Balls: Once chilled, take small portions of the mixture and roll them into about 1-inch balls.
- Melt the Orange Candy Coating: Melt the orange candy melts in a microwave-safe bowl.
- Coat the Pumpkin Balls: Dip each ball in the melted orange coating and let any excess drip off.
- Add the Green Toppers: While the orange coating is still wet, place a green sprinkle or candy on the top.
- Let Them Set: Allow the no-bake pumpkin balls to cool until the candy coating has hardened.
Notes
These pumpkin Oreo balls can be decorated in various ways, and can also be shaped into other festive shapes like ghosts or acorns.
- Prep Time: 15 minutes
- Cook Time: 30 minutes
- Category: Dessert
- Method: No-Bake
- Cuisine: American
Nutrition
- Serving Size: 1 ball
- Calories: 120
- Sugar: 15g
- Sodium: 70mg
- Fat: 7g
- Saturated Fat: 4g
- Unsaturated Fat: 2g
- Trans Fat: 0g
- Carbohydrates: 14g
- Fiber: 0g
- Protein: 1g
- Cholesterol: 15mg
Keywords: no-bake, pumpkin dessert, Halloween treats, Oreo balls

Minute One-Pan Creamy Butternut Squash Skillet Dinner
Butternut Squash Delight: A Cozy Journey in Flavor
Welcome to my kitchen, fellow food lovers! I’m Olivia Bennett, your guide on this culinary adventure, and today we’re diving into something truly magical: Butternut Squash Delight. This dish embodies everything I adore about cooking—comfort, warmth, and the ability to bring people together around the table.
As the days grow shorter and the air turns crisp, there’s nothing quite like the taste of roasted butternut squash. It’s sweet, savory, and oh-so-versatile, making it a star ingredient for any meal. Whether you’re a seasoned chef or just starting out, this recipe will become a cherished go-to in your kitchen repertoire. So, let’s transform those earthy flavors into something delightful!
A Cozy Memory
Before we jump into cooking, let me share a little story. I first fell in love with butternut squash while visiting my grandmother in the fall. She had a garden overflowing with vibrant vegetables, and as the leaves began to turn, we would venture out to collect the last of her harvest. The smell of warm spices and roasting squash would waft through her kitchen—a scent that brought an immediate sense of comfort.
One particularly chilly afternoon, she delighted me with her signature Butternut Squash Soup, creamy and rich with just the right kick of nutmeg. We sat together, spooning soup from colorful bowls, discussing everything from family traditions to dreams for the future. That simple meal was a celebration of warmth and love, and it’s a memory I treasure deeply. Today, I want to recreate that same warmth and share it with you through this delightful dish!
Ingredients
Here’s what you’ll need to create your own Butternut Squash Delight:
-
Butternut Squash (2 lbs): The star of the show! Look for squash that feels heavy for its size with a smooth, tan skin. If you can’t find butternut squash, acorn squash or pumpkin are good substitutes.
-
Olive Oil (2 tablespoons): This provides the richest flavor. You can also use coconut oil for a sweeter touch or avocado oil for a higher smoke point.
-
Garlic (3 cloves, minced): Your aromatic superstar! Honestly, you can never have too much garlic. If you’re short on fresh garlic, 1 teaspoon of garlic powder works too.
-
Ground Cinnamon (1 teaspoon): This adds that warm, cozy vibe. If you’re feeling adventurous, try substituting with nutmeg or allspice!
-
Ground Ginger (1 teaspoon): A hint of warmth and spice. If you prefer a stronger ginger flavor, feel free to add fresh grated ginger instead.
-
Salt (1 teaspoon): To enhance flavors—you can adjust this based on your taste.
-
Freshly Cracked Black Pepper (1/2 teaspoon): For a dash of heat! Feel free to use cayenne or crushed red pepper flakes if you like it spicy.
-
Vegetable Broth (4 cups): This forms the base of your dish. Chicken broth will work, but for a vegetarian option, stick with vegetable broth!
-
Fresh Thyme (1 tablespoon, chopped): This herb brings a fresh, earthy flavor. You can easily swap it for rosemary or sage, depending on your taste.
-
Cream (1/2 cup): For creaminess! If you’re looking for a dairy-free version, try coconut milk or a non-dairy cream.
Step-by-Step Instructions
Now that we have our ingredients lined up like a perfect culinary army, let’s get to cooking!
-
Prep the Butternut Squash: Start by preheating your oven to 400°F (200°C). Grab that gorgeous butternut squash and carefully cut it in half lengthwise. Scoop out the seeds—a fun job for kids if you have any little helpers! Once cleaned, cut the squash into bite-sized cubes. Pro tip: It’s easier to peel the squash after cutting it. If you’re struggling, use a vegetable peeler to remove the skin.
-
Roast the Squash: Toss the cubed squash in a mixing bowl with olive oil, minced garlic, cinnamon, ginger, salt, and pepper. Spread it out on a baking sheet lined with parchment paper. Pop it in the oven for about 25-30 minutes or until the squash is tender and starts to caramelize. You’ll know it’s done when it’s golden and smells divine!
-
Prepare the Broth: While the squash is roasting, let’s make that broth sing. In a large pot, bring the vegetable broth to a simmer over medium heat. Add in the chopped thyme and let it infuse for about 5 minutes.
-
Combine: Once the squash is ready, carefully transfer it to the pot with the broth. Let them mingle, allowing the flavors to blend for about 5-10 minutes.
-
Blend it Up: Here’s where the magic happens! Using an immersion blender, puree the mixture until it’s silky smooth. If you don’t have an immersion blender, carefully transfer to a regular blender in batches. Just watch those hot splatters!
-
Finish it Off: Return the blended soup to the pot. If you like it creamier (and who doesn’t?), stir in the cream. Adjust the seasoning with salt and pepper as necessary. If it’s too thick for your liking, feel free to stir in a splash more broth or water.
-
Serve Warm: Ladle your Butternut Squash Delight into bowls. Don’t forget to garnish with a sprinkle of fresh thyme or a swirl of cream for that lovely finishing touch!
Serving Suggestions
This Butternut Squash Delight is perfect for cozy winter nights! Serve it with crusty bread or a warm baguette. It also pairs beautifully with a fresh green salad sprinkled with nuts and cranberries for that added crunch. Each bite should bring comfort and joy!
Recipe Variations
Feeling adventurous? Here are a few creative twists to make this dish your own:
-
Spicy Kick: Add a pinch of cayenne pepper or a splash of hot sauce when blending for a spicy version.
-
Herbed Bliss: Experiment with different herbs like sage or rosemary for an aromatic twist.
-
Add Protein: Stir in some cooked lentils or chickpeas for extra nutrition and a heartier meal.
-
Nutty Flavor: Top with roasted pumpkin seeds or pecans for a delightful crunch.
-
Coconut Cream: For a tropical twist, replace the cream with coconut cream for a touch of sweetness.
Chef’s Notes
Every recipe has a life of its own, and this Butternut Squash Delight is no exception! Over the years, I’ve tweaked the ingredients and methods based on what I have on hand or what friends bring over. Some days, I’ll throw in a dash of curry powder, while other times I keep it classic. The beauty of cooking is that it can evolve with you.
I also remember a time I attempted to impress my partner with this dish, only to over-spice it with too much ginger! A quick fix with a little more cream saved the day, and we laughed about it as we enjoyed our “unexpected flavor adventure.” Cooking should always be fun and forgiving!
FAQs and Troubleshooting
Q: Why is my butternut squash soup too thick?
A: If your soup is thicker than you’d like, simply add more vegetable broth or water until you reach your desired consistency.
Q: How do I store leftovers?
A: Store any leftovers in an airtight container in the fridge for up to 4-5 days. Reheat on the stovetop, adding a splash of broth to loosen it up if necessary.
Q: Can I make this soup ahead of time?
A: Absolutely! This soup actually tastes even better the next day as the flavors meld. Just store it in the fridge and reheat before serving.
Q: I don’t have an immersion blender. What can I do?
A: A regular blender works just fine! Just be sure to let the soup cool slightly before blending, and blend in small batches to avoid any splatter.
Nutritional Info
While I won’t delve too deeply into the nitty-gritty nutritional details, this dish is packed with vitamins, fiber, and antioxidants thanks to the butternut squash! It makes for a wholesome, comforting meal that nourishes both body and soul.
Now, my dear friends, you’re ready to embark on your very own butternut squash journey! I can’t wait for you to experience the delightful flavors and the memories that will surely come with each spoonful. Gather your loved ones around the table, share some stories, and enjoy this cozy dish. Happy cooking!
Print
Butternut Squash Delight
- Total Time: 40 minutes
- Yield: 4 servings
- Diet: Vegetarian
Description
A comforting and flavorful soup made with roasted butternut squash, garlic, and cream, perfect for cozy winter nights.
Ingredients
- Butternut Squash (2 lbs)
- Olive Oil (2 tablespoons)
- Garlic (3 cloves, minced)
- Ground Cinnamon (1 teaspoon)
- Ground Ginger (1 teaspoon)
- Salt (1 teaspoon)
- Freshly Cracked Black Pepper (1/2 teaspoon)
- Vegetable Broth (4 cups)
- Fresh Thyme (1 tablespoon, chopped)
- Cream (1/2 cup)
Instructions
- Prep the Butternut Squash: Start by preheating your oven to 400°F (200°C). Cut the squash in half lengthwise, scoop out the seeds, and cut into bite-sized cubes.
- Roast the Squash: Toss the cubed squash with olive oil, garlic, cinnamon, ginger, salt, and pepper. Spread on a baking sheet and roast for 25-30 minutes.
- Prepare the Broth: In a large pot, bring the vegetable broth to a simmer and add chopped thyme. Let infuse for about 5 minutes.
- Combine: Transfer the roasted squash to the pot with the broth and let blend flavors for 5-10 minutes.
- Blend it Up: Use an immersion blender to puree the mixture until smooth.
- Finish it Off: Return the soup to the pot, stir in the cream, and adjust seasoning with salt and pepper.
- Serve Warm: Ladle into bowls and garnish with fresh thyme or a swirl of cream.
Notes
This Butternut Squash Delight is perfect for cozy winter nights! Serve it with crusty bread or a warm baguette.
- Prep Time: 10 minutes
- Cook Time: 30 minutes
- Category: Soup
- Method: Blending
- Cuisine: American
Nutrition
- Serving Size: 1 serving
- Calories: 300
- Sugar: 6g
- Sodium: 600mg
- Fat: 16g
- Saturated Fat: 8g
- Unsaturated Fat: 8g
- Trans Fat: 0g
- Carbohydrates: 36g
- Fiber: 5g
- Protein: 6g
- Cholesterol: 40mg
Keywords: butternut squash, soup, vegetarian, cozy meals, fall recipes

Crispy Chocolate Pretzel Spider Web Treat in 15 Minutes
Chocolate Pretzel Spider Webs: A Fun and Spooky Treat!
Welcome to my kitchen! I’m so excited to share a delightful and spooky treat that’s perfect for your next gathering or Halloween celebration: Chocolate Pretzel Spider Webs! These fun snacks blend sweet and salty flavors, and best of all, they’re super simple to make. Whether you’re hosting a Halloween party, looking for creative snacks for the kids, or just want to indulge your taste buds, this recipe is bound to become a favorite in your home.
There’s something inherently magical about this chocolate pretzel combination. The crunchy twists of the pretzel, the smooth velvety chocolate, and that hint of whimsy from the spider web design bring together everything that I love about cooking at home—creativity, comfort, and a little bit of nostalgia. Each bite cradles cozy moments and great conversations.
In this blog post, I’ll take you through a journey of crafting these sweet and salty delights, alongside stories from my own kitchen adventures. Together, we’ll whip up a batch of Chocolate Pretzel Spider Webs that’ll have you and your guests squealing in delight!
A Trip Down Memory Lane
One Halloween, I remember going to a local pumpkin patch to pick out the best gourds and apples to bake into pies. Among the stalls, there was a quaint little table run by a friendly family who would always have a selection of homemade baked goods. As kids, my sister and I were always drawn to their table, not just for the cookies but for the creative snacks they showcased. It was on that day I first had something like these chocolate pretzel webs – but instead of spiders, they showcased cute little ghosts made of marshmallows!
We each grabbed one and for some reason, the combination of the crunch and sweetness sent my taste buds into overdrive! That memory has stuck with me, and when I created my version of these spooky pretzel webs, I couldn’t help but reminisce about that Halloween day long ago. It’s funny how food weaves its way into our memories and becomes a thread in our life story, isn’t it?
Ingredients
To get started, here’s what you’ll need for your Chocolate Pretzel Spider Webs:
-
Pretzel Sticks
The foundation of your web! Crunchy and salty, they provide the perfect base. Don’t have pretzel sticks? Use regular pretzels or even breadsticks as a substitute. -
Chocolate Chips (Milk or Dark)
Choose your favorite chocolate—milk for a sweeter touch or dark for a more intense flavor. If you’re feeling adventurous, white chocolate also makes a great base for coloring! -
Black Candy Melts
These will give the perfect look to your spider web. If candy melts aren’t available, you can use chocolate mixed with a little vegetable oil to achieve a similar consistency. -
Confectioners Sugar
Just a sprinkle for sweetness! If you need a sugar-free option, you can find alternative sweeteners that work well, too. -
Edible Eyes
To bring your spiders to life! You can buy edible candy eyes from any baking supply store or make your own with small dollops of icing. -
Parchment Paper
Not an ingredient per se, but crucial for setting your webs and keeping everything tidy!
Step-by-Step Instructions
Let’s dive into crafting these delightful treats! Follow along as we build these Chocolate Pretzel Spider Webs step-by-step.
-
Prepare Your Workspace:
Start by lining a baking sheet with parchment paper. This will be where your completed spider webs will rest and harden. -
Melt the Chocolate:
In a microwave-safe bowl, add your chocolate chips. Heat them in 30-second intervals, stirring in between until completely melted and smooth. This should take about 1-2 minutes depending on your microwave power. Pro tip: Avoid overheating the chocolate, as it can seize up. If that happens, simply stir in a teaspoon of vegetable oil to salvage it. -
Dip the Pretzel Sticks:
Take your pretzel sticks and dip them halfway into the melted chocolate. Let the excess drip off and place them on the parchment paper. I love to make a bunch of these at once—perfect for sharing with family! -
Create the Spider Web:
Using a piping bag or a plastic sandwich bag with the corner snipped off, draw circles and lines over the chocolate-covered pretzel sticks to create the web effect. Start from the center and move outward—this is where creativity shines! Don’t worry if it’s not perfect; your webs will turn out adorable regardless! -
Add the Spiders:
While the chocolate is still soft, place two edible eyes on top of each pretzel stick to make them resemble spiders. The kids will love helping with this part! -
Let It Set:
Place the baking sheet in the refrigerator for about 30 minutes or until the chocolate has completely hardened. You can also leave them out at room temperature for a couple of hours if you prefer. -
Serve and Enjoy:
Once the chocolate is set, gently peel the pretzel webs off the parchment paper. They’re now ready to be devoured!
Serving Suggestions
When serving your Chocolate Pretzel Spider Webs, arrange them on a creepy platter surrounded by faux spider decorations or spooky candles for a charming display. You can even place them in a clear jar adorned with festive ribbons for a cute centerpiece. Pair them with some pumpkin spice dip for a deliciously seasonal treat!
Recipe Variations
Feel free to switch things up! Here are some creative twists to keep things fresh:
- Nut Butter Version: Instead of chocolate, use melted peanut butter or almond butter for a unique flavor!
- Add a Crunch: Mix in crushed nuts or sprinkle some chopped toffee on top before the chocolate hardens for an extra crunch.
- Colorful Treats: Use colored candy melts for different holidays or celebrations—think pastel colors for Easter or bright hues for a birthday!
- Gluten-Free: Swap the pretzel sticks for gluten-free options, like rice cakes or gluten-free pretzels.
- Dairy-Free: Use vegan chocolate chips for a dairy-free version that everyone can enjoy!
Chef’s Notes
There’s always room for creativity in the kitchen! Over the years, I’ve experimented with adding different toppings and flavors to this recipe. One of my favorite stories is when I tried to make mini cupcake versions of the spider webs. Let’s just say, they didn’t quite turn out as planned, but they were a delicious, albeit messy, trial!
With each attempt, I learn something new—whether it’s finding the right chocolate to achieve the glossy finish or discovering new designs for the webs. Cooking is a journey, and I cherish every messy moment along the way.
FAQs and Troubleshooting
Q: What if my chocolate seizes?
A: If your chocolate seizes up while melting, try adding a little vegetable oil and stirring it back to a smooth consistency.
Q: Can I make these in advance?
A: Absolutely! You can prepare them a few days ahead and store them in an airtight container to keep them fresh.
Q: How can I make the webs more defined?
A: Use a piping bag with a thin tip for better control, which will create sharper lines and more defined shapes in your chocolate webs!
Q: What can I substitute if I’m allergic to nuts?
A: You can easily swap the chocolate with carob chips or try using sunflower seed butter for that nut-free alternative!
Nutritional Info (if applicable)
While I always encourage you to indulge in these delightful treats, here’s a rough nutritional breakdown per spider web:
- Calories: 130
- Total Fat: 6g
- Saturated Fat: 3g
- Carbohydrates: 17g
- Sugar: 10g
- Protein: 2g
As always, your nutritional needs may vary depending on the brands used and personal dietary choices.
I can’t wait for you to try making these Chocolate Pretzel Spider Webs! They’re more than just a treat; they’re a wonderful way to celebrate creativity and bring people together. Happy cooking, friends, and don’t forget to enjoy every bite!
Print
Chocolate Pretzel Spider Webs
- Total Time: 45 minutes
- Yield: 20 servings
- Diet: Vegetarian
Description
A fun and spooky treat combining sweet and salty flavors, perfect for Halloween gatherings.
Ingredients
- Pretzel Sticks
- Chocolate Chips (Milk or Dark)
- Black Candy Melts
- Confectioners Sugar
- Edible Eyes
- Parchment Paper
Instructions
- Prepare your workspace by lining a baking sheet with parchment paper.
- Melt the chocolate in a microwave-safe bowl, heating in 30-second intervals until smooth.
- Dip the pretzel sticks halfway into the melted chocolate and place on parchment paper.
- Create the spider web using a piping bag or sandwich bag to draw over the chocolate-covered pretzel sticks.
- Add two edible eyes on each pretzel stick while the chocolate is still soft.
- Let the baking sheet sit in the refrigerator for about 30 minutes until the chocolate hardens.
- Serve and enjoy by gently peeling the pretzel webs off the parchment paper.
Notes
Feel free to get creative with toppings and variations, such as using nut butter or gluten-free pretzels.
- Prep Time: 15 minutes
- Cook Time: 30 minutes
- Category: Snacks
- Method: No-Bake
- Cuisine: American
Nutrition
- Serving Size: 1 spider web
- Calories: 130
- Sugar: 10g
- Sodium: 0mg
- Fat: 6g
- Saturated Fat: 3g
- Unsaturated Fat: 2g
- Trans Fat: 0g
- Carbohydrates: 17g
- Fiber: 0g
- Protein: 2g
- Cholesterol: 0mg
Keywords: Halloween treats, chocolate pretzels, spooky snacks, fun desserts
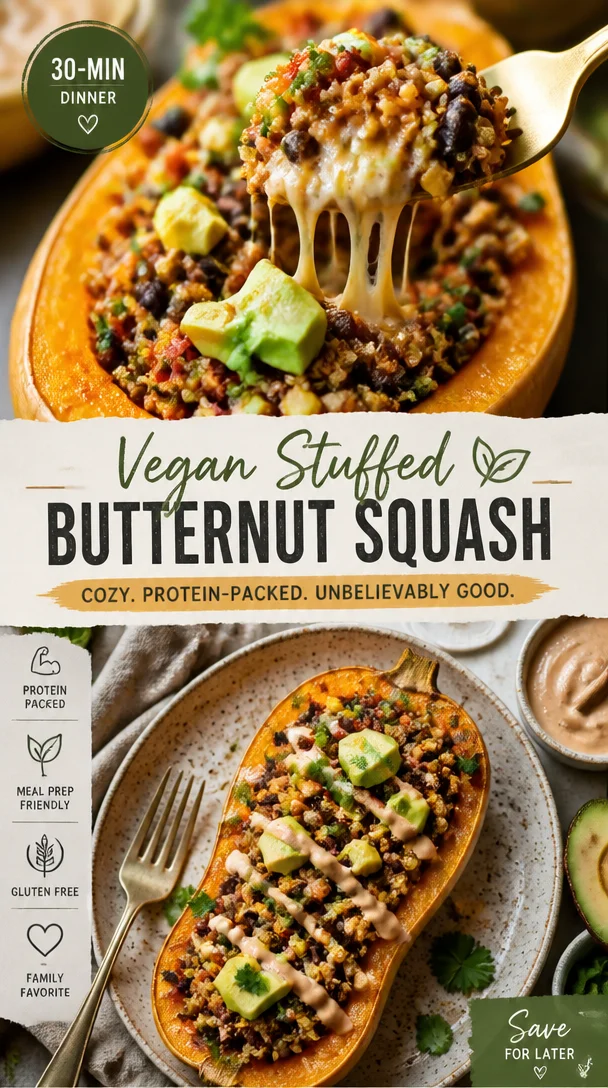
Vegan Stuffed Butternut Squash
Warm Up to Vegan Stuffed Butternut Squash
Welcome to my cozy corner of the kitchen, friends! I’m Olivia Bennett, your guide on this culinary adventure. Today, we’re diving into one of my absolute favorite dishes: Vegan Stuffed Butternut Squash. This recipe is a celebration of comfort, warmth, and vibrant flavors that are sure to make your kitchen feel like a welcoming haven. Perfect for a festive holiday gathering or even a family weeknight dinner, this dish proves that plant-based cooking can be both delicious and satisfying.
There’s just something magical about the smell of butternut squash baking in the oven. The sweet, nutty aroma fills the air, promising warmth and delightful flavors. Every time I make this dish, I’m transported back to those crisp autumn days as a child, where our family would gather around the table, sharing stories over a steaming bowl of something hearty. Cooking filled my home with love and joy, and I want to pass that legacy on to you.
As I carefully scoop out the sweet flesh of the roasted squash and mix it with spices, grains, and veggies, I can’t help but feel giddy. It’s like creating a cozy, edible hug! This dish is not only a treat for the taste buds but also a delightful centerpiece that brings everyone together. So, grab your apron and let’s get cooking!
A Journey to Flavor Town
Let me whisk you away to a memory that sparked my love for stuffed vegetables. I remember one chilly Thanksgiving afternoon, my grandmother, bless her heart, introduced me to the wonders of cooking with squashes. She pulled out her favorite old-fashioned cookbook, the pages worn and stained, and guided me through the process of stuffing acorn squashes with wild rice, cranberries, and pecans. As I stirred the fragrant mixture, I felt a sense of belonging, of tradition. The satisfaction of creating something from scratch and sharing it with family seeped into my soul.
As I grew older and ventured into the world of vegan cuisine, I found myself dreaming up my own version of that nostalgic dish. Enter the Vegan Stuffed Butternut Squash, with a hearty filling full of flavor and personality! It reminds me of those sweet family gatherings while allowing me to experiment with seasonal ingredients. Trust me; it makes people smile!
Ingredients That Sing
Let’s gather our ingredients and lay them out like the stars they are. Here’s what you’ll need for your Vegan Stuffed Butternut Squash:
-
1 large butternut squash
Sweet and nutty, butternut squash forms the perfect vessel for our stuffing. If you can’t find butternut squash, acorn squash can also work beautifully. -
1 cup quinoa (or rice)
This fluffy grain will serve as the base of the stuffing. Quinoa packs a protein punch and can be replaced with brown rice or even cauliflower rice for a low-carb option. -
1 can black beans (15 oz), drained and rinsed
Full of fiber and protein, black beans add substance to our dish. You can swap them with kidney beans or chickpeas, depending on your preference. -
1 cup corn (fresh or frozen)
Corn brings a sweet, crunchy texture to the filling. Feel free to substitute with diced bell peppers for a different flavor profile. -
1 medium onion, diced
Onions add depth and flavor. Yellow or red onions work best, but shallots can enhance the dish’s sweetness as well. -
2-3 cloves garlic, minced
Garlic is a flavor powerhouse! If you’re not a garlic fan, you can simply omit it or use garlic powder in a pinch. -
1 tsp ground cumin
A warm spice that brings out the earthiness of the squash. If you’re feeling adventurous, try smoked paprika for a smoky touch. -
1 tsp ground cinnamon
The aromatic flavor of cinnamon enhances the sweetness of the squash. If you’re not keen on cinnamon, nutmeg offers a nice alternative. -
Salt and pepper to taste
Essential for enhancing all the beautiful flavors in our dish! -
1 tablespoon olive oil
A drizzle of olive oil keeps the stuffing moist and adds healthy fats. Avocado oil works just as well. -
Fresh herbs for garnish (like cilantro or parsley)
These will brighten up the dish! Fresh basil or chives can add freshness too.
Step-By-Step Instructions
Alright, let’s get cooking! Follow these simple steps, and you’ll be well on your way to creating your own masterpiece.
-
Preheat Your Oven
Start by preheating your oven to 400°F (200°C) while you prep your squash. This allows for uniform cooking and that lovely caramelization you crave! -
Prepare the Butternut Squash
Slice the butternut squash in half lengthwise. Scoop out the seeds using a spoon or ice cream scoop—don’t forget to save those seeds for roasting later! Drizzle the cut surfaces with olive oil, and sprinkle with salt and pepper. Place the halves cut-side down on a baking dish lined with parchment paper. Bake for about 30-40 minutes until fork-tender. -
Cook the Quinoa
While the squash is baking, rinse your quinoa under cold water. Combine the rinsed quinoa with 2 cups of water in a saucepan. Bring it to a boil, reduce to a simmer, cover, and cook for about 15 minutes until the water is absorbed and the quinoa is fluffy. Fluff it with a fork and set aside. -
Sauté the Vegetables
In a skillet over medium heat, heat the remaining olive oil. Add the diced onion and sauté until translucent, about 5-6 minutes. Toss in the minced garlic, cumin, and cinnamon, cooking until fragrant, about 1 minute. Stir in the black beans and corn, allowing them to warm through. Finally, fold in the cooked quinoa and mix well. Season with salt and pepper to taste. -
Stuff the Squash
Once the butternut squash is out of the oven, flip the halves over so the cut side faces up. Carefully spoon the quinoa mixture into each half, pressing it down gently to pack it in. Feel free to overflow a little—who doesn’t love a heaping helping? -
Final Bake
Return the stuffed squash to the oven for an additional 10-15 minutes. This final bake allows all those delicious flavors to meld together beautifully. -
Serve and Enjoy!
Once done, remove from the oven and let it cool for a few minutes. Garnish with your favorite fresh herbs, cut into wedges, and serve warm. Enjoy every delicious bite, preferably with your favorite people around the table!
Serving Suggestions
To serve, I love to place the stuffed halves on a beautiful platter, garnished with fresh herbs. You could even drizzle a tangy tahini sauce or a squeeze of lime over the top for extra zest! Pair this dish with a simple mixed green salad drizzled with a balsamic vinaigrette, and voila! You’ve got yourself a dinner that looks and tastes like a cozy embrace.
Recipe Variations
Now, let’s have a little fun with this recipe! Here are some creative twists you can try with your vegan stuffed butternut squash:
- Spicy Southwest Flavors: Add diced jalapeños and a sprinkle of chili powder for a kick!
- Italian Style: Incorporate sun-dried tomatoes, pine nuts, and a sprinkle of nutritional yeast for a cheesy flavor. Toss in fresh basil for a fragrant touch.
- Mediterranean Touch: Mix in Kalamata olives, artichokes, and feta-style vegan cheese for a delightful twist.
- Savory Mushroom Bliss: Swap black beans for finely chopped mushrooms and add some spinach or kale for an earthy flavor.
- Nutty and Fruity: Toss in chopped apples or dried cranberries with almonds or walnuts for a crunchy, sweet surprise.
Chef’s Notes
As with any recipe, this vegan stuffed butternut squash has evolved over time. I remember the first time I made it a little too spicy—I mistakenly used cayenne instead of cumin! The result was a fiery dish, more suited for the bravest of taste buds. But it taught me to embrace experimentation in the kitchen, and now, I encourage you to enjoy the process, too!
Cooking is about joy, creativity, and sometimes, a little chaos in the kitchen. Don’t stress if things don’t go according to plan. Laugh it off, share it with loved ones, and make a memory out of it!
FAQs and Troubleshooting
Q: My quinoa always comes out mushy. What am I doing wrong?
A: Make sure to rinse quinoa under cold water before cooking, and follow the water-to-quinoa ratio on the package. A general rule is 2 cups of water for every 1 cup of quinoa. Fluff with a fork after cooking to avoid clumping.
Q: Can I prepare the stuffing ahead of time?
A: Absolutely! You can prepare the stuffing in advance and store it in the fridge for up to 2-3 days. Just assemble and bake when ready to serve!
Q: What if I have leftover stuffing?
A: Lucky you! The stuffing is fantastic on its own as a salad or even as a filling for wraps. Get creative in using it up!
Q: Can I freeze the stuffed squash?
A: Yes! You can freeze the stuffed squash before baking. Wrap it tightly in foil and freeze for up to a month. When you’re ready to eat, thaw in the refrigerator overnight and bake until heated through.
Nutritional Info
While cooking is about joy and creativity, it doesn’t hurt to know the benefits of what we’re eating! This Vegan Stuffed Butternut Squash is not only delicious but also nourishing. Each serving is rich in fiber, packed with protein from quinoa and black beans, and filled with essential vitamins and minerals from the veggies. It’s a wholesome meal that fuels your body and spirit!
So there you have it—your new favorite cozy dish, Vegan Stuffed Butternut Squash! Whether it’s fall or spring, a party or a quiet dinner at home, this recipe is sure to win hearts. Join me in the kitchen, and remember: every meal is an opportunity to create a connection, share a story, and savor the flavors of life! Happy cooking!
Print
Vegan Stuffed Butternut Squash
- Total Time: 55 minutes
- Yield: 4 servings 1x
- Diet: Vegan
Description
A cozy, plant-based dish featuring roasted butternut squash stuffed with a flavorful mixture of quinoa, black beans, and spices, perfect for any gathering.
Ingredients
- 1 large butternut squash
- 1 cup quinoa (or rice)
- 1 can black beans (15 oz), drained and rinsed
- 1 cup corn (fresh or frozen)
- 1 medium onion, diced
- 2–3 cloves garlic, minced
- 1 tsp ground cumin
- 1 tsp ground cinnamon
- Salt and pepper to taste
- 1 tablespoon olive oil
- Fresh herbs for garnish (like cilantro or parsley)
Instructions
- Preheat your oven to 400°F (200°C) while you prep your squash.
- Slice the butternut squash in half lengthwise and scoop out the seeds.
- Drizzle the cut surfaces with olive oil, sprinkle with salt and pepper, and place cut-side down on a baking dish lined with parchment paper.
- Bake for about 30-40 minutes until fork-tender.
- Rinse your quinoa under cold water and combine with 2 cups of water in a saucepan.
- Bring it to a boil, reduce to a simmer, cover, and cook for about 15 minutes until the water is absorbed.
- Heat the remaining olive oil in a skillet over medium heat and sauté the diced onion until translucent.
- Stir in the minced garlic, cumin, and cinnamon, cooking until fragrant.
- Add the black beans and corn, allowing them to warm through, then fold in the cooked quinoa and mix well.
- Flip the squash halves cut side up and spoon the quinoa mixture into each half.
- Return the stuffed squash to the oven for an additional 10-15 minutes.
- Remove from the oven, garnish with fresh herbs, and serve warm.
Notes
Feel free to experiment with the filling! Add spicy jalapeños or Italian flavors with sun-dried tomatoes.
- Prep Time: 15 minutes
- Cook Time: 40 minutes
- Category: Main Course
- Method: Baking
- Cuisine: Vegan
Nutrition
- Serving Size: 1 serving
- Calories: 350
- Sugar: 6g
- Sodium: 420mg
- Fat: 12g
- Saturated Fat: 2g
- Unsaturated Fat: 8g
- Trans Fat: 0g
- Carbohydrates: 45g
- Fiber: 10g
- Protein: 15g
- Cholesterol: 0mg
Keywords: vegan, stuffed butternut squash, plant-based, comfort food

One-Pan Roasted Butternut Squash Recipe for Weeknights
Embrace the Sweetness: A Heartwarming Butternut Squash Recipe
Welcome to my cozy kitchen, food lovers! Today, we’re diving into the delightful world of butternut squash—one of fall’s most beloved ingredients. Whether you’re dodging that winter chill or seeking to impress your friends with your newfound culinary skills, this sweet, nutty gem is a fantastic ingredient to bring warmth and comfort to your table.
Butternut squash isn’t just delicious; it’s also incredibly versatile! You can roast it, mash it, or even blend it into a velvety soup. The possibilities are endless, and today, I want to show you how to create a dish that’s not only easy to make but also packed with flavor and love.
Imagine the scent of roasted butternut squash wafting through your kitchen as you prepare this dish. It’s the kind of aroma that wraps around you like a warm hug, inviting everyone to the table. Cooking for me has always been about sharing moments and creating memories, and there’s something inherently joyful about preparing a meal with love, especially when it comes to a dish as comforting as this.
In this post, we’ll whip up a savory butternut squash and sage risotto that’s bound to become a family favorite. With creamy Arborio rice, roasted squash, and fragrant sage, it’s a dish that bridges the gap between comfort food and gourmet goodness. I promise, once you try this, your loved ones will be singing your praises! So, let’s roll up our sleeves, tie on our aprons, and get cooking!
A Slice of Nostalgia
Growing up, my grandmother would make the best butternut squash soup every autumn. The whole house would fill with the aroma of spices and slow-cooked goodness. I’d watch as she peeled and chopped the squash, her hands moving with a kind of grace that came from years of experience. We’d sit together, her sharing tales from her childhood while we stirred the pot, and it quickly became a tradition I cherished.
Those cozy afternoons inspired my love for cooking, and no dish fills me with nostalgia quite like a butternut squash creation. As I experimented with various recipes over the years, I found a special love for risotto—a creamy, cheesy delight that transforms a simple meal into a memorable feast. This dish feels like a comforting embrace, and I know that with every bite, you’ll be connecting with those same laughs, stories, and cozy moments from your own life.
Ingredients
Here’s what you’ll need to whip up this delightful dish:
-
1 medium butternut squash, peeled and cubed: This serves as the star of the show! Butternut squash is naturally sweet and creamy. If you need a substitute, pumpkin or sweet potato works beautifully.
-
1 cup Arborio rice: This short-grain rice is what gives risotto its signature creaminess. If you’re in a pinch, you can use Carnaroli or even short-grain brown rice, though this will alter the texture slightly.
-
4 cups vegetable broth (or chicken broth): Homemade is ideal, but store-bought works just as well. If you want to lower the salt content, opt for low-sodium broth.
-
1 medium onion, finely chopped: This adds sweetness and depth of flavor. Shallots are great too if you want a subtler flavor.
-
2 cloves garlic, minced: A must-have for any savory dish! Fresh garlic is best, but if you have garlic powder, use about 1/2 teaspoon.
-
2 tablespoons olive oil: For sautéing and drizzling. If you’re looking for a different flavor, consider using avocado oil or even a bit of butter.
-
1/2 cup grated Parmesan cheese: This contributes to the creaminess and a little cheesy goodness. For a dairy-free version, try nutritional yeast.
-
1 tablespoon fresh sage, chopped (or 1 teaspoon dried sage): Sage pairs beautifully with squash, adding an earthy flavor. Thyme or rosemary can also work as tasty substitutes!
-
Salt and pepper to taste: Seasonings are crucial! Freshly cracked pepper adds a lovely kick.
-
Optional: A drizzle of balsamic reduction for garnishing—this adds a touch of acidity and sweetness that elevates the dish.
With these ingredients, you’re all set to prepare a comforting bowl of butternut squash risotto that will have everyone coming back for seconds!
Step-by-Step Instructions
Let’s get down to the delicious part—cooking! Here’s how you can prepare your butternut squash risotto:
-
Prep the Squash: Begin by preheating your oven to 400°F (200°C). While it heats, peel your butternut squash and cut it into 1-inch cubes. Place the cubes on a baking sheet, drizzle with olive oil, and sprinkle with a bit of salt and pepper. Toss to combine. Roast for about 25-30 minutes, or until tender and caramelized around the edges. Chef Tip: Roasting enhances sweetness and depth!
-
Warm the Broth: In a saucepan, heat your vegetable broth and keep it warm over low heat. This will help maintain the temperature when adding it to the rice.
-
Sauté the Aromatics: In a large pot or Dutch oven, heat 2 tablespoons of olive oil over medium heat. Add the chopped onion and sauté for 3-4 minutes, until translucent. Add the minced garlic and fresh sage, cooking for an additional minute until fragrant. Chef Hack: Make sure to keep an eye on the garlic—it browns quickly!
-
Toast the Rice: Stir in the Arborio rice, cooking for 1-2 minutes until it’s lightly toasted. This helps to release the nutty aroma and prepares the rice for absorbing liquids.
-
Add the Broth: Begin adding your warm broth one ladleful at a time, stirring frequently. Allow the rice to absorb most of the liquid before adding more. This will take about 18-20 minutes. Think of it as a labor of love! Tip: This slow, steady process releases the starches, giving risotto its creaminess.
-
Incorporate the Squash: After about 15 minutes of cooking, add your roasted butternut squash pieces into the pot, mixing gently. This will ensure each bite has that delicious squash flavor. Pro Tip: You can reserve a few pieces for garnishing later!
-
Finish With Cheese: Once your risotto is creamy and the rice is al dente, remove it from heat. Stir in the grated Parmesan cheese until melted. Season to taste with salt and pepper. Chef’s Note: If you want that extra creaminess, add a tablespoon of butter!
-
Serve: Your butternut squash risotto is ready! Spoon it into bowls and garnish with the reserved squash, a sprinkle of extra Parmesan, and a drizzle of balsamic reduction if you’re feeling fancy.
Serving Suggestions
For a beautiful presentation, serve your risotto in deep bowls and top with a sprinkle of fresh sage leaves and a light drizzle of olive oil or balsamic reduction. Pair it with a simple arugula salad with lemon vinaigrette to balance out the creamy rice and enrich your dining experience.
Recipe Variations
Feeling adventurous? Here are a few variations to try:
-
Creamy Vegan Version: Substitute Parmesan cheese with nutritional yeast and coconut milk for a creamy base that’s dairy-free.
-
Add Some Protein: Toss in sautéed mushrooms, spinach, or chickpeas for added texture and nutrition—perfect for a hearty meal!
-
Spice It Up: Add a pinch of red pepper flakes to the onions for a hint of heat or stir in some ground nutmeg or cinnamon for a warm spice vibe.
-
Herb Swaps: Don’t have sage? Thyme or even fresh parsley can add a delightful touch! Season according to your pantry.
-
Seasonal Greens: Stir in some kale or Swiss chard at the end of cooking for added vitamins and a colorful presentation.
Chef’s Notes
I have to confess, the first time I made this risotto, I didn’t stir it enough and ended up with a clumpy mess! It was a lesson learned—so trust me when I say that constant stirring is key! Over the years, this dish has evolved from a simple recipe to a celebration of seasonal ingredients, with each rendition evoking a different memory or experience in the kitchen. This risotto has taken me to cozy dinners at home, dinner parties with friends, and even evenings of culinary experimentation. It’s become a beloved staple in my family, and I hope it will become a cherished recipe in yours as well!
FAQs and Troubleshooting
1. Why did my risotto come out too sticky?
If risotto becomes too sticky, it’s often due to either too much stirring or not using enough broth. Remember, slow and steady is key—keep an eye on your rice and add broth gradually.
2. Can I make this risotto ahead of time?
Risotto is best served fresh, but if you have leftovers, you can store them in the refrigerator for 1-2 days. Reheat gently, adding a splash of broth to loosen it up.
3. My risotto is too bland! What can I do?
If your risotto lacks flavor, it may just need more seasoning. Don’t hesitate to add a pinch of salt or more garlic. Also, the quality of your broth matters!
4. What if I don’t have Arborio rice?
If you can’t find Arborio rice, you can use other short-grain varieties like Carnaroli or even sushi rice in a bind. Just keep in mind the texture might change!
Nutritional Info (if applicable)
On average, a serving of butternut squash risotto (without additional toppings) contains approximately:
- Calories: 350
- Protein: 12g
- Carbohydrates: 60g
- Fats: 10g
- Fiber: 4g
Now that you have all the know-how to create this delicious dish, don’t be shy—get cooking! I can’t wait to hear your thoughts and stories as you enjoy this comforting, heartwarming butternut squash risotto. Happy cooking, my friends! 🍂✨
Print
Butternut Squash and Sage Risotto
- Total Time: 45 minutes
- Yield: 4 servings 1x
- Diet: Vegetarian
Description
A comforting and creamy risotto made with roasted butternut squash and fragrant sage, perfect for sharing with loved ones.
Ingredients
- 1 medium butternut squash, peeled and cubed
- 1 cup Arborio rice
- 4 cups vegetable broth (or chicken broth)
- 1 medium onion, finely chopped
- 2 cloves garlic, minced
- 2 tablespoons olive oil
- 1/2 cup grated Parmesan cheese
- 1 tablespoon fresh sage, chopped (or 1 teaspoon dried sage)
- Salt and pepper to taste
- Optional: A drizzle of balsamic reduction for garnishing
Instructions
- Prep the squash: Preheat your oven to 400°F (200°C). Peel the butternut squash and cut it into 1-inch cubes. Place the cubes on a baking sheet, drizzle with olive oil, and sprinkle with salt and pepper. Toss to combine. Roast for about 25-30 minutes until tender and caramelized.
- Warm the broth: In a saucepan, heat the vegetable broth and keep it warm over low heat.
- Sauté the aromatics: In a large pot, heat olive oil over medium heat. Add chopped onion and sauté for 3-4 minutes until translucent. Add minced garlic and fresh sage, cooking for an additional minute until fragrant.
- Toast the rice: Stir in Arborio rice and cook for 1-2 minutes until lightly toasted.
- Add the broth: Begin adding the warm broth one ladle at a time, stirring frequently, until absorbed—this takes about 18-20 minutes.
- Incorporate the squash: After 15 minutes of cooking, add the roasted butternut squash, mixing gently.
- Finish with cheese: Remove from heat and stir in grated Parmesan cheese until melted. Season with salt and pepper.
- Serve: Spoon the risotto into bowls and garnish with reserved squash, extra Parmesan, and balsamic reduction if desired.
Notes
Stir constantly to ensure creamy consistency and avoid clumping. Serve fresh for the best flavor.
- Prep Time: 15 minutes
- Cook Time: 30 minutes
- Category: Main Course
- Method: Stovetop
- Cuisine: Italian
Nutrition
- Serving Size: 1 serving
- Calories: 350
- Sugar: 6g
- Sodium: 400mg
- Fat: 12g
- Saturated Fat: 4g
- Unsaturated Fat: 6g
- Trans Fat: 0g
- Carbohydrates: 45g
- Fiber: 4g
- Protein: 12g
- Cholesterol: 30mg
Keywords: butternut squash, risotto, comfort food, fall recipes, vegetarian

Baked Butternut Squash Tots
Baked Butternut Squash Tots: A Cozy Comfort Food
Welcome to my kitchen! If you’re like me and get sheer joy from the bubbling sounds of a dish in the oven or the aroma of something warm and flavorful wafting through the air, you’ve stumbled upon a recipe that is pure comfort. Today, I’m thrilled to share my favorite Baked Butternut Squash Tots, a delightful twist on a classic that’s sure to bring smiles to your table.
Butternut squash is one of those magical ingredients that transform any recipe into a soul-warming experience. It’s sweet, nutty, and just downright cozy — and when you bake it into golden, crispy tots, you’re in for a treat that’s healthier than your typical potato version but equally delicious. It’s not just a side dish; these tots can steal the spotlight as a fun appetizer, a snack, or even the star of your dinner.
So pull up a chair, let’s get comfy, and dive into this recipe that’s not just about food but the memories we share over it! Trust me, once you sink your teeth into these baked butternut squash tots, you’ll be ready to fall in love with cooking all over again.
A Sweet Nostalgia
Before we get into the nitty-gritty of the recipe, I want to take you back to when I first discovered butternut squash. It was a chilly autumn evening, and I can vividly remember gathering in my grandma’s kitchen, where the air was filled with spices and laughter. She would roast butternut squash with just a sprinkle of cinnamon and nutmeg, turning it into a heavenly sweet treat that felt like a warm hug.
Fast forward to today, and I’ve taken that love for butternut squash and spun it into a recipe that’s playful and fun for everyone. I wanted to create something that reflects that warmth — a dish that invites family and friends to gather around, share stories, and embrace the season with every bite.
Now, let’s get to the good stuff!
Ingredients
Here’s what you’ll need for your Baked Butternut Squash Tots:
-
1 medium butternut squash (about 2 lbs)
- Look for a squash that feels heavy for its size; this usually means a sweeter, more flavorful flesh. If butternut squash isn’t available, you can substitute it with sweet potatoes or carrots for a different twist.
-
1/2 cup shredded cheddar cheese
- This adds a wonderful creaminess and depth of flavor. For a dairy-free option, you can use nutritional yeast or a vegan cheese substitute that melts well.
-
1/4 cup breadcrumbs
- The breadcrumbs give your tots that perfect crunch. Panko breadcrumbs are my favorite for that extra crispy texture, but you can also use crushed cornflakes or even almond flour for a gluten-free variant.
-
1/4 teaspoon salt
- Adjust according to your taste! If you’re watching sodium intake, consider using a salt substitute or skipping it altogether.
-
1/4 teaspoon black pepper
- Just a pinch to add some bite! You can elevate the flavor by using white pepper or adding some cayenne for heat if you’re feeling adventurous.
-
1/4 teaspoon garlic powder
- This is an essential for building flavor. Fresh minced garlic works too, just be mindful not to overpower the squash.
-
1/4 teaspoon onion powder
- Adding this will enhance the flavor profile of your tots. If you have shallots, you can finely chop and use them for a more subtle flavor.
-
1 large egg
- The egg acts as a binder to keep the tots together. For a vegan choice, a flaxseed egg (1 tablespoon ground flaxseed mixed with 2.5 tablespoons of water) works beautifully.
-
Cooking spray or olive oil
- This helps achieve that golden, crispy exterior. Feel free to use avocado oil for a different setting!
Step-by-Step Instructions
Now, let’s get cooking! Here’s how to create those irresistible Baked Butternut Squash Tots:
-
Prep the Butternut Squash
Begin by preheating your oven to 425°F (220°C). While the oven warms up, carefully peel and seed the butternut squash. Don’t worry if it seems challenging; a sharp vegetable peeler and a sturdy knife make this job much easier. Cut it into chunks for quicker cooking. -
Roast the Squash
Place the chunks on a baking sheet lined with parchment paper. Drizzle them with a touch of olive oil and sprinkle with a little salt and pepper. Roast them in your preheated oven for about 25-30 minutes, until fork-tender. Keep an eye on them! You’ll know they’re done when a lovely golden hue appears and the flesh is soft enough to mash. -
Mash and Mix
Once roasted, let your squash cool for a few minutes and then transfer it to a large mixing bowl. Mash it up like you would with potatoes. You want a smooth, creamy consistency — some small lumps are totally fine! -
Combine the Ingredients
Now, the fun part! Add your cheese, breadcrumbs, egg, garlic powder, onion powder, salt, and pepper to the bowl. Mix everything together just until combined. It should be sticky but moldable — if it seems too wet, feel free to add a touch more breadcrumbs. -
Shape the Tots
Use your hands to shape the mixture into small, tot-sized ovals. Ideally, each tot should be about one to two inches long. Place each tot back onto the parchment-lined baking sheet. Don’t worry if they don’t look perfect; the charm is in their homemade vibe! -
Bake Until Crispy
Lightly spray the tops of the shaped tots with cooking spray or brush with olive oil before placing them in the oven. Bake for about 20-25 minutes, flipping them halfway through. You want them to be crispy and golden on the outside. Keep an eye on them toward the end — a few extra minutes can make a world of difference!
Serving Suggestions
Once baked, pull those delicious tots out of the oven and let them sit for a few minutes to cool slightly. Serve your Baked Butternut Squash Tots with a side of your favorite dipping sauce — think spicy mayo, ranch, or even a tangy garlic aioli. They’re a fantastic addition to any table, whether it’s a cozy movie night at home or a lively gathering with friends.
Recipe Variations
Feeling a bit adventurous? Here are some fun twists you can try with this base recipe:
- Spicy Southwest Tots: Add some chopped jalapeños and cumin to the mix for a zesty kick.
- Herby Green Tots: Stir in some fresh herbs like parsley, cilantro, or chives for a burst of freshness.
- Cheesy Spinach Tots: Mix in some sautéed spinach or kale along with the cheddar for a green twist.
- Buffalo Chicken Tots: Incorporate shredded cooked chicken tossed in buffalo sauce for a hearty, spicy option.
- Sweet Potato & Bacon Tots: Use sweet potatoes instead of butternut, and add crispy bacon bits for a savory bite.
Chef’s Notes
Creating these Baked Butternut Squash Tots is truly a labor of love. Each time I make them, I remember those cherished kitchen moments with my grandmother. Reflecting on how cooking has transformed in my life brings a smile to my face. It’s a mix of nostalgia and creativity, where every meal is an opportunity to share, weave stories, and create memories.
Also, a little tip: if you find your mixture is too soft and not holding together, don’t despair! Just add a bit more breadcrumbs until the right texture is achieved. Trust your instincts and enjoy the process!
FAQs and Troubleshooting
-
Why do my tots fall apart?
If your tots are crumbling, you may need to add more binding ingredients such as breadcrumbs or a bit of extra egg. Make sure the mixture isn’t too wet. -
Can I make these in advance?
Absolutely! You can shape your tots ahead of time and refrigerate them. Just be sure to bake them when you’re ready! -
How can I store leftovers?
Store any leftovers in an airtight container in the fridge for up to 3 days. Simply reheat them in the oven to maintain that crispy texture. -
Can I freeze the tots?
Yes! Just freeze the uncooked tots in a single layer on a baking sheet. Once frozen, transfer them to a freezer bag. Bake directly from frozen, adding a few extra minutes to the cooking time.
Nutritional Info
While I believe that enjoying food is about so much more than just numbers, here’s a quick breakdown for those curious about the nutritional aspect of these tasty tots:
- Calories: Approximately 90 per serving (1 serving = 3 tots)
- Protein: 4g
- Carbohydrates: 10g
- Fat: 4g
- Fiber: 2g
So, there you have it! My take on Baked Butternut Squash Tots, bringing warmth and joy into your kitchen. Whether you’re snacking on them solo or sharing them with loved ones, these tots are bound to become a new favorite. Remember, the most important ingredient is your enthusiasm and creativity — so cook with love and enjoy every delicious bite! Happy cooking!
Print
Baked Butternut Squash Tots
- Total Time: 45 minutes
- Yield: 4 servings 1x
- Diet: Vegetarian
Description
A delightful twist on a classic comfort food, these Baked Butternut Squash Tots are crispy, healthy, and packed with flavor.
Ingredients
- 1 medium butternut squash (about 2 lbs)
- 1/2 cup shredded cheddar cheese
- 1/4 cup breadcrumbs
- 1/4 teaspoon salt
- 1/4 teaspoon black pepper
- 1/4 teaspoon garlic powder
- 1/4 teaspoon onion powder
- 1 large egg
- Cooking spray or olive oil
Instructions
- Prep the butternut squash by preheating your oven to 425°F (220°C), peeling and seeding it, and cutting it into chunks.
- Roast the squash on a baking sheet lined with parchment paper, drizzled with olive oil, salt, and pepper, for about 25-30 minutes until fork-tender.
- Mash the roasted squash in a large mixing bowl until smooth and creamy, with some small lumps.
- Combine cheese, breadcrumbs, egg, garlic powder, onion powder, salt, and pepper in the bowl, mixing until combined.
- Shape the mixture into small, tot-sized ovals and place them back onto the baking sheet.
- Bake the tots for about 20-25 minutes, flipping halfway through, until crispy and golden.
Notes
Serve the tots with your favorite dipping sauce. You can also make them in advance and bake them when ready.
- Prep Time: 15 minutes
- Cook Time: 30 minutes
- Category: Appetizer
- Method: Baking
- Cuisine: American
Nutrition
- Serving Size: 3 tots
- Calories: 90
- Sugar: 3g
- Sodium: 200mg
- Fat: 4g
- Saturated Fat: 2g
- Unsaturated Fat: 2g
- Trans Fat: 0g
- Carbohydrates: 10g
- Fiber: 2g
- Protein: 4g
- Cholesterol: 30mg
Keywords: baked, butternut squash, tots, vegetarian, comfort food
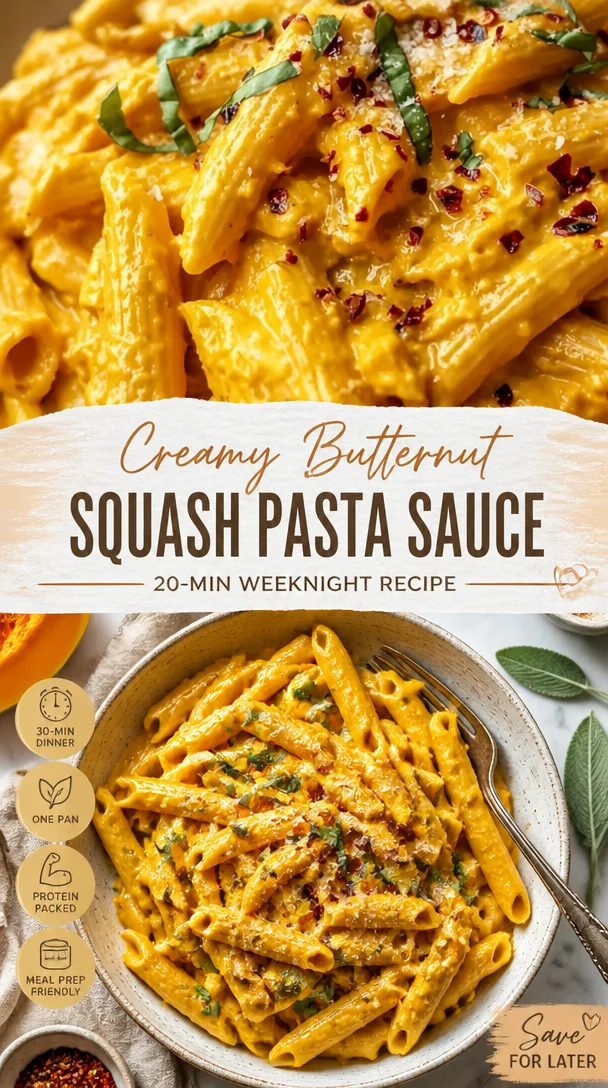
Creamy Butternut Squash Pasta Sauce: 20-Min Weeknight Recipe
Butternut Squash Pasta Sauce: A Cozy Fall Favorite
Welcome to my cozy kitchen, where the autumn air is filled with the sweet aroma of roasted butternut squash! If there’s one dish that truly captures the essence of fall, it’s this creamy, dreamy butternut squash pasta sauce. Every swirl of pasta coated in this rich, orange goodness evokes a feeling of warmth and nostalgia. Ready to cook up some comfort?
As the leaves turn and the days get shorter, I find myself gravitating toward dishes that utilize the seasonal bounty. Butternut squash is one of my all-time favorites — not just for its sweet, nutty flavor, but also for its versatility. Whether roasted in a salad, pureed into soup, or transformed into a luscious pasta sauce, it never fails to make my heart sing (and my taste buds dance).
I’ll never forget the first time I made this dish for my family. It was one of those crisp autumn evenings when the sun dipped below the horizon, painting the sky in hues of orange and purple. I had gone to the local farmer’s market, filled my basket with fresh produce, and brought home a beautiful butternut squash. As the squash roasted in the oven, the house filled with such an irresistible aroma that my kids started sneaking tastes long before it even made it into the sauce pot. The smiles on their faces as they twirled their pasta around their forks tell me everything I need to know: this dish has officially become a family favorite.
Now that I’m sharing this recipe with you, my goal is to help you create those same warm memories with your loved ones. Cooking doesn’t have to be complicated; it’s about sharing love through food. So, let’s get that apron on, roll up those sleeves, and get started!
Personal Story
One of my favorite memories involving butternut squash pasta sauce happened on a chilly November evening. My best friend and I had decided to host a cozy dinner party for our families to celebrate the season. We wanted to create a special dish, something that would leave everyone feeling the warmth of home. After chatting about our favorite flavors, we settled on butternut squash pasta.
As we prepared the sauce, we laughed over stories from our childhoods — how we’d each cook with our moms, and how the kitchen always seemed to be the heart of our homes. We roasted, blended, and tasted, adjusting spices here and there until we created a sauce that was absolutely divine. When our families arrived and took their first bites, you could feel the magic in the air. It became a dish that was not just about flavor but tied us all together, a memory we still cherish today. I hope this sauce brings you as much joy as it has brought me and my loved ones.
Ingredients
Here’s what you’ll need to whip up this fantastic butternut squash pasta sauce:
-
Butternut Squash
The star of the show, butternut squash is sweet and creamy when cooked. For this sauce, I recommend using fresh squash, but you can also find pre-cut options in stores to save time. If you can’t find it, feel free to substitute with pumpkin or sweet potato for a different flavor profile. -
Olive Oil
A good quality olive oil helps enhance the flavor of the squash while it roasts. Don’t have olive oil? You could use avocado oil or melted coconut oil for a different twist. -
Onion
A sweet onion brings depth to the sauce. Yellow or white onions work best, but you can also try shallots for a milder taste. -
Garlic
Because who doesn’t love garlic? It adds an aromatic note that complements the sweetness of the squash. If you prefer, you can use garlic powder in a pinch — about a teaspoon will do. -
Vegetable Broth
This helps thin out the sauce and give it a rich flavor. For a deeper taste, try using homemade broth. If you’re vegetarian or vegan, ensure your broth meets those dietary needs. -
Cream
A splash of heavy cream adds richness and creaminess to the sauce, but you could also use coconut cream for a dairy-free alternative. -
Nutmeg
Just a pinch adds warmth and complexity. If you don’t have nutmeg, try cinnamon for a slightly different flavor. -
Salt & Pepper
Simple seasonings that elevate all the flavors. Use them to taste as you go.
Step-by-Step Instructions
Now that you have your ingredients gathered, let’s get cooking!
-
Preheat the Oven
Preheat your oven to 400°F (200°C). This is the perfect temperature for roasting your butternut squash until it’s tender and caramelized. -
Prepare the Butternut Squash
Cut the butternut squash in half lengthwise and scoop out the seeds. You can save the seeds to roast later for a crunchy snack! Drizzle the cut sides with olive oil, salt, and pepper. Spread them face down on a baking sheet. Pro tip: Lining your baking sheet with parchment paper makes cleanup a breeze! -
Roast the Squash
Place the squash in your preheated oven and roast for about 30-40 minutes, or until tender and lightly browned. You’ll know it’s done when a fork easily pierces the flesh. -
Sauté the Aromatics
While the squash is roasting, chop your onion and garlic. Heat a tablespoon of olive oil in a large skillet over medium heat. Add the chopped onion and sauté until soft and translucent, about 5-7 minutes. Then, add the garlic and cook for another minute until fragrant — but be careful not to burn it! -
Blend the Sauce
Once the squash is cooked and slightly cooled, scoop the flesh into a blender or food processor. Add the sautéed onion and garlic, vegetable broth, cream, nutmeg, salt, and pepper. Blend until smooth and creamy. If your sauce is too thick, add more broth until you reach your desired consistency. Taste and adjust the seasoning as necessary. -
Heat and Combine with Pasta
In a large pot, cook your pasta of choice according to package instructions. Once drained, add the pasta to the sauce and stir to coat well. Let everything cook together for a couple of minutes on low heat, allowing the flavors to meld beautifully. -
Serve & Enjoy
Your butternut squash pasta is ready to be served! I like to top mine with a sprinkle of freshly grated Parmesan and some chopped fresh herbs.
Serving Suggestions
When it comes to plating this dish, presentation is key! Twirl the pasta into nests on your plates, ladle on a generous amount of sauce, and finish it off with a sprinkle of freshly grated Parmesan cheese and a few leaves of fresh basil or parsley. A drizzle of extra virgin olive oil just before serving adds that restaurant-quality shine. Enjoy your dish with a side of crusty bread — it’s perfect for soaking up any leftover sauce!
Recipe Variations
- Add Protein: Toss in sautéed shrimp, grilled chicken, or chickpeas for a protein-packed meal.
- Turn Up the Heat: Add red pepper flakes for a spicy kick that perfectly complements the creamy sauce.
- Herb Infusion: Try using fresh sage or thyme in the sauce for an earthy flavor profile that pairs wonderfully with squash.
- Noodle Swap: Use spiralized zucchini or whole grain pasta for a lighter, healthier option.
- Cheesy Twist: Feel free to mix in different cheeses like feta or goat cheese for a tangy twist.
Chef’s Notes
This recipe has evolved beautifully over the years! Originally, I kept it simple with just butternut squash and garlic, but after experimenting, I started adding cream and spices for more depth. I love how this sauce has become a blank canvas—you can customize it to your heart’s content! Plus, I once made a hilarious mistake by forgetting the cream altogether, and to my surprise, the sauce still turned out deliciously — a happy accident indeed!
FAQs and Troubleshooting
1. How can I store leftovers?
Place any leftover sauce in an airtight container and store it in the fridge for up to 4 days. You can also freeze the sauce for up to 3 months!
2. My sauce is too thick. What can I do?
No worries! You can simply add a splash more of vegetable broth or even a little bit of pasta water to thin it out to your desired consistency.
3. Can I use frozen squash?
Absolutely! Just make sure to thaw and drain any excess water before adding it to the recipe.
4. What kind of pasta works best?
I love using fettuccine for this sauce, as its wide noodles hold onto the creamy sauce beautifully. However, feel free to use any pasta shape you like!
Nutritional Info
(Optional: Feel free to include approximate nutritional values per serving to help your readers make informed choices. This could include calories, protein, carbs, fats, etc.)
And there you have it, my friendly kitchen adventurers! This butternut squash pasta sauce will warm your heart and fill your belly. I can’t wait to see how you put your own spin on it. Don’t forget to tag me if you share your culinary creations — I love connecting with fellow foodies! Happy cooking!
Print
Butternut Squash Pasta Sauce
- Total Time: 55 minutes
- Yield: 4 servings 1x
- Diet: Vegetarian
Description
A creamy, dreamy butternut squash pasta sauce perfect for fall that captures warmth and nostalgia.
Ingredients
- 1 butternut squash
- 2 tablespoons olive oil
- 1 sweet onion
- 2 cloves garlic
- 1 cup vegetable broth
- 1/2 cup heavy cream
- 1/4 teaspoon nutmeg
- Salt & pepper to taste
Instructions
- Preheat your oven to 400°F (200°C).
- Prepare the butternut squash by cutting it in half lengthwise, scooping out the seeds, and drizzling with olive oil, salt, and pepper before spreading face down on a baking sheet.
- Roast the squash for about 30-40 minutes, or until tender and lightly browned.
- Sauté the chopped onion and garlic in a tablespoon of olive oil in a skillet until the onion is soft and translucent, about 5-7 minutes.
- Blend the roasted squash with the sautéed onion and garlic, vegetable broth, cream, nutmeg, salt, and pepper until smooth.
- Heat the sauce and combine with your cooked pasta, stirring to coat well.
- Serve topped with freshly grated Parmesan and fresh herbs.
Notes
This sauce can be customized with protein, herbs, or a different type of pasta. Store leftovers in an airtight container for up to 4 days or freeze for up to 3 months.
- Prep Time: 15 minutes
- Cook Time: 40 minutes
- Category: Main Course
- Method: Baking
- Cuisine: Italian
Nutrition
- Serving Size: 1 serving
- Calories: 350
- Sugar: 5g
- Sodium: 400mg
- Fat: 12g
- Saturated Fat: 4g
- Unsaturated Fat: 6g
- Trans Fat: 0g
- Carbohydrates: 45g
- Fiber: 3g
- Protein: 15g
- Cholesterol: 30mg
Keywords: butternut squash, pasta sauce, fall recipe, vegetarian, cozy, comfort food

Gratin de Courge Butternut au Fromage
Gratin de Courge Butternut au Fromage: A Cozy Culinary Adventure
Welcome to my kitchen, where the aroma of roasted butternut squash fills the air and nostalgia hugs you like a favorite sweater! If you’ve ever found yourself mesmerized by the sight of autumn leaves or the first bite of creamy, cheesy goodness, this gratin is going to become your new go-to dish. Gratin de Courge Butternut au Fromage, or butternut squash gratin with cheese, is not just a meal; it’s a celebration of warmth, comfort, and all things delicious.
On a chilly evening, when the world outside bites with a hint of cold, there’s only one thing on my mind: reaching for vibrant veggies and turning them into something magnificent. This gratin embodies that spirit. Scents of nutmeg dance in the background while layers of sweet and savory mingle, all draped under a cozy blanket of melted cheese. Trust me; this lovely dish brings everyone together!
This recipe is ideal not only for family dinners but also for gatherings with friends. It’s a dish that sparks stories around the table and makes hearts full. Imagine your loved ones lingering over a plate of golden, bubbling gratin, savoring each bite while sharing laughs and tales. It doesn’t get much better than that! Ready to transform your kitchen into a cozy culinary haven? Let’s roll up our sleeves and start this delicious journey together!
A Slice of Personal History
As a child, every autumn, I’d rush to the kitchen to help my grandmother prepare her famous squash gratin. The kitchen would be alive with laughter, and the air would be fragrant with spices and melting cheese. She’d let me pick the herbs from the garden while she taught me the art of layering flavors. Butternut squash, freshly grated nutmeg, and a sprinkle of cheese were all wrapped up in those moments, and I often felt like a magician, transforming humble ingredients into a feast!
Fast forward to today, and although my grandmother is no longer with us, her spirit thrives in the memories we created together. I’ve put my own spin on her classic recipe, not to replace her magic but to carry it forward. Each time I make gratin de courge butternut, I’m reminded of her warm embrace and the carved-out kitchen conversations we cherished. It’s a true testament that food binds us across generations, isn’t it? Now, let’s channel those cozy vibes into creating our own beautiful dish!
Ingredients
Let’s gather our magical ingredients! Here’s what you’ll need to make this delightful gratin:
-
Butternut Squash (3-4 cups, peeled and thinly sliced)
The star of our dish! Butternut squash adds sweetness and creaminess. If you can’t find butternut squash, try acorn squash or sweet potatoes; they bring a similar flavor profile. -
Gruyère Cheese (1.5 cups, grated)
This cheese melts beautifully and has a nutty flavor that elevates the dish. Substitute with Emmental or a sharp cheddar if you’re in a pinch, but keep in mind that the flavor may change slightly. -
Heavy Cream (1 cup)
This will make your gratin rich and luscious. For a lighter option, you can use half-and-half or a non-dairy cream alternative. -
Garlic (2 cloves, minced)
Garlic brings depth and pungency. You can use garlic powder if you’re out, but fresh is always best for flavor. -
Nutmeg (1/4 teaspoon)
A pinch of nutmeg intensifies the warmth of the squash. If you don’t have it, cinnamon can be a delightful alternative for a different yet vibrant twist. -
Thyme (1 teaspoon, dried or fresh)
Thyme pairs beautifully with squash; it’s earthy and aromatic. Substitute with rosemary for a bolder flavor or omit if herbs aren’t your thing. -
Salt and Pepper
Essential for balancing flavors! Use sea salt for a gentler taste and fresh black pepper for a little kick.
This delightful combination is what gives our gratin its rich and inviting flavor profile. Pro tip: Always taste as you go to ensure your dish bursts with flavor!
Step-by-Step Instructions
Now, the best part – let’s cook! Follow these steps, and I promise you a stunning gratin that will impress everyone.
-
Preheat Your Oven
Preheat your oven to 375°F (190°C). Preheating ensures even cooking and that golden crust we all love. -
Prepare the Squash
Peel and slice the butternut squash into thin, even rounds (about 1/4 inch thick). This is vital; uniform slices ensure consistent cooking. Use a sharp knife for easy slicing, or if you’re feeling adventurous, a mandoline works wonders! -
Cook the Garlic
In a medium saucepan over medium heat, melt 2 tablespoons of butter and sauté the minced garlic for about 1 minute, until fragrant (but not browned!). This step infuses the butter with that glorious garlic flavor, creating a savory base for our gratin. -
Make the Creamy Mixture
Add the heavy cream, thyme, nutmeg, salt, and pepper to the garlic butter. Bring it to a gentle simmer and let it cook for about 5 minutes to allow the flavors to meld together beautifully. Remember, this creamy concoction will hug our squash slices like an oven-fresh blanket! -
Layer the Dish
In a greased 9×13 inch baking dish, start by creating a layer of butternut squash. Drizzle about one-third of the creamy mixture over the top. Sprinkle a handful of cheese on top (a bit more is always better!). Repeat this process until all the squash and sauce are used up, finishing with a generous layer of cheese. A little extra cheese on top will result in a beautifully crispy, cheesy crust. -
Bake It to Perfection
Cover the dish with foil and bake in the preheated oven for about 30 minutes. Then, remove the foil and let it bake for an additional 20-25 minutes until the cheese is golden brown and bubbling, and the squash is tender. The foil helps to steam the squash, while the uncovered time ensures that cheese gets that desirable golden hue. -
Cool & Serve
Once the gratin comes out of the oven, let it rest for about 10 minutes (if you don’t mind the wait!). This allows the layers to settle before you dive in, preventing it from falling apart when you serve it.
What’s more, the beauty of this dish is that it stays warm for a good while, making it perfect for those cozy get-togethers.
Serving Suggestions
The beauty of gratin de courge butternut is how it can be served! I love serving it right in the baking dish, family-style. A sprinkle of fresh thyme on top adds a pop of color and a fresh aroma. Pair it with a crisp green salad or some roasted veggies for a well-rounded meal. A drizzle of balsamic reduction over the top before serving can give a zesty kick that complements the creaminess of the gratin beautifully.
Recipe Variations
Feeling adventurous? Here are some creative twists you can try with this gratin:
-
Nutty Crunch: Add a topping of panko breadcrumbs mixed with Parmesan for an extra crunchy topping. You can even include some chopped nuts like walnuts for a delightful flavor boost!
-
Spicy Kick: For those who love a bit of heat, sprinkle in some chili flakes or fresh jalapeños between the layers for a tasty twist!
-
Herby Delight: Experiment with different herbs! Sage, rosemary, or even a bit of basil can add unique flavor profiles that brighten your dish.
-
Cheesy Alternatives: Mix in a variety of cheeses, like blue cheese or feta, for a flavor explosion that everyone will love.
-
Vegan Version: Substitute the heavy cream with coconut milk and use a plant-based cheese for a vegan delight that doesn’t skimp on flavor.
Chef’s Notes
This dish has always been a crowd-pleaser in my home. As a home cook, I find joy in experimenting, whether it’s the flavors or the textures. One time, I had a small disaster with the gratin spilling over in the oven – let’s just say my kitchen was a bit of a cheesy battlefield! But it all came together, and that’s what I love about cooking: embracing the mess and the journey.
Over the years, I’ve played around with different veggies and spices, and each iteration of my gratin brings a smile to my face. This recipe truly has evolved into something so special!
FAQs and Troubleshooting
-
Why is my gratin soupy?
If your gratin is too watery, make sure to let it rest after baking. This allows the layers to settle and thicken. If your squash was particularly watery, you might want to pat it dry with a clean towel before layering it. -
Can I prepare it ahead of time?
Absolutely! You can assemble the gratin a day in advance and store it in the fridge before baking. Just add a little more baking time if it’s cold from the fridge when you pop it in the oven. -
What if my cheese clumps instead of melting?
Make sure to shred your cheese fresh from the block instead of using pre-shredded varieties, as they often contain anti-caking agents that affect melting. -
How can I store leftovers?
Store any leftovers in an airtight container in the fridge for up to 3–4 days. Reheat in the oven or microwave until warmed through. It’s just as delicious as the first day!
Nutritional Info
This gratin makes for a hearty side dish that feeds the soul. Also, it’s packed with nutrients from the butternut squash, which is a fantastic source of vitamins A and C. Combined with the lovely richness of cheese and cream, this dish is comforting and provides a balance of flavors.
So there you have it, my lovely food enthusiasts! A journey through the delicious world of Gratin de Courge Butternut au Fromage. Let this recipe be a hug on a plate, perfect for sharing with those you love. So grab your apron, turn on some soothing music, and let’s create something magical in the kitchen! Happy cooking! 🍽️✨
Print
Gratin de Courge Butternut au Fromage
- Total Time: 70 minutes
- Yield: 6 servings 1x
- Diet: Vegetarian
Description
A cozy and creamy butternut squash gratin layered with cheese and spices, perfect for family gatherings and chilly evenings.
Ingredients
- 3–4 cups Butternut Squash, peeled and thinly sliced
- 1.5 cups Gruyère Cheese, grated
- 1 cup Heavy Cream
- 2 cloves Garlic, minced
- 1/4 teaspoon Nutmeg
- 1 teaspoon Thyme, dried or fresh
- Salt and Pepper, to taste
Instructions
- Preheat your oven to 375°F (190°C).
- Prepare the butternut squash by peeling and slicing it into thin, even rounds.
- Cook the garlic in a medium saucepan with melted butter until fragrant.
- Add the heavy cream, thyme, nutmeg, salt, and pepper to the garlic butter, bringing it to a gentle simmer.
- Layer the dish starting with butternut squash, drizzling the creamy mixture, and sprinkling cheese until all ingredients are used up.
- Bake covered with foil for about 30 minutes, then uncover and bake for an additional 20-25 minutes until golden brown.
- Cool for about 10 minutes before serving.
Notes
For a twist, try adding panko breadcrumbs and nuts on top for crunch or experimenting with different herbs and cheeses.
- Prep Time: 15 minutes
- Cook Time: 55 minutes
- Category: Side Dish
- Method: Baking
- Cuisine: French
Nutrition
- Serving Size: 1 serving
- Calories: 400
- Sugar: 4g
- Sodium: 450mg
- Fat: 25g
- Saturated Fat: 15g
- Unsaturated Fat: 8g
- Trans Fat: 0g
- Carbohydrates: 30g
- Fiber: 5g
- Protein: 10g
- Cholesterol: 60mg
Keywords: butternut squash, gratin, cheesy, comfort food, vegetarian

Quick Ghostly Halloween Desserts: 25 Spooky Treats in 30 Minutes
25 Ghost Themed Dessert Recipes for Halloween
Welcome to my kitchen! I’m Olivia Bennett—your friendly neighborhood chef and lover of all things cozy and homemade. You know, Halloween is one of those magical times of the year when the air is crisp, the leaves are crunchy, and everything around us is peppered with delightfully spooky characters. And, let’s not forget the sweet treats!
As the days grow shorter, I can’t help but feel inspired to whip up some cute, ghostly desserts that not only tantalize your taste buds but also add a dash of whimsy to your celebrations. Whether you’re hosting a spooky soirée, throwing a kids’ Halloween party, or just want to indulge in some sweet Halloween spirit, there’s something incredibly special about baking spooky sweets that bring everyone together. I’ve gathered 25 of my favorite ghost-themed dessert recipes that are sure to charm and delight. Let’s dive in, and may your Halloween be filled with laughter, treats, and maybe a few friendly ‘ghosts’ in the kitchen!
A Whimsical Halloween Memory
Growing up, Halloween was a big deal in our house. Mom would transform our kitchen into a mini haunted bakery, where we’d create spooky goodies together. I vividly remember a Halloween when she made the most adorable ghost cookies—simple sugar cookies decorated with royal icing. I was her little helper, always ready to dip my fingers into the colorful icing or sneak a sweet treat when I thought she wasn’t looking.
One night, we decided to host a small Halloween gathering with our neighbors. With the lights dimmed, we set up a spooky dessert table with those delightful ghost cookies, bat-shaped brownies, and pumpkin spice cupcakes with tiny candy corn toppers. I’ll never forget the giggles as our friends scurried around, trying to dodge ghosts while taste-testing everything. That Halloween solidified my love for baking and sharing food with loved ones. It was about more than just treats; it was about creating memories, connections, and a hint of magic—all of which I hope to replicate for you with these recipes.
Ingredients You’ll Need
Here are some ingredients that you’ll commonly find across our ghostly dessert recipes, complete with tips and tricks to make your spooky creations a hit!
-
All-Purpose Flour: The backbone of most desserts. If you’re looking for a gluten-free option, feel free to swap it with almond flour, coconut flour, or a gluten-free blend.
-
Granulated Sugar: This sweetener adds the necessary sweetness to your desserts. Brown sugar can provide a deeper flavor if you like a hint of molasses.
-
Eggs: The binding agent! If you’re vegan or have an egg allergy, you can use flax eggs (1 tablespoon of ground flaxseed mixed with 2-1/2 tablespoons of water).
-
Baking Powder or Baking Soda: Essential for leavening! Just make sure they’re fresh to avoid flat desserts—try the baking soda fizz test!
-
Butter: Adds richness to your desserts. For a dairy-free option, substitute with coconut oil or vegan butter.
-
Milk: A moisture booster in many recipes. Sweetened almond or oat milk works great as plant-based alternatives.
-
Vanilla Extract: This classic flavor enhancer elevates your desserts wonderfully. Feel free to experiment with other extracts like almond or peppermint for a spooky twist!
-
Food Coloring: Great for creating those ghostly white and eerie black features on your desserts. Gel colors are more vibrant and won’t thin out your batter.
-
Chocolate Chips or Melting Chocolate: Perfect for creating spooky decorations! Dark chocolate can add a little extra richness.
-
Candy Eyes: These adorable little decorations turn anything into a ghost! If you can’t find them, you can use chocolate chips or make little fondant eyes!
These ingredients will be the building blocks for our ghostly delights, ensuring a Halloween full of taste and fun!
Step-by-Step Instructions
Let’s get our chef hats on and dive into the fun part—cooking! Here are a few step-by-step guides for some crowd-favorite spooky desserts.
1. Ghostly Cupcakes
Ingredients:
- Cupcake batter (your favorite flavor)
- Whipped frosting
- Candy eyes
Instructions:
-
Preheat the oven to 350°F (175°C). This sets up the perfect environment for your cupcakes to rise beautifully, keeping your ghosts fluffy and light.
-
Prepare your cupcake tin by lining it with cute Halloween-themed liners. This step is crucial—besides the festive look, it keeps the cupcakes from sticking.
-
Mix your batter according to the recipe. Pro tip: If you’re adding spooky flavors (like pumpkin or cinnamon), now’s the time!
-
Fill each liner about two-thirds full with batter. This ensures room for the cupcakes to rise without spilling over.
-
Bake in the oven for about 18-20 minutes or until a toothpick comes out clean. Trust your nose here—the aroma will signal when they’re ready!
-
While they bake, make your frosting by whipping cream, powdered sugar, and a hint of vanilla.
-
Once the cupcakes have cooled, frost generously to create a ghostly mound.
-
Add candy eyes to give personality. Do you want them to be spooky or cute? You decide!
2. Ghostly Meringue Cookies
Ingredients:
- 4 large egg whites
- 1 cup granulated sugar
- ½ teaspoon vanilla extract
- A pinch of salt
- Dark chocolate (for eyes)
Instructions:
-
Preheat your oven to 200°F (93°C). Low and slow is key for meringues to get that delicate crunch!
-
Whip egg whites in a clean mixing bowl until foamy. Add a pinch of salt, then gradually mix in sugar until you get stiff peaks (the kind that make you feel like a kitchen wizard).
-
Add vanilla and gently fold; you want to keep the mix airy!
-
Spoon or pipe onto parchment-lined baking sheets in ghostly shapes. Don’t worry about perfection—quirkiness is part of the charm!
-
Bake for 1.5-2 hours until completely dry and crunchy. You can leave them in the oven to cool off with it for a softer center, if you like.
-
Melt dark chocolate and use it for little eyes. You can use a toothpick to dot them on for a spook-tacular effect!
3. Ghost Brownies
Ingredients:
- 1 box brownie mix (or homemade recipe)
- Whipped white frosting
- Candy corn (for decoration)
Instructions:
-
Prepare the brownie mix as directed on the box. Don’t forget to add a dash of espresso powder to enhance that chocolate flavor!
-
Pour it into your prepared pan and bake according to instructions.
-
Once cooled, frost them all over with the whipped white icing — this will provide the perfect base for ghostly decorations!
-
Cut into squares and use your frosting to create ghostly faces. Top off with candy corn to add a fun twist—like mini ghostly props!
By following these steps, I assure you’ll have a variety of delicious ghost treats ready for your Halloween festivities. Remember, cooking can be just as playful as it is practical!
Serving Suggestions
These ghostly desserts can be arranged on a spooky-decorated platter, accompanied by creepy treats like eyeball cake pops or themed candies. Serve them alongside a signature Halloween punch or spooky-themed drinks—perhaps a bubbling cauldron of apple cider? You can even add some dry ice for fog effects. Trust me, your guests will love the effort!
Recipe Variations
-
Spicy Ghosts: Add a hint of cinnamon or nutmeg to your dessert bases for a seasonal spice kick.
-
Nutty Ghosts: For a nuttier flavor in brownies, add chopped walnuts or pecans into the mix.
-
Vegan Ghostly Treats: Substitute traditional ingredients with plant-based alternatives, keeping all spooky flavors intact!
-
Fruit-Filled Ghosts: Add layers of fruit compote between cake layers to surprise your guests with a burst of flavor.
-
Gluten-Free Wonders: Use gluten-free flour blends to cater to guests with dietary restrictions without sacrificing the deliciousness!
Chef’s Notes
As you embark on this ghostly baking adventure, remember that the kitchen can be a playful place! I once had an epic battle with frosting consistency while trying to decorate a ghost cake—the result was messy, but we laughed it off while enjoying the lovely “abstract art” I created! Over the years, I’ve swapped ingredients, experimented with flavors, and, honestly, even made mistakes! Each ghostly dessert out of my kitchen tells a story, and I hope yours will too.
FAQs and Troubleshooting
-
Why did my meringue turn out flat?
Your egg whites need to be free of any grease or yolk. Ensure your bowl and whisk are perfectly clean. And make sure to add sugar gradually! -
How can I prevent brownies from becoming too cakey?
Avoid overmixing your batter and check your brownies a couple of minutes before the instructed time with a toothpick. -
My ghost icing keeps running off the cupcakes—what gives?
Ensure your frosting is thick enough and allow the cupcakes to cool completely before frosting. -
Can I freeze these ghost treats?
Absolutely! Both the cupcakes and brownie bites freeze well. Just make sure to wrap them tightly in plastic wrap.
If you encounter any other magical mishaps, feel free to reach out! Together, we can create a spook-tacular Halloween filled with fantastic flavors, memories, and plenty of ghostly treats!
Optional Nutritional Info:
While every spooky dessert will vary, I encourage you to be mindful of portion sizes. Enjoy these treats during Halloween festivities and embrace the joy they bring!
There you have it—a collection of 25 ghost-themed dessert recipes that will enchant your gatherings and make for unforgettable moments. Whether you’re making intricate ghost cupcakes or simple spooky brownies, it’s all about having fun in the kitchen! Just like my mom used to do, let your creativity run wild, and most importantly, don’t forget to share your delicious creations with those you love. Happy Halloween baking! 🎃
Print
25 Ghost Themed Dessert Recipes for Halloween
- Total Time: 40 minutes
- Yield: 12 servings
- Diet: Vegetarian
Description
A delightful collection of spooky dessert recipes perfect for Halloween celebrations.
Ingredients
- All-Purpose Flour
- Granulated Sugar
- Eggs
- Baking Powder or Baking Soda
- Butter
- Milk
- Vanilla Extract
- Food Coloring
- Chocolate Chips or Melting Chocolate
- Candy Eyes
Instructions
- Preheat the oven to 350°F (175°C) for the cupcakes.
- Prepare your cupcake tin with Halloween-themed liners.
- Mix your batter according to your recipe.
- Fill each liner about two-thirds full with batter.
- Bake for 18-20 minutes until a toothpick comes out clean.
- Make your frosting by whipping cream, powdered sugar, and vanilla.
- Frost the cooled cupcakes generously.
- Add candy eyes for decoration.
Notes
Experiment with flavors and toppings for added fun! These desserts are not only tasty but visually fun for Halloween.
- Prep Time: 20 minutes
- Cook Time: 20 minutes
- Category: Dessert
- Method: Baking
- Cuisine: American
Nutrition
- Serving Size: 1 cupcake
- Calories: 250
- Sugar: 18g
- Sodium: 150mg
- Fat: 10g
- Saturated Fat: 6g
- Unsaturated Fat: 2g
- Trans Fat: 0g
- Carbohydrates: 35g
- Fiber: 1g
- Protein: 3g
- Cholesterol: 30mg
Keywords: Halloween, ghost desserts, spooky treats, cupcakes, baking

Minute Stuffed Butternut Squash: Weeknight Meal Prep
Stuffed Butternut Squash: A Cozy Fall Delight
Welcome back to my kitchen, friends! Today, we’re diving into a recipe that’s as warm and inviting as a hug on a chilly day: Stuffed Butternut Squash. If you’ve ever walked through a farmers’ market in the fall, those creamy orange beauties just call out to you, don’t they? With their sweet, nutty flavor and stunning presentation, stuffed butternut squash has become a staple in my home, especially during cozy dinners with loved ones.
But before we get into the nitty-gritty of the recipe, let me set the scene for you. Picture this: it’s a cool autumn evening, the leaves are a tapestry of golden yellows and rustic oranges, and the air is filled with the fragrance of spices wafting through the kitchen. I often reminisce about Sundays at my grandmother’s house, where we’d gather around a table brimming with her delicious home-cooked meals. It was more than just the food; it was the love that filled those moments. Those cherished memories inspired me to create warm dishes that bring people together, and this stuffed butternut squash recipe is a perfect reflection of that spirit.
Stuffed butternut squash is not just a vibrant centerpiece; it’s a canvas to showcase all your favorite flavors. Whether you’re looking for a vegetarian option to impress guests or a comforting dish to warm your soul, this recipe is versatile and so easy to make. So, roll up your sleeves, grab that apron, and let’s get cooking!
Personal Story
One of my fondest kitchen memories involves my dear friend Sarah and her adventurous spirit. A few years back, she decided to host an autumn dinner party and invited me to help with the menu. Always up for a challenge, I suggested stuffed butternut squash because it epitomizes everything wonderful about fall.
We made it a fun day of cooking together—laughing, sipping on warm apple cider, and, of course, taste-testing! I remember the first time we pulled the squash out of the oven; the aroma was intoxicating, wrapping us in a warm embrace that made our kitchen feel like a haven. As we sat around the table with our friends that night, the stuffed squash became the centerpiece of joy, fueled by stories, laughter, and introspective conversations. This dish holds a special place in my heart, reminding me of not just the delightful flavors, but the timeless connections created through shared meals.
Ingredients
Here’s what you’ll need for your Stuffed Butternut Squash:
For the Squash:
- 1 large butternut squash: The star of the show! Look for a squash that feels heavy for its size, with a smooth skin. You can substitute acorn squash or a sweet pumpkin if you can’t find butternut squash.
For the Filling:
-
1 cup quinoa (or rice): A healthy whole grain that brings texture and nuttiness. If you’re gluten-free, ensure you use certified gluten-free quinoa.
-
1 can of black beans, drained and rinsed: Provides protein and creaminess. You can swap them for lentils, chickpeas, or even ground turkey for a heartier option.
-
1 bell pepper, diced: Adds crunch and color to the mix. Feel free to interchange with any color of bell pepper or even some sautéed mushrooms for an earthy twist.
-
1 small onion, diced: For sautéing and adding sweetness. If you can’t do onions, shallots or leeks will work beautifully.
-
2 cloves garlic, minced: Because what’s cooking without garlic, right? You can omit it or use garlic powder if necessary.
-
1 teaspoon cumin: Elevates the flavor profile with a warm, earthy note. Ground coriander or chili powder could also be used for a more vibrant taste.
-
Salt and pepper, to taste: Always crucial to bring out the natural flavors of your ingredients!
-
1 cup shredded cheese (optional): I love using a sharp cheddar or feta for tanginess. You can skip the cheese for a vegan take or try nutritional yeast as a cheesy alternative.
Toppings:
- Fresh cilantro or parsley, for garnish: Adds a pop of freshness. Try using green onions for a subtle onion flavor!
In total, these ingredients blend beautifully to create a colorful and nutritious dish that’s perfect for sharing.
Step-by-Step Instructions
Step 1: Preheat the Oven
Preheat your oven to 400°F (200°C). This step is crucial: a properly preheated oven ensures an even roast on the squash, giving it a beautiful caramelization that enhances the flavor.
Step 2: Prepare the Squash
- Carefully cut the butternut squash in half lengthwise using a sharp knife (be cautious, it’s tough!). Scoop out the seeds with a spoon—this can also be a fun activity to include little ones if you have them around!
- Brush the insides with olive oil, and sprinkle with salt and pepper. This adds flavor and helps with the roasting process.
Step 3: Roast the Squash
- Place the squash halves on a baking sheet cut-side up and roast for about 40-50 minutes, or until fork-tender. Keep an eye on them – you want that beautiful caramelization without burning! Perfect timing can be tough as every oven is slightly different, so check your squash after 30 minutes.
Step 4: Cook the Quinoa
While the squash roasts, rinse the quinoa under cold water to eliminate any bitterness. In a pot, combine 1 cup of quinoa with 2 cups of water. Bring it to a boil, reduce to a simmer, cover, and cook for about 15 minutes, or until all water is absorbed. Fluff with a fork and set aside.
Step 5: Sauté the Veggies
In a skillet, heat up a tablespoon of olive oil over medium heat. Add the diced onion and bell pepper. Sauté for about 5 minutes until they start to soften and turn golden. Then add the minced garlic and cook for an additional minute.
Step 6: Combine the Filling
In a large bowl, combine the cooked quinoa, sautéed vegetables, black beans, cumin, and cheese if using. Mix well, adding salt and pepper to taste. This filling is where you can get creative—feel free to taste along the way and adjust flavors!
Step 7: Stuff the Squash
Once the squash is roasted to perfection and cool enough to handle, generously fill each half with the veggie-quinoa mixture. Pack it in tight—they’re gonna get cozy in there!
Step 8: Bake Again
Return the stuffed squash to the oven for an additional 15-20 minutes. During this time, the flavors meld beautifully, and the edges of the stuffing can get delightfully crispy.
Step 9: Garnish and Serve
After baking, let the squash cool for a few minutes. Before serving, sprinkle with fresh herbs for a burst of color and freshness. This little detail elevates the dish both in presentation and taste!
Serving Suggestions
When it comes to plating, serve each half of the stuffed butternut squash on individual plates, accompanied by a vibrant salad or some crusty bread to balance the meal. A dollop of Greek yogurt or a drizzle of balsamic glaze on top can add an extra layer of flavor. This dish is hearty enough to be a main course but lovely as a side too!
Recipe Variations
- Mediterranean Twist: Replace black beans with chickpeas, add some sun-dried tomatoes, and top with feta cheese and olives.
- Mexican Flair: Combine taco seasoning with the filling and top with salsa and avocado after baking.
- Nutty & Sweet: Mix in some dried cranberries or apricots with nuts like pecans for a delightful sweet and crunchy combination.
- Vegan Delight: Skip the cheese, replace with nutritional yeast, and add some diced zucchini for extra nutrition.
- Hearty Protein Boost: Incorporate shredded chicken or turkey for a filling, meatier version of this dish.
Chef’s Notes
This stuffed butternut squash recipe has been on my menu for years now, and it has evolved so much over time. What started as a simple quinoa and black bean filling has turned into a well-loved, custom dish that changes with whatever’s in season or what I have on hand.
One fun story is how often I forget to set a timer while I’m cooking! Recently, I got sidetracked with a phone call while my squash was in the oven. When I finally remembered, I dashed to the kitchen only to find perfectly charred, slightly over-friendly squash! The nice thing about cooking is that there’s always something new to learn while having fun.
FAQs and Troubleshooting
1. My squash is tough to cut! Any tips?
Absolutely! Try microwaving the whole squash for 2-3 minutes to soften it slightly before cutting. Just be careful—it will be hot!
2. Can I prep this dish ahead of time?
Yes! You can roast the squash and prepare the filling the day before. Just stuff it when you’re ready to bake for a quick meal!
3. What if my filling seems too dry?
If you find your filling a bit dry, add a splash of vegetable broth or a drizzle of olive oil to bring everything together.
4. How can I tell when the squash is done?
You’ll know it’s ready when a fork easily pierces through the flesh, and it should have a lovely caramelized appearance.
Nutritional Info (if applicable)
Each serving of stuffed butternut squash is loaded with nutrients, providing an excellent source of fiber, protein, and healthy carbs. It’s moderately rich in calories, depending on added ingredients like cheese.
Per serving (half squash):
- Calories: Approx. 350
- Protein: 12g
- Carbs: 50g
- Dietary Fiber: 10g
- Fat: 10g
I hope you enjoy making this Stuffed Butternut Squash as much as I do! Remember, cooking is about experimentation and joy, so have fun and make it your own. Happy cooking!
Print
Stuffed Butternut Squash
- Total Time: 85 minutes
- Yield: 4 servings 1x
- Diet: Vegetarian
Description
A warm and inviting stuffed butternut squash recipe perfect for cozy dinners.
Ingredients
- 1 large butternut squash
- 1 cup quinoa (or rice)
- 1 can of black beans, drained and rinsed
- 1 bell pepper, diced
- 1 small onion, diced
- 2 cloves garlic, minced
- 1 teaspoon cumin
- Salt and pepper, to taste
- 1 cup shredded cheese (optional)
- Fresh cilantro or parsley, for garnish
Instructions
- Preheat your oven to 400°F (200°C).
- Carefully cut the butternut squash in half lengthwise and scoop out the seeds.
- Brush the insides with olive oil and sprinkle with salt and pepper.
- Place the squash halves on a baking sheet cut-side up and roast for about 40-50 minutes.
- While the squash roasts, rinse the quinoa under cold water and combine it with 2 cups of water in a pot. Bring to a boil, then reduce to a simmer, cover, and cook for about 15 minutes.
- In a skillet, heat olive oil and sauté the diced onion and bell pepper for about 5 minutes, then add garlic for an additional minute.
- In a bowl, combine the cooked quinoa, sautéed vegetables, black beans, cumin, and cheese (if using). Mix well.
- Generously fill each squash half with the veggie-quinoa mixture.
- Return the stuffed squash to the oven for an additional 15-20 minutes.
- After baking, let the squash cool slightly, then garnish with fresh herbs before serving.
Notes
Can prep ahead by roasting squash and preparing filling a day before. Just stuff and bake later.
- Prep Time: 15 minutes
- Cook Time: 70 minutes
- Category: Main Course
- Method: Baking
- Cuisine: American
Nutrition
- Serving Size: 1 half squash
- Calories: 350
- Sugar: 5g
- Sodium: 400mg
- Fat: 10g
- Saturated Fat: 4g
- Unsaturated Fat: 6g
- Trans Fat: 0g
- Carbohydrates: 50g
- Fiber: 10g
- Protein: 12g
- Cholesterol: 30mg
Keywords: stuffed butternut squash, fall recipes, vegetarian dinner, cozy meals, healthy recipes




