
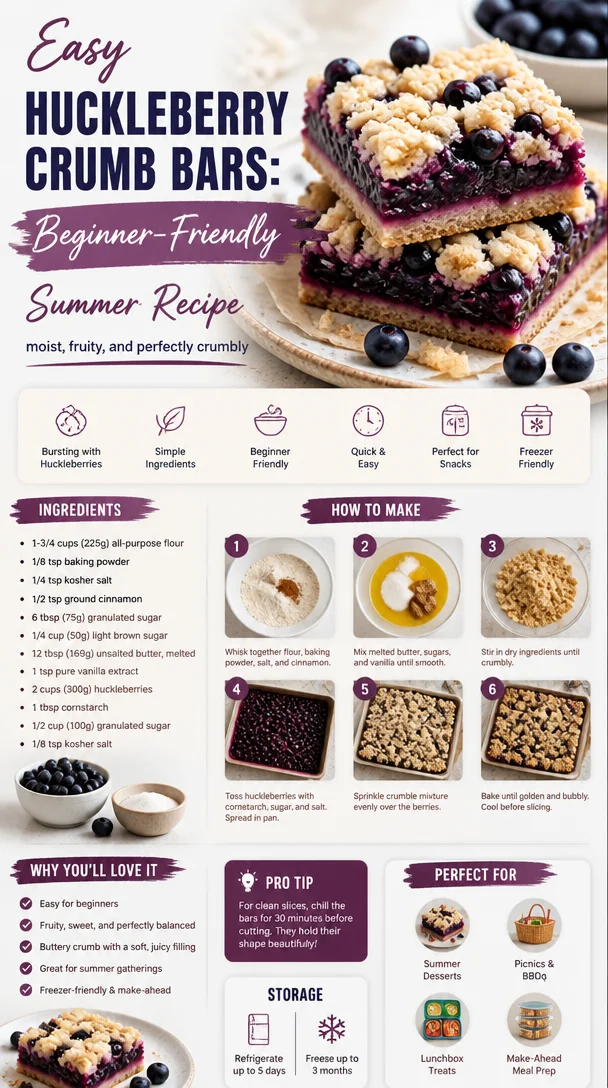
Easy Huckleberry Crumb Bars: Beginner-Friendly Summer Recipe
Huckleberry Crumb Bars: A Sweet Slice of Summer
Welcome to my kitchen, dear friend! I’m thrilled to have you here today as we embark on a delicious journey into the world of huckleberry crumb bars. There’s something special about summer and the way it lends itself to vibrant, juicy fruits. And for me, huckleberries have always been a star ingredient that dances between sweet and tart, making any dish sing!
Imagine this: the sun shining brightly, a gentle breeze coaxing the fragrant aroma of baked goods from an open window, and the laughter of friends and family filling the air. That’s the essence of culinary magic — taking a handful of simple ingredients and transforming them into something extraordinary. Today’s recipe is not only a delightful treat for your taste buds but also a reminder of cherished summertime memories spent gathering huckleberries in the wild.
Whether you’re new to baking or a seasoned pro, these huckleberry crumb bars are easy to whip up and even easier to enjoy. Perfect for picnics, potlucks, or quiet mornings with a cup of coffee, they’re bound to become a go-to recipe in your culinary arsenal. So, grab your apron and let’s dive into the scrumptious world of huckleberry crumb bars!
A Sweet Memory in the Kitchen
As I sit down to write about these delightful huckleberry crumb bars, my mind drifts back to a cherished childhood memory. Every summer, my family would venture into the woods behind our house, armed with nothing but buckets, snacks, and a healthy dose of excitement. The mission? To gather huckleberries!
Those escapades were filled with laughter, the sweet scent of pine, and the thrill of spotting those plump, purple berries glimmering in the sunlight. My siblings and I raced to see who could fill their bucket first, but the real joy was in the simple act of foraging together. Upon returning home, my mom would often turn our haul into heavenly huckleberry pies or cobblers, filling the kitchen with sweet warmth and delightful aromas.
Huckleberry crumb bars became a staple in our summer baking sessions, too — an easy, crowd-pleasing dessert that was equally at home on a picnic blanket or at a family gathering. This recipe brings back those joyful memories, and I hope it inspires you to create your own kitchen adventures filled with love and laughter.
Ingredients
Gathering ingredients for our huckleberry crumb bars is part of the fun! Here’s what you’ll need:
-
2 cups fresh huckleberries
These little gems have a unique flavor that balances sweetness with a hint of tartness. If you can’t find fresh huckleberries, you can substitute them with blueberries or blackberries, though the flavor will slightly differ. -
1 cup all-purpose flour
The backbone of our crumb bars. To make it gluten-free, you can swap in an all-purpose gluten-free blend. -
1 cup rolled oats
These provide a wonderful chewiness. If you prefer a nutty flavor, feel free to use almond flour instead for a unique twist! -
1/2 cup brown sugar
Brown sugar adds moisture and a hint of caramel flavor. If you’re looking to reduce sugar, coconut sugar is a great alternative. -
1/2 cup granulated sugar
This helps balance the tartness of the huckleberries. You can substitute with monk fruit sweetener for a lower-calorie option. -
1/2 cup unsalted butter, melted
Butter adds richness and flavor. If you’re dairy-free, coconut oil works well too! -
1 tsp vanilla extract
Vanilla enhances the sweetness of the huckleberries. You can also use almond extract for a different flavor profile. -
1 tsp baking powder
This gives our crumb bars a little lift. If you’re using self-rising flour, you can omit this ingredient. -
1/2 tsp salt
Balancing the sweetness with a touch of salt is essential! For a flavorful twist, try using sea salt instead.
Step-by-Step Instructions
Ready to bring these delicious huckleberry crumb bars to life? Here’s how to create them, step by step:
-
Preheat the Oven
Preheat your oven to 350°F (175°C). This is the first step in creating that warm, inviting environment that makes the kitchen feel alive with the scent of baking! -
Prepare Your Baking Dish
Line an 8×8-inch baking dish with parchment paper, leaving an overhang on the sides. This makes it super easy to remove the bars later. Grease the parchment with a little butter or cooking spray to ensure no sticky situations arise! -
Mix the Dry Ingredients
In a large bowl, combine the flour, rolled oats, brown sugar, granulated sugar, baking powder, and salt. Giving these ingredients a good mix ensures that your crumb base has an even distribution of flavors. -
Add the Butter and Vanilla
Pour in the melted butter and vanilla extract. Stir everything together until the mixture resembles wet sand. Don’t worry if it seems crumbly; that’s exactly what we want for that perfect crumb topping! -
Press the Mixture into the Pan
Take about 2/3 of the mixture and press it firmly into the bottom of your prepared baking dish. This creates a solid base for our huckleberry filling. Use your hands or the back of a spatula to help pack it down nicely. -
Prepare the Huckleberry Filling
In a medium bowl, combine your fresh huckleberries with a sprinkle of granulated sugar (about 2 tablespoons) and a dash of flour (1 tablespoon), gently tossing to coat the berries. This helps create a delicious filling that won’t be too runny. -
Spread the Huckleberry Mixture
Evenly spread the huckleberry mixture over the oat base in your baking dish. -
Crumble the Remaining Mixture on Top
Sprinkle the remaining crumb mixture over the huckleberries, making sure to cover them as much as possible. Those crumbs are going to crisp up beautifully in the oven! -
Bake to Perfection
Place the dish in the preheated oven and bake for about 30-35 minutes, or until the top is golden brown and the huckleberries are bubbling. Your kitchen will fill with heavenly aromas, and trust me, you’ll have a hard time waiting! -
Cool and Slice
Once baked, remove the crumb bars from the oven and let them cool in the pan for about 20 minutes. Use the parchment overhang to lift them out onto a cutting board. Let them cool completely before slicing into squares.
Serving Suggestions
These huckleberry crumb bars are as delightful to look at as they are to eat! For an elegant touch, serve them warm with a scoop of vanilla ice cream or a dollop of whipped cream on the side. Dust them with powdered sugar for an extra sprinkle of sweetness, and you’ve got an eye-catching dessert perfect for any occasion.
Recipe Variations
Feeling adventurous? Here are a few fun variations to try:
- Nutty Twist: Add chopped walnuts or pecans to the crumb mixture for an added crunch.
- Citrus Zing: Incorporate lemon or orange zest into the filling for a bright citrus flavor.
- Spiced Up: Mix in a half teaspoon of cinnamon or nutmeg to the crumbs for a cozy, spiced vibe.
- Oatmeal Bars: Use the same mixture and spread it into a larger baking pan for oatmeal bars to have on-the-go!
Chef’s Notes
As I worked on perfecting this recipe over the years, I discovered that huckleberries aren’t just found in the wild; they symbolize the joyous moments of connecting with nature and embracing simplicity. These crumb bars have evolved from being just a family treat to a recipe I share with friends, curated with love and memories, always reminding us to slow down, savor, and celebrate life’s delicious moments.
Speaking of memories, I once left my huckleberry bars in the oven a tad too long. Instead of tossing them out, I served the crispy edges as "baker’s treats!" You’d be surprised at what surprises the kitchen can throw at you!
FAQs and Troubleshooting
1. Can I use frozen huckleberries?
Absolutely! Frozen huckleberries work well; just be mindful that they might be a bit juicier, so consider adding an extra tablespoon of flour to the filling.
2. Why are my crumb bars too crumbly?
If your crumb bars turned out too crumbly, it could be due to not enough butter or overmixing the crumb mixture. For a sure result, make sure to measure carefully!
3. How do I store leftover bars?
Keep any leftovers in an airtight container at room temperature for up to three days or in the fridge for about a week. They can also be frozen for up to three months — just be sure to wrap them tightly!
4. What can I do if the bottom of the bars is too soggy?
If you noticed a soggy bottom, try pressing the crumb mixture down more firmly before adding the huckleberries. You can also bake them a few minutes longer if they seem undercooked, but keep an eye on them to avoid overbaking.
Nutritional Info
If you’re curious about the nutritional breakdown, a typical serving of these huckleberry crumb bars comes in at around 200 calories, with 8g of fat, 30g of carbs, and 2g of protein — a sweet treat that’s balanced and satisfying without overdoing it!
So there you have it, a slice of summer captured in these huckleberry crumb bars! I can’t wait for you to try this recipe and create your own beautiful memories in the kitchen. Happy baking, my friends!
Print
Huckleberry Crumb Bars
- Total Time: 50 minutes
- Yield: 12 servings 1x
- Diet: Vegetarian
Description
Delicious huckleberry crumb bars that bring the flavors of summer into your kitchen, perfect for sharing with friends and family.
Ingredients
- 2 cups fresh huckleberries
- 1 cup all-purpose flour
- 1 cup rolled oats
- 1/2 cup brown sugar
- 1/2 cup granulated sugar
- 1/2 cup unsalted butter, melted
- 1 tsp vanilla extract
- 1 tsp baking powder
- 1/2 tsp salt
Instructions
- Preheat your oven to 350°F (175°C).
- Line an 8×8-inch baking dish with parchment paper, leaving an overhang on the sides.
- In a large bowl, combine the flour, rolled oats, brown sugar, granulated sugar, baking powder, and salt.
- Pour in the melted butter and vanilla extract.
- Take about 2/3 of the mixture and press it firmly into the bottom of your prepared baking dish.
- In a medium bowl, combine your fresh huckleberries with a sprinkle of granulated sugar and a dash of flour.
- Evenly spread the huckleberry mixture over the oat base in your baking dish.
- Sprinkle the remaining crumb mixture over the huckleberries.
- Place the dish in the preheated oven and bake for about 30-35 minutes.
- Once baked, remove from the oven and let cool in the pan for about 20 minutes.
- Lift them out using the parchment overhang and allow to cool completely before slicing.
Notes
For a twist, add chopped nuts or citrus zest to the mixture. Serve warm with ice cream.
- Prep Time: 15 minutes
- Cook Time: 35 minutes
- Category: Dessert
- Method: Baking
- Cuisine: American
Nutrition
- Serving Size: 1 bar
- Calories: 200
- Sugar: 8g
- Sodium: 80mg
- Fat: 8g
- Saturated Fat: 4g
- Unsaturated Fat: 4g
- Trans Fat: 0g
- Carbohydrates: 30g
- Fiber: 2g
- Protein: 2g
- Cholesterol: 30mg
Keywords: huckleberry, dessert, summer, crumb bars, baking, easy recipe
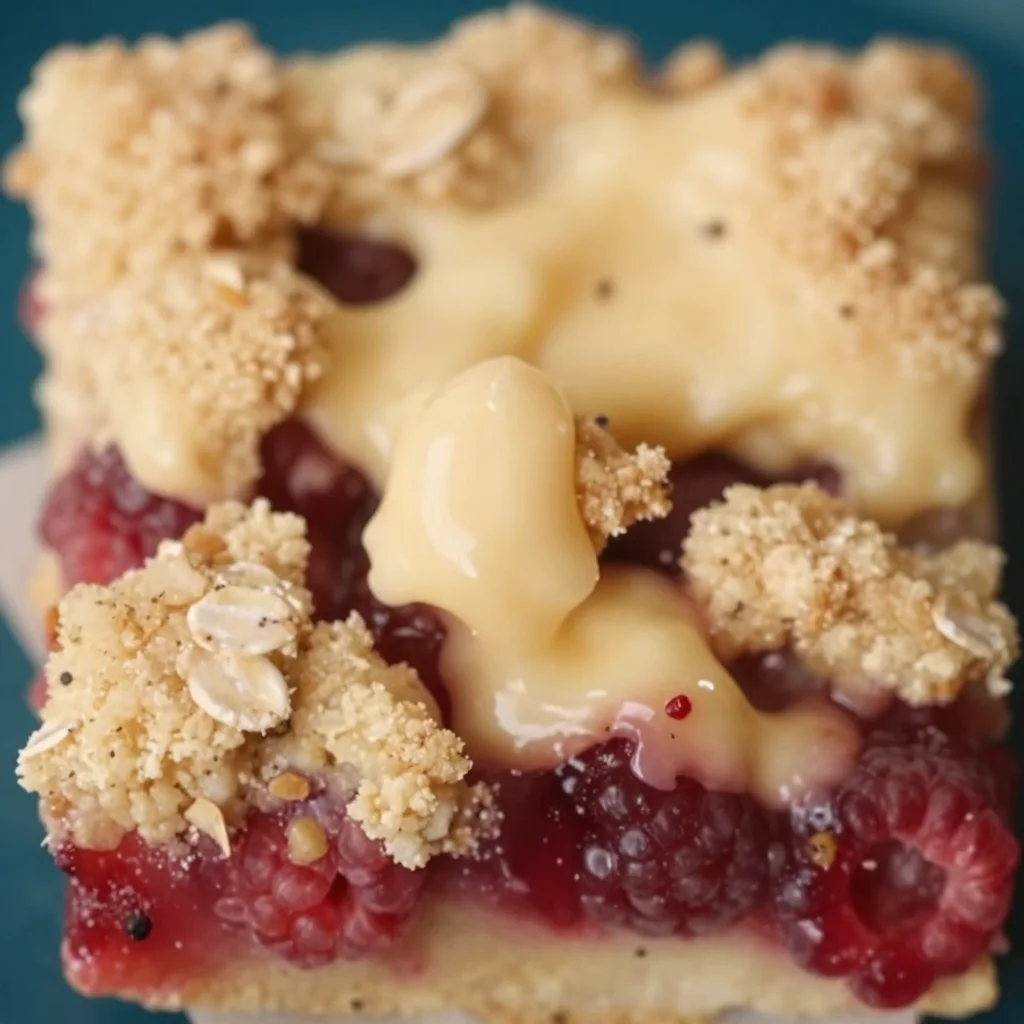
No-Bake Raspberry Crumb Bars: Easy 20-Minute Summer Treat
Raspberry Crumb Bars: A Sweet Slice of Nostalgia
Welcome to my cozy corner of the internet! Today, I’m thrilled to share a delightful treat that holds a special place in my heart: Raspberry Crumb Bars. Let me tell you—the moment you take your first bite of these sweet, tart bars, you’ll be transported to a sun-drenched afternoon filled with laughter and joy.
There’s something magical about the combination of buttery, crumbly crust layered with a vibrant raspberry filling. Whether you’re a fruit lover or just enjoy a good old-fashioned sweet treat, these bars are the perfect addition to any gathering or a lovely afternoon snack while curled up with your favorite book.
Growing up, my summer days were often spent in my grandmother’s kitchen, where the aroma of freshly baked goods wafted through the air. One summer, she decided we would make raspberry bars together. We picked the juiciest, plumpest raspberries from her garden, giggling as juice dripped from our fingers. I can still hear her playful teasing about my messy apron (which, let’s be honest, has become a badge of honor for me!). Those days are etched in my memory, each bite of those crumb bars filled with sweet nostalgia.
So, roll up your sleeves, don that apron—messy or not—and let’s dive into making these Raspberry Crumb Bars together!
Key Ingredients
For the Crust and Topping:
- All-purpose flour (2 cups): The backbone of the crumb bar. For a gluten-free option, substitute with gluten-free flour blend.
- Granulated sugar (¾ cup): Added for sweetness. Brown sugar can be used for a deeper flavor.
- Baking powder (1 teaspoon): This will give your bars a nice lift; make sure it’s fresh to ensure better rising.
- Salt (½ teaspoon): A pinch of salt helps balance the sweetness and enhances flavor.
- Butter (½ cup, cold and cubed): The heart and soul of these crumb bars. You can use unsalted butter or vegan butter as a substitute for dairy-free.
- Egg (1 large): Acts as a binding agent. For a vegan option, try using flaxseed meal (1 tablespoon mixed with 2.5 tablespoons water) as a substitute.
For the Raspberry Filling:
- Fresh raspberries (2 cups): The star of the show! Frozen raspberries will work, but fresh fruit provides the best flavor and texture.
- Lemon juice (1 tablespoon): Brings brightness to the raspberry filling. Lime juice can also be a zesty alternative.
- Cornstarch (2 tablespoons): Thickens the filling so it doesn’t ooze all over. Feel free to swap it with arrowroot powder for a different thickening agent.
- Granulated sugar (½ cup): Sweetens the tangy raspberries. Adjust to your taste depending on the ripeness of your fruit.
Step-by-Step Instructions
Step 1: Preheat Your Oven
Let’s get started by preheating your oven to 350°F (175°C) and greasing a 9×9-inch baking pan. Trust me; it’s going to be worth the wait!
Step 2: Prepare the Crust
In a large mixing bowl, combine the all-purpose flour, granulated sugar, baking powder, and salt. Now, here’s the fun part: use a fork or your fingers to cut the cold, cubed butter into the dry ingredients. You want a crumbly texture, similar to wet sand. You can also use a pastry cutter for a quicker method. Pro tip: Keep the butter cold for flakier crusts!
Step 3: Add the Egg
Crack in the egg and mix until everything just comes together. Don’t overmix! We want a tender crumb, not tough bars.
Step 4: Bake the Crust
Press about two-thirds of this mixture into the prepared baking pan. Bake for 15 minutes just until it starts to turn golden. The smell will be tantalizing, trust me!
Step 5: Make Raspberry Filling
While the crust is baking, it’s time to prepare the filling. In a medium saucepan over medium heat, combine the raspberries, lemon juice, granulated sugar, and cornstarch. Cook it down until the raspberries release their juices and thicken slightly, about 5-7 minutes. Stir gently to avoid smashing the fruit into mush.
Step 6: Assemble and Bake
Once your crust has baked and the filling is ready, pour it evenly over the crust. Crumble the remaining crust mixture on top. Bake these beauties for an additional 25 minutes until the top is golden brown and the filling is bubbling. It might take some patience, but oh, is it worth it!
Step 7: Cool and Slice
Let the bars cool in the pan for at least 30 minutes before slicing. (I know it’s tempting, but trust me—this step is crucial!) Once they’re cool, dust with powdered sugar for a little extra flair.
Serving Suggestions
These Raspberry Crumb Bars are best served slightly warm or at room temperature. You can serve them as is or dress them up with a scoop of vanilla ice cream or a dollop of freshly whipped cream for an elevated experience!
Recipe Variations
- Berry Blast: Mix in blueberries or blackberries with the raspberries for a delightful berry medley.
- Nutty Addition: Stir in some chopped nuts, such as almonds or walnuts, to the crumb topping for added crunch.
- Zesty Surprise: Add some grated lemon or orange zest to the filling for an extra fresh flavor.
- Chocolate Drizzle: Once cooled, drizzle melted dark chocolate over the bars for a luscious twist.
- Spiced Version: Sprinkle in some cinnamon or nutmeg to the crumb mixture for a warm, cozy flavor profile.
Chef’s Notes
Ah, Raspberry Crumb Bars—they’ve become a staple in my kitchen, evolving over the years from my grandmother’s simple recipe to something I love putting my own stamp on. I’ll never forget the time I added a pinch of cayenne pepper to the berry filling out of curiosity. I was surprised by how the heat enhanced those sweet, tangy raspberries; just a little spice gives it a whole new depth!
And of course, you can always sprinkle some crumbs into a bowl of yogurt for breakfast or even use the filling in a tart. So versatile!
FAQs and Troubleshooting
Q: My crumb topping didn’t come out crumbly! What went wrong?
A: This usually happens if the butter is too soft or if the mixture was overmixed. Keep your butter cold and mix just until combined for that perfect crumble.
Q: Can I make these ahead of time?
A: Absolutely! These bars hold up well for 3-4 days in an airtight container. Just let them cool completely before storing.
Q: How do I store leftovers?
A: Keep them in an airtight container in the fridge for up to a week, or freeze them for longer storage – I love pulling out a slice on a quiet afternoon!
Q: Can I use other fruits for the filling?
A: Yes! Feel free to experiment with strawberries, peaches, or even a mix of fruits. Just adjust the sugar according to the fruit’s sweetness.
Nutritional Info
Calories per serving: Approximately 200
Fat: 10g
Carbohydrates: 28g
Fiber: 1g
Protein: 2g
There you have it! Raspberry Crumb Bars that are sure to warm your heart and delight your taste buds. I hope these bars inspire many happy memories for you and your loved ones—just like they did for me. So go ahead, grab those raspberries, and let’s get baking! Happy cooking, friends!
Print
Raspberry Crumb Bars
- Total Time: 55 minutes
- Yield: 16 servings 1x
- Diet: Vegetarian
Description
Delightful and nostalgic Raspberry Crumb Bars with a buttery crust and vibrant raspberry filling, perfect for any gathering or an afternoon snack.
Ingredients
- 2 cups all-purpose flour
- ¾ cup granulated sugar
- 1 teaspoon baking powder
- ½ teaspoon salt
- ½ cup butter, cold and cubed
- 1 large egg
- 2 cups fresh raspberries
- 1 tablespoon lemon juice
- 2 tablespoons cornstarch
- ½ cup granulated sugar (for filling)
Instructions
- Preheat your oven to 350°F (175°C) and grease a 9×9-inch baking pan.
- Combine the all-purpose flour, granulated sugar, baking powder, and salt in a large mixing bowl.
- Cut the cold, cubed butter into the dry ingredients until crumbly.
- Crack in the egg and mix until just combined.
- Press about two-thirds of the mixture into the prepared baking pan and bake for 15 minutes.
- Cook the raspberries, lemon juice, granulated sugar, and cornstarch in a medium saucepan over medium heat until thickened, about 5-7 minutes.
- Pour the raspberry filling over the baked crust and crumble the remaining crust mixture on top.
- Bake for an additional 25 minutes until golden brown and bubbling.
- Cool the bars in the pan for at least 30 minutes before slicing.
Notes
Dust with powdered sugar before serving. These bars pair wonderfully with vanilla ice cream or whipped cream.
- Prep Time: 15 minutes
- Cook Time: 40 minutes
- Category: Dessert
- Method: Baking
- Cuisine: American
Nutrition
- Serving Size: 1 bar
- Calories: 200
- Sugar: 14g
- Sodium: 150mg
- Fat: 10g
- Saturated Fat: 6g
- Unsaturated Fat: 4g
- Trans Fat: 0g
- Carbohydrates: 28g
- Fiber: 1g
- Protein: 2g
- Cholesterol: 30mg
Keywords: raspberry, crumb bars, dessert, sweet treat, baking




