
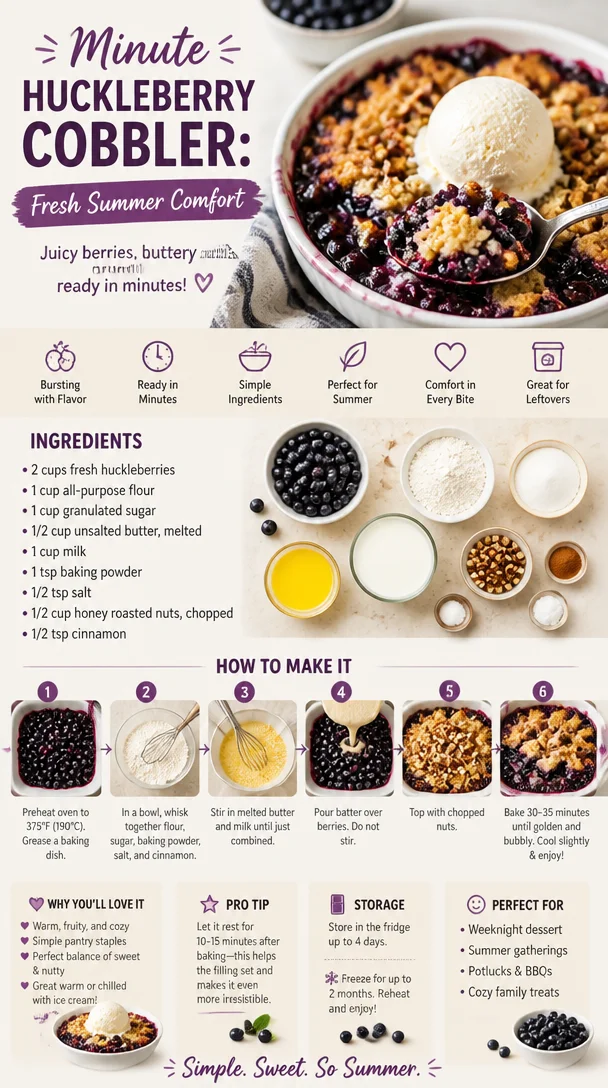
Minute Huckleberry Cobbler: Fresh Summer Comfort
Easy Fresh Huckleberry Cobbler: A Sweet Slice of Nostalgia
Welcome to my cozy corner of the kitchen, where we’re embracing the delightful world of home-cooked treats! Today, I’m over the moon to share one of my absolute favorite desserts: Easy Fresh Huckleberry Cobbler. Trust me, this recipe is like a warm hug on a plate, perfect for gatherings, family dinners, or just those moments when you need a little sweetness in your life.
Huckleberries are truly special – those vibrant little gems burst with flavor and nostalgia. Growing up, we had a patch of wild huckleberries near our family cabin. Every summer, my family would trek into the woods, buckets in hand, on a little adventure to gather these sweet treats. The excitement of picking those plump berries, the chatter among my siblings, and the joy of creating something delicious with them brings back such fond memories. It’s not just about the berries; it’s about the times spent together – the sun warming our backs, the sweet scent of the forest, and the laughter shared over a simple, homemade dessert.
This Easy Fresh Huckleberry Cobbler is my go-to recipe for those cherished moments. The combination of the juicy, tart berries with a luscious, buttery topping creates a symphony of flavors that’s sure to dazzle and bring smiles around the table. Plus, it’s wonderfully straightforward; even novice bakers can whip up this delightful dish without breaking a sweat!
So, grab your apron and let’s dive into making this enchanting huckleberry cobbler that will not only taste amazing but also fill your kitchen with sweet, comforting aromas.
Ingredients
-
Fresh Huckleberries (4 cups)
These beautiful berries are the stars of the show! Their tangy flavor adds depth to the cobbler. If you can’t find huckleberries, blueberries or blackberries make excellent substitutes. -
Granulated Sugar (1 cup)
Sweeten the deal with sugar! It balances the tartness of the huckleberries. For a lower-calorie option, consider using honey or coconut sugar. -
All-Purpose Flour (1 cup)
The backbone of your cobbler topping! It creates the delightful, fluffy layer. Need a gluten-free option? Swap it with almond flour or a gluten-free baking blend. -
Baking Powder (2 teaspoons)
This key ingredient helps the cobbler rise, giving it a light and fluffy texture. Always check the expiration date for best results! -
Salt (½ teaspoon)
A pinch of salt enhances sweetness and balances flavors. You can use sea salt or kosher salt for a slightly different taste. -
Whole Milk (1 cup)
Adds richness to the cobbler topping. If you’re looking for a dairy-free alternative, any plant-based milk like almond or oat milk works just fine. -
Butter (½ cup, melted)
Butter adds moisture and flavor to our topping, creating that sought-after buttery crust. For a vegan option, try melted coconut oil or vegan butter.
Step-by-Step Instructions
-
Preheat the Oven
Preheat your oven to 350°F (175°C). This ensures a consistent bake, giving your cobbler that perfect golden crust right from the get-go. Sticking with this step creates the perfect environment for our cobbler magic! -
Prepare the Huckleberries
Rinse the huckleberries gently under cold water and pat them dry. In a large mixing bowl, combine the huckleberries with ½ cup of granulated sugar. Let them sit for about 10 minutes. This step allows the berries to release their natural juices, creating a delightful syrup that will soak into the cobbler. -
Make the Topping
In another large bowl, whisk together the flour, baking powder, salt, and remaining ½ cup of sugar. Add the melted butter and milk, stirring until the mixture is just combined. Don’t overmix; a few lumps are perfectly fine. This will keep our topping light and airy! -
Combine and Layer
Pour the huckleberries into a greased 9×13-inch baking dish, spreading them out evenly. Spoon the batter over the huckleberries, carefully trying to cover as much of the berries as possible. Don’t worry about perfect coverage – rustic is the name of the game here! -
Bake to Perfection
Pop the dish into the preheated oven and bake for 40-45 minutes, or until the topping is golden brown and a toothpick inserted into the center comes out clean. Around the halfway point, you’ll start to smell an incredible aroma wafting through your kitchen. That’s the magic of baking! -
Cool and Serve
Once out of the oven, let the cobbler cool for about 10-15 minutes. This allows the juices to settle, making it easier to serve. If you can wait, that is! It’ll be a challenge, I get it.
Serving Suggestions
To plate your Easy Fresh Huckleberry Cobbler, scoop a generous portion into a bowl or on a plate. Serve it warm with a scoop of vanilla ice cream or a dollop of freshly whipped cream on top for delightful contrast. Drizzle a bit of the huckleberry juices over the ice cream for a sweet touch. Trust me, this combination is simply heavenly!
Recipe Variations
- Mixed Berry Cobbler: Swap out some of the huckleberries for strawberries, raspberries, or blackberries for a berry medley.
- Nutty Addition: Add ½ cup of chopped pecans or walnuts to the topping mixture for a crunchy texture.
- Spiced Up: Sprinkle in some cinnamon or nutmeg to the dry ingredients for a warming spice that compliments the berries beautifully.
- Lemon Zest: Mix in a teaspoon of lemon zest to the batter for a refreshing zing that brightens the flavor profile.
- Chia Seed Jam: Toss in a tablespoon of chia seeds with the huckleberries for added texture and healthy benefits!
Chef’s Notes
This huckleberry cobbler recipe holds a special place in my heart. Over the years, I’ve made countless variations, swapping berries and adding different spices based on what I had on hand, but the classic version always brings me back to those childhood days chasing after huckleberries in the woods. The laughter, the mess, and sometimes even the berry-stained smiles remind me of what cooking is all about: celebrating the moments that bring us together.
FAQs and Troubleshooting
1. What if my cobbler is too runny?
If your cobbler turns out a bit too runny, it might be due to excessive juice from the berries. Make sure to let it cool for a bit before serving; the juices will thicken as it sits. You can also add a tablespoon of cornstarch to the berries before baking to help thicken them up.
2. Can I use frozen huckleberries?
Absolutely! If using frozen, there’s no need to thaw them beforehand. Just toss them in the sugar and follow the recipe as instructed. You may need to add an extra 5-10 minutes to the baking time since they’ll release more moisture.
3. How do I store leftovers?
Store any leftover cobbler in an airtight container in the refrigerator for up to 3 days. You can also reheat individual portions in the microwave or pop them back in the oven to warm through.
4. Can I double this recipe?
Totally! To double the recipe, use a larger baking dish and adjust the baking time accordingly. Keep an eye on it, and test for doneness with a toothpick.
Nutritional Info
(Per serving, based on 8 servings)
- Calories: 250
- Protein: 3g
- Carbohydrates: 42g
- Fat: 10g
- Fiber: 2g
- Sugar: 15g
So there you have it, my friends! An Easy Fresh Huckleberry Cobbler that’s not just delicious but also comes with a side of beautiful memories and the promise of new stories to create in your own kitchen. Give it a try and share the love! I can’t wait to hear about your experiences baking this delightful dish. Happy cooking!
Print
Easy Fresh Huckleberry Cobbler
- Total Time: 60 minutes
- Yield: 8 servings
- Diet: Vegetarian
Description
A delightful dessert featuring juicy huckleberries and a buttery topping, perfect for gatherings and sweet moments.
Ingredients
- Fresh Huckleberries (4 cups)
- Granulated Sugar (1 cup)
- All-Purpose Flour (1 cup)
- Baking Powder (2 teaspoons)
- Salt (½ teaspoon)
- Whole Milk (1 cup)
- Butter (½ cup, melted)
Instructions
- Preheat the oven to 350°F (175°C).
- Rinse the huckleberries gently under cold water and pat them dry.
- Combine the huckleberries with ½ cup of granulated sugar in a large mixing bowl and let sit for about 10 minutes.
- Whisk together flour, baking powder, salt, and remaining ½ cup of sugar in another large bowl.
- Add melted butter and milk, stirring until just combined.
- Pour the huckleberries into a greased 9×13-inch baking dish and spoon the batter over them.
- Bake for 40-45 minutes or until golden brown.
- Let cool for about 10-15 minutes before serving.
Notes
Serve warm with vanilla ice cream or whipped cream for extra delight.
- Prep Time: 15 minutes
- Cook Time: 45 minutes
- Category: Dessert
- Method: Baking
- Cuisine: American
Nutrition
- Serving Size: 1 serving
- Calories: 250
- Sugar: 15g
- Sodium: 200mg
- Fat: 10g
- Saturated Fat: 6g
- Unsaturated Fat: 3g
- Trans Fat: 0g
- Carbohydrates: 42g
- Fiber: 2g
- Protein: 3g
- Cholesterol: 20mg
Keywords: cobbler, huckleberry, dessert, easy recipe, baking
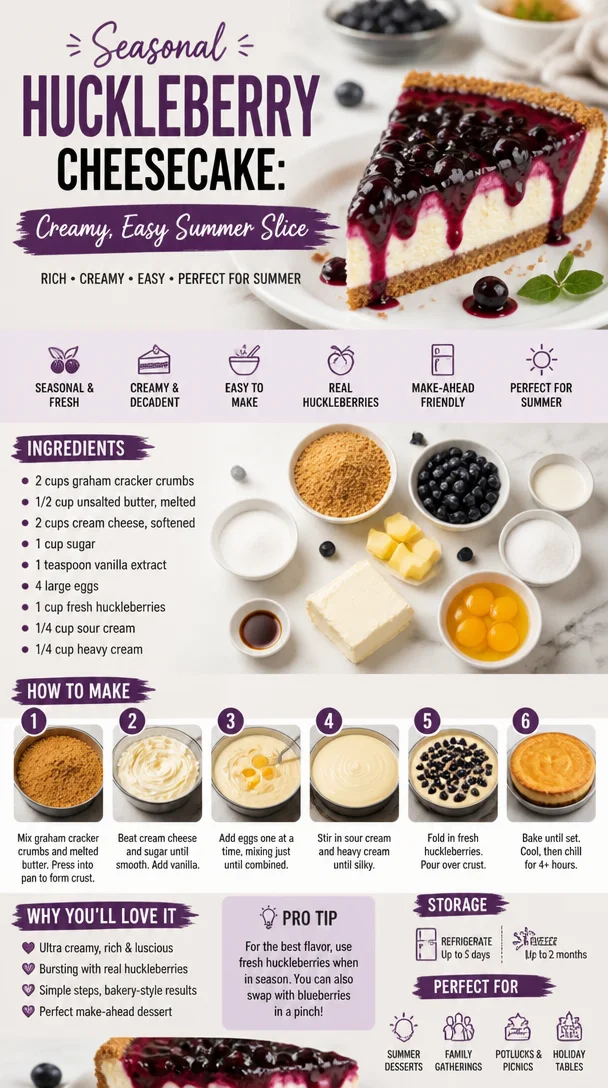
Seasonal Huckleberry Cheesecake: Creamy, Easy Summer Slice
Huckleberry Cheesecake: A Slice of Heaven
Welcome back to my cozy kitchen, where the magic of cooking unfolds with each whisk and sprinkle! Today, I’m thrilled to take you on a flavorful journey through one of my absolute favorite desserts: Huckleberry Cheesecake. If you’ve never tasted huckleberries, they’re like nature’s little jewels—sweet, tangy, and bursting with flavor. Combine that with the creamy richness of cheesecake, and you have a match made in dessert heaven!
This recipe holds a special place in my heart. It reminds me of sunny afternoons spent berry-picking with my family in the lush hills of the Pacific Northwest. There’s something undeniably joyful about wandering through nature, basket in hand, as you search for those plump little huckleberries hiding among the leaves. The best part? Coming home and transforming our haul into something delicious. Cheesecake became our go-to treat, a celebration of simplicity and the great outdoors.
As I share this recipe with you, I hope you too will treasure these little moments in the kitchen. Remember, you don’t need to be a pastry chef to whip up something delightful! Let’s get our hands floury and dive right into this dreamy huckleberry cheesecake recipe.
A Taste from My Past
The first time I made huckleberry cheesecake was during a family reunion, where we were reunited after years apart. My Aunt Clara, the family’s unofficial dessert queen, sparked the idea with her stories about foraging for huckleberries. Inspired, I decided I would give it a go myself. Armed with nothing but enthusiasm and a trusty old recipe book, I headed to the nearest berry-picking spot.
The thrill of picking huckleberries under the warm sun and chatting away with my cousins is a memory I cherish. We came home with baskets overflowing with berries, and the moment I transformed those little gems into a silky cheesecake, everyone was smitten! There’s something magical that happens when you share food made from the heart—the way laughter fills the air and everyone’s face lights up with joy. That day, huckleberry cheesecake became our family’s dessert legacy, and now, I can’t wait to share this treasured recipe with you.
Ingredients
Let’s gather our ingredients for this luscious huckleberry cheesecake. Here’s what you’ll need:
-
Huckleberries (2 cups)
- Fresh huckleberries are divine; however, if you can’t find them, blueberries make a fantastic substitute. Frozen huckleberries work too; just thaw and drain excess moisture.
-
Cream Cheese (24 oz, softened)
- The heart of any cheesecake! Make sure it’s at room temperature to ensure a smooth filling. If you want a healthier cream cheese alternative, look for Greek yogurt or a dairy-free cream cheese.
-
Granulated Sugar (1 cup)
- Sweetness is key, but you can use coconut sugar or a sugar alternative if you’re looking to cut back on refined sugars.
-
Eggs (3 large)
- Eggs help bind the cheesecake and give it that rich texture. If you’re vegan, try using flax eggs (1 tablespoon ground flaxseed mixed with 3 tablespoons water = 1 egg).
-
Sour Cream (1 cup)
- Adds a creamy tanginess that balances the sweetness. You can swap it with Greek yogurt for a healthier spin.
-
Vanilla Extract (1 teaspoon)
- A splash of vanilla elevates the flavors perfectly. Homemade vanilla extract adds an extra touch of warmth.
-
Graham Cracker Crumbs (1 ½ cups)
- For the crust! You can also use crushed Oreos or gluten-free graham crackers for a dietary twist.
-
Butter (½ cup, melted)
- Holds the crust together; substitute with coconut oil for a dairy-free option.
-
Salt (1/4 teaspoon)
- A pinch of salt enhances the overall flavor, even in sweet dishes.
With these ingredients in hand, you’re all set to create a delicious huckleberry cheesecake that’s bound to impress.
Step-by-Step Instructions
Now that we’ve gathered everything, let’s begin our delicious adventure! Follow these steps to craft your huckleberry cheesecake:
-
Preheat the Oven: Start by preheating your oven to 325°F (163°C). This ensures your cheesecake bakes evenly.
-
Make the Crust:
- In a mixing bowl, combine the graham cracker crumbs, melted butter, and a pinch of salt.
- Mix until well combined. The mixture should feel like wet sand. Press it down tightly into the bottom of a 9-inch springform pan. Use the bottom of a measuring cup to make it compact.
- Bake the crust for about 10 minutes, just until it’s golden and fragrant. This is the perfect time to take a whiff of yummy goodness!
-
Prepare the Filling:
- In a large mixing bowl, beat the softened cream cheese with an electric mixer until it’s smooth and fluffy. Keep the speed moderate to avoid too much air, which can lead to cracks.
- Gradually add in the granulated sugar, mixing until combined. Scrape down the sides to ensure everything is well blended.
- Add in the eggs one at a time, mixing gently. Follow up with the sour cream and vanilla extract. This will create a creamy, rich filling.
-
Add the Huckleberries:
- Gently fold in the huckleberries using a spatula. You want them to remain somewhat whole for that gorgeous burst of flavor in every slice.
-
Bake the Cheesecake:
- Pour the cheesecake filling over the pre-baked crust. Smooth the top with the spatula.
- Bake for about 50-60 minutes, or until the center is set but still slightly wobbly. Remember, it will firm up as it cools.
-
Cool Down:
- Once done, turn off the oven and crack the oven door open, letting the cheesecake cool slowly. This can help prevent cracks from forming.
- After about an hour, transfer it to the fridge to chill for at least four hours (or overnight for best results).
-
Serve with Love:
- Once chilled, carefully run a knife around the edge of the pan before releasing the sides of the springform.
Cheesecakes are best served with a fresh huckleberry compote on the side, enhancing the flavor and adding an extra layer of sweetness!
Serving Suggestions
To present your huckleberry cheesecake beautifully, slice it into generous wedges and drizzle some of that fresh huckleberry compote over the top. Garnish with a dollop of whipped cream and a sprig of mint. You can even serve it alongside a hot cup of coffee or a refreshing berry smoothie. Perfect for a summer gathering or a cozy dinner with your loved ones!
Recipe Variations
Here are a few creative twists you can try with this huckleberry cheesecake recipe:
- Chocolate Huckleberry Swirl: Add some melted dark chocolate swirl to the batter for a rich chocolatey flavor.
- Zesty Lemon Huckleberry: Add the zest of one lemon to the cream cheese filling for a refreshing citrus kick.
- Nutty Crust: Incorporate crushed nuts like pecans or almonds into the graham cracker crust for extra crunch and flavor.
- Huckleberry AND Blueberry: Mix in fresh blueberries to complement the huckleberries for a berry explosion!
- Mini Cheesecakes: Bake individual cheesecakes in muffin tins for cute and shareable servings.
Chef’s Notes
As I reflect on my journey with this huckleberry cheesecake, I can’t help but chuckle at the first time I attempted it. I was definitely more ambitious than experienced and misjudged the baking time. Let’s just say a quick panic ensued when I checked the oven to find a wobbly, semi-set "cheesecake." But what emerged was a deliciously soft, custardy filling that has since become my signature style. I now embrace the joy of imperfections in the kitchen; that’s where the best flavors often reside!
Over the years, this recipe has evolved, drawing inspiration from both traditional and contemporary cheesecake. Each iteration brings new memories, laughter, and, of course, delicious bites!
FAQs and Troubleshooting
-
Why is my cheesecake cracking?
- Cracking happens when the cheesecake is overbaked or if it cools too quickly. Make sure to gradually cool it by leaving it in the oven after baking, and avoid beating too much air into the batter.
-
How can I tell when my cheesecake is done?
- The edges should look set, while the center will remain slightly jiggly. Trust me, it will firm up as it chills in the fridge!
-
Can I make this cheesecake ahead of time?
- Absolutely! Cheesecake tastes even better the day after it’s made, so feel free to prepare it a day in advance.
-
What should I do if I don’t have huckleberries?
- No problem! You can easily swap them for blueberries or even raspberries, which will give you that same delightful tart-and-sweet balance.
Nutritional Info
While I love to indulge in decadent desserts, I believe in balance. Each slice of huckleberry cheesecake packs a complex mix of flavors and textures while providing energy from carbohydrates and protein from the cream cheese. Remember to enjoy it in moderation, and share it with friends for that ultimate cozy experience!
There you have it! A delightful journey into the world of huckleberry cheesecake! I hope you feel inspired to whip up this delicious dessert and create some lovely memories of your own. Bake it with love, share it with joy, and let the flavors speak for themselves! Happy baking!
Print
Huckleberry Cheesecake
- Total Time: 80 minutes
- Yield: 10 servings
- Diet: Vegetarian
Description
A creamy and luscious huckleberry cheesecake that captures the essence of a summer day and family memories.
Ingredients
- Huckleberries (2 cups)
- Cream Cheese (24 oz, softened)
- Granulated Sugar (1 cup)
- Eggs (3 large)
- Sour Cream (1 cup)
- Vanilla Extract (1 teaspoon)
- Graham Cracker Crumbs (1 ½ cups)
- Butter (½ cup, melted)
- Salt (1/4 teaspoon)
Instructions
- Preheat the Oven: Start by preheating your oven to 325°F (163°C).
- Make the Crust: In a mixing bowl, combine the graham cracker crumbs, melted butter, and a pinch of salt. Mix until well combined and press into a 9-inch springform pan. Bake for about 10 minutes.
- Prepare the Filling: In a large mixing bowl, beat the cream cheese until smooth. Gradually add in sugar, then eggs one at a time, followed by sour cream and vanilla extract.
- Add the Huckleberries: Gently fold in the huckleberries.
- Bake the Cheesecake: Pour the filling over the crust and bake for 50-60 minutes.
- Cool Down: Let it cool in the oven, then chill in the fridge for at least four hours.
- Serve with Love: Slice and serve with huckleberry compote and whipped cream.
Notes
Cheesecakes are best served chilled and can be made a day in advance for enhanced flavor.
- Prep Time: 20 minutes
- Cook Time: 60 minutes
- Category: Dessert
- Method: Baking
- Cuisine: American
Nutrition
- Serving Size: 1 slice
- Calories: 350
- Sugar: 28g
- Sodium: 250mg
- Fat: 22g
- Saturated Fat: 12g
- Unsaturated Fat: 8g
- Trans Fat: 0g
- Carbohydrates: 34g
- Fiber: 1g
- Protein: 5g
- Cholesterol: 120mg
Keywords: huckleberry, cheesecake, dessert, berry dessert, creamy cheesecake
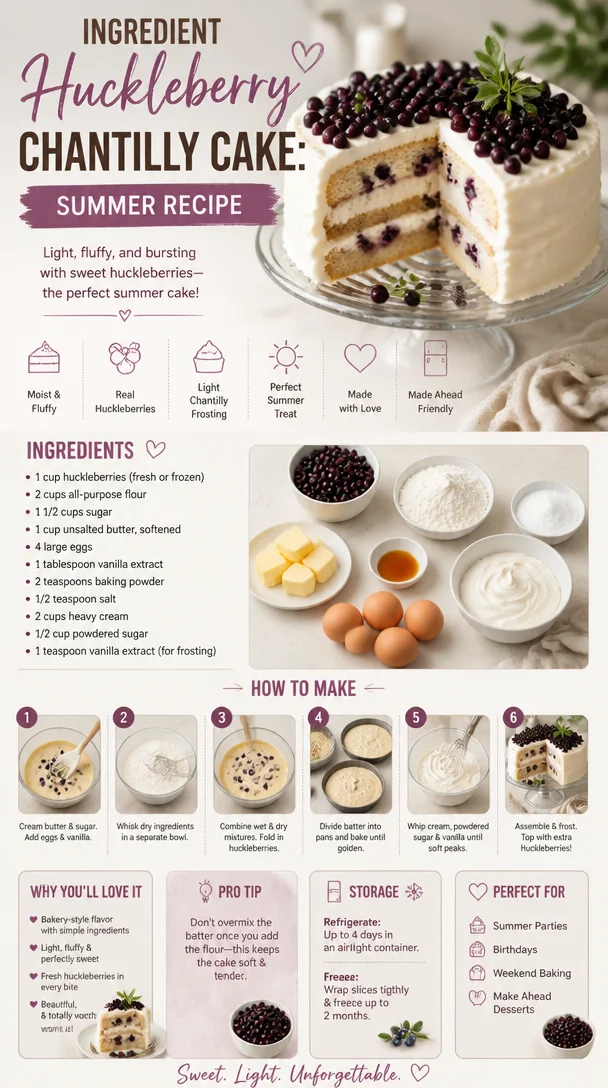
Ingredient Huckleberry Chantilly Cake: Summer Recipe
Huckleberry Chantilly Cake: A Slice of Joy
Welcome to my kitchen! Today, we’re diving into a delightful confection that embodies summer’s sweet embrace — the Huckleberry Chantilly Cake. As the season’s berries start to burst with color and flavor, there’s no better way to celebrate nature’s bounty than with a light and airy cake topped with a luscious chantilly cream. If the mention of huckleberries makes your heart flutter, then you’re in for a treat! This cake isn’t just a dessert; it’s a joyful explosion of happiness and nostalgia that can transport you back to lazy summer days filled with laughter and love.
But wait, let me take a moment to pull you into my little world. I remember the first time I stumbled upon huckleberries. I was about twelve, spending summer weekends with my grandparents in their cozy cabin tucked away in the woods. The moment we stepped outside, the air was rich with the scent of pine and the sounds of nature — the perfect backdrop for a little adventure. Armed with tiny pails and an insatiable curiosity, my grandfather and I ventured into the wild to forage for these little blue gems that grew in abundance.
Those days spent scouring the underbrush, discovering the sweet, juicy huckleberries hidden among the leaves, were magical. When we returned, sticky-fingered and beaming with pride, my grandmother would have all the ingredients ready to whip up her famous berry pie. While her recipe will always have a special place in my heart, I love to shake things up in the kitchen! Every year, as huckleberry season rolls around, I find new ways to incorporate these beauties into my cooking. This Huckleberry Chantilly Cake is one of my proudest creations — it brings all those cherished memories flooding back with every bite.
So, grab your apron, and let’s make this easy yet stunning cake that will have your friends asking for seconds (and maybe thirds!). Trust me, this recipe is a delightful celebration that’s meant to be shared.
Ingredients
Here’s what you’ll need to create this dreamy Huckleberry Chantilly Cake:
-
2 cups all-purpose flour
- This is the foundation of our cake. For a gluten-free option, try using a 1:1 gluten-free flour blend.
-
1 ½ cups granulated sugar
- Sweetness is key! If you want a lower-sugar version, you can substitute with coconut sugar, but adjust the liquids slightly as it absorbs more moisture.
-
½ cup unsalted butter (softened)
- Butter adds richness! If you’re aiming for a dairy-free cake, feel free to swap it with coconut oil or vegan butter.
-
1 cup buttermilk
- This helps in creating a moist cake with a tender crumb. No buttermilk? Mix 1 cup of milk with a tablespoon of vinegar or lemon juice and let it sit for five minutes.
-
3 large eggs
- Eggs provide structure. For an egg-free version, consider using flax eggs (1 tablespoon of flaxseed meal mixed with 3 tablespoons of water per egg) — just give it a few minutes to thicken.
-
1 tablespoon baking powder
- This ensures our cake rises beautifully and has a fluffy texture.
-
½ teaspoon baking soda
- Helps to balance the acidity of the buttermilk, promoting a nice rise.
-
1 teaspoon vanilla extract
- Always use pure vanilla for the best flavor. If you’re adventurous, try using almond extract for a deeper, nutty note.
-
2 cups huckleberries (fresh or frozen)
- The star of our show! If huckleberries are hard to find, blueberries make an excellent substitute. Just adjust the sweetness slightly since blueberries can be a tad sweeter.
-
2 cups heavy whipping cream
- Essential for our chantilly cream. If you want a lighter option, you can use a whipped coconut cream.
-
½ cup powdered sugar
- For sweetening the chantilly cream without the graininess of granulated sugar.
-
1 teaspoon vanilla extract
- Again, pure vanilla is key here for that lovely, aromatic flavor in your cream.
Step-by-Step Instructions
-
Preheat your oven to 350°F (175°C). Preheating is crucial so that your cake begins baking immediately, leading to a beautiful rise.
-
Prepare your cake pans. Grease two 9-inch round cake pans with butter or non-stick spray, then line the bottoms with parchment paper for easy removal. This little step ensures that your cake won’t stick and you’ll have picture-perfect layers.
-
Mix the dry ingredients. In a large mixing bowl, whisk together the flour, baking powder, baking soda, and a pinch of salt. This aerates the flour and distributes the leavening agents evenly.
-
Cream the butter and sugar. In another bowl, beat the softened butter and granulated sugar together until the mixture is light and fluffy — about 3-4 minutes. This step creates air pockets in the butter, which is essential for a light cake.
-
Add the eggs and vanilla. One at a time, mix in the eggs, scraping down the sides of the bowl as needed. Add the vanilla extract next and blend until just combined.
-
Combine wet and dry ingredients. Gradually stir in the flour mixture and buttermilk, alternating between both, starting and ending with the dry mix. Each addition needs to be mixed just until combined to avoid overworking the flour, which can lead to a tough cake.
-
Fold in the huckleberries. Gently fold the huckleberries into the batter, being careful to keep them whole to avoid purple swirls in your cake.
-
Divvy up the batter. Pour equal amounts of batter into the prepared cake pans and smooth the tops with a spatula.
-
Bake! Pop those pans into your preheated oven and bake for 25-30 minutes or until a toothpick inserted in the center comes out clean. Keep an eye on them, as overbaking can lead to dry cake.
-
Cool the layers. Once baked, remove the pans from the oven and let them cool in the pans for about 10 minutes. Then, carefully invert them onto a wire rack to cool completely. This helps prevent a soggy bottom.
-
Prepare the chantilly cream. Here comes the fun part! In a large mixing bowl, pour the heavy cream and add the powdered sugar and vanilla extract. Using an electric mixer, whip it on medium-high speed until soft peaks form. Don’t overwhip, or you’ll end up with butter!
-
Assemble the cake. Once the cake layers are completely cool, place one layer on a serving plate. Spread a thick layer of chantilly cream on top and scatter some more huckleberries over it. Place the second layer on top and spread the remaining chantilly cream over the top and sides.
-
Garnish and serve. Finish the cake by scattering more huckleberries on top for a stunning presentation. Your cake is now ready to impress!
Serving Suggestions
When it comes to serving, a slice of Huckleberry Chantilly Cake deserves a beautiful presentation. Place it on a nice cake stand, and serve with a side of fresh fruit or a drizzle of berry sauce for a pop of color. A thin dusting of powdered sugar on top creates an elegant finish. Encourage your guests to take their time, savoring the flavors of light sponge cake, fresh fruit, and fluffy cream.
Recipe Variations
Feeling adventurous? Here are a few variations to spice things up:
-
Lemon Zest: Add the zest of one lemon to the batter for a touch of citrus brightness.
-
Cream Cheese Frosting: Swap out the chantilly cream for a tangy cream cheese frosting, which pairs wonderfully with the sweetness of the huckleberries.
-
Nutty Addition: Fold finely chopped walnuts or pecans into the batter for a delightful crunch.
-
Layer it up: Make a three-tiered cake by adding an additional layer of your favorite flavor (like a vanilla or chocolate) for variety.
-
Gluten-Free: Substitute all-purpose flour with almond flour or a gluten-free flour blend for a gluten-free treat.
Chef’s Notes
This Huckleberry Chantilly Cake is a true reflection of my kitchen’s ethos — simple yet indulgent. Each year, I find myself experimenting with this recipe, whether it’s swapping berries or even trying different creams. One funny memory I treasure is the time I accidentally used salt instead of sugar in the chantilly cream. The reactions were priceless (and definitely not repeatable)! I love how recipes evolve over time. Each addition or change is like adding a new chapter to a beloved book. I hope this cake will inspire you to create your own kitchen stories and memories!
FAQs and Troubleshooting
-
Q: My cake turned out dense. What happened?
- A: This could be due to overmixing the batter. Mix until just combined, and be gentle when folding in the berries.
-
Q: How do I store leftovers?
- A: Store any leftover cake in an airtight container in the fridge for up to 3 days. Just know that the cream may soften the cake a bit over time.
-
Q: Can I freeze this cake?
- A: Absolutely! You can freeze the cake layers without frosting. Wrap them in plastic wrap, and use foil for extra protection. Thaw in the fridge before frosting.
-
Q: What do I do if the huckleberries are too tart?
- A: If you find huckleberries too tart for your taste, consider macerating them in a little sugar for 15-20 minutes before adding them to the batter. This helps to sweeten them!
So there you have it, my sweet friends — a detailed, scrumptious guide to creating a Huckleberry Chantilly Cake that’s sure to be the star of any gathering. Every slice brings back fond memories and creates new ones, so I hope you’ll whip this up and share it with your loved ones. Happy baking, and let the delicious flavors of huckleberries spark joy in your kitchen!
Print
Huckleberry Chantilly Cake
- Total Time: 50 minutes
- Yield: 8 servings 1x
- Diet: Vegetarian
Description
A delightful Huckleberry Chantilly Cake topped with luscious chantilly cream, celebrating summer’s fresh huckleberries.
Ingredients
- 2 cups all-purpose flour
- 1 ½ cups granulated sugar
- ½ cup unsalted butter (softened)
- 1 cup buttermilk
- 3 large eggs
- 1 tablespoon baking powder
- ½ teaspoon baking soda
- 1 teaspoon vanilla extract
- 2 cups huckleberries (fresh or frozen)
- 2 cups heavy whipping cream
- ½ cup powdered sugar
- 1 teaspoon vanilla extract
Instructions
- Preheat your oven to 350°F (175°C).
- Prepare your cake pans by greasing with butter or non-stick spray and lining with parchment paper.
- Mix the dry ingredients: whisk together flour, baking powder, baking soda, and salt in a large bowl.
- Cream the butter and sugar together until light and fluffy (about 3-4 minutes).
- Add the eggs one at a time, mixing in the vanilla extract until just combined.
- Combine wet and dry ingredients, alternating between flour mixture and buttermilk.
- Fold in the huckleberries gently to keep them whole.
- Divvy up the batter into prepared pans, smoothing the tops.
- Bake for 25-30 minutes until a toothpick comes out clean.
- Cool the layers in pans for about 10 minutes, then invert onto wire racks to cool completely.
- Prepare the chantilly cream: whip together heavy cream, powdered sugar, and vanilla extract until soft peaks form.
- Assemble the cake by stacking layers with chantilly cream and huckleberries between them.
- Garnish with additional huckleberries on top before serving.
Notes
For a gluten-free version, substitute the all-purpose flour with a gluten-free flour blend. Adjust the sweetness of the huckleberries if needed.
- Prep Time: 20 minutes
- Cook Time: 30 minutes
- Category: Dessert
- Method: Baking
- Cuisine: American
Nutrition
- Serving Size: 1 slice
- Calories: 400
- Sugar: 32g
- Sodium: 200mg
- Fat: 26g
- Saturated Fat: 15g
- Unsaturated Fat: 8g
- Trans Fat: 0g
- Carbohydrates: 45g
- Fiber: 2g
- Protein: 6g
- Cholesterol: 80mg
Keywords: cake, huckleberry, chantilly, dessert, summer
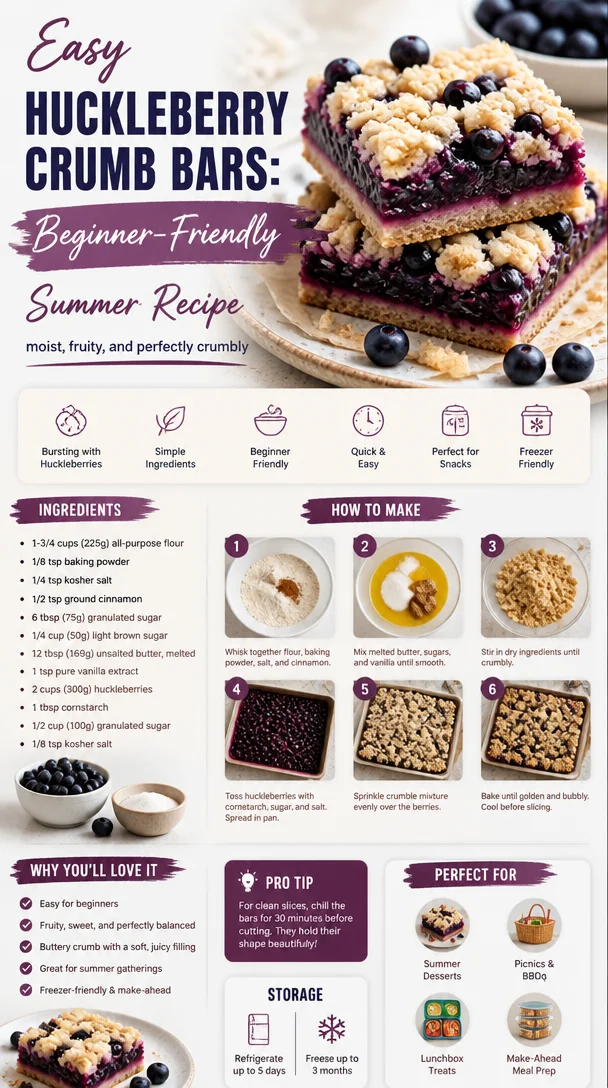
Easy Huckleberry Crumb Bars: Beginner-Friendly Summer Recipe
Huckleberry Crumb Bars: A Sweet Slice of Summer
Welcome to my kitchen, dear friend! I’m thrilled to have you here today as we embark on a delicious journey into the world of huckleberry crumb bars. There’s something special about summer and the way it lends itself to vibrant, juicy fruits. And for me, huckleberries have always been a star ingredient that dances between sweet and tart, making any dish sing!
Imagine this: the sun shining brightly, a gentle breeze coaxing the fragrant aroma of baked goods from an open window, and the laughter of friends and family filling the air. That’s the essence of culinary magic — taking a handful of simple ingredients and transforming them into something extraordinary. Today’s recipe is not only a delightful treat for your taste buds but also a reminder of cherished summertime memories spent gathering huckleberries in the wild.
Whether you’re new to baking or a seasoned pro, these huckleberry crumb bars are easy to whip up and even easier to enjoy. Perfect for picnics, potlucks, or quiet mornings with a cup of coffee, they’re bound to become a go-to recipe in your culinary arsenal. So, grab your apron and let’s dive into the scrumptious world of huckleberry crumb bars!
A Sweet Memory in the Kitchen
As I sit down to write about these delightful huckleberry crumb bars, my mind drifts back to a cherished childhood memory. Every summer, my family would venture into the woods behind our house, armed with nothing but buckets, snacks, and a healthy dose of excitement. The mission? To gather huckleberries!
Those escapades were filled with laughter, the sweet scent of pine, and the thrill of spotting those plump, purple berries glimmering in the sunlight. My siblings and I raced to see who could fill their bucket first, but the real joy was in the simple act of foraging together. Upon returning home, my mom would often turn our haul into heavenly huckleberry pies or cobblers, filling the kitchen with sweet warmth and delightful aromas.
Huckleberry crumb bars became a staple in our summer baking sessions, too — an easy, crowd-pleasing dessert that was equally at home on a picnic blanket or at a family gathering. This recipe brings back those joyful memories, and I hope it inspires you to create your own kitchen adventures filled with love and laughter.
Ingredients
Gathering ingredients for our huckleberry crumb bars is part of the fun! Here’s what you’ll need:
-
2 cups fresh huckleberries
These little gems have a unique flavor that balances sweetness with a hint of tartness. If you can’t find fresh huckleberries, you can substitute them with blueberries or blackberries, though the flavor will slightly differ. -
1 cup all-purpose flour
The backbone of our crumb bars. To make it gluten-free, you can swap in an all-purpose gluten-free blend. -
1 cup rolled oats
These provide a wonderful chewiness. If you prefer a nutty flavor, feel free to use almond flour instead for a unique twist! -
1/2 cup brown sugar
Brown sugar adds moisture and a hint of caramel flavor. If you’re looking to reduce sugar, coconut sugar is a great alternative. -
1/2 cup granulated sugar
This helps balance the tartness of the huckleberries. You can substitute with monk fruit sweetener for a lower-calorie option. -
1/2 cup unsalted butter, melted
Butter adds richness and flavor. If you’re dairy-free, coconut oil works well too! -
1 tsp vanilla extract
Vanilla enhances the sweetness of the huckleberries. You can also use almond extract for a different flavor profile. -
1 tsp baking powder
This gives our crumb bars a little lift. If you’re using self-rising flour, you can omit this ingredient. -
1/2 tsp salt
Balancing the sweetness with a touch of salt is essential! For a flavorful twist, try using sea salt instead.
Step-by-Step Instructions
Ready to bring these delicious huckleberry crumb bars to life? Here’s how to create them, step by step:
-
Preheat the Oven
Preheat your oven to 350°F (175°C). This is the first step in creating that warm, inviting environment that makes the kitchen feel alive with the scent of baking! -
Prepare Your Baking Dish
Line an 8×8-inch baking dish with parchment paper, leaving an overhang on the sides. This makes it super easy to remove the bars later. Grease the parchment with a little butter or cooking spray to ensure no sticky situations arise! -
Mix the Dry Ingredients
In a large bowl, combine the flour, rolled oats, brown sugar, granulated sugar, baking powder, and salt. Giving these ingredients a good mix ensures that your crumb base has an even distribution of flavors. -
Add the Butter and Vanilla
Pour in the melted butter and vanilla extract. Stir everything together until the mixture resembles wet sand. Don’t worry if it seems crumbly; that’s exactly what we want for that perfect crumb topping! -
Press the Mixture into the Pan
Take about 2/3 of the mixture and press it firmly into the bottom of your prepared baking dish. This creates a solid base for our huckleberry filling. Use your hands or the back of a spatula to help pack it down nicely. -
Prepare the Huckleberry Filling
In a medium bowl, combine your fresh huckleberries with a sprinkle of granulated sugar (about 2 tablespoons) and a dash of flour (1 tablespoon), gently tossing to coat the berries. This helps create a delicious filling that won’t be too runny. -
Spread the Huckleberry Mixture
Evenly spread the huckleberry mixture over the oat base in your baking dish. -
Crumble the Remaining Mixture on Top
Sprinkle the remaining crumb mixture over the huckleberries, making sure to cover them as much as possible. Those crumbs are going to crisp up beautifully in the oven! -
Bake to Perfection
Place the dish in the preheated oven and bake for about 30-35 minutes, or until the top is golden brown and the huckleberries are bubbling. Your kitchen will fill with heavenly aromas, and trust me, you’ll have a hard time waiting! -
Cool and Slice
Once baked, remove the crumb bars from the oven and let them cool in the pan for about 20 minutes. Use the parchment overhang to lift them out onto a cutting board. Let them cool completely before slicing into squares.
Serving Suggestions
These huckleberry crumb bars are as delightful to look at as they are to eat! For an elegant touch, serve them warm with a scoop of vanilla ice cream or a dollop of whipped cream on the side. Dust them with powdered sugar for an extra sprinkle of sweetness, and you’ve got an eye-catching dessert perfect for any occasion.
Recipe Variations
Feeling adventurous? Here are a few fun variations to try:
- Nutty Twist: Add chopped walnuts or pecans to the crumb mixture for an added crunch.
- Citrus Zing: Incorporate lemon or orange zest into the filling for a bright citrus flavor.
- Spiced Up: Mix in a half teaspoon of cinnamon or nutmeg to the crumbs for a cozy, spiced vibe.
- Oatmeal Bars: Use the same mixture and spread it into a larger baking pan for oatmeal bars to have on-the-go!
Chef’s Notes
As I worked on perfecting this recipe over the years, I discovered that huckleberries aren’t just found in the wild; they symbolize the joyous moments of connecting with nature and embracing simplicity. These crumb bars have evolved from being just a family treat to a recipe I share with friends, curated with love and memories, always reminding us to slow down, savor, and celebrate life’s delicious moments.
Speaking of memories, I once left my huckleberry bars in the oven a tad too long. Instead of tossing them out, I served the crispy edges as "baker’s treats!" You’d be surprised at what surprises the kitchen can throw at you!
FAQs and Troubleshooting
1. Can I use frozen huckleberries?
Absolutely! Frozen huckleberries work well; just be mindful that they might be a bit juicier, so consider adding an extra tablespoon of flour to the filling.
2. Why are my crumb bars too crumbly?
If your crumb bars turned out too crumbly, it could be due to not enough butter or overmixing the crumb mixture. For a sure result, make sure to measure carefully!
3. How do I store leftover bars?
Keep any leftovers in an airtight container at room temperature for up to three days or in the fridge for about a week. They can also be frozen for up to three months — just be sure to wrap them tightly!
4. What can I do if the bottom of the bars is too soggy?
If you noticed a soggy bottom, try pressing the crumb mixture down more firmly before adding the huckleberries. You can also bake them a few minutes longer if they seem undercooked, but keep an eye on them to avoid overbaking.
Nutritional Info
If you’re curious about the nutritional breakdown, a typical serving of these huckleberry crumb bars comes in at around 200 calories, with 8g of fat, 30g of carbs, and 2g of protein — a sweet treat that’s balanced and satisfying without overdoing it!
So there you have it, a slice of summer captured in these huckleberry crumb bars! I can’t wait for you to try this recipe and create your own beautiful memories in the kitchen. Happy baking, my friends!
Print
Huckleberry Crumb Bars
- Total Time: 50 minutes
- Yield: 12 servings 1x
- Diet: Vegetarian
Description
Delicious huckleberry crumb bars that bring the flavors of summer into your kitchen, perfect for sharing with friends and family.
Ingredients
- 2 cups fresh huckleberries
- 1 cup all-purpose flour
- 1 cup rolled oats
- 1/2 cup brown sugar
- 1/2 cup granulated sugar
- 1/2 cup unsalted butter, melted
- 1 tsp vanilla extract
- 1 tsp baking powder
- 1/2 tsp salt
Instructions
- Preheat your oven to 350°F (175°C).
- Line an 8×8-inch baking dish with parchment paper, leaving an overhang on the sides.
- In a large bowl, combine the flour, rolled oats, brown sugar, granulated sugar, baking powder, and salt.
- Pour in the melted butter and vanilla extract.
- Take about 2/3 of the mixture and press it firmly into the bottom of your prepared baking dish.
- In a medium bowl, combine your fresh huckleberries with a sprinkle of granulated sugar and a dash of flour.
- Evenly spread the huckleberry mixture over the oat base in your baking dish.
- Sprinkle the remaining crumb mixture over the huckleberries.
- Place the dish in the preheated oven and bake for about 30-35 minutes.
- Once baked, remove from the oven and let cool in the pan for about 20 minutes.
- Lift them out using the parchment overhang and allow to cool completely before slicing.
Notes
For a twist, add chopped nuts or citrus zest to the mixture. Serve warm with ice cream.
- Prep Time: 15 minutes
- Cook Time: 35 minutes
- Category: Dessert
- Method: Baking
- Cuisine: American
Nutrition
- Serving Size: 1 bar
- Calories: 200
- Sugar: 8g
- Sodium: 80mg
- Fat: 8g
- Saturated Fat: 4g
- Unsaturated Fat: 4g
- Trans Fat: 0g
- Carbohydrates: 30g
- Fiber: 2g
- Protein: 2g
- Cholesterol: 30mg
Keywords: huckleberry, dessert, summer, crumb bars, baking, easy recipe
Seasonal Nectarine Galette: Easy Rustic Summer Dessert
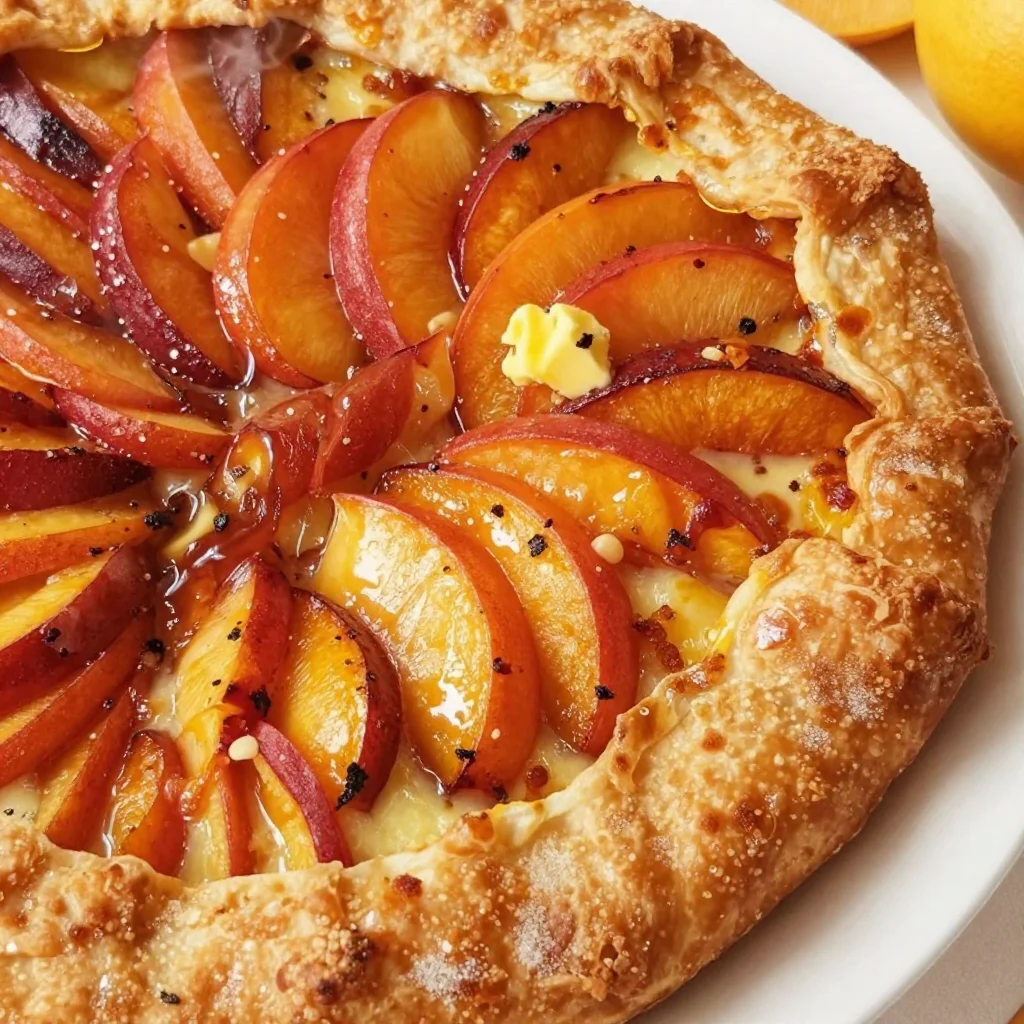
Nectarine Galette: A Slice of Summer Bliss
Welcome to my kitchen, food lovers! Today, we’re diving into the world of rustic desserts with a delightful Nectarine Galette. If you’ve never tasted the sweet, sunny richness of ripe nectarines wrapped in a buttery, flaky crust, you’re in for a treat. This dessert is all about celebrating the beautiful bounty of summer, and it’s as simple to make as it is to swoon over.
You might be asking yourself, “What’s a galette?” Well, it’s a fancy French term for a freeform pie that doesn’t require a pie dish or complex crimping. It embodies comfort and ease, much like that worn-in t-shirt you just can’t give up. Perfectly imperfect, it invites creativity, and trust me, no one will mind if your edges are a little rustic—it just adds to the charm!
I started making galettes when I stumbled upon a quaint little bakery in my neighborhood that served an array of these delicious treats. The warm, buttery aroma wafting through the air pulled me in, and let me tell you, after one bite, I was hooked! I’ve been crafting my own versions at home ever since, experimenting with different fruits and flavors. Nectarines became my go-to because of their vibrant juiciness and sweet-tart balance, especially during the summer months when they’re at their prime.
As we embark on this culinary adventure together, not only will I guide you through the steps to make a Nectarine Galette, but I’ll share stories, tips, and secrets that make this dish so special. So, let’s roll up our sleeves and get started on creating something magical that will have your family and friends raving!
A Bit of Nostalgia
One of my fondest memories associated with galettes goes back to a summer visit to my grandmother’s house. Her tiny kitchen was always filled with warmth from the oven and laughter from my family gathered around the table. Every evening, we’d pick fruits from her garden—peaches, plums, and, yes, nectarines! One particular evening, she whipped up a rustic galette, using whatever fruit we had gathered that day. Watching her work brought such a sense of joy; she moved with grace, flicking flour, rolling dough, and spilling sweet nectarines onto the countertop as if creating art.
That galette was a true masterpiece; the sweet filling spilled out ever so slightly, and the golden-brown crust glistened with a hint of sugar. We gathered around the table, forks in hand, ready to dive into that warm, comforting slice of nostalgia. It was more than just dessert; it was a reminder of love woven through the simple act of cooking. Today, I hope to recreate that magic right in your kitchen. Let’s make memories together!
Ingredients
Here’s what you’ll need to create your very own Nectarine Galette:
-
Nectarines (4-5 ripe)
- Choose ripe nectarines that yield slightly when pressed. If you don’t have nectarines, peaches work beautifully as well!
-
Flour (1 ¼ cups)
- All-purpose flour gives the crust its structure. For a gluten-free option, use a 1:1 gluten-free flour blend.
-
Unsalted Butter (½ cup, cold and cubed)
- This is the secret to a flaky crust! Cold butter helps to create that melt-in-your-mouth texture. If you’re dairy-free, try using chilled coconut oil or vegan butter.
-
Sugar (2 tablespoons)
- Sugar not only sweetens the filling but also gives a lovely caramelization on the crust. For a healthier option, use coconut sugar or honey (in the filling only).
-
Salt (¼ teaspoon)
- This enhances the flavors in the crust, balancing the sweetness.
-
Ice Water (3-4 tablespoons)
- Using cold water is key in keeping the butter cold while you work the dough. If you need a bit more moisture, add a splash of lemon juice for flavor.
-
Egg Wash (1 egg mixed with 1 tablespoon water)
- This gives the galette its golden, shiny crust. For a vegan alternative, brush with almond milk.
Step-by-Step Instructions
Let’s roll up our sleeves and get to cooking! Follow these steps to make your dreamy Nectarine Galette.
-
Make the Dough:
- In a mixing bowl, whisk together the flour, sugar, and salt. Add the cold cubed butter and, using your fingers or a pastry cutter, work the butter into the flour until you have a mixture that resembles coarse crumbs. Remember, some chunks of butter are okay!
-
Add Ice Water:
- Slowly add the ice water, one tablespoon at a time, stirring until the dough starts to come together. You want it to hold together without being sticky.
-
Chill the Dough:
- Form the dough into a disc, wrap it in plastic wrap, and refrigerate for at least 30 minutes. This resting time is crucial for developing flavor and making the dough easier to roll out.
-
Prepare the Filling:
- While the dough chills, wash, and slice the nectarines into thin wedges. You can remove the pit easily by cutting around it! Toss the slices with sugar and set aside to let the juices mix.
-
Preheat the Oven:
- Preheat your oven to 400°F (200°C). This will ensure your galette bakes evenly and gets that perfect golden crust.
-
Roll Out the Dough:
- On a floured surface, roll the dough out into a circle about 12 inches wide. Don’t stress if it’s not a perfect circle; remember rustic is the name of the game here! Transfer it to a parchment-lined baking sheet.
-
Assemble the Galette:
- Spoon the nectarines into the center of the dough, leaving about a 2-inch border. Fold the edges of the dough over the nectarines—don’t be afraid of the folds; they’re part of the charm!
-
Apply the Egg Wash:
- Brush the dough with the egg wash to give it that lovely shine. Sprinkle a little sugar on top of the crust for an extra crunchy texture.
-
Bake the Galette:
- Place the galette in your preheated oven and bake for about 30-35 minutes, or until the crust is golden brown and the nectarines are bubbling slightly.
-
Cool and Serve:
- Let your galette cool for about 10-15 minutes on a wire rack. This helps the juices set up a bit so it’s easier to slice.
Serving Suggestions
Your fantastic Nectarine Galette is now ready to serve! For a show-stopping presentation, slice it into wedges and place it on a lovely serving platter. Drizzle a bit of homemade vanilla cream or scoop of vanilla ice cream on top while it’s still warm. You can also dollop some whipped cream on each slice for that extra touch of luxury. Don’t forget a sprig of mint for color!
Recipe Variations
Get creative with these variations to make this galette your own:
- Berry Blend: Add some blueberries or raspberries to the filling for a pop of color and flavor.
- Herb Infusion: Swap out some of the sugar for fresh thyme or rosemary mixed into the filling for a surprising twist.
- Nutty Crunch: Sprinkle some chopped almonds or walnuts on the crust before adding the nectarines for a delightful crunch.
- Spiced Sensation: Add a pinch of cinnamon or nutmeg to the nectarines for a warm, cozy flavor.
Chef’s Notes
Every recipe I create has a little bit of history! Over the years, I’ve learned to adapt my galette based on what’s in season or what I have on hand. I once threw in some leftover apricots and cinnamon; it became an instant favorite among my friends! The beauty of this recipe is in its flexibility—let your imagination run free!
I still remember the first time I made this galette for a gathering. I was so nervous; what if it didn’t turn out? But, much to my delight, everyone loved it! It became our go-to dessert for every summer party thereafter, uniting us over shared moments and laughter.
FAQs and Troubleshooting
1. Why is my galette crust tough?
A tough crust usually means too much flour or overworking the dough. Remember to mix just until combined and use chilled ingredients.
2. My filling looks too liquidy! What should I do?
If your nectarines are very juicy, sprinkle some cornstarch over the fruit before you fold the dough. This helps absorb excess moisture.
3. How can I make it ahead of time?
You can prepare the dough and filling a day in advance. Just store the dough wrapped in the fridge and the fruit in an airtight container.
4. Is it okay to eat leftover galette?
Absolutely! Cover any leftovers tightly and store them in the fridge for up to 3 days. Reheat slices in the oven for a few minutes to restore that lovely crust!
Nutritional Info
(Per serving, approximately)
- Calories: 250
- Total Fat: 12g
- Saturated Fat: 7g
- Cholesterol: 35mg
- Carbohydrates: 32g
- Fiber: 2g
- Sugars: 10g
- Protein: 3g
I hope this Nectarine Galette fills your home with warmth and joy! I’d love to hear how your galette turns out and the stories that emerge from your kitchen. Remember, cooking is all about sharing love and creating memorable moments. Happy Baking!
Print
Nectarine Galette
- Total Time: 50 minutes
- Yield: 8 servings 1x
- Diet: Vegetarian
Description
A delightful, rustic dessert featuring ripe nectarines wrapped in a buttery, flaky crust, perfect for summer.
Ingredients
- 4–5 ripe nectarines
- 1 ¼ cups all-purpose flour
- ½ cup unsalted butter, cold and cubed
- 2 tablespoons sugar
- ¼ teaspoon salt
- 3–4 tablespoons ice water
- 1 egg mixed with 1 tablespoon water (for egg wash)
Instructions
- Make the dough: In a mixing bowl, whisk together the flour, sugar, and salt. Add the cold cubed butter and, using your fingers or a pastry cutter, work the butter into the flour until you have a mixture that resembles coarse crumbs.
- Add ice water: Slowly add the ice water, one tablespoon at a time, stirring until the dough starts to come together.
- Chill the dough: Form the dough into a disc, wrap it in plastic wrap, and refrigerate for at least 30 minutes.
- Prepare the filling: Wash and slice the nectarines into thin wedges. Toss the slices with sugar and set aside.
- Preheat the oven: Preheat your oven to 400°F (200°C).
- Roll out the dough: On a floured surface, roll the dough out into a circle about 12 inches wide and transfer it to a parchment-lined baking sheet.
- Assemble the galette: Spoon the nectarines into the center of the dough, leaving about a 2-inch border. Fold the edges of the dough over the nectarines.
- Apply the egg wash: Brush the dough with the egg wash and sprinkle a little sugar on top.
- Bake the galette: Bake for about 30-35 minutes, or until the crust is golden brown.
- Cool and serve: Let it cool for about 10-15 minutes on a wire rack.
Notes
Serve with vanilla ice cream or whipped cream for an extra touch of luxury.
- Prep Time: 15 minutes
- Cook Time: 35 minutes
- Category: Dessert
- Method: Baking
- Cuisine: French
Nutrition
- Serving Size: 1 slice
- Calories: 250
- Sugar: 10g
- Sodium: 400mg
- Fat: 12g
- Saturated Fat: 7g
- Unsaturated Fat: 5g
- Trans Fat: 0g
- Carbohydrates: 32g
- Fiber: 2g
- Protein: 3g
- Cholesterol: 35mg
Keywords: nectarine, galette, dessert, summer, rustic, pie, baking
Nectarine Bread
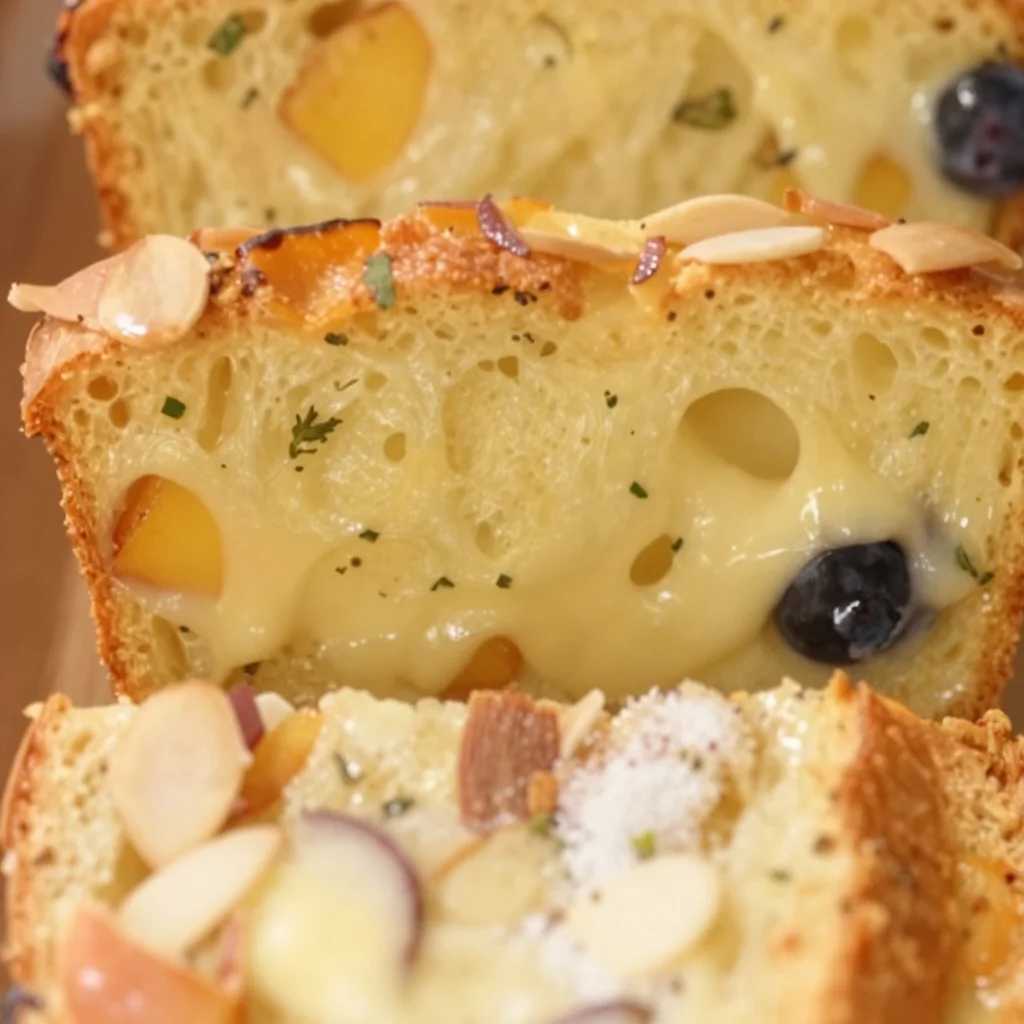
Nectarine Bread: A Slice of Summer in Every Bite
Welcome to my cozy kitchen! Today, I’m thrilled to share a recipe that warms my heart and fills my home with the delightful aroma of baked goodness: Nectarine Bread. Picture this: it’s a sunny afternoon, and you’ve just been to the local farmer’s market, where the luscious nectarines are practically begging to be taken home. It’s that sweet, juicy fruit that gives this bread its unique flavor and makes every bite taste like summer.
What I love about Nectarine Bread is how versatile it is—it’s perfect for breakfast, a snack, or even dessert. Whether you enjoy it plain, toasted with a sprinkle of cinnamon sugar, or slathered with creamy butter, this bread is bound to bring smiles and cozy chats to your table. Plus, when you take a loaf to share with friends or family, they’ll feel the love in every slice!
Not only is this recipe easy to whip up, but it’s also a wonderful way to step into the summer vibe, even when the seasons change. You see, baking with seasonal fruits like nectarines infuses your home with warmth, transforming ordinary moments into something magical. So grab your favorite apron (mine’s definitely stained—it tells the story of countless kitchen adventures!) and let’s get started on this delightful Nectarine Bread!
A Slice of Nostalgia
Ah, the memories that flood back when I think of Nectarine Bread! I can still hear the laughter of my childhood summers spent at my Grandma’s house. Every Saturday, my siblings and I would gather in her sunlit kitchen, where the scents of fresh fruit and warm bread danced through the air. Grandma had this way of making even the simplest recipes feel special, and her Nectarine Bread was no exception.
I remember the first time I helped her bake it. Speckles of flour covered the countertops, and we giggled as we tried to measure the sugar accurately—always a little more than the recipe called for, of course! She taught me the importance of using fresh, ripe nectarines, and the thrill of getting your hands messy while mixing batter. The best part? We could hardly wait for it to cool before we had our first slice, warm from the oven, with a pat of butter melting into the fresh loaf.
To this day, whenever I bake Nectarine Bread, I feel a wave of nostalgia wrap around me like a warm hug. It’s more than just a recipe; it’s a love letter to those carefree summer days, celebrating the joy of cooking with the people we cherish. And I can’t wait for you to create your own memories with this simple yet profound dish!
Ingredients
Here are the ingredients you’ll need to whip up this delicious Nectarine Bread:
-
3 ripe nectarines: Look for slightly soft, fragrant nectarines. They should give a bit when gently pressed. If you can’t find nectarines, peaches make for a fantastic substitute since they have a similar flavor and texture.
-
1 cup granulated sugar: This is the sweet love that brings it all together! If you want to cut down on sugar, feel free to use coconut sugar or a sugar substitute, but keep in mind that it might alter the flavor slightly.
-
1/2 cup unsalted butter, softened: The richness of butter adds depth to the bread’s flavor. If you’re in a pinch, you can substitute it with applesauce for a healthier option or use vegan butter for a dairy-free version.
-
2 large eggs: These little powerhouses help bind the ingredients. If you need an egg replacement, try using 1/4 cup of unsweetened applesauce for each egg!
-
1 teaspoon vanilla extract: A hint of vanilla makes everything taste amazing! If you want to get fancy, try using almond extract for a nutty twist.
-
1 teaspoon baking soda: This will help the bread rise beautifully. Make sure it’s fresh for the best results—if it’s been sitting in your pantry for a while, it might be time to replace it!
-
1 teaspoon baking powder: Another leavening agent that makes your bread fluffy. Similar to baking soda, check the expiration date for optimal performance.
-
1/2 teaspoon salt: This enhances the flavors of all the ingredients. If you’re watching your sodium intake, you can use a lower-sodium salt.
-
2 cups all-purpose flour: The base of the bread! If you’re looking for a whole wheat alternative, feel free to substitute half of the flour with whole wheat flour for added nutrition.
-
1/2 cup chopped walnuts (optional): These add a delightful crunch! Feel free to swap them with pecans, or omit them altogether if you’re nut-free.
Step-by-Step Instructions
Now, let’s get our hands a little dirty and dive into the making of this glorious Nectarine Bread!
-
Preheat your oven: Start by preheating your oven to 350°F (175°C). This ensures your bread bakes evenly and comes out perfectly every time.
-
Prepare the nectarines: Wash, pit, and chop your nectarines into small pieces. Don’t worry if they’re a bit messy—remember, we’re all about love and coziness in the kitchen! You can leave the skin on for added texture and nutrients, or peel them if that’s your preference.
-
Cream the butter and sugar: In a large mixing bowl, use an electric mixer to beat the softened butter and granulated sugar together until it’s light and fluffy. This should take about 2-3 minutes. Pro tip: Scrape down the sides of the bowl halfway through to ensure everything gets mixed evenly!
-
Add the eggs and vanilla: One at a time, add the eggs to the butter-sugar mixture, beating well after each addition. Then mix in the vanilla extract. Your batter should be looking smooth and delicious at this stage!
-
Combine dry ingredients: In another bowl, whisk together the flour, baking powder, baking soda, and salt until well blended. This helps distribute the leavening agents evenly throughout the flour.
-
Mix it all together: Gradually add the dry mixture to your wet mixture. You want to mix thoroughly but be careful not to overmix. Stir in the chopped nectarines and walnuts (if using), folding them into the batter gently.
-
Prepare the loaf pan: Grease a 9×5-inch loaf pan with some butter or cooking spray to prevent sticking. You can also line it with parchment paper for easy removal.
-
Pour and spread: Pour the batter into the prepared loaf pan, and use a spatula to spread it evenly. Tap it gently on the counter to release any air bubbles lurking inside.
-
Bake: Pop your loaf pan in the preheated oven and let it bake for about 60-70 minutes. You’ll know it’s done when a toothpick inserted into the center comes out clean. If the top starts browning too quickly, you can cover it loosely with aluminum foil.
-
Cool it down: Once baked, remove it from the oven and let it cool in the pan for about 10 minutes. After that, transfer it onto a wire rack to cool completely. This is the hardest part—waiting to slice into that warm, fragrant bread!
Serving Suggestions
Now the best part: serving your Nectarine Bread! Once it’s cooled, slice it into hearty pieces. You can serve it plain, sprinkle a bit of cinnamon sugar on top, or even spread a thin layer of butter or cream cheese for a decadent touch. It’s perfect alongside a cup of tea or coffee, making it a delightful afternoon treat or a lovely addition to your brunch spread!
Recipe Variations
While the classic Nectarine Bread is a joy on its own, let’s explore a few fun variations to keep things exciting:
-
Peachy Keen: Swap out the nectarines for ripe peaches for a similar, yet uniquely sweet flavor.
-
Berry Blast: Add in a cup of fresh or frozen berries, like blueberries or raspberries, for a burst of color and extra fruitiness.
-
Zesty Citrus: Incorporate some grated lemon or orange zest into the batter for a refreshing citrus twist.
-
Spiced Up: Experiment with spices like cinnamon, nutmeg, or allspice for a warm flavor narrative that deepens the taste of your bread.
-
Vegan Delight: Replace the eggs with flaxseed meal and water, and use plant-based yogurt instead of butter for a delightful vegan version that’s just as scrumptious!
Chef’s Notes
As I look back on my journey with this Nectarine Bread, it’s been a recipe that has grown with me. I often think about Grandma’s method of mixing—how her love for baking showed in every detail. Over the years, I’ve added my flair with different spices and flavors. This bread has welcomed countless variations and adaptations as I’ve experimented with flavors.
One of the funniest kitchen stories I have involves a baking mishap where I accidentally substituted salt for sugar one evening—thankfully, the nectarines saved the day, masking the salty flavor (though I wouldn’t recommend this method!).
No matter how it evolves, the beauty of Nectarine Bread is that it remains an expression of care, love, and the warmth of gathering around the table with those you cherish.
FAQs and Troubleshooting
Q: My bread didn’t rise! What went wrong?
A: If your bread didn’t rise, check the freshness of your baking powder and baking soda—they should be active. Also, make sure the mixture was mixed just enough; overmixing can lead to dense bread!
Q: Can I freeze Nectarine Bread?
A: Absolutely! This bread freezes beautifully. Wrap it tightly in plastic wrap and aluminum foil before placing it in the freezer. It’ll last for up to three months. Just thaw it overnight in the fridge when you want to enjoy it.
Q: My bread is too dry. How can I fix that?
A: This could be due to overbaking or too much flour. Make sure to measure your flour accurately (spoon it into the cup rather than packing it down). If it happens again, try adding a tablespoon of yogurt or applesauce to the batter next time!
Q: Can I add other fruits?
A: Definitely! You can mix and match with fruits like apricots, apples, or even a medley of summer fruits, keeping the spirit of the season alive in your bread!
Nutritional Info
(For approximate nutritional information)
- Serving size: 1 slice (approx. 1/12 of a loaf)
- Calories: 210
- Total fat: 8g
- Saturated fat: 4g
- Cholesterol: 40mg
- Sodium: 120mg
- Total carbohydrates: 32g
- Dietary fiber: 1g
- Sugars: 12g
- Protein: 3g
As you embark on your baking adventure, just remember—cooking is all about love, creativity, and sharing with those around you. So, dive in and make this Nectarine Bread your own. I can’t wait to hear about your kitchen stories and the memories you create as you bake! Happy cooking, friends!
Print
Nectarine Bread
- Total Time: 85 minutes
- Yield: 12 servings 1x
- Diet: Vegetarian
Description
A delightful bread infused with juicy nectarines, perfect for breakfast, snacks, or dessert.
Ingredients
- 3 ripe nectarines, chopped
- 1 cup granulated sugar
- 1/2 cup unsalted butter, softened
- 2 large eggs
- 1 teaspoon vanilla extract
- 1 teaspoon baking soda
- 1 teaspoon baking powder
- 1/2 teaspoon salt
- 2 cups all-purpose flour
- 1/2 cup chopped walnuts (optional)
Instructions
- Preheat your oven to 350°F (175°C).
- Wash, pit, and chop your nectarines into small pieces.
- Cream the butter and sugar together until light and fluffy.
- Add the eggs one at a time, beating well after each, then mix in the vanilla extract.
- Whisk together the flour, baking powder, baking soda, and salt in another bowl.
- Gradually add the dry mixture to the wet mixture, mixing until just combined.
- Fold in the chopped nectarines and walnuts (if using).
- Grease a 9×5-inch loaf pan and pour in the batter, spreading it evenly.
- Bake for 60-70 minutes or until a toothpick comes out clean.
- Cool in the pan for 10 minutes before transferring to a wire rack.
Notes
This bread can be served plain, with cinnamon sugar, or butter. Also freezes well for up to three months.
- Prep Time: 15 minutes
- Cook Time: 70 minutes
- Category: Baked Goods
- Method: Baking
- Cuisine: American
Nutrition
- Serving Size: 1 slice
- Calories: 210
- Sugar: 12g
- Sodium: 120mg
- Fat: 8g
- Saturated Fat: 4g
- Unsaturated Fat: 4g
- Trans Fat: 0g
- Carbohydrates: 32g
- Fiber: 1g
- Protein: 3g
- Cholesterol: 40mg
Keywords: nectarine, quick bread, summer recipe, easy baking, fruit bread

Easy Summer Dessert: Baked Nectarines with Cinnamon Honey Sauce
Baked Nectarines with Cinnamon Honey Sauce
Welcome to the warm, inviting world of my kitchen! I’m Olivia Bennett, your friendly neighborhood home cook and culinary cheerleader. Today, we’re diving into a dish that truly warms not just your palate but your heart: Baked Nectarines with Cinnamon Honey Sauce. If you’re like me and have an affinity for sweet, juicy fruits that feel like a hug in dessert form, then buckle up because we’re about to create an irresistible treat that’s as delightful to make as it is to share!
There’s something incredibly magical about fruits baked to perfection, their natural sweetness magnified and enveloped in the warm embrace of cinnamon and honey. This dessert feels like nostalgia wrapped in a flavor explosion—perfect for cozy nights in or impressing your friends at your next gathering. Trust me; your house will smell like a joy-filled bakery!
So, grab your apron and get ready to transform simple nectarines into a stunning dessert. No fancy equipment or mad chef skills required—just your love for good food and a few easy steps! Let’s do this together, and who knows? You might even discover a new favorite recipe!
A Slice of My Heart
Growing up, my family kitchen was always a bustling hub of activity, filled with laughter, chatter, and the delightful aroma of baked goods. One of my fondest memories revolves around the summers spent in my grandmother’s kitchen, where the bounty of her garden filled baskets beside the windowsill. Every evening, we’d transform her freshly picked fruits into cherished desserts, and nectarines were always the star of the show.
I remember one specific summer afternoon when we decided to bake nectarines together. My grandma imparted her time-tested wisdom, gently explaining that the key was letting the fruits speak for themselves while adding just the right amount of sweet warmth. We served our baked nectarines with homemade whipped cream, and I still recall how the golden, caramelized edges made my heart skip a beat. That summer, we weren’t just cooking; we were creating memories, and those sweet nectarines have held a special place in my heart ever since.
Ingredients
Here’s what you’ll need to create this simply delightful dish:
- Nectarines (4-6 ripe ones): Look for fruit that’s slightly soft to the touch but not mushy. If you can’t find nectarines, peaches work beautifully too!
- Honey (1/4 cup): This adds a natural sweetness. Feel free to swap it with maple syrup or agave for a vegan option.
- Ground cinnamon (1 teaspoon): A warm spice that complements the freshness of nectarines. If you’re feeling adventurous, try adding cardamom for a delightful twist!
- Butter (2 tablespoons): Adds richness to the sauce. You can substitute it with coconut oil or dairy-free margarine for a dairy-free version.
- Lemon juice (1 tablespoon): This brightens the flavors. Alternatively, you could use orange juice for a more citrusy vibe.
- Chopped walnuts or pecans (optional, for garnish): For added texture and flavor. Feel free to sprinkle on some toasted coconut for a tropical twist!
Step-by-Step Instructions
-
Preheat Your Oven:
Start by preheating your oven to 350°F (175°C). This ensures an even bake, allowing the nectarines to caramelize beautifully. -
Prepare the Nectarines:
Wash your nectarines thoroughly. Slice them in half and remove the pits—this is a great time to channel your inner chef! Don’t stress if they split a little; we’re all about that rustic feel here! -
Create the Cinnamon Honey Sauce:
In a small saucepan over low heat, combine the honey, butter, and ground cinnamon. Stir until the butter melts and the mixture is well combined. This delicious concoction is where the magic lies! You’ll notice an intoxicating aroma—don’t simply linger; it’s time to drizzle! -
Bake the Nectarines:
Arrange the halved nectarines in a baking dish, cut side up. Drizzle the warm cinnamon honey sauce generously over each half. Feel free to use a spoon to ensure that each nectarine gets its fair share of goodness. Pop those beauties into the oven and bake for ~25–30 minutes, or until the nectarines are soft and can easily be pierced with a fork. -
Serve Them Up:
Once baked, let them cool for a few minutes. Top with a dollop of whipped cream or a scoop of vanilla ice cream for an indulgent touch. If using nuts, sprinkle them on top for that satisfying crunch.
Savor the moment as you pull those aromatic nectarines from the oven. The golden hue and intoxicating scent will have everyone gathering around your kitchen—consider that a win!
Serving Suggestions
Serving these baked nectarines is a breeze! I love placing the warm nectarines on a beautiful plate—perhaps with a sprinkle of chopped nuts for color and texture. A fresh mint sprig adds a pop of color and a hint of freshness. If you’re feeling fancy, a drizzle of extra honey or a dusting of powdered sugar elevates the presentation. These desserts are perfect for sharing, and they also look stunning on a buffet table at gatherings!
Recipe Variations
Looking to switch things up? Here are a few fun variations you can explore:
- Spice It Up: Add a pinch of nutmeg or a dash of vanilla extract to the honey sauce for a more complex flavor.
- Tropical Twist: Serve with a scoop of coconut ice cream instead of traditional vanilla.
- Berry Magic: Toss in some fresh berries—like blueberries or raspberries—around the nectarines for a burst of flavor and color.
- Nutty Delight: Mix finely chopped almonds or hazelnuts into the cinnamon honey sauce for an extra crunch.
- Frozen Treat: Allow leftovers to cool and freeze them for a refreshing summer dessert later!
Chef’s Notes
This recipe has journeyed with me over the years, evolving as I discovered new flavors and combinations to incorporate. One time, I attempted this with overripe nectarines and—oh boy—what a disaster! They became a mushy mess. But instead of giving up, I turned it into a delicious smoothie that introduced my friends to a whole new level of fruity goodness!
Cooking is all about learning and adapting, and that’s where the real joy comes in. So I encourage you to embrace the little mishaps—each one is a stepping stone to finding your unique culinary voice.
FAQs and Troubleshooting
1. My nectarines are too hard. Can I still bake them?
Yes! If your nectarines are a bit under-ripe, slice them thinner to help them cook faster. Just keep an eye on them in the oven!
2. How do I know when they’ve finished baking?
Baked nectarines should be tender and start to caramelize around the edges. Use a fork to check for tenderness. If it easily pierces the flesh, they’re ready!
3. Can I use frozen nectarines?
Absolutely! Just be sure to thaw them first—no one wants to bake them straight from the freezer. You might need to adjust the baking time since frozen fruit may release more moisture.
4. What if I don’t have honey?
You can substitute with any sweetener you prefer! Maple syrup or agave both work as great alternatives that bring their unique flavors to the dish.
Nutritional Info
While I won’t dive into the nitty-gritty numbers today, I can tell you that baked nectarines are a fabulous source of vitamins A and C, and the honey adds natural sugars and antioxidants. Overall, a refreshing dessert that packs in more than just flavor!
Thank you for joining me today! I hope you feel inspired to whip up these Baked Nectarines with Cinnamon Honey Sauce. Remember, the kitchen is a place for creativity and joy. Let your heart guide your cooking, and the delicious results will follow! Bon appétit!
Print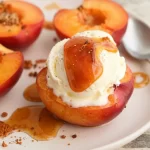
Baked Nectarines with Cinnamon Honey Sauce
- Total Time: 45 minutes
- Yield: 4 servings 1x
- Diet: Vegetarian
Description
A warm and inviting dessert made from baked nectarines enveloped in cinnamon and honey, perfect for cozy nights or gatherings.
Ingredients
- 4–6 ripe nectarines
- 1/4 cup honey
- 1 teaspoon ground cinnamon
- 2 tablespoons butter
- 1 tablespoon lemon juice
- Chopped walnuts or pecans (optional, for garnish)
Instructions
- Preheat your oven to 350°F (175°C).
- Prepare the nectarines by washing and slicing them in half, removing the pits.
- Create the cinnamon honey sauce by combining honey, butter, and cinnamon in a small saucepan over low heat.
- Bake the nectarines in a baking dish, drizzling the sauce over them, for 25-30 minutes until soft.
- Serve with whipped cream or vanilla ice cream and garnish with nuts if desired.
Notes
For a vegan option, substitute honey with maple syrup or agave. You can enhance the flavor with a pinch of nutmeg or vanilla extract.
- Prep Time: 15 minutes
- Cook Time: 30 minutes
- Category: Dessert
- Method: Baking
- Cuisine: American
Nutrition
- Serving Size: 1 serving
- Calories: 300
- Sugar: 25g
- Sodium: 50mg
- Fat: 10g
- Saturated Fat: 5g
- Unsaturated Fat: 5g
- Trans Fat: 0g
- Carbohydrates: 48g
- Fiber: 3g
- Protein: 2g
- Cholesterol: 15mg
Keywords: nectarines, baked dessert, cinnamon, honey, fruit dessert, easy recipe


