
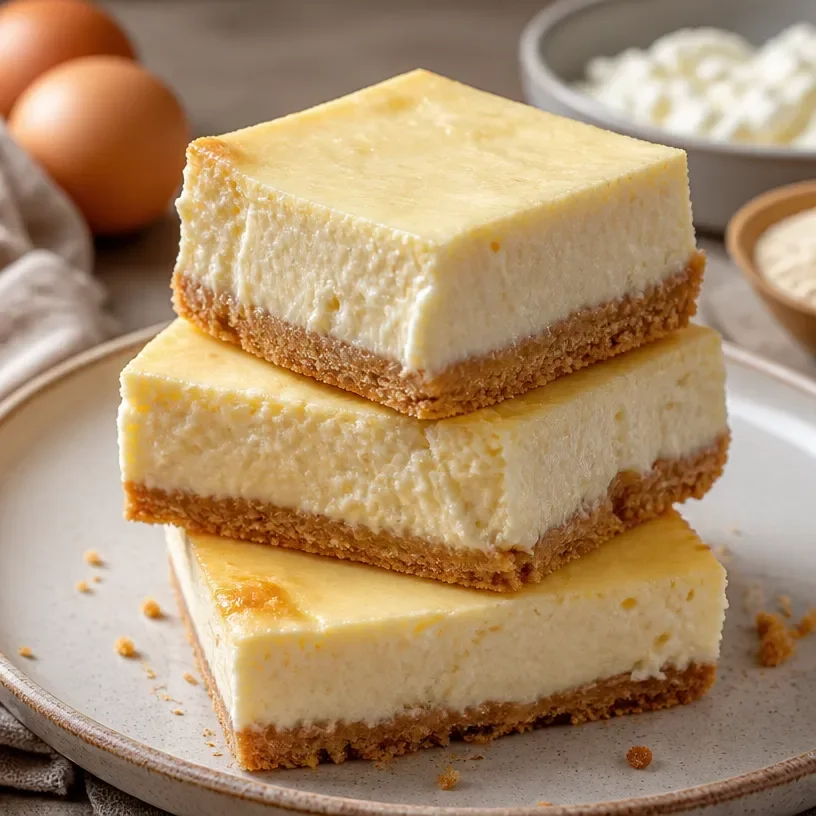
Ingredient Protein Cottage Cheese Cheesecake Bars (No-Bake)
Protein Cottage Cheese Cheesecake Bars: A Delightful Treat
Welcome to my kitchen! This is Olivia Bennett, your enthusiastic food companion, inviting you to embark on a delicious journey with me today. If you adore the comforting aroma of something sweet wafting through your home while holding a conversation about flavors and memories, you’re in for a treat. Today, I’ll share a recipe that’s not just good for the taste buds but also brings a healthy twist to classic indulgence: Protein Cottage Cheese Cheesecake Bars.
Imagine biting into a creamy slice of cheesecake that’s not only rich in flavor but also packed with protein. Yes, you heard me right! These bars marry the silky texture of traditional cheesecake with the nutritional benefits of cottage cheese. They’re great for an afternoon pick-me-up or a guilt-free dessert after dinner. What’s even better? They are easy to whip up, even on a busy weekday.
A Slice of Nostalgia
As I reflect on my childhood, the memories tied to dessert time always bring a smile to my face. My grandmother had a knack for baking the most incredible cheesecakes, and her kitchen was my favorite place in the whole world. I would watch her whisk away in front of the oven, creating sweet surprises that would leave everyone in our family grinning. I vividly remember those family gatherings where my grandmother would unveil her latest cheesecake creation, and we’d all gather around, forks in hand, ready for a slice of joy.
Fast forward to today, and although I still cherish the traditional recipes, I’m also on a mission to give them a nutritious upgrade. My Protein Cottage Cheese Cheesecake Bars are inspired by those nostalgic moments in my grandmother’s kitchen, but with a twist that’s perfect for our modern lifestyles. Let’s make some memories together!
Ingredients
Here’s what you’ll need to create these delightful bars. Don’t worry; I’ll provide tips and tricks along the way!
-
Cottage Cheese (2 cups): This is the star of our show! It gives the cheesecake its creamy texture while adding a protein punch. Opt for low-fat or fat-free versions if you’re watching calories. Greek yogurt can work as a substitute in a pinch.
-
Cream Cheese (8 oz): Adds richness and that classic cheesecake taste. If you’re making this dairy-free, you can use vegan cream cheese.
-
Honey or Maple Syrup (1/2 cup): A natural sweetener with a touch of flavor. Adjust according to your taste. For a lower-calorie option, consider using stevia or another sugar substitute.
-
Eggs (2): They help bind everything together and give our bars structure. Flax eggs (1 tablespoon flaxseed meal + 2.5 tablespoons of water) can be a vegan substitute.
-
Vanilla Extract (1 teaspoon): Always enhance the flavor of desserts! Use pure vanilla extract for a more intense flavor.
-
Crust:
- Graham Cracker Crumbs (1.5 cups): The classic choice for cheesecakes. Gluten-free crumbs can be used if needed.
- Butter or Coconut Oil (1/3 cup, melted): To bind the crumbs. Coconut oil will bring a subtle tropical flavor.
-
Salt (a pinch): Just a smidge to balance the sweetness.
Step-by-Step Instructions
Now that we have our ingredients ready, let’s dive into the process of creating these delicious cheesecake bars!
-
Preheat Your Oven: First things first, preheat your oven to 325°F (163°C). This step is essential for even baking and to ensure that your cheesecake sets perfectly.
-
Prepare the Crust: In a medium bowl, combine the graham cracker crumbs and melted butter (or coconut oil). Use a fork to mix until the crumbs are uniformly coated. This creates that crumbly texture we adore in cheesecake crusts. Press the mixture into the bottom of a greased (or lined with parchment paper) 9×9 inch baking dish. A flat-bottomed glass can help achieve an even layer.
-
Make the Cheesecake Filling: In a large mixing bowl, combine the cottage cheese, cream cheese, honey (or maple syrup), and vanilla extract. Use a hand mixer or a food processor to blend until smooth and creamy; we want to eliminate any lumps to achieve that smooth cheesecake texture.
-
Add the Eggs: Add the eggs one at a time, mixing thoroughly after each addition. This step not only binds everything but also helps to create a fluffy texture. Ensure each egg is well incorporated before adding the next!
-
Combine: Once the eggs are in and everything looks smooth, pour the cheesecake filling over the prepared crust. Use a spatula to ensure it’s evenly spread.
-
Bake: Place your cheesecake bars in the preheated oven and bake for about 30–35 minutes or until the center is just set and a slight jiggle remains. Keep an eye on them; overbaking can lead to cracks!
-
Cool: Remove the bars from the oven and let them cool at room temperature for about 30 minutes. Then transfer them to the fridge to chill for at least 2 hours. This waiting time is the hardest part, but trust me, it’s worth it!
-
Slice and Serve: Once chilled, remove from the fridge, slice into squares, and enjoy! It’s best to use a hot knife for clean cuts. Just dip it in hot water, then wipe it dry!
Serving Suggestions
You can serve these delicious protein-packed cheesecake bars chilled straight from the fridge or at room temperature. I love to plate these bars with a drizzle of honey or a sprinkle of fresh berries on top to elevate their presentation. You might even want to serve them with a dollop of whipped cream or dairy-free whipped topping for those extra special moments!
Recipe Variations
-
Berry Blast: Fold in fresh or frozen berries like blueberries or raspberries into the cheesecake mixture before baking for a fruity twist.
-
Chocolate Lovers: Add some cocoa powder or melted dark chocolate to the filling for a rich chocolate cheesecake version.
-
Zesty Lemon: Incorporate lemon zest and juice into the filling for a refreshing citrus flavor.
-
Nutty Surprise: Add chopped nuts (like pecans or walnuts) to the crust for a crunchy texture contrast.
-
Vegan Version: Substitute all dairy ingredients with vegan counterparts and use flax eggs.
Chef’s Notes
This recipe has evolved over the years. Initially, my cheesecake repertoire was strictly traditional, but I’ve found joy in transforming these classic desserts into healthier versions. I remember one time, I attempted to make a low-sugar version on a whim, and what came out was divine! It didn’t quite look as pretty as my grandmother’s desserts, but the taste? Absolutely out of this world! These kitchen experiments always remind me of her adventurous spirit.
FAQs and Troubleshooting
-
Why did my cheesecake crack?
Cracks can happen for a few reasons: either the oven temperature was too high, or it was overbaked. Keeping an eye on your cheesecake and taking it out as soon as it’s just set will prevent this. A water bath can also help keep the temperature consistent if you want to be extra cautious! -
Can I freeze these bars?
Absolutely! After they’ve cooled completely, slice the bars and freeze them in an airtight container. They make for delicious frozen treats! Just let them thaw in the fridge before serving. -
How do I know when my cheesecake is done?
It should be mostly set but slightly jiggly in the center; it will firm up as it cools. -
Why does my cheesecake taste eggy?
Over-mixing after adding the eggs can cause an eggy flavor. Make sure to mix just until incorporated!
Nutritional Info
While the nutritional info can vary based on specific ingredients used, here’s a general idea per bar (based on 16 servings):
- Calories: 120
- Protein: 8g
- Carbs: 12g
- Fat: 5g
There you have it! A delightful recipe for Protein Cottage Cheese Cheesecake Bars that melds memories with modern nutrition. I hope you enjoy this journey as much as I do. Remember, the best meals are created with love and a dash of creativity. Happy cooking!
Print
Protein Cottage Cheese Cheesecake Bars
- Total Time: 50 minutes
- Yield: 16 servings
- Diet: Healthy
Description
Delightful cheesecake bars made with cottage cheese for a protein-packed treat.
Ingredients
- Cottage Cheese (2 cups)
- Cream Cheese (8 oz)
- Honey or Maple Syrup (1/2 cup)
- Eggs (2)
- Vanilla Extract (1 teaspoon)
- Graham Cracker Crumbs (1.5 cups)
- Butter or Coconut Oil (1/3 cup, melted)
- Salt (a pinch)
Instructions
- Preheat your oven to 325°F (163°C).
- Prepare the crust by combining graham cracker crumbs and melted butter in a medium bowl.
- Press the mixture into the bottom of a greased 9×9 inch baking dish.
- Make the cheesecake filling by blending cottage cheese, cream cheese, honey, and vanilla until smooth.
- Add the eggs one at a time, mixing well after each addition.
- Pour the cheesecake filling over the prepared crust and spread evenly.
- Bake for 30–35 minutes until the center is set with a slight jiggle.
- Cool for 30 minutes, then chill in the fridge for at least 2 hours.
- Slice into squares and serve chilled or at room temperature.
Notes
Serve with a drizzle of honey or fresh berries. For variations, try adding berries, chocolate, lemon zest, or nuts.
- Prep Time: 15 minutes
- Cook Time: 35 minutes
- Category: Dessert
- Method: Baking
- Cuisine: American
Nutrition
- Serving Size: 1 serving
- Calories: 120
- Sugar: 9g
- Sodium: 100mg
- Fat: 5g
- Saturated Fat: 3g
- Unsaturated Fat: 1g
- Trans Fat: 0g
- Carbohydrates: 12g
- Fiber: 1g
- Protein: 8g
- Cholesterol: 30mg
Keywords: cheesecake, protein bars, dessert, cottage cheese, healthy dessert
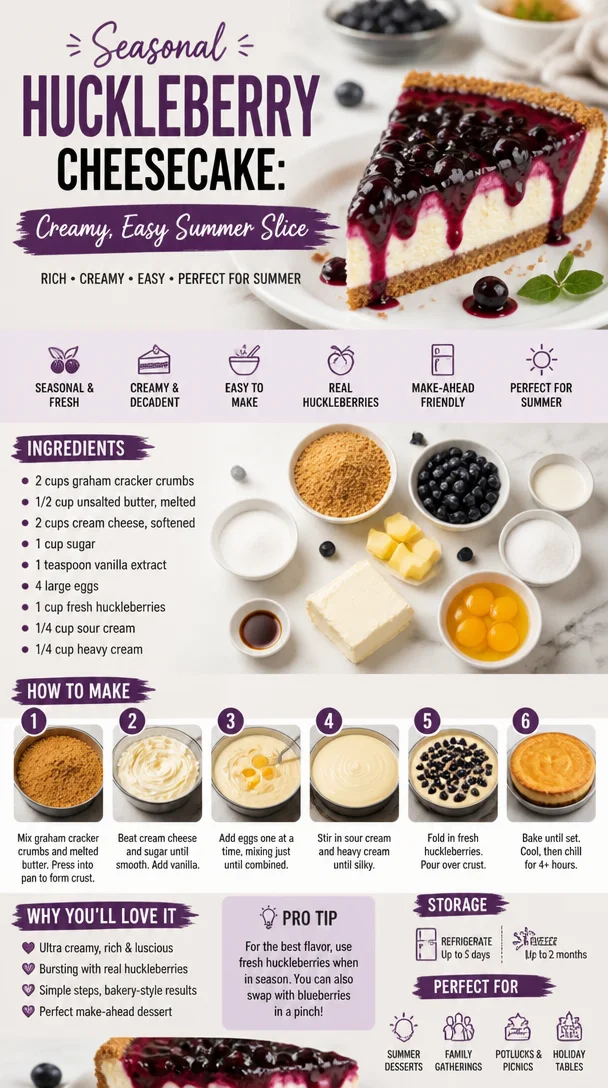
Seasonal Huckleberry Cheesecake: Creamy, Easy Summer Slice
Huckleberry Cheesecake: A Slice of Heaven
Welcome back to my cozy kitchen, where the magic of cooking unfolds with each whisk and sprinkle! Today, I’m thrilled to take you on a flavorful journey through one of my absolute favorite desserts: Huckleberry Cheesecake. If you’ve never tasted huckleberries, they’re like nature’s little jewels—sweet, tangy, and bursting with flavor. Combine that with the creamy richness of cheesecake, and you have a match made in dessert heaven!
This recipe holds a special place in my heart. It reminds me of sunny afternoons spent berry-picking with my family in the lush hills of the Pacific Northwest. There’s something undeniably joyful about wandering through nature, basket in hand, as you search for those plump little huckleberries hiding among the leaves. The best part? Coming home and transforming our haul into something delicious. Cheesecake became our go-to treat, a celebration of simplicity and the great outdoors.
As I share this recipe with you, I hope you too will treasure these little moments in the kitchen. Remember, you don’t need to be a pastry chef to whip up something delightful! Let’s get our hands floury and dive right into this dreamy huckleberry cheesecake recipe.
A Taste from My Past
The first time I made huckleberry cheesecake was during a family reunion, where we were reunited after years apart. My Aunt Clara, the family’s unofficial dessert queen, sparked the idea with her stories about foraging for huckleberries. Inspired, I decided I would give it a go myself. Armed with nothing but enthusiasm and a trusty old recipe book, I headed to the nearest berry-picking spot.
The thrill of picking huckleberries under the warm sun and chatting away with my cousins is a memory I cherish. We came home with baskets overflowing with berries, and the moment I transformed those little gems into a silky cheesecake, everyone was smitten! There’s something magical that happens when you share food made from the heart—the way laughter fills the air and everyone’s face lights up with joy. That day, huckleberry cheesecake became our family’s dessert legacy, and now, I can’t wait to share this treasured recipe with you.
Ingredients
Let’s gather our ingredients for this luscious huckleberry cheesecake. Here’s what you’ll need:
-
Huckleberries (2 cups)
- Fresh huckleberries are divine; however, if you can’t find them, blueberries make a fantastic substitute. Frozen huckleberries work too; just thaw and drain excess moisture.
-
Cream Cheese (24 oz, softened)
- The heart of any cheesecake! Make sure it’s at room temperature to ensure a smooth filling. If you want a healthier cream cheese alternative, look for Greek yogurt or a dairy-free cream cheese.
-
Granulated Sugar (1 cup)
- Sweetness is key, but you can use coconut sugar or a sugar alternative if you’re looking to cut back on refined sugars.
-
Eggs (3 large)
- Eggs help bind the cheesecake and give it that rich texture. If you’re vegan, try using flax eggs (1 tablespoon ground flaxseed mixed with 3 tablespoons water = 1 egg).
-
Sour Cream (1 cup)
- Adds a creamy tanginess that balances the sweetness. You can swap it with Greek yogurt for a healthier spin.
-
Vanilla Extract (1 teaspoon)
- A splash of vanilla elevates the flavors perfectly. Homemade vanilla extract adds an extra touch of warmth.
-
Graham Cracker Crumbs (1 ½ cups)
- For the crust! You can also use crushed Oreos or gluten-free graham crackers for a dietary twist.
-
Butter (½ cup, melted)
- Holds the crust together; substitute with coconut oil for a dairy-free option.
-
Salt (1/4 teaspoon)
- A pinch of salt enhances the overall flavor, even in sweet dishes.
With these ingredients in hand, you’re all set to create a delicious huckleberry cheesecake that’s bound to impress.
Step-by-Step Instructions
Now that we’ve gathered everything, let’s begin our delicious adventure! Follow these steps to craft your huckleberry cheesecake:
-
Preheat the Oven: Start by preheating your oven to 325°F (163°C). This ensures your cheesecake bakes evenly.
-
Make the Crust:
- In a mixing bowl, combine the graham cracker crumbs, melted butter, and a pinch of salt.
- Mix until well combined. The mixture should feel like wet sand. Press it down tightly into the bottom of a 9-inch springform pan. Use the bottom of a measuring cup to make it compact.
- Bake the crust for about 10 minutes, just until it’s golden and fragrant. This is the perfect time to take a whiff of yummy goodness!
-
Prepare the Filling:
- In a large mixing bowl, beat the softened cream cheese with an electric mixer until it’s smooth and fluffy. Keep the speed moderate to avoid too much air, which can lead to cracks.
- Gradually add in the granulated sugar, mixing until combined. Scrape down the sides to ensure everything is well blended.
- Add in the eggs one at a time, mixing gently. Follow up with the sour cream and vanilla extract. This will create a creamy, rich filling.
-
Add the Huckleberries:
- Gently fold in the huckleberries using a spatula. You want them to remain somewhat whole for that gorgeous burst of flavor in every slice.
-
Bake the Cheesecake:
- Pour the cheesecake filling over the pre-baked crust. Smooth the top with the spatula.
- Bake for about 50-60 minutes, or until the center is set but still slightly wobbly. Remember, it will firm up as it cools.
-
Cool Down:
- Once done, turn off the oven and crack the oven door open, letting the cheesecake cool slowly. This can help prevent cracks from forming.
- After about an hour, transfer it to the fridge to chill for at least four hours (or overnight for best results).
-
Serve with Love:
- Once chilled, carefully run a knife around the edge of the pan before releasing the sides of the springform.
Cheesecakes are best served with a fresh huckleberry compote on the side, enhancing the flavor and adding an extra layer of sweetness!
Serving Suggestions
To present your huckleberry cheesecake beautifully, slice it into generous wedges and drizzle some of that fresh huckleberry compote over the top. Garnish with a dollop of whipped cream and a sprig of mint. You can even serve it alongside a hot cup of coffee or a refreshing berry smoothie. Perfect for a summer gathering or a cozy dinner with your loved ones!
Recipe Variations
Here are a few creative twists you can try with this huckleberry cheesecake recipe:
- Chocolate Huckleberry Swirl: Add some melted dark chocolate swirl to the batter for a rich chocolatey flavor.
- Zesty Lemon Huckleberry: Add the zest of one lemon to the cream cheese filling for a refreshing citrus kick.
- Nutty Crust: Incorporate crushed nuts like pecans or almonds into the graham cracker crust for extra crunch and flavor.
- Huckleberry AND Blueberry: Mix in fresh blueberries to complement the huckleberries for a berry explosion!
- Mini Cheesecakes: Bake individual cheesecakes in muffin tins for cute and shareable servings.
Chef’s Notes
As I reflect on my journey with this huckleberry cheesecake, I can’t help but chuckle at the first time I attempted it. I was definitely more ambitious than experienced and misjudged the baking time. Let’s just say a quick panic ensued when I checked the oven to find a wobbly, semi-set "cheesecake." But what emerged was a deliciously soft, custardy filling that has since become my signature style. I now embrace the joy of imperfections in the kitchen; that’s where the best flavors often reside!
Over the years, this recipe has evolved, drawing inspiration from both traditional and contemporary cheesecake. Each iteration brings new memories, laughter, and, of course, delicious bites!
FAQs and Troubleshooting
-
Why is my cheesecake cracking?
- Cracking happens when the cheesecake is overbaked or if it cools too quickly. Make sure to gradually cool it by leaving it in the oven after baking, and avoid beating too much air into the batter.
-
How can I tell when my cheesecake is done?
- The edges should look set, while the center will remain slightly jiggly. Trust me, it will firm up as it chills in the fridge!
-
Can I make this cheesecake ahead of time?
- Absolutely! Cheesecake tastes even better the day after it’s made, so feel free to prepare it a day in advance.
-
What should I do if I don’t have huckleberries?
- No problem! You can easily swap them for blueberries or even raspberries, which will give you that same delightful tart-and-sweet balance.
Nutritional Info
While I love to indulge in decadent desserts, I believe in balance. Each slice of huckleberry cheesecake packs a complex mix of flavors and textures while providing energy from carbohydrates and protein from the cream cheese. Remember to enjoy it in moderation, and share it with friends for that ultimate cozy experience!
There you have it! A delightful journey into the world of huckleberry cheesecake! I hope you feel inspired to whip up this delicious dessert and create some lovely memories of your own. Bake it with love, share it with joy, and let the flavors speak for themselves! Happy baking!
Print
Huckleberry Cheesecake
- Total Time: 80 minutes
- Yield: 10 servings
- Diet: Vegetarian
Description
A creamy and luscious huckleberry cheesecake that captures the essence of a summer day and family memories.
Ingredients
- Huckleberries (2 cups)
- Cream Cheese (24 oz, softened)
- Granulated Sugar (1 cup)
- Eggs (3 large)
- Sour Cream (1 cup)
- Vanilla Extract (1 teaspoon)
- Graham Cracker Crumbs (1 ½ cups)
- Butter (½ cup, melted)
- Salt (1/4 teaspoon)
Instructions
- Preheat the Oven: Start by preheating your oven to 325°F (163°C).
- Make the Crust: In a mixing bowl, combine the graham cracker crumbs, melted butter, and a pinch of salt. Mix until well combined and press into a 9-inch springform pan. Bake for about 10 minutes.
- Prepare the Filling: In a large mixing bowl, beat the cream cheese until smooth. Gradually add in sugar, then eggs one at a time, followed by sour cream and vanilla extract.
- Add the Huckleberries: Gently fold in the huckleberries.
- Bake the Cheesecake: Pour the filling over the crust and bake for 50-60 minutes.
- Cool Down: Let it cool in the oven, then chill in the fridge for at least four hours.
- Serve with Love: Slice and serve with huckleberry compote and whipped cream.
Notes
Cheesecakes are best served chilled and can be made a day in advance for enhanced flavor.
- Prep Time: 20 minutes
- Cook Time: 60 minutes
- Category: Dessert
- Method: Baking
- Cuisine: American
Nutrition
- Serving Size: 1 slice
- Calories: 350
- Sugar: 28g
- Sodium: 250mg
- Fat: 22g
- Saturated Fat: 12g
- Unsaturated Fat: 8g
- Trans Fat: 0g
- Carbohydrates: 34g
- Fiber: 1g
- Protein: 5g
- Cholesterol: 120mg
Keywords: huckleberry, cheesecake, dessert, berry dessert, creamy cheesecake
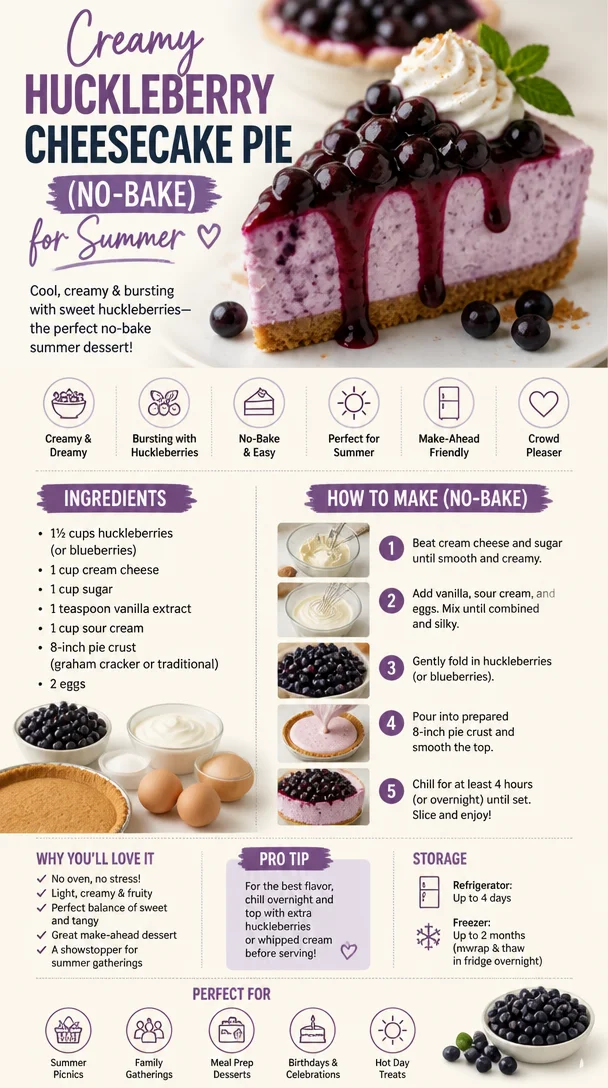
Creamy Huckleberry Cheesecake Pie (No-Bake) for Summer
Huckleberry Cheesecake Pie: A Slice of Summer
Welcome to my kitchen! Today, we’re diving into a pie that’s not just a dessert but a celebration of flavors that feels like summer on a plate: the Huckleberry Cheesecake Pie. If you’ve never experienced the delight that is huckleberries, let me tell you—these tiny berries pack a punch of sweet-tart goodness that will have you rethinking every other fruit out there. Picture this: you take a bite and the flavor bursts in your mouth, transporting you to sun-drenched berry-picking adventures in the mountains. Isn’t that what cooking is all about?
There’s something magical about pies—especially creamy ones like this cheesecake pie. They not only tantalize your taste buds but also create moments. Whether it’s a backyard barbecue, a cozy family dinner, or simply a chill night in with your favorite people, nothing beats the joy of sharing a homemade dessert. Plus, huckleberries have a nostalgic charm; they remind me of warm summer days spent gathering wild berries with my family, laughing, and savoring the sweetness of life.
In this blog post, I’m going to take you through the entire process of making a Huckleberry Cheesecake Pie, from the dreamy ingredients to the last bite of velvety goodness. You don’t need to be a culinary wizard to whip this up; just some good vibes and a pinch of enthusiasm! Let’s get cooking, shall we?
A Sweet Memory
Every time I make this pie, I can’t help but think back to that one summer when my family decided to hit the road and explore the mountainous landscapes of Idaho. We were on the hunt for those elusive huckleberries that everyone raved about. I remember the scent of pine in the air and the thrill of seeing those tiny purple gems nestled among the leaves. My mom was quick to fill a basket, while my dad teased us about our “berry strategy.”
When we finally returned home, we decided to mix those fragrant huckleberries into my grandmother’s cheesecake recipe. It was like magic—each bite was a sweet reminder of that day in the mountains. We all gathered around the table, forks in hand, and the laughter filled the kitchen as we savored every creamy, fruity morsel. That pie was more than just a dessert; it was a symbol of our family unity and adventure. I still use that same recipe today, adding a twist of my own with a touch of creativity.
Ingredients
Here’s what you’ll need to create this scrumptious Huckleberry Cheesecake Pie:
-
Huckleberries (2 cups): The star of this dish! These tiny berries are packed with flavor and have a sweet-tart profile. If you can’t find huckleberries, blueberries are a great substitute, though you may need to adjust the sugar slightly.
-
Cream Cheese (16 oz, softened): This base adds that rich, creamy texture we love in cheesecake. Make sure it’s room temperature for easy mixing. For a lighter version, you can substitute with Greek yogurt.
-
Granulated Sugar (1 cup): This sweetens your filling. You can use coconut sugar or a sugar substitute, but it might alter the final taste a bit.
-
Sour Cream (1 cup): This adds a delightful tanginess and creaminess. For a non-dairy option, try using non-dairy sour cream or coconut cream.
-
Vanilla Extract (2 teaspoons): Adds warmth and depth. Make sure to use pure vanilla extract for the best flavor!
-
Eggs (2 large): These provide structure and richness. If you’re looking for a vegan option, try flax eggs (1 tablespoon of ground flaxseed mixed with 2.5 tablespoons of water per egg).
-
Graham Cracker Crust (store-bought or homemade): You can’t have cheesecake pie without this crust! Use a store-bought option for convenience or whip up a quick homemade version with crushed graham crackers, sugar, and melted butter.
-
Butter (1/2 cup, melted): This binds the crust together and gives it that wonderful flavor. If you’re making a gluten-free version, you can use gluten-free graham crackers.
Step-by-Step Instructions
Step 1: Prepare Your Crust
-
Mix the crust ingredients: In a mixing bowl, combine 1 ½ cups of crushed graham crackers, 1/3 cup of sugar, and 1/2 cup of melted butter. Give it a good stir until it resembles wet sand.
- Chef Tip: If you want a little extra flavor, consider adding a pinch of cinnamon or a tablespoon of cocoa powder to the crust.
-
Press and bake: Firmly press the mixture into the bottom and up the sides of a 9-inch pie pan. Bake at 350°F (175°C) for about 10 minutes or until golden brown. Once it’s done, remove it from the oven and let it cool.
- Commentary: A well-baked crust holds everything in place and adds a lovely crunch to your creamy filling—don’t skip this step!
Step 2: Make the Filling
-
Blend the cream cheese: In a large mixing bowl, beat the softened cream cheese until smooth and creamy.
- Chef Hack: Make sure there aren’t any lumps. A whisk or handheld mixer works wonders here!
-
Add sugar and sour cream: Gradually mix in the granulated sugar and sour cream until well combined. Then add in the vanilla extract.
- Pro Tip: Tasting the filling at this stage is crucial—adjust the sweetness if necessary to suit your taste!
-
Incorporate the eggs: Beat in the eggs, one at a time, mixing just until combined. Overmixing can lead to cracks during baking.
- Insider Info: If you’re making this pie for an event, beat the eggs in separately. This adds air and creates a fluffier texture in the final pie.
-
Fold in huckleberries: Gently fold in your fresh or frozen huckleberries with a spatula. You want to keep them intact for that burst of flavor in every bite!
- Little Joy: If using frozen huckleberries, there’s no need to thaw them first.
Step 3: Assemble and Bake
-
Pour into crust: Carefully pour the cheesecake filling into your cooled crust, smoothing the top with a spatula.
- Tip: To avoid bubbles, tap the pie pan on the counter a few times to release any air pockets.
-
Bake the pie: Bake in a preheated oven at 325°F (160°C) for about 50-60 minutes, or until the center is just set but still has a slight jiggle.
- Watch Out: Overbaking can lead to cracks! To prevent this, you can place a pan of water below the pie in the oven to create steam.
-
Cool and chill: Turn off the oven and crack the door open. Let the pie slowly cool down for about 1 hour before transferring it to the fridge to chill for at least four hours, preferably overnight.
- Classic Chef Note: Cooling slowly helps prevent the dreaded cracks.
Serving Suggestions
Once your pie has chilled and is ready to be savored, slice it up and serve it on a pretty plate. A dollop of whipped cream on top never hurt anyone! To elevate your presentation, consider garnishing with a sprig of mint or additional huckleberries. Trust me, the vibrant colors will make it Instagram-ready!
Recipe Variations
- Berry Medley: Swap huckleberries for a mix of your favorite berries like blueberries, raspberries, and strawberries for a mixed berry cheesecake pie.
- Chocolate Drizzle: Drizzle some melted dark chocolate over the cooled pie for an indulgent twist.
- Crunchy Topping: Add a crumble topping made from oats, nuts, and brown sugar for a textural contrast.
- Lemon Zest: Add a teaspoon of lemon zest to the filling for a refreshing tang that balances the sweetness.
- Vegan Version: Substitute cream cheese with a cashew cream or vegan cream cheese for a delicious dairy-free option.
Chef’s Notes
This recipe has traveled with me through years of experimentation, and I love how it always brings people together. One memorable mistake I made was forgetting to add the sugar once—let’s just say it was an unforgettable experience! Everybody found it hilarious, and it turned into a running joke in our family about a “diet cheesecake.”
Every time I revisit this recipe, I play with the balance of ingredients, and while I’m always perfecting it, the essence of that summer road trip is my guiding star. Feel free to put your own spin on it!
FAQs and Troubleshooting
1. Why did my cheesecake crack?
Cracks often form from overmixing eggs or baking at too high a temperature. Ensure you mix just until combined and bake slowly.
2. Can I use frozen huckleberries?
Absolutely! Frozen huckleberries work perfectly—just toss them directly into the batter without thawing.
3. How do I store leftovers?
Store your Huckleberry Cheesecake Pie in an airtight container in the fridge for up to 5 days. You can also freeze slices wrapped tightly for up to 2 months.
4. My pie isn’t setting properly—what went wrong?
If the filling remains too jiggly after baking, it may need more time in the oven. Check on it every 5-10 minutes until it firms up but still jiggles slightly in the center.
Nutritional Info
While loving dessert is important, it’s good to know what you’re indulging in! A slice of Huckleberry Cheesecake Pie is approximately:
- Calories: 320
- Protein: 6g
- Carbs: 40g
- Fat: 15g
(Note: Nutritional values may vary depending on the exact ingredients used and portion sizes.)
Thank you for joining me in my kitchen today! I hope this Huckleberry Cheesecake Pie recipe inspires you to create sweet memories in your own home. Remember, every slice is an opportunity to share love, laughter, and a taste of nostalgia. Happy baking!
Print
Huckleberry Cheesecake Pie
- Total Time: 85 minutes
- Yield: 8 servings
- Diet: Vegetarian
Description
A creamy pie filled with sweet-tart huckleberries, perfect for summer gatherings.
Ingredients
- Huckleberries (2 cups)
- Cream Cheese (16 oz, softened)
- Granulated Sugar (1 cup)
- Sour Cream (1 cup)
- Vanilla Extract (2 teaspoons)
- Eggs (2 large)
- Graham Cracker Crust (store-bought or homemade)
- Butter (1/2 cup, melted)
Instructions
- Mix the crust ingredients: In a mixing bowl, combine 1 ½ cups of crushed graham crackers, 1/3 cup of sugar, and 1/2 cup of melted butter. Give it a good stir until it resembles wet sand.
- Press the mixture into the bottom and up the sides of a 9-inch pie pan. Bake at 350°F (175°C) for about 10 minutes or until golden brown. Let it cool.
- Blend the cream cheese: In a large mixing bowl, beat the softened cream cheese until smooth and creamy.
- Add sugar and sour cream: Gradually mix in the granulated sugar and sour cream until well combined. Then add in the vanilla extract.
- Incorporate the eggs: Beat in the eggs, one at a time, mixing just until combined.
- Fold in huckleberries: Gently fold in the fresh or frozen huckleberries with a spatula.
- Pour the cheesecake filling into your cooled crust, smoothing the top with a spatula.
- Bake in a preheated oven at 325°F (160°C) for about 50-60 minutes, or until the center is just set but still has a slight jiggle.
- Cool and chill: Let the pie cool for about 1 hour before transferring it to the fridge to chill for at least four hours, preferably overnight.
Notes
Serve with whipped cream and garnish with a sprig of mint or additional huckleberries for a beautiful presentation.
- Prep Time: 15 minutes
- Cook Time: 70 minutes
- Category: Dessert
- Method: Baking
- Cuisine: American
Nutrition
- Serving Size: 1 slice
- Calories: 320
- Sugar: 20g
- Sodium: 120mg
- Fat: 15g
- Saturated Fat: 9g
- Unsaturated Fat: 6g
- Trans Fat: 0g
- Carbohydrates: 40g
- Fiber: 3g
- Protein: 6g
- Cholesterol: 80mg
Keywords: huckleberry, cheesecake, summer dessert, pie, creamy dessert
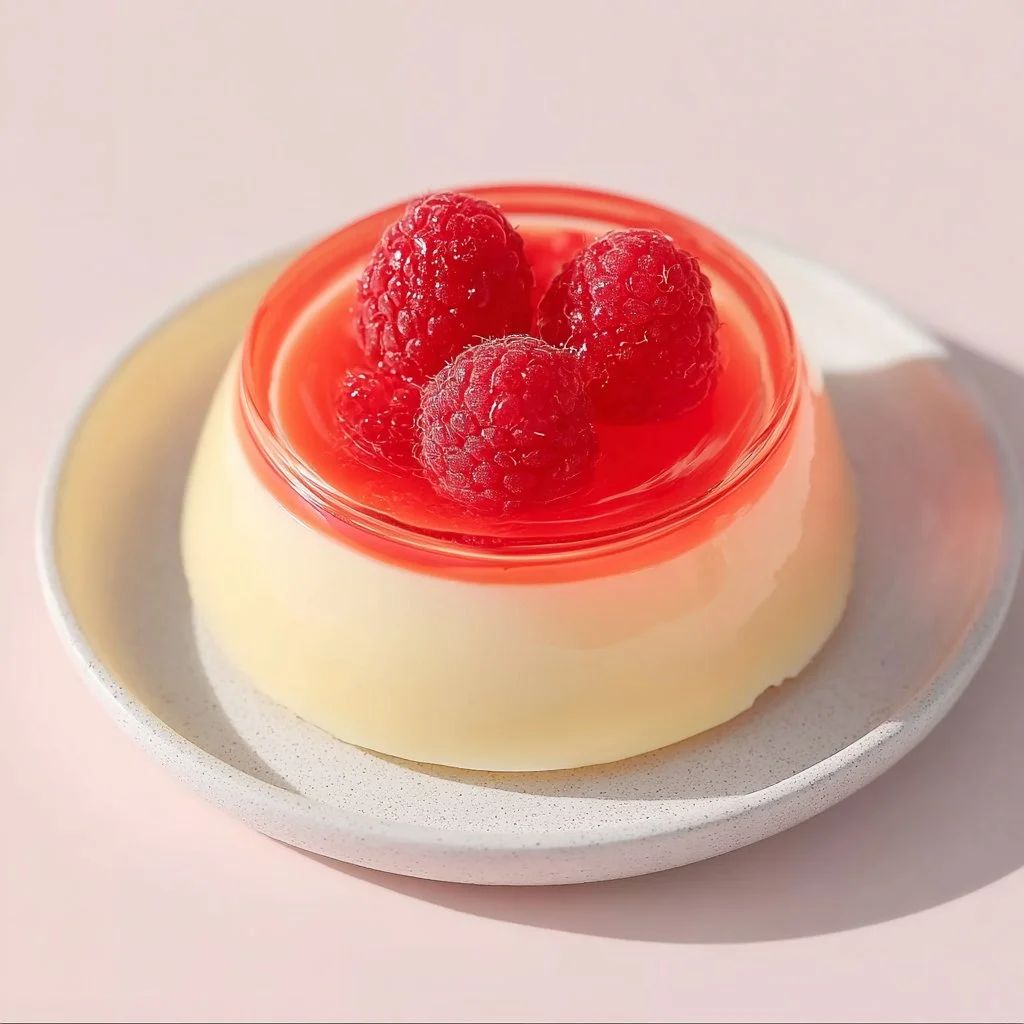
Quick Greek Yogurt Jello Cheesecake
Quick Greek Yogurt Jello Cheesecake: A Delightful Treat with a Twist
Hey there, food lovers! 🌟 Welcome back to my cozy kitchen, where the aroma of homemade goodness dances in the air, and I’m always whipping up something exciting! Today, I’m beyond thrilled to share one of my favorite light and refreshing desserts: Quick Greek Yogurt Jello Cheesecake. If you’re like me and can’t resist a creamy cheesecake but want a healthier twist, this recipe is your new best friend!
Picture this: It’s a warm summer afternoon, and you’ve spent the day lounging in the sun, enjoying the vibrant colors of the season’s blooms. You gather your friends around for a backyard BBQ, and the time comes for dessert. Instead of serving a heavy, traditional cheesecake, you dazzle everyone with this elegant, velvety creation that looks like a work of art and tastes like pure bliss! With a few simple ingredients, minimal effort, and a little bit of love, you can create something extraordinary that will leave your guests raving for more.
But don’t worry about complicated techniques or hard-to-find ingredients! This recipe is all about making cooking enjoyable and accessible for everyone. Plus, we’re using Greek yogurt for a health boost—it’s rich in protein and gives a wonderful tang that perfectly complements the sweetness of the Jello. So, are you ready to dive into the world of this delightful dessert? Grab your spatula and let’s whip up a batch of delicious joy!
Personal Story
Let me take you back to one of my childhood summers—imagine a sun-kissed backyard with aroma wafting from my mom’s kitchen. I was always intrigued by her culinary creations, especially her cheesecakes, which were a staple at family gatherings. We’d wait eagerly for when she’d unveil that creamy, dreamy dessert, topped with fresh fruit and blissfully chilled in the fridge.
One summer, during a particularly sunny weekend, I decided I wanted to help her make a cheesecake. However, since it was sizzling outside, we opted for a lighter alternative that wouldn’t weigh us down in the heat. That day marked the first time I encountered Jello in a cheesecake, and I remember feeling a surge of excitement as we combined flavors to create a beautiful balance of sweet and tangy.
Fast forward to today, I replicate that recipe and infuse it with my love for Greek yogurt. Every time I make it, it’s like a time machine to that summer, filled with laughter, family bonding, and delicious bites. Now I’m sharing this joy with all of you!
Ingredients
Here’s a simple ingredient list for your Quick Greek Yogurt Jello Cheesecake:
-
1 ½ cups Greek yogurt (plain, unsweetened)
Greek yogurt is rich, creamy, and provides essential protein. For a non-dairy option, try coconut or almond yogurt. -
1 package (3 oz) Jello (any color/flavor)
The star player! Classic flavors like strawberry or lemon work wonders, but you can also experiment with grape or lime for a twist. -
⅓ cup honey (or maple syrup)
Sweetness is key! Honey brings a floral depth, but if you prefer a vegan option, maple syrup is a lovely substitute. -
1 cup cream cheese (softened)
This adds that classic cheesecake creaminess. Feel free to use low-fat cream cheese if you’re watching your calories. -
1 tsp vanilla extract
Pure vanilla elevates the overall flavor of the dessert. It’s amazing what this little bottle can do! -
1 cup graham cracker crumbs
These are essential for the crust! You can swap for gluten-free crumbs or crushed nuts if you’re looking for a different texture. -
4 tbsp unsalted butter (melted)
This holds your crust together. If you want a dairy-free option, try coconut oil! -
Fresh fruit or whipped cream for garnish
Feel free to get creative here! Berries, kiwi, or a drizzle of chocolate sauce will take it to the next level.
Step-by-Step Instructions
Alright, let’s get our hands dirty and dive into the delightful process of whipping up this Quick Greek Yogurt Jello Cheesecake. Follow these steps, and I promise you’ll have a show-stopping dessert ready to impress your friends!
Step 1: Preheat the Oven
Preheat your oven to 350°F (175°C). This ensures everything gets nicely baked. (I know, it’s a cheesecake that doesn’t really have to bake for long, but trust me—it helps the crust!)
Step 2: Crust Creation
In a mixing bowl, combine your graham cracker crumbs and melted butter. Stir until everything is evenly coated and resembles wet sand. Here’s a little chef hack: if your crust feels too dry, add more melted butter, one tablespoon at a time.
Step 3: Press and Bake
Press the crumb mixture firmly into the bottom of a 9-inch pie pan or tart pan. Use the back of a measuring cup or the palm of your hand to pack it down tightly—for a crust that won’t crumble into disappointing bits later! Bake in the preheated oven for about 8-10 minutes, until lightly golden. Once it’s done, let it cool completely.
Step 4: Mix the Filling
In a large bowl, beat your softened cream cheese with a whisk or electric mixer until smooth and creamy. Add the Greek yogurt, honey (or maple syrup), vanilla extract, and the gelatin from your Jello package. Mix until everything is beautifully blended. Getting those textures right makes all the difference; you want it silky and smooth!
Step 5: Flavored Joy
This is where the fun begins! Gradually mix in the boiling water according to Jello package instructions to dissolve it completely. The color will brighten, and you’ll feel the excitement as it transforms into something special!
Step 6: Combine and Chill
Pour your Jello mixture into the cream cheese mixture and stir well until it’s all combined—think vibrant, beautiful colors! Pour it over your cooled crust, smooth the top with a spatula, and pop it in the refrigerator. Chill for a minimum of 4-6 hours or ideally overnight (this will help the cheesecake set perfectly).
Step 7: Serve with Flair
Once it’s fully set and chilled, you can slice it up. As you cut into this velvety cheesecake, you’ll notice the layers and vibrant colors. Garnish with fresh fruit or a dollop of whipped cream, and get ready for the compliments to roll in!
Serving Suggestions
For a lovely presentation, slice your cheesecake into wedges and place a few fresh berries on top for color. You can also drizzle a bit of honey or chocolate syrup over the pieces to indulge in extra sweetness. Serve with a cup of tea or your favorite coffee, and watch how everyone gravitates towards this irresistible treat!
Recipe Variations
Feeling creative? Here are a few fun twists to switch things up with your Quick Greek Yogurt Jello Cheesecake:
-
Berry Blast: Swirl in some pureed strawberries or blueberries right before chilling for a fruity flavor burst.
-
Zesty Lemon: Swap the Jello for lemon gelatin and add 2 tablespoons of fresh lemon juice for a zippy citrus kick.
-
Chocolate Delight: Use chocolate-flavored Greek yogurt and chocolate gelatin for a decadent chocolate cheesecake!
-
Tropical Twist: Use pineapple-flavored Jello and fold in some crushed pineapple pieces for a tropical paradise.
-
Nutty Goodness: Add about 1/2 cup of finely chopped nuts into the crust for added crunch!
Chef’s Notes
This Quick Greek Yogurt Jello Cheesecake is one of those recipes that keeps evolving in my kitchen. Its simplicity allows for so much creativity, and I’ve been known to experiment with whatever ingredients I have on hand. I can’t tell you how many times I’ve desperate-ly searched my pantry for that perfect Jello flavor!
One of my funniest kitchen mishaps came when I accidentally grabbed grape Jello instead of strawberry! At first, I was terrified, but it turned out, it was an unexpected hit! The laughter we shared over that “unique” cheesecake made it even more memorable.
Life is all about those little surprises, just like this incredible dessert!
FAQs and Troubleshooting
Q: Why did my cheesecake not set properly?
A: Ensure your Jello is fully dissolved in boiling water before mixing it with the cream cheese mixture. If the mixture was too warm, it may not set correctly; chilling for a longer time can help firm it up.
Q: Can I use non-fat Greek yogurt?
A: Absolutely! Non-fat Greek yogurt works fine, but you might lose a bit of creaminess. Feel free to use low-fat cream cheese for a lighter version too.
Q: What if I want to make this dairy-free?
A: You can use dairy-free cream cheese and coconut or almond yogurt. Just ensure the Jello you choose is vegetarian (as some Jello is made from gelatin) or opt for a plant-based alternative.
Q: How long does this cheesecake last in the fridge?
A: Stored well, this cheesecake can last about 4-5 days in the fridge. Just cover it tightly to avoid it absorbing any odors!
Nutritional Info
(Optional: Includes general estimates per serving)
- Calories: 210 kcal
- Protein: 8 g
- Carbohydrates: 24 g
- Fat: 9 g
- Sugar: 10 g
And there you have it, lovely fellow foodies! Your complete guide to creating the perfect Quick Greek Yogurt Jello Cheesecake. I hope you get as much joy out of this dessert as I do every time I prepare it. Remember, cooking is all about experimenting and sharing love with those around you. Enjoy every bite, and happy baking! 🍰✨
Print
Quick Greek Yogurt Jello Cheesecake
- Total Time: 360 minutes
- Yield: 8 servings 1x
- Diet: Vegetarian
Description
A light and refreshing cheesecake made with Greek yogurt and Jello, perfect for summer gatherings.
Ingredients
- 1 ½ cups Greek yogurt (plain, unsweetened)
- 1 package (3 oz) Jello (any color/flavor)
- ⅓ cup honey (or maple syrup)
- 1 cup cream cheese (softened)
- 1 tsp vanilla extract
- 1 cup graham cracker crumbs
- 4 tbsp unsalted butter (melted)
- Fresh fruit or whipped cream for garnish
Instructions
- Preheat the oven to 350°F (175°C).
- Combine graham cracker crumbs and melted butter in a mixing bowl.
- Press the mixture into the bottom of a 9-inch pie pan or tart pan and bake for 8-10 minutes until lightly golden. Let cool.
- Beat softened cream cheese until smooth, then add Greek yogurt, honey, vanilla, and Jello powder, mixing well.
- Gradually mix in boiling water to dissolve the Jello.
- Pour the Jello mixture into the cream cheese mixture and stir until combined. Pour over the cooled crust and refrigerate for at least 4-6 hours or overnight.
- Slice and garnish with fresh fruit or whipped cream before serving.
Notes
Experiment with different Jello flavors and toppings for variations.
- Prep Time: 15 minutes
- Cook Time: 10 minutes
- Category: Dessert
- Method: Chilling
- Cuisine: Greek
Nutrition
- Serving Size: 1 slice
- Calories: 210
- Sugar: 10g
- Sodium: 100mg
- Fat: 9g
- Saturated Fat: 4g
- Unsaturated Fat: 5g
- Trans Fat: 0g
- Carbohydrates: 24g
- Fiber: 1g
- Protein: 8g
- Cholesterol: 30mg
Keywords: cheesecake, Greek yogurt, dessert, summer, Jello




