
Gluten and Dairy Free Huckleberry Clafoutis
Delight in a Gluten and Dairy Free Huckleberry Clafoutis: A Cozy Kitchen Favorite
Welcome to my kitchen, my fellow food lovers! Today, we’re diving into a heartwarming dessert that’s not just delicious, it’s packed with memories—huckleberry clafoutis! This delightful French dish has been slightly adapted to be gluten and dairy-free without sacrificing flavor or texture. As we explore this recipe together, I guarantee it will transport you to cozy summer evenings, the sweet scent of wild berries wafting through the air, and the warmth of loved ones gathered around a table.
Let’s be honest: life can get pretty hectic, and sometimes all you want is to whip up something that feels like a hug in dessert form. If you’ve never tried clafoutis before, you’re in for a real treat! Originally made with cherries, clafoutis is a baked custard that envelops fruit in a luscious batter. Huckleberries, with their sweet-tart flavor, are the perfect duo for this dish. Whether you’ve picked them fresh from the wild or purchased them at your local farmer’s market, that burst of juicy goodness is sure to make you swoon.
I remember my own first encounter with clafoutis—I was a young home cook, experimenting with whatever fruits I could find in my grandmother’s backyard. One sunny afternoon, we plucked ripe huckleberries from the bushes, creating our own recipe on a whim. The thrill of seeing the batter rise in the oven was exhilarating, and the aroma that filled the kitchen was nothing short of magical. Sharing slices of that clafoutis with my family brought so much joy, solidifying it as a cherished tradition. Now, I want to share this very recipe with you, with a few of my favorite twists to make it gluten and dairy-free!
Ready to gather some ingredients and infuse your kitchen with warmth and love? Let’s get baking!
Personal Story
Growing up, my summers were often spent in the kitchen with my grandma. She had a knack for transforming simple ingredients into delightful desserts that would make our family gatherings extra special. One summer, we set out on a huckleberry-picking adventure, and I’ll always remember the glee of finding those deep purple gems nestled among the green foliage. As we returned home, our baskets brimming with berries, my grandma introduced me to clafoutis for the first time. We adapted her classic recipe to include huckleberries, and from that moment on, it became our go-to dessert. The tangy sweetness of the berries paired with the delicate custard was unlike anything I’d ever tasted. Each bite brought a rush of laughter and a sprinkle of nostalgia.
As I started to embrace a gluten and dairy-free lifestyle, that beloved clafoutis recipe became a kitchen challenge worth tackling. I’m thrilled to share the updated version with you, ensuring that everyone can partake in making memories around the table, relishing every bite of this creamy, fruit-filled dish!
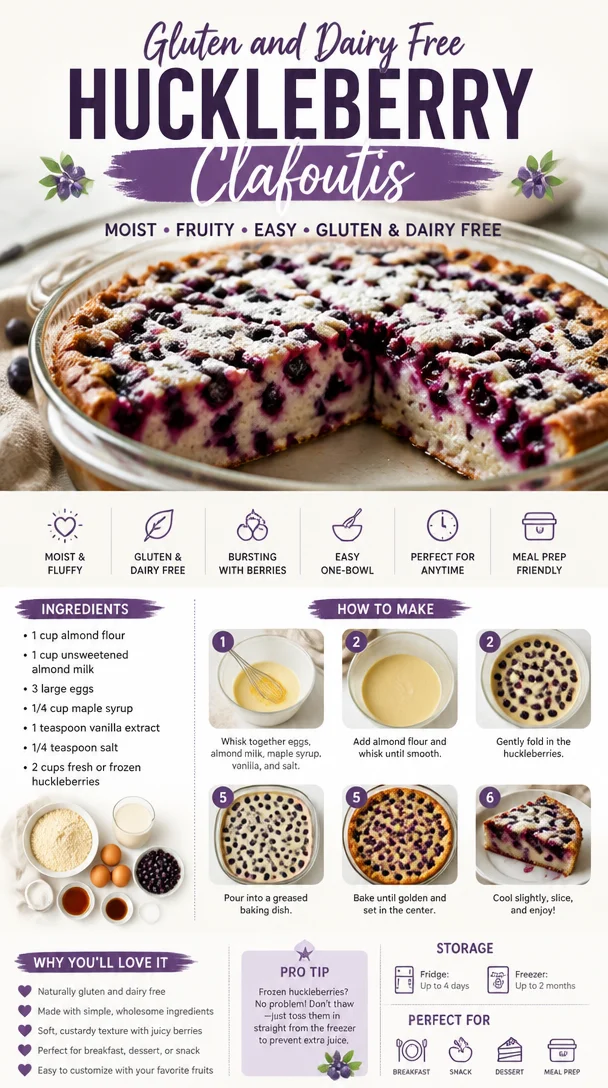
Ingredients
Here’s what you’ll need to create this gluten and dairy-free huckleberry clafoutis:
- Huckleberries (2 cups): These little gems are the stars of the show! If you can’t find fresh huckleberries, blueberries or blackberries make excellent alternatives.
- Almond Milk (1 ½ cups): This nutty beverage substitutes well for cow’s milk. For a creamier clafoutis, you can use coconut milk instead.
- Eggs (3 large): Eggs help bind the clafoutis and give it that luscious custard texture. For a vegan option, substitute with flax eggs (1 tablespoon ground flaxseed mixed with 2.5 tablespoons water).
- Maple Syrup (½ cup): This natural sweetener adds depth and pairs beautifully with the huckleberries. Honey or agave syrup can be used if you prefer.
- Gluten-Free Flour Blend (1 cup): Look for a blend that contains xanthan gum; this ingredient helps achieve the right texture in baked goods. Alternatively, oat flour works nicely, too.
- Vanilla Extract (1 teaspoon): A splash of vanilla elevates the flavor profile. Choose pure vanilla extract for a more robust taste.
- Salt (¼ teaspoon): Just a pinch to enhance the sweetness of the batter.
As a little tip, when selecting your huckleberries, go for plump and firm ones—this ensures a vibrant clafoutis. Get creative with sweetness levels—should you want it to be less sweet, you can easily reduce the maple syrup.
Step-by-Step Instructions
Alright, let’s get our hands into the batter. Follow these steps to create your gluten and dairy-free huckleberry clafoutis:
-
Preheat the Oven: Start by preheating your oven to 350°F (175°C). This ensures a nice even bake. Don’t forget to grease your baking dish—a pie dish works perfectly—preferably with coconut oil or a dairy-free cooking spray to prevent sticking.
-
Prepare the Huckleberries: Rinse your huckleberries gently under cold water and pat them dry with a clean kitchen towel. Then, spread them evenly across the bottom of your greased baking dish. This inner layer of fruit will caramelize beautifully during baking—trust me!
-
Make the Batter: In a mixing bowl, whisk together the almond milk, eggs, and maple syrup until smooth. It’s best to start with the wet ingredients; the flavors meld beautifully. Consider using an electric mixer for a fluffier batter!
-
Add Dry Ingredients: Gradually sift in the gluten-free flour blend and salt. Stir until just combined. This isn’t the time to overmix—keep that batter lumpy for a perfectly textured clafoutis!
-
Incorporate the Vanilla: Once mixed, add the vanilla extract and give it one more gentle stir to combine.
-
Pour the Batter Over the Berries: Carefully pour the batter over the huckleberries in your baking dish. Give it a little jiggle to ensure the batter settles around the berries—this creates that beautiful custard effect!
-
Bake Away: Place your dish in the preheated oven and bake for about 35-40 minutes or until the edges are golden and the middle is set. You can insert a knife into the center to check for doneness—if it comes out clean, you’re good to go!
-
Cool and Serve: Once baked, remove from the oven and let the clafoutis cool for about 10-15 minutes. This will help it firm up a bit.
Just a pro tip—this dish is best enjoyed warm or at room temperature. If you can wait, let the clafoutis sit for a while; the flavors deepen, and the texture improves!
Serving Suggestions
Serving up the clafoutis is all about keeping it simple and cozy. Dust it lightly with powdered sugar for an elegant touch and serve alongside a dollop of dairy-free whipped cream or a scoop of your favorite dairy-free ice cream. Fresh mint leaves can add a bright pop of color and freshness. Check it out—your friends and family will be asking for seconds!
Recipe Variations
Feeling adventurous? Here are some fun twists for your clafoutis:
- Berry Medley: Swap out the huckleberries for a mix of berries like raspberries, strawberries, and blueberries for a colorful bark you can’t resist!
- Citrus Zest: Add some lemon or orange zest to the batter for a refreshing citrus kick—oh-so-good!
- Nutty Flavor: Incorporate ground nuts (like almonds or pecans) into the batter for additional flavor and texture.
- Chocolate Chip Delight: For those with a sweet tooth, sprinkle mini dairy-free chocolate chips on top before baking. Who says clafoutis can’t be decadent?
- Savory Twist: Add some sautéed spinach and sun-dried tomatoes for a savory clafoutis that works wonderfully for brunch or as a light lunch.
The possibilities are endless!
Chef’s Notes
Whenever I make this clafoutis, I can’t help but smile as I remember those sunny afternoons spent with my grandma. The laughter, the shared stories, and the delicious treats—it’s what grounded my love for cooking in the first place. As I adapted the clafoutis to be gluten and dairy-free, I not only kept the essence of the dish alive but also sparked new creativity in the kitchen. It’s proof that beloved recipes can evolve without losing their charm.
I recommend giving this recipe a few trial runs, as clafoutis can vary based on the type of flour you use and how thick or thin you want the batter. The best part? It’s hard to mess this recipe up! Trust your instincts, and feel free to experiment.
FAQs and Troubleshooting
Q: Can I use frozen huckleberries?
A: Absolutely! Just be sure to thaw them completely and pat them dry to reduce excess moisture.
Q: My clafoutis didn’t rise. What went wrong?
A: This could happen if the batter was overmixed or if the baking powder is old. Ensure you mix until just combined, and check the expiration date on your baking powder.
Q: Can I replace almond milk with another type of milk?
A: Yes! Coconut milk or oat milk are excellent alternatives to almond milk. Just keep in mind that it may alter the flavor slightly, so choose one that you love!
Q: How do I store leftovers?
A: Store any uneaten clafoutis in an airtight container in the fridge for up to 3 days. It can be reheated in a warm oven or enjoyed cold—perfect for breakfast!
Nutritional Info
While I didn’t delve too deeply into the nutritional stats, keep in mind that this clafoutis is not only gluten and dairy-free but also a great source of antioxidants from the huckleberries. Depending on your ingredients, you can enjoy this dessert without the heavy guilt, and it’s a wholesome way to treat yourself!
There you have it—your ultimate guide to baking a decadent, gluten and dairy-free huckleberry clafoutis that’s as rich in memories as it is in flavor. So gather your loved ones, roll up those sleeves, and get ready to whip up something wonderful. Happy baking, friends!
Print
Gluten and Dairy Free Huckleberry Clafoutis
- Total Time: 55 minutes
- Yield: 8 servings 1x
- Diet: Gluten-Free, Dairy-Free
Description
A heartwarming gluten and dairy-free dessert featuring huckleberries enveloped in a luscious custard batter.
Ingredients
- 2 cups Huckleberries
- 1 ½ cups Almond Milk
- 3 large Eggs
- ½ cup Maple Syrup
- 1 cup Gluten-Free Flour Blend
- 1 teaspoon Vanilla Extract
- ¼ teaspoon Salt
Instructions
- Preheat the oven to 350°F (175°C) and grease your baking dish.
- Prepare the huckleberries by rinsing them gently and patting them dry.
- Make the batter by whisking together almond milk, eggs, and maple syrup until smooth.
- Add the gluten-free flour blend and salt, stirring until just combined.
- Incorporate the vanilla extract into the mixture.
- Pour the batter over the huckleberries in the baking dish.
- Bake in the oven for about 35-40 minutes until golden and set.
- Cool the clafoutis for 10-15 minutes before serving.
Notes
Best enjoyed warm or at room temperature. Dust with powdered sugar and serve with dairy-free whipped cream.
- Prep Time: 15 minutes
- Cook Time: 40 minutes
- Category: Dessert
- Method: Baking
- Cuisine: French
Nutrition
- Serving Size: 1 serving
- Calories: 275
- Sugar: 10g
- Sodium: 160mg
- Fat: 8g
- Saturated Fat: 0g
- Unsaturated Fat: 8g
- Trans Fat: 0g
- Carbohydrates: 41g
- Fiber: 4g
- Protein: 6g
- Cholesterol: 60mg
Keywords: clafoutis, huckleberry, gluten-free, dairy-free, dessert
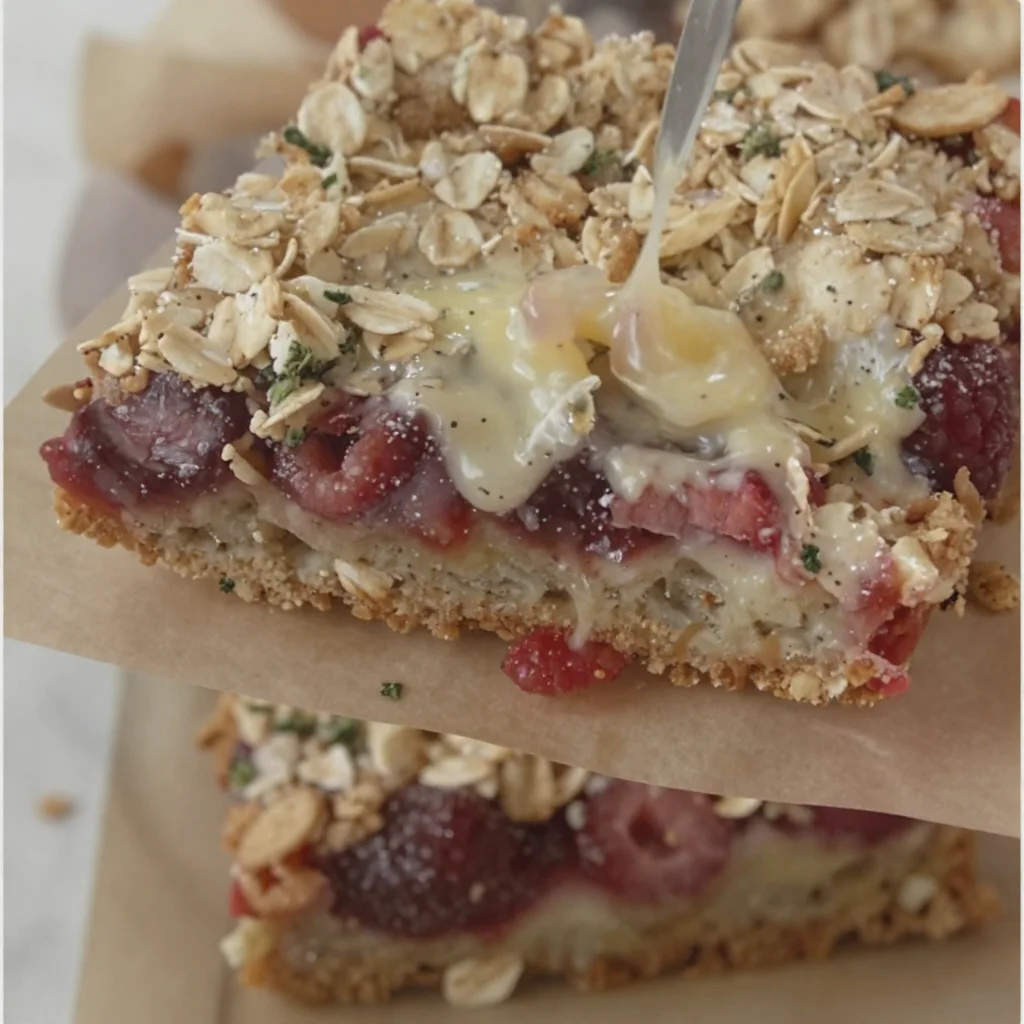
Ingredient Raspberry Oatmeal Crumble Bars (Summer Snack)
Raspberry Oatmeal Crumble Bars: A Cozy Kitchen Delight
Welcome to my cozy corner of the culinary world! Today, I’m excited to share with you one of my favorite recipes that embodies all the warmth and comfort of homemade goodness: Raspberry Oatmeal Crumble Bars. These delightful treats are perfect for breakfast, snacks, or a sweet afternoon pick-me-up. With layers of tangy raspberry and a buttery, crumbly oat topping, these bars are a crowd-pleaser that will have everyone asking for seconds.
The beauty of these Raspberry Oatmeal Crumble Bars lies not only in their delicious flavor but also in their heartwarming backstory. I remember the first time I made them; it was during a rainy Saturday afternoon. I had just returned from the local farmers’ market with a pint of fresh raspberries that were bursting with flavor. The rain pattered against the window as I whisked together the mixture, filled the kitchen with the smell of melting butter, and transformed those vibrant berries into a sweet filling. The sight of my family munching on the bars, their faces lighting up with delight, is a memory I’ll cherish forever.
So, let’s step into the kitchen together and create a batch of these irresistible bars that will fill your home with fragrant joy!
Personal Story
One of my fondest memories with Raspberry Oatmeal Crumble Bars dates back to a summer family reunion at my grandmother’s house. The afternoon sun poured through the kitchen windows, illuminating her old wooden table where she used to knead dough and prepare sweet treats. She pulled out her secret stash of frozen raspberries, a treasure trove from her garden. As she expertly layered the oats and berries in a baking dish, I marveled at her effortless grace in the kitchen. She handed me a spoon and encouraged me to help sprinkle the oat topping—her legacy of cooking was palpable in that moment. Those bars vanished quickly that day, devoured by a bunch of happy faces, and ever since, they’ve held a special place in my heart.
Ingredients
To whip up these delectable Raspberry Oatmeal Crumble Bars, you’ll need the following ingredients:
-
Fresh Raspberries (2 cups)
Fresh raspberries bring a tartness and vibrant color to these bars. If you can’t find fresh ones, feel free to use frozen raspberries—just make sure to thaw and drain them beforehand to avoid excess moisture. -
Rolled Oats (2 cups)
Rolled oats provide the chewy texture and heartiness. Quick oats can be used in a pinch, but avoid instant oats, as they won’t yield the same structure. -
All-Purpose Flour (1 cup)
This gives the crumble its base. For a gluten-free version, substitute with almond flour or a gluten-free flour blend. -
Brown Sugar (1 cup)
Brown sugar adds that lovely caramel flavor. You can use coconut sugar for a healthier substitute, but it will alter the color of the crumble slightly. -
Butter (½ cup, unsalted)
Butter binds it all together and adds richness. For a vegan version, substitute with coconut oil or dairy-free butter. -
Baking Powder (1 tsp)
This helps to give the oatmeal a little lift and lightness. -
Salt (½ tsp)
Just a pinch to enhance the flavors; it balances the sweetness of the sugar and brings out the raspberry’s bright notes. -
Vanilla Extract (1 tsp)
This infuses the mixture with a warm aroma and depth of flavor.
Step-by-Step Instructions
-
Preheat the Oven
Begin by preheating your oven to 350°F (175°C). This is the perfect time to gather your ingredients and prepare your baking dish. Grease a 9×9-inch baking pan with a little butter or line it with parchment paper for easy removal later. -
Mix the Dry Ingredients
In a large mixing bowl, whisk together the rolled oats, flour, brown sugar, baking powder, and salt until well combined. Trust me, this step is key for ensuring an even distribution of flavors. -
Incorporate the Butter
Melt the butter in a small saucepan over low heat or in the microwave. Allow it to cool slightly, then pour it into the dry mixture. Using your fingers (my favorite method!) or a fork, blend it together until the mixture resembles coarse crumbs. You want some larger clumps, as they’ll create a lovely texture on top! -
Reserve Oats for Topping
Take about 1½ cups of this mixture and set it aside—this will be your crumble topping. -
Create the Raspberry Filling
In another bowl, toss the fresh (or thawed) raspberries with a tablespoon of flour to help absorb excess liquid. Gently fold in the vanilla extract. You want those luscious little berries to shine, without drowning in moisture. -
Layer It Up
Spread the remaining oat mixture evenly into the prepared baking pan, pressing it firmly to form the crust. Spoon the raspberry mixture over the crust, spreading it evenly. Finally, sprinkle the reserved crumble topping over the raspberries. Don’t be shy; this is where the magic happens! -
Bake to Perfection
Slide the pan into the preheated oven and bake for about 30–35 minutes, or until the topping is golden brown and the raspberries are bubbly. The delicious aroma wafting through your kitchen will be intoxicating, I promise! -
Cooling Time
Once out of the oven, let the bars cool in the pan for at least 15 minutes before transferring them to a wire rack to cool completely. This step will help them set up for easy slicing. -
Slice and Enjoy
Use a sharp knife to cut the bars into squares or rectangles. Serve them warm for a gooey treat or at room temperature for a delightful snack.
Serving Suggestions
For an extra touch of coziness, serve these Raspberry Oatmeal Crumble Bars with a dollop of whipped cream or a scoop of vanilla ice cream on top. They also pair beautifully with a steaming cup of tea or coffee for a delightful afternoon treat.
Recipe Variations
- Nutty Version: Fold in some chopped nuts like almonds or walnuts into the crumble mixture for added crunch and depth.
- Different Berries: Swap out the raspberries for strawberries, blueberries, or blackberries, depending on the season and your preference.
- Spiced Up: Add a teaspoon of cinnamon or a pinch of nutmeg to the dry ingredients for a warm, spiced flavor.
- Zesty Twist: Incorporate a bit of lemon zest into the raspberry filling for a refreshing citrusy kick.
Chef’s Notes
This recipe is particularly adaptable! I’ve made these bars countless times, experimenting with what I have on hand. One memorable attempt was using a mix of frozen berries leftover from summer and a bit of almond extract instead of vanilla. The flavors melded surprisingly well! Sometimes my kids even get involved in the process, adding their own spin—chocolate chips sneaked in here and there. It’s a lovely way to bond over something delicious!
FAQs and Troubleshooting
-
Why are my crumble bars falling apart?
If your bars aren’t holding together, they may not have cooled long enough before slicing. Give them ample time to set completely—patience is key! -
Can I use other fruits besides raspberries?
Absolutely! Feel free to experiment with your fruit of choice. Just make sure the fruit isn’t overly watery, which could make the filling too soggy. -
How do I store the leftover bars?
Store any leftovers in an airtight container at room temperature for 2–3 days. For longer storage, you can refrigerate them for about a week or freeze them for up to 3 months—perfect for a quick snack! -
Can I make these vegan?
Yes! Simply substitute the butter with a plant-based alternative, and for the egg (if you choose to include it), use a flax or chia seed egg.
Nutritional Info (Optional)
This recipe yields approximately 16 bars. Each bar can be expected to have around 180 calories, with 8g of fat, 24g of carbohydrates, and 2g of protein. For a more precise analysis, consider using a nutritional calculator.
I hope you enjoy making these Raspberry Oatmeal Crumble Bars as much as I do. They’re a hug in dessert form and a fantastic way to celebrate the simple joys of cooking and sharing with loved ones. Happy baking!
Print
Raspberry Oatmeal Crumble Bars
- Total Time: 50 minutes
- Yield: 16 servings 1x
- Diet: Vegetarian
Description
Delightful Raspberry Oatmeal Crumble Bars with layers of tangy raspberry and buttery, crumbly oat topping, perfect for breakfast or snacks.
Ingredients
- 2 cups Fresh Raspberries
- 2 cups Rolled Oats
- 1 cup All-Purpose Flour
- 1 cup Brown Sugar
- ½ cup Unsalted Butter
- 1 tsp Baking Powder
- ½ tsp Salt
- 1 tsp Vanilla Extract
Instructions
- Preheat the oven to 350°F (175°C) and prepare a 9×9-inch baking pan.
- Mix the rolled oats, flour, brown sugar, baking powder, and salt in a large bowl.
- Incorporate the melted butter into the dry mixture until coarse crumbs form.
- Reserve about 1½ cups of the mixture for the topping.
- Create the raspberry filling by tossing fresh raspberries with a tablespoon of flour and folding in vanilla.
- Layer the remaining oat mixture in the baking pan, add the raspberry filling, and top with reserved crumble.
- Bake for 30-35 minutes until golden brown and bubbly.
- Cool in the pan for 15 minutes before transferring to a wire rack.
- Slice into bars and enjoy!
Notes
Serve with whipped cream or ice cream. Store leftovers in an airtight container for up to 3 days.
- Prep Time: 15 minutes
- Cook Time: 35 minutes
- Category: Dessert
- Method: Baking
- Cuisine: American
Nutrition
- Serving Size: 1 bar
- Calories: 180
- Sugar: 10g
- Sodium: 100mg
- Fat: 8g
- Saturated Fat: 4g
- Unsaturated Fat: 4g
- Trans Fat: 0g
- Carbohydrates: 24g
- Fiber: 2g
- Protein: 2g
- Cholesterol: 15mg
Keywords: raspberry, oatmeal, crumble, bars, dessert, baking, cozy
Healthy Chocolate Zucchini Cake (Easy One-Bowl Recipe)
The Ultimate Chocolate Zucchini Cake: A Cozy Baking Adventure
Welcome to my kitchen, friends! Today, I’m thrilled to share a delightful recipe that beautifully blends the rich, indulgent flavor of chocolate with the subtle earthiness of zucchini. Yes, you heard that right — zucchini in a cake! This isn’t just any cake; it’s a chocolate zucchini cake that’s moist, decadent, and sure to impress.
Picture this: It’s a rainy afternoon, the scent of chocolate wafting through the air, and you find yourself cozy in your kitchen, ready to create something special. Chocolate zucchini cake is the perfect answer. It’s comfort food at its finest — a sweet treat that brings back childhood memories while providing a chance to sneak in some veggies. Whether you’re hosting guests or just in need of a little self-care, this cake is a fantastic choice.
If you’re new to baking or just looking for that extra spark of inspiration, fear not! I’m here to guide you through every step of the process. We’ll explore not only how to make this delicious cake but also why zucchini deserves a spotlight in your dessert repertoire. From the creamiest chocolate frosting to tips and tricks to elevate your baking game, let’s dive into this adventure together!
A Sweet Memory with Zucchini
Let me take you back to my childhood, where everything revolved around my grandma’s kitchen. She had a magical way of turning simple ingredients into moments of joy. One summer, after spending countless hours tending to her vegetable garden, she pulled out a basket brimming with squash and zucchinis. Instead of the usual savory dishes, she decided to make a chocolate zucchini cake.
I can still taste the first bite — the outer layer was rich and chocolaty, while the inside was surprisingly fluffy and moist. We enjoyed it as a family after a long day spent in her garden. It was a simple yet profound lesson on how something unexpected could bring so much happiness. Ever since that day, this recipe has held a special place in my heart, and I can’t wait for you to experience the same warmth and joy!
Ingredients
Here’s what you’ll need to whip up this chocolate zucchini cake, along with some helpful insights:
-
Zucchini (1 ½ cups, grated): The star of the show! Zucchini adds moisture without a strong flavor. If you can’t find zucchini, look for yellow squash as a substitute.
-
All-Purpose Flour (1 ¾ cups): This forms the base of our cake. If you want a healthier twist, you can use whole wheat flour, but reduce the quantity slightly as it absorbs more liquid.
-
Granulated Sugar (1 cup): Adds sweetness, of course! Consider using coconut sugar for a lower glycemic index option.
-
Cocoa Powder (½ cup): Use unsweetened cocoa for a deep chocolate flavor. Dutch-processed cocoa will give a richer taste, while natural cocoa will provide a lighter flavor.
-
Baking Soda (1 tsp): Leavening agent to help our cake rise. Make sure it’s fresh for the best results!
-
Baking Powder (½ tsp): Another leavening agent, ensuring a light and fluffy texture.
-
Salt (½ tsp): Enhances the overall flavor of the cake.
-
Eggs (2 large): Binds the ingredients together and adds moisture. For a vegan option, you can use flax eggs (1 tbsp ground flaxseed mixed with 2.5 tbsp water).
-
Vegetable Oil (½ cup): Gives richness and moisture. You can substitute melted coconut oil for a different flavor profile.
-
Vanilla Extract (1 tsp): A kitchen staple that amplifies the sweetness.
-
Chocolate Chips (¾ cup): I love adding semi-sweet chocolate chips to make this cake extra decadent. Dark chocolate chips work well too!
With these ingredients ready, we’re set to create something truly special!
Step-by-Step Instructions
-
Preheat Your Oven: Start by preheating your oven to 350°F (175°C). This ensures your cake bakes evenly.
-
Prep Your Pan: Grease and flour a 9×13-inch baking pan or line it with parchment paper for easy removal and cleanup.
-
Grate the Zucchini: Using a box grater, grate the zucchini. Once done, use a clean kitchen towel to squeeze out any excess moisture. Trust me, you want to eliminate that extra water!
-
Combine Dry Ingredients: In a large mixing bowl, whisk together the flour, cocoa powder, baking soda, baking powder, and salt. This step evenly distributes the leavening agents and cocoa, allowing for a uniform rise.
-
Mix Wet Ingredients: In another bowl, combine the sugar, eggs, oil, and vanilla extract. Use an electric mixer or whisk until it’s well blended, about 2-3 minutes.
-
Combine the Mixtures: Gradually add the dry ingredients to the wet mixture. Stir until just combined; be careful not to overmix! A few lumps are okay.
-
Add Zucchini and Chocolate Chips: Fold in the grated zucchini and chocolate chips. This is where the magic happens! The batter will look thick, but you’ll love the texture.
-
Bake: Pour the batter into your prepared pan, smoothing the top with a spatula. Bake in the preheated oven for 30-35 minutes or until a toothpick inserted in the center comes out clean.
-
Cool: Once baked, remove the cake from the oven and let it cool in the pan for about 10 minutes. Then transfer it to a wire rack to cool completely.
-
Frost (Optional): If you want to take your cake to the next level, top it with a creamy chocolate frosting or a dusting of powdered sugar.
Chef Hack: If you’re short on time, feel free to skip the frosting and serve it warm with a scoop of vanilla ice cream for a delicious dessert à la mode!
Serving Suggestions
When it comes to plating your chocolate zucchini cake, the choices are endless! For a rustic approach, simply cut a generous square and dust with powdered sugar. Is it a special occasion? Elevate the presentation with a dollop of whipped cream, a few fresh berries, or a drizzle of chocolate syrup. If you are feeling adventurous, try adding a sprinkle of sea salt on top for that sweet-savory experience!
Recipe Variations
Now for the fun part! Here are a few creative alternatives to switch up your chocolate zucchini cake:
-
Spice it Up: Add a teaspoon of cinnamon or a pinch of nutmeg to the batter for a warm, cozy flavor twist.
-
Nutty Delight: Fold in some chopped nuts, like walnuts or pecans, for extra crunch.
-
Fruity Surprise: Stir in a handful of fresh raspberries or cherries for a fruity burst that complements the chocolate perfectly.
-
Gluten-Free Option: Substitute the all-purpose flour with a 1:1 gluten-free baking blend. It works wonderfully!
-
Frosting Fun: Experiment with different types of frosting! Try a cream cheese frosting, peanut butter frosting, or even a light citrus glaze to brighten things up.
Chef’s Notes
This chocolate zucchini cake recipe has evolved over the years. Initially, I followed my grandma’s instructions verbatim, but as I delved deeper into the world of baking, I started playing with flavors and textures. I often reminisce about that rainy afternoon spent in her kitchen. Now, when I bake, I aim to recapture that enchanting aroma that made my heart sing.
You know those "oops" moments in the kitchen? Once, I accidentally added a whole cup of cocoa powder instead of a half! It turned out to be a chocolate explosion that everyone enjoyed — just a little too rich! Embrace the mishaps; they often lead to delicious discoveries!
FAQs and Troubleshooting
1. My cake came out too dry. What went wrong?
- This can happen if the zucchini wasn’t grated finely or if it was overbaked. Make sure to check for doneness at the lower end of the baking time.
2. Why is my cake sinking?
- Sinking cakes can result from underbaking or too much liquid in the batter. Make sure you’re using the correct amount of grated zucchini and check that your leavening agents are fresh!
3. Can I make this cake ahead of time?
- Absolutely! The flavors often deepen after a day. Store it in an airtight container at room temperature for up to 3 days.
4. How do I know when my cake is done baking?
- Use the toothpick test! Insert a toothpick in the center; if it comes out clean or with a few moist crumbs, it’s perfect.
Nutritional Info (Optional)
While I won’t dive deep into the numbers, a slice of this chocolate zucchini cake typically contains calories from wholesome ingredients, thanks to the hidden veggies! It’s a treat for the soul that doesn’t leave you feeling too guilty.
There you have it, lovely people! A chocolate zucchini cake that merges the comfort of baking with clever, healthy substitutes. As you venture through this journey in your kitchen, remember: cooking is all about joy, creativity, and the love you put into it. So, roll up those sleeves, pour yourself a cup of coffee, and get ready for a delicious adventure! Happy baking! 🍫🧁
Print
The Ultimate Chocolate Zucchini Cake
- Total Time: 50 minutes
- Yield: 12 servings 1x
- Diet: Vegetarian
Description
A delightful blend of rich chocolate flavor with the moistness of zucchini, creating a decadent chocolate cake that’s sure to impress.
Ingredients
- 1 ½ cups Zucchini, grated
- 1 ¾ cups All-Purpose Flour
- 1 cup Granulated Sugar
- ½ cup Cocoa Powder
- 1 tsp Baking Soda
- ½ tsp Baking Powder
- ½ tsp Salt
- 2 large Eggs
- ½ cup Vegetable Oil
- 1 tsp Vanilla Extract
- ¾ cup Chocolate Chips
Instructions
- Preheat your oven to 350°F (175°C).
- Prep a 9×13-inch baking pan by greasing it and flouring it or lining it with parchment paper.
- Grate the zucchini and squeeze out excess moisture using a clean towel.
- Combine dry ingredients: In a large bowl, whisk together the flour, cocoa powder, baking soda, baking powder, and salt.
- Mix wet ingredients: In another bowl, mix together the sugar, eggs, oil, and vanilla extract until well blended.
- Combine the dry ingredients with the wet ingredients, stirring until just combined.
- Add the grated zucchini and chocolate chips, folding them into the batter.
- Bake the batter in the prepared pan for 30-35 minutes, or until a toothpick inserted in the center comes out clean.
- Cool the cake for 10 minutes in the pan before transferring it to a wire rack to cool completely.
- Frost with chocolate frosting or dust with powdered sugar if desired.
Notes
For a healthier option, you can use whole wheat flour instead of all-purpose flour, but reduce the quantity. You can also use flax eggs for a vegan version.
- Prep Time: 15 minutes
- Cook Time: 35 minutes
- Category: Dessert
- Method: Baking
- Cuisine: American
Nutrition
- Serving Size: 1 slice
- Calories: 350
- Sugar: 22g
- Sodium: 400mg
- Fat: 12g
- Saturated Fat: 4g
- Unsaturated Fat: 6g
- Trans Fat: 0g
- Carbohydrates: 45g
- Fiber: 3g
- Protein: 5g
- Cholesterol: 30mg
Keywords: chocolate zucchini cake, baking, dessert, comfort food
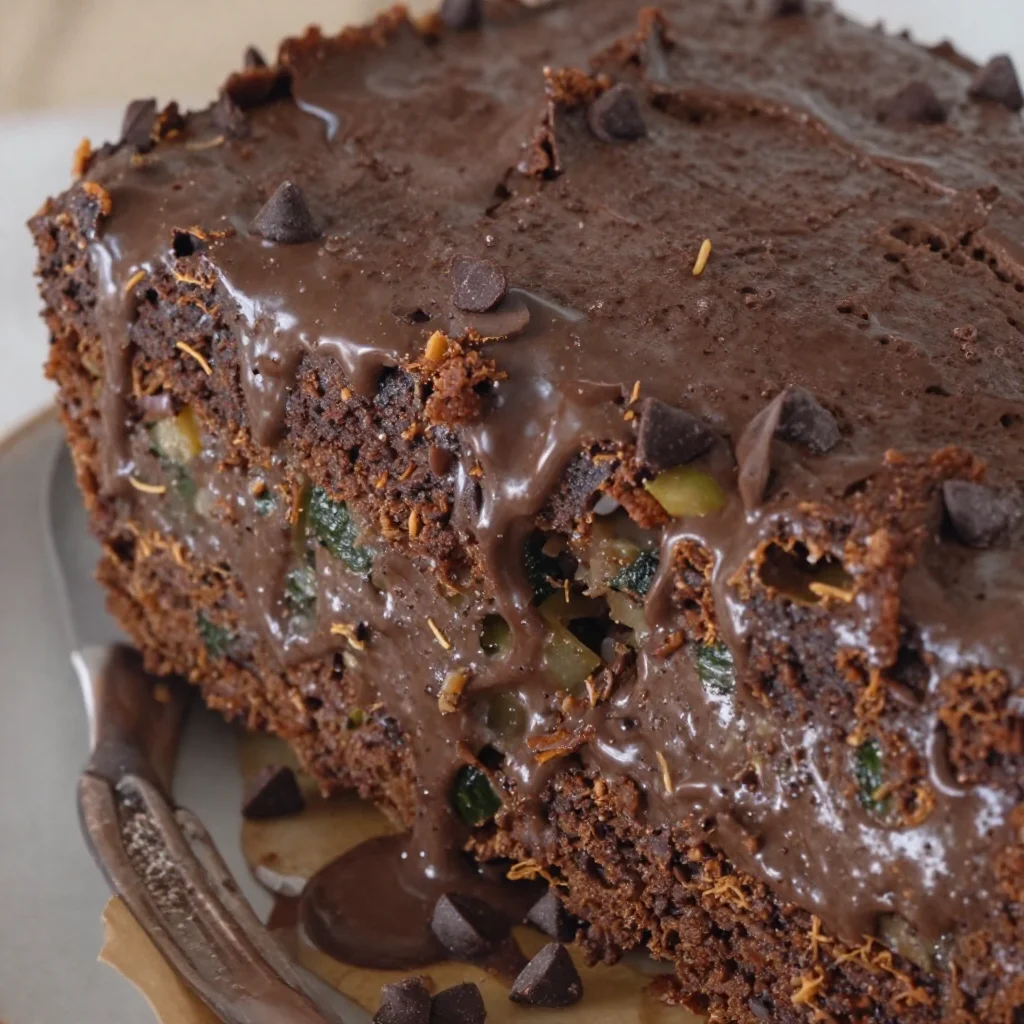
Chocolate Lover’s Zucchini Cake
Chocolate Lover’s Zucchini Cake: Indulge in the Unexpected Delight!
Welcome to my cozy corner of the world, where the scent of something delicious baking is just a whisk away! Today, we’re diving into a delightful recipe that embraces the essence of comfort and surprises: Chocolate Lover’s Zucchini Cake. Yes, you heard me right—zucchini! This humble vegetable takes on a whole new persona when combined with rich chocolate, and I promise, you’ll never look at zucchini the same way again.
Imagine a cake that’s moist, fudgy, and bursting with flavors that make you wonder if there’s truly a vegetable lurking inside. As someone who adores the charm of homemade goodies, I can say this cake checks all the boxes: it’s simple to whip up, secretly healthy, and absolutely indulgent. Whether you’re looking to impress a crowd or just seeking a cozy treat to savor with your favorite cup of coffee, this cake has got you covered.
My goal here is to inspire you to embrace your inner baker, even on the craziest of days. After all, cooking isn’t just about sustenance; it’s about creating memories, sharing joy, and enjoying the little moments. So get ready, pull out your beaters, and let’s get baking!
A Slice of Nostalgia
I’ll never forget the first time I tried a slice of zucchini cake. It was a beautiful sunny afternoon, and my neighbor, Mrs. Johnson, had just pulled a warm cake out of her oven. The rich aroma wafted through our open windows, beckoning my siblings and me to investigate. With a twinkle in her eye, she served us slices topped with a creamy chocolate frosting that seemed to glide off the plate. We dove in, and that first bite was magical. The cake was soft and moist, the chocolate rich and decadent, yet there was this delightful mystery to it—the hidden zucchini!
It turned out her secret ingredient not only made the cake incredibly moist but also contributed a subtle sweetness that made it dangerously delicious. Since that sunny afternoon, I’ve made it a tradition to bake a version of her zucchini cake anytime my friends come over or when I’m simply in need of a treat. It’s a recipe that carries love, nostalgia, and the spirit of sharing good food.
Ingredients
Here’s what you’ll need to create your Chocolate Lover’s Zucchini Cake. Let’s gather our ingredients!
-
Zucchini (2 cups, grated): The star of our recipe! Grating zucchini allows it to blend seamlessly into the cake, keeping it moist. You can also use yellow squash as a great substitute if zucchini isn’t available.
-
Unsweetened cocoa powder (½ cup): This is what gives our cake that deep, rich chocolate flavor. Make sure to use unsweetened to avoid over-sweetening your cake.
-
All-purpose flour (1½ cups): A classic choice for structure! You can substitute with whole wheat flour for added fiber or gluten-free flour blends if you’re avoiding gluten.
-
Granulated sugar (1 cup): Sweetness is key! You can adjust the sugar to your taste; using coconut sugar offers a healthier alternative with a caramel-like flavor.
-
Baking soda (1 tsp): This little powerhouse helps the cake rise beautifully and gives it a lovely texture. No substitutes—this is essential!
-
Baking powder (½ tsp): Works in conjunction with baking soda to create fluffiness in your cake.
-
Salt (½ tsp): A pinch of salt enhances all the flavors and balances the sweetness.
-
Eggs (2 large): These provide moisture and help the cake hold together. For a vegan option, you can use flax eggs (1 tbsp flaxseed meal + 2.5 tbsp water for each egg, let it sit for 5 mins).
-
Plant-based oil (½ cup): I love using vegetable or canola oil for this recipe, but for a richer flavor, you can use melted coconut or avocado oil.
-
Vanilla extract (1 tsp): A splash of vanilla brings warmth and depth to the flavor profile. Opt for pure vanilla for the best taste!
-
Chocolate chips (1 cup): Because we can never have too much chocolate, right? You can use dark chocolate chips, milk chocolate, or even white chocolate for a fun twist!
Step-by-Step Instructions
Now, let’s dive into the baking process! Don your apron, roll up those sleeves, and prep yourself for a delightful kitchen adventure.
-
Preheat the Oven: Start by preheating your oven to 350°F (175°C). This ensures your cake rises beautifully and bakes evenly.
-
Prepare the Pan: Grease a 9×13-inch baking pan or line it with parchment paper for easy removal. This step is essential for a clean exit!
-
Grate the Zucchini: Grab your box grater and shred that zucchini. No need to peel it—just give it a good wash. Once grated, squeeze out some of the excess moisture using a clean kitchen towel. We want the zucchini to add moisture without making the cake too soggy.
-
Mix Dry Ingredients: In a large mixing bowl, whisk together the flour, cocoa powder, baking soda, baking powder, and salt. This step not only combines the ingredients but also aerates them, which is vital for a fluffy cake.
-
Combine Wet Ingredients: In a separate bowl, beat the eggs, then add the oil and sugar, mixing until it’s well combined. Add in the vanilla extract and stir in the grated zucchini. Get ready for the magic—it’s going to smell amazing!
-
Bring it Together: Gradually add the dry ingredients to the wet mix, stirring just until combined. Be careful not to overmix; our goal is to keep the cake light and airy!
-
Chocolate Chips Galore: Fold in those chocolate chips! You can also sprinkle some on top for an extra chocolatey finish.
-
Bake: Pour the batter into your prepared pan and smooth the top. Bake in the preheated oven for about 30 to 35 minutes, or until a toothpick inserted in the center comes out clean. Your kitchen will become a haven of chocolate goodness!
-
Cool and Frost: Once baked, allow the cake to cool in the pan for about 10 minutes before transferring it to a wire rack. Once completely cooled, frost it with your favorite chocolate frosting—or enjoy it plain if you’re feeling simple!
-
Serve and Enjoy: Slice it up, serve it with a dollop of whipped cream or a scoop of ice cream, and watch your loved ones light up as they take their first bite!
Chef Tips: Remember, baking is all about feeling it out! Don’t hesitate to taste as you go and adjust ingredients. If you love a touch of spice, throwing in cinnamon or even chili powder can offer a delightful kick that pairs beautifully with chocolate.
Serving Suggestions
When it comes to serving this decadent zucchini cake, less is often more. A simple dusting of powdered sugar adds a lovely touch of elegance, and if you’re feeling adventurous, a dollop of whipped cream or a scoop of vanilla ice cream turns it into an indulgent dessert. Serve it warm for maximum deliciousness, and consider pairing it with a side of fresh berries for a burst of freshness that balances out the rich chocolate.
Recipe Variations
Want to shake things up? Here are a few creative twists to make this cake your own:
- Nutty Add-In: Toss in chopped walnuts or pecans for a delightful crunch.
- Fruity Zing: Add orange zest to the batter for a subtle citrus flavor that blends beautifully with chocolate.
- Minty Fresh: Infuse some peppermint extract into the frosting to create a refreshing mint chocolate experience.
- Sheet Pan Brownies: Use the same batter and bake in an 8×8 pan for fudgy brownie-like squares—perfect for those chocolate cravings!
- Gluten-Free Option: Use a 1:1 gluten-free flour blend to create a delicious version for those with dietary needs.
Chef’s Notes
This recipe has been a staple in my kitchen for years, evolving along with my own baking journey. Initially, I made it for family gatherings, and it was always a hit. Over time, I started experimenting with different frostings and add-ins! The best part is how this cake invites you to get creative. One day, I decided to add leftover chocolate ganache I had from another dessert, and let’s just say it was a game-changer!
And let’s not forget the fun of sharing this cake with friends. It’s the perfect conversation starter at gatherings, and I always love witnessing the surprise on people’s faces when they find out it’s made with zucchini. It’s a dish that proves the unexpected can be wonderfully delicious!
FAQs and Troubleshooting
1. My cake didn’t rise. What went wrong?
There could be several reasons for a flat cake. Make sure your baking soda and baking powder are fresh, as expired leavening agents may not work effectively. Also, be cautious about overmixing; that can result in a denser cake.
2. Can I use other types of flour?
Absolutely! You can play with different flours. Just keep in mind that whole wheat flour will yield a denser texture. If using gluten-free flour, opt for a blend specifically designed for baking.
3. How long does this cake last?
Stored in an airtight container, this cake should last for about 3-4 days at room temperature, or up to a week in the fridge. Trust me, it’s unlikely to last that long—you’ll be going back for seconds!
4. What if I want to make it ahead of time?
This cake holds up beautifully! You can bake it a day in advance and keep it covered at room temperature. Just frost it on the day of serving for the best presentation and flavor.
Nutritional Info
(Please note that this is an approximation and can varies by ingredient brands and substitutes.)
- Serving Size: 1 slice (1/12 of cake)
- Calories: 230
- Fat: 10g
- Carbohydrates: 34g
- Fiber: 2g
- Sugar: 12g
- Protein: 4g
And there you have it—a delightful exploration into the world of Chocolate Lover’s Zucchini Cake! I hope you feel inspired to try this recipe, share it with loved ones, and maybe even create your own kitchen memories. Happy baking, and don’t forget to embrace the mess—it’s all part of the joy of cooking!
Print
Chocolate Lover’s Zucchini Cake
- Total Time: 50 minutes
- Yield: 12 servings 1x
- Diet: Vegetarian
Description
A delightful and moist chocolate zucchini cake that’s secretly healthy and indulgent.
Ingredients
- 2 cups zucchini, grated
- ½ cup unsweetened cocoa powder
- 1½ cups all-purpose flour
- 1 cup granulated sugar
- 1 tsp baking soda
- ½ tsp baking powder
- ½ tsp salt
- 2 large eggs
- ½ cup plant-based oil
- 1 tsp vanilla extract
- 1 cup chocolate chips
Instructions
- Preheat the oven to 350°F (175°C).
- Prepare a 9×13-inch baking pan by greasing it or lining it with parchment paper.
- Grate the zucchini and squeeze out excess moisture.
- Mix dry ingredients: flour, cocoa powder, baking soda, baking powder, and salt in a bowl.
- Combine wet ingredients: beat eggs, then mix in oil and sugar, followed by vanilla extract and zucchini.
- Bring the dry mixture into the wet ingredients, stirring just until combined.
- Fold in the chocolate chips.
- Bake for 30 to 35 minutes, or until a toothpick comes out clean.
- Cool the cake for 10 minutes, then transfer to a wire rack.
- Frost with your favorite chocolate frosting or enjoy plain.
- Serve with a dollop of whipped cream or ice cream, if desired.
Notes
For added flavor, experiment with nuts, citrus zest, or different frostings.
- Prep Time: 15 minutes
- Cook Time: 35 minutes
- Category: Dessert
- Method: Baking
- Cuisine: American
Nutrition
- Serving Size: 1 slice
- Calories: 230
- Sugar: 12g
- Sodium: 200mg
- Fat: 10g
- Saturated Fat: 1g
- Unsaturated Fat: 8g
- Trans Fat: 0g
- Carbohydrates: 34g
- Fiber: 2g
- Protein: 4g
- Cholesterol: 60mg
Keywords: zucchini cake, chocolate cake, healthy dessert, vegan options, baking
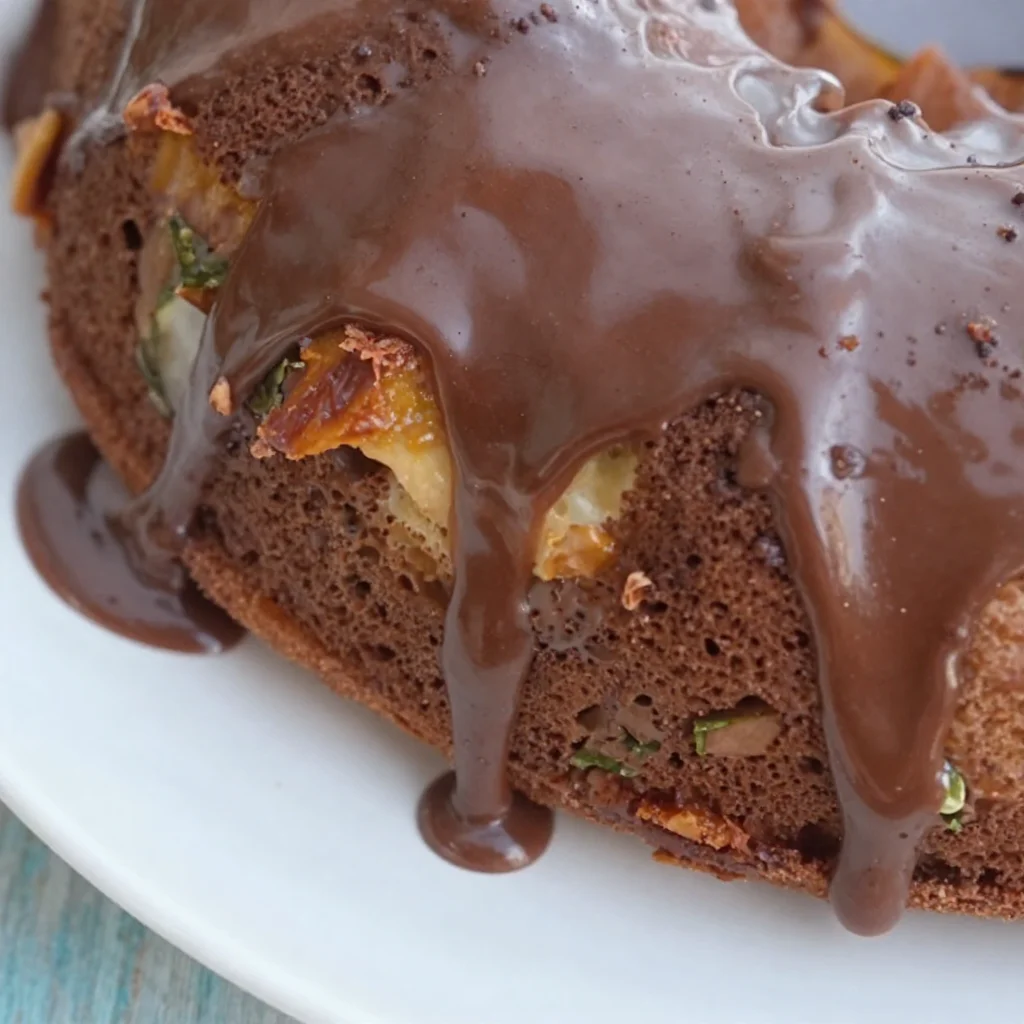
Chocolate Zucchini Bundt Cake
The Divine Chocolate Zucchini Bundt Cake: Sweetness with a Twist!
Welcome to my kitchen, friends! Today, we’re diving into a recipe that’s not just any dessert; it’s an enchanting blend of flavors that will have you questioning why you ever hesitated to pair chocolate with vegetables. Yes, you heard me right! Our star ingredient is zucchini, which brings moisture and a pleasant texture to the cake while magically disappearing into the rich, velvety chocolate. This Chocolate Zucchini Bundt Cake is a beloved family recipe that has graced our table during countless gatherings, and I can’t wait to share it with you.
Baking is like a little science experiment, don’t you think? The kitchen becomes a laboratory where everyday ingredients transform into something delightful. Whether you’re indulging on a rainy afternoon or impressing guests at your next gathering, this cake checks all the boxes: delicious, easy to make, and surprisingly healthy! With each slice, you’ll enjoy a moist, rich, and oh-so-chocolatey experience that’s sure to spark smiles and conversation.
Now, before we roll up our sleeves and get our hands into some chocolatey goodness, let me share a delightful little backstory related to my experience with this cake.
A Journey Through a Sweet Memory
Flashback to a sun-filled afternoon back in my grandmother’s kitchen—this is where my love for baking first blossomed. Each summer, when her garden overflowed with zucchini, she would whip up her delightful Chocolate Zucchini Bundt Cake. The smell of chocolate wafting through the house was always enticing! I remember standing on a stool by the counter, eagerly awaiting the moment I could sneak a taste of the batter.
As she grated the green squash and folded it into the rich cocoa mix, she’d beam with pride, sharing stories about how zucchini becomes a secret ingredient in desserts. “People will never guess there’s a veggie in here, but it’s what makes this cake luxurious,” she’d giggle.
Baking with her felt magical; it wasn’t just about the cake—it was about connection, family, and love. She taught me that baking is not just a task: it’s an invitation to create joyful memories. Fast forward to today, and I’m excited to pass this recipe down to you! So grab your mixing bowl and let’s get started on this journey together.
Ingredients You’ll Need
Now that we’re all nostalgic and inspired, let’s gather our ingredients for this glorious Chocolate Zucchini Bundt Cake!
-
Zucchini (2 cups, grated): The star of our show! Zucchini keeps the cake moist without adding a strong flavor. You can substitute it with grated carrots or unsweetened applesauce if you’re in a pinch.
-
All-Purpose Flour (1 ¾ cups): Provides structure to the cake. If you want a healthier twist, you can use whole wheat flour or a gluten-free blend.
-
Granulated Sugar (1 ½ cups): Sweetens the cake and helps with moisture. For a lower-calorie option, try coconut sugar or a sugar substitute, but keep in mind this may slightly alter the texture.
-
Unsweetened Cocoa Powder (¾ cup): This gives the cake its deep chocolate flavor. Be sure to use high-quality cocoa for the best taste! Dutch-processed cocoa can also be used for a milder flavor.
-
Baking Soda (1 teaspoon) and Baking Powder (1 teaspoon): These are our leavening agents that help the cake rise. Make sure they are fresh; old baking powder or soda can lead to a dense cake.
-
Salt (½ teaspoon): A crucial component that enhances flavors—never skip it!
-
Eggs (2 large): Acts as a binder and adds richness. If you’re vegan, you can replace them with flax eggs (2 tablespoons ground flaxseed + 6 tablespoons water, mixed and set for 10 minutes).
-
Vanilla Extract (1 teaspoon): A flavor booster that elevates the cocoa and makes everything more aromatic. You can swap it for almond extract for a unique twist!
-
Vegetable Oil (½ cup): For moisture! You can also use melted coconut oil for a different flavor profile.
-
Chocolate Chips (optional, ½ cup): Add a little extra decadence! Dark or semi-sweet chips work wonderfully.
Each ingredient has its role in making this cake spectacular, so let’s dive into some delightful cooking steps!
Step-by-Step Instructions
-
Preheat Your Oven: Preheat your oven to 350°F (175°C). Don’t skip this step, as it ensures your cake bakes evenly from the get-go!
-
Prepare the Bundt Pan: Generously grease your bundt pan with cooking spray or butter, and dust it lightly with flour. This helps the cake release easily after baking. You can also use cocoa powder instead of flour to give it that little extra chocolate kick!
-
Grate the Zucchini: With a box grater or food processor, grate your zucchini. You can choose to squeeze it in a clean kitchen towel to eliminate excess moisture, but I usually don’t. A little moisture doesn’t hurt!
-
Mix Dry Ingredients: In a large bowl, whisk together the flour, cocoa powder, baking soda, baking powder, and salt until well combined. This is essential; it ensures your leavening agents are evenly distributed throughout the cake.
-
Combine Wet Ingredients: In another bowl, whisk together sugar, eggs, oil, and vanilla extract until fluffy. This mixture should look slightly frothy. The air you incorporate will lead to a lighter cake!
-
Combine It All: Gradually add the dry ingredients to the wet ingredients and mix until just combined. Over-mixing can lead to a tough cake, so be gentle here. Fold in the grated zucchini and chocolate chips (if using).
-
Pour into the Bundt Pan: Transfer the batter into your prepared bundt pan, smoothing it out so it’s level. Give the pan a gentle tap on the counter to remove any air bubbles.
-
Bake: Bake in the preheated oven for about 50-60 minutes or until a toothpick inserted into the center comes out clean. Your kitchen will smell absolutely divine, and this is when the magic happens!
-
Cool Down: Once baked, take the cake out and let it cool in the pan for about 15-20 minutes. Then, carefully invert it onto a wire rack to cool completely.
-
Serve with Love: Dust the cooled cake with powdered sugar or drizzle chocolate ganache over the top for a stunning presentation!
Serving Suggestions
This Chocolate Zucchini Bundt Cake shines when served with a scoop of vanilla ice cream or a dollop of fresh whipped cream! For a more sophisticated touch, consider pairing it with a side of fresh berries. Dust the top with a bit of powdered sugar or drizzle some salted caramel over each slice for that glorious finish. It’s a cake that truly steals the show in any setting!
Recipe Variations
Ready to mix things up? Here are a few delicious twists on this recipe:
- Spicy Chocolate Zucchini Bundt Cake: Add ½ teaspoon of cinnamon and a pinch of cayenne pepper for a warm kick.
- Nutty Delight: Toss in some chopped walnuts or pecans for added texture and flavor. They pair wonderfully with chocolate!
- Dairy-Free Option: Use almond or oat milk in place of dairy milk with your eggs or substitute for flax eggs if you’re going vegan.
- Fruits and Spices: Add apple sauce or mashed bananas to enhance the moistness, or incorporate orange zest for a citrus twist!
- Frosting Ideas: Instead of dusting with sugar, consider a cream cheese frosting for a tangy complement to the chocolate.
Chef’s Notes
This recipe has evolved over the years as I’ve experimented with different ingredients and techniques. The original had more sugar, but the healthier iterations now make it a guilt-free treat! I fondly remember the first time I cooked this for a group of friends. The skeptical looks at a chocolate-veggie cake turned to joyous smiles after the first bite! Each time I bake it, I’m reminded of those summer days in my grandmother’s kitchen, sweltering heat, laughter, and, of course, chocolate.
Keep in mind that cakes are forgiving! Feel free to play around and make this recipe your own. Perhaps one day, your unique twist will be a new family tradition!
FAQs and Troubleshooting
Why is my cake dense?
This could be due to over-mixing the batter or using too many wet ingredients. Make sure to mix until just combined and keep an eye on your zucchini moisture.
Can I freeze this cake?
Absolutely! Wrap individual slices in plastic wrap and store in an airtight container. It’ll stay fresh for up to three months—perfect for when you need a sweet treat later!
How do I know when the cake is done?
Insert a toothpick into the center of the cake. If it comes out clean or with just a few moist crumbs, it’s ready. If it has wet batter on it, give it some more time in the oven.
Can I use other types of flour?
Yes! Feel free to sub in whole wheat flour or gluten-free alternatives. Just remember, your cake may have a slightly different texture, but it’s all about experimentation!
Nutritional Info (optional)
A slice of your Chocolate Zucchini Bundt Cake brings a nice mix of carbohydrates, a bit of protein from the eggs, and healthy fats from the oil. Plus, the zucchini offers a range of vitamins, making it a surprisingly nutritious dessert option!
Now that you have all this information, it’s time to don that apron and bake something incredible! Remember to enjoy the process, share stories, and maybe, just maybe, inspire someone else to create their own baking memories. Happy baking!
Print
Chocolate Zucchini Bundt Cake
- Total Time: 75 minutes
- Yield: 12 servings 1x
- Diet: Vegetarian
Description
A moist and rich cake that beautifully blends chocolate and zucchini, perfect for any occasion.
Ingredients
- 2 cups Zucchini, grated
- 1 ¾ cups All-Purpose Flour
- 1 ½ cups Granulated Sugar
- ¾ cup Unsweetened Cocoa Powder
- 1 teaspoon Baking Soda
- 1 teaspoon Baking Powder
- ½ teaspoon Salt
- 2 large Eggs
- 1 teaspoon Vanilla Extract
- ½ cup Vegetable Oil
- ½ cup Chocolate Chips (optional)
Instructions
- Preheat your oven to 350°F (175°C).
- Prepare your bundt pan by greasing it with cooking spray and dusting with flour.
- Grate the zucchini using a box grater or food processor.
- Mix the dry ingredients: whisk together flour, cocoa powder, baking soda, baking powder, and salt.
- Combine the wet ingredients: whisk sugar, eggs, oil, and vanilla until fluffy.
- Combine the wet and dry ingredients until just mixed. Fold in zucchini and chocolate chips.
- Pour the batter into the bundt pan and smooth out.
- Bake for 50-60 minutes or until a toothpick comes out clean.
- Cool for 15-20 minutes in the pan before inverting onto a wire rack.
- Serve dusted with powdered sugar or drizzled with chocolate ganache.
Notes
This cake can be served with vanilla ice cream or fresh berries for added indulgence. It can also be frozen for up to three months.
- Prep Time: 15 minutes
- Cook Time: 60 minutes
- Category: Dessert
- Method: Baking
- Cuisine: American
Nutrition
- Serving Size: 1 slice
- Calories: 350
- Sugar: 20g
- Sodium: 250mg
- Fat: 16g
- Saturated Fat: 2g
- Unsaturated Fat: 14g
- Trans Fat: 0g
- Carbohydrates: 45g
- Fiber: 3g
- Protein: 4g
- Cholesterol: 30mg
Keywords: chocolate cake, zucchini cake, bundt cake, dessert, easy baking

Budget-Friendly 3-Ingredient Chocolate Zucchini Cake
Indulge Your Sweet Tooth with a 3-Ingredient Chocolate Zucchini Cake
Welcome to my cozy kitchen, where the aroma of freshly baked goods dances in the air! I’m thrilled you’ve chosen to join me as we whip up something truly special today: a delicious 3-Ingredient Chocolate Zucchini Cake. Yes, you heard that right! Only three ingredients! But don’t let the simplicity fool you; this dessert is rich, moist, and oh-so-chocolatey. It’s the perfect treat for those who cherish flavors without a lengthy shopping list or complicated techniques.
You know, when I first stumbled upon this recipe, I was both skeptical and intrigued. Could something so easy really taste this good? Spoiler alert: It does! I can remember the delightful surprise on my friends’ faces when I brought this cake to a gathering. They couldn’t believe that zucchini, of all things, could create such a rich and scrumptious dessert. It’s a testament to the magic that happens when you combine the right ingredients with a pinch of love and a dash of creativity.
The beauty of this cake extends beyond its fantastic flavor; it also embodies the spirit of cooking. It’s about experimenting, about taking something you have on hand and turning it into a delightful meal or treat. So grab your apron and let’s dive into this sweet adventure together! Your kitchen is about to fill with warmth, laughter, and the irresistible scent of chocolate baking—trust me, it’s worth it!
A Sweet Memory
As a young girl, my baking adventures often began with my grandmother by my side. I can still picture her in her sunny kitchen, the golden afternoon light casting warm shadows on her worn wooden table. She was always filled with wisdom and a twinkle in her eye, encouraging me to experiment and create with whatever we had at hand. One summer, we had an abundance of zucchini from her garden, and instead of letting it go to waste, she decided to bake.
“Let’s make a cake!” she proclaimed. My little mind was racing. A cake made with zucchini? But she assured me that the secret was to let the flavors meld and that the moisture from the zucchini would create the most delightful dessert! It was a simple, no-fuss cake that we tossed together in mere minutes. The rich chocolate flavor won us both over, and we couldn’t stop stealing bites as it cooled on the counter.
Fast forward years later, and this nostalgic memory inspires me as I share my very own version—a simple recipe that invites everyone to gather and share joy over a piece of cake. Whether you’re baking for a birthday, a casual weekend treat, or just because you can, this 3-Ingredient Chocolate Zucchini Cake brings a slice of warmth right from my kitchen to yours.
Ingredients
Here are the three magical ingredients we’ll use for our delightful cake. Trust me; each plays a vital role, and I’ll share some tips along the way!
-
Zucchini (about 1 cup, grated)
- This wonderfully versatile vegetable adds moisture and nutrition to our cake without altering the flavor. You can substitute it with shredded carrots for a different twist, or if you’re feeling adventurous, try blending in some canned pumpkin!
-
Chocolate cake mix (1 box, about 15.25 oz)
- You can’t go wrong with chocolate cake mix—it’s the shortcut to a rich, chocolatey flavor! You can opt for a gluten-free mix if dietary restrictions are a concern, or even a vanilla cake mix for a different take.
-
Unsweetened applesauce (1 cup)
- Applesauce brings added moisture and sweetness while cutting down on some oils or butter you’d typically find in traditional recipes. You could also use mashed bananas or yogurt if you want to switch it up!
Step-by-Step Instructions
Now, let’s get our hands dirty! Follow these steps, and I promise you’ll create a cake that’s as delightful to make as it is to eat.
-
Preheat the Oven
- Start by preheating your oven to 350°F (175°C). This way, it will be ready for our delicious creation! It’s often the step that many people forget, but don’t be one of them! An adequately heated oven ensures an even bake.
-
Prep the Zucchini
- Grate your zucchini finely with a box grater or a food processor. No need to peel it; the skin adds color and nutrients. After grating, place the zucchini on a clean dish towel and gently squeeze out any excess moisture. This step is crucial as it helps our cake maintain the perfect texture.
-
Mix the Ingredients
- In a large mixing bowl, combine the chocolate cake mix, grated zucchini, and unsweetened applesauce. Stir until everything is well-incorporated. The batter may be somewhat thick—don’t worry! This is expected, as the zucchini brings a lot of moisture once it bakes.
-
Prepare Your Baking Pan
- Grease a 9×13-inch baking pan or line it with parchment paper for easy removal. If you’re feeling fancy, use a bundt pan for a more dramatic presentation! The parchment paper trick is a chef’s best-kept secret; it makes cleaning up a breeze and prevents sticking.
-
Pour and Spread
- Pour the batter into your prepared pan, smoothing it out evenly with a spatula. Don’t worry if it looks a little lumpy; that’s part of its charm! Plus, we’re on a flavorful adventure here, remember?
-
Bake Away!
- Place your cake in the preheated oven and bake for about 25-30 minutes. Start checking for doneness around the 25-minute mark by inserting a toothpick into the center. If it comes out clean or with just a few crumbs attached, it’s ready to come out!
-
Cool and Serve
- Allow the cake to cool in the pan for about 10 minutes before transferring it to a wire rack to cool completely. I know it’s tempting to cut into it right away, but patience pays off! Letting it cool ensures better texture and helps the flavors settle.
Serving Suggestions
When it comes to serving your 3-Ingredient Chocolate Zucchini Cake, the options are limitless! Slice it up and place it on a pretty plate—maybe dust it with a sprinkle of powdered sugar for a touch of elegance. If you’re feeling indulgent, serve it warm with a scoop of vanilla ice cream or a dollop of whipped cream. For a hint of freshness, a sprinkle of fresh berries on the side can add a delightful burst of flavor and color to your plate!
Recipe Variations
Feeling adventurous? Here are some creative variations to shake things up with this recipe:
- Nutty Chocolate Delight: Add a handful of chopped walnuts or pecans to the batter for an extra crunch.
- Spicy Twist: Incorporate a teaspoon of cinnamon or a pinch of nutmeg to warm up the flavor profile—perfect for fall!
- Minty Fresh: Fold in some peppermint extract for a refreshing chocolate mint cake that brings a delightful twist to the classic.
- Vegan Option: Use a vegan chocolate cake mix and swap applesauce for a flaxseed meal mixed with water to create an egg substitute.
- Frosted Fantasy: For a rich finish, top with a cream cheese frosting or chocolate ganache after cooling.
Chef’s Notes
One of my favorite things about this recipe is its ability to evolve! I remember the first time I made this cake; I was hesitant about adding zucchini to a dessert. However, watching my friends’ surprised faces as they enjoyed slice after slice was pure magic. Over time, I experimented with adding nut butter and various spices, making it a staple in my baking repertoire. Each time I bake it, I’m reminded that cooking is as much about the memories as it is about the food!
Oh, and a little tip: if you’ve got leftover zucchini after making the cake, toss it into a stir-fry or sauté it with garlic and olive oil for a delightful side dish!
FAQs and Troubleshooting
1. My cake didn’t rise! What happened?
- Ensure your baking powder is fresh. An expired cake mix can lead to a dense cake. Make sure to follow the baking time closely too!
2. Can I use frozen zucchini?
- Definitely! Make sure to thaw and squeeze out excess moisture before mixing it into your batter.
3. My cake is too wet—what went wrong?
- If your zucchini was very watery, try squeezing out more moisture next time. Also, make sure you’re measuring your ingredients accurately.
4. How can I store leftovers?
- Store any leftover cake in an airtight container at room temperature for up to three days. If it lasts that long! You can also refrigerate it to extend its freshness.
Nutritional Info
While I don’t focus too heavily on nutritional information (because indulging in a slice of happiness is more important!), here’s a simple breakdown for reference:
- Calories per slice: Approximately 180
- Fat: Varies based on the cake mix used
- Fiber: Thanks to the zucchini!
Remember, everyone deserves a little treat now and then!
Thank you for joining me on this baking adventure—I hope your kitchen fills with the wonderful scent of chocolate and warm memories just like mine. As you gather around the table, savor every bite, and share laughter with friends or family. Happy baking, and can’t wait to see you back here for more culinary creations!
Print
3-Ingredient Chocolate Zucchini Cake
- Total Time: 40 minutes
- Yield: 8 servings 1x
- Diet: Vegetarian
Description
A simple, rich, and moist chocolate zucchini cake made with just three ingredients.
Ingredients
- 1 cup Zucchini, grated
- 1 box (15.25 oz) Chocolate cake mix
- 1 cup Unsweetened applesauce
Instructions
- Preheat the oven to 350°F (175°C).
- Grate the zucchini and squeeze out excess moisture.
- Mix the chocolate cake mix, grated zucchini, and applesauce in a large bowl until well combined.
- Prepare a 9×13-inch baking pan by greasing it or lining it with parchment paper.
- Pour the batter into the pan and spread evenly.
- Bake in the preheated oven for 25-30 minutes, checking for doneness with a toothpick.
- Cool the cake in the pan for 10 minutes before transferring it to a wire rack to cool completely.
Notes
Serve dusted with powdered sugar or with a scoop of ice cream.
- Prep Time: 10 minutes
- Cook Time: 30 minutes
- Category: Dessert
- Method: Baking
- Cuisine: American
Nutrition
- Serving Size: 1 slice
- Calories: 180
- Sugar: 12g
- Sodium: 400mg
- Fat: 6g
- Saturated Fat: 1g
- Unsaturated Fat: 5g
- Trans Fat: 0g
- Carbohydrates: 30g
- Fiber: 2g
- Protein: 2g
- Cholesterol: 0mg
Keywords: chocolate cake, zucchini cake, easy dessert, 3-ingredient cake, baking
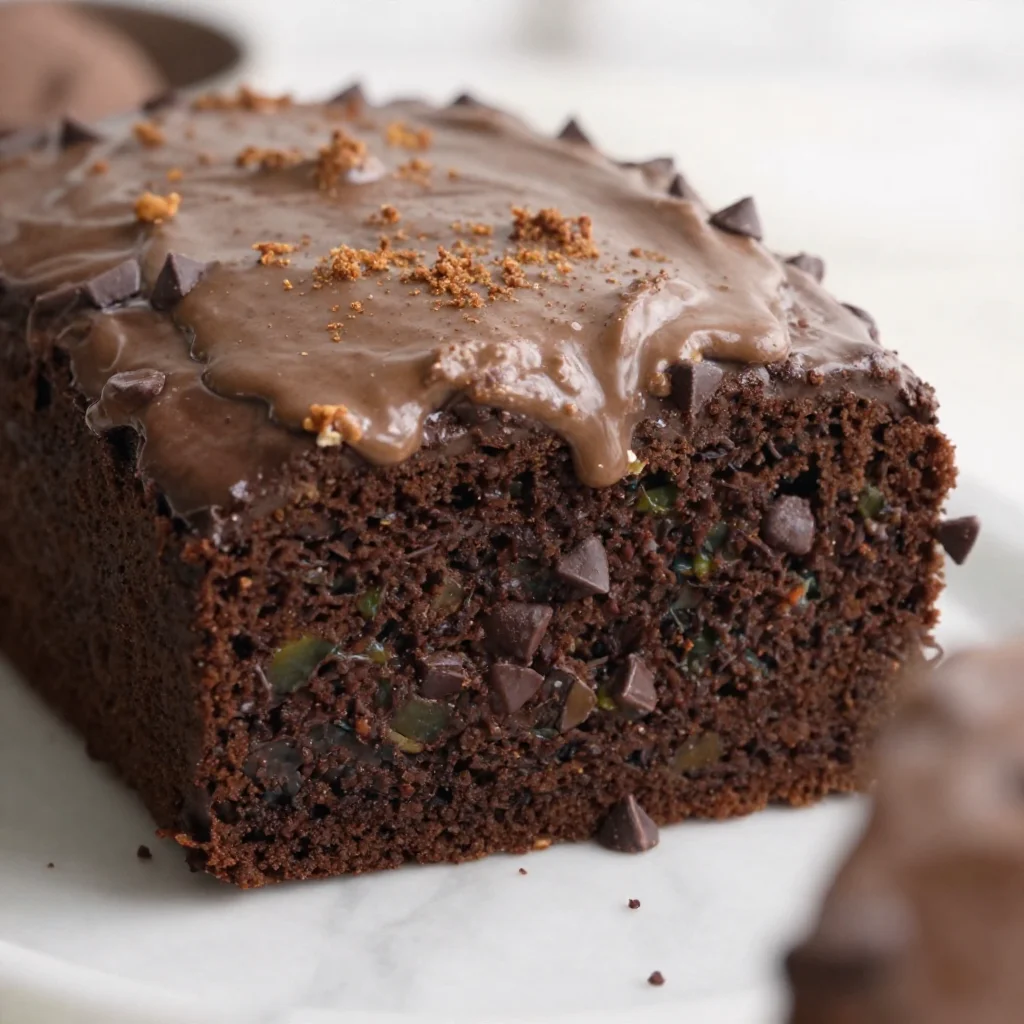
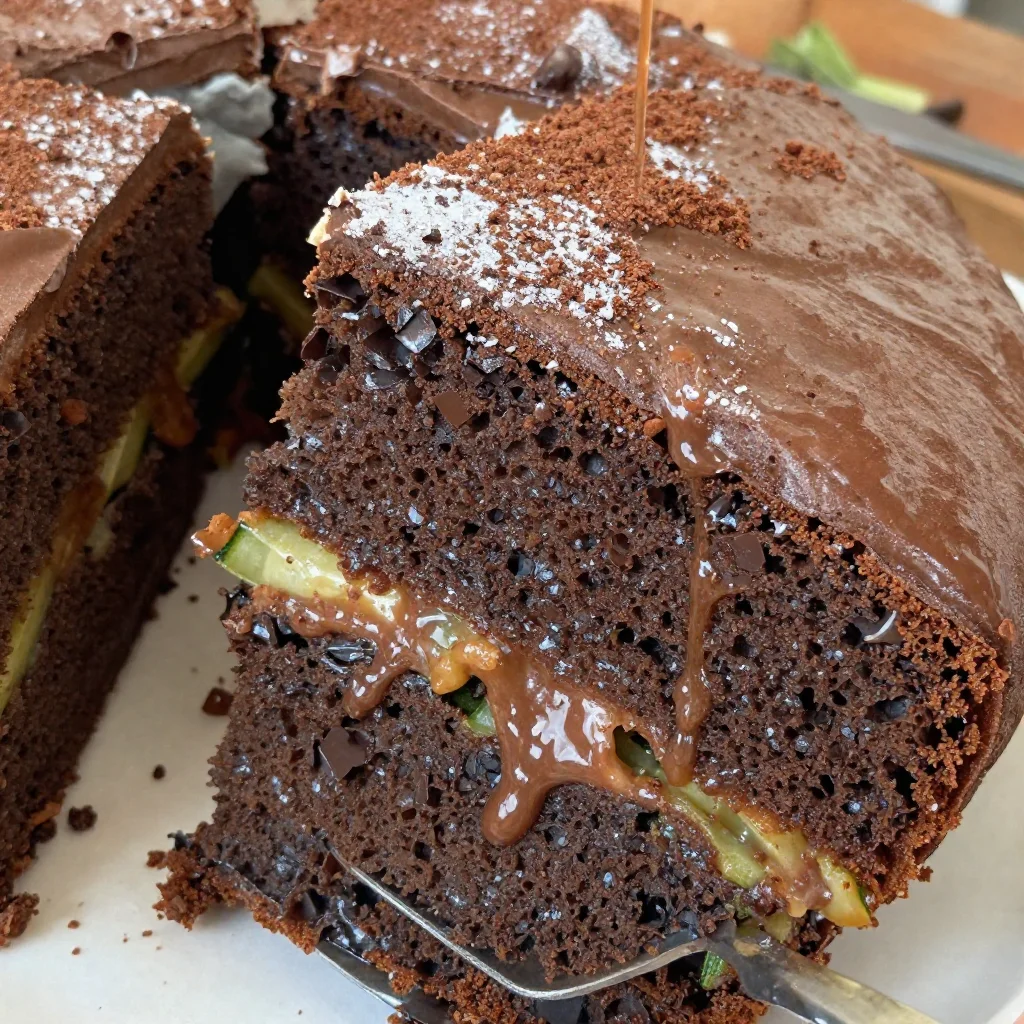
One-Bowl Chocolate Zucchini Loaf: Moist, 30-Min Prep
The Chocolate Zucchini Loaf That Will Make You Believe in Magic
Welcome to my cozy kitchen! I’m Olivia Bennett, your culinary companion on a journey through flavors and nostalgia. Today, we’re diving into the world of Chocolate Zucchini Loaf—a delightful treat that’s as heartwarming as it is delicious. Just imagine this: a moist, fudgy loaf that takes advantage of the garden’s bounty while teasing your sweet tooth. You’ll find that this recipe is not only easy to whip up but also a fantastic way to sneak in some veggies (yes, really!) to satisfy your chocolate cravings.
Baking this loaf is akin to wrapping yourself in a warm blanket on a chilly night. The aromas that fill your kitchen bring back fond memories of family gatherings and lazy afternoons spent enjoying the simple pleasures in life. Have you ever noticed how a single scent can transport you back to a moment in time? For me, the rich smell of chocolate mingling with the earthiness of zucchini is a glorious embodiment of my family’s tradition of cooking and baking together.
I remember a sunny afternoon spent with my grandmother, who was a baker extraordinaire. She would often slide the most decadent chocolate cakes out of the oven, followed closely by her secret obsession with adding hidden veggies to her concoctions. It was during one of those lively kitchen sessions that I first tasted a rich chocolate zucchini bread, and it was love at first bite. The way the chocolate danced with the faintest hint of garden-fresh zucchini always left me speechless. Now, I’m thrilled to share this chocolatey creation with you—just as my grandmother shared with me.
Are you ready to bring the joy of baking into your home? Let’s get our aprons on and dive into this scrumptious adventure!
Ingredients You’ll Need
Here’s what you need to gather to create this heavenly delight:
-
2 cups zucchini, grated
Fresh zucchini adds moisture to the loaf without overpowering the flavor. Use medium-sized zucchini for better texture. If you don’t have zucchini, finely grated carrots could be a wonderful substitute! -
1 cup all-purpose flour
A wholesome base for your loaf. If you prefer, you can use whole wheat flour for a nuttier flavor and extra fiber. -
1 cup cocoa powder
Unsweetened cocoa powder is essential for that deep chocolate flavor. If you’re feeling adventurous, try Dutch-processed cocoa for an even richer taste. -
1 cup sugar
Granulated sugar sweetens and caramelizes the loaf beautifully. You can replace half with brown sugar for additional moisture and flavor depth. -
½ cup vegetable oil
The oil keeps the loaf moist and tender. Feel free to swap this with melted coconut oil or apple sauce for a healthier twist! -
2 large eggs
Eggs help bind the ingredients. For a vegan alternative, try ½ cup of unsweetened applesauce or a flax egg (1 tablespoon of flaxseed meal mixed with 2.5 tablespoons of water). -
1 teaspoon vanilla extract
The vanilla enhances the overall flavor profile and adds warmth. Always choose pure vanilla extract when possible for the best taste. -
1 teaspoon baking soda
Baking soda is crucial for leavening your loaf. Ensure it’s fresh for optimum rise! -
½ teaspoon salt
A pinch of salt brings out all the flavors wonderfully. Don’t skip it! -
1 cup chocolate chips (optional, but encouraged)
Because who doesn’t love a bit of chocolate in every bite? You can use semi-sweet, dark, or even white chocolate chips for a fun twist.
Step-by-Step Instructions
Let’s transform these ingredients into a delectable Chocolate Zucchini Loaf! Follow these steps closely, and trust me, you’ll be left with something remarkable.
-
Preheat Your Oven
Preheat your oven to 350°F (175°C). This is essential for an evenly baked loaf. While the oven warms up, you can prep your ingredients. -
Prepare Your Zucchini
Wash and grate your zucchini using a box grater or a food processor. Don’t peel it; the skin adds lovely color and nutrients! After grating, use a clean kitchen towel to squeeze out excess moisture. This will prevent the loaf from becoming too soggy. -
Mix the Dry Ingredients
In a large mixing bowl, whisk together the flour, cocoa powder, baking soda, and salt. This combines everything evenly, ensuring no clumps of cocoa mishaps later on. A little chef hack? Sift your cocoa powder beforehand for an ultra-smooth result. -
Combine the Wet Ingredients
In a separate bowl, beat the eggs (or your substitute) together. Stir in the sugar, vegetable oil, and vanilla extract until it’s nice and smooth. This should only take a minute or two. -
Join Forces!
Gradually add the wet mixture into the dry mixture, folding gently. Don’t overmix! We want a tender loaf, not rubbery. The secret here is to stir just until combined; a few flour streaks are okay. -
Add the Zucchini and Chocolate Chips
Gently fold in the grated zucchini and chocolate chips. It’s okay if some zucchini chunks are left intact; they’ll provide fantastic pockets of moisture! -
Pour into Loaf Pan
Grease a 9×5-inch loaf pan or line it with parchment paper for easy removal. Pour the batter in and smooth the top with a spatula. Sprinkle a few extra chocolate chips on top if you wish—it’s the “I’m about to amaze you” touch. -
Bake
Place the pan in the preheated oven and bake for 50-60 minutes. You’ll know it’s done when a toothpick inserted in the center comes out clean or with a few moist crumbs (not wet batter). -
Cool Time
Once baked, allow the loaf to cool in the pan for about 10 minutes, then carefully transfer it to a wire rack to cool completely. Smelling its intoxicating aroma while it cools is pure joy!
Serving Suggestions
Once your loaf is fully cooled (and that might take some serious willpower not to dive in early!), slice it into generous pieces. Consider serving it on a pretty platter with a side of whipped cream or a scoop of vanilla ice cream. Fresh berries or a drizzle of chocolate ganache can elevate it to dessert status. I love enjoying a slice alongside a warm cup of coffee or a cozy evening tea, letting the flavors mingle.
Recipe Variations
Feeling experimental? Here are a few creative twists to try with your Chocolate Zucchini Loaf:
-
Nutty Crunch: Fold in chopped walnuts or pecans for a delightful crunch that contrasts beautifully with the soft, moist cake.
-
Spiced Addition: Add a teaspoon of cinnamon or a dash of nutmeg to the dry ingredients for a warm, spicy twist—perfect for autumn!
-
Vegan Delight: Swap eggs with flax eggs, use coconut oil, and replace sugar with maple syrup for a vegan version of this delightful treat.
-
Minty Fresh: Stir in crushed peppermint candies or a splash of peppermint extract to create a refreshing seasonal variation.
-
Bistro Style: Bake as muffins—this reduces the baking time to about 20-25 minutes—great for grab-and-go snacks that are not just your average muffin!
Chef’s Notes
I can’t emphasize how much love I’ve poured into perfecting this recipe over the years. It has become a staple in my household, always met with smiles and a sense of nostalgia. It’s versatile too; I’ve adapted it countless times based on what I had on hand. One fun memory was when my neighbor gifted me a load of zucchini from his garden, and I whipped up a double batch for a community potluck. Everyone raved about it, and I even had a couple of friends ask for the recipe (which I always share, of course!).
FAQs and Troubleshooting
Q: Can I replace the cocoa powder with a different type of flour?
A: Cocoa powder is what gives this loaf its chocolatey goodness! If you simply can’t have cocoa, consider experimenting with a carob powder, but I suggest keeping the ratios similar to maintain texture.
Q: My bread is too dense; what did I do wrong?
A: Density often comes from overmixing the batter. Aim to mix just until the ingredients are combined, and try not to overbake.
Q: How can I tell when the loaf is done?
A: Insert a toothpick into the center; if it comes out clean or with a few moist crumbs, it’s perfect!
Q: Can I freeze this loaf?
A: Yes! This loaf freezes wonderfully. Just wrap slices in plastic wrap and then in foil, or place the whole loaf in an airtight container. It can stay fresh for about 3 months in the freezer.
Nutritional Info
(Note: These values are based on approximately 12 servings per loaf. Please adjust according to your specific measurements.)
- Calories: 250 per slice
- Fat: 12g
- Carbohydrates: 35g
- Fiber: 2g
- Protein: 4g
As you embark on this baking adventure, I hope you discover as much joy in creating this Chocolate Zucchini Loaf as I have. Remember, cooking is all about love—turning the ordinary into something that nourishes both the body and heart! Happy baking, my friends!
Print
Chocolate Zucchini Loaf
- Total Time: 75 minutes
- Yield: 12 servings 1x
- Diet: Vegetarian
Description
A delightful chocolate zucchini loaf that’s moist, fudgy, and sneakily incorporates veggies to satisfy your sweet tooth.
Ingredients
- 2 cups zucchini, grated
- 1 cup all-purpose flour
- 1 cup cocoa powder
- 1 cup sugar
- ½ cup vegetable oil
- 2 large eggs
- 1 teaspoon vanilla extract
- 1 teaspoon baking soda
- ½ teaspoon salt
- 1 cup chocolate chips (optional)
Instructions
- Preheat your oven to 350°F (175°C).
- Prepare your zucchini by washing and grating it, then squeezing out excess moisture.
- Mix the dry ingredients: flour, cocoa powder, baking soda, and salt.
- Combine the wet ingredients: beat the eggs, then stir in sugar, oil, and vanilla extract.
- Join the wet mixture into the dry mixture, folding gently until just combined.
- Add the grated zucchini and chocolate chips, folding gently.
- Pour the batter into a greased 9×5-inch loaf pan and smooth the top.
- Bake for 50-60 minutes until a toothpick comes out clean.
- Cool in the pan for 10 minutes, then transfer to a wire rack to cool completely.
Notes
Serve with whipped cream or vanilla ice cream for an elevated dessert experience. This loaf freezes well for about 3 months.
- Prep Time: 15 minutes
- Cook Time: 60 minutes
- Category: Dessert
- Method: Baking
- Cuisine: American
Nutrition
- Serving Size: 1 slice
- Calories: 250
- Sugar: 20g
- Sodium: 200mg
- Fat: 12g
- Saturated Fat: 3g
- Unsaturated Fat: 7g
- Trans Fat: 0g
- Carbohydrates: 35g
- Fiber: 2g
- Protein: 4g
- Cholesterol: 40mg
Keywords: chocolate bread, zucchini bread, dessert, baking
Quick Dairy-Free Vegan Desserts for Busy Weeknights
Indulge Guilt-Free: The Ultimate Vegan Chocolate Avocado Mousse
Welcome to my kitchen! Today, I am thrilled to share a recipe that perfectly marries indulgence with health: Vegan Chocolate Avocado Mousse. If you’re anything like me, the mere thought of chocolate invokes a wave of happiness. But what if I told you that you could enjoy a rich, creamy dessert without any dairy or guilt? This mousse not only satisfies your chocolate cravings but also sneaks in some healthy fats and nutrients thanks to the superstar ingredient—avocado!
Imagine cozying up with a silky bowl of chocolate goodness after a long day, knowing it’s nourishing your body while delighting your taste buds. Sounds dreamy, right? This recipe combines simple ingredients to create a dessert that’s not just vegan and dairy-free but also an absolute crowd-pleaser. Whether it’s for a special occasion or a quiet night in, this mousse will have you basking in compliments and well-deserved "Wow!" moments from everyone at the table.
Perhaps you’re thinking, “Avocado in dessert? No way!” Trust me; I had my doubts too until I tried it for the first time at a friend’s dinner party. She served it in tiny elegant cups, and I was skeptical as I took my first bite. To my absolute delight, the rich texture and deep chocolate flavor blew my mind! I couldn’t believe I was indulging in something so decadent yet so nutritious. Ever since that delightful evening, I’ve been whipping up this vegan mousse whenever I want to impress friends or treat myself to something sweet, and now it’s time for you to experience this joy too!
So grab your mixing bowl and get ready to dive into a dessert that will redefine your expectations of healthy sweets. Let’s turn those ripe avocados into a luscious treat that you’ll want to make again and again!
A Taste of Nostalgia
My journey with cooking has always been tied to the warmth of family and friends, particularly the joy of dessert-making together. One memory that stands out was the summer my sister and I teamed up to create our own dessert recipes. We rummaged through our family cookbook, coming across a version of chocolate mousse that sparked our curiosity. However, we weren’t just satisfied with following a recipe. We looked to make an indulgent dessert that also catered to our evolving dietary choices in our teenage years.
That’s when we stumbled upon the idea of incorporating avocados into our chocolate creation. At first, my sister raised an eyebrow, but with a little coaxing and a dash of sibling curiosity, we set to work in the kitchen. The feel of the creamy avocado blending with the chocolate was pure magic, and the moment we dipped the spoon in for a taste, we couldn’t stop smiling. It was beyond what we had imagined. That day, we not only created a delicious dish but also built a cherished memory that I carry with me every time I whip up this fantastic mousse.
Now, I love sharing this recipe with my friends and family, hoping to inspire them to explore cooking with newfound ingredients. It’s amazing how a simple dish can evoke powerful emotions and create lasting bonds.
Ingredients
To create this decadent Vegan Chocolate Avocado Mousse, you will need the following ingredients:
-
Ripe Avocados
The base of our mousse! When choosing avocados, look for ones that are dark purple and have a slight give when squeezed gently. If they’re too firm, leave them at room temperature for a couple of days before using. If you don’t have avocados, you could substitute them with silken tofu for a similar creamy texture. -
Cocoa Powder
Unsweetened cocoa powder adds that rich chocolate flavor. Opt for a high-quality brand, as it makes a difference. If you’re looking for something sweeter, you can swap it with carob powder, but the flavor will shift to a more earthy profile. -
Maple Syrup
This natural sweetener balances the bitterness of the cocoa. Maple syrup has a unique flavor that pairs wonderfully with chocolate, but agave nectar or even honey can serve as alternatives (if not vegan). -
Vanilla Extract
A splash of vanilla enhances the overall flavor, bringing a warm richness to the mousse. If you’re out of vanilla extract, try using almond extract for a different but delicious twist. -
Almond Milk (or any plant-based milk)
This will help achieve the creamy consistency we want in our mousse. You can use soy milk, coconut milk, or even oat milk if you prefer! -
A Pinch of Salt
Trust me, a little salt elevates the sweetness and helps bring out the flavors. If you’re on a sodium-restricted diet, feel free to omit it!
Step-by-Step Instructions
Let’s get cooking! Follow these steps for a delicious Vegan Chocolate Avocado Mousse.
-
Prep Your Avocados
Cut open your ripe avocados and carefully remove the pit. Scoop the flesh into your mixing bowl. This is an excellent time to reflect on the delightful memories tied to cooking with friends and family as you feel the texture of the avocado! -
Blend the Ingredients
Add the cocoa powder, maple syrup, vanilla extract, almond milk, and a pinch of salt to the mixing bowl with the avocados. Use a hand mixer or a food processor for this step. A blender can work too, but be careful not to over-blend—taste as you go! You’ll want a smooth and creamy consistency. -
Taste and Adjust
After blending, taste your mousse. Does it need more sweetness? Add a bit more maple syrup! Too thick? Splash in a little more almond milk until you reach your desired consistency. Remember, this is your mousse, so tailor it to your taste! -
Chill It Out
Once you’re satisfied, transfer the mousse into serving bowls or cups. Cover them with plastic wrap and place them in the fridge for at least 30 minutes. Chilling allows the flavors to meld and gives it the perfect texture—like a chocolatey hug! -
Garnish and Serve
When you’re ready to serve, feel free to get creative with your presentation! Top with fresh berries, crushed nuts, or a dollop of coconut whipped cream for an extra touch of sweetness and elegance. And don’t forget a sprig of mint for that pop of color!
Serving Suggestions
When it comes to serving this Vegan Chocolate Avocado Mousse, think presentation! Layer the mousse into elegant glasses or mason jars for a charming touch. You could also serve it in a small bowl topped with your favorite crunch—like granola or cacao nibs—giving it a delightful bite and contrast in texture.
For an extra treat, consider offering a selection of toppings on the side, such as shredded coconut, mini dark chocolate chips, or fresh berries, allowing everyone to customize their dessert just the way they like it!
Recipe Variations
Want to mix things up? Here are a few creative twists you can try:
- Minty Fresh: Add a drop of peppermint extract to your mousse for a refreshing mint chocolate vibe.
- Spiced Mocha: Stir in a teaspoon of instant coffee granules or espresso powder for a fabulous mocha flavor.
- Nutty Delight: Blend in a tablespoon of almond or peanut butter to enhance the richness.
- Citrus Zing: A hint of orange or lemon zest can brighten the flavor profile beautifully.
- Avocado-Free Option: If you’re not keen on avocados, try this with silken tofu to maintain the creamy texture while adding protein!
Chef’s Notes
This recipe has been a staple in my kitchen for years, but it didn’t start with a perfect outcome! I remember the first time I made it, and the texture was a bit grainy because I didn’t blend it enough—welcome to the learning curve of culinary adventures! Now, I’ve mastered the art of achieving that luscious, silky texture, and this mousse always brings joy, laughter, and satisfaction—just like the many cherished memories of cooking with loved ones.
So don’t hesitate to make this your own! Share your kitchen adventures with me—I’d love to hear how your chocolate mousse journey goes!
FAQs and Troubleshooting
Here are a few common questions and issues you might run into while making this Vegan Chocolate Avocado Mousse:
-
My mousse turned out too thick. What can I do?
If your mousse is too thick, a splash of almond milk will help thin it out! Just blend it again until you reach the desired consistency. -
It tastes too avocado-y for my liking. What did I do wrong?
If you can taste the avocado too strongly, try adding more cocoa powder and sweetener to balance the flavor. Blending well helps achieve that creamy chocolate finish too! -
Can I use overripe avocados?
Sure! As long as they’re not brown inside and have no off-smells, overripe avocados can give you an even creamier mousse. -
How long can I store the mousse?
It will last in the fridge for about 2-3 days. Just make sure to cover it well to prevent it from oxidizing and turning brown.
Nutritional Info
Though I’d usually focus on the enjoyment of cooking, it’s good to know that each serving of this delightful Vegan Chocolate Avocado Mousse is packed with heart-healthy fats from avocados, while also remaining free of dairy and refined sugars. This delightful indulgence keeps everything balanced, providing good energy without the guilty aftermath—perfect for both your palate and your body!
Now, get cooking! I can’t wait for you to take a spoonful of this healthy, delightful, and utterly delicious Vegan Chocolate Avocado Mousse. Happy cooking!
Print
Vegan Chocolate Avocado Mousse
- Total Time: 40 minutes
- Yield: 4 servings 1x
- Diet: Vegan
Description
A rich and creamy dessert made from avocados and cocoa powder, perfect for satisfying chocolate cravings guilt-free.
Ingredients
- 2 ripe avocados
- 1/2 cup unsweetened cocoa powder
- 1/4 cup maple syrup (or agave nectar)
- 1 tsp vanilla extract
- 1/2 cup almond milk (or any plant-based milk)
- A pinch of salt
Instructions
- Prep your avocados by cutting them open and removing the pit. Scoop the flesh into a mixing bowl.
- Blend the cocoa powder, maple syrup, vanilla extract, almond milk, and a pinch of salt with the avocados until smooth.
- Taste the mousse and adjust sweetness or thickness as needed.
- Chill in the fridge for at least 30 minutes to allow flavors to meld.
- Garnish with fresh berries, crushed nuts, or coconut whipped cream before serving.
Notes
For an avocado-free option, substitute the avocados with silken tofu. This mousse can last in the fridge for 2-3 days when covered.
- Prep Time: 10 minutes
- Cook Time: 0 minutes
- Category: Dessert
- Method: No Cook
- Cuisine: Vegan
Nutrition
- Serving Size: 1 serving
- Calories: 250
- Sugar: 12g
- Sodium: 50mg
- Fat: 10g
- Saturated Fat: 1.5g
- Unsaturated Fat: 8g
- Trans Fat: 0g
- Carbohydrates: 34g
- Fiber: 6g
- Protein: 3g
- Cholesterol: 0mg
Keywords: vegan dessert, chocolate mousse, healthy chocolate, avocado mousse, guilt-free dessert

Keto Milkshake
Indulge in Creamy Bliss: The Ultimate Keto Milkshake
Introduction
Hey there, fellow food lover! Welcome back to my cozy corner of the kitchen. Today, we’re diving into a beverage that’s not only fabulously creamy but also aligns beautifully with a keto lifestyle—yes, I’m talking about the ever-tempting Keto Milkshake! Now, if you’ve ever craved a thick and luscious shake but thought that keto meant saying goodbye to such indulgent delights, fear not! This recipe is here to make your taste buds dance without the guilt.
Imagine this: it’s a sunny afternoon, you’ve been busy all day, and all you want is something rich and satisfying to cool you down. You whip up this Keto Milkshake in just a few minutes—it’s not just a drink; it’s a mini celebration of flavor and creativity. Picture yourself curling up on the couch with this dreamy concoction, relishing each sip, and momentarily escaping the hustle and bustle of everyday life. Perfect, right?
But beyond the refreshing taste, making a milkshake at home means you can control every single ingredient—no hidden sugars or mysterious additives. Whether you’re staying true to keto or simply looking to indulge in a treat that won’t sabotage your goals, we’re about to make magic together.
So roll up your sleeves, grab your blender, and let’s create a Keto Milkshake that will have you saying, “I can’t believe this is low-carb!” Trust me, you’ll want to keep this recipe in your back pocket for those moments when you need a delectable pick-me-up. Now, let’s get blending!
Personal Story
Ah, the vivid memories of childhood! One of my favorite nostalgia-fueled moments was our family’s Friday night tradition: homemade milkshake night. My dad would pull out the old-school blender, assembling flavors that seemed almost endless—chocolate, vanilla, strawberry—you name it! I can still hear the whirring sound echoing through our kitchen as he’d call us to come help him.
In those moments, it wasn’t just about the milkshake; it was about the laughter, the mess, and the sweet anticipation of oozing creamy goodness. We’d pile into the living room with our frosty glasses, the sweet aroma wrapping around us in a cozy embrace. And though we were pouring in sugary ice cream back then, I remember feeling exhilarated at how one simple drink could bring our family together every Friday night.
Fast forward to today, and with a little more knowledge about nutritional choices, I’ve reinvented that beloved tradition to fit my keto lifestyle while keeping all that memory-infused joy intact. So today, let’s recreate a bit of that magic, shall we?
Ingredients
Here’s what you’ll need to whip up the ultimate Keto Milkshake. Each ingredient not only contributes to the deliciousness but brings its own unique flair!
-
Heavy Cream: The star of our shake! Heavy cream is rich in fats and low in carbohydrates, making it the perfect keto-friendly base. For a lighter option, you can use coconut cream, but be aware that it will alter the flavor.
-
Unsweetened Almond Milk: This low-calorie milk alternative gives our milkshake a smooth texture. If you prefer, you can substitute with unsweetened coconut milk, though this will impart a more tropical flavor.
-
Sugar-Free Sweetener: I adore using erythritol for sweetness! It provides that sugary flavor without disturbing blood sugar levels. If erythritol isn’t your jam, feel free to try monk fruit sweetener or stevia.
-
Vanilla Extract: A splash of pure vanilla extract enhances flavor, bringing warmth and depth to the shake. If you’re feeling adventurous, try adding almond extract for a different twist!
-
Ice Cubes: These are essential for achieving that frosty consistency we all crave in a milkshake. You can also swap out some of the ice for frozen cauliflower or zucchini for a sneaky veggie boost—don’t worry, you won’t taste it!
-
Optional Toppings: Whipped cream, a sprinkle of cocoa powder, or even sugar-free chocolate chips. These are not just added flair; they help transform the milkshake into a showstopper!
With these simple, wholesome ingredients, you’re well on your way to a sensational keto treat.
Step-by-Step Instructions
Now for the best part—let’s make our Keto Milkshake! Follow these simple steps and enjoy the process:
-
Gather Your Ingredients: Grab all your ingredients and have them measured out and ready to go. It makes the blending process super smooth. Here’s a little chef hack: use room temperature ingredients as much as possible; it helps everything blend more evenly!
-
Add the Base: In the blender, start with 1 cup of heavy cream. This provides that luscious texture that makes the milkshake feel indulgent. If using coconut cream, just remember to blend well to prevent any chunky bits!
-
Mix in the Almond Milk: Pour in 1/2 cup of unsweetened almond milk. Adjust this based on how thick you prefer your shake. The less almond milk you add, the thicker your milkshake will become—so play around until you find your perfect balance.
-
Sweeten It Up: Add in 2–3 tablespoons of your preferred sugar-free sweetener (adjust based on taste). Blend this mixture until it’s fully combined; you may need to scrape down the sides to ensure everything gets incorporated.
-
Vanilla Love: Don’t forget to add 1 teaspoon of pure vanilla extract. This may seem like a small amount, but trust me, it packs a flavor punch! Blend again until smooth.
-
Crush Those Ice Cubes: Toss in about 1-2 cups of ice cubes (or your vegetable alternative). Blend until you have the consistency you like. If it’s too thick, add a splash more almond milk; too thin? Just throw in more ice!
-
Taste Test: Here’s where you can adjust any flavors—want it sweeter? Toss in a bit more sweetener! Want a chocolatey twist? Add some unsweetened cocoa powder. Blend again to mix.
-
Serve It Up: Pour your milkshake into chilled glasses or mason jars for an extra cozy vibe. You might want to drizzle a bit of chocolate sauce down the sides of the glasses—they don’t just look pretty; they’re delicious too!
Serving Suggestions
When it comes to serving your Keto Milkshake, presentation matters! Check out these fun ideas to make your drink delightful:
-
Consider topping your milkshake with a dollop of homemade whipped cream—pure bliss! A sprinkle of cocoa powder or a few sugar-free chocolate chips will add that finishing touch.
-
Serve it alongside a stack of keto-friendly cookies or brownies for an elegant dessert experience.
-
For a fun party twist, create a DIY milkshake bar. Set out various toppings and let everyone build their own masterpiece.
Recipe Variations
Feeling adventurous? Here are some twisty options to keep your Keto Milkshake exciting:
-
Chocolate Peanut Butter Delight: Add 2 tablespoons of unsweetened cocoa powder and 2 tablespoons of sugar-free peanut butter for a rich, decadent flavor.
-
Mint Chocolate Chip: Toss in half a teaspoon of peppermint extract and some sugar-free chocolate chips. It’s like a refreshing treat after a meal!
-
Berry Bliss: Blend in a handful of frozen berries (strawberries or raspberries work well). Just remember to account for added carbs!
-
Mocha Magic: Mix in a shot of espresso or some instant coffee granules for a caffeine boost—the perfect pick-me-up!
Chef’s Notes
As with any recipe, don’t be afraid to make it your own! This Keto Milkshake has evolved as I’ve experimented over the years. I started with the classic flavor, but as I learned more about keto-friendly ingredients, I found all these amazing ways to build upon that initial foundation.
And here’s a funny tidbit: the first time I attempted to recreate a milkshake, I accidentally added too much sweetener, and the blend came out overly sweet! We ended up calling it “the candy melt,” and although it wasn’t what I had intended, it sparked lots of laughs and sweet memories. So, don’t stress if things don’t go perfectly; that’s all part of the cooking adventure!
FAQs and Troubleshooting
Here are a few common questions you might have or pitfalls to avoid:
-
Why is my milkshake too thin?
- If your shake isn’t thick enough, try adding more ice or a bit of frozen fruit. Alternatively, you can reduce the amount of almond milk added next time.
-
Can I use flavored almond milk?
- Absolutely! Just be cautious with added sweeteners and flavors. Make sure it aligns with your keto goals. Some flavored options might have added sugars.
-
What if I don’t have a blender?
- You could use an immersion blender or even a whisk for a less creamy consistency. A well-mixed shake can still be delicious; you just might have to work a little harder!
-
Is it okay to make this ahead of time?
- While it’s best enjoyed fresh, you can store your milkshake in a jar for a couple of hours. Just give it a quick stir or shake before you enjoy it again.
Nutritional Info
When you prepare your Keto Milkshake just right, you can indulge without the high carbs! Here’s an approximate breakdown for one serving based on the ingredients listed:
- Calories: 400
- Fat: 36g
- Carbohydrates: 5g (Net Carbs roughly 3g after fiber)
- Protein: 6g
(Note: Nutritional values will vary depending on the specific ingredients and brands you use.)
There you have it—a Keto Milkshake recipe that’s simple, delightful, and sure to satisfy those cravings! I hope it brings as much joy to your kitchen as it has to mine. Happy blending, my friends!
Print
Ultimate Keto Milkshake
- Total Time: 5 minutes
- Yield: 2 servings 1x
- Diet: Keto
Description
A creamy, low-carb milkshake that indulges your cravings without the guilt, perfect for a keto lifestyle.
Ingredients
- 1 cup Heavy Cream
- 1/2 cup Unsweetened Almond Milk
- 2–3 tablespoons Sugar-Free Sweetener (such as erythritol)
- 1 teaspoon Vanilla Extract
- 1–2 cups Ice Cubes
- Optional Toppings: Whipped cream, cocoa powder, sugar-free chocolate chips
Instructions
- Gather Your Ingredients: Measure out all your ingredients and have them ready to go.
- Add the Base: In the blender, start with 1 cup of heavy cream.
- Mix in the Almond Milk: Pour in 1/2 cup of unsweetened almond milk.
- Sweeten It Up: Add 2–3 tablespoons of sugar-free sweetener and blend until combined.
- Vanilla Love: Add 1 teaspoon of pure vanilla extract and blend again.
- Crush Those Ice Cubes: Toss in 1-2 cups of ice and blend to desired consistency.
- Taste Test: Adjust any flavors like sweetness or add cocoa powder as desired.
- Serve It Up: Pour into chilled glasses and garnish with toppings if desired.
Notes
For a thicker shake, reduce almond milk; for a thinner shake, add more ice or almond milk.
- Prep Time: 5 minutes
- Cook Time: 0 minutes
- Category: Beverage
- Method: Blending
- Cuisine: American
Nutrition
- Serving Size: 1 serving
- Calories: 400
- Sugar: 1g
- Sodium: 150mg
- Fat: 36g
- Saturated Fat: 24g
- Unsaturated Fat: 12g
- Trans Fat: 0g
- Carbohydrates: 5g
- Fiber: 2g
- Protein: 6g
- Cholesterol: 120mg
Keywords: Keto, Milkshake, Low Carb, Dessert, Beverage

Low Calorie Greek Yogurt Brownies
Indulge in Guilt-Free Delight: Low-Calorie Greek Yogurt Brownies
Hey there, fellow food lovers! I’m Olivia Bennett, and today, I’m inviting you into my cozy kitchen to whip up something that’s as delicious as it is guilt-free: Low-Calorie Greek Yogurt Brownies! I mean, who doesn’t love a rich, fudgy brownie? But what if I told you that you could indulge without the usual calorie splurge? Sounds too good to be true, right? But trust me, these brownies are here to reshape your dessert experience!
Picture this: It’s a rainy afternoon, the kind that begs for something sweet. The smell of cocoa fills the air as you mix up a bowl of ingredients that promise chocolaty bliss. We all have those days where a box of brownies can just whisk away the blues, but often those decadent treats come with a hefty price tag on our waistlines and energy levels. Enter Greek yogurt—our hero ingredient! Not only does it add delightful moisture and texture, but it also dials down the calories while keeping the flavor cranked up to eleven!
Whether you’re baking for your family, friends, or that special someone who loves chocolate as much as you do, these brownies will bring everyone together. They are perfect for any occasion, from cozy movie nights to summertime picnics, and they’re super easy to make, even for beginner bakers. So, roll up those sleeves, preheat that oven, and let’s dive into our delicious journey of Low-Calorie Greek Yogurt Brownies!
Personal Story
I can’t help but smile when I think about the first time I created these Greek Yogurt brownies. It was a chilly winter evening, and my best friend Sarah had dropped by for a girl’s night. We had a crazy week and decided to indulge in a bake-off challenge! But with both of us trying to eat healthier, we needed a recipe that wouldn’t derail our efforts. So, we put on our creative hats and started experimenting.
The kitchen was a whirl of laughter, flour, and enthusiastic tasting spoons as we swapped ideas and flavors. After a bit of trial (and a few “oops” moments—yikes!) we emerged victorious with a batch of brownies that were rich, fudgy, and totally satisfying. Each bite was a reminder that we didn’t have to sacrifice flavor for health, and that evening bonded us even more. Those brownies became a staple at our gatherings, and every time I bake these, they bring back those warm, nostalgic memories of friendship, laughter, and a shared love for sweet treats.
Ingredients
Here’s what you’ll need to bring these Low-Calorie Greek Yogurt Brownies to life:
-
1 cup unsweetened cocoa powder: This is the heart of your brownies! Using unsweetened cocoa ensures rich flavor without adding too much sugar. If you want, you can use Dutch-processed cocoa for a smoother taste.
-
1 cup whole wheat flour: A wonderful alternative to all-purpose flour that adds fiber and nutrients. You can substitute it with almond flour for a gluten-free version, but you might need to adjust the liquid slightly.
-
1 cup Greek yogurt (plain, non-fat): The magic ingredient that keeps these brownies moist and delicious while cutting down on fat. You can swap it with regular yogurt, but I recommend sticking with Greek for that creamy texture.
-
1/2 cup honey or maple syrup: Both sweeteners provide natural sweetness while keeping calories low. Honey will give a richer taste, whereas maple syrup adds a slight caramel flavor—choose according to your preference!
-
2 large eggs: Essential for binding and moisture. If you’re looking for a vegan option, you can replace each egg with a 1/4 cup of unsweetened applesauce.
-
1 teaspoon vanilla extract: A must for enhancing flavors! Always use pure vanilla extract for the best taste. If you’re running low, a pinch of almond extract can add a lovely touch.
-
1/2 teaspoon baking powder: This helps your brownies rise just a bit. If you’re using self-rising flour instead of whole wheat, you can omit this ingredient.
-
1/4 teaspoon sea salt: A tad of salt enhances all the flavors. If you like a touch of sweetness, try adding a sprinkle of flaky sea salt on top of the brownies before baking!
Step-by-Step Instructions
Let’s roll up our sleeves and get cooking! Here’s a detailed guide to making your Low-Calorie Greek Yogurt Brownies:
-
Preheat the Oven: Set that oven to 350°F (175°C). This is a crucial first step because a preheated oven ensures even baking. The brownies will rise perfectly and get that nice outer crust.
-
Prepare Your Pan: Grab an 8×8-inch baking dish and line it with parchment paper. Trust me, this will help you lift the brownies out later and ensure they don’t stick. A little cooking spray on the pan also goes a long way!
-
Mix the Wet Ingredients: In a large mixing bowl, whisk together the Greek yogurt, eggs, honey (or maple syrup), and vanilla extract until smooth. This is such a great chance to channel your inner chef! Feel free to sing while you mix—it makes everything more fun!
-
Combine Dry Ingredients: In another bowl, sift together the cocoa powder, whole wheat flour, baking powder, and salt. Sifting the cocoa powder helps to avoid lumps and ensures an even distribution of the dry ingredients. Plus, it’s a great workout for your arms!
-
Combine Wet and Dry: Gradually add the dry mixture into the wet mixture, folding it gently. Use a spatula to combine—don’t overmix, but make sure no dry pockets are left behind. You want the batter to be thick and luscious!
-
Fold in Chocolate Chips (Optional): If you’re feeling indulgent, fold in about a half cup of dark chocolate chips. These add lovely melty pockets of chocolate, taking your brownies to the next level. Just be mindful of your sweet tooth!
-
Pour into Prepared Pan: Transfer the brownie batter into your lined baking dish, smoothing the top with your spatula. You can even tap the pan gently on the counter to release any air bubbles.
-
Bake: Slide your brownies into the preheated oven and bake for about 20-25 minutes. The edges will start to pull away from the pan, and a toothpick inserted into the center should come out with a few moist crumbs—not completely clean. Remember, they’ll continue to cook slightly after you take them out!
-
Cool and Slice: Allow the brownies to cool in the pan for about 10-15 minutes. Use the parchment paper to lift them out and transfer them to a wire rack. Let them cool completely before slicing. I know, waiting is the hardest part, but it’s worth it!
-
Enjoy! Now it’s time to enjoy your heavenly Greek yogurt brownies! Serve them as is or with a dollop of Greek yogurt on top for added creaminess.
Serving Suggestions
As you slice into these fudgy beauties, consider serving them warm with a scoop of vanilla Greek yogurt or a sprinkle of crushed nuts for a delightful contrast in texture. You can also pair them with a rich berry compote to add a fresh burst of flavor. And if you want to make it like a dessert sundae — layer a slice of brownie with a scoop of your favorite ice cream. Yum!
Recipe Variations
Here are a few fun ideas to change things up:
- Nutty Brownies: Stir in chopped walnuts or pecans for that added crunch and healthy fats.
- Mint Chocolate Brownies: Add a drop of peppermint extract to the batter to make delicious mint-flavored brownies perfect for the holidays.
- Peanut Butter Swirl: Add a dollop of natural peanut butter and swirl it through the batter before baking for a PB & chocolate combination that’s simply irresistible.
- Spicy Kick: Toss in a pinch of cayenne pepper or chili powder for a surprising kick that complements the chocolate beautifully.
- Fruit Fusion: Fold in fresh raspberries or chopped strawberries right before baking for a fruity twist!
Chef’s Notes
As with any recipe, these Greek Yogurt Brownies have seen their fair share of evolution. The original recipe started as just your classic brownie, but over the years, I’ve had my fair share of mishaps and successes (like the time I accidently used baking soda instead of baking powder. Oh boy, was that a fluffy disaster!). Each time I made tweaks, I learned something new about balancing flavors and textures. Now, these brownies are a staple in my home, showing that healthy doesn’t have to be boring.
Here’s a fun fact: I like to double the batch and freeze half for those late-night chocolate cravings. Just wrap them well in plastic wrap, and they’ll last up to three months. When you need a treat, pop them in the microwave for a few seconds, and you’re golden!
FAQs and Troubleshooting
1. Can I use other flours instead of whole wheat?
Absolutely! You can experiment with almond flour or coconut flour, but keep in mind that the texture might change slightly. Coconut flour absorbs more moisture, so adjust the wet ingredients accordingly!
2. The brownies turned out too dry; where did I go wrong?
Overbaking is usually the culprit! Make sure to adjust the baking time based on your oven and check the brownies a few minutes earlier. Remember, they’ll continue to cook even after they’re out of the oven!
3. What’s a good substitute for honey?
You can use agave syrup, maple syrup, or even a sugar substitute like Stevia if you’re looking to further lower the calories. Just keep in mind that this might slightly alter the flavor.
4. How can I tell when my brownies are done?
Check for moist crumbs on your toothpick when inserted into the center—this is your sign for fudgy perfection. If it comes out clean, they might be overdone, unless you love a cakey brownie!
Nutritional Info
Per brownie (based on 16 servings):
- Calories: ~90
- Protein: 4g
- Fat: 3g
- Carbohydrates: 14g
- Fiber: 2g
- Sugar: 6g (depending on sweetener)
And there you have it—heavenly Low-Calorie Greek Yogurt Brownies that are sure to impress without the guilt! I hope you enjoyed this little journey through my kitchen, and I can’t wait for you to try these out. Remember, cooking is all about having fun and experimenting! Happy baking, my friends! 🍫💖
Print
Low-Calorie Greek Yogurt Brownies
- Total Time: 40 minutes
- Yield: 16 servings 1x
- Diet: Vegetarian
Description
Indulge in these guilt-free brownies made with Greek yogurt for a moist and delicious treat without the calorie splurge.
Ingredients
- 1 cup unsweetened cocoa powder
- 1 cup whole wheat flour
- 1 cup Greek yogurt (plain, non-fat)
- 1/2 cup honey or maple syrup
- 2 large eggs
- 1 teaspoon vanilla extract
- 1/2 teaspoon baking powder
- 1/4 teaspoon sea salt
Instructions
- Preheat the oven to 350°F (175°C).
- Prepare your 8×8-inch baking dish with parchment paper.
- Mix the wet ingredients: Greek yogurt, eggs, honey (or maple syrup), and vanilla extract in a large bowl.
- Combine the dry ingredients: sift together cocoa powder, whole wheat flour, baking powder, and salt in another bowl.
- Combine the wet and dry mixtures, folding gently until no dry pockets remain.
- Fold in chocolate chips if using.
- Pour the batter into the prepared pan, smoothing the top.
- Bake for 20-25 minutes until edges pull away and a toothpick comes out with a few moist crumbs.
- Cool in the pan for 10-15 minutes, then transfer to a wire rack.
- Enjoy as is or with a dollop of Greek yogurt on top!
Notes
Consider serving with vanilla Greek yogurt or crushed nuts. These brownies can also be frozen for late-night cravings!
- Prep Time: 15 minutes
- Cook Time: 25 minutes
- Category: Dessert
- Method: Baking
- Cuisine: American
Nutrition
- Serving Size: 1 brownie
- Calories: 90
- Sugar: 6g
- Sodium: 50mg
- Fat: 3g
- Saturated Fat: 1g
- Unsaturated Fat: 2g
- Trans Fat: 0g
- Carbohydrates: 14g
- Fiber: 2g
- Protein: 4g
- Cholesterol: 50mg
Keywords: brownies, low-calorie, healthy dessert, Greek yogurt, baking


