

Low Calorie Greek Yogurt Brownies
Indulge in Guilt-Free Delight: Low-Calorie Greek Yogurt Brownies
Hey there, fellow food lovers! I’m Olivia Bennett, and today, I’m inviting you into my cozy kitchen to whip up something that’s as delicious as it is guilt-free: Low-Calorie Greek Yogurt Brownies! I mean, who doesn’t love a rich, fudgy brownie? But what if I told you that you could indulge without the usual calorie splurge? Sounds too good to be true, right? But trust me, these brownies are here to reshape your dessert experience!
Picture this: It’s a rainy afternoon, the kind that begs for something sweet. The smell of cocoa fills the air as you mix up a bowl of ingredients that promise chocolaty bliss. We all have those days where a box of brownies can just whisk away the blues, but often those decadent treats come with a hefty price tag on our waistlines and energy levels. Enter Greek yogurt—our hero ingredient! Not only does it add delightful moisture and texture, but it also dials down the calories while keeping the flavor cranked up to eleven!
Whether you’re baking for your family, friends, or that special someone who loves chocolate as much as you do, these brownies will bring everyone together. They are perfect for any occasion, from cozy movie nights to summertime picnics, and they’re super easy to make, even for beginner bakers. So, roll up those sleeves, preheat that oven, and let’s dive into our delicious journey of Low-Calorie Greek Yogurt Brownies!
Personal Story
I can’t help but smile when I think about the first time I created these Greek Yogurt brownies. It was a chilly winter evening, and my best friend Sarah had dropped by for a girl’s night. We had a crazy week and decided to indulge in a bake-off challenge! But with both of us trying to eat healthier, we needed a recipe that wouldn’t derail our efforts. So, we put on our creative hats and started experimenting.
The kitchen was a whirl of laughter, flour, and enthusiastic tasting spoons as we swapped ideas and flavors. After a bit of trial (and a few “oops” moments—yikes!) we emerged victorious with a batch of brownies that were rich, fudgy, and totally satisfying. Each bite was a reminder that we didn’t have to sacrifice flavor for health, and that evening bonded us even more. Those brownies became a staple at our gatherings, and every time I bake these, they bring back those warm, nostalgic memories of friendship, laughter, and a shared love for sweet treats.
Ingredients
Here’s what you’ll need to bring these Low-Calorie Greek Yogurt Brownies to life:
-
1 cup unsweetened cocoa powder: This is the heart of your brownies! Using unsweetened cocoa ensures rich flavor without adding too much sugar. If you want, you can use Dutch-processed cocoa for a smoother taste.
-
1 cup whole wheat flour: A wonderful alternative to all-purpose flour that adds fiber and nutrients. You can substitute it with almond flour for a gluten-free version, but you might need to adjust the liquid slightly.
-
1 cup Greek yogurt (plain, non-fat): The magic ingredient that keeps these brownies moist and delicious while cutting down on fat. You can swap it with regular yogurt, but I recommend sticking with Greek for that creamy texture.
-
1/2 cup honey or maple syrup: Both sweeteners provide natural sweetness while keeping calories low. Honey will give a richer taste, whereas maple syrup adds a slight caramel flavor—choose according to your preference!
-
2 large eggs: Essential for binding and moisture. If you’re looking for a vegan option, you can replace each egg with a 1/4 cup of unsweetened applesauce.
-
1 teaspoon vanilla extract: A must for enhancing flavors! Always use pure vanilla extract for the best taste. If you’re running low, a pinch of almond extract can add a lovely touch.
-
1/2 teaspoon baking powder: This helps your brownies rise just a bit. If you’re using self-rising flour instead of whole wheat, you can omit this ingredient.
-
1/4 teaspoon sea salt: A tad of salt enhances all the flavors. If you like a touch of sweetness, try adding a sprinkle of flaky sea salt on top of the brownies before baking!
Step-by-Step Instructions
Let’s roll up our sleeves and get cooking! Here’s a detailed guide to making your Low-Calorie Greek Yogurt Brownies:
-
Preheat the Oven: Set that oven to 350°F (175°C). This is a crucial first step because a preheated oven ensures even baking. The brownies will rise perfectly and get that nice outer crust.
-
Prepare Your Pan: Grab an 8×8-inch baking dish and line it with parchment paper. Trust me, this will help you lift the brownies out later and ensure they don’t stick. A little cooking spray on the pan also goes a long way!
-
Mix the Wet Ingredients: In a large mixing bowl, whisk together the Greek yogurt, eggs, honey (or maple syrup), and vanilla extract until smooth. This is such a great chance to channel your inner chef! Feel free to sing while you mix—it makes everything more fun!
-
Combine Dry Ingredients: In another bowl, sift together the cocoa powder, whole wheat flour, baking powder, and salt. Sifting the cocoa powder helps to avoid lumps and ensures an even distribution of the dry ingredients. Plus, it’s a great workout for your arms!
-
Combine Wet and Dry: Gradually add the dry mixture into the wet mixture, folding it gently. Use a spatula to combine—don’t overmix, but make sure no dry pockets are left behind. You want the batter to be thick and luscious!
-
Fold in Chocolate Chips (Optional): If you’re feeling indulgent, fold in about a half cup of dark chocolate chips. These add lovely melty pockets of chocolate, taking your brownies to the next level. Just be mindful of your sweet tooth!
-
Pour into Prepared Pan: Transfer the brownie batter into your lined baking dish, smoothing the top with your spatula. You can even tap the pan gently on the counter to release any air bubbles.
-
Bake: Slide your brownies into the preheated oven and bake for about 20-25 minutes. The edges will start to pull away from the pan, and a toothpick inserted into the center should come out with a few moist crumbs—not completely clean. Remember, they’ll continue to cook slightly after you take them out!
-
Cool and Slice: Allow the brownies to cool in the pan for about 10-15 minutes. Use the parchment paper to lift them out and transfer them to a wire rack. Let them cool completely before slicing. I know, waiting is the hardest part, but it’s worth it!
-
Enjoy! Now it’s time to enjoy your heavenly Greek yogurt brownies! Serve them as is or with a dollop of Greek yogurt on top for added creaminess.
Serving Suggestions
As you slice into these fudgy beauties, consider serving them warm with a scoop of vanilla Greek yogurt or a sprinkle of crushed nuts for a delightful contrast in texture. You can also pair them with a rich berry compote to add a fresh burst of flavor. And if you want to make it like a dessert sundae — layer a slice of brownie with a scoop of your favorite ice cream. Yum!
Recipe Variations
Here are a few fun ideas to change things up:
- Nutty Brownies: Stir in chopped walnuts or pecans for that added crunch and healthy fats.
- Mint Chocolate Brownies: Add a drop of peppermint extract to the batter to make delicious mint-flavored brownies perfect for the holidays.
- Peanut Butter Swirl: Add a dollop of natural peanut butter and swirl it through the batter before baking for a PB & chocolate combination that’s simply irresistible.
- Spicy Kick: Toss in a pinch of cayenne pepper or chili powder for a surprising kick that complements the chocolate beautifully.
- Fruit Fusion: Fold in fresh raspberries or chopped strawberries right before baking for a fruity twist!
Chef’s Notes
As with any recipe, these Greek Yogurt Brownies have seen their fair share of evolution. The original recipe started as just your classic brownie, but over the years, I’ve had my fair share of mishaps and successes (like the time I accidently used baking soda instead of baking powder. Oh boy, was that a fluffy disaster!). Each time I made tweaks, I learned something new about balancing flavors and textures. Now, these brownies are a staple in my home, showing that healthy doesn’t have to be boring.
Here’s a fun fact: I like to double the batch and freeze half for those late-night chocolate cravings. Just wrap them well in plastic wrap, and they’ll last up to three months. When you need a treat, pop them in the microwave for a few seconds, and you’re golden!
FAQs and Troubleshooting
1. Can I use other flours instead of whole wheat?
Absolutely! You can experiment with almond flour or coconut flour, but keep in mind that the texture might change slightly. Coconut flour absorbs more moisture, so adjust the wet ingredients accordingly!
2. The brownies turned out too dry; where did I go wrong?
Overbaking is usually the culprit! Make sure to adjust the baking time based on your oven and check the brownies a few minutes earlier. Remember, they’ll continue to cook even after they’re out of the oven!
3. What’s a good substitute for honey?
You can use agave syrup, maple syrup, or even a sugar substitute like Stevia if you’re looking to further lower the calories. Just keep in mind that this might slightly alter the flavor.
4. How can I tell when my brownies are done?
Check for moist crumbs on your toothpick when inserted into the center—this is your sign for fudgy perfection. If it comes out clean, they might be overdone, unless you love a cakey brownie!
Nutritional Info
Per brownie (based on 16 servings):
- Calories: ~90
- Protein: 4g
- Fat: 3g
- Carbohydrates: 14g
- Fiber: 2g
- Sugar: 6g (depending on sweetener)
And there you have it—heavenly Low-Calorie Greek Yogurt Brownies that are sure to impress without the guilt! I hope you enjoyed this little journey through my kitchen, and I can’t wait for you to try these out. Remember, cooking is all about having fun and experimenting! Happy baking, my friends! 🍫💖
Print
Low-Calorie Greek Yogurt Brownies
- Total Time: 40 minutes
- Yield: 16 servings 1x
- Diet: Vegetarian
Description
Indulge in these guilt-free brownies made with Greek yogurt for a moist and delicious treat without the calorie splurge.
Ingredients
- 1 cup unsweetened cocoa powder
- 1 cup whole wheat flour
- 1 cup Greek yogurt (plain, non-fat)
- 1/2 cup honey or maple syrup
- 2 large eggs
- 1 teaspoon vanilla extract
- 1/2 teaspoon baking powder
- 1/4 teaspoon sea salt
Instructions
- Preheat the oven to 350°F (175°C).
- Prepare your 8×8-inch baking dish with parchment paper.
- Mix the wet ingredients: Greek yogurt, eggs, honey (or maple syrup), and vanilla extract in a large bowl.
- Combine the dry ingredients: sift together cocoa powder, whole wheat flour, baking powder, and salt in another bowl.
- Combine the wet and dry mixtures, folding gently until no dry pockets remain.
- Fold in chocolate chips if using.
- Pour the batter into the prepared pan, smoothing the top.
- Bake for 20-25 minutes until edges pull away and a toothpick comes out with a few moist crumbs.
- Cool in the pan for 10-15 minutes, then transfer to a wire rack.
- Enjoy as is or with a dollop of Greek yogurt on top!
Notes
Consider serving with vanilla Greek yogurt or crushed nuts. These brownies can also be frozen for late-night cravings!
- Prep Time: 15 minutes
- Cook Time: 25 minutes
- Category: Dessert
- Method: Baking
- Cuisine: American
Nutrition
- Serving Size: 1 brownie
- Calories: 90
- Sugar: 6g
- Sodium: 50mg
- Fat: 3g
- Saturated Fat: 1g
- Unsaturated Fat: 2g
- Trans Fat: 0g
- Carbohydrates: 14g
- Fiber: 2g
- Protein: 4g
- Cholesterol: 50mg
Keywords: brownies, low-calorie, healthy dessert, Greek yogurt, baking

Baked Greek Yogurt: Quick, Healthy Protein Packed Breakfast
# Baked Greek Yogurt: Quick, Healthy, Protein-Packed Breakfast

## Introduction

Welcome to my cozy kitchen, friends! Today, we're diving into a delightful breakfast that will change the way you think about starting your day. Say goodbye to the mundane bowl of cereal and hello to Baked Greek Yogurt. Yes, you heard me right! This recipe not only packs a punch of protein but also offers a warm, comforting twist that will make you want to leap out of bed.

Baked Greek yogurt is a simple yet satisfying dish that brings joy to your morning routine. Picture this: you open your oven to reveal a golden-brown, fluffy delight topped with your favorite fruits and a drizzle of honey. It’s like a hug in breakfast form! And the best part? You can personalize it to match your mood or the season.

Let’s not forget the health benefits – Greek yogurt is a powerhouse of protein and probiotics, perfect for getting your digestion in check while also keeping you full and energized. Whether you’re rushing to work or enjoying a lazy weekend brunch with family, this dish effortlessly fits into any scenario. Plus, it’s quick to whip up on busy mornings, making breakfast a breeze!

So, grab your favorite apron and let’s get baking! This recipe is about to become your new breakfast superstar. It’s time to transform a simple ingredient into something that feels like a special treat. Ready? Let’s jump in!

## Personal Story

Growing up, breakfast was a big deal in our house. My mom had a knack for turning simple ingredients into unforgettable meals, and one of my absolute favorites was her baked yogurt. I can still remember waking up to the sweet aroma wafting through the house; it was always a delightful surprise to discover what flavor she had whipped up that morning.

I fondly remember one winter morning when it was snowing outside, and the warmth of the kitchen was heavenly. My mom made baked Greek yogurt topped with warm cinnamon apples, and we all gathered around the table, cozy in our pajamas. Our laughter filled the space as we enjoyed every spoonful while listening to soft music in the background. Those moments ignited my passion for cooking and my deep love for sharing food with friends and family.

Today, I’m excited to recreate that experience and share it with you. A little nostalgia goes a long way in our kitchens, and I hope this recipe brings as much joy to your mornings as it did to mine.

## Ingredients

Here’s what you’ll need to create this mouthwatering Baked Greek Yogurt:

- **2 cups Greek yogurt**
  - **Insight**: Opt for plain unsweetened to control the sweetness. It’s creamy, rich, and full of protein.

- **2 large eggs**
  - **Substitution Tip**: To make this recipe vegan, use flaxseed meal (1 tablespoon mixed with 2.5 tablespoons of water) for each egg.

- **1/4 cup honey or maple syrup**
  - **Insight**: Adjust sweetness according to your taste! You could also try agave nectar or coconut sugar for a different flavor.

- **1 teaspoon vanilla extract**
  - **Chef Tip**: Using pure vanilla extract elevates the flavor. Homemade vanilla extract is even better!

- **1/2 teaspoon baking powder**
  - **Insight**: This helps your yogurt bake up light and fluffy. Don’t skip it!

- **Toppings**: Your choice! Fruits, nuts, granola, or a sprinkle of cinnamon.
  - **Insight**: Fresh berries are fantastic in the summer, while roasted apples or pears work wonders in the fall.

## Step-by-Step Instructions

### Step 1: Preheat Your Oven
First things first, preheat your oven to 350°F (175°C). This step sets the stage for a perfectly baked yogurt.

### Step 2: Mix the Ingredients
In a large mixing bowl, combine the Greek yogurt, eggs, honey (or maple syrup), vanilla extract, and baking powder. Mix with a whisk until all ingredients are thoroughly blended. Don’t worry if it looks a little lumpy at this stage; it will smooth out beautifully as it bakes!

### Step 3: Prepare a Baking Dish
Lightly grease an 8x8-inch baking dish or a medium-sized cast-iron skillet with cooking spray or a little olive oil. This prevents any sticking and helps achieve a gorgeous color on the edges.

### Step 4: Pour and Spread
Pour the yogurt mixture into the greased baking dish. Use a spatula to spread it evenly, smoothing the top for a lovely finish.

### Step 5: Get Creative with Toppings
Here’s where you can have some fun! Sprinkle your choice of toppings over the yogurt mixture. I love using a mix of fresh sliced strawberries and a handful of crunchy granola. But feel free to experiment with what’s in season or what you have on hand.

### Step 6: Bake it Up
Place your dish in the preheated oven and bake for 25-30 minutes. Keep an eye on it as it bakes – you’re looking for a light golden top and a slight jiggle in the center. The edges should be puffed and set, while the middle might still be a touch soft.

### Step 7: Cool & Serve
Once it’s done baking, remove it from the oven and let it cool for about 5-10 minutes. This allows it to firm up just enough for easy serving. You can cut it into squares or serve it right from the dish.

## Serving Suggestions

Serve your baked Greek yogurt warm, straight from the oven, or let it cool slightly and plate it up with a drizzle of honey or a dollop of yogurt on top. It’s delightful with a side of fresh fruit or a sprinkle of nuts for crunch – perfect for elevating your breakfast experience!

## Recipe Variations

- **Berry Blast**: Add a blend of fresh or frozen berries mixed into the yogurt for a fruity twist.
- **Tropical Escape**: Mix in crushed pineapple and coconut flakes for a summery vibe.
- **Chocolate Delight**: Stir in some cocoa powder or chocolate chips for a rich, indulgent breakfast treat.
- **Nutty Banana**: Top with sliced banana and a drizzle of peanut butter for an extra protein boost.
- **Savory Twist**: Consider adding herbs like rosemary or thyme and topping with sautéed mushrooms or spinach for a savory breakfast version.

## Chef's Notes

This recipe has been a staple in my kitchen for years! I love how easy it is to tweak depending on what’s in the fridge or the season. Plus, I have to confess, I've had my share of “kitchen disasters” – like the time I forgot to add the eggs and ended up with a yogurt pudding instead. But hey, they say every great chef has their stories, right? Embrace the mess, enjoy the journey, and remember that every mishap is just a delicious learning experience!

## FAQs and Troubleshooting

**1. Can I make this ahead of time?**
Yes! You can prepare the mixture the night before and refrigerate it. Just bake it in the morning when you're ready to enjoy.

**2. It turned out too runny — what happened?**
If your yogurt mixture ends up too runny, it might be due to underbaking. Make sure it’s set and not too jiggly in the center before removing it from the oven.

**3. Can I add protein powder to this recipe?**
Absolutely! Just replace a portion of the Greek yogurt with protein powder, but you may need to add a bit more liquid to maintain the right consistency.

**4. How do I store leftovers?**
Store any leftovers in an airtight container in the refrigerator for up to 3 days. You can reheat it in the microwave for a quick breakfast!

## Nutritional Info

- **Calories**: Approximately 150 per serving (based on 8 servings)
- **Protein**: 10g
- **Carbohydrates**: 15g
- **Fat**: 6g

With this Baked Greek Yogurt recipe, you’re not just making breakfast; you’re creating memories, sharing joy, and enjoying all the goodness that comes from cooking. Each bite brings warmth and smiles, making every morning a little brighter. Happy baking, foodies! 🍽️
Baked Greek Yogurt
- Total Time: 40 minutes
- Yield: 4 servings 1x
- Diet: Vegetarian
Description
A warm, protein-packed baked yogurt delight, perfect for breakfast.
Ingredients
- 2 cups Greek yogurt (plain, unsweetened)
- 2 large eggs
- 1/4 cup honey or maple syrup
- 1 teaspoon vanilla extract
- 1/2 teaspoon baking powder
- Toppings: fruits, nuts, or granola of your choice
Instructions
- Preheat your oven to 350°F (175°C).
- Mix the Greek yogurt, eggs, honey (or maple syrup), vanilla extract, and baking powder in a large bowl.
- Prepare an 8×8-inch baking dish or cast-iron skillet by greasing it lightly.
- Pour the yogurt mixture into the greased dish and smooth the top with a spatula.
- Get creative by adding your favorite toppings on top.
- Bake for 25-30 minutes until lightly golden and set around the edges.
- Cool for 5-10 minutes, then serve warm.
Notes
Feel free to personalize with seasonal fruits or favorite toppings.
- Prep Time: 10 minutes
- Cook Time: 30 minutes
- Category: Breakfast
- Method: Baking
- Cuisine: Mediterranean
Nutrition
- Serving Size: 1 serving
- Calories: 150
- Sugar: 10g
- Sodium: 80mg
- Fat: 6g
- Saturated Fat: 2g
- Unsaturated Fat: 2g
- Trans Fat: 0g
- Carbohydrates: 15g
- Fiber: 1g
- Protein: 10g
- Cholesterol: 50mg
Keywords: baked yogurt, healthy breakfast, quick breakfast, protein-packed breakfast
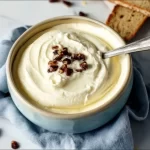
Chocolate Greek Yogurt Mousse
Indulge in Decadence: Chocolate Greek Yogurt Mousse Recipe
Welcome back to my kitchen, dear foodies! Today, we’re diving into a luscious and incredibly satisfying dessert that combines the rich, creamy goodness of chocolate with the tangy freshness of Greek yogurt: Chocolate Greek Yogurt Mousse. Trust me; this delightful treat will not only satisfy your sweet tooth but also add a dash of sophistication to your dessert table.
Now, I understand that when you think of mousse, you might picture something that requires intricate techniques or fancy equipment. Spoiler alert: that’s not the case here! This mousse is wonderfully simple to make, perfect for both beginners and seasoned chefs who crave a quick yet decadent dessert.
As someone who has spent countless hours in the kitchen (and who has probably eaten their weight in chocolate!), I can assure you that this mousse is a game changer. It’s light, fluffy, and has a deep chocolate flavor that will have everyone coming back for seconds. Plus, with Greek yogurt as a base, it’s a healthier alternative to traditional mousse, meaning you can indulge a little more guilt-free.
So, whether you’re prepping for a dinner party, a cozy night in, or just need a sweet pick-me-up, this Chocolate Greek Yogurt Mousse is your answer. Grab your spatula, let’s create magic in the kitchen!
Personal Story
Let me take you back a few years to a bustling kitchen filled with laughter, chatting, and, yes, the sweet smell of chocolate wafting through the air. It was my best friend Jamie’s birthday, and we decided to host a surprise dinner party to celebrate. We planned every detail, from the appetizers to the entrée, but dessert had us both stumped.
Then, I remembered a recipe I had seen for a chocolate mousse made with yogurt instead of heavy cream. Being the adventurous cooks that we are, we decided to give it a shot. As we mixed and whipped, we giggled like schoolgirls, sneaking spoonfuls of the luscious chocolate mixture.
Little did we know that our improvised dessert would become the star of the evening! Our guests raved about the mousse’s rich texture, and Jamie even declared it the best birthday dessert she’d ever had. That night solidified our love for this recipe, and it’s become a staple at our gatherings ever since.
Now, every time I make this Chocolate Greek Yogurt Mousse, I’m transported back to that joyous night, surrounded by friends and laughter. I hope this recipe brings you as much happiness as it has brought me!
Ingredients
To whip up this delightful mousse, you’ll need the following ingredients:
-
Greek Yogurt (2 cups)
Greek yogurt provides a creamy base that keeps this mousse light yet decadent. If you’re looking for a dairy-free option, try using coconut yogurt for a similar texture and a hint of tropical flavor. -
Semi-sweet Chocolate (1 cup)
Semi-sweet chocolate gives the mousse that luscious, rich flavor. You can substitute with dark chocolate for a more intense taste, but remember that it can be slightly less sweet. -
Cocoa Powder (2 tablespoons)
This adds an extra depth of chocolate flavor and enhances the richness of the dish. For a unique twist, try using a flavored cocoa powder — like dark chocolate or spicy chili chocolate. -
Honey or Maple Syrup (3 tablespoons)
This natural sweetener balances the tang of the yogurt. If you prefer to avoid sweeteners, you can substitute with a few drops of stevia or another sugar alternative to taste. -
Vanilla Extract (1 teaspoon)
A splash of vanilla elevates the flavor, giving the mousse a warm, inviting aroma. You could even toss in a pinch of espresso powder for a mocha twist! -
Salt (a pinch)
Don’t forget this essential ingredient! A tiny pinch of salt brings all the flavors together. If you’re feeling fancy, consider using flaky sea salt to sprinkle on top before serving.
Step-by-Step Instructions
Now that we have our ingredients ready, let’s get started on making this velvety mousse!
Step 1: Melt the Chocolate
Begin by breaking your semi-sweet chocolate into small pieces and placing them in a microwave-safe bowl. Heat in the microwave in 20-second intervals, stirring between each, until the chocolate is smooth and completely melted. Make sure not to overheat; burned chocolate is a sad, sad fate! If you prefer the stovetop, you can melt it in a double boiler instead. Keep it aside to cool slightly.
Step 2: Mix Greek Yogurt and Sweetener
In a large mixing bowl, combine the Greek yogurt and your choice of honey or maple syrup. Use a whisk or electric mixer to blend these two ingredients until smooth and creamy. Taste the mixture and adjust the sweetness as desired — you want it pleasantly sweet, just enough to balance the yogurt’s tang.
Step 3: Incorporate the Chocolate
Once the chocolate has cooled down a bit (safety first, friends!), pour half of it into the Greek yogurt mixture. Use a spatula to gently fold the chocolate into the yogurt until it’s well combined. Then, pour in the rest of the melted chocolate and continue folding until the mixture is a uniform color and texture. Remember, be gentle! You want to keep that airiness in the mousse.
Step 4: Add the Remaining Ingredients
Sprinkle in the cocoa powder, vanilla extract, and that pinch of salt. Continue to fold until everything is combined and silky-smooth. This is the perfect moment to taste your creation again — don’t hold back! Adjust sweetness or flavor if you feel inspired.
Step 5: Chill
Transfer the mousse into individual serving cups or a large bowl if you prefer to scoop your servings. Cover with plastic wrap and refrigerate for at least 1 hour. Chilling helps the mousse set up and enhances the flavors.
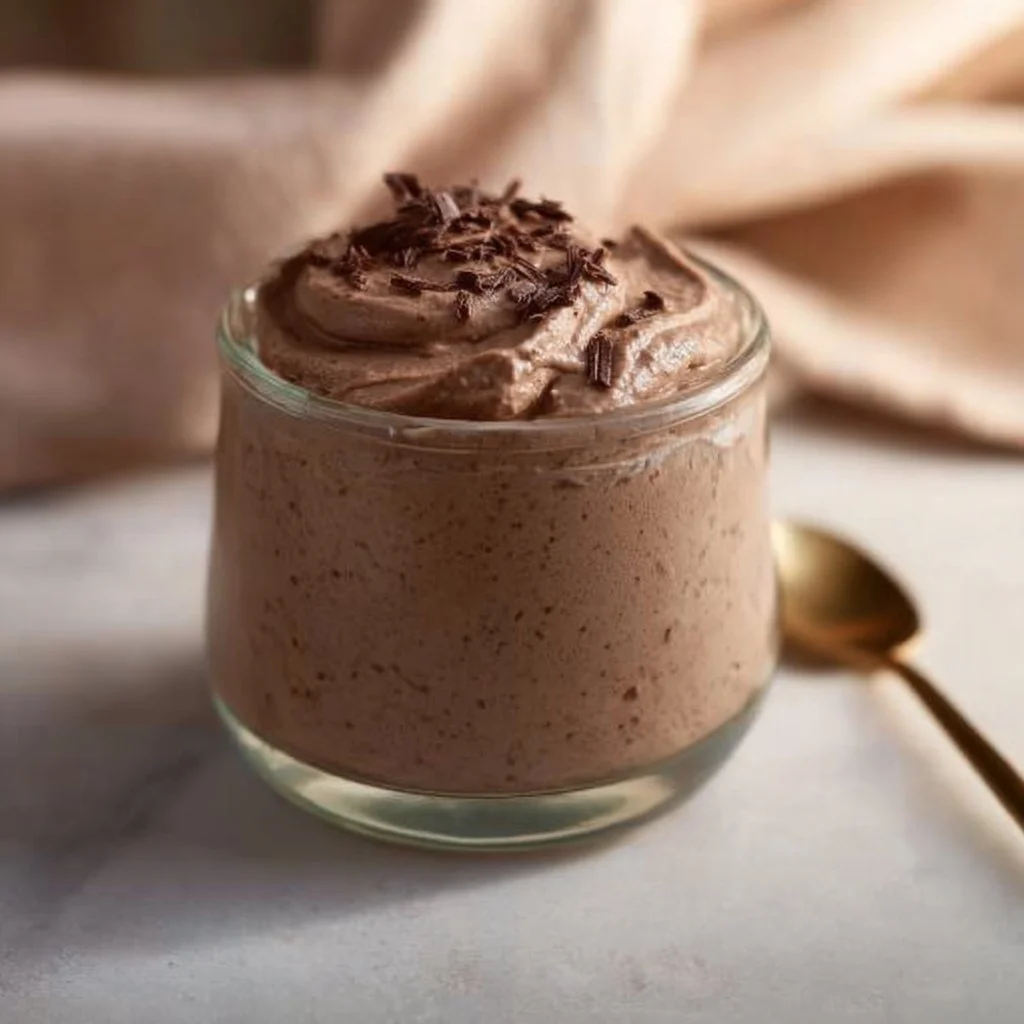
Step 6: Serve and Enjoy!
When your mousse is ready, serve it chilled. You can top it with whipped cream, fresh berries, or shaved chocolate for added elegance. Don’t forget to snap that Instagram-worthy photo!
Serving Suggestions
When it comes to serving this Chocolate Greek Yogurt Mousse, presentation is key! A simple yet sophisticated touch is to layer the mousse in clear dessert glasses, allowing the beautiful, creamy layers to be visible. Add a dollop of whipped cream on top, sprinkle with chocolate shavings, and a few fresh raspberries or mint leaves for a splash of color. Voila! You have a stunning dessert that would impress even the toughest critics!
Recipe Variations
Now, let’s make this mousse even more exciting with a few clever twists:
- Nutty Delight: Stir in crushed nuts (like almonds or hazelnuts) for a delightful added crunch.
- Berry Swirl: Before refrigerating, fold in some fresh berry puree to create a beautiful marbled effect.
- Spicy Chocolate: Add a pinch of cayenne pepper or cinnamon for a warm, spicy flavor that’s unexpected and delicious!
- Peanut Butter Chocolate Mousse: Swirl in some natural peanut butter for a creamy, nutty taste that takes it to another level of indulgence.
- Vegan Option: Use a plant-based yogurt and agave syrup instead of honey to make this dessert completely vegan-friendly.
Chef’s Notes
This recipe is one of those delightful creations that evolved with experimentation in my kitchen. The initial idea came from a traditional chocolate mousse recipe loaded with heavy cream and sugar. While I love a classic, I always strive for a balance between indulgence and health. This chocolate mousse struck that magical chord!
One of my favorite kitchen mishaps occurred while perfecting this recipe. I once accidentally grabbed a bottle of balsamic glaze instead of chocolate syrup when sweetening the yogurt. After the shock subsided, I tasted the result and surprisingly loved the tanginess with the chocolate! It’s never a waste of time to play around with ingredients and see what happens.
FAQs and Troubleshooting
Q: My mousse didn’t turn out fluffy. What went wrong?
A: The key to making your mousse fluffy lies in folding the ingredients together gently. Overmixing can result in a dense mousse, so take it easy on that spatula!
Q: Can I make this ahead of time?
A: Absolutely! This mousse actually tastes even better after sitting in the fridge overnight, allowing the flavors to meld beautifully.
Q: What if my mousse is too sweet?
A: No worries! If you find it too sweet, try stirring in a little more Greek yogurt until it reaches your desired taste. The tartness will help balance it out.
Q: Can I freeze the leftovers?
A: While I highly doubt you’ll have any leftovers, if you do, you can freeze the mousse. Just store it in an airtight container for up to a month. Thaw in the fridge before serving!
Nutritional Info
If you are wondering about the nutritional breakdown, here’s a general idea per serving (based on 6 servings):
- Calories: 150
- Protein: 6g
- Carbohydrates: 18g
- Fat: 6g
- Saturated Fat: 3g
- Sugar: 10g
This mousse is a light and satisfying treat that won’t leave you feeling guilty.
So, there you have it, my wonderful food lovers! Your very own Chocolate Greek Yogurt Mousse to whip up and share — or not! After all, it is deliciously tempting. Enjoy making it, savoring it, and, most importantly, sharing it with the people you love. Happy cooking!
Print
Chocolate Greek Yogurt Mousse
- Total Time: 120 minutes
- Yield: 6 servings 1x
- Diet: Vegetarian
Description
A rich and creamy chocolate mousse made healthier with Greek yogurt, perfect for satisfying your sweet tooth guilt-free.
Ingredients
- 2 cups Greek Yogurt
- 1 cup Semi-sweet Chocolate
- 2 tablespoons Cocoa Powder
- 3 tablespoons Honey or Maple Syrup
- 1 teaspoon Vanilla Extract
- a pinch of Salt
Instructions
- Melt the chocolate by breaking it into pieces and microwaving in intervals until smooth.
- Mix Greek yogurt and sweetener until smooth and creamy.
- Incorporate half of the melted chocolate into the yogurt mixture, folding gently.
- Add the remaining chocolate along with cocoa powder, vanilla, and salt, folding until smooth.
- Chill the mousse in serving cups for at least 1 hour.
- Serve chilled and enjoy!
Notes
For a vegan option, use plant-based yogurt and agave syrup instead of honey. Chilling overnight enhances flavor.
- Prep Time: 15 minutes
- Cook Time: 5 minutes
- Category: Dessert
- Method: Chilling
- Cuisine: Mediterranean
Nutrition
- Serving Size: 1 serving
- Calories: 150
- Sugar: 10g
- Sodium: 50mg
- Fat: 6g
- Saturated Fat: 3g
- Unsaturated Fat: 3g
- Trans Fat: 0g
- Carbohydrates: 18g
- Fiber: 1g
- Protein: 6g
- Cholesterol: 5mg
Keywords: chocolate mousse, Greek yogurt dessert, healthy dessert, easy chocolate mousse, fluffy mousse
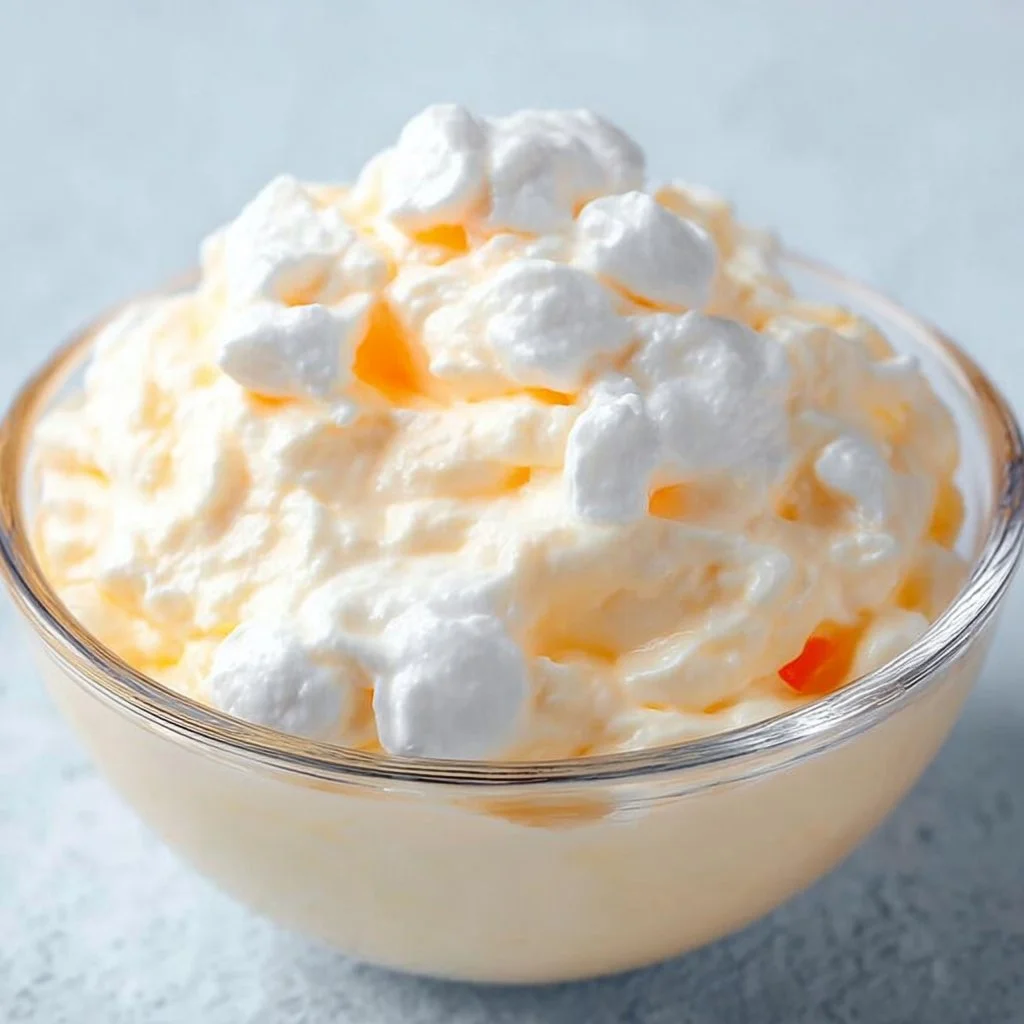
Greek Yogurt Orange Fluff
Greek Yogurt Orange Fluff: A Dreamy Citrus Delight
Welcome to my kitchen, my lovely food friends! Today, we’re diving into a recipe that combines lightness and sweetness in the most delightful way—my Greek Yogurt Orange Fluff! This recipe is not just a treat for your taste buds but also a fabulous, wholesome dish that elevates any gathering.
Imagine walking into a cozy kitchen, the sun shining in as you spot a beautiful, fluffy dessert waiting to be shared. The aroma of fresh oranges fills the air, and you can’t help but feel that rush of joy that only good food can bring. This dish is perfect for those moments—be it a casual Sunday brunch, a potluck with friends, or a festive family dinner.
With its creamy texture, refreshing citrus flavor, and a touch of sweetness, Greek Yogurt Orange Fluff is a concoction that captures the spirit of all things cozy and homemade. Plus, it’s incredibly versatile! You can serve it as a dessert, a breakfast treat, or even as a snack during the day. Whichever way you slice it, this fluff is bound to be a hit!
So grab your apron (I know mine is probably a little messy already) and let’s get ready to whip up something special together!
A Taste of My Childhood
My love for fluffy desserts goes way back to my childhood. I remember my grandmother’s kitchen, which was the heart of our home. It was always bustling with activity—dough rising, spices dancing through the air, and laughter echoing off the walls. One of my favorite memories is of her preparing a light, fluffy dessert to brighten our family gatherings, especially during the warmer months.
She used to whip up a similar fluffy creation using whipped cream and citrus fruits, and everyone would eagerly gather around the table, waiting to sample her latest masterpiece. Weeks turned into months, and seasons slipped by, but that dessert continued to hold a special place in my heart.
As I grew up and began to experiment in my own kitchen, I wanted to create something just as light and cheerful but with a modern twist. Enter Greek Yogurt! It added a healthy spin while still allowing for that same delightful fluffiness I adored from my grandma’s creations. This Greek Yogurt Orange Fluff is my homage to those memory-filled afternoons spent in the kitchen, and I can’t wait for you to share it with your loved ones, too!
Ingredients
Here’s what you’ll need to make this dreamy, creamy dessert:
-
1 cup Greek yogurt
Look for plain, unsweetened Greek yogurt for the best results! It provides a rich base, packed with protein and a tangy flavor that balances perfectly with the sweetness of oranges. If you prefer a dairy-free option, coconut yogurt works wonderfully too! -
1 cup heavy whipping cream
This adds that luscious fluffiness we love in desserts! Make sure to whip it until soft peaks form—this gives the fluff a light and airy texture. If you’re looking for a lighter option, you can use whipped coconut cream instead. -
1/2 cup powdered sugar
Powdered sugar dissolves beautifully and sweetens the fluff without adding graininess. If you’re watching your sugar intake, feel free to swap it for a natural sweetener like honey or agave syrup, but adjust to taste! -
Zest of 1 large orange
Zesting the orange adds an aromatic brightness to the dish that’s simply irresistible. If you’re out of oranges, lemon zest can create a zesty variation! -
Juice of 1 large orange
Freshly squeezed juice is key! This will infuse your fluff with just the right amount of citrusy goodness. If you don’t have fresh oranges, bottled juice can be a quick alternative, but be sure to select one that’s 100% juice with no added sugars. -
Optional: 1 teaspoon vanilla extract
A touch of vanilla enhances the flavor and adds warmth—like a comfy hug for your taste buds! Use pure vanilla extract for the best taste. If you’re feeling adventurous, experiment with almond or orange extract!
Step-by-Step Instructions
Let’s dive right into creating our Greek Yogurt Orange Fluff masterpiece!
Step 1: Prepare the Base
In a large mixing bowl, combine the Greek yogurt, powdered sugar, orange zest, and orange juice. Mix it up gently until everything is well combined. Take a moment to breathe in the heavenly aroma of fresh oranges—this is what summer dreams are made of!
Step 2: Whip the Cream
In a separate bowl, start whipping the heavy cream with a hand mixer or stand mixer until soft peaks form. You want it light and fluffy—almost like a cloud! This step is crucial for achieving that airy texture we love, so take your time and don’t rush.
Step 3: Fold Together
Once your cream is whipped, it’s time for the magic! Gently fold the whipped cream into your yogurt mixture using a spatula. Start by adding a small amount of whipped cream into the yogurt to lighten it up (this is called tempering). Then, carefully fold in the rest. You want to maintain that fluffy texture, so be gentle!
Step 4: Chill
Pour the combined mixture into your desired serving bowl or individual cups. Cover and refrigerate for at least 2 hours (or, ideally, overnight for the flavors to meld together).
Step 5: Serve and Enjoy
When you’re ready to eat, scoop out a generous serving of that fluffy goodness. You can garnish it with some additional orange zest or a sprig of mint for a pop of color. Now sit down and prepare to enjoy the delightful blend of tangy yogurt and sweet orange flavors!
Chef’s Tips
- Taste and Adjust: Always taste your fluff mixture before chilling. If you desire a little more sweetness, add more powdered sugar or sweetener.
- Be Patient: Allowing the fluff to chill is essential as it helps the flavors develop and the texture to set—your patience will be rewarded!
- Presentation: For an extra touch, consider adding a crunchy topping like crushed nuts or granola just before serving for added texture!
Serving Suggestions
This Greek Yogurt Orange Fluff can be served in various ways! For an elegant presentation, serve it in beautiful glass cups or mason jars to showcase its fluffy layers. Decorate the top with a sprinkle of your favorite nuts, a dollop of orange marmalade, or even a mint leaf for that extra touch of flair. You can also create a fun dessert bar where guests can top their fluff with various fruits, granola, or chocolate shavings!
Recipe Variations
Feeling a little adventurous? Try these creative twists on the classic recipe:
- Berry Blast: Substitute the orange juice with mixed berry puree for a vibrant berry version!
- Coconut Citrus: Add shredded coconut to the fluff for a tropical flair—perfect for summer!
- Chocolate Orange: Mix in some cocoa powder for a chocolatey twist, creating a decadent treat sure to impress.
- Nutty Delight: Replace the orange zest with lemon, and add crushed pistachios for a nutty variation.
- Honey Lavender: Drizzle some honey and add culinary lavender for a unique flavor profile—perfect for a calming dessert!
Chef’s Notes
I love how this recipe has evolved over the years! Initially, I focused on the traditional sweet fluff, but as I experimented with different ingredients and healthier choices, Greek yogurt became my go-to. It offers the same creamy texture without feeling too heavy while packing a nutritional punch. Plus, it’s been a fantastic way to sneak some additional protein into dessert!
One amusing kitchen story sticks with me—when I first attempted this dessert, I accidentally over-whipped my cream, and let me tell you, it turned into butter! While it was a funny mishap, it taught me a valuable lesson about patience and attention in the kitchen. Cooking is all about learning, and I love sharing those little moments with you!
FAQs and Troubleshooting
Q: Can I make this recipe dairy-free?
A: Absolutely! Substituting regular Greek yogurt with coconut yogurt and using whipped coconut cream makes a delicious, dairy-free version.
Q: My fluff is not setting properly. What went wrong?
A: If your fluff isn’t setting, it may be due to insufficient chilling time. Also, make sure you whipped the heavy cream to soft peaks before folding it in—this is key for maintaining that fluffy texture!
Q: Can I use flavored yogurt?
A: While you can, I recommend using plain Greek yogurt to control the sweetness and flavor profile. However, if you find a delicious orange-flavored yogurt, it could work nicely too!
Q: How long can I store the Greek Yogurt Orange Fluff in the fridge?
A: This dessert can be stored in the fridge for about 3 days. Just remember to cover it well to prevent it from absorbing unwanted odors from your fridge!
Nutritional Info
While I typically let you focus on enjoyment and connection with food rather than its numbers, here’s a rough estimate per serving (if this recipe serves 8):
- Calories: 150
- Protein: 6g
- Fat: 7g
- Carbohydrates: 15g
- Sugar: 10g
(Please note that this is an approximation and can vary based on specific ingredients used.)
And there you have it, my friends—a delightful and fluffy Greek Yogurt Orange Fluff that’s bound to impress! Whether you’re enjoying it solo or sharing it with loved ones, I hope it brings as much joy to your kitchen as it has brought to mine. So, roll up those sleeves, have fun, and let’s celebrate the deliciousness of homemade treats! Happy cooking!
Print
Greek Yogurt Orange Fluff
- Total Time: 135 minutes
- Yield: 8 servings 1x
- Diet: Vegetarian
Description
A light and fluffy dessert combining Greek yogurt with refreshing citrus flavors, perfect for any gathering.
Ingredients
- 1 cup Greek yogurt
- 1 cup heavy whipping cream
- 1/2 cup powdered sugar
- Zest of 1 large orange
- Juice of 1 large orange
- Optional: 1 teaspoon vanilla extract
Instructions
- Prepare the Base: In a large mixing bowl, combine the Greek yogurt, powdered sugar, orange zest, and orange juice. Mix it up gently until everything is well combined.
- Whip the Cream: In a separate bowl, start whipping the heavy cream with a hand mixer or stand mixer until soft peaks form.
- Fold Together: Gently fold the whipped cream into your yogurt mixture using a spatula.
- Chill: Pour the combined mixture into your desired serving bowl or individual cups and cover. Refrigerate for at least 120 minutes.
- Serve and Enjoy: Scoop out a generous serving and garnish with additional orange zest or a sprig of mint.
Notes
Allow the fluff to chill adequately for the best texture and flavor. Consider adding crunchy toppings like crushed nuts before serving.
- Prep Time: 15 minutes
- Cook Time: 0 minutes
- Category: Dessert
- Method: Mixing and Chilling
- Cuisine: Mediterranean
Nutrition
- Serving Size: 1 serving
- Calories: 150
- Sugar: 10g
- Sodium: 30mg
- Fat: 7g
- Saturated Fat: 4g
- Unsaturated Fat: 2g
- Trans Fat: 0g
- Carbohydrates: 15g
- Fiber: 0g
- Protein: 6g
- Cholesterol: 30mg
Keywords: Greek Yogurt, Orange, Dessert, Light, Fluff

Frozen Greek Yogurt Peanut Butter Bites
Frozen Greek Yogurt Peanut Butter Bites: A Sweet and Simple Treat!
Welcome back to my cozy kitchen, food enthusiasts! Today, I’m bringing you a delightful treat that marries the creamy goodness of Greek yogurt with the rich, nutty flavor of peanut butter. Frozen Greek Yogurt Peanut Butter Bites are your new best friend when you’re craving something sweet but also want a healthier option. These little bites are not only easy to whip up, but they also satisfy that sweet tooth while providing a boost of protein and calcium. Who knew healthy could taste this good?
Let me tell you, there’s something magical about the combination of Greek yogurt and peanut butter. It’s like a hug in food form! The creamy yogurt balances perfectly with the smooth, nutty peanut butter—creating a luxurious, indulgent flavor without the guilt. And let’s be honest, who doesn’t love a snack that you can pop in your mouth whenever you want? These bites are ideal for busy afternoons, a sweet snack for kids, or even a late-night dessert when you’re feeling a little naughty but not too naughty.
Now, not to get too sentimental, but these bites bring me back to simpler times—snack times with friends, making memories in the kitchen with family, and the joy of sharing something delicious that’s also good for you. By the end of this post, you’ll not only have a recipe in hand but also a cozy story to go along with it! So, let’s roll up our sleeves and dive in!
Personal Story
There’s a vivid memory I hold close to my heart that involves a summer spent in my grandmother’s kitchen. She was a master at turning ordinary ingredients into pure magic. One particularly hot afternoon, as we were looking for something cool and tasty, she introduced me to the world of frozen treats made from yogurt. We didn’t have fancy gadgets back then—just a simple mixing bowl, a spatula, and lots of love!
She would whip up yogurt mixtures infused with peanut butter, vanilla, and whatever fruits we had on hand. I remember impatiently waiting for those little bites to freeze, sneaking tastes of the mixture before it made its way to the freezer. It became our little ritual: making scrumptious frozen bites while sharing stories and giggles. Every summer since, I’ve felt the urge to recreate those lovely afternoons, and my Frozen Greek Yogurt Peanut Butter Bites are my homage to her legacy. Now, let’s bring a taste of that nostalgia into your kitchen!
Ingredients
Here’s what you’ll need to create your own frozen delights. Each ingredient plays a crucial role in building that yummy flavor we’re after!
-
Greek Yogurt (Plain or Vanilla): This creamy base is packed with protein and probiotics. Plain yogurt gives you more control over the sweetness, while vanilla adds a lovely flavor boost. If you’re not a fan of Greek yogurt, regular yogurt will work too, but it may give a slightly different texture.
-
Peanut Butter (Creamy or Crunchy): Smooth peanut butter will create a velvety finish, while crunchy offers a delightful texture. If you’re allergic to peanuts or want a twist, try almond butter or sun butter.
-
Honey or Maple Syrup: This natural sweetener balances out the tanginess of the yogurt. For a lower-sugar option, you can use stevia or monk fruit; just adjust to your taste!
-
Mini Chocolate Chips (Optional): Because who doesn’t appreciate a bit of chocolate? Feel free to skip these, or replace them with dried fruit or nuts for a different crunch.
-
Vanilla Extract: A splash of this will elevate your bites to a whole new level of deliciousness, adding warmth and depth. If you’re out of vanilla, a hint of almond extract can do the trick!
-
Pinch of Salt: A tiny bit of salt enhances all the other flavors, making everything pop! Don’t skip it; it’s like the secret handshake between flavors!
Step-by-Step Instructions
Now that we’ve got our ingredients prepped, it’s time to get cooking… or, should I say, mixing! Here’s how to put it all together:
-
Gather Your Equipment: Grab a mixing bowl, a spatula, a measuring cup, and a mini muffin tin or silicone mold (the season’s hottest molds—because they make everything more fun!).
-
Mix the Yogurt and Peanut Butter: In the mixing bowl, add 1 cup of Greek yogurt and ½ cup of peanut butter. Use your spatula and mix until the two ingredients are fully combined. You want it creamy and smooth without any streaks (think of this as a workout for your arms!).
-
Sweeten the Deal: Next, drizzle in about 2 tablespoons of honey or maple syrup (or to taste). Mix again until beautifully blended. Remember, you can always start with less and add more, depending on your sweet tooth!
-
Add the Vanilla and Salt: Pour in ½ teaspoon of vanilla extract and add a pinch of salt. This step is crucial for enhancing the overall flavor profile! Stir everything together until smooth and well incorporated.
-
Fold in Chocolate Chips: If you’re using mini chocolate chips, gently fold them in at this step. This part is so satisfying—imagine each chip being a pocket of joy waiting to burst in your mouth!
-
Scoop and Freeze: Using a spoon or an ice cream scoop, fill your muffin tin or silicone mold with the mixture. Press it down gently for even pops. Leave a little room at the top as they might expand slightly while freezing.
-
Freeze Blissfully: Pop your filled molds into the freezer and let them chill for at least 2 hours, or until solid. This is the hardest part (waiting!), but trust me, the end result is worth it.
-
Enjoy Your Treats: Once they’re frozen solid, pop them out of the molds. You can store them in an airtight container in the freezer for up to a month—if they last that long!
Serving Suggestions
When it comes to serving, the world is your oyster! These bites are fabulous as-is, but you could also do a little extra magic by drizzling some melted chocolate on top or dusting them with a sprinkle of crushed nuts. Serve them in colorful cupcake liners for a festive touch at gatherings, or present them on a pretty platter at your next movie night. They’re perfect alongside fresh fruit or nutty granola, making for a fun DIY yogurt parfait!
Recipe Variations
Y’all know I love a twist! Here are a few fun ideas to switch up your Frozen Greek Yogurt Peanut Butter Bites:
-
Nutty Banana Bliss: Add a mashed ripe banana to the yogurt mixture for a fruity twist. It pairs beautifully with peanut butter!
-
Berry Delicious: Fold in fresh or frozen berries alongside or instead of the chocolate chips for an antioxidant-packed treat.
-
Coconut Craze: Mix in unsweetened shredded coconut for that tropical flair! Pair it with macadamia nut butter for an extra layer of flavor.
-
Spicy Kick: For those who love a little heat, consider adding a small pinch of cayenne or cinnamon. It adds an unexpected zing that’s delightful!
-
Dairy-Free Delight: Substitute the Greek yogurt with a dairy-free yogurt alternative (almond, coconut, or cashew) and use a plant-based peanut butter for a vegan-friendly treat!
Chef’s Notes
Every recipe tells a story, and this one has evolved over the years! I first started making these bites as a healthy after-school snack for my kids. As we began experimenting, the flavors developed, and soon they became a staple in our home. I have even found myself making versions that are more indulgent for parties and gatherings. One of my funniest kitchen mishaps involved misreading the quantities—a bit too much peanut butter led to some delicious peanut butter ice cream instead of bites! Ah, the chaos of creativity!
FAQs and Troubleshooting
-
Why are my bites not freezing properly?
If your bites aren’t freezing well, it may be due to too much peanut butter or yogurt. Try adjusting the ratios slightly. Adding more yogurt can create a firmer texture! -
Can I reuse the molds after making these?
Absolutely! Just give them a good wash to remove any residue, and you’re good to go for your next batch. -
How do I store my Frozen Greek Yogurt Peanut Butter Bites?
Store them in an airtight container in the freezer. You can separate layers with parchment paper to ensure they don’t stick together! -
What if I don’t have mini muffin tins?
No worries! You can use ice cube trays or even silicone molds in fun shapes! The bites will still taste fantastic!
Nutritional Info
While I’m not one to count every calorie, here’s a quick overview of what you can expect per serving (this is an estimate and can vary based on specific brands):
- Calories: Approximately 100
- Protein: 5g
- Fat: 6g
- Carbohydrates: 8g
- Fiber: 1g
- Sugar: 4g (depends on the sweetness of yogurt and added sweetener)
And there you have it, my lovely foodies! Your very own Frozen Greek Yogurt Peanut Butter Bites recipe is ready to delight! Whether you whip these up for a snack, dessert, or a cozy gathering, I hope they bring you just as much joy as they have brought to my kitchen. Remember, cooking is about sharing love and joy, so go ahead, make a batch, and feel that good vibe! Happy cooking!
Print
Frozen Greek Yogurt Peanut Butter Bites
- Total Time: 135 minutes
- Yield: 12 servings 1x
- Diet: Vegetarian
Description
A sweet and simple treat that combines Greek yogurt and peanut butter for a healthy, protein-packed snack.
Ingredients
- 1 cup Greek Yogurt (Plain or Vanilla)
- ½ cup Peanut Butter (Creamy or Crunchy)
- 2 tablespoons Honey or Maple Syrup
- ½ teaspoon Vanilla Extract
- Pinch of Salt
- Mini Chocolate Chips (Optional)
Instructions
- Gather your equipment: Grab a mixing bowl, a spatula, a measuring cup, and a mini muffin tin or silicone mold.
- Mix the yogurt and peanut butter in the mixing bowl until creamy and smooth.
- Sweeten the deal by drizzling in honey or maple syrup and mixing again.
- Add the vanilla extract and salt, stirring until smooth.
- Fold in the chocolate chips if using.
- Scoop the mixture into the muffin tin or mold, pressing down gently.
- Freeze for at least 2 hours until solid.
- Enjoy your treats and store in an airtight container in the freezer.
Notes
For variations, consider adding fruits, coconut, or spices to customize your bites.
- Prep Time: 15 minutes
- Cook Time: 120 minutes
- Category: Dessert
- Method: Freezing
- Cuisine: American
Nutrition
- Serving Size: 1 bite
- Calories: 100
- Sugar: 4g
- Sodium: 80mg
- Fat: 6g
- Saturated Fat: 1g
- Unsaturated Fat: 3g
- Trans Fat: 0g
- Carbohydrates: 8g
- Fiber: 1g
- Protein: 5g
- Cholesterol: 0mg
Keywords: frozen yogurt, peanut butter bites, healthy treat, snack, dessert


