

Falafels au potimarron
Falafels au Potimarron: A Cozy Kitchen Adventure
Welcome back to my kitchen, fellow food lovers! Today, we’re diving into a delightful cuisine that perfectly marries heartiness with warmth: falafels au potimarron, or pumpkin falafels. If the thought of crispy, golden-brown falafels made with sweet winter squash makes your mouth water, then you’re in for a treat. This recipe is not just about the food; it’s about the joy of cooking and sharing delicious meals with the people you love.
Growing up, my family was all about cozy meals that brought everyone together, usually featuring something deliciously roasted from our garden. I fondly remember the autumn days when the air turned crisp, and my mom would bring home a hefty potimarron — the sweetest pumpkin you could ever taste. She’d whip up everything from hearty soups to beautiful roasted slices drizzled with honey. And every time I think of potimarron, I can almost hear the laughter and kitchen chatter as we gathered around the table, savoring every bite of those cozy meals.
Fast forward to today, and I’ve taken the essence of those comforting dishes and added a chic twist. This falafel recipe balances the nutty flavor of chickpeas with the sweet earthiness of potimarron, giving you a crispy exterior and a fluffy interior that’s completely irresistible. So let’s roll up our sleeves and get cooking!
Personal Story
The first time I experimented with potimarron in my falafels, it was more out of culinary curiosity than necessity. I remember my friend Sarah coming over for a dinner party; we had planned an elaborate feast that ended up being a wildly fun disaster (there were more laughs than actual food). At the last minute, I threw some potimarron into the food processor with my traditional falafel mix, and oh boy, did that change everything!
Those golden nuggets of goodness were a hit! My guests couldn’t get enough, and I nearly started a food frenzy in my small kitchen. The memory of their happy faces and satisfied spirits fueled my passion for cooking more than any recipe ever could. This dish not only became a family favorite but also found its way into my heart as a reminder that sometimes, the best moments come from being spontaneous and adventurous in the kitchen.
Ingredients
Here’s what you’ll need to create these fabulous falafels au potimarron:
-
1 cup chickpeas (dried, soaked overnight)
- Essential for the classic falafel texture. If you’re short on time, canned chickpeas work but may yield slightly less crispy results.
-
1 cup cooked potimarron (peeled and cubed)
- Adds a unique sweetness. If unavailable, butternut squash is a great alternative.
-
1 small onion, roughly chopped
- Essential for flavor. You can substitute with shallots for a milder taste or leeks for a unique twist.
-
2 cloves garlic, minced
- The aromatic powerhouse! Feel free to use roasted garlic for a sweeter flavor.
-
1 tablespoon ground cumin
- Adds warmth; can be swapped with coriander or smoked paprika for a different flavor profile.
-
1 tablespoon ground coriander
- Compliments the chickpeas perfectly. Not a fan? Try dried dill or oregano for a herbal note.
-
1 teaspoon salt
- Essential for flavor. Adjust as needed for dietary preferences.
-
1/2 teaspoon black pepper
- For a subtle kick. If you like it spicy, add a pinch of cayenne pepper!
-
2 tablespoons fresh parsley, chopped
- Brightens up the flavors; cilantro works too for an even fresher taste.
-
1 tablespoon tahini (optional)
- A lovely creamy addition, but feel free to substitute with sunflower seed butter for nut-free diets.
-
Oil for frying (canola or sunflower)
- Essential for achieving crispy falafels. For a healthier spin, consider baking!
Step-by-Step Instructions
Step 1: Prepare the Chickpeas
Start by soaking your dried chickpeas in water for about 8 hours or overnight. This plumps them up and makes them easier to blend. If you’re using canned chickpeas, just give them a good rinse and drain. This step is crucial because it ensures your falafels are light and fluffy!
Step 2: Roast the Potimarron
While the chickpeas are soaking, you can prepare your potimarron. Preheat your oven to 400°F (200°C). Cut the potimarron in half, scoop out the seeds, and peel the skin (though you can leave it on for added texture if you prefer). Cut into cubes, toss them with a drizzle of olive oil, and season with salt and pepper. Roast for about 20-25 minutes until fork-tender and slightly caramelized. This step intensifies the sweetness!
Step 3: Blend the Ingredients
In a food processor, combine the soaked and drained chickpeas, roasted potimarron, onion, garlic, cumin, coriander, salt, pepper, and fresh parsley. Pulse until everything is mixed but not completely puréed. You want some texture here; don’t turn it into mush! If the mixture feels too dry, you can add a splash of water or a bit of tahini for creaminess.
Step 4: Chill the Mixture
Transfer the falafel mixture to a bowl, cover it, and chill in the fridge for at least 30 minutes. This step allows the flavors to meld and helps hold the falafels together when frying — a little patience goes a long way in the kitchen!
Step 5: Shape the Falafels
Once chilled, it’s time to shape your falafels. Using your hands, scoop out about a tablespoon of mixture and form small balls or patties. This is a great time to get your hands a bit messy (isn’t that part of the fun?)! If the mixture is too crumbly, add a touch more water or chickpea flour; if it’s too wet, a bit of breadcrumbs can help.
Step 6: Fry or Bake
Heat the oil in a heavy-bottomed skillet over medium heat. Fry in batches, about 4-5 falafels at a time, for 3-4 minutes on each side until golden brown. The sizzle is music to the ears! If you’d rather bake them, preheat your oven to 375°F (190°C) and arrange the falafels on a baking sheet lined with parchment paper. Brush with a bit of oil and bake for around 20-25 minutes, flipping halfway through.
Step 7: Enjoy
Serve your crispy falafels warm, drizzled with tahini or a spicy sauce, and perhaps nestled in a warm pita or on a bed of fresh greens with a side of yogurt dip. Bon appétit!
Serving Suggestions
To plate these gorgeous falafels, consider serving them family-style with a vibrant Mediterranean-inspired salad, garnished with pickled red onions, fresh cucumber, and a few slices of ripe tomatoes. Add a sprinkle of sumac for a zesty punch. Pile your falafels on a large platter, drizzle tahini sauce over them, and voilà! A feast for the eyes and the belly!
Recipe Variations
- Spicy Falafels: Toss in some chopped jalapeños or a pinch of cayenne for kick!
- Herb-Infused Version: Mix in some fresh mint or dill for a refreshing twist.
- Baked Falafels: For a lighter option, bake instead of frying. They’ll still be delicious!
- Mediterranean Bowl: Serve over grains like quinoa or couscous with your favorite tahini dressing.
- Falafel Wrap: Wrap them in a flatbread with your choice of veggies and sauces for the perfect on-the-go meal.
Chef’s Notes
This recipe has been through many iterations in my kitchen! From experimenting with different spices to adjusting the ratio of chickpeas and squash, each time is an adventure. I once had a mishap where I accidentally used smoked paprika instead of regular – talk about a game changer. Those smoky falafels had a cult following for a good while!
Cooking is about exploring and evolving. Don’t be afraid to make it your own. Remember, if something doesn’t go according to plan, just laugh it off; those kitchen stories are the ones we cherish the most!
FAQs and Troubleshooting
-
Why do my falafels fall apart when frying?
- This usually happens if the mixture is too wet. Try adding more flour or breadcrumbs to bind it.
-
Can I make these falafels ahead of time?
- Absolutely! You can prepare the mixture ahead of time and store it in the fridge for 1-2 days. Just shape and cook when you’re ready.
-
What dipping sauces pair well?
- My favorites are a cool yogurt tahini dip or a spicy harissa sauce. Both complement the falafel beautifully!
-
How do I store leftover falafels?
- Store any leftovers in an airtight container in the fridge for up to 3 days. Reheat in the oven or a skillet for the best texture.
Nutritional Info
(Calories and nutritional info will depend on the specific ingredients used and cooking methods)
These falafels are packed with plant protein, fiber, and healthy fats, making them a nourishing choice for any meal!
So there you have it, my friends! A cozy journey through the art of making Falafels au Potimarron. May your kitchen be filled with laughter, warmth, and really good food. Until next time, happy cooking! 🍽️
Print
Falafels au Potimarron
- Total Time: 45 minutes
- Yield: 4 servings 1x
- Diet: Vegetarian
Description
Delicious pumpkin falafels that balance the nutty flavor of chickpeas with the sweetness of potimarron, resulting in crispy exteriors and fluffy interiors.
Ingredients
- 1 cup chickpeas (dried, soaked overnight)
- 1 cup cooked potimarron (peeled and cubed)
- 1 small onion, roughly chopped
- 2 cloves garlic, minced
- 1 tablespoon ground cumin
- 1 tablespoon ground coriander
- 1 teaspoon salt
- 1/2 teaspoon black pepper
- 2 tablespoons fresh parsley, chopped
- 1 tablespoon tahini (optional)
- Oil for frying (canola or sunflower)
Instructions
- Prepare the Chickpeas: Soak your dried chickpeas in water for about 8 hours or overnight. If you’re using canned chickpeas, rinse and drain them. This step is crucial for fluffy falafels!
- Roast the Potimarron: Preheat your oven to 400°F (200°C). Cut the potimarron in half, scoop out the seeds, and peel. Cut into cubes and toss with olive oil, salt, and pepper. Roast for 20-25 minutes until fork-tender.
- Blend the Ingredients: In a food processor, combine the soaked chickpeas, roasted potimarron, onion, garlic, cumin, coriander, salt, pepper, and parsley. Pulse until mixed but not puréed.
- Chill the Mixture: Transfer the mixture to a bowl, cover, and chill in the fridge for at least 30 minutes.
- Shape the Falafels: Once chilled, scoop out a tablespoon of mixture and form small balls or patties. Adjust texture if needed with water or breadcrumbs.
- Fry or Bake: Heat oil in a skillet over medium heat. Fry in batches for 3-4 minutes on each side until golden brown, or bake at 375°F (190°C) for 20-25 minutes.
- Enjoy: Serve warm drizzled with tahini or a spicy sauce in pita or on a bed of greens.
Notes
Feel free to experiment with spices and ingredients to make it your own. If the mixture is too wet, add flour; if too dry, add a bit of water.
- Prep Time: 15 minutes
- Cook Time: 30 minutes
- Category: Main Course
- Method: Frying
- Cuisine: Mediterranean
Nutrition
- Serving Size: 1 serving
- Calories: 350
- Sugar: 5g
- Sodium: 500mg
- Fat: 12g
- Saturated Fat: 1g
- Unsaturated Fat: 9g
- Trans Fat: 0g
- Carbohydrates: 45g
- Fiber: 8g
- Protein: 15g
- Cholesterol: 0mg
Keywords: falafel, potimarron, pumpkin, vegetarian, Mediterranean

Crispy Butternut Squash Fritters (30-Minute Weeknight)
Butternut Squash Fritters: A Cozy Kitchen Adventure
Welcome to my kitchen! I’m so excited to share this amazing recipe for butternut squash fritters with you. These delightful little bites are not only packed with flavor, but they also embody everything I love about cooking: warmth, creativity, and the joy of sharing with loved ones. Imagine your kitchen filled with the sweet, nutty aroma of roasting butternut squash as you whip up these fritters—sounds wonderful, doesn’t it?
Butternut squash fritters are perfect for any occasion—whether it’s a cozy weeknight dinner, a fun brunch with friends, or a tasty appetizer for your next gathering. They’re crispy on the outside, tender on the inside, and oh-so-satisfying. And the best part? They’re easy to make and require simple, wholesome ingredients.
I’ve had a special place in my heart for fritters ever since my grandmother introduced me to her beloved zucchini fritters back when I was a kid. She’d make them whenever we visited, and I remember the excitement in the kitchen as the batter sizzled in the skillet. Fast forward to today, and my version incorporates the vibrant flavors of butternut squash, making them comforting yet fresh. Let’s dive into this recipe together and create a dish that will surely inspire many joyful bites and cherished memories!
Personal Story: A Taste of Home
Cooking has always been a family affair for me. Growing up, I spent countless hours in the kitchen, learning from my grandmother and sharing laughter over the stove. One of my most vivid memories is of her cooking up a storm, using seasonal veggies from her garden. Whenever autumn rolled around, butternut squash became the star of the show. My grandmother would roast them to sweetness and incorporate them into everything from soups to casseroles.
One chilly October afternoon, we decided to experiment and create fritters. I can still hear her humming softly as we mixed the ingredients and marveled at how easy it was to transform a humble squash into something so special. With every crunchy bite, I felt loved, nourished, and connected to my roots. Those fritters became a family favorite, and I’ve carried that warmth into my own kitchen. Now, I’m thrilled to pass on this recipe to you, hoping it will become a cherished dish in your home, too!
Ingredients
Let’s gather our ingredients! This part is crucial because using the right ingredients makes all the difference. Here’s what you’ll need:
-
Butternut Squash (about 2 cups, peeled and grated)
The star of the dish! Butternut squash is naturally sweet and adds a lovely creaminess to the fritters. If you can’t find butternut squash, any winter squash will work as a substitute—like acorn or even pumpkin. -
All-purpose Flour (½ cup)
This helps bind the fritters together. For a gluten-free option, you can swap this for a blend of almond flour or a gluten-free all-purpose flour mix. -
Eggs (2 large)
The eggs are essential for binding the mixture and giving it a nice fluffy texture. You can replace them with flax eggs (1 tablespoon ground flaxseed mixed with 3 tablespoons of water per egg) for a vegan option. -
Green Onions (4, chopped)
These add a mild onion flavor to the fritters. If you don’t have green onions, feel free to use shallots or regular onions instead—just adjust the amount to avoid overpowering flavors. -
Garlic (2 cloves, minced)
Fresh garlic adds a savory depth. If you’re in a pinch, garlic powder can take its place, though fresh is always the best option! -
Ground Cumin (1 teaspoon)
This warming spice complements the sweetness of the squash beautifully. Want to switch it up? Smoked paprika or chili powder can bring a nice kick instead! -
Salt (½ teaspoon)
Essential for enhancing the flavors. Adjust to taste if you’re watching your sodium intake. -
Pepper (½ teaspoon)
Freshly cracked pepper adds a lovely mild kick. Feel free to amp it up if you enjoy a bit more heat! -
Olive Oil (for frying)
This is key for achieving those crispy edges. You can substitute with avocado oil if desired, which has a higher smoke point.
Now that we’ve got everything lined up, let’s get cooking!
Step-by-Step Instructions
-
Prep the Butternut Squash
Start with peeling the butternut squash carefully (watch those fingers!). Cut it in half lengthwise and scoop out the seeds. Then, grate the flesh using the large holes of a box grater—you’re looking for about 2 cups. If you have a food processor, feel free to use the grater attachment—it’ll save you some time! -
Squeeze Out the Moisture
Place the grated squash in a clean kitchen towel and give it a good twist to squeeze out excess moisture. This helps your fritters achieve that crispy texture! (Trust me; it’s worth the extra effort). -
Mix It All Together
In a large bowl, combine the drained butternut squash, flour, eggs, chopped green onions, minced garlic, ground cumin, salt, and pepper. Stir until everything is well incorporated. The mixture should be thick but hold together; if it feels too wet, you can add a bit more flour. -
Heat the Pan
In a non-stick skillet, heat a tablespoon of olive oil over medium heat. You want the oil hot enough to sizzle when you drop the batter in, but not so hot that it smokes. -
Form the Fritters
Using a tablespoon, scoop the batter and carefully drop it into the skillet, pressing down gently to flatten. Avoid overcrowding the pan—give each fritter some space to breathe! -
Cook Until Golden Brown
Let the fritters cook for about 3-4 minutes on one side until they turn golden brown. Flip them over with a spatula and cook the other side for another 3-4 minutes. You’ll know they’re ready when they’re crispy and beautifully browned. -
Drain and Repeat
Remove the fritters from the skillet and place them on a plate lined with paper towels to absorb excess oil. Add more oil to the pan as needed and repeat the process until all the batter is cooked. -
Serve Warm
As soon as they come off the stovetop, serve them warm with your favorite dipping sauce or a dollop of yogurt for extra creaminess.
Serving Suggestions
These fritters are wonderfully versatile! Plate them on a colorful serving dish and sprinkle with fresh herbs like parsley or cilantro for a pop of color. Consider serving them alongside a zesty dipping sauce—like a lemon garlic aioli—or plain Greek yogurt drizzled with olive oil and a splash of lemon juice. They make a stunning centerpiece for brunch or a tasty side at dinner.
Recipe Variations
-
Cheesy Twist
Add shredded cheese (like feta or cheddar) to the batter for a gooey, indulgent twist! -
Herb Infusion
Fresh herbs like thyme or rosemary can elevate the flavors. Chop them finely and mix them into the batter for an aromatic touch. -
Sweet Heat
Add a pinch of crushed red pepper flakes to the batter if you like a touch of heat. -
Vegan Version
Use flax eggs instead of regular eggs, and try chickpea flour instead of all-purpose flour for a hearty vegan fritter. -
Baked Option
Instead of frying, you can bake them! Preheat your oven to 400°F (200°C), place the fritters on a parchment-lined baking sheet, and lightly spray with cooking oil. Bake for about 20 minutes, flipping halfway through until they’re golden and crispy!
Chef’s Notes
As with any recipe, don’t be afraid to make it your own! This dish has evolved for me over the years, and I love experimenting with new flavors and techniques each time I make it. One day, I might incorporate some diced bell peppers for added color. Another time, I may swap in sweet potatoes instead of butternut squash for a fun twist. Remember, cooking is all about creativity and having fun. If something doesn’t go as planned (trust me, it happens to the best of us!), just laugh it off and try again. That’s the beauty of cooking!
FAQs and Troubleshooting
1. My fritters fell apart while cooking. What did I do wrong?
This could be due to excess moisture in the squash. Make sure to squeeze out as much liquid as possible. If they still seem too wet, add a bit more flour to bind the mixture.
2. Can I make the mixture ahead of time?
Absolutely! You can prepare the batter ahead and store it in the fridge for a few hours. Just give it a good stir before cooking.
3. How do I store leftovers?
You can keep leftover fritters in an airtight container in the fridge for up to three days. To reheat, place them in a skillet over medium heat with a touch of olive oil to crisp them up again.
4. Can I freeze these fritters?
Yes! Once cooked, let them cool completely before placing them in a freezer-safe container. They should last up to three months. To reheat, bake them from frozen in a preheated oven until heated through.
Nutritional Info (if applicable)
While I won’t dive into too many details about calories and macros—because cooking should be a joyful experience, not a stressful one—it’s worth noting that these fritters, packed with nutritious butternut squash, offer plenty of vitamins, fiber, and a taste of the season.
So, there you have it! A cozy recipe for butternut squash fritters that’s sure to bring smiles and warmth to your kitchen. Whether you’re enjoying them during a quiet family dinner or serving them at a lively gathering, I hope this dish fills your home with love and deliciousness. Happy cooking!
Print
Butternut Squash Fritters
- Total Time: 35 minutes
- Yield: 4 servings
- Diet: Vegetarian
Description
Delicious and crispy butternut squash fritters, perfect for any occasion.
Ingredients
- Butternut Squash (about 2 cups, peeled and grated)
- All-purpose Flour (½ cup)
- Eggs (2 large)
- Green Onions (4, chopped)
- Garlic (2 cloves, minced)
- Ground Cumin (1 teaspoon)
- Salt (½ teaspoon)
- Pepper (½ teaspoon)
- Olive Oil (for frying)
Instructions
- Prep the butternut squash by peeling, halving, and grating it.
- Squeeze out the moisture using a kitchen towel.
- Mix together the grated squash, flour, eggs, green onions, garlic, cumin, salt, and pepper in a bowl.
- Heat olive oil in a skillet over medium heat.
- Form fritters by scooping the batter into the skillet and flattening gently.
- Cook until golden brown, about 3-4 minutes on each side.
- Drain on paper towels and repeat cooking with the remaining batter.
- Serve warm with your favorite dipping sauce or yogurt.
Notes
Adjust seasoning and enjoy these fritters warm. For a baked option, preheat to 400°F (200°C) and bake for 20 minutes.
- Prep Time: 15 minutes
- Cook Time: 20 minutes
- Category: Appetizer
- Method: Frying
- Cuisine: American
Nutrition
- Serving Size: 1 fritter
- Calories: 250
- Sugar: 3g
- Sodium: 300mg
- Fat: 10g
- Saturated Fat: 1g
- Unsaturated Fat: 8g
- Trans Fat: 0g
- Carbohydrates: 34g
- Fiber: 4g
- Protein: 6g
- Cholesterol: 70mg
Keywords: butternut squash, fritters, vegetarian recipe, cozy cooking, easy appetizers
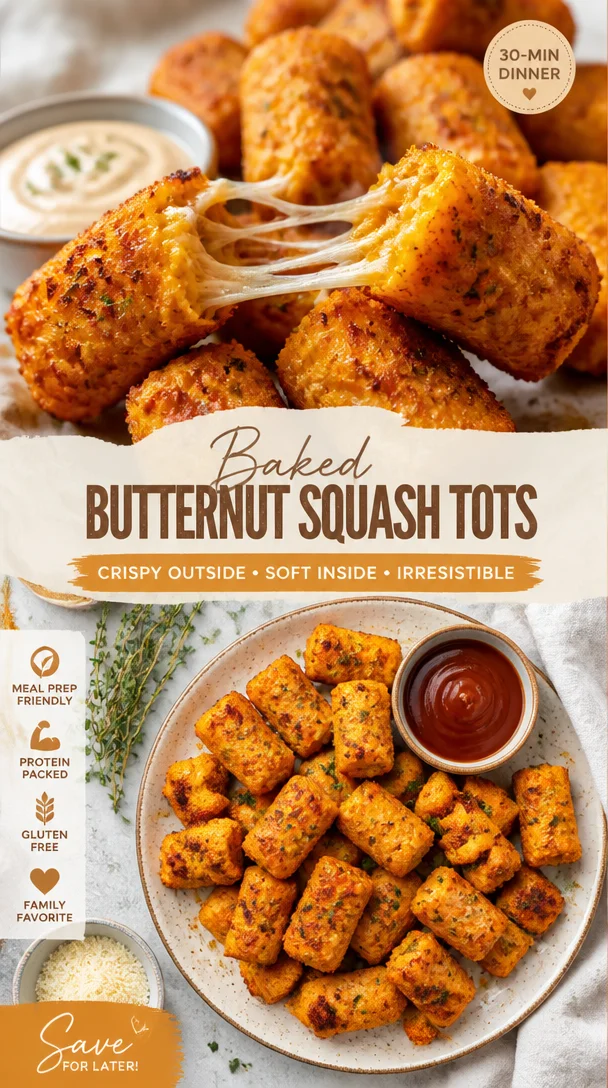
Baked Butternut Squash Tots
Baked Butternut Squash Tots: A Cozy Comfort Food
Welcome to my kitchen! If you’re like me and get sheer joy from the bubbling sounds of a dish in the oven or the aroma of something warm and flavorful wafting through the air, you’ve stumbled upon a recipe that is pure comfort. Today, I’m thrilled to share my favorite Baked Butternut Squash Tots, a delightful twist on a classic that’s sure to bring smiles to your table.
Butternut squash is one of those magical ingredients that transform any recipe into a soul-warming experience. It’s sweet, nutty, and just downright cozy — and when you bake it into golden, crispy tots, you’re in for a treat that’s healthier than your typical potato version but equally delicious. It’s not just a side dish; these tots can steal the spotlight as a fun appetizer, a snack, or even the star of your dinner.
So pull up a chair, let’s get comfy, and dive into this recipe that’s not just about food but the memories we share over it! Trust me, once you sink your teeth into these baked butternut squash tots, you’ll be ready to fall in love with cooking all over again.
A Sweet Nostalgia
Before we get into the nitty-gritty of the recipe, I want to take you back to when I first discovered butternut squash. It was a chilly autumn evening, and I can vividly remember gathering in my grandma’s kitchen, where the air was filled with spices and laughter. She would roast butternut squash with just a sprinkle of cinnamon and nutmeg, turning it into a heavenly sweet treat that felt like a warm hug.
Fast forward to today, and I’ve taken that love for butternut squash and spun it into a recipe that’s playful and fun for everyone. I wanted to create something that reflects that warmth — a dish that invites family and friends to gather around, share stories, and embrace the season with every bite.
Now, let’s get to the good stuff!
Ingredients
Here’s what you’ll need for your Baked Butternut Squash Tots:
-
1 medium butternut squash (about 2 lbs)
- Look for a squash that feels heavy for its size; this usually means a sweeter, more flavorful flesh. If butternut squash isn’t available, you can substitute it with sweet potatoes or carrots for a different twist.
-
1/2 cup shredded cheddar cheese
- This adds a wonderful creaminess and depth of flavor. For a dairy-free option, you can use nutritional yeast or a vegan cheese substitute that melts well.
-
1/4 cup breadcrumbs
- The breadcrumbs give your tots that perfect crunch. Panko breadcrumbs are my favorite for that extra crispy texture, but you can also use crushed cornflakes or even almond flour for a gluten-free variant.
-
1/4 teaspoon salt
- Adjust according to your taste! If you’re watching sodium intake, consider using a salt substitute or skipping it altogether.
-
1/4 teaspoon black pepper
- Just a pinch to add some bite! You can elevate the flavor by using white pepper or adding some cayenne for heat if you’re feeling adventurous.
-
1/4 teaspoon garlic powder
- This is an essential for building flavor. Fresh minced garlic works too, just be mindful not to overpower the squash.
-
1/4 teaspoon onion powder
- Adding this will enhance the flavor profile of your tots. If you have shallots, you can finely chop and use them for a more subtle flavor.
-
1 large egg
- The egg acts as a binder to keep the tots together. For a vegan choice, a flaxseed egg (1 tablespoon ground flaxseed mixed with 2.5 tablespoons of water) works beautifully.
-
Cooking spray or olive oil
- This helps achieve that golden, crispy exterior. Feel free to use avocado oil for a different setting!
Step-by-Step Instructions
Now, let’s get cooking! Here’s how to create those irresistible Baked Butternut Squash Tots:
-
Prep the Butternut Squash
Begin by preheating your oven to 425°F (220°C). While the oven warms up, carefully peel and seed the butternut squash. Don’t worry if it seems challenging; a sharp vegetable peeler and a sturdy knife make this job much easier. Cut it into chunks for quicker cooking. -
Roast the Squash
Place the chunks on a baking sheet lined with parchment paper. Drizzle them with a touch of olive oil and sprinkle with a little salt and pepper. Roast them in your preheated oven for about 25-30 minutes, until fork-tender. Keep an eye on them! You’ll know they’re done when a lovely golden hue appears and the flesh is soft enough to mash. -
Mash and Mix
Once roasted, let your squash cool for a few minutes and then transfer it to a large mixing bowl. Mash it up like you would with potatoes. You want a smooth, creamy consistency — some small lumps are totally fine! -
Combine the Ingredients
Now, the fun part! Add your cheese, breadcrumbs, egg, garlic powder, onion powder, salt, and pepper to the bowl. Mix everything together just until combined. It should be sticky but moldable — if it seems too wet, feel free to add a touch more breadcrumbs. -
Shape the Tots
Use your hands to shape the mixture into small, tot-sized ovals. Ideally, each tot should be about one to two inches long. Place each tot back onto the parchment-lined baking sheet. Don’t worry if they don’t look perfect; the charm is in their homemade vibe! -
Bake Until Crispy
Lightly spray the tops of the shaped tots with cooking spray or brush with olive oil before placing them in the oven. Bake for about 20-25 minutes, flipping them halfway through. You want them to be crispy and golden on the outside. Keep an eye on them toward the end — a few extra minutes can make a world of difference!
Serving Suggestions
Once baked, pull those delicious tots out of the oven and let them sit for a few minutes to cool slightly. Serve your Baked Butternut Squash Tots with a side of your favorite dipping sauce — think spicy mayo, ranch, or even a tangy garlic aioli. They’re a fantastic addition to any table, whether it’s a cozy movie night at home or a lively gathering with friends.
Recipe Variations
Feeling a bit adventurous? Here are some fun twists you can try with this base recipe:
- Spicy Southwest Tots: Add some chopped jalapeños and cumin to the mix for a zesty kick.
- Herby Green Tots: Stir in some fresh herbs like parsley, cilantro, or chives for a burst of freshness.
- Cheesy Spinach Tots: Mix in some sautéed spinach or kale along with the cheddar for a green twist.
- Buffalo Chicken Tots: Incorporate shredded cooked chicken tossed in buffalo sauce for a hearty, spicy option.
- Sweet Potato & Bacon Tots: Use sweet potatoes instead of butternut, and add crispy bacon bits for a savory bite.
Chef’s Notes
Creating these Baked Butternut Squash Tots is truly a labor of love. Each time I make them, I remember those cherished kitchen moments with my grandmother. Reflecting on how cooking has transformed in my life brings a smile to my face. It’s a mix of nostalgia and creativity, where every meal is an opportunity to share, weave stories, and create memories.
Also, a little tip: if you find your mixture is too soft and not holding together, don’t despair! Just add a bit more breadcrumbs until the right texture is achieved. Trust your instincts and enjoy the process!
FAQs and Troubleshooting
-
Why do my tots fall apart?
If your tots are crumbling, you may need to add more binding ingredients such as breadcrumbs or a bit of extra egg. Make sure the mixture isn’t too wet. -
Can I make these in advance?
Absolutely! You can shape your tots ahead of time and refrigerate them. Just be sure to bake them when you’re ready! -
How can I store leftovers?
Store any leftovers in an airtight container in the fridge for up to 3 days. Simply reheat them in the oven to maintain that crispy texture. -
Can I freeze the tots?
Yes! Just freeze the uncooked tots in a single layer on a baking sheet. Once frozen, transfer them to a freezer bag. Bake directly from frozen, adding a few extra minutes to the cooking time.
Nutritional Info
While I believe that enjoying food is about so much more than just numbers, here’s a quick breakdown for those curious about the nutritional aspect of these tasty tots:
- Calories: Approximately 90 per serving (1 serving = 3 tots)
- Protein: 4g
- Carbohydrates: 10g
- Fat: 4g
- Fiber: 2g
So, there you have it! My take on Baked Butternut Squash Tots, bringing warmth and joy into your kitchen. Whether you’re snacking on them solo or sharing them with loved ones, these tots are bound to become a new favorite. Remember, the most important ingredient is your enthusiasm and creativity — so cook with love and enjoy every delicious bite! Happy cooking!
Print
Baked Butternut Squash Tots
- Total Time: 45 minutes
- Yield: 4 servings 1x
- Diet: Vegetarian
Description
A delightful twist on a classic comfort food, these Baked Butternut Squash Tots are crispy, healthy, and packed with flavor.
Ingredients
- 1 medium butternut squash (about 2 lbs)
- 1/2 cup shredded cheddar cheese
- 1/4 cup breadcrumbs
- 1/4 teaspoon salt
- 1/4 teaspoon black pepper
- 1/4 teaspoon garlic powder
- 1/4 teaspoon onion powder
- 1 large egg
- Cooking spray or olive oil
Instructions
- Prep the butternut squash by preheating your oven to 425°F (220°C), peeling and seeding it, and cutting it into chunks.
- Roast the squash on a baking sheet lined with parchment paper, drizzled with olive oil, salt, and pepper, for about 25-30 minutes until fork-tender.
- Mash the roasted squash in a large mixing bowl until smooth and creamy, with some small lumps.
- Combine cheese, breadcrumbs, egg, garlic powder, onion powder, salt, and pepper in the bowl, mixing until combined.
- Shape the mixture into small, tot-sized ovals and place them back onto the baking sheet.
- Bake the tots for about 20-25 minutes, flipping halfway through, until crispy and golden.
Notes
Serve the tots with your favorite dipping sauce. You can also make them in advance and bake them when ready.
- Prep Time: 15 minutes
- Cook Time: 30 minutes
- Category: Appetizer
- Method: Baking
- Cuisine: American
Nutrition
- Serving Size: 3 tots
- Calories: 90
- Sugar: 3g
- Sodium: 200mg
- Fat: 4g
- Saturated Fat: 2g
- Unsaturated Fat: 2g
- Trans Fat: 0g
- Carbohydrates: 10g
- Fiber: 2g
- Protein: 4g
- Cholesterol: 30mg
Keywords: baked, butternut squash, tots, vegetarian, comfort food
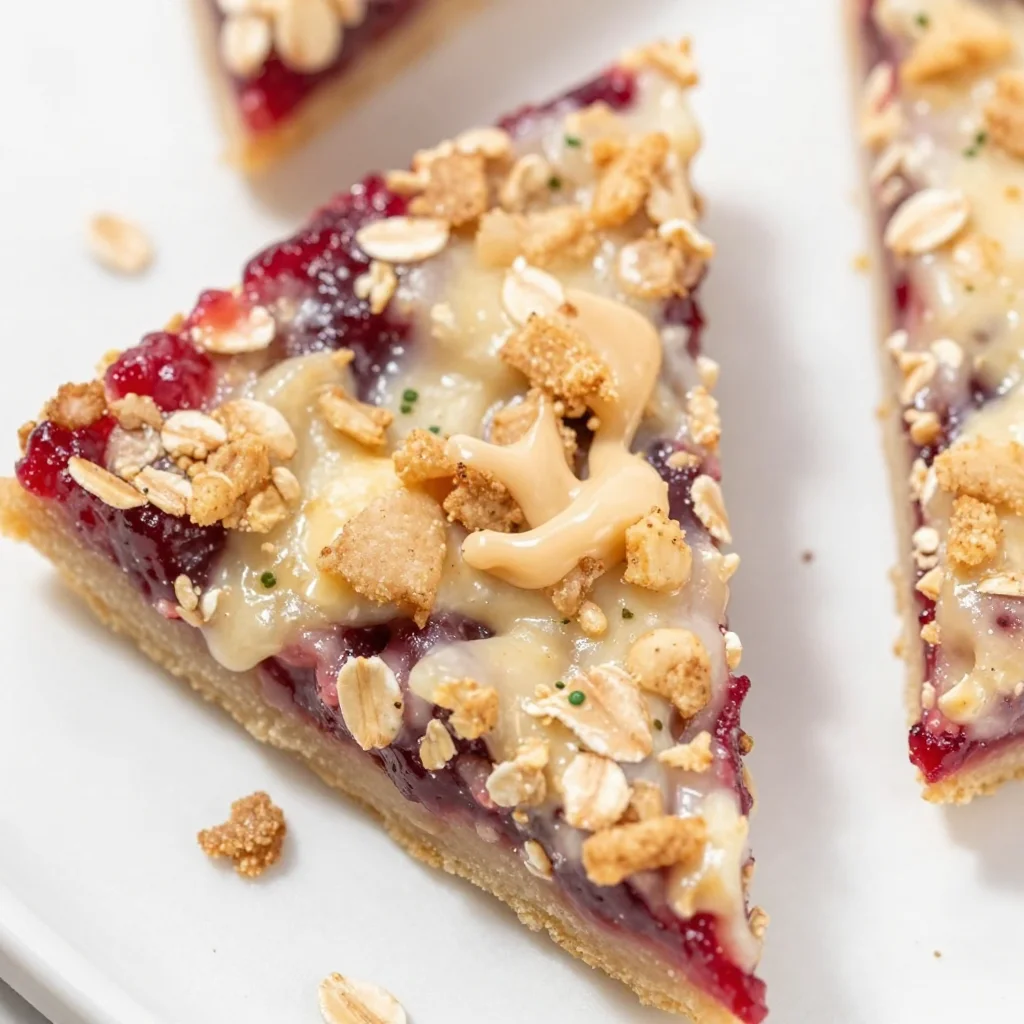
Ingredient Raspberry Oatmeal Bars: Quick & Beginner-Friendly
The Easiest Raspberry Oatmeal Bars: A Sweet Adventure in Every Bite!
Welcome to my cozy corner of the internet, where all things delicious and delightful come together! Today, I am thrilled to share a recipe that’s close to my heart and guaranteed to bring a smile to your face. These Easiest Raspberry Oatmeal Bars are not just scrumptious; they’re a blast from the past—packed with nostalgia, flavor, and the charm of home cooking. Whether you’re whipping them up for breakfast, snacking, or dessert, they’re perfect any time of day.
Picture this: the sun is shining through your kitchen window, the smell of baked oats fills the air, and you’re about to dig into the ultimate treat. These bars are a delightful combination of chewy oatmeal, sweet-tart raspberries, and a hint of cinnamon that makes them so irresistibly good. You won’t need hours in the kitchen or fancy equipment. With just a few simple ingredients and a bit of love, you’ll create a batch of oatmeal bars that everyone will rave about!
Now, let me take you back to where it all began. I vividly remember the summer afternoons spent at my grandmother’s house, surrounded by the enticing scent of her delicious baking. One of my favorite memories is the moment when she pulled a pan of her signature oatmeal bars from the oven, golden and bubbling with fresh fruits. I loved the way her kitchen felt; it was warm and inviting, just like these bars! We would devour those treats together while sharing stories and laughter, creating lasting bonds over a simple snack.
Fast forward to today, and I’ve decided to put my own twist on those nostalgic treats. My Easiest Raspberry Oatmeal Bars embody that warmth and joy. Trust me, once you try them, you’ll want to make them over and over again. So, let’s get cooking and make some magical memories in your kitchen!
What You’ll Need: Ingredients
Before we dive into the cooking process, let me lay out the ingredients for these delicious bars. Each component is simple, accessible, and adds its own unique touch.
-
Old-Fashioned Oats (2 cups): These are the backbone of your bars, giving them that lovely chewy texture. You can substitute quick oats if you prefer, but I find the old-fashioned oats create a heartier bar.
-
All-Purpose Flour (1 cup): This helps to bind everything together. If you’re gluten-free, feel free to swap this with almond flour or a gluten-free blend.
-
Brown Sugar (½ cup): For that rich sweetness and a hint of caramel flavor. If you’re looking to cut down on sugar, coconut sugar works well as a substitute.
-
Baking Powder (1 teaspoon): This helps your bars rise and become fluffy rather than dense.
-
Cinnamon (1 teaspoon): A warm spice that enhances the flavors of the oats and raspberries. If cinnamon isn’t your thing, try nutmeg or leave it out altogether.
-
Salt (½ teaspoon): Just a pinch to balance the sweetness.
-
Unsalted Butter (½ cup, melted): Adds richness and helps with the texture. Coconut oil is a great vegan alternative here.
-
Fresh Raspberries (1 cup): The stars of the show! You can swap these with blueberries, strawberries, or even apples if you like.
-
Egg (1 large): Binds everything together. For a vegan option, replace it with a flaxseed egg (1 tablespoon ground flaxseed mix with 3 tablespoons water).
Step-by-Step Instructions
Alright, let’s get to the fun part! Here’s how to bring these Easiest Raspberry Oatmeal Bars to life:
-
Preheat Your Oven: Start by preheating your oven to 350°F (175°C). This step ensures your bars bake evenly and develop a lovely golden color.
-
Prep Your Pan: Grab an 8×8-inch baking pan and line it with parchment paper for easy removal. You could also grease it lightly with butter or oil to prevent sticking.
-
Mix the Dry Ingredients: In a large bowl, combine the old-fashioned oats, flour, brown sugar, baking powder, cinnamon, and salt. Use a whisk to mix them well. This ensures that the baking powder is evenly distributed, which is key to even rising.
-
Incorporate the Wet Ingredients: In a separate bowl, mix the melted butter and egg. If you’re going vegan, make sure you whisk together the flaxseed and water thoroughly before adding. Pour this mixture into the dry ingredients and combine gently. It should be crumbly but hold together when you squeeze it.
-
Fold in the Raspberries: Gently fold in your fresh raspberries, being careful not to break them up too much. You want to maintain those lovely whole berries throughout your bars!
-
Spread the Mixture: Transfer half of the oatmeal mixture into the prepared pan, pressing it down to form an even layer. This base layer is crucial as it will hold all the delicious filling.
-
Add the Topping: Sprinkle the remaining mixture over the top of the raspberries. The texture should be crumbly and add a beautiful, crunchy top to your bars.
-
Bake: Pop the pan in the preheated oven and bake for 25-30 minutes, or until the top is golden and a toothpick inserted into the center comes out clean.
-
Cool and Slice: Allow your oatmeal bars to cool completely in the pan on a wire rack. This step is vital! If you can be patient, cutting them too soon may result in a lovely crumble instead of neat bars. Once cool, slice into squares or rectangles.
-
Enjoy!: Serve your bars warm, or store them in an airtight container at room temperature for up to a week! They also freeze beautifully if you want to enjoy them later.
Serving Suggestions
When it comes to serving your Easiest Raspberry Oatmeal Bars, simplicity is key! You can plate them up plainly, but for an added touch, consider drizzling them with a little warm honey or adding a dollop of yogurt. Pairing them with a cup of tea or coffee creates the perfect afternoon snack, and they’re great for sharing at brunch or a picnic!
Recipe Variations
Now that you’ve mastered the classic version, let’s talk about how you can give these bars your own spin!
-
Nutty Boost: Add ½ cup of chopped nuts (like almonds, walnuts, or pecans) for added crunch and healthy fats.
-
Chocolate Lovers: Stir in some dark chocolate chips or cacao nibs for a delicious chocolate raspberry combo.
-
Seasonal Swaps: In place of raspberries, use seasonal fruits like peaches, apples, or even cranberries for a fall twist.
-
Spice it Up: Mix in different spices like cardamom or ginger for a unique flavor profile.
-
Vegan Delight: Substitute eggs with flaxseed eggs and use maple syrup instead of brown sugar to make it completely plant-based.
Chef’s Notes
These Easiest Raspberry Oatmeal Bars have become a staple in my kitchen. I’ve experimented with so many variations over the years! One time, I had a batch that didn’t set properly because I was too impatient to let them cool down. Instead of tossing them out, I crumbled the bars over my morning yogurt, and it turned into an accidental breakfast favorite! It was the perfect example of how one little mistake can lead to something delightful.
Cooking is all about enjoying the process and embracing those little imperfections, right?
FAQs and Troubleshooting
1. Why did my bars crumble apart?
If your bars are crumbling, they may not have cooled completely before slicing. Make sure you let them cool in the pan entirely for better slicing. Also, check that you used the right proportions of wet to dry ingredients.
2. Can I use frozen raspberries?
Absolutely! If you’re using frozen raspberries, there’s no need to thaw them beforehand. Just be aware that they might create a bit more liquid, but that just makes them more moist and delicious!
3. How do I store these bars?
Store your oatmeal bars in an airtight container at room temperature for up to a week. If you’d like to keep them longer, freeze them in individual portions, and pull one out whenever you need a sweet treat!
4. Can I double the recipe?
Yes, feel free to double the recipe! Just use a larger baking dish (like a 9×13-inch pan) and extend the baking time slightly, checking for doneness.
Nutritional Info (Optional)
Each bar (based on 12 servings):
- Calories: 180
- Protein: 3g
- Carbohydrates: 29g
- Dietary Fiber: 3g
- Sugars: 8g
- Fat: 7g
With these Easiest Raspberry Oatmeal Bars, you’re all set to create a wholesome, delightful treat that brings joy to your kitchen and to the ones you love. Happy baking, friends! Enjoy every sweet moment! 🍓✨
Print
Easiest Raspberry Oatmeal Bars
- Total Time: 40 minutes
- Yield: 12 servings
- Diet: Vegetarian
Description
Deliciously chewy oatmeal bars packed with sweet-tart raspberries and a hint of cinnamon, perfect for breakfast or as a snack.
Ingredients
- Old-Fashioned Oats (2 cups)
- All-Purpose Flour (1 cup)
- Brown Sugar (½ cup)
- Baking Powder (1 teaspoon)
- Cinnamon (1 teaspoon)
- Salt (½ teaspoon)
- Unsalted Butter (½ cup, melted)
- Fresh Raspberries (1 cup)
- Egg (1 large)
Instructions
- Preheat your oven to 350°F (175°C).
- Prep an 8×8-inch baking pan by lining it with parchment paper.
- Mix the dry ingredients: oats, flour, brown sugar, baking powder, cinnamon, and salt in a bowl.
- Incorporate the wet ingredients: melted butter and egg (or flaxseed egg).
- Fold in the fresh raspberries gently.
- Spread half of the mixture into the prepared pan and press down.
- Add the remaining mixture as a topping.
- Bake for 25-30 minutes, until golden and a toothpick comes out clean.
- Cool completely on a wire rack before slicing.
- Enjoy warm or store in an airtight container for up to a week.
Notes
For a vegan option, substitute butter with coconut oil and egg with a flaxseed egg. These bars can be customized with nuts or chocolate chips.
- Prep Time: 10 minutes
- Cook Time: 30 minutes
- Category: Snack
- Method: Baking
- Cuisine: American
Nutrition
- Serving Size: 1 bar
- Calories: 180
- Sugar: 8g
- Sodium: 50mg
- Fat: 7g
- Saturated Fat: 4g
- Unsaturated Fat: 3g
- Trans Fat: 0g
- Carbohydrates: 29g
- Fiber: 3g
- Protein: 3g
- Cholesterol: 30mg
Keywords: raspberry, oatmeal, bars, dessert, snack

Ingredient 15-Minute No-Bake Raspberry Chocolate Bites
Indulge in the Sweet Symphony of Chocolate-Covered Raspberry Bites
Welcome back to my cozy kitchen! Today, I’m thrilled to share a delightful treat that perfectly balances indulgence and freshness: Chocolate-Covered Raspberry Bites. If you’re like me, the combination of rich chocolate and vibrant, tangy raspberries makes your heart skip a beat. These little bites are not just a feast for the taste buds; they’re also a nod to the sweet moments that we get to share with family and friends.
Now, you might be wondering why I’m so drawn to this delicious combination. Well, let me take you on a little trip down memory lane. When I was a child, my grandmother had the most magical garden overflowing with raspberry bushes. During the summer months, my cousins and I would spend hours picking those ruby-red gems right off the vines. We’d pop them in our mouths like candy, their sweetness bursting with each bite.
One hot afternoon, my grandma decided it was time to create something special with our bounty. We melted chocolate together and dipped those fresh raspberries, creating a dessert that was as beautiful as it was delicious. This moment was more than just about the food; it was about bonding with loved ones and creating lasting memories. Now, every time I make these Chocolate-Covered Raspberry Bites, I’m reminded of those sun-soaked days spent laughing in the garden, and I’m excited to pass that joy along to you!
So, let’s get started on a recipe that’s not just accessible but also a fantastic way to impress. Whether you’re planning a cozy night in or need a sweet addition for a party, these bites are sure to steal the show.
Ingredients
Here’s what you’ll need to whip up these delectable morsels:
-
Fresh Raspberries: About 12 ounces. The freshness makes all the difference! You can also use strawberries or blackberries if raspberries aren’t your thing.
-
Dark Chocolate: 8 ounces, chopped. I love using at least 70% cocoa for that rich taste, but feel free to swap it out for milk chocolate if you prefer something sweeter.
-
White Chocolate: 4 ounces, for drizzling (optional). A touch of sweetness that contrasts beautifully with dark chocolate. If you want a bit more color, use colored candy melts instead!
-
Coconut Oil: 1 tablespoon (optional). Mixing a bit of coconut oil with your chocolate will give it a lovely sheen and a smoother texture when melted.
-
Sea Salt: A sprinkle for garnish. The salt enhances the flavor of the chocolate and berries. It’s optional, but trust me, it’s worth it!
-
Parchment Paper: For easy cooling. Not an ingredient, but a handy tool to make clean-up a breeze!
Let’s get those taste buds tingling with anticipation!
Step-by-Step Instructions
Alright, let’s dive into the fun part! Here’s how to create these divine chocolate-covered raspberry bites:
-
Prepare Your Workspace: Start by gathering all your ingredients and tools. This is a great time to put on your favorite playlist! A little music makes all the difference in the kitchen.
-
Wash and Dry the Raspberries: Gently wash the raspberries under cold water and pat them dry with a paper towel. It’s crucial to get them nice and dry; otherwise, the chocolate won’t stick as well.
-
Melt the Dark Chocolate: In a microwave-safe bowl, combine the chopped dark chocolate and coconut oil, if using. Melt the mixture in 30-second increments, stirring in between until smooth. Be patient — overcooking can lead to a lumpy mess. Alternatively, you can use a double boiler to melt the chocolate gently.
-
Dip the Raspberries: Once the chocolate is melted and silky, it’s time for some fun! Hold each raspberry by the stem and dip it into the chocolate, making sure to cover it completely. You can roll it around a bit to get an even coat. Let the excess chocolate drip off before placing the berry on a parchment-lined baking sheet.
-
Chill: Pop the baking sheet into the refrigerator for about 30 minutes to allow the chocolate to set. This is the perfect time to enjoy a snack or sip on some herbal tea.
-
Melt the White Chocolate (Optional): If you’re feeling fancy and want to add a drizzle, melt the white chocolate in the same way as the dark chocolate. Once melted, use a fork to drizzle it over the set dark chocolate raspberries for that extra touch of flair.
-
Garnish: After drizzling, toss a tiny pinch of sea salt over the top while the chocolate is still warm. This little touch elevates the flavor and adds a subtle crunch.
-
Serve & Enjoy: Once set, you can transfer the raspberry bites to a serving platter or simply keep them on the baking sheet for a more casual presentation. These little gems are perfect for sharing (or keeping all to yourself!).
Serving Suggestions
To make your chocolate-covered raspberry bites truly shine, consider serving them on a beautiful platter alongside a sprig of mint for a pop of color. You can also pair them with a scoop of vanilla ice cream or on a bed of whipped cream for a more indulgent dessert. They’re blissful on their own, but there’s nothing wrong with going all out!
Recipe Variations
Feeling adventurous? Here are a few fun twists you can try:
-
Nutty Addition: Dip the chocolate-covered raspberries in crushed nuts or sprinkles for extra crunch and flavor.
-
Spicy Kick: Add a hint of cayenne pepper or chili powder to the melted chocolate for a surprising kick that offsets the sweetness.
-
Coconut Delight: Roll the chocolate-covered raspberries in shredded coconut before chilling. This gives them a tropical twist!
-
Flavor Infusions: Infuse the melted chocolate with flavors such as orange zest, mint extract, or espresso powder for a flavor boost.
-
Dairy-Free: Swap the dark chocolate for a dairy-free chocolate variant to make these vegan-friendly.
Chef’s Notes
As I’ve been perfecting this recipe over the years, I can’t help but chuckle at the kitchen mishaps along the way. Once, I tried to multitask and ended up with chocolate everywhere — on my hands, my face, and even my hair! These moments remind me that cooking isn’t just about perfection; it’s about joy and laughter. Plus, those little spills can lead to some of the best kitchen stories to share with friends and family.
This recipe has evolved into my go-to for so many occasions, from birthday parties to cozy movie nights. The tantalizing aroma of melted chocolate fills the kitchen, and the first bite back to the summer days spent in my grandmother’s garden is always a heartwarming reminder of where it all began.
FAQs and Troubleshooting
Q1: The chocolate is clumpy! What did I do wrong?
A: This usually happens when the chocolate gets overheated. Always melt chocolate in short intervals and stir well. If it does clump, try adding a tiny bit of coconut oil to smooth it out.
Q2: How do I prevent the chocolate from cracking when bitten?
A: Make sure the raspberries are thoroughly chilled before dipping. This will help the chocolate set perfectly around the berry.
Q3: My chocolate didn’t stick to the raspberries. Why?
A: This usually happens if the raspberries are wet. Ensure they’re completely dry before dipping. If needed, you can give them a quick dip in a thin layer of melted chocolate, let it set, and then dip again.
Q4: How long can I store these chocolate-covered raspberry bites?
A: You can store them in an airtight container in the refrigerator for up to three days. But with how delicious they are, I doubt they’ll last that long!
Nutritional Info
- Serving Size: 1 Chocolate-Covered Raspberry Bite
- Calories: Approx. 50 calories (varies based on chocolate choice)
- Protein: 0.5g
- Carbohydrates: 6g
- Fats: 3.5g
So there you have it — a sweet, simple recipe to brighten your day and fill your home with delicious memories. Give these Chocolate-Covered Raspberry Bites a try this weekend and let me know how they turn out! Happy cooking, my fellow foodies!
Print
Chocolate-Covered Raspberry Bites
- Total Time: 45 minutes
- Yield: 4 servings
- Diet: Vegetarian
Description
Delightful chocolate-covered raspberry bites that perfectly balance indulgence and freshness, inspired by childhood memories.
Ingredients
- Fresh Raspberries: About 12 ounces
- Dark Chocolate: 8 ounces, chopped
- White Chocolate: 4 ounces, for drizzling (optional)
- Coconut Oil: 1 tablespoon (optional)
- Sea Salt: A sprinkle for garnish (optional)
- Parchment Paper: For easy cooling
Instructions
- Prepare Your Workspace: Start by gathering all your ingredients and tools.
- Wash and Dry the Raspberries: Gently wash the raspberries under cold water and pat them dry.
- Melt the Dark Chocolate: In a microwave-safe bowl, combine the chopped dark chocolate and coconut oil, if using. Melt in 30-second increments, stirring until smooth.
- Dip the Raspberries: Hold each raspberry by the stem and dip it into the chocolate, then let the excess drip off.
- Chill: Place the baking sheet in the refrigerator for about 30 minutes.
- Melt the White Chocolate (Optional): Melt the white chocolate and drizzle over the set dark chocolate raspberries.
- Garnish: Sprinkle with sea salt while the chocolate is still warm.
- Serve & Enjoy: Transfer to a serving platter or keep on the baking sheet.
Notes
These bites can be served with mint or alongside ice cream for an indulgent dessert.
- Prep Time: 15 minutes
- Cook Time: 30 minutes
- Category: Dessert
- Method: Dipping
- Cuisine: American
Nutrition
- Serving Size: 1 bite
- Calories: 50
- Sugar: 5g
- Sodium: 30mg
- Fat: 3.5g
- Saturated Fat: 2g
- Unsaturated Fat: 1.5g
- Trans Fat: 0g
- Carbohydrates: 6g
- Fiber: 1g
- Protein: 0.5g
- Cholesterol: 0mg
Keywords: chocolate, raspberries, dessert, sweet treat, snacks
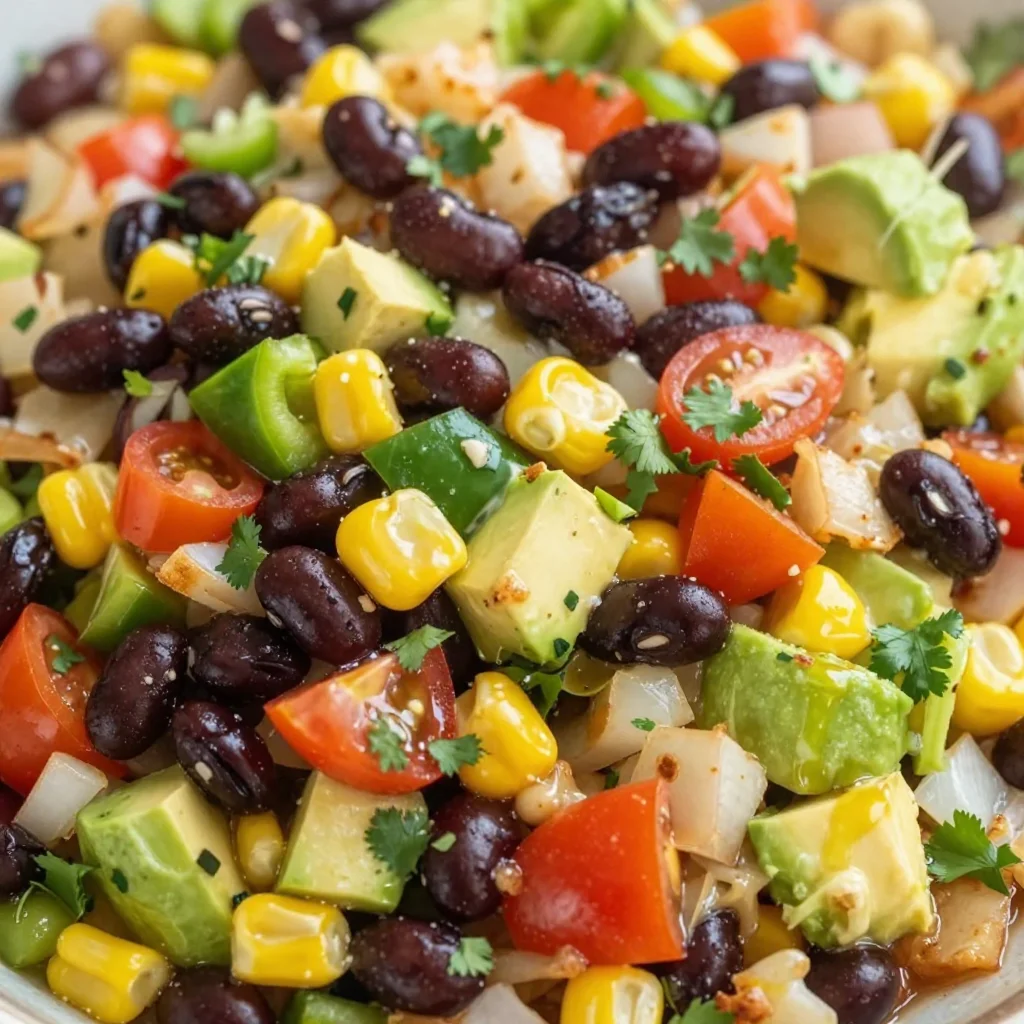
Cowboy Caviar
Cowboy Caviar: A Colorful Dip for Every Occasion
Welcome to my kitchen, my foodie friends! Today, I’m beyond excited to share a recipe that brings a burst of flavor and a bit of sunshine to any gathering: Cowboy Caviar. This vibrant dish is not only a feast for the eyes, but it’s also packed with nutrients and love. Picture this: a colorful medley of black beans, corn, tomatoes, and zesty dressings that combine to create a dip that is simply irresistible. Perfect for parties, picnics, or even just a cozy evening at home, Cowboy Caviar has become a staple in my kitchen, and I can’t wait for you to experience it too!
Now, let me take you back to a warm summer day when I first encountered this crowd-pleaser. My best friend Sarah invited me over for a casual backyard BBQ, and as soon as I stepped through the gate, I was hit with the inviting scent of grilled veggies and something oh-so-fresh. It was then that I saw it — a big bowl of Cowboy Caviar sitting pretty on the table, glimmering in the sunlight like a rainbow. I took a dip with some crispy tortilla chips, and the explosion of flavors made my taste buds dance! From that moment, I was hooked. Since then, I’ve played around with the traditional recipe and made it my own. It’s a dish that brings people together, and I can guarantee that this version will do just that!
But before we dive into the delicious details, let’s talk ingredients. No need for fancy-schmancy stuff here. Just a few simple, fresh ingredients will do the trick, and I promise you’ll be amazed by the incredible flavors that come together. So grab your apron, and let’s get cooking!
Ingredients
Here’s what you’ll need to create your own Cowboy Caviar:
-
Black Beans (1 can, rinsed and drained)
Black beans are not only delicious but also packed with protein and fiber. If you don’t have black beans, feel free to substitute them with kidney beans or pinto beans for a different twist! -
Corn (1 can, drained)
Sweet corn adds a natural sweetness and crunch. You can also use fresh corn off the cob when it’s in season or even frozen corn—just make sure to thaw and drain it well! -
Cherry Tomatoes (1 cup, halved)
Cherry tomatoes add a pop of color and juiciness. Any tomato variety works here, though I recommend using grape tomatoes for their sweetness. If fresh isn’t available, you can use a can of diced tomatoes, just drain them! -
Red Bell Pepper (1, finely chopped)
The sweetness and crunch of red bell peppers are essential for that crunchy texture. If you’re looking for more spice, diced jalapeños can offer a delightful kick, or you can use green bell peppers for a milder flavor. -
Red Onion (1/2, finely chopped)
Adds a delightful sharpness to the mix. If you find raw onion too intense, soak the chopped onion in cold water for about 10 minutes to mellow out the flavor. -
Fresh Cilantro (1/4 cup, chopped)
This herb elevates the dish with its fresh flavor. If you’re not a fan of cilantro, try using parsley or omit it altogether. -
Lime Juice (from 2 limes)
Lime juice gives Cowboy Caviar its zesty brightness. You can switch it up with lemon juice for a slightly different flavor profile. -
Olive Oil (2 tablespoons)
A splash of olive oil helps bring everything together. Avocado oil is a great alternative if you’d like a change in flavor. -
Seasoning (1 teaspoon each of salt, pepper, cumin, and chili powder)
These spices bring warmth and depth to the dish. Feel free to add more chili powder if you like it spicy or swap in taco seasoning for a different flavor spin.
Step-by-Step Instructions
Now that we’ve got our vibrant cast of ingredients ready, let’s bring this Cowboy Caviar to life! Trust me, it’s easier than you think.
-
Prep the Veggies: Start by gathering all your fresh ingredients. Rinse and drain the black beans and corn in a colander. Then, chop the red onion, red bell pepper, and cilantro, halving the cherry tomatoes as you go.
Tip: A sharp knife is your best friend—keep everything tidy and neat to make it easier to mix later!
-
Mix It Up: In a large mixing bowl, combine the black beans, corn, chopped cherry tomatoes, red bell pepper, red onion, and cilantro. Use a spatula or wooden spoon to gently fold everything together. You want to make sure all the ingredients are well incorporated without smashing them!
Hack: If you’re using canned beans, give them a quick rinse to get rid of excess sodium and residue. This really elevates the fresh flavor!
-
Dressing Time: In a separate small bowl, whisk together the lime juice, olive oil, salt, pepper, cumin, and chili powder. This dressing is the magic sauce that ties all the flavors together, so don’t skip this step!
Chef Insight: If you love a little heat, consider adding a few dashes of hot sauce to the dressing before mixing it in!
-
Combine Everything: Pour the dressing over the vegetable mixture and gently fold until everything is well coated. Taste and adjust the seasoning if needed—you want to find that perfect balance of flavors!
-
Let It Chill: Cover the bowl with plastic wrap or a lid and let it chill in the fridge for at least 30 minutes. This allows the ingredients to meld beautifully. Trust me, it’s worth the wait!
Tip: If you’re short on time, you can serve it right away, but letting it chill enhances the flavors significantly!
-
Serve It Up: Once the flavors have mingled beautifully, scoop your Cowboy Caviar into a serving bowl! You can garnish it with a sprinkle of additional cilantro or maybe a few diced avocados for added creaminess.
Serving Suggestions
Cowboy Caviar is versatile! Serve it as a dip with tortilla chips, pile it onto a bed of greens for a zesty salad, or use it as a topping for grilled chicken or fish. The colorful presentation will not only delight your guests but will also have everyone asking for the recipe!
Recipe Variations
-
Add Avocado: Cube up a ripe avocado and fold it into the mix right before serving for creaminess that’s heavenly!
-
Spicy Twist: Add diced jalapeños if you like some heat, or use a spicy bean mix instead of regular beans.
-
Tropical Touch: Toss in some diced mango or pineapple for a sweet, tropical flair.
-
Grain Boost: For a heartier dish, serve it with cooked quinoa or brown rice to create a filling bowl.
-
Cheesy Fun: Sprinkle crumbled feta or shredded cheese on top for a decadent twist!
Chef’s Notes
Cowboy Caviar has evolved so much in my kitchen over the years. Initially, I followed traditional recipes strictly, but as I began to experiment, I discovered how forgiving and versatile it is. I’ve enjoyed it during vibrant summer barbecues, cozy winter gatherings, and even as a quick snack when I’m craving something fresh. Plus, it’s a fantastic recipe to make with the kids—let them choose their favorite ingredients for a fun, family cooking session!
FAQs and Troubleshooting
-
Why is my Cowboy Caviar too watery?
If your dip seems too liquidy, ensure you’ve drained everything well, especially the beans and corn. You might also want to add more solid ingredients like bell peppers to balance it out! -
Can I make it ahead of time?
Yes! Cowboy Caviar actually tastes better the next day as the flavors have time to blend. Just keep it in an airtight container in the fridge for up to 3 days. -
What can I serve it with?
Cowboy Caviar pairs fabulously with tortilla chips, but it can also be served with pita chips, on tacos, or even as a topping for grilled meats and fish. -
Can I freeze it?
It’s best enjoyed fresh, but if you have leftover, you can freeze it. However, the texture may change once thawed, so it’s better as a fresh dish!
Nutritional Info
While nutritional information may vary based on specific ingredients and brands used, here’s a general breakdown per serving (1/2 cup):
- Calories: 120
- Protein: 7g
- Carbohydrates: 20g
- Fiber: 5g
- Fat: 4g
And there you have it—your very own Cowboy Caviar! So whether you’re dipping into it on game day or serving it for a fancy brunch with friends, this recipe is sure to bring joy and deliciousness to your table. I’d love to hear about your adventures in the kitchen as you whip up this gem, so feel free to share your stories or any fun twists you create! Happy cooking!
Print
Cowboy Caviar
- Total Time: 45 minutes
- Yield: 4 servings 1x
- Diet: Vegan
Description
A vibrant dip made with black beans, corn, tomatoes, and zesty dressings, perfect for parties and gatherings.
Ingredients
- 1 can Black Beans, rinsed and drained
- 1 can Corn, drained
- 1 cup Cherry Tomatoes, halved
- 1 Red Bell Pepper, finely chopped
- 1/2 Red Onion, finely chopped
- 1/4 cup Fresh Cilantro, chopped
- Juice from 2 Limes
- 2 tablespoons Olive Oil
- 1 teaspoon Salt
- 1 teaspoon Pepper
- 1 teaspoon Cumin
- 1 teaspoon Chili Powder
Instructions
- Prep the Veggies: Gather all your fresh ingredients. Rinse and drain the black beans and corn in a colander. Chop the red onion, red bell pepper, and cilantro, halving the cherry tomatoes as you go.
- Mix It Up: In a large mixing bowl, combine the black beans, corn, cherry tomatoes, red bell pepper, red onion, and cilantro. Use a spatula to gently fold everything together.
- Dressing Time: In a separate small bowl, whisk together the lime juice, olive oil, salt, pepper, cumin, and chili powder.
- Combine Everything: Pour the dressing over the vegetable mixture and gently fold until well coated. Taste and adjust seasoning if needed.
- Let It Chill: Cover the bowl and let it chill in the fridge for at least 30 minutes.
- Serve It Up: Scoop the Cowboy Caviar into a serving bowl and garnish as desired.
Notes
This dip is perfect as a snack or served with tortilla chips. It tastes even better the day after as flavors meld.
- Prep Time: 15 minutes
- Cook Time: 0 minutes
- Category: Appetizer
- Method: Mixing
- Cuisine: Tex-Mex
Nutrition
- Serving Size: 1/2 cup
- Calories: 120
- Sugar: 4g
- Sodium: 300mg
- Fat: 4g
- Saturated Fat: 0.5g
- Unsaturated Fat: 3g
- Trans Fat: 0g
- Carbohydrates: 20g
- Fiber: 5g
- Protein: 7g
- Cholesterol: 0mg
Keywords: cowboy caviar, dip recipe, black bean dip, healthy appetizer

Cowboy Caviar
Cowboy Caviar: A Flavorful Journey into the Heart of the Southwest
Welcome to my kitchen! I’m thrilled you’re here to explore the colorful world of Cowboy Caviar with me. If you’ve never experienced this zesty, vibrant dish, prepare to embark on a culinary adventure that’s perfect for gatherings, cozy evenings in, or even a solo snack session. Think of Cowboy Caviar as a fiesta in a bowl — a scrumptious blend of fresh ingredients that brings a taste of the Southwest right to your table.
Picture this: a hot summer day, the sun shining, and laughter filling the air as friends gather for a casual backyard barbecue. The grill is sizzling, and the scent of smoky meats wafts through the air. But wait! The real star of the spread is bubbling away in a bowl nestled on the picnic table — that’s right, it’s Cowboy Caviar! Your friends dip their tortilla chips into the shimmering mix of beans, tomatoes, and bright peppers while chatting and sharing stories, and suddenly the day feels a little brighter and filled with love.
What I adore about Cowboy Caviar is its versatility and ease. It can be an appetizer, a side dish, or even a light meal on its own. And, like any good recipe, it’s inspired by my moments in the kitchen — where every stir, taste, and garnish tells a story. As a home cook, my goal is to create dishes that celebrate the joy of cooking and sharing. So grab your apron and let’s dive into some Cowboy Caviar magic!
A Trip Down Memory Lane
Cowboy Caviar was something I discovered during a family reunion in Texas a few years back. Armed with my trusty notepad and a healthy appetite, I was determined to soak up every recipe, tip, and tale from my relatives. One evening, while the sun dipped deliciously low in the sky, my great-aunt Clara set down a bowl brimming with what I would come to know as Cowboy Caviar.
I remember the vibrant colors of black beans, fresh corn, and sunny tomatoes mingling with a kick of lime and cilantro. It was a feast for the eyes as much as the palate! As we sat around the table, everyone shared their versions of the dish, each with its own flair and family secrets. By the end of the night, with bellies full and laughter echoing, I realized that this lively dish didn’t just feed us; it connected us. It’s funny how food has a way of wrapping you in nostalgia, isn’t it?
I left that family reunion not just with a full stomach but with a heart bursting with inspiration. That’s when I knew I had to recreate Cowboy Caviar in my own kitchen — blending my personal touches with the cherished memories from my family.
Ingredients: The Building Blocks of Flavor
Now that we’ve set the scene, let’s gather our ingredients. Cowboy Caviar is super accessible, and you probably have many of these items on hand. Here’s what you’ll need:
-
Black Beans (1 can, rinsed and drained): The hearty base of the dish adds protein. Feel free to substitute with pinto or kidney beans for a different flavor.
-
Corn (1 can or 1 cup fresh): Sweet and crunchy, corn brings a pop of flavor! If using fresh corn, grill it for extra smokiness.
-
Diced Tomatoes (1 cup): Juicy, ripe tomatoes are a must! Cherry tomatoes work great here. If you want less liquid, opt for diced fire-roasted tomatoes.
-
Red Onion (1 small, diced): Adds a sharp bite. If raw onion isn’t your thing, soak the diced onion in cold water for 10 minutes to mellow it out.
-
Bell Peppers (1-2, diced): Choose a mix of colors — green, red, and yellow — for sweetness and crunch. If you’re feeling adventurous, throw in a jalapeño for heat!
-
Cilantro (1/4 cup, chopped): Fresh cilantro lifts the entire dish. If cilantro isn’t for you, try fresh parsley for a different herbaceous note.
-
Lime (2, juiced): The zesty acid brightens everything up! You can substitute lime with lemon if that’s what you have on hand.
-
Olive Oil (2 tablespoons): Adds richness. If you’re looking for a lighter version, use less, or skip it entirely.
-
Salt and Pepper (to taste): Simple but necessary for balancing flavors. Remember, seasoning is key!
-
Optional spices: Consider adding chili powder or cumin for an extra Southwest kick.
When prepping a dish as fun as Cowboy Caviar, allow yourself to play around with substitutes and additions! Cooking is an art, not a science, and the best dishes often come from some playful experimentation in the kitchen.
Step-by-Step Instructions: Bringing It All Together
Alright, foodies — let’s get to cooking!
-
Prep Your Ingredients: Start by rinsing and draining your black beans. If using canned corn, do the same. If you’re using fresh corn, I recommend grilling it or steaming briefly for a bit of tenderness.
-
Chop and Dice: Next, finely dice your red onion and bell peppers. Grab your cutting board and channel your inner chef! The trick here is to aim for a uniform size, so everything blends beautifully in your bowl. Don’t forget to give those tomatoes a good chop — using cherry tomatoes? Halve them for that perfect bite!
-
Mix It Up: In a large mixing bowl, combine the black beans, corn, diced tomatoes, diced red onion, bell peppers, and cilantro. Give it a gentle toss to combine. You want the colors to intermingle — it’s a party in there!
-
Dress It: Now, add the lime juice and olive oil to your mixture. A little salt and pepper sprinkle over the top, and you’re ready for the fun part! Stir everything with a wooden spoon (or your favorite spatula) until well coated. Taste and adjust for seasoning — could it use a bit more salt or lime juice? Go for it!
-
Let It Sit: I know it’s tough to wait, but let the Cowboy Caviar sit for at least 30 minutes in the fridge. This helps the flavors meld together beautifully over time. It’s kind of like letting a good story simmer!
-
Serve & Enjoy: When you’re ready to serve, give it one last gentle toss. Dive in with your favorite tortilla chips or use it as a topping for tacos, grilled meats, or even salads!
Seeing that beautiful, vibrant bowl of Cowboy Caviar makes all the chopping and mixing worthwhile, doesn’t it? The anticipation builds as you plate it up, ready to share the deliciousness with those around you.
Serving Suggestions: How to Delight Your Guests
When it comes to serving Cowboy Caviar, presentation is everything! Consider serving it in a rustic bowl for that authentic feel. Pair it with crunchy tortilla chips for dipping or have it as a topping on grilled chicken or fish.
You can also make it more festive by garnishing with a sprinkle of extra cilantro or avocado slices! If you’re feeling fancy, try serving it in small cups for a fun appetizer at parties — trust me; your guests will love it. The vibrant colors will brighten up any table setting — making it not just a dish but a centerpiece!
Recipe Variations: Put Your Own Spin on It
Just like any cherished recipe, you can make Cowboy Caviar your own! Here are a few creative twists to consider:
-
Spicy Twist: Add diced jalapeños or a pinch of cayenne pepper for some heat!
-
Avocado Cowboy Caviar: Toss in diced avocados right before serving for creaminess and a great texture contrast.
-
Quinoa Power: Swap out the beans for cooked quinoa for added protein and a fun texture.
-
Tropical Fusion: Experiment with pineapple or mango for a sweet, tropical flavor that balances the savory ingredients.
-
Vegan Delight: This dish is already vegan-friendly, but you can add some nuts or seeds for crunch. Sunflower seeds or chopped walnuts work beautifully!
Feel free to have fun with it, using these variations as a springboard to explore your creativity in the kitchen!
Chef’s Notes: A Little Extra Love from My Kitchen
This Cowboy Caviar recipe has evolved over the years, much like my journey as a home cook. I’ve experimented with various ingredients, and every time I prepare it, I remember that warm summer night with my great-aunt Clara. It’s always served at family gatherings, and it has a way of bringing everyone together, regardless of how crowded the kitchen gets.
One funny little story I have is that I once added too much lime juice, and the caviar turned out to be a bit too tart. My sister cleverly named it “Navy Caviar,” and it became an inside joke every time I made it! So remember — taste as you go, and don’t be afraid to share those little kitchen mishaps!
FAQs and Troubleshooting
1. How long can I store Cowboy Caviar?
You can store it in an airtight container in the refrigerator for about 3-5 days. The flavors will deepen over time, but keep in mind that the veggies may get softer.
2. Can I make this dish ahead of time?
Absolutely! In fact, making it a day in advance allows the flavors to develop even more. Just make sure to give it a stir before serving!
3. What can I substitute if I’m allergic to cilantro?
If cilantro isn’t your friend, fresh parsley is a great alternative. It offers a similar freshness without the distinct flavor of cilantro.
4. My Cowboy Caviar came out too salty. What can I do?
If you oversalted, try adding more canned beans or corn to balance the flavors. You could also add more lime juice, which can help offset the saltiness.
With these tips, you’ll be well on your way to mastering Cowboy Caviar — and ensuring it’s always a hit at your gatherings!
Nutritional Info
Here’s a rough estimate for a serving of Cowboy Caviar (not including tortilla chips):
- Calories: 150
- Protein: 7g
- Carbohydrates: 25g
- Fat: 4g
- Fiber: 7g
- Sugars: 3g
Remember, these values can change based on specific brands or variations you might use.
So there you have it, my dear foodies! Cowboy Caviar is a celebration of fresh flavors and cherished memories — perfect for sharing or enjoying all by yourself. I hope this recipe inspires you to create delicious moments in your kitchen. Happy cooking, and may your kitchen always be filled with joy and the aroma of something wonderful!
Print
Cowboy Caviar
- Total Time: 30 minutes
- Yield: 4 servings 1x
- Diet: Vegan
Description
A vibrant and zesty Southwestern dish combining beans, corn, and fresh vegetables, perfect for gatherings or as a light meal.
Ingredients
- 1 can Black Beans, rinsed and drained
- 1 can or 1 cup fresh Corn
- 1 cup Diced Tomatoes
- 1 small Red Onion, diced
- 1–2 Bell Peppers, diced
- 1/4 cup Cilantro, chopped
- 2 Limes, juiced
- 2 tablespoons Olive Oil
- Salt and Pepper, to taste
- Optional: Chili powder or cumin
Instructions
- Prep your ingredients by rinsing and draining the beans and corn.
- Chop and dice the red onion and bell peppers uniformly.
- Mix all ingredients in a large mixing bowl and gently toss to combine.
- Dress the mixture with lime juice, olive oil, salt, and pepper, then stir until well coated.
- Let it sit in the fridge for at least 30 minutes to meld flavors.
- Serve with tortilla chips or as a topping for tacos or grilled meats.
Notes
Feel free to experiment with ingredients or add spices for personal touches. Serve in a rustic bowl for authenticity.
- Prep Time: 15 minutes
- Cook Time: 0 minutes
- Category: Appetizer
- Method: Mixing
- Cuisine: Southwestern
Nutrition
- Serving Size: 1 serving
- Calories: 150
- Sugar: 3g
- Sodium: 200mg
- Fat: 4g
- Saturated Fat: 0g
- Unsaturated Fat: 4g
- Trans Fat: 0g
- Carbohydrates: 25g
- Fiber: 7g
- Protein: 7g
- Cholesterol: 0mg
Keywords: cowboy caviar, appetizer, vegan, southwestern, fresh ingredients

Minute Cowboy Caviar: Quick Prep for Weeknight Meals
Easy Cowboy Caviar: A Flavorful Festivity in a Bowl
Welcome to my cozy kitchen! Today, I’m thrilled to share with you one of my all-time favorite recipes: Easy Cowboy Caviar. Now, you might be wondering what on Earth Cowboy Caviar is. Well, it’s a vibrant bean and vegetable salad that’s perfect for gatherings or simply as a delightful snack. It’s got loads of personality—much like the cowboys who inspired its name!
Imagine this: a sunny afternoon, the smell of spices wafting through the air, laughter bubbling over among friends or family, and a giant bowl of Cowboy Caviar sitting at the center of your table. This dish is not just about the flavors; it’s a celebration of togetherness and joy. And trust me, once you taste it, you’ll find yourself discovering reasons to make it again and again!
Personal Story: Memories from Grandma’s Kitchen
Let me take you back to my childhood for a moment. My grandma, the queen of gatherings, would whip up her version of Cowboy Caviar—though she called it “Texas Caviar”. I remember the vibrant colors filling her kitchen, making everything feel alive and welcoming. Every summer, she’d host a backyard barbecue, and it was a tradition to have her Texas Caviar as a starter.
I can still hear the sound of excited chatter and the clinking of plates as family and friends dug into the tantalizing bowl of goodies. We’d stand around the table, scooping the beans, corn, tomatoes, and all those crunchy veggies with our chips, and laughing together as stories flowed as freely as the drinks. This dish was a bridge that brought generations together, and even now, it evokes a warm nostalgia that is hard to replicate. Now, I want you to experience that same joy with this Easy Cowboy Caviar recipe!
Ingredients
Here’s what you’ll need to make this dish luscious:
-
Black Beans (1 can, drained and rinsed)
Packed with protein and fiber, black beans are hearty and nutritious. If you’re short on time, canned beans are perfect, but you could also use cooked dried beans (just soak and cook them beforehand!). -
Corn (1 cup, canned or frozen)
Sweet corn adds a pop of flavor and texture. If you’re using frozen corn, just thaw it beforehand. You could also try grilled corn for an extra smoky touch! -
Cherry Tomatoes (1 cup, halved)
Juicy and sweet, they add freshness. Substitute with diced Roma tomatoes if you want; just make sure to squeeze out excess moisture. -
Red Onion (1 small, finely chopped)
For a sharp, tangy bite. If red onion is too strong for your palate, try using green onions or sweet onions instead. -
Bell Pepper (1, diced)
A colorful addition! You can use any type you like—red, yellow, or orange—to bring a different flavor profile. -
Cilantro (1/4 cup, chopped)
This herb is a game-changer! If you’re not a fan of cilantro, consider parsley or chopped green onions for a milder taste. -
Jalapeño (1, minced)
Adds a little heat! If you prefer a milder version, remove the seeds, or use a milder pepper like a green bell pepper or even skip it entirely. -
Lime Juice (from 1 lime)
A splash of lime juice brightens everything! Fresh juice will give the best flavor, but you can use bottled juice in a pinch. -
Olive Oil (2 tablespoons)
A drizzle of olive oil brings everything together. You can experiment with flavored oils or use avocado oil for a different twist. -
Salt & Pepper (to taste)
Essential for seasoning—don’t skip this step! Regular table salt works fine, but sea salt adds a nice crunch.
Step-by-Step Instructions
Let’s dive into the making of this vibrant Cowboy Caviar!
-
Prep Your Ingredients: Start by gathering all the ingredients listed. Washing and chopping the vegetables will make the process smoother. Pro tip: if you soak the black beans overnight, they will cook faster, or you can simply use canned for convenience.
-
Combine the Beans and Corn: In a large mixing bowl, add the drained black beans and corn. Use a spatula or spoon to gently fold them together. I love to mix these first so they can absorb the flavors before the other ingredients are added.
-
Chop & Add the Veggies: Chop your cherry tomatoes, red onion, and bell pepper. Add them to the bowl with the beans and corn. Make sure to mix gently to avoid mushing the tomatoes. This part is so colorful—feel free to savor the sight before continuing.
-
Spice It Up: Now it’s time for jalapeño and cilantro! If you like heat, go for the full jalapeño. If not, make sure to dice it finely and remove the seeds. Toss it in along with cilantro and give everything a good stir.
-
Dress It Up: Drizzle the olive oil and lime juice over the mixture. Season with salt and pepper. This is where you can really elevate the flavor! Mix everything well, ensuring the oil coats all the ingredients nicely.
-
Taste and Adjust: Here comes a fun part! Taste your Cowboy Caviar and adjust the seasoning if necessary. Feel free to add more lime juice or salt to make it even more flavorful. Don’t be shy—it’s your kitchen!
-
Chill (Optional): For the best flavor, let it sit in the fridge for at least 30 minutes. I love to cover it and allow it to mingle in the fridge—this lets the flavors combine beautifully!
Serving Suggestions
When it comes time to serve, present your Cowboy Caviar in a vibrant bowl. This dish is perfect for dipping! Use tortilla chips, pita chips, or even veggie sticks. For a beautiful touch, pop in some fresh lime wedges on the side to squeeze over. If you’re feeling fancy, you could also use it as a topping for grilled chicken or fish—it’s that versatile!
Recipe Variations
Now, let’s spice things up even further! Here are a few variations to try:
- Tropical Twist: Add diced mango or pineapple for a sweet and fruity flavor. This gives a fun island vibe!
- Avocado Heaven: Incorporate diced avocado for creaminess. Just be cautious since avocados can brown quickly.
- Quinoa Boost: For added protein and texture, mix in cooked quinoa. It’ll make it heartier while being gluten-free!
- Herbaceous Fusion: Swap cilantro for fresh basil or mint for a completely different aromatic profile—perfect for summer!
- Spicy Kick: Add a dash of hot sauce or a sprinkle of chili powder if you like a good heat level!
Chef’s Notes
Cowboy Caviar is a dish that has evolved for me over the years. I remember when I first learned to make it, I followed a standard recipe to the letter. But over time, it transformed into my own creation! Now, I love mixing different beans or adding in whatever veggies are in my fridge. The best part? It’s nearly impossible to mess up! Just keep it fresh and vibrant, and you’ll have a winner every time. And who knows? Maybe it will become a cherished family recipe for you, too!
FAQs and Troubleshooting
Here are some common questions you may have when making your Easy Cowboy Caviar:
1. Can I make Cowboy Caviar ahead of time?
Absolutely! You can prepare it a day ahead of your event. Just remember to give it a good stir before serving, and adjust any seasonings as necessary since flavors may mellow overnight.
2. Is Cowboy Caviar healthy?
You bet! It’s loaded with fiber from the beans, vitamins from the veggies, and healthy fats if you add avocado. Perfect for a nutritious snack or side dish.
3. What can I do with leftovers?
Store leftovers in an airtight container in the refrigerator for up to 3 days. It’s great on tacos, salads, or mixed into scrambled eggs for an added twist!
4. What if I don’t like beans?
No problem! You can simply leave the beans out and make it more of a veggie salsa. Just be sure to balance the other flavors well.
Nutritional Info
While exact nutrition can vary based on specific brands and quantities, here’s a general breakdown per serving (assuming 6 servings):
- Calories: 150
- Protein: 6g
- Carbohydrates: 20g
- Dietary Fiber: 5g
- Sugars: 3g
- Fat: 7g
And there you have it! This Easy Cowboy Caviar is more than just a dish; it’s a canvas for creativity, flavor, and, most importantly, connection. I hope you enjoy making it as much as I do, and even more, I hope it brings smiles and laughter to your gatherings! Happy cooking, and let the festivities begin!
Print
Easy Cowboy Caviar
- Total Time: 30 minutes
- Yield: 6 servings 1x
- Diet: Vegetarian
Description
A vibrant bean and vegetable salad that’s perfect for gatherings or as a delightful snack.
Ingredients
- 1 can Black Beans, drained and rinsed
- 1 cup Corn, canned or frozen
- 1 cup Cherry Tomatoes, halved
- 1 small Red Onion, finely chopped
- 1 Bell Pepper, diced
- 1/4 cup Cilantro, chopped
- 1 Jalapeño, minced
- Juice from 1 Lime
- 2 tablespoons Olive Oil
- Salt & Pepper, to taste
Instructions
- Prep Your Ingredients: Start by gathering all the ingredients listed. Washing and chopping the vegetables will make the process smoother.
- Combine the Beans and Corn: In a large mixing bowl, add the drained black beans and corn. Use a spatula or spoon to gently fold them together.
- Chop & Add the Veggies: Chop your cherry tomatoes, red onion, and bell pepper. Add them to the bowl with the beans and corn. Mix gently to avoid mushing the tomatoes.
- Spice It Up: Add jalapeño and cilantro, tossing everything together.
- Dress It Up: Drizzle olive oil and lime juice over the mixture, and season with salt and pepper. Mix everything well.
- Taste and Adjust: Taste your Cowboy Caviar and adjust the seasoning if necessary.
- Chill (Optional): For the best flavor, let it sit in the fridge for at least 30 minutes before serving.
Notes
Perfect for serving with tortilla chips, pita chips, or veggie sticks. Can also be used as a topping for grilled chicken or fish.
- Prep Time: 15 minutes
- Cook Time: 0 minutes
- Category: Salad
- Method: Mixing
- Cuisine: American
Nutrition
- Serving Size: 1 serving
- Calories: 150
- Sugar: 3g
- Sodium: 150mg
- Fat: 7g
- Saturated Fat: 1g
- Unsaturated Fat: 6g
- Trans Fat: 0g
- Carbohydrates: 20g
- Fiber: 5g
- Protein: 6g
- Cholesterol: 0mg
Keywords: Cowboy Caviar, bean salad, vegetable salad, party food, healthy snack

Minute Cowboy Caviar: Fresh, Tangy Bean Dip for Summer
Easy Cowboy Caviar: A Flavorful Fiesta in a Bowl!
Welcome to my kitchen! I’m Olivia Bennett, and today I’m excited to share a scrumptious dish that will make your taste buds dance: Easy Cowboy Caviar! If you’re anything like me, you find pure joy in colorful, fresh ingredients coming together to create something fabulous. This dish is not just a regular salsa; it’s a vibrant party in a bowl, bursting with flavor and perfect for any occasion.
Cowboy Caviar is like a Texan roots-inspired guacamole, often served as a dip but versatile enough to be enjoyed as a salad or side dish. Picture this: a colorful mix of black beans, corn, peppers, tomatoes, and a zesty dressing that tantalizes your palate. It’s a crowd-pleaser that’s quick to whip up, making it ideal for everything from game day snacking to backyard barbecues to casual dinners at home. Plus, it’s a fantastic option if you want something healthy yet hearty. Trust me; once you’ve had a taste, you’ll be coming back for seconds (or thirds).
But before we dive into the recipe, let me set the scene for you. Picture me in my cozy kitchen, with sunlight streaming through the window, fresh produce spread out on the counter, and the anticipation of good food filling the air. This isn’t just cooking; it’s an experience filled with laughter, stories, and moments to cherish. Are you ready to join the fun? Let’s get started on making your new favorite appetizer!
A Slice of Nostalgia
Let me take you back to one of my fondest culinary memories. Growing up, my family had a tradition of hosting summer barbecues. My aunt Clara was the ultimate entertainer, and her Cowboy Caviar was the star of the show. She’d set out a giant bowl of it on the picnic table, and we’d all gather around, plates in hand, ready to dive in. The vibrant colors of the black beans, tomatoes, and bell peppers were not only a feast for the eyes but also for the taste buds.
I remember the mouthwatering smell of the lime and cilantro dressing as I helped her toss it all together. Aunt Clara always encouraged me to add my own twist, and together we experimented with different ingredients, like adding diced avocado or a sprinkle of feta cheese. Those delicious bites were accompanied by hours of laughter, games, and the sweet sound of our family coming together. Every scoop of that Cowboy Caviar brought us closer, creating memories that still warm my heart today.
And so, as I share this recipe with you, my hope is that it becomes a cherished addition to your kitchen, bringing your loved ones together, just like it did for me and my family.
Ingredients
Here’s what you need to whip up this delightful Cowboy Caviar:
-
1 can black beans, drained and rinsed
Black beans are a fantastic source of protein and fiber. If you’re looking for a different flavor, feel free to substitute with chickpeas or pinto beans. -
1 can sweet corn, drained
The sweetness of corn balances the dish beautifully. You can also use fresh corn on the cob if it’s in season—just grill or boil it first! -
1 cup cherry tomatoes, halved
Cherry tomatoes add bursty sweetness. If you don’t have them, any diced tomatoes will work, but fresh is best! -
1 red bell pepper, diced
This adds crunch and a sweet flavor. You could swap in yellow or orange bell peppers for a different twist! -
1 green bell pepper, diced
The green bell pepper adds freshness. You could also use jalapeños if you want a spicy kick. -
1/2 red onion, finely chopped
Onions provide depth of flavor. If you’re sensitive to raw onions, soak them in cold water for 10 minutes before adding them to reduce their bite. -
1/4 cup fresh cilantro, chopped
Cilantro adds a fresh, herbal note. If you’re not a fan, try substituting with parsley or omitting it altogether. -
Juice of 2 limes
Lime juice brightens everything up. You can use lemon juice in a pinch, but it will change the flavor slightly. -
1 tablespoon olive oil
This adds richness and helps meld the flavors. You can swap for avocado oil if you prefer a neutral taste. -
1 teaspoon ground cumin
Cumin gives this dish an earthy depth. If you’re looking to switch things up, smoked paprika can bring a lovely smoky flavor. -
Salt and pepper to taste
Essential for enhancing the dish’s flavor! Use sea salt and freshly cracked black pepper for the best taste.
Step-by-Step Instructions
Now that we’ve gathered our ingredients, let’s get cooking! Here’s how to make your Cowboy Caviar step by step.
-
Prep the Veggies
Start by washing your fresh produce. It’s essential to have clean veggies! Drain and rinse the black beans and corn. I like to use a colander for this step — it’s an easy clean-up! -
Chop and Dice
Dice the bell peppers, cherry tomatoes, and red onion. Aim for uniform pieces so they’re visually appealing and easy to scoop up. If you’re feeling artistic, try cutting the vegetables in fun shapes (kids love this!). -
Combine Everything
In a large mixing bowl, toss together the black beans, corn, cherry tomatoes, red bell pepper, green bell pepper, red onion, and cilantro. Take a moment to enjoy the vibrant colors! -
Make the Dressing
In a small bowl, whisk together the lime juice, olive oil, ground cumin, salt, and pepper. This is where the magic happens! The tanginess of the lime and the warmth of the cumin will elevate all those fresh ingredients. -
Mix it All Together
Pour the dressing over the vegetable mixture and gently stir until everything is coated. I like to use a rubber spatula for this — it’s gentle but effective. -
Taste and Adjust
Here’s where you can put on your chef hat! Give it a taste and adjust seasoning if necessary. Sometimes, a little extra lime juice can make all the difference. -
Chill and Marinate
Cover the bowl with plastic wrap or a lid and let it chill in the fridge for at least 30 minutes. This allows the flavors to meld. If you can let it sit longer, even better! -
Serve and Enjoy
When you’re ready to serve, stir the Cowboy Caviar one last time and transfer it to a beautiful serving dish. Don’t forget the tort tortilla chips for dipping!
Serving Suggestions
To make your Cowboy Caviar stand out, consider serving it in a vibrant bowl that complements the colors of the dish. Use colorful tortilla chips, pita chips, or even fresh veggie sticks for dipping. Another delightful way to present it is over mixed greens for a refreshing salad. Drizzle some extra lime juice on top for an added zing!
Recipe Variations
Cowboy Caviar is incredibly versatile! Here are some creative twists you can try:
- Spicy Kick: Add diced jalapeños or a splash of hot sauce for heat.
- Creamy Avocado: Mash in some ripe avocado for a creamy texture.
- Zesty Citrus: Swap half of the lime juice for orange juice for a unique sweetness.
- Protein Boost: Toss in some diced grilled chicken or shrimp for a heartier meal.
- Herbal Remix: Experiment with different herbs like dill or basil for exciting flavor profiles.
Chef’s Notes
I love experimenting with this recipe! There have been times when I’ve found leftover ingredients from my fridge that I’ve tossed in, from black olives to diced mango. Never be afraid to get creative! One of the best parts of cooking is adapting and making a dish your own. Remember, my Cowboy Caviar recipe was inspired by Aunt Clara’s amazing version, and I’ve added my twists along the way. I encourage you to do the same!
Don’t forget to share your Cowboy Caviar stories with me! I love hearing how my recipes fit into your life and bring joy to your gatherings.
FAQs and Troubleshooting
Q1: Can I make Cowboy Caviar ahead of time?
Absolutely! It tastes even better after marinating overnight. Just be sure to store it in an airtight container in the fridge.
Q2: How long will it last in the fridge?
If stored properly, it should last for 3-5 days. Just make sure to give it a good stir before you serve it again.
Q3: Is it okay to use frozen corn and beans?
Yes, frozen corn works wonderfully! Just thaw it first. If using frozen beans, make sure they’re fully cooked.
Q4: What can I serve with Cowboy Caviar?
It pairs beautifully with grilled meats, on nachos, or in a burrito bowl. You can even elevate it by placing a scoop on top of tacos for an added crunch!
Nutritional Info
Here’s a rough breakdown of each serving (based on eight servings):
- Calories: 120
- Protein: 5g
- Carbohydrates: 24g
- Fat: 2g
- Fiber: 6g
- Sugar: 3g
Cowboy Caviar is not only delicious but packed with fiber and nutrients, making it a great addition to any meal!
And there you have it! A fabulous, vibrant dish that’s so easy to make and even easier to share. Now, roll up your sleeves, put on your favorite apron, and let’s get cooking! I can’t wait to hear how your Cowboy Caviar turns out, so don’t forget to share your creations with me. Happy cooking, friends!
Print
Easy Cowboy Caviar
- Total Time: 45 minutes
- Yield: 8 servings 1x
- Diet: Vegan
Description
A vibrant mix of black beans, corn, and fresh vegetables in a zesty dressing, perfect as a dip or a salad.
Ingredients
- 1 can black beans, drained and rinsed
- 1 can sweet corn, drained
- 1 cup cherry tomatoes, halved
- 1 red bell pepper, diced
- 1 green bell pepper, diced
- 1/2 red onion, finely chopped
- 1/4 cup fresh cilantro, chopped
- Juice of 2 limes
- 1 tablespoon olive oil
- 1 teaspoon ground cumin
- Salt and pepper to taste
Instructions
- Prep the Veggies: Start by washing your fresh produce. It’s essential to have clean veggies! Drain and rinse the black beans and corn.
- Chop and Dice: Dice the bell peppers, cherry tomatoes, and red onion into uniform pieces.
- Combine Everything: In a large mixing bowl, toss together the black beans, corn, cherry tomatoes, red bell pepper, green bell pepper, red onion, and cilantro.
- Make the Dressing: In a small bowl, whisk together the lime juice, olive oil, ground cumin, salt, and pepper.
- Mix it All Together: Pour the dressing over the vegetable mixture and gently stir until everything is coated.
- Taste and Adjust: Give it a taste and adjust seasoning if necessary.
- Chill and Marinate: Cover the bowl and let it chill in the fridge for at least 30 minutes.
- Serve and Enjoy: Stir the Cowboy Caviar and transfer it to a serving dish with tortilla chips.
Notes
Cowboy Caviar can be made ahead of time and tastes even better after marinating overnight.
- Prep Time: 15 minutes
- Cook Time: 0 minutes
- Category: Appetizer
- Method: Mixing
- Cuisine: Tex-Mex
Nutrition
- Serving Size: 1 serving
- Calories: 120
- Sugar: 3g
- Sodium: 200mg
- Fat: 2g
- Saturated Fat: 0g
- Unsaturated Fat: 2g
- Trans Fat: 0g
- Carbohydrates: 24g
- Fiber: 6g
- Protein: 5g
- Cholesterol: 0mg
Keywords: cowboy caviar, dip, salad, Tex-Mex, fresh vegetables, party food

Cowboy Caviar
Cowboy Caviar: A Colorful Fiesta in a Bowl
Welcome to my kitchen, foodie friends! Today, we’re diving into a dish that’s as vibrant as a summer festival and as comforting as a cozy night in—Cowboy Caviar! This delightful dip is not only bursting with flavor but is also wonderfully versatile, making it perfect for gatherings, potlucks, or simply snacking at home. If you’ve never had the pleasure of enjoying Cowboy Caviar, get ready to be thrilled by its exciting combination of fresh vegetables, zesty seasonings, and hearty black beans.
Now, I know what you might be thinking: “Caviar? Isn’t that fancy?” Fear not! This caviar is actually a dip that hails from the Southwestern United States, filled with fresh ingredients that bring the essence of the cowboy spirit to your table. Whether you’re watching the game, hosting a backyard barbecue, or just looking for a colorful snack, this dish is sure to impress.
One of my favorite things about Cowboy Caviar is how adaptable it is. You can serve it as a dip with tortilla chips, pile it on tacos, or even toss it with greens for a refreshing salad. Plus, it’s easy to whip up, making it the perfect option for both beginner cooks and seasoned chefs alike. So grab your apron, and let’s get started on this delicious journey together!
Personal Story
Let me take you back to a summer evening a few years ago, one of those magical nights where the sunset paints the sky in hues of orange and pink. I was at a country-themed potluck, eagerly receiving the scent of barbecue wafting through the air. As I arrived, I saw tables laden with dishes, and right in the middle sat a colorful bowl of Cowboy Caviar. Its cheerful colors caught my eye, and I was drawn in like a moth to a flame.
I remember scooping a generous portion onto my plate, not knowing I was about to embark on a flavor adventure. The first bite was a burst of freshness—the crunchiness of the veggies, the creaminess of the avocado, and that perfect kick of lime. It was love at first taste! From that day on, I made it a tradition to recreate that Cowboy Caviar for every gathering. It became a symbol of summer, friendship, and the joy of sharing delicious food with those we love.
Ingredients
Here’s what you’ll need to create this masterpiece:
-
Black Beans (1 can, drained and rinsed)
A hearty base to this dish, black beans add protein and fiber. You can substitute them with pinto beans or chickpeas for a different texture. -
Corn (1 cup, fresh or canned)
Sweet and crunchy goodness! If using fresh corn, you can grill it first for an added smoky flavor. Frozen corn works well too; just thaw before use. -
Red Bell Pepper (1, diced)
Adds a pop of color and sweetness. Feel free to swap it with yellow or orange peppers for a different look and taste. -
Red Onion (1 small, finely chopped)
This ingredient brings pungency and depth to the dip. If you prefer milder flavors, soak the chopped onion in water for a few minutes before adding it. -
Tomatoes (2 medium, diced)
Juicy and vibrant, tomatoes complete the fresh medley. Cherry tomatoes are a great substitute and don’t require chopping! -
Avocado (1 large, diced)
Creamy goodness! For a twist, you can use mango or pineapple for a fruity sweetness. Just make sure to enjoy it right away to prevent browning. -
Jalapeño (1 small, finely chopped)
For those who like a kick! Remove the seeds for a milder flavor or add more if you’re feeling adventurous. -
Cilantro (1/4 cup, chopped)
This herb adds freshness and a slightly citrusy flavor. If you’re not a fan, parsley makes an excellent substitute. -
Lime Juice (from 1 lime)
Zesty and bright, lime juice brings the whole dish to life. You can also use lemon juice for a different tang. -
Olive Oil (2 tablespoons)
Adds richness and helps meld the flavors together. Avocado oil is a great alternative if you want something lighter. -
Salt and Pepper (to taste)
Essential for bringing out all the flavors. Feel free to experiment with other spices, like cumin or smoked paprika.
Step-by-Step Instructions
Step 1: Prepare Your Ingredients
Start by gathering all your wonderful ingredients. A sharp knife and a good cutting board will make your prep work that much easier. Dice the red onion and jalapeño, chop the cilantro, and dice the tomatoes and bell pepper. If you’re using fresh corn, now is the time to cook it! You can grill or steam it for a few minutes to enhance the flavor.
Step 2: Combine the Base Ingredients
In a large mixing bowl, add the black beans, corn, diced red bell pepper, and the chopped tomatoes. Make sure the ingredients are well-drained to keep the salad from getting soggy. Give everything a gentle stir to combine.
Step 3: Add Freshness and Flavor
Next comes the exciting part! Throw in the jalapeño, red onion, and cilantro. Toss everything together so that the flavors start mingling. There’s something so satisfying about this step—watching all those colors blend together is like creating a culinary masterpiece!
Step 4: Dress It Up
Now it’s time for the dressing! In a separate small bowl, whisk together lime juice, olive oil, salt, and pepper. Drizzle this over your mixed ingredients and toss gently yet thoroughly. This is where the magic happens—the house will start smelling delightful as the dressing permeates each ingredient.
Step 5: Add Avocado Last
Finally, add the diced avocado. Gently fold it into the mixture to keep those lovely pieces intact. Remember, avocado can brown quickly, so if you plan to serve it later, add it right before serving.
Step 6: Let It Chill
Cover your bowl with plastic wrap and let the Cowboy Caviar chill in the fridge for at least 30 minutes. This allows the flavors to deepen and gives you some time to relax (or prep the rest of your meal!).
Serving Suggestions
Serve your Cowboy Caviar in a beautiful bowl alongside a platter of crispy tortilla chips. You can also present it in individual cups for a fun appetizer at parties. Pair it with your favorite salsa or guacamole to create a festive appetizer spread. If you want to add some volume, use it as a topping for grilled chicken or fish—or pour it over a bed of mixed greens for a refreshing salad.
Recipe Variations
- Spicy Kick: Add diced serrano peppers in place of jalapeños for extra heat.
- Cheesy Delight: Incorporate crumbled feta or queso fresco for a creamy, tangy twist.
- Pasta Caviar: Mix with cooked pasta for a hearty, noodle-inspired twist on Cowboy Caviar.
- Mediterranean Vibes: Swap black beans for chickpeas and add olives for a Mediterranean flair.
- Grain Bowl: Turn it into a grain bowl by pairing it with quinoa or brown rice for a filling meal.
Chef’s Notes
This Cowboy Caviar recipe has evolved over time. I remember the first time I made it, I used whatever was in my pantry. Since then, I’ve discovered how much fun it is to customize the ingredients based on what’s in season or what my friends love. I once served it at a gathering, and someone suggested adding pineapple for extra sweetness. It was a huge hit! Don’t be afraid to experiment with flavors and textures—every batch can be a new adventure.
FAQs and Troubleshooting
1. Can I make Cowboy Caviar ahead of time?
Yes! You can prepare it a few hours in advance. Just be cautious about adding the avocado; it’s best to add that right before serving to prevent browning.
2. How long does Cowboy Caviar last in the fridge?
In an airtight container, Cowboy Caviar stays fresh for 3-5 days. The flavors will intensify over time, but the avocado may brown.
3. What can I do if it’s too spicy?
If your Cowboy Caviar turned out spicier than expected, try adding more diced tomatoes or a dollop of sour cream to balance the heat.
4. Is Cowboy Caviar gluten-free?
Absolutely! Cowboy Caviar is inherently gluten-free, making it a great option for those with dietary restrictions.
Nutritional Info
While the nutritional information can vary based on specific ingredients used, this dish is generally low in calories, rich in fiber, and packed with essential vitamins and minerals. Each serving offers a healthy dose of protein, making it a fantastic snack option.
So there you have it! Cowboy Caviar is not just a dip; it’s a celebration of flavors and a dish that brings people together. I hope this recipe brightens your kitchen and inspires you to share the love with friends and family. Until next time, keep cooking with joy and passion!
Print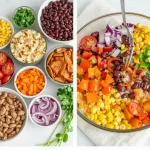
Cowboy Caviar
- Total Time: 30 minutes
- Yield: 4 servings 1x
- Diet: Vegetarian
Description
A vibrant dip bursting with fresh vegetables, zesty seasonings, and hearty black beans, perfect for gatherings or snacking.
Ingredients
- 1 can Black Beans, drained and rinsed
- 1 cup Corn, fresh or canned
- 1 Red Bell Pepper, diced
- 1 small Red Onion, finely chopped
- 2 medium Tomatoes, diced
- 1 large Avocado, diced
- 1 small Jalapeño, finely chopped
- 1/4 cup Cilantro, chopped
- Juice of 1 Lime
- 2 tablespoons Olive Oil
- Salt and Pepper, to taste
Instructions
- Prepare Your Ingredients by gathering and chopping them as needed.
- Combine the black beans, corn, red bell pepper, and tomatoes in a large mixing bowl.
- Add the jalapeño, red onion, and cilantro; toss to combine.
- Dress the salad with lime juice, olive oil, salt, and pepper. Toss gently.
- Add the diced avocado last, folding it into the mixture.
- Let the Cowboy Caviar chill in the fridge for at least 30 minutes before serving.
Notes
Best served with tortilla chips or as a topping for grilled chicken or fish. Add avocado right before serving to prevent browning.
- Prep Time: 15 minutes
- Cook Time: 0 minutes
- Category: Appetizer
- Method: No Cook
- Cuisine: Southwestern
Nutrition
- Serving Size: 1 serving
- Calories: 250
- Sugar: 4g
- Sodium: 300mg
- Fat: 10g
- Saturated Fat: 1.5g
- Unsaturated Fat: 8g
- Trans Fat: 0g
- Carbohydrates: 35g
- Fiber: 10g
- Protein: 8g
- Cholesterol: 0mg
Keywords: Cowboy Caviar, dip, vegetarian, summer recipe, easy appetizer


