
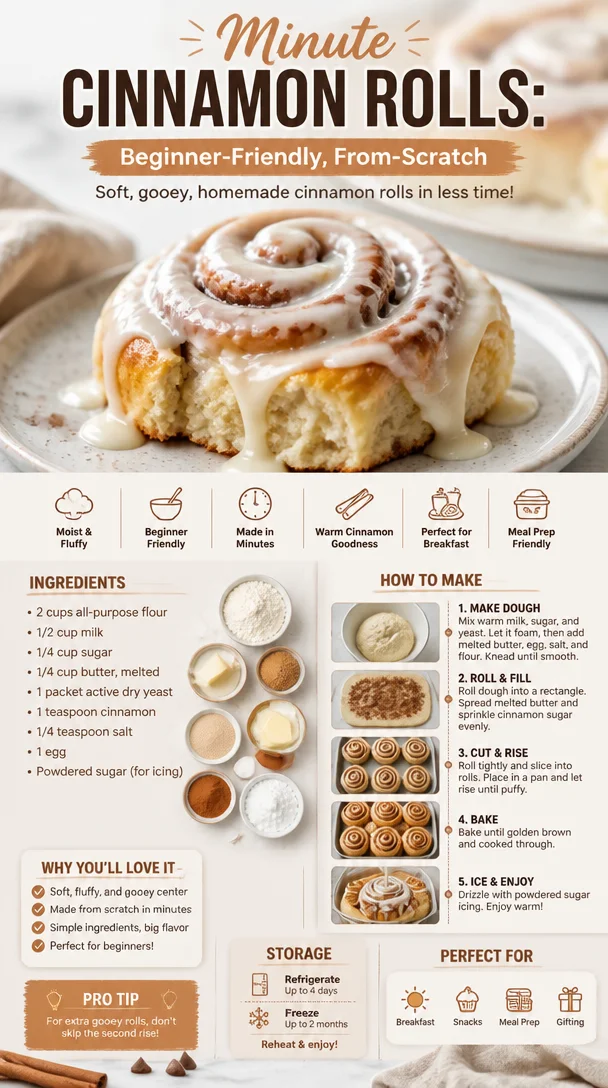
Minute Cinnamon Rolls: Beginner-Friendly, From-Scratch
Easy Homemade Cinnamon Rolls Recipe
Welcome to my cozy kitchen! I’m Olivia Bennett, and today I’m inviting you to roll up your sleeves and indulge in the wonderful world of homemade cinnamon rolls. There’s something magical about the scent of cinnamon wafting through your home as these delightful rolls rise in the oven—warm, gooey, and utterly irresistible. Whether you’re gearing up for a lazy Sunday brunch, a festive holiday gathering, or simply want to treat yourself and your loved ones to a sweet surprise, these cinnamon rolls are bound to steal the show.
There was a time when I thought homemade cinnamon rolls were only for the pros or those with endless time on their hands. But let me tell you a little secret: making cinnamon rolls from scratch is one of the most rewarding kitchen experiences you can have. The joy of transforming simple ingredients into something so scrumptious is unparalleled. I still remember my first attempt at these delightful treats. It was a chilly autumn morning, and I wanted to surprise my family with breakfast. I dusted off my grandma’s recipe, rolled up my sleeves, and got started. The kitchen was filled with the warm, inviting smell of cinnamon and sugar, and when I finally pulled those rolls out of the oven, I felt like a kitchen superhero!
Are you ready to embark on your own cinnamon roll journey? Brace yourself for the fluffiest, most decadent rolls you’ve ever made—the kind that hugs you back with every bite. Let’s dive into the magic!
Ingredients
Here’s what you’ll need to make these heavenly cinnamon rolls:
-
2 ¼ teaspoons active dry yeast: This little powerhouse is what makes your rolls rise! If you don’t have active dry yeast, you can use instant yeast at the same ratio.
-
¾ cup warm milk (about 110°F/43°C): Warm milk activates the yeast. If you’re looking for a dairy-free option, almond milk or oat milk work well too!
-
¼ cup granulated sugar: Sweetness is essential! You can substitute brown sugar for a deeper, caramel-like flavor.
-
1 egg: This binds everything together and adds richness. For an egg substitute, try ¼ cup unsweetened applesauce or a flax egg (1 tablespoon ground flaxseed mixed with 2.5 tablespoons of water).
-
3 ½ to 4 cups all-purpose flour: Flour provides structure. If you want a lighter roll, consider using bread flour instead—it has a higher protein content.
-
½ teaspoon salt: Balances out the sweetness and enhances the flavor of the rolls.
-
⅓ cup unsalted butter, softened: Butter makes everything better! You can swap for coconut oil for a dairy-free version.
Filling
-
½ cup brown sugar, packed: This caramelizes delightfully as the rolls bake. Feel free to use coconut sugar if you prefer a less processed option!
-
2 tablespoons ground cinnamon: The star of our show! Try experimenting with spices like nutmeg or cardamom for a unique spin.
-
¼ cup unsalted butter, softened: This is layered into the rolls for maximum gooeyness!
Frosting (optional but highly recommended)
-
1 cup powdered sugar: This adds a sweet, creamy finish.
-
2 tablespoons unsalted butter, softened: For that rich buttery flavor. Again, coconut oil can work here!
-
1 tablespoon cream cheese, softened: For a tangy kick, but this is optional. You could also use vegan cream cheese!
-
1 teaspoon vanilla extract: The aromatic essence that ties everything together.
-
1-2 tablespoons milk: Adjust the consistency of your frosting.
Step-by-Step Instructions
Ready to get baking? Let’s turn those ingredients into baked bliss!
-
Activate the Yeast: In a small bowl, combine the warm milk and active dry yeast. Add the sugar and whisk gently. Let it sit for about 5–10 minutes until frothy. This means your yeast is alive and ready to work its magic!
-
Mix it Up: In a large mixing bowl, whisk together 2 ½ cups of flour and salt. After your yeast mixture is frothy, add the egg and melted butter to the bowl, mixing until just combined.
-
Knead to Perfection: Gradually add the remaining flour, ½ cup at a time, until your dough comes together. Turn it out onto a floured surface and knead for about 5-7 minutes until smooth and elastic. This is a great arm workout too!
-
Let it Rise: Place the dough in a greased bowl, cover it with a clean cloth, and let it rise in a warm place for about an hour, or until it doubles in size. This is a great time to clean up and prepare the filling!
-
Prepare the Filling: In a small bowl, mix together the brown sugar and cinnamon. Once your dough has risen, punch it down gently (that feels good, right?) and roll it out on a floured surface into a rectangle, about ¼ inch thick.
-
Spread the Butter: Smear the softened butter all over the rolled-out dough, leaving a little border around the edges for easy rolling.
-
Sprinkle and Roll: Evenly sprinkle the cinnamon-sugar mixture over the butter. Starting from one long end, roll the dough tightly into a log. Use a sharp knife to slice the log into 12 equal rolls.
-
Second Rise: Place the rolls in a greased baking dish, cover them again, and let them rise for another 30 minutes. Preheat your oven to 350°F (175°C) while you wait!
-
Bake: Bake the rolls for 25-30 minutes until golden brown. If you want the tops to be extra golden, brush a bit of melted butter on them halfway through baking.
-
Frost: While the rolls are cooling slightly, beat together the frosting ingredients until smooth. Drizzle it generously over the warm rolls and enjoy!
Serving Suggestions
These cinnamon rolls are best enjoyed fresh out of the oven, but they’re just as delicious the next day (if they last that long!). Serve them warm with a side of coffee or hot cocoa for a cozy treat. For an extra special presentation, you might even want to add some chopped nuts or a sprinkle of sea salt on the frosting just before serving.
Recipe Variations
Feeling adventurous? Here are a few scrumptious twists you could try:
-
Chocolate Chip Cinnamon Rolls: Add a handful of chocolate chips to the filling for a sweet surprise in every bite.
-
Maple Pecan Rolls: Swap out the brown sugar for maple sugar and toss in some chopped pecans for added crunch.
-
Vegan Cinnamon Rolls: Use plant-based milk, coconut oil, and vegan cream cheese to create a dairy-free delightful treat.
-
Savory Cinnamon Rolls: Change the filling to include cheese, herbs, and garlic for a unique dinner roll twist!
-
Pumpkin Spice Rolls: Replace ¼ cup of flour with pumpkin puree and add pumpkin pie spice to the filling for a fall-inspired delight!
Chef’s Notes
Cinnamon rolls have a special spot in my heart. I even remember my first baking mishap: I forgot to add the sugar to the dough, and I ended up offering my family “cinnamon rolls” that were more like sad little bread logs. Thankfully, they were so kind and ate them anyway! Over the years, my technique has matured (as have my roll skills), and I’ve mastered the art of sprinkling joy into every roll!
FAQs and Troubleshooting
1. My rolls didn’t rise! What went wrong?
There could be a few reasons. Make sure your yeast is fresh and active—if it doesn’t froth up when mixed with milk, it’s best to start over. The dough’s environment also matters, so it should be warm and draft-free during the rise.
2. The dough was too sticky to handle!
Use additional flour sparingly when kneading the dough. Remember, a slightly sticky dough results in softer rolls, so be mindful not to add too much flour.
3. Can I make these ahead of time?
Absolutely! You can prepare the rolls up to the second rise stage, cover them, and refrigerate overnight. In the morning, let them sit at room temperature for 30 minutes before baking.
4. How do I store leftover rolls?
Seal any unused rolls in an airtight container at room temperature for up to two days. For longer storage, freeze them (unfrosted) for up to three months. Just thaw and reheat before indulging!
Nutritional Info
While indulging in these cinnamon rolls, keep in mind that they are a treat! Each roll is approximately 300 calories, depending on the size and frosting quantity. Enjoy them in moderation alongside a balanced diet.
Happy baking, friends! Remember, the best part of making homemade cinnamon rolls is the love you put into them. So gather your ingredients, let the sweet fragrance fill your home, and enjoy every delicious bite!
Print
Easy Homemade Cinnamon Rolls
- Total Time: 50 minutes
- Yield: 12 servings 1x
- Diet: Vegetarian
Description
Indulge in the delightful world of homemade cinnamon rolls, warm and gooey, perfect for any occasion.
Ingredients
- 2 ¼ teaspoons active dry yeast
- ¾ cup warm milk (about 110°F/43°C)
- ¼ cup granulated sugar
- 1 egg
- 3 ½ to 4 cups all-purpose flour
- ½ teaspoon salt
- ⅓ cup unsalted butter, softened
- ½ cup brown sugar, packed
- 2 tablespoons ground cinnamon
- ¼ cup unsalted butter, softened (for filling)
- 1 cup powdered sugar (for frosting)
- 2 tablespoons unsalted butter, softened (for frosting)
- 1 tablespoon cream cheese, softened (optional for frosting)
- 1 teaspoon vanilla extract
- 1–2 tablespoons milk (for frosting)
Instructions
- Activate the yeast: In a small bowl, combine the warm milk and active dry yeast. Add the sugar and whisk gently. Let it sit for about 5–10 minutes until frothy.
- Mix it up: In a large mixing bowl, whisk together 2 ½ cups of flour and salt. After your yeast mixture is frothy, add the egg and melted butter to the bowl, mixing until just combined.
- Knead to perfection: Gradually add the remaining flour, ½ cup at a time, until your dough comes together. Turn it out onto a floured surface and knead for about 5-7 minutes until smooth and elastic.
- Let it rise: Place the dough in a greased bowl, cover it with a clean cloth, and let it rise in a warm place for about an hour, or until it doubles in size.
- Prepare the filling: In a small bowl, mix together the brown sugar and cinnamon. Roll out the risen dough on a floured surface into a rectangle, about ¼ inch thick.
- Spread the butter: Smear the softened butter all over the rolled-out dough.
- Sprinkle and roll: Evenly sprinkle the cinnamon-sugar mixture over the butter. Roll the dough tightly into a log and slice into 12 equal rolls.
- Second rise: Place the rolls in a greased baking dish, cover them again, and let them rise for another 30 minutes.
- Bake: Bake the rolls at 350°F (175°C) for 25-30 minutes until golden brown.
- Frost: Beat together the frosting ingredients until smooth, drizzle over warm rolls, and enjoy!
Notes
These rolls are best enjoyed fresh, but they can be stored in an airtight container for up to two days or frozen for longer storage.
- Prep Time: 20 minutes
- Cook Time: 30 minutes
- Category: Dessert
- Method: Baking
- Cuisine: American
Nutrition
- Serving Size: 1 roll
- Calories: 300
- Sugar: 20g
- Sodium: 200mg
- Fat: 10g
- Saturated Fat: 5g
- Unsaturated Fat: 5g
- Trans Fat: 0g
- Carbohydrates: 40g
- Fiber: 1g
- Protein: 4g
- Cholesterol: 25mg
Keywords: cinnamon rolls, homemade, dessert, baking
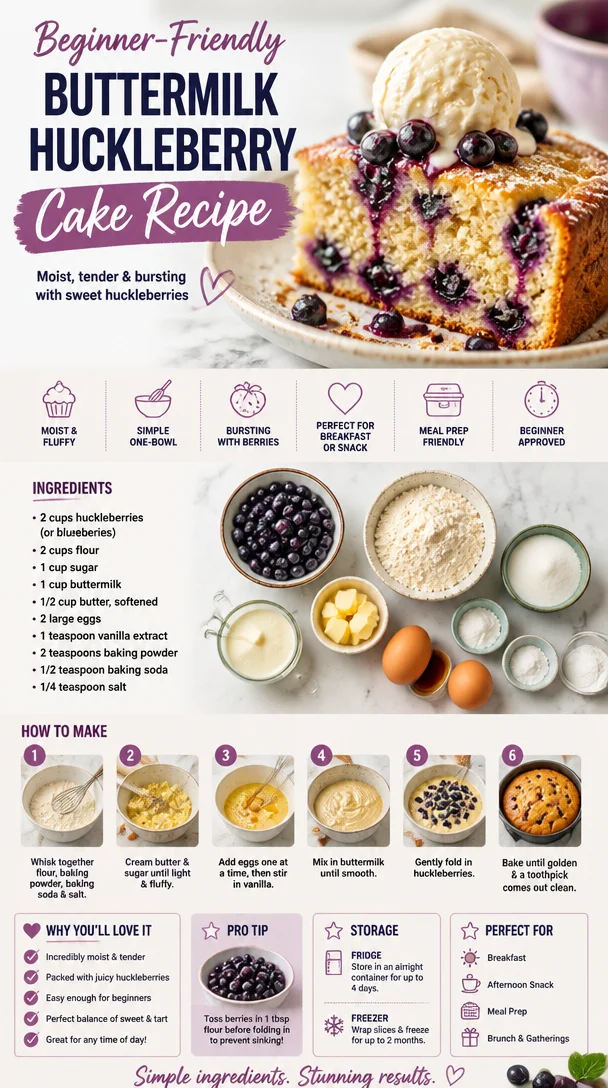
Beginner-Friendly Buttermilk Huckleberry Cake Recipe
Buttermilk Huckleberry Cake: A Slice of Happiness
Welcome to my kitchen! I’m so glad you’re here, and I can’t wait to share a delicious recipe that’s truly close to my heart: Buttermilk Huckleberry Cake. This cake is not just a dessert; it’s a celebration of summer, family gatherings, and sweet nostalgia. With its moist, tender crumb and the burst of juicy huckleberries, this cake makes for the perfect centerpiece at any occasion—from Sunday brunch to cozy family dinners.
Picture this: the sun is shining, and the air is warm with the sweet scent of wild berries. As a child, I spent countless afternoons in the woods behind my grandmother’s house, foraging for huckleberries. Those charming little blue-black gems were always a delight to find, hiding among the leaves, waiting to be picked. I remember my grandmother’s laugh as she whisked up her famous huckleberry pancakes in the mornings, reminding us of the timeless connection between food and memories.
One beautiful summer day, she decided to surprise us all with something special—a huckleberry cake! That day in her cozy kitchen, filled with the sounds of whisking and laughter, ignited my love for baking and the sheer joy of sharing food with those I love. Now, every time I whip up this Buttermilk Huckleberry Cake, I’m reminded of those precious moments spent with her, and I hope this recipe brings as much joy to your kitchen as it has to mine.
Let’s dive into the ingredients and get cooking!
Ingredients
-
2 cups all-purpose flour
Perfect for creating a light and tender cake. You can substitute with whole wheat flour for a nuttier flavor, but keep in mind that it might make the cake denser. -
1 cup granulated sugar
This adds the right amount of sweetness. For a lower-calorie option, consider using coconut sugar or a sugar substitute; just remember to adjust the quantity according to the substitution guidelines. -
1/2 teaspoon baking powder
A vital ingredient that helps your cake rise and prevents it from being too dense. -
1 teaspoon baking soda
This interacts with the acidity of buttermilk to create a wonderfully fluffy texture. -
1/2 teaspoon salt
Balances the sweetness and enhances the flavors of the cake. -
1 cup buttermilk
Adds moisture and a slight tang. If you don’t have buttermilk on hand, you can make your own by mixing one cup of milk with a tablespoon of vinegar or lemon juice and letting it sit for about 10 minutes. -
1/2 cup vegetable oil
Keeps the cake moist and tender. Melted butter can also be used for a richer flavor. -
2 large eggs
Essential for binding the ingredients together and adding a bit of richness. Flaxseed eggs (1 tablespoon flaxseed meal mixed with 2.5 tablespoons water) could be a great vegan substitute. -
1 ½ cups fresh huckleberries
Deliciously sweet and tart—they make this cake sing! If you can’t find huckleberries, blueberries work beautifully as well. -
1 teaspoon vanilla extract
Adds warmth and rounds out the flavors. Use pure vanilla extract for the best results.
Ready to embark on your baking adventure? Let’s mix up this delicious Buttermilk Huckleberry Cake together!
Step-by-Step Instructions
-
Preheat Your Oven
Start by preheating your oven to 350°F (175°C). This ensures that your cake will bake evenly and create that perfect golden crust. -
Prepare Your Cake Pan
Grease a 9×13-inch baking dish (or two 8-inch round pans, if you prefer layers) with butter or cooking spray. For an extra non-stick guarantee, you can also dust the pan with a bit of flour—this helps the cake slide right out. -
Combine Dry Ingredients
In a large mixing bowl, whisk together the flour, sugar, baking powder, baking soda, and salt. This is where we bring together all those dry ingredients, ensuring they’re well-mixed for even flavor and texture. -
Mix Wet Ingredients
In a separate bowl, whisk together the buttermilk, vegetable oil, eggs, and vanilla extract until thoroughly combined. You want these ingredients to blend smoothly—don’t be afraid to put some elbow grease into it! -
Combine Wet and Dry Ingredients
Pour the wet mixture into the dry ingredients, and stir gently until just combined. Be careful not to overmix; this will keep your cake light and fluffy. You might see some lumps, and that’s perfectly fine! -
Fold in the Huckleberries
Now for the star of the show! Gently fold in the huckleberries, taking care not to break them apart too much—they should remain intact to create those lovely bursts of fruit in every slice. -
Transfer to the Pan
Pour the batter into your prepared baking dish, spreading it evenly. If you want a little extra flair, you can save a handful of huckleberries to sprinkle on top before baking! -
Bake the Cake
Place the cake in your preheated oven and bake for about 30-35 minutes. You’ll know it’s done when a toothpick inserted in the center comes out clean or with just a few moist crumbs clinging to it. -
Cooling Time
Once baked, remove the cake from the oven and allow it to cool in the pan for about 10 minutes. Then, transfer it to a wire rack to cool completely. This step is crucial as it helps set the cake and prevents it from becoming soggy. -
Slice and Serve!
Once the cake has cooled, it’s time for the best part—enjoying a slice (or two) of your Buttermilk Huckleberry Cake. Feel free to serve it plain, dusted with powdered sugar, or topped with a dollop of whipped cream for an extra indulgence!
Serving Suggestions
To serve your Buttermilk Huckleberry Cake, slice it into generous squares and place them on colorful dessert plates. A light dusting of powdered sugar makes for an appealing presentation, or add fresh huckleberries and mint leaves for that extra pop of color. If you’re feeling fancy, serve it alongside a scoop of vanilla ice cream or a drizzle of cream cheese frosting—trust me, you can’t go wrong with that!
Recipe Variations
Looking to switch things up? Here are a few ideas:
-
Lemon Zest: Add a tablespoon of lemon zest to the batter for a refreshing citrus twist.
-
Spices: Incorporate cinnamon or nutmeg for a warm spice profile, perfect for those cozy autumn days.
-
Coconut Flakes: Stir in some sweetened coconut flakes for an exotic flair and added texture.
-
Nuts: Chopped walnuts or pecans could add a delightful crunch and a nutty flavor contrast.
-
Gluten-Free Option: Substitute in a 1:1 gluten-free flour blend to make it gluten-free without sacrificing flavor.
Chef’s Notes
Every time I make this cake, it takes me back to my grandmother’s kitchen. I often find myself reminiscing about those carefree summer afternoons spent berry-picking and the laughter shared over delicious food. The beauty of this recipe is in its simplicity; it’s a canvas for your creativity! Over the years, I’ve tried different flavors and variations. One fun memory is when I surprised my grandmother with a ‘Huckleberry Lemon Cheesecake’ for her birthday, inspired by this very cake. She took one bite and it was like I had transported her back to her own childhood. That’s the magic of cooking—it connects generations and creates a tapestry of memories.
FAQs and Troubleshooting
1. My cake turned out too dense; what did I do wrong?
This could be due to overmixing the batter or using too much flour. Be gentle when combining wet and dry ingredients and measure flour accurately (spoon it into your measuring cup and level it off!).
2. I can’t find huckleberries; how can I substitute?
You can use fresh or frozen blueberries, blackberries, or even raspberries. Just adjust the quantity if the substitute is more or less sweet.
3. Can I make this cake ahead of time?
Absolutely! This cake stores well. Just make sure to keep it wrapped in an airtight container at room temperature for up to 3 days (or refrigerate for longer freshness).
4. How can I make the cake gluten-free?
Simply substitute the all-purpose flour with a gluten-free 1:1 flour blend. Make sure to check that other ingredients (like baking powder) are gluten-free too.
Nutritional Info
While this cake is definitely a treat, here’s a quick glance at the estimated nutritional info per slice (based on 12 slices per cake):
- Calories: 220
- Protein: 3g
- Total Fat: 10g
- Saturated Fat: 1g
- Dietary Fiber: 1g
- Total Sugars: 12g
As always, adjust based on your serving size and ingredients used, and enjoy every delicious bite guilt-free!
There you have it: my beloved Buttermilk Huckleberry Cake recipe, filled with love, memories, and loads of flavor! I hope you find as much joy in baking it as I do. Happy baking, and may your kitchen always be filled with warmth and laughter!
Print
Buttermilk Huckleberry Cake
- Total Time: 50 minutes
- Yield: 12 servings 1x
- Diet: Vegetarian
Description
A delightful cake celebrating summer with juicy huckleberries and a tender crumb, perfect for family gatherings.
Ingredients
- 2 cups all-purpose flour
- 1 cup granulated sugar
- 1/2 teaspoon baking powder
- 1 teaspoon baking soda
- 1/2 teaspoon salt
- 1 cup buttermilk
- 1/2 cup vegetable oil
- 2 large eggs
- 1 ½ cups fresh huckleberries
- 1 teaspoon vanilla extract
Instructions
- Preheat your oven to 350°F (175°C).
- Grease a 9×13-inch baking dish with butter or cooking spray.
- Combine the flour, sugar, baking powder, baking soda, and salt in a large bowl.
- Mix the buttermilk, vegetable oil, eggs, and vanilla extract in another bowl until blended.
- Pour the wet mixture into the dry ingredients and stir gently until just combined.
- Fold in the huckleberries carefully.
- Transfer the batter to your prepared pan, spreading it evenly.
- Bake for about 30-35 minutes, until a toothpick comes out clean.
- Cool in the pan for 10 minutes, then transfer to a wire rack.
- Slice and serve with powdered sugar or whipped cream.
Notes
This cake can be made ahead of time and stored in an airtight container for up to 3 days. You can substitute various fruits if huckleberries are unavailable.
- Prep Time: 15 minutes
- Cook Time: 35 minutes
- Category: Dessert
- Method: Baking
- Cuisine: American
Nutrition
- Serving Size: 1 slice
- Calories: 220
- Sugar: 12g
- Sodium: 200mg
- Fat: 10g
- Saturated Fat: 1g
- Unsaturated Fat: 9g
- Trans Fat: 0g
- Carbohydrates: 32g
- Fiber: 1g
- Protein: 3g
- Cholesterol: 35mg
Keywords: cake, huckleberry, dessert, summer, baking, family
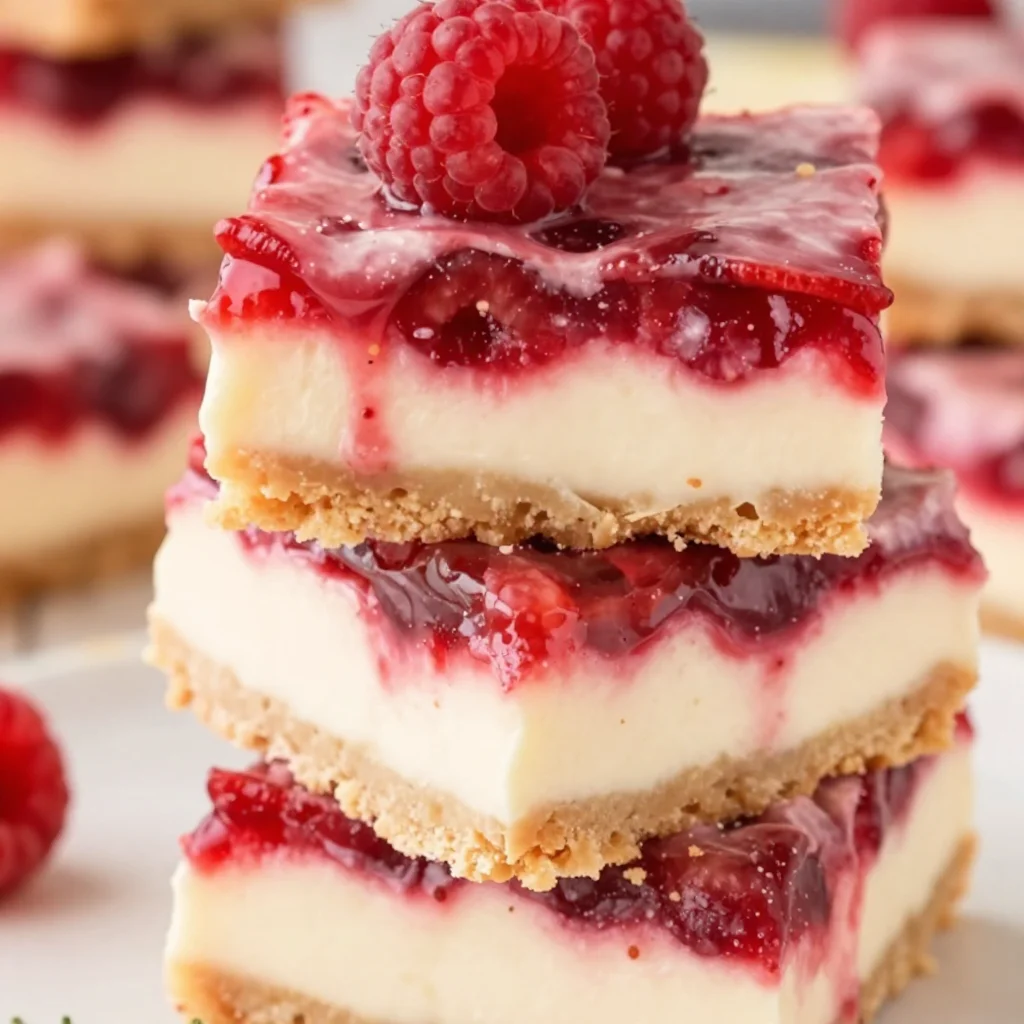
Beginner-Friendly Raspberry Cheesecake Bars: Simple & Creamy
Raspberry Cheesecake Bars: A Sweet Slice of Nostalgia
Welcome, friends! Gather around as we dive into the delightful world of Raspberry Cheesecake Bars. Picture this: you’re in your kitchen, the sun is gently streaming through the window, and the sweet scent of creamy cheesecake mixed with tart, juicy raspberries wafts through the air. It’s a slice of bliss that not only satisfies your sweet tooth but also warms your heart. As someone who believes that food is a way to connect and create memories, these bars hold a special place in my heart.
Growing up, my family had a tradition of gathering every Sunday for a big dinner. We would sit around the table, sharing stories, laughter, and, of course, delicious food. One Sunday, my Aunt Lily surprised us all with her famous raspberry cheesecake bars. They were the highlight of our meal! As we enjoyed the creamy, tangy treats, I saw how one dish could spark joy and bring folks together. It was in that moment I realized that cooking is about so much more than just flavors; it’s about the connections we make and the memories we create.
Now, I’m excited to share this recipe with you! Whether you’re planning a summer picnic, a cozy dinner party, or just a sweet treat for yourself, these Raspberry Cheesecake Bars are sure to impress. So grab your apron, and let’s get cooking!
Personal Story: A Family Tradition
One of my fondest memories of raspberry cheesecake bars goes back to those cherished Sunday dinners at Aunt Lily’s house. She was the quintessential gathering queen, whipping up magical recipes that had everyone lining up for seconds. When she made these bars, it was like a sweet, comforting hug from the inside. The way she would delicately layer the creamy cheesecake filling on top of the buttery crust, and then swirl that vibrant raspberry puree—oh, it was pure artistry!
I remember the anticipation building as we waited for the bars to cool. After dinner, the moment finally arrived: the first slice! As I took my first bite, the rich, creamy cheesecake blended beautifully with that pop of tartness from the raspberries. Each bite danced on my taste buds, leaving me craving more. Now, I often find myself recreating that memory in my own kitchen, hoping to inspire the same joy in my family and friends that Aunt Lily did for us.
Ingredients
Here’s what you’ll need to bring these raspberry cheesecake bars to life:
-
For the Crust:
- 1 ½ cups graham cracker crumbs
- Feel free to substitute with crushed Oreo cookies for a chocolatey twist!
- ½ cup granulated sugar
- For a less sweet crust, reduce sugar to 1/3 cup.
- ½ cup unsalted butter, melted
- Coconut oil can be a great dairy-free alternative here.
- 1 ½ cups graham cracker crumbs
-
For the Cheesecake Filling:
- 16 ounces cream cheese, softened
- Neufchâtel cheese works if you want a lighter option.
- 1 cup granulated sugar
- Replace with coconut sugar for a touch of caramel flavor!
- 1 teaspoon vanilla extract
- Always use pure vanilla for the best aroma and taste.
- 3 large eggs
- Replace with 1 cup of unsweetened applesauce for a vegan version.
- ½ cup sour cream
- Greek yogurt works well to add that creamy texture with less fat.
- 16 ounces cream cheese, softened
-
For the Raspberry Swirl:
- 1 cup fresh raspberries (or frozen, thawed and drained)
- You can substitute half the raspberries with blueberries for a mixed berry treat.
- 2 tablespoons sugar
- Switch to honey or maple syrup if you prefer a more natural sweetener.
- 1 tablespoon lemon juice
- A splash of orange juice can also work wonderfully!
- 1 cup fresh raspberries (or frozen, thawed and drained)
Step-by-Step Instructions
Step 1: Preheat and Prepare the Pan
Begin by preheating your oven to 325°F (160°C). While that’s warming up, grab a 9×13 inch baking pan and line it with parchment paper, leaving some overhang. This will help you lift the bars out later—trust me, it’s a game-changer!
Step 2: Make the Crust
In a medium bowl, mix together the graham cracker crumbs, sugar, and melted butter until it resembles damp sand. If it feels dry, add a touch more melted butter. Press this mixture firmly into the bottom of your prepared baking pan, creating an even layer. Pop it into the oven for 10 minutes until slightly golden.
Step 3: Prepare the Cheesecake Filling
While the crust is baking, let’s whip up that luscious cheesecake filling! In a large mixing bowl, beat the softened cream cheese until smooth. Gradually add in the sugar and beat until fluffy, about 2-3 minutes. Then, mix in the vanilla extract. Now, add the eggs one at a time, mixing well after each addition. Finally, blend in the sour cream until creamy and delicious-looking.
Step 4: Create the Raspberry Swirl
In a small saucepan over medium heat, combine the raspberries, sugar, and lemon juice. Stir gently until the raspberries break down and the mixture becomes syrupy (about 3-5 minutes). If you like chunks, leave some berries whole! Set it aside to cool slightly.
Step 5: Combine and Bake
Pour the cheesecake mixture over the pre-baked crust, spreading it evenly. Now, drizzle the raspberry puree across the top and use a knife or toothpick to swirl it gently—this is where the magic happens! 🎨
Bake in the oven for 45-50 minutes, or until the edges are set but the center still jiggles slightly. Remove from the oven and let it cool at room temperature for about an hour. Then refrigerate for at least 4 hours (or overnight if you can wait!).
Step 6: Serving
Once chilled, lift the cheesecake bars out of the pan using the parchment paper. Cut them into squares, and serve them on a pretty platter. Garnish with fresh raspberries and a dusting of powdered sugar for that elegant touch!
Serving Suggestions
These raspberry cheesecake bars are fantastic on their own, but if you want to elevate your serving game, consider pairing them with a dollop of whipped cream or a scoop of vanilla ice cream. A sprig of mint on the side adds a pop of color and freshness that looks so appealing on the plate. For a brunch or tea party, serve them alongside a cup of iced tea or a sparkling lemonade; they make the perfect refreshing treat!
Recipe Variations
Ready to get creative? Here are some fun variations to try:
- Chocolate Raspberry Cheesecake Bars: Incorporate ½ cup melted dark chocolate into the cheesecake mixture for a rich, decadent twist.
- Lemon Raspberry Bars: Add 1-2 tablespoons of lemon zest to the filling for a zesty kick.
- Nutty Graham Cracker Crust: Use crushed almonds or hazelnuts in the crust for added flavor and crunch.
- Swap the Berries: Try using blackberries, strawberries, or cherries to mix things up!
- Vegan Version: Substitute all dairy ingredients with plant-based alternatives and replace eggs with silken tofu blended until smooth.
Chef’s Notes
Over the years, I’ve experimented with this recipe, tweaking ingredients and adding my little spin. One time, I misjudged my raspberry supply and ended up turning it into a mixed berry cheesecake! That accidental innovation ended up being a total hit at a family gathering. So remember, cooking is all about experimenting and making it your own! If you find you prefer more raspberry flavor, don’t be shy; feel free to add an extra cup of berries to the mix!
FAQs and Troubleshooting
1. Why are my cheesecake bars cracking?
A common issue! This often happens if the filling is overcooked or if it cools too quickly. To avoid this, bake your bars slowly and allow them to cool gradually in the oven with the door cracked open.
2. Can I use frozen raspberries instead of fresh?
Absolutely! Just make sure they’re thawed and well-drained. They may add more liquid, so it’s a good idea to strain them before using.
3. How do I store leftovers?
These bars can be stored in an airtight container in the refrigerator for up to a week. Just make sure to separate layers with parchment paper to prevent sticking!
4. Can I freeze the cheesecake bars?
Yes, you can! Wrap them tightly in plastic wrap and foil before freezing. When you’re ready to enjoy them, thaw them in the refrigerator overnight.
Nutritional Info
While I don’t usually dwell on the numbers too much, it’s helpful to know:
- Calories: Approximately 250 per bar
- Fat: 16g
- Carbohydrates: 25g
- Protein: 4g
These values can vary based on your ingredient choices, so make adjustments as needed!
And there you have it! Raspberry cheesecake bars that are not just a dessert but a tasty tradition and a sweet celebration of life. I hope this recipe inspires you to create your own beautiful memories in the kitchen. Happy baking, friends! 🍰
Print
Raspberry Cheesecake Bars
- Total Time: 4 hours 10 minutes
- Yield: 12 servings 1x
- Diet: Vegetarian
Description
Delicious raspberry cheesecake bars that blend creamy cheesecake with a tart raspberry swirl, perfect for gatherings and sweet treats.
Ingredients
- 1 ½ cups graham cracker crumbs
- ½ cup granulated sugar
- ½ cup unsalted butter, melted
- 16 ounces cream cheese, softened
- 1 cup granulated sugar
- 1 teaspoon vanilla extract
- 3 large eggs
- ½ cup sour cream
- 1 cup fresh raspberries (or frozen, thawed and drained)
- 2 tablespoons sugar
- 1 tablespoon lemon juice
Instructions
- Preheat your oven to 325°F (160°C) and prepare a 9×13 inch baking pan with parchment paper.
- Mix together graham cracker crumbs, sugar, and melted butter in a bowl until it resembles damp sand. Press into the bottom of the baking pan and bake for 10 minutes.
- Beat the softened cream cheese in a large bowl until smooth. Gradually add sugar and beat until fluffy, then mix in vanilla extract, followed by eggs one at a time. Finally, blend in sour cream.
- Combine raspberries, sugar, and lemon juice in a saucepan over medium heat. Stir until syrupy, about 3-5 minutes.
- Pour the cheesecake mixture over the pre-baked crust, drizzle raspberry puree on top and swirl gently with a knife. Bake for 45-50 minutes.
- Cool at room temperature for an hour, then refrigerate for at least 4 hours before cutting into squares and serving.
Notes
For serving, consider adding whipped cream, a scoop of vanilla ice cream, or fresh raspberries on top.
- Prep Time: 20 minutes
- Cook Time: 50 minutes
- Category: Dessert
- Method: Baking
- Cuisine: American
Nutrition
- Serving Size: 1 bar
- Calories: 250
- Sugar: 20g
- Sodium: 350mg
- Fat: 16g
- Saturated Fat: 9g
- Unsaturated Fat: 6g
- Trans Fat: 0g
- Carbohydrates: 25g
- Fiber: 1g
- Protein: 4g
- Cholesterol: 65mg
Keywords: dessert, cheesecake, raspberry, bars, sweet treat
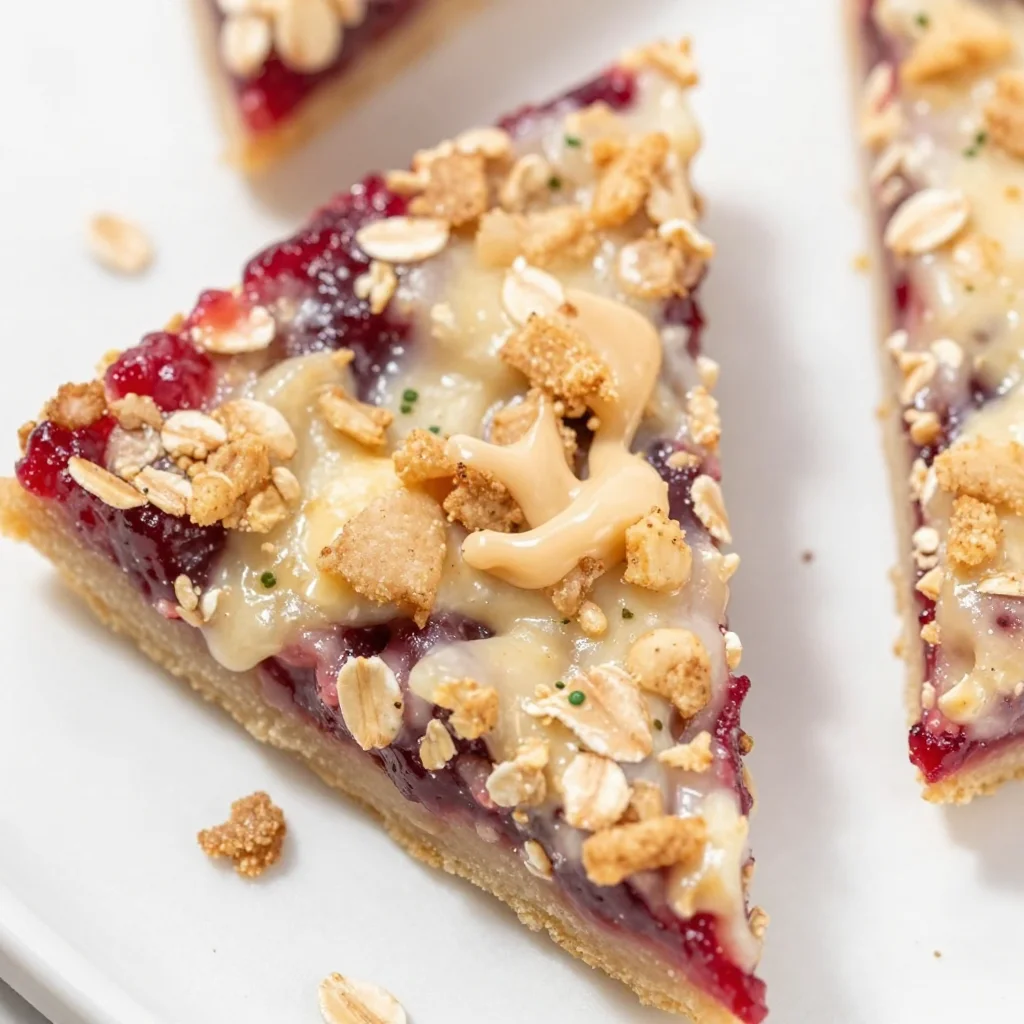
Ingredient Raspberry Oatmeal Bars: Quick & Beginner-Friendly
The Easiest Raspberry Oatmeal Bars: A Sweet Adventure in Every Bite!
Welcome to my cozy corner of the internet, where all things delicious and delightful come together! Today, I am thrilled to share a recipe that’s close to my heart and guaranteed to bring a smile to your face. These Easiest Raspberry Oatmeal Bars are not just scrumptious; they’re a blast from the past—packed with nostalgia, flavor, and the charm of home cooking. Whether you’re whipping them up for breakfast, snacking, or dessert, they’re perfect any time of day.
Picture this: the sun is shining through your kitchen window, the smell of baked oats fills the air, and you’re about to dig into the ultimate treat. These bars are a delightful combination of chewy oatmeal, sweet-tart raspberries, and a hint of cinnamon that makes them so irresistibly good. You won’t need hours in the kitchen or fancy equipment. With just a few simple ingredients and a bit of love, you’ll create a batch of oatmeal bars that everyone will rave about!
Now, let me take you back to where it all began. I vividly remember the summer afternoons spent at my grandmother’s house, surrounded by the enticing scent of her delicious baking. One of my favorite memories is the moment when she pulled a pan of her signature oatmeal bars from the oven, golden and bubbling with fresh fruits. I loved the way her kitchen felt; it was warm and inviting, just like these bars! We would devour those treats together while sharing stories and laughter, creating lasting bonds over a simple snack.
Fast forward to today, and I’ve decided to put my own twist on those nostalgic treats. My Easiest Raspberry Oatmeal Bars embody that warmth and joy. Trust me, once you try them, you’ll want to make them over and over again. So, let’s get cooking and make some magical memories in your kitchen!
What You’ll Need: Ingredients
Before we dive into the cooking process, let me lay out the ingredients for these delicious bars. Each component is simple, accessible, and adds its own unique touch.
-
Old-Fashioned Oats (2 cups): These are the backbone of your bars, giving them that lovely chewy texture. You can substitute quick oats if you prefer, but I find the old-fashioned oats create a heartier bar.
-
All-Purpose Flour (1 cup): This helps to bind everything together. If you’re gluten-free, feel free to swap this with almond flour or a gluten-free blend.
-
Brown Sugar (½ cup): For that rich sweetness and a hint of caramel flavor. If you’re looking to cut down on sugar, coconut sugar works well as a substitute.
-
Baking Powder (1 teaspoon): This helps your bars rise and become fluffy rather than dense.
-
Cinnamon (1 teaspoon): A warm spice that enhances the flavors of the oats and raspberries. If cinnamon isn’t your thing, try nutmeg or leave it out altogether.
-
Salt (½ teaspoon): Just a pinch to balance the sweetness.
-
Unsalted Butter (½ cup, melted): Adds richness and helps with the texture. Coconut oil is a great vegan alternative here.
-
Fresh Raspberries (1 cup): The stars of the show! You can swap these with blueberries, strawberries, or even apples if you like.
-
Egg (1 large): Binds everything together. For a vegan option, replace it with a flaxseed egg (1 tablespoon ground flaxseed mix with 3 tablespoons water).
Step-by-Step Instructions
Alright, let’s get to the fun part! Here’s how to bring these Easiest Raspberry Oatmeal Bars to life:
-
Preheat Your Oven: Start by preheating your oven to 350°F (175°C). This step ensures your bars bake evenly and develop a lovely golden color.
-
Prep Your Pan: Grab an 8×8-inch baking pan and line it with parchment paper for easy removal. You could also grease it lightly with butter or oil to prevent sticking.
-
Mix the Dry Ingredients: In a large bowl, combine the old-fashioned oats, flour, brown sugar, baking powder, cinnamon, and salt. Use a whisk to mix them well. This ensures that the baking powder is evenly distributed, which is key to even rising.
-
Incorporate the Wet Ingredients: In a separate bowl, mix the melted butter and egg. If you’re going vegan, make sure you whisk together the flaxseed and water thoroughly before adding. Pour this mixture into the dry ingredients and combine gently. It should be crumbly but hold together when you squeeze it.
-
Fold in the Raspberries: Gently fold in your fresh raspberries, being careful not to break them up too much. You want to maintain those lovely whole berries throughout your bars!
-
Spread the Mixture: Transfer half of the oatmeal mixture into the prepared pan, pressing it down to form an even layer. This base layer is crucial as it will hold all the delicious filling.
-
Add the Topping: Sprinkle the remaining mixture over the top of the raspberries. The texture should be crumbly and add a beautiful, crunchy top to your bars.
-
Bake: Pop the pan in the preheated oven and bake for 25-30 minutes, or until the top is golden and a toothpick inserted into the center comes out clean.
-
Cool and Slice: Allow your oatmeal bars to cool completely in the pan on a wire rack. This step is vital! If you can be patient, cutting them too soon may result in a lovely crumble instead of neat bars. Once cool, slice into squares or rectangles.
-
Enjoy!: Serve your bars warm, or store them in an airtight container at room temperature for up to a week! They also freeze beautifully if you want to enjoy them later.
Serving Suggestions
When it comes to serving your Easiest Raspberry Oatmeal Bars, simplicity is key! You can plate them up plainly, but for an added touch, consider drizzling them with a little warm honey or adding a dollop of yogurt. Pairing them with a cup of tea or coffee creates the perfect afternoon snack, and they’re great for sharing at brunch or a picnic!
Recipe Variations
Now that you’ve mastered the classic version, let’s talk about how you can give these bars your own spin!
-
Nutty Boost: Add ½ cup of chopped nuts (like almonds, walnuts, or pecans) for added crunch and healthy fats.
-
Chocolate Lovers: Stir in some dark chocolate chips or cacao nibs for a delicious chocolate raspberry combo.
-
Seasonal Swaps: In place of raspberries, use seasonal fruits like peaches, apples, or even cranberries for a fall twist.
-
Spice it Up: Mix in different spices like cardamom or ginger for a unique flavor profile.
-
Vegan Delight: Substitute eggs with flaxseed eggs and use maple syrup instead of brown sugar to make it completely plant-based.
Chef’s Notes
These Easiest Raspberry Oatmeal Bars have become a staple in my kitchen. I’ve experimented with so many variations over the years! One time, I had a batch that didn’t set properly because I was too impatient to let them cool down. Instead of tossing them out, I crumbled the bars over my morning yogurt, and it turned into an accidental breakfast favorite! It was the perfect example of how one little mistake can lead to something delightful.
Cooking is all about enjoying the process and embracing those little imperfections, right?
FAQs and Troubleshooting
1. Why did my bars crumble apart?
If your bars are crumbling, they may not have cooled completely before slicing. Make sure you let them cool in the pan entirely for better slicing. Also, check that you used the right proportions of wet to dry ingredients.
2. Can I use frozen raspberries?
Absolutely! If you’re using frozen raspberries, there’s no need to thaw them beforehand. Just be aware that they might create a bit more liquid, but that just makes them more moist and delicious!
3. How do I store these bars?
Store your oatmeal bars in an airtight container at room temperature for up to a week. If you’d like to keep them longer, freeze them in individual portions, and pull one out whenever you need a sweet treat!
4. Can I double the recipe?
Yes, feel free to double the recipe! Just use a larger baking dish (like a 9×13-inch pan) and extend the baking time slightly, checking for doneness.
Nutritional Info (Optional)
Each bar (based on 12 servings):
- Calories: 180
- Protein: 3g
- Carbohydrates: 29g
- Dietary Fiber: 3g
- Sugars: 8g
- Fat: 7g
With these Easiest Raspberry Oatmeal Bars, you’re all set to create a wholesome, delightful treat that brings joy to your kitchen and to the ones you love. Happy baking, friends! Enjoy every sweet moment! 🍓✨
Print
Easiest Raspberry Oatmeal Bars
- Total Time: 40 minutes
- Yield: 12 servings
- Diet: Vegetarian
Description
Deliciously chewy oatmeal bars packed with sweet-tart raspberries and a hint of cinnamon, perfect for breakfast or as a snack.
Ingredients
- Old-Fashioned Oats (2 cups)
- All-Purpose Flour (1 cup)
- Brown Sugar (½ cup)
- Baking Powder (1 teaspoon)
- Cinnamon (1 teaspoon)
- Salt (½ teaspoon)
- Unsalted Butter (½ cup, melted)
- Fresh Raspberries (1 cup)
- Egg (1 large)
Instructions
- Preheat your oven to 350°F (175°C).
- Prep an 8×8-inch baking pan by lining it with parchment paper.
- Mix the dry ingredients: oats, flour, brown sugar, baking powder, cinnamon, and salt in a bowl.
- Incorporate the wet ingredients: melted butter and egg (or flaxseed egg).
- Fold in the fresh raspberries gently.
- Spread half of the mixture into the prepared pan and press down.
- Add the remaining mixture as a topping.
- Bake for 25-30 minutes, until golden and a toothpick comes out clean.
- Cool completely on a wire rack before slicing.
- Enjoy warm or store in an airtight container for up to a week.
Notes
For a vegan option, substitute butter with coconut oil and egg with a flaxseed egg. These bars can be customized with nuts or chocolate chips.
- Prep Time: 10 minutes
- Cook Time: 30 minutes
- Category: Snack
- Method: Baking
- Cuisine: American
Nutrition
- Serving Size: 1 bar
- Calories: 180
- Sugar: 8g
- Sodium: 50mg
- Fat: 7g
- Saturated Fat: 4g
- Unsaturated Fat: 3g
- Trans Fat: 0g
- Carbohydrates: 29g
- Fiber: 3g
- Protein: 3g
- Cholesterol: 30mg
Keywords: raspberry, oatmeal, bars, dessert, snack
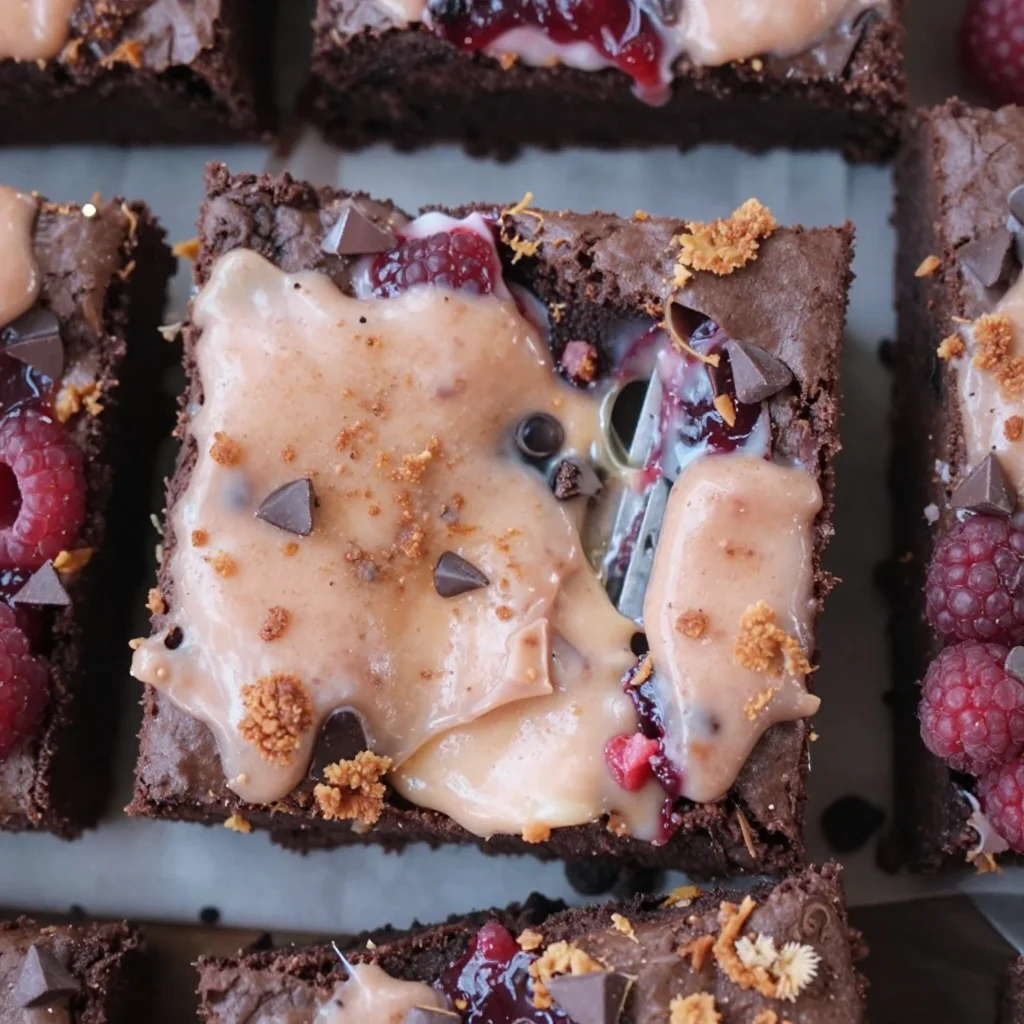
Beginner-Friendly Raspberry Brownies (One-Bowl Recipe)
Indulge in Raspberry Brownies: A Sweet Journey to Flavor Paradise
Welcome to my cozy corner of the kitchen! Today, we’re diving into luscious Raspberry Brownies that are bound to tickle your taste buds and steal your heart. The scent of warm, gooey chocolate dancing with tart raspberries creates a vibe that’s perfect for sharing (or not—no judgment here!). Just imagine, a plate of these beauties on your table, their rich dark chocolate complimented by vibrant red raspberries. It’s a symphony of flavors that’s hard to resist.
Every time I bake these brownies, I’m flooded with nostalgia from my childhood when my mom would whip up a batch for our family gatherings. I can still hear the laughter ringing in our kitchen as my siblings and I eagerly awaited the moment the brownies would make their grand debut. It became a sweet tradition, one that would draw us all into the heart of the home. These brownies not only won our hearts; they became the ultimate treat to impress everyone.
But don’t worry! You don’t need a culinary degree to make these scrumptious Raspberry Brownies. It’s all about combining simple ingredients and a little love. So, grab your mixing bowl, channel that inner chef, and let’s bake something special!
A Fond Kitchen Memory
Let me take you back to the summer I turned 10. It was a sunny afternoon, and I decided to bake my very first batch of brownies all by myself. I couldn’t wait to surprise my family with my newfound culinary skills. As I carefully measured the flour, the chocolate melted, and the raspberries burst with juicy goodness, I could hardly contain my excitement. I remember the smell wafting through the house, pulling everyone in like a siren’s call.
With my little apron tied too loosely around my waist, I proudly took the warm brownies out of the oven. With a sprinkle of powdered sugar, they looked heavenly! But that’s not all—a few sneaky bites had led to a chocolate explosion and raspberry chaos all over my face! I couldn’t stop laughing, and neither could my family when they saw my little "chocolate monster" look. That day, I learned that baking is not just about following a recipe; it’s about the joy of creation and the taste of those delightful moments spent together.
Ingredients
Let’s gather our ingredients for these decadent Raspberry Brownies. Here’s what you’ll need, along with some tips:
-
Unsalted Butter (1/2 cup)
Unsalted butter allows you to control the saltiness in your brownies. If you’re out of butter, try using coconut oil for a cute twist! -
Semi-Sweet Chocolate (4 oz. or about 1 cup of chips)
The chocolate is the heart of these brownies! Feel free to use dark chocolate for a richer flavor or milk chocolate if you prefer something sweeter. -
Granulated Sugar (1 cup)
This adds sweetness and helps create that delightful crust on top. You can substitute half the sugar with brown sugar for extra moisture and a hint of caramel flavor. -
Large Eggs (2)
Eggs are essential for binding the ingredients together. If you’re vegan, you can use flaxseed meal as a substitute. Just mix 1 tablespoon of flax with 2.5 tablespoons of water and let it sit until it thickens. -
All-Purpose Flour (1/2 cup)
Flour provides structure. For gluten-free options, you can use a 1:1 gluten-free flour blend—it works wonders! -
Cocoa Powder (1/4 cup)
Good quality unsweetened cocoa powder gives the brownies their rich chocolatey flavor. If you’re feeling adventurous, you can use Dutch-processed cocoa for a smoother taste. -
Fresh Raspberries (1 cup)
The star of our show! Fresh raspberries add a zesty contrast. If you can’t find fresh ones, frozen raspberries work in a pinch—just don’t thaw them until you’re ready to use them, or it might get messy. -
Vanilla Extract (1 teaspoon)
This enhances the flavors beautifully. You can use almond extract for a unique flavor twist! -
Salt (1/4 teaspoon)
A little salt balances the sweetness and intensifies the chocolate flavor.
Step-By-Step Instructions
Now, let’s bring these ingredients together magically! Here’s how to create your Raspberry Brownies, step by step:
-
Preheat Your Oven:
Preheat your oven to 350°F (175°C). This is key for even baking. Nobody wants a gooey middle that’s not cooked! -
Prepare Your Baking Dish:
Grease an 8×8 inch baking pan with cooking spray or butter. You can also line it with parchment paper for easier removal. This little hack ensures you’ll have no casualties when cutting those brownies! -
Melt the Chocolate and Butter:
In a saucepan over low heat, melt the unsalted butter and semi-sweet chocolate together. Stir continuously to avoid burning. This will create a smooth, glossy mixture—just like magic! -
Mix in Sugar:
Once melted, remove the saucepan from the heat and stir in the granulated sugar. Mixing it while it’s warm helps to dissolve the sugar better for a fudgier texture. -
Add Eggs and Vanilla:
Let the mixture cool for a few minutes. Then, whisk in the eggs, one at a time, and add the vanilla extract. Your mixture should now be thick and glossy. If you want to feel like a superstar chef, use a whisk for this step! -
Combine the Dry Ingredients:
In a separate bowl, whisk together the flour, cocoa powder, and salt. Gradually fold this dry mixture into the chocolate mixture using a spatula. Be careful not to over-mix—just combine until you don’t see any flour streaks. -
Add the Raspberries:
Gently fold in the fresh raspberries. This step adds juicy pockets of tartness that perfectly balance the richness of the brownies. If you prefer even distribution, sprinkle some raspberries on top after pouring the batter in the pan—you’ll have a delightful topping! -
Pour into the Pan:
Pour the brownie batter into your prepared baking dish, spreading it evenly. Use a spatula to smooth the top for that professional touch! -
Bake to Perfection:
Bake in the preheated oven for 25-30 minutes. You’ll know they’re done when a toothpick inserted into the center comes out with a few moist crumbs. Remember, they will continue to cook while cooling! -
Cool and Cut:
Let the brownies cool in the pan for at least 15 minutes. If you can resist the temptation, cool them completely before slicing into squares. They’ll hold their shape better that way!
Serving Suggestions
Ready to impress your family and friends? Plate your raspberry brownies on a beautiful serving dish. Dust them lightly with powdered sugar for that charming touch. Serve them warm with a scoop of vanilla ice cream on the side and a drizzle of chocolate sauce for an extra indulgent dessert! Add fresh mint leaves for a pop of color, and watch the jaws drop!
Recipe Variations
Here are a few fun twists you can try with your Raspberry Brownies:
-
Nutty Addition:
Add 1/2 cup of chopped walnuts or pecans for a delightful crunch. -
Minty Fresh:
Include a few drops of peppermint extract in the batter for a refreshing twist. -
Chocolate overload:
Top the brownies with chocolate chips or drizzle melted chocolate for a rich finish. -
Swirl with Cream Cheese:
Create a cream cheese swirl by mixing 4 oz. softened cream cheese with 1/4 cup sugar and a dash of vanilla. Drop spoonfuls into the batter and swirl with a knife before baking! -
Berry Medley:
Swap out raspberries for a mix of berries—think strawberries or blueberries for a fruity explosion!
Chef’s Notes
Oh, the stories I could tell about these brownies! They’ve been my go-to treat for birthdays, anniversaries, and even bake sales. Over the years, I’ve experimented with adding different spices like cinnamon or chai, and I’ve discovered that a pinch of espresso powder really elevates the chocolate flavor. I’ve had my fair share of epic kitchen fails while trying to perfect this recipe, but each mishap only brought me closer to the fabulous delights I serve today. Just remember, each brownie has its own personality, and every bake tells a story!
FAQs and Troubleshooting
-
Why are my brownies too cakey?
If your brownies are too cakey, it might be due to overmixing or too much flour. Be sure to fold the ingredients gently and measure accurately. -
My brownies sunk in the middle! What happened?
This can occur if they were underbaked or if too much air got incorporated during mixing. The trick is to pull them out when they’re just done—don’t wait for the toothpick to come out completely clean! -
Can I use frozen raspberries?
Absolutely! Just add them directly to the batter frozen; this will help them keep their shape and prevent the brownies from turning into a mushy mess. -
How do I store leftover brownies?
Store them in an airtight container at room temperature for 3-4 days, or refrigerate for up to a week. Trust me, they’ll be gone before you know it!
Nutritional Info
- Serving Size: 1 brownie
- Calories: 210
- Total Fat: 12g
- Saturated Fat: 7g
- Cholesterol: 45mg
- Sodium: 50mg
- Total Carbohydrates: 24g
- Dietary Fiber: 2g
- Sugars: 15g
- Protein: 2g
So there you have it! My delicious Raspberry Brownies that will leave your loved ones craving more. Get ready to savor the delight of baking and the joy of sharing these little squares of happiness! Happy baking, my fellow foodies!
Print
Raspberry Brownies
- Total Time: 45 minutes
- Yield: 16 servings 1x
- Diet: Vegetarian
Description
Luscious Raspberry Brownies that combine rich chocolate with tart raspberries, perfect for sharing or indulging alone.
Ingredients
- 1/2 cup Unsalted Butter
- 4 oz. Semi-Sweet Chocolate (about 1 cup of chips)
- 1 cup Granulated Sugar
- 2 Large Eggs
- 1/2 cup All-Purpose Flour
- 1/4 cup Cocoa Powder
- 1 cup Fresh Raspberries
- 1 teaspoon Vanilla Extract
- 1/4 teaspoon Salt
Instructions
- Preheat your oven to 350°F (175°C).
- Grease an 8×8 inch baking pan with cooking spray or butter.
- Melt the unsalted butter and semi-sweet chocolate together over low heat.
- Mix in the granulated sugar until dissolved.
- Add the eggs and vanilla, whisking until smooth.
- Combine the flour, cocoa powder, and salt in a separate bowl.
- Fold the dry ingredients into the chocolate mixture.
- Add in the fresh raspberries gently.
- Pour the batter into the prepared baking dish.
- Bake for 25-30 minutes.
- Cool in the pan for at least 15 minutes before cutting.
Notes
For best results, let the brownies cool completely before slicing. Serve with powdered sugar and vanilla ice cream for an indulgent treat!
- Prep Time: 15 minutes
- Cook Time: 30 minutes
- Category: Dessert
- Method: Baking
- Cuisine: American
Nutrition
- Serving Size: 1 brownie
- Calories: 210
- Sugar: 15g
- Sodium: 50mg
- Fat: 12g
- Saturated Fat: 7g
- Unsaturated Fat: 4g
- Trans Fat: 0g
- Carbohydrates: 24g
- Fiber: 2g
- Protein: 2g
- Cholesterol: 45mg
Keywords: brownies, dessert, raspberry, chocolate, baking
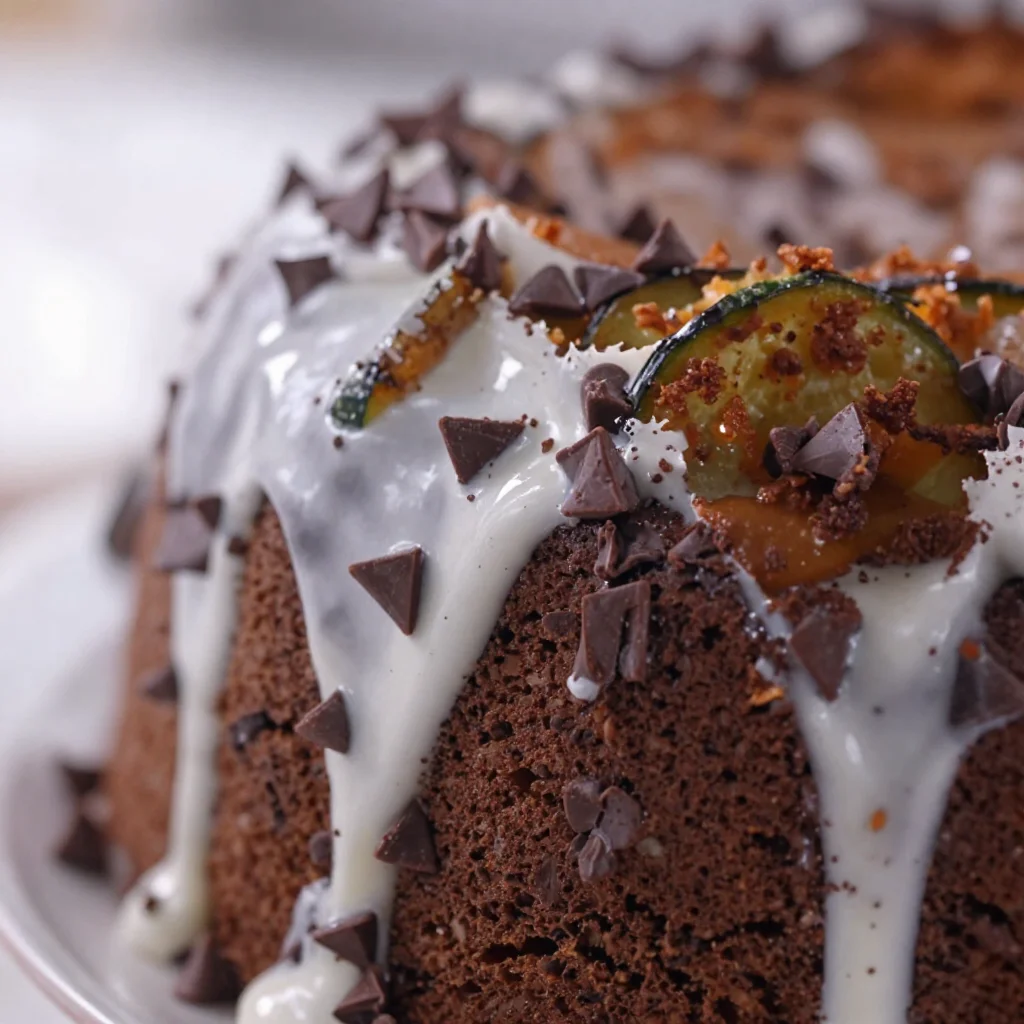
Decadent Chocolate Zucchini Cake: Beginner-Friendly Recipe
Death by Chocolate Zucchini Cake: A Slice of Heaven
Welcome to my kitchen! Today, we’re diving into a dessert that’s going to be the ultimate treat for any chocolate lover out there: Death by Chocolate Zucchini Cake! Before you raise an eyebrow at the idea of zucchini sneaking its way into a chocolate cake, let me assure you — this cake is going to be your new obsession. It’s moist, rich, and just the right amount of chocolatey. And the best part? You won’t even notice there’s zucchini in it!
I remember the first time I made this delectable cake. It was a rainy Saturday afternoon, and I was feeling a bit adventurous. We had a few zucchinis from our garden, and I thought, why not combine them with my all-time favorite ingredient—chocolate? As the cake baked, the kitchen filled with the most intoxicating aroma, and I couldn’t wait to try it. When I finally took that first bite, I was transported to a cocoa wonderland. The zucchini lent a subtle sweetness and moistness, making it a cake like no other. Ever since then, this recipe has been a household staple, always bringing smiles (and forks) to the table.
Now, I’m excited to share it with you! So, let’s grab our aprons and get ready to make this incredible Death by Chocolate Zucchini Cake!
Personal Story
Growing up, my grandmother had a way of making any dish feel special. Her secret? A dash of love and a sprinkle of nostalgia, which worked wonders in the kitchen. One summer, I remember visiting her, and herbs were blooming like crazy in her garden. As we walked through the rows of tomatoes and cucumbers, she suddenly exclaimed, “Olivia, let’s make something chocolatey!” And there it was—the first time I tasted chocolate zucchini cake.
We enthusiastically grated zucchinis and measured out cocoa powder, sharing stories and laughing as the cake came together. I can still hear her voice, urging me to always embrace unconventional ingredients — they can bring a delightful surprise. That day, I learned that magic isn’t just in the recipe, it’s in the love and memories that turn a simple cake into something unforgettable. Since then, this cake has become my go-to for gatherings, instantly creating joy for everyone around the table.
Ingredients
Here’s what you’ll need to bring this chocolatey delight to life:
-
Zucchini (2 cups, grated)
Fresh zucchini adds moisture and a subtle sweetness without being overpowering. If you don’t have zucchini, you could substitute finely grated carrots for a similar texture and flavor! -
All-purpose flour (1 ¾ cups)
This is the backbone of the cake, providing structure. If you’re looking for a gluten-free option, almond flour works remarkably well, but be mindful of the cake’s texture. -
Unsweetened cocoa powder (½ cup)
Use high-quality cocoa powder for the richest chocolate flavor. If you’re feeling adventurous, try dark cocoa powder for an intense taste. -
Granulated sugar (1 cup)
This sweetens the deal! If you prefer a less sugary cake, you can swap half of the sugar for a natural sweetener like coconut sugar or honey (just adjust the liquids accordingly). -
Brown sugar (½ cup)
For a hint of molasses flavor and added moisture. You could also use maple sugar here for a unique twist! -
Baking soda (1 tsp)
Essential for leavening! Make sure it’s fresh for a good rise. -
Baking powder (½ tsp)
This works alongside the baking soda to help your cake rise beautifully. -
Salt (½ tsp)
A pinch of salt enhances the flavors and balances the sweetness. -
Eggs (2 large)
These bring everything together and add richness. For an egg-free option, try using two flax eggs (2 tablespoons of flaxseed meal mixed with 6 tablespoons of water) instead! -
Vegetable oil (½ cup)
The oil keeps the cake moist. You can use melted coconut oil or unsweetened applesauce for a healthier option. -
Vanilla extract (1 tsp)
Pure vanilla extract adds warmth and depth to the flavor. Always opt for pure over artificial! -
Chocolate chips (1 cup, optional)
Because who can resist more chocolate? Use semisweet or dark chocolate chips for an extra gooey texture.
Step-by-Step Instructions
-
Preheat Your Oven
Start by preheating your oven to 350°F (175°C). This step is crucial! A hot oven ensures that your cake rises properly and sets well. -
Prepare the Pan
Grease a 9×13 inch baking pan with non-stick spray or line it with parchment paper. This will prevent your cake from sticking and makes for easier cleanup. Plus, who doesn’t love a clean kitchen? -
Grate the Zucchini
Grate your fresh zucchini using a box grater or a food processor. You don’t need to peel it – the skin adds a lovely color and nutrients! Once grated, squeeze out any excess moisture using a clean kitchen towel. This prevents your cake from being too wet. -
Mix Dry Ingredients
In a large mixing bowl, whisk together the flour, cocoa powder, baking soda, baking powder, and salt. This helps evenly distribute the leavening agents and ensures your cake rises evenly. -
Combine Wet Ingredients
In another bowl, combine the granulated sugar, brown sugar, vegetable oil, eggs, and vanilla extract. Whisk well until everything is fully incorporated and the mixture is slightly frothy. This is where the magic begins, as the sugars and fats combine to create a rich base. -
Combine Wet and Dry Mixtures
Gently fold your wet ingredients into the dry ingredients using a spatula. Be careful not to over-mix! This can lead to tough cake. You want to combine them just until the flour is no longer visible. -
Add Zucchini and Chocolate Chips
Now, fold in the grated zucchini and chocolate chips! This is the exciting part — you can already start to envision how decadent this cake is going to be. Don’t be shy; mix until just combined. -
Pour into the Pan
Pour the batter into the prepared baking pan and use a spatula to smooth the top for an even bake. Don’t worry if the batter looks a little thick; that’s perfectly normal! -
Bake
Place in the oven and bake for 30-35 minutes, or until a toothpick inserted in the center comes out clean. Your kitchen will smell heavenly — a definite winner in the aroma department! -
Cool the Cake
Once baked, remove the cake from the oven and let it cool in the pan for about 15 minutes. Then, transfer the cake to a wire rack to cool completely. Trust me; letting the cake cool will make for a better texture! -
Frost if Desired
If you like (and why wouldn’t you?), frost your cooled cake with a chocolate ganache or your favorite chocolate frosting. For an extra touch, top it with additional chocolate chips or chopped nuts!
Serving Suggestions
When it comes to serving this decadent Death by Chocolate Zucchini Cake, presentation is key! Slice into generous pieces and dust with powdered sugar or drizzle with a rich chocolate ganache. For a delightful contrast, serve it alongside a scoop of vanilla bean ice cream, or fresh berries to add a burst of color and freshness. Your guests will swoon with delight!
Recipe Variations
-
Nutty Addition: Fold in some chopped walnuts or pecans for a crunchy texture that complements the softness of the cake.
-
Spiced Up: Add a teaspoon of cinnamon or espresso powder to enhance the chocolate flavor and give the cake a warm undertone.
-
Vegan Twist: Substitute eggs with flax eggs and use plant-based milk in place of regular milk in your frosting for a vegan-friendly version.
-
Fruit Fusion: Experiment by adding ½ cup of mashed bananas or applesauce in place of part of the oil for a fruity sweetness.
Chef’s Notes
This recipe was born from a beautiful combination of heritage and creativity in the kitchen. I love how quick it is to prepare — perfect for those evenings when you need to whip up something sweet but satisfying. Over the years, I’ve passed on this recipe to friends and family, each adding their twists. I remember my sister once added a hint of peppermint extract for a special holiday treat, and it was a game changer! Ultimately, I find the most joy is in those sweet moments shared around the table — with laughter, stories, and, of course, a bit of cake.
FAQs and Troubleshooting
Q: What if my cake comes out too dry?
A: Overbaking can lead to a dry cake. Make sure to check the cake a few minutes before the recommended time. Insert a toothpick, and if it comes out with a few moist crumbs, it’s done!
Q: Can I make this cake ahead of time?
A: Absolutely! This cake actually tastes better the next day as the flavors meld. Just keep it covered at room temperature.
Q: How do I store leftovers?
A: Store any leftover cake in an airtight container at room temperature for up to three days. It will stay moist and delicious!
Q: My cake didn’t rise, what happened?
A: This could be due to expired baking powder or baking soda. Always check the freshness of your leavening agents before baking to ensure the perfect rise.
Nutritional Info
While I typically steer away from counting calories, for those of you keeping track, a slice typically contains around 250 calories, depending on the ingredients used and portion sizes. It’s a comforting treat, so enjoy every bite!
So, are you ready to bring this delightful Death by Chocolate Zucchini Cake into your kitchen? I can’t wait for you to experience the magic of this recipe! Remember, cooking is all about having fun, being adventurous, and making wonderful memories. Happy baking!
Print
Death by Chocolate Zucchini Cake
- Total Time: 50 minutes
- Yield: 12 servings 1x
- Diet: Vegetarian
Description
A rich and moist chocolate cake that cleverly incorporates zucchini for added sweetness and moisture, perfect for chocolate lovers.
Ingredients
- 2 cups Zucchini, grated
- 1 ¾ cups All-purpose flour
- ½ cup Unsweetened cocoa powder
- 1 cup Granulated sugar
- ½ cup Brown sugar
- 1 tsp Baking soda
- ½ tsp Baking powder
- ½ tsp Salt
- 2 large Eggs
- ½ cup Vegetable oil
- 1 tsp Vanilla extract
- 1 cup Chocolate chips (optional)
Instructions
- Preheat your oven to 350°F (175°C).
- Prepare a 9×13 inch baking pan by greasing it or lining it with parchment paper.
- Grate the fresh zucchini and squeeze out excess moisture.
- Mix the dry ingredients in a large bowl: flour, cocoa powder, baking soda, baking powder, and salt.
- Combine the wet ingredients in another bowl: granulated sugar, brown sugar, vegetable oil, eggs, and vanilla extract.
- Fold the wet mixture into the dry mixture until just combined.
- Add the grated zucchini and chocolate chips to the batter and mix until incorporated.
- Pour the batter into the prepared baking pan, smoothing the top.
- Bake for 30-35 minutes or until a toothpick comes out clean.
- Cool the cake in the pan for 15 minutes, then transfer to a wire rack to cool completely.
- Frost with chocolate ganache or frosting if desired.
Notes
For a healthier option, substitute vegetable oil with applesauce or melted coconut oil. You can also experiment by adding nuts or spices to the batter.
- Prep Time: 15 minutes
- Cook Time: 35 minutes
- Category: Dessert
- Method: Baking
- Cuisine: American
Nutrition
- Serving Size: 1 slice
- Calories: 250
- Sugar: 20g
- Sodium: 200mg
- Fat: 10g
- Saturated Fat: 2g
- Unsaturated Fat: 8g
- Trans Fat: 0g
- Carbohydrates: 35g
- Fiber: 2g
- Protein: 4g
- Cholesterol: 50mg
Keywords: chocolate cake, zucchini cake, dessert, baking, chocolate lover




