
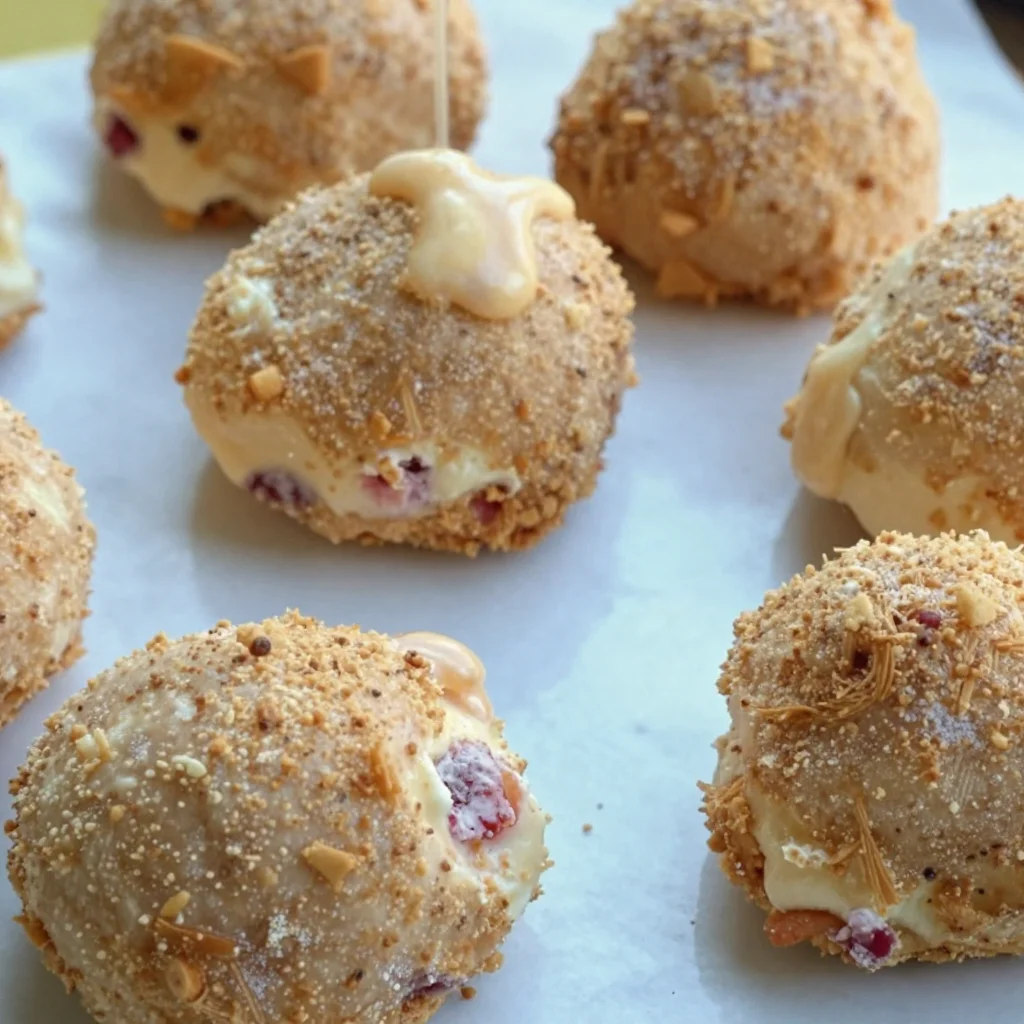
No Bake Raspberry Cheesecake Bites
No Bake Raspberry Cheesecake Bites: A Delightful Treat for All Occasions
Welcome to Olivia’s kitchen! Today, we’re diving into a delightful recipe that’s perfect for gatherings or a sweet treat on your own. Get ready to impress your family and friends with these No Bake Raspberry Cheesecake Bites! They’re creamy, dreamy, and so simple to whip up, you can enjoy them any day of the week.
Introduction
When it comes to desserts, nothing quite captures the essence of summer like fresh raspberries. Their vibrant color and juicy flavor evoke memories of warm afternoons spent lounging in the sun, surrounded by the laughter of loved ones. These No Bake Raspberry Cheesecake Bites encapsulate that summertime bliss in one bite-sized package.
Not only do these cheesecake bites highlight the deliciousness of raspberries, but they also don’t require turning on your oven — perfect for those hot days when you want something sweet but don’t want to heat up the house. Plus, they’re a hit at parties, potlucks, or even a cozy night in with a movie.
These little bites are a perfect blend of tangy cream cheese, sweet raspberries, and a buttery crumb crust. In this post, I’ll share my favorite recipe, some tips to make them your own, and a peek into my culinary journey. So, put on your apron, grab your mixing bowls, and let’s get started on this fun, no-bake adventure!
Personal Story
The inspiration for these No Bake Raspberry Cheesecake Bites comes from my childhood summers spent at my grandmother’s house. She had a lush raspberry patch that seemed to burst with fruit each year. We would spend hours picking plump, juicy berries, racing to see who could gather the biggest haul. Afterward, she’d set us up in her cozy kitchen, where we’d conjure up all sorts of deliciousness — raspberry jams, pies, and, of course, her famous cheesecake.
I vividly remember one summer when we decided to get creative and make a no-bake version of her cheesecake, just because it was too hot to turn on the oven. She guided me as I mixed the cream cheese with cool whip and folded in those perfectly sweet raspberries. The smiles that spread across our faces when we took the first bite? Indescribable. The creamy texture combined with the tartness of the raspberries was pure magic — one of those moments I’ve carried into my cooking to this day. Now, I want to share that joy with you!
Ingredients
Here’s what you’ll need to make these scrumptious No Bake Raspberry Cheesecake Bites:
-
1 cup graham cracker crumbs
Graham crackers create a buttery, slightly sweet crust. For a gluten-free option, use crushed gluten-free cookies or almond flour. -
4 tablespoons unsalted butter, melted
Butter binds the crust. Coconut oil can be a great alternative for a dairy-free option. -
8 oz cream cheese, softened
Cream cheese is the star! Ensure it’s at room temperature for easier mixing. A vegan cream cheese can be used as a substitute if you’re looking for a plant-based option. -
1/2 cup powdered sugar
This adds sweetness and a silky texture to the filling. If you’d prefer a healthier alternative, you can use maple syrup or agave nectar, just adjust the amount to taste! -
1 teaspoon vanilla extract
This adds a lovely depth of flavor. You can even experiment with almond extract for a different twist! -
1 cup fresh raspberries, plus extra for garnish
Fresh raspberries provide the best flavor and brightness, but if they’re out of season, frozen raspberries will work just fine. Just thaw and drain excess moisture before using. -
1/2 cup whipped cream (optional, for extra fluffiness)
Adding whipped cream lightens up the mixture. For a dairy-free option, use coconut whipped cream!
Step-by-Step Instructions
Now let’s get to the fun part — making those delightful bites!
-
Prepare the crust
In a mixing bowl, combine the graham cracker crumbs and melted butter. Stir until the mixture resembles wet sand. The key to a great crust is to make sure all the crumbs are coated with butter! -
Press into bite-sized molds
Using your fingers or a measuring spoon, press the mixture firmly into the bottom and slightly up the sides of a mini muffin tin or silicone mold. Pack it tightly for a sturdy base. If you have any leftovers, feel free to snack on them or make more bites! -
Chill the crust
Pop the crust-filled molds in the refrigerator for about 10-15 minutes while you prepare the cheesecake filling. This helps the crust firm up nicely. -
Make the cheesecake filling
In a large mixing bowl, beat the softened cream cheese with an electric mixer until it’s fluffy. Gradually add in the powdered sugar, combining well. Then, mix in the vanilla extract. -
Fold in the raspberries
Gently fold in the fresh raspberries. You can leave them whole for bursts of flavor or mash them slightly for a marbled effect — it’s entirely up to you! -
Lighten it up (optional)
If you want an extra light texture, fold in the whipped cream at this stage. This will create a beautifully airy filling that’s simply irresistible. -
Fill the crusts
Spoon the raspberry cheesecake filling into the chilled crusts. Use a spatula to smooth out the tops. You can also leave them rustic for a more homemade look — that’s part of their charm! -
Chill for 1-2 hours
Place the filled molds back in the fridge and let them chill for at least an hour. This helps everything set properly and makes it easier to pop them out later. -
Serve and enjoy!
Once they’re chilled and firm, gently pop the cheesecake bites out of the molds and place them on a serving platter. Garnish with extra fresh raspberries and even a dollop of whipped cream on top if you’re feeling indulgent!
Serving Suggestions
These No Bake Raspberry Cheesecake Bites are as much a treat for the eyes as they are for the taste buds! Arrange them on a pretty platter for a beautiful presentation. They also make a great addition to a dessert table, especially when paired with other bite-sized treats. Consider serving them alongside a refreshing cup of iced tea or a berry-infused lemonade for a perfect warm-weather pairing.
Recipe Variations
Here are some fun twists to keep the flavor exciting:
-
Mixed Berry Cheesecake Bites: Substitute raspberries with a mix of strawberries, blueberries, and blackberries for a colorful twist!
-
Chocolate Drizzle: Melt some dark or white chocolate and drizzle it over the top for a decadent touch.
-
Lemon Zest: Add a teaspoon of fresh lemon zest to the filling for a zesty kick that balances the sweetness.
-
Nutty Crust: For a nutty flavor, substitute half of the graham cracker crumbs with ground nuts, like almonds or pecans.
-
Coconut Cream: Replace half of the cream cheese with coconut cream for a tropical vibe!
Chef’s Notes
These little bites have come a long way since that summer with my grandmother. I’ve experimented with different toppings and flavors, and I often find myself coming back to the classic raspberry combination. There’s something about those plump little berries that just sings summer to me. Plus, their vibrant color makes any dessert look fabulous!
Don’t be discouraged if your bites aren’t perfect — the charm of homemade treats is in their imperfections! Each batch brings its own little character and flavor. And, of course, eating the "oops" or imperfect bites is always a delicious consolation!
FAQs and Troubleshooting
1. Why is my filling too runny?
If your filling is too runny, it may be due to the cream cheese not being well whipped or added too much liquid. Ensure your cream cheese is at room temperature before mixing, and consider adding a bit more powdered sugar or folding in more whipped cream to thicken it up.
2. Can I use frozen raspberries?
Absolutely! Just make sure to thaw them thoroughly and drain any excess liquid. This will help maintain the texture of the cheesecake bites without making them mushy.
3. How do I store leftovers?
Store any leftovers in an airtight container in the fridge for up to 3 days. They’re still amazing cold, so you can enjoy them right out of the fridge for a quick snack!
4. Can I make these in advance?
Yes! These bites are perfect for making ahead of time. Prepare them a day in advance and keep them covered in the fridge until you’re ready to serve.
Nutritional Info
Each Raspberry Cheesecake Bite contains approximately 95 calories, 6g of fat, and 8g of sugar. While they’re a treat, feel free to enjoy them in moderation!
So there you have it — my No Bake Raspberry Cheesecake Bites recipe, along with some fun stories and tips that I hope inspire you to get creating in your kitchen. With every bite, you’ll be reminded of the love that goes into homemade treats! Happy baking and enjoy the deliciousness!
Print
No Bake Raspberry Cheesecake Bites
- Total Time: 120 minutes
- Yield: 12 servings 1x
- Diet: Vegetarian
Description
Delicious no bake raspberry cheesecake bites that are perfect for gatherings or a sweet treat any day.
Ingredients
- 1 cup graham cracker crumbs
- 4 tablespoons unsalted butter, melted
- 8 oz cream cheese, softened
- 1/2 cup powdered sugar
- 1 teaspoon vanilla extract
- 1 cup fresh raspberries, plus extra for garnish
- 1/2 cup whipped cream (optional, for extra fluffiness)
Instructions
- Prepare the crust: In a mixing bowl, combine the graham cracker crumbs and melted butter. Stir until the mixture resembles wet sand.
- Press into bite-sized molds: Using your fingers or a measuring spoon, press the mixture firmly into the bottom and slightly up the sides of a mini muffin tin or silicone mold.
- Chill the crust: Pop the crust-filled molds in the refrigerator for about 10-15 minutes.
- Make the cheesecake filling: In a large mixing bowl, beat the softened cream cheese with an electric mixer until fluffy. Gradually add in the powdered sugar and mix in the vanilla extract.
- Fold in the raspberries: Gently fold in the fresh raspberries.
- Lighten it up (optional): If desired, fold in the whipped cream.
- Fill the crusts: Spoon the raspberry cheesecake filling into the chilled crusts and smooth out the tops.
- Chill for 1-2 hours: Place the filled molds back in the fridge to set.
- Serve and enjoy: Pop the cheesecake bites out of the molds and garnish with fresh raspberries.
Notes
Store leftovers in an airtight container in the fridge for up to 3 days. These treats can be made a day in advance.
- Prep Time: 15 minutes
- Cook Time: 0 minutes
- Category: Dessert
- Method: No-Bake
- Cuisine: American
Nutrition
- Serving Size: 1 bite
- Calories: 95
- Sugar: 8g
- Sodium: 200mg
- Fat: 6g
- Saturated Fat: 4g
- Unsaturated Fat: 1g
- Trans Fat: 0g
- Carbohydrates: 10g
- Fiber: 1g
- Protein: 1g
- Cholesterol: 15mg
Keywords: no bake, raspberry, cheesecake, bites, dessert, summer treat
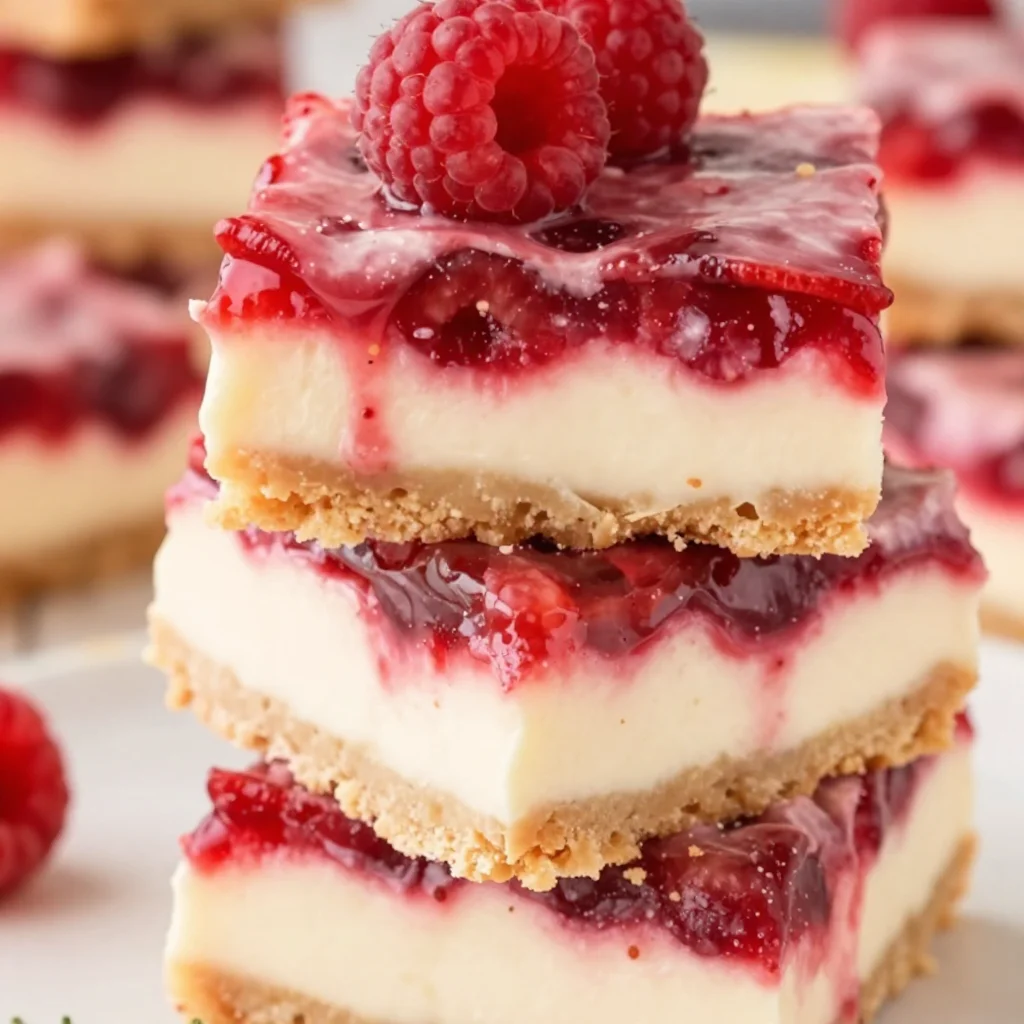
Beginner-Friendly Raspberry Cheesecake Bars: Simple & Creamy
Raspberry Cheesecake Bars: A Sweet Slice of Nostalgia
Welcome, friends! Gather around as we dive into the delightful world of Raspberry Cheesecake Bars. Picture this: you’re in your kitchen, the sun is gently streaming through the window, and the sweet scent of creamy cheesecake mixed with tart, juicy raspberries wafts through the air. It’s a slice of bliss that not only satisfies your sweet tooth but also warms your heart. As someone who believes that food is a way to connect and create memories, these bars hold a special place in my heart.
Growing up, my family had a tradition of gathering every Sunday for a big dinner. We would sit around the table, sharing stories, laughter, and, of course, delicious food. One Sunday, my Aunt Lily surprised us all with her famous raspberry cheesecake bars. They were the highlight of our meal! As we enjoyed the creamy, tangy treats, I saw how one dish could spark joy and bring folks together. It was in that moment I realized that cooking is about so much more than just flavors; it’s about the connections we make and the memories we create.
Now, I’m excited to share this recipe with you! Whether you’re planning a summer picnic, a cozy dinner party, or just a sweet treat for yourself, these Raspberry Cheesecake Bars are sure to impress. So grab your apron, and let’s get cooking!
Personal Story: A Family Tradition
One of my fondest memories of raspberry cheesecake bars goes back to those cherished Sunday dinners at Aunt Lily’s house. She was the quintessential gathering queen, whipping up magical recipes that had everyone lining up for seconds. When she made these bars, it was like a sweet, comforting hug from the inside. The way she would delicately layer the creamy cheesecake filling on top of the buttery crust, and then swirl that vibrant raspberry puree—oh, it was pure artistry!
I remember the anticipation building as we waited for the bars to cool. After dinner, the moment finally arrived: the first slice! As I took my first bite, the rich, creamy cheesecake blended beautifully with that pop of tartness from the raspberries. Each bite danced on my taste buds, leaving me craving more. Now, I often find myself recreating that memory in my own kitchen, hoping to inspire the same joy in my family and friends that Aunt Lily did for us.
Ingredients
Here’s what you’ll need to bring these raspberry cheesecake bars to life:
-
For the Crust:
- 1 ½ cups graham cracker crumbs
- Feel free to substitute with crushed Oreo cookies for a chocolatey twist!
- ½ cup granulated sugar
- For a less sweet crust, reduce sugar to 1/3 cup.
- ½ cup unsalted butter, melted
- Coconut oil can be a great dairy-free alternative here.
- 1 ½ cups graham cracker crumbs
-
For the Cheesecake Filling:
- 16 ounces cream cheese, softened
- Neufchâtel cheese works if you want a lighter option.
- 1 cup granulated sugar
- Replace with coconut sugar for a touch of caramel flavor!
- 1 teaspoon vanilla extract
- Always use pure vanilla for the best aroma and taste.
- 3 large eggs
- Replace with 1 cup of unsweetened applesauce for a vegan version.
- ½ cup sour cream
- Greek yogurt works well to add that creamy texture with less fat.
- 16 ounces cream cheese, softened
-
For the Raspberry Swirl:
- 1 cup fresh raspberries (or frozen, thawed and drained)
- You can substitute half the raspberries with blueberries for a mixed berry treat.
- 2 tablespoons sugar
- Switch to honey or maple syrup if you prefer a more natural sweetener.
- 1 tablespoon lemon juice
- A splash of orange juice can also work wonderfully!
- 1 cup fresh raspberries (or frozen, thawed and drained)
Step-by-Step Instructions
Step 1: Preheat and Prepare the Pan
Begin by preheating your oven to 325°F (160°C). While that’s warming up, grab a 9×13 inch baking pan and line it with parchment paper, leaving some overhang. This will help you lift the bars out later—trust me, it’s a game-changer!
Step 2: Make the Crust
In a medium bowl, mix together the graham cracker crumbs, sugar, and melted butter until it resembles damp sand. If it feels dry, add a touch more melted butter. Press this mixture firmly into the bottom of your prepared baking pan, creating an even layer. Pop it into the oven for 10 minutes until slightly golden.
Step 3: Prepare the Cheesecake Filling
While the crust is baking, let’s whip up that luscious cheesecake filling! In a large mixing bowl, beat the softened cream cheese until smooth. Gradually add in the sugar and beat until fluffy, about 2-3 minutes. Then, mix in the vanilla extract. Now, add the eggs one at a time, mixing well after each addition. Finally, blend in the sour cream until creamy and delicious-looking.
Step 4: Create the Raspberry Swirl
In a small saucepan over medium heat, combine the raspberries, sugar, and lemon juice. Stir gently until the raspberries break down and the mixture becomes syrupy (about 3-5 minutes). If you like chunks, leave some berries whole! Set it aside to cool slightly.
Step 5: Combine and Bake
Pour the cheesecake mixture over the pre-baked crust, spreading it evenly. Now, drizzle the raspberry puree across the top and use a knife or toothpick to swirl it gently—this is where the magic happens! 🎨
Bake in the oven for 45-50 minutes, or until the edges are set but the center still jiggles slightly. Remove from the oven and let it cool at room temperature for about an hour. Then refrigerate for at least 4 hours (or overnight if you can wait!).
Step 6: Serving
Once chilled, lift the cheesecake bars out of the pan using the parchment paper. Cut them into squares, and serve them on a pretty platter. Garnish with fresh raspberries and a dusting of powdered sugar for that elegant touch!
Serving Suggestions
These raspberry cheesecake bars are fantastic on their own, but if you want to elevate your serving game, consider pairing them with a dollop of whipped cream or a scoop of vanilla ice cream. A sprig of mint on the side adds a pop of color and freshness that looks so appealing on the plate. For a brunch or tea party, serve them alongside a cup of iced tea or a sparkling lemonade; they make the perfect refreshing treat!
Recipe Variations
Ready to get creative? Here are some fun variations to try:
- Chocolate Raspberry Cheesecake Bars: Incorporate ½ cup melted dark chocolate into the cheesecake mixture for a rich, decadent twist.
- Lemon Raspberry Bars: Add 1-2 tablespoons of lemon zest to the filling for a zesty kick.
- Nutty Graham Cracker Crust: Use crushed almonds or hazelnuts in the crust for added flavor and crunch.
- Swap the Berries: Try using blackberries, strawberries, or cherries to mix things up!
- Vegan Version: Substitute all dairy ingredients with plant-based alternatives and replace eggs with silken tofu blended until smooth.
Chef’s Notes
Over the years, I’ve experimented with this recipe, tweaking ingredients and adding my little spin. One time, I misjudged my raspberry supply and ended up turning it into a mixed berry cheesecake! That accidental innovation ended up being a total hit at a family gathering. So remember, cooking is all about experimenting and making it your own! If you find you prefer more raspberry flavor, don’t be shy; feel free to add an extra cup of berries to the mix!
FAQs and Troubleshooting
1. Why are my cheesecake bars cracking?
A common issue! This often happens if the filling is overcooked or if it cools too quickly. To avoid this, bake your bars slowly and allow them to cool gradually in the oven with the door cracked open.
2. Can I use frozen raspberries instead of fresh?
Absolutely! Just make sure they’re thawed and well-drained. They may add more liquid, so it’s a good idea to strain them before using.
3. How do I store leftovers?
These bars can be stored in an airtight container in the refrigerator for up to a week. Just make sure to separate layers with parchment paper to prevent sticking!
4. Can I freeze the cheesecake bars?
Yes, you can! Wrap them tightly in plastic wrap and foil before freezing. When you’re ready to enjoy them, thaw them in the refrigerator overnight.
Nutritional Info
While I don’t usually dwell on the numbers too much, it’s helpful to know:
- Calories: Approximately 250 per bar
- Fat: 16g
- Carbohydrates: 25g
- Protein: 4g
These values can vary based on your ingredient choices, so make adjustments as needed!
And there you have it! Raspberry cheesecake bars that are not just a dessert but a tasty tradition and a sweet celebration of life. I hope this recipe inspires you to create your own beautiful memories in the kitchen. Happy baking, friends! 🍰
Print
Raspberry Cheesecake Bars
- Total Time: 4 hours 10 minutes
- Yield: 12 servings 1x
- Diet: Vegetarian
Description
Delicious raspberry cheesecake bars that blend creamy cheesecake with a tart raspberry swirl, perfect for gatherings and sweet treats.
Ingredients
- 1 ½ cups graham cracker crumbs
- ½ cup granulated sugar
- ½ cup unsalted butter, melted
- 16 ounces cream cheese, softened
- 1 cup granulated sugar
- 1 teaspoon vanilla extract
- 3 large eggs
- ½ cup sour cream
- 1 cup fresh raspberries (or frozen, thawed and drained)
- 2 tablespoons sugar
- 1 tablespoon lemon juice
Instructions
- Preheat your oven to 325°F (160°C) and prepare a 9×13 inch baking pan with parchment paper.
- Mix together graham cracker crumbs, sugar, and melted butter in a bowl until it resembles damp sand. Press into the bottom of the baking pan and bake for 10 minutes.
- Beat the softened cream cheese in a large bowl until smooth. Gradually add sugar and beat until fluffy, then mix in vanilla extract, followed by eggs one at a time. Finally, blend in sour cream.
- Combine raspberries, sugar, and lemon juice in a saucepan over medium heat. Stir until syrupy, about 3-5 minutes.
- Pour the cheesecake mixture over the pre-baked crust, drizzle raspberry puree on top and swirl gently with a knife. Bake for 45-50 minutes.
- Cool at room temperature for an hour, then refrigerate for at least 4 hours before cutting into squares and serving.
Notes
For serving, consider adding whipped cream, a scoop of vanilla ice cream, or fresh raspberries on top.
- Prep Time: 20 minutes
- Cook Time: 50 minutes
- Category: Dessert
- Method: Baking
- Cuisine: American
Nutrition
- Serving Size: 1 bar
- Calories: 250
- Sugar: 20g
- Sodium: 350mg
- Fat: 16g
- Saturated Fat: 9g
- Unsaturated Fat: 6g
- Trans Fat: 0g
- Carbohydrates: 25g
- Fiber: 1g
- Protein: 4g
- Cholesterol: 65mg
Keywords: dessert, cheesecake, raspberry, bars, sweet treat

Easy Baked Raspberry Cheesecake
Easy Baked Raspberry Cheesecake: Your New Go-To Dessert
Welcome to my cozy kitchen! Today, we’re diving into a delightful treat that’s sure to steal the hearts of your friends and family: Easy Baked Raspberry Cheesecake. Oh, the joy of cheesecake—smooth, creamy, and oh-so-decadent! The best part? It’s surprisingly simple to whip up, even on those busy weeknights when you just want to treat yourself (or someone special).
For me, baking is more than just a task; it’s a form of self-expression and a way to connect with the people I love. There’s something magical about the smell of something sweet wafting from the oven, drawing everyone to the kitchen like bees to honey. As I’m prepping this cheesecake, I can practically hear the giggles and conversations bubbling and swirling around me, and that’s when I know it’s time to share a slice.
I want you to experience that same joy and love when you bake this cheesecake. With every layer and every step, we’ll turn simple ingredients into an unforgettable dessert that’s both elegant for entertaining and comforting for a cozy night in. So, grab your apron (mine might be a little messy, but that’s called character!), and let’s get started on this delicious journey together!
A Sweet Memory: My First Cheesecake
Ah, cheesecake—my love affair with this dessert dates back to childhood. I still vividly remember the first time I helped my mom make a cheesecake for a family gathering. I was about eight years old, perched on a kitchen stool, my little hands dripping in batter. I can still picture the moment when I excitedly blended the cream cheese, sugar, and eggs—all while my mom guided me with her patient words. We used a simple vanilla base, but what I remember most vividly was the feeling of joy and love that pulsed between us in that warm kitchen.
Years later, I found my way to using tangy raspberries to add a delightful twist. Raspberries have always been one of my favorites—sweet yet slightly tart, adding a perfect zing that brightens up any dish. Fast forward, and this Easy Baked Raspberry Cheesecake has become a family staple at gatherings, embodying those early lessons my mom taught me: laughter, patience, and sharing good food with the people you love.
Ingredients
Here’s a rundown of what you’ll need to create your own slice of cheesecake heaven:
-
Graham cracker crumbs (1 ½ cups)
A classic base for any cheesecake, the crispy texture provides a delightful crunch. If you’re trying to avoid glutin or want a healthier option, feel free to use almond flour or gluten-free cookies as a substitute. -
Unsalted butter (½ cup)
Melted butter holds the crust together and adds richness. If you’re looking for a dairy-free option, coconut oil works wonders here, giving a slightly different (but delightful) flavor. -
Cream cheese (24 oz, softened)
This is the star of our show! Make sure your cream cheese is at room temperature for a super smooth and creamy filling. Alternatively, ricotta cheese can be blended in for a lighter texture. -
Granulated sugar (1 cup)
The sugar balances out the rich creaminess. If you’re watching your sugar intake, you might try using coconut sugar or a sugar substitute, but keep in mind the flavor might differ a bit. -
Sour cream (1 cup)
Adds tanginess and creaminess! Greek yogurt is a fantastic alternative, and it’ll give you a slightly different flavor while keeping it creamy. -
Eggs (3 large)
These bind everything together and create that dreamy texture. For a vegan option, you can experiment with flax eggs (1 tablespoon ground flaxseed mixed with 2.5 tablespoons of water equals one egg). -
Vanilla extract (1 tablespoon)
A classic flavor enhancer! You can also use almond or peppermint extract for an exciting twist. -
Fresh raspberries (1 cup)
These beauties add flavor and color. If they’re out of season, frozen raspberries work just as well—just make sure to thaw and drain them before mixing! -
Optional: powdered sugar (for dusting)
Just a light dusting on top before serving adds the perfect finishing touch!
Step-by-Step Instructions
Let’s jump into the fun part! Grab your mixing bowls, and let’s create some dessert magic.
-
Preheat your oven to 325°F (160°C)
The first step is always the most important! Preheating ensures even baking and a perfectly set cheesecake. Trust me, there’s nothing worse than a cheesecake that hasn’t fully baked. -
Make the crust
- In a mixing bowl, combine graham cracker crumbs and melted butter until well mixed. You want it to feel like wet sand—moist enough to hold together. If it’s too crumbly, just add a little more melted butter.
- Press the mixture firmly into the bottom of a springform pan (9 inches works perfectly). Don’t be shy! You want a firm base—use the bottom of a measuring cup for an even finish.
-
Bake the crust
- Pop that crust into the preheated oven for 10 minutes until it’s lightly golden. This step is crucial—it gives the crust a nice crunch and locks in the flavor.
-
Prepare the filling
- In a large mixing bowl, add your softened cream cheese. Use a hand mixer or a stand mixer on medium speed to cream it until it’s super smooth! Scrape down the sides to ensure everything is blended.
- Gradually add the granulated sugar and mix until it’s fully incorporated. Can you smell that sweet goodness already?
- Beat in the sour cream, eggs, and vanilla extract one at a time, mixing just until combined after each addition. Remember, overmixing can lead to cracks in your cheesecake. Yikes!
-
Fold in the raspberries
- Gently fold in your fresh or thawed raspberries. You want to distribute them evenly without breaking them up too much—those little bursts of flavor are what makes this cheesecake special!
-
Pour the filling
- Carefully pour your luscious filling over the pre-baked crust, leveling it out with a spatula. This step is crucial—make it as smooth as possible for that picture-perfect finish!
-
Bake the cheesecake
- Bake in the oven for about 50-60 minutes until the edges are set but the center is still a little jiggly. It will continue to firm up as it cools.
-
Cool and chill
- When the cheesecake is done, turn off the oven and crack the oven door open, letting the cheesecake cool slowly. This will help prevent cracking! After about an hour, cover it and let it chill in the fridge for at least 4 hours (or overnight for best results).
-
Serve and enjoy
- Once chilled, remove from the springform pan, dust with powdered sugar if desired, and slice it up. Each piece should have that beautiful raspberry swirl—just like a work of art!
Serving Suggestions
When it comes to serving this gorgeous cheesecake, keep it simple to let the flavors shine. You can plate it alongside a small scoop of vanilla ice cream or whipped cream for that extra indulgence. Don’t forget to garnish with a few fresh raspberries on top and a sprig of mint for that gorgeous pop of color! Setting the scene at your dining table with soft lighting and cozy napkins will make it a memorable experience. Here’s to sweet moments with loved ones!
Recipe Variations
Now, if you’re feeling adventurous, here are a few variations to amp up your cheesecake game:
-
Chocolate Raspberry Cheesecake: Add half a cup of melted chocolate (dark or white) into the filling before baking for a decadent twist.
-
Lemon Zest: Incorporate the zest of one lemon into the filling for a refreshing citrusy flavor that pairs beautifully with raspberries.
-
Nutty Crust: Try using almond meal instead of graham cracker to create a gluten-free option, lending a unique flavor to your crust.
-
Swirled Raspberry Sauce: Drizzle raspberry sauce on top before baking for a stunning marbled effect.
-
Mixed Berries: Substitute or mix in blueberries or strawberries with raspberries for a delightful berry medley!
Chef’s Notes
Each time I make this Easy Baked Raspberry Cheesecake, I’m reminded of how versatile it is. My mom’s recipe has evolved over the years, adapting to my tastes and the seasons. Some days, I love adding hints of citrus, while others, I revel in chocolatey goodness. It’s all about experimenting with flavors! Plus, I have a little secret: if there’s any leftover cheesecake (which is rare!), it freezes beautifully! Just wrap individual slices tightly, and you’ll have instant treats ready whenever the craving strikes.
FAQs and Troubleshooting
Here are a few common questions you might have while making this cheesecake:
-
Why did my cheesecake crack?
Overmixing the batter or baking at too high a temperature can lead to cracks during cooling. Be gentle with the mixing and monitor the baking temperature closely! -
How do I know my cheesecake is done?
The edges should be set, while the center looks slightly jiggly. Remember that it continues to cook as it cools! -
Can I make this a day ahead?
Absolutely! In fact, it’s best served chilled overnight. Just cover it well to keep those flavors intact. -
What if I don’t have a springform pan?
You can use a regular round cake pan. Just make sure to line it with parchment paper for easy removal, or you can also convert this recipe into cupcake form for individual servings!
Nutritional Info
While I don’t typically dwell on the nitty-gritty of calories, here’s a quick glance at the estimated nutritional info for one slice (based on 12 servings):
- Calories: 300
- Total fat: 20g
- Saturated fat: 12g
- Carbohydrates: 30g
- Sugars: 18g
- Protein: 5g
With that said, enjoy in moderation—this cheesecake is all about celebrating special moments!
So there you have it, my friends! This Easy Baked Raspberry Cheesecake isn’t just a recipe; it’s a celebration of flavors, memories, and love. Each slice tells a story filled with warmth and joy, evoking laughter and connection. I can’t wait for you to try it and create your own memories in the kitchen. Happy baking, foodie friends!
Print
Easy Baked Raspberry Cheesecake
- Total Time: 80 minutes
- Yield: 12 servings
- Diet: Vegetarian
Description
A delightful and creamy raspberry cheesecake that’s simple to make and perfect for any occasion.
Ingredients
- Graham cracker crumbs (1 ½ cups)
- Unsalted butter (½ cup, melted)
- Cream cheese (24 oz, softened)
- Granulated sugar (1 cup)
- Sour cream (1 cup)
- Eggs (3 large)
- Vanilla extract (1 tablespoon)
- Fresh raspberries (1 cup)
- Powdered sugar (for dusting, optional)
Instructions
- Preheat your oven to 325°F (160°C).
- Combine graham cracker crumbs and melted butter until well mixed. Press the mixture into the bottom of a springform pan.
- Bake the crust in the oven for 10 minutes.
- Add softened cream cheese to a large mixing bowl and cream until smooth. Gradually add the granulated sugar and mix fully.
- Beat in the sour cream, eggs, and vanilla extract one at a time, mixing just until combined.
- Fold in the raspberries gently.
- Pour the filling over the pre-baked crust and level it out.
- Bake in the oven for about 50-60 minutes until the edges are set.
- Cool and chill the cheesecake for at least 4 hours in the fridge.
- Serve chilled, dusting with powdered sugar if desired.
Notes
This cheesecake can be made a day ahead for the best flavor. It can also be frozen for future treats.
- Prep Time: 20 minutes
- Cook Time: 60 minutes
- Category: Dessert
- Method: Baking
- Cuisine: American
Nutrition
- Serving Size: 1 slice
- Calories: 300
- Sugar: 18g
- Sodium: 400mg
- Fat: 20g
- Saturated Fat: 12g
- Unsaturated Fat: 8g
- Trans Fat: 0g
- Carbohydrates: 30g
- Fiber: 1g
- Protein: 5g
- Cholesterol: 80mg
Keywords: cheesecake, raspberry, dessert, baking, easy recipe


