
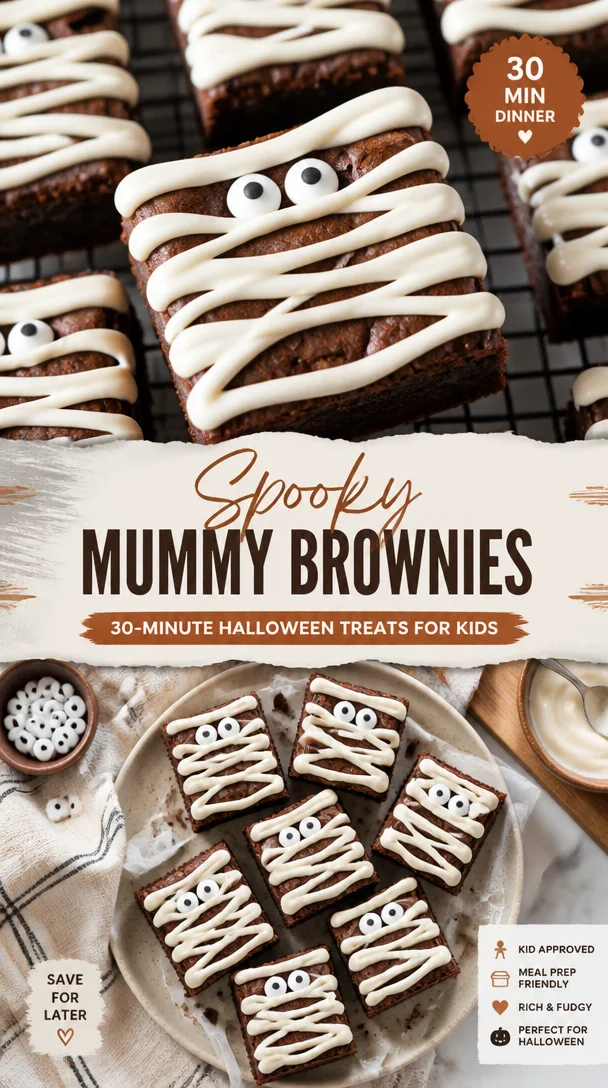
Spooky Mummy Brownies: 30-Minute Halloween Treats for Kids
Spooky Mummy Brownies: A Halloween Treat to Delight
Welcome to my kitchen, food friends! I’m so thrilled to have you here today. As we approach Halloween, the air becomes crisp, leaves crunch underfoot, and the scent of baked goods wafts through homes everywhere. There’s something truly magical about this time of year — it’s all about treats, spooky vibes, and the joy of creating something delightful to share with friends and family. Today, I’m sharing a recipe that’s near and dear to my heart: Spooky Mummy Brownies.
These brownies are not just fudgy and decadent; they’re irresistibly cute with their mummy-like appearance. Perfect for both kids and adults, these treats may just become your new Halloween tradition. Imagine this: a cozy kitchen filled with laughter and the warm aroma of chocolate as you whip up a batch of these spooky brownies. It’s a recipe that combines the fun of crafting with the joy of cooking — and who could say no to that?
When I think of Halloween, I can’t help but remember the excitement shared with my family as we prepped for the spooky season. We’d gather together, donned in our costumes, with bowls of candy and stacks of decorations piled high. One year, we decided to throw a Halloween-themed dinner party, complete with ghoulish decorations and a dessert table that had everyone buzzing. That’s when I first served these Mummy Brownies, and their popularity skyrocketed. They became the highlight of the evening, and the kids couldn’t get enough of them. The best part? The scaredy-cats among us loved that they were surprisingly satisfying and indulgent, despite their eerie look.
So, ready to dive into the creation of these delightful mummies? Let’s get baking!
Ingredients
For your Spooky Mummy Brownies, you will need the following ingredients:
-
1 cup (2 sticks) unsalted butter: Butter adds richness to your brownies; feel free to use a dairy-free alternative if you’re looking for a vegan option.
-
2 cups granulated sugar: This sweetens your brownies wonderfully. For a less sweet version, try using coconut sugar.
-
4 large eggs: Eggs provide moisture and help bind everything together. If you’re vegan, you can substitute ground flaxseed (1 tablespoon of flaxseed with 3 tablespoons of water for one egg).
-
1 teaspoon vanilla extract: Vanilla enhances the flavors. Use pure vanilla for the best taste, or sub with almond extract for a different twist!
-
1 cup all-purpose flour: This gives structure to your brownies. For gluten-free options, a 1:1 gluten-free flour blend works great.
-
1 cup unsweetened cocoa powder: Cocoa is key for that rich chocolate flavor. Dutch-process cocoa can be used for a deeper taste.
-
1 teaspoon baking powder: This helps the brownies rise slightly during baking. If you’re out, baking soda works in a pinch—just use half the amount.
-
½ teaspoon salt: A little salt balances the sweetness. You can reduce it slightly if you are watching your sodium intake.
-
Candy eyes: These bring the mummies to life! Use small chocolate chips if you can’t find candy eyes.
-
White chocolate melts or candy coating: For wrapping your brownies like mummies. If you want to keep it dairy-free, look for vegan white chocolate.
Step-by-Step Instructions
Let’s jump right into making these spooky delights! Follow these steps for brownie perfection:
-
Preheat the oven to 350°F (175°C). This is essential, as it allows for even cooking right from the start. While it heats, prepare your baking pan.
-
Prepare your baking pan: Grease a 9×13 inch baking dish or line it with parchment paper. This will prevent sticking and make it easier to remove the brownies after baking. I always recommend parchment paper for ease of lifting out the brownies.
-
Melt the butter: In a medium saucepan over low heat, melt the butter. Stir it gently until it has fully melted, making sure it doesn’t brown. If you do overheat and brown it, don’t worry — just let it cool a bit before proceeding.
-
Combine sugar and eggs: In a large mixing bowl, whisk together the melted butter and sugar until well blended. Then, add the eggs one at a time, mixing thoroughly after each. The mixture should be creamy and smooth.
-
Add the vanilla: Stir in the vanilla extract. This is where the magic happens, as the aroma fills your kitchen, making it feel cozier.
-
Incorporate dry ingredients: Now, sift together the flour, cocoa powder, baking powder, and salt in another bowl. This step is key to ensuring there are no lumps in your brownies and the flavors mix well. Gradually add this dry mixture to the wet ingredients and stir until just combined. Be careful not to overmix. We want fudgy brownies, not cake-like ones!
-
Pour into the pan: Transfer the brownie batter into the prepared baking dish and spread it evenly. A spatula works great for this step.
-
Bake for 25-30 minutes: You know your brownies are done when a toothpick inserted into the center comes out with a few moist crumbs. No batter, but a little gooey is exactly what we’re aiming for.
-
Cool completely: Once baked, let the brownies cool in the pan on a wire rack. This allows them to firm up before cutting.
-
Cut into pieces: Once cooled, cut the brownies into rectangles or squares, depending on your preference.
-
Mummify them up!: Melt your white chocolate melts according to the package instructions. Use a piping bag or a zip-top bag with the corner snipped off to drizzle the melted chocolate over the brownies, creating mummy bandages. Place two candy eyes on each brownie while the chocolate is still soft.
Serving Suggestions
Serve your Spooky Mummy Brownies on a rustic wooden board or a vibrant Halloween-themed platter. They look fantastic with miniature pumpkins or autumn leaves scattered around for decor. These brownies are perfect for Halloween parties, school events, or simply to enjoy with your family on a cozy movie night. Pair them with a scoop of vanilla ice cream or a drizzle of caramel for an added treat!
Recipe Variations
Want to mix things up? Here are a few creative twists you can try:
-
Peanut Butter Swirl: Before baking, drop spoonfuls of peanut butter into the brownie batter and swirl it lightly for a delicious twist.
-
Fruity Add-ins: Add chopped cherries or raspberries for a tart surprise within the brownies.
-
Spicy Kick: A pinch of cinnamon or cayenne pepper can give your brownies a unique flavor profile with a little warmth.
-
Nutty Crunch: Toss in some chopped nuts like walnuts or pecans to add texture—just make sure your guests are nut-friendly!
-
Oreo Surprise: Crush some Oreo cookies and fold them into the batter. The cookies will create delightful pockets of flavor.
Chef’s Notes
As with any beloved recipe, mine has seen many iterations over the years. The chocolate drizzle was born from my love for decoration, and every Halloween party I host somehow ends with these brownies being the star! I remember an autumn night when I forgot to buy candy eyes, and we ended up using mini chocolate chips instead. The kids loved them just as much and even named them “Choco-Mummies!”
Every time I make these brownies, I reminisce about those cozy family gatherings and how the simple act of cooking can bring everyone together. These brownies aren’t just a treat; they’re a medium for laughter and connection!
FAQs and Troubleshooting
Here are some common questions I’ve received, along with answers:
1. Why are my brownies cakey?
- Ensure you’re not overmixing the batter. Also, be cautious with your baking time; check your brownies a few minutes early. Fudgy brownie perfection lies just under the “done” threshold.
2. What’s the best way to store leftover brownies?
- Store them in an airtight container at room temperature for up to three days. They also freeze beautifully for up to three months!
3. Can I make these brownies ahead of time?
- Absolutely! You can make them a day or two before your event. Just keep them covered to maintain freshness.
4. What if I want vegan brownies?
- You can easily substitute the eggs with ground flaxseed and use plant-based butter and chocolate. Just check that your chocolate and candy eyes are dairy-free!
Nutritional Info
While I usually focus on enjoyment over nutrition when it comes to indulging, I believe it’s helpful to know what you’re eating! Each brownie (out of about 24 servings) contains approximately:
- Calories: 200-250
- Total Fat: 10g
- Carbohydrates: 30g
- Protein: 2g
Feel free to adjust portions based on your serving size and dietary needs!
Conclusion
There you have it! Spooky Mummy Brownies that are not only scrumptious but also add a playful twist to your Halloween festivities. I hope this recipe fills your kitchen with warmth and laughter, making memories with every bite. So, gather your loved ones, crank up your favorite Halloween tunes, and have a blast while baking!
Happy Halloween, and may your kitchen always smell like something delicious! If you make these brownies, I’d love to hear how they turn out. Share your spooky creations with me!
Print
Spooky Mummy Brownies
- Total Time: 45 minutes
- Yield: 24 brownies 1x
- Diet: Vegetarian
Description
These fudgy and decadent Spooky Mummy Brownies are irresistibly cute and perfect for Halloween celebrations.
Ingredients
- 1 cup (2 sticks) unsalted butter
- 2 cups granulated sugar
- 4 large eggs
- 1 teaspoon vanilla extract
- 1 cup all-purpose flour
- 1 cup unsweetened cocoa powder
- 1 teaspoon baking powder
- ½ teaspoon salt
- Candy eyes
- White chocolate melts or candy coating
Instructions
- Preheat the oven to 350°F (175°C).
- Prepare your baking pan: Grease a 9×13 inch baking dish or line it with parchment paper.
- Melt the butter in a medium saucepan over low heat.
- Combine the melted butter and sugar in a large mixing bowl until well blended.
- Add the eggs one at a time, mixing thoroughly after each.
- Stir in the vanilla extract.
- Incorporate dry ingredients: sift flour, cocoa powder, baking powder, and salt in another bowl.
- Gradually add the dry mixture to the wet ingredients and stir until just combined.
- Pour the brownie batter into the prepared baking dish and spread it evenly.
- Bake for 25-30 minutes until a toothpick comes out with a few moist crumbs.
- Cool completely in the pan on a wire rack.
- Cut into rectangles or squares.
- Mummify the brownies with melted white chocolate and place candy eyes on top.
Notes
Store leftover brownies in an airtight container at room temperature for up to three days or freeze for up to three months.
- Prep Time: 15 minutes
- Cook Time: 30 minutes
- Category: Dessert
- Method: Baking
- Cuisine: American
Nutrition
- Serving Size: 1 brownie
- Calories: 225
- Sugar: 25g
- Sodium: 85mg
- Fat: 10g
- Saturated Fat: 6g
- Unsaturated Fat: 4g
- Trans Fat: 0g
- Carbohydrates: 30g
- Fiber: 2g
- Protein: 3g
- Cholesterol: 30mg
Keywords: Halloween, brownies, dessert, spooky, treats
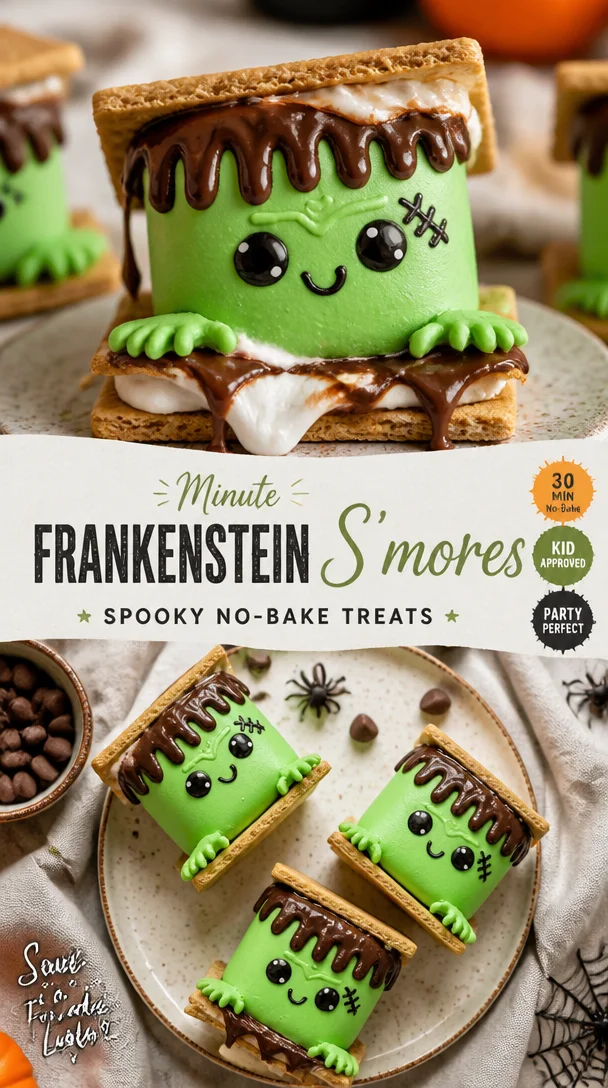
Minute Frankenstein S’mores: Spooky No-Bake Treats
Frankenstein S’mores: A Spooktacular Twist on a Classic Treat
Welcome, my fellow food lovers! Today, we’re diving into a fun kitchen adventure that’s perfect for anyone looking to add a little spooky flair to their dessert table. Inspired by the beloved campfire classic, I’m excited to introduce you to my Frankenstein S’mores: a ghoulishly green twist that’s just as delicious as the original without losing that playful charm we all adore. Whether you’re hosting a Halloween party, a cozy movie night, or just in the mood for some treats that will impress friends and family, these s’mores are sure to steal the show!
Let’s face it: there’s something magical about the combination of melted chocolate, sticky marshmallows, and crispy graham crackers. They transport us back to our childhood, reminding us of laughter around the campfire and sticky fingers at sleepovers. Now, imagine taking that nostalgic recipe and adding a modern, monstrous twist. Trust me, your taste buds will thank you!
As we embark on this sugary journey, I’ll be your guide, sharing personal stories, essential tips, and every step of the way to ensure your Frankenstein S’mores are a hit. So grab your apron (or don’t; I know how messy things can get), and let’s get cooking!
A Sweet Memory
I have a particularly fond memory that revolves around s’mores. It takes me back to those summer nights spent at my grandparents’ cabin in the woods. You could smell the pine trees mingling with the smoke from the campfire as my siblings and I giggled, dodging around the flickering firelight. My grandmother would always station herself at the fire, expertly roasting marshmallows to achieve that perfect golden-brown texture. I remember eagerly waiting for my turn, clutching my graham crackers and chocolate.
One night, in a cheeky spirit of culinary creativity, we decided to switch things up. Instead of regular chocolate, we rummaged through the pantry and found some colorful candies. We dubbed our creation “witches’ s’mores” that night, and it sparked an idea that never truly left me. Now, as an adult, I love taking simple recipes and putting a whimsical spin on them, just like that night. With Halloween around the corner, I thought it was time to breathe new life into my childhood nostalgia with these Frankenstein S’mores!
Ingredients
Here’s what you’ll need to whip up these delightful treats:
-
Graham Crackers:
- Explanation: The classic base for s’mores! Their crunchy texture and honey sweetness are essential.
- Substitution Tips: You can swap them with chocolate graham crackers for a chocolatey boost or use gluten-free options if needed.
-
Green Marshmallows (or regular plus food coloring):
- Explanation: These are crucial for that Frankenstein vibe.
- Quick Chef Insight: You can actually use white marshmallows and dip them in green candy melts for an even more vibrant look!
-
Chocolate Bars:
- Explanation: Mini chocolate bars work best for easy melting and layering.
- Substitution Tips: Use dark, milk, or even white chocolate, depending on your preference, or try flavored chocolates like peppermint for a fun twist.
-
Vanilla Frosting:
- Explanation: This will act as our “green goo” to make these s’mores extra creepy.
- Chef Insight: If you’d like a healthier option, try Greek yogurt mixed with a bit of green food coloring.
-
Plastic “Monster” Eyeballs (optional):
- Explanation: These are purely for decoration and fun!
- Fun Tip: You can find edible candy eyeballs for a sweet touch instead!
-
Cooking Spray (optional):
- Explanation: Helps prevent sticking if you’re using a pan method.
- Chef Insight: Just a light spray will do; we don’t want our marshmallows to slide off!
Step-by-Step Instructions
Now that we’ve got our ingredients lined up, let’s dive right into making these spooky treats! Follow along and don’t hesitate to get messy—after all, kitchen magic often comes with a sprinkle of chaos.
-
Prep Your Ingredients:
- Gather all your ingredients and preheat your oven to 350°F (175°C) if you’re using it. This will make the s’mores nice and gooey inside!
-
Line Your Baking Tray:
- If going the oven route, line a baking tray with parchment paper. Be generous with that spray to avoid any sticky situations.
-
Layer the Graham Crackers:
- Take a graham cracker and place it on the tray. You can break them in half if you prefer smaller s’mores or keep them whole for a substantial bite.
-
Add the Chocolate:
- Place a piece of your chosen chocolate bar on top of the graham cracker. Feel free to use layers if you’re feeling adventurous!
-
Melt the Marshmallows:
- Now, either roast marshmallows over the fire, use a kitchen torch, or pop them in the microwave for about 10-15 seconds just until they start to puff up. Try not to overdo it!
-
Assemble the S’mores:
- Top those gooey marshmallows with a second graham cracker. Press down gently so they stick together, and let the melted chocolate do its magic.
-
Frost with Green Goo:
- Smear vanilla frosting on top of the assembled s’mores to create that creepy effect. Don’t skimp on the “goo”—this is what makes them Frankenstein!
-
Decorate with Eyeballs:
- If using edible eyeballs, now’s the time to stick them on for that perfectly frightening look!
-
Chill or Serve Warm:
- You can serve these immediately for that gooey factor or pop them in the fridge for a bit if you prefer them a bit firm.
Serving Suggestions
To really make these Frankenstein S’mores pop, consider arranging them on a platter alongside some fake spider webs and mini plastic spiders for a fun Halloween touch. You could even place a few candles around them for that perfect ambiance. For a cozy movie night, serve them on a rustic wooden board, paired with your favorite film snacks. And don’t forget to have napkins on hand—these treats can get a little messy (in the best way possible)!
Recipe Variations
Looking to put your own spin on these Frankenstein S’mores? Here are a few fun variations to consider:
- Nutty Crunch: Add crushed nuts like almonds or peanuts for a delightful crunch.
- Spooky Spices: A sprinkle of cinnamon or cayenne can add a warm bite to the frosting!
- Different Flavors: Replace the chocolate with caramel squares for a sweet twist, or use flavored marshmallows, such as strawberry or mint.
- Vegan Version: Swap regular marshmallows for vegan options and use dairy-free chocolate for a plant-based treat.
- Mini-Mores: Use mini graham crackers and marshmallows for bite-sized treats perfect for parties.
Chef’s Notes
When I created these Frankenstein S’mores, I was reminded of how fun and creative the kitchen can be, especially when you’re not afraid to experiment. I remember one year I attempted a “Monster Marshmallow Cake” for a Halloween party, which ended in a flour explosion and a lot of laughter. The best part of cooking is embracing the mess and madness that comes with it. This recipe has evolved over time, wandering from traditional s’mores to something a little more whimsical and spooky.
FAQs and Troubleshooting
Q: Can I make these s’mores in advance?
Absolutely! You can prepare the components separately and assemble them right before serving to maintain that gooey goodness.
Q: My marshmallows aren’t melting! What did I do wrong?
Make sure your marshmallows are puffed up and soft before adding them to the s’mores. If they seem stiff, try microwaving them for an extra few seconds.
Q: Can I use different flavors for the frosting?
Of course! Feel free to experiment with chocolate, strawberry, or even mint frosting to match your flavor preferences. The sky’s the limit!
Q: How do I store leftovers?
If you have any s’mores left (unlikely!), store them in an airtight container at room temperature for up to three days. Just be aware they may lose some of their delicious gooeyness.
Nutritional Info
While indulgent, these Frankenstein S’mores can be a fun treat! Though I don’t typically offer nutritional info, a single treat will usually clock in around 150-200 calories depending on your ingredients—sugar is a devilish friend.
And there you have it—your ultimate guide to making irresistible Frankenstein S’mores! I hope this recipe not only brings a hint of spookiness to your kitchen but also stirs up fond memories of your own. Remember, cooking is about joy, exploration, and perhaps a touch of creative madness. Now roll up your sleeves, get those ingredients ready, and let’s make some food memories together! Happy cooking, and may your treats be as delightful as your kitchen tales!
Print
Frankenstein S’mores
- Total Time: 30 minutes
- Yield: 12 servings
- Diet: Vegetarian
Description
A spooktacular twist on the classic s’mores, featuring green marshmallows and chocolate goo.
Ingredients
- Graham Crackers
- Green Marshmallows (or regular plus food coloring)
- Chocolate Bars
- Vanilla Frosting
- Plastic “Monster” Eyeballs (optional)
- Cooking Spray (optional)
Instructions
- Prep Your Ingredients: Gather all your ingredients and preheat your oven to 350°F (175°C) if you’re using it.
- Line Your Baking Tray: If going the oven route, line a baking tray with parchment paper and spray it lightly.
- Layer the Graham Crackers: Place a graham cracker on the tray, breaking them in half if desired.
- Add the Chocolate: Place a piece of chocolate bar on top of the graham cracker.
- Melt the Marshmallows: Roast marshmallows, use a kitchen torch, or microwave them until puffy.
- Assemble the S’mores: Top marshmallows with a second graham cracker and press down gently.
- Frost with Green Goo: Apply vanilla frosting on top of the assembled s’mores.
- Decorate with Eyeballs: Stick on edible eyeballs if using.
- Chill or Serve Warm: Serve immediately or chill in the fridge for a firmer texture.
Notes
Feel free to customize with nuts, spices, or different chocolates to match personal taste.
- Prep Time: 15 minutes
- Cook Time: 15 minutes
- Category: Dessert
- Method: Baking
- Cuisine: American
Nutrition
- Serving Size: 1 s'more
- Calories: 200
- Sugar: 15g
- Sodium: 150mg
- Fat: 7g
- Saturated Fat: 3g
- Unsaturated Fat: 4g
- Trans Fat: 0g
- Carbohydrates: 29g
- Fiber: 1g
- Protein: 2g
- Cholesterol: 0mg
Keywords: Halloween, dessert, s'mores, fun, easy recipes, spooky treats
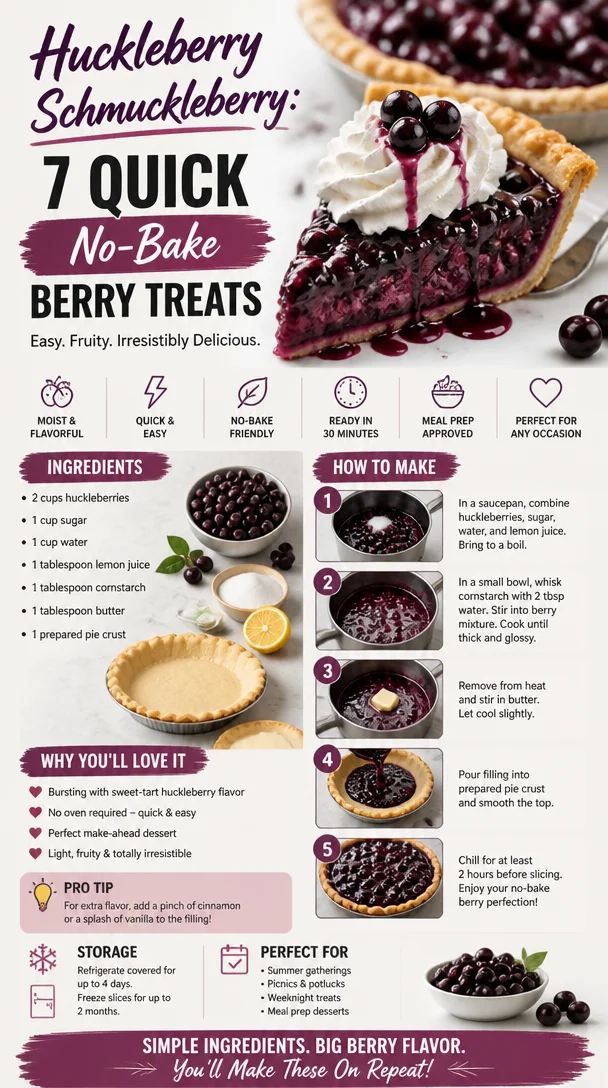
Huckleberry Schmuckleberry: 7 Quick No-Bake Berry Treats
Huckleberry Schmuckleberry: A Cozy Recipe for Sweet Memories
Welcome back to my kitchen, fellow food lovers! Today, I’m inviting you to whip up something that is not just delicious but also packed with warm, fuzzy nostalgia – the delectable Huckleberry Schmuckleberry! This dish isn’t just a recipe; it’s a journey through memories, flavors, and a dash of magic that comes from the heart.
Now, we’re diving into the enchanting world of huckleberries – those tiny, tart berries that are a hidden gem of nature. Growing up in the Pacific Northwest, I was lucky enough to experience the joy of huckleberry-picking with my family every summer. Imagine running through the woods, sun shining, with the sweet scent of wild berries hanging in the air. We’d fill our baskets to the brim, giggling and chatting about the best berry-picking spots. And the best part? Transforming our colorful haul into scrumptious desserts that filled our home with the incredible aroma of baking goodness!
Whether it’s a refreshing huckleberry crumble, a scrumptious pancake topping, or a heavenly jam, these tiny powerhouses of flavor have a way of making everything taste better. And trust me, when you combine huckleberries with some comforting, buttery goodness, you’re in for a real treat.
So, grab your favorite apron and let’s get cooking! I promise you’ll want to share this recipe with your family and friends – they’ll be begging for the secret to this mouthwatering dish!
A Sweet Memory with Huckleberries
Let me take you back to a sun-soaked afternoon in my childhood. It was one of those beautiful days where the sun painted everything golden, and the sweet smell of summer hung in the air like a gentle hug. My family and I ventured into the nearby woods, baskets in hand and excitement bubbling over. We were on the hunt for huckleberries, and let me tell you, it was a quest like no other!
As we trekked through the trails, my little feet would dart from bush to bush, my hands stained with berry juice and my laughter echoing through the trees. The huckleberry bushes seemed to be hiding their treasures just for us, and I remember the thrill of spotting those tiny, plump blue-black berries, glistening like jewels in the dappled sunlight.
Once our baskets were full, it was time for the best part – baking! My mom would turn our treasure into the most scrumptious huckleberry pie, filling our kitchen with warmth and sweet aromas. We’d sit around the kitchen table, eagerly awaiting that first slice, and I’ll never forget the delicious sense of pride that came from tasting something made with love and joy. That’s what I want to share with you today – the beauty of creating something from scratch that brings people together and fills your heart with warmth.
Let’s delve into the ingredients that will bring this huckleberry delight to life!
Ingredients You’ll Need
Here’s a little overview of the ingredients you’ll need to create your Huckleberry Schmuckleberry.
-
Fresh or Frozen Huckleberries (2 cups): These are the star of the show! If you can’t find huckleberries, blueberries or blackberries work too. Just note that huckleberries have a unique tartness that you may want to balance with a little extra sugar.
-
Granulated Sugar (¾ cup): This adds sweetness, balancing the tartness of the berries. Feel free to adjust it based on your preference. You could also substitute with honey or maple syrup for a natural sweetener.
-
Lemon Juice (2 tablespoons): The acidity of lemon juice elevates the flavor. Don’t skip it! If lemons aren’t handy, lime juice works like a charm, or even a splash of vinegar to mimic that tang.
-
Flour (1 cup): For binding everything together! You can use all-purpose flour, or if you’re going gluten-free, almond flour or oat flour can be good substitutes. Just keep an eye on the texture!
-
Old-Fashioned Rolled Oats (1 cup): This adds a fabulous chewy texture. If you’re looking for a gluten-free twist, ensure you choose certified gluten-free oats.
-
Brown Sugar (½ cup): For that hint of caramel flavor. If you don’t have brown sugar, granulated sugar can work as well, though the flavor will be a tad different.
-
Butter (½ cup, melted): The magic ingredient that makes everything come together! Coconut oil can be a fantastic dairy-free alternative.
-
Cinnamon (1 teaspoon): Adds warmth and depth. If you don’t have cinnamon, nutmeg or cardamom could make interesting substitutes.
-
Salt (½ teaspoon): Just a pinch to balance the sweetness.
Step-by-Step Instructions
Grab your apron and let’s get started! Here’s how to create your Huckleberry Schmuckleberry:
-
Preheat the Oven: Set your oven to 350°F (175°C). This way, it’s nice and hot by the time you’re ready to bake, ensuring a bubbly, golden topping!
-
Prepare the Huckleberries: In a medium bowl, combine the huckleberries, granulated sugar, and lemon juice. Stir gently, being careful not to mash the berries. Let this mixture sit for about 10 minutes – this helps the juices release and creates a delicious filling!
-
Mix the Dry Ingredients: In a large bowl, whisk together the flour, rolled oats, brown sugar, cinnamon, and salt until well blended. This is where the cozy aroma begins to fill your kitchen!
-
Incorporate the Butter: Pour the melted butter into the dry ingredients and mix with a fork until everything is combined and crumbly. You want a texture that’s similar to wet sand. If it feels too dry, a splash of milk or a bit of coconut oil can help bring it together.
-
Layer the Dish: Grab a baking dish (8×8 inches works perfectly) and spread half of your oat mixture evenly across the bottom. This is your base!
-
Add the Berry Filling: Spoon the huckleberry mixture on top of the base. Make sure to distribute the berries evenly for a tasty bite every time.
-
Top It Off: Sprinkle the remaining oat mixture over the huckleberries. This will create a lovely topping that crisps up beautifully in the oven.
-
Bake to Perfection: Place your dish in the preheated oven and bake for 30-35 minutes, or until the top is golden brown and bubbly. You’ll know it’s ready when your kitchen smells like a warm hug!
-
Cool and Serve: Once out of the oven, let it cool for about 10-15 minutes. This allows the filling to set up a bit for easier serving.
Serving Suggestions
To serve your delightful Huckleberry Schmuckleberry, scoop generous portions into bowls and top with a dollop of whipped cream or a scoop of vanilla ice cream for a beautiful contrast of temperatures and textures. Drizzling a bit of honey or maple syrup on top adds an extra touch of sweetness! Enjoy it warm, and embrace the wonderful company around you. Remember, this dish is all about sharing and celebrating the flavor!
Recipe Variations
Feel free to get creative with your Huckleberry Schmuckleberry. Here are a few fun twists to consider:
- Nutty Crumble: Add ½ cup of chopped nuts (like almonds or pecans) to the topping for a crunchy texture.
- Berry Duo: Mix huckleberries with raspberries or strawberries for an extra fruity flavor explosion!
- Spiced Up: Add a pinch of nutmeg or allspice to the filling for a warm, aromatic twist.
- Dairy-Free Delight: Swap out regular butter for coconut oil and use almond milk instead to make the recipe completely dairy-free.
- Vegan Version: Use flax eggs (1 tablespoon of ground flaxseed mixed with 3 tablespoons of water) in place of the butter and add maple syrup instead of granulated sugar.
Chef’s Notes
This recipe has evolved from countless kitchen experiments and cherished family gatherings. Each time I make it, I’m reminded of those sun-soaked afternoons spent berry-picking with my loved ones. My mom would often say that the messier I got with the dough and berry juices, the more delicious the dish would turn out. And let me tell you, that’s a philosophy I absolutely live by!
One of my most memorable kitchen mishaps happened when I accidentally forgot to add the sugar one day. I was so worried about making it perfect, I skipped it altogether! But when family arrived and tasted the “experiment,” we all laughed so hard at the unexpectedly tart version. Sometimes, the best memories evolve from little mistakes – just don’t forget the sugar!
FAQs and Troubleshooting
-
Q: My huckleberry filling is too runny. What did I do wrong?
- A: This can happen if your berries are super juicy. Next time, try adding a tablespoon of cornstarch to help thicken the filling while it bakes!
-
Q: How can I make this dish more flavorful?
- A: Adding a teaspoon of vanilla extract to the berry mixture or a citrus zest can amp up the flavors beautifully!
-
Q: Can I prepare this ahead of time?
- A: Absolutely! You can pre-mix the dry ingredients and the huckleberry filling, store them separately in the fridge, and assemble the topping just before you bake.
-
Q: Why is my crumbles topping too crumbly?
- A: If it’s separating too much, you might have added too much butter or flour. Just ensure the mixture stays a bit moist, like wet sand, when you’re mixing.
Nutritional Info
While I believe in enjoying every bite without guilt, it’s also helpful to have a sense of what you’re consuming. Here’s a rough estimate per serving (based on 8 servings):
- Calories: 280
- Carbohydrates: 42g
- Protein: 3g
- Fat: 12g
- Fiber: 4g
And there you have it – your very own Huckleberry Schmuckleberry. I hope this delightful recipe brings as much joy to your kitchen as it has to mine. Remember, the best dishes are made with love, laughter, and a hint of nostalgia. Now, get cooking and share those delicious moments with the people you love! Happy baking!
Print
Huckleberry Schmuckleberry
- Total Time: 50 minutes
- Yield: 8 servings
- Diet: Vegetarian
Description
A nostalgic and delightful dessert featuring huckleberries, perfect for sharing with loved ones.
Ingredients
- Fresh or Frozen Huckleberries (2 cups)
- Granulated Sugar (¾ cup)
- Lemon Juice (2 tablespoons)
- Flour (1 cup)
- Old-Fashioned Rolled Oats (1 cup)
- Brown Sugar (½ cup)
- Butter (½ cup, melted)
- Cinnamon (1 teaspoon)
- Salt (½ teaspoon)
Instructions
- Preheat the Oven: Set your oven to 350°F (175°C).
- Prepare the Huckleberries: In a medium bowl, combine the huckleberries, granulated sugar, and lemon juice. Let this mixture sit for about 10 minutes.
- Mix the Dry Ingredients: In a large bowl, whisk together the flour, rolled oats, brown sugar, cinnamon, and salt until well blended.
- Incorporate the Butter: Pour the melted butter into the dry ingredients and mix until everything is combined and crumbly.
- Layer the Dish: Spread half of your oat mixture evenly across the bottom of an 8×8 inch baking dish.
- Add the Berry Filling: Spoon the huckleberry mixture on top of the base, distributing evenly.
- Top It Off: Sprinkle the remaining oat mixture over the huckleberries.
- Bake to Perfection: Place your dish in the preheated oven and bake for 30-35 minutes.
- Cool and Serve: Let it cool for about 10-15 minutes before serving.
Notes
Serve warm with whipped cream or vanilla ice cream on top.
- Prep Time: 15 minutes
- Cook Time: 35 minutes
- Category: Dessert
- Method: Baking
- Cuisine: American
Nutrition
- Serving Size: 1 serving
- Calories: 280
- Sugar: 15g
- Sodium: 200mg
- Fat: 12g
- Saturated Fat: 7g
- Unsaturated Fat: 4g
- Trans Fat: 0g
- Carbohydrates: 42g
- Fiber: 4g
- Protein: 3g
- Cholesterol: 30mg
Keywords: huckleberry, dessert, nostalgic, baking, summer recipe
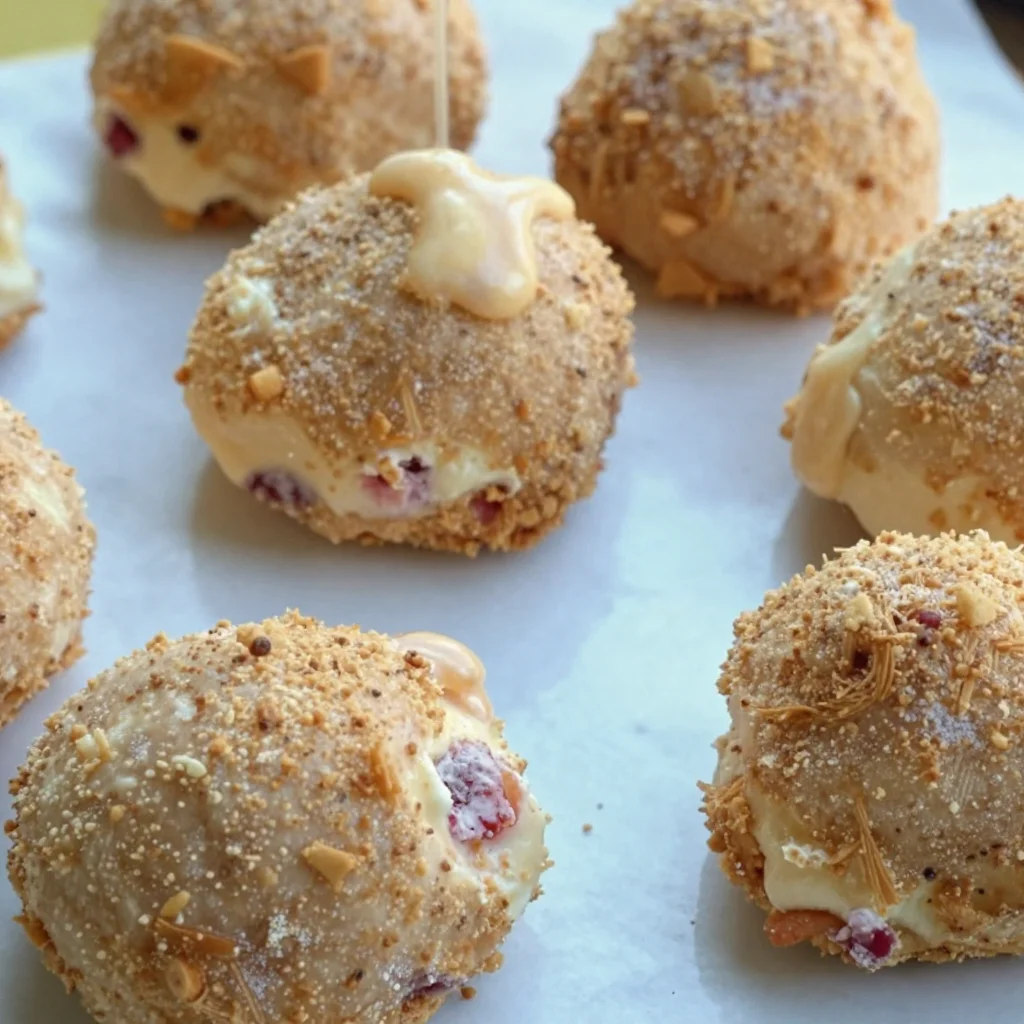
No Bake Raspberry Cheesecake Bites
No Bake Raspberry Cheesecake Bites: A Delightful Treat for All Occasions
Welcome to Olivia’s kitchen! Today, we’re diving into a delightful recipe that’s perfect for gatherings or a sweet treat on your own. Get ready to impress your family and friends with these No Bake Raspberry Cheesecake Bites! They’re creamy, dreamy, and so simple to whip up, you can enjoy them any day of the week.
Introduction
When it comes to desserts, nothing quite captures the essence of summer like fresh raspberries. Their vibrant color and juicy flavor evoke memories of warm afternoons spent lounging in the sun, surrounded by the laughter of loved ones. These No Bake Raspberry Cheesecake Bites encapsulate that summertime bliss in one bite-sized package.
Not only do these cheesecake bites highlight the deliciousness of raspberries, but they also don’t require turning on your oven — perfect for those hot days when you want something sweet but don’t want to heat up the house. Plus, they’re a hit at parties, potlucks, or even a cozy night in with a movie.
These little bites are a perfect blend of tangy cream cheese, sweet raspberries, and a buttery crumb crust. In this post, I’ll share my favorite recipe, some tips to make them your own, and a peek into my culinary journey. So, put on your apron, grab your mixing bowls, and let’s get started on this fun, no-bake adventure!
Personal Story
The inspiration for these No Bake Raspberry Cheesecake Bites comes from my childhood summers spent at my grandmother’s house. She had a lush raspberry patch that seemed to burst with fruit each year. We would spend hours picking plump, juicy berries, racing to see who could gather the biggest haul. Afterward, she’d set us up in her cozy kitchen, where we’d conjure up all sorts of deliciousness — raspberry jams, pies, and, of course, her famous cheesecake.
I vividly remember one summer when we decided to get creative and make a no-bake version of her cheesecake, just because it was too hot to turn on the oven. She guided me as I mixed the cream cheese with cool whip and folded in those perfectly sweet raspberries. The smiles that spread across our faces when we took the first bite? Indescribable. The creamy texture combined with the tartness of the raspberries was pure magic — one of those moments I’ve carried into my cooking to this day. Now, I want to share that joy with you!
Ingredients
Here’s what you’ll need to make these scrumptious No Bake Raspberry Cheesecake Bites:
-
1 cup graham cracker crumbs
Graham crackers create a buttery, slightly sweet crust. For a gluten-free option, use crushed gluten-free cookies or almond flour. -
4 tablespoons unsalted butter, melted
Butter binds the crust. Coconut oil can be a great alternative for a dairy-free option. -
8 oz cream cheese, softened
Cream cheese is the star! Ensure it’s at room temperature for easier mixing. A vegan cream cheese can be used as a substitute if you’re looking for a plant-based option. -
1/2 cup powdered sugar
This adds sweetness and a silky texture to the filling. If you’d prefer a healthier alternative, you can use maple syrup or agave nectar, just adjust the amount to taste! -
1 teaspoon vanilla extract
This adds a lovely depth of flavor. You can even experiment with almond extract for a different twist! -
1 cup fresh raspberries, plus extra for garnish
Fresh raspberries provide the best flavor and brightness, but if they’re out of season, frozen raspberries will work just fine. Just thaw and drain excess moisture before using. -
1/2 cup whipped cream (optional, for extra fluffiness)
Adding whipped cream lightens up the mixture. For a dairy-free option, use coconut whipped cream!
Step-by-Step Instructions
Now let’s get to the fun part — making those delightful bites!
-
Prepare the crust
In a mixing bowl, combine the graham cracker crumbs and melted butter. Stir until the mixture resembles wet sand. The key to a great crust is to make sure all the crumbs are coated with butter! -
Press into bite-sized molds
Using your fingers or a measuring spoon, press the mixture firmly into the bottom and slightly up the sides of a mini muffin tin or silicone mold. Pack it tightly for a sturdy base. If you have any leftovers, feel free to snack on them or make more bites! -
Chill the crust
Pop the crust-filled molds in the refrigerator for about 10-15 minutes while you prepare the cheesecake filling. This helps the crust firm up nicely. -
Make the cheesecake filling
In a large mixing bowl, beat the softened cream cheese with an electric mixer until it’s fluffy. Gradually add in the powdered sugar, combining well. Then, mix in the vanilla extract. -
Fold in the raspberries
Gently fold in the fresh raspberries. You can leave them whole for bursts of flavor or mash them slightly for a marbled effect — it’s entirely up to you! -
Lighten it up (optional)
If you want an extra light texture, fold in the whipped cream at this stage. This will create a beautifully airy filling that’s simply irresistible. -
Fill the crusts
Spoon the raspberry cheesecake filling into the chilled crusts. Use a spatula to smooth out the tops. You can also leave them rustic for a more homemade look — that’s part of their charm! -
Chill for 1-2 hours
Place the filled molds back in the fridge and let them chill for at least an hour. This helps everything set properly and makes it easier to pop them out later. -
Serve and enjoy!
Once they’re chilled and firm, gently pop the cheesecake bites out of the molds and place them on a serving platter. Garnish with extra fresh raspberries and even a dollop of whipped cream on top if you’re feeling indulgent!
Serving Suggestions
These No Bake Raspberry Cheesecake Bites are as much a treat for the eyes as they are for the taste buds! Arrange them on a pretty platter for a beautiful presentation. They also make a great addition to a dessert table, especially when paired with other bite-sized treats. Consider serving them alongside a refreshing cup of iced tea or a berry-infused lemonade for a perfect warm-weather pairing.
Recipe Variations
Here are some fun twists to keep the flavor exciting:
-
Mixed Berry Cheesecake Bites: Substitute raspberries with a mix of strawberries, blueberries, and blackberries for a colorful twist!
-
Chocolate Drizzle: Melt some dark or white chocolate and drizzle it over the top for a decadent touch.
-
Lemon Zest: Add a teaspoon of fresh lemon zest to the filling for a zesty kick that balances the sweetness.
-
Nutty Crust: For a nutty flavor, substitute half of the graham cracker crumbs with ground nuts, like almonds or pecans.
-
Coconut Cream: Replace half of the cream cheese with coconut cream for a tropical vibe!
Chef’s Notes
These little bites have come a long way since that summer with my grandmother. I’ve experimented with different toppings and flavors, and I often find myself coming back to the classic raspberry combination. There’s something about those plump little berries that just sings summer to me. Plus, their vibrant color makes any dessert look fabulous!
Don’t be discouraged if your bites aren’t perfect — the charm of homemade treats is in their imperfections! Each batch brings its own little character and flavor. And, of course, eating the "oops" or imperfect bites is always a delicious consolation!
FAQs and Troubleshooting
1. Why is my filling too runny?
If your filling is too runny, it may be due to the cream cheese not being well whipped or added too much liquid. Ensure your cream cheese is at room temperature before mixing, and consider adding a bit more powdered sugar or folding in more whipped cream to thicken it up.
2. Can I use frozen raspberries?
Absolutely! Just make sure to thaw them thoroughly and drain any excess liquid. This will help maintain the texture of the cheesecake bites without making them mushy.
3. How do I store leftovers?
Store any leftovers in an airtight container in the fridge for up to 3 days. They’re still amazing cold, so you can enjoy them right out of the fridge for a quick snack!
4. Can I make these in advance?
Yes! These bites are perfect for making ahead of time. Prepare them a day in advance and keep them covered in the fridge until you’re ready to serve.
Nutritional Info
Each Raspberry Cheesecake Bite contains approximately 95 calories, 6g of fat, and 8g of sugar. While they’re a treat, feel free to enjoy them in moderation!
So there you have it — my No Bake Raspberry Cheesecake Bites recipe, along with some fun stories and tips that I hope inspire you to get creating in your kitchen. With every bite, you’ll be reminded of the love that goes into homemade treats! Happy baking and enjoy the deliciousness!
Print
No Bake Raspberry Cheesecake Bites
- Total Time: 120 minutes
- Yield: 12 servings 1x
- Diet: Vegetarian
Description
Delicious no bake raspberry cheesecake bites that are perfect for gatherings or a sweet treat any day.
Ingredients
- 1 cup graham cracker crumbs
- 4 tablespoons unsalted butter, melted
- 8 oz cream cheese, softened
- 1/2 cup powdered sugar
- 1 teaspoon vanilla extract
- 1 cup fresh raspberries, plus extra for garnish
- 1/2 cup whipped cream (optional, for extra fluffiness)
Instructions
- Prepare the crust: In a mixing bowl, combine the graham cracker crumbs and melted butter. Stir until the mixture resembles wet sand.
- Press into bite-sized molds: Using your fingers or a measuring spoon, press the mixture firmly into the bottom and slightly up the sides of a mini muffin tin or silicone mold.
- Chill the crust: Pop the crust-filled molds in the refrigerator for about 10-15 minutes.
- Make the cheesecake filling: In a large mixing bowl, beat the softened cream cheese with an electric mixer until fluffy. Gradually add in the powdered sugar and mix in the vanilla extract.
- Fold in the raspberries: Gently fold in the fresh raspberries.
- Lighten it up (optional): If desired, fold in the whipped cream.
- Fill the crusts: Spoon the raspberry cheesecake filling into the chilled crusts and smooth out the tops.
- Chill for 1-2 hours: Place the filled molds back in the fridge to set.
- Serve and enjoy: Pop the cheesecake bites out of the molds and garnish with fresh raspberries.
Notes
Store leftovers in an airtight container in the fridge for up to 3 days. These treats can be made a day in advance.
- Prep Time: 15 minutes
- Cook Time: 0 minutes
- Category: Dessert
- Method: No-Bake
- Cuisine: American
Nutrition
- Serving Size: 1 bite
- Calories: 95
- Sugar: 8g
- Sodium: 200mg
- Fat: 6g
- Saturated Fat: 4g
- Unsaturated Fat: 1g
- Trans Fat: 0g
- Carbohydrates: 10g
- Fiber: 1g
- Protein: 1g
- Cholesterol: 15mg
Keywords: no bake, raspberry, cheesecake, bites, dessert, summer treat

Minute Raspberry Galette for Beginners (No-Fuss Crust)
Easy Raspberry Galette: A Simple Yet Stunning Dessert!
Welcome to my kitchen, dear friends! Today, I’m thrilled to share a delightful recipe that not only brings a splash of vibrant flavor but also a touch of rustic charm to your dessert table: the Easy Raspberry Galette. When I think of galettes, I envision sunny afternoons spent savoring the sweet-tart notes of fresh fruits, mixed with a buttery crust, all while enjoying good company. The beauty of this dish lies in its simplicity—you don’t need to be a pastry chef to impress your friends and family with this stunning dessert.
There’s something magical about the way a galette allows the fruit to take center stage, enveloped in a flaky, tender crust that seems to sing of home. Whether it’s fresh raspberries reminding you of warm summer days or a cozy gathering with loved ones, every bite tells a story. And guess what? This rustic dessert is incredibly forgiving; it doesn’t need to be perfect. The charm is in its imperfect shape, the golden edges, and the bubbling fruit that peeks through. So, let’s roll up those sleeves and dive into this joyfully messy kitchen adventure!
To make an Easy Raspberry Galette, you’ll be working with a handful of wholesome ingredients. I promise, you’ll find it therapeutic to create something so beautiful with your own two hands. And not only will your kitchen smell divine, but you’ll also fill the hearts of those around you with a little love and sweetness. Whether you’re enjoying it on a Sunday brunch, a family gathering, or just a self-care treat, this galette is sure to create memories and smiles.
A Sweet Memory: My First Galette
Let me take you back to a warm summer evening a few years ago. My grandma, the queen of all things baked and buttery, invited me over for what she called a “fancy dessert night.” I remember walking into her cozy kitchen, the delicious aroma of fresh baked goods wafting through the air, making my stomach growl in anticipation.
That evening, she introduced me to the galette. As she rolled out the dough—flour clouds gently dancing around us—she explained, “It’s just a free-form pie, darling.” With a wink and a wink of her flour-dusted nose, she showed me how to fold the edges, leaving a beautiful rustic border. We chose plump, ripe raspberries from her garden that day, and watching those bright jewels come alive in the oven was pure magic.
Sitting together at her kitchen table, we savored every slice, the tart raspberries beautifully balancing the sweet, buttery crust. I learned that day that cooking is not just about flavors—it’s about connections. Now, every time I whip up a galette, I am reminded of those special moments shared in that cozy kitchen and the sense of warmth that good food brings to the table.
Ingredients
Before we jump into the cooking, let’s gather our ingredients! Here’s what you’ll need to create this delightful Easy Raspberry Galette:
-
All-purpose flour (1 1/4 cups): The foundation of our buttery crust. You can substitute with whole wheat flour for a nuttier flavor or gluten-free flour for a gluten-free version.
-
Unsalted butter (1/2 cup, chilled, chopped): Butter brings a rich flavor and flaky texture to the crust. If you’re in a pinch, you can use cold coconut oil or margarine, although the taste will vary.
-
Granulated sugar (1/4 cup, plus more for sprinkling): This sweetness helps balance the tartness of the raspberries. Feel free to swap in brown sugar for a more caramel-like flavor or to use honey or maple syrup in moderation.
-
Salt (1/4 tsp): A pinch of salt enhances and balances the flavors beautifully.
-
Ice water (3-4 tbsp): This helps bring the dough together without melting the butter. You can use club soda for a bubbly crust!
-
Fresh raspberries (2 cups): The star of the show! Use fresh for the best flavor and texture; if you’re using frozen, thaw them first and drain excess liquid.
-
Cornstarch (1 tbsp): This helps absorb moisture from the raspberries, keeping the crust from getting soggy.
-
Vanilla extract (1 tsp): This adds a lovely layer of flavor. Feel free to substitute with almond extract for something a bit different!
-
Egg wash (1 egg beaten with a splash of water): This gives the galette a beautiful, shiny glaze. If you’re going vegan, a plant-based milk works too.
With all these wonderful ingredients, you’ll be ready to create something deliciously rustic and totally Instagram-worthy!
Step-by-Step Instructions
Let’s get into the fun part! Here’s a detailed guide to making your own Easy Raspberry Galette, along with some little chef hacks to make the process easier and even more enjoyable.
Step 1: Prepare the Dough
-
Mix the Flour and Butter: In a mixing bowl, combine the all-purpose flour and salt. Add the chilled, chopped unsalted butter. Using a pastry cutter or your fingers, work the butter into the flour until it resembles coarse crumbs. You want little bits of butter to remain—this is what makes the crust flaky!
-
Add the Sugar and Water: Stir in the granulated sugar. Then, slowly add the ice water, one tablespoon at a time, mixing until the dough comes together. It should be moist but not sticky. If it feels too dry, add a tiny bit more water.
-
Chill the Dough: Form the dough into a disk, wrap it in plastic wrap, and chill for at least 30 minutes. This step is crucial for the butter to firm up and will make rolling out easier.
Step 2: Prepare the Filling
- Mix the Berries: In a medium bowl, gently toss the fresh raspberries with cornstarch, sugar, and vanilla extract. Let the mixture sit for about 10-15 minutes for the juices to meld together. During this time, you can preheat your oven to 400°F (200°C).
Step 3: Roll Out the Dough
-
Flour Your Surface: Once the dough has chilled, remove it from the refrigerator. On a lightly floured surface, roll out the dough into a rough 12-inch circle. Don’t stress about it being perfectly round—remember, rustic is the name of the game!
-
Transfer It: Carefully transfer the dough to a lined baking sheet. You can use parchment paper for easy cleanup and to prevent sticking.
Step 4: Assemble the Galette
-
Add the Filling: Spoon the raspberry filling into the center of the dough, leaving about a 2-inch border.
-
Fold the Edges: Gently fold the edges of the dough over the filling, creating a pleasing border. It doesn’t have to be perfect. The goal is to contain the berries while allowing the top to be exposed.
-
Egg Wash Time: Brush the crust with the egg wash (or plant-based milk), and sprinkle a bit of sugar over the crust for a sparkling finish.
Step 5: Bake
-
Bake to Perfection: Bake the galette in your preheated oven for about 25-30 minutes or until the crust is golden brown and the berries are bubbling.
-
Cool and Enjoy: Allow the galette to cool for at least 10 minutes before slicing. This gives the juices time to settle, making for a cleaner cut.
Serving Suggestions
When serving the Easy Raspberry Galette, presentation is key! Slice it into wedges and serve warm, perhaps with a generous dollop of whipped cream or a scoop of vanilla ice cream on the side. A sprinkle of powdered sugar on top can elevate its beauty even more. Enjoy this delightful treat with a cup of tea or coffee for a perfect afternoon pick-me-up!
Recipe Variations
- Berry Galette: Swap out raspberries for strawberries, blueberries, or even a mix of berries for a colorful twist.
- Peach Raspberry Galette: Combine sweet peaches with raspberries for a delightful summer flavor.
- Nutty Crust: Add ground almonds to the crust for a nutty flavor that pairs beautifully with the fruit.
- Herb-Infused: Add a touch of fresh thyme or basil to the raspberry filling for a unique and aromatic flavor.
- Vegan Option: Use coconut oil instead of butter and a flax egg in place of the egg wash!
Chef’s Notes
This Easy Raspberry Galette has been a staple in my kitchen for years, and it evolves with the seasons, just like life itself. I remember one summer trying out different fillings, and oh boy, the combinations were endless! My favorite deviation was adding a splash of balsamic vinegar to the filling for a lovely depth of flavor.
Don’t be afraid to experiment and use whatever fruits are in season—this recipe is all about creativity, joy, and a bit of delicious messiness! Every time I make it, I’m reminded of those lovely afternoons with my grandma.
FAQs and Troubleshooting
-
My dough is too sticky! What should I do?
If your dough feels overly sticky when rolling it out, don’t panic! Simply add a light sprinkle of flour to your work surface and your rolling pin. Alternatively, chill the dough for another 15 minutes to firm it up. -
Why is my galette soggy?
Soggy galette can happen if the filling is too wet. Make sure to drain any excess liquid from thawed frozen berries, and don’t skip the cornstarch—it helps absorb moisture during baking. -
How do I store leftovers?
Store any leftover galette covered in an airtight container in the fridge for up to 2 days. For the best texture when reheating, place it in the oven to warm up rather than the microwave. -
Can I make the dough ahead of time?
Absolutely! You can make the dough up to 2 days ahead. Just make sure it’s wrapped well and chilled in the fridge. You can also freeze it for up to a month.
Nutritional Info
Note: Nutritional values are estimates and may vary depending on specific brands and preparation methods.
- Serving Size: 1 slice (based on 8 servings)
- Calories: ~210
- Protein: 2g
- Fat: 10g
- Carbohydrates: 29g
- Sugar: 8g
And there you have it! A charming and incredibly easy Raspberry Galette recipe that’s as enjoyable to make as it is to eat. So, gather your loved ones, don that apron, and bake up a storm! I can’t wait to hear about your creations and the sweet moments they inspire. Happy baking, friends!
Print
Easy Raspberry Galette
- Total Time: 45 minutes
- Yield: 8 servings 1x
- Diet: Vegetarian
Description
A delightful and simple dessert featuring a flaky crust and fresh raspberries, perfect for any gathering.
Ingredients
- 1 1/4 cups All-purpose flour
- 1/2 cup Unsalted butter, chilled, chopped
- 1/4 cup Granulated sugar, plus more for sprinkling
- 1/4 tsp Salt
- 3–4 tbsp Ice water
- 2 cups Fresh raspberries
- 1 tbsp Cornstarch
- 1 tsp Vanilla extract
- 1 Egg wash (1 egg beaten with a splash of water)
Instructions
- Mix the flour and butter: Combine flour and salt in a bowl. Add the chopped butter and work it into the flour until it resembles coarse crumbs.
- Add the sugar and water: Stir in sugar and slowly mix in ice water until the dough comes together.
- Chill the dough: Form the dough into a disk, wrap in plastic, and chill for at least 30 minutes.
- Mix the berries: Gently toss raspberries with cornstarch, sugar, and vanilla in a bowl and let sit for 10-15 minutes.
- Flour your surface: Roll out chilled dough into a rough 12-inch circle on a floured surface.
- Transfer it: Move the dough to a lined baking sheet.
- Add the filling: Place raspberry filling in the center of the dough, leaving a 2-inch border.
- Fold the edges: Fold the dough edges over the filling to create a border.
- Brush with egg wash: Apply egg wash and sprinkle sugar over the crust.
- Bake to perfection: Bake in a preheated oven at 400°F for 25-30 minutes until golden brown and bubbling.
- Cool and enjoy: Let cool for 10 minutes before slicing.
Notes
Serve warm with whipped cream or vanilla ice cream. You can substitute with different berries or make it vegan.
- Prep Time: 15 minutes
- Cook Time: 30 minutes
- Category: Dessert
- Method: Baking
- Cuisine: French
Nutrition
- Serving Size: 1 slice
- Calories: 210
- Sugar: 8g
- Sodium: 100mg
- Fat: 10g
- Saturated Fat: 6g
- Unsaturated Fat: 4g
- Trans Fat: 0g
- Carbohydrates: 29g
- Fiber: 2g
- Protein: 2g
- Cholesterol: 70mg
Keywords: galette, raspberry dessert, easy dessert, rustic pie
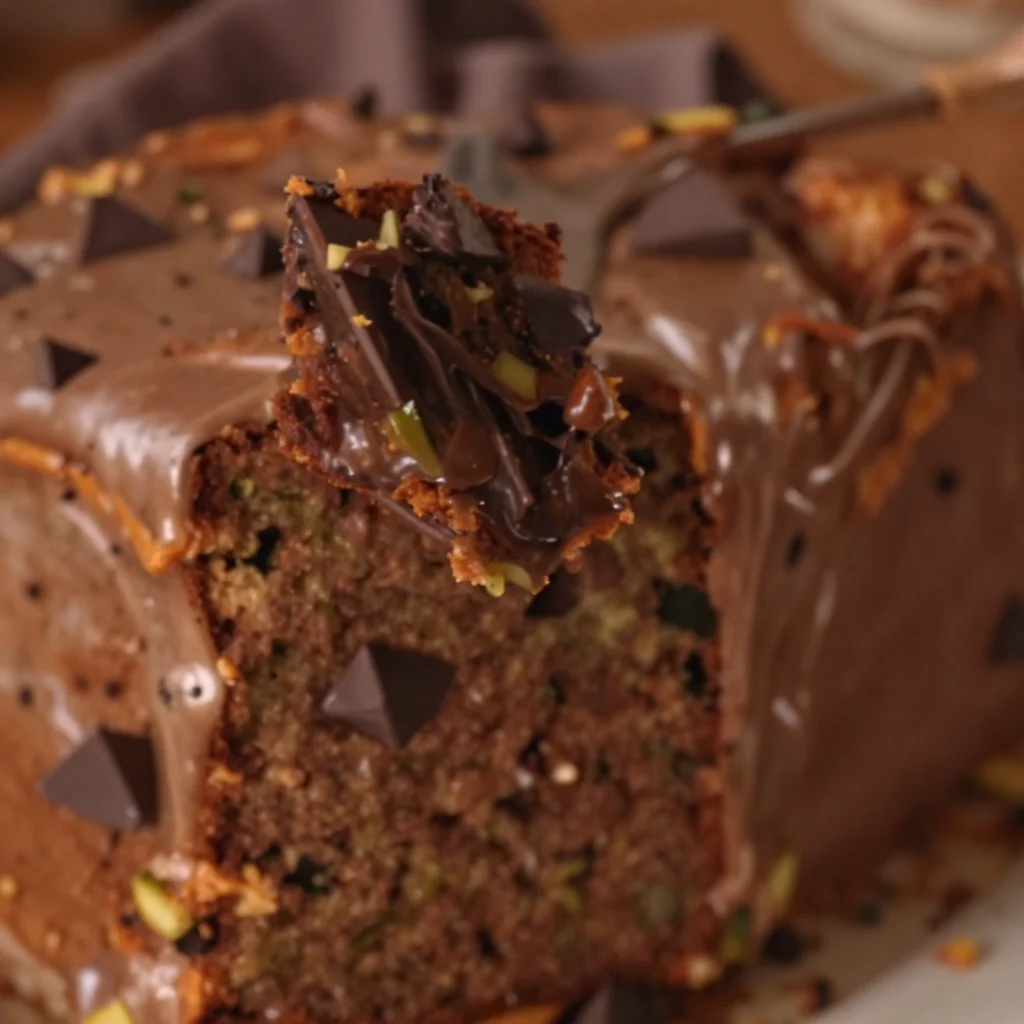
One-Bowl Chocolate Zucchini Cake: Easy Weeknight Dessert
Chocolate Zucchini Cake: A Deliciously Moist Treat
Welcome to my kitchen, dear friends! If there’s one thing that brings me an overwhelming sense of joy, it’s baking something delicious that becomes an instant hit with family and friends. There’s a special magic that happens when you combine simple ingredients to create something extraordinarily delightful. Today, I’m excited to share with you my go-to recipe for Chocolate Zucchini Cake. This lush cake is not only a chocolate lover’s dream, but it also sneaks in some veggies—shh, don’t tell the kids!
This cake is the perfect example of how we can take what seems like a simple ingredient (like zucchini) and transform it into something that feels indulgent and special. So, if you’re ready to experience the rich and moist flavors of this fabulous dessert, grab your apron, and let’s get baking!
A Memory Wrapped in Chocolate
Growing up, I spent countless hours in my grandmother’s kitchen. She had an incredible ability to turn the most mundane ingredients into fantastic desserts. One summer afternoon, I remember walking into her house, greeted by the sweet, chocolatey aroma wafting through the air. She was experimenting with a new recipe—a chocolate cake with zucchini! At first, I was hesitant. Zucchini in a cake? But as I took my first bite, all my doubts vanished. The cake was rich, moist, and oh-so-delicious!
From that day forward, chocolate zucchini cake became a staple at our family gatherings. We shared stories, laughter, and, of course, second servings of this magical cake. Creating this recipe today isn’t just about baking; it’s about cherishing those memories and passing them on through food.
Ingredients: What You’ll Need
To whip up this delightful Chocolate Zucchini Cake, gather the following ingredients:
-
Zucchini (2 cups, grated)
- Moisture is key! Zucchini keeps the cake tender, so don’t skimp on it. You can substitute with carrots for a different flavor profile.
-
All-purpose flour (1 ¾ cups)
- This is the backbone of your cake. If you’re feeling adventurous, try whole wheat flour for added fiber or gluten-free flour for a gluten-free version.
-
Unsweetened cocoa powder (¾ cup)
- Cocoa adds deep chocolate flavor. Make sure it’s unsweetened so you can control the sweetness of your cake!
-
Granulated sugar (1 ½ cups)
- Sweetness is essential, but if you’re looking to cut sugar, honey or maple syrup can be excellent natural sweeteners.
-
Brown sugar (½ cup)
- This adds moisture and a hint of caramel flavor. Light or dark will work; the darker will give you a richer taste.
-
Baking soda (1 tsp)
- This is your leavening agent. Make sure it’s fresh for the best rise.
-
Baking powder (1 tsp)
- A backup leavener to ensure a fluffy cake. Always check the expiration date!
-
Salt (½ tsp)
- Enhances all the flavors. Don’t leave it out—you’ll be surprised how much it contributes!
-
Eggs (2 large)
- They bind the ingredients and add richness. If you need an egg substitute, consider using flaxseed meal or applesauce (1/4 cup per egg).
-
Vanilla extract (1 tsp)
- A simple yet essential flavor booster. You can use almond extract for a different twist.
-
Vegetable oil (¾ cup)
- Keeps the cake moist. If you prefer a lighter option, try using unsweetened applesauce!
-
Chocolate chips (1 cup, optional)
- Add these to bring an extra chocolate punch! You can swap them for nuts or dried fruit for added texture.
Step-by-Step Instructions: How to Create Your Masterpiece
-
Preheat Your Oven:
Preheat your oven to 350°F (175°C). This ensures your cake bakes evenly from the get-go! While the oven warms up, take a moment to gather your ingredients and enjoy the delightful aroma of the cocoa. -
Prepare Your Baking Pan:
Grease and flour a 9×13 inch baking pan. This prevents the cake from sticking. You can also line it with parchment paper for easy removal and cleanup. Trust me, you want to get this cake out in one piece! -
Grate the Zucchini:
Grate the zucchini using a box grater or food processor. No need to peel it; the skin adds color! Once grated, place it in a clean kitchen towel, twist it, and squeeze out excess moisture. This step is crucial for avoiding a soggy cake. -
Mix Dry Ingredients:
In a large bowl, whisk together the flour, cocoa powder, baking soda, baking powder, and salt. This step helps to evenly distribute the dry ingredients, ensuring every bite is just as delicious as the last! -
Combine Wet Ingredients:
In another bowl, whisk the granulated sugar, brown sugar, eggs, vanilla extract, and vegetable oil until smooth. You should see a lovely, glossy mixture. This is where the magic starts! If you can sneak a taste at this point, go for it—just remember, we’re saving room for cake! -
Mix Everything Together:
Gradually add the dry ingredients into the wet ingredients, stirring until just combined. Don’t overmix—lumps are okay! Then, gently fold in the grated zucchini and chocolate chips if you’re using them. You want to keep that wonderful texture! -
Pour Into the Pan:
Pour the batter into the prepared baking pan, spreading it evenly. Take a moment to admire the deep, dark color of the batter. It’ll rise beautifully in the oven! -
Bake:
Bake in your preheated oven for 30–35 minutes, or until a toothpick inserted into the center comes out clean. Keep an eye on it; ovens can vary. The cake should spring back when lightly touched. -
Cool Down:
Let the cake cool in the pan for about 15 minutes before transferring it to a wire rack to cool completely. This cool-down is the hardest part, but trust me; it’s worth the wait!
Serving Suggestions: Treat Your Guests!
Once your cake is cool, it’s time to slice and serve! For a delightful presentation, dust the top with powdered sugar or top with a scoop of vanilla ice cream. If you’re feeling extra indulgent, drizzle a warm chocolate ganache over it! Serve it on a cozy plate, maybe with a sprig of mint for that pop of color.
Recipe Variations: Creative Twists to Try
- Spicy Chocolate: Add a pinch of cayenne pepper or cinnamon to the batter for a warm, spicy kick.
- Nuts & Zucchini: Fold in chopped walnuts or pecans for added crunch.
- Fruity Delight: Mix in some shredded coconut or even crushed pineapple for an exotic twist.
- Gluten-Free: Use a gluten-free flour blend to make it suitable for gluten-free eaters.
- Sugar-Free Version: Substitute granulated sugar with a sugar substitute like erythritol or stevia for a low-calorie treat!
Chef’s Notes: A Cake Journey
This Chocolate Zucchini Cake recipe has been tirelessly refined over the years. I’ve experimented with countless variations, but I always return to this classic! I remember one time I decided to swap zucchini for beet puree. While the taste was phenomenal, my cake came out a vibrant shade of pink. My friends called it “Rosy Chocolate Cake” affectionately; it was definitely a hit in terms of flavor!
Don’t hesitate to play around with the ingredients—it’s how you find your perfect version.
FAQs and Troubleshooting: Common Questions
1. My cake turned out too dense. What did I do wrong?
It’s likely because of overmixing. Be gentle when combining wet and dry ingredients, and avoid overbaking—this will also dry it out!
2. Can I make this cake ahead of time?
Absolutely! This cake keeps well in an airtight container for 3-4 days at room temperature. You can also freeze it—just wrap slices in plastic wrap and place them in a freezer bag.
3. How do I know when my cake is done?
A toothpick inserted into the center should come out clean, or with just a few moist crumbs attached. If it comes out wet, give it a few more minutes in the oven.
4. What if I don’t have eggs?
No problem! Use 1/4 cup applesauce or a flax egg (1 tablespoon ground flaxseed mixed with 3 tablespoons water). Let it sit for a few minutes to thicken.
Nutritional Info (Optional)
For those counting calories: one slice of this delightful Chocolate Zucchini Cake typically has around 250 calories. Packed with fiber from the zucchini, it can be a guilt-free indulgence when enjoyed in moderation!
In the end, whether you’re baking this treat for yourself or to share with others, remember that food is about community, about connection. Each bite of this Chocolate Zucchini Cake brings a reminder of those warm, loving moments in the kitchen. So, let’s celebrate cooking together—happy baking!
Print
Chocolate Zucchini Cake
- Total Time: 50 minutes
- Yield: 12 servings 1x
- Diet: Vegetarian
Description
A deliciously moist chocolate cake that sneakily incorporates zucchini for added tenderness and nutrition.
Ingredients
- 2 cups Zucchini, grated
- 1 ¾ cups All-purpose flour
- ¾ cup Unsweetened cocoa powder
- 1 ½ cups Granulated sugar
- ½ cup Brown sugar
- 1 tsp Baking soda
- 1 tsp Baking powder
- ½ tsp Salt
- 2 large Eggs
- 1 tsp Vanilla extract
- ¾ cup Vegetable oil
- 1 cup Chocolate chips (optional)
Instructions
- Preheat your oven to 350°F (175°C).
- Prepare a 9×13 inch baking pan by greasing and flouring it.
- Grate the zucchini and squeeze out excess moisture using a kitchen towel.
- Mix dry ingredients: whisk together flour, cocoa powder, baking soda, baking powder, and salt in a large bowl.
- Combine wet ingredients: whisk granulated sugar, brown sugar, eggs, vanilla extract, and vegetable oil until smooth.
- Mix everything together by gradually adding dry ingredients to wet ingredients, stirring until just combined. Fold in zucchini and chocolate chips if using.
- Pour the batter into the prepared baking pan, spreading it evenly.
- Bake for 30–35 minutes, or until a toothpick inserted comes out clean.
- Cool in the pan for 15 minutes, then transfer to a wire rack to cool completely.
Notes
For extra indulgence, dust with powdered sugar or top with vanilla ice cream. This cake can be kept in an airtight container for 3-4 days or frozen for longer storage.
- Prep Time: 15 minutes
- Cook Time: 35 minutes
- Category: Dessert
- Method: Baking
- Cuisine: American
Nutrition
- Serving Size: 1 slice
- Calories: 250
- Sugar: 22g
- Sodium: 360mg
- Fat: 10g
- Saturated Fat: 1.5g
- Unsaturated Fat: 8g
- Trans Fat: 0g
- Carbohydrates: 37g
- Fiber: 2g
- Protein: 4g
- Cholesterol: 40mg
Keywords: chocolate zucchini cake, dessert, baking, chocolate cake, vegetable cake
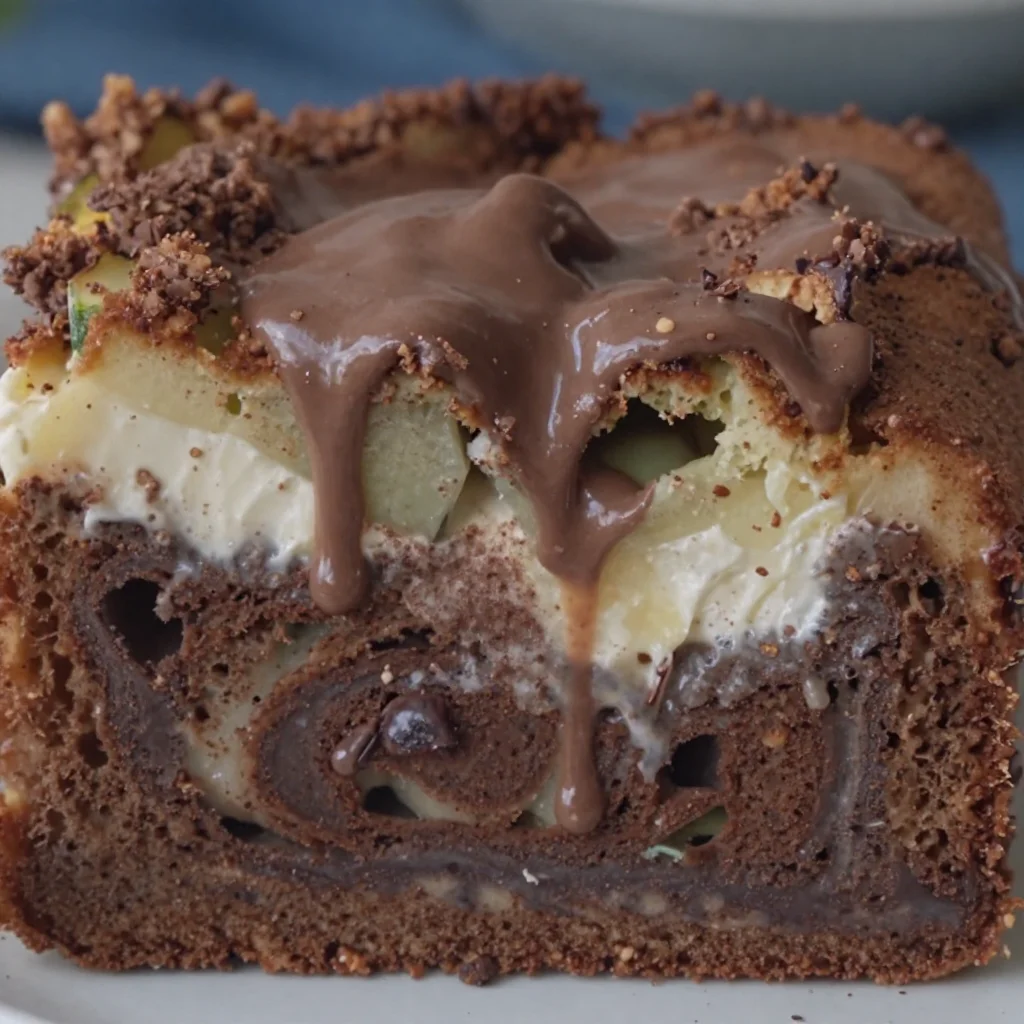
One-Pan Zucchini Chocolate Swirl Sheet Cake (Easy Weeknight)
Indulge in a Slice of Heaven: Chocolate Swirl Zucchini Sheet Cake
Welcome to my cozy kitchen, where the aroma of sweet bakes and savory dishes fills the air! I’m Olivia Bennett, and I’m thrilled to share one of my all-time favorite recipes with you today: Chocolate Swirl Zucchini Sheet Cake. This delightful dessert is all about taking simple, humble ingredients and transforming them into something spectacular that not only pleases the taste buds but also warms the heart.
You might wonder, "Zucchini in a cake?" But trust me, this moist and decadent creation will make you fall in love with vegetables in a way you’ve never imagined. Perfectly spiced with cinnamon and complemented by rich chocolate, this cake is a burst of joy in every bite. Whether you’re whipping it up for a family gathering, a potluck, or just a cozy night in, this recipe is sure to impress. Plus, it’s a fantastic way to sneak in a little extra veggie goodness while satisfying your sweet tooth!
So roll up those sleeves and preheat your oven to 350°F (175°C); let’s dive into the delicious world of baking!
A Slice of Nostalgia
Growing up, my family had a tradition of baking together on rainy Sundays. One particular memory stands out: my grandma’s famous zucchini bread. The smell of fresh bread rising in the oven was nothing short of magic. One day, with a generous pile of zucchini from the garden, I suggested we mix things up with chocolate. My grandma raised an eyebrow but agreed. The result? A decadent chocolate zucchini cake that left us all in awe! This recipe is a tribute to those precious moments spent in the kitchen with loved ones, transforming ordinary ingredients into extraordinary bites of joy.
Ingredients
Here’s what you’ll need to create this irresistible Chocolate Swirl Zucchini Sheet Cake:
-
2 cups grated zucchini
(Don’t worry about peeling it—most of the nutrients are in the skin! If you don’t have zucchini, try using shredded carrots as a fun twist.) -
1 ½ cups all-purpose flour
(This is your base! For gluten-free options, a 1:1 gluten-free flour blend works great.) -
1 cup granulated sugar
(You can substitute with coconut sugar for a more caramel-like flavor, or use a sugar substitute if watching your sugar intake.) -
½ cup unsweetened cocoa powder
(This adds the chocolatey goodness! Dutch-processed cocoa lends a smoother texture, while regular cocoa gives a deeper chocolate flavor.) -
1 teaspoon baking soda
(Essential for fluffiness! Ensure it’s fresh. If you run out, you can use baking powder (just double the amount).) -
½ teaspoon baking powder
(This helps the cake rise perfectly! Similar to baking soda, make sure it’s not expired.) -
½ teaspoon salt
(Enhances flavor and balances the sweetness!) -
1 teaspoon ground cinnamon
(Warm spices elevate the chocolate flavor. Feel free to add a pinch of nutmeg for a cozy twist.) -
½ cup vegetable oil
(This keeps the cake moist. For a lighter option, you can substitute with applesauce or Greek yogurt—just add a touch more flour.) -
3 large eggs
(These are the glue! For an egg-free version, try flax eggs: mix 1 tablespoon of ground flaxseed with 2.5 tablespoons water; let sit for 5 minutes.) -
1 teaspoon vanilla extract
(A must for flavor! Use pure vanilla for the best taste; artificial extract just doesn’t cut it.) -
1 cup chocolate chips
(Semi-sweet is classic, but dark chocolate or even white chocolate would make for a fun variation!)
Step-by-Step Instructions
Step 1: Prepping the Zucchini
First, let’s give that zucchini a gentle wash. Grate it using a box grater or food processor. You want about 2 cups. Too watery? Squeeze the grated zucchini in a clean kitchen towel to remove any excess moisture—it’ll help keep your cake from getting soggy.
Step 2: Mix the Dry Ingredients
In a large mixing bowl, whisk together the flour, sugar, cocoa powder, baking soda, baking powder, salt, and cinnamon. Stop for a moment and inhale that chocolatey aroma! It’s the best kind of therapy, I swear.
Step 3: Combine the Wet Ingredients
In a separate bowl, beat the eggs, then add in the vegetable oil and vanilla extract. Give it a good whisk until combined—the more air you incorporate, the fluffier your cake will be!
Step 4: Join Wet and Dry
Now it’s time to make magic happen! Pour the wet mixture into the dry ingredients. Gently fold until just combined. Be cautious not to overmix; we want a tender cake, not a bread-like loaf!
Step 5: Add the Zucchini and Chocolate Chips
Fold in the grated zucchini and half of the chocolate chips. This is where the fun begins! The zucchini adds an incredible texture and moisture to the cake. Plus, those chocolate chips are about to melt into gooey perfection!
Step 6: Pour and Swirl
Pour the batter into a greased or lined sheet pan (16×12 inches works beautifully). Now, use a spatula to smooth it out evenly. Use the remaining chocolate chips and sprinkle them on top. If you’re feeling adventurous (and I always encourage that!), take a butter knife and create swirls in the batter—this adds a stunning visual!
Step 7: Bake to Perfection
Pop your cake in the oven and bake for about 25-30 minutes, or until a toothpick comes out clean. The aroma will fill your home, making it feel like a warm hug.
Step 8: Cool and Serve
Let the cake cool in the pan for about 10 minutes, then transfer to a wire rack to cool completely. This is the hardest part—waiting for it to cool! But believe me, a warm slice fresh out of the oven is magical.
Serving Suggestions
To serve, cut your Chocolate Swirl Zucchini Sheet Cake into squares. You can dust them with powdered sugar for a touch of elegance, or add a scoop of vanilla ice cream for those indulgent moments. Pair with a cup of coffee or tea, and you’ve got yourself a delightful afternoon treat!
Recipe Variations
- Nutty Crunch: Add chopped walnuts or pecans to the batter for extra texture and flavor.
- Spiced Up: Stir in a teaspoon of pumpkin spice or cardamom for a seasonal twist.
- Double Chocolate: Instead of just chocolate chips, swirl in some Nutella for an ultra-chocolatey delight!
- Fruity Bonus: Mix in some blueberries or raspberries for a fruity surprise amidst the chocolate.
- Gluten-Free: As mentioned earlier, opt for a gluten-free flour to cater to dietary needs.
Chef’s Notes
This recipe is a product of my kitchen experiments, evolving over the years. I started with zucchini bread, and after many successful (and not-so-successful) iterations, I landed on this chocolatey delight! Sometimes, I add a pinch of espresso powder to enhance the chocolate flavor further. And, oh boy, it is mouthwatering! Cooking and baking have a charm that keeps us connected, and I love that this cake feels like a warm embrace from the inside out.
FAQs and Troubleshooting
Can I freeze this cake?
Absolutely! Once cooled, wrap it tightly in plastic wrap and then in foil. You can freeze it for up to 3 months. Thaw it in the fridge overnight before enjoying!
My cake came out dry; what went wrong?
Overbaking is the culprit! Keep an eye on it as it gets closer to the baking time mentioned. Every oven is different, so checking with a toothpick can save the day.
Can I use other vegetables?
Definitely! While zucchini is the star here, shredded carrots or even finely grated beetroot could bring delightful variations.
Why should I use unsweetened cocoa powder?
Unsweetened cocoa powder allows you to control the sweetness of the cake while providing the rich chocolate flavor it craves. Sweetened cocoa can make your cake overly sweet.
Nutritional Info (Optional)
- Serving Size: 1 square (serves approximately 16)
- Calories: 230
- Fat: 10g
- Carbohydrates: 32g
- Protein: 3g
So, there you have it—my cherished Chocolate Swirl Zucchini Sheet Cake. With its tender crumb, rich chocolate flavor, and hidden veggie goodness, it’s a dessert that embodies love and warmth. I hope you try this recipe and make it your own—maybe even create some new cherished kitchen memories along the way. Happy baking!
Print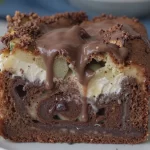
Chocolate Swirl Zucchini Sheet Cake
- Total Time: 45 minutes
- Yield: 16 servings 1x
- Diet: Vegetarian
Description
A moist and decadent chocolate cake incorporating grated zucchini for a unique twist, perfect for family gatherings or a cozy night in.
Ingredients
- 2 cups grated zucchini
- 1 ½ cups all-purpose flour
- 1 cup granulated sugar
- ½ cup unsweetened cocoa powder
- 1 teaspoon baking soda
- ½ teaspoon baking powder
- ½ teaspoon salt
- 1 teaspoon ground cinnamon
- ½ cup vegetable oil
- 3 large eggs
- 1 teaspoon vanilla extract
- 1 cup chocolate chips
Instructions
- Prepping the Zucchini: Wash and grate zucchini, then squeeze out excess moisture if needed.
- Mix the Dry Ingredients: Whisk flour, sugar, cocoa powder, baking soda, baking powder, salt, and cinnamon in a bowl.
- Combine the Wet Ingredients: Beat eggs, then mix in vegetable oil and vanilla extract.
- Join Wet and Dry: Pour the wet mixture into the dry ingredients and fold gently until just combined.
- Add the Zucchini and Chocolate Chips: Fold in grated zucchini and half the chocolate chips.
- Pour and Swirl: Transfer batter to a greased sheet pan, sprinkle remaining chocolate chips, and create swirls.
- Bake to Perfection: Bake in a preheated oven at 350°F for 25-30 minutes or until a toothpick comes out clean.
- Cool and Serve: Let the cake cool before transferring to a wire rack.
Notes
Dust with powdered sugar or serve with ice cream for an extra treat. Can freeze for up to 3 months.
- Prep Time: 15 minutes
- Cook Time: 30 minutes
- Category: Dessert
- Method: Baking
- Cuisine: American
Nutrition
- Serving Size: 1 square
- Calories: 230
- Sugar: 15g
- Sodium: 200mg
- Fat: 10g
- Saturated Fat: 2g
- Unsaturated Fat: 8g
- Trans Fat: 0g
- Carbohydrates: 32g
- Fiber: 2g
- Protein: 3g
- Cholesterol: 50mg
Keywords: Chocolate Cake, Zucchini Cake, Dessert, Baking

One-Bowl Chocolate Zucchini Cake: Easy Weeknight Dessert
Chocolate Zucchini Cake: A Sweet Surprise from the Garden
Welcome to my kitchen, where the magic of baking is about to unfold! I’m so thrilled to share one of my all-time favorite recipes with you: Chocolate Zucchini Cake. Now, before you raise an eyebrow at the idea of veggie-infused dessert, let me assure you that this cake is velvety, rich, and incredibly delicious. The secret? Fresh zucchini adds moisture and a subtle sweetness that takes chocolate to a whole new level. So grab your apron, let’s make some kitchen magic together!
When summertime rolls around, gardens burst with vibrant zucchinis, and that’s when I find myself getting a little creative. My fondest food memories revolve around those lazy summer afternoons spent in my grandmother’s kitchen. She had a spectacular garden, overflowing with vegetables, and there were always a few overflowing bowls of freshly grated zucchini in her fridge. I can still picture her hands, dusted with flour, stirring a divine chocolate cake batter, while the inviting smell of cocoa danced around the room. It was a baking tradition that filled my heart (and belly) with joy, and today, I continue that legacy right from my cozy kitchen.
Delightfully moist and decadent, this Chocolate Zucchini Cake is a perfect balance of flavors. Whether you have an abundance of zucchini or just want to sneak some veggies into your dessert (no judgment here!), this cake brings smiles all around. Plus, it’s super easy to make—let’s dive into the details!
Ingredients
Here’s what you’ll need to create this scrumptious cake:
- Zucchini: About 2 cups, grated. Choose medium-sized zucchinis for the best flavor. You can use yellow squash if zucchini isn’t available!
- All-Purpose Flour: 1 ½ cups for structure. Whole wheat flour can add nice density, or gluten-free flour works fine too.
- Unsweetened Cocoa Powder: ½ cup for that rich chocolate flavor. Look for high-quality cocoa for the best results; Dutch-processed cocoa gives a deeper taste.
- Granulated Sugar: 1 cup to balance the cocoa. For a healthier twist, substitute with coconut sugar or maple syrup.
- Brown Sugar: ½ cup for added moisture and flavor depth. Use light brown sugar for a milder taste or dark for more robust caramel notes.
- Baking Soda & Baking Powder: 1 tsp each to ensure a fluffy cake. If you’re out of baking powder, you can use 2 tsp of baking soda or swap it with self-rising flour.
- Salt: Just a pinch to enhance sweetness.
- Eggs: 2 large, room temperature. If you’re vegan or egg-free, unsweetened applesauce or flaxseed meal mixed with water can work as great substitutes (1 egg = ¼ cup applesauce or 1 tbsp flaxseed + 2.5 tbsp water).
- Vanilla Extract: 2 tsp for flavor. Homemade vanilla is a game-changer!
- Vegetable Oil: ½ cup for moisture. If you prefer, melted coconut oil or apple sauce can replace it.
- Chopped Walnuts or Pecans: Optional, about ½ cup for crunch! If you have nut allergies, feel free to skip or substitute with seeds.
Step-by-Step Instructions
Baking this Chocolate Zucchini Cake is a delightful journey, and I’m here to guide you step-by-step!
-
Preheat Your Oven: Start by preheating your oven to 350°F (175°C). This is an essential first step—trust me, no one likes a cake that’s in the oven too long after you’ve already mixed the batter.
-
Prep Your Pan: Grease and flour a 9×13-inch baking dish or two 9-inch round cake pans if you want to make a layered cake. If you’re feeling fancy, line the bottom with parchment paper for easy removal.
-
Grate the Zucchini: Grab your box grater, and grate that zucchini! You don’t need to peel it; the skin adds color and nutrients. Once you’ve got the zucchini grated, place it in a clean kitchen towel, twist it up, and squeeze out excess moisture. This keeps your cake from getting overly soggy.
-
Combine Dry Ingredients: In a large mixing bowl, sift together all-purpose flour, cocoa powder, baking soda, baking powder, and salt. Whisking them together ensures even distribution and helps combat lumps.
-
Mix the Sugars: In another bowl, whisk together the granulated sugar, brown sugar, and eggs until blended and slightly frothy. This introduces air into the mix and will help your cake rise beautifully!
-
Pour in Oil and Vanilla: Add the vegetable oil and vanilla extract to your sugar and egg mixture. Whisk until combined. A little tip: Make sure your oil is room temperature too—cold oil can create lumps.
-
Add Zucchini: Stir in the grated zucchini until fully incorporated. This is where the magic happens—the moisture from the zucchini makes the cake luscious.
-
Combine Wet and Dry: Gradually fold the dry ingredients into the wet ingredients using a spatula or wooden spoon. Mix until just combined; overmixing can lead to a dense cake.
-
Include Nuts: If using, fold in your chopped nuts. This is optional but adds a lovely crunch.
-
Bake: Pour the batter into your prepared pan(s) and smooth the top. Bake for about 30–35 minutes, checking for doneness with a toothpick inserted into the center; it should come out clean or with just a few crumbs attached.
-
Cool: Let the cake cool in the pan for about 10 minutes, then transfer it to a wire rack to cool completely before frosting.
Serving Suggestions
This Chocolate Zucchini Cake is divine on its own, but a light dusting of powdered sugar or a generous slather of cream cheese frosting takes it to the next level. Serve it warm with a scoop of vanilla ice cream or drizzle with chocolate sauce for an indulgent dessert. Plate it up with fresh berries or a mint sprig for a pop of color!
Recipe Variations
Get creative with this recipe! Here are a few twists you can try:
- Spicy Chocolate Zucchini Cake: Add a teaspoon of cinnamon or a pinch of cayenne for a flavorful kick.
- Minty Delight: Stir in mint extract or top with mint-flavored frosting for a refreshing zing.
- Double Chocolate: Throw in some chocolate chips for an extra chocolatey experience.
- Gluten-Free Option: Use a 1-to-1 gluten-free flour blend to make this entirely gluten-free without sacrificing flavor.
Chef’s Notes
Ah, the journey of this recipe! It’s evolved over the years, and I’ll confess there have been flops—like the time I thought I could skip squeezing the zucchini and ended up with a chocolate soup! Each failure brought me a fresh perspective: getting the right moisture without compromising the cake’s texture is key. Now, this cake holds a special place in my heart (and on my dinner table) as it embodies what cooking is all about—experimenting, sharing, and enjoying.
FAQs and Troubleshooting
-
Why did my cake turn out too dense?
This can happen if you overmix the batter or inadvertently add too much flour. Remember, just mix until combined! -
How do I know if my cake is done?
The toothpick test is your best friend! A toothpick should come out with a few moist crumbs, not wet batter. Also, the cake should spring back when lightly pressed. -
Can I store leftovers?
Absolutely! Store cooled cake in an airtight container at room temperature for up to 2 days, or refrigerate for up to a week. You can also freeze slices wrapped in plastic wrap for up to 3 months! -
Can I use frozen zucchini?
Yes! Just ensure you thaw it thoroughly and squeeze out excess moisture before adding it to your batter.
Nutritional Info
While I focus more on flavor and joy than strict nutritional guidelines when baking, this cake does offer a delicious way to sneak in some veggies! Each slice is rich in antioxidants from cocoa and adds some fiber from zucchini—great justification for that second piece, right?
Thank you for joining me in this baking adventure! I hope this Chocolate Zucchini Cake finds a special spot in your home, just like it has in mine. Happy baking, and may your kitchen always be filled with love and laughter!
Print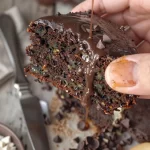
Chocolate Zucchini Cake
- Total Time: 50 minutes
- Yield: 8 servings 1x
- Diet: Vegetarian
Description
A rich and moist chocolate cake infused with fresh zucchini, perfect for sneaking veggies into dessert.
Ingredients
- About 2 cups zucchini, grated
- 1 ½ cups all-purpose flour
- ½ cup unsweetened cocoa powder
- 1 cup granulated sugar
- ½ cup brown sugar
- 1 tsp baking soda
- 1 tsp baking powder
- Salt, a pinch
- 2 large eggs, room temperature
- 2 tsp vanilla extract
- ½ cup vegetable oil
- ½ cup chopped walnuts or pecans (optional)
Instructions
- Preheat your oven to 350°F (175°C).
- Grease and flour a 9×13-inch baking dish or two 9-inch round cake pans.
- Grate the zucchini and squeeze out excess moisture using a clean kitchen towel.
- Combine the flour, cocoa powder, baking soda, baking powder, and salt in a large mixing bowl.
- Mix the granulated sugar, brown sugar, and eggs in another bowl until blended.
- Pour in the oil and vanilla extract, whisking until combined.
- Add the grated zucchini and stir until fully incorporated.
- Combine the dry ingredients with the wet ingredients until just mixed.
- Fold in the chopped nuts if using.
- Bake for about 30–35 minutes, checking with a toothpick for doneness.
- Cool the cake in the pan for 10 minutes before transferring to a wire rack.
Notes
A dusting of powdered sugar or cream cheese frosting enhances the cake’s flavor. Experiment with additional flavors or toppings to make it your own.
- Prep Time: 15 minutes
- Cook Time: 35 minutes
- Category: Dessert
- Method: Baking
- Cuisine: American
Nutrition
- Serving Size: 1 slice
- Calories: 280
- Sugar: 23g
- Sodium: 180mg
- Fat: 10g
- Saturated Fat: 1g
- Unsaturated Fat: 8g
- Trans Fat: 0g
- Carbohydrates: 38g
- Fiber: 2g
- Protein: 3g
- Cholesterol: 60mg
Keywords: chocolate cake, zucchini cake, dessert, baking, garden recipes

One-Bowl Chocolate Zucchini Cake: Quick Weeknight Bake
The Ultimate Chocolate Zucchini Cake Recipe: A Sweet Surprise from My Kitchen
Welcome back to my cozy kitchen, my lovely foodies! Today, I’m excited to share with you one of my all-time favorite recipes — a rich, indulgent, and surprisingly moist Chocolate Zucchini Cake. Now, before you raise an eyebrow at the idea of mixing chocolate and zucchini, let me assure you that this delightful treat is a hidden gem in the world of desserts. Seriously, it’s the kind of cake that’ll leave everyone guessing what that secret ingredient might be. Trust me, if you’ve had trouble getting the kids (or even some grown-ups) to eat their vegetables, this cake is going to be your new best friend!
As a home cook who genuinely enjoys the process of creating delicious meals, I’ve always found comfort in the idea that something as humble as zucchini can contribute to a decadent dessert. It makes me feel warm and fuzzy inside, knowing that the world of baking is full of surprises, and today I’m here to share that joy with you! So, grab a cup of tea (or coffee, if that’s more your speed), put on your favorite apron, and let’s dive into the lush, chocolatey depths of this recipe!
A Slice of Nostalgia: My Zucchini Cake Story
Let’s rewind a few years. I remember the sunny late summer afternoons when my grandmother would send me to the garden with her big wicker basket, asking me to gather the beautiful green zucchinis that had taken over her carefully-tended patch. She had a special knack for planting enough zucchini to feed an army, and we often found ourselves with basket loads of the stuff. Her answer to this bounty? Her famous Chocolate Zucchini Cake!
One memorable day, as the aroma of melted chocolate wafted through the air, I hovered in the kitchen, fascinated by my grandmother’s effortless grace. She told me that the key was to finely grate the zucchini so that it would blend seamlessly into the batter. That day we laughed, we shared stories, and with every bite of that cake, we felt a little closer. Now, whenever I bake this cake, it’s not just about satisfying a sweet tooth; it’s truly a trip down memory lane filled with love and gratitude.
Ingredients You’ll Need
Let’s gather our ingredients! This recipe is straightforward, and I’ll include some handy tips and substitutions along the way.
-
2 cups grated zucchini: Zucchini acts as a natural sweetener and keeps the cake moist. No zucchini? Use grated carrots instead for a similar texture and sweetness!
-
1½ cups all-purpose flour: The backbone of the cake’s structure. For a gluten-free option, try almond or oat flour.
-
½ cup unsweetened cocoa powder: This gives our cake its rich chocolate flavor. Dutch-processed cocoa will yield a smoother taste, while natural cocoa gives a bit of acidity to balance the sweetness.
-
1 teaspoon baking soda: This leavening agent ensures your cake rises beautifully. Double-check its expiration date to avoid a flat cake!
-
½ teaspoon salt: Just a pinch to enhance flavors. Use sea salt for a more complex taste or omit if you’re watching your sodium intake.
-
1 teaspoon vanilla extract: This adds warmth to the chocolate flavor. Feel free to substitute with almond extract for a different flavor profile.
-
3 large eggs: Eggs provide structure and moisture. You can replace them with flax eggs (1 tablespoon ground flaxseed mixed with 2.5 tablespoons water = 1 egg) for a vegan option.
-
1 cup granulated sugar: The sweetness you expect! For a healthier alternative, use maple syrup (just reduce the liquid in the recipe by a couple of tablespoons).
-
½ cup vegetable oil or melted coconut oil: This keeps our cake moist. If you prefer a lighter option, try applesauce.
-
1 cup semi-sweet chocolate chips: The crowning glory of our cake! You can swap these for dark chocolate chips or even white chocolate if you’re feeling adventurous.
Are you ready to gather everything? Let’s move on to the fun part — the baking!
Step-by-Step Instructions
Step 1: Preheat and Prepare
Begin by preheating your oven to 350°F (175°C). While that magical process happens, grease and flour a 9×13-inch baking pan or line it with parchment paper for easy release. A well-prepared pan makes all the difference!
Step 2: Grate the Zucchini
Grab that zucchini and finely grate it using the large holes of a box grater or a food processor. I love using a box grater — it feels so rustic and old-school! Once grated, place it in a clean kitchen towel and squeeze out any excess moisture. This is crucial to avoid a soggy cake.
Step 3: Mix Dry Ingredients
In a large bowl, whisk together the flour, cocoa powder, baking soda, and salt. This step not only combines the ingredients but also aerates the flour, leading to a lighter cake. The more you whisk, the more love goes into that bowl!
Step 4: Beat the Wet Ingredients
In another bowl, beat the eggs and sugar together until pale and fluffy. I usually do this in a stand mixer, but a hand mixer works just fine! Add in the oil and vanilla, and mix until everything is well combined.
Step 5: Combine and Fold
Now, gently fold the dry ingredients into the wet mixture in three parts, alternating with the grated zucchini. Make sure not to overmix — you want a tender crumb. This is where the magic happens; you’ll be amazed at how zucchini almost disappears into the batter!
Step 6: Add Chocolate Chips
Fold in the chocolate chips, making sure they’re evenly distributed throughout the batter. This is also the part where you can sneak a few morsels for yourself. Yum!
Step 7: Bake
Pour the batter into your prepared pan and spread it evenly. Pop it into your preheated oven and bake for about 30-35 minutes, or until a toothpick inserted in the center comes out clean (a few chocolate bits are okay!).
Step 8: Cool and Serve
Once baked to perfection, remove the cake from the oven and let it cool in the pan for about 15 minutes before transferring it to a wire rack to cool completely. Trust me, the anticipation makes the first slice all the more satisfying!
Serving Suggestions
When it comes to plating this delightful Chocolate Zucchini Cake, simplicity is key! Serve it dusted with powdered sugar, and maybe a dollop of whipped cream or a scoop of vanilla ice cream on the side. A sprinkle of fresh mint can add a refreshing touch. I love serving it with a strong cup of coffee or a warm herbal tea — the flavors dance together like old friends!
Recipe Variations
- Nutty Addition: Add a half cup of chopped walnuts or pecans for a rich, crunchy texture.
- Spicy Twist: Mix in a dash of cinnamon or chili powder for a warm, spicy kick.
- Frosted Delight: Top with cream cheese frosting or a rich ganache for an even more decadent experience.
- Fruit Fusion: Fold in some fresh berries or chopped pineapple for a tropical twist.
- Vegan Version: Replace eggs with flax eggs and use a plant-based oil for a completely vegan cake.
Chef’s Notes
I’ll let you in on a little secret: I often find myself sneaking extra zucchini into this cake when I have some leftovers from the farmers’ market. It’s a great way to use up any extra veggies and ensures that every bake is a bit different. Plus, the more zucchini, the moister the cake, in my opinion! Sometimes I even drizzle a quick ganache over the top for that extra pizzazz when I’m feeling fancy.
And let’s not forget that every kitchen disaster has its silver lining. There was a time I accidentally dropped half a jar of chocolate chips into the batter because I was multitasking (hello, chaos!). It turned out to be one of my best batches! So don’t be afraid to experiment — you never know what delicious surprises await!
FAQs and Troubleshooting
Q: Why did my cake turn out dry?
Dryness can occur if you overbaked the cake or if there wasn’t enough moisture in the batter. Don’t forget to check your oven temperature and use fresh ingredients!
Q: Can I freeze this cake?
Absolutely! This cake freezes beautifully. Just wrap it tightly in plastic wrap and then in foil. It can last up to 3 months in the freezer. Thaw it overnight in the fridge when you’re ready to enjoy!
Q: How do I know when the cake is done?
The toothpick test is your best friend! If it comes out clean or with just a few moist crumbs, you’re good to go.
Q: Can I reduce the sugar?
Absolutely! Feel free to reduce the sugar by about ¼ cup, especially if you plan to add frosting or serve it with sweet toppings.
Nutritional Info
While I don’t delve too deeply into numbers in my kitchen, here’s a rough estimate for a slice of this delightful cake (based on a cake yielding 12 slices):
- Calories: 220
- Carbs: 30g
- Fat: 8g
- Protein: 4g
Just remember, this recipe is all about sharing love and deliciousness — any cake made from the heart is good for the soul!
So there you have it! A hearty, delicious recipe for Chocolate Zucchini Cake that brings back fond memories while delivering an irresistible flavor. I can’t wait for you to try this out in your kitchen and share it with your loved ones. Don’t forget to let me know how it turned out and any fun kitchen stories you whip up along the way! Happy baking!
Print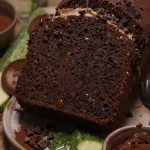
Ultimate Chocolate Zucchini Cake
- Total Time: 50 minutes
- Yield: 12 servings 1x
- Diet: Vegetarian
Description
A rich, moist Chocolate Zucchini Cake that surprisingly hides its secret ingredient, zucchini, making it a delightful dessert for all ages.
Ingredients
- 2 cups grated zucchini
- 1½ cups all-purpose flour
- ½ cup unsweetened cocoa powder
- 1 teaspoon baking soda
- ½ teaspoon salt
- 1 teaspoon vanilla extract
- 3 large eggs
- 1 cup granulated sugar
- ½ cup vegetable oil or melted coconut oil
- 1 cup semi-sweet chocolate chips
Instructions
- Preheat your oven to 350°F (175°C). Grease and flour a 9×13-inch baking pan or line it with parchment paper.
- Grate the zucchini and squeeze out excess moisture using a kitchen towel.
- Whisk together the flour, cocoa powder, baking soda, and salt in a large bowl.
- Beat the eggs and sugar in another bowl until pale and fluffy. Add in the oil and vanilla, mixing well.
- Fold the dry ingredients into the wet mixture in three parts, alternating with the grated zucchini.
- Fold in the chocolate chips, ensuring even distribution.
- Pour the batter into the prepared pan and bake for 30-35 minutes, or until a toothpick comes out clean.
- Cool the cake in the pan for 15 minutes before transferring it to a wire rack to cool completely.
Notes
For a nutty addition, consider adding ½ cup of chopped walnuts or pecans. This cake can be frosted with cream cheese frosting for added decadence.
- Prep Time: 15 minutes
- Cook Time: 35 minutes
- Category: Dessert
- Method: Baking
- Cuisine: American
Nutrition
- Serving Size: 1 slice
- Calories: 220
- Sugar: 15g
- Sodium: 200mg
- Fat: 8g
- Saturated Fat: 1g
- Unsaturated Fat: 5g
- Trans Fat: 0g
- Carbohydrates: 30g
- Fiber: 2g
- Protein: 4g
- Cholesterol: 30mg
Keywords: chocolate zucchini cake, dessert, baking, zucchini recipes, chocolate cake
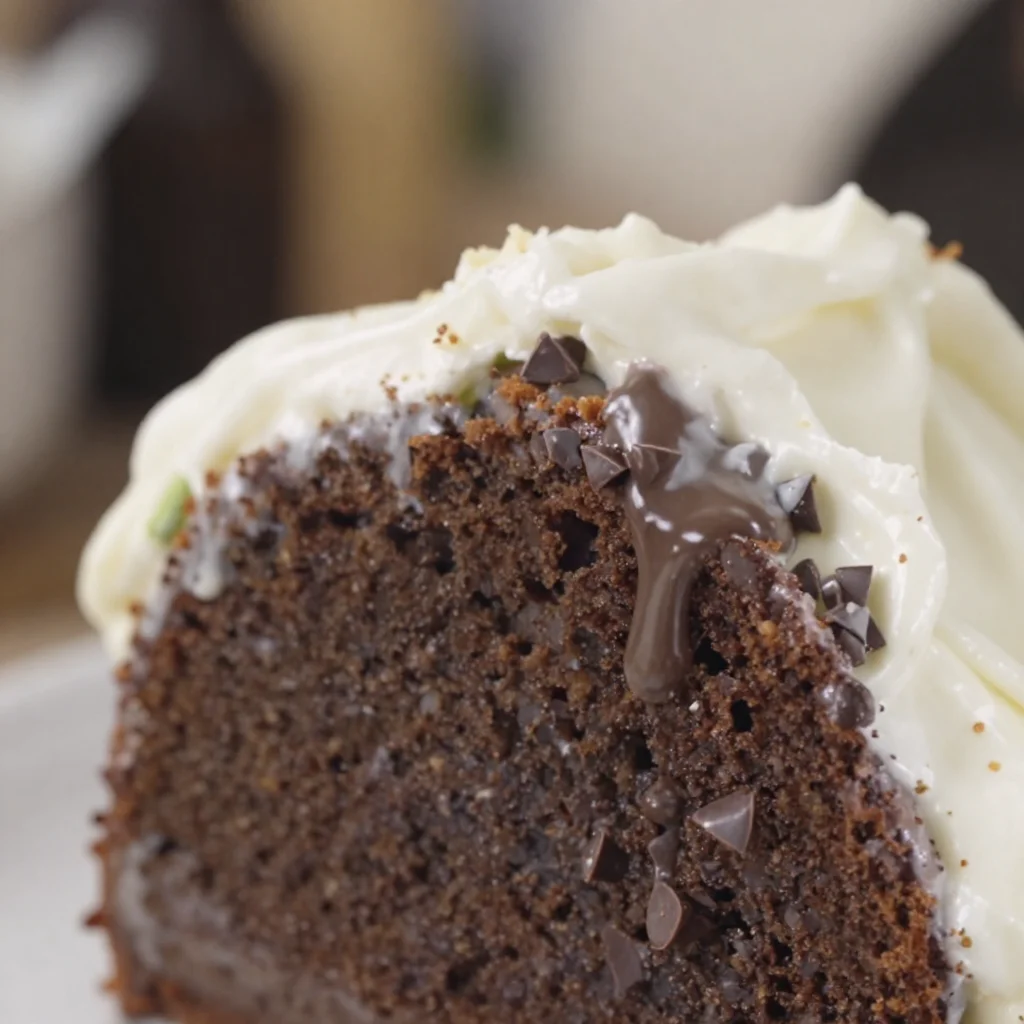
One-Bowl Chocolate Zucchini Cake: Easy Weeknight Dessert
The Ultimate Chocolate Zucchini Cake Recipe That Will Steal Your Heart
Welcome to my cozy corner of the internet! I’m Olivia Bennett, your friendly kitchen companion, and today, we’re diving into a recipe that’s not just about satisfying your sweet tooth—it’s a delightful way to sneak in a bit of goodness too! Yes, I’m talking about the incredible Chocolate Zucchini Cake. Now, I know what you might be thinking: “Zucchini in my cake? Really?” But trust me, this cake is a game changer; it’s moist, rich, and oh-so-decadent, all while packing a healthy punch with those sneaky veggies.
There’s something truly magical about combining flavors that you wouldn’t typically think go together. The cocoa brings out an amazing depth of flavor while the zucchini lends moisture without making it taste like you’re getting a serving of vegetables—this is truly comfort food at its finest. Whether you’re looking for a treat to share or just craving a slice of something sweet with your afternoon coffee, this cake is your new go-to.
Now, you might be wondering how I stumbled upon this delightful recipe. Let me take you back to one of my favorite summertime memories in my grandmother’s kitchen.
Growing up, summers at Grandma’s house were filled with endless treats, and her signature dish was her deliciously rich chocolate cake. One day, when I visited her during peak zucchini season, she decided to take a leap of faith and add this garden vegetable to her famous chocolate cake. At first, I was skeptical; I mean, who adds zucchini to cake? But the divine smell wafting through her house as it baked melted away my doubts. The moment I sunk my fork into that first slice and tasted the moist, chocolaty goodness was pure bliss. She told me the trick was to finely grate the zucchini, ensuring it blended seamlessly into the batter. From that day forward, I carried that lesson into my kitchen and have been enchanting friends and family with my version of her chocolate zucchini cake ever since!
Ingredients
To whip up your own Chocolate Zucchini Cake, gather the following ingredients. I’ve included some substitution tips and quick chef insights to help you along the way!
-
2 cups finely grated zucchini
Use fresh zucchini, and don’t worry about peeling it! The skin adds great color and nutrients. If you’re in a pinch, you can use pre-grated zucchini, but ensure it’s well-drained. -
1 ¾ cups all-purpose flour
All-purpose flour works perfectly, but if you want a gluten-free option, try a 1:1 gluten-free flour blend. Just make sure it contains xanthan gum for the right texture! -
¾ cup unsweetened cocoa powder
Quality matters! Choose a good quality unsweetened cocoa powder for soul-satisfying depth. Dark cocoa powder can also be used for a deeper chocolate flavor. -
1 tsp baking soda
This is your rising agent. Make sure it’s fresh! An expired baking soda will lead to a dense cake—no one wants that. -
½ tsp baking powder
For that perfect rise! This helps the cake stay soft and fluffy. Again, freshness is key here! -
1 tsp salt
Balances the sweetness. If you’re watching your sodium, you can cut this back slightly without compromising too much. -
1 ¼ cups granulated sugar
Feel free to reduce the sugar if you’d like it less sweet, or try coconut sugar for a healthier twist! -
½ cup vegetable oil
Oil keeps the cake moist, but you can substitute it with melted coconut oil or even applesauce for a lighter version—it will change the texture slightly but still be delicious! -
½ cup buttermilk
Buttermilk lends a delightful tang. You can make your own by adding a tablespoon of lemon juice or vinegar to milk and letting it sit for 5 minutes! -
2 large eggs
These provide structure. You can replace them with flax eggs (1 tablespoon ground flaxseed mixed with 2.5 tablespoons water) for a vegan version! -
1 tsp pure vanilla extract
Enhances the overall flavor. Always opt for pure over imitation for the best taste! -
1 cup semi-sweet chocolate chips
Baking chips are great for melting, but feel free to use dark chocolate chunks for a richer flavor. If you’re avoiding dairy, seek out vegan chocolate options!
Step-by-Step Instructions
Ready to embark on this chocolatey adventure? Let’s get baking!
-
Preheat Your Oven: Start by preheating your oven to 350°F (175°C). While it heats up, you can prepare your baking pan.
-
Prepare the Pan: Grease and flour a 9×13-inch baking dish. Alternatively, you can line the dish with parchment paper for easier removal later. I swear by this method for any cake!
-
Grate the Zucchini: Grab your box grater or a food processor and finely grate the zucchini. The key here is to squeeze out excess moisture—put that grated zucchini in a clean kitchen towel and give it a good twist. This ensures that your cake won’t turn out soggy!
-
Mix the Dry Ingredients: In a large mixing bowl, whisk together the flour, cocoa powder, baking soda, baking powder, and salt. This step is crucial as it helps to evenly distribute your leavening agents and prevents lumps in the batter.
-
Mix the Wet Ingredients: In another bowl, combine the granulated sugar, oil, buttermilk, eggs, and vanilla. Whisk until smooth. This is where all the magic happens! The sugar will dissolve partially, and the mixture will have a lovely creamy texture.
-
Combine the Mixtures: Gradually add your dry ingredients to the wet ingredients, stirring just until everything is combined. Be gentle—overmixing can lead to tough cake. A few lumps are perfectly okay!
-
Add the Zucchini and Chocolate Chips: With a spatula, fold in the grated zucchini and chocolate chips. The mixture will be thick and chunky, and it smells heavenly!
-
Transfer to the Baking Dish: Pour the batter into your prepared baking dish and spread it evenly. Give it a little shake to settle it nicely.
-
Bake: Place the dish in the oven and bake for 35-40 minutes, or until a toothpick inserted in the center comes out clean (or with just a few moist crumbs).
-
Cool: Once baked, remove from the oven and let it cool for about 10-15 minutes in the pan. Then, transfer it to a wire rack to cool completely. The aroma wafting through your kitchen will have everyone asking, “What’s baking?”
Serving Suggestions
Once your cake has cooled, it’s time to serve! Dust it with powdered sugar for a simple yet elegant touch, or slather on a rich chocolate frosting or cream cheese frosting for some serious indulgence. You can also serve it with a dollop of whipped cream or a scoop of vanilla ice cream for that extra touch of sweetness. A slice of this moist and chocolaty delight pairs beautifully with a warm cup of coffee or a luscious glass of cold milk.
Recipe Variations
Here are a few fun twists to take your Chocolate Zucchini Cake to the next level!
-
Chocolate Orange Zucchini Cake: Add the zest of one orange to the batter for a refreshing citrus twist that complements the chocolate beautifully.
-
Nutty Delight: Stir in half a cup of chopped walnuts or pecans for added crunch and flavor.
-
Swapping Sweeteners: Experiment with maple syrup or honey instead of granulated sugar for a different sweet profile.
-
Gluten-Free Option: Use almond flour or a gluten-free flour blend to cater to gluten sensitivity—just adjust the liquid slightly since almond flour can absorb more moisture.
-
Chocolate Mint Zucchini Cake: Incorporate a few drops of peppermint extract for a refreshing chocolate mint twist. Perfect for the holiday season!
Chef’s Notes
As with all recipes, this chocolate zucchini cake has a life of its own in terms of evolution. I’ve experimented with various sweeteners, flours, and add-ins over the years. One fun memory I have is testing this cake in my friend Jamie’s kitchen, where we tried adding leftover cream cheese frosting from another dish—it took the whole experience to a new level! Now, I often use that frosting to make it more indulgent. Each batch has its own quirks and character, and I love that it can be customized. This recipe has unwittingly become a foundation for creativity in the kitchen, and it always brings a smile to faces around the table.
FAQs and Troubleshooting
-
Why did my cake come out dense?
Ensure you’re not overmixing the batter—gently combine the ingredients and remember to measure accurately. Also, check the freshness of your leavening agents. -
Can I freeze this cake?
Absolutely! Wrap the completely cooled cake in plastic wrap and then in aluminum foil. It will keep well for about 3 months in the freezer. Just thaw before serving! -
What’s the best way to store leftover cake?
Keep your cake covered at room temperature for about 2-3 days or store it in the fridge for up to a week. -
How can I make the frosting extra fluffy?
When preparing cream cheese frosting, beat the cream cheese and butter very well until light and fluffy before adding powdered sugar. This will give your frosting that airy texture!
There you have it—my cherished Chocolate Zucchini Cake recipe! I invite you to step into your kitchen and immerse yourself in these flavors. May every slice remind you of sweet memories and cozy moments shared with your loved ones. Happy baking, my friend!
Print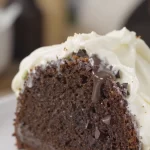
The Ultimate Chocolate Zucchini Cake
- Total Time: 55 minutes
- Yield: 12 servings 1x
- Diet: Vegetarian
Description
A moist and rich chocolate cake that cleverly incorporates zucchini for added nutrition without compromising on flavor.
Ingredients
- 2 cups finely grated zucchini
- 1 ¾ cups all-purpose flour
- ¾ cup unsweetened cocoa powder
- 1 tsp baking soda
- ½ tsp baking powder
- 1 tsp salt
- 1 ¼ cups granulated sugar
- ½ cup vegetable oil
- ½ cup buttermilk
- 2 large eggs
- 1 tsp pure vanilla extract
- 1 cup semi-sweet chocolate chips
Instructions
- Preheat your oven to 350°F (175°C).
- Prepare a 9×13-inch baking dish by greasing and flouring it.
- Grate the zucchini and squeeze out excess moisture using a kitchen towel.
- Mix the dry ingredients: flour, cocoa powder, baking soda, baking powder, and salt.
- Mix the wet ingredients: sugar, oil, buttermilk, eggs, and vanilla until smooth.
- Combine the dry and wet ingredients until just blended.
- Add in the grated zucchini and chocolate chips, folding gently.
- Transfer the batter to the prepared baking dish.
- Bake for 35-40 minutes, until a toothpick comes out clean.
- Cool for 10-15 minutes in the pan, then transfer to a wire rack to cool completely.
Notes
Dust with powdered sugar or top with chocolate frosting. Consider adding nuts or citrus zest for variations.
- Prep Time: 15 minutes
- Cook Time: 40 minutes
- Category: Dessert
- Method: Baking
- Cuisine: American
Nutrition
- Serving Size: 1 slice
- Calories: 350
- Sugar: 20g
- Sodium: 400mg
- Fat: 16g
- Saturated Fat: 3g
- Unsaturated Fat: 8g
- Trans Fat: 0g
- Carbohydrates: 50g
- Fiber: 3g
- Protein: 5g
- Cholesterol: 30mg
Keywords: chocolate cake, zucchini cake, dessert recipe, moist cake, healthy desserts


