Sugar-Free Cheesecake Bars
Sugar-Free Cheesecake Bars: A Decadent Delight Without the Guilt
Welcome back to my cozy kitchen! Today, we’re diving into a delightful dessert that not only satisfies your sweet tooth but also keeps those sugar levels in check. Yes, you guessed it — we’re making Sugar-Free Cheesecake Bars! As a passionate home cook, I always find myself on the lookout for recipes that make everyone feel included—especially those who might be watching their sugar intake.
These cheesecake bars are creamy, dreamy, and utterly delicious, proving that you don’t need to sacrifice flavor for health. On a crisp autumn afternoon, there’s nothing quite like the rich aroma of cream cheese melding with vanilla and a hint of lemon wafting through the air. It’s those moments when friends gather around my kitchen island, forks in hand, that I truly cherish.
Cheesecakes have always held a special place in my heart—and my recipe box. Growing up, my grandmother would whip up her famous cheesecake for every family gathering, and I’d sit cross-legged on the kitchen floor, soaking in her every move. I can still picture her, apron dusted with flour, laughter bubbling up as she guided me through the process. This recipe is inspired by her classic, yet with a modern twist!
When I think of desserts, I want them to evoke that same feeling of warmth and happiness that my grandmother’s cheesecake did. So, let’s roll up our sleeves, don our aprons, and get ready to create a sweet indulgence that’s perfect for any occasion—without the guilt that often comes with sugary treats. Let’s make some Sugar-Free Cheesecake Bars!
Personal Story
I’ve always had a soft spot for cheesecakes. One of my fondest memories is from my childhood, standing by my grandmother’s side as she baked. It was around the holidays, chilly outside, and the air in her warm kitchen was filled with laughter and the smell of her classic cheesecake setting in the oven. That creamy, tender filling topped with smooth raspberry sauce was pure bliss!
In her wise and cheerful manner, she taught me that a good cheesecake starts with quality ingredients, a little love, and a whole lot of patience. However, as I grew older, I realized that my health needed attention, and I started experimenting with alternatives to sugar and other ingredients. I was determined to create a recipe that would evoke the same nostalgic flavors of my grandmother’s cheesecake yet still be kinder to my waistline. And thus, my journey to these Sugar-Free Cheesecake Bars began! Every time I make them, I can’t help but smile, knowing that I’m passing down this legacy while also taking care of my health—and yours.
Ingredients
Here’s what you’ll need for these delightful bars, along with some helpful tips and substitution ideas:
-
Cream Cheese (16 oz, softened)
- The star of the show! Use full-fat cream cheese for a rich, creamy texture. Low-fat options work, but they may result in a dryer texture.
-
Greek Yogurt (1 cup)
- This adds a nice tang and creamy texture. Feel free to swap it with any plain yogurt or even sour cream for a richer taste.
-
Eggs (2 large)
- They are essential for structure. If you’re vegan or egg-free, try using flax eggs as a substitute: mix 1 tablespoon of ground flaxseed with 2.5 tablespoons of water and let it sit for 5 minutes.
-
Sugar Substitute (1/2 cup)
- Here’s where we cut the sugar! Use erythritol, stevia, or monk fruit sweetener. If using a granulated sweetener, remember it should be a 1:1 ratio for sweetness.
-
Vanilla Extract (2 teaspoons)
- For that warm, inviting flavor! Always use pure vanilla extract for the best taste.
-
Lemon Juice (1 tablespoon)
- Freshly squeezed adds an extra zing! If you’re in a pinch, bottled lemon juice will work, but it won’t be as bright.
-
Almond Flour (1 cup)
- This will be our crust base. If you’re nut-free, use gluten-free graham cracker crumbs or oat flour.
-
Coconut Oil (1/4 cup, melted)
- This adds moisture and binds your crust together. Unsalted butter can serve as a quick substitute.
-
Salt (1/4 teaspoon)
- Just a pinch to balance flavors and enhance sweetness.
Step-by-Step Instructions
Alright, my fellow foodies, grab those aprons, and let’s get cooking! Here’s how to whip up your own Sugar-Free Cheesecake Bars:
-
Preheat the Oven
First things first, we need to preheat your oven to 325°F (160°C). This helps achieve that perfectly set filling while allowing your crust to bake nicely without becoming too hard. -
Make the Crust
In a medium mixing bowl, combine 1 cup of almond flour, 1/4 cup melted coconut oil, and a pinch of salt until well-mixed. If you prefer a crust with more texture, you can add in a tablespoon or two of chopped nuts! Press this mixture into the bottom of an 8×8-inch baking dish lined with parchment paper, ensuring it’s evenly compact. Using a measuring cup can help smooth it out. Pop this into the preheated oven for 10–12 minutes until lightly golden, and let it cool while we prepare the filling. -
Mix the Filling
In another large mixing bowl, beat together 16 oz of softened cream cheese and 1/2 cup of your sugar substitute using a hand mixer or standing mixer until smooth. This is where the magic happens—make sure there are no lumps! -
Add the Rest
Slowly incorporate 1 cup of Greek yogurt, 2 eggs, 2 teaspoons of vanilla extract, and 1 tablespoon of lemon juice. Mix on low speed until everything is blended. Take a moment to taste the batter—this is one of my favorite parts! You might want to adjust sweetness at this point; feel free to add a touch more sweetener if desired. -
Pour and Bake
Pour that luscious filling over the pre-baked crust. Give the pan a gentle shake to level it out (this helps get rid of any bubbles). Bake in the oven for 25-30 minutes, or until the center is set but still slightly jiggly. Remember, it will continue to firm up as it cools! -
Cool Down
Once baked, let your cheesecake bars cool initially at room temperature for about 30 minutes. Then, cover and place them in the refrigerator to chill for at least 2 hours or overnight if you can wait! Patience is key here! -
Slice and Serve
Once fully chilled, lift the cheesecake out from the baking dish using the parchment paper. Slice it into squares and enjoy every, single bite. Maybe sprinkle some fresh berries on top, or drizzle with a bit of sugar-free chocolate sauce—anything goes!
Serving Suggestions
For the ultimate presentation, arrange the cheesecake bars on a nice serving platter with a few fresh berries scattered around. A dollop of whipped cream on top (you can use sugar-free whipped cream) adds a touch of elegance. If you want to add a special flair, a sprig of mint can elevate the look.
Recipe Variations
-
Chocolate Swirl: Melt some sugar-free chocolate and swirl it into the filling before baking for a decadent chocolate cheesecake!
-
Berry Bliss: Fold in some fresh or frozen blueberries or raspberries into the filling for fruity bursts.
-
Nuts About You: If you love nuts, add finely chopped pecans or walnuts into your crust for an extra crunch!
-
Pumpkin Spice: Add 1/2 cup of pumpkin puree and some pumpkin pie spice for a seasonal twist.
-
Coconut Lime: Substitute the lemon juice for lime and add shredded coconut to the crust for a tropical flair.
Chef’s Notes
I’ll let you in on a little secret: I’ve made these cheesecake bars way too many times to count—trust me, having a sugar-free option helps me keep my sweet cravings in line! You can actually play with the sweetness level to suit your taste, and over time, I’ve switched my sugar substitutes to reflect what’s available and more commonly liked. I remember making these one holiday season; they disappeared in minutes at my family gathering!
Once, I even forgot to add the eggs! The bars still turned out surprisingly delicious, albeit a little denser than normal. It was a happy accident, and it’s these moments in the kitchen that remind us cooking is about exploration and having fun!
FAQs and Troubleshooting
Q: My cheesecake bars cracked! What did I do wrong?
A: Cracking can be caused by too much air in the batter. Make sure to mix on low speed and don’t overbeat the cream cheese. Additionally, bake slowly at a lower temperature, as sudden changes can create cracks.
Q: How do I know when my cheesecake is done?
A: Your cheesecake is done when the edges are set and the middle is still slightly jiggly. It will continue to set as it cools in the fridge.
Q: Can I freeze these bars?
A: Yes! Slice them after they have fully cooled, then wrap them tightly in plastic wrap and foil, or store them in an airtight container. They’ll last for about 2–3 months in the freezer. Just let them thaw in the fridge before serving.
Q: I don’t like Greek yogurt, what can I use instead?
A: You can substitute it with sour cream or even a plant-based yogurt for a dairy-free version.
Nutritional Info
These Sugar-Free Cheesecake Bars, when made with my recommended substitutions, yield about 8 servings, with each serving containing approximately:
- Calories: 180
- Fat: 14g
- Carbohydrates: 5g
- Fiber: 1g
- Protein: 6g
- Sugar: 2g
And there you have it—my favorite Sugar-Free Cheesecake Bars, a sweet treat that fits into a healthy lifestyle. I hope you try this recipe and enjoy every bite as much as I do. Happy baking, and remember: the kitchen is the heart of the home. Here’s to the beautiful memories we create around the table!
Print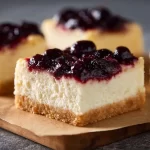
Sugar-Free Cheesecake Bars
- Total Time: 45 minutes
- Yield: 8 servings 1x
- Diet: Gluten-Free, Sugar-Free
Description
A guilt-free dessert that captures the creamy and rich flavors of traditional cheesecake, perfect for those watching their sugar intake.
Ingredients
- 16 oz Cream Cheese, softened
- 1 cup Greek Yogurt
- 2 large Eggs
- 1/2 cup Sugar Substitute (erythritol, stevia or monk fruit)
- 2 teaspoons Vanilla Extract
- 1 tablespoon Lemon Juice
- 1 cup Almond Flour
- 1/4 cup Coconut Oil, melted
- 1/4 teaspoon Salt
Instructions
- Preheat the oven to 325°F (160°C).
- Combine almond flour, melted coconut oil, and salt in a medium mixing bowl, then press into an 8×8-inch baking dish.
- Bake the crust for 10-12 minutes until lightly golden and let cool.
- Beat the softened cream cheese and sugar substitute until smooth in a large bowl.
- Add Greek yogurt, eggs, vanilla extract, and lemon juice, mixing on low speed until blended.
- Pour the filling over the pre-baked crust and level it out.
- Bake for 25-30 minutes, or until the center is set but slightly jiggly.
- Cool at room temperature for 30 minutes, then refrigerate for at least 2 hours before slicing.
Notes
These bars can be topped with fresh berries or a drizzle of sugar-free chocolate sauce for extra flair.
- Prep Time: 15 minutes
- Cook Time: 30 minutes
- Category: Dessert
- Method: Baking
- Cuisine: American
Nutrition
- Serving Size: 1 bar
- Calories: 180
- Sugar: 2g
- Sodium: 300mg
- Fat: 14g
- Saturated Fat: 8g
- Unsaturated Fat: 6g
- Trans Fat: 0g
- Carbohydrates: 5g
- Fiber: 1g
- Protein: 6g
- Cholesterol: 50mg
Keywords: cheesecake, sugar-free dessert, healthy dessert, gluten-free cheesecake

Quick Greek Yogurt Jello Cheesecake
A Slice of Heaven: Quick Greek Yogurt Jello Cheesecake
Introduction
Welcome back to my cozy corner of the kitchen! Today, we’re diving into a delightful treat that not only satisfies your sweet tooth but also brings a playful twist to traditional cheesecake. Enter the Quick Greek Yogurt Jello Cheesecake! This dessert is the perfect blend of creamy richness and fruity brightness, making it a family favorite at my house and the showstopper of every gathering.
I remember my first encounter with Greek yogurt cheesecake. It was a hot summer afternoon, and my good friend Mia invited me over for a potluck. As soon as I walked in, I was hit with the sweet scent of strawberries and cream. There, sitting proudly on the dining table, was a vibrant cheesecake adorned with colorful jelly. My heart raced as I took that first bite—the creamy texture, the fruity glaze, and the pleasant tang of Greek yogurt all danced together in perfect harmony. That day, I knew I had to recreate the magic at home!
Fast forward to today, and I’ve experimented with this recipe countless times. Each iteration is more exciting than the last, with flavors and toppings that reflect my mood and the seasons. Whether you’re feeding a crowd or treating yourself to a cozy night in, this Quick Greek Yogurt Jello Cheesecake will certainly impress. Plus, it’s easy, quick, and guilt-free enough to enjoy without any hesitation. Let’s roll up our sleeves and create this masterpiece together!
Personal Story
The inspiration for my Quick Greek Yogurt Jello Cheesecake came from my childhood summers spent at my grandparents’ house. Every Saturday, they would host what we called "Dessert Saturdays." The entire family would gather around, and my grandma would pull out her vintage cookbook filled with colorful pages of recipes, each one hand-written in her beautiful cursive.
One week, she decided to experiment with a new recipe that combined her love for cheesecake with my grandpa’s obsession with jello. She used light cream cheese and topped the cake with bright, gelatinous fruit that looked like a rainbow on a plate. I remember watching her whip the ingredients together, the kitchen filled with laughter, chatter, and the comfortable clanking of mixing bowls. We all eagerly awaited that first slice, and when it finally arrived, it became an instant family legend!
This Quick Greek Yogurt Jello Cheesecake is my homage to those joyful Saturdays, merging fun flavors while creating new memories. Without further ado, let’s gather our ingredients and bring this beautiful dessert to life!
Ingredients
Here’s what you’ll need to whip up your very own Quick Greek Yogurt Jello Cheesecake:
-
16 oz Greek Yogurt (Plain or Vanilla)
- Tip: Use full-fat for creamier results or non-fat for a lighter option. Greek yogurt gives that rich texture while providing a protein boost!
-
8 oz Cream Cheese (Softened)
- Substitution: You can swap it with a dairy-free cream cheese if needed. Softening is crucial; otherwise, you risk lumps.
-
½ cup Sugar (Adjust to taste)
- Chef Insight: Feel free to substitute with honey, maple syrup, or a sweetener if you’re looking to reduce sugar.
-
1 tsp Vanilla Extract
- Tip: Pure vanilla extract is always best, but imitation works in a pinch. It adds that warm flavor familiar in dessert classics!
-
1 packet (3 oz) Jello Powder (Your favorite flavor)
- Chef Insight: The choice of flavor is where you can get creative! Strawberry, raspberry, or lemon are big hits, but feel free to experiment!
-
1 cup Boiling Water
- Quick Tip: Stirring the jello powder in boiling water helps it dissolve completely, giving a smooth finish.
-
1 cup Graham Cracker Crumbs
- Substitution: Gluten-free or any cookie crumbs work well here, too! This will be the crunchy base of your cheesecake.
-
½ cup Unsalted Butter (Melted)
- Tip: Ensure the butter is cooled slightly before mixing, so it doesn’t melt the crumbs.
-
Fresh Fruit (for garnish, optional)
- Chef Insight: Strawberries, blueberries, or kiwis not only look stunning but add fruity freshness that balances the sweetness.
Step-by-Step Instructions
-
Prepare the Crust:
- In a medium bowl, combine the Graham cracker crumbs and melted butter. Mix until the crumbs are evenly coated and resemble wet sand. This is a fantastic way to get that satisfying crunch!
-
Press Crust into Pan:
- Firmly press the crumb mixture into the bottom of a 9-inch springform pan or a pie dish. Use the back of a measuring cup for evenness and to pack it tightly. This will give your cheesecake a great foundation!
-
Make the Jello:
- Pour 1 cup boiling water into a mixing bowl, then add your Jello powder. Stir until completely dissolved. This step is super crucial! If there are any chunks remaining, they will show up in your final product.
-
Cream the Cheese:
- In another bowl, combine the softened cream cheese, Greek yogurt, sugar, and vanilla extract. Using a hand mixer (or stand mixer) on medium speed, whip until the mixture is creamy and there are no lumps.
-
Incorporate the Jello:
- Once the jello mixture has cooled slightly (but is still liquid), slowly pour it into the cream cheese mixture while mixing. This combination adds a stunning zest that takes your cheesecake to the next level!
-
Combine and Chill:
- Gently pour the filling over your crust in the springform pan. Smooth the top with a spatula for a gorgeous finish. Cover with plastic wrap and refrigerate for at least 4 hours, or until set. Overnight chilling is ideal for a firmer texture!
-
Garnish and Serve:
- When you’re ready to serve, remove the cheesecake from the pan. Top with fresh fruit, if desired, and slice away! It’s always rewarding to see your creation take center stage!
Serving Suggestions
When it comes to presenting this jewel of a dessert, simplicity is key. A classic way to serve is to slice it into wedges, then elegantly arrange them on a colorful plate. If you want to impress a crowd, consider adding a drizzle of honey or chocolate sauce over the top, or a sprinkle of crushed nuts for added texture. Remember, a beautiful cheesecake doesn’t need much to shine!
Recipe Variations
Here are some fun twists you can play with to make this cheesecake your own:
-
Berries Delight: Swirl in a berry puree (like raspberries or blueberries) into the filling before it sets for a burst of flavor.
-
Chocolate Lover’s: Add cocoa powder to the cream cheese filling or pour some melted chocolate over the top.
-
Spiced Pumpkin: With fall vibes, replace the jello with pumpkin puree and add cinnamon and nutmeg for a seasonal treat!
-
Nutty Crunch: Mix in some finely crushed nuts like pecans or almonds into the crust for added texture.
-
Matcha Twist: Stir some matcha powder into the Greek yogurt layer for an earthy flavor and vibrant color!
Chef’s Notes
As I reflect on my journey with this Quick Greek Yogurt Jello Cheesecake, I realize how it has evolved, much like my cooking journey. Initially, I would follow recipes to the letter, afraid to deviate. But now, this cheesecake is a canvas for creativity! It showcases how playful cooking can be—each time I make it, I infuse it with a little bit of my mood and the season.
And here’s a funny little secret: the first time I attempted this recipe, I accidentally grabbed the chili powder instead of cinnamon! Not my proudest moment—I wouldn’t recommend it! Safe to say, that mishap led to a brief, fiery adventure, during which we had a hearty laugh and a lot of water!
FAQs and Troubleshooting
-
Why is my cheesecake too watery?
- Ensure the jello is fully dissolved before mixing. If it sits too long before setting, it could lead to a watery consistency. Patience is key!
-
Can I skip the jello?
- Of course! You can make a classic Greek yogurt cheesecake by skipping the jello. Just substitute it with some fresh fruit or even a fruit compote atop the cheesecake instead.
-
How long does it last in the fridge?
- This cheesecake stays fresh for about 5 days in the fridge. Just keep it covered to maintain its texture.
-
I accidentally added too much sugar, how can I fix it?
- If it’s too sweet, you can add some extra Greek yogurt and cream cheese to balance it out. Another option is to brighten it with a splash of lemon juice!
Nutritional Info (Optional)
While I encourage indulgence in desserts, it’s good to have an idea of what we’re serving! Here’s an approximate nutritional breakdown per slice (based on 12 servings):
- Calories: 200
- Protein: 5g
- Carbohydrates: 25g
- Fat: 9g
- Sugar: 12g
And there you have it! A delightful journey through the creation of a Quick Greek Yogurt Jello Cheesecake. I hope this recipe inspires you to embrace your inner chef and fill your home with delicious aromas and joyful laughter. Happy baking! 🍰✨
Print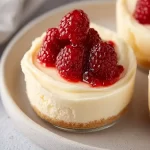
Quick Greek Yogurt Jello Cheesecake
- Total Time: 240 minutes
- Yield: 12 servings 1x
- Diet: Vegetarian
Description
A creamy and fruity cheesecake made with Greek yogurt and topped with colorful jello, perfect for any gathering.
Ingredients
- 16 oz Greek Yogurt (Plain or Vanilla)
- 8 oz Cream Cheese (Softened)
- ½ cup Sugar (Adjust to taste)
- 1 tsp Vanilla Extract
- 1 packet (3 oz) Jello Powder (Your favorite flavor)
- 1 cup Boiling Water
- 1 cup Graham Cracker Crumbs
- ½ cup Unsalted Butter (Melted)
- Fresh Fruit (for garnish, optional)
Instructions
- Prepare the Crust: In a medium bowl, combine the Graham cracker crumbs and melted butter. Mix until the crumbs are evenly coated and resemble wet sand.
- Press Crust into Pan: Firmly press the crumb mixture into the bottom of a 9-inch springform pan or a pie dish.
- Make the Jello: Pour 1 cup boiling water into a mixing bowl, then add your Jello powder. Stir until completely dissolved.
- Cream the Cheese: In another bowl, combine the softened cream cheese, Greek yogurt, sugar, and vanilla extract. Whip until creamy and smooth.
- Incorporate the Jello: Slowly pour the cooled jello mixture into the cream cheese mixture while mixing.
- Combine and Chill: Pour the filling over your crust. Smooth the top and refrigerate for at least 4 hours, or until set.
- Garnish and Serve: Remove the cheesecake from the pan, top with fresh fruit, and slice to serve.
Notes
Serve with a drizzle of honey or chocolate sauce for an extra touch.
- Prep Time: 30 minutes
- Cook Time: 0 minutes
- Category: Dessert
- Method: Chilling
- Cuisine: Greek
Nutrition
- Serving Size: 1 slice
- Calories: 200
- Sugar: 12g
- Sodium: 200mg
- Fat: 9g
- Saturated Fat: 5g
- Unsaturated Fat: 4g
- Trans Fat: 0g
- Carbohydrates: 25g
- Fiber: 0g
- Protein: 5g
- Cholesterol: 30mg
Keywords: cheesecake, dessert, Greek yogurt, jello, refreshing