
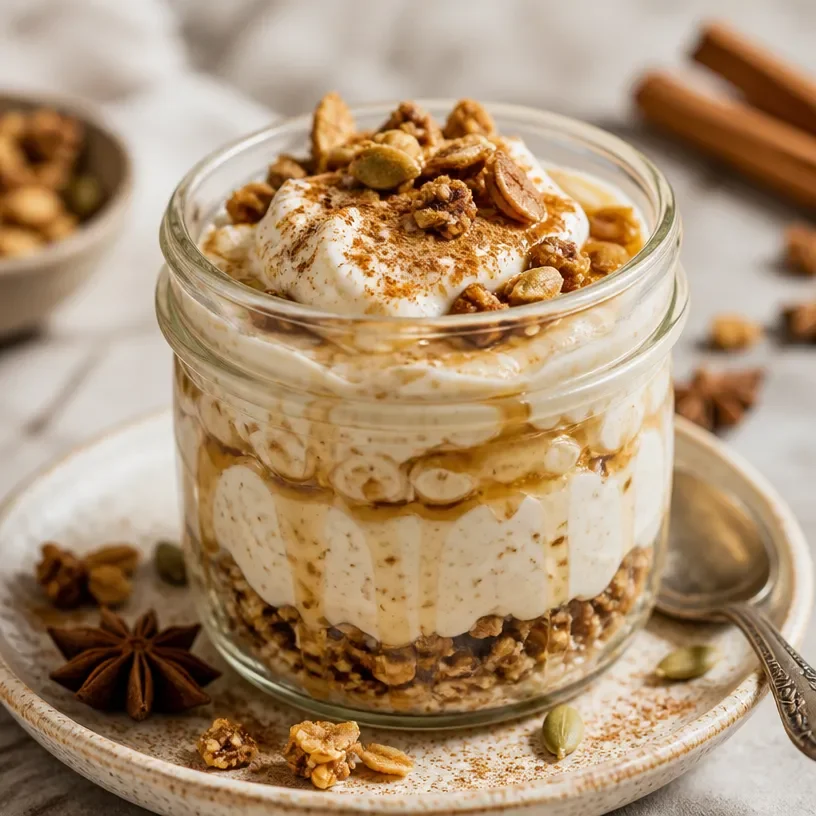
High-Protein Chai Cheesecake Jar: 5-Minute No-Bake Dessert
Indulge in Deliciousness: Protein Chai Cheesecake Jars
Welcome to my kitchen, fellow foodies! Today, we’re diving into something sweet, indulgent, and surprisingly guilt-free—Protein Chai Cheesecake Jars! Picture this: creamy cheesecake goodness layered with a hint of spiced chai, all in a portable, cute jar that’s perfect for breakfast or dessert. If you’re tired of the same old snacks and looking for something that feels like a cozy hug, you’ve stepped into the right recipe.
Now, you might be wondering, “What makes this cheesecake so special?” Well, not only is it a delightful fusion of flavors that brings out the warmth of chai spices, but it’s also packed with protein! That means you can enjoy these jars as a post-workout treat or a satisfying dessert without any guilt. Plus, they’re a breeze to whip up, making them perfect for both novice cooks and seasoned kitchen warriors alike.
Speaking of cozy, I’ve got a little kitchen story that I’d love to share. One rainy afternoon, I was cozying up at home with my family, and the aroma of spicy chai tea wafted through the air. My grandmother was brewing her famous chai, and I couldn’t help but reminisce about those chilly winters spent huddled in the kitchen, sipping warming cups while indulging in sweet treats. Inspired by those comforting memories, I decided to combine two of my favorite things—chai and cheesecake! And thus, the Protein Chai Cheesecake Jar was born. Now, let’s get into the delicious details so you can enjoy these jars today!
Ingredients
Here’s what you’ll need to create these delightful Protein Chai Cheesecake Jars. I’ve also included some handy tips and substitutions for each ingredient!
-
Cream Cheese (8 oz): The star of the show! Use full-fat for a rich flavor, or opt for lower-fat cream cheese for fewer calories. You can also substitute with a plant-based cream cheese for a dairy-free option.
-
Greek Yogurt (1 cup): This adds creaminess and boosts the protein content. Choose plain, nonfat for a lighter option. If you don’t have Greek yogurt, regular yogurt works too—just be aware it will be a bit less thick.
-
Protein Powder (1 scoop): Opt for vanilla flavor to enhance the cheesecake taste. You can use whey, casein, or plant-based protein (like pea or hemp), but be mindful of how each type affects the flavor and texture.
-
Chai Spice Mix (2 teaspoons): A key player in achieving that warm chai flavor! If you don’t have a mix, combine ground cinnamon, cardamom, ginger, and nutmeg to create your own.
-
Honey or Maple Syrup (2-3 tablespoons): This natural sweetener brings out the flavors beautifully. Use maple syrup for a vegan option; agave syrup is another alternative!
-
Graham Cracker Crumbs (1 cup): Such a classic cheesecake base! If you’re looking for gluten-free options, crushed almonds or gluten-free cookies work splendidly.
-
Butter (2 tablespoons, melted): This binds the crust together and adds flavor. For a dairy-free version, try coconut oil or a plant-based butter alternative.
-
Milk (2-3 tablespoons): Just enough to adjust the consistency! You can use cow’s milk or any plant-based milk like almond or oat.
Once you gather all these ingredients, you’ll be ready to create your very own chai cheesecake jars.
Step-by-Step Instructions
Now let’s bring this lovely recipe to life! Prepping these jars is super fun, and I’ve included my best tips along the way.
-
Prepare the Cheesecake Filling:
- In a large mixing bowl, combine the cream cheese and Greek yogurt. Use a hand mixer or a whisk to beat them together until smooth. This step is crucial, as it creates a creamy texture. If you go the whisk route, be prepared for a little workout!
-
Add the Protein Powder and Sweetener:
- Gradually mix in the protein powder and honey (or maple syrup) until fully combined. This stage is where the goodness gets real! Taste your mixture; adjust sweetener as needed, especially if you’re opting for plain Greek yogurt.
-
Incorporate the Chai Spice Mix:
- Sprinkle in the chai spice mix and give it all another mix. The aroma here is heavenly! If you want to amp up the chai flavor, consider adding an extra pinch of your favorite spice.
-
Create the Crust:
- In a separate bowl, mix the graham cracker crumbs with melted butter until combined. You want the crumbs to be moist enough to hold together without becoming too soggy—think the texture of wet sand.
-
Assemble in Jars:
- Grab your jars (or any small glasses), and start layering! Begin with a tablespoon of the graham cracker crust at the bottom. Next, add a layer of the cheesecake filling. Repeat this process until your jars are full, finishing off with cheesecake filling at the top.
-
Chill Out!
- Pop the jars in the fridge to chill for at least 2 hours—this allows the flavors to meld beautifully. If you’re crunched for time, 30 minutes can work in a pinch, but overnight is even better if you can wait!
-
Top and Serve:
- Before serving, you can add a dollop of whipped cream, a sprinkle of crushed graham crackers, or a sprinkle of cinnamon on top for an extra touch of fanciness. Let your creativity flow!
Serving Suggestions
To make your Protein Chai Cheesecake Jars truly special, try placing them on a cozy wooden board garnished with a few star anise or cinnamon sticks. A side of fresh fruit, like strawberries or figs, adds a lovely pop of color and freshness. Serve with a warm chai tea or a non-caffeinated herbal drink for the ultimate relaxing experience.
Recipe Variations
Feeling adventurous? Here are a few fun variations you can try with your Protein Chai Cheesecake Jars:
- Coffee Infusion: Swap out some of the milk with cold brew coffee for a delightful morning pick-me-up.
- Fruit Swirl: Drizzle a layer of fruit purée (mango, raspberry, or berry) between the layers for added flavor!
- Chocolate Twist: Incorporate cocoa powder into the filling for a chai-chocolate surprise. You could even add dark chocolate shavings on top!
- Nutty Crunch: Add a layer of chopped nuts (like pecans or walnuts) between the layers for an enjoyable texture and extra nutrient boost.
- Seasonal Spices: Switch up the chai spice for pumpkin spice in the fall for a festive touch.
Chef’s Notes
I have to say, these Protein Chai Cheesecake Jars have been a delightful project for my friends and family. One dose of these delicious treats leads to smiles all around! Initially, I started off making these in larger cheesecake form, but let’s be honest: individual jars are so much cuter and perfect for portion control. Plus, who doesn’t enjoy a dessert that’s also a bit of an eye-catcher?
Remember, the beauty of this recipe is its flexibility! Feel free to adjust the spices and sweetness to make it your own. It’s these little adaptations that keep cooking fun and personal!
FAQs and Troubleshooting
Q: Why is my cheesecake mixture too runny?
A: If the mixture seems too runny, try adding a bit more protein powder or Greek yogurt. You may also want to chill it longer before serving, as it will set up as it cools.
Q: Can I make this cheesecake jar in advance?
A: Absolutely! These jars store beautifully in the fridge for up to five days, making them a great week-ahead meal prep option.
Q: How do I know when my cheesecake jars are set?
A: Gently jiggle the jars. If the filling has a slight wobble but isn’t liquid, it’s ready! They’ll firm up more as they cool in the fridge.
Q: Can I freeze these cheesecake jars?
A: Yes, you can freeze them, but the texture may change slightly after thawing. If you choose to freeze, keep them tightly sealed, and allow them to thaw overnight in the fridge before enjoying.
Feeling inspired yet? I hope you’ve come away with some tips, ideas, and, most importantly, a desire to create your very own Protein Chai Cheesecake Jars! Try this recipe out, and let me know how it goes. Remember, cooking should be fun and filled with love—and a touch of spice doesn’t hurt either! Enjoy and happy cooking!
Print
Protein Chai Cheesecake Jars
- Total Time: 120 minutes
- Yield: 4 servings 1x
- Diet: High Protein
Description
Indulge in these creamy cheesecake jars layered with spiced chai flavor, perfect for a healthy treat or dessert.
Ingredients
- 8 oz Cream Cheese
- 1 cup Greek Yogurt
- 1 scoop Protein Powder
- 2 teaspoons Chai Spice Mix
- 2–3 tablespoons Honey or Maple Syrup
- 1 cup Graham Cracker Crumbs
- 2 tablespoons Butter, melted
- 2–3 tablespoons Milk
Instructions
- Prepare the Cheesecake Filling: In a large mixing bowl, combine the cream cheese and Greek yogurt. Use a hand mixer or a whisk to beat them together until smooth.
- Add the Protein Powder and Sweetener: Gradually mix in the protein powder and honey (or maple syrup) until fully combined.
- Incorporate the Chai Spice Mix: Sprinkle in the chai spice mix and give it all another mix.
- Create the Crust: In a separate bowl, mix the graham cracker crumbs with melted butter until combined.
- Assemble in Jars: Begin layering with graham cracker crust and cheesecake filling until jars are full.
- Chill Out! Pop the jars in the fridge to chill for at least 2 hours.
- Top and Serve: Before serving, add a dollop of whipped cream or a sprinkle of cinnamon for decoration.
Notes
These jars can be made in advance and stored in the fridge for up to five days. Feel free to adjust sweetness and spices to your taste.
- Prep Time: 15 minutes
- Cook Time: 0 minutes
- Category: Dessert
- Method: No Bake
- Cuisine: Fusion
Nutrition
- Serving Size: 1 jar
- Calories: 280
- Sugar: 10g
- Sodium: 150mg
- Fat: 14g
- Saturated Fat: 6g
- Unsaturated Fat: 8g
- Trans Fat: 0g
- Carbohydrates: 30g
- Fiber: 2g
- Protein: 12g
- Cholesterol: 40mg
Keywords: cheesecake, protein, chai, dessert, no bake, healthy treat
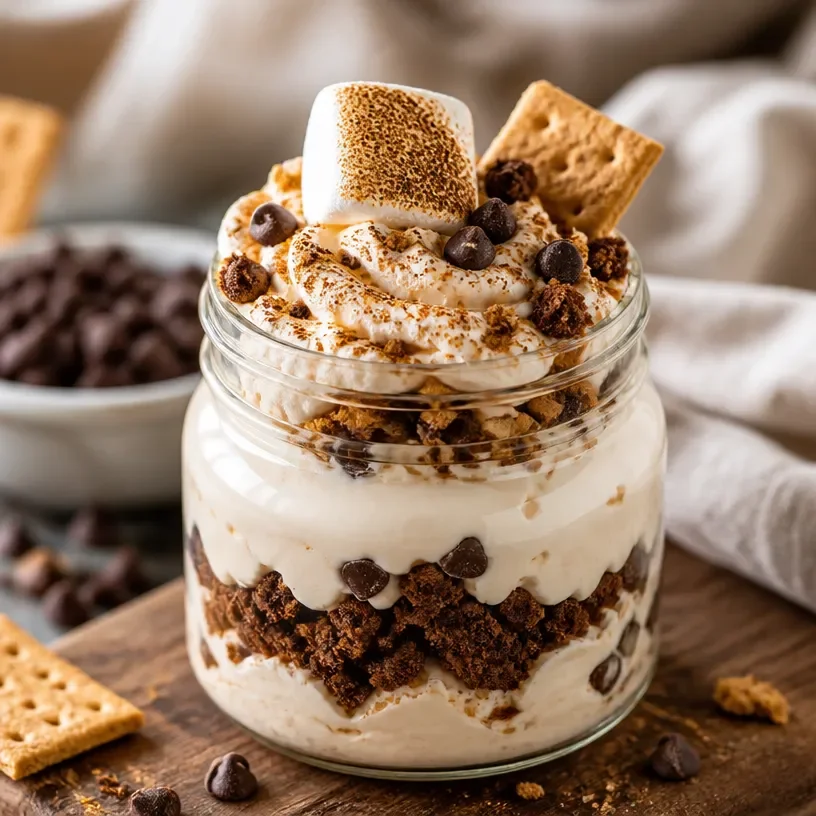
No-Bake Protein S’mores Jar (5-Minute High-Protein Snack)
Protein S’mores Jar: A Delicious, Wholesome Twist on a Classic Treat
Welcome to my cozy kitchen, food lovers! I’m Olivia Bennett, and today, I’m beyond excited to share with you a recipe that puts a delightful spin on a timeless favorite: the classic s’more. Introducing the Protein S’mores Jar! Imagine scooping into glass jars filled with layers of graham cracker crumbs, rich chocolate, fluffy marshmallow, and a hefty dose of protein! It’s an indulgent dessert that not only satisfies your sweet tooth but also fuels your body. Whether you’re looking for a post-workout treat, a snack for the kiddos, or just something sweet to enjoy at home, this Protein S’mores Jar is the answer.
This recipe encapsulates the essence of comfort food—sweet, gooey, and oh-so-fun to eat. Plus, it brings back warm memories of campfires, laughter, and roasting marshmallows under the stars. Let’s dive into how we can recreate that nostalgic magic with a twist that will leave you feeling good about indulging!
A Sticky, Sweet Memory
As a little girl, I spent countless summer nights camping in the woods with my family. I can still hear the crackling fire and the sounds of crickets chirping as my dad expertly toasted marshmallows on the end of a long stick. There was something so magical about the whole experience—the family together, laughter echoing in the trees, and those first bites of a hot, gooey s’more.
But oh, did I make a mess! Chocolate smeared all over my face, and sticky fingers covered in marshmallow were the norm. However, it was those messy, sweet moments that taught me the importance of creating memories through food. Fast forward to today, and while I’ve got a few more cooking skills under my belt, I still cherish that joy of making food that brings people together. This Protein S’mores Jar not only captures that magic but allows us to enjoy it without the campfire.
Ingredients
Here’s what you’ll need to create these delightful Protein S’mores Jars:
-
Graham cracker crumbs (1 cup): The backbone of a s’more! If you’re looking for a gluten-free option, try crushed gluten-free graham crackers or almond flour for a nutty twist.
-
Chocolate protein powder (1/2 cup): A great way to add a protein boost! If you’re not into protein powder, feel free to use cocoa powder mixed with a little sweetener.
-
Unsweetened cocoa powder (2 tablespoons): This adds rich chocolate flavor without all the added sugar. You can swap it with carob powder if you prefer a healthier option.
-
Nut butter (1/2 cup): This is your gooey filling! Almond butter offers a subtle sweetness, while peanut butter adds a familiar flavor. Cashew butter is also a delightful alternative if you’re looking for something creamier.
-
Mini marshmallows (1 cup): Nothing beats the fluffiness! If you want a healthier option, use coconut whipped cream or homemade marshmallow fluff.
-
Milk (or dairy-free alternative, 1/2 cup): Dairy or nut milk will do just fine. Almond milk or oat milk can be substituted for a lactose-free variation.
-
Honey or maple syrup (1/4 cup): For sweetness and that lovely sticky texture to bind everything together. For a vegan option, maple syrup is the perfect choice.
Step-by-Step Instructions
Now, let’s get cooking! Follow these steps to create your Protein S’mores Jar.
-
Preheat Your Oven: If you want to elevate your graham cracker layer, preheat your oven to 350°F (175°C). Spread the crumbs on a baking sheet and lightly toast them for 5-7 minutes for that authentic toasted flavor. But if you want to skip this step, that’s totally okay too!
-
Prepare Your Ingredients: In a mixing bowl, combine the graham cracker crumbs and cocoa powder. Stir them together until well blended. This combination provides that delightful s’mores flavor we all adore.
-
Mix Protein Batter: In another bowl, mix together the chocolate protein powder, nut butter, and milk until you achieve a smooth, creamy consistency. If you feel it’s too thick, add a splash more milk—don’t hesitate to adjust based on your desired texture.
-
Sweeten the Mix: Add in honey or maple syrup to your protein mix, stirring until fully combined. The sweetness will balance out the richness of the nut butter and protein powder, creating a delightful combination.
-
Layering the Jars: Grab your jars (or bowls). Start by adding a layer of the toasted graham cracker crumbs at the bottom, about 2 tablespoons is perfect. Press it down gently with the back of a spoon.
-
Add the Protein Mix: Spoon a layer (about 2-3 tablespoons) of your protein batter over the graham cracker layer. Use a spatula to smooth it out and make sure it reaches the edges.
-
Marshmallow Time: Add a layer of mini marshmallows on top of the protein mix—go as wild as you like! They’ll provide that classic s’more feel.
-
Repeat Layers: Repeat the layers until you fill your jars or bowls. The last layer can be marshmallows if you want a lovely topping that will melt on contact.
-
Chill Out: For optimum enjoyment, place your jars in the refrigerator for at least an hour. This allows everything to set and meld together beautifully.
-
Serve and Enjoy: Once chilled, you can dig in as is, or take it up a notch by using a kitchen torch to toast the marshmallows just like you would over a campfire. Just be careful to keep it moving so they don’t burn!
Serving Suggestions
Pack your Protein S’mores Jars with a spoon and a few extra marshmallows on the side for a fun, interactive treat. They make for an adorable dessert for gatherings or personal night-in treat. Plus, they can be enjoyed straight from the jar!
Recipe Variations
Feeling adventurous? Here are some delicious twists to consider:
-
Peanut Butter Cup: Use peanut butter protein powder and top with crushed peanut butter cups.
-
Minty Fresh: Add a drop of peppermint extract to your mix for a refreshing mint chocolate flavor.
-
Fruit Fusion: Add sliced strawberries or bananas in between the layers for a fruity twist.
-
Spicy Treat: Try adding a dash of cayenne pepper to the protein mix for a hint of heat that pairs fabulously with chocolate.
Chef’s Notes
Ah, the joy of creating recipes! This Protein S’mores Jar evolved from my search for a healthier snack that still felt like a treat. I love experimenting with different ingredients—sometimes I even throw in a scoop of cookie dough protein powder for fun!
Oh, and don’t be surprised if your friends start asking you to make these for every gathering! I once made them for a potluck, and they vanished in minutes!
FAQs and Troubleshooting
-
Can I make this recipe vegan?
Absolutely! Use plant-based protein powder, almond or oat milk, and maple syrup in place of honey. For marshmallows, check for vegan options or use coconut whipped cream. -
Why did my protein mix get too thick?
No worries! If your mixture is thick, just add a little more milk—up to 1 tablespoon at a time—until you reach your desired consistency. -
How long can I store these jars?
Keep them in the fridge for up to 3 days. Just remember to let them sit out for a few minutes before digging in so they soften up a bit. -
Can I freeze these?
Yes! These jars freeze well, just pull them out a few hours before you plan on enjoying them to thaw.
Nutritional Info
While I won’t provide exact nutritional info since it can vary based on the brands of ingredients you use, I can tell you that each jar is filled with protein, healthy fats, and the sweet joy of nostalgia!
I hope this Protein S’mores Jar recipe brings a bit of warmth and deliciousness into your life. Remember, cooking is all about having fun, experimenting, and making memories. Let me know how your jars turn out, and feel free to get creative with them! Happy cooking, fellow foodies!
Print
Protein S’mores Jar
- Total Time: 25 minutes
- Yield: 4 servings 1x
- Diet: Vegetarian
Description
A delightful twist on the classic s’more, these Protein S’mores Jars are layered with graham cracker crumbs, rich chocolate, fluffy marshmallows, and a protein boost for a wholesome treat.
Ingredients
- 1 cup graham cracker crumbs
- 1/2 cup chocolate protein powder
- 2 tablespoons unsweetened cocoa powder
- 1/2 cup nut butter
- 1 cup mini marshmallows
- 1/2 cup milk or dairy-free alternative
- 1/4 cup honey or maple syrup
Instructions
- Preheat your oven to 350°F (175°C) and toast the graham cracker crumbs for 5-7 minutes if desired.
- Combine the graham cracker crumbs and cocoa powder in a mixing bowl.
- Mix the chocolate protein powder, nut butter, and milk in another bowl until smooth.
- Add honey or maple syrup to the protein mix and stir well.
- Layer about 2 tablespoons of the toasted graham cracker crumbs at the bottom of your jars.
- Spoon a layer of your protein batter over the graham cracker layer.
- Add a layer of mini marshmallows on top of the protein mix.
- Repeat layers until the jars are filled, finishing with marshmallows on top.
- Chill your jars in the refrigerator for at least an hour.
- Serve and enjoy, optionally toasting the marshmallows with a kitchen torch.
Notes
These jars can be made vegan by using plant-based protein powder, almond or oat milk, and maple syrup instead of honey. They can keep in the fridge for up to 3 days.
- Prep Time: 15 minutes
- Cook Time: 10 minutes
- Category: Dessert
- Method: No Bake
- Cuisine: American
Nutrition
- Serving Size: 1 jar
- Calories: 320
- Sugar: 15g
- Sodium: 150mg
- Fat: 14g
- Saturated Fat: 2g
- Unsaturated Fat: 10g
- Trans Fat: 0g
- Carbohydrates: 40g
- Fiber: 3g
- Protein: 10g
- Cholesterol: 0mg
Keywords: s'mores, dessert, protein, healthy, no-bake




