
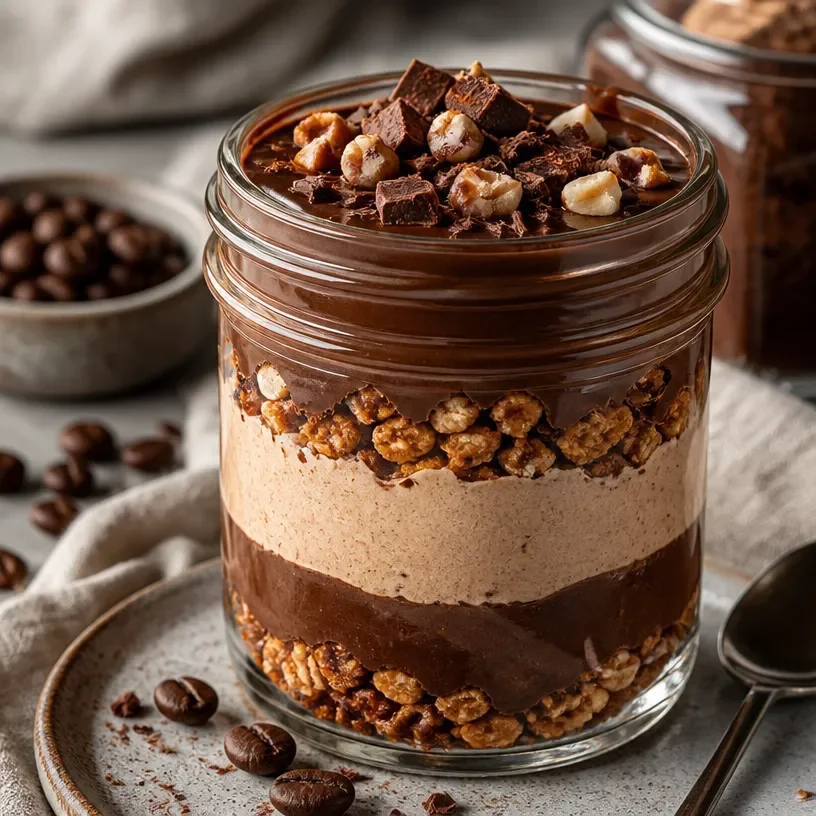
Min No-Bake Protein Mocha Fudge Jar: Grab-N-Go Snack
Protein Mocha Fudge Jar: A Delicious Pick-Me-Up!
Welcome to my cozy corner of the internet! I’m Olivia Bennett, your friendly kitchen guide, and today we’re diving deep into a recipe that will not only satisfy your sweet tooth but also give you a healthy boost! That’s right, we’re making a Protein Mocha Fudge Jar that’s perfect for a midday pick-me-up or as a delightful post-workout treat.
Imagine this: you’re in the midst of a busy day, your energy is waning, and all you can think about is that perfect balance of rich chocolate and robust coffee to push you through. This luscious fudge is not only the answer to your cravings but also packed with protein to keep you feeling energized. Plus, it’s in a jar—how cute is that?!
As we cook together, I’ll share why this recipe brings back memories for me, the sunshine of nostalgia brightening our culinary adventure. The joy of homemade treats is something that connects us all, and I can’t wait for you to experience it through this delightful fudge.
So, grab your apron, and let’s turn simple ingredients into something unforgettable!
A Sweet Trip Down Memory Lane
Whenever I think of chocolate and coffee, a warm rush of nostalgia washes over me. One of my fondest childhood memories is sitting in my grandmother’s kitchen, watching her create delectable desserts that filled the house with mouthwatering aromas. She had a special knack for combining flavors, and her famous mocha fudge was always a highlight during family gatherings.
The air would be thick with the rich scent of chocolate, and I would be perched on a stool, eagerly waiting for a taste—just a tiny morsel of that velvety goodness! It wasn’t just dessert; it was an experience. Grandma would tell stories about her own upbringing in the kitchen, while we licked the spoons and shared giggles. I’ll never forget her twinkling eyes, full of life and love, as she added a hint of espresso to her fudge mixture.
This recipe for Protein Mocha Fudge takes me back to those days. It’s comforting and packed with the flavors that remind me of my grandma, while also being a modern twist for those of us with busy lives. I hope it creates the same warm moments for you and your loved ones!
Gather Your Ingredients
Before we get started, let’s take a look at what you’ll need for this delightful Protein Mocha Fudge Jar:
-
1 cup almond butter
This creamy nut butter provides healthy fats and a smooth texture. If you’re allergic to nuts or prefer a different flavor, try sunflower seed butter for a nut-free option! -
1/2 cup maple syrup
This natural sweetener adds just the right amount of sweetness and a hint of depth to the flavor. You can substitute with agave syrup or honey for a different twist. -
1/4 cup unsweetened cocoa powder
The rich flavor of cocoa powder is essential for that chocolatey experience! You can use carob powder if you prefer a caffeine-free alternative. -
1/2 cup protein powder
This ingredient is the secret ingredient for that protein boost! I personally like whey or plant-based protein powder, so pick your favorite flavor that complements chocolate, like vanilla. -
1 tablespoon espresso powder
Espresso powder elevates the flavor of the fudge; it’s like a coffee hug in every bite! If you don’t have it, brewed coffee or instant coffee granules work well, just adjust the quantity for taste. -
1/4 teaspoon sea salt
A pinch of salt enhances the sweetness and balances flavors beautifully. Don’t skip it! -
Optional toppings:
- Chopped nuts (like walnuts or pistachios)
- Shredded coconut
- Drizzle of dark chocolate
Let’s Get Cooking: Step-by-Step Instructions
Alright, my kitchen buddy, it’s time to roll up our sleeves and get started! Follow these steps, and I promise you’ll be devouring that fudge in no time.
Step 1: Prep Your Workspace
Before we dive in, it’s crucial to have a clean workspace. Gather all your ingredients, utensils, and a mixing bowl. You’ll also need a container or jar to store your fudge—let’s go for something cute and reusable!
Step 2: Mix Together the Base
In a medium-sized bowl, add the almond butter and maple syrup. Mix these two together until they are well combined. You want a smooth consistency, so give it a good stir. A hand mixer can make this step even easier, but a sturdy spoon will work just fine too!
Step 3: Add Cocoa Powder & Protein
Next, sift in the unsweetened cocoa powder and protein powder. Stir until it’s completely combined—this is where the magic starts to happen! If the mixture feels too thick, don’t panic; adding a splash of your choice of non-dairy milk can help reach your desired consistency.
Step 4: Espresso and Salt
Now for that fabulous espresso powder and a touch of sea salt! This is what will make your fudge sing! Mix well, ensuring all ingredients are beautifully incorporated.
Step 5: Taste for Sweetness
Go ahead and taste your mixture! If you like your fudge a bit sweeter, feel free to add a drizzle more of maple syrup. Cooking is all about your personal preference, so make it your own!
Step 6: Prepare Your Jar
Now, transfer your fudge mixture into the jar or container. You can use a spatula to scoop out every last bit of that gooey goodness. Smooth the top out with the spatula, and you can even add toppings like chopped nuts or shredded coconut to create an aesthetically pleasing layer!
Step 7: Chill and Firm Up
Place your jar in the refrigerator for at least 2 hours to allow it to firm up. Trust me; the wait will be worth it! This is a perfect time to clean up your kitchen and maybe whip up another batch!
Step 8: Enjoy!
Once it’s set, dig in! Enjoy your Protein Mocha Fudge straight from the jar, or scoop it out and place it on a pretty plate to share with loved ones.
Serving Suggestions
To serve your Protein Mocha Fudge, you can either present it directly in the jar for a rustic look or scoop it into cute little bowls if you’re hosting a gathering. Drizzle some melted dark chocolate on top for an extra touch of indulgence, and add a sprinkle of sea salt to elevate the flavor. Serve alongside a hot cup of coffee or a chilled glass of almond milk for a delightful pairing!
Recipe Variations
Feeling adventurous? Here are a few creative twists you can try with your Protein Mocha Fudge Jar:
-
Nut Butter Bliss: Swap different nut butters to change the flavor profile—try peanut butter or cashew butter for a different taste adventure.
-
Spicy Fudge: Add a dash of cayenne pepper or cinnamon for a delightful kick. This can elevate your fudge and add a warm, spicy undertone.
-
Fruity Delight: Fold in some dried fruit like cranberries or chopped apricots to add a touch of natural sweetness and chewiness.
-
Mint Mocha: Incorporate a few drops of mint extract for a refreshing mint mocha version—perfect for the holiday season!
-
Vegan Friendly: Use a plant-based protein powder and replace maple syrup with agave or brown rice syrup to make a vegan treat.
Chef’s Notes
This Protein Mocha Fudge Jar is a recipe that has evolved beautifully over time. Initially, I created it to satisfy my sweet-tooth cravings while also fueling my energy levels, but it’s quickly become a favorite among my friends and family! I often find myself making it in large batches to share at potlucks or school events. The smiles I get when they take their first bite are priceless!
One funny kitchen story that comes to mind is when I tried experimenting with different types of protein powder. Let’s just say, not all flavors mix well! The chocolate mint protein powder incident left my friends in stitches, but the fudge was a fun conversation starter.
FAQs and Troubleshooting
Q1: Why did my fudge turn out too crumbly?
A: If your fudge is crumbly, it might be due to using too much protein powder or not enough sweetener. Try mixing in a bit more almond butter or maple syrup to help bind it together.
Q2: Can I freeze the fudge?
A: Absolutely! This fudge freezes well. Just make sure to store it in an airtight container, and it can last for up to three months in the freezer. Just thaw it in the fridge before indulging!
Q3: Can I use a different sweetener?
A: Yes! Feel free to use honey, agave syrup, or even date syrup. Each will bring a unique touch to your fudge, but bear in mind the flavor could change slightly.
Q4: How can I make this fudge richer?
A: To make your fudge even richer, consider adding a tablespoon or two of melted coconut oil or more cocoa powder. Both will enhance the chocolate flavor and creaminess!
Nutritional Info
Here’s a rough breakdown of one serving of your Protein Mocha Fudge Jar (assuming about 12 servings for the entire jar):
- Calories: Approximately 200
- Protein: 6g
- Carbohydrates: 15g
- Fats: 12g
- Fiber: 3g
There you have it, my fellow food lovers! Your Protein Mocha Fudge Jar is ready to be enjoyed, whether as a snack or a dessert. I hope this recipe brings you and your loved ones as much joy as it has brought me. Happy cooking, and might I say, eat with happiness!
Print
Protein Mocha Fudge Jar
- Total Time: 135 minutes
- Yield: 12 servings 1x
- Diet: Vegetarian
Description
A delicious protein-packed mocha fudge that’s perfect for a sweet pick-me-up or post-workout treat.
Ingredients
- 1 cup almond butter
- 1/2 cup maple syrup
- 1/4 cup unsweetened cocoa powder
- 1/2 cup protein powder
- 1 tablespoon espresso powder
- 1/4 teaspoon sea salt
- Optional toppings: chopped nuts, shredded coconut, drizzle of dark chocolate
Instructions
- Prep your workspace.
- Mix together the almond butter and maple syrup in a bowl until smooth.
- Add the cocoa powder and protein powder, stirring until combined.
- Incorporate the espresso powder and sea salt, mixing well.
- Taste for sweetness and adjust with more maple syrup if needed.
- Transfer the mixture into a jar or container and smooth the top.
- Chill in the refrigerator for at least 120 minutes to firm up.
- Enjoy your Protein Mocha Fudge straight from the jar or serve on a plate.
Notes
Store any leftover fudge in an airtight container in the refrigerator for up to one week.
- Prep Time: 15 minutes
- Cook Time: 0 minutes
- Category: Dessert
- Method: No-Bake
- Cuisine: American
Nutrition
- Serving Size: 1 serving
- Calories: 200
- Sugar: 8g
- Sodium: 100mg
- Fat: 12g
- Saturated Fat: 2g
- Unsaturated Fat: 10g
- Trans Fat: 0g
- Carbohydrates: 15g
- Fiber: 3g
- Protein: 6g
- Cholesterol: 0mg
Keywords: protein fudge, mocha fudge, healthy dessert, no-bake treat, gluten-free, snacks
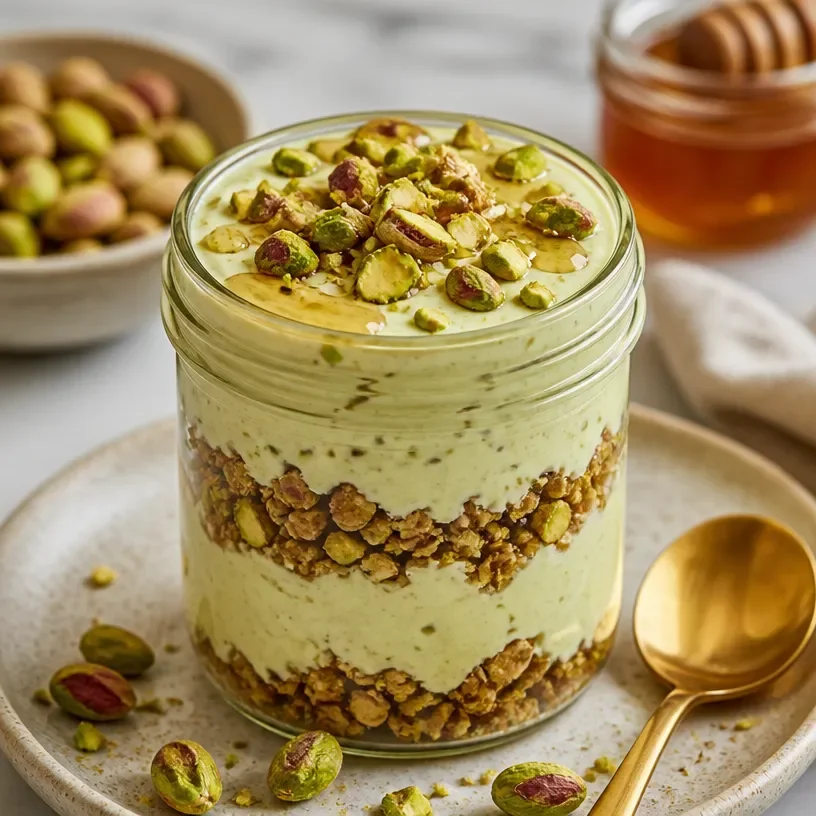
High-Protein Pistachio Cream Jar: 5-Min No-Bake Snack
The Ultimate Protein Pistachio Cream Jar: A Delicious and Nutritious Treat
Welcome to my kitchen, friends! I’m thrilled to share one of my absolute favorite recipes with you that not only satisfies your sweet tooth but also packs a protein punch—introducing the delectable Protein Pistachio Cream Jar! In a world where healthy eating can sometimes feel boring or, let’s be honest, a tad uninspired, this recipe turns the tables. Imagine the creamy, nutty goodness of pistachios combined with rich protein—perfect for breakfast, a midday snack, or even dessert.
Pistachios are not just a fantastic source of protein; they are also rich in healthy fats, fiber, and antioxidants. When blended into a creamy indulgence, they bring a bit of luxury to your everyday meals. And the best part? This recipe takes minimal time to prepare. Whether you’re whipping it up for yourself or impressing guests at a gathering, these little jars of joy are guaranteed to bring smiles all around.
The warm, inviting aroma of roasted nuts wafting through your kitchen while you blend is just the cherry on top. Picture this: you take a spoonful of that creamy goodness, and suddenly, your taste buds are dancing! It’s the perfect balance of rich, buttery pistachios and a hint of sweetness. Who knew healthy could taste this divine?
If you’re ready to embark on this flavorful journey, put on your favorite apron, turn up some music, and let’s create something unforgettable together. Trust me, your taste buds will thank you!
A Spoonful of Nostalgia
Every recipe has a story, and this one is no different. I remember the first time I tasted pistachio cream. I was visiting a quaint little café with a friend, and it was one of those cozy places where the ambiance wraps you in warmth, kind of like a big hug. The moment we sat down, I spotted a little jar of pistachio cream on the menu, and I knew I had to try it.
The barista served it in a small glass jar, beautifully layered with fresh, ripe fruits and a sprinkle of granola on top. With that first spoonful, I was transported to a world where every worry melted away. The velvety texture and that subtle sweetness of the pistachios were unlike anything I had ever tasted. That day, I left the café not only with a full tummy but also with a heart brimming with inspiration. From that moment on, I became obsessed with pistachios and knew that I had to recreate that creamy delight at home.
Using my trusty food processor and a little bit of experimentation, I created this Protein Pistachio Cream Jar—a recipe that embodies the same joy and comfort I felt that day. Now, I want to help you experience that same magic in your kitchen!
Ingredients: Let’s Get Started!
Here’s everything you’ll need to whip up your own Protein Pistachio Cream Jar. Each ingredient plays a vital role, so let’s break them down:
- Pistachios (2 cups, shelled): The star of the show! Packed with protein and healthy fats. If you have a nut allergy, you can substitute with sunflower seeds for a similar creamy texture.
- Greek Yogurt (1 cup): Adds creaminess and protein. Use non-dairy yogurt for a vegan version, or feel free to swap it with cottage cheese for a twist!
- Honey or Maple Syrup (2-4 tablespoons): This adds natural sweetness. Adjust according to your taste or substitute with agave nectar for a vegan option.
- Vanilla Extract (1 teaspoon): For an aromatic flavor boost. You can also use almond extract for a nutty twist!
- Salt (a pinch): Enhances flavors and balances sweetness. You can use sea salt or even Himalayan pink salt for a pop of color.
- Milk (1/4 cup): Any type will work—dairy, almond, oat, or soy—just ensure it’s unsweetened for better flavor control.
With these simple ingredients, you can create a delightful treat that’s as nourishing as it is delicious.
Step-by-Step Instructions: Time to Create!
Let’s get cooking! Follow these detailed steps to make your Protein Pistachio Cream Jar:
-
Prep the Pistachios: Begin by measuring out your shelled pistachios and give them a quick rinse under cold water to remove any dust or residue. Pat them dry with a clean towel. This helps the cream blend smoothly!
-
Blend It Up: In your food processor, add the pistachios and blend on high speed for about 1-2 minutes until they start to break down into a fine crumb. Use a spatula to scrape down the sides as needed. You’re looking for that creamy, nutty texture, so don’t rush this step!
-
Add the Yogurt: Once your pistachios are all crumbly, add the Greek yogurt to the food processor. This is where the magic happens! It brings a luscious creaminess that complements the pistachios perfectly.
-
Sweeten the Deal: Next, drizzle in the honey or maple syrup along with the vanilla extract and the pinch of salt. Blend again until everything is well combined. Taste and adjust sweetness if necessary—this is your cream; make it how you like it!
-
Thin It Out: At this point, slowly add in your milk while the food processor is still running. You want the cream to be spreadable but not too runny. Adjust the milk according to your desired consistency!
-
Storage Time: Once everything is blended to your liking, transfer the cream into clean glass jars or airtight containers. This is where you can get creative—layer your cream with fresh fruits or granola if you’re ready to eat!
And voilà! Your Protein Pistachio Cream is ready to be devoured. Trust me, once you taste it, you’ll want to make it every week!
Serving Suggestions: Arranging Your Delight
Now that your delicious creation is ready, let’s talk presentation. Pour your creamy pistachio treat into small glass jars or bowls. I love the charm of using mason jars—they’re rustic and fun! You can layer the cream with fresh strawberries or blueberries for a touch of color and added nutrients. Top them off with a sprinkle of granola or crushed nuts for a satisfying crunch!
Serve these jars as a luxurious breakfast, an afternoon snack, or a delightful dessert—your guests will think you’ve put in hours of effort, but we know it only took a quick blend!
Recipe Variations: Get Creative!
Want to switch things up? Here are some fun variations you can try:
- Chocolate Lover’s Dream: Add in a couple of tablespoons of cocoa powder for a delicious chocolate pistachio cream.
- Spiced Magic: Mix in a pinch of cinnamon or some pumpkin spice for a warm, cozy flavor.
- Tropical Twist: Blend in some shredded coconut or mango puree —perfect for a summer refresh!
- Nutty Delight: Combine other nuts like almonds or cashews for a varied texture and flavor.
These variations give you endless opportunities to enjoy your pistachio cream!
Chef’s Notes: A Dash of Wisdom
As with every recipe, this is where you can make it your own. I’ve had a lot of fun experimenting with different add-ins. One time, I mistakenly added too much milk and ended up with a smoothie-like texture, which turned out to be a hit for breakfast! Now, I sometimes make it a bit thinner on purpose.
Also, don’t hesitate to taste as you go! Cooking is about exploration and discovery, so if you feel the urge to add an extra pinch of salt or a splash of vanilla, go for it!
FAQs and Troubleshooting
-
Can I use unsalted pistachios? Absolutely! Unsalted pistachios will work just fine. Just be sure to add a pinch of salt to enhance all those glorious flavors.
-
Why is my cream too thick? If it’s too thick, slowly incorporate more milk, one tablespoon at a time, blending well after each addition until you reach your desired consistency.
-
How long will it last in the fridge? Your Protein Pistachio Cream should last about a week in the refrigerator, stored in an airtight container.
-
Can I freeze it? Yes, you can freeze portions of this cream! Just make sure it’s in a freezer-safe container. Thaw it in the fridge overnight before enjoying.
Nutritional Info
Nutritional content may vary, but generally, each serving of this Protein Pistachio Cream (about 1/4 cup) contains approximately:
- Calories: 150
- Protein: 7g
- Fat: 10g
- Carbohydrates: 15g
- Fiber: 3g
This make-ahead treat is an excellent way to stay nourished while enjoying every delicious spoonful!
And there you have it—your ultimate guide to making Protein Pistachio Cream Jars! I hope this recipe brings warmth, joy, and love into your kitchen, just as it has into mine. Remember, each ingredient is a part of this delicious story we’re crafting together. Happy cooking, and don’t forget to share your creations! 🍴✨
Print
Protein Pistachio Cream Jar
- Total Time: 10 minutes
- Yield: 4 servings 1x
- Diet: Vegetarian
Description
A delicious and nutritious treat made with creamy pistachios and rich protein, perfect for breakfast or a snack.
Ingredients
- 2 cups shelled Pistachios
- 1 cup Greek Yogurt (or non-dairy yogurt)
- 2–4 tablespoons Honey or Maple Syrup
- 1 teaspoon Vanilla Extract
- a pinch of Salt
- 1/4 cup Milk (dairy or non-dairy, unsweetened)
Instructions
- Prep the pistachios by rinsing them under cold water and patting them dry.
- Blend the pistachios in a food processor on high speed for 1-2 minutes until they form a fine crumb.
- Add the Greek yogurt to the food processor and blend until creamy.
- Sweeten by drizzling in honey or maple syrup, vanilla extract, and a pinch of salt. Blend again.
- Thin out the cream by slowly adding milk while the processor is running until desired consistency is reached.
- Storage: Transfer to glass jars or airtight containers. Layer with fresh fruits or granola if desired.
Notes
You can substitute pistachios with sunflower seeds if you have a nut allergy. Adjust sweetness according to your taste.
- Prep Time: 10 minutes
- Cook Time: 0 minutes
- Category: Snack
- Method: Blending
- Cuisine: American
Nutrition
- Serving Size: 1 serving
- Calories: 150
- Sugar: 6g
- Sodium: 15mg
- Fat: 10g
- Saturated Fat: 1g
- Unsaturated Fat: 6g
- Trans Fat: 0g
- Carbohydrates: 15g
- Fiber: 3g
- Protein: 7g
- Cholesterol: 5mg
Keywords: pistachio, protein, snack, healthy, creamy, dessert
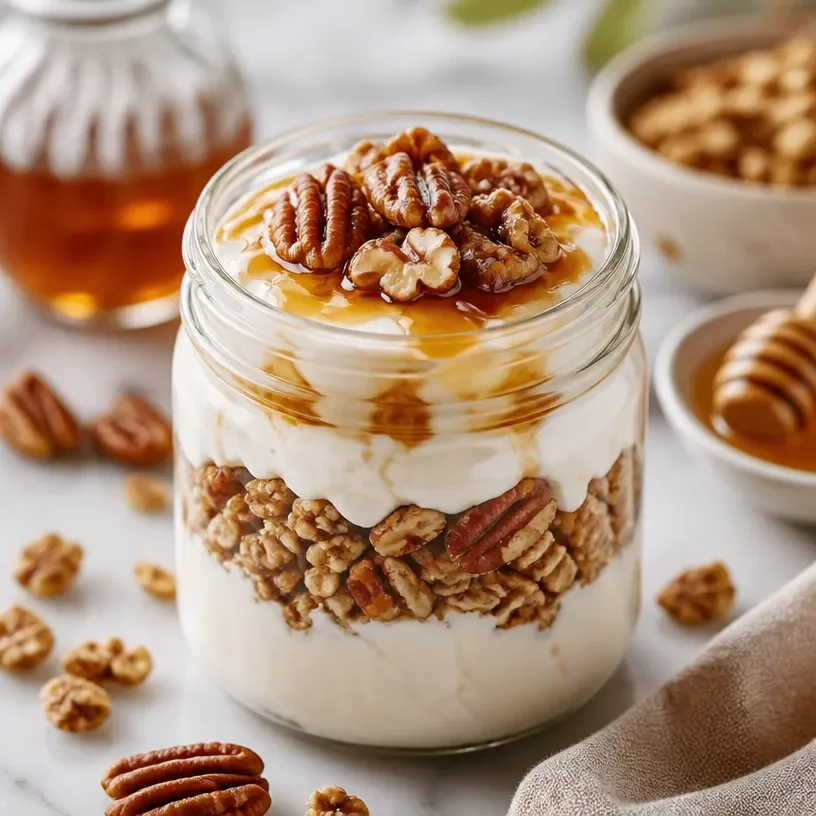
Protein Maple Pecan Jar: 5-Min No-Bake Morning Snack
Protein Maple Pecan Jar: A Cozy Treat for Anytime
Welcome back to my cozy kitchen, friends! If you’re anything like me, you know that some days need a little extra love, a sprinkle of sweetness, and perhaps a delightful crunch. Today, I’m thrilled to share a recipe that embodies all those feelings — the Protein Maple Pecan Jar! Perfect for breakfast, an on-the-go snack, or even dessert, this layered delight is as nutritious as it is delicious.
Picture this: you’re feeling a bit peckish, maybe you just came home from a long day or you’ve just wrapped up a workout. You want something that will satisfy that craving without the guilt. Enter the Protein Maple Pecan Jar! Its vibrant layers of creamy yogurt, crunchy pecans, and a drizzle of maple syrup create a beautiful balance of flavors and textures. Not only is it quick and easy to prepare, but it’s also customizable, so you can tailor it to suit your taste buds or what you have on hand.
Let’s dive into this scrumptious recipe together. I can’t wait to hear what you think!
A Spoonful of Memories
Every recipe holds a special place in my heart, but the Protein Maple Pecan Jar has a particularly warm spot. I vividly recall my early morning breakfast rituals with my grandmother. Our kitchen would wake up to the soft sound of jazz playing in the background while she mixed the ingredients for her famous granola. We often made a big batch, and the kitchen would fill with the intoxicating smell of toasted oats and pecans.
One day, as I brought her freshly chopped pecans, she suggested we create something new on the fly. We layered the granola with creamy yogurt and a drizzle of maple syrup. We called it “our breakfast in a jar.” It was such a simple idea yet held so much joy! Every bite reminded me of her love for food and family. Now, every time I make this Protein Maple Pecan Jar, I’m taken back to those lively mornings filled with laughter.
Ingredients
Here’s what you need to whip up your very own Protein Maple Pecan Jar:
-
Greek Yogurt: This creamy base is high in protein and adds tartness. If you prefer a non-dairy option, coconut yogurt works wonderfully too!
-
Pecans: The star of the dish! They add crunch and a slight sweetness. You can substitute walnuts or almonds if you’re looking for a change.
-
Maple Syrup: Pure maple syrup gives it that cozy sweetness. Honey can be used as an alternative, but it brings a different flavor profile.
-
Chia Seeds: These little powerhouses add fiber and healthy fats. If you don’t have any, you can omit them or replace them with flax seeds.
-
Cinnamon: Just a pinch adds warmth and depth of flavor. Feel free to swap with nutmeg or pumpkin spice for a seasonal twist.
-
Vanilla Extract: A splash makes everything better! If you’re out, almond extract can make a wonderful substitution.
-
Fruits (optional): Fresh berries or sliced bananas add freshness and extra nutrients. Swap them based on what’s in season or what you have in your kitchen!
Choosing high-quality, organic ingredients when possible will elevate this dish even further, so don’t hesitate to splurge on the pure stuff!
Step-by-Step Instructions
Ready to get cooking? Here’s how to bring your Protein Maple Pecan Jar to life!
-
Gather Your Ingredients: Before you start, gather all your ingredients together. Having everything at hand makes the process smooth and enjoyable. Plus, it minimizes kitchen chaos!
-
Prepare the Greek Yogurt: In a medium mixing bowl, add about 2 cups of Greek yogurt. If you’d like a smoother texture, you can whisk it for a minute or two. This also helps incorporate air, making it fluffier.
Chef Tip: If you want to sweeten it up, mix in a tablespoon of maple syrup directly into the yogurt. It’ll become wonderfully fragrant!
-
Toast the Pecans: In a dry skillet over medium heat, toast your pecans for about 5-7 minutes until they are fragrant. Stir them frequently to avoid burning.
Quick Note: If you’re short on time, pre-toasted pecans work well too, but fresh pecans have that unbeatable crunch!
-
Combine Chia Seeds: Mix in 2 tablespoons of chia seeds into the yogurt mixture alongside a sprinkle of cinnamon and a splash of vanilla extract. Stir well until combined.
-
Layering Time!: Grab your mason jar or serving glass. Start with a layer of the yogurt mixture at the bottom (about 1/3 full). Then, add a generous layer of toasted pecans for that irresistible crunch.
-
Repeat: Add another layer of yogurt, followed by a drizzle of maple syrup, and repeat the layering process until you reach the top of the jar. Finish with a final sprinkle of pecans and a drizzle of syrup for an eye-catching presentation.
-
Chill or Serve: You can enjoy your Protein Maple Pecan Jar right away, or pop it in the refrigerator to chill for about 30 minutes. The flavors meld even better when given a little time!
Serving Suggestion: Top it off with fresh berries or a dollop of whipped cream for an indulgent touch!
Recipe Variations
Feeling adventurous? Here are a few fun twists you can try:
-
Chocolate Lover’s Delight: Mix cocoa powder into your yogurt for a rich, chocolatey flavor. Top with shaved dark chocolate!
-
Nutty Banana Bliss: Slice a banana between the layers for a fruity surprise.
-
Pumpkin Spice Dreams: Incorporate pumpkin purée and pumpkin pie spice into the yogurt mix during fall for a seasonal treat.
-
Coconut Crunch: Swap in coconut yogurt and sprinkle some toasted coconut flakes for an island vibe.
-
Berry Goodness: Layer your pecans with mixed berries for bright colors and refreshing flavors.
Chef’s Notes
This Protein Maple Pecan Jar isn’t just a recipe — it’s my heart in a jar! I love how it has evolved over time, from a breakfast tradition with my grandmother to a go-to snack for my busy life. It’s been a joy to experiment with various ingredients and flavors, reminding me of the creativity and love we can infuse into our cooking.
And speaking of creativity, one time, I mixed up the chia seeds with some jam by accident. While trying to rescue my jar, I ended up with a delicious concoction that turned out to be a fan favorite! So, don’t be afraid to explore and make this recipe your own!
FAQs and Troubleshooting
1. What can I use in place of Greek yogurt?
If you prefer a non-dairy option, try using almond yogurt, coconut yogurt, or even silken tofu blended smooth!
2. How do I avoid soggy layers?
To keep layers distinct, ensure that your yogurt isn’t too runny. Adding chia seeds also helps absorb excess moisture and creates a nice thick texture.
3. Can I make it ahead of time?
Absolutely! These jars can be made a day in advance. Just be sure to keep the toppings separate until you’re ready to serve to maintain crunchiness.
4. What if I forget an ingredient?
No worries! Cooking is all about improvisation. Missing an ingredient? Go with what you have. The jar’s versatility allows for many substitutions, and you might stumble into a new favorite combination.
Nutritional Info (per serving, approx.)
- Calories: 350
- Protein: 20g
- Carbohydrates: 30g
- Fat: 15g
- Fiber: 7g
See how straightforward that was? Before you go, I’d love for you to try this recipe and share your thoughts — I can’t wait to see how your Protein Maple Pecan Jars turn out! Remember, cooking is about joy, creativity, and love, so have fun with every scoop. Happy cooking, and see you next time in my cozy kitchen!
Print
Protein Maple Pecan Jar
- Total Time: 30 minutes
- Yield: 2 servings 1x
- Diet: Vegetarian
Description
A deliciously layered treat of creamy yogurt, crunchy pecans, and a drizzle of maple syrup, perfect for breakfast or a snack.
Ingredients
- 2 cups Greek Yogurt
- 1 cup Pecans
- 2 tablespoons Maple Syrup
- 2 tablespoons Chia Seeds
- 1 teaspoon Cinnamon
- 1 teaspoon Vanilla Extract
- Fruits (optional): Fresh berries or sliced bananas
Instructions
- Gather your ingredients.
- Prepare the Greek yogurt in a medium mixing bowl.
- Toast the pecans in a dry skillet over medium heat.
- Combine chia seeds, cinnamon, and vanilla extract into the yogurt mixture.
- Layering time: Start with a layer of yogurt, then pecans.
- Repeat the layering process until the jar is full.
- Chill in the refrigerator for about 30 minutes before serving.
Notes
Feel free to customize this recipe with your favorite fruits or other mix-ins. Best enjoyed chilled.
- Prep Time: 10 minutes
- Cook Time: 7 minutes
- Category: Snack
- Method: Layering
- Cuisine: American
Nutrition
- Serving Size: 1 jar
- Calories: 350
- Sugar: 15g
- Sodium: 5mg
- Fat: 15g
- Saturated Fat: 2g
- Unsaturated Fat: 8g
- Trans Fat: 0g
- Carbohydrates: 30g
- Fiber: 7g
- Protein: 20g
- Cholesterol: 10mg
Keywords: protein snack, maple pecan, healthy dessert, layered yogurt, quick breakfast
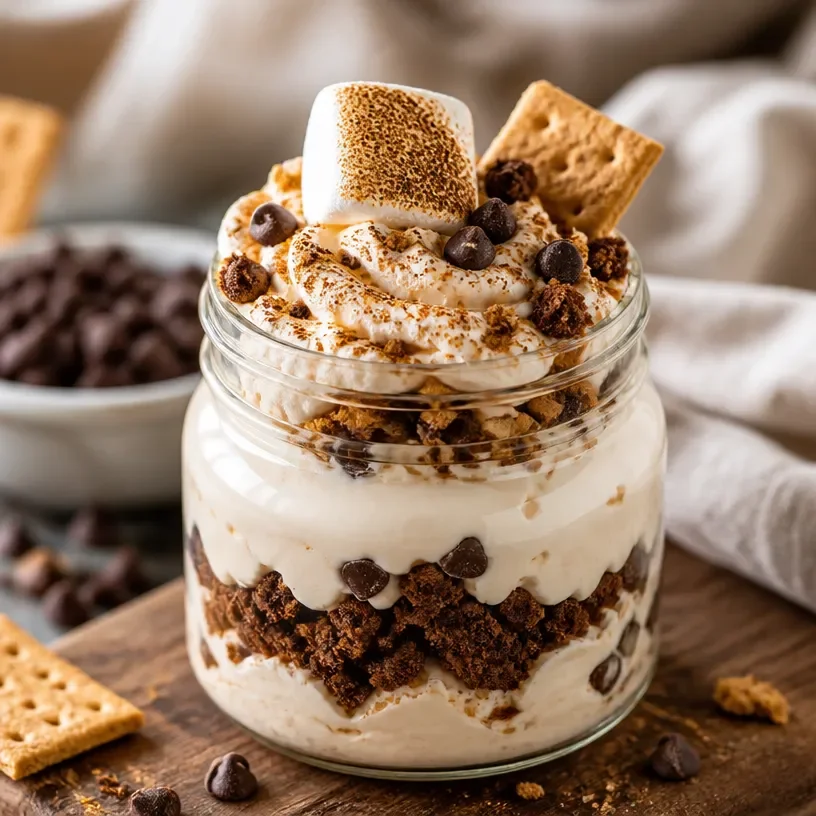
No-Bake Protein S’mores Jar (5-Minute High-Protein Snack)
Protein S’mores Jar: A Delicious, Wholesome Twist on a Classic Treat
Welcome to my cozy kitchen, food lovers! I’m Olivia Bennett, and today, I’m beyond excited to share with you a recipe that puts a delightful spin on a timeless favorite: the classic s’more. Introducing the Protein S’mores Jar! Imagine scooping into glass jars filled with layers of graham cracker crumbs, rich chocolate, fluffy marshmallow, and a hefty dose of protein! It’s an indulgent dessert that not only satisfies your sweet tooth but also fuels your body. Whether you’re looking for a post-workout treat, a snack for the kiddos, or just something sweet to enjoy at home, this Protein S’mores Jar is the answer.
This recipe encapsulates the essence of comfort food—sweet, gooey, and oh-so-fun to eat. Plus, it brings back warm memories of campfires, laughter, and roasting marshmallows under the stars. Let’s dive into how we can recreate that nostalgic magic with a twist that will leave you feeling good about indulging!
A Sticky, Sweet Memory
As a little girl, I spent countless summer nights camping in the woods with my family. I can still hear the crackling fire and the sounds of crickets chirping as my dad expertly toasted marshmallows on the end of a long stick. There was something so magical about the whole experience—the family together, laughter echoing in the trees, and those first bites of a hot, gooey s’more.
But oh, did I make a mess! Chocolate smeared all over my face, and sticky fingers covered in marshmallow were the norm. However, it was those messy, sweet moments that taught me the importance of creating memories through food. Fast forward to today, and while I’ve got a few more cooking skills under my belt, I still cherish that joy of making food that brings people together. This Protein S’mores Jar not only captures that magic but allows us to enjoy it without the campfire.
Ingredients
Here’s what you’ll need to create these delightful Protein S’mores Jars:
-
Graham cracker crumbs (1 cup): The backbone of a s’more! If you’re looking for a gluten-free option, try crushed gluten-free graham crackers or almond flour for a nutty twist.
-
Chocolate protein powder (1/2 cup): A great way to add a protein boost! If you’re not into protein powder, feel free to use cocoa powder mixed with a little sweetener.
-
Unsweetened cocoa powder (2 tablespoons): This adds rich chocolate flavor without all the added sugar. You can swap it with carob powder if you prefer a healthier option.
-
Nut butter (1/2 cup): This is your gooey filling! Almond butter offers a subtle sweetness, while peanut butter adds a familiar flavor. Cashew butter is also a delightful alternative if you’re looking for something creamier.
-
Mini marshmallows (1 cup): Nothing beats the fluffiness! If you want a healthier option, use coconut whipped cream or homemade marshmallow fluff.
-
Milk (or dairy-free alternative, 1/2 cup): Dairy or nut milk will do just fine. Almond milk or oat milk can be substituted for a lactose-free variation.
-
Honey or maple syrup (1/4 cup): For sweetness and that lovely sticky texture to bind everything together. For a vegan option, maple syrup is the perfect choice.
Step-by-Step Instructions
Now, let’s get cooking! Follow these steps to create your Protein S’mores Jar.
-
Preheat Your Oven: If you want to elevate your graham cracker layer, preheat your oven to 350°F (175°C). Spread the crumbs on a baking sheet and lightly toast them for 5-7 minutes for that authentic toasted flavor. But if you want to skip this step, that’s totally okay too!
-
Prepare Your Ingredients: In a mixing bowl, combine the graham cracker crumbs and cocoa powder. Stir them together until well blended. This combination provides that delightful s’mores flavor we all adore.
-
Mix Protein Batter: In another bowl, mix together the chocolate protein powder, nut butter, and milk until you achieve a smooth, creamy consistency. If you feel it’s too thick, add a splash more milk—don’t hesitate to adjust based on your desired texture.
-
Sweeten the Mix: Add in honey or maple syrup to your protein mix, stirring until fully combined. The sweetness will balance out the richness of the nut butter and protein powder, creating a delightful combination.
-
Layering the Jars: Grab your jars (or bowls). Start by adding a layer of the toasted graham cracker crumbs at the bottom, about 2 tablespoons is perfect. Press it down gently with the back of a spoon.
-
Add the Protein Mix: Spoon a layer (about 2-3 tablespoons) of your protein batter over the graham cracker layer. Use a spatula to smooth it out and make sure it reaches the edges.
-
Marshmallow Time: Add a layer of mini marshmallows on top of the protein mix—go as wild as you like! They’ll provide that classic s’more feel.
-
Repeat Layers: Repeat the layers until you fill your jars or bowls. The last layer can be marshmallows if you want a lovely topping that will melt on contact.
-
Chill Out: For optimum enjoyment, place your jars in the refrigerator for at least an hour. This allows everything to set and meld together beautifully.
-
Serve and Enjoy: Once chilled, you can dig in as is, or take it up a notch by using a kitchen torch to toast the marshmallows just like you would over a campfire. Just be careful to keep it moving so they don’t burn!
Serving Suggestions
Pack your Protein S’mores Jars with a spoon and a few extra marshmallows on the side for a fun, interactive treat. They make for an adorable dessert for gatherings or personal night-in treat. Plus, they can be enjoyed straight from the jar!
Recipe Variations
Feeling adventurous? Here are some delicious twists to consider:
-
Peanut Butter Cup: Use peanut butter protein powder and top with crushed peanut butter cups.
-
Minty Fresh: Add a drop of peppermint extract to your mix for a refreshing mint chocolate flavor.
-
Fruit Fusion: Add sliced strawberries or bananas in between the layers for a fruity twist.
-
Spicy Treat: Try adding a dash of cayenne pepper to the protein mix for a hint of heat that pairs fabulously with chocolate.
Chef’s Notes
Ah, the joy of creating recipes! This Protein S’mores Jar evolved from my search for a healthier snack that still felt like a treat. I love experimenting with different ingredients—sometimes I even throw in a scoop of cookie dough protein powder for fun!
Oh, and don’t be surprised if your friends start asking you to make these for every gathering! I once made them for a potluck, and they vanished in minutes!
FAQs and Troubleshooting
-
Can I make this recipe vegan?
Absolutely! Use plant-based protein powder, almond or oat milk, and maple syrup in place of honey. For marshmallows, check for vegan options or use coconut whipped cream. -
Why did my protein mix get too thick?
No worries! If your mixture is thick, just add a little more milk—up to 1 tablespoon at a time—until you reach your desired consistency. -
How long can I store these jars?
Keep them in the fridge for up to 3 days. Just remember to let them sit out for a few minutes before digging in so they soften up a bit. -
Can I freeze these?
Yes! These jars freeze well, just pull them out a few hours before you plan on enjoying them to thaw.
Nutritional Info
While I won’t provide exact nutritional info since it can vary based on the brands of ingredients you use, I can tell you that each jar is filled with protein, healthy fats, and the sweet joy of nostalgia!
I hope this Protein S’mores Jar recipe brings a bit of warmth and deliciousness into your life. Remember, cooking is all about having fun, experimenting, and making memories. Let me know how your jars turn out, and feel free to get creative with them! Happy cooking, fellow foodies!
Print
Protein S’mores Jar
- Total Time: 25 minutes
- Yield: 4 servings 1x
- Diet: Vegetarian
Description
A delightful twist on the classic s’more, these Protein S’mores Jars are layered with graham cracker crumbs, rich chocolate, fluffy marshmallows, and a protein boost for a wholesome treat.
Ingredients
- 1 cup graham cracker crumbs
- 1/2 cup chocolate protein powder
- 2 tablespoons unsweetened cocoa powder
- 1/2 cup nut butter
- 1 cup mini marshmallows
- 1/2 cup milk or dairy-free alternative
- 1/4 cup honey or maple syrup
Instructions
- Preheat your oven to 350°F (175°C) and toast the graham cracker crumbs for 5-7 minutes if desired.
- Combine the graham cracker crumbs and cocoa powder in a mixing bowl.
- Mix the chocolate protein powder, nut butter, and milk in another bowl until smooth.
- Add honey or maple syrup to the protein mix and stir well.
- Layer about 2 tablespoons of the toasted graham cracker crumbs at the bottom of your jars.
- Spoon a layer of your protein batter over the graham cracker layer.
- Add a layer of mini marshmallows on top of the protein mix.
- Repeat layers until the jars are filled, finishing with marshmallows on top.
- Chill your jars in the refrigerator for at least an hour.
- Serve and enjoy, optionally toasting the marshmallows with a kitchen torch.
Notes
These jars can be made vegan by using plant-based protein powder, almond or oat milk, and maple syrup instead of honey. They can keep in the fridge for up to 3 days.
- Prep Time: 15 minutes
- Cook Time: 10 minutes
- Category: Dessert
- Method: No Bake
- Cuisine: American
Nutrition
- Serving Size: 1 jar
- Calories: 320
- Sugar: 15g
- Sodium: 150mg
- Fat: 14g
- Saturated Fat: 2g
- Unsaturated Fat: 10g
- Trans Fat: 0g
- Carbohydrates: 40g
- Fiber: 3g
- Protein: 10g
- Cholesterol: 0mg
Keywords: s'mores, dessert, protein, healthy, no-bake
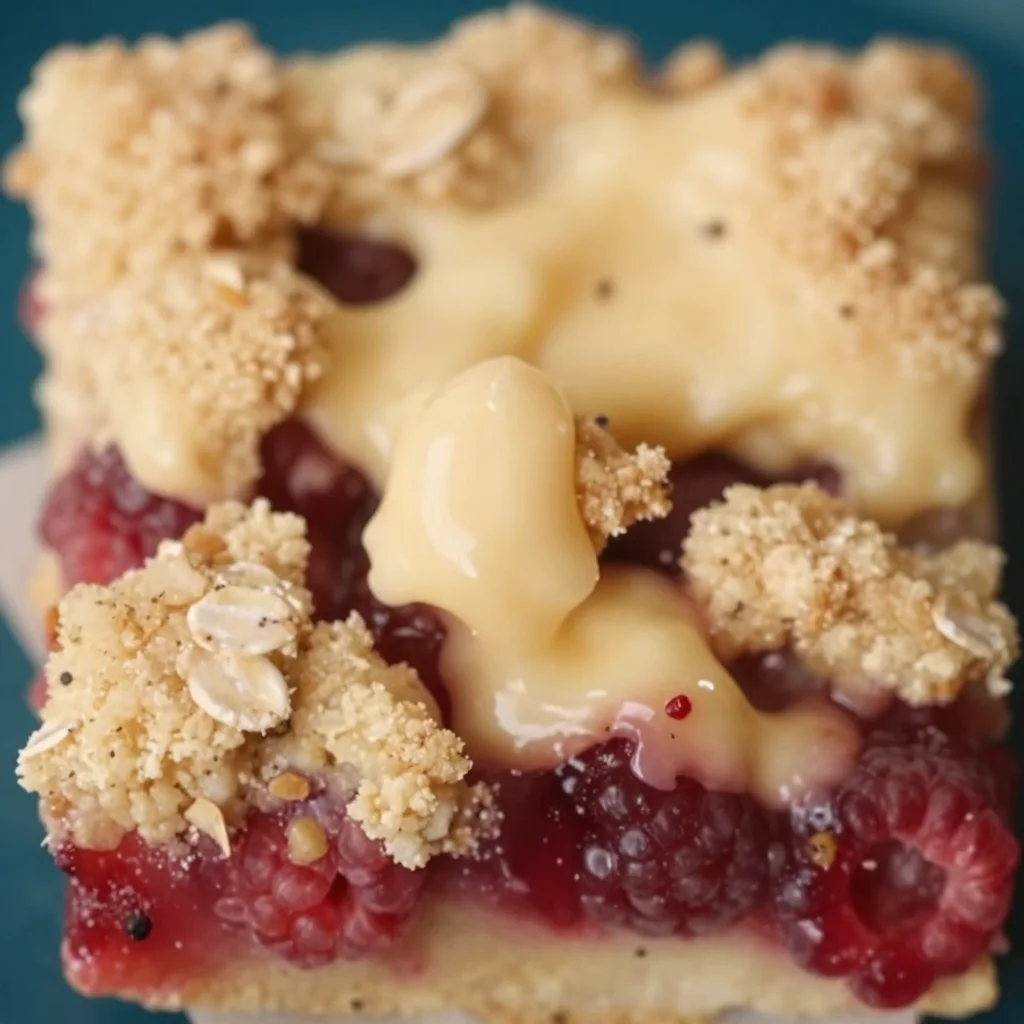
No-Bake Raspberry Crumb Bars: Easy 20-Minute Summer Treat
Raspberry Crumb Bars: A Sweet Slice of Nostalgia
Welcome to my cozy corner of the internet! Today, I’m thrilled to share a delightful treat that holds a special place in my heart: Raspberry Crumb Bars. Let me tell you—the moment you take your first bite of these sweet, tart bars, you’ll be transported to a sun-drenched afternoon filled with laughter and joy.
There’s something magical about the combination of buttery, crumbly crust layered with a vibrant raspberry filling. Whether you’re a fruit lover or just enjoy a good old-fashioned sweet treat, these bars are the perfect addition to any gathering or a lovely afternoon snack while curled up with your favorite book.
Growing up, my summer days were often spent in my grandmother’s kitchen, where the aroma of freshly baked goods wafted through the air. One summer, she decided we would make raspberry bars together. We picked the juiciest, plumpest raspberries from her garden, giggling as juice dripped from our fingers. I can still hear her playful teasing about my messy apron (which, let’s be honest, has become a badge of honor for me!). Those days are etched in my memory, each bite of those crumb bars filled with sweet nostalgia.
So, roll up your sleeves, don that apron—messy or not—and let’s dive into making these Raspberry Crumb Bars together!
Key Ingredients
For the Crust and Topping:
- All-purpose flour (2 cups): The backbone of the crumb bar. For a gluten-free option, substitute with gluten-free flour blend.
- Granulated sugar (¾ cup): Added for sweetness. Brown sugar can be used for a deeper flavor.
- Baking powder (1 teaspoon): This will give your bars a nice lift; make sure it’s fresh to ensure better rising.
- Salt (½ teaspoon): A pinch of salt helps balance the sweetness and enhances flavor.
- Butter (½ cup, cold and cubed): The heart and soul of these crumb bars. You can use unsalted butter or vegan butter as a substitute for dairy-free.
- Egg (1 large): Acts as a binding agent. For a vegan option, try using flaxseed meal (1 tablespoon mixed with 2.5 tablespoons water) as a substitute.
For the Raspberry Filling:
- Fresh raspberries (2 cups): The star of the show! Frozen raspberries will work, but fresh fruit provides the best flavor and texture.
- Lemon juice (1 tablespoon): Brings brightness to the raspberry filling. Lime juice can also be a zesty alternative.
- Cornstarch (2 tablespoons): Thickens the filling so it doesn’t ooze all over. Feel free to swap it with arrowroot powder for a different thickening agent.
- Granulated sugar (½ cup): Sweetens the tangy raspberries. Adjust to your taste depending on the ripeness of your fruit.
Step-by-Step Instructions
Step 1: Preheat Your Oven
Let’s get started by preheating your oven to 350°F (175°C) and greasing a 9×9-inch baking pan. Trust me; it’s going to be worth the wait!
Step 2: Prepare the Crust
In a large mixing bowl, combine the all-purpose flour, granulated sugar, baking powder, and salt. Now, here’s the fun part: use a fork or your fingers to cut the cold, cubed butter into the dry ingredients. You want a crumbly texture, similar to wet sand. You can also use a pastry cutter for a quicker method. Pro tip: Keep the butter cold for flakier crusts!
Step 3: Add the Egg
Crack in the egg and mix until everything just comes together. Don’t overmix! We want a tender crumb, not tough bars.
Step 4: Bake the Crust
Press about two-thirds of this mixture into the prepared baking pan. Bake for 15 minutes just until it starts to turn golden. The smell will be tantalizing, trust me!
Step 5: Make Raspberry Filling
While the crust is baking, it’s time to prepare the filling. In a medium saucepan over medium heat, combine the raspberries, lemon juice, granulated sugar, and cornstarch. Cook it down until the raspberries release their juices and thicken slightly, about 5-7 minutes. Stir gently to avoid smashing the fruit into mush.
Step 6: Assemble and Bake
Once your crust has baked and the filling is ready, pour it evenly over the crust. Crumble the remaining crust mixture on top. Bake these beauties for an additional 25 minutes until the top is golden brown and the filling is bubbling. It might take some patience, but oh, is it worth it!
Step 7: Cool and Slice
Let the bars cool in the pan for at least 30 minutes before slicing. (I know it’s tempting, but trust me—this step is crucial!) Once they’re cool, dust with powdered sugar for a little extra flair.
Serving Suggestions
These Raspberry Crumb Bars are best served slightly warm or at room temperature. You can serve them as is or dress them up with a scoop of vanilla ice cream or a dollop of freshly whipped cream for an elevated experience!
Recipe Variations
- Berry Blast: Mix in blueberries or blackberries with the raspberries for a delightful berry medley.
- Nutty Addition: Stir in some chopped nuts, such as almonds or walnuts, to the crumb topping for added crunch.
- Zesty Surprise: Add some grated lemon or orange zest to the filling for an extra fresh flavor.
- Chocolate Drizzle: Once cooled, drizzle melted dark chocolate over the bars for a luscious twist.
- Spiced Version: Sprinkle in some cinnamon or nutmeg to the crumb mixture for a warm, cozy flavor profile.
Chef’s Notes
Ah, Raspberry Crumb Bars—they’ve become a staple in my kitchen, evolving over the years from my grandmother’s simple recipe to something I love putting my own stamp on. I’ll never forget the time I added a pinch of cayenne pepper to the berry filling out of curiosity. I was surprised by how the heat enhanced those sweet, tangy raspberries; just a little spice gives it a whole new depth!
And of course, you can always sprinkle some crumbs into a bowl of yogurt for breakfast or even use the filling in a tart. So versatile!
FAQs and Troubleshooting
Q: My crumb topping didn’t come out crumbly! What went wrong?
A: This usually happens if the butter is too soft or if the mixture was overmixed. Keep your butter cold and mix just until combined for that perfect crumble.
Q: Can I make these ahead of time?
A: Absolutely! These bars hold up well for 3-4 days in an airtight container. Just let them cool completely before storing.
Q: How do I store leftovers?
A: Keep them in an airtight container in the fridge for up to a week, or freeze them for longer storage – I love pulling out a slice on a quiet afternoon!
Q: Can I use other fruits for the filling?
A: Yes! Feel free to experiment with strawberries, peaches, or even a mix of fruits. Just adjust the sugar according to the fruit’s sweetness.
Nutritional Info
Calories per serving: Approximately 200
Fat: 10g
Carbohydrates: 28g
Fiber: 1g
Protein: 2g
There you have it! Raspberry Crumb Bars that are sure to warm your heart and delight your taste buds. I hope these bars inspire many happy memories for you and your loved ones—just like they did for me. So go ahead, grab those raspberries, and let’s get baking! Happy cooking, friends!
Print
Raspberry Crumb Bars
- Total Time: 55 minutes
- Yield: 16 servings 1x
- Diet: Vegetarian
Description
Delightful and nostalgic Raspberry Crumb Bars with a buttery crust and vibrant raspberry filling, perfect for any gathering or an afternoon snack.
Ingredients
- 2 cups all-purpose flour
- ¾ cup granulated sugar
- 1 teaspoon baking powder
- ½ teaspoon salt
- ½ cup butter, cold and cubed
- 1 large egg
- 2 cups fresh raspberries
- 1 tablespoon lemon juice
- 2 tablespoons cornstarch
- ½ cup granulated sugar (for filling)
Instructions
- Preheat your oven to 350°F (175°C) and grease a 9×9-inch baking pan.
- Combine the all-purpose flour, granulated sugar, baking powder, and salt in a large mixing bowl.
- Cut the cold, cubed butter into the dry ingredients until crumbly.
- Crack in the egg and mix until just combined.
- Press about two-thirds of the mixture into the prepared baking pan and bake for 15 minutes.
- Cook the raspberries, lemon juice, granulated sugar, and cornstarch in a medium saucepan over medium heat until thickened, about 5-7 minutes.
- Pour the raspberry filling over the baked crust and crumble the remaining crust mixture on top.
- Bake for an additional 25 minutes until golden brown and bubbling.
- Cool the bars in the pan for at least 30 minutes before slicing.
Notes
Dust with powdered sugar before serving. These bars pair wonderfully with vanilla ice cream or whipped cream.
- Prep Time: 15 minutes
- Cook Time: 40 minutes
- Category: Dessert
- Method: Baking
- Cuisine: American
Nutrition
- Serving Size: 1 bar
- Calories: 200
- Sugar: 14g
- Sodium: 150mg
- Fat: 10g
- Saturated Fat: 6g
- Unsaturated Fat: 4g
- Trans Fat: 0g
- Carbohydrates: 28g
- Fiber: 1g
- Protein: 2g
- Cholesterol: 30mg
Keywords: raspberry, crumb bars, dessert, sweet treat, baking




