
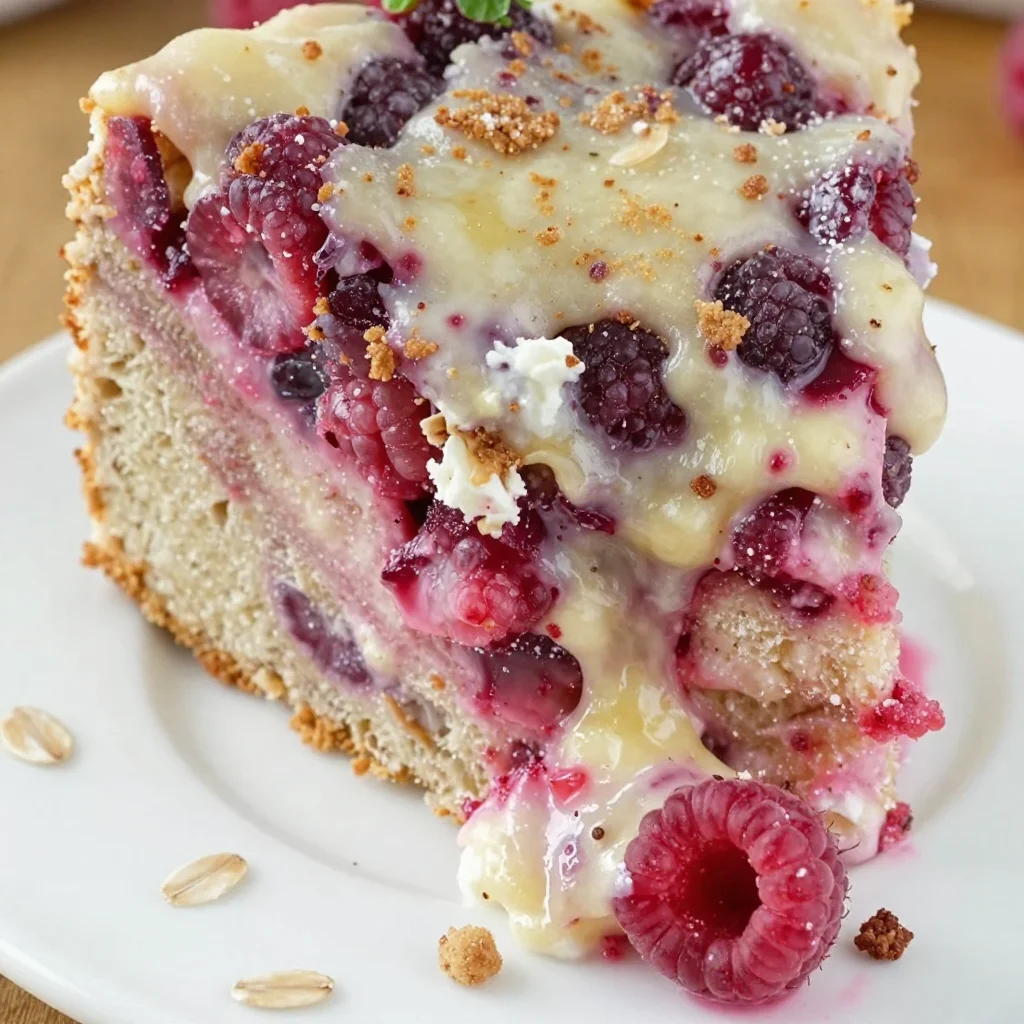
Weeknight-Ready Raspberry Cream Cheese Coffee Cake
Raspberry Cream Cheese Coffee Cake: A Sweet Slice of Nostalgia
Welcome, friends! I’m so excited you’re here in my cozy kitchen today because we’re about to whip up something that’s not just a treat for your taste buds but also a delightful trip down memory lane. It’s my Raspberry Cream Cheese Coffee Cake! 🍰
This cake is the perfect combination of sweet and tangy, with a luscious cream cheese filling that makes it unbelievably rich. Imagine biting into that moist, fluffy cake, with pockets of hearty raspberries bursting with flavor. And the best part? It’s marked with a delicious crumb topping that makes it simply irresistible. Whether for breakfast, an afternoon snack, or a dessert treat, this coffee cake hits all the right spots.
Each time I bake this cake, it reminds me of lazy Sunday mornings spent in my grandmother’s kitchen, the air heavy with the smell of fresh coffee and sweet baked goods. It was a time when family gathered around the table, exchanging stories and laughter, all while savoring the warm, buttery goodness of her creations. Those moments were filled with love, and as I grew older, I made it my mission to carry on that tradition in my own kitchen.
So, roll up your sleeves, grab your apron (you’ll need it!), and let’s dive into this delightful recipe that brings people together. After all, what’s better than bonding over a slice of homemade cake?
A Slice of My Childhood
I’ll never forget the first time I baked this Raspberry Cream Cheese Coffee Cake. I was a curious little munchkin, eager to learn the secrets of my grandmother’s kitchen. One sunny afternoon, she decided it was time to pass down the family recipe, and I remember the thrill of standing on a stool, peering over the counter as she measured out the ingredients.
The raspberries were vibrant, glistening like jewels, and the cream cheese filling intrigued me. As we mixed and mingled the ingredients, my grandmother shared snippets of her culinary adventures, revealing stories that sparked my love for cooking. It was a beautiful bonding experience, and we giggled as the batter splattered everywhere—my curious hands wanted to do it all!
After what felt like an eternity of waiting, a heavenly aroma filled the kitchen as the cake baked to golden perfection. When we finally pulled it from the oven, it looked like a masterpiece—despite the chaos! We let it cool, and when I took that first bite, it wasn’t just delicious; it was love, nostalgia, and happiness all rolled into one.
Now, every time I bake this cake, I’m reminded of those childhood moments brimming with laughter and incredible flavors, and I hope to recreate that magic in your kitchen too!
Ingredients
Here’s what you’ll need to create this dreamy Raspberry Cream Cheese Coffee Cake:
For the Cake:
-
2 cups all-purpose flour
- A staple in most baking. For a gluten-free option, substitute with a 1:1 gluten-free baking mix.
-
1 tablespoon baking powder
- This helps provide aeration and lift. Ensure it’s fresh for maximum fluffiness!
-
½ teaspoon baking soda
- Adds the perfect rise and is especially handy when paired with acidic ingredients like the cream cheese.
-
½ teaspoon salt
- Just a pinch enhances all the flavors.
-
1 cup granulated sugar
- Sweetens the cake! You can substitute it with coconut sugar for a bit of a caramel note.
-
½ cup unsalted butter, softened
- Gives the cake moisture and flavor. If you’re looking for a dairy-free version, coconut oil does wonders!
-
2 large eggs
- Helps bind everything together. For a vegan swap, try ½ cup unsweetened applesauce.
-
1 teaspoon vanilla extract
- Adds depth and warms up the flavor. Fresh vanilla bean or vanilla bean paste are delightful alternatives.
-
1 cup milk
- Whole milk is perfect for richness, but almond or oat milk work just as well!
For the Cream Cheese Filling:
-
8 oz cream cheese, softened
- Provides that luscious, tangy filling we crave! Softened means easy mixing, trust me.
-
1/3 cup granulated sugar
-
1 large egg
-
1 teaspoon vanilla extract
For the Raspberry Topping:
- 2 cups fresh raspberries
- The star of our show! You can swap for blueberries or blackberries if you prefer. Frozen berries work but may create a wetter batter.
For the Crumb Topping:
-
½ cup all-purpose flour
-
½ cup brown sugar
- For that lovely caramel-like flavor!
-
½ teaspoon cinnamon
- Just a pinch adds warmth and spice.
-
¼ cup cold unsalted butter
- Cube it to help create those beautiful crumbs!
Step-by-Step Instructions
Let’s get our hands dirty, shall we? Here’s how to create this delightful Raspberry Cream Cheese Coffee Cake:
Step 1: Preheat and Prep
Begin by preheating your oven to 350°F (175°C). Grease a 9-inch square baking pan or use parchment paper for easy removal later. The goal is to make sure our cake doesn’t stick!
Step 2: Mix Your Dry Ingredients
In a large bowl, whisk together your flour, baking powder, baking soda, and salt. This is important as it evenly distributes the leavening agents ensuring a lovely rise. Set it aside for now.
Step 3: Cream the Butter and Sugar
In another bowl, cream together the softened butter and granulated sugar until light and fluffy. This should take about 3-5 minutes. The air you’re incorporating here is vital for that fluffy texture—it’s like magic! Add in the eggs, one at a time, beating well after each addition. Toss in that vanilla extract too.
Step 4: Combine Wet and Dry
Now, alternate adding the dry ingredients and milk into your butter mixture. Start with a third of the dry mix, then half the milk, and repeat until everything is just combined. Don’t overmix—lumps are perfectly fine!
Step 5: Craft Your Cream Cheese Filling
In a separate bowl, beat the softened cream cheese, sugar, egg, and vanilla until smooth and creamy. This filling will add that dreamy texture and tang that we love.
Step 6: Assemble the Cake
Pour half of the cake batter into your greased pan. Spread it evenly; it’s going to be the foundation! Now, carefully pour the cream cheese mixture over the batter. Dollop the remaining cake batter on top and smooth it out gently.
Step 7: Add Those Raspberries
Scatter the fresh raspberries over the top; the more, the merrier! They’ll sink slightly while baking, creating that beautiful hidden surprise.
Step 8: Time for Crumb Topping
In a small bowl, mix together the flour, brown sugar, cinnamon, and cold butter using your fingers or a pastry cutter until it resembles coarse crumbs. Sprinkle this glorious mixture generously over the cake.
Step 9: Bake
Pop your cake into the preheated oven and bake for 45-55 minutes, or until a toothpick inserted into the center comes out clean. A little bit of melted cream cheese on the toothpick is fine!
Step 10: Cool and Enjoy
Let it cool in the pan for at least 15 minutes before transferring it to a wire rack to cool completely. This cake is divine warm, but giving it time to cool allows the flavors to meld beautifully.
Serving Suggestions
This Raspberry Cream Cheese Coffee Cake looks delightful when plated in thick slices, generous enough to share with family and friends. Dust a light sprinkle of powdered sugar on top for that lovely finishing touch, and serve it with a dollop of whipped cream or a scoop of vanilla ice cream on the side. Coffee or tea pairs perfectly with this treat, making it an ideal afternoon indulgence or a fancy brunch centerpiece!
Recipe Variations
Feel free to get creative with these variations:
-
Mixed Berry Bake: Swap out the raspberries for a mix of your favorite berries such as strawberries, blueberries, or blackberries. Each will bring a unique flavor twist!
-
Citrus Zest: Add lemon or orange zest to the cream cheese filling for a refreshing zing.
-
Nutty Crunch: Fold in some chopped walnuts or pecans into the cake batter for added texture and crunch.
-
Chocolate Dreams: Include chocolate chips in the batter for those who can’t resist a bit of chocolate!
-
Gluten-Free Goodness: Use a gluten-free 1:1 substitute flour for those mindful of gluten.
Chef’s Notes
This Raspberry Cream Cheese Coffee Cake is one of those recipes that has evolved over time. I initially made it with strawberries, but as a lover of diverse flavors, I started experimenting with different fruits. I discovered that the tartness of raspberries pairs beautifully with the sweetness of the cream cheese—truly a match made in flavor heaven!
Remember, it’s completely okay to make a mess while cooking—it just means you’re creating! I always try to keep a camera handy for those messy moments that later become funny cooking stories. Just last week while making this cake, I ended up with flour all over my face and a sprinkle of powdered sugar on my dog from a hopping mishap!
FAQs and Troubleshooting
1. My cake didn’t rise. What went wrong?
Make sure your baking powder and baking soda are fresh. A common mistake is using old leaveners, which can result in a dense cake.
2. How do I store leftovers?
Wrap slices in plastic wrap or store them in an airtight container. They can be left at room temperature for a day or two but refrigerate for longer freshness.
3. Can I freeze this coffee cake?
Absolutely! Once fully cooled, wrap it tightly in plastic wrap and foil, and store it in the freezer. To enjoy, simply thaw it in the fridge overnight and reheat before serving.
4. Can I make the cream cheese filling ahead of time?
Yes! Prepare the filling the night before and keep it in the fridge. Just give it a quick stir before using.
Nutritional Info
While I always encourage balance in eating, here’s a quick nutritional breakdown per serving (slice):
- Calories: 300
- Total Fat: 15g
- Saturated Fat: 8g
- Carbohydrates: 38g
- Sugars: 16g
- Protein: 5g
It’s a sweet treat, but like all things lovely, enjoy it with love and moderation!
And that’s it, friends! I hope this Raspberry Cream Cheese Coffee Cake fills your kitchen with warm memories and delightful aromas, just as it does mine. Don’t forget to share your baking adventures with me—I’d love to hear all about your kitchen stories! Happy baking! 🍰✨
Print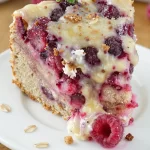
Raspberry Cream Cheese Coffee Cake
- Total Time: 75 minutes
- Yield: 12 servings 1x
- Diet: Vegetarian
Description
A sweet and tangy coffee cake filled with luscious cream cheese and fresh raspberries, topped with a delightful crumb topping.
Ingredients
- 2 cups all-purpose flour
- 1 tablespoon baking powder
- ½ teaspoon baking soda
- ½ teaspoon salt
- 1 cup granulated sugar
- ½ cup unsalted butter, softened
- 2 large eggs
- 1 teaspoon vanilla extract
- 1 cup milk
- 8 oz cream cheese, softened
- 1/3 cup granulated sugar (for filling)
- 1 large egg (for filling)
- 1 teaspoon vanilla extract (for filling)
- 2 cups fresh raspberries
- ½ cup all-purpose flour (for crumb topping)
- ½ cup brown sugar
- ½ teaspoon cinnamon
- ¼ cup cold unsalted butter
Instructions
- Preheat your oven to 350°F (175°C) and grease a 9-inch square baking pan.
- Whisk together the flour, baking powder, baking soda, and salt in a large bowl.
- Cream the softened butter and granulated sugar until light and fluffy; then add eggs and vanilla.
- Alternate adding the dry ingredients and milk into the butter mixture until just combined.
- Beat the cream cheese, sugar, egg, and vanilla until smooth for the filling.
- Pour half of the batter into the pan, then add cream cheese filling, followed by the remaining batter.
- Scatter raspberries over the top.
- Mix flour, brown sugar, cinnamon, and cold butter until crumbs form, then sprinkle over the cake.
- Bake for 45-55 minutes until a toothpick comes out clean.
- Cool for 15 minutes before transferring to a wire rack to cool completely.
Notes
For a gluten-free option, substitute all-purpose flour with a 1:1 gluten-free baking mix.
- Prep Time: 20 minutes
- Cook Time: 55 minutes
- Category: Dessert
- Method: Baking
- Cuisine: American
Nutrition
- Serving Size: 1 slice
- Calories: 300
- Sugar: 16g
- Sodium: 200mg
- Fat: 15g
- Saturated Fat: 8g
- Unsaturated Fat: 6g
- Trans Fat: 0g
- Carbohydrates: 38g
- Fiber: 1g
- Protein: 5g
- Cholesterol: 70mg
Keywords: coffee cake, raspberry cake, dessert, baking

No-Bake Raspberry Crumb Bars: Easy 20-Minute Summer Treat
Raspberry Crumb Bars: A Sweet Slice of Nostalgia
Welcome to my cozy corner of the internet! Today, I’m thrilled to share a delightful treat that holds a special place in my heart: Raspberry Crumb Bars. Let me tell you—the moment you take your first bite of these sweet, tart bars, you’ll be transported to a sun-drenched afternoon filled with laughter and joy.
There’s something magical about the combination of buttery, crumbly crust layered with a vibrant raspberry filling. Whether you’re a fruit lover or just enjoy a good old-fashioned sweet treat, these bars are the perfect addition to any gathering or a lovely afternoon snack while curled up with your favorite book.
Growing up, my summer days were often spent in my grandmother’s kitchen, where the aroma of freshly baked goods wafted through the air. One summer, she decided we would make raspberry bars together. We picked the juiciest, plumpest raspberries from her garden, giggling as juice dripped from our fingers. I can still hear her playful teasing about my messy apron (which, let’s be honest, has become a badge of honor for me!). Those days are etched in my memory, each bite of those crumb bars filled with sweet nostalgia.
So, roll up your sleeves, don that apron—messy or not—and let’s dive into making these Raspberry Crumb Bars together!
Key Ingredients
For the Crust and Topping:
- All-purpose flour (2 cups): The backbone of the crumb bar. For a gluten-free option, substitute with gluten-free flour blend.
- Granulated sugar (¾ cup): Added for sweetness. Brown sugar can be used for a deeper flavor.
- Baking powder (1 teaspoon): This will give your bars a nice lift; make sure it’s fresh to ensure better rising.
- Salt (½ teaspoon): A pinch of salt helps balance the sweetness and enhances flavor.
- Butter (½ cup, cold and cubed): The heart and soul of these crumb bars. You can use unsalted butter or vegan butter as a substitute for dairy-free.
- Egg (1 large): Acts as a binding agent. For a vegan option, try using flaxseed meal (1 tablespoon mixed with 2.5 tablespoons water) as a substitute.
For the Raspberry Filling:
- Fresh raspberries (2 cups): The star of the show! Frozen raspberries will work, but fresh fruit provides the best flavor and texture.
- Lemon juice (1 tablespoon): Brings brightness to the raspberry filling. Lime juice can also be a zesty alternative.
- Cornstarch (2 tablespoons): Thickens the filling so it doesn’t ooze all over. Feel free to swap it with arrowroot powder for a different thickening agent.
- Granulated sugar (½ cup): Sweetens the tangy raspberries. Adjust to your taste depending on the ripeness of your fruit.
Step-by-Step Instructions
Step 1: Preheat Your Oven
Let’s get started by preheating your oven to 350°F (175°C) and greasing a 9×9-inch baking pan. Trust me; it’s going to be worth the wait!
Step 2: Prepare the Crust
In a large mixing bowl, combine the all-purpose flour, granulated sugar, baking powder, and salt. Now, here’s the fun part: use a fork or your fingers to cut the cold, cubed butter into the dry ingredients. You want a crumbly texture, similar to wet sand. You can also use a pastry cutter for a quicker method. Pro tip: Keep the butter cold for flakier crusts!
Step 3: Add the Egg
Crack in the egg and mix until everything just comes together. Don’t overmix! We want a tender crumb, not tough bars.
Step 4: Bake the Crust
Press about two-thirds of this mixture into the prepared baking pan. Bake for 15 minutes just until it starts to turn golden. The smell will be tantalizing, trust me!
Step 5: Make Raspberry Filling
While the crust is baking, it’s time to prepare the filling. In a medium saucepan over medium heat, combine the raspberries, lemon juice, granulated sugar, and cornstarch. Cook it down until the raspberries release their juices and thicken slightly, about 5-7 minutes. Stir gently to avoid smashing the fruit into mush.
Step 6: Assemble and Bake
Once your crust has baked and the filling is ready, pour it evenly over the crust. Crumble the remaining crust mixture on top. Bake these beauties for an additional 25 minutes until the top is golden brown and the filling is bubbling. It might take some patience, but oh, is it worth it!
Step 7: Cool and Slice
Let the bars cool in the pan for at least 30 minutes before slicing. (I know it’s tempting, but trust me—this step is crucial!) Once they’re cool, dust with powdered sugar for a little extra flair.
Serving Suggestions
These Raspberry Crumb Bars are best served slightly warm or at room temperature. You can serve them as is or dress them up with a scoop of vanilla ice cream or a dollop of freshly whipped cream for an elevated experience!
Recipe Variations
- Berry Blast: Mix in blueberries or blackberries with the raspberries for a delightful berry medley.
- Nutty Addition: Stir in some chopped nuts, such as almonds or walnuts, to the crumb topping for added crunch.
- Zesty Surprise: Add some grated lemon or orange zest to the filling for an extra fresh flavor.
- Chocolate Drizzle: Once cooled, drizzle melted dark chocolate over the bars for a luscious twist.
- Spiced Version: Sprinkle in some cinnamon or nutmeg to the crumb mixture for a warm, cozy flavor profile.
Chef’s Notes
Ah, Raspberry Crumb Bars—they’ve become a staple in my kitchen, evolving over the years from my grandmother’s simple recipe to something I love putting my own stamp on. I’ll never forget the time I added a pinch of cayenne pepper to the berry filling out of curiosity. I was surprised by how the heat enhanced those sweet, tangy raspberries; just a little spice gives it a whole new depth!
And of course, you can always sprinkle some crumbs into a bowl of yogurt for breakfast or even use the filling in a tart. So versatile!
FAQs and Troubleshooting
Q: My crumb topping didn’t come out crumbly! What went wrong?
A: This usually happens if the butter is too soft or if the mixture was overmixed. Keep your butter cold and mix just until combined for that perfect crumble.
Q: Can I make these ahead of time?
A: Absolutely! These bars hold up well for 3-4 days in an airtight container. Just let them cool completely before storing.
Q: How do I store leftovers?
A: Keep them in an airtight container in the fridge for up to a week, or freeze them for longer storage – I love pulling out a slice on a quiet afternoon!
Q: Can I use other fruits for the filling?
A: Yes! Feel free to experiment with strawberries, peaches, or even a mix of fruits. Just adjust the sugar according to the fruit’s sweetness.
Nutritional Info
Calories per serving: Approximately 200
Fat: 10g
Carbohydrates: 28g
Fiber: 1g
Protein: 2g
There you have it! Raspberry Crumb Bars that are sure to warm your heart and delight your taste buds. I hope these bars inspire many happy memories for you and your loved ones—just like they did for me. So go ahead, grab those raspberries, and let’s get baking! Happy cooking, friends!
Print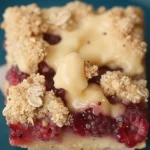
Raspberry Crumb Bars
- Total Time: 55 minutes
- Yield: 16 servings 1x
- Diet: Vegetarian
Description
Delightful and nostalgic Raspberry Crumb Bars with a buttery crust and vibrant raspberry filling, perfect for any gathering or an afternoon snack.
Ingredients
- 2 cups all-purpose flour
- ¾ cup granulated sugar
- 1 teaspoon baking powder
- ½ teaspoon salt
- ½ cup butter, cold and cubed
- 1 large egg
- 2 cups fresh raspberries
- 1 tablespoon lemon juice
- 2 tablespoons cornstarch
- ½ cup granulated sugar (for filling)
Instructions
- Preheat your oven to 350°F (175°C) and grease a 9×9-inch baking pan.
- Combine the all-purpose flour, granulated sugar, baking powder, and salt in a large mixing bowl.
- Cut the cold, cubed butter into the dry ingredients until crumbly.
- Crack in the egg and mix until just combined.
- Press about two-thirds of the mixture into the prepared baking pan and bake for 15 minutes.
- Cook the raspberries, lemon juice, granulated sugar, and cornstarch in a medium saucepan over medium heat until thickened, about 5-7 minutes.
- Pour the raspberry filling over the baked crust and crumble the remaining crust mixture on top.
- Bake for an additional 25 minutes until golden brown and bubbling.
- Cool the bars in the pan for at least 30 minutes before slicing.
Notes
Dust with powdered sugar before serving. These bars pair wonderfully with vanilla ice cream or whipped cream.
- Prep Time: 15 minutes
- Cook Time: 40 minutes
- Category: Dessert
- Method: Baking
- Cuisine: American
Nutrition
- Serving Size: 1 bar
- Calories: 200
- Sugar: 14g
- Sodium: 150mg
- Fat: 10g
- Saturated Fat: 6g
- Unsaturated Fat: 4g
- Trans Fat: 0g
- Carbohydrates: 28g
- Fiber: 1g
- Protein: 2g
- Cholesterol: 30mg
Keywords: raspberry, crumb bars, dessert, sweet treat, baking
Easy Chocolate Raspberry Tart
Easy Chocolate Raspberry Tart: A Delightful Indulgence
Welcome to my kitchen, friends! Today, I’m bursting with excitement to share a dessert that never fails to dazzle—my Easy Chocolate Raspberry Tart. You know, the kind of treat that can make a regular Tuesday evening feel like a special occasion. Imagine this: a buttery, flaky crust cradling a rich chocolate ganache, topped with vibrant, juicy raspberries. It’s a dessert that’s not just about flavor; it’s about creating beautiful memories in the kitchen and around the table.
When I first made this tart, it was a labor of love and a delightful way to impress my friends at a little potluck dinner. The anticipation as it cooled on the counter, the aroma of chocolate sinking into my skin, and the thrill of cutting into that shiny ganache are moments etched in my memory. I’ve served it for birthdays, anniversaries, and even casual get-togethers with a glass of red wine. It’s the kind of dessert that always brings smiles and often leads to second helpings—which, let’s be honest, is the best kind of feedback!
So, whether you’re an experienced home cook or just starting your culinary journey, this Easy Chocolate Raspberry Tart is a recipe you’ll want to try. It’s simple yet impressive, and while chocolate and raspberries may seem fancy, I promise you’ll feel like a star chef whipping it up in your cozy kitchen. Let’s dive into the delicious details!
Personal Story: The First Time I Made This Tart
I still remember the day I first attempted this chocolate raspberry tart. It was a chilly evening, and my friend Sarah invited me over for a cozy dinner, encouraging me to bring dessert. Now, I can’t resist a challenge—especially when it comes to impressing friends with something delicious!
Armed with a desire to create magic, I rummaged through my recipe collection and found this tart. Learning to make the buttery crust was a bit like a dance, and let me tell you, I had my fair share of mishaps, flour everywhere and giggles aplenty. But when I pulled the tart from the oven, the sight of that glossy ganache and the vibrant raspberries made all the chaos worthwhile. As I sliced into the tart, the decadent chocolate filling flowed as if it had a heartbeat of its own, and the first bite was pure bliss.
That evening turned into a sweet success story—everybody at the table was asking for seconds. It became a cherished recipe in my repertoire, not just for its rich flavors, but for the memories of laughter and joy that filled that dinner. I hope this tart brings the same warmth and happiness into your home.
Ingredients
Here’s what you’ll need to whip up this delicious tart:
-
1 ½ cups all-purpose flour: The base of our pastry. To make it gluten-free, substitute with a gluten-free 1:1 baking flour blend.
-
½ cup unsalted butter: Freshness is key! For a dairy-free option, try using coconut oil or a non-dairy butter substitute.
-
¼ cup sugar: Sweetens the crust perfectly. For a healthier alternative, coconut sugar does a lovely job too.
-
1 large egg yolk: Adds richness to the crust. If you need an egg-free version, try 3 tablespoons of applesauce or a flax egg (mix 1 tablespoon of flaxseed meal with 2.5 tablespoons of water).
-
1 cup heavy cream: Essential for the ganache’s silky texture. You can use full-fat coconut milk for a dairy-free option.
-
8 ounces dark chocolate (70% cacao or more): This is where the magic happens! Feel free to substitute with semi-sweet chocolate if that’s more your style.
-
1 cup fresh raspberries: They add a gorgeous pop of color and a tangy flavor. If raspberries aren’t in season, you can use frozen, just thaw and drain them beforehand!
-
Powdered sugar (for dusting): This is optional but adds a touch of elegance. You can leave it off if you prefer.
Step-by-Step Instructions
Let’s get started on this delightful tart!
-
Preheat Your Oven: First things first, preheat your oven to 350°F (175°C). This is essential for a perfectly baked crust!
-
Make the Tart Crust: In a mixing bowl, combine 1 ½ cups of all-purpose flour, ¼ cup of sugar, and a pinch of salt. Add the diced cold unsalted butter and use your fingers or a pastry cutter to blend until it resembles coarse crumbs with some pea-sized bits of butter remaining (this is what gives us that flaky texture!).
-
Add Egg Yolk and Form Dough: Mix in 1 large egg yolk and a tablespoon of ice water. Combine until the dough clings together. If it’s too crumbly, add a bit more water, just a teaspoon at a time.
-
Chill Before Rolling: Wrap the dough in plastic wrap and chill it in the refrigerator for about 30 minutes. This step is crucial for keeping the crust from shrinking while baking.
-
Roll Out the Dough: Once chilled, lightly flour your work surface and roll out the dough to about ¼ inch thick. Carefully transfer it to a 9-inch tart pan. Press it gently to fit the bottom and sides. Trim off any excess dough hanging over the edges.
-
Blind Bake the Crust: Prick the bottom of the crust with a fork (to prevent bubbling), cover it with parchment paper, and fill it with pie weights or dried beans. Bake for 20 minutes. After that, remove the weights and parchment, and bake for an additional 10 minutes until golden. Let it cool.
-
Prepare the Ganache: While the crust is cooling, heat 1 cup of heavy cream in a saucepan over medium heat until steaming—not boiling! Remove from heat, then add 8 ounces of chopped dark chocolate. Let it sit for a minute, then stir until smooth and glossy.
-
Assemble the Tart: Pour the chocolate ganache into the cooled tart crust, spreading it evenly. Allow it to set at room temperature for about 30 minutes.
-
Add the Raspberries: Once the ganache is slightly firmed up, artfully arrange 1 cup of fresh raspberries on top. You can go for a loose, casual look or a more structured design—it’s entirely up to you!
-
Chill and Serve: Place the tart in the fridge for at least 2 hours before serving. This allows the ganache to fully set and makes slicing much easier.
Serving Suggestions
When it’s time to serve, grab a sharp knife and cut the tart into wedges. You can simply arrange the slices on beautiful plates or serve it right from the tart pan for a rustic feel. A light dusting of powdered sugar on top brings a whimsical touch. For an extra indulgence, pair it with a dollop of fresh whipped cream or a scoop of vanilla ice cream.
Recipe Variations
Feeling adventurous? Here are a few variations to try:
-
Nutty Crust: Swap out ½ cup of the all-purpose flour for finely ground almonds or hazelnuts for a nutty flavor that combines beautifully with chocolate.
-
Mint Chocolate: Add a few drops of peppermint extract to the ganache for a refreshing minty twist.
-
Different Fruits: Replace the raspberries with strawberries, blueberries, or even a mix of seasonal fruits for a colorful explosion!
-
Spicy Chocolate: Add a pinch of cayenne pepper to your ganache for a subtle kick that pairs perfectly with the sweetness of the tart.
-
Extra Crunch: Fold in crushed cookies or nuts into the ganache for a delightful texture contrast.
Chef’s Notes
I absolutely adore how versatile this tart is; it feels like a blank canvas waiting for your personality to shine through! What I find particularly endearing is how each occasion brings its flavor—whether it’s the laughter of friends or a quiet moment of indulgence at home, this tart always seems to fit right in.
Over the years, I’ve experimented with countless variations, and while I’ve settled on this classic recipe as my go-to, each time I make it, I discover something new about the joy of cooking. Don’t be afraid to get a little messy and experiment in your own kitchen. Who knows? You might just come up with the next big twist on this beloved dessert!
FAQs and Troubleshooting
-
Why did my tart crust shrink?
A common issue! Make sure to chill your dough sufficiently before baking. Blind baking with weights can also help minimize shrinking. -
My ganache didn’t set! What did I do wrong?
If your ganache is too runny, it might not have cooled long enough after mixing. Be patient and let it sit until slightly thickened before pouring into the tart shell. -
Can I make this tart ahead of time?
Absolutely! You can bake the crust and prepare the ganache a day in advance. Just assemble it with the raspberries the day you plan to serve it. -
What if I don’t have a tart pan?
No worries! You can use a pie dish or even a square baking pan—your tart will still be delicious regardless of its shape!
Nutritional Info
While I always encourage baking in moderation and enjoying treats, it’s worth noting that this tart is indulgent! Each slice offers a delightful balance of rich flavors and textures. As a rough estimate (per slice based on an 8-slice tart), expect around 300-400 calories with carbs, fats, and sugars playing a significant role.
So grab your apron, gather your ingredients, and let’s make some kitchen magic together! I can’t wait for you to taste this Easy Chocolate Raspberry Tart and create your cozy moments filled with joy, laughter, and, of course, chocolate! Happy baking!
Print
Easy Chocolate Raspberry Tart
- Total Time: 45 minutes
- Yield: 8 servings 1x
- Diet: Vegetarian
Description
A delightful indulgence featuring a buttery crust, rich chocolate ganache, and vibrant raspberries.
Ingredients
- 1 ½ cups all-purpose flour
- ½ cup unsalted butter
- ¼ cup sugar
- 1 large egg yolk
- 1 cup heavy cream
- 8 ounces dark chocolate (70% cacao or more)
- 1 cup fresh raspberries
- Powdered sugar (for dusting, optional)
Instructions
- Preheat your oven to 350°F (175°C).
- Combine 1 ½ cups of all-purpose flour, ¼ cup of sugar, and a pinch of salt in a mixing bowl. Add the diced cold unsalted butter and blend until it resembles coarse crumbs.
- Mix in 1 large egg yolk and a tablespoon of ice water until the dough clings together.
- Wrap the dough in plastic wrap and chill in the refrigerator for about 30 minutes.
- Roll out the chilled dough to about ¼ inch thick and transfer it to a 9-inch tart pan.
- Prick the bottom of the crust with a fork, cover with parchment paper, and fill with pie weights. Bake for 20 minutes, then remove weights and bake for an additional 10 minutes until golden.
- Heat 1 cup of heavy cream in a saucepan until steaming, then remove from heat and add 8 ounces of chopped dark chocolate. Stir until smooth.
- Pour the chocolate ganache into the cooled tart crust and spread evenly. Allow to set for about 30 minutes.
- Arrange 1 cup of fresh raspberries on top of the ganache.
- Chill the tart in the fridge for at least 2 hours before serving.
Notes
For added flair, dust with powdered sugar before serving. This tart is versatile; feel free to experiment with different fruits or flavorings.
- Prep Time: 15 minutes
- Cook Time: 30 minutes
- Category: Dessert
- Method: Baking
- Cuisine: French
Nutrition
- Serving Size: 1 slice
- Calories: 350
- Sugar: 20g
- Sodium: 150mg
- Fat: 25g
- Saturated Fat: 15g
- Unsaturated Fat: 8g
- Trans Fat: 0g
- Carbohydrates: 30g
- Fiber: 3g
- Protein: 5g
- Cholesterol: 30mg
Keywords: chocolate tart, raspberry tart, dessert recipe, easy dessert, baking


