
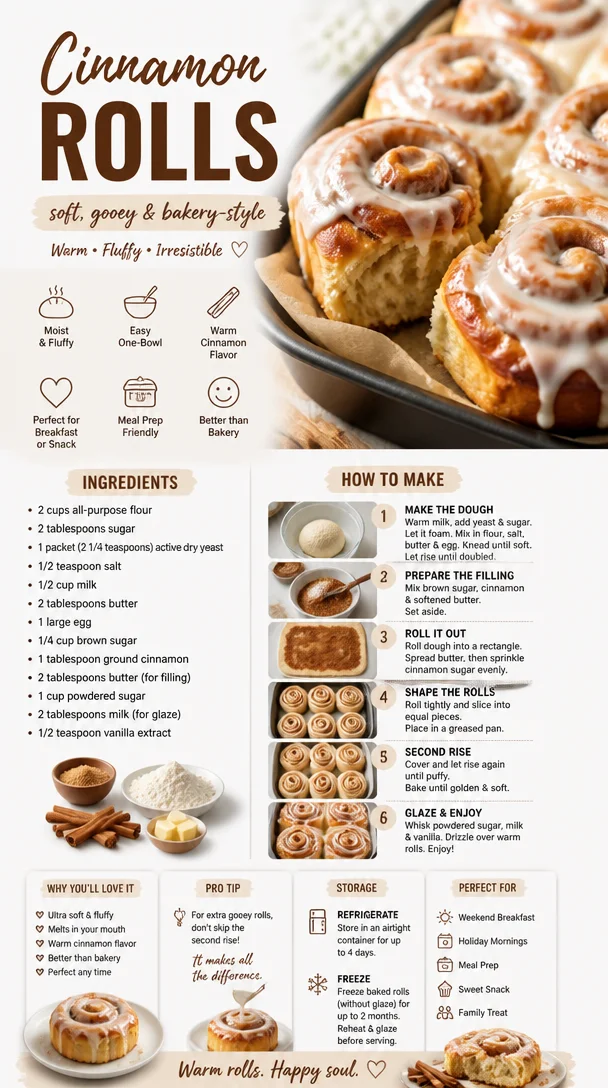
Cinnamon Rolls
The Ultimate Cinnamon Roll Recipe that Will Warm Your Heart
Welcome to my cozy kitchen, where the scent of cinnamon wafts through the air like a warm hug! I’m Olivia Bennett, and today, I’m bursting with excitement to share a cherished recipe that has been a staple in my home for years: my delectable cinnamon rolls. These sweet, fluffy beauties are not just a treat; they’re a delicious memory wrapped in a gooey glaze, ready to bring joy to your family and friends.
There’s something magical about cinnamon rolls. They evoke nostalgia, perhaps because they remind us of lazy Sunday mornings spent lingering over breakfast, the kind that draws everyone to the kitchen with sleepy eyes and hopeful hearts. Picture this: warm coffee brewing, the sun streaming through the window, and the tantalizing aroma of cinnamon swirling through the air. It’s a sensory experience that speaks to the soul, and that’s exactly what I want to recreate for you today.
My love for baking cinnamon rolls started in my childhood, standing on a stool beside my grandmother, who had the knack for creating magic in the kitchen. I remember mixing the dough, sprinkling what felt like an endless mountain of cinnamon sugar, and watching in awe as those rolls blossomed into golden, pillowy clouds in the oven. That anticipation, that sense of warmth and belonging, is what has fueled my passion over the years, and it’s why I’m thrilled to guide you through this journey.
So, grab your apron (and maybe a few extra napkins because things might get sticky), and let’s dive into the world of cinnamon rolls—a place where flour flies, smiles abound, and hearts grow a little fonder with every bite!
A Special Memory: Cinnamon Rolls and Sunday Morning Bliss
Every Sunday during my childhood was carefully marked on the calendar with one simple yet joyous activity: grandma’s cinnamon roll mornings. It wasn’t just about eating; it was an experience filled with laughter, the clink of coffee mugs, and stories that seemed to float through the air like the scent of baking cinnamon.
I vividly recall my grandma’s habit of sneaking a little extra cinnamon and brown sugar into the filling—her secret touch for making them extra special. While we waited for the dough to rise, she would share tales of her own culinary adventures, introducing me to the magic of baking and the happiness it brings.
After what felt like an eternity, the oven timer would ding, a sound that could summon the whole family in an instant. The first bite of those sticky, warm rolls was sheer bliss, a reminder that love is often found in the simplest of pleasures. It was a connection, a way to gather and create memories that have stuck with me through the years.
As I bake these cinnamon rolls today, I channel that same joy and excitement, hoping to share a piece of my past with each person who tries this recipe. Trust me—after just one bite, you’re bound to make your own cherished memories!
Ingredients: What You’ll Need
To make these fluffy cinnamon rolls, gather the following ingredients and let’s create some magic in the kitchen!
-
All-purpose flour (4 cups): This is the base for our dough. It provides structure and fluffiness. If you’re looking for a gluten-free option, you can use a 1:1 gluten-free flour blend.
-
Granulated sugar (½ cup): This sweetens the dough and balances out the spices. For a less sweet option, you can reduce the sugar to ¼ cup.
-
Active dry yeast (2 ¼ teaspoons): This little powerhouse helps the dough rise and become wonderfully fluffy. If you’re using instant yeast, you can use the same amount without needing to activate it in water.
-
Warm milk (1 cup): It activates the yeast and adds richness to the dough. If you’re dairy-free, feel free to use almond milk or oat milk. Just ensure it’s slightly warm, not hot.
-
Unsalted butter (½ cup, melted): Butter brings a lovely flavor and richness to the rolls. You could replace it with coconut oil for a dairy-free version!
-
Large egg (1): This binds the dough together and gives a slight richness. For a vegan alternative, try using a flax egg (1 tablespoon of ground flaxseed mixed with 3 tablespoons of water).
-
Cinnamon (2 tablespoons): The star of our show! It’s warm and aromatic, making these rolls irresistible. If you want a little kick, try adding a pinch of nutmeg or allspice to the mix.
-
Brown sugar (¾ cup): This adds moisture and deep, caramel-like flavor. You can substitute with coconut sugar if preferred.
-
Cream cheese (for frosting): You can’t have cinnamon rolls without icing! Cream cheese gives a tangy sweetness that complements the cinnamon perfectly. For a dairy-free option, try using cashew cream or a non-dairy cream cheese alternative.
Step-by-Step Instructions: How to Make the Perfect Cinnamon Rolls
Ready to roll up those sleeves? Let’s get baking!
Step 1: Prepare the Dough
-
Activate the Yeast: In a small bowl, combine warm milk (about 110°F) with the granulated sugar and yeast. Stir gently and let it sit for about 10 minutes until it’s frothy. This means your yeast is happy and active!
-
Create the Dough: In a large bowl, mix together the flour and a pinch of salt. In a separate bowl, whisk the melted butter, egg, and the bubbly yeast mixture until well combined.
-
Combine Wet and Dry Ingredients: Pour the wet ingredients into the flour mixture, stirring until a shaggy dough forms. Don’t worry about being too precise—this is meant to be a little messy!
Step 2: Knead the Dough
-
Kneading Time: Transfer the dough to a lightly floured surface and knead for about 8-10 minutes. Your dough should be smooth and elastic. If it’s too sticky, sprinkle a little more flour as needed.
-
Let it Rise: Place your kneaded dough in a greased bowl, cover it with a warm towel, and let it rise in a warm spot for about 1-2 hours, or until it has doubled in size. Take this time to sip some coffee and daydream about how amazing these rolls will be!
Step 3: Fill and Roll
-
Prepare your Filling: In a small bowl, mix together the brown sugar and cinnamon. It’s like a sweet spice hug just waiting to be nestled in those rolls!
-
Roll it Out: Once the dough has risen, punch it down gently and turn it out onto a floured surface. Roll it into a rectangle about 1/4-inch thick, aiming for a size of 12×18 inches.
-
Spread the Goodness: Brush the rolled-out dough with melted butter, leaving a small border around the edges. Sprinkle the cinnamon-sugar mixture evenly on top.
Step 4: Shape the Rolls
-
Roll it Up: Starting from the long edge, tightly roll the dough into a log. Pinch the seam to seal it, and keep that delicious filling inside!
-
Slice and Arrange: Cut the log into 12 even slices (you can use dental floss for a clean cut!). Place the rolls in a greased 9×13 inch baking dish, leaving a little space for them to rise, and cover with a towel.
Step 5: Second Rise
- Final Rise: Let those beauties rise for about 30 minutes. Preheat your oven to 350°F (175°C), and take a moment to appreciate the sweet smell wafting through your kitchen.
Step 6: Bake
- Baking Time: After the second rise, pop the rolls in the oven and bake for 20-25 minutes, or until they’re golden brown. Your kitchen will be filled with the irresistible aroma of cinnamon and sweet dough—it’s pure magic!
Step 7: Frost and Enjoy
-
Cream Cheese Frosting: While the rolls are baking, prepare the frosting by mixing softened cream cheese with powdered sugar, a splash of vanilla extract, and a little milk until creamy.
-
Glaze Those Rolls: Once the rolls are out of the oven and slightly cooled, drizzle the creamy frosting over the top. Feel free to go big or go home—there’s no such thing as too much frosting in this house!
Serving Suggestions: The Perfect Way to Enjoy
To serve, simply pull apart the rolls (that’s half the fun!) and place them on a large platter or simply keep them in the baking dish. They’re delicious both warm and at room temperature, so don’t worry if you can’t devour them all at once! And if you’re feeling extra fancy, why not pair them with a steaming cup of coffee or homemade hot chocolate? They’ll elevate your cinnamon roll experience to new heights!
Recipe Variations: Get Creative with Your Rolls
- Nutty Delight: Add chopped nuts (like pecans or walnuts) to the filling for a delicious crunch.
- Fruit-Infused: Incorporate dried fruit, such as raisins or cranberries, for a sweet and tangy twist.
- Spiced Up: Experiment with different spices—try adding cardamom or ginger for a unique flavor profile.
- Dairy-Free: Substitute all dairy products with their non-dairy alternatives to keep things cozy and inclusive.
- Chocolate Chip: Sprinkle chocolate chips into the filling for a gooey, melty treat that’s sure to delight!
Chef’s Notes: Memories and Mischief in the Kitchen
As I bake these cinnamon rolls, I can’t help but recount the times I got a little too eager and accidentally made a flour explosion! It was a mess, but let’s be real—those moments are always the most entertaining. My first batch turned into “cinnamon roll puddles,” but it’s these mishaps that make our kitchen journeys memorable.
Over the years, I’ve tweaked this recipe to perfection, ensuring that every bite is soft, sweet, and gooey. And while I might have thought I was the star chef as a kid, it turns out my grandma was the real genius here!
FAQs and Troubleshooting
Q1: My rolls didn’t rise! What happened?
A: If your yeast is old or the milk was too hot, it might not activate properly. Always check your yeast’s expiration and ensure the milk is just warm to the touch.
Q2: Can I make the dough ahead of time?
A: Absolutely! You can make the dough, let it rise, punch it down, and refrigerate it overnight. Just take it out to warm up before rolling it out.
Q3: How do I store leftovers?
A: Store any leftovers in an airtight container at room temperature for up to 2 days or in the fridge for up to a week. Reheat in the microwave for a few seconds to enjoy that fresh-baked goodness!
Q4: Can I freeze the rolls?
A: Yes! You can freeze unbaked rolls after slicing. Just freeze them on a baking sheet, then transfer to a freezer-safe bag. When you’re ready, let them rise and bake as directed.
Nutritional Information (Optional)
These cinnamon rolls are a delightful treat, but if you’re curious about nutritional content, a single roll (without frosting) contains roughly:
- Calories: 230
- Total Fat: 7g
- Carbohydrates: 36g
- Protein: 4g
Remember, these rolls are about joy, warmth, and sharing, so indulge guilt-free and enjoy every bite!
So there you have it, my dear friends: the ultimate cinnamon roll recipe to fill your kitchen with warmth and your hearts with joy. Whether you’re sharing them with loved ones or savoring them solo, each roll is a little hug that says, “You are loved.” Join me on this delicious journey, and don’t forget to make a few sticky memories along the way! Happy baking!
Print
The Ultimate Cinnamon Roll Recipe that Will Warm Your Heart
- Total Time: 55 minutes
- Yield: 12 servings
- Diet: Vegetarian
Description
Delight in the warmth of homemade cinnamon rolls, filled with sweet, fluffy dough and a gooey glaze, perfect for sharing with family and friends.
Ingredients
- All-purpose flour (4 cups)
- Granulated sugar (½ cup)
- Active dry yeast (2 ¼ teaspoons)
- Warm milk (1 cup)
- Unsalted butter (½ cup, melted)
- Large egg (1)
- Cinnamon (2 tablespoons)
- Brown sugar (¾ cup)
- Cream cheese (for frosting)
Instructions
- Activate the yeast: In a small bowl, combine warm milk with the granulated sugar and yeast. Stir gently and let it sit for about 10 minutes until it’s frothy.
- Create the dough: In a large bowl, mix together the flour and a pinch of salt. In a separate bowl, whisk the melted butter, egg, and the bubbly yeast mixture until well combined.
- Combine wet and dry ingredients: Pour the wet ingredients into the flour mixture, stirring until a shaggy dough forms.
- Knead the dough: Transfer the dough to a lightly floured surface and knead for about 8-10 minutes until smooth and elastic.
- Let it rise: Place your kneaded dough in a greased bowl, cover it with a warm towel, and let it rise for about 1-2 hours until doubled in size.
- Prepare your filling: Mix together the brown sugar and cinnamon in a small bowl.
- Roll it out: Once the dough has risen, punch it down gently and turn it out onto a floured surface. Roll it into a rectangle about 1/4-inch thick.
- Spread the goodness: Brush the rolled-out dough with melted butter and sprinkle the cinnamon-sugar mixture evenly on top.
- Roll it up: Starting from the long edge, tightly roll the dough into a log, pinching the seam to seal it.
- Slice and arrange: Cut the log into 12 even slices and place them in a greased baking dish, covering with a towel.
- Final rise: Let those beauties rise for about 30 minutes and preheat your oven to 350°F.
- Bake: Pop the rolls in the oven and bake for 20-25 minutes until golden brown.
- Prepare the frosting: While the rolls are baking, mix cream cheese with powdered sugar, a splash of vanilla extract, and a little milk until creamy.
- Glaze those rolls: Once baked, drizzle the creamy frosting over the top before serving.
Notes
Feel free to add nuts, dried fruit, or chocolate chips for variation. Make it dairy-free by substituting with non-dairy alternatives.
- Prep Time: 30 minutes
- Cook Time: 25 minutes
- Category: Dessert
- Method: Baking
- Cuisine: American
Nutrition
- Serving Size: 1 roll
- Calories: 350
- Sugar: 10g
- Sodium: 300mg
- Fat: 15g
- Saturated Fat: 8g
- Unsaturated Fat: 5g
- Trans Fat: 0g
- Carbohydrates: 45g
- Fiber: 2g
- Protein: 6g
- Cholesterol: 30mg
Keywords: cinnamon rolls, dessert, baking, sweet rolls, comfort food

Beginner-Friendly One-Bowl Old-Fashioned Spice Cake
The Cozy Charm of Old Fashioned Spice Cake
Welcome back to my cozy kitchen, dear food friends! Today, I’m thrilled to dive into a recipe that warms the heart and brings nostalgia to the forefront — the delightful Old Fashioned Spice Cake. This cake is more than just a sweet treat; it’s a fragrant hug on a plate that dances with the richness of spices and invites you to slow down and savor life’s simple pleasures.
Imagine walking into your home, greeted by the comforting aroma of cinnamon, nutmeg, and cloves wafting through the air. It’s like wrapping yourself in a warm blanket on a chilly autumn day! Spice cake has a way of evoking those memories, transporting us back to family gatherings, holiday festivities, and the cozy corners of our grandparents’ kitchens.
Through this blog, I want to share not only the recipe for this beautiful cake but also the stories and warmth that come with it. Whether you’re baking for a special occasion or simply indulging in a treat for yourself, my goal is to empower you to create delicious food with love and joy in your heart. So, grab your apron, and let’s embark on this baking adventure together!
A Slice of Memory
Let me take you back to my childhood for a moment. Picture this: a crisp fall afternoon, leaves painting the yard in vibrant shades of orange and gold. I was barely tall enough to see over the counter of my grandmother’s kitchen when she pulled out her well-worn cookbook. With flour dusting the tabletop and a teasing sprinkle of sugar in the air, she set out to make her famous spice cake.
As she measured out the fragrant spices, I was enchanted by each unique scent filling the room — cinnamon, cloves, and ginger. “These spices are like warm hugs for your taste buds,” she would say, a twinkle in her eye. I would watch intently, soaking in every detail as she mixed the batter, gently folding in love and laughter along with the ingredients.
When the cake finally emerged from the oven, golden and puffed, we waited (impatiently) for it to cool before drenching it in cream cheese frosting. There was nothing quite like that first slice, a harmonious blend of sweetness and spice that ignited our taste buds and our hearts. That beloved cake became a staple at family gatherings, and each bite was a sweet reminder of the love and joy that filled our kitchen. Today, I hope to share that same delicious nostalgia with you!
Ingredients
Before we dive into baking, let’s gather our ingredients. Here’s what you’ll need to create this old-fashioned gem:
-
All-purpose flour (2 cups)
- The backbone of our cake, providing structure. Feel free to use a gluten-free blend if you’re looking for a gluten-free option!
-
Granulated sugar (1 1/2 cups)
- This will sweeten our cake beautifully. For a lower glycemic index, consider coconut sugar as a substitute.
-
Baking soda (2 teaspoons)
- Our leavening agent, ensuring the cake rises. Make sure it’s fresh for maximum effectiveness!
-
Ground cinnamon (2 teaspoons)
- The star of our spice show! Cinnamon adds warmth and sweetness. If you prefer a bolder flavor, try Vietnamese cinnamon.
-
Ground ginger (1 teaspoon)
- Adding a zesty kick, ginger complements the sweetness. You can replace it with ground cardamom for a different spin.
-
Ground nutmeg (1 teaspoon)
- Just a pinch can elevate the flavor profile! Freshly grated nutmeg is always a lovely touch.
-
Ground cloves (1/2 teaspoon)
- The secret ingredient that gives spice cake depth. Use sparingly, as it can overpower other flavors.
-
Salt (1/2 teaspoon)
- Balances the sweetness; don’t skip this! A pinch of sea salt can enhance the overall taste.
-
Unsalted butter (1 cup, softened)
- This will keep our cake moist and rich. If you prefer an oil-based cake, avocado oil works wonders too.
-
Large eggs (2)
- Essential for binding and richness. For a vegan option, you can replace them with flax eggs (1 tablespoon ground flaxseed mixed with 2.5 tablespoons water per egg).
-
Buttermilk (1 cup)
- Adds moisture and tang. No buttermilk? Mix regular milk with a tablespoon of lemon juice or vinegar and let it sit for a few minutes!
-
Vanilla extract (1 teaspoon)
- Pure vanilla gives a lovely backdrop flavor. Homemade vanilla extract? Even better!
These ingredients combined will turn into a cake that is as comforting as a cup of hot cocoa on a chilly night. Now, let’s get our hands doughy and throw this cake together!
Step-by-Step Instructions
1. Preheat Your Oven
Before anything else, let’s get that oven warming up! Preheat it to 350°F (175°C). This ensures your cake begins baking at the right temperature for perfectly moist results.
2. Prepare Your Cake Pans
Grease and flour two 9-inch round cake pans. This is crucial to ensure the cakes release effortlessly once baked. You can use a bit of butter or cooking spray, and a light dusting of flour will do the trick.
3. Combine Dry Ingredients
In a medium-sized bowl, whisk together the flour, baking soda, salt, cinnamon, ginger, nutmeg, and cloves. This simple step ensures that the spices and leaveners are evenly distributed throughout your cake, which harmonizes the flavor.
4. Mix the Butter and Sugar
In a large mixing bowl, beat the softened butter and granulated sugar together until it’s light and fluffy. This process takes about 3-5 minutes using an electric mixer. The lightness from the butter and sugar helps to create a tender cake.
5. Add the Eggs and Vanilla
Next, add the eggs one at a time, mixing well after each addition. Let the yolks create that velvety texture! Add the vanilla extract and blend until combined. The batter should be smooth and fluffy.
6. Alternate Adding Dry Ingredients and Buttermilk
Begin incorporating the dry mixture into the butter-sugar mixture gradually, alternating with the buttermilk. Start with a third of the dry ingredients, mix until just combined, add half of the buttermilk, and continue this process until all ingredients are combined. This keeps the batter nice and airy.
7. Pour into Pans
Once your batter is ready, it’s time to pour it into the greased pans. Divide it evenly for uniform cakes and smooth the tops with a spatula.
8. Bake Until Done
Pop the cake pans into the preheated oven and let them bake for about 25-30 minutes or until a toothpick inserted in the center comes out clean. The aroma filling your kitchen will be irresistible!
9. Cool the Cakes
Once baked, remove the cakes from the oven and allow them to cool in the pans for about 10 minutes. Then, gently invert them onto a wire rack to cool completely. Cooling completely is important if you want to frost your cakes without melting your icing!
10. Frosting Time!
Let’s make it pretty! While the cakes cool, you can whip up a luscious cream cheese frosting to slather on top. It’s simple — beat together 8 oz of softened cream cheese, 1/2 cup of softened butter, 2 cups of powdered sugar, and 1 tsp of vanilla extract. Once everything is mixed and creamy, frost the layers generously and stack them together.
Serving Suggestions
To serve, slice the cake into generous wedges and plate them with a sprinkle of cinnamon or a few candied nuts on top for that extra touch of elegance. A scoop of vanilla ice cream by the side makes for a perfect contrast to the spiced cake! This is also a lovely dessert for any gathering or a cozy night in, where you can just enjoy every single bite.
Recipe Variations
- Nutty Spice Cake: Add chopped walnuts or pecans to the batter for an added crunch.
- Fruity Twist: Fold in raisins or chopped apples for an extra layer of flavor and texture.
- Chocolate Lovers: Mix in cocoa powder for a chocolate-spice cake that’s rich and decadent!
- Glazed Alternative: Instead of frosting, drizzle with a simple glaze made of powdered sugar and milk for a lighter option.
- Vegan Makeover: Substitute eggs with flax eggs and use plant-based butter and milk to make this cake vegan-friendly — still delicious!
Chef’s Notes
This Old Fashioned Spice Cake holds a special place in my heart, and over the years, I’ve seen it evolve. I love experimenting with additional spices or tweaking the recipe depending on what I have in my pantry. My version has changed with each family gathering, sometimes incorporating seasonal fruits or daring new flavor experiments. It’s the perfect canvas for creativity!
And let me tell you, if you accidentally overmix the batter or forget an ingredient, it still comes out delicious in its own right. The beauty of home cooking is that it’s a perfect reflection of love, patience, and a sprinkle of imperfection.
FAQs and Troubleshooting
Q: My cake didn’t rise. What went wrong?
A: This can happen for a couple of reasons — check the freshness of your baking soda and make sure your oven is at the right temperature.
Q: Can I bake this in a single pan?
A: Absolutely! If you prefer a single-layer cake, just adjust the baking time and keep an eye on it; it may need a little longer to bake through.
Q: How do I store leftovers?
A: Store the cooled cake in an airtight container at room temperature for up to 3 days. If frosted, keep it in the fridge!
Q: What can I do if the cake is too dry?
A: If you accidentally overbake it, don’t fret! A drizzle of milk or a sprinkle of flavored simple syrup over the top can help soften each slice and revive some moisture.
Nutritional Info
(Note: Please adjust based on specific ingredients used.)
- Serving Size: 1 slice (1/12 of the cake)
- Calories: Approximately 350
- Fat: 15g
- Carbohydrates: 49g
- Protein: 4g
- Sugars: 28g
And there you have it, my lovely friends! This Old Fashioned Spice Cake celebrates that cozy essence of home baking and nourishes not just your body but your soul, too. Give yourself permission to indulge in the process — let the kitchen be a therapeutic space where you can unite with the magic of flavors. I can’t wait to hear about your cake adventures! Happy baking!
Print
Old Fashioned Spice Cake
- Total Time: 45 minutes
- Yield: 12 servings 1x
- Diet: Vegetarian
Description
A delightful old-fashioned spice cake that warms the heart with its fragrant blend of cinnamon, nutmeg, and cloves, perfect for any occasion.
Ingredients
- 2 cups all-purpose flour
- 1 1/2 cups granulated sugar
- 2 teaspoons baking soda
- 2 teaspoons ground cinnamon
- 1 teaspoon ground ginger
- 1 teaspoon ground nutmeg
- 1/2 teaspoon ground cloves
- 1/2 teaspoon salt
- 1 cup unsalted butter, softened
- 2 large eggs
- 1 cup buttermilk
- 1 teaspoon vanilla extract
Instructions
- Preheat your oven to 350°F (175°C).
- Prepare two 9-inch round cake pans by greasing and flouring them.
- Combine the flour, baking soda, salt, cinnamon, ginger, nutmeg, and cloves in a medium bowl.
- Mix the softened butter and sugar until light and fluffy.
- Add the eggs one at a time and mix in the vanilla extract.
- Alternate adding the dry ingredients and buttermilk to the butter mixture, starting and ending with the dry ingredients.
- Pour the batter evenly into the prepared cake pans.
- Bake for 25-30 minutes or until a toothpick comes out clean.
- Cool the cakes in the pans for 10 minutes before inverting them onto a wire rack.
- Frost with cream cheese frosting once cooled.
Notes
Serve with a sprinkle of cinnamon or a scoop of vanilla ice cream for an extra special touch.
- Prep Time: 15 minutes
- Cook Time: 30 minutes
- Category: Dessert
- Method: Baking
- Cuisine: American
Nutrition
- Serving Size: 1 slice
- Calories: 350
- Sugar: 28g
- Sodium: 300mg
- Fat: 15g
- Saturated Fat: 9g
- Unsaturated Fat: 5g
- Trans Fat: 0g
- Carbohydrates: 49g
- Fiber: 1g
- Protein: 4g
- Cholesterol: 60mg
Keywords: spice cake, old fashioned cake, baking, dessert, autumn recipes

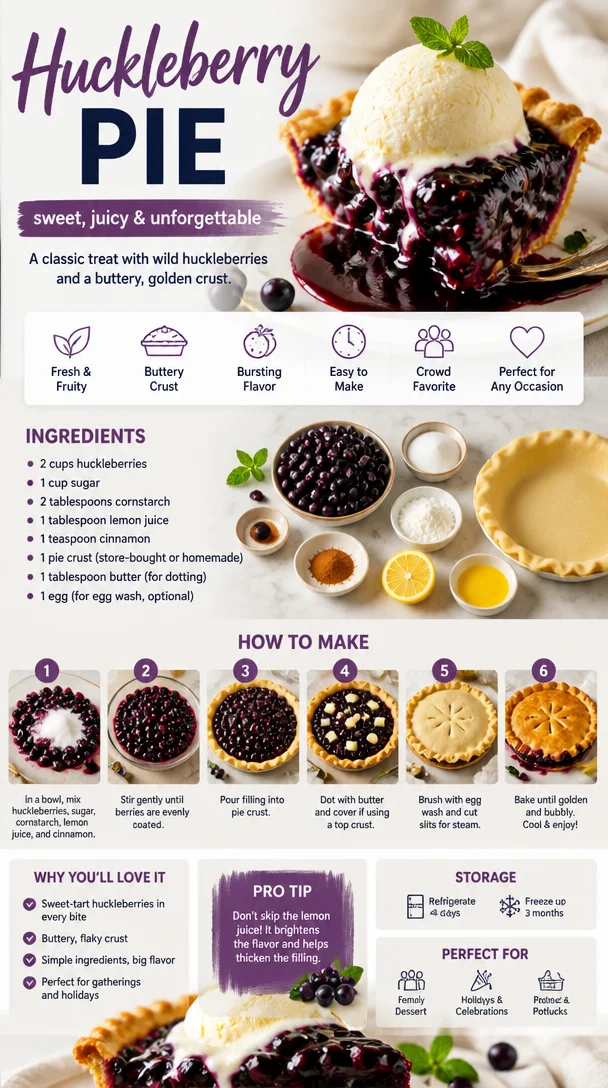
Wild Huckleberry Pie
The Joy of Wild Huckleberry Pie: A Slice of Nostalgia
Welcome to my kitchen! Today, we’re diving into one of my all-time favorites: Wild Huckleberry Pie. There’s something truly magical about this dessert that not only tantalizes your taste buds but also stirs up warm, loving memories of summers spent in nature’s embrace. Picture this: plump, juicy huckleberries, vibrant in color, bursting with sweet-tart goodness, and enveloped by a flaky, buttery crust. It’s like a hug in dessert form, and I can’t wait to share my love of this pie with you.
Let’s rewind to the summer I turned ten years old. My family decided to escape the hustle and bustle of city life for a week in the woods. My parents packed the car with camping gear, and my siblings and I packed our excitement. Little did I know, this adventure would kick off my lifelong obsession with huckleberries. Nestled near our campsite was a hidden patch of dark purple berries, and with my mother’s guidance, I learned to spot the ripest ones. Eventually, we returned to our campsite with buckets overflowing with huckleberries, our hands stained with juice, our laughter echoing through the trees.
That night, we baked our first pie outdoors over a campfire. With the smell of that sweet aroma wafting through the air, we gathered around the flickering flames, sharing stories and making memories that still bring a smile to my face. As we dove into that pie, I could see the joy on everyone’s faces; it was a simple symbol of togetherness, a bond forged in the kitchen and warmed by the spirit of family.
Now that I’ve recounted this delightful memory, let’s roll up our sleeves and jump into this recipe! I promise it’s easy and rewarding, perfect for any occasion, whether you’re in search of a simple weeknight dessert or looking to impress your friends at a summer gathering.
Ingredients
Before we start, let’s gather our ingredients. Here’s what you’ll need to make this delicious Wild Huckleberry Pie:
-
2 cups fresh wild huckleberries
These little gems are the star of the show! If you can’t find wild huckleberries, blueberries make a fantastic substitute. Just remember to adjust the sugar slightly, as blueberries tend to be sweeter. -
1 cup granulated sugar
This will sweeten our filling. You can use coconut sugar or honey for a healthier alternative. If you enjoy less sweetness, feel free to scale back on the sugar. -
1 tablespoon cornstarch
This acts as a thickener, ensuring your pie filling has that perfect luscious texture. If you prefer a gluten-free option, tapioca starch does the trick beautifully. -
1 teaspoon lemon juice
A splash of acidity balances the sweetness of the berries. Fresh lemon juice is ideal, but bottled juice will work if you’re in a pinch! -
1 teaspoon vanilla extract
Vanilla adds a warm depth to the flavor. You can switch it up with almond extract for a different nutty twist or skip it entirely if you want to keep it simple. -
1 tablespoon butter (for dotting)
Just a little pat of butter adds richness to the filling. You can use margarine if you’re looking for a dairy-free option. -
1 homemade or store-bought pie crust
I usually go for a homemade, flaky pie crust. But if time is short, don’t shy away from the convenience of pre-made crusts! -
Egg wash (1 egg beaten with a tablespoon of water)
This is optional but gives your pie that beautiful golden finish.
Step-by-Step Instructions
Now, let’s get to the fun part! Here’s a detailed guide on how to make your Wild Huckleberry Pie:
-
Preheat Your Oven:
Start by preheating your oven to 425°F (220°C). A hot oven ensures that your crust will be flaky and perfectly cooked. Trust me, a well-preheated oven is the key to baking success! -
Prepare the Filling:
In a large mixing bowl, combine your huckleberries, sugar, cornstarch, lemon juice, and vanilla extract. Gently toss to coat the berries and let them sit for about 15 minutes. This step allows the juices to be released and helps the flavors meld together beautifully. I love taking this moment to reminisce about that camping trip while I wait! -
Roll Out the Pie Crust:
Whether you’re using store-bought or homemade crust, roll it out on a lightly floured surface to about 1/8-inch thick. Carefully transfer it to your pie dish, pressing gently to fit into the corners. If using store-bought dough, follow the package instructions for thawing and placement. -
Fill the Pie:
Pour the huckleberry mixture into the prepared crust, making sure it fills all the nooks and crannies. Dot the filling with little bits of butter for added richness—trust me, it’s worth it! -
Top with Another Crust:
If you love a double-crust pie, roll out your second dough and place it over the filling. Cut slits in the top to allow steam to escape. This is where you can get creative: make a lattice pattern or cut out shapes for fun! -
Brush with Egg Wash:
If you’re feeling fancy, brush the crust with the egg wash. This will give it a glorious golden sheen. Not only does it make your pie look professional, but it also adds a slight richness when you bite into it. -
Bake the Pie:
Place your pie on a baking sheet (to catch any drips) and slide it into the oven. Bake for 15 minutes at 425°F (220°C), then reduce the temperature to 350°F (175°C) and continue baking for 30–35 minutes, or until the crust is golden brown and the filling is bubbling beautifully. -
Cool and Enjoy:
Once baked to perfection, remove your pie from the oven and let it cool for at least an hour before slicing. This allows the filling to set. Plus, it gives you a moment to enjoy that incredible aroma filling your kitchen!
Serving Suggestions
When it comes to serving your Wild Huckleberry Pie, let your creativity shine! A generous scoop of vanilla ice cream or a dollop of whipped cream on the side adds a delightful creamy contrast to the tartness of the berries. For a seasonal twist, top it with a sprinkle of fresh mint or powdered sugar for a pop of color and flavor.
Recipe Variations
-
Huckleberry Blueberry Mix: Combine huckleberries and blueberries for a fun flavor twist! The blueberries will naturally sweeten the pie.
-
Lemon Huckleberry: Enhance the filling with extra zest from a lemon for a more pronounced citrus flavor that brightens up the berries!
-
Spiced Huckleberry: Add a pinch of cinnamon or nutmeg to the filling for a warm, cozy flavor that’s perfect for fall gatherings.
-
Gluten-Free Crust: Use a gluten-free pie crust or a mixture of almond flour and coconut flour for a deliciously different base.
-
Vegan Twist: Substitute butter with coconut oil and the egg wash with a mixture of almond milk and maple syrup for a scrumptious vegan pie.
Chef’s Notes
Huckleberry pie holds a special place in my heart, and I’ve tinkered with this recipe over the years. Your instincts as a cook will guide you. If you taste the filling and think it needs a little more sweetness, feel free to adjust! And here’s a funny kitchen story for you: the first time I made this pie solo, I forgot to dot the filling with butter. I ended up with a delicious yet slightly dry pie! It was a great reminder that every misstep in the kitchen is an opportunity to learn and evolve. Feel free to put your own twist on this pie and make it your own!
FAQs and Troubleshooting
-
Why is my pie filling runny?
Runny filling can happen if you undercooked the cornstarch or didn’t allow the pie to cool before serving. Ensure you mix the cornstarch thoroughly with the berries, and patience is key—let it cool properly! -
How can I prevent my crust from getting soggy?
For a flakier crust, you can blind bake it for about 10 minutes before adding the filling! This helps seal off the bottom and ensures it stays crisp. -
What should I do if I can’t find huckleberries?
Blueberries, blackberries, or even cranberries can serve as excellent alternatives. Each brings its own unique flavor that will still create a delightful dessert! -
How do I store leftover pie?
Cover your pie loosely with plastic wrap or aluminum foil and store it in the fridge for up to 3 days. You can also freeze slices for up to 3 months—just make sure they’re well-wrapped to avoid freezer burn.
Remember, cooking is all about enjoyment, exploration, and sharing with others. I hope you’ll be inspired to try this Wild Huckleberry Pie recipe, whether it’s for yourself or to share with loved ones. Happy baking, and may your kitchen always be filled with laughter and delightful aromas!
Print
Wild Huckleberry Pie
- Total Time: 1 hour 5 minutes
- Yield: 8 servings 1x
- Diet: Vegetarian
Description
A delightful Wild Huckleberry Pie recipe that evokes nostalgic summer memories, featuring sweet-tart huckleberries in a flaky buttery crust.
Ingredients
- 2 cups fresh wild huckleberries
- 1 cup granulated sugar
- 1 tablespoon cornstarch
- 1 teaspoon lemon juice
- 1 teaspoon vanilla extract
- 1 tablespoon butter (for dotting)
- 1 homemade or store-bought pie crust
- 1 egg beaten with a tablespoon of water (for egg wash)
Instructions
- Preheat your oven to 425°F (220°C).
- Combine huckleberries, sugar, cornstarch, lemon juice, and vanilla extract in a large mixing bowl. Let sit for 15 minutes.
- Roll out the pie crust to about 1/8-inch thick and transfer it to your pie dish.
- Pour the huckleberry mixture into the prepared crust and dot with butter.
- Top with another crust, cutting slits for steam to escape.
- Brush with egg wash for a golden finish.
- Bake for 15 minutes at 425°F, then reduce to 350°F (175°C) and bake for 30–35 minutes.
- Cool for at least an hour before slicing.
Notes
Serve with a scoop of vanilla ice cream or whipped cream for a delightful contrast. Consider variations like a Huckleberry Blueberry mix or a spiced version with cinnamon.
- Prep Time: 20 minutes
- Cook Time: 45 minutes
- Category: Dessert
- Method: Baking
- Cuisine: American
Nutrition
- Serving Size: 1 slice
- Calories: 300
- Sugar: 24g
- Sodium: 200mg
- Fat: 14g
- Saturated Fat: 7g
- Unsaturated Fat: 6g
- Trans Fat: 0g
- Carbohydrates: 40g
- Fiber: 3g
- Protein: 3g
- Cholesterol: 70mg
Keywords: huckleberry, pie, dessert, summer, baking
Huckleberry Pie
The Delights of Huckleberry Pie: A Slice of Nostalgia
Welcome back to my kitchen, friends! Today, we’re diving into one of my favorite desserts that brings a smile to my face every time I make it — huckleberry pie. Whether you’re a huckleberry aficionado or someone who has yet to be introduced to these tiny, tart beauties, this pie is bursting with flavor and love.
Imagine this: it’s a splendid summer day, and you’re surrounded by the lush greenery of the forest. You’ve got a basket in hand, and you’re on a quest to gather wild huckleberries. One by one, you pluck these plump little gems from their leafy homes, their sweet-tart aroma filling the air. The thrill of foraging them with loved ones, the laughter that floats through the trees, and the storytelling that follows those harvests make these moments truly special. And when we get back home? Well, it’s time to transform those huckleberries into a pie that’s sure to spark joy and nostalgia.
For me, making huckleberry pie is more than just a cooking process; it’s a tradition that connects me to the moments spent with my family. My grandmother had her special recipe, and every summer, she’d invite us into her cozy kitchen to help her with the filling. I remember standing on a stool to reach the countertop, rolling out dough with my tiny hands, laughing with my siblings, and occasionally sneaking a huckleberry or two! Those memories are ingrained in my heart and have become a cherished part of my culinary journey.
So, whether you’re dusting off grandma’s old recipe or trying your hand at making this delightful dessert for the first time, I promise that huckleberry pie is an experience that will create sweet memories. Let’s get started, so you can fill your home with that irresistible scent of baking pie!
Ingredients
To make this huckleberry pie, here’s what you’ll need:
- Fresh Huckleberries (4 cups): The star of our show! Fresh huckleberries are deep purple and burst with flavor. If you can’t find them, blueberries or blackberries can be fantastic substitutes. Just make sure to adjust the sugar level depending on the sweetness of the fruit.
- Granulated Sugar (1 cup): This balances the tartness of the huckleberries. For a healthier option, feel free to use coconut sugar or honey, but keep in mind that it might change the texture slightly.
- All-Purpose Flour (1/4 cup): This is a thickening agent that helps form a beautiful filling. If you need a gluten-free option, you can replace it with a gluten-free flour blend.
- Lemon Juice (2 tablespoons): This brightens the flavors and enhances the huckleberries’ natural tartness. You can also experiment with lime juice for a fun twist.
- Butter (2 tablespoons, unsalted): For richness, this ingredient brings a lovely flavor to the filling. You can quickly swap with coconut oil for a dairy-free version.
- Ground Cinnamon (1 teaspoon): A sprinkle of this adds warmth to the pie’s flavor. If you’re feeling adventurous, cardamom or nutmeg could be a delightful touch!
- Pie Crust (1 double-crust recipe): You can use either a homemade pie crust or store-bought, depending on your time situation. For a twist, try a graham cracker crust for a sweeter, crunchier base.
Step-by-Step Instructions
1. Preheat Your Oven
First things first, let’s set the vibe for your kitchen! Preheat your oven to 425°F (220°C). This will ensure your pie bakes beautifully with that perfect golden crust and bubbling filling.
2. Prepare the Pie Crust
If you’re making your own crust, roll it out to fit your 9-inch pie dish. Make sure to keep it thick enough for structure but thin enough to enjoy that buttery goodness. Don’t worry if it doesn’t look perfect; we’re going for homemade charm here! If you’re using a store-bought crust, just follow the instructions on the package. Once you have your bottom crust in place, trim the edges and set it aside.
3. Mix the Filling
In a large mixing bowl, combine your huckleberries, sugar, flour, lemon juice, butter, and cinnamon. Gently fold the ingredients together to avoid squishing those lovely berries. Take a moment to relish the vibrant colors and enchanting smell — it’s all about those little joys in the kitchen!
Chef Tip: Make sure your huckleberries are clean! Rinse them gently under cold water and pat them dry to avoid excess moisture in the filling.
4. Fill the Pie
Pour the huckleberry mixture into the prepared bottom crust, giving it a little shake to settle everything. It should look luscious and inviting! If you like, you can add some lattice work on top or simply cover it with another sheet of pie crust. If you choose to go with the latter, make sure to cut a few slits for steam to escape — we don’t want it to explode in the oven!
5. Bake Your Pie
Place the pie on a baking sheet (to catch any drips) and pop it in the oven. Bake for 15 minutes at 425°F, then reduce the temperature to 350°F (175°C) and continue baking for an additional 30-35 minutes. You want that crust to be a delightful golden brown, and the filling to be bubbling up through the openings.
Chef Hack: If you notice the crust browning too fast, you can gently cover the edges with aluminum foil to protect them from burning.
6. Cool and Serve
Once your huckleberry pie is beautifully baked, remove it from the oven and let it cool for at least 1-2 hours. This cooling time allows the filling to set perfectly. It’s tough to wait, but trust me, it’ll be worth it when you slice into it later!
Serving Suggestions
For that extra cozy touch, serve your huckleberry pie warm with a scoop of vanilla ice cream or a dollop of freshly whipped cream. You can even sprinkle a bit of cinnamon on top for a charming finish. If you’re feeling fancy, pair it with a pot of herbal tea or a cup of freshly brewed coffee — it’s a match made in culinary heaven!
Recipe Variations
Here are some creative twists you might like to try with this huckleberry pie:
- Huckleberry-Lemon Pie: Add a bit more lemon zest for a refreshing zing that elevates the flavor profile.
- Mixed Berry Pie: Combine huckleberries with blueberries, raspberries, or chopped strawberries for a delightful mixed berry experience.
- Nutty Crust: Use ground almonds or pecans in your pie crust for a nutty flavor that pairs perfectly with the huckleberries.
- Vegan Version: Substitute butter with vegan margarine and use a vegan pie crust; swap out sugar for your favorite vegan-friendly sweetener!
- Spiced Huckleberry Pie: Add a touch of ginger or cardamom to the filling for a warm and inviting flavor.
Chef’s Notes
As I’ve made this pie over the years, I’ve learned a few things along the way. One of my favorite moments was when I decided to throw in a hint of almond extract into the filling, and oh my goodness! The twist was simply delightful. Watching smiles spread across my family’s faces as they tasted my latest creation is what keeps me going in the kitchen. Every batch is an opportunity for a sweet surprise and a new memory in making!
FAQs and Troubleshooting
Q1: Why did my huckleberry pie become runny?
Sometimes, it’s all about moisture in the fruit. If your huckleberries were too juicy, adding an extra tablespoon of flour in the filling can help absorb that excess moisture.
Q2: How do I keep my crust from getting soggy?
Use a light brush of egg wash or melted butter on the bottom of your crust before adding the filling. This helps create a barrier and keeps it crisp.
Q3: Can I freeze huckleberry pie?
Absolutely! Just make sure it’s completely cooled, wrap it tightly in plastic wrap and then in foil. It should hold up nicely for about 2-3 months. To serve, bake directly from the freezer, just add a few extra minutes to the baking time.
Q4: Is there a way to make my huckleberry pie less sweet?
You can reduce the amount of sugar you use in the filling. I recommend gradually reducing it instead of cutting it out completely to maintain a balance of flavors.
Nutritional Info
Each slice of huckleberry pie (1/8 of the pie) typically contains around 200-250 calories, depending on your crust and ingredients. It’s packed with antioxidants from the huckleberries and can absolutely be part of a balanced diet!
Now that you have all the tips and tricks, it’s time for you to grab your apron and get to baking! I can’t wait to hear about your huckleberry pie adventures. Remember, cooking is about joy, share it, and create those beautiful moments. Happy baking!
Print
Huckleberry Pie
- Total Time: 1 hour 5 minutes
- Yield: 8 servings
- Diet: Vegetarian
Description
This delightful huckleberry pie is bursting with flavor and nostalgia, perfect for summer gatherings and creating sweet memories.
Ingredients
- Fresh Huckleberries (4 cups)
- Granulated Sugar (1 cup)
- All-Purpose Flour (1/4 cup)
- Lemon Juice (2 tablespoons)
- Butter (2 tablespoons, unsalted)
- Ground Cinnamon (1 teaspoon)
- Pie Crust (1 double-crust recipe)
Instructions
- Preheat your oven to 425°F (220°C).
- Prepare the pie crust by rolling it out to fit a 9-inch pie dish.
- Mix the huckleberries, sugar, flour, lemon juice, butter, and cinnamon in a large mixing bowl.
- Fill the prepared bottom crust with the huckleberry mixture.
- Bake the pie: Bake for 15 minutes at 425°F, then reduce the temperature to 350°F (175°C) for an additional 30-35 minutes.
- Cool the pie for at least 1-2 hours before serving.
Notes
For a twist, serve warm with ice cream or whipped cream. Can substitute huckleberries with blueberries or blackberries if necessary.
- Prep Time: 20 minutes
- Cook Time: 45 minutes
- Category: Dessert
- Method: Baking
- Cuisine: American
Nutrition
- Serving Size: 1 slice
- Calories: 225
- Sugar: 20g
- Sodium: 50mg
- Fat: 8g
- Saturated Fat: 5g
- Unsaturated Fat: 3g
- Trans Fat: 0g
- Carbohydrates: 36g
- Fiber: 3g
- Protein: 2g
- Cholesterol: 15mg
Keywords: huckleberry, pie, dessert, summer, berries
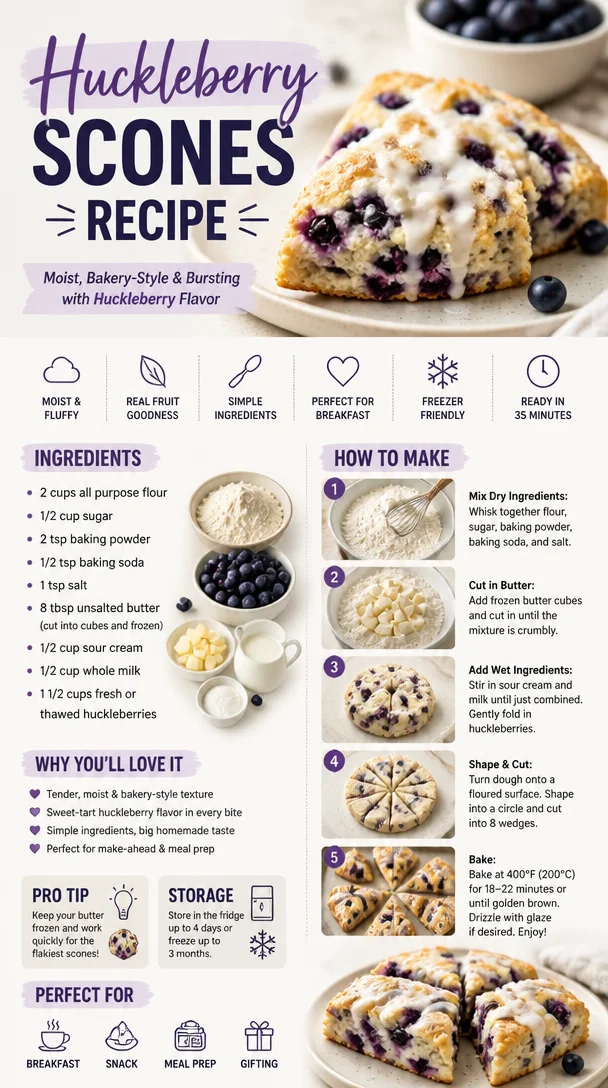
Huckleberry Scones Recipe
The Ultimate Huckleberry Scones Recipe: Cozy Mornings in Your Kitchen
Welcome to my kitchen, fellow food lovers! Today, we’re diving into the delightful world of huckleberry scones. There’s something incredibly special about the smell of baked goods wafting through your home, especially when those goodies come together so effortlessly. As someone who believes in the power of homemade treats, these scones have a way of bringing a sprinkle of magic to your breakfast table or afternoon tea.
Picture this: you wake up on a lazy weekend morning, the sun peeking through your kitchen window. You can hear the birds chirping outside, and the aroma of freshly brewed coffee fills the air. What better way to complement that cup of joe than with warm, flaky huckleberry scones? Not only are they incredibly easy to whip up, but they also capture the essence of cozy gatherings, offering a bit of delicious nostalgia with every bite.
Huckleberries have an enchanting sweetness and tartness that dances on your palate. If you haven’t had the pleasure of tasting these little gems, now’s your chance! When my dear friend Mia first introduced me to these delightful berries during a hiking trip in the Pacific Northwest, I was smitten. We’d picked them right off the bush, laughing as we tried to fill our baskets, and then we headed back to her cozy cabin where I had the joy of baking my first batch of huckleberry scones. The combination of fresh berries, rich butter, and the fragrant scent of vanilla filled the air, and I decided right then that scones would hold a special place in my heart (and my kitchen). Today, I’ll share that very recipe with you!
In this blog post, you will learn not only how to make these scrumptious scones but also some little tips and tricks, variations to tickle your tastebuds, and stories that make the kitchen a second home. So, grab your apron, preheat that oven, and let’s get into the magic of huckleberry scones!
Personal Story: A Huckleberry Adventure
I can still recall the thrill of our huckleberry-picking adventure like it was yesterday. It was the height of summer, and Mia and I had no idea the treasure we were about to uncover. With our backpacks filled with water, snacks, and ample enthusiasm, we set out on a hiking trail known for its vibrant wildflowers and luscious huckleberry bushes. We laughed at our amateur navigating skills and our constant chatter about what we’d make with the huckleberries we so hoped to find.
After a few hours filled with stunning views and laughter, we found ourselves surrounded by bushes bursting with plump, juicy huckleberries. With every handful we picked, we couldn’t contain our joy! Once we returned to Mia’s cabin, we set about creating something memorable. That’s how a spontaneous session in the kitchen turned into an afternoon of baking and bonding. The first bite of those warm scones, fresh from the oven, was a blissful moment. It sparked something in me—the realization that simple ingredients can create cherished memories. I knew I had to share this recipe, and now, I’m thrilled to pass that joy on to you!
Ingredients
Let’s gather our ingredients for these delightful huckleberry scones! Here’s what you’ll need:
-
2 cups all-purpose flour
A must-have for structure; if gluten-free is your style, use a gluten-free all-purpose blend! It will work beautifully! -
1/4 cup granulated sugar
For a hint of sweetness; consider using coconut sugar for a deeper flavor or a sugar substitute if you’re watching your intake. -
1 tablespoon baking powder
This ingredient is key for that rise. Be sure it’s fresh for the best results! -
1/2 teaspoon salt
A pinch of salt enhances all the flavors. You can sub with sea salt for a gourmet touch! -
1/2 cup unsalted butter, cold and cubed
Butter brings that rich flavor and flaky texture. Cold is the secret for delicious scones! If you’re dairy-free, coconut oil or vegan butter can work as a substitute. -
1/2 cup heavy cream
Add richness; half-and-half can be a great substitute if you’re in a pinch! -
1 large egg
The binding agent; if you need a vegan option, a flax egg works wonders! Just mix 1 tablespoon of ground flaxseed with 2.5 tablespoons of water and let it sit for a few minutes. -
1 teaspoon vanilla extract
This adds a beautiful aroma and depth. Swap with almond extract if you want a twist! -
1 cup fresh or frozen huckleberries
The star ingredient! Fresh is best, but frozen works well too; just toss them in flour to avoid clumping.
Step-by-Step Instructions
Now to the fun part! Here’s how to whip up these huckleberry scones like a pro:
-
Preheat the oven to 425°F (220°C). This will ensure your scones bake quickly and evenly!
-
Mix dry ingredients. In a large bowl, whisk together the flour, sugar, baking powder, and salt until well combined. This step is crucial as it evenly distributes the leavening agents throughout the flour, which will help your scones rise beautifully.
-
Cut in the butter. Using a pastry cutter or your fingers, mix in the cold, cubed butter until the mixture resembles coarse crumbs. This process creates those coveted flaky layers, so don’t rush it!
-
Combine wet ingredients. In a separate bowl, whisk together the heavy cream, egg, and vanilla extract. Don’t skip the whisking—this adds air to the mixture!
-
Mix it all together. Pour the wet ingredients into the dry ingredients, and gently stir using a spatula or wooden spoon until just combined. DO NOT overmix! It’s okay if there are a few lumps; that’s what keeps our scones tender.
-
Fold in the huckleberries. Gently fold in your huckleberries, being careful not to crush them. The goal is to have those little gems spread evenly without turning the dough purple. Think of it as a dance; you want them to waltz into the mixture, not slam!
-
Shape the dough. Turn the dough onto a floured surface and knead it gently just a couple of times until it holds together. Pat it into a circle about 1 inch thick. Using a sharp knife, cut into 8 wedges (like a pizza!), or use a biscuit cutter for round shapes.
-
Prepare for baking. Place the scones on a lined baking sheet, about 2 inches apart. If you’d like, brush the tops with a bit of heavy cream for a golden crust, then sprinkle some sugar on top for that extra sweetness.
-
Bake. Pop those beauties in the oven for about 15-20 minutes, or until they’re golden brown and a toothpick comes out clean. The aroma will drive you wild!
-
Cool and enjoy! Let the scones cool on a wire rack for a few minutes before diving in. Serve them warm with a drizzle of honey or a slather of butter (or both if you’re feeling adventurous!).
Serving Suggestions
For a cozy breakfast or afternoon tea, plate your warm huckleberry scones on a lovely cake stand or a rustic wooden board. Pair them with a dollop of whipped cream, a side of fresh jam, or even a scoop of clotted cream—heavenly! I love to serve them alongside a hot cup of Earl Grey or freshly brewed coffee to elevate the experience.
Recipe Variations
Want to put a spin on this classic recipe? Try these delightful variations:
- Lemon Zest Addition: Add the zest of one lemon to the dry ingredients for a refreshing citrus kick.
- Chocolate Chip Delight: Fold in some dark chocolate chips with the huckleberries for a sweet twist.
- Berry Blend: Swap out huckleberries for blueberries or raspberries, or use a mix of all three!
- Spiced Version: Incorporate a teaspoon of cinnamon or ginger into the dry ingredients for a warm, spiced flavor!
- Oatmeal Upgrade: Substitute half a cup of flour for quick oats for added texture.
Chef’s Notes
I absolutely adore these scones, and they have a special place in my heart. I can’t help but laugh at my initial attempts—they were more like huckleberry hockey pucks! But with practice, I perfected the light and flaky texture. Over the years, I’ve also experimented with different flavors and substitutions, discovering the beauty of adaptability in baking. The kitchen should be fun, and it’s all about finding what works for you. So, don’t be afraid to play around with flavors, and keep that oven warm with delicious creations!
FAQs and Troubleshooting
Q: Why did my scones turn out too dry?
A: Overmixing the dough can lead to dry scones, as can using too much flour. Measure carefully and mix just until combined. Remember, lumps are okay!
Q: Can I use frozen huckleberries?
A: Absolutely! Just thaw them out and toss them in flour to prevent them from sinking in the dough.
Q: How can I store leftover scones?
A: These scones are best eaten fresh, but you can store them in an airtight container for up to 3 days. Reheat in the oven for a few minutes to bring that fresh-baked goodness back!
Q: Can I freeze the dough?
A: Yes! You can freeze shaped and unbaked scones. Just pop them in the oven directly from the freezer; add a few extra minutes to the baking time.
Warm, comforting, and utterly satisfying—these huckleberry scones are sure to become a cherished recipe in your home, just as they have in mine. So, gather your loved ones, put on a pot of tea, and enjoy the cozy memories created in your kitchen. Happy baking, and remember, the best ingredient is always joy!
Print
Huckleberry Scones
- Total Time: 30 minutes
- Yield: 8 servings 1x
- Diet: Vegetarian
Description
Delightful huckleberry scones that are flaky and perfect for breakfast or afternoon tea.
Ingredients
- 2 cups all-purpose flour
- 1/4 cup granulated sugar
- 1 tablespoon baking powder
- 1/2 teaspoon salt
- 1/2 cup unsalted butter, cold and cubed
- 1/2 cup heavy cream
- 1 large egg
- 1 teaspoon vanilla extract
- 1 cup fresh or frozen huckleberries
Instructions
- Preheat the oven to 425°F (220°C).
- Mix dry ingredients: whisk together the flour, sugar, baking powder, and salt until well combined.
- Cut in the butter until the mixture resembles coarse crumbs.
- Combine wet ingredients in a separate bowl and whisk together.
- Mix the wet ingredients into the dry until just combined.
- Fold in the huckleberries gently.
- Shape the dough and cut into 8 wedges or round shapes.
- Prepare for baking by placing the scones on a lined baking sheet; brush with heavy cream and sprinkle sugar on top.
- Bake for 15-20 minutes or until golden brown.
- Cool on a wire rack and enjoy warm!
Notes
Best served fresh with whipped cream or jam. Can freeze the dough for later use.
- Prep Time: 10 minutes
- Cook Time: 20 minutes
- Category: Bakery
- Method: Baking
- Cuisine: American
Nutrition
- Serving Size: 1 scone
- Calories: 250
- Sugar: 5g
- Sodium: 200mg
- Fat: 12g
- Saturated Fat: 7g
- Unsaturated Fat: 5g
- Trans Fat: 0g
- Carbohydrates: 30g
- Fiber: 1g
- Protein: 4g
- Cholesterol: 30mg
Keywords: scones, huckleberry, breakfast, baking, easy recipe
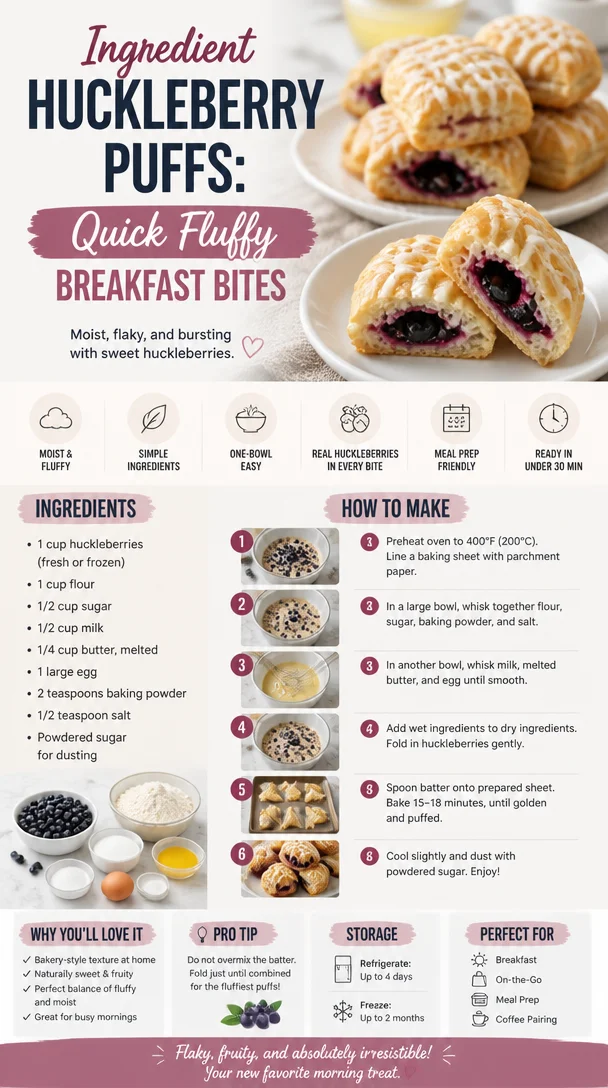
Ingredient Huckleberry Puffs: Quick Fluffy Breakfast Bites
Huckleberry Puffs: A Sweet Tale of Flavor and Nostalgia
Welcome back to my kitchen, friends! Today, I’m over the moon excited to share a recipe that’s incredibly close to my heart: Huckleberry Puffs! Imagine a light, airy pastry with pockets of sweet, tart huckleberries bursting through. It’s the kind of treat that not only satisfies your sweet tooth but also wraps you in cozy memories with every bite.
Huckleberries have always held a special place in my culinary adventures. When I was a kid, my family would go on end-of-summer hikes in the mountains, and one of our favorite activities was picking huckleberries. My dad would lead the charge, showing us the best spots to find those plump, dark purple berries hidden beneath the leaves. There’s something magical about standing in the serene woods, with birds chirping and the smell of earth and pine swirling around us while we collect these little gems. By the time we returned home, our hands would be stained with berry juice, and our stomachs full of impromptu snacks.
Once back in the kitchen, my mom would whip up her famous huckleberry pie. And let me tell you, the aroma of that pie baking would draw everyone in like a moth to a flame! Those summer afternoons spent cooking together, draping flour on the counters with giggles and sugar-fueled silliness, laid the foundation for my love of cooking. As I grew older, I wanted to mimic those joyous moments in my own way. And voila, here we are with my version – Huckleberry Puffs!
Not only are these little delights a way to celebrate huckleberries, but they also remind us of the importance of gathering in the kitchen and savoring life’s simple pleasures. So, put on your favorite apron, and let’s get baking together!
Ingredients
Here’s what you’ll need to create these delightful Huckleberry Puffs:
-
1 cup fresh huckleberries
Oh, the star of our show! These little beauties are sweet and a tad tart, bringing a burst of flavor that’s hard to resist. If you can’t find huckleberries, feel free to swap in blueberries or blackberries for a delicious alternative! -
1 sheet puff pastry (thawed)
This flaky, buttery pastry is a game changer! Store-bought makes it easy (we love a good shortcut), but for the adventurous at heart, you could always try your hand at making your own puff pastry. Just remember, keep it cold for the flakiest results! -
1 tablespoon sugar (plus extra for sprinkling)
A touch of sweetness to help the huckleberries shine! If you’re looking to reduce sugar, you can use coconut sugar or a sugar substitute. -
1 egg (for egg wash)
An egg wash gives the puffs that beautiful golden color. If you’d like a vegan option, use a brush of almond milk or aquafaba instead. -
1 teaspoon vanilla extract
Adding vanilla takes the flavor profile up a notch, complementing the huckleberries perfectly. You can also use almond extract for a different twist. -
Pinch of salt
Just a dash to balance the sweetness and elevate the flavors! -
Powdered sugar (for dusting, optional)
A finishing touch that adds a lovely sweetness and an elegant presentation. Who doesn’t love a little powdered sugar?
Step-by-Step Instructions
Let’s dive into the deliciousness! Follow these steps to create your very own Huckleberry Puffs.
-
Preheat the Oven
Start by preheating your oven to 400°F (200°C). This ensures that our puffs will rise beautifully when they hit the warm air. -
Prepare the Huckleberries
In a bowl, combine the fresh huckleberries, 1 tablespoon of sugar, and vanilla extract. Give it a gentle toss to coat the berries. If you’re using frozen huckleberries, be sure to thaw them and pat them dry to avoid soggy puffs. You want that juicy burst without the sog! -
Roll Out the Puff Pastry
Unroll your sheet of puff pastry on a floured surface. If it’s too thick, you can lightly roll it out to make it slightly thinner. Cut the pastry into squares or circles (about 4×4 inches or doodle-like circles). -
Add the Huckleberries
Place a heaping tablespoon of the huckleberry mixture in the center of each pastry square. Be careful not to overload them, or they’ll spill out during baking like a wild party! -
Seal the Puffs
Fold over one corner of the pastry to meet the opposite side, forming a triangle (or a pocket if you’re using circles). Press the edges together to seal, and then use a fork to crimp the edges for that adorable, rustic look. -
Brush with Egg Wash
Beat the egg in a small bowl and brush it over the tops of your puffs for that golden shine. If you’re vegan, go with almond milk or aquafaba – both work just as well to help the puffs get that gorgeous color! -
Sprinkle with Sugar
Don’t forget the extra sprinkle of sugar on top! It’s like giving your pastries a glittery finish that not only looks stunning but enhances that sweet crunch. -
Bake to Perfection
Pop them in the preheated oven and bake for about 15-20 minutes or until they’re puffed and golden brown. The scent wafting through your kitchen will be nothing short of heavenly! -
Cool and Dust
Once out of the oven, let them cool for a few minutes. Dust with powdered sugar right before serving for that extra touch of elegance!
Serving Suggestions
For a delightful serving experience, arrange your Huckleberry Puffs on a beautiful platter, preferably with a fresh sprig of mint or edible flowers to elevate the visual appeal. Pair them with a scoop of vanilla ice cream or a dollop of whipped cream to bring even more joy to this sweet indulgence. And don’t be shy – drizzle a little honey or maple syrup over the top for added decadence!
Recipe Variations
Feeling adventurous? Here are a few fun twists you can try with your Huckleberry Puffs:
- Lemon Zest: Add a teaspoon of lemon zest to the huckleberry filling for a zesty kick!
- Cheese Factor: Fold in some cream cheese or mascarpone cheese with the huckleberries for a richer, decadent version.
- Spicy Kick: Incorporate some cinnamon or cardamom into the sugar for those who love a little warmth in their desserts.
- Nutty Crunch: Toss in some chopped pecans or walnuts with the huckleberries for added texture and flavor.
Chef’s Notes
These Huckleberry Puffs are a lovely recipe that has evolved over time in my kitchen. Initially, I made them using various fruits depending on the season, from peaches in summer to apples in the fall. But there’s just something about huckleberries that keeps calling me back! Plus, I can’t get enough of that childhood nostalgia.
Whenever I make them, I remember my dad’s jovial spirit as we’d laugh and share stories in the wilderness. Now, I enjoy making them for family gatherings, sharing those lovely moments of joy with a new generation. It’s all about creating memories and cozy moments around the kitchen table – that’s what cooking is truly about!
FAQs and Troubleshooting
-
What if my puff pastry is soggy?
If your puff pastry appears soggy, you might have overloaded the filling or used frozen berries without thawing them properly. Make sure to pat them dry and avoid excess filling to keep that delightful puff! -
How can I make this recipe in advance?
You can prepare the puffs ahead of time and store them in the fridge for a day or two before baking. Just remember to brush them with the egg wash right before popping them in the oven for that fresh-baked taste! -
Can I freeze the puffs?
Absolutely! Before baking, you can freeze them on a baking sheet. Once frozen, transfer them into a freezer bag for up to a month. When you’re ready to enjoy, bake them straight from the freezer, adding an extra few minutes to the cooking time. -
What can I substitute for huckleberries?
If huckleberries are hard to find, don’t worry! Blueberries, blackberries, or even chopped strawberries can work beautifully. Just adjust the sugar type based on the sweetness of the substitute fruit used!
Nutritional Info (optional)
If you’re curious about the nutritional side of these puffs, here’s a rough estimate per puff (without powdered sugar):
- Calories: 200
- Fat: 9g
- Carbohydrates: 28g
- Protein: 2g
- Fiber: 1g
(Note: Values may vary based on specific ingredients used and serving sizes.)
Join me in relishing the warm, buttery goodness of Huckleberry Puffs, while cherishing the fond memories they create. I hope you feel inspired to bring a little bit of joy into your kitchen today! Remember, the best recipes are the ones that bring us together and celebrate life’s sweetest moments. Happy baking, my fellow foodies!
Print
Huckleberry Puffs
- Total Time: 35 minutes
- Yield: 8 servings 1x
- Diet: Vegetarian
Description
Delightful pastries filled with sweet and tart huckleberries, reminiscent of cherished childhood memories.
Ingredients
- 1 cup fresh huckleberries
- 1 sheet puff pastry (thawed)
- 1 tablespoon sugar (plus extra for sprinkling)
- 1 egg (for egg wash)
- 1 teaspoon vanilla extract
- Pinch of salt
- Powdered sugar (for dusting, optional)
Instructions
- Preheat the oven to 400°F (200°C).
- Combine the fresh huckleberries, 1 tablespoon of sugar, and vanilla extract in a bowl and toss gently.
- Unroll the puff pastry on a floured surface and cut into squares or circles.
- Place a heaping tablespoon of the huckleberry mixture in the center of each pastry piece.
- Fold the pastry to form a triangle and crimp the edges to seal.
- Brush the tops with egg wash or almond milk for a golden finish.
- Sprinkle with extra sugar on top.
- Bake for about 15-20 minutes or until golden brown.
- Cool for a few minutes and dust with powdered sugar before serving.
Notes
Feel free to substitute huckleberries with blueberries or blackberries. You can also add lemon zest or cream cheese to the filling for additional flavor.
- Prep Time: 15 minutes
- Cook Time: 20 minutes
- Category: Dessert
- Method: Baking
- Cuisine: American
Nutrition
- Serving Size: 1 pastry
- Calories: 200
- Sugar: 9g
- Sodium: 150mg
- Fat: 9g
- Saturated Fat: 3g
- Unsaturated Fat: 5g
- Trans Fat: 0g
- Carbohydrates: 28g
- Fiber: 1g
- Protein: 2g
- Cholesterol: 30mg
Keywords: Huckleberry Puffs, pastries, dessert, huckleberries, easy recipe, nostalgia
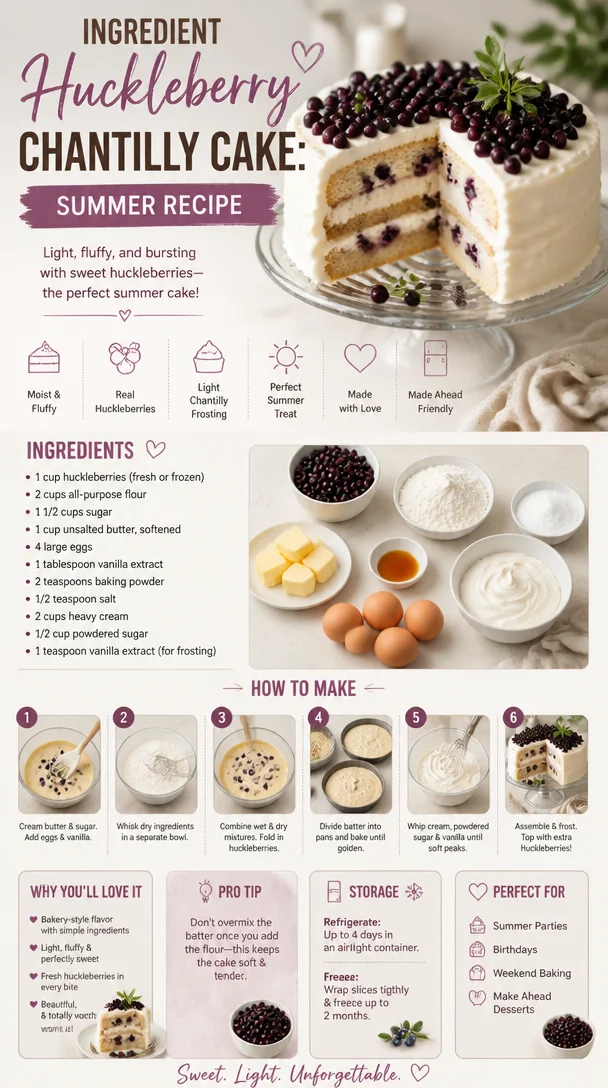
Ingredient Huckleberry Chantilly Cake: Summer Recipe
Huckleberry Chantilly Cake: A Slice of Joy
Welcome to my kitchen! Today, we’re diving into a delightful confection that embodies summer’s sweet embrace — the Huckleberry Chantilly Cake. As the season’s berries start to burst with color and flavor, there’s no better way to celebrate nature’s bounty than with a light and airy cake topped with a luscious chantilly cream. If the mention of huckleberries makes your heart flutter, then you’re in for a treat! This cake isn’t just a dessert; it’s a joyful explosion of happiness and nostalgia that can transport you back to lazy summer days filled with laughter and love.
But wait, let me take a moment to pull you into my little world. I remember the first time I stumbled upon huckleberries. I was about twelve, spending summer weekends with my grandparents in their cozy cabin tucked away in the woods. The moment we stepped outside, the air was rich with the scent of pine and the sounds of nature — the perfect backdrop for a little adventure. Armed with tiny pails and an insatiable curiosity, my grandfather and I ventured into the wild to forage for these little blue gems that grew in abundance.
Those days spent scouring the underbrush, discovering the sweet, juicy huckleberries hidden among the leaves, were magical. When we returned, sticky-fingered and beaming with pride, my grandmother would have all the ingredients ready to whip up her famous berry pie. While her recipe will always have a special place in my heart, I love to shake things up in the kitchen! Every year, as huckleberry season rolls around, I find new ways to incorporate these beauties into my cooking. This Huckleberry Chantilly Cake is one of my proudest creations — it brings all those cherished memories flooding back with every bite.
So, grab your apron, and let’s make this easy yet stunning cake that will have your friends asking for seconds (and maybe thirds!). Trust me, this recipe is a delightful celebration that’s meant to be shared.
Ingredients
Here’s what you’ll need to create this dreamy Huckleberry Chantilly Cake:
-
2 cups all-purpose flour
- This is the foundation of our cake. For a gluten-free option, try using a 1:1 gluten-free flour blend.
-
1 ½ cups granulated sugar
- Sweetness is key! If you want a lower-sugar version, you can substitute with coconut sugar, but adjust the liquids slightly as it absorbs more moisture.
-
½ cup unsalted butter (softened)
- Butter adds richness! If you’re aiming for a dairy-free cake, feel free to swap it with coconut oil or vegan butter.
-
1 cup buttermilk
- This helps in creating a moist cake with a tender crumb. No buttermilk? Mix 1 cup of milk with a tablespoon of vinegar or lemon juice and let it sit for five minutes.
-
3 large eggs
- Eggs provide structure. For an egg-free version, consider using flax eggs (1 tablespoon of flaxseed meal mixed with 3 tablespoons of water per egg) — just give it a few minutes to thicken.
-
1 tablespoon baking powder
- This ensures our cake rises beautifully and has a fluffy texture.
-
½ teaspoon baking soda
- Helps to balance the acidity of the buttermilk, promoting a nice rise.
-
1 teaspoon vanilla extract
- Always use pure vanilla for the best flavor. If you’re adventurous, try using almond extract for a deeper, nutty note.
-
2 cups huckleberries (fresh or frozen)
- The star of our show! If huckleberries are hard to find, blueberries make an excellent substitute. Just adjust the sweetness slightly since blueberries can be a tad sweeter.
-
2 cups heavy whipping cream
- Essential for our chantilly cream. If you want a lighter option, you can use a whipped coconut cream.
-
½ cup powdered sugar
- For sweetening the chantilly cream without the graininess of granulated sugar.
-
1 teaspoon vanilla extract
- Again, pure vanilla is key here for that lovely, aromatic flavor in your cream.
Step-by-Step Instructions
-
Preheat your oven to 350°F (175°C). Preheating is crucial so that your cake begins baking immediately, leading to a beautiful rise.
-
Prepare your cake pans. Grease two 9-inch round cake pans with butter or non-stick spray, then line the bottoms with parchment paper for easy removal. This little step ensures that your cake won’t stick and you’ll have picture-perfect layers.
-
Mix the dry ingredients. In a large mixing bowl, whisk together the flour, baking powder, baking soda, and a pinch of salt. This aerates the flour and distributes the leavening agents evenly.
-
Cream the butter and sugar. In another bowl, beat the softened butter and granulated sugar together until the mixture is light and fluffy — about 3-4 minutes. This step creates air pockets in the butter, which is essential for a light cake.
-
Add the eggs and vanilla. One at a time, mix in the eggs, scraping down the sides of the bowl as needed. Add the vanilla extract next and blend until just combined.
-
Combine wet and dry ingredients. Gradually stir in the flour mixture and buttermilk, alternating between both, starting and ending with the dry mix. Each addition needs to be mixed just until combined to avoid overworking the flour, which can lead to a tough cake.
-
Fold in the huckleberries. Gently fold the huckleberries into the batter, being careful to keep them whole to avoid purple swirls in your cake.
-
Divvy up the batter. Pour equal amounts of batter into the prepared cake pans and smooth the tops with a spatula.
-
Bake! Pop those pans into your preheated oven and bake for 25-30 minutes or until a toothpick inserted in the center comes out clean. Keep an eye on them, as overbaking can lead to dry cake.
-
Cool the layers. Once baked, remove the pans from the oven and let them cool in the pans for about 10 minutes. Then, carefully invert them onto a wire rack to cool completely. This helps prevent a soggy bottom.
-
Prepare the chantilly cream. Here comes the fun part! In a large mixing bowl, pour the heavy cream and add the powdered sugar and vanilla extract. Using an electric mixer, whip it on medium-high speed until soft peaks form. Don’t overwhip, or you’ll end up with butter!
-
Assemble the cake. Once the cake layers are completely cool, place one layer on a serving plate. Spread a thick layer of chantilly cream on top and scatter some more huckleberries over it. Place the second layer on top and spread the remaining chantilly cream over the top and sides.
-
Garnish and serve. Finish the cake by scattering more huckleberries on top for a stunning presentation. Your cake is now ready to impress!
Serving Suggestions
When it comes to serving, a slice of Huckleberry Chantilly Cake deserves a beautiful presentation. Place it on a nice cake stand, and serve with a side of fresh fruit or a drizzle of berry sauce for a pop of color. A thin dusting of powdered sugar on top creates an elegant finish. Encourage your guests to take their time, savoring the flavors of light sponge cake, fresh fruit, and fluffy cream.
Recipe Variations
Feeling adventurous? Here are a few variations to spice things up:
-
Lemon Zest: Add the zest of one lemon to the batter for a touch of citrus brightness.
-
Cream Cheese Frosting: Swap out the chantilly cream for a tangy cream cheese frosting, which pairs wonderfully with the sweetness of the huckleberries.
-
Nutty Addition: Fold finely chopped walnuts or pecans into the batter for a delightful crunch.
-
Layer it up: Make a three-tiered cake by adding an additional layer of your favorite flavor (like a vanilla or chocolate) for variety.
-
Gluten-Free: Substitute all-purpose flour with almond flour or a gluten-free flour blend for a gluten-free treat.
Chef’s Notes
This Huckleberry Chantilly Cake is a true reflection of my kitchen’s ethos — simple yet indulgent. Each year, I find myself experimenting with this recipe, whether it’s swapping berries or even trying different creams. One funny memory I treasure is the time I accidentally used salt instead of sugar in the chantilly cream. The reactions were priceless (and definitely not repeatable)! I love how recipes evolve over time. Each addition or change is like adding a new chapter to a beloved book. I hope this cake will inspire you to create your own kitchen stories and memories!
FAQs and Troubleshooting
-
Q: My cake turned out dense. What happened?
- A: This could be due to overmixing the batter. Mix until just combined, and be gentle when folding in the berries.
-
Q: How do I store leftovers?
- A: Store any leftover cake in an airtight container in the fridge for up to 3 days. Just know that the cream may soften the cake a bit over time.
-
Q: Can I freeze this cake?
- A: Absolutely! You can freeze the cake layers without frosting. Wrap them in plastic wrap, and use foil for extra protection. Thaw in the fridge before frosting.
-
Q: What do I do if the huckleberries are too tart?
- A: If you find huckleberries too tart for your taste, consider macerating them in a little sugar for 15-20 minutes before adding them to the batter. This helps to sweeten them!
So there you have it, my sweet friends — a detailed, scrumptious guide to creating a Huckleberry Chantilly Cake that’s sure to be the star of any gathering. Every slice brings back fond memories and creates new ones, so I hope you’ll whip this up and share it with your loved ones. Happy baking, and let the delicious flavors of huckleberries spark joy in your kitchen!
Print
Huckleberry Chantilly Cake
- Total Time: 50 minutes
- Yield: 8 servings 1x
- Diet: Vegetarian
Description
A delightful Huckleberry Chantilly Cake topped with luscious chantilly cream, celebrating summer’s fresh huckleberries.
Ingredients
- 2 cups all-purpose flour
- 1 ½ cups granulated sugar
- ½ cup unsalted butter (softened)
- 1 cup buttermilk
- 3 large eggs
- 1 tablespoon baking powder
- ½ teaspoon baking soda
- 1 teaspoon vanilla extract
- 2 cups huckleberries (fresh or frozen)
- 2 cups heavy whipping cream
- ½ cup powdered sugar
- 1 teaspoon vanilla extract
Instructions
- Preheat your oven to 350°F (175°C).
- Prepare your cake pans by greasing with butter or non-stick spray and lining with parchment paper.
- Mix the dry ingredients: whisk together flour, baking powder, baking soda, and salt in a large bowl.
- Cream the butter and sugar together until light and fluffy (about 3-4 minutes).
- Add the eggs one at a time, mixing in the vanilla extract until just combined.
- Combine wet and dry ingredients, alternating between flour mixture and buttermilk.
- Fold in the huckleberries gently to keep them whole.
- Divvy up the batter into prepared pans, smoothing the tops.
- Bake for 25-30 minutes until a toothpick comes out clean.
- Cool the layers in pans for about 10 minutes, then invert onto wire racks to cool completely.
- Prepare the chantilly cream: whip together heavy cream, powdered sugar, and vanilla extract until soft peaks form.
- Assemble the cake by stacking layers with chantilly cream and huckleberries between them.
- Garnish with additional huckleberries on top before serving.
Notes
For a gluten-free version, substitute the all-purpose flour with a gluten-free flour blend. Adjust the sweetness of the huckleberries if needed.
- Prep Time: 20 minutes
- Cook Time: 30 minutes
- Category: Dessert
- Method: Baking
- Cuisine: American
Nutrition
- Serving Size: 1 slice
- Calories: 400
- Sugar: 32g
- Sodium: 200mg
- Fat: 26g
- Saturated Fat: 15g
- Unsaturated Fat: 8g
- Trans Fat: 0g
- Carbohydrates: 45g
- Fiber: 2g
- Protein: 6g
- Cholesterol: 80mg
Keywords: cake, huckleberry, chantilly, dessert, summer
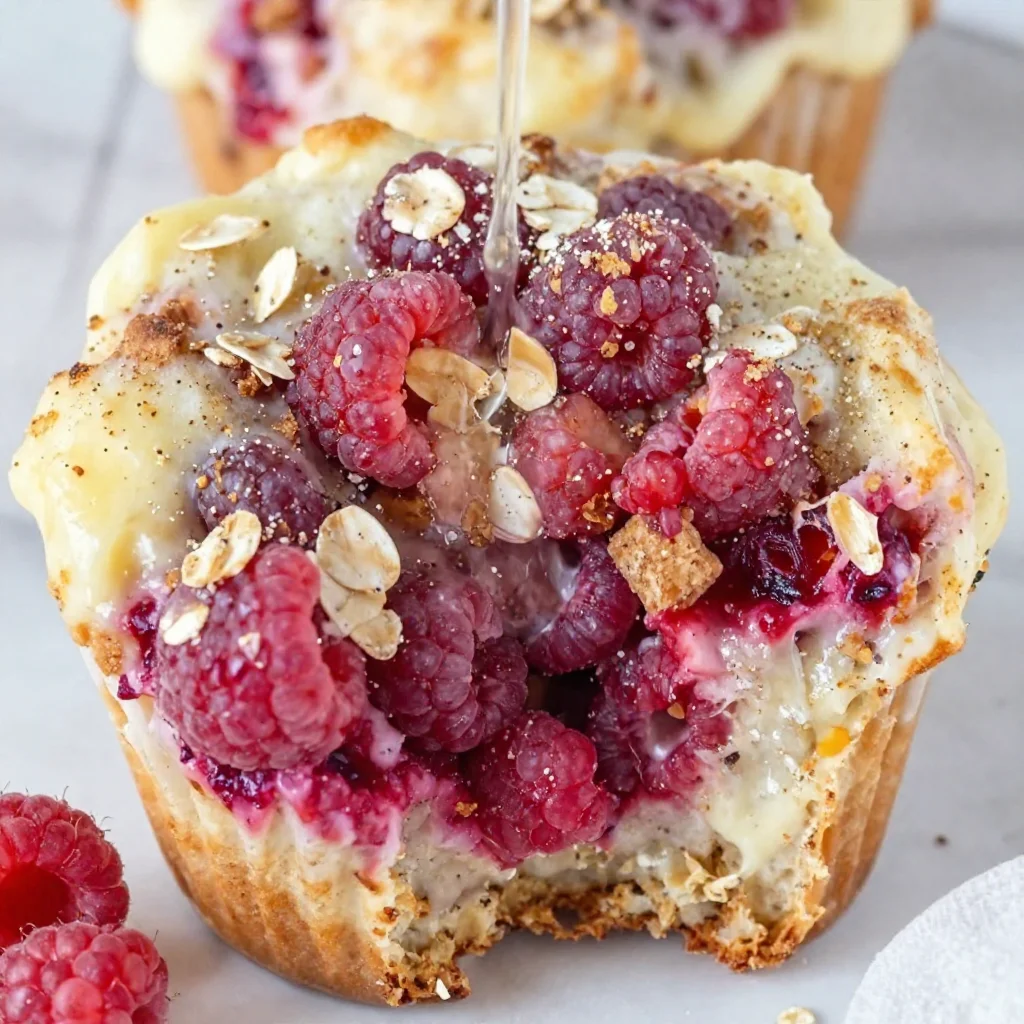
Minute Raspberry Streusel Muffins for Busy Mornings
Delicious Raspberry Streusel Muffins: A Cozy Treat from My Kitchen
Welcome to my kitchen, dear friend! Today, I’m excited to share a recipe that has become one of my absolute favorites: Raspberry Streusel Muffins. Picture this: a sunny weekend morning, the aroma of baked goods wafting through your home, and the promise of delicious, fluffy muffins filled with tangy raspberries and topped with a crumbly, buttery streusel. Can you smell it already? Trust me, these muffins are not just a breakfast treat; they’re the perfect way to start your day, take a cozy snack break, or impress friends at brunch.
I love cooking, not just for the end result but for the memories that come attached to each recipe. These muffins have a special place in my heart because they remind me of my grandmother, who had a knack for whipping up the most delightful baked goods. She would often involve me in the kitchen, teaching me how to measure, mix, and most importantly, taste. The smell of fresh raspberries and sugar would fill her kitchen as we made muffins that seemed to melt in our mouths.
That delightful time spent with her sparked my passion for baking and all things cozy. Now, I can’t help but recreate those tender moments when I make Raspberry Streusel Muffins at home. They’re not just a recipe; they’re a connection to my past, to family, and the love that is shared over good food. If you’re ready to embark on this delicious adventure with me, grab your apron, and let’s get baking!
Ingredients
Before we dive into the baking, let’s gather our ingredients. This recipe calls for simple, fresh components that can easily be found at your local grocery store.
-
Fresh Raspberries (1 cup): Sweet and tangy, these beauties are the star of the show! If you can’t find fresh raspberries, feel free to use frozen ones, but make sure to let them thaw and drain excess moisture before adding to your batter.
-
All-Purpose Flour (2 cups): The backbone of our muffins! If you’re looking for a healthier alternative, you can swap half of the flour for whole wheat flour, which will offer a nuttier flavor and more fiber.
-
Granulated Sugar (3/4 cup): We need just the right amount of sweetness. For a less refined option, try using coconut sugar or maple sugar, which will lend a slightly different flavor.
-
Brown Sugar (1/4 cup): Adds depth and moisture to the streusel topping. If you’re out of brown sugar, you can combine white sugar with a bit of molasses for a quick substitute.
-
Baking Powder (1 tablespoon): This fantastic leavening agent ensures your muffins rise beautifully! Make sure it’s fresh for the best results.
-
Salt (1/2 teaspoon): Just a pinch helps balance the sweetness and enhance all the flavors.
-
Unsalted Butter (1/2 cup, melted): Rich and tasty! If you’re looking for a dairy-free option, melted coconut oil or dairy-free margarine can be used instead.
-
Egg (1 large): Acts as a binding agent. For a vegan alternative, try a "flax egg" by mixing 1 tablespoon of ground flaxseed with 2.5 tablespoons of water; let it sit for about 5 minutes to gel.
-
Milk (1 cup): Whole, buttermilk, or any plant-based milk works wonderfully here. The choice ultimately depends on your preference!
-
Vanilla Extract (1 teaspoon): A splash of vanilla takes these muffins to the next level. If you’re feeling adventurous, you can substitute it with almond extract.
Step-by-Step Instructions
Now it’s time to roll up our sleeves and get our hands floury! Follow these steps carefully, and you’ll have a batch of delicious muffins in no time!
1. Preheat Your Oven
Start by preheating your oven to 375°F (190°C). This step is crucial for achieving that lovely, golden brownie look you’re aiming for.
2. Prepare Your Muffin Pan
While your oven warms up, grab your muffin pan and line it with muffin liners or spray it with a non-stick spray. This will help the muffins come out perfectly, leaving you less mess to clean up afterward.
3. Mix the Dry Ingredients
In a large bowl, combine the flour, granulated sugar, baking powder, and salt. Whisk them together until well blended. I like to use a fork for this because it helps break up any clumps and creates a lighter texture.
4. Mix the Wet Ingredients
In another bowl, whisk together the melted butter, egg, milk, and vanilla extract until combined. This part is so joyful; you can already feel the muffin magic happening!
5. Combine the Mixtures
Pour your wet mixture into the dry ingredients and gently mix with a spatula or wooden spoon. Stir just until combined—don’t overmix! A few lumps are totally fine. The key to fluffy muffins is to keep the batter tender.
6. Fold in the Raspberries
Gently fold in the raspberries. If you’re using frozen raspberries, be gentle to avoid squishing them too much. Too much mixing will result in a grey batter (not the look we’re going for)!
7. Make the Streusel Topping
In a small bowl, combine the brown sugar, a bit of flour, and melted butter to create your streusel topping. Mix with your finger or a fork until crumbly, and feel free to add a dash of cinnamon for an extra kick!
8. Fill Muffin Cups
Divide the batter evenly among your muffin cups, filling each about 3/4 full. Sprinkle a generous layer of that delightful streusel topping over each one—this is what makes your muffins irresistibly crunchy and scrumptious!
9. Bake!
Place your muffin pan in the preheated oven and bake for 20-25 minutes, or until a toothpick inserted in the center comes out clean. The aroma wafting through your kitchen will be downright heavenly!
10. Cool and Enjoy
Once they’re perfectly golden, remove the muffins from the oven and let them cool for about 5 minutes in the pan before transferring them to a wire rack. This helps them firm up and finish cooking without getting soggy.
Serving Suggestions
These Raspberry Streusel Muffins are delightful served warm, with a pat of butter melting into the nooks and crannies. Pair them alongside your favorite jam or a dollop of fresh whipped cream for an extra treat. They also make a wonderful addition to a brunch table or as a thoughtful homemade gift for a friend!
Recipe Variations
Looking to switch it up? Here are a few fun variations you can try:
-
Berry Medley: Swap out the raspberries for blueberries, strawberries, or any mix of berries. The flavor will change, but the love will remain the same!
-
Nuts About Muffins: Add some chopped walnuts or pecans to the batter for a delightful crunch.
-
Citrus Zing: Incorporate the zest of a lemon or orange to brighten the muffins even more.
-
Chocolate Lovers: Mix in some chocolate chips for a decadent twist—because who doesn’t love chocolate?
-
Gluten-Free Option: Substitute the all-purpose flour with a 1:1 gluten-free flour blend for a gluten-free friendly version!
Chef’s Notes
As with any recipe, I believe that cooking should be fun and flexible! My grandma always encouraged me to make a recipe my own. This muffin recipe has evolved over the years, often influenced by the fruits in season or the preferences of those I’m sharing with. I remember adding peaches once when I had a fruit basket overflowing. They turned out to be a surprisingly amazing combination!
I also have to mention that my dog, Fluffy, is often by my side during baking adventures, waiting for some crumbs to fall. The sight of his eager face makes the mess worthwhile!
FAQs and Troubleshooting
Q: Why are my muffins dense?
A: Overmixing can be a culprit! Remember, gentle folding in the wet and dry ingredients preserves that delightful fluffiness.
Q: Can I freeze these muffins?
A: Absolutely! These muffins freeze beautifully. Just let them cool completely, then wrap them tightly in plastic wrap and store them in a freezer-safe bag. They’ll be good for up to 3 months.
Q: How do I know when my muffins are done?
A: The toothpick test is your best friend here. If it comes out clean or with a few moist crumbs (not wet batter), they’re ready to be devoured!
Q: What’s the best way to store them?
A: Store your muffins in an airtight container at room temperature for up to three days. For longer storage, refrigerate or freeze as described above.
Nutritional Info
(Per muffin, approximately)
- Calories: 220
- Carbohydrates: 30g
- Protein: 3g
- Fat: 10g
- Sugar: 8g
And there you have it—my Raspberry Streusel Muffins recipe! I hope it brings a little joy to your kitchen and maybe even a cozy memory or two. Happy baking, and remember: cooking is all about love, laughter, and a pinch of creativity!
Print
Delicious Raspberry Streusel Muffins
- Total Time: 40 minutes
- Yield: 12 servings 1x
- Diet: Vegetarian
Description
Fluffy muffins filled with tangy raspberries and topped with a buttery streusel, perfect for breakfast or brunch.
Ingredients
- 1 cup Fresh Raspberries
- 2 cups All-Purpose Flour
- 3/4 cup Granulated Sugar
- 1/4 cup Brown Sugar
- 1 tablespoon Baking Powder
- 1/2 teaspoon Salt
- 1/2 cup Unsalted Butter, melted
- 1 large Egg
- 1 cup Milk
- 1 teaspoon Vanilla Extract
Instructions
- Preheat your oven to 375°F (190°C).
- Prepare your muffin pan by lining it with muffin liners or spraying with non-stick spray.
- Mix the flour, granulated sugar, baking powder, and salt in a large bowl.
- Whisk together the melted butter, egg, milk, and vanilla extract in another bowl.
- Pour the wet mixture into the dry ingredients and gently mix.
- Fold in the raspberries carefully.
- Combine brown sugar, a bit of flour, and melted butter to create streusel topping.
- Divide the batter among muffin cups and sprinkle with streusel.
- Bake for 20-25 minutes, or until a toothpick comes out clean.
- Cool for 5 minutes before transferring to a wire rack.
Notes
These muffins freeze beautifully. Store in an airtight container for up to three days.
- Prep Time: 15 minutes
- Cook Time: 25 minutes
- Category: Breakfast
- Method: Baking
- Cuisine: American
Nutrition
- Serving Size: 1 muffin
- Calories: 220
- Sugar: 8g
- Sodium: 150mg
- Fat: 10g
- Saturated Fat: 6g
- Unsaturated Fat: 4g
- Trans Fat: 0g
- Carbohydrates: 30g
- Fiber: 1g
- Protein: 3g
- Cholesterol: 30mg
Keywords: muffins, raspberry, breakfast, brunch, baking
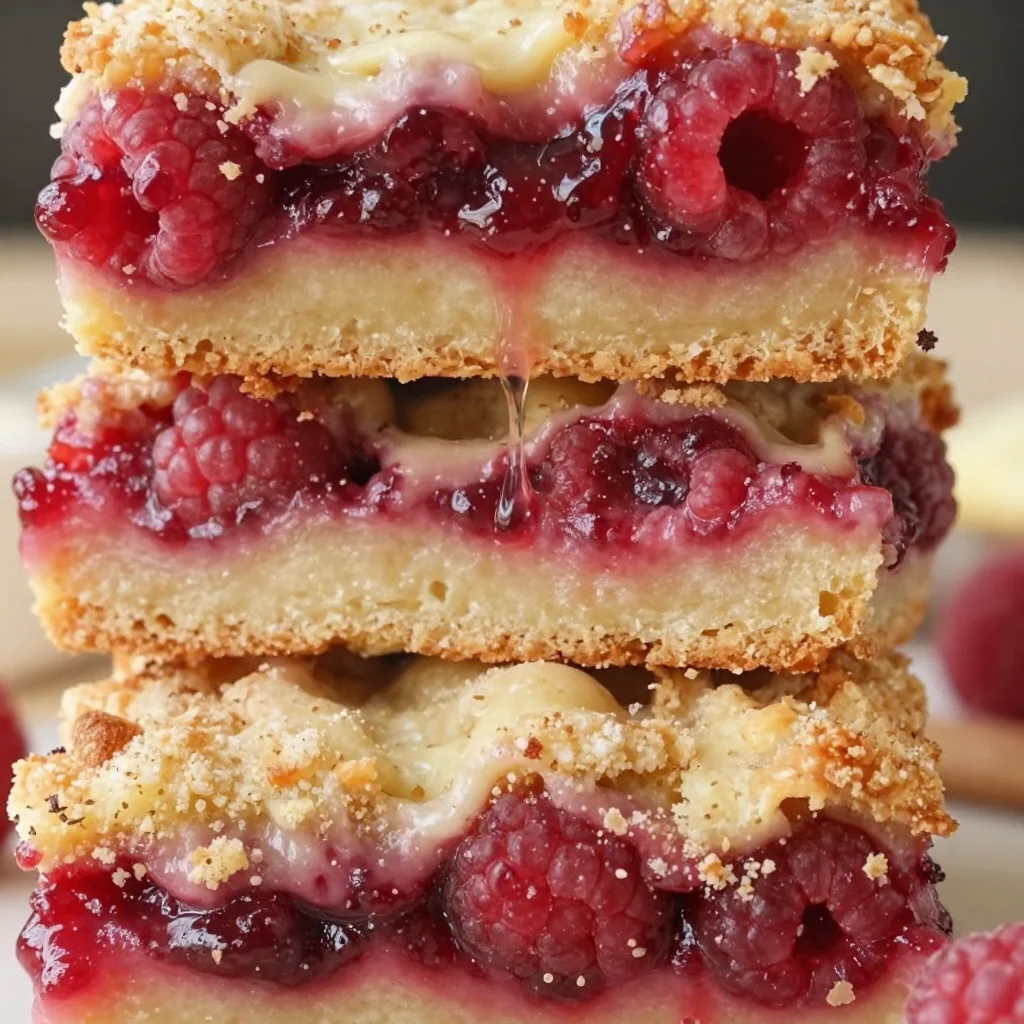
Minute Raspberry Crumb Bars: Easy Weeknight Treats
Raspberry Crumb Bars: A Delicious Slice of Nostalgia
Welcome to my kitchen, dear food lovers! I’m Olivia Bennett, and today we’re diving into the delightful world of Raspberry Crumb Bars. If you’re like me, the mere thought of fresh raspberries nestled in a buttery crumb crust makes your heart flutter. There’s something magical about those sweet-tart little jewels, and when they’re combined with crumbly goodness, you know you’re in for a treat.
Picture this: it’s a sunny afternoon in late summer, the sun filtering through the trees, and the air is sweetened with the scent of ripening berries. As a child, one of my favorite activities was picking raspberries with my grandma in her sprawling garden. She would hand me a small basket, and I’d scamper off, the thrill of the hunt bringing an extra spark to our little adventure. But here’s the kicker: for every handful I picked, I’d sneak a couple into my mouth! Who could resist those deliciously plump berries?
Once we returned home, we’d whip up her famous raspberry crumb bars, the kitchen filled with laughter and the warm aroma of baking. Those bars were the ultimate crowd-pleaser. They were always a perfect balance of crispy and chewy, sweet and tart. They bridged generations, sparking stories and bonding over bites. Now, every time I make them, I’m transported back to that sun-soaked garden, sharing laughter and love with my grandma.
So, whether you’re searching for a cozy dessert to share with friends, a scrumptious snack for yourself, or a nostalgic treat that brings back memories, these Raspberry Crumb Bars are perfect for every occasion. Let’s gather our ingredients, roll up our sleeves, and get baking!
Ingredients
Now, let’s gather our star players for this yummy adventure! Here’s what you’ll need to whip up these delightful Raspberry Crumb Bars:
-
Fresh Raspberries (2 cups)
- The jewel of the recipe! Fresh raspberries give a vibrant, tangy flavor. If you’re not a fan of raspberries, feel free to swap with blueberries, strawberries, or even peaches.
-
All-Purpose Flour (1 ½ cups)
- This is the base for both the crumb crust and topping. If you’re looking for a gluten-free alternative, try using a 1:1 gluten-free baking flour.
-
Granulated Sugar (¾ cup)
- A touch of sweetness! You can use coconut sugar or even honey if you’re aiming for a lower glycemic index.
-
Brown Sugar (¼ cup)
- Adds depth and moisture to your crumb topping. If you’re out, you can substitute with white sugar, but you’ll miss that lovely Carol’s caramel-like flavor.
-
Unsalted Butter (1 cup)
- I love using unsalted butter to control the salt level. Make sure it’s at room temperature for easy mixing. If you’re vegan or dairy-free, you can use coconut oil or a vegan butter alternative.
-
Eggs (1 large)
- Eggs help bind everything together, giving the bars their rich texture. You can replace it with a flax egg (1 tablespoon ground flaxseed + 2.5 tablespoons water), which works surprisingly well!
-
Baking Powder (½ teaspoon)
- This little magic ingredient gives your bars the perfect rise.
-
Salt (½ teaspoon)
- A pinch of salt enhances the sweetness. If you’re using salted butter, feel free to leave this out!
With these simple ingredients, you’ll create a little slice of heaven that’s beautiful, bright, and bursting with flavor. Now, let’s get those aprons on, and I’ll guide you step-by-step through the process!
Step-by-Step Instructions
-
Preheat the Oven
- Start by preheating your oven to 350°F (175°C). This ensures that our bars bake evenly and perfectly crispy right from the get-go.
-
Prepare Your Baking Dish
- Grease a 9×9-inch baking pan with butter or line it with parchment paper for easy removal. I’m a huge fan of parchment; it makes cleaning up a breeze!
-
Make the Crumb Mixture
- In a large mixing bowl, combine 1 ½ cups of flour, ¾ cup of granulated sugar, ¼ cup of brown sugar, ½ teaspoon of baking powder, and ½ teaspoon of salt. Mix well until combined. Don’t worry; a wooden spoon is great for this job.
-
Incorporate the Butter
- Add 1 cup of softened unsalted butter to your dry ingredients. Use your fingers or a pastry cutter to blend until the mixture resembles coarse crumbs. For an extra tip, chill your butter before cutting it in to maintain that perfect crumbly texture!
-
Reserve Some Crumbs
- After creating those lovely crumbs, set aside about 1 cup of this mixture for the topping. This is where the magic happens!
-
Mix in the Eggs
- Add 1 large egg to the remaining crumb mixture and mix until everything is combined. The mixture will be moist but still crumbly, which is exactly what we want!
-
Spread the Base
- Press the crumb mixture firmly into the bottom of your prepared baking dish. Use a spatula to ensure it’s an even layer. If you’re feeling a bit rebellious, add a hint of cinnamon or nutmeg for warmth!
-
Layer the Raspberries
- Gently spread those luscious 2 cups of fresh raspberries over the crumb base. Don’t worry if some burst; that’s just releasing more berry goodness!
-
Sprinkle the Topping
- Break apart the reserved crumb mixture and sprinkle it evenly over the raspberries. Trust me, this layer is what makes these bars irresistible!
-
Bake to Perfection
- Place your baking dish in the preheated oven and bake for about 35-40 minutes or until the top is golden brown and the raspberries are bubbling. Your kitchen will smell like heaven during this time!
-
Cool and Slice
- Once baked, remove the dish from the oven and allow it to cool completely. This will help the bars hold together better when sliced. Patience, my friend! Cooling can take about 30 to 45 minutes, but it will be worth it.
-
Cut and Serve
- Once cool, use a sharp knife to slice into squares. You can dust them with powdered sugar for a pretty touch before serving. Happy munching!
Serving Suggestions
Serve your Raspberry Crumb Bars in charming little dessert plates alongside a scoop of vanilla ice cream or a dollop of whipped cream. They’re delightful as is, but pairing them with a cup of coffee or tea makes for an even cozier experience. If you’re feeling a bit fancy, sprinkle some fresh mint leaves on top for that pop of color and a refreshing touch!
Recipe Variations
Don’t be afraid to mix things up a bit! Here are some creative twists to personalize your Raspberry Crumb Bars:
-
Mixed Berry Medley: Swap the raspberries with a combination of blueberries, blackberries, and strawberries for a colorful summer treat.
-
Nutty Crumb: Add ½ cup of chopped walnuts or almonds to the crumb mixture for an extra crunch and flavor.
-
Zesty Twist: Incorporate lemon or orange zest into the crumb base for a citrusy brightness that complements the berries beautifully.
-
Choco-Dream: Fold in mini chocolate chips for a decadent twist—because who can ever say no to chocolate?
-
Vegan Delight: Substitute all ingredients for their vegan counterparts (like flax eggs and coconut oil) for a guilt-free treat that everyone will love!
Chef’s Notes
Remember, every recipe evolves as we grow in our cooking journeys. When I first made these bars with Grandma, they were a bit more rustic and full of happy accidents—like the time I accidentally doubled the raspberries! Instead of a mishap, it turned out to be a delicious mistake that led to these scrumptious, fruity-infused bars we adore today. Not only did I get a baking lesson, but I learned much more about the joy of experimentation in the kitchen.
And dear friends, always keep your spirit light and enjoy the process! Don’t fret if things don’t go perfectly; sometimes those quirks lead to delightful surprises. After all, that’s what cooking is all about!
FAQs and Troubleshooting
-
Q: Why did my bars crumble apart when sliced?
- A: Make sure to let them cool completely before slicing. Patience is key; the bars need to set so they hold their shape.
-
Q: Can I use frozen raspberries?
- A: Absolutely! Just remember to thaw and drain excess moisture before adding to the crust. They may be a bit softer, but they’ll still taste delicious!
-
Q: How can I tell when the bars are done baking?
- A: Look for a golden brown top and bubbling around the edges. If you gently press down in the center, it should feel firm to the touch.
-
Q: Can I make these in advance?
- A: Yes! These bars store wonderfully in an airtight container for up to 4 days at room temperature, or you can freeze them for up to 3 months. Just thaw in the fridge when you’re ready to enjoy!
Nutritional Info
While I’m all about the joy of cooking and sharing, I know some of you like to keep an eye on numbers. Each Raspberry Crumb Bar (based on 16 servings) has approximately:
- Calories: 190
- Protein: 2g
- Fat: 9g
- Carbohydrates: 29g
- Fiber: 1g
- Sugar: 10g
Feel free to adjust the ingredients to fit your nutritional needs!
And there you have it, my dear culinary companions—a foolproof recipe for Raspberry Crumb Bars that will warm your heart and bring joy to your kitchen! I can’t wait to hear about your baking adventures and the twists you come up with. Happy baking, and remember, the kitchen is always better filled with friends, laughter, and delicious treats!
Print
Raspberry Crumb Bars
- Total Time: 55 minutes
- Yield: 16 servings 1x
- Diet: Vegetarian
Description
Delightful Raspberry Crumb Bars featuring fresh raspberries nestled in a buttery crumb crust, perfect for any occasion.
Ingredients
- 2 cups Fresh Raspberries
- 1 ½ cups All-Purpose Flour
- ¾ cup Granulated Sugar
- ¼ cup Brown Sugar
- 1 cup Unsalted Butter, at room temperature
- 1 large Egg
- ½ teaspoon Baking Powder
- ½ teaspoon Salt
Instructions
- Preheat the oven to 350°F (175°C).
- Grease a 9×9-inch baking pan with butter or line it with parchment paper.
- Combine 1 ½ cups of flour, ¾ cup of granulated sugar, ¼ cup of brown sugar, ½ teaspoon of baking powder, and ½ teaspoon of salt in a large mixing bowl.
- Add 1 cup of softened unsalted butter to the dry ingredients and blend until the mixture resembles coarse crumbs.
- Set aside about 1 cup of crumb mixture for the topping.
- Mix in 1 large egg with the remaining crumb mixture until combined.
- Press the crumb mixture firmly into the bottom of your prepared baking dish.
- Spread 2 cups of fresh raspberries over the crumb base.
- Sprinkle the reserved crumb mixture evenly over the raspberries.
- Bake for about 35-40 minutes or until the top is golden brown and raspberries are bubbling.
- Remove from the oven and allow to cool completely before slicing.
- Cut into squares and dust with powdered sugar before serving.
Notes
These bars are great served warm or at room temperature. Pair with ice cream or whipped cream for an extra treat!
- Prep Time: 15 minutes
- Cook Time: 40 minutes
- Category: Dessert
- Method: Baking
- Cuisine: American
Nutrition
- Serving Size: 1 bar
- Calories: 190
- Sugar: 10g
- Sodium: 200mg
- Fat: 9g
- Saturated Fat: 5g
- Unsaturated Fat: 4g
- Trans Fat: 0g
- Carbohydrates: 29g
- Fiber: 1g
- Protein: 2g
- Cholesterol: 30mg
Keywords: Raspberry, Crumb Bars, Dessert, Sweet, Summer Recipe
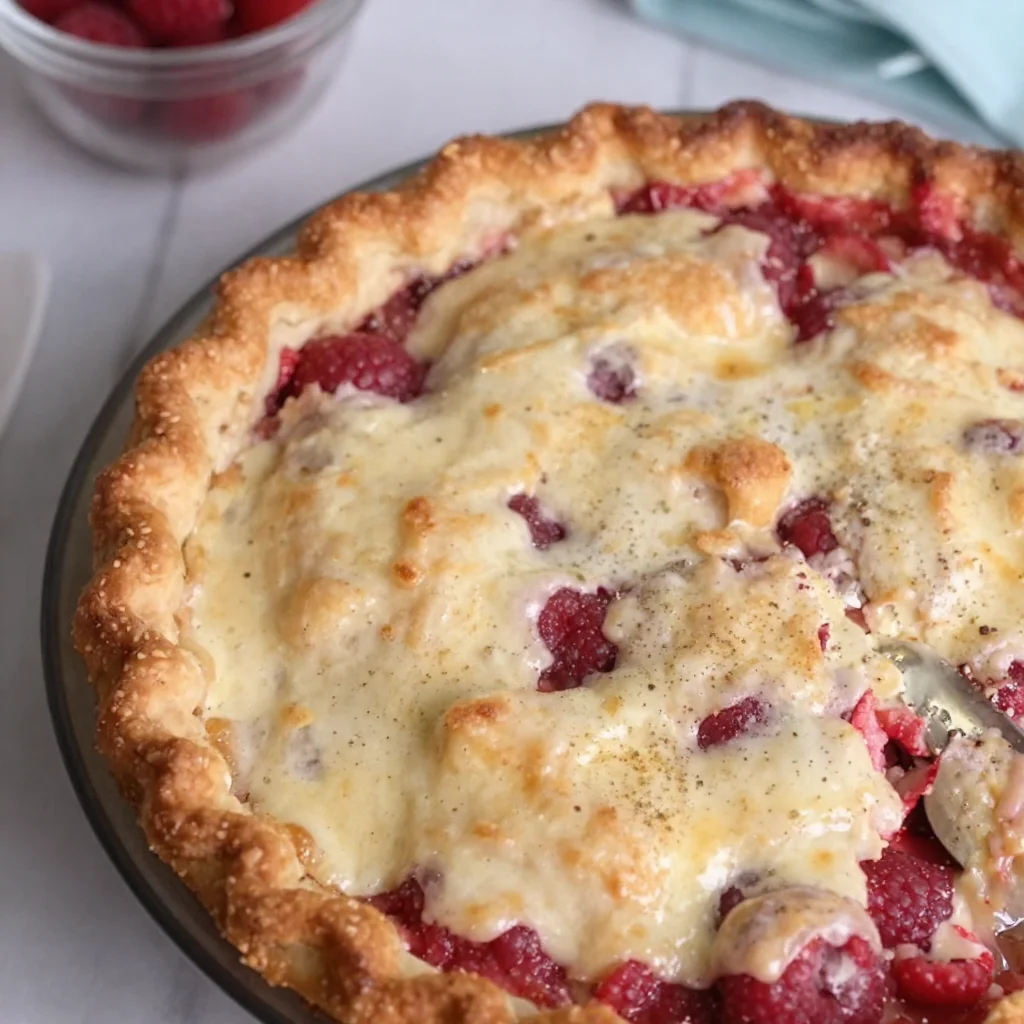
Raspberry Pie
The Joy of Baking: Raspberry Pie Love
Welcome to my kitchen, dear friends! Today, we’re diving into a dish that embodies summer, sweetness, and nostalgia: Raspberry Pie. Oh, how this pie takes me back! The delightful aroma of raspberries filling the air has always brought a smile to my face and a warmth to my heart. Whether enjoyed after a family meal or served during a backyard gathering, Raspberry Pie has a way of turning ordinary moments into cherished memories.
Picture this: a sunlit kitchen, laughter bouncing off the walls, and my grandmother expertly rolling out dough as we prepare for our favorite summer tradition—pie making! Every summer, we’d gather the juiciest raspberries from her garden, the plump little gems bursting with flavor. I can still hear her voice, mixing up the sweet filling, telling stories of pies she made as a child. The magic of those moments is what drives my passion for cooking today.
Making Raspberry Pie is not just about creating a dessert; it’s about celebrating life’s sweetest moments with those you love. Each bite is filled with memories of time spent together, and if you close your eyes, the taste takes you back to simpler times—an experience I want to share with all of you! So, let’s roll up our sleeves, grab our ingredients, and create something extraordinary. Trust me, your family and friends will thank you for it!
A Slice of Nostalgia
One summer, I was around ten years old, and my grandmother decided it was time for me to take on the sacred responsibility of pie-making. Armed with a rolling pin almost as tall as me and a heart full of enthusiasm, I was ready to dive into the world of baking. Grandma showed me how to coax the delicate dough into submission while ensuring our raspberry filling shimmered like jewels.
We scooped those ripe, tart raspberries lovingly plucked from her garden, and I learned the balance of sweetness and tartness—skills that I carry with me to this day. Little did I know then that these hours spent in the kitchen would shape my life and my passion for flavorful, homemade dishes. It was more than making a pie; it was about storytelling, connection, and the love of beautiful food. And those moments created a symphony of flavors, laughter, and memories that will forever be dear to my heart.
Ingredients for the Perfect Raspberry Pie
Now that we’re warmed up with nostalgia, let’s gather our ingredients! Here’s what you’ll need for this delightful Raspberry Pie, along with some tips to make your life easier:
-
Fresh Raspberries (6 cups)
Sweet, juicy raspberries are the star of our show! If you don’t have fresh ones on hand, you can use frozen raspberries (just don’t forget to thaw and drain them first). -
Granulated Sugar (1 cup)
This balances the tartness of the raspberries. Feel free to swap with coconut sugar or honey for a different flavor profile. -
Cornstarch (2 tablespoons)
This thickens the filling. Don’t have cornstarch? You can use tapioca starch as a one-to-one replacement. -
Lemon Juice (2 tablespoons)
Adds brightness and brings out the raspberry flavor. Stay away from bottled lemon juice—fresh is always best! -
Vanilla Extract (1 teaspoon)
A splash of vanilla enhances the raspberry flavor. If you’re in a pinch, you can substitute it with almond extract for a unique twist. -
Pie Crust (store-bought or homemade)
Use your favorite crust recipe or a pre-made one for convenience. If you’re going homemade, I recommend using a buttery pie crust for that perfect flaky texture. -
Egg Wash (1 egg, beaten)
For that golden, glossy finish that makes your pie shine! You can also use milk or cream if you prefer.
Step-by-Step Instructions
Let’s get down to business! Here’s how to turn those ingredients into a masterpiece.
-
Preheat Your Oven
Preheat your oven to 425°F (220°C). This step is crucial for achieving a beautifully baked pie. The high heat helps the crust get that lovely golden color while the filling bubbles away. -
Prepare the Filling
In a large bowl, gently toss the raspberries, sugar, cornstarch, lemon juice, and vanilla extract. Be careful not to mash the berries too much— we want them intact to provide that delightful burst of flavor in every bite. Let this mixture rest for 10-15 minutes. This helps the sugar draw out the juices, creating a delicious filling. -
Roll Out the Dough
If you’re making homemade dough, roll it out on a floured surface to about 1/8-inch thickness. For store-bought, let it sit at room temperature for a few minutes before unrolling. This allows it to be more pliable and easier to work with. -
Assemble the Pie
Lay half of the pie crust in a 9-inch pie pan. Pour the raspberry filling into the crust, spreading it evenly. Top it off with the remaining crust. You can make a full top crust or lattice for a more beautiful presentation—just be sure to cut slits for steam to escape! -
Brush the Crust
Brush the top crust with the beaten egg wash. This is where that golden color comes from! You can also sprinkle a little sugar on top for added crunch and sweetness. -
Bake
Place the pie in the oven and bake for 15 minutes at 425°F. After that, reduce the temperature to 350°F (175°C) and continue baking for 20-25 minutes until the filling is bubbly, and the crust is golden brown. The smell wafting through your kitchen will be pure bliss! -
Cool Down
Let your pie cool for at least 30 minutes before slicing. This step allows the filling to set, making it easier to serve those perfect slices. Patience is key here!
Serving Suggestions
When it comes to serving Raspberry Pie, simplicity is key! I love to serve it warm with a scoop of vanilla ice cream or a dollop of freshly whipped cream. The creamy contrast against the tart raspberries is simply divine. For an elegant touch, sprinkle powdered sugar on top or garnish with a few fresh raspberries and a mint leaf. Voila! You’ve got a showstopper!
Recipe Variations
Fancy switching things up? Here are a few ideas to make this Raspberry Pie your own:
-
Mixed Berry Pie: Swap out some of the raspberries for blueberries or blackberries for a delightful berry medley.
-
Almond Raspberry Pie: Add a teaspoon of almond extract in addition to vanilla for a nutty flavor twist that complements the raspberries beautifully.
-
Gluten-Free Option: Use a gluten-free pie crust to accommodate dietary needs, and don’t worry—the flavor will still shine!
-
Chocolate Raspberry Pie: Mix in a handful of chocolate chips to the filling for an indulgent chocolate twist.
-
Spiced Raspberry Pie: Sprinkle in some cinnamon and nutmeg to the filling for a warm, aromatic touch.
Chef’s Notes
It’s amazing how recipes evolve over time. This Raspberry Pie wasn’t always a summer staple in my kitchen. I’ve adapted and tweaked it to align with what’s freshest and in season, and every time I make it, I find new ways to explore flavors. Plus, there’s a certain joy that comes from getting a little messy in the kitchen! If you’re ever feeling down, I suggest rolling out dough or tossing some berries around—it’s therapeutic, I promise!
I once had a mishap where I forgot to add sugar to the filling. Let’s just say, it was a tart surprise for my family! But life in the kitchen—like life itself—sometimes you just have to roll with it and learn. That’s what makes cooking so fun!
FAQs and Troubleshooting
-
Why did my filling bubble over?
If your pie filling isn’t thick enough, it can bubble over. Make sure to add enough cornstarch and let the mixture sit before filling the pie. -
What if my crust is too dry?
If your dough feels crumbly, it may be too dry. Add a teaspoon of cold water at a time until the dough comes together nicely. -
How do I know when my pie is done?
Your pie is ready when the crust is golden, and you can see the filling bubbling through the top. If you’re unsure, use a thermometer; the filling should reach about 200°F. -
Can I make this ahead of time?
Absolutely! You can prepare the pie and refrigerate it before baking or freeze it before it goes in the oven. Just make sure to adjust baking time as needed!
Nutritional Info (Optional)
(Nutritional information can vary based on specific brands and portion sizes)
- Serving Size: 1 slice (1/8 of pie)
- Calories: Approximately 250
- Total Fat: 10g
- Saturated Fat: 5g
- Carbohydrates: 38g
- Fiber: 3g
- Sugars: 15g
- Protein: 3g
I hope you find joy in making this Raspberry Pie as much as I do. Whether you’re creating it alone or bringing friends and family into the kitchen, remember that every moment spent cooking is a moment invested in love and connection. So, go ahead, put on that messy apron, and let’s bake some magic!
Print
Raspberry Pie
- Total Time: 60 minutes
- Yield: 8 servings
- Diet: Vegetarian
Description
A delightful Raspberry Pie that embodies summer, sweetness, and nostalgia, perfect for family gatherings.
Ingredients
- Fresh Raspberries (6 cups)
- Granulated Sugar (1 cup)
- Cornstarch (2 tablespoons)
- Lemon Juice (2 tablespoons)
- Vanilla Extract (1 teaspoon)
- Pie Crust (store-bought or homemade)
- Egg Wash (1 egg, beaten)
Instructions
- Preheat your oven to 425°F (220°C).
- Prepare the filling in a large bowl by tossing raspberries, sugar, cornstarch, lemon juice, and vanilla extract gently.
- Roll out the dough on a floured surface to about 1/8-inch thickness.
- Assemble the pie by placing half the crust in a 9-inch pie pan, pouring in the filling, and topping with the remaining crust.
- Brush the top crust with the beaten egg wash.
- Bake for 15 minutes at 425°F, then reduce to 350°F (175°C) for 20-25 minutes.
- Cool down for at least 30 minutes before slicing.
Notes
Serve warmed with vanilla ice cream or whipped cream for a delightful treat. Experiment with different berries for variations.
- Prep Time: 20 minutes
- Cook Time: 40 minutes
- Category: Dessert
- Method: Baking
- Cuisine: American
Nutrition
- Serving Size: 1 slice
- Calories: 250
- Sugar: 15g
- Sodium: 100mg
- Fat: 10g
- Saturated Fat: 5g
- Unsaturated Fat: 3g
- Trans Fat: 0g
- Carbohydrates: 38g
- Fiber: 3g
- Protein: 3g
- Cholesterol: 0mg
Keywords: raspberry pie, summer dessert, pie recipe, baking, homemade pie


