

Minute Homemade Raspberry Lemonade for Summer Refreshment
Refreshing Homemade Raspberry Lemonade: A Sweet Summer Treat
Welcome to my kitchen, dear friends! Today, I’m excited to share with you one of my all-time favorite summer recipes: homemade raspberry lemonade. Nothing screams warm weather quite like the bright, zesty sweetness of lemonade—especially when it’s complemented by the vibrant flavor of fresh raspberries. There’s just something about this drink that instantly takes me back to lazy afternoons spent outdoors, soaking up the sun, and enjoying the company of friends and family.
Growing up, one of my fondest memories was the annual family reunion held at my grandmother’s house. Every summer, she would prepare a massive pitcher of icy lemonade infused with whatever fruits were in season, and raspberries were always a fan favorite. I remember the excitement as we gathered on her porch, laughter filling the air, as she poured pink lemonade into colorful cups. Those moments, bathed in sunshine and the sweet aroma of berries, are etched in my heart. This homemade raspberry lemonade captures that same essence, and I can’t wait to bring those summer vibes into your kitchen.
The beauty of this homemade raspberry lemonade is in its simplicity. With just a handful of fresh ingredients, you can whip up a beverage that is refreshing, flavorful, and oh-so-impressive. Whether you’re hosting a backyard barbecue, a birthday party, or just treating yourself to a delightful drink on a sunny afternoon, this recipe is sure to be a hit. Let’s invite some sunshine into our lives and get started!
Personal Story
I vividly recall the first time I attempted to make raspberry lemonade on my own. It was a sunny Saturday afternoon, and I had a few friends over. The plan was to relax by the pool, but I felt inspired to contribute something delicious. I rummaged through my kitchen and found a container of ripe raspberries. Nostalgia hit me hard—I could almost hear my grandma’s laughter. I decided, then and there, to channel her spirit and recreate that beloved lemonade.
As I squeezed the fresh lemons and muddled the raspberries, I couldn’t help but laugh at the mess I was making. The kitchen turned into a berry explosion—a vibrant splatter of pink everywhere! My friends arrived just as I was pouring the drink into a pitcher, glasses in hand, and they were instantly captivated by the intoxicating aroma. One sip, and they were hooked. It was a magical moment that reminded me of the power of food: it can transport us back in time, evoke strong emotions, and create wonderful new memories. This homemade raspberry lemonade is more than just a drink; it’s a connection to the past and a celebration of the present.
Ingredients
To make this scrumptious homemade raspberry lemonade, you’ll need the following ingredients:
-
Fresh Raspberries (2 cups)
- Choose ripe, plump raspberries for the best flavor. You can also use frozen raspberries if fresh ones aren’t available—just be sure to thaw them first!
-
Fresh Lemons (1 cup juiced)
- About 4 to 6 lemons, depending on their size. Always go for fresh lemons for a bright, zesty kick. If you’re in a pinch, you can use bottled lemon juice, but it won’t have the same vibrant flavor.
-
Water (4 cups)
- Use filtered water for the best taste. You can swap out part of the water for sparkling water to add a fizzy element to your lemonade.
-
Granulated Sugar (¾ cup)
- Adjust the amount based on your sweetness preference. You can substitute with honey, agave syrup, or a sugar alternative if desired. Just be mindful that different sweeteners have varying levels of sweetness.
-
Mint Leaves (optional)
- Fresh mint can elevate the flavor! Use it as a garnish or muddle it into the mixture for an aromatic twist.
-
Ice (as needed)
- Keep your lemonade refreshingly cold by serving it over ice. You can even freeze some raspberry juice into ice cubes for a fun twist!
Step-by-Step Instructions
-
Prep the Raspberries: Rinse the fresh raspberries gently under cold water to remove any dirt or impurities. Drain them carefully and set aside.
-
Juice the Lemons: Cut your lemons in half and use a citrus juicer to extract the juice. You’ll want about one cup of fresh lemon juice. Don’t forget to remove any seeds that sneak their way in!
-
Make the Raspberry Puree: In a blender, combine the fresh raspberries and half of the sugar (about ⅓ cup). Pulse until smooth — a minute or two should do the trick. If you prefer a smoother drink, strain the mixture through a fine-mesh sieve to remove the seeds.
-
Dissolve the Sugar: In a small saucepan, heat 1 cup of water and the remaining sugar over medium heat. Stir until the sugar is fully dissolved. This creates a simple syrup that will blend beautifully into your lemonade.
-
Combine Ingredients: In a large pitcher, combine the raspberry puree, fresh lemon juice, simple syrup, and the remaining 3 cups of water. Stir well to mix everything together. Taste it—if it needs more sweetness, feel free to add extra sugar, honey, or your sweetener of choice!
-
Chill and Serve: Chill your raspberry lemonade in the refrigerator for at least 30 minutes to allow the flavors to meld. When you’re ready to serve, add ice to glasses and pour the lemonade over. Garnish with fresh mint leaves and a few whole raspberries for an eye-catching finish!
-
Enjoy: Grab a seat on the porch, soak in the sunshine, and share a toast with loved ones—this homemade raspberry lemonade is sure to refresh and delight!
Serving Suggestions
When it comes to plating or serving, presentation is everything! Serve your homemade raspberry lemonade in clear glasses to showcase that gorgeous pink hue. Add a sprig of fresh mint and a couple of whole raspberries to each glass for that Instagram-worthy touch. If you’re feeling extra fancy, rim the glasses with sugar for a sweet surprise with every sip. Perfect for picnics, barbecues, or simply enjoying a quiet moment at home!
Recipe Variations
Looking to shake things up? Here are a few creative twists on this delightful recipe:
-
Berry Blend: Mix in strawberries, blueberries, or blackberries to the raspberry puree for a colorful berry medley.
-
Herbal Infusion: Try adding basil or rosemary for a unique herbal note that complements the tartness of the lemonade.
-
Sparkling Splash: Transform your lemonade into a sparkling beverage by substituting part of the water with sparkling water or club soda.
-
Alcoholic Option: Elevate your drink by adding a splash of vodka or gin for a refreshing adult spritzer.
-
Low-Sugar Version: Use an all-natural sweetener like stevia or erythritol for a guilt-free treat that’s still bursting with flavor.
Chef’s Notes
This recipe has evolved over the years and has been a staple at summer gatherings. I remember the first time I tried adding mint, and it instantly became a hit! Every time I make it, I can’t help but smile at the memories associated with it—the laughter shared, the stories told, and the friendships deepened over pitcher after pitcher of icy lemonade.
One of my funniest kitchen moments happened while making this lemonade. I was trying to squeeze the lemons, and one shot right out of my hand, making a perfect arc across the kitchen! I couldn’t help but laugh as I mopped up the juice—it’s a reminder that cooking is meant to be joyful, sometimes messy, and always full of surprises.
FAQs and Troubleshooting
1. My lemonade is too tart! What can I do?
No worries! Just add a bit more sugar or sweetener to balance the tartness. You could also add more water to dilute it to your liking.
2. Can I make this ahead of time?
Absolutely! You can prepare the lemonade a day in advance and store it in the refrigerator. Just give it a good stir before serving, as some of the ingredients may settle.
3. The raspberries are seedy; how can I avoid this?
If you prefer a smoother texture, simply strain the raspberry puree through a fine-mesh sieve to separate the seeds before mixing it with the other ingredients.
4. Can I store leftover lemonade?
Yes! Store any leftover lemonade in a sealed container in the fridge for up to 3 days. Just keep in mind that it may separate; stir well before serving.
Nutritional Info
(For 1 serving, approx. 1 cup)
- Calories: 90
- Protein: 1g
- Carbohydrates: 24g
- Fiber: 1g
- Sugar: 19g
- Fat: 0g
With this recipe in your repertoire, you’ll be ready to sip on something delicious and refreshing all summer long. I hope you enjoy this homemade raspberry lemonade as much as I do—and that it brings a little extra sunshine into your life! Happy cooking, my friends!
Print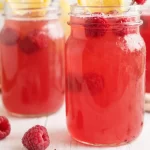
Homemade Raspberry Lemonade
- Total Time: 40 minutes
- Yield: 4 servings
- Diet: Vegan
Description
A refreshing summer drink that combines the zesty sweetness of fresh lemons with the vibrant flavor of ripe raspberries.
Ingredients
- Fresh Raspberries (2 cups)
- Fresh Lemons (1 cup juiced, about 4 to 6 lemons)
- Water (4 cups)
- Granulated Sugar (¾ cup)
- Mint Leaves (optional)
- Ice (as needed)
Instructions
- Rinse the fresh raspberries gently under cold water to remove any dirt or impurities. Drain them carefully and set aside.
- Cut your lemons in half and use a citrus juicer to extract the juice, aiming for about one cup of fresh lemon juice. Remove any seeds that sneak in!
- Combine the raspberries and half of the sugar in a blender. Pulse until smooth. Strain if you prefer a smoother drink.
- Heat 1 cup of water in a small saucepan with the remaining sugar over medium heat. Stir until the sugar is fully dissolved.
- Mix the raspberry puree, fresh lemon juice, simple syrup, and the remaining 3 cups of water in a large pitcher. Stir well and taste for sweetness.
- Chill the lemonade in the refrigerator for at least 30 minutes. When ready to serve, add ice to glasses and pour the lemonade over. Garnish with mint leaves and whole raspberries.
- Enjoy your homemade raspberry lemonade on a sunny day with friends and family!
Notes
For additional flavor, you can mix in a variety of berries or herbs, and serve in clear glasses for an eye-catching presentation.
- Prep Time: 10 minutes
- Cook Time: 0 minutes
- Category: Beverage
- Method: Blending
- Cuisine: American
Nutrition
- Serving Size: 1 serving
- Calories: 90
- Sugar: 19g
- Sodium: 0mg
- Fat: 0g
- Saturated Fat: 0g
- Unsaturated Fat: 0g
- Trans Fat: 0g
- Carbohydrates: 24g
- Fiber: 1g
- Protein: 1g
- Cholesterol: 0mg
Keywords: raspberry, lemonade, summer drink, refreshing beverage, homemade lemonade
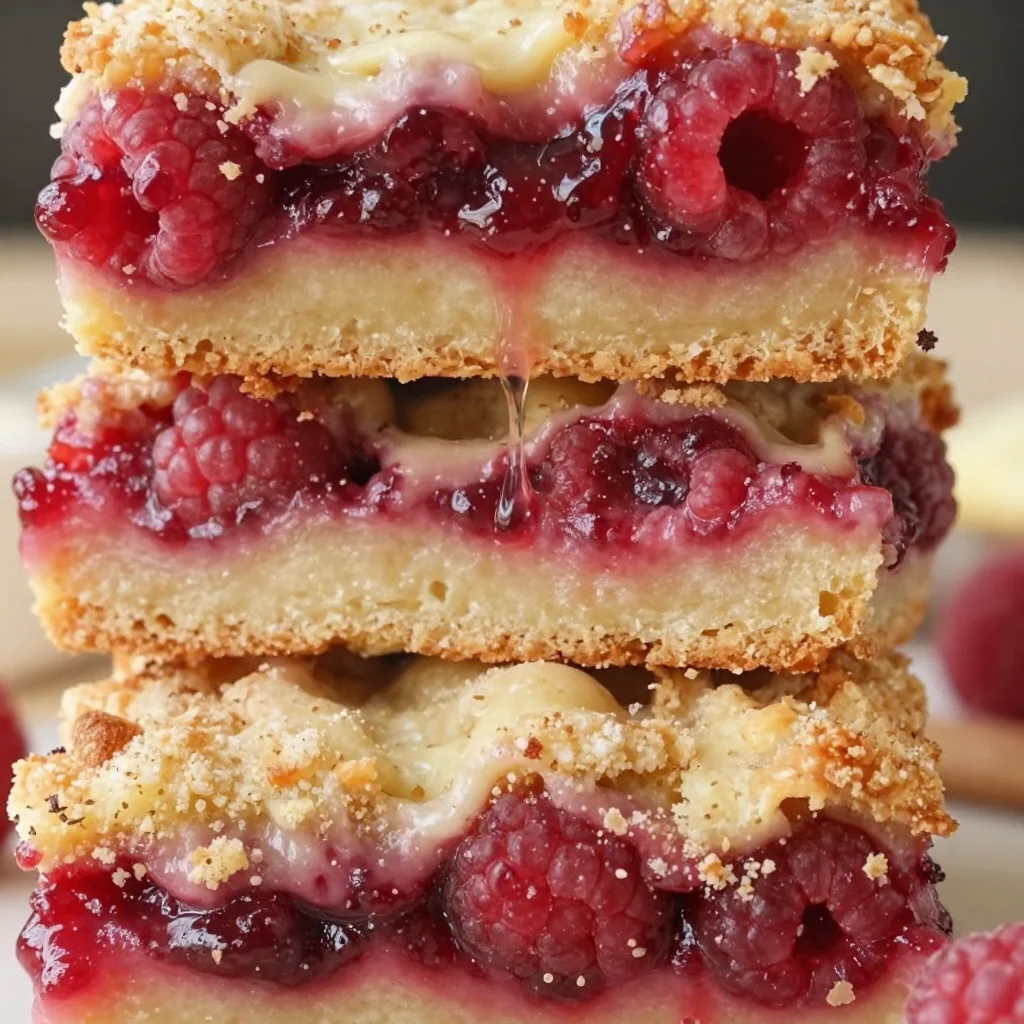
Minute Raspberry Crumb Bars: Easy Weeknight Treats
Raspberry Crumb Bars: A Delicious Slice of Nostalgia
Welcome to my kitchen, dear food lovers! I’m Olivia Bennett, and today we’re diving into the delightful world of Raspberry Crumb Bars. If you’re like me, the mere thought of fresh raspberries nestled in a buttery crumb crust makes your heart flutter. There’s something magical about those sweet-tart little jewels, and when they’re combined with crumbly goodness, you know you’re in for a treat.
Picture this: it’s a sunny afternoon in late summer, the sun filtering through the trees, and the air is sweetened with the scent of ripening berries. As a child, one of my favorite activities was picking raspberries with my grandma in her sprawling garden. She would hand me a small basket, and I’d scamper off, the thrill of the hunt bringing an extra spark to our little adventure. But here’s the kicker: for every handful I picked, I’d sneak a couple into my mouth! Who could resist those deliciously plump berries?
Once we returned home, we’d whip up her famous raspberry crumb bars, the kitchen filled with laughter and the warm aroma of baking. Those bars were the ultimate crowd-pleaser. They were always a perfect balance of crispy and chewy, sweet and tart. They bridged generations, sparking stories and bonding over bites. Now, every time I make them, I’m transported back to that sun-soaked garden, sharing laughter and love with my grandma.
So, whether you’re searching for a cozy dessert to share with friends, a scrumptious snack for yourself, or a nostalgic treat that brings back memories, these Raspberry Crumb Bars are perfect for every occasion. Let’s gather our ingredients, roll up our sleeves, and get baking!
Ingredients
Now, let’s gather our star players for this yummy adventure! Here’s what you’ll need to whip up these delightful Raspberry Crumb Bars:
-
Fresh Raspberries (2 cups)
- The jewel of the recipe! Fresh raspberries give a vibrant, tangy flavor. If you’re not a fan of raspberries, feel free to swap with blueberries, strawberries, or even peaches.
-
All-Purpose Flour (1 ½ cups)
- This is the base for both the crumb crust and topping. If you’re looking for a gluten-free alternative, try using a 1:1 gluten-free baking flour.
-
Granulated Sugar (¾ cup)
- A touch of sweetness! You can use coconut sugar or even honey if you’re aiming for a lower glycemic index.
-
Brown Sugar (¼ cup)
- Adds depth and moisture to your crumb topping. If you’re out, you can substitute with white sugar, but you’ll miss that lovely Carol’s caramel-like flavor.
-
Unsalted Butter (1 cup)
- I love using unsalted butter to control the salt level. Make sure it’s at room temperature for easy mixing. If you’re vegan or dairy-free, you can use coconut oil or a vegan butter alternative.
-
Eggs (1 large)
- Eggs help bind everything together, giving the bars their rich texture. You can replace it with a flax egg (1 tablespoon ground flaxseed + 2.5 tablespoons water), which works surprisingly well!
-
Baking Powder (½ teaspoon)
- This little magic ingredient gives your bars the perfect rise.
-
Salt (½ teaspoon)
- A pinch of salt enhances the sweetness. If you’re using salted butter, feel free to leave this out!
With these simple ingredients, you’ll create a little slice of heaven that’s beautiful, bright, and bursting with flavor. Now, let’s get those aprons on, and I’ll guide you step-by-step through the process!
Step-by-Step Instructions
-
Preheat the Oven
- Start by preheating your oven to 350°F (175°C). This ensures that our bars bake evenly and perfectly crispy right from the get-go.
-
Prepare Your Baking Dish
- Grease a 9×9-inch baking pan with butter or line it with parchment paper for easy removal. I’m a huge fan of parchment; it makes cleaning up a breeze!
-
Make the Crumb Mixture
- In a large mixing bowl, combine 1 ½ cups of flour, ¾ cup of granulated sugar, ¼ cup of brown sugar, ½ teaspoon of baking powder, and ½ teaspoon of salt. Mix well until combined. Don’t worry; a wooden spoon is great for this job.
-
Incorporate the Butter
- Add 1 cup of softened unsalted butter to your dry ingredients. Use your fingers or a pastry cutter to blend until the mixture resembles coarse crumbs. For an extra tip, chill your butter before cutting it in to maintain that perfect crumbly texture!
-
Reserve Some Crumbs
- After creating those lovely crumbs, set aside about 1 cup of this mixture for the topping. This is where the magic happens!
-
Mix in the Eggs
- Add 1 large egg to the remaining crumb mixture and mix until everything is combined. The mixture will be moist but still crumbly, which is exactly what we want!
-
Spread the Base
- Press the crumb mixture firmly into the bottom of your prepared baking dish. Use a spatula to ensure it’s an even layer. If you’re feeling a bit rebellious, add a hint of cinnamon or nutmeg for warmth!
-
Layer the Raspberries
- Gently spread those luscious 2 cups of fresh raspberries over the crumb base. Don’t worry if some burst; that’s just releasing more berry goodness!
-
Sprinkle the Topping
- Break apart the reserved crumb mixture and sprinkle it evenly over the raspberries. Trust me, this layer is what makes these bars irresistible!
-
Bake to Perfection
- Place your baking dish in the preheated oven and bake for about 35-40 minutes or until the top is golden brown and the raspberries are bubbling. Your kitchen will smell like heaven during this time!
-
Cool and Slice
- Once baked, remove the dish from the oven and allow it to cool completely. This will help the bars hold together better when sliced. Patience, my friend! Cooling can take about 30 to 45 minutes, but it will be worth it.
-
Cut and Serve
- Once cool, use a sharp knife to slice into squares. You can dust them with powdered sugar for a pretty touch before serving. Happy munching!
Serving Suggestions
Serve your Raspberry Crumb Bars in charming little dessert plates alongside a scoop of vanilla ice cream or a dollop of whipped cream. They’re delightful as is, but pairing them with a cup of coffee or tea makes for an even cozier experience. If you’re feeling a bit fancy, sprinkle some fresh mint leaves on top for that pop of color and a refreshing touch!
Recipe Variations
Don’t be afraid to mix things up a bit! Here are some creative twists to personalize your Raspberry Crumb Bars:
-
Mixed Berry Medley: Swap the raspberries with a combination of blueberries, blackberries, and strawberries for a colorful summer treat.
-
Nutty Crumb: Add ½ cup of chopped walnuts or almonds to the crumb mixture for an extra crunch and flavor.
-
Zesty Twist: Incorporate lemon or orange zest into the crumb base for a citrusy brightness that complements the berries beautifully.
-
Choco-Dream: Fold in mini chocolate chips for a decadent twist—because who can ever say no to chocolate?
-
Vegan Delight: Substitute all ingredients for their vegan counterparts (like flax eggs and coconut oil) for a guilt-free treat that everyone will love!
Chef’s Notes
Remember, every recipe evolves as we grow in our cooking journeys. When I first made these bars with Grandma, they were a bit more rustic and full of happy accidents—like the time I accidentally doubled the raspberries! Instead of a mishap, it turned out to be a delicious mistake that led to these scrumptious, fruity-infused bars we adore today. Not only did I get a baking lesson, but I learned much more about the joy of experimentation in the kitchen.
And dear friends, always keep your spirit light and enjoy the process! Don’t fret if things don’t go perfectly; sometimes those quirks lead to delightful surprises. After all, that’s what cooking is all about!
FAQs and Troubleshooting
-
Q: Why did my bars crumble apart when sliced?
- A: Make sure to let them cool completely before slicing. Patience is key; the bars need to set so they hold their shape.
-
Q: Can I use frozen raspberries?
- A: Absolutely! Just remember to thaw and drain excess moisture before adding to the crust. They may be a bit softer, but they’ll still taste delicious!
-
Q: How can I tell when the bars are done baking?
- A: Look for a golden brown top and bubbling around the edges. If you gently press down in the center, it should feel firm to the touch.
-
Q: Can I make these in advance?
- A: Yes! These bars store wonderfully in an airtight container for up to 4 days at room temperature, or you can freeze them for up to 3 months. Just thaw in the fridge when you’re ready to enjoy!
Nutritional Info
While I’m all about the joy of cooking and sharing, I know some of you like to keep an eye on numbers. Each Raspberry Crumb Bar (based on 16 servings) has approximately:
- Calories: 190
- Protein: 2g
- Fat: 9g
- Carbohydrates: 29g
- Fiber: 1g
- Sugar: 10g
Feel free to adjust the ingredients to fit your nutritional needs!
And there you have it, my dear culinary companions—a foolproof recipe for Raspberry Crumb Bars that will warm your heart and bring joy to your kitchen! I can’t wait to hear about your baking adventures and the twists you come up with. Happy baking, and remember, the kitchen is always better filled with friends, laughter, and delicious treats!
Print
Raspberry Crumb Bars
- Total Time: 55 minutes
- Yield: 16 servings 1x
- Diet: Vegetarian
Description
Delightful Raspberry Crumb Bars featuring fresh raspberries nestled in a buttery crumb crust, perfect for any occasion.
Ingredients
- 2 cups Fresh Raspberries
- 1 ½ cups All-Purpose Flour
- ¾ cup Granulated Sugar
- ¼ cup Brown Sugar
- 1 cup Unsalted Butter, at room temperature
- 1 large Egg
- ½ teaspoon Baking Powder
- ½ teaspoon Salt
Instructions
- Preheat the oven to 350°F (175°C).
- Grease a 9×9-inch baking pan with butter or line it with parchment paper.
- Combine 1 ½ cups of flour, ¾ cup of granulated sugar, ¼ cup of brown sugar, ½ teaspoon of baking powder, and ½ teaspoon of salt in a large mixing bowl.
- Add 1 cup of softened unsalted butter to the dry ingredients and blend until the mixture resembles coarse crumbs.
- Set aside about 1 cup of crumb mixture for the topping.
- Mix in 1 large egg with the remaining crumb mixture until combined.
- Press the crumb mixture firmly into the bottom of your prepared baking dish.
- Spread 2 cups of fresh raspberries over the crumb base.
- Sprinkle the reserved crumb mixture evenly over the raspberries.
- Bake for about 35-40 minutes or until the top is golden brown and raspberries are bubbling.
- Remove from the oven and allow to cool completely before slicing.
- Cut into squares and dust with powdered sugar before serving.
Notes
These bars are great served warm or at room temperature. Pair with ice cream or whipped cream for an extra treat!
- Prep Time: 15 minutes
- Cook Time: 40 minutes
- Category: Dessert
- Method: Baking
- Cuisine: American
Nutrition
- Serving Size: 1 bar
- Calories: 190
- Sugar: 10g
- Sodium: 200mg
- Fat: 9g
- Saturated Fat: 5g
- Unsaturated Fat: 4g
- Trans Fat: 0g
- Carbohydrates: 29g
- Fiber: 1g
- Protein: 2g
- Cholesterol: 30mg
Keywords: Raspberry, Crumb Bars, Dessert, Sweet, Summer Recipe
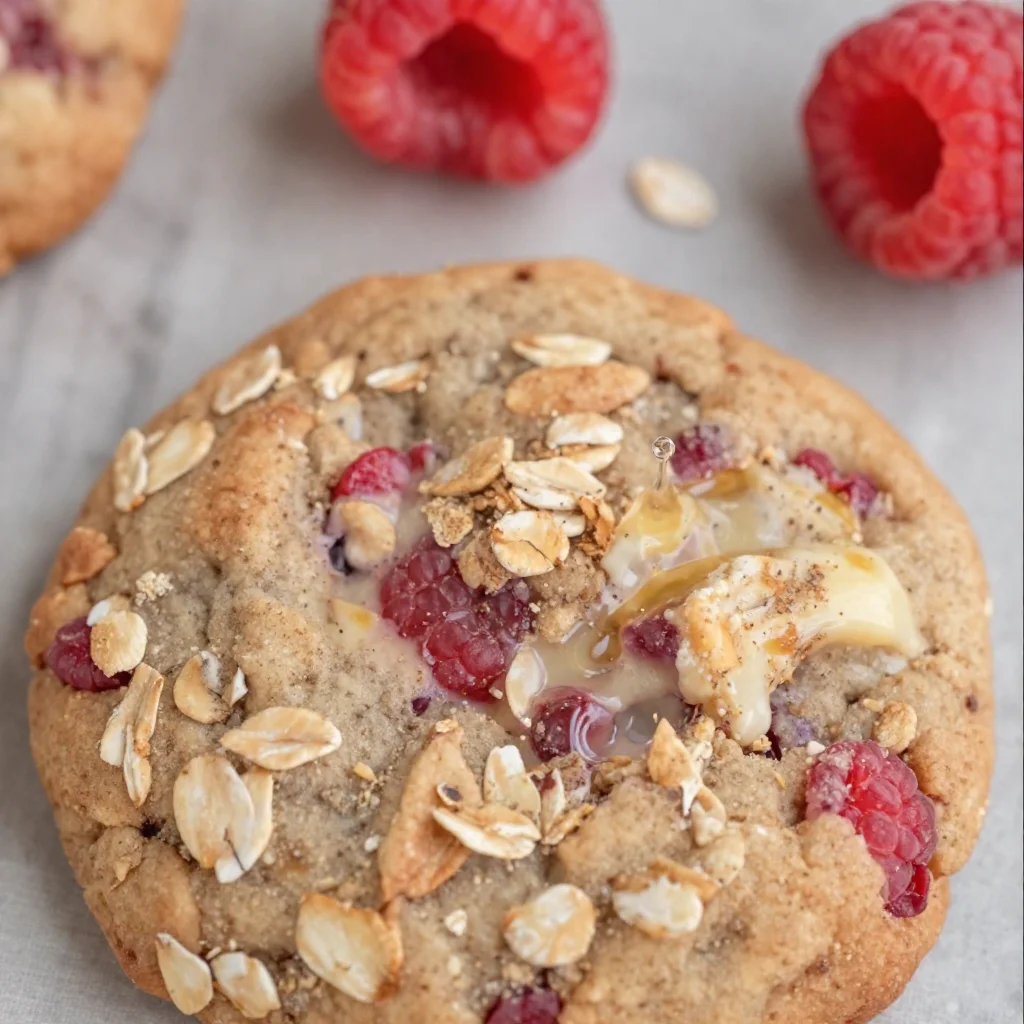
Healthy Raspberry Oatmeal Cookies: Quick Meal-Prep Treats
Healthy Raspberry Oatmeal Cookies: A Sweet Treat for Every Occasion
Welcome to my cozy corner of the kitchen! I’m Olivia Bennett, and I’m so glad you’re here. Today, we’re diving into a delightful treat that balances healthy ingredients with the kind of sweetness that warms your heart: healthy raspberry oatmeal cookies. Whether you’re looking for a nutritious snack to power through your afternoon slump or a wholesome dessert to satisfy your sweet tooth, these cookies are your answer.
There’s something incredibly satisfying about baking cookies. The aroma of warm oats and sweet berries wafting through the kitchen feels like a hug on a chilly day, doesn’t it? I remember the first time I made oatmeal cookies with my grandma. Every Saturday, after a long week of school, we would whip up a batch in her little green kitchen. Flour would fly, laughter would echo, and countless anecdotes flowed like the batter we mixed. Raspberry was always her favorite addition, and now it’s become one of mine. The tartness of the berries perfectly complements the wholesome oats, creating a cookie that’s not just tasty but also nourishing.
These cookies are so easy to whip up and truly customizable. Let’s get started on making your new favorite healthy snack!
Ingredients
Here’s what you’ll need for these scrumptious cookies:
-
1 cup rolled oats
Oats provide a hearty base and are full of fiber. You can swap them with quick oats if that’s what you have on hand, but rolled oats give that perfect chewy texture. -
½ cup whole wheat flour
Whole wheat flour adds nutrition and a slight nuttiness. If you want to be gluten-free, feel free to use almond flour or a gluten-free all-purpose blend. -
½ teaspoon baking soda
This helps our cookies rise a little and gives them that soft texture. If you don’t have baking soda, you can use baking powder, but the texture may vary slightly. -
½ teaspoon salt
A little salt helps balance the sweetness. You can add less if you’re watching your sodium intake. -
¼ cup honey or maple syrup
This natural sweetener keeps the cookies moist. If you’re looking for a vegan option, go for maple syrup. For low-calorie sweetness, a sugar substitute like stevia works too—just adjust according to your brand’s instructions! -
¼ cup coconut oil or unsalted butter, melted
Both are great for binding the ingredients. Coconut oil adds a subtle tropical flavor, while butter gives that rich cookie essence. Use applesauce for a lower-fat alternative! -
1 tablespoon vanilla extract
This is a must-have for flavor! Feel free to experiment with almond extract for a different twist. -
¾ cup fresh raspberries
These juicy gems are the star of our cookies! If fresh raspberries are out of season, frozen ones work too; just be sure to thaw and drain them first. -
¼ cup dark chocolate chips (optional)
Because who can resist chocolate? You can easily swap this with any nut or leave it out entirely for a simpler cookie.
Step-by-Step Instructions
Now that we have our ingredients lined up, let’s roll up our sleeves and get baking!
-
Preheat the Oven
Preheat your oven to 350°F (175°C). This ensures your cookies bake evenly. While it’s heating, you can prep everything else. -
Mix Dry Ingredients
In a large bowl, combine the rolled oats, whole wheat flour, baking soda, and salt. Whisk it together to make sure there’s an even distribution of dry ingredients. This prevents pockets of flour or baking soda in your batter. -
Combine Wet Ingredients
In a separate bowl, mix the melted coconut oil (or butter), honey (or maple syrup), and vanilla extract. If your oil has cooled down and solidified slightly, you can pop it in the microwave for a few seconds to melt it again. A well-mixed wet combination gives the cookies a lovely, even texture. -
Blend Wet and Dry Mixtures
Pour the wet ingredients into the dry mixture and stir until just combined. Over-mixing can lead to tough cookies, so don’t be afraid to leave some lumps—it’s all part of the charm! -
Gently Fold in Raspberries
Using a spatula or wooden spoon, carefully fold in the fresh raspberries and chocolate chips (if using). This step is important! You want to integrate the berries without smashing them too much. You want those beautiful bursts of color and flavor in every bite. -
Scoop the Dough
Using a cookie scoop or a tablespoon, drop the dough onto a parchment-lined baking sheet, leaving about 2 inches between each cookie. This gives them room to spread. -
Bake
Pop the baking sheet in the oven and bake for 12-15 minutes, or until the cookies are golden brown around the edges and still soft in the center. Trust your nose; the aroma will be a heavenly hint that they’re almost ready! -
Cool and Enjoy
Let the cookies cool on the baking sheet for about 5 minutes before transferring them to a wire rack. This helps them set as they cool down. If you try to move them too soon, they may fall apart. Patience, my friend!
Serving Suggestions
Once your cookies are completely cool, stack them on a cute plate, or for a cozy breakfast treat, serve them warm alongside a hot cup of tea or coffee. Crumble one over some Greek yogurt with a sprinkle of granola for a delicious breakfast bowl. They’re perfect for sharing too—line them up in mason jars for thoughtful gifts!
Recipe Variations
Looking to mix things up? Here are a few ideas for you to get creative with:
- Nutty Raspberry Cookies: Add ¼ cup of chopped nuts, like walnuts or almonds, for an extra crunch.
- Cinnamon Twist: Sprinkle in some ground cinnamon (about ½ teaspoon) for a warm, cozy flavor.
- Lemon Zing: Grate some lemon zest into the dough for a refreshing citrus burst. This pairs beautifully with raspberries.
- Peanut Butter Bliss: Incorporate 2 tablespoons of your favorite nut butter into the wet ingredients for added creaminess and flavor.
Chef’s Notes
Oh, the stories my kitchen holds! One time, I had a bunch of overripe bananas about to meet their fate in the compost bin, so I decided to mash them into this dough. My raspberry oatmeal cookies transformed into a delightful banana-raspberry combo, and let me tell you, they were a hit! It just goes to show you how versatile this recipe is. If you find yourself with ingredients that need using up, don’t hesitate to experiment—there’s always something delicious waiting to be discovered!
FAQs and Troubleshooting
1. My cookies are too dry. What went wrong?
This usually means that there was too much flour or a lack of moisture in your dough. Make sure to measure your ingredients accurately. If your dough looks a bit dry before baking, try adding another tablespoon of coconut oil or a splash of milk.
2. How can I store these cookies?
These cookies can be stored in an airtight container at room temperature for up to a week. You can freeze them as well! Just wrap each cookie in plastic wrap or place them in a freezer bag for up to 3 months.
3. Can I use frozen raspberries?
Absolutely! Just remember to thaw and drain them before adding them to the dough. You might want to reduce the number slightly, as frozen berries can be juicier.
4. What’s the secret to chewy cookies?
The key is not to overbake! When you pull these cookies out of the oven, they might look a bit underbaked in the center—that’s okay! Let them cool. They will continue to cook on the baking sheet and become deliciously chewy.
Nutritional Info
While the nutritional info can vary based on your specific ingredients and portion sizes, these cookies are generally low in sugar and high in fiber, thanks to the oats and raspberries. Each cookie (with the recipe yielding about 12-15 cookies) contains approximately:
- Calories: 120
- Protein: 2g
- Fat: 5g
- Carbohydrates: 18g
- Fiber: 3g
Feel free to adjust elements based on your dietary needs or to create different variations!
Thank you so much for joining me in the kitchen today! I hope these healthy raspberry oatmeal cookies become a delightful addition to your baking repertoire. Remember, cooking is all about joy, love, and a little bit of mess. Now, go bake, share, and enjoy! Bon Appétit!
Print
Healthy Raspberry Oatmeal Cookies
- Total Time: 25 minutes
- Yield: 12-15 cookies 1x
- Diet: Vegetarian
Description
Deliciously wholesome raspberry oatmeal cookies, perfect for a nutritious snack or dessert.
Ingredients
- 1 cup rolled oats
- ½ cup whole wheat flour
- ½ teaspoon baking soda
- ½ teaspoon salt
- ¼ cup honey or maple syrup
- ¼ cup coconut oil or unsalted butter, melted
- 1 tablespoon vanilla extract
- ¾ cup fresh raspberries
- ¼ cup dark chocolate chips (optional)
Instructions
- Preheat your oven to 350°F (175°C).
- Mix the rolled oats, whole wheat flour, baking soda, and salt in a large bowl.
- Combine the melted coconut oil (or butter), honey (or maple syrup), and vanilla extract in a separate bowl.
- Blend the wet ingredients into the dry mixture and stir until just combined.
- Gently fold in the fresh raspberries and chocolate chips (if using).
- Scoop the dough onto a parchment-lined baking sheet, leaving about 2 inches between each cookie.
- Bake for 12-15 minutes, until golden brown around the edges.
- Cool on the baking sheet for about 5 minutes before transferring to a wire rack.
Notes
These cookies can be stored in an airtight container for up to a week and can be frozen for up to 3 months.
- Prep Time: 10 minutes
- Cook Time: 15 minutes
- Category: Dessert
- Method: Baking
- Cuisine: American
Nutrition
- Serving Size: 1 cookie
- Calories: 120
- Sugar: 5g
- Sodium: 60mg
- Fat: 5g
- Saturated Fat: 3g
- Unsaturated Fat: 2g
- Trans Fat: 0g
- Carbohydrates: 18g
- Fiber: 3g
- Protein: 2g
- Cholesterol: 10mg
Keywords: raspberry, oatmeal, cookies, healthy baking, vegetarian dessert


