

Minute Homemade Raspberry Lemonade for Summer Refreshment
Refreshing Homemade Raspberry Lemonade: A Sweet Summer Treat
Welcome to my kitchen, dear friends! Today, I’m excited to share with you one of my all-time favorite summer recipes: homemade raspberry lemonade. Nothing screams warm weather quite like the bright, zesty sweetness of lemonade—especially when it’s complemented by the vibrant flavor of fresh raspberries. There’s just something about this drink that instantly takes me back to lazy afternoons spent outdoors, soaking up the sun, and enjoying the company of friends and family.
Growing up, one of my fondest memories was the annual family reunion held at my grandmother’s house. Every summer, she would prepare a massive pitcher of icy lemonade infused with whatever fruits were in season, and raspberries were always a fan favorite. I remember the excitement as we gathered on her porch, laughter filling the air, as she poured pink lemonade into colorful cups. Those moments, bathed in sunshine and the sweet aroma of berries, are etched in my heart. This homemade raspberry lemonade captures that same essence, and I can’t wait to bring those summer vibes into your kitchen.
The beauty of this homemade raspberry lemonade is in its simplicity. With just a handful of fresh ingredients, you can whip up a beverage that is refreshing, flavorful, and oh-so-impressive. Whether you’re hosting a backyard barbecue, a birthday party, or just treating yourself to a delightful drink on a sunny afternoon, this recipe is sure to be a hit. Let’s invite some sunshine into our lives and get started!
Personal Story
I vividly recall the first time I attempted to make raspberry lemonade on my own. It was a sunny Saturday afternoon, and I had a few friends over. The plan was to relax by the pool, but I felt inspired to contribute something delicious. I rummaged through my kitchen and found a container of ripe raspberries. Nostalgia hit me hard—I could almost hear my grandma’s laughter. I decided, then and there, to channel her spirit and recreate that beloved lemonade.
As I squeezed the fresh lemons and muddled the raspberries, I couldn’t help but laugh at the mess I was making. The kitchen turned into a berry explosion—a vibrant splatter of pink everywhere! My friends arrived just as I was pouring the drink into a pitcher, glasses in hand, and they were instantly captivated by the intoxicating aroma. One sip, and they were hooked. It was a magical moment that reminded me of the power of food: it can transport us back in time, evoke strong emotions, and create wonderful new memories. This homemade raspberry lemonade is more than just a drink; it’s a connection to the past and a celebration of the present.
Ingredients
To make this scrumptious homemade raspberry lemonade, you’ll need the following ingredients:
-
Fresh Raspberries (2 cups)
- Choose ripe, plump raspberries for the best flavor. You can also use frozen raspberries if fresh ones aren’t available—just be sure to thaw them first!
-
Fresh Lemons (1 cup juiced)
- About 4 to 6 lemons, depending on their size. Always go for fresh lemons for a bright, zesty kick. If you’re in a pinch, you can use bottled lemon juice, but it won’t have the same vibrant flavor.
-
Water (4 cups)
- Use filtered water for the best taste. You can swap out part of the water for sparkling water to add a fizzy element to your lemonade.
-
Granulated Sugar (¾ cup)
- Adjust the amount based on your sweetness preference. You can substitute with honey, agave syrup, or a sugar alternative if desired. Just be mindful that different sweeteners have varying levels of sweetness.
-
Mint Leaves (optional)
- Fresh mint can elevate the flavor! Use it as a garnish or muddle it into the mixture for an aromatic twist.
-
Ice (as needed)
- Keep your lemonade refreshingly cold by serving it over ice. You can even freeze some raspberry juice into ice cubes for a fun twist!
Step-by-Step Instructions
-
Prep the Raspberries: Rinse the fresh raspberries gently under cold water to remove any dirt or impurities. Drain them carefully and set aside.
-
Juice the Lemons: Cut your lemons in half and use a citrus juicer to extract the juice. You’ll want about one cup of fresh lemon juice. Don’t forget to remove any seeds that sneak their way in!
-
Make the Raspberry Puree: In a blender, combine the fresh raspberries and half of the sugar (about ⅓ cup). Pulse until smooth — a minute or two should do the trick. If you prefer a smoother drink, strain the mixture through a fine-mesh sieve to remove the seeds.
-
Dissolve the Sugar: In a small saucepan, heat 1 cup of water and the remaining sugar over medium heat. Stir until the sugar is fully dissolved. This creates a simple syrup that will blend beautifully into your lemonade.
-
Combine Ingredients: In a large pitcher, combine the raspberry puree, fresh lemon juice, simple syrup, and the remaining 3 cups of water. Stir well to mix everything together. Taste it—if it needs more sweetness, feel free to add extra sugar, honey, or your sweetener of choice!
-
Chill and Serve: Chill your raspberry lemonade in the refrigerator for at least 30 minutes to allow the flavors to meld. When you’re ready to serve, add ice to glasses and pour the lemonade over. Garnish with fresh mint leaves and a few whole raspberries for an eye-catching finish!
-
Enjoy: Grab a seat on the porch, soak in the sunshine, and share a toast with loved ones—this homemade raspberry lemonade is sure to refresh and delight!
Serving Suggestions
When it comes to plating or serving, presentation is everything! Serve your homemade raspberry lemonade in clear glasses to showcase that gorgeous pink hue. Add a sprig of fresh mint and a couple of whole raspberries to each glass for that Instagram-worthy touch. If you’re feeling extra fancy, rim the glasses with sugar for a sweet surprise with every sip. Perfect for picnics, barbecues, or simply enjoying a quiet moment at home!
Recipe Variations
Looking to shake things up? Here are a few creative twists on this delightful recipe:
-
Berry Blend: Mix in strawberries, blueberries, or blackberries to the raspberry puree for a colorful berry medley.
-
Herbal Infusion: Try adding basil or rosemary for a unique herbal note that complements the tartness of the lemonade.
-
Sparkling Splash: Transform your lemonade into a sparkling beverage by substituting part of the water with sparkling water or club soda.
-
Alcoholic Option: Elevate your drink by adding a splash of vodka or gin for a refreshing adult spritzer.
-
Low-Sugar Version: Use an all-natural sweetener like stevia or erythritol for a guilt-free treat that’s still bursting with flavor.
Chef’s Notes
This recipe has evolved over the years and has been a staple at summer gatherings. I remember the first time I tried adding mint, and it instantly became a hit! Every time I make it, I can’t help but smile at the memories associated with it—the laughter shared, the stories told, and the friendships deepened over pitcher after pitcher of icy lemonade.
One of my funniest kitchen moments happened while making this lemonade. I was trying to squeeze the lemons, and one shot right out of my hand, making a perfect arc across the kitchen! I couldn’t help but laugh as I mopped up the juice—it’s a reminder that cooking is meant to be joyful, sometimes messy, and always full of surprises.
FAQs and Troubleshooting
1. My lemonade is too tart! What can I do?
No worries! Just add a bit more sugar or sweetener to balance the tartness. You could also add more water to dilute it to your liking.
2. Can I make this ahead of time?
Absolutely! You can prepare the lemonade a day in advance and store it in the refrigerator. Just give it a good stir before serving, as some of the ingredients may settle.
3. The raspberries are seedy; how can I avoid this?
If you prefer a smoother texture, simply strain the raspberry puree through a fine-mesh sieve to separate the seeds before mixing it with the other ingredients.
4. Can I store leftover lemonade?
Yes! Store any leftover lemonade in a sealed container in the fridge for up to 3 days. Just keep in mind that it may separate; stir well before serving.
Nutritional Info
(For 1 serving, approx. 1 cup)
- Calories: 90
- Protein: 1g
- Carbohydrates: 24g
- Fiber: 1g
- Sugar: 19g
- Fat: 0g
With this recipe in your repertoire, you’ll be ready to sip on something delicious and refreshing all summer long. I hope you enjoy this homemade raspberry lemonade as much as I do—and that it brings a little extra sunshine into your life! Happy cooking, my friends!
Print
Homemade Raspberry Lemonade
- Total Time: 40 minutes
- Yield: 4 servings
- Diet: Vegan
Description
A refreshing summer drink that combines the zesty sweetness of fresh lemons with the vibrant flavor of ripe raspberries.
Ingredients
- Fresh Raspberries (2 cups)
- Fresh Lemons (1 cup juiced, about 4 to 6 lemons)
- Water (4 cups)
- Granulated Sugar (¾ cup)
- Mint Leaves (optional)
- Ice (as needed)
Instructions
- Rinse the fresh raspberries gently under cold water to remove any dirt or impurities. Drain them carefully and set aside.
- Cut your lemons in half and use a citrus juicer to extract the juice, aiming for about one cup of fresh lemon juice. Remove any seeds that sneak in!
- Combine the raspberries and half of the sugar in a blender. Pulse until smooth. Strain if you prefer a smoother drink.
- Heat 1 cup of water in a small saucepan with the remaining sugar over medium heat. Stir until the sugar is fully dissolved.
- Mix the raspberry puree, fresh lemon juice, simple syrup, and the remaining 3 cups of water in a large pitcher. Stir well and taste for sweetness.
- Chill the lemonade in the refrigerator for at least 30 minutes. When ready to serve, add ice to glasses and pour the lemonade over. Garnish with mint leaves and whole raspberries.
- Enjoy your homemade raspberry lemonade on a sunny day with friends and family!
Notes
For additional flavor, you can mix in a variety of berries or herbs, and serve in clear glasses for an eye-catching presentation.
- Prep Time: 10 minutes
- Cook Time: 0 minutes
- Category: Beverage
- Method: Blending
- Cuisine: American
Nutrition
- Serving Size: 1 serving
- Calories: 90
- Sugar: 19g
- Sodium: 0mg
- Fat: 0g
- Saturated Fat: 0g
- Unsaturated Fat: 0g
- Trans Fat: 0g
- Carbohydrates: 24g
- Fiber: 1g
- Protein: 1g
- Cholesterol: 0mg
Keywords: raspberry, lemonade, summer drink, refreshing beverage, homemade lemonade
Minute Raspberry Iced Tea for Summer Refreshment
Refreshing Raspberry Iced Tea: A Summer Delight
Welcome to my kitchen! Today, we’re diving into the vibrant world of Raspberry Iced Tea—a refreshing drink that captures the essence of summer in every sip. Imagine yourself lounging in the sun, a gentle breeze fanning your skin, and this lovely, fruity concoction in your hand. Whether you’re hosting a weekend brunch, enjoying a lazy afternoon, or gearing up for a cookout with friends, this iced tea promises to bring joy and refreshment.
You may be wondering why I’m so passionate about Raspberry Iced Tea. Well, it’s not just about the delightful taste; it’s about the memories and the connection it fosters. I remember the first time I sipped this sweet elixir at a summer picnic with my family. My mom used to brew her iced tea on the stove, and we would pop fresh raspberries in just before serving. It was a simple ritual, but it created an atmosphere of warmth, laughter, and love. Those little moments around the table—sharing stories and enjoying homemade treats—are what truly make the experience special.
So let’s get started! This recipe is not only delicious but also easy and fun to make. You don’t need to be a professional chef or have a ton of time on your hands; you just need a little enthusiasm and a few basic ingredients. Ready to create some delicious memories? Let’s jump into the details!
Ingredients
- Black Tea Bags (4-5): Use your favorite brand for this base. If you don’t like black tea, green tea works beautifully too. Adjust the quantity depending on how strong you like your tea!
- Fresh Raspberries (1 cup): Nothing beats fresh raspberries for flavor. If they’re out of season, frozen raspberries will do just fine—just make sure to thaw them before adding.
- Water (4 cups): Filtered water is always the best choice for clarity and taste. You can also experiment by using sparkling water for a fizzy twist!
- Sugar (or Honey) (½ cup): This sweetener balances the tartness of the raspberries. Feel free to adjust it to your liking, or use a sugar substitute for a healthier option.
- Lemon Juice (2 tablespoons): Fresh lemon juice enhances the flavor profile. If you’re in a pinch, bottled lemon juice can work, but fresh is always best.
- Mint Leaves (for garnish): These add an aromatic touch to your drink. You can also muddle a few leaves in the pitcher for an extra minty kick.
Step-by-Step Instructions
-
Prepare the Tea:
- In a saucepan, bring 4 cups of water to a boil. Once boiling, remove it from the heat and add in your black tea bags. Let them steep for about 5-7 minutes, depending on how strong you like your tea.
- Chef’s Tip: If you’re using green tea, steep it for only 3-5 minutes to avoid bitterness.
-
Sweeten the Tea:
- After steeping, remove the tea bags and add your sugar (or honey). Stir until completely dissolved. If you prefer less sweetness, start with half the amount and adjust according to taste.
- Hearty Note: Remember, you can always add more sugar later, but it’s tricky to take it out once it’s in!
-
Incorporate the Raspberries:
- While the tea is still warm, add in the fresh raspberries. For an extra boost of flavor, lightly muddle them with a spoon to release their juices.
- Chef Hack: If you want a brighter red color, blend the raspberries and strain them before adding to the tea.
-
Cool It Down:
- Transfer the tea mixture to a pitcher and refrigerate it until chilled—about 1-2 hours should do the trick. Don’t rush this step; the chilling enhances the flavors.
- Insight: You can also pour the warm tea over ice if you’re in a hurry, though it may dilute the flavors a bit!
-
Add Lemon Juice:
- Once chilled, stir in the fresh lemon juice. Taste and adjust—if you fancy a more fruity note, add more raspberries!
- Flavor Bomb: Feel free to add a pinch of lemon zest for an extra punch of citrusy aroma.
-
Serve:
- Pour the Raspberry Iced Tea over ice and garnish with mint leaves. For an added touch, drop in a few whole raspberries.
- Cheers! Enjoy your refreshing creation!
Serving Suggestions
When it comes to serving your Raspberry Iced Tea, presentation matters! Use clear glassware to showcase the beautiful ruby color of your drink. You can even rim the glasses with sugar for a fun twist or add lemon slices for a pop of color. Pair it with your favorite summer snacks like grilled chicken, fresh fruit platters, or a light salad to create a lovely afternoon gathering.
Recipe Variations
- Herbal Twist: Replace black tea with herbal tea for a caffeine-free version. Mint or chamomile would pair beautifully with raspberries.
- Berry Medley: Mix in a variety of berries, like strawberries or blueberries, for a splash of different flavors.
- Peachy Iced Tea: Swap raspberries for fresh peaches—talk about a summer dream!
- Sparkling Raspberry Iced Tea: Add tonic or soda water instead of plain water for a refreshing fizz.
- Sweetened with Agave: Use agave syrup instead of sugar for a different sweetness that complements the raspberries nicely.
Chef’s Notes
Raspberry Iced Tea has come a long way since my mom’s simple version. Over the years, I’ve experimented with various flavors and garnishes, and I love how versatile it can be. In fact, I once threw a little summer bash and set up a DIY iced tea bar where guests could mix and match different flavors—such a hit! The memories created around that table still warm my heart, much like this iced tea does on a hot day.
FAQs and Troubleshooting
1. What if my tea is too sweet?
If you accidentally added too much sugar, dilute it with more water or tea. Adding more raspberries can also help balance the sweetness!
2. How can I make this recipe ahead of time?
You can make Raspberry Iced Tea a day in advance and store it in the refrigerator. It tastes even better the next day as the flavors meld together.
3. What can I do with leftover tea?
Leftover tea can be frozen into ice cubes to use in future drinks or smoothies. You can also turn it into a flavorful marinade for meats!
4. How do I get rid of bitterness?
If your tea becomes bitter, avoid steeping too long or using overly hot water. Adding a splash of lemon juice can also help cut the bitterness.
Nutritional Info
While specific nutritional information can vary, this Raspberry Iced Tea recipe is generally low in calories if you use less sugar. Each serving (8 oz) should be around 50-100 calories, depending on your sweetener choices. Plus, it’s rich in antioxidants from the tea and raspberries!
So there you have it! A delightful, refreshing Raspberry Iced Tea recipe that’s bound to become a staple in your summer beverage rotation. Don’t forget to share your creations with friends and family; after all, the best memories are made over good food and drinks. Happy sipping, everyone!
Print
Refreshing Raspberry Iced Tea
- Total Time: 120 minutes
- Yield: 4 servings
- Diet: Vegetarian
Description
A delightful, fruity Raspberry Iced Tea perfect for summer gatherings, rich in flavor and memories.
Ingredients
- Black Tea Bags (4-5)
- Fresh Raspberries (1 cup)
- Water (4 cups)
- Sugar (or Honey) (½ cup)
- Lemon Juice (2 tablespoons)
- Mint Leaves (for garnish)
Instructions
- Prepare the Tea: In a saucepan, bring 4 cups of water to a boil. Once boiling, remove it from the heat and add in your black tea bags. Let them steep for about 5-7 minutes.
- Sweeten the Tea: After steeping, remove the tea bags and add your sugar (or honey). Stir until completely dissolved.
- Incorporate the Raspberries: While the tea is still warm, add in the fresh raspberries. Lightly muddle them with a spoon to release their juices.
- Cool It Down: Transfer the tea mixture to a pitcher and refrigerate it until chilled—about 60-120 minutes.
- Add Lemon Juice: Once chilled, stir in the fresh lemon juice. Taste and adjust.
- Serve: Pour the Raspberry Iced Tea over ice and garnish with mint leaves and a few whole raspberries. Cheers!
Notes
For added flair, rim glasses with sugar or add lemon slices. Serve with summer snacks like grilled chicken or fruit platters.
- Prep Time: 15 minutes
- Cook Time: 10 minutes
- Category: Beverage
- Method: Brewing
- Cuisine: American
Nutrition
- Serving Size: 1 cup
- Calories: 75
- Sugar: 12g
- Sodium: 10mg
- Fat: 0g
- Saturated Fat: 0g
- Unsaturated Fat: 0g
- Trans Fat: 0g
- Carbohydrates: 19g
- Fiber: 1g
- Protein: 0g
- Cholesterol: 0mg
Keywords: Raspberry Iced Tea, Summer Beverage, Refreshing Drink

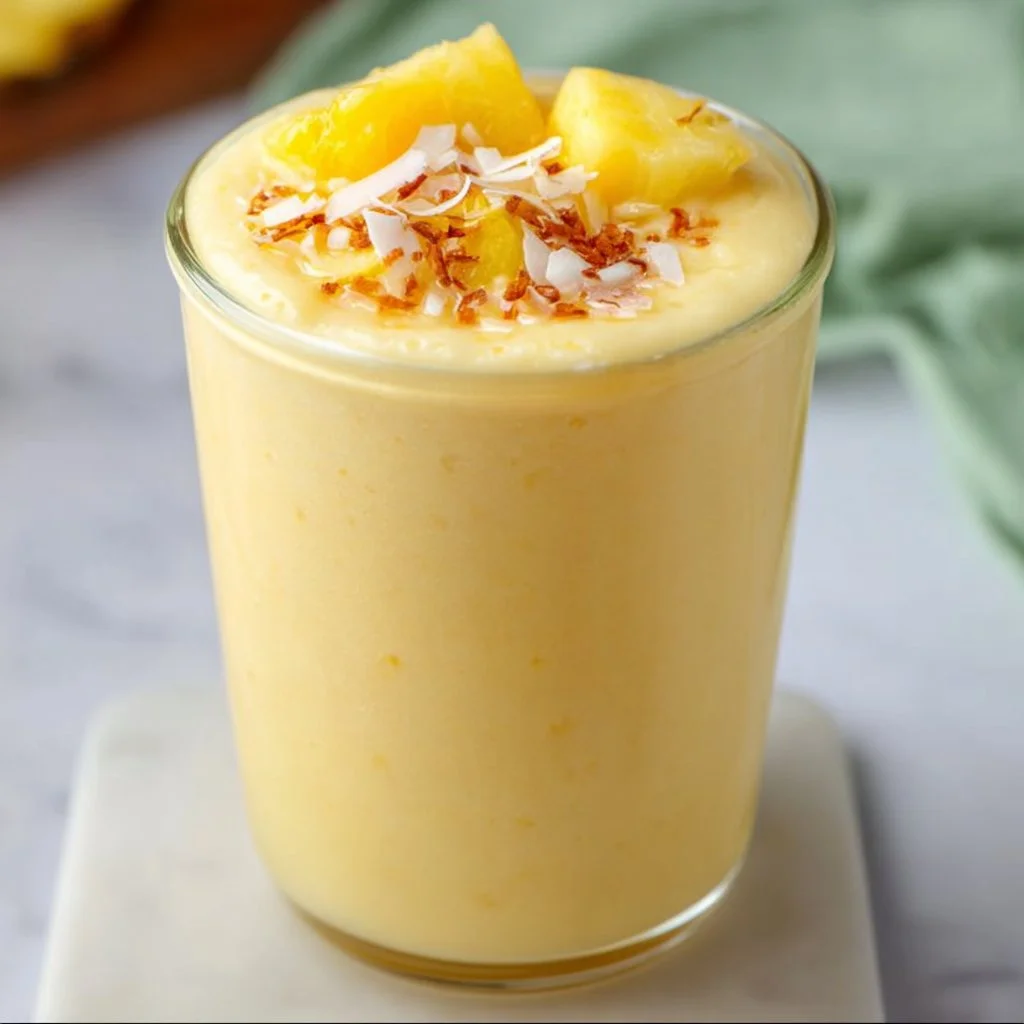
Tropical Pineapple Orange Smoothie
Refreshing Tropical Pineapple Orange Smoothie Recipe: A Slice of Sunshine in a Glass
Welcome to my kitchen! Today, I’m thrilled to share a recipe that truly embodies the essence of summer, sunshine, and everything fresh and fruity—the Tropical Pineapple Orange Smoothie. If you’re like me and find joy in sipping something deliciously refreshing, especially after a long day or as a morning pick-me-up, this smoothie is going to be your new best friend.
Imagine it: you wake up, the sun is shining through your window, and all you crave is something fruity that transports you to a tropical paradise. This smoothie is basically a mini-vacation in a glass! Packed with vitamins and natural flavors, it’s not only a delight for your taste buds but also a nutritious option to kickstart your day—or to keep you cool during an afternoon slump.
Now, I know there are countless smoothie recipes out there, but what sets this one apart is its perfect balance of sweet and tangy, creamy and refreshing. Plus, it’s incredibly easy to whip up! Whether you’re an experienced home cook or just starting your culinary journey, I’m here to guide you through the process with love and a few fun stories along the way. So grab your blender, and let’s dive into the world of tropical flavors!
A Trip Down Memory Lane
Let me take you back to a sunny afternoon a few summers ago. I was visiting my dear friend, Maria, in Hawaii—yes, paradise found! We spent our days lounging on the beach, trying out local cuisine, and exploring hidden waterfalls. While we were there, Maria introduced me to her favorite tropical smoothie, made with the freshest pineapples and oranges from her backyard. She would blend them right there on the patio, and the aroma wafting in the air was simply divine!
I’ll never forget the first sip—the sweet pineapple mingled so perfectly with the zesty orange, and just like that, I was in heaven! When I got home, I knew I had to recreate that sunshine-in-a-glass experience. After a few tweaks and experiments, I developed this Tropical Pineapple Orange Smoothie recipe, and it has since become a staple in my kitchen. So, let’s bring a taste of Hawaii to your home!
Ingredients
Here’s what you need for your Tropical Pineapple Orange Smoothie:
-
Fresh Pineapple Chunks (1 cup)
Pineapples are the star of this show! Sweet, tangy, and packed with vitamins, they create a delightful base. If fresh isn’t available, you can use frozen pineapple. -
Fresh Orange Juice (1/2 cup)
Freshly squeezed orange juice adds that citrusy zing! If you’re short on oranges, store-bought juice will do, but look for one without added sugar for the best flavor. -
Banana (1 medium)
Bananas add creaminess and natural sweetness, plus they’re a great source of potassium. Overripe bananas that you might have lying around are perfect for this! -
Greek Yogurt (1/2 cup)
This adds a creamy texture and a protein boost. If you’re dairy-free, you can substitute with plant-based yogurt or a banana for extra creaminess. -
Coconut Water (1/2 cup)
Bringing in the tropical vibes, coconut water hydrates and adds a subtle sweetness. Feel free to replace it with regular water or milk for a creamier texture. -
Honey or Maple Syrup (1-2 tablespoons)
Sweeten to your liking! Depending on the ripeness of your fruit, you may or may not need this. Local honey gives an extra layer of flavor, but maple syrup is a beautiful vegan alternative. -
Ice Cubes (1/2 cup)
Essential for that refreshing chill! If you’re using frozen fruit, you may want to adjust the amount.
Step-by-Step Instructions
Now that we have our ingredients gathered, let’s get blending!
-
Prepare the Ingredients
Start by peeling and chopping your pineapple and banana. If you’re using fresh pineapple, make sure to cut away the tough core and slice it into chunks. As for the banana, just peel it and break it into smaller pieces. This helps create a smooth blend! -
Juice the Oranges
If you’re using fresh oranges, grab a juicer or just squeeze by hand for fresh orange juice. Aim for about half a cup of juice. Remember, the more fresh, the better the flavor! -
Add Ingredients to the Blender
Into your blender, add the pineapple chunks, fresh orange juice, banana, Greek yogurt, coconut water, and if you choose, honey or maple syrup. Layering the ingredients is key, so place the softer items on top for easier blending. -
Blend Until Smooth
Secure the lid on your blender and blend on high speed for about 30 seconds. Stop to scrape down the sides if necessary, then blend for another 30 seconds or until everything is perfectly smooth. You’re looking for that velvety consistency that encourages second sips! -
Adjust to Taste
This is where you can get creative! If you want it sweeter, add more honey or maple syrup. If you prefer it thicker, throw in more yogurt or banana. For a thinner consistency, simply add more coconut water or juice and blend again. -
Add Ice and Blend Again
Once you’re happy with the base, add ice cubes to the blender. Blend on high until you achieve your desired chill factor. This part is super fun; it’s like the final sprinkle of joy on your tropical creation! -
Taste and Adjust
Don’t forget to taste your smoothie! This is your chef moment—do a little shimmy of delight as you enjoy this fruity concoction. Adjust flavors as needed, then you’re ready to pour!
Serving Suggestions
Pour your Tropical Pineapple Orange Smoothie into a tall glass and serve it with a slice of orange or a pineapple wedge perched on the rim for that added tropical flair. You can even top it off with a sprinkle of shredded coconut or a few chia seeds for texture!
Feel free to grab a colorful straw and let the sunshine vibes brighten your day. It’s best enjoyed immediately, ideally outside in the sun or while listening to your favorite tunes!
Recipe Variations
-
Berry Bliss: Add a handful of strawberries or blueberries for a berry twist. They pair beautifully with pineapple and orange!
-
Green Paradise: Toss in a handful of spinach or kale for an added dose of nutrients. You won’t even taste it with all that tropical sweetness!
-
Protein Power: Add a scoop of your favorite protein powder for a post-workout boost.
-
Spice It Up: A pinch of cayenne pepper or a few slices of fresh ginger will add a warming kick that contrasts delightful with the smoothness.
-
Creamy Avocado: Throw in a quarter of an avocado for extra creaminess and healthy fats. It also adds a unique flavor!
Chef’s Notes
This Tropical Pineapple Orange Smoothie has seen plenty of iterations in my kitchen. The first few times, I experimented with various fruits, experimenting until I found this heavenly combination that perfectly encapsulates that vibrant, tropical goodness.
I’ve had friends take one sip and immediately declare they’re “transported to an island paradise.” There’s something magical about food that brings people together, and this smoothie does just that! Plus, it’s a wonderful way to use up leftover fruit in your kitchen.
Fun fact: the idea of “smoothing” my ingredients came to fruition one chaotic morning when I realized I was running late for work. I threw everything in the blender, and voila! The rest is history.
FAQs and Troubleshooting
What’s the best way to store leftover smoothie?
If you have some smoothie left over—first, let me say, good for you! Store it in an airtight container in the refrigerator for up to 24 hours. Just give it a good shake or stir before enjoying again, as it may separate a bit.
Can I freeze this smoothie?
Absolutely! Pour the smoothie into ice cube trays to preserve the flavors. You can then toss the frozen smoothie cubes into your blender again for a super quick and icy treat down the road!
What if my smoothie is too thick?
If you find your smoothie is thicker than you’d like, just add a splash more coconut water or orange juice to loosen it up. Blend again until you reach your desired consistency.
Why is my smoothie not sweet enough?
The sweetness level is really down to personal preference and the ripeness of your fruits. If it’s not sweet enough for your taste, feel free to add more honey, maple syrup, or even a pitted date for an extra natural sweet kick!
Nutritional Info
This delightful smoothie serves as a refreshing breakfast option or a healthy snack. Full of vitamins A, C, and potassium, it provides a good balance of carbohydrates and protein, making it a nutritious choice for any time of day!
Enjoy this Tropical Pineapple Orange Smoothie whenever you crave sunshine in a glass. It’s sure to be a staple in your kitchen just like it is in mine! Happy blending! 🌴🍹
Print
Tropical Pineapple Orange Smoothie
- Total Time: 10 minutes
- Yield: 2 servings 1x
- Diet: Vegan
Description
A refreshing and nutritious smoothie packed with tropical flavors of pineapple and orange, perfect for kickstarting your day or keeping you cool.
Ingredients
- 1 cup Fresh Pineapple Chunks
- 1/2 cup Fresh Orange Juice
- 1 medium Banana
- 1/2 cup Greek Yogurt
- 1/2 cup Coconut Water
- 1–2 tablespoons Honey or Maple Syrup
- 1/2 cup Ice Cubes
Instructions
- Prepare the ingredients by peeling and chopping your pineapple and banana.
- Juice the oranges for half a cup of fresh orange juice.
- Add the pineapple chunks, orange juice, banana, Greek yogurt, coconut water, and honey or maple syrup to the blender.
- Blend on high speed for about 30 seconds until smooth.
- Adjust sweetness or thickness by adding more honey, yogurt, or coconut water as needed.
- Add ice and blend again until you reach your desired chill factor.
- Taste and adjust flavors before serving.
- Pour into a tall glass and serve with a slice of orange or pineapple.
Notes
This smoothie can also be stored in an airtight container in the refrigerator for up to 24 hours or frozen for later use.
- Prep Time: 10 minutes
- Cook Time: 0 minutes
- Category: Beverage
- Method: Blending
- Cuisine: Tropical
Nutrition
- Serving Size: 1 glass
- Calories: 250
- Sugar: 30g
- Sodium: 50mg
- Fat: 3g
- Saturated Fat: 1g
- Unsaturated Fat: 2g
- Trans Fat: 0g
- Carbohydrates: 56g
- Fiber: 5g
- Protein: 6g
- Cholesterol: 10mg
Keywords: smoothie, tropical, pineapple, orange, healthy drink, refreshing, vegan

McDonald’s strawberry banana smoothie
The Ultimate Homemade Strawberry Banana Smoothie: A Cozy Kitchen Adventure
Welcome back to my kitchen, food lovers! Today, I’m excited to share a delicious recipe that brings back so many fond memories—my homemade take on McDonald’s famous strawberry banana smoothie. There’s something so comforting about sipping on a smoothie that perfectly blends fruit flavors while also feeling indulgent and refreshing.
Whether you’re whipping up a quick breakfast, a snack between meals, or a post-workout treat, this smoothie is here to satisfy your cravings. Not only is it a delightful burst of flavor, but it’s also super simple to make with just a handful of ingredients! Trust me, once you’ve tried this homemade version, you’ll never be tempted by the drive-thru again.
Picture this: It’s a sunny Saturday morning, and I’ve just rolled out of bed, still in my pajamas, with the sweet scent of fresh strawberries wafting through the air. The blender is whirring, and I can hardly contain my excitement as the fruits and yogurt blend together, swirling into a vibrant pink potion. My little ones come running into the kitchen, their eyes lighting up as I pour the smoothie into their favorite cups. The joy on their faces as they take that first sip? Absolutely priceless!
So, grab your blender and let’s dive into this delightful recipe together!
A Nostalgic Sip
Growing up, my family adored weekend brunches where we’d experiment in the kitchen, mixing fruit, yogurt, and whatever else we could find. One summer, in a quest to recreate McDonald’s strawberry banana smoothie, we tried countless combinations until we finally hit the jackpot with a blend that was just right. I remember giggling with my siblings as we toasted to our creation—strumming our way through family photos while we enjoyed the smooth, creamy delight!
These days, whenever I whip up this strawberry banana treat, it puts me right back to those carefree days spent with my loved ones. It’s more than just a drink; it’s a memory-filled opportunity to gather, connect, and share life’s simple pleasures.
Ingredients
Let’s get to the good stuff—here’s what you’ll need to make this strawberry banana smoothie:
-
Fresh Strawberries (1 cup): The star of our show! Fresh strawberries add that delicious sweetness and vibrant color. If strawberries aren’t in season, feel free to use frozen ones—just thaw them slightly for better blending.
-
Banana (1 medium): This adds creaminess and natural sweetness to your smoothie. Spotty bananas are the ripest, making them perfect for blending. If you prefer a lower sugar option, consider using a smaller banana or half an avocado for creaminess without the sweetness.
-
Plain Yogurt (1/2 cup): This provides creaminess and a nice tang. Greek yogurt works wonderfully if you want more protein. For a dairy-free alternative, use coconut yogurt or almond yogurt.
-
Orange Juice (1/2 cup): A splash of orange juice brightens the flavors and adds some acidity. You can substitute it with apple juice or even a splash of almond milk if you prefer a different flavor.
-
Honey or Maple Syrup (1 tablespoon): Sweeten it up if needed! Adjust based on your taste and the sweetness of your fruits. For a vegan option, stick to pure maple syrup.
-
Ice (1 cup): This is optional, but it gives your smoothie a frosty texture. If you’re using frozen strawberries, you may not need extra ice at all!
Now that you’ve gathered everything you need, let’s blend our way to smoothie perfection!
Step-By-Step Instructions
-
Prep Your Ingredients: Start by washing your fresh strawberries under cold water. Remove the green tops and slice them in half to help with the blending. Peel your banana and chop it into smaller pieces.
Tip: If you want to save time, you can freeze bananas in advance. Just peel and slice them before freezing in a single layer on a baking sheet, then transfer to a bag or container once solid.
-
Combine Ingredients in Your Blender: Add the strawberries and banana pieces to the blender first. Pour in the yogurt and fresh orange juice. If you’re adding honey or maple syrup, toss that in too!
Chef Hack: Layering helps with blending. If you put denser ingredients at the bottom, it helps the blender do its job more effectively.
-
Blend, Blend, Blend: Secure the lid on your blender and blend on high speed until the mixture is smooth. Depending on your blender, this should take about 30 seconds to a minute. If it’s too thick, add a little more orange juice or some water; if it’s too thin, toss in another banana or some more yogurt.
Friendly Reminder: Stop and scrape down the sides of the blender if needed to make sure everything gets incorporated well!
-
Taste Test: Give your smoothie a quick taste. If you’d like it sweeter, add an extra drizzle of honey or maple syrup. Blend again for a few seconds to mix it in.
-
Serve in Style: Pour the smoothie into your favorite glasses or bowls. You can garnish with extra strawberry slices or a sprinkle of granola for an added crunch.
Pro Tip: If you’re feeling fancy, use a cocktail shaker to mix and chill your smoothie before serving—adds a touch of elegance!
Serving Suggestions
Serving a vibrant smoothie can be just as fun as making it! I love to pour mine into clear glass cups so guests can admire the lovely pink hues. A colorful straw or a cute paper umbrella can brighten things up, too! If you’re feeling creative, serve it in a bowl topped with fresh fruit, chia seeds, or crushed nuts for an Instagram-worthy breakfast or snack.
Recipe Variations
Looking to mix things up? Here are a few creative twists to try:
-
Tropical Twist: Swap out the strawberries for pineapple and add some shredded coconut for a tropical vibe.
-
Creamy Avocado: Add half an avocado for a creamier texture and a dose of healthy fats without altering the flavor much.
-
Nutty Banana: Stir in a spoonful of almond butter or peanut butter for that extra nutty flavor and a protein boost.
-
Green Power: Add a handful of spinach or kale for an extra nutrient punch! The fruit flavors will still dominate.
-
Berry Delight: Mix and match with blueberries or raspberries for a berry explosion!
Chef’s Notes
This strawberry banana smoothie has truly evolved over the years! Originally, it was just a simple mix of strawberries and bananas, but it gradually became a family favorite with all these fun variations. It always brings laughter and connection to our morning routine, even when life gets a bit hectic.
One of my favorite kitchen stories is the time I accidentally grabbed cayenne pepper instead of cinnamon while crafting a "spicy" smoothie. The reaction from my kids was priceless! They were brave enough to try it, but I quickly learned that a savory twist on sweet smoothies may not win hearts every time.
FAQs and Troubleshooting
1. Why is my smoothie too thick?
If your smoothie is too thick, try adding a little more liquid! Water, orange juice, or even almond milk work great. Blend again, and you should get a smoother consistency.
2. What if my smoothie is too thin?
If it’s too thin, you can add more fruit or yogurt to thicken it up. Frozen strawberries or a banana can help achieve that creamy texture!
3. Can I use frozen fruit instead?
Absolutely! Frozen fruit can actually make your smoothie even creamier. Just blend longer if you’re using frozen ingredients to achieve the perfect consistency.
4. How can I store leftover smoothie?
Store any leftover smoothie in an airtight container in the fridge. Try to drink it within 24 hours for the best flavor and freshness. If you want to save it for later, consider freezing it in ice cube trays for smoothies on-the-go!
Now, armed with this ultimate guide, I hope you feel inspired to create and enjoy your very own homemade strawberry banana smoothie. Remember, it’s all about creating memories and savoring the flavor of life—one delicious sip at a time. Cheers to cozy moments in the kitchen and delectable smoothies that bring joy to our days! Happy blending, friends!
Print
The Ultimate Homemade Strawberry Banana Smoothie
- Total Time: 10 minutes
- Yield: 2 servings
- Diet: Vegetarian
Description
A delightful homemade take on McDonald’s famous strawberry banana smoothie, perfect for breakfast or a refreshing snack.
Ingredients
- Fresh Strawberries (1 cup)
- Banana (1 medium)
- Plain Yogurt (1/2 cup)
- Orange Juice (1/2 cup)
- Honey or Maple Syrup (1 tablespoon)
- Ice (1 cup)
Instructions
- Prep your ingredients: Wash strawberries, remove tops and slice them. Peel and chop the banana.
- Combine ingredients in your blender: Add strawberries and banana, then pour in yogurt and orange juice. Add honey or maple syrup if desired.
- Blend the mixture on high speed until smooth, adjusting thickness with orange juice or water as needed.
- Taste test the smoothie and adjust sweetness if necessary before blending again.
- Serve in glasses or bowls, garnishing with extra strawberries or granola if desired.
Notes
For variations, try using pineapple, avocado, nut butter, or leafy greens for a different twist!
- Prep Time: 10 minutes
- Cook Time: 0 minutes
- Category: Beverage
- Method: Blending
- Cuisine: American
Nutrition
- Serving Size: 1 serving
- Calories: 250
- Sugar: 20g
- Sodium: 60mg
- Fat: 3g
- Saturated Fat: 1g
- Unsaturated Fat: 2g
- Trans Fat: 0g
- Carbohydrates: 50g
- Fiber: 4g
- Protein: 8g
- Cholesterol: 5mg
Keywords: smoothie, strawberry banana, healthy drink, breakfast, snack, easy recipe
Pineapple Orange Smoothie
Pineapple Orange Smoothie: A Taste of Sunshine in a Glass
Welcome to my delightful little corner of the kitchen! If you’ve ever craved a drink that feels like a warm hug on a sunny day, then you’re in just the right place. Today, I’m excited to share with you one of my all-time favorite smoothie recipes—a refreshing Pineapple Orange Smoothie. Whether you’re kicking off your day or winding down in the evening, this vibrant blend is guaranteed to brighten your mood and tantalize your taste buds.
Imagine standing in your kitchen, fresh fruit surrounding you, and the sweet scent of citrus filling the air. There’s something magical about blending simple, wholesome ingredients into a drink that radiates joy. The best part? It’s ridiculously easy to whip up, and you don’t need any fancy kitchen gadgets to do it. Just grab your blender, and let’s dive in!
This smoothie is more than just a drink; it’s a celebration of flavors. The sweetness of pineapple dances with the tang of fresh oranges, creating a symphony that feels like summer, no matter the season. Plus, it’s loaded with nutrients, making it a perfect pick-me-up for any time of the day. So, let’s get started on creating this sunshine in a glass!
A Sweet Memory: Chasing Summer Vibes
As I think about my love for smoothies, I’m transported back to my childhood summers spent visiting my grandparents in Florida. Their backyard was a tropical paradise filled with palm trees, colorful flowers, and the sound of cicadas buzzing in the warm air. Every afternoon, we would sneak into the kitchen to whip up the most refreshing smoothies out of whatever fresh fruit we could find.
It was during those carefree days that I first tasted the incredible combination of pineapple and orange. My grandma would blend the fruit with a splash of coconut milk, and we’d sip on our creations while lounging by the pool. The colors would swirl together like a sunset, and every sip tasted just like summer. These are the moments that inspired me to experiment in the kitchen, celebrating flavors from nature.
That’s why this Pineapple Orange Smoothie holds a special place in my heart. It’s not just a drink; it’s a link to those cherished memories and a way to recreate that joy in my own kitchen. I can’t wait for you to experience this delicious blend!
Ingredients
Here’s what you’ll need to bring this smoothie to life:
-
1 cup fresh or frozen pineapple chunks
Pineapple isn’t just delicious; it’s packed with vitamins and minerals. If you can’t find fresh, frozen works just as well. You can also substitute it with mango or papaya for a different tropical twist. -
1 medium ripe banana
Bananas add a creamy texture and natural sweetness. If you’re looking for a low-sugar option, try using half an avocado or 1/4 cup of Greek yogurt instead. -
1 cup fresh orange juice
Freshly squeezed is best for flavor! However, if you’re short on time, go for a good quality store-bought option. Just make sure it’s 100% pure orange juice without added sugars. -
1/2 cup coconut milk (canned or carton)
Coconut milk gives our smoothie that tropical touch! For a lighter option, you can use almond milk or oat milk. -
1 tablespoon honey or maple syrup (optional)
Depending on your sweetness preference, you might want to add a drizzle of honey or maple syrup. You can totally skip it if the fruits are sweet enough! -
A handful of ice
Ice is essential for that frosty, refreshing vibe. If you’re using frozen fruit, you might need less ice.
Step-by-Step Instructions
-
Prepare your ingredients:
Start by gathering all your ingredients. The fresher, the better! If using fresh pineapple, chop it into manageable chunks. Peel the banana and squeeze the oranges to get that juice flowing. Trust me; the preparation makes everything feel organized and more fun! -
Add the fruits to the blender:
Toss the pineapple chunks, banana, and any additional fruits into the blender first. I recommend layering soft fruits like banana on top of the harder ones to ensure even blending. -
Pour in the orange juice:
Next, add your freshly squeezed orange juice. The vibrant color and zesty aroma should immediately ignite your senses—what a glorious start! -
Combine the coconut milk:
Time for the creamy element! Add the coconut milk to the blender. If you prefer a thicker smoothie, lean toward canned coconut milk; if lighter is your goal, choose the carton version. -
Sweeten it up (if desired):
Whether you prefer it on the sweeter side or more tangy, give it a taste at this stage. Add a little honey or maple syrup if you want, but remember to adjust to your personal taste! -
Add ice and blend:
Finally, throw in a handful of ice, put the lid on tightly, and blend until smooth! You’re looking for a lovely, thick consistency that you can easily sip through a straw. If it’s too thick, add a touch more coconut milk or juice; if too runny, throw in more ice or frozen fruit. -
Taste test:
Here’s the fun part! Taste your creation and adjust if necessary. Want more zing? A squeeze of lemon or lime can brighten it up. Need it sweeter? Add a little more honey. -
Blend one last time:
Blend everything until you achieve that sexy, velvety texture. You’ll know it’s ready when you have a beautifully vibrant mix that’s all one gorgeous color!
Serving Suggestions
Pour your refreshing Pineapple Orange Smoothie into a tall glass or stylish mason jar. You can garnish it with a slice of orange on the rim or a few pineapple chunks for that inviting look. If you’re feeling extra fancy, sprinkle a few chia seeds or shredded coconut on top for added texture and flavor. Serve with a colorful straw and enjoy immediately while it’s cold and vibrant!
Recipe Variations
Ready to mix things up? Here are a few creative twists you can try with your Pineapple Orange Smoothie:
-
Tropical Greens: Toss in a handful of spinach or kale for a nutritious boost without compromising flavor. The greens make it a tad more vibrant and loaded with nutrients.
-
Berry Bliss: Replace half of the pineapple with strawberries or blueberries for a berry twist that adds antioxidants and a stunning color contrast.
-
Creamy Avocado: Substitute the banana with half an avocado, giving you a super creamy and rich texture that’s also heart-healthy.
-
Protein Boost: Add a scoop of your favorite protein powder or Greek yogurt for an extra dose of goodness.
-
Spiced Up: A pinch of ground ginger or turmeric can add a subtle warmth and a trendy health kick.
Chef’s Notes
Ah, this smoothie is so near and dear to my heart! There’s nothing quite like that blissful moment when you take your first sip and are instantly transported to your happy place. Over the years, I’ve tweaked this recipe countless times to suit my cravings and what I have on hand. Sometimes, I even make it into a smoothie bowl by adding toppings like granola, fresh fruit, and nuts.
And here’s a funny kitchen story: Once, I accidentally used lime juice instead of orange juice because my zestful self didn’t pay proper attention. Let me tell you, the result was a very interesting concoction. But hey, we all have our moments! It turned out to be a fun discovery because I added a splash of coconut, and it was a whole new creation.
FAQs and Troubleshooting
-
Why is my smoothie too thick?
If you find your smoothie too thick, simply add a little extra coconut milk or orange juice until you reach your desired consistency. -
Can I freeze this smoothie?
Absolutely! You can freeze any leftovers. Just pour it into an airtight container, and when you’re ready to enjoy, let it thaw for about 30 minutes or blend it again with a little added liquid. -
How do I make it dairy-free?
All the ingredients in this recipe are already dairy-free, mainly if you’re using coconut milk or almond milk. Always ensure any supplemental ingredients like protein powder are also dairy-free. -
Can I add other fruits?
Of course! This smoothie is versatile. Feel free to switch things up with your favorite fruits or whatever is in season for a truly unique blend.
Nutritional Info (Optional)
While the exact nutritional values may fluctuate based on ingredient brands and quantities, here’s a general idea of what a serving provides (about 1-2 cups):
- Calories: 210-250
- Protein: 4-6g
- Fat: 5-10g (depends on coconut milk)
- Carbohydrates: 40-50g
- Sugars: 30-35g (natural sugars from fruits)
Remember, dear foodie friends, cooking is an adventure filled with creativity and joy. This Pineapple Orange Smoothie is not only delightful for your taste buds but also a beautiful reminder of joyful moments spent in the kitchen. I can’t wait for you to recreate this in your home! Cheers to lazy mornings and sunny sips! 🍹✨
Print
Pineapple Orange Smoothie
- Total Time: 10 minutes
- Yield: 2 servings 1x
- Diet: Vegan
Description
A refreshing Pineapple Orange Smoothie that feels like a warm hug on a sunny day. This vibrant blend is perfect for brightening your mood and tantalizing your taste buds.
Ingredients
- 1 cup fresh or frozen pineapple chunks
- 1 medium ripe banana
- 1 cup fresh orange juice
- 1/2 cup coconut milk (canned or carton)
- 1 tablespoon honey or maple syrup (optional)
- A handful of ice
Instructions
- Prepare your ingredients: Gather all your ingredients and chop the pineapple into chunks. Peel the banana and squeeze oranges for juice.
- Add the fruits to the blender: Toss in the pineapple, banana, and any additional fruits.
- Pour in the orange juice: Add the freshly squeezed orange juice to the blender.
- Combine the coconut milk: Add the coconut milk for creaminess.
- Sweeten it up (if desired): Taste your mixture and add honey or maple syrup if needed.
- Add ice and blend: Throw in ice, blend until smooth, adjusting thickness as needed.
- Taste test: Taste your smoothie and adjust flavors as needed.
- Blend one last time: Blend until achieving a velvety texture.
Notes
You can substitute the banana with avocado for a creamier texture. This smoothie can also be frozen for later enjoyment.
- Prep Time: 10 minutes
- Cook Time: 0 minutes
- Category: Beverage
- Method: Blending
- Cuisine: American
Nutrition
- Serving Size: 1 serving
- Calories: 250
- Sugar: 35g
- Sodium: 40mg
- Fat: 8g
- Saturated Fat: 6g
- Unsaturated Fat: 2g
- Trans Fat: 0g
- Carbohydrates: 50g
- Fiber: 5g
- Protein: 4g
- Cholesterol: 0mg
Keywords: smoothie, pineapple, orange, refreshing, vegan

Peanut Butter Cup Restore Smoothie: A Bold Blend to Welcome Summer
Peanut Butter Cup Restore Smoothie: A Bold Blend to Welcome Summer
Hey there, fellow foodies! ☀️ Summer is finally here, and that means it’s time to soak up the sun, dive into refreshing flavors, and celebrate everything fresh and vibrant! At the heart of my kitchen is the love for creating delicious recipes that not only taste incredible but also nourish the soul. Today, I’m thrilled to share with you one of my go-to summer delights—the Peanut Butter Cup Restore Smoothie. Trust me, if you’re someone who loves the rich, creamy goodness of peanut butter and the playful sweetness of chocolate, this smoothie is going to be your new best friend!
This isn’t just another smoothie recipe; it’s a celebration of bold flavors and nourishing ingredients that provide a delightful boost to start your day or refuel after a workout. Imagine sipping on a velvety blend of nutritious ingredients, each sip wrapping you in a comforting hug of flavors. Whether you’re lounging by the pool or running out the door in the morning, this smoothie is perfect for crafting those sun-soaked vibes.
Making this smoothie is quick and easy, so no need to stress about fancy techniques or lengthy prep times. With just a handful of wholesome ingredients, you’ll be blending up a delicious treat that’ll have you feeling refreshed and energized. And the best part? You can customize it to suit your cravings! So roll up those sleeves (or just put on that messy apron), and let’s dive into the fantastic world of smoothies!
Personal Story
Ah, the memories my kitchen holds! I’ll always cherish those hot summer afternoons spent sweltering in my childhood kitchen. The faint sounds of the ice cream truck ring in the background as my little brother and I wiped our hands on the nearest towel after finishing a game of tag. Our go-to after-school treat—homemade smoothies, of course! My mom inspired me back then with her endless creativity. She would whip up concoctions of whatever was in the fridge, making it a fun surprise every time. One day, I came home to a smoothie that combined peanut butter and chocolate. My taste buds danced as each sip was smooth and dreamy!
Ever since then, peanut butter and chocolate have been my ultimate comfort pairing, symbolizing warmth and love through the years. Fast forward to today, and I’ve developed my own take on this nostalgic treat. With a few more superfood additions, I’ve transformed it into the Peanut Butter Cup Restore Smoothie—a creation that not only honors my childhood memories but also fuels my summer adventures. Now it’s your turn to add your own twist to this classic delight!
Ingredients
-
Banana: The perfect base for any smoothie! Bananas bring natural sweetness and creaminess. Can’t find ripe bananas? No worries! Frozen bananas work wonders, too!
-
Peanut Butter: The star of the show! Choose your favorite natural peanut butter, whether it’s creamy or crunchy. Just keep an eye on added sugars; you want to keep it as wholesome as possible.
-
Cacao Powder: For that rich chocolatey flavor! Cacao is packed with antioxidants, making it a healthier alternative to regular cocoa powder. If you’re in a pinch, unsweetened cocoa powder will do just fine.
-
Almond Milk (or your favorite milk): A fantastic dairy-free option! The light and nutty flavor of almond milk complements the peanut butter perfectly. If you prefer cow’s milk or oat milk, feel free to swap them in!
-
Greek Yogurt (or dairy-free alternative): Adds a delightful creaminess and boosts the protein content. You can use dairy-free yogurt, like almond or coconut yogurt, if you want a vegan option.
-
Honey (or maple syrup): Sweeten things up! Honey gives a lovely floral note, while maple syrup brings its own unique flavor. You can adjust the sweetness based on your preference.
-
Chia Seeds: A sprinkle of these nutrient-packed seeds adds fiber and omega-3s! If chia isn’t your preference, flax seeds or hemp seeds are great substitutes.
-
Ice: To chill and thicken! A big handful makes this smoothie refreshing and perfect for those hot summer days.
Step-by-Step Instructions
-
Gather Your Ingredients: First things first, gather all your ingredients so you’re ready to blend away! I always find that having everything laid out makes the process smoother and more enjoyable. Plus, it saves you from frantic searches halfway through!
-
Prep the Banana: If you’re using a fresh banana, peel it and break it into chunks. If you happened to go the frozen route, just pop those babies in the blender as is! Bananas add natural sweetness and creaminess that is irresistible.
-
Add the Peanut Butter: Spoon in about 2 tablespoons of peanut butter into your blender. Just a heads up—if you’re using a thicker variety, you may want to let it sit at room temperature for a few minutes to help it mix easily.
-
Mix in the Cacao Powder: Time to add 1–2 tablespoons of cacao powder! Don’t be afraid to taste as you go. Remember, you control the flavor profile, so adjust as needed!
-
Pour in the Almond Milk: Add approximately 1 cup of almond milk for a balanced consistency. If you like it a little thinner, go ahead and add a splash more! This is where your preference shines through.
-
In with the Yogurt: Scoop in half a cup of Greek yogurt to create that rich texture. It makes this smoothie decadent, trust me! For a thicker smoothie, add a bit more yogurt!
-
Sweeten it Up: If you like your smoothie on the sweeter side, drizzle in 1–2 teaspoons of honey or maple syrup. Always taste-test before adding more; you want the sweetness to complement, not overwhelm!
-
Add Chia Seeds and Ice: Toss in a tablespoon of chia seeds and a generous cup of ice. The ice will keep this smoothie refreshing, while the chia seeds bring an added crunch as they soak in all the deliciousness.
-
Blend: Secure the lid on your blender, and blend until smooth. Depending on your blender’s power, this could take 30 seconds to a minute. If it’s struggling or too thick, add a splash more milk—and let the blending magic happen!
-
Taste and Adjust: Here’s the fun part! Give your smoothie a taste. Want it sweeter? Add more honey! Need chocolate? Mix in more cacao! Adjust until it’s the way you love it.
-
Serve and Enjoy: Pour into your favorite glass, maybe top with a sprinkle of cacao or some chopped peanuts, and dive in! You’re officially a smoothie master!
Serving Suggestions
For a delightful presentation, consider serving your Peanut Butter Cup Restore Smoothie in mason jars or your favorite clear glasses. Add a colorful straw and top with a dusting of cacao powder, a few chopped peanuts, or even a dollop of whipped cream for that cozy touch. If you’re feeling extra fancy, garnish with a few banana slices or fresh berries on the side. Enjoy every last sip as you soak in those summer vibes!
Recipe Variations
-
Add Greens: Want to sneak in some nutrients? Toss a handful of spinach or kale into the mix—you won’t even taste it!
-
Protein Boost: Add a scoop of protein powder for extra muscle support after a workout or to keep you full longer.
-
Nut Butter Switch-Up: Swap out peanut butter for almond butter or sunflower seed butter for a twist on flavors while keeping it nutty.
-
Frozen Fruits: Consider adding ½ cup of frozen berries (such as strawberries or blueberries) for a berry-infused smoothie bursting with fresh flavor.
-
A Dash of Spice: Add a pinch of cinnamon or vanilla extract for an extra layer of warmth and depth.
Chef’s Notes
As a food blogger and a home cook, I hold onto these little stories that make cooking so magical. This recipe has evolved through experimentation, bringing together flavors, textures, and health benefits, all while holding on to that nostalgic love for peanut butter and chocolate. The beauty of this smoothie? It’s versatile! Feel free to swap ingredients based on what you have on hand. My own daughter loves it with a sprinkle of protein powder, while my best friend can’t resist tossing in a handful of greens for extra goodness. No matter how you make it, the essence of comfort and nourishment remains!
FAQs and Troubleshooting
Q: What can I use instead of Greek yogurt?
A: You can use any type of yogurt, including dairy-free options like almond or coconut yogurt. Smoothies are flexible!
Q: My smoothie is too thick; what should I do?
A: If your smoothie is thicker than you’d like, simply add a splash of almond milk or water and blend again until you reach your desired consistency.
Q: Can I make this smoothie vegan?
A: Absolutely! Use plant-based yogurt, almond milk, and maple syrup instead of honey for a delicious vegan treat.
Q: Can I store leftovers?
A: It’s best to enjoy this smoothie fresh, but if you have leftovers, store in an airtight container in the fridge for up to 24 hours. Just give it a good shake before enjoying!
Now, you’re armed with all the details to make your very own Peanut Butter Cup Restore Smoothie. I can’t wait for you to create it in your kitchen! Remember, cooking is all about having fun, being creative, and sharing love through food! Cheers to summertime sipping! 🍹🥜❤️
Print
Peanut Butter Cup Restore Smoothie
- Total Time: 10 minutes
- Yield: 2 servings 1x
- Diet: Vegetarian
Description
A rich and creamy smoothie combining peanut butter, chocolate, and nutritious ingredients for a refreshing summer treat.
Ingredients
- 1 Banana (fresh or frozen)
- 2 tablespoons Peanut Butter
- 1–2 tablespoons Cacao Powder
- 1 cup Almond Milk (or your favorite milk)
- 1/2 cup Greek Yogurt (or dairy-free alternative)
- 1–2 teaspoons Honey (or maple syrup)
- 1 tablespoon Chia Seeds
- 1 cup Ice
Instructions
- Gather your ingredients.
- Prep the banana by peeling and breaking it into chunks (or using frozen).
- Add the peanut butter to the blender.
- Mix in the cacao powder.
- Pour in the almond milk.
- In with the yogurt.
- Sweeten it up with honey or maple syrup.
- Add chia seeds and ice.
- Blend until smooth.
- Taste and adjust sweetness or chocolate level if needed.
- Serve in glasses and enjoy.
Notes
Customize with greens, protein powder, or frozen fruits for variations. Store leftovers in the fridge for up to 24 hours.
- Prep Time: 10 minutes
- Cook Time: 0 minutes
- Category: Beverage
- Method: Blending
- Cuisine: American
Nutrition
- Serving Size: 1 serving
- Calories: 300
- Sugar: 15g
- Sodium: 150mg
- Fat: 15g
- Saturated Fat: 4g
- Unsaturated Fat: 8g
- Trans Fat: 0g
- Carbohydrates: 35g
- Fiber: 6g
- Protein: 10g
- Cholesterol: 5mg
Keywords: smoothie, peanut butter, chocolate, summer, healthy

Strawberry Banana Milkshake
Strawberry Banana Milkshake: A Nostalgic Sip of Summer
Introduction
Hey there, friends! Welcome back to my cozy little corner of the internet! Today, we’re diving into one of my all-time favorite treats: the classic strawberry banana milkshake. If there’s one thing that brings back sweet childhood memories, it’s sitting in my grandma’s kitchen, watching her blend up this refreshing drink on a hot summer day. The way the creamy vanilla ice cream would swirl together with ripe bananas and luscious strawberries was pure magic, and I couldn’t wait to get my hands on the first frosty glass.
As the blender whirred, I could feel the anticipation building. There was something about that bright pink color and the sugary-sweet aroma that made my heart skip a beat! Whenever we made milkshakes, it became a mini celebration — a reason to gather, to laugh, and to indulge. Now, I’m all grown up, but the delight of a homemade milkshake still captures my heart in the same way.
This strawberry banana milkshake isn’t just a delicious, creamy treat; it also holds the power to revive those fond memories and connect us with the people we care about. It’s a perfect pick-me-up for any occasion—whether you’re enjoying an afternoon snack, hosting friends for brunch, or just treating yourself on a lazy Sunday.
So grab your apron and let’s get shaking! We’re about to blend up something fantastic that will leave you craving more. Whether you’re channeling your inner child or trying your hand at homemade shakes for the first time, I’ve got everything you need right here. Trust me, once you whip this up, you’ll be dreaming of summer days all year long!
Personal Story
I remember it vividly—the sweltering summer afternoons spent at my grandmother’s house. It was one of those days when the sun blazed in the sky, and the air was sticky with the promise of heat. Grandma, with her ever-present apron tied around her waist, would announce, “It’s milkshake time!” And just like that, the world outside vanished as we gathered around her well-loved kitchen counter.
With a mischievous twinkle in her eye, she would pull out the blender and start tossing in fresh strawberries, creamy bananas, and a healthy scoop of vanilla ice cream. As a kid, I was tasked with the all-important duty of taste-testing—it was a responsibility I took very seriously! I can still recall the exhilarating blend of sweetness and creaminess that danced on my taste buds, with the burst of strawberry flavor taking the lead. Grandma always added a splash of milk and a hint of vanilla to enhance the flavors, and she had a knack for getting the consistency just right: not too thick but perfectly sippable.
These milkshake moments weren’t just about the drink; they were about connection, laughter, and creating memories that I cherish to this day. So when I whip up my own strawberry banana milkshake now, it’s like a delicious time capsule that transports me back to those warmer days filled with love, laughter, and the pure joy of being together.
Ingredients
To bring this wonderful milkshake to life, you’ll need the following ingredients. Don’t worry—this list isn’t intimidating at all!
-
Fresh Strawberries (1 cup): Sweet, juicy strawberries are the star of the show. Look for ripe ones that have a bright red color and a sweet aroma. If you don’t have fresh berries, feel free to use frozen ones—just slightly adjust the amount of milk since frozen berries can release water as they thaw!
-
Ripe Bananas (1 medium): A perfectly ripe banana adds a natural sweetness and creamy texture. Choose one that has small brown speckles; this indicates it’s at peak sweetness and flavor. If you’re out of bananas, use ½ cup of yogurt instead for a creamy base.
-
Vanilla Ice Cream (2 scoops): The creamy element that elevates this milkshake to indulgent heights! You can use any flavor you like, but the classic vanilla pairs beautifully with strawberry and banana. If you’re looking for a lighter option, consider Greek yogurt or dairy-free ice cream.
-
Milk (½ cup, adjust to preference): Whole milk offers a rich consistency, but any milk (almond, oat, or coconut) will work. You can adjust the amount depending on how thick or thin you prefer your milkshake. Start with less and add more if needed!
-
Vanilla Extract (1 teaspoon): A splash of vanilla extract brings all the flavors together and adds warmth. If you don’t have vanilla extract, almond extract could impart a unique flavor twist.
-
Whipped Cream (optional for topping): For that classic indulgent touch! Homemade whipped cream takes it to the next level, but store-bought is perfectly fine too.
Step-by-Step Instructions
Ready to blend up some nostalgia? Let’s jump into the steps!
-
Prep Your Ingredients: Start by washing your strawberries. Remove the green tops using a small knife or your fingers, then slice the strawberries to help them blend smoothly. Peel your banana and slice it into rounds for easier blending.
Chef Tip: Make sure your fruits are at room temperature for the best flavor. Cold ingredients can dull the taste, so let them sit out for a bit if they’ve been in the fridge!
-
Blend the Base: In a blender, combine the sliced strawberries and bananas. Add in two generous scoops of vanilla ice cream. Yes, this is the time to be generous—treat yourself!
Commentary: The key to a well-blended milkshake is to layer your ingredients in this order. Fruits first help them get blitzed right up against the blades, ensuring no chunky bits are left.
-
Add the Milk: Pour in about ½ cup of milk and the teaspoon of vanilla extract. This will help create that creamy, sippable consistency.
Chef Hack: If you want a super-thick milkshake, start with less milk and gradually add more during blending until you reach the desired thickness.
-
Blend Away: Secure the lid on your blender and blend on high speed for about 30 seconds to a minute. You want everything to be beautifully mixed—no banana chunks! If needed, give it a shake halfway through and keep blending until smooth.
Tip: If it’s too thick, add more milk a splash at a time; if too runny, toss in a bit more ice cream or a few extra berries.
-
Taste Test: Here’s the best part—grab a spoon and taste your creation! Adjust sweetness by adding a tiny bit of honey or sugar if necessary.
-
Serve: Pour your divine milkshake into tall glasses. Work your magic when pouring—let the creaminess cascade down the sides.
Chef Insight: Feel free to use a fancy glass if you’re feeling extra! Presentation can elevate the experience, even in your own kitchen!
-
Garnish: Top it off with a swirl of whipped cream and sprinkle some crushed strawberries or chocolate shavings, if you’re feeling indulgent.
Serving Suggestions
When it comes to serving your delightful strawberry banana milkshake, the options are endless! You can top it off with a dollop of whipped cream, drizzle some chocolate or caramel syrup, and sprinkle crushed nuts for a crunchy twist. Serve it alongside a slice of your favorite cake or some freshly baked cookies for a delicious dessert platter. If you’re entertaining, consider making milkshake flights with different flavors to wow your guests!
Recipe Variations
-
Peanut Butter Banana Milkshake: Add a couple of tablespoons of creamy peanut butter for a nutty twist that pairs perfectly with banana.
-
Chocolate Strawberry Banana Milkshake: Mix in a tablespoon of chocolate syrup or cocoa powder for a chocolatey spin.
-
Dairy-Free Delight: Use almond milk, coconut ice cream, and agave instead of regular milk and ice cream for a creamy, dairy-free version.
-
Berry Blast: Replace some of the strawberries with blueberries or blackberries for a mixed berry delight.
-
Protein Power: Sneak in a scoop of protein powder to turn this treat into a post-workout shake without sacrificing taste!
Chef’s Notes
I love how this strawberry banana milkshake recipe has evolved over the years! It started as a simple summer treat and has now turned into a versatile base for creativity. I remember a kitchen disaster when I accidentally added too much vanilla extract—my shake turned out almost too fragrant. I laughed about it, but hey, these little moments remind me why cooking is so fun! After all, cooking is about experimentation, learning, and having joy in the process, even when things don’t go exactly as planned.
FAQs and Troubleshooting
1. My milkshake is too thick! What can I do?
Simply add a little more milk, one tablespoon at a time, and blend until you reach the desired consistency.
2. Can I make this milkshake in advance?
While fresh is best, you can prepare all your ingredients and store them in the fridge for up to a few hours before blending. If making ahead, consider storing the blended shake for a short time in the fridge, but it might need a stir and a bit more milk to bring it back to life!
3. What if I don’t have ripe bananas?
Using a frozen banana or a splash of banana extract can help replicate that sweetness and flavor—just adjust the added sugar accordingly!
4. How can I make a lower-sugar version?
You can swap out the ice cream for a yogurt base or use unsweetened almond milk with a little bit of honey or stevia for sweetening. You can also reduce the amount of strawberries!
Now that you’ve got all the essential tips and tricks, why not grab your blender and whip up this delightful strawberry banana milkshake? It’s not just a recipe; it’s an experience waiting to unfold! Cheers to savoring every sweet sip! 🍓🥤
Print
Strawberry Banana Milkshake
- Total Time: 10 minutes
- Yield: 2 servings 1x
- Diet: Vegetarian
Description
A classic strawberry banana milkshake that brings back sweet childhood memories, blending creamy vanilla ice cream with fresh strawberries and ripe bananas for a refreshing treat.
Ingredients
- 1 cup Fresh Strawberries
- 1 medium Ripe Banana
- 2 scoops Vanilla Ice Cream
- ½ cup Milk (adjust to preference)
- 1 teaspoon Vanilla Extract
- Whipped Cream (optional for topping)
Instructions
- Prep your ingredients: Wash strawberries, remove tops, and slice. Peel and slice banana.
- Blend the base: Combine strawberries and bananas in a blender with vanilla ice cream.
- Add the milk and vanilla extract.
- Blend on high speed for 30 seconds to a minute until smooth.
- Taste and adjust sweetness if necessary.
- Serve the milkshake in tall glasses.
- Garnish with whipped cream and optional toppings.
Notes
Adjust the milk to achieve your desired thickness. Use frozen strawberries if fresh ones aren’t available.
- Prep Time: 10 minutes
- Cook Time: 0 minutes
- Category: Beverage
- Method: Blending
- Cuisine: American
Nutrition
- Serving Size: 1 serving
- Calories: 300
- Sugar: 40g
- Sodium: 100mg
- Fat: 10g
- Saturated Fat: 6g
- Unsaturated Fat: 4g
- Trans Fat: 0g
- Carbohydrates: 45g
- Fiber: 3g
- Protein: 5g
- Cholesterol: 30mg
Keywords: milkshake, strawberry, banana, summer drink, nostalgic dessert


