
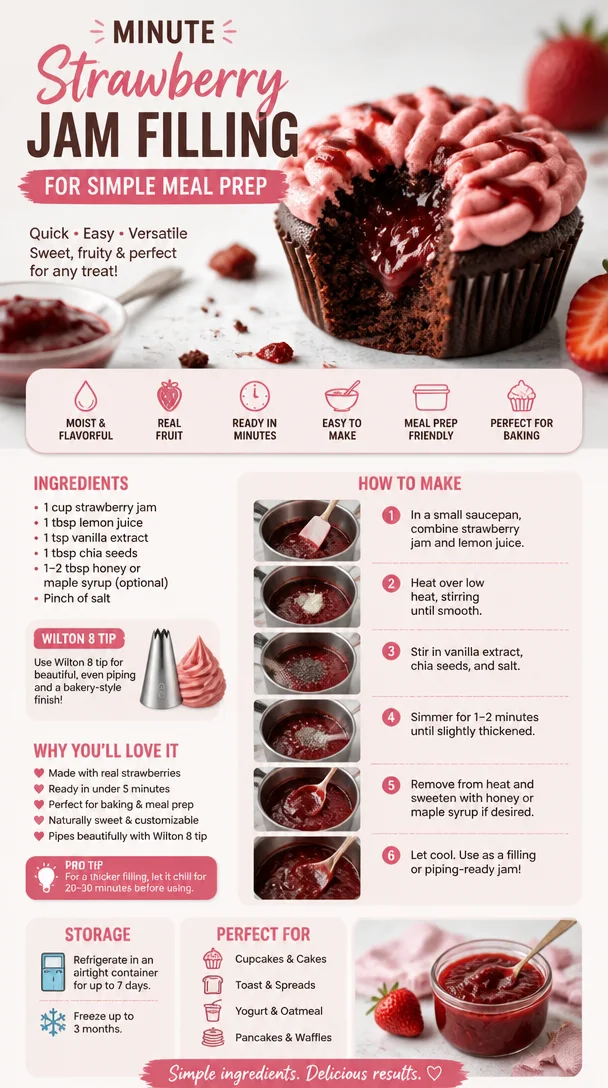
Minute Strawberry Jam Filling for Simple Meal Prep
The Sweetness of Homemade Strawberry Jam Filling: A Heartfelt Guide
Welcome back to my cozy kitchen! It’s Olivia Bennett here, guiding you through a delightful culinary journey that celebrates one of my favorite treats—homemade strawberry jam filling. There’s nothing quite like the joy of spreading freshly made jam on a warm scone, a slice of toasted bread, or even dolloping it atop a luscious cake—yum! Today, we’ll explore not only how to make this delicious filling from scratch but also why it’s a beloved tradition in many homes (including mine).
The scent of strawberries simmering on the stove reminds me of lazy summer afternoons spent in my grandmother’s kitchen. As a child, I would watch her work with a twinkle in her eye, guiding me through each step with love and laughter. "The secret," she would say, "is to use the ripest strawberries you can find. They’re nature’s candy!" The sweet, sticky mixture bubbling away would fill the room with a fragrance that made my mouth water, and I couldn’t wait to taste the final product.
Today, let’s keep that nostalgia alive as we create a vibrant strawberry jam filling that’s sure to become a treasured recipe in your home as well. Not only does it make for a fantastic addition to pastries, desserts, and breakfast items, but it also carries that personal touch that store-bought versions simply can’t compete with. Grab your apron, and let’s get cooking!
A Taste of Nostalgia: My Strawberry Jam Story
Growing up, summer meant strawberry picking with my family. My siblings and I would race each other through the rows of berry-laden plants, eager to fill our baskets with plump, juicy strawberries. It was a tradition that brought us closer, filled our afternoons with sunshine, and rewarded us with the sweetest of treats.
Once we had our bounty, we’d head home, sweaty and giggly, only to dive into my grandmother’s kitchen, where the magic happened. I recall the excitement of watching her cook the strawberries down with sugar, their color deepening into a ruby red as the sweet scent enveloped us. Every spoonful of that warm strawberry jam seemed to hold the essence of our summer adventures, and each jar we sealed was a treasure that would last through the year.
Today, I still make strawberry jam using the same recipe, infused with those delightful memories, and I can’t wait for you to create your own unforgettable experiences with this filling!
Ingredients
Here’s what you’ll need to whip up this luscious strawberry jam filling:
- 2 pounds fresh strawberries: The stars of the show! Look for ripe, sweet strawberries for the best flavor. If strawberries aren’t in season, you can substitute with frozen, thawed strawberries, but ensure they retain some natural sweetness.
- 1 cup granulated sugar: This sweetness balances the tartness of the strawberries. Feel free to use less sugar or sugar substitutes like honey or maple syrup if you prefer.
- 1 tablespoon lemon juice: This adds brightness and helps preserve the color of the strawberries. Freshly squeezed lemon juice is best, but bottled lemon juice works too.
- 1 teaspoon vanilla extract (optional): A touch of vanilla enhances the flavors! You can even use almond extract for a slightly different twist.
- 1 packet fruit pectin: Pectin helps the jam set perfectly. You can use either powdered or liquid based on your preference, and some brands even come low-sugar options.
Step-by-Step Instructions
Step 1: Prepare the Strawberries
Start by washing the strawberries thoroughly under cold water. Remove the green tops and hull the strawberries—this means cutting away the stem and the white part just beneath it. You can slice them in half for quicker cooking, or if you prefer a chunkier texture, leave them intact.
Chef’s Tip: Use a paring knife to hull the strawberries easily, creating a nice, clean cut without wasting fruit!
Step 2: Macerate the Strawberries
Place your cleaned strawberries in a large mixing bowl. Sprinkle the cup of granulated sugar over them, and add the tablespoon of lemon juice. Gently toss the strawberries until they’re all coated in sugar. Let them sit for about 30 minutes. This step draws out the natural juices from the fruit and creates a syrupy mixture that is bursting with flavor!
Chef’s Insight: This process of maceration not only enhances the strawberry flavors but also allows the sugar to dissolve, leading to a smoother jam.
Step 3: Cook the Mixture
Transfer the macerated strawberries into a large saucepan over medium heat. Bring the mixture to a gentle boil, stirring frequently to prevent sticking. Once boiling, add the pectin packet, mixing well to incorporate it into the strawberries effectively.
Chef Hack: If you prefer a smoother consistency, consider using an immersion blender to purée the strawberries to your desired texture!
Step 4: Let it Simmer
Allow the mixture to simmer for about 15-20 minutes, continuing to stir frequently. You’ll notice the mixture thickening and bubbling up like magic. Keep an eye on it to avoid any sticking or burning.
Pro Tip: To check if your jam is ready, place a small amount on a chilled plate. If it holds its shape after a minute, it’s time to turn off the heat!
Step 5: Bottle It Up
Once your jam has reached the desired consistency, carefully ladle it into sterilized jars. Leave a little headspace at the top. Seal the jars with lids while the jam is still hot, and invert them for a few minutes to help create a vacuum seal.
Chef’s Note: Proper sealing will help preserve the freshness of your jam for longer, and these little jars make for lovely gifts!
Step 6: Cool and Store
Let your jars cool completely at room temperature before storing them in the fridge or pantry. Your homemade strawberry jam filling is now ready to shine in all your favorite recipes!
Serving Suggestions
When it comes to serving your homemade strawberry jam filling, the possibilities are endless! Spread it generously on toast, use it as a layer in sponge cakes, or fill pastries for a dessert that will have everyone returning for seconds. You can also swirl it into yogurt or oatmeal for a splash of fruity goodness. If you’re feeling adventurous, try it in savory dishes, like glazing grilled chicken or pork to add a sweet twist!
Recipe Variations
Here are a few fun variations to make your strawberry jam uniquely yours:
- Strawberry Lemon Jam: Add an extra zing by increasing the lemon juice to 2 tablespoons.
- Balsamic Strawberry Jam: Stir in a splash of balsamic vinegar for a sophisticated touch that pairs beautifully with cheese.
- Spiced Strawberry Jam: Infuse with spices like cinnamon or ginger for a warm flavor profile—perfect for fall!
- Strawberry-Basil Jam: Fold in a handful of fresh basil leaves at the end of cooking for a fragrant herbaceous twist.
Chef’s Notes
Every time I make this strawberry jam filling, it’s a warm reminder of love, family, and tradition. Some days, I can hear my grandmother’s voice in my head, guiding me through the steps while I craft this rich blend of flavors. Over the years, I’ve tweaked this recipe to suit my preferences—adding a hint of vanilla one day or tossing in a few raspberries on another for fun.
Cooking is about creativity and exploration, so don’t hesitate to make it your own!Each jar of jam captures not just flavors but also sweet moments, waiting to be shared with those you love.
FAQs and Troubleshooting
-
Why didn’t my jam set?
If your jam is too runny, you may need to cook it a little longer, letting it reach a higher temperature for more evaporation. If using pectin, make sure you followed the quantity correctly! -
Can I use frozen strawberries?
Yes, frozen strawberries are a great option! Just thaw them completely and drain any excess liquid before following the normal steps. -
How long does this jam last?
Properly sealed and stored in a cool place, your homemade strawberry jam can last up to a year in the pantry and a few months in the fridge after opening. -
Is it safe to use jars that don’t seal?
If a jar doesn’t seal, it’s best to refrigerate it and use it within a few weeks. You can also reprocess the jam into a new jar with a new lid for better sealing.
Nutritional Info
Though I haven’t provided specific nutritional information, homemade strawberry jam is generally light and can be enjoyed in moderation. It provides a good dose of vitamin C from the fresh strawberries, with sugar adding sweetness to your meals.
With this guide, you’re now equipped to bring the sweetness of homemade strawberry jam filling into your kitchen. I hope you recreate these cherished memories and make it a family tradition of your own. Happy cooking, my fellow foodies! 🍓💖
Print
Homemade Strawberry Jam Filling
- Total Time: 50 minutes
- Yield: 4 cups 1x
- Diet: Vegetarian
Description
A delightful homemade strawberry jam filling, perfect for spreading on toast or using in desserts, capturing the essence of summer in every jar.
Ingredients
- 2 pounds fresh strawberries
- 1 cup granulated sugar
- 1 tablespoon lemon juice
- 1 teaspoon vanilla extract (optional)
- 1 packet fruit pectin
Instructions
- Prepare the strawberries by washing them and removing the green tops.
- Macerate the strawberries with sugar and lemon juice, then let sit for 30 minutes.
- Cook the strawberries over medium heat until boiling, then add the pectin.
- Let the mixture simmer for 15-20 minutes, stirring frequently.
- Bottle the jam into sterilized jars, leaving headspace.
- Cool the jars at room temperature before storing them.
Notes
For variations, consider adding more lemon juice, balsamic vinegar, or spices for unique flavors.
- Prep Time: 30 minutes
- Cook Time: 20 minutes
- Category: Spread
- Method: Canning
- Cuisine: American
Nutrition
- Serving Size: 2 tablespoons
- Calories: 50
- Sugar: 12g
- Sodium: 1mg
- Fat: 0g
- Saturated Fat: 0g
- Unsaturated Fat: 0g
- Trans Fat: 0g
- Carbohydrates: 13g
- Fiber: 1g
- Protein: 0g
- Cholesterol: 0mg
Keywords: strawberry jam, homemade jam, jam filling, preserves, summer recipes
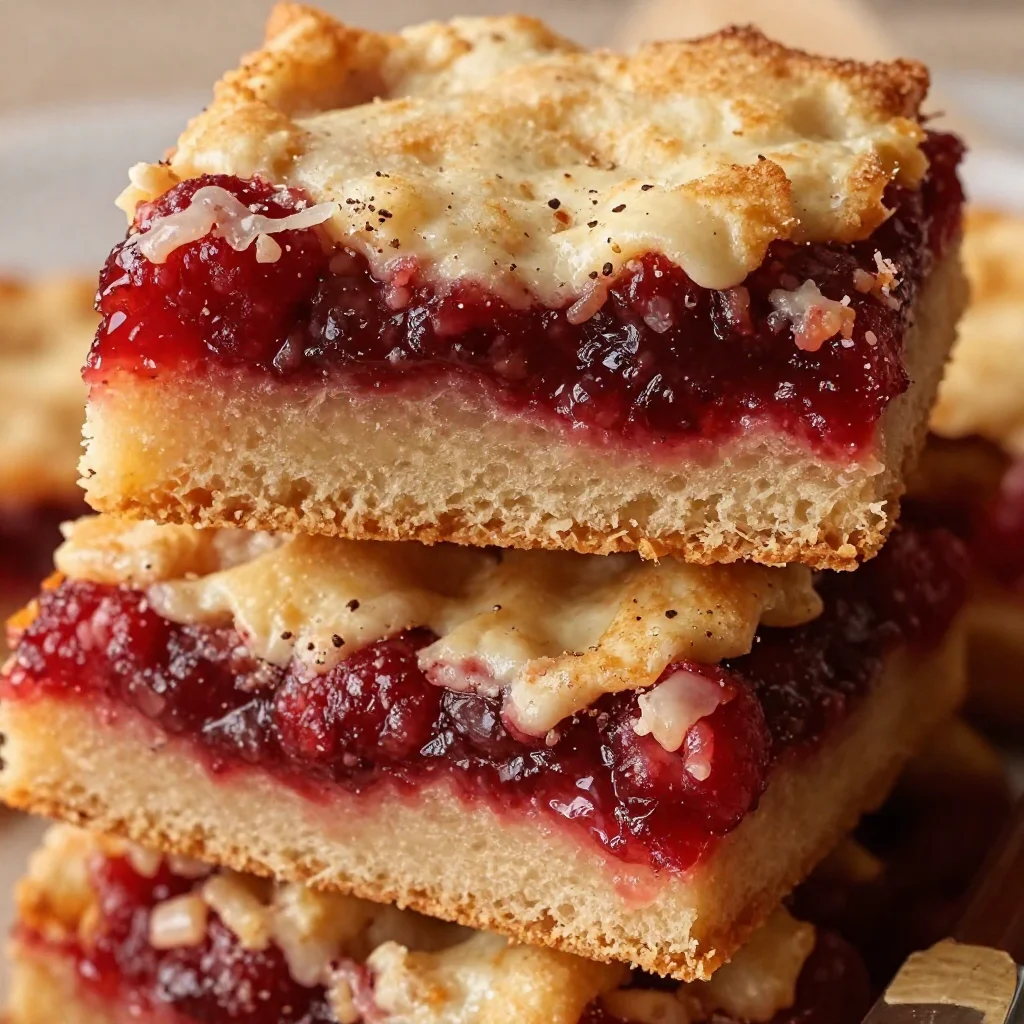
Fabulous Five Ingredient Raspberry Bars
Fabulous Five Ingredient Raspberry Bars: A Sweet Slice of Heaven
Welcome back to my cozy kitchen! Today, I’m thrilled to share with you a sweet treat that’s as easy to whip up as it is delicious: Fabulous Five Ingredient Raspberry Bars. These bars are bursting with rich raspberry flavor, and the best part? They come together with just five simple ingredients. Yes, you heard that right! We’re all about simplicity here, and trust me, this easy dessert will impress your family and friends.
There’s something magical about summer berries, and raspberries have always held a special place in my heart. They evoke fond memories of warm afternoons spent at my grandmother’s house, where we would pick wild raspberries from her garden and make our way to the kitchen, giggling and sneaking a few tangy morsels as we went. My grandmother had a way of turning simple ingredients into something extraordinary, and I aspire to do the same in my own kitchen.
Let’s dive into the joy of creating these delightful Raspberry Bars together! You’ll find that with just five ingredients, a little bit of love, and the warmth of your kitchen, you’ll not only create a scrumptious dessert but also a moment to cherish with those you love.
A Sweet Childhood Memory
Thinking back to those summer days in my grandmother’s kitchen, I can almost smell that sweet and slightly tart aroma of raspberry jam bubbling away on the stove. Every summer, we would make her famous raspberry bars, a recipe that had been passed down for generations. I remember the excitement of smashing those tart berries and mixing them with sugar, watching the transformation as they turned into a glossy filling ready to be spread over buttery crumbles. The best part was waiting for the bars to cool down before cutting into them, the anticipation almost too much to handle!
These bars not only filled our tummies but also filled our hearts with laughter, stories, and memories that would last a lifetime. It’s so much more than just a recipe; it’s a piece of nostalgia that I carry with me. Today, I want to pass on that love and joy to you through this simple, yet oh-so-delicious raspberry bar recipe.
Ingredients
Here’s what you’ll need to create these delightful bars:
-
Fresh Raspberries (2 cups): The star of the show! Use fresh berries for the best flavor. If raspberries are out of season, you can use frozen ones, just make sure to thaw and drain them first to avoid excess moisture.
-
Granulated Sugar (1 cup): Sweetness is key! Feel free to adjust the sugar level depending on your taste preferences. You could swap out regular sugar for coconut sugar or use a sugar substitute for a healthier option.
-
All-Purpose Flour (2 cups): The backbone of our crumbly crust and topping! If you’re gluten-free, a 1:1 gluten-free flour mix works wonderfully here.
-
Unsalted Butter (1 cup, softened): This adds that rich, creamy flavor to your bars. Don’t have unsalted butter? You can use salted butter instead, just reduce any added salt in the recipe.
-
Baking Powder (1 teaspoon): This little helper gives your bars a light texture. If you’re out of baking powder, you can substitute it with baking soda and an acid (like lemon juice or vinegar) in a 1:1 ratio.
Now that you have everything ready, let’s explore how to turn these simple ingredients into a masterpiece!
Step-by-Step Instructions
-
Preheat the Oven: Begin by preheating your oven to 350°F (175°C). This will ensure your bars bake evenly from start to finish.
-
Prepare the Baking Pan: Grease a 9×13-inch baking dish with a bit of butter or line it with parchment paper for easy removal. Trust me, you want your bars to come out neatly for the perfect slice!
-
Make the Crust Mixture: In a large mixing bowl, combine 1 cup of flour, ½ cup of sugar, and ¼ cup of softened butter. Mix together using a pastry cutter or your fingers until it resembles coarse crumbs. The texture should look a bit like sand with some larger pea-sized clumps. It’s okay to get a little messy!
-
Press into the Pan: Take about two-thirds of this crust mixture and evenly press it into the bottom of your prepared pan. This crust is the foundation for your bars, so make sure it’s snug and even.
-
Prepare the Raspberry Filling: In a medium bowl, toss your fresh raspberries with ½ cup of sugar and 1 cup of flour. The flour will help absorb excess liquid from the berries during baking, preventing your bars from becoming too soggy.
-
Spread the Filling: Pour the raspberry filling over the crust in the baking pan, spreading it evenly. The sweet and tangy aroma of the raspberries will make your mouth water!
-
Top with Crumb Mixture: Take the remaining crust mixture and sprinkle it evenly over the raspberry filling. As it bakes, this will create that delightful crumbly topping we all love.
-
Bake: Place the pan in your preheated oven and bake for 30-35 minutes, or until the top is golden brown and the filling is bubbling. Keep an eye on it, as oven times can vary!
-
Cool Down: Once baked, take it out of the oven and allow it to cool in the pan for about 10-15 minutes. Then transfer it to a wire rack to cool completely. Patience is key here; you don’t want to cut into these babies while they’re still warm!
-
Slice and Serve: Once cooled, cut the bars into squares or rectangles, depending on your preferred serving size. Dust with powdered sugar for an elegant finish, and enjoy a well-deserved slice of raspberry bliss!
Serving Suggestions
These Fabulous Five Ingredient Raspberry Bars are perfect for any occasion! Serve them as a sweet snack at your next picnic, as a delightful dessert for family gatherings, or even for a cozy night in with a cup of tea. Plated neatly on a decorative dish and dusted with powdered sugar, they make for a stunning presentation that’s sure to impress your guests.
Recipe Variations
-
Lemon Zest: Add a tablespoon of lemon zest to the raspberry filling for a bright, zesty kick.
-
Nutty Twist: Mix in some chopped nuts (like almonds or walnuts) into your crumb mixture for an added crunch.
-
Coconut Flakes: Sprinkle unsweetened coconut flakes on top before baking for a tropical twist.
-
Vegan Option: Substitute the butter with coconut oil and use a flax egg (1 tablespoon flaxseed meal mixed with 3 tablespoons of water) instead of the egg for a plant-based option.
-
Chocolate Drizzle: Enhance the flavor with a drizzled dark chocolate ganache over the cooled bars for a decadent finish.
Chef’s Notes
This recipe has evolved over my years of cooking, inspired by the classic raspberry bars my grandmother made. Initially, I experimented with different fruits, but raspberries always came out on top. I have fond memories of baking these with my kids, who were more interested in snacking on raw raspberries than waiting for the bars to cool. If you have little sous chefs at home, get them involved! They might just become your best kitchen helpers.
I’ve also learned that making these bars is not just about the end result but the joy of the process. So, don’t sweat the small stuff! Embrace the mess, share a laugh with loved ones, and create sweet memories along the way.
FAQs and Troubleshooting
1. My bars turned out too soggy. What went wrong?
This can happen if the berries were too juicy or if they weren’t drained properly (if using frozen). To fix this in the future, make sure to use fresh, firm raspberries, and drain any excess liquid if using frozen ones.
2. Can I use another type of berry?
Absolutely! Blueberries, blackberries, or even strawberries would work wonderfully. Just keep in mind that the sweetness may vary based on the fruit you choose.
3. How do I store leftovers?
Store any leftover bars in an airtight container in the fridge for up to a week, or freeze them for up to three months. Just make sure to thaw them overnight in the fridge before serving.
4. Can I double the recipe?
Yes! You can easily double the ingredients and use a larger baking dish for a bigger batch, perfect for gatherings or potlucks.
Nutritional Info (optional)
While I didn’t dive into the specific nutritional facts this time, feel free to use a nutrition calculator to analyze the ingredients based on your dietary needs!
There you have it! A delightful, easy-to-follow recipe for Fabulous Five Ingredient Raspberry Bars that not only pleases the taste buds but also warms the heart. I hope you dive into this recipe and enjoy every bite as much as I do! Happy baking! 🍰✨
Print
Fabulous Five Ingredient Raspberry Bars
- Total Time: 50 minutes
- Yield: 12 servings
- Diet: Vegetarian
Description
These Raspberry Bars are a delicious dessert featuring fresh raspberries and a crumbly crust, perfect for any occasion!
Ingredients
- Fresh Raspberries (2 cups)
- Granulated Sugar (1 cup)
- All-Purpose Flour (2 cups)
- Unsalted Butter (1 cup, softened)
- Baking Powder (1 teaspoon)
Instructions
- Preheat the Oven to 350°F (175°C).
- Prepare the Baking Pan by greasing a 9×13-inch baking dish with butter or lining it with parchment paper.
- Make the Crust Mixture by combining 1 cup of flour, ½ cup of sugar, and ¼ cup of softened butter until coarse crumbs form.
- Press about two-thirds of the crust mixture into the bottom of the prepared pan.
- Prepare the Raspberry Filling by tossing fresh raspberries with ½ cup of sugar and 1 cup of flour.
- Spread the raspberry filling over the crust evenly.
- Top with the remaining crust mixture.
- Bake for 30-35 minutes, or until golden brown and bubbling.
- Cool in the pan for 10-15 minutes, then transfer to a wire rack to cool completely.
- Slice into squares or rectangles and dust with powdered sugar before serving.
Notes
These bars can be enjoyed as a sweet snack or a delightful dessert. Feel free to adjust sugar levels to taste.
- Prep Time: 15 minutes
- Cook Time: 35 minutes
- Category: Dessert
- Method: Baking
- Cuisine: American
Nutrition
- Serving Size: 1 bar
- Calories: 200
- Sugar: 10g
- Sodium: 150mg
- Fat: 8g
- Saturated Fat: 5g
- Unsaturated Fat: 2g
- Trans Fat: 0g
- Carbohydrates: 28g
- Fiber: 2g
- Protein: 2g
- Cholesterol: 20mg
Keywords: raspberry bars, dessert, easy recipe, summer treats, baking
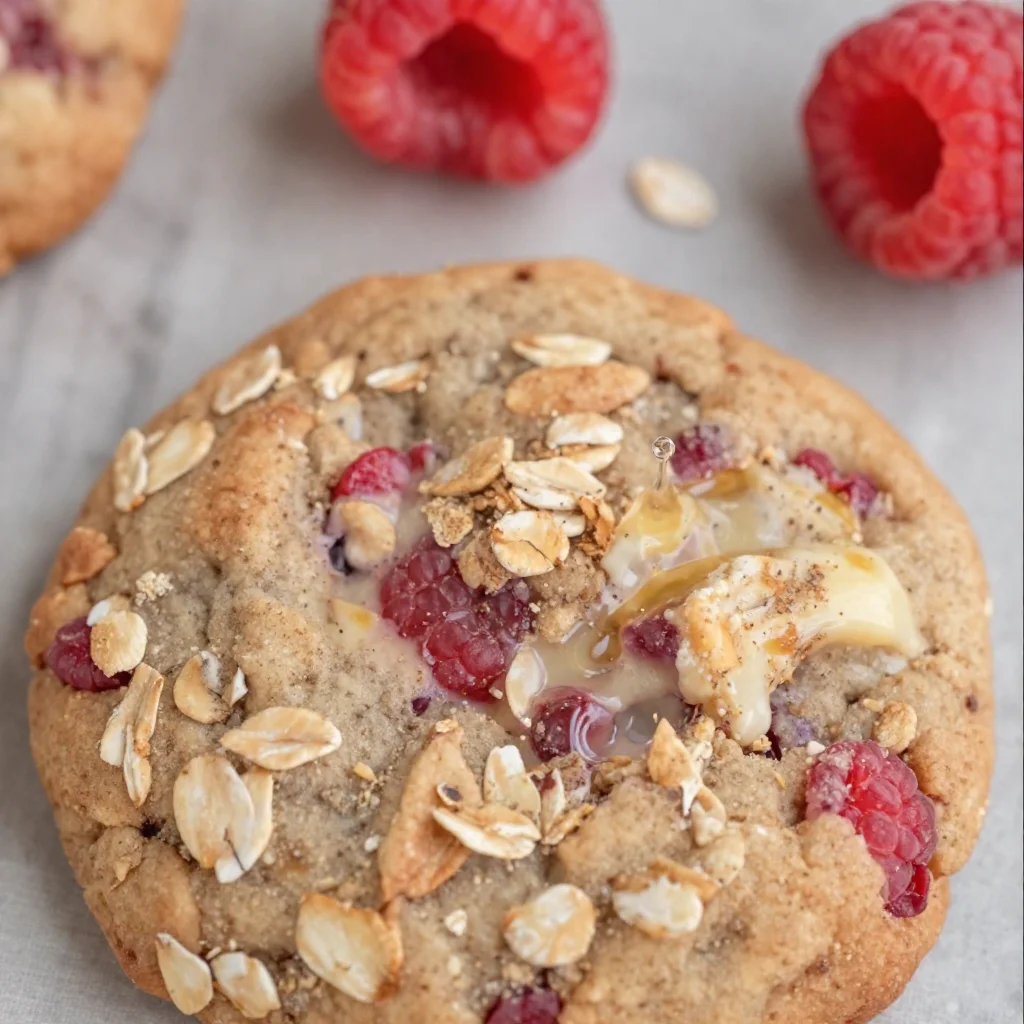
Healthy Raspberry Oatmeal Cookies: Quick Meal-Prep Treats
Healthy Raspberry Oatmeal Cookies: A Sweet Treat for Every Occasion
Welcome to my cozy corner of the kitchen! I’m Olivia Bennett, and I’m so glad you’re here. Today, we’re diving into a delightful treat that balances healthy ingredients with the kind of sweetness that warms your heart: healthy raspberry oatmeal cookies. Whether you’re looking for a nutritious snack to power through your afternoon slump or a wholesome dessert to satisfy your sweet tooth, these cookies are your answer.
There’s something incredibly satisfying about baking cookies. The aroma of warm oats and sweet berries wafting through the kitchen feels like a hug on a chilly day, doesn’t it? I remember the first time I made oatmeal cookies with my grandma. Every Saturday, after a long week of school, we would whip up a batch in her little green kitchen. Flour would fly, laughter would echo, and countless anecdotes flowed like the batter we mixed. Raspberry was always her favorite addition, and now it’s become one of mine. The tartness of the berries perfectly complements the wholesome oats, creating a cookie that’s not just tasty but also nourishing.
These cookies are so easy to whip up and truly customizable. Let’s get started on making your new favorite healthy snack!
Ingredients
Here’s what you’ll need for these scrumptious cookies:
-
1 cup rolled oats
Oats provide a hearty base and are full of fiber. You can swap them with quick oats if that’s what you have on hand, but rolled oats give that perfect chewy texture. -
½ cup whole wheat flour
Whole wheat flour adds nutrition and a slight nuttiness. If you want to be gluten-free, feel free to use almond flour or a gluten-free all-purpose blend. -
½ teaspoon baking soda
This helps our cookies rise a little and gives them that soft texture. If you don’t have baking soda, you can use baking powder, but the texture may vary slightly. -
½ teaspoon salt
A little salt helps balance the sweetness. You can add less if you’re watching your sodium intake. -
¼ cup honey or maple syrup
This natural sweetener keeps the cookies moist. If you’re looking for a vegan option, go for maple syrup. For low-calorie sweetness, a sugar substitute like stevia works too—just adjust according to your brand’s instructions! -
¼ cup coconut oil or unsalted butter, melted
Both are great for binding the ingredients. Coconut oil adds a subtle tropical flavor, while butter gives that rich cookie essence. Use applesauce for a lower-fat alternative! -
1 tablespoon vanilla extract
This is a must-have for flavor! Feel free to experiment with almond extract for a different twist. -
¾ cup fresh raspberries
These juicy gems are the star of our cookies! If fresh raspberries are out of season, frozen ones work too; just be sure to thaw and drain them first. -
¼ cup dark chocolate chips (optional)
Because who can resist chocolate? You can easily swap this with any nut or leave it out entirely for a simpler cookie.
Step-by-Step Instructions
Now that we have our ingredients lined up, let’s roll up our sleeves and get baking!
-
Preheat the Oven
Preheat your oven to 350°F (175°C). This ensures your cookies bake evenly. While it’s heating, you can prep everything else. -
Mix Dry Ingredients
In a large bowl, combine the rolled oats, whole wheat flour, baking soda, and salt. Whisk it together to make sure there’s an even distribution of dry ingredients. This prevents pockets of flour or baking soda in your batter. -
Combine Wet Ingredients
In a separate bowl, mix the melted coconut oil (or butter), honey (or maple syrup), and vanilla extract. If your oil has cooled down and solidified slightly, you can pop it in the microwave for a few seconds to melt it again. A well-mixed wet combination gives the cookies a lovely, even texture. -
Blend Wet and Dry Mixtures
Pour the wet ingredients into the dry mixture and stir until just combined. Over-mixing can lead to tough cookies, so don’t be afraid to leave some lumps—it’s all part of the charm! -
Gently Fold in Raspberries
Using a spatula or wooden spoon, carefully fold in the fresh raspberries and chocolate chips (if using). This step is important! You want to integrate the berries without smashing them too much. You want those beautiful bursts of color and flavor in every bite. -
Scoop the Dough
Using a cookie scoop or a tablespoon, drop the dough onto a parchment-lined baking sheet, leaving about 2 inches between each cookie. This gives them room to spread. -
Bake
Pop the baking sheet in the oven and bake for 12-15 minutes, or until the cookies are golden brown around the edges and still soft in the center. Trust your nose; the aroma will be a heavenly hint that they’re almost ready! -
Cool and Enjoy
Let the cookies cool on the baking sheet for about 5 minutes before transferring them to a wire rack. This helps them set as they cool down. If you try to move them too soon, they may fall apart. Patience, my friend!
Serving Suggestions
Once your cookies are completely cool, stack them on a cute plate, or for a cozy breakfast treat, serve them warm alongside a hot cup of tea or coffee. Crumble one over some Greek yogurt with a sprinkle of granola for a delicious breakfast bowl. They’re perfect for sharing too—line them up in mason jars for thoughtful gifts!
Recipe Variations
Looking to mix things up? Here are a few ideas for you to get creative with:
- Nutty Raspberry Cookies: Add ¼ cup of chopped nuts, like walnuts or almonds, for an extra crunch.
- Cinnamon Twist: Sprinkle in some ground cinnamon (about ½ teaspoon) for a warm, cozy flavor.
- Lemon Zing: Grate some lemon zest into the dough for a refreshing citrus burst. This pairs beautifully with raspberries.
- Peanut Butter Bliss: Incorporate 2 tablespoons of your favorite nut butter into the wet ingredients for added creaminess and flavor.
Chef’s Notes
Oh, the stories my kitchen holds! One time, I had a bunch of overripe bananas about to meet their fate in the compost bin, so I decided to mash them into this dough. My raspberry oatmeal cookies transformed into a delightful banana-raspberry combo, and let me tell you, they were a hit! It just goes to show you how versatile this recipe is. If you find yourself with ingredients that need using up, don’t hesitate to experiment—there’s always something delicious waiting to be discovered!
FAQs and Troubleshooting
1. My cookies are too dry. What went wrong?
This usually means that there was too much flour or a lack of moisture in your dough. Make sure to measure your ingredients accurately. If your dough looks a bit dry before baking, try adding another tablespoon of coconut oil or a splash of milk.
2. How can I store these cookies?
These cookies can be stored in an airtight container at room temperature for up to a week. You can freeze them as well! Just wrap each cookie in plastic wrap or place them in a freezer bag for up to 3 months.
3. Can I use frozen raspberries?
Absolutely! Just remember to thaw and drain them before adding them to the dough. You might want to reduce the number slightly, as frozen berries can be juicier.
4. What’s the secret to chewy cookies?
The key is not to overbake! When you pull these cookies out of the oven, they might look a bit underbaked in the center—that’s okay! Let them cool. They will continue to cook on the baking sheet and become deliciously chewy.
Nutritional Info
While the nutritional info can vary based on your specific ingredients and portion sizes, these cookies are generally low in sugar and high in fiber, thanks to the oats and raspberries. Each cookie (with the recipe yielding about 12-15 cookies) contains approximately:
- Calories: 120
- Protein: 2g
- Fat: 5g
- Carbohydrates: 18g
- Fiber: 3g
Feel free to adjust elements based on your dietary needs or to create different variations!
Thank you so much for joining me in the kitchen today! I hope these healthy raspberry oatmeal cookies become a delightful addition to your baking repertoire. Remember, cooking is all about joy, love, and a little bit of mess. Now, go bake, share, and enjoy! Bon Appétit!
Print
Healthy Raspberry Oatmeal Cookies
- Total Time: 25 minutes
- Yield: 12-15 cookies 1x
- Diet: Vegetarian
Description
Deliciously wholesome raspberry oatmeal cookies, perfect for a nutritious snack or dessert.
Ingredients
- 1 cup rolled oats
- ½ cup whole wheat flour
- ½ teaspoon baking soda
- ½ teaspoon salt
- ¼ cup honey or maple syrup
- ¼ cup coconut oil or unsalted butter, melted
- 1 tablespoon vanilla extract
- ¾ cup fresh raspberries
- ¼ cup dark chocolate chips (optional)
Instructions
- Preheat your oven to 350°F (175°C).
- Mix the rolled oats, whole wheat flour, baking soda, and salt in a large bowl.
- Combine the melted coconut oil (or butter), honey (or maple syrup), and vanilla extract in a separate bowl.
- Blend the wet ingredients into the dry mixture and stir until just combined.
- Gently fold in the fresh raspberries and chocolate chips (if using).
- Scoop the dough onto a parchment-lined baking sheet, leaving about 2 inches between each cookie.
- Bake for 12-15 minutes, until golden brown around the edges.
- Cool on the baking sheet for about 5 minutes before transferring to a wire rack.
Notes
These cookies can be stored in an airtight container for up to a week and can be frozen for up to 3 months.
- Prep Time: 10 minutes
- Cook Time: 15 minutes
- Category: Dessert
- Method: Baking
- Cuisine: American
Nutrition
- Serving Size: 1 cookie
- Calories: 120
- Sugar: 5g
- Sodium: 60mg
- Fat: 5g
- Saturated Fat: 3g
- Unsaturated Fat: 2g
- Trans Fat: 0g
- Carbohydrates: 18g
- Fiber: 3g
- Protein: 2g
- Cholesterol: 10mg
Keywords: raspberry, oatmeal, cookies, healthy baking, vegetarian dessert
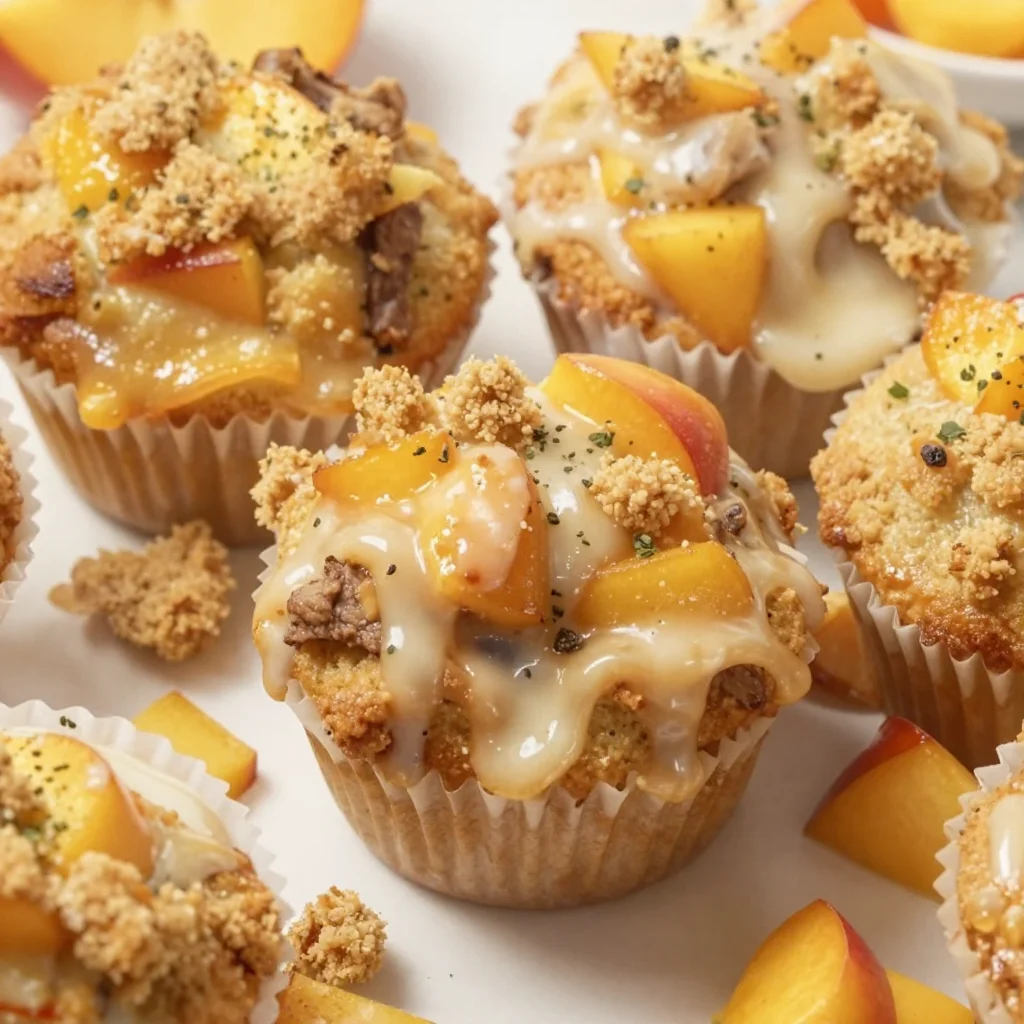
Summer Nectarine Muffins: Quick Batch Recipe for Meal Prep
Nectarine Muffins: A Cozy Kitchen Tale
Welcome to my kitchen, my fellow food lovers! Today, we’re diving into the delightful world of baking with a recipe that’s not only scrumptious but also holds a special place in my heart: Nectarine Muffins. These little gems are a celebration of summer’s ripest fruit and make for the perfect breakfast or snack. Trust me, the aroma of fresh nectarines mixed with the smell of baked goods will transform your kitchen into a cozy haven that even your neighbors will envy.
A Story from the Heart
Ah, nectarines. They remind me of my childhood during summer vacations at my grandmother’s house. Every year, she’d wake us up early, inviting us into the kitchen with the promise of something warm and sweet. Among the deliciousness of buttery pastries and cinnamon rolls, her nectarines always stole the show. One day, she decided to teach me how to make muffins, using those luscious, sun-kissed nectarines she’d plucked from her backyard tree.
As we mixed the ingredients together, I remember the dusting of flour on her nose and the way her eyes lit up whenever I’d crack an egg perfectly. The sound of the mixer whirling and the sweet scent of baking filled the air. It was one of those magical moments where I realized cooking was more than just feeding your body — it was about creating memories, traditions, and a feeling of connection. Those Nectarine Muffins were the sweet icing on our summer adventures, and I couldn’t wait to share this recipe with you.
Ingredients
Before we dive into the baking fun, let’s gather our ingredients. Here’s what you’ll need to make these delightful Nectarine Muffins:
-
Fresh Nectarines (2-3 medium): Choose ripe nectarines that yield slightly when pressed; this means they’re juicy and ready to shine in your muffins. If you don’t have nectarines, peaches or plums can work beautifully as substitutes.
-
All-Purpose Flour (2 cups): This is your base. For a whole grain touch, substitute half with whole wheat flour for added fiber and a deeper flavor.
-
Granulated Sugar (¾ cup): Perfect for that sweet touch. For a healthier option, try coconut sugar or honey, but keep in mind that using honey may alter the moistness of the muffins.
-
Baking Powder (1 tablespoon): This is your leavening agent, giving your muffins that delightful rise. Remember NOT to swap it out for baking soda; they aren’t interchangeable.
-
Salt (½ teaspoon): A pinch of salt enhances all the flavors. Just a touch is enough; too much can overpower your sweet nectarines.
-
Egg (1 large): This helps bind everything together. For a vegan option, you can use a flax egg (1 tablespoon of flaxseed meal mixed with 2.5 tablespoons of water) instead.
-
Milk (1 cup): I recommend whole milk for richness, but any milk or plant-based milk (like almond or oat) will work great!
-
Butter, melted (½ cup): Ah, the source of that magical muffin texture! If you’re after a dairy-free version, feel free to use coconut oil or applesauce for moisture.
-
Vanilla Extract (1 teaspoon): This little addition elevates the flavor profile. For a twist, almond extract can add a delightful depth.
-
Cinnamon (1 teaspoon): Warm and inviting, cinnamon pairs wonderfully with fruit. You could also experiment with nutmeg or cardamom for something unique.
Step-by-Step Instructions
Now that we have our ingredients, let’s get to the fun part! Here’s how you’ll bring these nectarines to life in muffin form:
-
Preheat Your Oven: Start by preheating your oven to 350°F (175°C). This ensures an even bake right from the start.
-
Prep Your Muffin Pan: Line a muffin tin with paper liners or grease it lightly with butter. This will keep your muffins from sticking and make cleanup a breeze. I love using parchment paper liners for a rustic touch.
-
Chop the Nectarines: Wash and dice your nectarines into small pieces (about ½ inch). You can peel them if you prefer, but I find the skin adds lovely texture and those beautiful, summery colors. Set them aside.
-
Mix Dry Ingredients: In a large bowl, whisk together the flour, sugar, baking powder, salt, and cinnamon. Give it a good mix to aerate everything; this is key for light, fluffy muffins!
-
Combine Wet Ingredients: In another bowl, beat the egg and add the milk, melted butter, and vanilla extract. Mix well to combine all the wet ingredients into one creamy fluid.
-
Combine Wet and Dry: Make a well in the center of your dry ingredient bowl and pour in the wet mixture. Stir gently until just combined; a few lumps are totally okay! Be careful not to overmix, as this can lead to tough muffins.
-
Fold in the Nectarines: Gently fold in your chopped nectarines. Make sure they’re evenly distributed throughout the batter; we want every muffin to have a gorgeous burst of flavor!
-
Scoop into Muffin Tin: Use a large spoon or an ice cream scoop to fill each muffin cup about 2/3 full. This helps them rise beautifully without overflowing.
-
Bake: Pop the muffin tin into your preheated oven and bake for 20-25 minutes. You’ll know they’re done when they’re golden brown on top and a toothpick inserted into the center comes out clean.
-
Cool and Devour: Once they’re done, remove the muffins from the oven and let them cool in the pan for about 5 minutes. Then, transfer them to a wire rack to cool completely. I know it’s tempting, but giving them a few minutes before munching ensures the flavors have a chance to settle.
Serving Suggestions
These Nectarine Muffins are perfect served warm from the oven, but here’s a fun serving suggestion: try them with a dollop of whipped cream cheese or a sprinkle of powdered sugar on top. You could also accompany them with a side of yogurt for a delightful breakfast spread or enjoy them with a cup of your favorite tea.
Recipe Variations
Now, if you’re feeling adventurous, here are a few creative twists you can add to your Nectarine Muffins:
-
Nectarine and Blueberry: Toss in a handful of fresh blueberries for a pop of color and flavor.
-
Nutty Delight: Fold in chopped nuts like almonds, walnuts, or pecans for added crunch and healthy fats.
-
Spiced Up: Experiment with a pinch of cardamom or ginger for a spicier flavor profile.
-
Coconut Twist: Add shredded coconut to the batter for a tropical vibe.
-
Chocolate Chip: A handful of semi-sweet or dark chocolate chips can turn these into an indulgent treat!
Chef’s Notes
Over the years, this Nectarine Muffin recipe has truly evolved. Initially, I was a bit nervous about baking with fruits, but experimenting with nectarines opened up a world of delicious possibilities! I remember using rather clumsy measuring cups back in the day, ending up with too much flour and too little nectarines. But as my skills improved (and I invested in a good kitchen scale — seriously, get one), I found the perfect balance.
And here’s a funny story: One day, I tried to impress my friends with a batch of nectarines I picked right from the tree, only to find out I was allergic to them! Let’s just say my afternoon of baking turned into an unexpected trip to the local pharmacy. But in the end, nothing could deter my love for these muffins!
FAQs and Troubleshooting
-
My muffins turned out dense! What did I do wrong?
- Denseness often comes from overmixing the batter. Mix just until combined and leave those lumps in. Trust the process!
-
Can I substitute nectarines for another fruit?
- Absolutely! Peaches, plums, or even apples would make fantastic substitutes. Just adjust the sugar depending on the fruit’s sweetness.
-
Why are my muffins sticking to the liners?
- This can happen if they aren’t completely cooled before removing from the liners or if they were greased minimally. Make sure to use quality liners and let them cool before serving.
-
How do I store leftover muffins?
- Store them in an airtight container at room temperature for up to 3 days. You can also freeze them for up to 2 months. Just reheat in the oven when you’re ready to indulge!
Nutritional Info (Optional)
These delightful Nectarine Muffins pack a flavorful punch while being relatively light. Each muffin has approximately:
- Calories: 180
- Protein: 4g
- Carbs: 30g
- Fats: 7g
Feel free to calculate this based on your specific ingredients and adjustments!
And there you have it! A step-by-step journey through creating magical Nectarine Muffins that are bound to bring smiles and warmth into your home. Remember, cooking is all about enjoying the process, so don’t rush — savor every moment because each muffin is a little piece of love baked right into your day. Happy baking!
Print
Nectarine Muffins
- Total Time: 40 minutes
- Yield: 12 servings
- Diet: Vegetarian
Description
Delightful nectarines come together in these scrumptious muffins, perfect for breakfast or a snack.
Ingredients
- Fresh Nectarines (2-3 medium)
- All-Purpose Flour (2 cups)
- Granulated Sugar (¾ cup)
- Baking Powder (1 tablespoon)
- Salt (½ teaspoon)
- Egg (1 large)
- Milk (1 cup)
- Butter, melted (½ cup)
- Vanilla Extract (1 teaspoon)
- Cinnamon (1 teaspoon)
Instructions
- Preheat your oven to 350°F (175°C).
- Prep your muffin pan by lining it with paper liners or greasing it lightly.
- Chop the nectarines into small pieces and set them aside.
- Mix dry ingredients in a bowl: flour, sugar, baking powder, salt, and cinnamon.
- Combine wet ingredients in another bowl: egg, milk, melted butter, and vanilla extract.
- Combine the wet and dry mixtures, stirring gently until just mixed.
- Fold in the chopped nectarines evenly throughout the batter.
- Scoop the batter into the muffin tin, filling each cup about 2/3 full.
- Bake for 20-25 minutes, or until golden brown.
- Cool in the pan for 5 minutes before transferring to a wire rack.
Notes
Serve warm with whipped cream cheese or sprinkled with powdered sugar.
- Prep Time: 15 minutes
- Cook Time: 25 minutes
- Category: Breakfast
- Method: Baking
- Cuisine: American
Nutrition
- Serving Size: 1 muffin
- Calories: 180
- Sugar: 5g
- Sodium: 200mg
- Fat: 7g
- Saturated Fat: 4g
- Unsaturated Fat: 2g
- Trans Fat: 0g
- Carbohydrates: 30g
- Fiber: 1g
- Protein: 4g
- Cholesterol: 30mg
Keywords: nectarine, muffins, breakfast, baking, summer


