
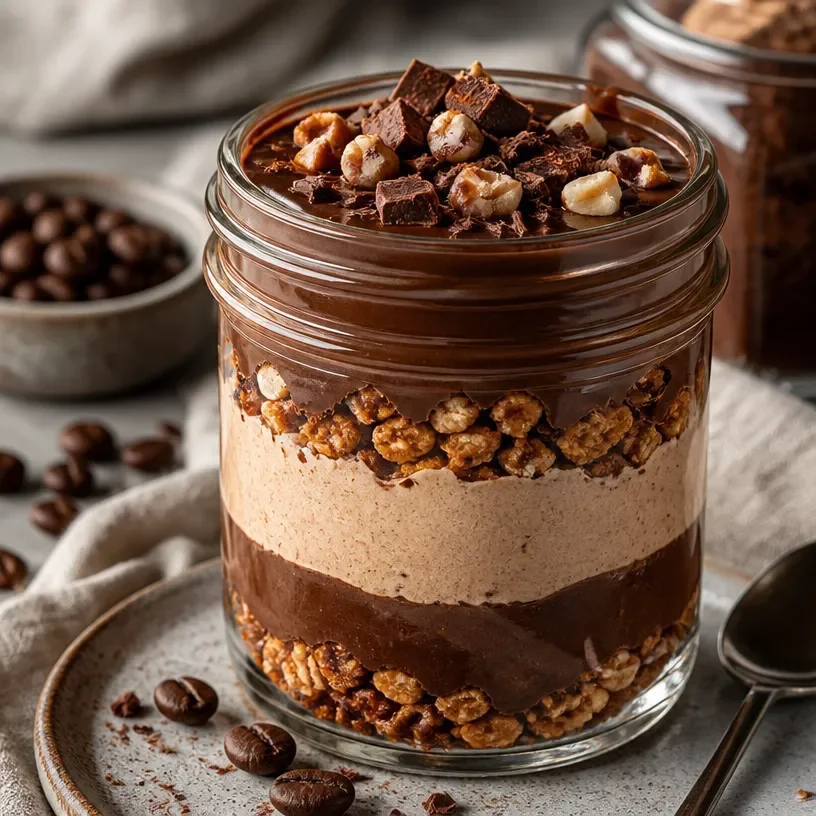
Min No-Bake Protein Mocha Fudge Jar: Grab-N-Go Snack
Protein Mocha Fudge Jar: A Delicious Pick-Me-Up!
Welcome to my cozy corner of the internet! I’m Olivia Bennett, your friendly kitchen guide, and today we’re diving deep into a recipe that will not only satisfy your sweet tooth but also give you a healthy boost! That’s right, we’re making a Protein Mocha Fudge Jar that’s perfect for a midday pick-me-up or as a delightful post-workout treat.
Imagine this: you’re in the midst of a busy day, your energy is waning, and all you can think about is that perfect balance of rich chocolate and robust coffee to push you through. This luscious fudge is not only the answer to your cravings but also packed with protein to keep you feeling energized. Plus, it’s in a jar—how cute is that?!
As we cook together, I’ll share why this recipe brings back memories for me, the sunshine of nostalgia brightening our culinary adventure. The joy of homemade treats is something that connects us all, and I can’t wait for you to experience it through this delightful fudge.
So, grab your apron, and let’s turn simple ingredients into something unforgettable!
A Sweet Trip Down Memory Lane
Whenever I think of chocolate and coffee, a warm rush of nostalgia washes over me. One of my fondest childhood memories is sitting in my grandmother’s kitchen, watching her create delectable desserts that filled the house with mouthwatering aromas. She had a special knack for combining flavors, and her famous mocha fudge was always a highlight during family gatherings.
The air would be thick with the rich scent of chocolate, and I would be perched on a stool, eagerly waiting for a taste—just a tiny morsel of that velvety goodness! It wasn’t just dessert; it was an experience. Grandma would tell stories about her own upbringing in the kitchen, while we licked the spoons and shared giggles. I’ll never forget her twinkling eyes, full of life and love, as she added a hint of espresso to her fudge mixture.
This recipe for Protein Mocha Fudge takes me back to those days. It’s comforting and packed with the flavors that remind me of my grandma, while also being a modern twist for those of us with busy lives. I hope it creates the same warm moments for you and your loved ones!
Gather Your Ingredients
Before we get started, let’s take a look at what you’ll need for this delightful Protein Mocha Fudge Jar:
-
1 cup almond butter
This creamy nut butter provides healthy fats and a smooth texture. If you’re allergic to nuts or prefer a different flavor, try sunflower seed butter for a nut-free option! -
1/2 cup maple syrup
This natural sweetener adds just the right amount of sweetness and a hint of depth to the flavor. You can substitute with agave syrup or honey for a different twist. -
1/4 cup unsweetened cocoa powder
The rich flavor of cocoa powder is essential for that chocolatey experience! You can use carob powder if you prefer a caffeine-free alternative. -
1/2 cup protein powder
This ingredient is the secret ingredient for that protein boost! I personally like whey or plant-based protein powder, so pick your favorite flavor that complements chocolate, like vanilla. -
1 tablespoon espresso powder
Espresso powder elevates the flavor of the fudge; it’s like a coffee hug in every bite! If you don’t have it, brewed coffee or instant coffee granules work well, just adjust the quantity for taste. -
1/4 teaspoon sea salt
A pinch of salt enhances the sweetness and balances flavors beautifully. Don’t skip it! -
Optional toppings:
- Chopped nuts (like walnuts or pistachios)
- Shredded coconut
- Drizzle of dark chocolate
Let’s Get Cooking: Step-by-Step Instructions
Alright, my kitchen buddy, it’s time to roll up our sleeves and get started! Follow these steps, and I promise you’ll be devouring that fudge in no time.
Step 1: Prep Your Workspace
Before we dive in, it’s crucial to have a clean workspace. Gather all your ingredients, utensils, and a mixing bowl. You’ll also need a container or jar to store your fudge—let’s go for something cute and reusable!
Step 2: Mix Together the Base
In a medium-sized bowl, add the almond butter and maple syrup. Mix these two together until they are well combined. You want a smooth consistency, so give it a good stir. A hand mixer can make this step even easier, but a sturdy spoon will work just fine too!
Step 3: Add Cocoa Powder & Protein
Next, sift in the unsweetened cocoa powder and protein powder. Stir until it’s completely combined—this is where the magic starts to happen! If the mixture feels too thick, don’t panic; adding a splash of your choice of non-dairy milk can help reach your desired consistency.
Step 4: Espresso and Salt
Now for that fabulous espresso powder and a touch of sea salt! This is what will make your fudge sing! Mix well, ensuring all ingredients are beautifully incorporated.
Step 5: Taste for Sweetness
Go ahead and taste your mixture! If you like your fudge a bit sweeter, feel free to add a drizzle more of maple syrup. Cooking is all about your personal preference, so make it your own!
Step 6: Prepare Your Jar
Now, transfer your fudge mixture into the jar or container. You can use a spatula to scoop out every last bit of that gooey goodness. Smooth the top out with the spatula, and you can even add toppings like chopped nuts or shredded coconut to create an aesthetically pleasing layer!
Step 7: Chill and Firm Up
Place your jar in the refrigerator for at least 2 hours to allow it to firm up. Trust me; the wait will be worth it! This is a perfect time to clean up your kitchen and maybe whip up another batch!
Step 8: Enjoy!
Once it’s set, dig in! Enjoy your Protein Mocha Fudge straight from the jar, or scoop it out and place it on a pretty plate to share with loved ones.
Serving Suggestions
To serve your Protein Mocha Fudge, you can either present it directly in the jar for a rustic look or scoop it into cute little bowls if you’re hosting a gathering. Drizzle some melted dark chocolate on top for an extra touch of indulgence, and add a sprinkle of sea salt to elevate the flavor. Serve alongside a hot cup of coffee or a chilled glass of almond milk for a delightful pairing!
Recipe Variations
Feeling adventurous? Here are a few creative twists you can try with your Protein Mocha Fudge Jar:
-
Nut Butter Bliss: Swap different nut butters to change the flavor profile—try peanut butter or cashew butter for a different taste adventure.
-
Spicy Fudge: Add a dash of cayenne pepper or cinnamon for a delightful kick. This can elevate your fudge and add a warm, spicy undertone.
-
Fruity Delight: Fold in some dried fruit like cranberries or chopped apricots to add a touch of natural sweetness and chewiness.
-
Mint Mocha: Incorporate a few drops of mint extract for a refreshing mint mocha version—perfect for the holiday season!
-
Vegan Friendly: Use a plant-based protein powder and replace maple syrup with agave or brown rice syrup to make a vegan treat.
Chef’s Notes
This Protein Mocha Fudge Jar is a recipe that has evolved beautifully over time. Initially, I created it to satisfy my sweet-tooth cravings while also fueling my energy levels, but it’s quickly become a favorite among my friends and family! I often find myself making it in large batches to share at potlucks or school events. The smiles I get when they take their first bite are priceless!
One funny kitchen story that comes to mind is when I tried experimenting with different types of protein powder. Let’s just say, not all flavors mix well! The chocolate mint protein powder incident left my friends in stitches, but the fudge was a fun conversation starter.
FAQs and Troubleshooting
Q1: Why did my fudge turn out too crumbly?
A: If your fudge is crumbly, it might be due to using too much protein powder or not enough sweetener. Try mixing in a bit more almond butter or maple syrup to help bind it together.
Q2: Can I freeze the fudge?
A: Absolutely! This fudge freezes well. Just make sure to store it in an airtight container, and it can last for up to three months in the freezer. Just thaw it in the fridge before indulging!
Q3: Can I use a different sweetener?
A: Yes! Feel free to use honey, agave syrup, or even date syrup. Each will bring a unique touch to your fudge, but bear in mind the flavor could change slightly.
Q4: How can I make this fudge richer?
A: To make your fudge even richer, consider adding a tablespoon or two of melted coconut oil or more cocoa powder. Both will enhance the chocolate flavor and creaminess!
Nutritional Info
Here’s a rough breakdown of one serving of your Protein Mocha Fudge Jar (assuming about 12 servings for the entire jar):
- Calories: Approximately 200
- Protein: 6g
- Carbohydrates: 15g
- Fats: 12g
- Fiber: 3g
There you have it, my fellow food lovers! Your Protein Mocha Fudge Jar is ready to be enjoyed, whether as a snack or a dessert. I hope this recipe brings you and your loved ones as much joy as it has brought me. Happy cooking, and might I say, eat with happiness!
Print
Protein Mocha Fudge Jar
- Total Time: 135 minutes
- Yield: 12 servings 1x
- Diet: Vegetarian
Description
A delicious protein-packed mocha fudge that’s perfect for a sweet pick-me-up or post-workout treat.
Ingredients
- 1 cup almond butter
- 1/2 cup maple syrup
- 1/4 cup unsweetened cocoa powder
- 1/2 cup protein powder
- 1 tablespoon espresso powder
- 1/4 teaspoon sea salt
- Optional toppings: chopped nuts, shredded coconut, drizzle of dark chocolate
Instructions
- Prep your workspace.
- Mix together the almond butter and maple syrup in a bowl until smooth.
- Add the cocoa powder and protein powder, stirring until combined.
- Incorporate the espresso powder and sea salt, mixing well.
- Taste for sweetness and adjust with more maple syrup if needed.
- Transfer the mixture into a jar or container and smooth the top.
- Chill in the refrigerator for at least 120 minutes to firm up.
- Enjoy your Protein Mocha Fudge straight from the jar or serve on a plate.
Notes
Store any leftover fudge in an airtight container in the refrigerator for up to one week.
- Prep Time: 15 minutes
- Cook Time: 0 minutes
- Category: Dessert
- Method: No-Bake
- Cuisine: American
Nutrition
- Serving Size: 1 serving
- Calories: 200
- Sugar: 8g
- Sodium: 100mg
- Fat: 12g
- Saturated Fat: 2g
- Unsaturated Fat: 10g
- Trans Fat: 0g
- Carbohydrates: 15g
- Fiber: 3g
- Protein: 6g
- Cholesterol: 0mg
Keywords: protein fudge, mocha fudge, healthy dessert, no-bake treat, gluten-free, snacks
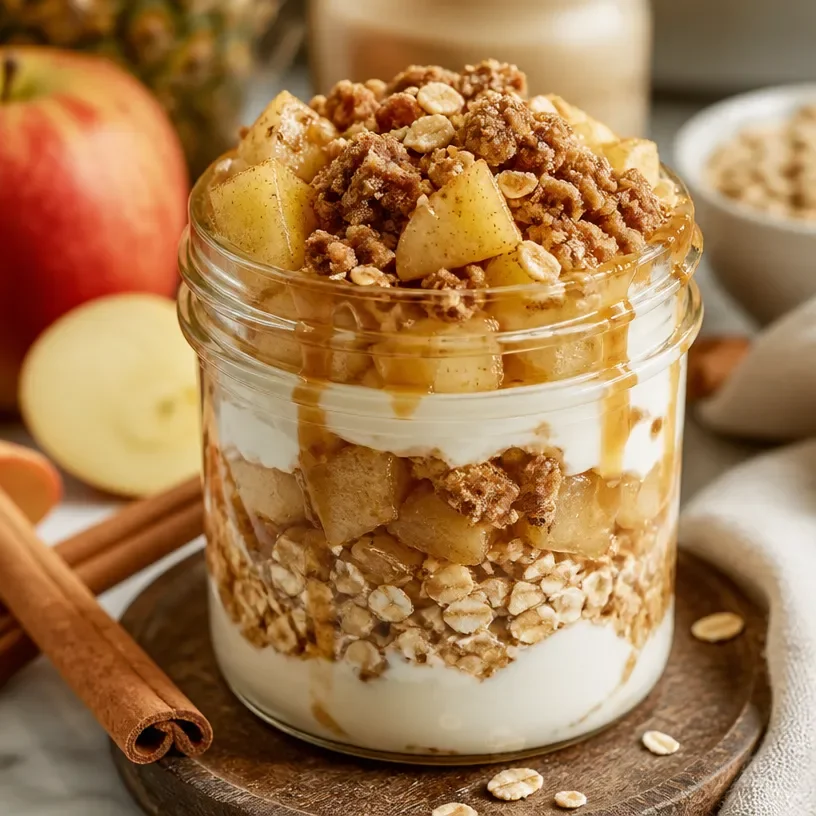
Protein Apple Crisp Jar
Protein Apple Crisp Jar: A Cozy Dessert with a Twist
Welcome to my kitchen! I’m so excited to share one of my all-time favorite recipes with you today: the Protein Apple Crisp Jar. This delightful dessert not only satisfies your sweet tooth but also packs a protein punch—perfect for those cozy nights in or as a make-ahead treat for the week!
Picture this: You’ve just finished a long day, and all you want is something warm and comforting. Maybe you’re snuggled up on the couch with your favorite blanket or gathered around the table with loved ones. The scent of sweet apples, cinnamon, and buttery crisp topping fills the air, creating an inviting atmosphere that welcomes everyone. That’s the essence of my Protein Apple Crisp Jar—it’s not just food; it’s a celebration of flavors and memories that make life beautiful.
I absolutely adore recipes that are as hearty as they are wholesome. Apple crisp is one of those nostalgic desserts that screams comfort—and when you throw in protein, it becomes a deliciously guilt-free indulgence. We all know that autumn brings an abundance of apples, but honestly, any time of year is a good time for this apple crisp. The best part? You can prep it in advance and have it on hand for quick desserts that feel like a big hug in a jar. So grab your spoon, and let’s dive into this cozy treat!
A Taste of Nostalgia
Growing up, my family’s kitchen was always bustling with the joy of cooking and the aroma of freshly baked goods. My mom had a knack for turning everyday ingredients into magical desserts that filled our home with warmth. One fall afternoon, I remember her making a classic apple crisp. As we peeled apples together, I couldn’t wait to taste the sweet filling and the crunchy topping. She would always let me steal bites of the cinnamon-sugar mixture before it even made it into the oven—a little taste of heaven!
That day, as we pulled the crisp out of the oven, the smell was intoxicating. We’d gather around the table, where bowls of creamy vanilla ice cream complemented the warm, gooey apple filling. It was moments like these that cemented my love for cooking and sharing food with those I adore. Now, I’ve swapped in a protein twist to this classic, making it a special treat that still carries the comfort of my roots. It’s amazing how flavors have the power to evoke memories and create new ones in the process!
Ingredients
Let’s gather our ingredients for this Protein Apple Crisp Jar. Here’s what you’ll need to make this deliciously cozy dessert:
-
Apples: A mix of sweet and tart varieties works best (like Honeycrisp and Granny Smith). If you don’t have fresh apples, you can use frozen ones!
-
Oats: Rolled oats create that signature crisp texture. If you’re gluten-free, look for certified gluten-free oats.
-
Protein Powder: Choose your favorite protein powder—whey, plant-based, or whatever you enjoy. You can even use a flavored variety for an extra flavor boost!
-
Brown Sugar or Coconut Sugar: Brown sugar adds depth and richness; coconut sugar is a great alternative if you’re aiming for less processed sweeteners.
-
Cinnamon: This warm spice is essential. Feel free to mix in a pinch of nutmeg for added warmth.
-
Butter or Coconut Oil: This adds richness to the topping and is what makes it all come together. If you’re vegan, coconut oil is a fantastic substitute.
-
Vanilla Extract: A little splash enhances the overall flavor; use pure vanilla for the best results.
-
Salt: Just a pinch brightens up the sweetness and balances the flavors.
These ingredients come together like a big group hug of flavor! They’re simple but impactful, resulting in a dish that turns heads while being surprisingly nutritious.
Step-by-Step Instructions
Now, let’s get started on making this delightful Protein Apple Crisp Jar. Follow these simple steps for a result that will blow your mind!
-
Preheat the Oven: Start by preheating your oven to 350°F (175°C). This is crucial to ensure your apple crisp bakes evenly and gets that beautiful golden brown color we all love.
-
Prep the Apples: Peel, core, and slice your apples into thin wedges. Aim for uniform sizes to promote even cooking. If you’re using a mix of apple varieties, this will add great depth to the flavor!
-
Spice It Up: In a large bowl, toss your sliced apples with a sprinkle of brown sugar (or coconut sugar), a spoonful of cinnamon, and a pinch of salt. Don’t hold back on the spices; they make all the difference.
-
Layer It Up: In your jars, start layering! Begin with a generous scoop of spiced apples at the bottom. Depending on the size of your jars, you might fill them halfway or just below the rim.
-
Prepare the Crisp Topping: In another bowl, combine the rolled oats, protein powder, remaining brown sugar, and cinnamon. Melt your butter (or coconut oil) and mix it in until everything is crumbly. This is where the magic happens!
-
Top It Off: Spoon the crisp topping over the layered apples in each jar. Press it down gently and make sure it’s evenly distributed. This creates that coveted crunchy topping that contrasts beautifully with the soft apples.
-
Bake to Perfection: Place your jars on a baking sheet (to catch any spills) and pop them into the preheated oven. Bake for about 25-30 minutes until the topping is golden brown and the apples are bubbling.
-
Cool Down: Once baked, let your jars cool for a few minutes. The aroma will be irresistible, so be patient! Enjoying hot apple crisp is delightful, but just let it sit for a moment to set.
-
Serve with Love: Top these protein-packed treats with a scoop of your favorite ice cream or dollop of whipped cream if you’re feeling indulgent.
Cooking doesn’t have to be complicated—when you break it down into steps, it becomes a fun and rewarding experience! Each step is an opportunity to savor the process and experiment with flavors.
Serving Suggestions
When it comes to serving, presentation is key! I love to arrange the jars on a rustic wooden board, showcasing each layer of vibrant apple and golden crisp. You can adorn each jar with a sprinkle of cinnamon, a drizzle of honey or maple syrup for added sweetness, or even a few fresh apple slices on the side. A scoop of vanilla ice cream perched atop the warm crisp brings it all together beautifully.
Recipe Variations
Want to switch things up a bit? Here are a few variations to play with your Protein Apple Crisp Jar:
-
Nutty Twist: Add chopped nuts like walnuts or pecans into the crisp topping for added crunch and healthy fats.
-
Berry Bonus: Mix in some fresh or frozen berries with the apple layer for a pop of color and delightful flavor.
-
Spicy Kick: Incorporate a dash of ginger or cardamom for an extra warm and cozy twist.
-
Sweeten It Up: Swap in maple syrup or honey instead of brown sugar for a different kind of sweetness.
-
Fruit Swap: Try this recipe with pears, peaches, or cherries—a delightful way to switch up the flavor profile based on the season!
Chef’s Notes
This recipe has evolved over the years as I’ve learned more about balancing flavors and textures. Initially, I would just make the classic apple crisp, but after experimenting with protein and health-conscious options, I discovered that you can create a delicious dessert that aligns with a balanced lifestyle. It’s funny how cooking allows you to adapt and innovate based on what you have on hand or what season you’re in.
Also, I have to admit… the first time I tried baking in jars, I accidentally overflowed them and ended up with a crispy apple mess in my oven! Now, I always use a baking sheet under my jars as a backup. The little kitchen escapades make the best stories, right?
FAQs and Troubleshooting
Q: Can I make this recipe ahead of time?
Absolutely! You can prepare the jars a day in advance and keep them in the refrigerator until you’re ready to bake. Just add a couple of extra minutes to the baking time if they’re starting cold.
Q: What if my apples turn out mushy?
Using firmer apple varieties and not overbaking will help prevent mushiness. If they do seem soft, fear not! They’ll still taste delicious!
Q: Is it okay to use a different protein powder?
Definitely! You can substitute any protein powder you like—whey, plant-based, or even a flavored option for extra taste.
Q: Can I freeze the assembled jars?
Yes! Layer your ingredients and freeze them before baking. When you’re ready to enjoy, let them thaw in the fridge overnight, then bake as instructed.
Nutritional Info
While the exact nutritional information may vary based on the ingredients you use, each serving generally contains a healthy balance of protein, fiber, and healthy fats. It’s a cozy dessert that won’t sabotage your nutrition goals!
There you have it, folks! The Protein Apple Crisp Jar is not just a dessert; it’s a little piece of comfort that you can whip up anytime—whether you’re treating yourself or sharing with loved ones. I hope this recipe brings as much joy to your kitchen as it does to mine! Now, go on, grab those apples, and let’s make something special together. Happy cooking!
Print
Protein Apple Crisp Jar
- Total Time: 45 minutes
- Yield: 4 servings 1x
- Diet: Vegetarian
Description
A cozy dessert that combines sweet apples, crunchy topping, and a protein twist, perfect for any time of the year.
Ingredients
- 4 medium Apples (a mix of sweet and tart)
- 1 cup Rolled Oats
- 1 scoop Protein Powder
- 1/2 cup Brown Sugar or Coconut Sugar
- 2 tsp Cinnamon
- 1/4 cup Butter or Coconut Oil
- 1 tsp Vanilla Extract
- 1/4 tsp Salt
Instructions
- Preheat the oven to 350°F (175°C).
- Prep the apples by peeling, coring, and slicing them into thin wedges.
- Spice the sliced apples with brown sugar, cinnamon, and salt in a large bowl.
- Layer the spiced apples into jars.
- Prepare the crisp topping by combining oats, protein powder, remaining brown sugar, and cinnamon in a bowl.
- Melt the butter (or coconut oil) and mix it into the oat mixture until crumbly.
- Top each jar with the crisp topping and press down gently.
- Bake for 25-30 minutes until the topping is golden brown and apples are bubbling.
- Cool for a few minutes before serving.
- Serve with a scoop of ice cream or whipped cream.
Notes
Can be made ahead of time and stored in the refrigerator. Adjust baking time if jars are cold.
- Prep Time: 15 minutes
- Cook Time: 30 minutes
- Category: Dessert
- Method: Baking
- Cuisine: American
Nutrition
- Serving Size: 1 jar
- Calories: 350
- Sugar: 22g
- Sodium: 150mg
- Fat: 15g
- Saturated Fat: 6g
- Unsaturated Fat: 8g
- Trans Fat: 0g
- Carbohydrates: 48g
- Fiber: 5g
- Protein: 10g
- Cholesterol: 25mg
Keywords: apple crisp, dessert, healthy dessert, cozy dessert, protein dessert, gluten-free options
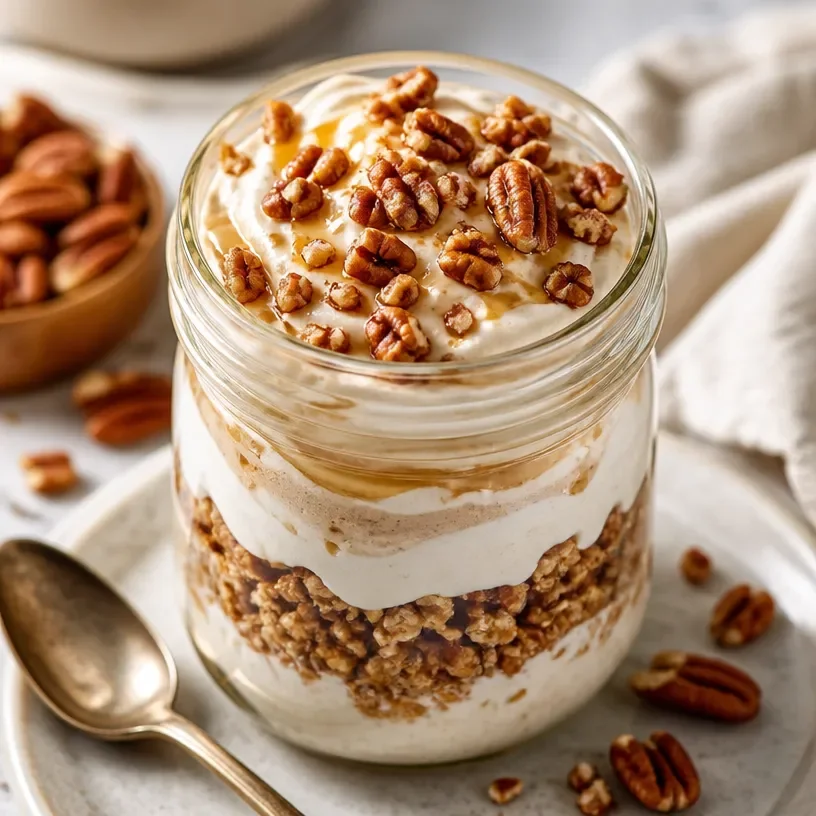
Protein Butter Pecan Jar: 15-Minute Protein Snack Prep
The Whimsical Delight of Protein Butter Pecan Jars
Welcome, fellow food enthusiasts, to another delicious journey in my cozy kitchen! Today, we’re diving into a delightful treat that pulls together nostalgia, health, and a guilty pleasure into one scrumptious package — the Protein Butter Pecan Jar. If you’ve ever mixed the joys of baking with the fun of cooking, you’re in for a stylish and satisfying adventure!
Imagine a creamy, nutty concoction mixed with the warm, buttery essence of pecans, all packed with protein to keep your energy up. Sounds dreamy, right? This recipe is not only a treat for your taste buds but also perfect for those of us who want a nutritious sweet fix without sacrificing flavor. You can enjoy it as a breakfast booster, a mid-afternoon pick-me-up, or even a dessert after dinner. Buckle up as we take a flavor-packed trip down memory lane while we prepare this magnificent jar of goodness!
A Spoonful of Nostalgia
Growing up, my kitchen was always alive with scents and laughter. One of my fondest memories was baking with my grandma on Sundays. She would whip up batches of her signature pecan pie that filled the house with a warmth like no other. I remember standing on a stool, watching her skillfully toast the pecans until they were just perfect — golden, crunchy, and oh-so-fragrant!
One day, she told me about using leftover pecans to create a rich butter with a delightful creaminess that would be perfect on toast or just slathered on a spoon. Years later, I decided to put my own twist on that tradition, combining her pecan butter idea with the modern need for protein and nutrition. And thus, the Protein Butter Pecan Jar was born! Every spoonful takes me back to my grandma’s kitchen, a reminder of simple pleasures and heartfelt moments.
Ingredients
Here’s what you need to whip up your very own Protein Butter Pecan Jar, plus some handy notes along the way:
- Pecans (1 cup, toasted): The star of the show! Toasting enhances the nutty flavor, making it richer. No pecans? Try walnuts or almonds instead!
- Creamy Peanut Butter (1/2 cup): Adds a luscious texture and boosts protein. You can use almond butter or cashew butter if you want a different flavor profile.
- Honey or Maple Syrup (2-3 tablespoons): Sweetness is the name of the game. Adjust according to taste — agave syrup works well too if you prefer a vegan option.
- Vanilla Extract (1 teaspoon): A dash of vanilla can elevate the flavor. Feel free to swap for almond extract for a unique twist!
- Protein Powder (1/3 cup): Choose your favorite — whey or plant-based. This adds the protein punch. For a nut-free version, look into pea protein.
- Cinnamon (1/2 teaspoon): A warm touch that pairs perfectly with the pecans. Nutmeg can also make an exciting substitution.
- Salt (a pinch): Just a pinch to elevate the flavors! If you’re salt-sensitive, you can omit this.
Step-by-Step Instructions
Now that we have our ingredient lineup, let’s get cooking! Grab your measuring cups and let’s create some magic.
-
Toast the Pecans: Preheat your oven to 350°F (175°C). Spread the pecans on a baking sheet in a single layer and roast for about 8-10 minutes. The fragrance will fill your kitchen; keep an eye on them to prevent burning. (Tip: Let them cool before you blend; it makes everything easier!)
-
Blend the Ingredients: In a high-speed blender or food processor, combine the toasted pecans, creamy peanut butter, honey or maple syrup, vanilla extract, and protein powder. (Chef’s hack: Start with a pulse function and then blend continuously for a smooth texture. Don’t forget to scrape down the sides.)
-
Add Cinnamon and Salt: Once you’ve reached a nice creamy consistency, add in the cinnamon and salt. Blend again for a few seconds to mix thoroughly.
-
Taste and Adjust: This is a crucial step! Spoon a little out to taste. Need more sweetness or nuttiness? Don’t hesitate to adjust with a bit more syrup or peanut butter.
-
Jar It Up: Transfer your lovely concoction into a clean jar. I love using mason jars for their rustic charm! It’s a great way to showcase the beautiful layers.
And there you have it! Your Protein Butter Pecan Jar is ready to impress.
Serving Suggestions
Serving this delightful treat is as easy as pie! You can enjoy it straight from the jar with a spoon (trust me, I won’t judge!), or if you’re feeling fancy, spread it on whole-grain toast with banana slices on top. For a sweet mid-afternoon snack, serve with apple slices or incorporate it into smoothies for a creamy protein boost!
Recipe Variations
Feeling adventurous? Here are a few creative twists to elevate your Protein Butter Pecan Jar:
- Coconut Pecan Delight: Stir in shredded unsweetened coconut for a tropical twist!
- Chocolate Lovers’ Dream: Add cocoa powder or chocolate chips to create a rich chocolate-pecan flavor.
- Spicy Kick: A pinch of cayenne pepper can add an unexpected and delightful heat.
- Fruit Fusion: Incorporate dried fruit like cranberries or raisins for added texture and sweetness.
Chef’s Notes
This recipe has been a journey of memories and flavor explorations for me. What started as a simple pecan butter has evolved into this protein-packed powerhouse you see today! I’ve played with countless iterations, and each time, it somehow tastes like a warm hug from my grandma. Plus, this jar is super versatile. Got leftovers? Use it in baking — it makes killer cookies!
FAQs and Troubleshooting
1. My pecan butter is too thick. What should I do?
No problem! Just add a little warm water or a splash of milk until you reach your desired consistency while blending.
2. Can I use sweeteners other than honey or syrup?
Absolutely! You can use stevia, monk fruit, or any sweetener of choice. Just adjust according to your taste preference.
3. How long will my Protein Butter Pecan Jar last?
Stored in the fridge, it should stay fresh for up to two weeks. However, I bet it won’t last that long!
4. I don’t have a food processor. Can I still make this?
Yes! Just chop the pecans finely, then mix everything by hand. It may take longer, but it’ll be worth it!
Nutritional Info (optional)
For those interested, a typical serving (1 tablespoon) of the Protein Butter Pecan Jar packs approximately 100 calories, 4g protein, 8g fat, and a touch of sweetness.
So there you have it, my delightful friends! The Protein Butter Pecan Jar is not just a recipe; it’s a celebration of flavors, memories, and shared moments. I hope you enjoy whipping this up as much as I do! Remember, cooking should always be fun–so don’t stress, get a little messy, and make it your own! Happy cooking, and cheers to flavors that bring us together!
Print
Protein Butter Pecan Jar
- Total Time: 20 minutes
- Yield: 12 servings 1x
- Diet: Vegetarian
Description
A creamy and nutty concoction of toasted pecans and protein-rich ingredients, perfect for breakfast, snacks, or dessert.
Ingredients
- 1 cup Pecans, toasted
- 1/2 cup Creamy Peanut Butter
- 2–3 tablespoons Honey or Maple Syrup
- 1 teaspoon Vanilla Extract
- 1/3 cup Protein Powder
- 1/2 teaspoon Cinnamon
- a pinch of Salt
Instructions
- Preheat your oven to 350°F (175°C). Spread the pecans on a baking sheet and roast for about 8-10 minutes.
- Combine the toasted pecans, creamy peanut butter, honey or maple syrup, vanilla extract, and protein powder in a blender.
- Add the cinnamon and salt once you reach a creamy consistency and blend again.
- Taste and adjust sweetness or nuttiness as needed.
- Transfer the mixture into a clean jar for storage.
Notes
This protein-packed treat is super versatile and can be used as a spread or added to various recipes.
- Prep Time: 10 minutes
- Cook Time: 10 minutes
- Category: Snack
- Method: Blending
- Cuisine: American
Nutrition
- Serving Size: 1 serving
- Calories: 100
- Sugar: 2g
- Sodium: 50mg
- Fat: 8g
- Saturated Fat: 1g
- Unsaturated Fat: 7g
- Trans Fat: 0g
- Carbohydrates: 6g
- Fiber: 1g
- Protein: 4g
- Cholesterol: 0mg
Keywords: pecan butter, protein snack, healthy spread, easy recipes
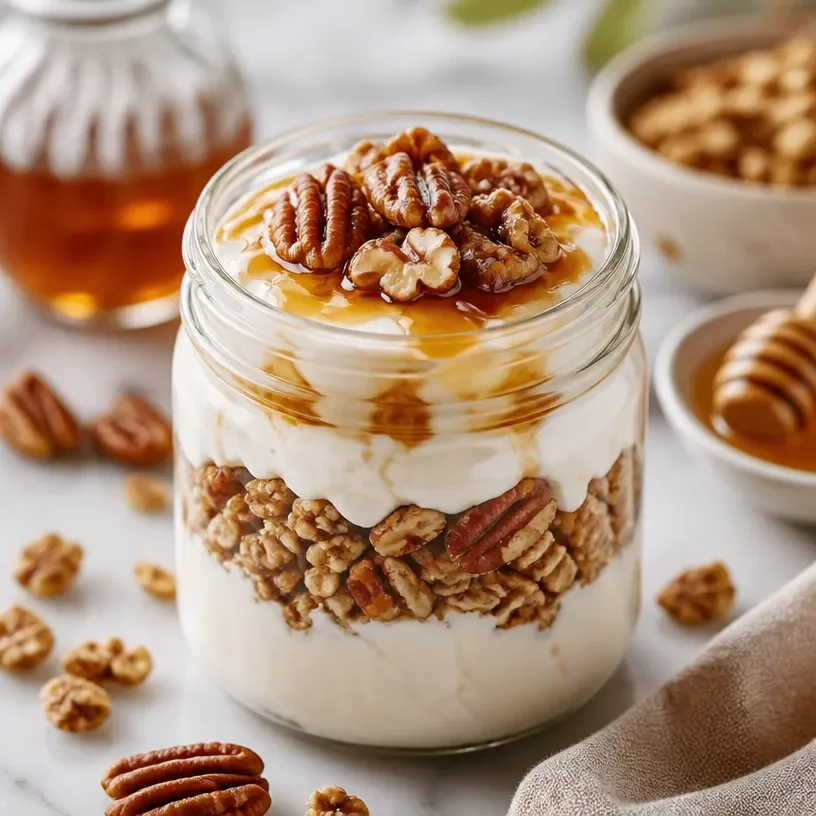
Protein Maple Pecan Jar: 5-Min No-Bake Morning Snack
Protein Maple Pecan Jar: A Cozy Treat for Anytime
Welcome back to my cozy kitchen, friends! If you’re anything like me, you know that some days need a little extra love, a sprinkle of sweetness, and perhaps a delightful crunch. Today, I’m thrilled to share a recipe that embodies all those feelings — the Protein Maple Pecan Jar! Perfect for breakfast, an on-the-go snack, or even dessert, this layered delight is as nutritious as it is delicious.
Picture this: you’re feeling a bit peckish, maybe you just came home from a long day or you’ve just wrapped up a workout. You want something that will satisfy that craving without the guilt. Enter the Protein Maple Pecan Jar! Its vibrant layers of creamy yogurt, crunchy pecans, and a drizzle of maple syrup create a beautiful balance of flavors and textures. Not only is it quick and easy to prepare, but it’s also customizable, so you can tailor it to suit your taste buds or what you have on hand.
Let’s dive into this scrumptious recipe together. I can’t wait to hear what you think!
A Spoonful of Memories
Every recipe holds a special place in my heart, but the Protein Maple Pecan Jar has a particularly warm spot. I vividly recall my early morning breakfast rituals with my grandmother. Our kitchen would wake up to the soft sound of jazz playing in the background while she mixed the ingredients for her famous granola. We often made a big batch, and the kitchen would fill with the intoxicating smell of toasted oats and pecans.
One day, as I brought her freshly chopped pecans, she suggested we create something new on the fly. We layered the granola with creamy yogurt and a drizzle of maple syrup. We called it “our breakfast in a jar.” It was such a simple idea yet held so much joy! Every bite reminded me of her love for food and family. Now, every time I make this Protein Maple Pecan Jar, I’m taken back to those lively mornings filled with laughter.
Ingredients
Here’s what you need to whip up your very own Protein Maple Pecan Jar:
-
Greek Yogurt: This creamy base is high in protein and adds tartness. If you prefer a non-dairy option, coconut yogurt works wonderfully too!
-
Pecans: The star of the dish! They add crunch and a slight sweetness. You can substitute walnuts or almonds if you’re looking for a change.
-
Maple Syrup: Pure maple syrup gives it that cozy sweetness. Honey can be used as an alternative, but it brings a different flavor profile.
-
Chia Seeds: These little powerhouses add fiber and healthy fats. If you don’t have any, you can omit them or replace them with flax seeds.
-
Cinnamon: Just a pinch adds warmth and depth of flavor. Feel free to swap with nutmeg or pumpkin spice for a seasonal twist.
-
Vanilla Extract: A splash makes everything better! If you’re out, almond extract can make a wonderful substitution.
-
Fruits (optional): Fresh berries or sliced bananas add freshness and extra nutrients. Swap them based on what’s in season or what you have in your kitchen!
Choosing high-quality, organic ingredients when possible will elevate this dish even further, so don’t hesitate to splurge on the pure stuff!
Step-by-Step Instructions
Ready to get cooking? Here’s how to bring your Protein Maple Pecan Jar to life!
-
Gather Your Ingredients: Before you start, gather all your ingredients together. Having everything at hand makes the process smooth and enjoyable. Plus, it minimizes kitchen chaos!
-
Prepare the Greek Yogurt: In a medium mixing bowl, add about 2 cups of Greek yogurt. If you’d like a smoother texture, you can whisk it for a minute or two. This also helps incorporate air, making it fluffier.
Chef Tip: If you want to sweeten it up, mix in a tablespoon of maple syrup directly into the yogurt. It’ll become wonderfully fragrant!
-
Toast the Pecans: In a dry skillet over medium heat, toast your pecans for about 5-7 minutes until they are fragrant. Stir them frequently to avoid burning.
Quick Note: If you’re short on time, pre-toasted pecans work well too, but fresh pecans have that unbeatable crunch!
-
Combine Chia Seeds: Mix in 2 tablespoons of chia seeds into the yogurt mixture alongside a sprinkle of cinnamon and a splash of vanilla extract. Stir well until combined.
-
Layering Time!: Grab your mason jar or serving glass. Start with a layer of the yogurt mixture at the bottom (about 1/3 full). Then, add a generous layer of toasted pecans for that irresistible crunch.
-
Repeat: Add another layer of yogurt, followed by a drizzle of maple syrup, and repeat the layering process until you reach the top of the jar. Finish with a final sprinkle of pecans and a drizzle of syrup for an eye-catching presentation.
-
Chill or Serve: You can enjoy your Protein Maple Pecan Jar right away, or pop it in the refrigerator to chill for about 30 minutes. The flavors meld even better when given a little time!
Serving Suggestion: Top it off with fresh berries or a dollop of whipped cream for an indulgent touch!
Recipe Variations
Feeling adventurous? Here are a few fun twists you can try:
-
Chocolate Lover’s Delight: Mix cocoa powder into your yogurt for a rich, chocolatey flavor. Top with shaved dark chocolate!
-
Nutty Banana Bliss: Slice a banana between the layers for a fruity surprise.
-
Pumpkin Spice Dreams: Incorporate pumpkin purée and pumpkin pie spice into the yogurt mix during fall for a seasonal treat.
-
Coconut Crunch: Swap in coconut yogurt and sprinkle some toasted coconut flakes for an island vibe.
-
Berry Goodness: Layer your pecans with mixed berries for bright colors and refreshing flavors.
Chef’s Notes
This Protein Maple Pecan Jar isn’t just a recipe — it’s my heart in a jar! I love how it has evolved over time, from a breakfast tradition with my grandmother to a go-to snack for my busy life. It’s been a joy to experiment with various ingredients and flavors, reminding me of the creativity and love we can infuse into our cooking.
And speaking of creativity, one time, I mixed up the chia seeds with some jam by accident. While trying to rescue my jar, I ended up with a delicious concoction that turned out to be a fan favorite! So, don’t be afraid to explore and make this recipe your own!
FAQs and Troubleshooting
1. What can I use in place of Greek yogurt?
If you prefer a non-dairy option, try using almond yogurt, coconut yogurt, or even silken tofu blended smooth!
2. How do I avoid soggy layers?
To keep layers distinct, ensure that your yogurt isn’t too runny. Adding chia seeds also helps absorb excess moisture and creates a nice thick texture.
3. Can I make it ahead of time?
Absolutely! These jars can be made a day in advance. Just be sure to keep the toppings separate until you’re ready to serve to maintain crunchiness.
4. What if I forget an ingredient?
No worries! Cooking is all about improvisation. Missing an ingredient? Go with what you have. The jar’s versatility allows for many substitutions, and you might stumble into a new favorite combination.
Nutritional Info (per serving, approx.)
- Calories: 350
- Protein: 20g
- Carbohydrates: 30g
- Fat: 15g
- Fiber: 7g
See how straightforward that was? Before you go, I’d love for you to try this recipe and share your thoughts — I can’t wait to see how your Protein Maple Pecan Jars turn out! Remember, cooking is about joy, creativity, and love, so have fun with every scoop. Happy cooking, and see you next time in my cozy kitchen!
Print
Protein Maple Pecan Jar
- Total Time: 30 minutes
- Yield: 2 servings 1x
- Diet: Vegetarian
Description
A deliciously layered treat of creamy yogurt, crunchy pecans, and a drizzle of maple syrup, perfect for breakfast or a snack.
Ingredients
- 2 cups Greek Yogurt
- 1 cup Pecans
- 2 tablespoons Maple Syrup
- 2 tablespoons Chia Seeds
- 1 teaspoon Cinnamon
- 1 teaspoon Vanilla Extract
- Fruits (optional): Fresh berries or sliced bananas
Instructions
- Gather your ingredients.
- Prepare the Greek yogurt in a medium mixing bowl.
- Toast the pecans in a dry skillet over medium heat.
- Combine chia seeds, cinnamon, and vanilla extract into the yogurt mixture.
- Layering time: Start with a layer of yogurt, then pecans.
- Repeat the layering process until the jar is full.
- Chill in the refrigerator for about 30 minutes before serving.
Notes
Feel free to customize this recipe with your favorite fruits or other mix-ins. Best enjoyed chilled.
- Prep Time: 10 minutes
- Cook Time: 7 minutes
- Category: Snack
- Method: Layering
- Cuisine: American
Nutrition
- Serving Size: 1 jar
- Calories: 350
- Sugar: 15g
- Sodium: 5mg
- Fat: 15g
- Saturated Fat: 2g
- Unsaturated Fat: 8g
- Trans Fat: 0g
- Carbohydrates: 30g
- Fiber: 7g
- Protein: 20g
- Cholesterol: 10mg
Keywords: protein snack, maple pecan, healthy dessert, layered yogurt, quick breakfast




