
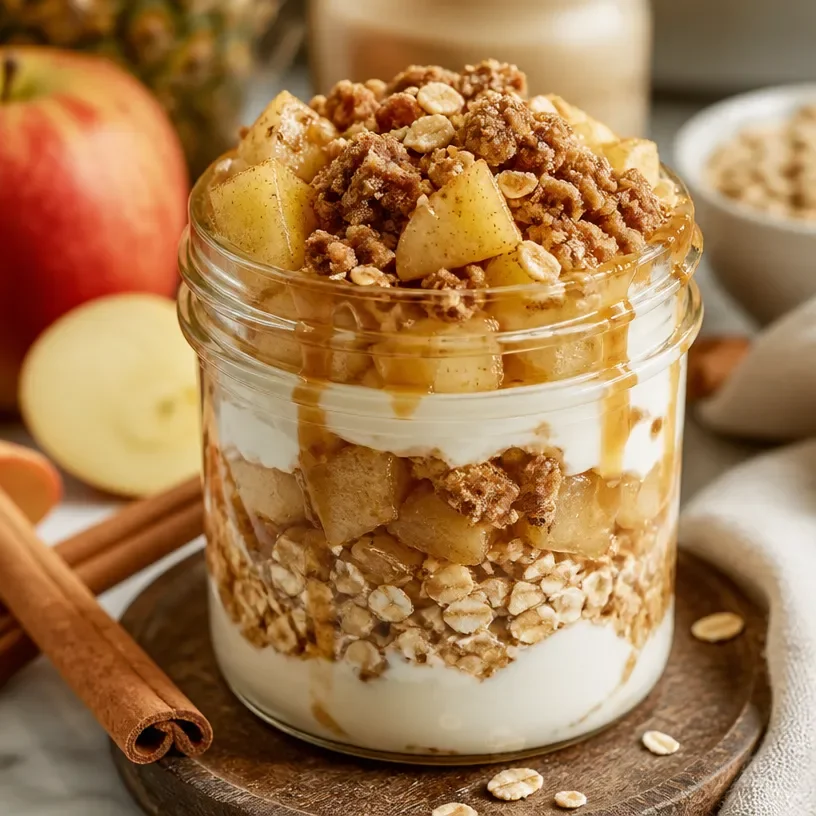
Protein Apple Crisp Jar
Protein Apple Crisp Jar: A Cozy Dessert with a Twist
Welcome to my kitchen! I’m so excited to share one of my all-time favorite recipes with you today: the Protein Apple Crisp Jar. This delightful dessert not only satisfies your sweet tooth but also packs a protein punch—perfect for those cozy nights in or as a make-ahead treat for the week!
Picture this: You’ve just finished a long day, and all you want is something warm and comforting. Maybe you’re snuggled up on the couch with your favorite blanket or gathered around the table with loved ones. The scent of sweet apples, cinnamon, and buttery crisp topping fills the air, creating an inviting atmosphere that welcomes everyone. That’s the essence of my Protein Apple Crisp Jar—it’s not just food; it’s a celebration of flavors and memories that make life beautiful.
I absolutely adore recipes that are as hearty as they are wholesome. Apple crisp is one of those nostalgic desserts that screams comfort—and when you throw in protein, it becomes a deliciously guilt-free indulgence. We all know that autumn brings an abundance of apples, but honestly, any time of year is a good time for this apple crisp. The best part? You can prep it in advance and have it on hand for quick desserts that feel like a big hug in a jar. So grab your spoon, and let’s dive into this cozy treat!
A Taste of Nostalgia
Growing up, my family’s kitchen was always bustling with the joy of cooking and the aroma of freshly baked goods. My mom had a knack for turning everyday ingredients into magical desserts that filled our home with warmth. One fall afternoon, I remember her making a classic apple crisp. As we peeled apples together, I couldn’t wait to taste the sweet filling and the crunchy topping. She would always let me steal bites of the cinnamon-sugar mixture before it even made it into the oven—a little taste of heaven!
That day, as we pulled the crisp out of the oven, the smell was intoxicating. We’d gather around the table, where bowls of creamy vanilla ice cream complemented the warm, gooey apple filling. It was moments like these that cemented my love for cooking and sharing food with those I adore. Now, I’ve swapped in a protein twist to this classic, making it a special treat that still carries the comfort of my roots. It’s amazing how flavors have the power to evoke memories and create new ones in the process!
Ingredients
Let’s gather our ingredients for this Protein Apple Crisp Jar. Here’s what you’ll need to make this deliciously cozy dessert:
-
Apples: A mix of sweet and tart varieties works best (like Honeycrisp and Granny Smith). If you don’t have fresh apples, you can use frozen ones!
-
Oats: Rolled oats create that signature crisp texture. If you’re gluten-free, look for certified gluten-free oats.
-
Protein Powder: Choose your favorite protein powder—whey, plant-based, or whatever you enjoy. You can even use a flavored variety for an extra flavor boost!
-
Brown Sugar or Coconut Sugar: Brown sugar adds depth and richness; coconut sugar is a great alternative if you’re aiming for less processed sweeteners.
-
Cinnamon: This warm spice is essential. Feel free to mix in a pinch of nutmeg for added warmth.
-
Butter or Coconut Oil: This adds richness to the topping and is what makes it all come together. If you’re vegan, coconut oil is a fantastic substitute.
-
Vanilla Extract: A little splash enhances the overall flavor; use pure vanilla for the best results.
-
Salt: Just a pinch brightens up the sweetness and balances the flavors.
These ingredients come together like a big group hug of flavor! They’re simple but impactful, resulting in a dish that turns heads while being surprisingly nutritious.
Step-by-Step Instructions
Now, let’s get started on making this delightful Protein Apple Crisp Jar. Follow these simple steps for a result that will blow your mind!
-
Preheat the Oven: Start by preheating your oven to 350°F (175°C). This is crucial to ensure your apple crisp bakes evenly and gets that beautiful golden brown color we all love.
-
Prep the Apples: Peel, core, and slice your apples into thin wedges. Aim for uniform sizes to promote even cooking. If you’re using a mix of apple varieties, this will add great depth to the flavor!
-
Spice It Up: In a large bowl, toss your sliced apples with a sprinkle of brown sugar (or coconut sugar), a spoonful of cinnamon, and a pinch of salt. Don’t hold back on the spices; they make all the difference.
-
Layer It Up: In your jars, start layering! Begin with a generous scoop of spiced apples at the bottom. Depending on the size of your jars, you might fill them halfway or just below the rim.
-
Prepare the Crisp Topping: In another bowl, combine the rolled oats, protein powder, remaining brown sugar, and cinnamon. Melt your butter (or coconut oil) and mix it in until everything is crumbly. This is where the magic happens!
-
Top It Off: Spoon the crisp topping over the layered apples in each jar. Press it down gently and make sure it’s evenly distributed. This creates that coveted crunchy topping that contrasts beautifully with the soft apples.
-
Bake to Perfection: Place your jars on a baking sheet (to catch any spills) and pop them into the preheated oven. Bake for about 25-30 minutes until the topping is golden brown and the apples are bubbling.
-
Cool Down: Once baked, let your jars cool for a few minutes. The aroma will be irresistible, so be patient! Enjoying hot apple crisp is delightful, but just let it sit for a moment to set.
-
Serve with Love: Top these protein-packed treats with a scoop of your favorite ice cream or dollop of whipped cream if you’re feeling indulgent.
Cooking doesn’t have to be complicated—when you break it down into steps, it becomes a fun and rewarding experience! Each step is an opportunity to savor the process and experiment with flavors.
Serving Suggestions
When it comes to serving, presentation is key! I love to arrange the jars on a rustic wooden board, showcasing each layer of vibrant apple and golden crisp. You can adorn each jar with a sprinkle of cinnamon, a drizzle of honey or maple syrup for added sweetness, or even a few fresh apple slices on the side. A scoop of vanilla ice cream perched atop the warm crisp brings it all together beautifully.
Recipe Variations
Want to switch things up a bit? Here are a few variations to play with your Protein Apple Crisp Jar:
-
Nutty Twist: Add chopped nuts like walnuts or pecans into the crisp topping for added crunch and healthy fats.
-
Berry Bonus: Mix in some fresh or frozen berries with the apple layer for a pop of color and delightful flavor.
-
Spicy Kick: Incorporate a dash of ginger or cardamom for an extra warm and cozy twist.
-
Sweeten It Up: Swap in maple syrup or honey instead of brown sugar for a different kind of sweetness.
-
Fruit Swap: Try this recipe with pears, peaches, or cherries—a delightful way to switch up the flavor profile based on the season!
Chef’s Notes
This recipe has evolved over the years as I’ve learned more about balancing flavors and textures. Initially, I would just make the classic apple crisp, but after experimenting with protein and health-conscious options, I discovered that you can create a delicious dessert that aligns with a balanced lifestyle. It’s funny how cooking allows you to adapt and innovate based on what you have on hand or what season you’re in.
Also, I have to admit… the first time I tried baking in jars, I accidentally overflowed them and ended up with a crispy apple mess in my oven! Now, I always use a baking sheet under my jars as a backup. The little kitchen escapades make the best stories, right?
FAQs and Troubleshooting
Q: Can I make this recipe ahead of time?
Absolutely! You can prepare the jars a day in advance and keep them in the refrigerator until you’re ready to bake. Just add a couple of extra minutes to the baking time if they’re starting cold.
Q: What if my apples turn out mushy?
Using firmer apple varieties and not overbaking will help prevent mushiness. If they do seem soft, fear not! They’ll still taste delicious!
Q: Is it okay to use a different protein powder?
Definitely! You can substitute any protein powder you like—whey, plant-based, or even a flavored option for extra taste.
Q: Can I freeze the assembled jars?
Yes! Layer your ingredients and freeze them before baking. When you’re ready to enjoy, let them thaw in the fridge overnight, then bake as instructed.
Nutritional Info
While the exact nutritional information may vary based on the ingredients you use, each serving generally contains a healthy balance of protein, fiber, and healthy fats. It’s a cozy dessert that won’t sabotage your nutrition goals!
There you have it, folks! The Protein Apple Crisp Jar is not just a dessert; it’s a little piece of comfort that you can whip up anytime—whether you’re treating yourself or sharing with loved ones. I hope this recipe brings as much joy to your kitchen as it does to mine! Now, go on, grab those apples, and let’s make something special together. Happy cooking!
Print
Protein Apple Crisp Jar
- Total Time: 45 minutes
- Yield: 4 servings 1x
- Diet: Vegetarian
Description
A cozy dessert that combines sweet apples, crunchy topping, and a protein twist, perfect for any time of the year.
Ingredients
- 4 medium Apples (a mix of sweet and tart)
- 1 cup Rolled Oats
- 1 scoop Protein Powder
- 1/2 cup Brown Sugar or Coconut Sugar
- 2 tsp Cinnamon
- 1/4 cup Butter or Coconut Oil
- 1 tsp Vanilla Extract
- 1/4 tsp Salt
Instructions
- Preheat the oven to 350°F (175°C).
- Prep the apples by peeling, coring, and slicing them into thin wedges.
- Spice the sliced apples with brown sugar, cinnamon, and salt in a large bowl.
- Layer the spiced apples into jars.
- Prepare the crisp topping by combining oats, protein powder, remaining brown sugar, and cinnamon in a bowl.
- Melt the butter (or coconut oil) and mix it into the oat mixture until crumbly.
- Top each jar with the crisp topping and press down gently.
- Bake for 25-30 minutes until the topping is golden brown and apples are bubbling.
- Cool for a few minutes before serving.
- Serve with a scoop of ice cream or whipped cream.
Notes
Can be made ahead of time and stored in the refrigerator. Adjust baking time if jars are cold.
- Prep Time: 15 minutes
- Cook Time: 30 minutes
- Category: Dessert
- Method: Baking
- Cuisine: American
Nutrition
- Serving Size: 1 jar
- Calories: 350
- Sugar: 22g
- Sodium: 150mg
- Fat: 15g
- Saturated Fat: 6g
- Unsaturated Fat: 8g
- Trans Fat: 0g
- Carbohydrates: 48g
- Fiber: 5g
- Protein: 10g
- Cholesterol: 25mg
Keywords: apple crisp, dessert, healthy dessert, cozy dessert, protein dessert, gluten-free options
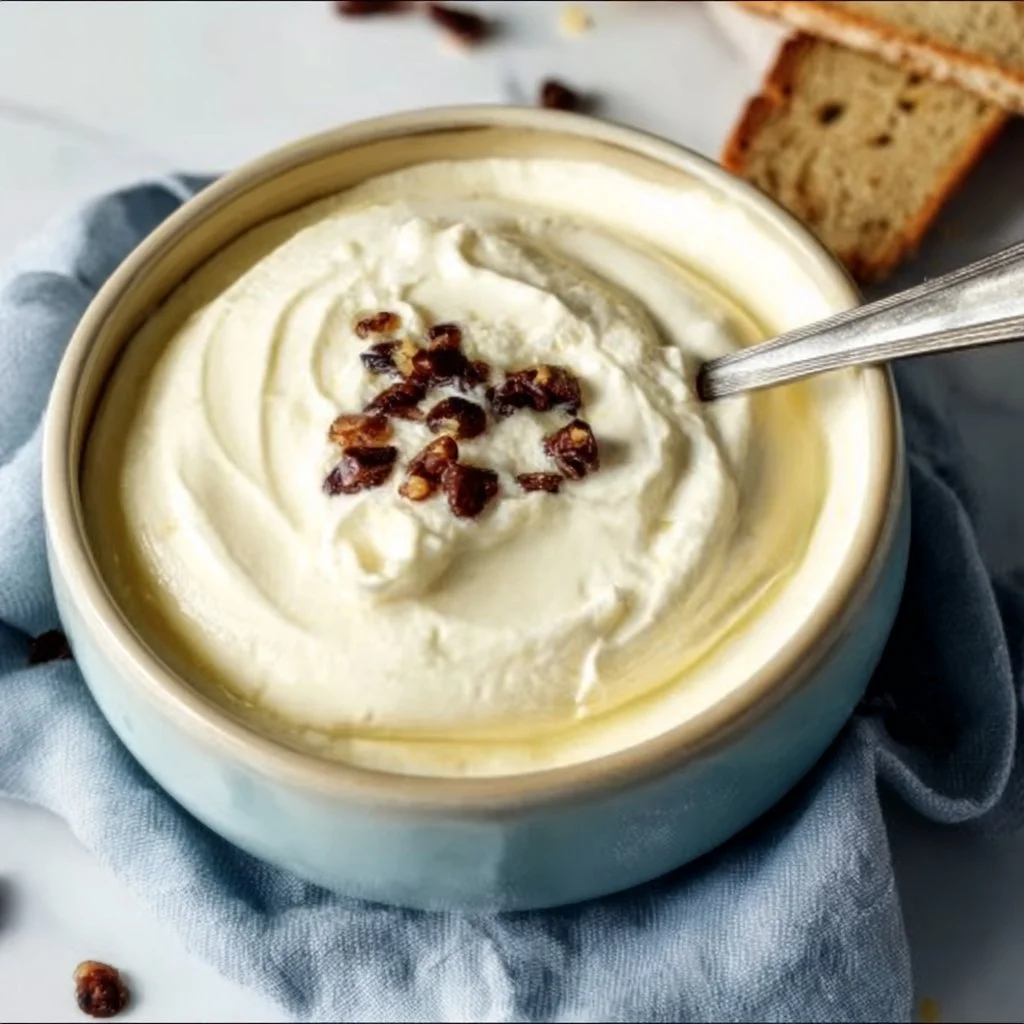
Baked Greek Yogurt: Quick, Healthy Protein Packed Breakfast
# Baked Greek Yogurt: Quick, Healthy, Protein-Packed Breakfast

## Introduction

Welcome to my cozy kitchen, friends! Today, we're diving into a delightful breakfast that will change the way you think about starting your day. Say goodbye to the mundane bowl of cereal and hello to Baked Greek Yogurt. Yes, you heard me right! This recipe not only packs a punch of protein but also offers a warm, comforting twist that will make you want to leap out of bed.

Baked Greek yogurt is a simple yet satisfying dish that brings joy to your morning routine. Picture this: you open your oven to reveal a golden-brown, fluffy delight topped with your favorite fruits and a drizzle of honey. It’s like a hug in breakfast form! And the best part? You can personalize it to match your mood or the season.

Let’s not forget the health benefits – Greek yogurt is a powerhouse of protein and probiotics, perfect for getting your digestion in check while also keeping you full and energized. Whether you’re rushing to work or enjoying a lazy weekend brunch with family, this dish effortlessly fits into any scenario. Plus, it’s quick to whip up on busy mornings, making breakfast a breeze!

So, grab your favorite apron and let’s get baking! This recipe is about to become your new breakfast superstar. It’s time to transform a simple ingredient into something that feels like a special treat. Ready? Let’s jump in!

## Personal Story

Growing up, breakfast was a big deal in our house. My mom had a knack for turning simple ingredients into unforgettable meals, and one of my absolute favorites was her baked yogurt. I can still remember waking up to the sweet aroma wafting through the house; it was always a delightful surprise to discover what flavor she had whipped up that morning.

I fondly remember one winter morning when it was snowing outside, and the warmth of the kitchen was heavenly. My mom made baked Greek yogurt topped with warm cinnamon apples, and we all gathered around the table, cozy in our pajamas. Our laughter filled the space as we enjoyed every spoonful while listening to soft music in the background. Those moments ignited my passion for cooking and my deep love for sharing food with friends and family.

Today, I’m excited to recreate that experience and share it with you. A little nostalgia goes a long way in our kitchens, and I hope this recipe brings as much joy to your mornings as it did to mine.

## Ingredients

Here’s what you’ll need to create this mouthwatering Baked Greek Yogurt:

- **2 cups Greek yogurt**
  - **Insight**: Opt for plain unsweetened to control the sweetness. It’s creamy, rich, and full of protein.

- **2 large eggs**
  - **Substitution Tip**: To make this recipe vegan, use flaxseed meal (1 tablespoon mixed with 2.5 tablespoons of water) for each egg.

- **1/4 cup honey or maple syrup**
  - **Insight**: Adjust sweetness according to your taste! You could also try agave nectar or coconut sugar for a different flavor.

- **1 teaspoon vanilla extract**
  - **Chef Tip**: Using pure vanilla extract elevates the flavor. Homemade vanilla extract is even better!

- **1/2 teaspoon baking powder**
  - **Insight**: This helps your yogurt bake up light and fluffy. Don’t skip it!

- **Toppings**: Your choice! Fruits, nuts, granola, or a sprinkle of cinnamon.
  - **Insight**: Fresh berries are fantastic in the summer, while roasted apples or pears work wonders in the fall.

## Step-by-Step Instructions

### Step 1: Preheat Your Oven
First things first, preheat your oven to 350°F (175°C). This step sets the stage for a perfectly baked yogurt.

### Step 2: Mix the Ingredients
In a large mixing bowl, combine the Greek yogurt, eggs, honey (or maple syrup), vanilla extract, and baking powder. Mix with a whisk until all ingredients are thoroughly blended. Don’t worry if it looks a little lumpy at this stage; it will smooth out beautifully as it bakes!

### Step 3: Prepare a Baking Dish
Lightly grease an 8x8-inch baking dish or a medium-sized cast-iron skillet with cooking spray or a little olive oil. This prevents any sticking and helps achieve a gorgeous color on the edges.

### Step 4: Pour and Spread
Pour the yogurt mixture into the greased baking dish. Use a spatula to spread it evenly, smoothing the top for a lovely finish.

### Step 5: Get Creative with Toppings
Here’s where you can have some fun! Sprinkle your choice of toppings over the yogurt mixture. I love using a mix of fresh sliced strawberries and a handful of crunchy granola. But feel free to experiment with what’s in season or what you have on hand.

### Step 6: Bake it Up
Place your dish in the preheated oven and bake for 25-30 minutes. Keep an eye on it as it bakes – you’re looking for a light golden top and a slight jiggle in the center. The edges should be puffed and set, while the middle might still be a touch soft.

### Step 7: Cool & Serve
Once it’s done baking, remove it from the oven and let it cool for about 5-10 minutes. This allows it to firm up just enough for easy serving. You can cut it into squares or serve it right from the dish.

## Serving Suggestions

Serve your baked Greek yogurt warm, straight from the oven, or let it cool slightly and plate it up with a drizzle of honey or a dollop of yogurt on top. It’s delightful with a side of fresh fruit or a sprinkle of nuts for crunch – perfect for elevating your breakfast experience!

## Recipe Variations

- **Berry Blast**: Add a blend of fresh or frozen berries mixed into the yogurt for a fruity twist.
- **Tropical Escape**: Mix in crushed pineapple and coconut flakes for a summery vibe.
- **Chocolate Delight**: Stir in some cocoa powder or chocolate chips for a rich, indulgent breakfast treat.
- **Nutty Banana**: Top with sliced banana and a drizzle of peanut butter for an extra protein boost.
- **Savory Twist**: Consider adding herbs like rosemary or thyme and topping with sautéed mushrooms or spinach for a savory breakfast version.

## Chef's Notes

This recipe has been a staple in my kitchen for years! I love how easy it is to tweak depending on what’s in the fridge or the season. Plus, I have to confess, I've had my share of “kitchen disasters” – like the time I forgot to add the eggs and ended up with a yogurt pudding instead. But hey, they say every great chef has their stories, right? Embrace the mess, enjoy the journey, and remember that every mishap is just a delicious learning experience!

## FAQs and Troubleshooting

**1. Can I make this ahead of time?**
Yes! You can prepare the mixture the night before and refrigerate it. Just bake it in the morning when you're ready to enjoy.

**2. It turned out too runny — what happened?**
If your yogurt mixture ends up too runny, it might be due to underbaking. Make sure it’s set and not too jiggly in the center before removing it from the oven.

**3. Can I add protein powder to this recipe?**
Absolutely! Just replace a portion of the Greek yogurt with protein powder, but you may need to add a bit more liquid to maintain the right consistency.

**4. How do I store leftovers?**
Store any leftovers in an airtight container in the refrigerator for up to 3 days. You can reheat it in the microwave for a quick breakfast!

## Nutritional Info

- **Calories**: Approximately 150 per serving (based on 8 servings)
- **Protein**: 10g
- **Carbohydrates**: 15g
- **Fat**: 6g

With this Baked Greek Yogurt recipe, you’re not just making breakfast; you’re creating memories, sharing joy, and enjoying all the goodness that comes from cooking. Each bite brings warmth and smiles, making every morning a little brighter. Happy baking, foodies! 🍽️

Baked Greek Yogurt
- Total Time: 40 minutes
- Yield: 4 servings 1x
- Diet: Vegetarian
Description
A warm, protein-packed baked yogurt delight, perfect for breakfast.
Ingredients
- 2 cups Greek yogurt (plain, unsweetened)
- 2 large eggs
- 1/4 cup honey or maple syrup
- 1 teaspoon vanilla extract
- 1/2 teaspoon baking powder
- Toppings: fruits, nuts, or granola of your choice
Instructions
- Preheat your oven to 350°F (175°C).
- Mix the Greek yogurt, eggs, honey (or maple syrup), vanilla extract, and baking powder in a large bowl.
- Prepare an 8×8-inch baking dish or cast-iron skillet by greasing it lightly.
- Pour the yogurt mixture into the greased dish and smooth the top with a spatula.
- Get creative by adding your favorite toppings on top.
- Bake for 25-30 minutes until lightly golden and set around the edges.
- Cool for 5-10 minutes, then serve warm.
Notes
Feel free to personalize with seasonal fruits or favorite toppings.
- Prep Time: 10 minutes
- Cook Time: 30 minutes
- Category: Breakfast
- Method: Baking
- Cuisine: Mediterranean
Nutrition
- Serving Size: 1 serving
- Calories: 150
- Sugar: 10g
- Sodium: 80mg
- Fat: 6g
- Saturated Fat: 2g
- Unsaturated Fat: 2g
- Trans Fat: 0g
- Carbohydrates: 15g
- Fiber: 1g
- Protein: 10g
- Cholesterol: 50mg
Keywords: baked yogurt, healthy breakfast, quick breakfast, protein-packed breakfast




