
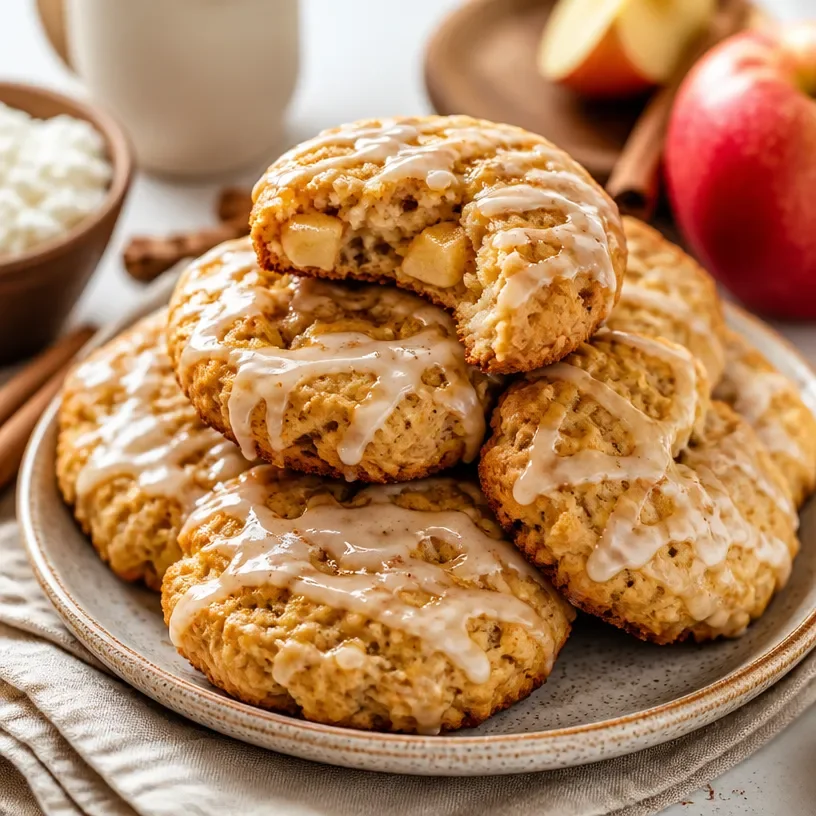
High-Protein Cottage Cheese Apple Pie Cookies for Meal Prep
Protein Cottage Cheese Apple Pie Cookies: A Delicious Twist on a Classic
Welcome back, food lovers! I’m so thrilled you’re here, ready to dive into a delightful recipe that merges the cozy, comforting flavors of a classic dessert with a fun, protein-packed spin. Today’s star is none other than the Protein Cottage Cheese Apple Pie Cookies! These little gems are not just cookies—they are a heartwarming blend of nostalgia and nutrition, making them perfect for a snack, dessert, or even a breakfast treat. Who says you can’t have cookies for breakfast, am I right?
Now, let me take you back to one of my fondest kitchen memories. It was a crisp autumn afternoon, and the air was filled with the scent of cinnamon and freshly baked apple pie. My grandma, with her flour-dusted apron and twinkling eyes, was the mastermind behind it all. I fondly recall standing on a stool, desperately trying to help her peel apples while she shared stories of her childhood in the countryside. The bubbling buttery goodness of the pie filling and the warmth of the oven created a sense of magic in our kitchen. Fast forward to today, and those memories are etched in my heart, inspiring me to create a healthier version of those sweet treats we used to make together.
These Protein Cottage Cheese Apple Pie Cookies not only carry the essence of my beloved grandma’s apple pie but also incorporate the benefits of cottage cheese. Yes, you heard that right! Cottage cheese is a fantastic source of protein, adds creaminess, and keeps our cookies moist, all while taking the flavor to a whole new level. So, grab your spatula and let’s create some kitchen magic together!
Ingredients
Here’s what you’ll need to whip up these delightful cookies:
-
1 cup cottage cheese
- A surprise ingredient that adds protein and moisture to our cookies. Low-fat or full-fat options work! If you’re not a fan of cottage cheese, Greek yogurt can be a good substitute.
-
1 cup old-fashioned oats
- Whole grain and hearty, oats provide the perfect texture and a boost of fiber. If you’re gluten-free, use gluten-free oats for a safe swap.
-
1 cup apple sauce
- Sweet and naturally flavorful, apple sauce replaces some of the added sugars. You can also use mashed bananas for a different twist!
-
1 medium apple, diced
- Fresh apples bring that classic apple pie flavor. Granny Smith apples are great for a tart touch, while Honeycrisp adds sweetness.
-
1 tsp cinnamon
- The warm spice that makes everything nice! Feel free to experiment with nutmeg or allspice for additional depth.
-
1/2 tsp vanilla extract
- A splash adds a lovely bouquet of flavor. Try almond extract for a unique twist.
-
1/4 cup honey or maple syrup
- A natural sweetener to bring everything together. For a lower glycemic option, consider using stevia or agave syrup.
-
1/2 cup whole wheat flour (or almond flour for gluten-free)
- This binds it all together while providing some nutritious benefits. Almond flour adds a lovely nuttiness.
-
1 tsp baking powder
- To help our cookies rise and become deliciously fluffy. Make sure it’s fresh for the best results!
-
Pinch of salt
- Don’t skip the salt! It enhances all the flavors.
Step-by-Step Instructions
-
Preheat your oven to 350°F (175°C). Oh, that warm air filling your kitchen is the best! It sets the stage for our baking adventure.
-
Prepare your baking sheet by lining it with parchment paper. This little trick ensures your cookies don’t stick and makes cleanup a breeze!
-
In a large mixing bowl, combine the cottage cheese, apple sauce, and vanilla extract. Use a fork or a whisk to blend them until they’re smooth and creamy. This is where the magic starts—those flavors will meld together beautifully.
-
Now, add the diced apple, oats, cinnamon, honey (or maple syrup), and any optional spices. Stir everything gently; we want that delicious apple and spice mixture to be evenly distributed.
-
Next, sprinkle in the flour, baking powder, and salt. Fold the mixture until just combined. Resist overmixing; we want the moisture to stay intact.
-
Using a cookie scoop or just a spoon, drop rounded tablespoons of the dough onto your prepared baking sheet. Leave a little space between them; they’ll spread a smidge while baking.
-
Bake in your preheated oven for about 15-20 minutes, or until they turn golden brown around the edges. The aroma wafting through your kitchen will have everyone asking, “What’s baking?”
-
Once done, let them cool on the baking sheet for about 5 minutes, then transfer them to a wire rack to cool completely. Trust me; the waiting will be worth it!
Serving Suggestions
These Protein Cottage Cheese Apple Pie Cookies are perfect on their own but can be elevated in a few delightful ways! Serve them warm with a dollop of Greek yogurt on top or a drizzle of honey. They also pair beautifully with a cup of chai tea or a tall glass of cold almond milk. For a fun twist, sprinkle some crushed nuts or granola over them for an added crunch when serving.
Recipe Variations
Want to switch things up? Here are a few creative twists you can try:
- Nutty Apple Pie Cookies: Add a handful of walnuts or pecans for extra crunch and flavor.
- Spiced Chai Twist: Mix in a teaspoon of chai spice for a delightful kick.
- Dried Fruits: Throw in some raisins or dried cranberries for a chewy texture difference.
- Chocolate Drizzle: Drizzle some melted dark chocolate over the cooled cookies for a decadent touch.
- Sugar-Free Option: Swap honey for a sugar-free syrup for a lighter treat!
Chef’s Notes
These cookies are a journey through my kitchen nostalgia! The original idea stemmed from experimenting with healthier ingredients while trying to preserve the essence of that warm apple pie flavor my grandma perfected. A happy accident occurred when I realized how much more texture and protein cottage cheese added to the cookies. It went from being an experiment to a household favorite!
If you find yourself with leftover cookies (as if!), they store well in an airtight container for about a week or can be frozen for up to three months. But let’s be honest—you’ll probably eat them all within a few days, right?
FAQs and Troubleshooting
Q: Why are my cookies flat?
A: If your cookies spread too much, ensure you’ve measured your flour correctly. Also, check that your baking powder is fresh as it’s essential for proper rising.
Q: Can I use flavored cottage cheese?
A: Sure! Just be mindful of the additional sweetness or flavor it may contribute, which can alter the final taste.
Q: How do I know when they’re done baking?
A: Look for a golden-brown edge and a slightly soft center that will firm up as they cool. If they’re too soft, they likely need a few more minutes.
Q: Can I make these vegan?
A: Absolutely! Use a dairy-free yogurt instead of cottage cheese, and replace honey/maple syrup with agave or date syrup.
Nutritional Info
Each cookie has approximately 90 calories, 4g of protein, and 2g of dietary fiber. They’re a guilt-free indulgence that satisfies your sweet tooth while offering nutrients and energy for your day.
With each bite of these Protein Cottage Cheese Apple Pie Cookies, you not only experience a taste of comfort but also a healthy twist that can fit into your daily routine. So, grab your apron, channel that cozy vibe, and bake up a batch (or two!). I can’t wait to hear how they turn out for you. Until next time, happy cooking! 🍏🍏
Print
Protein Cottage Cheese Apple Pie Cookies
- Total Time: 30 minutes
- Yield: 12 cookies 1x
- Diet: Protein-rich, Vegetarian
Description
Delicious cookies that merge classic apple pie flavors with protein-packed cottage cheese for a healthier twist.
Ingredients
- 1 cup cottage cheese
- 1 cup old-fashioned oats
- 1 cup apple sauce
- 1 medium apple, diced
- 1 tsp cinnamon
- 1/2 tsp vanilla extract
- 1/4 cup honey or maple syrup
- 1/2 cup whole wheat flour (or almond flour for gluten-free)
- 1 tsp baking powder
- Pinch of salt
Instructions
- Preheat your oven to 350°F (175°C).
- Prepare your baking sheet by lining it with parchment paper.
- In a large mixing bowl, combine the cottage cheese, apple sauce, and vanilla extract until smooth and creamy.
- Add the diced apple, oats, cinnamon, honey (or maple syrup), and any optional spices. Stir gently.
- Sprinkle in the flour, baking powder, and salt. Fold until just combined.
- Using a cookie scoop, drop rounded tablespoons of dough onto the prepared baking sheet.
- Bake for about 15-20 minutes, or until golden brown around the edges.
- Let them cool on the baking sheet for about 5 minutes, then transfer to a wire rack to cool completely.
Notes
These cookies store well in an airtight container for about a week or can be frozen for up to three months.
- Prep Time: 10 minutes
- Cook Time: 20 minutes
- Category: Dessert
- Method: Baking
- Cuisine: American
Nutrition
- Serving Size: 1 cookie
- Calories: 90
- Sugar: 5g
- Sodium: 100mg
- Fat: 3g
- Saturated Fat: 1g
- Unsaturated Fat: 2g
- Trans Fat: 0g
- Carbohydrates: 15g
- Fiber: 2g
- Protein: 4g
- Cholesterol: 5mg
Keywords: cookie, apple pie, protein, dessert, healthy treat

High-Protein Pumpkin Cottage Cheese Cheesecake (No-Bake)
Protein Cottage Cheese Pumpkin Cheesecake: A Cozy Delight
Welcome back to my kitchen, cozy friends! Today, we’re diving into a dish that’s going to warm up your home and put a huge smile on your face. It’s a delightful Protein Cottage Cheese Pumpkin Cheesecake that’s perfect for both dessert lovers and those who want to sneak in a bit of protein. Now, I know cheesecake might sound indulgent, but believe me, this recipe keeps things light while still being utterly scrumptious and satisfying.
As the leaves begin to change and the air turns crisp, there’s something inherently comforting about the scent of pumpkin mixed with warm spices wafting through the kitchen. Today, we’re creating a dessert that merges the traditional flavors of pumpkin pie with the creamy, rich texture of cheesecake, all while packing a protein punch with cottage cheese. What’s not to love?
Imagine gathering around the table, sharing slices of this silky cheesecake, and knowing you’ve created something special. It’s just another reason why I’m passionate about cooking; it brings people together! Plus, with a few simple ingredients and straightforward steps, even if you’re brand new to the kitchen, you’ll find yourself whipping up this gem before you know it.
So, grab your apron, a good playlist, and let’s get cooking!
A Slice of Nostalgia
Before we dive into the nitty-gritty of the recipe, allow me to share a sweet memory that sparked my love for pumpkin desserts. It was during the fall of my college years, and I was hosting my very first Thanksgiving dinner for friends who were away from home. This gathering felt like an adventure; we were all a mix of excitement and nerves as we gathered to learn and share recipes, decorate the space, and create our own little festive experience.
My roommate, Sarah, and I decided to tackle the pumpkin dessert. We knew we wanted something that would not only satisfy our sweet tooth but also remind us of cozy family traditions. After a bit of trial and error in the kitchen (and a fair amount of playful chaos), we ended up creating a version of pumpkin cheesecake, complete with a crunchy graham cracker crust and a creamy filling.
As our friends entered the kitchen, the sweet aroma of pumpkin and spices filled the air, and we could see their faces light up. We spent the evening dining, reminiscing about holidays past, bonding over our culinary creations, and laughing until our sides hurt. That experience ignited a love for cooking in me, a desire to recreate those family traditions in my own way.
That’s the beauty of cooking: it’s as much about the food as it is about the memories we create around it. So, let’s make a cheesecake today that not only tastes amazing but also gives you the chance to create your own cherished moments!
Ingredients
Here’s what you’ll need to create this scrumptious Protein Cottage Cheese Pumpkin Cheesecake:
-
Cottage Cheese (2 cups)
The star of our recipe! Cottage cheese provides a creamy texture and a boost of protein, making this cheesecake a tad healthier than traditional varieties. If you’re looking for a smoother texture, opt for whipped cottage cheese, or blend regular cottage cheese in the mixer! -
Pumpkin Puree (1 cup)
Use canned pumpkin puree for convenience, or make your own by roasting fresh pumpkin. It’s rich in flavors and packed with nutrients, especially beta-carotene. Just be sure to avoid pumpkin pie filling, as it contains added sugar and spices. -
Eggs (3 large)
They provide structure and richness, binding the ingredients together for that perfect cheesecake consistency. For a vegan option, you can try using flaxseed meal or chia seeds mixed with water as an egg substitute. -
Greek Yogurt (1/2 cup)
This adds creaminess and tang, balancing the sweetness of pumpkin. Feel free to use regular yogurt if that’s what you have on hand. Simply swap it 1:1, but Greek yogurt has that extra protein boost! -
Maple Syrup (1/2 cup)
A natural sweetener that complements the pumpkin flavor beautifully. You can also substitute honey or agave syrup if that’s what you prefer. Just keep in mind it will slightly alter the flavor. -
Vanilla Extract (1 tsp)
Pure vanilla extract enhances the overall flavor profile, elevating the cheesecake to new heights. The aroma alone is worth adding! -
Pumpkin Spice (1 tsp)
A must-have! If you don’t have pumpkin spice, a combination of cinnamon, nutmeg, and allspice will do the trick. This warm spice blend is what makes your cheesecake feel like a cozy hug. -
Graham Cracker Crumbs (1.5 cups)
For the crust, these add that irresistible crunch and sweetness. Gluten-free options are available; just replace them with your favorite gluten-free crackers or nut-based crust. -
Butter (1/4 cup, melted)
To bind the crust together, use any unsalted butter. If you’d like, coconut oil is a fantastic substitute, imparting a subtle flavor twist. -
Salt (a pinch)
Enhances all the flavors, ensuring a balanced sweetness. Don’t skip it; it makes a world of difference!
With these ingredients, you’re set to create a cheesecake that not only looks fabulous but also tastes extraordinary! Now, let’s roll up our sleeves and get to the fun part—making it!
Step-by-Step Instructions
-
Prepare the Crust:
Start by preheating your oven to 350°F (175°C). In a mixing bowl, combine the graham cracker crumbs and melted butter until it resembles wet sand. Press this mixture firmly into the bottom of a greased 9-inch springform pan. Remember, this crust is your base, so make it sturdy! Use the back of a measuring cup to help compact it evenly. -
Bake the Crust:
Place the pan in the preheated oven and bake for about 10 minutes. This helps set the crust, giving it a delightful crunch. Keep an eye on it; you don’t want it to get too brown! -
Mix the Filling:
While the crust is baking, in a large mixing bowl, add the cottage cheese and blend it using an immersion blender or food processor until smooth and creamy. This step is crucial; it’ll ensure your cheesecake isn’t lumpy.Once smooth, add the pumpkin puree, Greek yogurt, eggs, maple syrup, vanilla extract, pumpkin spice, and salt. Blend until everything is fully incorporated. Take a moment to taste the filling—yum! Isn’t it delightful? Adjust the sweetness if necessary.
-
Combine with the Crust:
After the crust has cooled slightly, pour the pumpkin filling over the top, spreading it evenly with a spatula. This is where the magic starts to happen; your cheesecake is coming to life! -
Bake the Cheesecake:
Return the springform pan to the oven and bake for 45-55 minutes, or until the edges are set and the center has a slight jiggle. The cheesecake will puff up and might crack slightly as it cools—don’t worry; that’s normal! -
Cool Down:
Once baked, turn off the oven, crack the door open, and let the cheesecake cool in the oven for an hour. This gentle cooling process helps prevent cracks. After an hour, remove it from the oven and chill it in the fridge for at least 4 hours, preferably overnight. Patience is key! -
Slice and Serve:
When you’re ready to serve, run a knife around the edges of the springform pan and carefully remove the sides. Use a sharp knife to cut slices, wiping the blade with a damp cloth in between cuts for clean edges—trust me, it makes a difference!
Serving Suggestions
There’s something about presentation that can elevate dessert! Serve your Protein Cottage Cheese Pumpkin Cheesecake chilled, topped with a dollop of whipped cream and a sprinkle of cinnamon or nutmeg. You might even want to add some candied pecans or walnuts for that extra crunch. Part of the fun is getting creative with your toppings!
If you’re feeling adventurous, drizzle a little extra maple syrup over the top before serving for a sweet finishing touch. Trust me, your guests (or family!) will be raving about this cheesecake for days!
Recipe Variations
-
Chocolate Pumpkin Cheesecake: Add cocoa powder to the filling for a delicious chocolate twist. Substitute half of the cottage cheese with chocolate-flavored protein powder for an extra yummy layer.
-
Nutty Crust: Swap out graham crackers for crushed nuts (almond or pecans) mixed with dates and coconut oil for a grain-free version that adds a unique flavor!
-
No-Bake Version: To make a no-bake cheesecake, use a gelatin or agar-agar alternative to set the filling instead of baking. Make sure you let it chill until firm!
-
Skim or Nonfat Options: Swap full-fat cottage cheese and yogurt for skim or nonfat versions to make it lighter without losing too much creaminess.
-
Spiced it Up: Add some finely grated ginger or cardamom to the filling for an exotic twist that takes the traditional pumpkin flavors to a whole new level.
Chef’s Notes
This recipe has evolved quite a bit over the years! It started as a full-fat cheesecake, and I can distinctly remember sneaking a piece after everyone had gone home and savoring that rich, creamy goodness. Over time, I realized I wanted to create something more balanced that would fit into my healthier lifestyle while still being utterly delicious.
Funny enough, I once forgot to add the eggs in an early version of this recipe. Cue a freak-out moment! It ended up being a super creamy pumpkin pudding instead of a cheesecake. Although it wasn’t what I intended, it became a family favorite that year for topping off pies—we learned to embrace happy accidents in the kitchen!
FAQs and Troubleshooting
1. Why did my cheesecake crack?
Cracking is normal, especially with pumpkin cheesecakes. To prevent this, ensure you don’t overbake your cheesecake, and allow it to cool slowly in the oven. Also, consider placing a pan of water on the oven rack below during baking to create humidity.
2. Can I freeze this cheesecake?
Absolutely! Wrap it tightly in plastic wrap or foil and keep it in the freezer for up to two months. Just be sure to allow it to thaw in the fridge before serving!
3. It’s too sweet! What can I do?
If you find your cheesecake too sweet after mixing the filling, you can balance it out by adding a bit of sour cream or more Greek yogurt to the mix, or consider omitting the maple syrup entirely for a more neutral flavor.
4. How do I store leftovers?
Refrigerate any leftovers in an airtight container for up to a week. Just make sure to keep them covered to maintain freshness!
Nutritional Info
While the nutritional values can vary based on specific ingredient brands and measurements, here’s a rough estimate per slice (based on 12 slices total):
- Calories: 180
- Protein: 10g
- Carbohydrates: 20g
- Fat: 7g
- Fiber: 2g
- Sugar: 8g
With these nutritional insights, you can indulge guilt-free in one of my favorite fall desserts!
And there you have it—your very own Protein Cottage Cheese Pumpkin Cheesecake! I hope you find not just joy in making this delicious dessert but also in sharing it with those you love. Remember, cooking is about the memories we create, the laughter we share, and the flavors that bring us back to the comforts of home. Happy baking, friend!
Print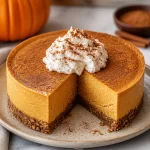
Protein Cottage Cheese Pumpkin Cheesecake
- Total Time: 75 minutes
- Yield: 12 servings 1x
- Diet: High Protein
Description
A light and delicious pumpkin cheesecake packed with protein from cottage cheese, perfect for dessert lovers.
Ingredients
- 2 cups Cottage Cheese
- 1 cup Pumpkin Puree
- 3 large Eggs
- 1/2 cup Greek Yogurt
- 1/2 cup Maple Syrup
- 1 tsp Vanilla Extract
- 1 tsp Pumpkin Spice
- 1.5 cups Graham Cracker Crumbs
- 1/4 cup Butter, melted
- a pinch Salt
Instructions
- Preheat the oven to 350°F (175°C).
- Combine the graham cracker crumbs and melted butter in a mixing bowl until it resembles wet sand.
- Press the mixture into the bottom of a greased 9-inch springform pan.
- Bake the crust for about 10 minutes.
- Blend the cottage cheese in a large mixing bowl until smooth.
- Add the pumpkin puree, Greek yogurt, eggs, maple syrup, vanilla extract, pumpkin spice, and salt. Blend until fully incorporated.
- Pour the pumpkin filling over the cooled crust.
- Bake for 45-55 minutes, until edges are set and center has a slight jiggle.
- Cool in the oven for an hour, then chill in the fridge for at least 4 hours.
- Slice and serve with toppings as desired.
Notes
Serve chilled and consider topping with whipped cream and nuts for added flavor.
- Prep Time: 20 minutes
- Cook Time: 55 minutes
- Category: Dessert
- Method: Baking
- Cuisine: American
Nutrition
- Serving Size: 1 slice
- Calories: 180
- Sugar: 8g
- Sodium: 200mg
- Fat: 7g
- Saturated Fat: 4g
- Unsaturated Fat: 2g
- Trans Fat: 0g
- Carbohydrates: 20g
- Fiber: 2g
- Protein: 10g
- Cholesterol: 80mg
Keywords: cheesecake, pumpkin cheesecake, protein dessert, fall desserts, holiday recipes
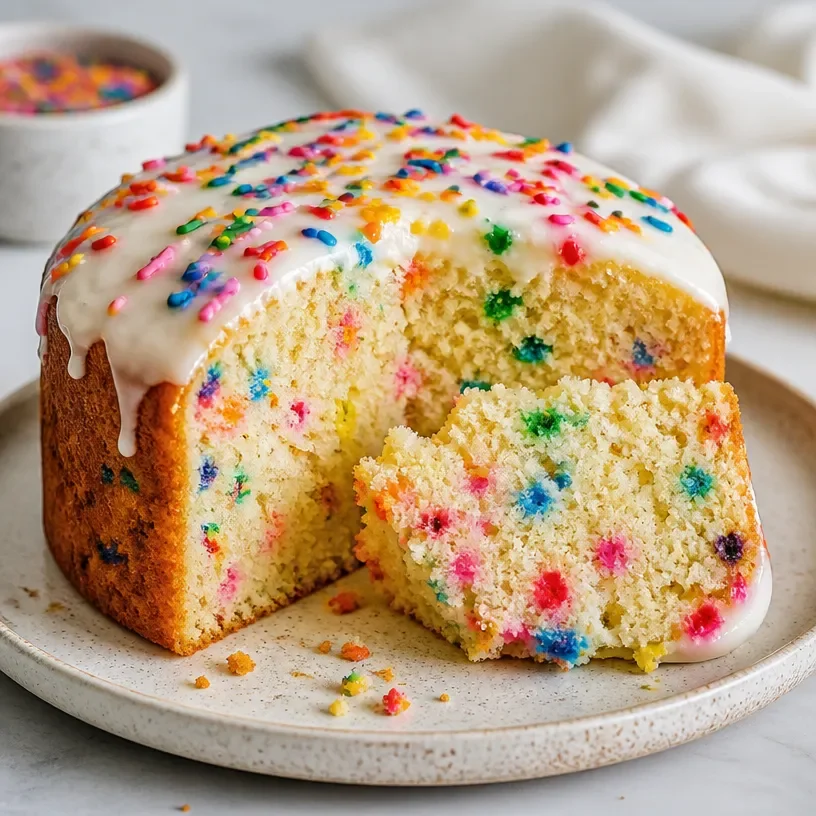
Minute High-Protein Cottage Cheese Funfetti Cake
The Joy of Baking: Protein Cottage Cheese Funfetti Cake
Welcome to my kitchen! I’m so thrilled to have you here today. If you’re new to my little corner of the internet, let me introduce myself. I’m Olivia Bennett — just a passionate home cook tangled up in a love affair with flavors, cozy vibes, and of course, homemade treats. There’s something magical about baking that fills the air with warmth and brings back the sweetest of memories, don’t you think? And that’s exactly what this recipe for Protein Cottage Cheese Funfetti Cake is all about: joy, nostalgia, and maybe just a little bit of sprinkles!
When I think about cake, the first thing that comes to mind is celebration. Birthdays, family get-togethers, or just those days that call for a little extra sweetness. As a kid, my birthday cake of choice was always layered with colorful sprinkles, the type that sparkled like confetti. My mom would bake those cakes from scratch, and as soon as the smell of vanilla hit the air, I’d find myself pacing around the kitchen, waiting with eager hands to help with the frosting. Those moments made cooking feel like magic, like we were crafting happiness from flour and sugar.
Ah, but let’s fast forward to the present! Nowadays, I’m all about making indulgent goodies a touch healthier without sacrificing flavor. Enter the Protein Cottage Cheese Funfetti Cake—a delightful hybrid of nostalgia and nutrition! This cake is not only super moist and bursting with flavor; it also sneaks in some extra protein thanks to cottage cheese. Trust me, it’s a game-changer! It hits the spot whether you want to treat yourself after a long day or impress friends with something unique. So, let’s dive into this fun recipe together!
A Slice of My Childhood
Growing up, weekends meant two things: family gatherings and baking marathons in my mom’s kitchen. I remember one particular birthday party where my mom baked me a rainbow sprinkle cake, complete with layers of fluffy vanilla frosting. As friends and family gathered, we crushed through a piñata, laughter filling the air like sweet melody. But the best part? That first bite of cake—light, moist, and exploding with colors and flavors!
Little did I know then that those cozy kitchen afternoons would pave the way for my culinary passion. Today, I recreate that joyful spirit with my Protein Cottage Cheese Funfetti Cake. It’s a nod to my childhood, perfect for celebrating everything from birthdays to ordinary weeknight dinners. So grab your apron, and let’s whisk up some memories!
Ingredients: What You’ll Need
Here’s a simple list of the ingredients to whip up this delightful cake, complete with a few handy tips and substitutions along the way.
-
Cottage Cheese (1 cup): The star of our show! It not only adds moisture but also ups the protein content. If you’re not a fan of cottage cheese, you can substitute it with Greek yogurt for a similar texture and protein boost.
-
All-Purpose Flour (1 ½ cups): This cake needs a solid foundation. You can swap it for whole wheat flour if you’re looking for more fiber or a gluten-free blend if you’re gluten-sensitive.
-
Granulated Sugar (1 cup): Sweetness is the name of the game! You can use coconut sugar or a sugar substitute if you’re looking for a healthier alternative.
-
Baking Powder (2 tsp): This is what helps our cake rise and become fluffy. Don’t forget to check the expiration date; expired baking powder can lead to a dense cake!
-
Salt (½ tsp): A pinch of salt enhances all the flavors. You can use sea salt or even Himalayan salt for a touch of uniqueness.
-
Eggs (2): They act as a binder for all the ingredients. If you’re vegan or egg-free, try using flax eggs (1 tablespoon of ground flaxseed mixed with 3 tablespoons of water = 1 egg) as a substitute.
-
Vanilla Extract (1 tsp): The essence of warmth and flavor. Feel free to use almond extract for a different twist.
-
Rainbow Sprinkles (½ cup): Because what’s a funfetti cake without sprinkles? You can swap these out for any color-themed sprinkles to suit any occasion!
-
Milk (½ cup): Use any type of milk you prefer—dairy, almond, or oat milk all work beautifully here.
-
Optional Frosting: A simple cream cheese frosting or a light whipped cream complements the cake perfectly.
Step-by-Step Instructions
Alright, let’s roll up our sleeves and get baking! Here’s how we bring this Protein Cottage Cheese Funfetti Cake to life:
Step 1: Preheat the Oven
Preheat your oven to 350°F (175°C). It’s an essential first step to ensure your cake bakes evenly. While it heats, you can prepare your cake batter!
Step 2: Prepare Your Baking Pan
Grease and flour a 9-inch round cake pan—or two if you’re looking for layers! My favorite method is using a bit of butter to grease the pan, then adding a sprinkle of flour. This helps the cake slide out easily once baked.
Step 3: Mix the Dry Ingredients
In a large mixing bowl, whisk together the all-purpose flour, baking powder, and salt. This helps to evenly distribute the leavening agent, ensuring a light cake!
Step 4: Blend the Wet Ingredients
In another bowl, combine the cottage cheese, sugar, eggs, and vanilla extract. If you’re using a blender or food processor, this is the perfect time to blend until the mixture is smooth. The cottage cheese should be undetectable in texture!
Step 5: Combine and Sprinkle
Slowly pour the wet mixture into the dry ingredients and mix until just combined. Be careful not to overmix to keep that fluffy texture. Now’s the fun part—fold in those vibrant rainbow sprinkles!
Step 6: Bake
Pour the batter into your prepared cake pan and smooth the top with a spatula. Bake in your preheated oven for 25–30 minutes, or until a toothpick inserted in the center comes out clean. The delightful smell should start wafting through your kitchen right about now!
Step 7: Cool and Frost
Once baked, allow your cake to cool in the pan for about 10 minutes, then transfer it to a wire rack. This step prevents sogginess. Once cooled, you can frost it with cream cheese frosting or simply sprinkle some powdered sugar on top for an easy finish.
Step 8: Serve
Cut yourself a generous slice and dig in! Don’t forget to snap a picture—this cake is just begging to be ‘grammed.
Serving Suggestions
Serve your Protein Cottage Cheese Funfetti Cake on a colorful plate, perhaps alongside fresh berries or a scoop of vanilla ice cream for that ultimate treat experience. Drizzle with a bit of chocolate sauce or adorn with additional sprinkles for a dedicated dessert table showstopper!
Recipe Variations
Feeling adventurous? Here are a few fun variations to try out:
-
Chocolate Funfetti Cake: Replace a third of the flour with cocoa powder to give your cake a delightful chocolate twist.
-
Mixed Fruit Funfetti: Toss in some finely chopped strawberries or cherries along with your sprinkles for a delicious fruity explosion.
-
Vegan Funfetti Cake: Substitute cottage cheese with a plant-based yogurt and use flax eggs to make your cake completely vegan yet delicious!
-
Zesty Lemon: Add lemon zest for a refreshing citrus zing that pairs beautifully with the sweetness of the cake.
Chef’s Notes
This recipe has evolved over the years from a traditional sprinkles cake into something healthier before my eyes. I remember the first time I tried to swap in cottage cheese—it felt like a dare, but boy did it pay off! Each bite brings me back to those happy childhood moments.
You know what else is hilarious? The first cake I made for my partner used half a cup of salt instead of sugar. Imagine an epic ‘salty surprise’ moment! We learned that day, always read the labels twice!
FAQs and Troubleshooting
Q: Why did my cake sink in the middle?
A: A sinkhole cake usually happens because of overmixing the batter or not baking it long enough. Make sure to gently combine your ingredients and check on your cake a few minutes before the timer!
Q: Can I freeze this cake?
A: Absolutely! You can wrap slices tightly in plastic wrap and store them in an airtight container for up to three months. Just thaw them overnight in the fridge when you’re ready for a treat.
Q: How can I make this cake lower in sugar?
A: You can cut down on sugar by up to a third without affecting the taste too much. Alternatively, try a sugar substitute like monk fruit or erythritol.
Q: I don’t have rainbow sprinkles — now what?
A: No worries! You can use chocolate chips, nuts, or dried fruits for a different texture and flavor.
Nutritional Info
(If applicable, provide details such as calories, fat, protein, etc.)
There you have it, friends! A delightful, wholesome, and delicious Protein Cottage Cheese Funfetti Cake, crafted with love right in your own kitchen. I hope you find as much joy in making and serving this cake as I do. Until next time, happy baking!
Don’t forget to share your cake adventures in the comments below—I love hearing from fellow foodies!
Print
Protein Cottage Cheese Funfetti Cake
- Total Time: 40 minutes
- Yield: 8 servings 1x
- Diet: Vegetarian
Description
A delightful and healthier twist on traditional funfetti cake, loaded with protein from cottage cheese and colorful sprinkles.
Ingredients
- 1 cup Cottage Cheese
- 1 ½ cups All-Purpose Flour
- 1 cup Granulated Sugar
- 2 tsp Baking Powder
- ½ tsp Salt
- 2 Eggs
- 1 tsp Vanilla Extract
- ½ cup Rainbow Sprinkles
- ½ cup Milk
- Optional: Cream Cheese Frosting
Instructions
- Preheat your oven to 350°F (175°C).
- Grease and flour a 9-inch round cake pan.
- Whisk together the all-purpose flour, baking powder, and salt in a bowl.
- Combine cottage cheese, sugar, eggs, and vanilla in another bowl.
- Pour the wet mixture into the dry ingredients and mix until just combined.
- Fold in the rainbow sprinkles.
- Pour the batter into the prepared pan and smooth the top.
- Bake for 25–30 minutes or until a toothpick comes out clean.
- Cool in the pan for 10 minutes, then transfer to a wire rack.
- Frost with cream cheese frosting or powdered sugar if desired.
- Serve and enjoy!
Notes
For a vegan version, substitute cottage cheese with a plant-based yogurt and use flax eggs. You can also experiment with flavors by adding lemon zest or using cocoa powder for a chocolate version.
- Prep Time: 10 minutes
- Cook Time: 30 minutes
- Category: Dessert
- Method: Baking
- Cuisine: American
Nutrition
- Serving Size: 1 slice
- Calories: 300
- Sugar: 20g
- Sodium: 200mg
- Fat: 10g
- Saturated Fat: 4g
- Unsaturated Fat: 6g
- Trans Fat: 0g
- Carbohydrates: 35g
- Fiber: 1g
- Protein: 10g
- Cholesterol: 70mg
Keywords: funfetti, cake, protein, cottage cheese, dessert

High-Protein Strawberry Cheesecake Bars (No-Bake) Recipe
Protein Cottage Cheese Strawberry Cheesecake Bars: A Delightful Treat!
Welcome to my kitchen! I’m so excited to share one of my all-time favorite recipes with you today — Protein Cottage Cheese Strawberry Cheesecake Bars. Think of these bars as a dreamy blend of creamy cheesecake with the health benefits of protein, all tucked inside a delicious strawberry-flavored package. Whether you’re craving a sweet treat after dinner or an energizing snack during the day, these bars are the perfect solution. Plus, they’re simple to whip up and make you feel good about what you’re eating.
Now, let me tell you, the inspiration for these bars comes from my childhood love of cheesecake. Growing up, my mom would whip up a classic cheesecake every holiday season. The tangy cream cheese filling and buttery crust created an indulgent dessert that always had everyone coming back for seconds. I remember sneaking into the fridge late at night, stealing spoonfuls of the leftover filling and trying to balance that with a guilty conscience (which was hard to do with such a delicious treat!). As I grew older and my culinary skills developed, I wanted to recreate that nostalgia while making it healthier for our modern lives.
Enter the cottage cheese! I’ve always adored how versatile this ingredient is. It adds creaminess and a protein punch to any dish without compromising on flavor. These bars are not only a delightful homage to the cheesecakes of my childhood, but they’ve also become an exciting project that I love making with friends over a cozy afternoon. And you know what? They’re so easy that even the most novice cooks can dive into this recipe with confidence.
Are you ready to create your delicious Protein Cottage Cheese Strawberry Cheesecake Bars? Let’s gather our ingredients and get started!
Ingredients
- Cottage Cheese: This creamy base is packed with protein, making it a fantastic substitute for traditional cream cheese in cheesecake recipes. If you want a smoother texture, blend it before adding it to the mix.
- Greek Yogurt: It adds an extra layer of creaminess while still keeping the protein content high and the fat content low. You can replace it with sour cream for a richer flavor.
- Fresh Strawberries: The star of the show! Fresh strawberries deliver a burst of flavor and sweetness. If strawberries aren’t in season, feel free to swap them out for other berries like blueberries or raspberries.
- Honey or Maple Syrup: This acts as a natural sweetener. You can adjust the amount based on your sweetness preference. If you need it to be sugar-free, consider using a sugar substitute like stevia.
- Oats: Ground oats make a lovely base for the crust. But if you’re looking for a gluten-free option, use almond flour or gluten-free oats.
- Coconut Oil: This gives the crust a delicious buttery flavor. Unsalted butter can be used as an alternative without altering the overall taste too much.
- Vanilla Extract: A touch of vanilla enhances the flavors and makes everything taste even more delicious. It’s one of my essential pantry staples!
- Gelatin or Agar-Agar: This gives the bars a nice firm texture, helping them hold together once cooled. You can skip this if you prefer a softer dessert, but they might be a bit crumbly.
Step-by-Step Instructions
-
Preheat the Oven: Preheat your oven to 350°F (175°C). This is key because a properly preheated oven helps achieve that lovely golden crust on your bars.
-
Prepare the Crust: In a mixing bowl, combine 1 cup of ground oats, 1/4 cup of melted coconut oil, and 2 tablespoons of honey or maple syrup. Mix until the oats are fully coated. Here’s a chef tip: If you want a more flavorful crust, you can add a pinch of salt and a dash of cinnamon to the mixture.
-
Press the Crust: Line an 8×8-inch baking pan with parchment paper, leaving some overhang (this will make it easy to lift out later). Press the oat mixture firmly into the bottom of the pan, making sure it’s evenly distributed. A flat-bottomed measuring cup works wonderfully for this step!
-
Bake the Crust: Bake the crust in the preheated oven for about 10-12 minutes until it’s lightly golden. Keep an eye on it; you want it to get just the right color without burning. The aroma at this stage is heavenly!
-
Blend the Filling: While the crust cools, it’s time to whip up that creamy filling! In a blender or food processor, combine 1 cup of cottage cheese, 1/2 cup of Greek yogurt, 1/4 cup of honey or maple syrup, and 1 teaspoon of vanilla extract. Blend until smooth and creamy. Need it extra smooth? Blend a little longer; it’s worth it!
-
Add Gelatin: If using gelatin, sprinkle 1 tablespoon over 3 tablespoons of cold water and let it bloom for about 5 minutes. Then, heat it gently until fully melted, and blend it into the filling mixture. If opting for agar-agar, follow the package instructions for activation.
-
Pour the Filling: Take your cooled crust out of the oven and pour the cottage cheese mixture over it. Gently smooth the top with a spatula. This layer will be the star of your bars!
-
Layer the Strawberries: Now, chop up fresh strawberries and scatter them generously on top of the filling. You can lightly press them in so they’re secured in the mix. For a chocolaty twist, drizzle melted dark chocolate on top!
-
Chill: Cover the pan with plastic wrap and refrigerate for at least 4 hours, or overnight if you can wait that long. This will help everything set beautifully.
-
Slice and Serve: When you’re ready to serve, lift the bars out of the pan using the parchment paper. Slice into squares and serve chilled. Enjoy the sweet smiles that will come your way!
Serving Suggestions
To plate these Protein Cottage Cheese Strawberry Cheesecake Bars, consider serving them with a dollop of whipped Greek yogurt for added creaminess or a sprig of fresh mint for color. You could also drizzle a little extra honey on top or a dusting of powdered sugar for a touch of elegance. Pair them with a hot cup of tea or coffee for the perfect cozy afternoon treat!
Recipe Variations
- Mixed Berry Cheesecake Bars: Swap out strawberries for a mix of your favorite berries (raspberries, blueberries, and blackberries work wonderfully together).
- Chocolate Chip: Fold in mini chocolate chips into the filling for a treat that combines flavors beautifully.
- Nut Crust: Replace part of the oats with finely crushed nuts for a crunchy and savory twist.
- Dairy-Free Version: Use vegan cream cheese and coconut yogurt as substitutes to make this dessert dairy-free.
Chef’s Notes
You know, when I first started making these bars, I had no idea they would become such a hit! One sunny afternoon, my best friend and I decided to have an afternoon backyard bake-off. We both brought our favorite recipes to share, and let me tell you, the healthy cheesecake bars stole the show. Since then, I’ve experimented with all sorts of flavors and had fun making them fit the seasons — pumpkin spice in the fall, citrus zest in the spring; the possibilities are endless!
FAQs and Troubleshooting
How do I store these bars?
Store your Protein Cottage Cheese Strawberry Cheesecake Bars in an airtight container in the refrigerator for up to a week. They also freeze well if you want to save some for later — just make sure to wrap them tightly!
Can I use frozen strawberries?
Absolutely! While fresh strawberries are fantastic, frozen ones work great too. Just make sure to thaw and drain them well before adding them to the filling, otherwise, they may make the mixture too watery.
My bars are too soft! What did I do wrong?
If the bars are too soft, it might be due to an insufficient chilling time. They need time to set properly in the fridge. Make sure to give them at least 4 hours or until completely firm.
How can I adjust the sweetness?
You can always taste the filling before pouring it over the crust. If you like it sweeter, feel free to add extra honey or your sweetener of choice — just keep in mind that the final flavor may vary slightly based on the sweetness of the strawberries you choose.
Nutritional Info (per serving)
- Calories: 150
- Protein: 10g
- Fat: 6g
- Carbohydrates: 20g
- Fiber: 2g
Now, you’re all set to bake your very own Protein Cottage Cheese Strawberry Cheesecake Bars! I hope you enjoy every scrumptious bite as much as I do. Happy cooking, and remember — the kitchen is always a place for creativity and joy. Cheers!
Print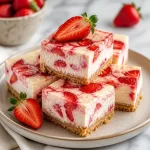
Protein Cottage Cheese Strawberry Cheesecake Bars
- Total Time: 240 minutes
- Yield: 16 servings 1x
- Diet: High Protein
Description
A delightful blend of creamy cheesecake with the health benefits of protein, all packed inside strawberry-flavored bars.
Ingredients
- 1 cup cottage cheese
- 1/2 cup Greek yogurt
- 1/4 cup honey or maple syrup
- 1 teaspoon vanilla extract
- 1 cup ground oats
- 1/4 cup melted coconut oil
- 2 tablespoons honey or maple syrup (for crust)
- 1 tablespoon gelatin or agar-agar
- Fresh strawberries, chopped
Instructions
- Preheat your oven to 350°F (175°C).
- Combine ground oats, melted coconut oil, and honey or maple syrup in a mixing bowl.
- Press the crust mixture into an 8×8-inch baking pan lined with parchment paper.
- Bake the crust for 10-12 minutes until lightly golden.
- Blend together cottage cheese, Greek yogurt, honey or maple syrup, and vanilla extract until smooth.
- Sprinkle gelatin over cold water, let it bloom, then blend into the filling.
- Pour the filling over the cooled crust and smooth the top.
- Layer chopped strawberries on top of the filling.
- Chill in the refrigerator for at least 4 hours.
- Lift the bars out of the pan using the parchment paper, slice, and serve chilled.
Notes
Serve with whipped Greek yogurt or a sprig of mint. These bars can also be stored in an airtight container for a week or frozen for later.
- Prep Time: 15 minutes
- Cook Time: 12 minutes
- Category: Dessert
- Method: Baking
- Cuisine: American
Nutrition
- Serving Size: 1 bar
- Calories: 150
- Sugar: 8g
- Sodium: 60mg
- Fat: 6g
- Saturated Fat: 3g
- Unsaturated Fat: 3g
- Trans Fat: 0g
- Carbohydrates: 20g
- Fiber: 2g
- Protein: 10g
- Cholesterol: 15mg
Keywords: cottage cheese, cheesecake, strawberry, protein bars, healthy dessert
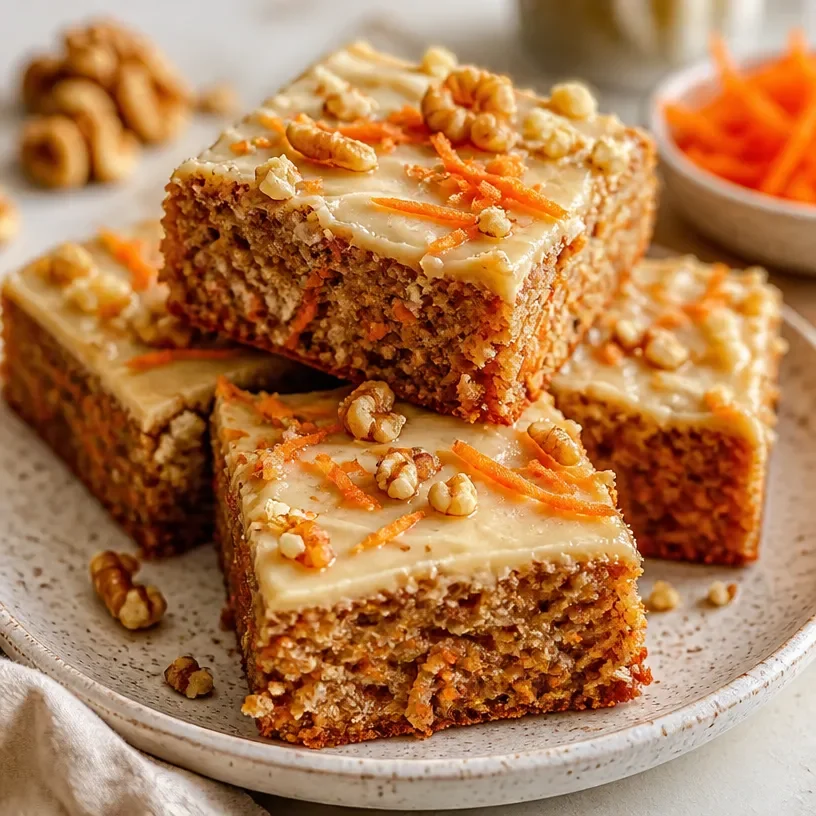
Protein Cottage Cheese Carrot Cake Bars
Protein-Packed Cottage Cheese Carrot Cake Bars: A Wholesome Twist on a Classic Favorite
Welcome to my kitchen! Today, I am excited to share a recipe that’s not only delightful but also packed with nutrition. It’s my Protein Cottage Cheese Carrot Cake Bars — a fun and wholesome twist on the classic carrot cake that you’ll love! Whether you’re looking for a healthy snack, a satisfying dessert, or even a post-workout treat, these bars check all the boxes. They’re moist, flavorful, and incredibly simple to make, perfect for busy weekdays or lazy weekends alike.
Carrot cake has always had a special place in my heart. It reminds me of my grandmother’s cozy kitchen, where warm smells mingled with hearty laughter. She would pull out her well-loved recipe box from the shelf and start hand-grating fresh carrots, the vibrant orange bits transforming into a cake batter that elicited eager anticipation. Those afternoons spent alongside her, sneaking bites of batter and smelling the intoxicating spices, ignited my love for cooking. Oh, the joy of turning simple ingredients into something magical – a memory I carry with me to this day.
So, let’s dive into creating these delightful Protein Cottage Cheese Carrot Cake Bars. They’re not only reminiscent of my grandmother’s classic recipe but also incorporate protein-packed cottage cheese that makes every bite deliciously nourishing!
Ingredients:
- 1 cup grated carrots: Freshly grated carrots bring moisture and sweetness to the bars. If you’re short on time, you can use pre-grated carrots.
- 1 cup cottage cheese: This creamy ingredient is packed with protein! For a dairy-free version, you could use silken tofu or vegan cream cheese as a substitute.
- 1/2 cup rolled oats: Adds texture and heartiness. Gluten-free oats can also be used for a gluten-free version.
- 1/2 cup applesauce: A fantastic natural sweetener and moisture booster! You can substitute it with mashed bananas for a different flavor.
- 1/4 cup honey or maple syrup: This gives sweetness to the bars. Adjust the sweetness to taste; you can even use stevia or coconut sugar for lower-calorie options.
- 2 large eggs: Eggs help bind the mixture. For a vegan swap, use flax eggs (1 tablespoon of ground flaxseed with 2.5 tablespoons of water = 1 egg).
- 1 tsp cinnamon: A warm spice that complements the flavors beautifully. Feel free to add nutmeg or ginger for an extra kick!
- 1/2 tsp baking powder: This helps the bars rise and lends a lovely fluffiness. Make sure it’s fresh for the best results.
- 1/4 cup chopped walnuts or pecans (optional): For those who love a crunchy texture, feel free to add these for an added nutty flavor. If you have nut allergies, seeds would also work great!
Step-by-Step Instructions:
-
Preheat Your Oven: Begin by preheating your oven to 350°F (175°C). This step is crucial because you want your bars to cook evenly!
-
Prep the Baking Dish: Line an 8×8 inch baking dish with parchment paper, leaving some overhang on the sides. This will make it super easy to lift the bars out once they’re baked—trust me, you’ll thank yourself later!
-
Mix the Wet Ingredients: In a large mixing bowl, combine the cottage cheese, applesauce, eggs, and honey (or maple syrup). Whisk them together until smooth. This is where you get that creamy texture we’re after!
-
Incorporate the Carrots: Fold in the grated carrots gently. The vibrant color will make you smile and bring back those nostalgic childhood memories I love talking about!
-
Combine the Dry Ingredients: In another bowl, mix together the rolled oats, cinnamon, baking powder, and nuts if using. Make sure they’re well combined; this helps with even distribution when mixed with the wet ingredients.
-
Blend Wet and Dry Ingredients: Slowly add the dry mixture to the wet mixture, stirring until just combined. Be careful not to overmix, or you might end up with dense bars instead of fluffy goodness!
-
Pour into the Baking Dish: Scrape the thick batter into the prepared baking dish and spread it out evenly. Don’t worry about perfection; these bars are meant to be rustic and homemade!
-
Bake: Place the dish in the preheated oven and bake for about 25-30 minutes, or until a toothpick inserted in the center comes out clean. The aroma will be irresistible!
-
Cool and Slice: Once baked, allow the bars to cool in the pan for about 10 minutes, then use those handy parchment edges to lift the entire thing out. Transfer to a wire rack to cool completely before slicing into bars.
-
Enjoy!: These bars can be eaten warm or cold, but I recommend letting them sit for a few hours in the fridge. They become even more flavorful and easier to cut!
Serving Suggestions:
When it comes to serving your Protein Cottage Cheese Carrot Cake Bars, a little presentation can go a long way! Consider dusting the tops with a light sprinkle of powdered sugar for a sweet touch. Pair them with a dollop of Greek yogurt or a scoop of your favorite nut butter for an extra layer of flavor. And don’t forget to slice them into fun shapes; bars, squares, or even triangles can make all the difference in making them look extra appealing!
Recipe Variations:
- Spice It Up: Feel free to add a dash of nutmeg or ginger to enhance the flavor profile!
- Fruity Twist: Toss in some raisins or dried cranberries for a sweet and chewy element.
- Chocolate Lover: Add chocolate chips or cocoa powder for a decadent version.
- Nut-Free: Omit the nuts or replace them with sunflower seeds or pepitas for crunch without the allergens.
- Zucchini Alternative: Swap out some or all of the carrots for grated zucchini for a slightly different taste but equally delicious bars!
Chef’s Notes:
Ah, the joy of creating something new in the kitchen! I remember the first time I tried to make a protein-packed version of my grandmother’s carrot cake—it was a trial and error journey, for sure! The first batch ended up a little too dense, and I learned the importance of balancing wet and dry ingredients. The secret is in the cottage cheese which not only adds protein but also helps keep the bars moist. Now, I always double the recipe, as these bars hardly last a day in the house!
FAQs and Troubleshooting:
1. My bars came out too dry! What did I do wrong?
This can happen if your baking time was too long or if you overmixed the batter. Every oven is different, so keep an eye on them towards the end of the baking time!
2. Can I substitute the cottage cheese?
Absolutely! Silken tofu or vegan cream cheese are excellent alternatives for a dairy-free version.
3. How do I store these bars?
Once cooled, you can store them in an airtight container in the fridge for up to a week. They also freeze well; just make sure to wrap them tightly!
4. What can I do if my batter is too thick?
If your batter feels too thick, add a tablespoon of milk (or a milk substitute) to loosen it up a bit. You want it to be thick but spreadable!
Nutritional Info (Optional):
Each Protein Cottage Cheese Carrot Cake Bar contains roughly:
- Calories: 150
- Protein: 6g
- Carbohydrates: 20g
- Fat: 5g
- Fiber: 2g
And there you have it! A cozy recipe that’s not just about satisfying your sweet tooth but also nourishing your body. I can’t wait for you to try these bars and experience the wonderful flavors and memories they evoke. Happy baking, my foodie friends, and don’t forget to share your creations with me!
Print
Protein-Packed Cottage Cheese Carrot Cake Bars
- Total Time: 45 minutes
- Yield: 12 servings 1x
- Diet: Vegetarian
Description
A wholesome twist on the classic carrot cake, packed with protein and deliciously moist.
Ingredients
- 1 cup grated carrots
- 1 cup cottage cheese
- 1/2 cup rolled oats
- 1/2 cup applesauce
- 1/4 cup honey or maple syrup
- 2 large eggs
- 1 tsp cinnamon
- 1/2 tsp baking powder
- 1/4 cup chopped walnuts or pecans (optional)
Instructions
- Preheat your oven to 350°F (175°C).
- Line an 8×8 inch baking dish with parchment paper.
- In a large mixing bowl, combine the cottage cheese, applesauce, eggs, and honey (or maple syrup). Whisk together until smooth.
- Fold in the grated carrots gently.
- In another bowl, mix together the rolled oats, cinnamon, baking powder, and optional nuts.
- Slowly add the dry mixture to the wet mixture, stirring until just combined.
- Scrape the batter into the prepared baking dish and spread it out evenly.
- Bake for about 25-30 minutes, or until a toothpick inserted comes out clean.
- Allow to cool in the pan for about 10 minutes, then lift out and transfer to a wire rack to cool completely before slicing.
Notes
These bars can be enjoyed warm or cold and become even more flavorful after a few hours in the fridge.
- Prep Time: 15 minutes
- Cook Time: 30 minutes
- Category: Dessert
- Method: Baking
- Cuisine: American
Nutrition
- Serving Size: 1 bar
- Calories: 150
- Sugar: 8g
- Sodium: 200mg
- Fat: 5g
- Saturated Fat: 1g
- Unsaturated Fat: 4g
- Trans Fat: 0g
- Carbohydrates: 20g
- Fiber: 2g
- Protein: 6g
- Cholesterol: 30mg
Keywords: carrot cake, protein bars, healthy dessert, cottage cheese, nutritious snacks
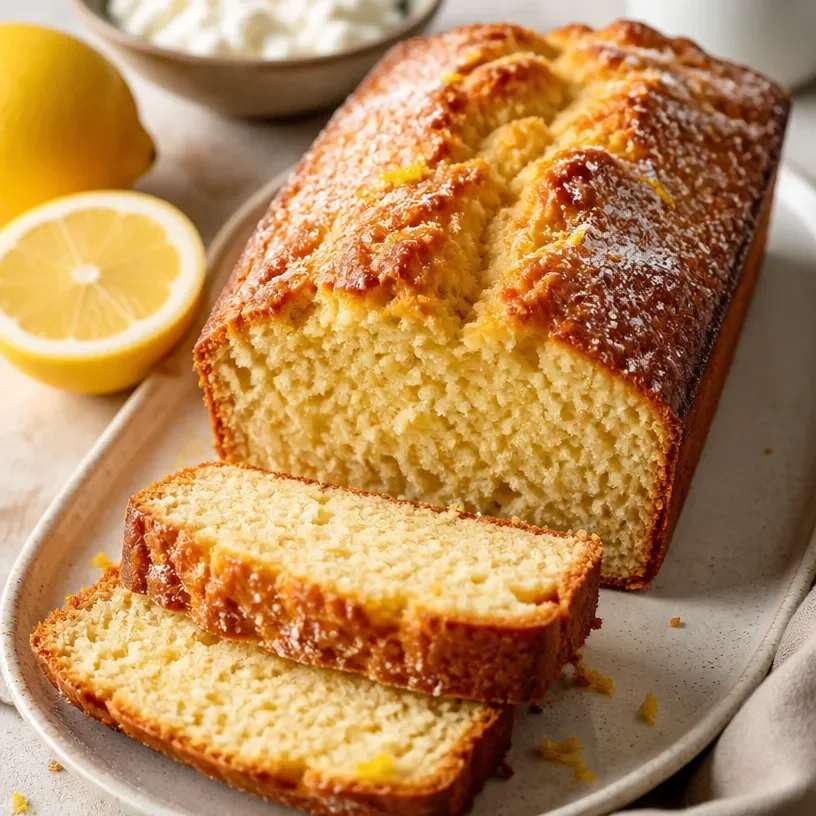
Protein Cottage Cheese Lemon Loaf
The Zesty Joy of Protein Cottage Cheese Lemon Loaf
Welcome to my kitchen! Today, we’re whipping up something spectacular: a Protein Cottage Cheese Lemon Loaf that is bursting with refreshing flavors and is also packed with nutrients. You might be wondering, “Cottage cheese in a loaf?” Trust me, once you give this recipe a try, you’ll be searching for excuses to make it again and again!
As someone who has always viewed cooking as an act of love, this lemon loaf is especially dear to my heart. It’s that type of recipe that not only fuels the body but also brightens the mood. Whether you’re planning a Sunday brunch with friends, a family gathering, or just a solo afternoon treat as you sip tea and flip through your favorite cookbook, this loaf has it all.
The beautiful balance of tangy lemon paired with the subtle creaminess of cottage cheese makes this loaf moist yet light, fluffy yet hearty. Plus, it’s an excellent way to sneak in some protein without sacrificing taste! Just the smell of it baking in the oven brings back such joyful memories, and I can’t wait to share that joy with you. So, let’s don our aprons and dive into this delightful adventure!
A Blast from the Past: My Lemon Love Affair
Growing up, my grandmother had a magical hand in the kitchen. She had a way of making every dish feel special, but it was her lemon desserts that truly stole my heart. Each summer, we’d pick fragrant lemons from our garden and spend hours in the kitchen, their zesty aroma filling the air.
I vividly remember those afternoons, standing on a stool beside her, eagerly stirring batter and sneaking bites of raw dough. It was during those moments that I learned the importance of using fresh ingredients and the power of flavors that can transport you back to cherished memories. This Protein Cottage Cheese Lemon Loaf is a tribute to those sweet days, reminding me of my roots and the love that baking can evoke in all of us.
Ingredients
Gather your ingredients and let’s start cooking! Here’s what you’ll need for this Protein Cottage Cheese Lemon Loaf:
-
1 cup cottage cheese
A protein powerhouse that adds moisture and a delicious tang. For a lighter option, you can use low-fat cottage cheese, and if you’re dairy-free, try silken tofu as a substitute! -
1/2 cup Greek yogurt
This adds creaminess and a bit of tartness. You can swap it with any plain yogurt or a dairy-free yogurt alternative if necessary. -
1/2 cup honey or maple syrup
A natural sweetener that provides depth of flavor. Feel free to adjust the quantity based on your sweetness preference or even use coconut sugar for a more robust taste. -
1/4 cup coconut oil (melted)
Adds healthy fats and moisture. If you prefer, you can substitute it with unsalted butter or apple sauce for a lighter texture. -
3 large eggs
The backbone of any good loaf, providing structure and binding. If you’re looking for an egg-free option, try flax eggs (1 tablespoon of flaxseed meal mixed with 2.5 tablespoons of water per egg). -
1 cup all-purpose flour
The base of your loaf. For a gluten-free version, use a gluten-free baking mix instead. -
1 teaspoon baking powder
Ensures that your loaf rises beautifully. Make sure it’s fresh for the best results! -
1 teaspoon baking soda
Enhances the overall texture and helps the loaf rise. -
Zest of 2 lemons
This is where the magic happens! The zest adds a bright, aromatic punch. If you don’t have fresh lemons, bottled lemon zest can be a great substitute. -
Juice of 1 lemon
For that tangy freshness! You can adjust the amount depending on your taste. -
1/4 teaspoon salt
Balances all the flavors and enhances the sweetness.
Step-by-Step Instructions
Now that we have our ingredients lined up, let’s dive into making this delicious loaf!
-
Preheat Your Oven
Preheat your oven to 350°F (175°C). A hot oven gives our loaf the perfect rise and texture. -
Prep Your Loaf Pan
Grease a 9×5-inch loaf pan with a bit of coconut oil or line it with parchment paper. This makes it super easy to pop the loaf out later! -
Blend the Wet Ingredients
In a large mixing bowl, combine the cottage cheese, Greek yogurt, honey (or maple syrup), and melted coconut oil. You can use a whisk, but I love using an immersion blender here for ultra-smoothness! Just a quick whirl and you’ll have a creamy base. -
Add the Eggs
Crack in the eggs and continue to blend until everything is just combined. You want that luscious texture, so avoid over-mixing at this stage. -
Combine the Dry Ingredients
In another bowl, whisk together the flour, baking powder, baking soda, salt, and lemon zest. This ensures even distribution of the leaveners and zest throughout the loaf. -
Mix Everything Together
Gradually add the dry mixture into your wet ingredients, folding gently with a spatula. Add in the lemon juice during this stage! The batter should be thick yet pourable, perfectly blending the elements. -
Pour into the Prepared Pan
Pour the batter into the greased loaf pan, smoothing out the top as you go. Give the pan a little jiggle to level it out. -
Bake Your Loaf
Pop your loaf into the preheated oven and set a timer for 50-60 minutes. The loaf is done when a toothpick inserted in the center comes out clean, with just a few moist crumbs stuck to it. -
Cool It Down
Once baked, take it out and let it cool in the pan for about 10 minutes, then transfer it to a wire rack to cool completely. This step is often skipped, but cooling helps with the texture and allows the flavors to settle! -
Slice and Enjoy
Once cooled, slice it up and serve it fresh. The first bite will make your heart sing! Don’t be surprised if it disappears faster than you can say “lemon loaf.”
Serving Suggestions
When it comes to serving your Protein Cottage Cheese Lemon Loaf, the sky’s the limit! You can enjoy it plain, but here are a couple of fun serving ideas:
- Spread a little whipped cream cheese on top for a tangy boost.
- Pair it with fresh berries or a dollop of Greek yogurt for a delightful brunch experience.
- Drizzle a lemon glaze made with powdered sugar and fresh lemon juice over the top for that extra zing!
Recipe Variations
Feeling a little creative? Here are some simple variations you can try:
- Blueberry Lemon Loaf: Fold in a cup of fresh or frozen blueberries to add a burst of sweetness.
- Poppy Seed Lemon Loaf: Add 1-2 tablespoons of poppy seeds for a delightful crunch and a twist on the classic flavor!
- Herbed Lemon Loaf: Add a tablespoon of finely chopped fresh herbs like rosemary or thyme for a savory spin.
- Chocolate Lemon Loaf: Fold in some cocoa powder and chocolate chips for a sweet and tangy dessert loaf.
- Gluten-Free Version: Swap the all-purpose flour for a 1:1 gluten-free blend to make this loaf suitable for gluten-sensitive friends!
Chef’s Notes
I’ve been baking this lemon loaf for years, and it has seen quite the transformation! Initially, it was a simple recipe I found in a dusty old cookbook — but over time, I added my own twists, making it a protein-packed delight. That’s the beauty of cooking; it’s all about evolving and making recipes your own.
If you’re nervous about working with cottage cheese, don’t be! The key is to blend it well, and you’ll be surprised at how adaptable the flavor is. Plus, this loaf freezes beautifully! Just wrap it tightly in plastic wrap and pop it in the freezer for those days you want a slice of sunshine.
FAQs and Troubleshooting
Here are some common questions and fixes for your Protein Cottage Cheese Lemon Loaf:
-
My loaf didn’t rise! What went wrong?
The most likely culprit is old baking powder or baking soda. Check the expiry dates! Also, make sure all your ingredients were at room temperature before mixing. -
Why is my loaf too dense?
Over-mixing the batter can lead to a denser loaf. Be gentle and fold just until combined. -
Can I reduce the sugar?
Absolutely! Feel free to cut down on the honey/maple syrup if you prefer a less sweet loaf. Just note that the flavor and moisture might be slightly altered. -
How can I store leftovers?
Store in an airtight container in the fridge for up to a week, or slice and freeze for up to three months. Just reheat in the oven or microwave when you’re ready to enjoy!
Nutritional Info
For those interested in the numbers, here’s a quick breakdown:
- Serving Size: 1 slice
- Calories: Approximately 150
- Protein: 8g
- Carbohydrates: 20g
- Fat: 6g
Just so you know, the nutritional info may change depending on the specific brands and ingredients you use. It’s always good to check the packaging for accuracy!
With this Protein Cottage Cheese Lemon Loaf recipe, you’re armed with not just a delightful dish but a slice of nostalgia and pure joy. Remember, cooking should always feel like a warm hug, and I hope this loaf brings warmth to your heart and kitchen. So, grab your apron, have some fun, and share the love with those around you. Happy baking!
Print
Protein Cottage Cheese Lemon Loaf
- Total Time: 75 minutes
- Yield: 8 servings 1x
- Diet: Vegetarian
Description
A refreshing Protein Cottage Cheese Lemon Loaf that combines tangy lemon flavors with the creaminess of cottage cheese for a nutritious treat.
Ingredients
- 1 cup cottage cheese
- 1/2 cup Greek yogurt
- 1/2 cup honey or maple syrup
- 1/4 cup coconut oil (melted)
- 3 large eggs
- 1 cup all-purpose flour
- 1 teaspoon baking powder
- 1 teaspoon baking soda
- Zest of 2 lemons
- Juice of 1 lemon
- 1/4 teaspoon salt
Instructions
- Preheat your oven to 350°F (175°C).
- Prep a 9×5-inch loaf pan with coconut oil or parchment paper.
- Blend the cottage cheese, Greek yogurt, honey (or maple syrup), and melted coconut oil in a large mixing bowl until smooth.
- Add the eggs and blend until just combined.
- Combine the flour, baking powder, baking soda, salt, and lemon zest in another bowl.
- Mix the dry ingredients into the wet ingredients, folding gently. Add the lemon juice.
- Pour the batter into the prepared loaf pan.
- Bake for 50-60 minutes or until a toothpick comes out clean.
- Cool the loaf in the pan for 10 minutes, then transfer to a wire rack to cool completely.
- Slice and enjoy!
Notes
This loaf freezes well; wrap tightly and store in the freezer.
- Prep Time: 15 minutes
- Cook Time: 60 minutes
- Category: Dessert
- Method: Baking
- Cuisine: American
Nutrition
- Serving Size: 1 slice
- Calories: 150
- Sugar: 10g
- Sodium: 150mg
- Fat: 6g
- Saturated Fat: 4g
- Unsaturated Fat: 1g
- Trans Fat: 0g
- Carbohydrates: 20g
- Fiber: 1g
- Protein: 8g
- Cholesterol: 70mg
Keywords: lemon loaf, cottage cheese, protein, dessert, healthy baking
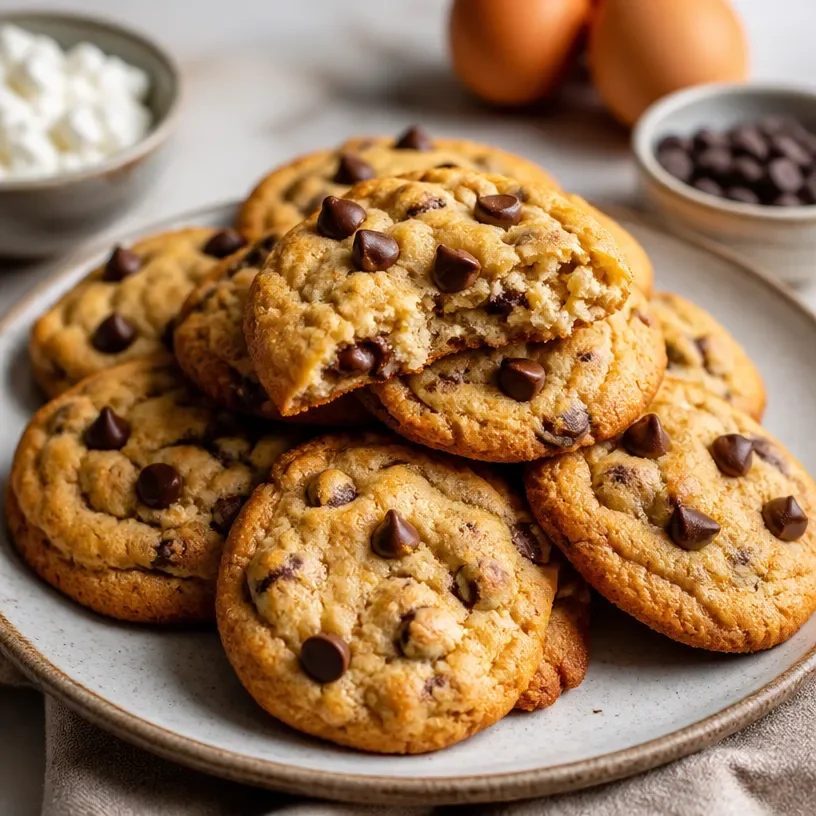
High-Protein Cottage Cheese Cookies with Chocolate Chips
Protein Cottage Cheese Chocolate Chip Cookies: A Guilt-Free Indulgence
Welcome to my cozy kitchen! I’m Olivia Bennett, and today, I am beyond excited to share with you one of my absolute favorite recipes that perfectly balances indulgence and nutrition: Protein Cottage Cheese Chocolate Chip Cookies. If you’ve ever had those days when you crave something sweet but don’t want to go overboard on the calories, then these cookies are your new best friend. With rich flavors, a soft and chewy texture, and a protein boost from cottage cheese, every bite is like a little hug from the inside out.
Imagine this: You’ve just gotten home after a long day, and the scent of warm cookies fills your kitchen, mingling with the sounds of laughter and life. These cookies not only satisfy your sweet tooth but also pack a powerful punch of protein. Plus, they are surprisingly simple to make and are perfect for both cozy evenings by the fire or as healthier options for school lunches. So, put on your favorite apron, and let’s get baking!
A Sweet Memory with Cottage Cheese Cookies
Let me take you back to my childhood for a moment. There was a summer when my grandmother decided to teach me how to bake. She was an amazing cook, and the kitchen was her kingdom. One sunny afternoon, we dove into her cherished recipe book, filled with handwritten notes and flour smudges. That’s when we stumbled upon her unique recipe for cottage cheese cookies.
I was a little skeptical at first; cottage cheese wasn’t exactly the star ingredient people typically associated with cookies! However, Grandma was a master at making magic happen, and sure enough, our kitchen soon filled with the smells of baking sweetness. The cookies turned out to be wonderfully soft, with chocolate melting in every bite. That summer, we spent countless afternoons experimenting and adding our own twists to the base recipe, creating our very own sweet tradition.
Now, years later, I’ve taken that cherished recipe and revamped it with added protein but kept all the love and nostalgia. Trust me, once you take a bite of these delicious Protein Cottage Cheese Chocolate Chip Cookies, you’ll understand why they bring me such warmth and joy.
Ingredients
Let’s gather our stars for this delightful cookie adventure! Here’s what you’ll need:
-
Cottage Cheese (1 cup): A superb source of protein and gives these cookies a tender texture. If you’re vegan, you can use silken tofu blended until smooth as a fantastic substitute.
-
Oats (1 cup): They not only add a hearty texture but also provide fiber to keep you full. If gluten-free, make sure to use gluten-free oats.
-
Nut Butter (½ cup): Any nut butter will do—peanut, almond, or cashew! For a nut-free option, sunflower seed butter works great.
-
Honey or Maple Syrup (⅓ cup): This is your natural sweetener. Honey is great, but maple syrup is an excellent vegan alternative.
-
Vanilla Extract (1 tablespoon): Adds that lovely aroma and flavor. You can experiment with almond extract for a different taste.
-
Baking Powder (1 teaspoon): Ensures your cookies rise and get that perfect fluffiness.
-
Chocolate Chips (½ cup): The icing on the cake—or cookie, in this case! Use dark, semi-sweet, or even dairy-free chocolate chips to suit your preferences.
-
Egg (1 large): This helps bind everything together. If you need an egg-free version, try using a flax egg (1 tablespoon flaxseed meal mixed with 2.5 tablespoons water, left for a few minutes until it gels).
With these ingredients, you’re well on your way to creating cookies that are as nutritious as they are delicious!
Step-by-Step Instructions
Now, let’s dive into the baking process! Get that oven preheating to 350°F (175°C) while we whip up the cookie dough.
-
Prepare Your Baking Sheet: Line a baking sheet with parchment paper. This will prevent sticking and make cleanup a breeze.
-
Mix Cottage Cheese and Nut Butter: In a large mixing bowl, combine 1 cup of cottage cheese with ½ cup of your chosen nut butter. I prefer using a fork to break down the cottage cheese a bit, mixing until they are nearly combined.
-
Add Sweetness and Flavor: Pour in ⅓ cup of honey (or maple syrup) and 1 tablespoon of vanilla extract. Stir this mixture until it’s smooth and creamy.
-
Incorporate the Dry Ingredients: In a separate bowl, mix 1 cup of oats with 1 teaspoon of baking powder. Now, gradually add this to your wet ingredients. Stir just until everything comes together—don’t overmix!
-
Chocolate Chips Time: Fold in ½ cup of chocolate chips, making sure they’re evenly distributed throughout the dough.
-
Scoop and Bake: Using a cookie scoop or spoon, drop the dough onto your prepared baking sheet, spacing them about 2 inches apart. Bake in the preheated oven for 12-15 minutes or until the edges are slightly golden.
-
Cool Down: Once they’re out of the oven, let them cool on the baking sheet for about 5 minutes before transferring them to a wire rack to cool completely. This will help them firm up a bit and give you that chewy texture.
Serving Suggestions
Once your Protein Cottage Cheese Chocolate Chip Cookies are cool and ready to enjoy, you can serve them in various fun ways! Pile them on a beautiful serving plate for an eye-catching display, or stack a couple high and wrap them up in saran wrap for a delightful gift. They also pair wonderfully with a glass of cold almond milk or a steaming cup of your favorite coffee or tea.
Recipe Variations
Looking to switch things up? Here are some creative variations and add-ins to try:
-
Nutty Delight: Add ½ cup of chopped nuts like walnuts or pecans for an extra crunch.
-
Fruit Fusion: Toss in ½ cup of dried fruits, such as cranberries or apricots, for a delightful sweet-tart flavor.
-
Spices: Enhance the flavor by adding a teaspoon of cinnamon or a hint of sea salt to bring balance.
-
Coconut Bliss: Mix in some shredded coconut for a tropical twist that adds both flavor and texture.
-
Protein Boost: Incorporate your favorite protein powder (like vanilla or chocolate) for an extra protein kick!
Chef’s Notes
These cookies have come a long way since my grandmother’s original recipe. I’ve had my fair share of baking disasters, from forgetting to add the sugar to accidentally mixing up the salt and sugar! But with every mishap, I learned something new, and these cookies have evolved into a guilt-free treat that feels indulgent without the heavy calories.
Also, don’t be surprised if you find yourself munching on the dough. It’s totally safe to eat this cookie dough since there are no eggs—just remember to save some for baking!
FAQs and Troubleshooting
1. Can I use low-fat cottage cheese?
Absolutely! Low-fat cottage cheese works perfectly, but it may slightly alter the texture. Don’t be afraid to experiment.
2. My cookies spread too much. What went wrong?
If they spread too much, it could be that the dough was too warm. Make sure to chill the dough for about 30 minutes before baking to help the cookies hold their shape better.
3. Why are my cookies dry?
Overbaking can lead to dry cookies. Keep a close eye and remove them from the oven as soon as the edges start to golden.
4. How do I store these cookies?
Store them in an airtight container at room temperature for up to a week. You can also freeze them for up to 3 months—just make sure to place parchment paper between layers to prevent sticking!
Nutritional Info (Optional)
- Serving Size: 1 cookie
- Calories: Approximately 100
- Protein: 6g
- Carbohydrates: 12g
- Fat: 4g
- Fiber: 1g
So there you have it—a complete guide to making delicious Protein Cottage Cheese Chocolate Chip Cookies! With a touch of nostalgia and a lot of love, these cookies bring happiness to any day and are perfect for sharing. Happy baking, my friends!
Print
Protein Cottage Cheese Chocolate Chip Cookies
- Total Time: 30 minutes
- Yield: 12 cookies 1x
- Diet: Vegetarian
Description
Delicious and nutritious cookies made with protein-rich cottage cheese, perfect for satisfying your sweet tooth without the guilt.
Ingredients
- 1 cup Cottage Cheese
- 1 cup Oats
- ½ cup Nut Butter
- ⅓ cup Honey or Maple Syrup
- 1 tablespoon Vanilla Extract
- 1 teaspoon Baking Powder
- ½ cup Chocolate Chips
- 1 large Egg
Instructions
- Preheat the oven to 350°F (175°C).
- Line a baking sheet with parchment paper.
- Mix cottage cheese and nut butter in a large mixing bowl until nearly combined.
- Add honey (or maple syrup) and vanilla extract, then stir until smooth.
- Incorporate oats and baking powder in a separate bowl, then gradually mix into the wet ingredients.
- Fold in chocolate chips until evenly distributed.
- Scoop the dough onto the baking sheet, spacing about 2 inches apart.
- Bake for 12-15 minutes, or until the edges are slightly golden.
- Cool on the baking sheet for 5 minutes, then transfer to a wire rack to cool completely.
Notes
Store cookies in an airtight container at room temperature for up to a week or freeze for up to 3 months.
- Prep Time: 15 minutes
- Cook Time: 15 minutes
- Category: Dessert
- Method: Baking
- Cuisine: American
Nutrition
- Serving Size: 1 cookie
- Calories: 100
- Sugar: 6g
- Sodium: 200mg
- Fat: 4g
- Saturated Fat: 1g
- Unsaturated Fat: 2g
- Trans Fat: 0g
- Carbohydrates: 12g
- Fiber: 1g
- Protein: 6g
- Cholesterol: 10mg
Keywords: cookies, healthy dessert, protein cookies, cottage cheese cookies, guilt-free sweets
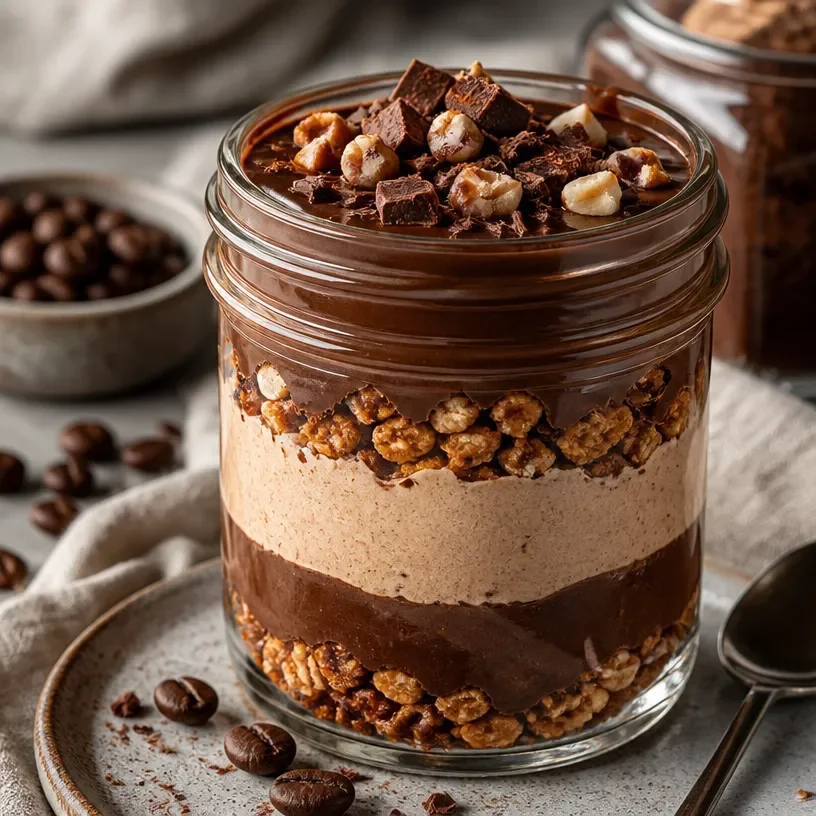
Min No-Bake Protein Mocha Fudge Jar: Grab-N-Go Snack
Protein Mocha Fudge Jar: A Delicious Pick-Me-Up!
Welcome to my cozy corner of the internet! I’m Olivia Bennett, your friendly kitchen guide, and today we’re diving deep into a recipe that will not only satisfy your sweet tooth but also give you a healthy boost! That’s right, we’re making a Protein Mocha Fudge Jar that’s perfect for a midday pick-me-up or as a delightful post-workout treat.
Imagine this: you’re in the midst of a busy day, your energy is waning, and all you can think about is that perfect balance of rich chocolate and robust coffee to push you through. This luscious fudge is not only the answer to your cravings but also packed with protein to keep you feeling energized. Plus, it’s in a jar—how cute is that?!
As we cook together, I’ll share why this recipe brings back memories for me, the sunshine of nostalgia brightening our culinary adventure. The joy of homemade treats is something that connects us all, and I can’t wait for you to experience it through this delightful fudge.
So, grab your apron, and let’s turn simple ingredients into something unforgettable!
A Sweet Trip Down Memory Lane
Whenever I think of chocolate and coffee, a warm rush of nostalgia washes over me. One of my fondest childhood memories is sitting in my grandmother’s kitchen, watching her create delectable desserts that filled the house with mouthwatering aromas. She had a special knack for combining flavors, and her famous mocha fudge was always a highlight during family gatherings.
The air would be thick with the rich scent of chocolate, and I would be perched on a stool, eagerly waiting for a taste—just a tiny morsel of that velvety goodness! It wasn’t just dessert; it was an experience. Grandma would tell stories about her own upbringing in the kitchen, while we licked the spoons and shared giggles. I’ll never forget her twinkling eyes, full of life and love, as she added a hint of espresso to her fudge mixture.
This recipe for Protein Mocha Fudge takes me back to those days. It’s comforting and packed with the flavors that remind me of my grandma, while also being a modern twist for those of us with busy lives. I hope it creates the same warm moments for you and your loved ones!
Gather Your Ingredients
Before we get started, let’s take a look at what you’ll need for this delightful Protein Mocha Fudge Jar:
-
1 cup almond butter
This creamy nut butter provides healthy fats and a smooth texture. If you’re allergic to nuts or prefer a different flavor, try sunflower seed butter for a nut-free option! -
1/2 cup maple syrup
This natural sweetener adds just the right amount of sweetness and a hint of depth to the flavor. You can substitute with agave syrup or honey for a different twist. -
1/4 cup unsweetened cocoa powder
The rich flavor of cocoa powder is essential for that chocolatey experience! You can use carob powder if you prefer a caffeine-free alternative. -
1/2 cup protein powder
This ingredient is the secret ingredient for that protein boost! I personally like whey or plant-based protein powder, so pick your favorite flavor that complements chocolate, like vanilla. -
1 tablespoon espresso powder
Espresso powder elevates the flavor of the fudge; it’s like a coffee hug in every bite! If you don’t have it, brewed coffee or instant coffee granules work well, just adjust the quantity for taste. -
1/4 teaspoon sea salt
A pinch of salt enhances the sweetness and balances flavors beautifully. Don’t skip it! -
Optional toppings:
- Chopped nuts (like walnuts or pistachios)
- Shredded coconut
- Drizzle of dark chocolate
Let’s Get Cooking: Step-by-Step Instructions
Alright, my kitchen buddy, it’s time to roll up our sleeves and get started! Follow these steps, and I promise you’ll be devouring that fudge in no time.
Step 1: Prep Your Workspace
Before we dive in, it’s crucial to have a clean workspace. Gather all your ingredients, utensils, and a mixing bowl. You’ll also need a container or jar to store your fudge—let’s go for something cute and reusable!
Step 2: Mix Together the Base
In a medium-sized bowl, add the almond butter and maple syrup. Mix these two together until they are well combined. You want a smooth consistency, so give it a good stir. A hand mixer can make this step even easier, but a sturdy spoon will work just fine too!
Step 3: Add Cocoa Powder & Protein
Next, sift in the unsweetened cocoa powder and protein powder. Stir until it’s completely combined—this is where the magic starts to happen! If the mixture feels too thick, don’t panic; adding a splash of your choice of non-dairy milk can help reach your desired consistency.
Step 4: Espresso and Salt
Now for that fabulous espresso powder and a touch of sea salt! This is what will make your fudge sing! Mix well, ensuring all ingredients are beautifully incorporated.
Step 5: Taste for Sweetness
Go ahead and taste your mixture! If you like your fudge a bit sweeter, feel free to add a drizzle more of maple syrup. Cooking is all about your personal preference, so make it your own!
Step 6: Prepare Your Jar
Now, transfer your fudge mixture into the jar or container. You can use a spatula to scoop out every last bit of that gooey goodness. Smooth the top out with the spatula, and you can even add toppings like chopped nuts or shredded coconut to create an aesthetically pleasing layer!
Step 7: Chill and Firm Up
Place your jar in the refrigerator for at least 2 hours to allow it to firm up. Trust me; the wait will be worth it! This is a perfect time to clean up your kitchen and maybe whip up another batch!
Step 8: Enjoy!
Once it’s set, dig in! Enjoy your Protein Mocha Fudge straight from the jar, or scoop it out and place it on a pretty plate to share with loved ones.
Serving Suggestions
To serve your Protein Mocha Fudge, you can either present it directly in the jar for a rustic look or scoop it into cute little bowls if you’re hosting a gathering. Drizzle some melted dark chocolate on top for an extra touch of indulgence, and add a sprinkle of sea salt to elevate the flavor. Serve alongside a hot cup of coffee or a chilled glass of almond milk for a delightful pairing!
Recipe Variations
Feeling adventurous? Here are a few creative twists you can try with your Protein Mocha Fudge Jar:
-
Nut Butter Bliss: Swap different nut butters to change the flavor profile—try peanut butter or cashew butter for a different taste adventure.
-
Spicy Fudge: Add a dash of cayenne pepper or cinnamon for a delightful kick. This can elevate your fudge and add a warm, spicy undertone.
-
Fruity Delight: Fold in some dried fruit like cranberries or chopped apricots to add a touch of natural sweetness and chewiness.
-
Mint Mocha: Incorporate a few drops of mint extract for a refreshing mint mocha version—perfect for the holiday season!
-
Vegan Friendly: Use a plant-based protein powder and replace maple syrup with agave or brown rice syrup to make a vegan treat.
Chef’s Notes
This Protein Mocha Fudge Jar is a recipe that has evolved beautifully over time. Initially, I created it to satisfy my sweet-tooth cravings while also fueling my energy levels, but it’s quickly become a favorite among my friends and family! I often find myself making it in large batches to share at potlucks or school events. The smiles I get when they take their first bite are priceless!
One funny kitchen story that comes to mind is when I tried experimenting with different types of protein powder. Let’s just say, not all flavors mix well! The chocolate mint protein powder incident left my friends in stitches, but the fudge was a fun conversation starter.
FAQs and Troubleshooting
Q1: Why did my fudge turn out too crumbly?
A: If your fudge is crumbly, it might be due to using too much protein powder or not enough sweetener. Try mixing in a bit more almond butter or maple syrup to help bind it together.
Q2: Can I freeze the fudge?
A: Absolutely! This fudge freezes well. Just make sure to store it in an airtight container, and it can last for up to three months in the freezer. Just thaw it in the fridge before indulging!
Q3: Can I use a different sweetener?
A: Yes! Feel free to use honey, agave syrup, or even date syrup. Each will bring a unique touch to your fudge, but bear in mind the flavor could change slightly.
Q4: How can I make this fudge richer?
A: To make your fudge even richer, consider adding a tablespoon or two of melted coconut oil or more cocoa powder. Both will enhance the chocolate flavor and creaminess!
Nutritional Info
Here’s a rough breakdown of one serving of your Protein Mocha Fudge Jar (assuming about 12 servings for the entire jar):
- Calories: Approximately 200
- Protein: 6g
- Carbohydrates: 15g
- Fats: 12g
- Fiber: 3g
There you have it, my fellow food lovers! Your Protein Mocha Fudge Jar is ready to be enjoyed, whether as a snack or a dessert. I hope this recipe brings you and your loved ones as much joy as it has brought me. Happy cooking, and might I say, eat with happiness!
Print
Protein Mocha Fudge Jar
- Total Time: 135 minutes
- Yield: 12 servings 1x
- Diet: Vegetarian
Description
A delicious protein-packed mocha fudge that’s perfect for a sweet pick-me-up or post-workout treat.
Ingredients
- 1 cup almond butter
- 1/2 cup maple syrup
- 1/4 cup unsweetened cocoa powder
- 1/2 cup protein powder
- 1 tablespoon espresso powder
- 1/4 teaspoon sea salt
- Optional toppings: chopped nuts, shredded coconut, drizzle of dark chocolate
Instructions
- Prep your workspace.
- Mix together the almond butter and maple syrup in a bowl until smooth.
- Add the cocoa powder and protein powder, stirring until combined.
- Incorporate the espresso powder and sea salt, mixing well.
- Taste for sweetness and adjust with more maple syrup if needed.
- Transfer the mixture into a jar or container and smooth the top.
- Chill in the refrigerator for at least 120 minutes to firm up.
- Enjoy your Protein Mocha Fudge straight from the jar or serve on a plate.
Notes
Store any leftover fudge in an airtight container in the refrigerator for up to one week.
- Prep Time: 15 minutes
- Cook Time: 0 minutes
- Category: Dessert
- Method: No-Bake
- Cuisine: American
Nutrition
- Serving Size: 1 serving
- Calories: 200
- Sugar: 8g
- Sodium: 100mg
- Fat: 12g
- Saturated Fat: 2g
- Unsaturated Fat: 10g
- Trans Fat: 0g
- Carbohydrates: 15g
- Fiber: 3g
- Protein: 6g
- Cholesterol: 0mg
Keywords: protein fudge, mocha fudge, healthy dessert, no-bake treat, gluten-free, snacks
Protein Apple Crisp Jar
Protein Apple Crisp Jar: A Cozy Dessert with a Twist
Welcome to my kitchen! I’m so excited to share one of my all-time favorite recipes with you today: the Protein Apple Crisp Jar. This delightful dessert not only satisfies your sweet tooth but also packs a protein punch—perfect for those cozy nights in or as a make-ahead treat for the week!
Picture this: You’ve just finished a long day, and all you want is something warm and comforting. Maybe you’re snuggled up on the couch with your favorite blanket or gathered around the table with loved ones. The scent of sweet apples, cinnamon, and buttery crisp topping fills the air, creating an inviting atmosphere that welcomes everyone. That’s the essence of my Protein Apple Crisp Jar—it’s not just food; it’s a celebration of flavors and memories that make life beautiful.
I absolutely adore recipes that are as hearty as they are wholesome. Apple crisp is one of those nostalgic desserts that screams comfort—and when you throw in protein, it becomes a deliciously guilt-free indulgence. We all know that autumn brings an abundance of apples, but honestly, any time of year is a good time for this apple crisp. The best part? You can prep it in advance and have it on hand for quick desserts that feel like a big hug in a jar. So grab your spoon, and let’s dive into this cozy treat!
A Taste of Nostalgia
Growing up, my family’s kitchen was always bustling with the joy of cooking and the aroma of freshly baked goods. My mom had a knack for turning everyday ingredients into magical desserts that filled our home with warmth. One fall afternoon, I remember her making a classic apple crisp. As we peeled apples together, I couldn’t wait to taste the sweet filling and the crunchy topping. She would always let me steal bites of the cinnamon-sugar mixture before it even made it into the oven—a little taste of heaven!
That day, as we pulled the crisp out of the oven, the smell was intoxicating. We’d gather around the table, where bowls of creamy vanilla ice cream complemented the warm, gooey apple filling. It was moments like these that cemented my love for cooking and sharing food with those I adore. Now, I’ve swapped in a protein twist to this classic, making it a special treat that still carries the comfort of my roots. It’s amazing how flavors have the power to evoke memories and create new ones in the process!
Ingredients
Let’s gather our ingredients for this Protein Apple Crisp Jar. Here’s what you’ll need to make this deliciously cozy dessert:
-
Apples: A mix of sweet and tart varieties works best (like Honeycrisp and Granny Smith). If you don’t have fresh apples, you can use frozen ones!
-
Oats: Rolled oats create that signature crisp texture. If you’re gluten-free, look for certified gluten-free oats.
-
Protein Powder: Choose your favorite protein powder—whey, plant-based, or whatever you enjoy. You can even use a flavored variety for an extra flavor boost!
-
Brown Sugar or Coconut Sugar: Brown sugar adds depth and richness; coconut sugar is a great alternative if you’re aiming for less processed sweeteners.
-
Cinnamon: This warm spice is essential. Feel free to mix in a pinch of nutmeg for added warmth.
-
Butter or Coconut Oil: This adds richness to the topping and is what makes it all come together. If you’re vegan, coconut oil is a fantastic substitute.
-
Vanilla Extract: A little splash enhances the overall flavor; use pure vanilla for the best results.
-
Salt: Just a pinch brightens up the sweetness and balances the flavors.
These ingredients come together like a big group hug of flavor! They’re simple but impactful, resulting in a dish that turns heads while being surprisingly nutritious.
Step-by-Step Instructions
Now, let’s get started on making this delightful Protein Apple Crisp Jar. Follow these simple steps for a result that will blow your mind!
-
Preheat the Oven: Start by preheating your oven to 350°F (175°C). This is crucial to ensure your apple crisp bakes evenly and gets that beautiful golden brown color we all love.
-
Prep the Apples: Peel, core, and slice your apples into thin wedges. Aim for uniform sizes to promote even cooking. If you’re using a mix of apple varieties, this will add great depth to the flavor!
-
Spice It Up: In a large bowl, toss your sliced apples with a sprinkle of brown sugar (or coconut sugar), a spoonful of cinnamon, and a pinch of salt. Don’t hold back on the spices; they make all the difference.
-
Layer It Up: In your jars, start layering! Begin with a generous scoop of spiced apples at the bottom. Depending on the size of your jars, you might fill them halfway or just below the rim.
-
Prepare the Crisp Topping: In another bowl, combine the rolled oats, protein powder, remaining brown sugar, and cinnamon. Melt your butter (or coconut oil) and mix it in until everything is crumbly. This is where the magic happens!
-
Top It Off: Spoon the crisp topping over the layered apples in each jar. Press it down gently and make sure it’s evenly distributed. This creates that coveted crunchy topping that contrasts beautifully with the soft apples.
-
Bake to Perfection: Place your jars on a baking sheet (to catch any spills) and pop them into the preheated oven. Bake for about 25-30 minutes until the topping is golden brown and the apples are bubbling.
-
Cool Down: Once baked, let your jars cool for a few minutes. The aroma will be irresistible, so be patient! Enjoying hot apple crisp is delightful, but just let it sit for a moment to set.
-
Serve with Love: Top these protein-packed treats with a scoop of your favorite ice cream or dollop of whipped cream if you’re feeling indulgent.
Cooking doesn’t have to be complicated—when you break it down into steps, it becomes a fun and rewarding experience! Each step is an opportunity to savor the process and experiment with flavors.
Serving Suggestions
When it comes to serving, presentation is key! I love to arrange the jars on a rustic wooden board, showcasing each layer of vibrant apple and golden crisp. You can adorn each jar with a sprinkle of cinnamon, a drizzle of honey or maple syrup for added sweetness, or even a few fresh apple slices on the side. A scoop of vanilla ice cream perched atop the warm crisp brings it all together beautifully.
Recipe Variations
Want to switch things up a bit? Here are a few variations to play with your Protein Apple Crisp Jar:
-
Nutty Twist: Add chopped nuts like walnuts or pecans into the crisp topping for added crunch and healthy fats.
-
Berry Bonus: Mix in some fresh or frozen berries with the apple layer for a pop of color and delightful flavor.
-
Spicy Kick: Incorporate a dash of ginger or cardamom for an extra warm and cozy twist.
-
Sweeten It Up: Swap in maple syrup or honey instead of brown sugar for a different kind of sweetness.
-
Fruit Swap: Try this recipe with pears, peaches, or cherries—a delightful way to switch up the flavor profile based on the season!
Chef’s Notes
This recipe has evolved over the years as I’ve learned more about balancing flavors and textures. Initially, I would just make the classic apple crisp, but after experimenting with protein and health-conscious options, I discovered that you can create a delicious dessert that aligns with a balanced lifestyle. It’s funny how cooking allows you to adapt and innovate based on what you have on hand or what season you’re in.
Also, I have to admit… the first time I tried baking in jars, I accidentally overflowed them and ended up with a crispy apple mess in my oven! Now, I always use a baking sheet under my jars as a backup. The little kitchen escapades make the best stories, right?
FAQs and Troubleshooting
Q: Can I make this recipe ahead of time?
Absolutely! You can prepare the jars a day in advance and keep them in the refrigerator until you’re ready to bake. Just add a couple of extra minutes to the baking time if they’re starting cold.
Q: What if my apples turn out mushy?
Using firmer apple varieties and not overbaking will help prevent mushiness. If they do seem soft, fear not! They’ll still taste delicious!
Q: Is it okay to use a different protein powder?
Definitely! You can substitute any protein powder you like—whey, plant-based, or even a flavored option for extra taste.
Q: Can I freeze the assembled jars?
Yes! Layer your ingredients and freeze them before baking. When you’re ready to enjoy, let them thaw in the fridge overnight, then bake as instructed.
Nutritional Info
While the exact nutritional information may vary based on the ingredients you use, each serving generally contains a healthy balance of protein, fiber, and healthy fats. It’s a cozy dessert that won’t sabotage your nutrition goals!
There you have it, folks! The Protein Apple Crisp Jar is not just a dessert; it’s a little piece of comfort that you can whip up anytime—whether you’re treating yourself or sharing with loved ones. I hope this recipe brings as much joy to your kitchen as it does to mine! Now, go on, grab those apples, and let’s make something special together. Happy cooking!
Print
Protein Apple Crisp Jar
- Total Time: 45 minutes
- Yield: 4 servings 1x
- Diet: Vegetarian
Description
A cozy dessert that combines sweet apples, crunchy topping, and a protein twist, perfect for any time of the year.
Ingredients
- 4 medium Apples (a mix of sweet and tart)
- 1 cup Rolled Oats
- 1 scoop Protein Powder
- 1/2 cup Brown Sugar or Coconut Sugar
- 2 tsp Cinnamon
- 1/4 cup Butter or Coconut Oil
- 1 tsp Vanilla Extract
- 1/4 tsp Salt
Instructions
- Preheat the oven to 350°F (175°C).
- Prep the apples by peeling, coring, and slicing them into thin wedges.
- Spice the sliced apples with brown sugar, cinnamon, and salt in a large bowl.
- Layer the spiced apples into jars.
- Prepare the crisp topping by combining oats, protein powder, remaining brown sugar, and cinnamon in a bowl.
- Melt the butter (or coconut oil) and mix it into the oat mixture until crumbly.
- Top each jar with the crisp topping and press down gently.
- Bake for 25-30 minutes until the topping is golden brown and apples are bubbling.
- Cool for a few minutes before serving.
- Serve with a scoop of ice cream or whipped cream.
Notes
Can be made ahead of time and stored in the refrigerator. Adjust baking time if jars are cold.
- Prep Time: 15 minutes
- Cook Time: 30 minutes
- Category: Dessert
- Method: Baking
- Cuisine: American
Nutrition
- Serving Size: 1 jar
- Calories: 350
- Sugar: 22g
- Sodium: 150mg
- Fat: 15g
- Saturated Fat: 6g
- Unsaturated Fat: 8g
- Trans Fat: 0g
- Carbohydrates: 48g
- Fiber: 5g
- Protein: 10g
- Cholesterol: 25mg
Keywords: apple crisp, dessert, healthy dessert, cozy dessert, protein dessert, gluten-free options
High-Protein Cherry Cheesecake Jar (No-Bake, 4-Ingredient)
Deliciously Decadent Protein Cherry Cheesecake Jars: A Treat Worth Savoring
Welcome back to my cozy kitchen! I’m Olivia Bennett, and I’m so thrilled you’re joining me today for a delightful culinary adventure. If you’ve ever found yourself craving a sweet treat that’s as good for your taste buds as it is for your health goals, you’re in for a real treat with my Protein Cherry Cheesecake Jars! Oh yes, we’re diving into a recipe that combines creamy, dreamy cheesecake deliciousness with the vibrant flavors of tart cherries, all while packing a protein punch.
Now, let’s get real for a moment—sometimes, life gets busy, and those sweet cravings can hit hard. That’s why I love turning to these cheesecake jars, which are not only quick to whip up but can also be made in advance, making them perfect for grab-and-go snacks or an easy dessert to impress your guests. Who knew something so tasty could also fit into a healthy eating plan?
What makes this recipe even more special is the freedom to indulge without guilt. It’s light, protein-packed, and oh-so-satisfying. Plus, there’s something truly comforting about enjoying a homemade dessert in a jar—it’s like a little taste of nostalgia that brings back memories of family gatherings and cozy evenings spent in the kitchen. Trust me, once you dig into this cherry cheesecake goodness, you’ll find it hard to keep your spoon away!
So, grab your apron, turn up your favorite tunes, and let’s create something magical. Who’s ready to get cooking?
A Sweet Memory
Growing up, my family often had Sunday dinner at my grandparents’ house. After we cleared the table and washed the dishes, dessert was always the grand finale. My grandmother, who was a legendary baker, would unveil her creations with flourish. One dessert always stole the spotlight: her cherry cheesecake. It was creamy, with a buttery crust, and laid under a glistening layer of bright cherry topping. I remember feeling like a kid in a candy store as I patiently waited for my slice, savoring each bite in a blissful state of dessert euphoria.
However, as I grew older and became more health-conscious, I found myself reminiscing about that cherry cheesecake but longing for a healthier version. That’s what inspired this recipe! These Protein Cherry Cheesecake Jars bring back the essence of my grandmother’s classic while incorporating nutritious ingredients that promote a healthier lifestyle. It’s my way of honoring my roots while creating something fresh and exciting for today’s health-savvy foodies!
Ingredients
Here’s what you’ll need to make these scrumptious protein-packed cheesecake jars:
For the Cheesecake Layer:
-
1 cup Greek yogurt
A creamy base that’s high in protein and gives that all-important tang! You can substitute it with dairy-free yogurt if needed. -
1 cup cream cheese (light or full-fat)
Provides that classic cheesecake texture. Softened at room temperature works best for easy mixing. -
1/2 cup protein powder (vanilla or unflavored)
This adds a boost of protein to your dessert! A plant-based protein powder can be easily substituted for a vegan option. -
1/4 cup sweetener of choice
I love honey or maple syrup for natural sweetness, but feel free to use stevia or your favorite sugar substitute! -
1 teaspoon vanilla extract
A must for warm, comforting flavors! If you have almond extract, that works beautifully, too, for a twist.
For the Cherry Topping:
-
2 cups fresh or frozen dark cherries
The star of our dish! Fresh cherries are fabulous, but frozen will work just fine. Just be sure to thaw and drain them. -
2 tablespoons maple syrup or honey
A touch of sweetness enhances the cherry flavor. You can use agave syrup as a substitute. -
1 teaspoon lemon juice
Adds a refreshing brightness and helps balance the sweetness.
Additional Items:
- Optional: Crushed graham crackers or nuts for layering
A great way to introduce a crunchy texture. Use gluten-free crackers or nuts based on your dietary preferences.
Now that you have all your ingredients ready, let’s get to the fun part—cooking!
Step-by-Step Instructions
Step 1: Prepare the Cheesecake Layer
In a large mixing bowl, combine the Greek yogurt, cream cheese, protein powder, sweetener, and vanilla extract. Using an electric mixer, blend until smooth and creamy—about 2 minutes. Here’s a little chef tip: Scrape down the sides halfway through mixing to ensure everything is well incorporated.
Step 2: Layer the Ingredients
Grab your favorite serving jars or glasses (the mini mason jars make for a cute presentation). Start by placing a layer of the cheesecake mixture at the bottom. You can even do a fancy piping bag if you want it to look professional—just make sure the first layer is even and delightful!
Step 3: Prepare the Cherry Topping
In a small saucepan over medium heat, add the dark cherries, maple syrup, and lemon juice. Cook for about 5-7 minutes until the cherries brake down and become syrupy. This is where the magic happens! If your cherries aren’t as saucy as you hoped, a splash of water will help create that beautiful cherry goodness. Voila, you have your topping!
Step 4: Assemble
Once the cherry topping has cooled slightly, layer it on top of the cheesecake layer. Depending on how much you love cherries (and I know you will!), feel free to heap them generously! You can also add a sprinkling of crushed graham crackers or nuts for extra texture at this point.
Step 5: Refrigerate
Cover your jars with lids or plastic wrap and pop them in the fridge for at least one hour. Letting it chill allows the flavors to meld together beautifully. This is also a great time to sit back with a cup of tea and watch a cooking show for a bit of inspiration.
Serving Your Jars
When you’re ready to serve these delightful cheesecake jars, feel free to top them with an extra dollop of Greek yogurt, a few whole cherries, or a sprinkle of mint for a pop of color!
Recipe Variations
If you’re feeling adventurous, try these fun twists on the classic recipe:
-
Berry Medley: Instead of cherries, use a mix of strawberries, blueberries, and raspberries for a vibrant, mixed-berry topping.
-
Chocolate Delight: Mix some cocoa powder into the cheesecake layer for a chocolate-flavored cheesecake! Add chocolate shavings on top—because chocolate, right?
-
Nutty Crunch: Substitute crushed nuts for the graham cracker layer for an extra crunch factor. Almonds or pecans are great choices!
-
Spiced Pumpkin: For a fall twist, add canned pumpkin puree and pumpkin spice to the cheesecake layer. Christmas flavors in a jar? Yes, please!
-
Coconut Cream: Mix in some unsweetened shredded coconut to the cheesecake layer for an added tropical flair.
Chef’s Notes
This Protein Cherry Cheesecake Jar recipe has evolved quite a bit over time. Initially, I tried using tofu instead of cream cheese for a vegan version, and while it was quite tasty, it didn’t quite hit the mark for nostalgic cheesecake flavor. However, through trial and error, I’ve perfected the balance of flavors, and I can confidently say that this is my favorite version yet!
And speaking of tidbits, one of the funniest kitchen mishaps I had while making these was when I accidentally whipped my Greek yogurt too long, and let’s just say it turned into a frothy cloud rather than a creamy layer. Lesson learned: be gentle with your ingredients!
FAQs and Troubleshooting
Q1: Can I make this recipe dairy-free?
Absolutely! Use dairy-free cream cheese and yogurt alternatives. Make sure to select a protein powder compatible with dairy-free diets.
Q2: How long can I store these jars?
You can store your jars in the fridge for up to 4 days. Just be careful not to top them with the cherry layer until you’re ready to dig in!
Q3: What if my cheesecake layer is too runny?
If your cheesecake layer turns out too runny, try adding a little bit more protein powder or Greek yogurt until it thickens up. Remember, it should have a light, creamy consistency!
Q4: Can I freeze the cheesecake jars?
Yes! These jars can be frozen for up to a month. Just let them thaw overnight in the fridge before serving.
So there you have it—everything you need to whip up these delightful Protein Cherry Cheesecake Jars. They’re perfect for any occasion, whether you’re pampering yourself or entertaining friends. Enjoy every luscious layer, and remember to share your creations with those you love! Happy cooking!
Print
Deliciously Decadent Protein Cherry Cheesecake Jars
- Total Time: 25 minutes
- Yield: 4 servings 1x
- Diet: High Protein, Gluten-Free Option Available
Description
A delightful and healthy twist on classic cherry cheesecake packed with protein, perfect for satisfying sweet cravings.
Ingredients
- 1 cup Greek yogurt
- 1 cup cream cheese (light or full-fat)
- 1/2 cup protein powder (vanilla or unflavored)
- 1/4 cup sweetener of choice (honey, maple syrup, or favorite sugar substitute)
- 1 teaspoon vanilla extract
- 2 cups fresh or frozen dark cherries
- 2 tablespoons maple syrup or honey
- 1 teaspoon lemon juice
- Optional: crushed graham crackers or nuts for layering
Instructions
- Prepare the Cheesecake Layer: In a large mixing bowl, combine Greek yogurt, cream cheese, protein powder, sweetener, and vanilla extract. Blend until smooth and creamy—about 2 minutes.
- Layer the Ingredients: Place a layer of cheesecake mixture at the bottom of serving jars.
- Prepare the Cherry Topping: In a small saucepan, add dark cherries, maple syrup, and lemon juice. Cook for about 5-7 minutes until the cherries break down and become syrupy.
- Assemble: Once the cherry topping has cooled, layer it on top of the cheesecake layer and optionally add crushed graham crackers or nuts.
- Refrigerate: Cover jars and refrigerate for at least one hour to allow flavors to meld.
Notes
Great for grab-and-go snacks or quick desserts. Store in the fridge for up to 4 days without cherry topping.
- Prep Time: 15 minutes
- Cook Time: 10 minutes
- Category: Dessert
- Method: No-Bake
- Cuisine: American
Nutrition
- Serving Size: 1 jar
- Calories: 280
- Sugar: 10g
- Sodium: 200mg
- Fat: 14g
- Saturated Fat: 7g
- Unsaturated Fat: 6g
- Trans Fat: 0g
- Carbohydrates: 30g
- Fiber: 2g
- Protein: 15g
- Cholesterol: 30mg
Keywords: cheesecake, protein dessert, cherry dessert, healthy cheesecake, no-bake dessert


