
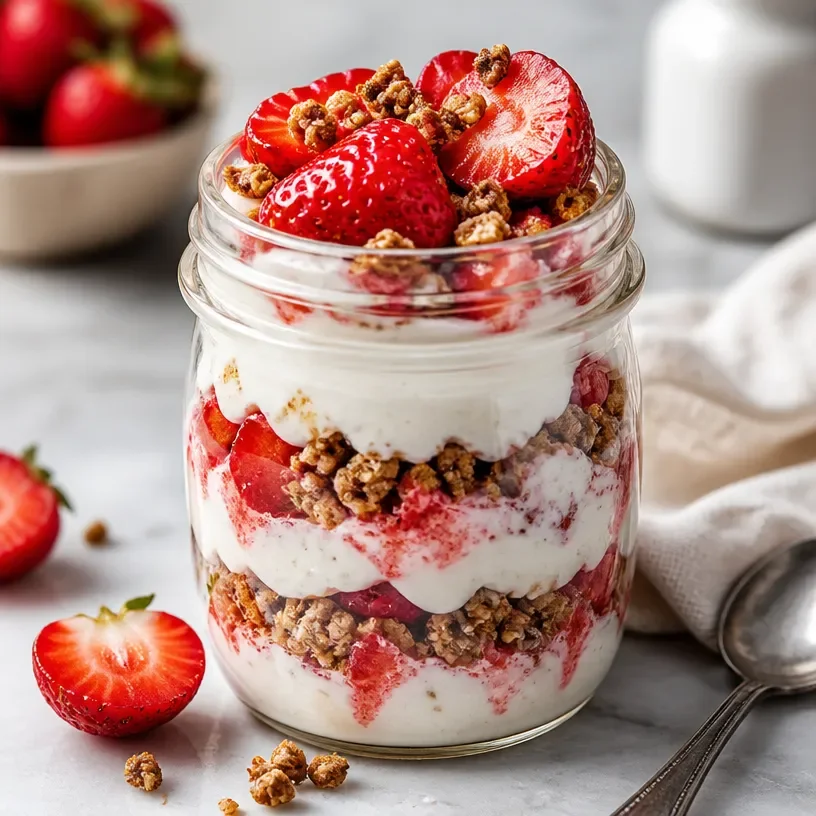
High-Protein Strawberry Cheesecake Jar for Quick Meal Prep
Deliciously Decadent: Protein Strawberry Cheesecake Jars
Welcome to my kitchen! I’m Olivia Bennett — a passionate home cook, flavor enthusiast, and lover of all things cozy and homemade. Today, I’m bringing you one of my all-time favorite desserts: Protein Strawberry Cheesecake Jars. This delightful treat combines the creamy goodness of cheesecake with the refreshing sweetness of strawberries, all while packing a protein punch. Whether you’re looking to satisfy a sweet tooth or fuel up post-workout, these jars are the perfect blend of indulgence and nutrition!
Picture this: a warm summer day, the sun shining bright, and the scent of strawberries wafting through the air. Not too long ago, I found myself at a charming farmers’ market, surrounded by vibrant stalls filled with plump, juicy strawberries. I picked a handful, eager to create something special in my kitchen. The idea of a cheesecake had been on my mind, but how could I make it a little healthier while still keeping it utterly delicious? That’s when it hit me! I could blend the classic flavors of cheesecake with a protein twist, creating something that feels indulgent but also fuels my day.
Every layer of these Protein Strawberry Cheesecake Jars tells a story— the creamy cheesecake filling, the sweet and tangy strawberry compote, and the crunchy graham cracker topping. Plus, they’re super easy to whip up! If you’re someone who lights up at the smell of something sweet baking or enjoys feeding loved ones, you’ll absolutely adore this recipe. Let’s get started on your journey to cheesecake bliss!
Personal Story
I still vividly remember the first time I attempted to make a classic cheesecake. It was for my best friend’s birthday, and I had promised to bake her favorite dessert. The kitchen was filled with laughter, flour flew everywhere, and my dog, Benny, attempted to steal a piece of my graham cracker crust (he did succeed a few times!). My first cheesecake was a little lopsided but oh-so-delicious. It was so satisfying to see everyone enjoying it!
Fast forward a few years, and my culinary adventures pushed me to think outside the box. I wanted to create something lighter yet equally delicious. That day at the farmers’ market sparked inspiration, and the Protein Strawberry Cheesecake Jar was born! Every time I make it, it takes me back to that special birthday, reminding me that cooking is not just about food— it’s about memories, joy, and connection.
Ingredients
Now, let’s dive into what you’ll need for the Protein Strawberry Cheesecake Jars. Here’s the full list of ingredients to get you started!
-
1 cup Greek yogurt: A fantastic source of protein that adds creaminess. You can substitute with low-fat or dairy-free yogurt if desired.
-
1/2 cup cream cheese: Traditional cheesecake flavor definitely comes from this! Opt for light cream cheese for a lower-fat version.
-
1/4 cup powdered sugar or a sugar substitute: Sweetness is key! Powdered sugar mixes smoothly, but feel free to use honey or agave syrup as a natural alternative.
-
1/2 teaspoon vanilla extract: For a rich and warming flavor that ties everything together. Sometimes, I even add almond extract for a twist!
-
1 cup fresh strawberries, hulled and sliced: These juicy gems are essential! If strawberries aren’t in season, feel free to use frozen ones—just thaw and drain excess moisture.
-
1/2 cup graham cracker crumbs: The crunch factor! You can make your own by blending whole graham crackers or use gluten-free options if needed.
-
2 tablespoons melted butter: Helps bind the graham cracker crust. Coconut oil can be a great substitute for a healthier twist.
-
Protein powder (optional): If you want an extra protein boost, adding a scoop of your favorite protein powder to the filling works great!
Step-by-Step Instructions
Ready to create your own Protein Strawberry Cheesecake Jars? Let’s gather all your ingredients and get cooking!
Step 1: Prepare your jars
Select a few cute jars or containers—about 4 to 6 if you’re feeling generous! Giving them a good wash and letting them dry can be a great start. This not only makes your presentation delightful but also adds a personal touch.
Step 2: Make the crust
In a medium mixing bowl, combine the graham cracker crumbs with the melted butter, mixing until you have a sandy consistency. You know it’s ready when it holds between your fingers. If the mixture feels a bit dry, add a touch more melted butter. Press a layer of this mixture into the bottom of each jar (about 2 tablespoons per jar) and pack it tightly. A small measuring cup works wonders for this!
Step 3: Prepare the cheesecake filling
In another bowl, mix the Greek yogurt, cream cheese, powdered sugar, and vanilla extract. Use an electric mixer, or a whisk if you’re feeling adventurous! Beat until it’s smooth, creamy, and oh-so-inviting. You can fold in a scoop of protein powder here if you’d like. This is where you’ll see the magic happen, transforming a simple mix into something truly luscious!
Step 4: Make the strawberry topping
In a small saucepan over medium heat, add your fresh strawberries. Stir them gently until they begin to soften; this typically takes about 5-7 minutes. If you’re craving a bit more sweetness, sprinkle a teaspoon of sugar over the top. Allow it to thicken slightly, creating a delightful strawberry compote. Remove from heat and let it cool.
Step 5: Assemble the jars
Now comes the fun part! Grab your jars and start layering. Add a generous spoonful of the cheesecake filling atop the graham cracker crust, smoothing it out with a spatula. Then, layer in that luscious strawberry compote over the cheesecake filling. Repeat the layering process, finishing with the cheesecake layer on top.
Step 6: Chill
Once assembled, cover your jars with lids or plastic wrap and refrigerate for at least 1-2 hours (or overnight if you can resist!). This chilling time allows flavors to meld beautifully and the cheesecake to set up, making it even more enjoyable.
Step 7: Serve
When you’re ready to indulge, grab your jars, remove the lids, and dig in! For a lovely finishing touch, garnish with a whole strawberry or a sprig of mint on top.
Serving Suggestions
These Protein Strawberry Cheesecake Jars are adorable will look fantastic on a picnic blanket or your kitchen table. Consider serving them after a summer BBQ or as a delightful dessert for your next brunch gathering. They’re also fantastic as meal prep for the week—just grab a jar while heading out the door!
Recipe Variations
Want to make this recipe your own? Here are some fun twists you can consider:
-
Mixed Berry Delight: Substitute strawberries with a mix of raspberries, blueberries, and blackberries for a wholesome berry medley.
-
Chocolate Lovers’: Add cocoa powder to the cream cheese mixture for a dreamy chocolate cheesecake flavor—it’s heavenly!
-
Lemon Zest Twist: Add a teaspoon of lemon zest to the filling for a bright, zesty punch and a fresher flavor profile.
-
Almond Joy: Incorporate shredded coconut and almond extract for a tropical cheesecake experience.
-
Nutty Crunch: Mix in your favorite nuts or seeds into the crust for an added healthy crunch and flavor boost!
Chef’s Notes
Let me tell you a little secret—these jars have become my go-to dessert for almost every occasion. I love how they bring smiles and satisfaction, yet still fit into an active lifestyle with their protein boost. I remember making them for a friend’s surprise party and watching everyone ooh and aah over how cute they looked. And the best part? They can be made ahead of time, so you can enjoy the party instead of worrying over the last-minute dessert! Just remember, the longer you let them chill, the more delicious they become as the flavors marry.
FAQs and Troubleshooting
1. Can I make this keto-friendly?
Absolutely! You can use keto-certified sweeteners and almond flour instead of graham crackers for a low-carb crust.
2. My cheesecake mixture is lumpy! What did I do wrong?
Make sure your cream cheese is at room temperature before mixing. Cold cream cheese doesn’t blend smoothly and can lead to lumps.
3. How do I store leftovers?
These jars can be kept in the fridge for up to 4-5 days. Just make sure they’re sealed properly to prevent them from drying out!
4. Can I freeze them?
While the cheesecake jars can technically be frozen, the texture may change upon thawing. It’s best enjoyed fresh or refrigerated.
Nutritional Info
Here’s a rough estimate of the nutritional info per jar (excluding optional protein powder):
- Calories: 240
- Protein: 15g
- Carbohydrates: 30g
- Fats: 9g
Grab your jars, channel your inner chef, and let’s create a little bit of magic in the kitchen today! Happy cooking, friends!
I hope you enjoy making these Protein Strawberry Cheesecake Jars as much as I do! Remember, every time you step into the kitchen, it’s another opportunity to create cherished memories. Whether you’re cooking for yourself or sharing with loved ones, food is a beautiful way to connect and celebrate the simple pleasures of life. Let’s keep cooking and sharing those flavors together!
Print
Protein Strawberry Cheesecake Jars
- Total Time: 30 minutes
- Yield: 4 servings 1x
- Diet: High Protein
Description
A delightful dessert that combines creamy cheesecake and sweet strawberries while packing a protein punch, perfect for satisfying your sweet tooth or fueling up post-workout.
Ingredients
- 1 cup Greek yogurt
- 1/2 cup cream cheese
- 1/4 cup powdered sugar or sugar substitute
- 1/2 teaspoon vanilla extract
- 1 cup fresh strawberries, hulled and sliced
- 1/2 cup graham cracker crumbs
- 2 tablespoons melted butter
- Protein powder (optional)
Instructions
- Prepare your jars by selecting 4 to 6 containers, washing, and drying them.
- Make the crust by mixing graham cracker crumbs with melted butter until sandy, then press into the bottom of each jar.
- Prepare the cheesecake filling by mixing Greek yogurt, cream cheese, powdered sugar, and vanilla until smooth, adding protein powder if desired.
- Make the strawberry topping by gently cooking fresh strawberries in a saucepan over medium heat for 5-7 minutes until softened, then let it cool.
- Assemble the jars by layering cheesecake filling and strawberry compote, finishing with a layer of cheesecake.
- Chill the assembled jars for at least 1-2 hours or overnight to allow flavors to meld.
- Serve when ready, garnishing with a whole strawberry or mint if desired.
Notes
These jars are perfect for a summer dessert, picnic, or brunch gathering. They can also be made ahead of time for convenience.
- Prep Time: 20 minutes
- Cook Time: 10 minutes
- Category: Dessert
- Method: Chilling
- Cuisine: American
Nutrition
- Serving Size: 1 jar
- Calories: 240
- Sugar: 8g
- Sodium: 200mg
- Fat: 9g
- Saturated Fat: 4g
- Unsaturated Fat: 4g
- Trans Fat: 0g
- Carbohydrates: 30g
- Fiber: 1g
- Protein: 15g
- Cholesterol: 30mg
Keywords: cheesecake, dessert, strawberries, high protein, healthy treat, meal prep
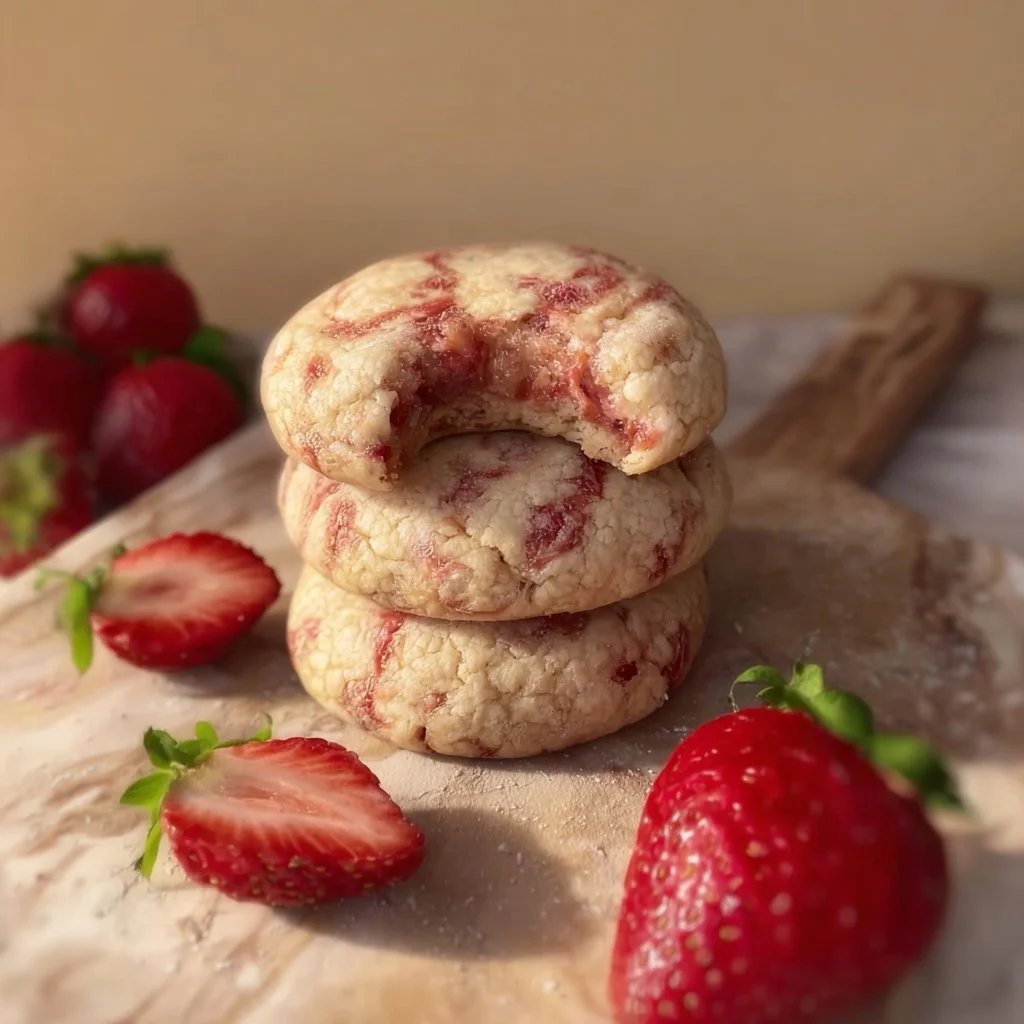
Strawberry Cheesecake Cookies (Pretty & Delicious!)
Strawberry Cheesecake Cookies: Pretty & Delicious!
Welcome back to my kitchen, friends! Today, I’m thrilled to share a recipe that’s near and dear to my heart: Strawberry Cheesecake Cookies. Just saying the name brings a smile to my face, and I can almost smell the sweet, creamy aroma wafting through my kitchen. Picture this: tender, chewy cookies infused with rich cream cheese and bursting with the vibrant sweetness of fresh strawberries. They are a little bite of cloud-like bliss that’s not only visually captivating but also perfect for any occasion.
Whether you’re looking for a fun treat to brighten up your week or a fabulous dessert to impress at your next gathering, these cookies deliver that “wow” factor with every bite. What I love most about them is the delightful fusion of textures and flavors. The creaminess of the cheesecake-inspired dough, coupled with the juicy strawberries, creates a cookie experience that transcends your regular baked goods. Plus, they’re a great way to celebrate strawberry season!
The idea of turning a classic cheesecake into a cookie form was inspired by those lovely warm afternoons where the sun shines just right, and the world feels just a little bit more magical. For me, it’s about finding joy in baking and sharing delicious treats with loved ones. So, pull up a chair, put on your apron, and let’s get baking! I promise these cookies will bring a smile to your face and a sweet taste to your day.
Personal Story
Growing up, my family had a beautiful tradition of gathering for Sunday brunch. It was a time when we would savor delightful homemade dishes, engage in lively conversations, and share stories that still make us laugh today. One Sunday, my grandmother surprised us all with her famous cheesecake — a dish that everyone in the family loved. The creamy filling paired with the bright tartness of strawberries was simply irresistible.
As we gathered around the table, I remember watching her whip up the cheesecake with such ease, telling stories as she effortlessly folded in the strawberries. I was captivated. Inspired by that cherished memory, I decided to create a unique version of that classic treat: Strawberry Cheesecake Cookies! Not only do they evoke nostalgia, but they also bring my family together in the same way. Every time I bake them, I can’t help but think of those cozy brunches filled with laughter, love, and lots of cheesecake!
Ingredients
Let’s gather our ingredients! Here’s what you’ll need to create your Strawberry Cheesecake Cookies, along with a few helpful insights:
-
1 cup unsalted butter, softened
Butter adds richness and moisture to the cookies. If you’re in a pinch, feel free to substitute with margarine or coconut oil for a dairy-free option. -
1 cup cream cheese, softened
This is the star of the show! Cream cheese gives that iconic cheesecake flavor. For a lower-fat option, try Neufchâtel cheese, which has less fat but a similar taste! -
1 cup granulated sugar
Sugar adds sweetness and helps with the cookie structure. You can use coconut sugar for a more caramel-like flavor or a sugar substitute for a healthier option. -
1 large egg
Eggs provide moisture and bind the ingredients together. For a vegan option, you can use a flax egg (1 tablespoon of ground flaxseed mixed with 2.5 tablespoons of water) to achieve the binding effect! -
2 cups all-purpose flour
This forms the base of the cookies. For a gluten-free version, substitute with gluten-free all-purpose flour, and add a touch of xanthan gum to help with the texture! -
1 teaspoon vanilla extract
Vanilla enhances the flavor profile, giving it that comforting aroma. Consider using almond extract for a nuttier flavor or leave it out completely if preferred. -
1 teaspoon baking powder
This gives your cookies that lift and fluffiness. Baking soda can also be used if you’re out of baking powder; just adjust the acidity with a touch of vinegar! -
½ teaspoon salt
A pinch of salt balances the sweetness and brings out the flavors. Sea salt or Himalayan salt can be great alternatives for a different flavor. -
1 cup fresh strawberries, diced
Fresh strawberries bring sweetness and a burst of flavor. You can also use freeze-dried strawberries for a more concentrated flavor if fresh ones aren’t available!
Step-by-Step Instructions
Now, let’s dive into the fun part — baking those Strawberry Cheesecake Cookies! Here’s how to make them step-by-step:
Step 1: Preheat the Oven
Start by preheating your oven to 350°F (175°C). This initial heat is crucial for achieving that perfect, chewy texture in your cookies. A hot oven means that the cookies will rise beautifully!
Step 2: Cream the Butter and Cream Cheese
In a large mixing bowl, beat together the softened butter and cream cheese until the mixture is creamy and smooth. This should take about 2-3 minutes of beating. You want that lovely, light texture to form!
Chef’s Tip: Use an electric mixer for this step if you want to save time and energy! You can also mix by hand with a strong spatula, but it may take a bit longer.
Step 3: Add Sugar and Egg
Now, add the granulated sugar and egg to the mixture. Beat again until everything is well combined. This will create a wonderfully fluffy base for your cookie dough.
Little Hack: Don’t just crack the egg directly into the bowl! Crack it into a separate dish first to avoid getting any shell bits in your mixture.
Step 4: Combine Dry Ingredients
In another bowl, mix together the flour, baking powder, and salt. This ensures that the flour is evenly distributed and the cookies have a nice rise. Gradually add this dry mixture to the wet ingredients, mixing until just combined. Over-mixing can lead to tough cookies, so be gentle!
Step 5: Fold in Strawberries
Once your dough is ready, gently fold in the diced fresh strawberries. You should see vibrant bits of red speckle throughout — this makes the cookies extra pretty!
Chef’s Note: If your strawberries are particularly juicy, consider patting them dry with a paper towel before mixing them in. This prevents the dough from becoming overly wet.
Step 6: Scoop and Bake
Line your baking sheet with parchment paper. Using a cookie scoop (or two spoons), drop heaping tablespoons of dough onto the sheet, leaving enough space between each cookie to allow for spreading. Bake in your preheated oven for 12-15 minutes, or until the edges are lightly golden.
Pro Tip: If you want an extra burst of strawberry flavor, reserve a few pieces to sprinkle on top before baking.
Step 7: Cool and Enjoy
Once they’re done, remove the cookies from the oven, and let them cool on the baking sheet for 5 minutes before transferring them to a wire rack to cool completely. The cooling process allows the cookies to set up perfectly — you don’t want to bite into a gooey mess!
Serving Suggestions
Serve these gorgeous Strawberry Cheesecake Cookies on a beautiful platter or in a fun, rustic basket lined with a cloth napkin. They pair perfectly with a cup of coffee, tea, or even a tall glass of milk! For a little added flair, dust the cookies with powdered sugar before serving for a hint of elegance.
Recipe Variations
Feeling adventurous? Here are a few creative twists you can try with your Strawberry Cheesecake Cookies:
-
Chocolate Chips: Add a handful of semi-sweet or white chocolate chips to the dough for a decadent chocolate-strawberry combo.
-
Lemon Zest: Incorporate zest from one lemon into the dough for a zesty kick that complements the strawberries beautifully.
-
Nuts: Fold in some chopped pecans or walnuts for an extra crunch and delightful flavor.
-
Dried Fruits: Swap strawberries for dried cranberries or cherries for a tart flavor twist.
-
Coconut Flakes: Add unsweetened coconut flakes for a tropical flair!
Chef’s Notes
As with all recipes, this one has evolved over time. Originally, I just made a basic cheesecake but quickly realized I wanted something that was a bit more fun and portable. Cookies seemed like the perfect solution! Whenever I bake these, I always think of Grandma, who never shyed away from adding her personal touch. Sometimes, I even leave a few unbaked cookies in the fridge overnight — they taste even better the next day when the flavors have had time to meld!
Oh, and let me share a funny little kitchen blunder! One time, I got so caught up in nostalgia that I accidentally added salt instead of sugar. Let’s just say those batch didn’t make it very far! But hey, the lesson learned? Always double-check the labels!
FAQs and Troubleshooting
1. Why are my cookies flat?
If your cookies spread too much, it could be due to melted butter. Ensure your butter is softened, not melted. Additionally, chilling the dough for about 30 minutes before baking can help them hold their shape better!
2. Can I use frozen strawberries?
Yes, you can use frozen strawberries! Just be sure to thaw them first and pat them dry to remove excess moisture before adding them to the dough.
3. How do I store leftover cookies?
Store your cookies in an airtight container at room temperature for up to 5 days. For longer storage, you can freeze them for up to 3 months. Just make sure to separate layers with parchment paper to prevent sticking!
4. Can I make the dough ahead of time?
Absolutely! You can prepare the dough ahead of time and keep it in the fridge for up to 24 hours. Just scoop and bake when you’re ready!
Nutritional Info (Optional)
Calories per cookie (estimated): 150
Total Fat: 7g
Carbohydrates: 20g
Protein: 2g
(Values may vary based on ingredient brands and amounts used.)
There you have it, my friends — a delightful recipe that will add a pop of color and joy to your baking repertoire! I hope you enjoy making these Strawberry Cheesecake Cookies as much as I do. Remember, baking is all about the love you put into it, so let that heart shine through every cookie you make. Happy baking! 🍓🧁
Print
Strawberry Cheesecake Cookies
- Total Time: 30 minutes
- Yield: 24 servings 1x
- Diet: Vegetarian
Description
Delicious and visually captivating cookies infused with rich cream cheese and fresh strawberries.
Ingredients
- 1 cup unsalted butter, softened
- 1 cup cream cheese, softened
- 1 cup granulated sugar
- 1 large egg
- 2 cups all-purpose flour
- 1 teaspoon vanilla extract
- 1 teaspoon baking powder
- ½ teaspoon salt
- 1 cup fresh strawberries, diced
Instructions
- Preheat the oven to 350°F (175°C).
- Cream the butter and cream cheese in a large mixing bowl until smooth.
- Add sugar and egg to the mixture and beat until well combined.
- Combine dry ingredients (flour, baking powder, and salt) in another bowl.
- Gradually add the dry mixture to the wet ingredients, mixing until just combined.
- Fold in the diced strawberries.
- Scoop heaping tablespoons of dough onto a lined baking sheet and bake for 12-15 minutes.
- Cool on a wire rack before serving.
Notes
Chill the dough for about 30 minutes before baking for a better cookie shape.
- Prep Time: 15 minutes
- Cook Time: 15 minutes
- Category: Dessert
- Method: Baking
- Cuisine: American
Nutrition
- Serving Size: 1 cookie
- Calories: 150
- Sugar: 8g
- Sodium: 80mg
- Fat: 7g
- Saturated Fat: 4g
- Unsaturated Fat: 2g
- Trans Fat: 0g
- Carbohydrates: 20g
- Fiber: 1g
- Protein: 2g
- Cholesterol: 30mg
Keywords: cookies, cheesecake, strawberry, dessert, sweet treats




