
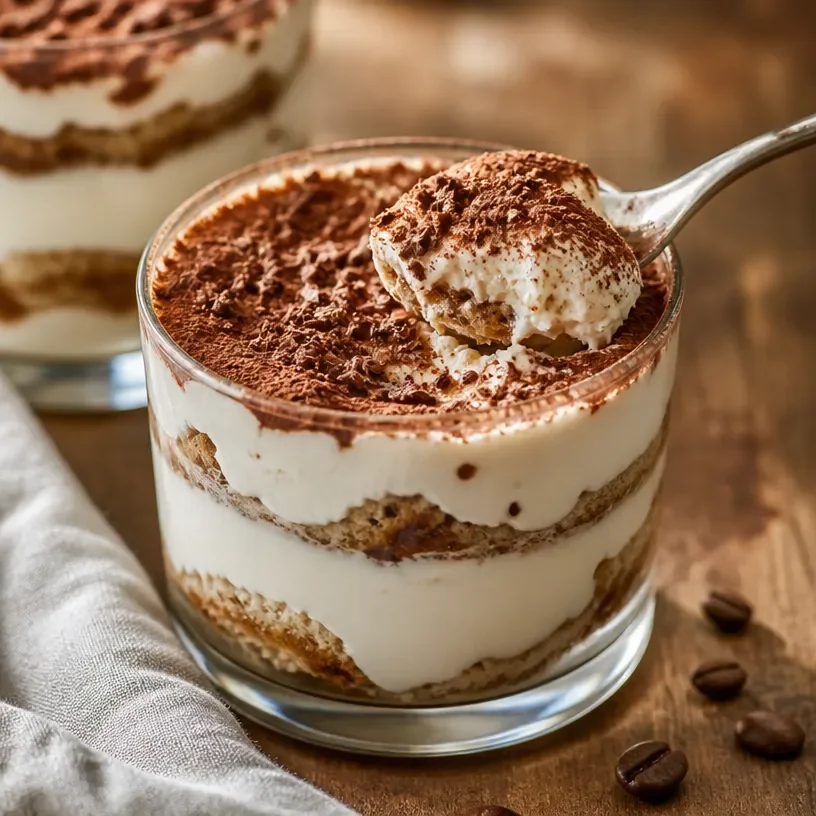
No-Bake High-Protein Cottage Cheese Tiramisu Cups
Protein Cottage Cheese Tiramisu Cups: A Light Twist on an Italian Classic
Welcome, dear friends, to my cozy kitchen! I’m Olivia Bennett, and today I’m absolutely thrilled to share a delightful twist on a classic dessert that will make your heart sing and your taste buds dance. Yes, you guessed it right — we’re diving into the world of Protein Cottage Cheese Tiramisu Cups! This treat takes the beloved Italian dessert and gives it a nutritious spin, perfect for those moments when you want something indulgent that’s also good for you.
Picture this: smooth, creamy layers of cottage cheese mingling with rich espresso, all elegantly layered into cute little cups. It’s the ideal dessert for a family gathering, a romantic dinner, or just a sweet treat after a long day. And the best part? You get to enjoy all that deliciousness without the guilt!
Now, why did I choose cottage cheese, you ask? Well, I adore the way it adds a creamy richness while keeping the protein content high! I came up with this recipe on a whim when I was on a personal quest to create healthier desserts that still retain that classic comfort we all crave. I remember the first time I served these cups to my friends, and the looks on their faces were priceless. They couldn’t believe they were eating cottage cheese!
So grab your mixing bowls, and let’s create something special together.
Bringing Back Tiramisu Memories
Let me take you on a little journey down memory lane. I remember the first time I tasted traditional tiramisu. I was just a kid, accompanying my grandmother during one of her culinary adventures to a charming Italian restaurant in our town. The warm aroma of coffee filled the air, mingling with sweet hints of cocoa and cream. My grandmother ordered tiramisu, and I was smitten at first bite. Every layer told a story — the softness of the mascarpone, the bitterness of the coffee-soaked ladyfingers, and the dusting of cocoa on top.
As we savored each bite, we talked about everything — family, dreams, and the love we shared for cooking. Those moments fueled my passion for food and the joy it brings. Fast forward to today, and I wanted to recreate that memory but with a healthier touch. Enter: Protein Cottage Cheese Tiramisu Cups! It has become a dish that is not only reminiscent of my childhood but also a nod to my journey as a home cook striving to make comfort food a little lighter and brighter.
Ingredients You’ll Need
Here’s what you’ll need to make these delightful Protein Cottage Cheese Tiramisu Cups. Not only are these ingredients simple, but they can also easily be swapped based on what you have on hand!
-
Cottage Cheese (2 cups): Look for a good-quality brand — the creaminess of full-fat or low-fat cottage cheese works best. If you’re not a cottage cheese fan, you can substitute it with Greek yogurt for a low-carb option!
-
Protein Powder (2 scoops): Choose your favorite flavor! Vanilla works wonderfully, but chocolate can add an exciting twist. You can also use a plant-based protein powder if you’re looking for a vegan alternative.
-
Espresso or Strong Coffee (1 cup): Brew a fresh cup for the best flavor. If you’re avoiding caffeine, chicory root coffee or decaf would work great too!
-
Cocoa Powder (1-2 tablespoons): Look for unsweetened cocoa powder for a rich, deep chocolate flavor. You can also use carob powder for a unique taste.
-
Honey or Maple Syrup (to taste): Sweeten to your preference! For a vegan option, stick with maple syrup.
-
Vanilla Extract (1 teaspoon): A dash amplifies the flavor — it’s a must! Or try almond extract for something unique.
-
Milk (1/4 cup): Any milk of your choice will work fine; almond, oat, or regular dairy — just ensure it’s unsweetened if you’re watching those sugar levels.
-
Ladyfingers or Biscuit Crumbs (optional): Traditional tiramisu includes ladyfingers, but to keep things simple and gluten-free, you can use crushed gluten-free cookies or skip this entirely.
-
Chocolate Shavings or Cocoa Powder for Garnish: These are optional but highly suggested for a beautiful finish!
Step-by-Step Instructions
Now, let’s get started on making these heavenly Protein Cottage Cheese Tiramisu Cups! You’ll love how simple and straightforward this recipe is.
-
Prepare Your Coffee: Brew a strong cup of espresso or coffee and let it cool slightly. If you’re like me and can’t wait, you can pop it in the fridge to speed up the process!
-
Mix the Cottage Cheese and Protein Powder: In a medium bowl, combine the cottage cheese and protein powder. You’ll want to whisk it until it’s smooth and creamy. If the mixture seems too thick, add a splash of milk to loosen it. This little tip ensures you’ll have a silky mixture that won’t need a blender!
-
Sweeten Your Mixture: Now’s the time to add honey or maple syrup, along with the vanilla extract. Keep tasting as you mix; this is your creation! You can customize to your ideal sweetness level.
-
Layering Time!: Grab your serving cups (small glasses or ramekins work beautifully). Start by dipping the ladyfingers or cookies in the cooled espresso. Quick dips are key; you want them moist but not soggy! If you’re skipping the biscuits, you can just add a layer of the cottage cheese mixture directly into the cups.
-
Create Your Layers: In each cup, start with a layer of the dipped ladyfingers (or biscuit crumbs), followed by a generous scoop of the cottage cheese mixture. Repeat this process until you fill your cups, ending with the cottage cheese layer on top.
-
Chill Out: Cover the cups with plastic wrap and pop them into the fridge for at least 2 hours, if possible. This will help all the flavors mingle together nicely!
-
Finishing Touch: Just before serving, dust the tops with cocoa powder and add chocolate shavings if you’re feeling extra fancy.
-
Serve and Enjoy!: Dig in and relish each creamy, coffee-flavored bite!
Serving Suggestions
To serve, consider having these cups already chilled in your fridge, ready to impress guests! You can sprinkle a little extra cocoa or a few more chocolate shavings on top for that gourmet touch. For a fun twist, consider serving alongside fresh berries or a dollop of whipped cream for an added texture experience.
Recipe Variations
If you want to switch things up, here are some creative variations:
-
Chocolate Delight: Use chocolate protein powder and layer some finely chopped dark chocolate in between the cottage cheese mixture.
-
Fruit Fiesta: Add a layer of fruit like strawberries or bananas for a fresh twist. They add vibrant color and taste!
-
Nutty Flavor: Fold in some almond or hazelnut extract for a nutty aroma, and use crushed nuts as layers or toppings.
-
Mochaccino Cups: Add a little cocoa powder to the espresso for an extra mocha kick.
-
Vegan Version: Substitute the cottage cheese with vegan cream cheese or blended silken tofu mixed with plant-based protein powder and maple syrup.
Chef’s Notes
The great thing about cooking is making it your own. This dessert has evolved over the years, and I love playing with flavors and textures. I once hosted a brunch where I offered a “build your own tiramisu” bar — complete with different layers and toppings! Guests could create their own unique flavors. It turned out to be such a hit!
And for a funny moment: One time, I accidentally used double the amount of cocoa powder intended, thinking it would intensify the chocolate flavor. Let’s just say it was an explosion of epic chocolate that no one could finish! Every kitchen adventure teaches us a little more — embrace the messy moments!
FAQs and Troubleshooting
-
Can I make this ahead of time?
Yes! These cups are perfect for make-ahead desserts. You can prepare them a day or two in advance. -
What if I can’t find cottage cheese?
If you can’t find it or aren’t a fan, Greek yogurt is a fantastic alternative. It maintains the creaminess and adds a nice tang. -
How can I store leftovers?
Store any leftovers covered in the refrigerator for up to three days. Just be sure they’re kept airtight! -
Is it okay to freeze these cups?
While I wouldn’t recommend freezing them, you can store the components separately and assemble them when you’re ready to enjoy!
Nutritional Info
Each serving of Protein Cottage Cheese Tiramisu Cups (serving size = 1 cup) delivers a balanced taste and nutritional value. You’re looking at approximately:
- Calories: 200
- Protein: 20g
- Carbohydrates: 25g
- Sugar: 8g
- Fat: 5g
(Values may vary based on specific ingredient brands and quantities)
There you have it — a delightful recipe that combines nostalgia with a fresh twist, making it easy to recreate a small piece of Italy at home! Remember that the kitchen is a space of creativity, love, and laughter. So don’t be afraid to mix things up and make this Protein Cottage Cheese Tiramisu Cups your very own. Enjoy the journey, and happy cooking!
Print
Protein Cottage Cheese Tiramisu Cups
- Total Time: 120 minutes
- Yield: 4 servings 1x
- Diet: Healthy
Description
A delightful twist on the classic Italian dessert, this Protein Cottage Cheese Tiramisu Cups recipe combines creamy cottage cheese with rich espresso for a nutritious treat.
Ingredients
- 2 cups Cottage Cheese
- 2 scoops Protein Powder
- 1 cup Espresso or Strong Coffee
- 1–2 tablespoons Cocoa Powder
- Honey or Maple Syrup (to taste)
- 1 teaspoon Vanilla Extract
- 1/4 cup Milk
- Ladyfingers or Biscuit Crumbs (optional)
- Chocolate Shavings or Cocoa Powder for Garnish
Instructions
- Prepare your coffee: Brew a strong cup of espresso or coffee and let it cool slightly.
- Mix the cottage cheese and protein powder in a medium bowl until smooth and creamy.
- Sweeten the mixture with honey or maple syrup and vanilla extract.
- Grab your serving cups and dip ladyfingers in the cooled espresso.
- Create layers in each cup, starting with ladyfingers and continuing with the cottage cheese mixture until filled.
- Chill the cups in the refrigerator for at least 2 hours.
- Dust the tops with cocoa powder and add chocolate shavings before serving.
- Serve and enjoy each creamy, coffee-flavored bite!
Notes
These cups can be made ahead of time and stored in the refrigerator for up to three days. Customize by adding layers of fruit or nuts for a twist.
- Prep Time: 15 minutes
- Cook Time: 5 minutes
- Category: Dessert
- Method: No-Bake
- Cuisine: Italian
Nutrition
- Serving Size: 1 cup
- Calories: 200
- Sugar: 8g
- Sodium: 150mg
- Fat: 5g
- Saturated Fat: 2g
- Unsaturated Fat: 3g
- Trans Fat: 0g
- Carbohydrates: 25g
- Fiber: 2g
- Protein: 20g
- Cholesterol: 10mg
Keywords: tiramisu, dessert, healthy dessert, cottage cheese, protein dessert, no-bake dessert
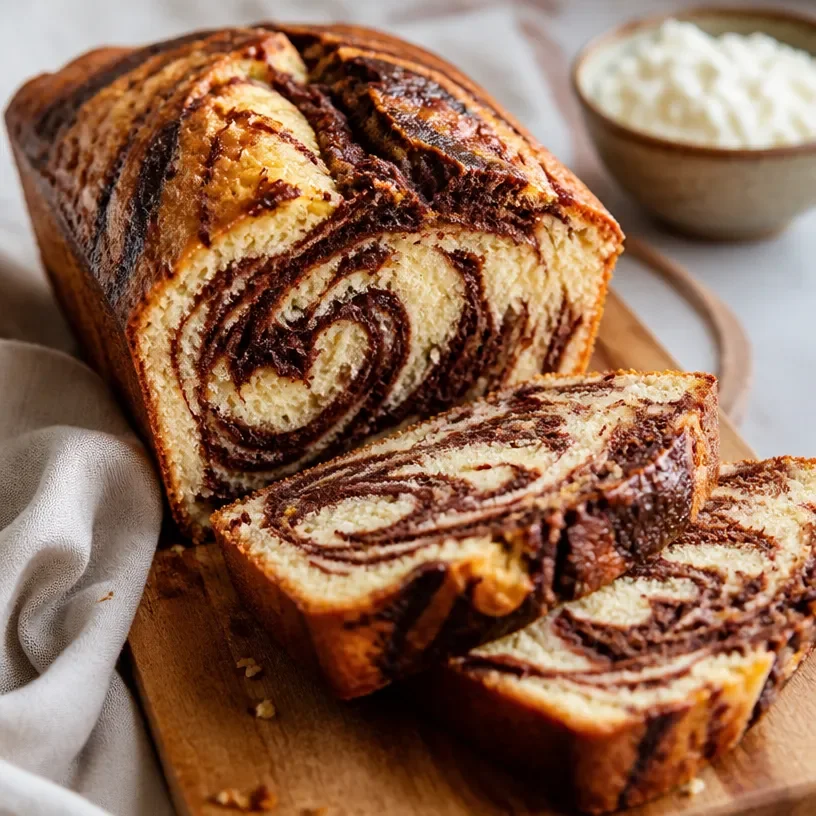
High-Protein Cottage Cheese Marble Cake: Easy 1-Bowl Recipe
The Joy of Baking: Protein Cottage Cheese Marble Cake
Welcome to my kitchen, my fellow food lovers! Today, I am thrilled to take you on a delicious journey of baking that will not only tantalize your taste buds but also fill your home with the warm, comforting aroma of something wonderful coming out of the oven. We’re making a delightful Protein Cottage Cheese Marble Cake!
Marble cake has always had a special place in my heart. It’s the perfect blend of flavors and textures, merging rich chocolate with a light, fluffy vanilla base, creating a dessert that’s as beautiful as it is delicious. But this isn’t just any marble cake; today, we’re adding cottage cheese to the mix to boost the protein content, making this cake not only a treat but a slightly healthier choice too!
Picture this: a rainy afternoon, the sky heavy with clouds, and you’re huddled in the kitchen, mixing together the ingredients for this glorious cake. The moment you swirl that chocolate batter into the vanilla, you’re creating art, and perhaps even a little magic. Each slice unveils a ripple of flavors, enticing your loved ones to gather around the table, savoring each bite while sharing stories and laughter.
So, grab your apron, put on your favorite tunes, and let’s dive into this cozy baking adventure!
A Trip Down Memory Lane
Before we cook up this wonderful cake, let me share a little something from my childhood that makes this recipe even more special. When I was a little girl, my grandmother would often bake marble cake for our family get-togethers. She had this magical ability to whip up desserts that everybody raved about, and her marble cake was the highlight. I remember standing on my tiptoes, eager to help her in the kitchen, my little hands trying to measure out flour as she guided me with her gentle smile.
She was never one for exact measurements—just a sprinkle of this, a dash of that, and her love mixed in. When I got old enough to bake by myself, that recipe became my go-to for birthdays and celebrations. Over the years, I decided to give it a twist by adding cottage cheese, infusing my beloved childhood treat with a protein-packed upgrade, making it perfect for any occasion!
Ingredients You’ll Need
Let’s gather our ingredients! Here’s what you’ll need to whip up this delicious Protein Cottage Cheese Marble Cake:
-
1 ½ cups all-purpose flour
This forms the base of our cake. If you want to make it gluten-free, substitute with almond flour or a gluten-free all-purpose blend. -
1 cup cottage cheese
The star of our show, cottage cheese adds moisture and protein. You can use low-fat or full-fat cottage cheese, depending on your preference. If you want a dairy-free option, try using silken tofu blended until smooth! -
1 cup granulated sugar
Sweetness is key! If you’re looking to cut down on sugar, you can use coconut sugar or a sugar substitute like stevia or monk fruit. -
½ cup unsalted butter, softened
This adds richness! For a dairy-free option, coconut oil or vegan butter works perfectly. -
3 large eggs
They help bind everything together! If you’re vegan, you can use flax eggs (1 tablespoon ground flaxseed mixed with 3 tablespoons water = 1 egg). -
1 teaspoon baking powder
This makes the cake rise, giving it that fluffy texture. -
½ teaspoon baking soda
Another leavening agent that ensures our cake is light and airy. -
½ teaspoon salt
Salt is essential to enhance all the flavors. -
1 teaspoon vanilla extract
It adds depth and warmth to our cake. -
¼ cup cocoa powder
This gives us that rich chocolate layer. Use unsweetened cocoa to balance the sweetness of the cake. -
1 tablespoon milk (dairy or non-dairy)
For adjusting the consistency of the batter if needed.
Make sure to have everything ready before we start baking. It makes the process smoother and more enjoyable—trust me!
Let’s Bake This Cake!
Now that we have all our ingredients ready, it’s time to get down to business! Here’s how we create this Protein Cottage Cheese Marble Cake step by step.
Step 1: Preheat and Prepare
Preheat your oven to 350°F (175°C). Grease and flour a 9-inch round cake pan, or alternatively, line it with parchment paper. This ensures an easy release and a beautiful cake.
Step 2: Mix the Wet Ingredients
In a large mixing bowl, beat the softened butter and sugar together until they’re light and fluffy—about 3-4 minutes. You want to incorporate air into the mixture. Adding cottage cheese at this stage gives a creamy texture, so mix it in thoroughly. Follow with the eggs one at a time, beating well after each addition, and finally, add the vanilla extract.
Chef’s Tip: Make sure your ingredients are at room temperature for the best emulsification. This helps with the texture of your cake!
Step 3: Combine the Dry Ingredients
In another bowl, whisk together the flour, baking powder, baking soda, and salt. Gradually add this dry mixture to the wet ingredients, alternating with the milk, starting and ending with the flour mixture. Combine until just mixed—overmixing can lead to a dense cake.
Step 4: Separate the Batter
Divide the batter evenly into two bowls. In one bowl, sift in the cocoa powder and mix until fully integrated. You’ll have a beautiful chocolate batter and a lovely vanilla batter!
Step 5: Create the Marble Effect
Now comes the fun part! In your prepared cake pan, dollop spoonfuls of vanilla and chocolate batter randomly. Using a knife or a toothpick, gently swirl the batters together to create a marbled effect. Don’t overdo it—less is more for that beautiful swirl!
Step 6: Bake
Pop the cake into your preheated oven and bake for 30-35 minutes, or until a toothpick inserted into the center comes out clean. Keep an eye on it in the last few minutes of baking.
Step 7: Cool and Enjoy
Once baked, remove the cake from the oven and allow it to cool in the pan for about 10 minutes before transferring it to a wire rack to cool completely. Resist the temptation to dig in too soon—letting it cool will give you cleaner slices!
Serving Suggestions
To serve, place the cake on a lovely serving plate and dust with a bit of powdered sugar for a touch of elegance. You could also add fresh berries or a dollop of Greek yogurt on the side for a delightful contrast. It pairs beautifully with a cup of coffee or tea, making it a perfect accompaniment for afternoon gatherings with friends or family.
Recipe Variations
Feeling adventurous? Here are some variations you can try with this Protein Cottage Cheese Marble Cake:
- Nutty Addition: Fold in some chopped walnuts or almonds into the batter for added crunch and flavor.
- Fruit Swirl: Add some pureed strawberries or raspberries into the batter for a fruity marble cake.
- Chocolate Chunk Delight: Mix in dark chocolate chips for a richer chocolate experience.
- Spice it Up: Sprinkle in some cinnamon or nutmeg for a warm, spicy twist.
- Zesty Lemon: Add a tablespoon of lemon zest to the vanilla batter for a refreshing hint of citrus.
Chef’s Notes
As I’ve experimented with this recipe over the years, it has evolved into my go-to cake for any occasion! When I first started experimenting with cottage cheese, I was concerned about the texture, but surprisingly, it came out beautifully! The added protein gives it a unique twist that delights everyone who tries it. And let’s be honest here—one of my favorite things about baking is that it doesn’t always have to look perfect. Embrace the messiness of it all; it’s a sign of a home filled with love, laughter, and, of course, delicious baked goods!
FAQ and Troubleshooting
-
My cake didn’t rise, what did I do wrong?
It’s likely that your baking powder or baking soda is old. Always check the expiration date. Also, make sure to mix the batter just enough; overmixing can result in a dense cake. -
Why did my cake stick to the pan?
Be sure to grease and flour your pan thoroughly before adding the batter. Parchment paper can be a lifesaver in ensuring it releases smoothly. -
Can I freeze this cake?
Absolutely! Allow the cake to cool completely, wrap it tightly in plastic wrap, and then store it in an airtight container. It keeps well for up to three months. Just thaw it in the fridge overnight before serving. -
Is this cake suitable for different diets?
Yes! With simple substitutions, you can easily make it dairy-free, gluten-free, or even vegan. Just use the recommended alternatives in the ingredients list!
Nutritional Info
While I love baking for the joy it brings, I also appreciate the benefits of mindful eating. This Protein Cottage Cheese Marble Cake provides a good dose of protein and essential nutrients, making it a perfect treat to enjoy on special occasions or when you need a pick-me-up!
I hope this recipe brings as much joy to your kitchen as it has to mine. Remember, cooking is all about having fun, experimenting, and sharing. So, have a blast baking away, and I can’t wait to hear how your Protein Cottage Cheese Marble Cake turns out! Happy baking!
Print
Protein Cottage Cheese Marble Cake
- Total Time: 50 minutes
- Yield: 8 servings 1x
- Diet: Vegetarian
Description
A delightful marble cake combining rich chocolate and light vanilla layers, enhanced with protein-packed cottage cheese.
Ingredients
- 1 ½ cups all-purpose flour
- 1 cup cottage cheese
- 1 cup granulated sugar
- ½ cup unsalted butter, softened
- 3 large eggs
- 1 teaspoon baking powder
- ½ teaspoon baking soda
- ½ teaspoon salt
- 1 teaspoon vanilla extract
- ¼ cup cocoa powder
- 1 tablespoon milk (dairy or non-dairy)
Instructions
- Preheat your oven to 350°F (175°C) and grease and flour a 9-inch round cake pan.
- Mix the softened butter and sugar together until light and fluffy, then mix in the cottage cheese, followed by the eggs and vanilla extract.
- Combine the flour, baking powder, baking soda, and salt in another bowl, then gradually add to the wet mixture, alternating with the milk.
- Separate the batter into two bowls, adding cocoa powder to one, mixing well.
- Create the marble effect by dolloping spoonfuls of vanilla and chocolate batter in the prepared pan and swirling together gently.
- Bake for 30-35 minutes, or until a toothpick inserted comes out clean.
- Cool the cake in the pan for 10 minutes before transferring to a wire rack to cool completely.
Notes
For a lighter texture, ensure all ingredients are at room temperature before mixing.
- Prep Time: 15 minutes
- Cook Time: 35 minutes
- Category: Dessert
- Method: Baking
- Cuisine: American
Nutrition
- Serving Size: 1 slice
- Calories: 320
- Sugar: 18g
- Sodium: 270mg
- Fat: 12g
- Saturated Fat: 7g
- Unsaturated Fat: 4g
- Trans Fat: 0g
- Carbohydrates: 45g
- Fiber: 2g
- Protein: 10g
- Cholesterol: 70mg
Keywords: cake, marble cake, protein dessert, cottage cheese cake, baking
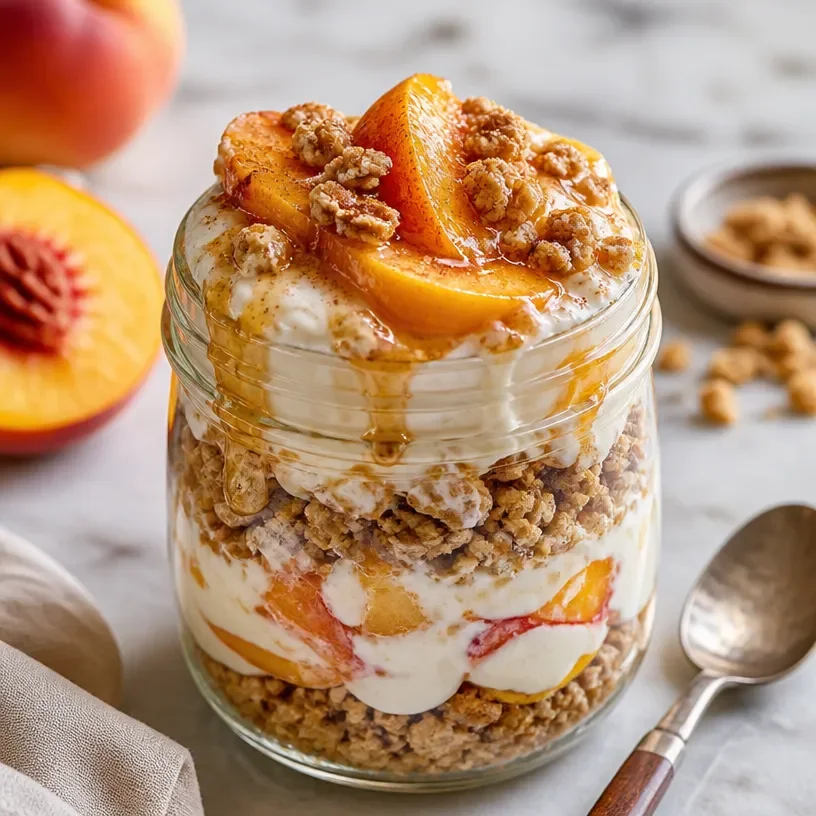
Minute High-Protein Peach Cobbler Jar for Meal Prep
Protein Peach Cobbler Jar: A Delicious, Cozy Delight!
Welcome to my kitchen, my friends! Today, we’re taking a delightful journey into the world of desserts with something that’s close to my heart—a Protein Peach Cobbler Jar. If you’re anything like me, nothing says "home" more than the comforting aroma of baked peaches and a sweet, crumbly topping. Oh, the memories! Each layer in this jar tells a story, turning a simple ingredient list into a moment of joy.
Whether you’re seeking a sweet treat after dinner or a fueling start to your day, this protein-packed dessert will keep you satisfied without sacrificing taste. It’s the perfect blend of health and indulgence, making it the ideal addition to your kitchen repertoire. Plus, it’s so easy to whip up! So, grab your ingredients, put on your favorite apron (I guarantee it’s going to get a little messy), and let’s create something unforgettable together.
A Personal Story: Warm Memories
I remember summers spent at my grandmother’s house, where breakfast would frequently morph into dessert, especially during peach season. She had this magical peach tree in her backyard, and we’d spend lazy afternoons picking the juiciest peaches to bake into cobbler. The simplicity of those days still brings warmth to my heart. I’d stand next to her in the cozy kitchen, absorbing her every movement and instinctive flair for flavor.
One particularly sunny day, we made peach cobbler for the neighborhood picnic. Grandma would always say, “Good food is made with love,” as she whipped together the crust while I helped slice the peaches. The cobbler baked to golden perfection, filling the kitchen with a sweetness that invited everyone to gather round and share in the joy. Those jars of joy we’re creating today are a modern twist on those cherished memories.
Let’s channel that warmth and joy into this Protein Peach Cobbler Jar!
Ingredients
Let’s dive into the ingredients you’ll need:
-
Fresh Peaches (4-5 large or 6-8 medium): The star of the show! Fresh peaches offer the best flavor. You can substitute with frozen peaches if fresh ones aren’t available. Just make sure they’re thawed and drained of excess moisture.
-
Protein Powder (1 scoop): This helps transform the cobbler into a healthy treat! Vanilla or unflavored protein powders work well. For a plant-based option, consider pea or brown rice protein.
-
Oats (1 cup): Rolled oats create a lovely texture. If you’re looking for gluten-free options, there are gluten-free rolled oats available.
-
Flour (1/2 cup): All-purpose flour gives a lovely crumb; however, you can substitute with almond flour for a gluten-free option. If you do this, the texture will vary slightly.
-
Brown Sugar (1/3 cup): This adds sweetness and a slight molasses flavor. Coconut sugar can be used for a healthier option with a lower glycemic index.
-
Cinnamon (1 tsp): A warm spice that complements the peaches beautifully. Feel free to use a pumpkin spice blend for a fall twist!
-
Butter (1/4 cup or coconut oil for dairy-free): This adds richness; use unsalted for better control over the sweetness.
-
Vanilla Extract (1 tsp): It elevates the flavors. Make sure to use pure vanilla extract for the best results.
-
Almond Milk (or any milk of your choice, 1/2 cup): This helps to moisten the jar layers. If you prefer a creamier texture, use whole milk or even almond milk if you’re looking for a dairy-free alternative.
Step-by-Step Instructions
-
Prepare the Peaches
Wash, peel (if preferred), and slice the peaches. Place them in a medium bowl, and sprinkle them with a tablespoon of brown sugar and a dash of cinnamon. Let them sit for about 15 minutes, allowing their natural sweetness to develop. This is a game-changer for flavor! -
Make the Cobbler Batter
In another bowl, combine the oats, flour, protein powder, remaining brown sugar, cinnamon, and salt. Mix these dry ingredients well. In a separate bowl, whisk together the melted butter (or coconut oil), vanilla extract, and almond milk until well combined. Gradually stir the wet mixture into the dry ingredients, mixing until everything is just combined. Don’t overmix—trust that delicious fluffiness! -
Layering the Jars
Grab your favorite mason jars (or any other container you like). Start with a generous layer of the prepared peaches at the bottom, followed by a layer of the cobbler batter. Repeat these layers until the jars are filled about three-quarters of the way. Leave some space at the top for expansion as they bake. -
Bake to Perfection
Preheat your oven to 350°F (175°C). Place the jars on a baking sheet (just in case of any spillage) and bake for about 25-30 minutes, or until the top is golden brown and the peaches are bubbly. Your kitchen will smell heavenly, and you’ll have a hard time resisting sneaking a spoonful before they’re ready! -
Cool and Serve
Once baked, allow the jars to cool for about 10-15 minutes. This keeps the delicious layers intact when you dig in. Serve warm or at room temperature, and consider topping with a dollop of Greek yogurt or a scoop of ice cream for an added twist!
Serving Suggestions
To serve your Protein Peach Cobbler Jars, consider a sprinkle of chopped nuts on top for crunch or a swirl of honey to enhance the sweetness. For a relaxing brunch or a cozy evening treat, pair with freshly brewed tea or your favorite coffee. The adorable jars can also double as delightful gifts for friends—who wouldn’t love a homemade dessert delivered with love?
Recipe Variations
-
Berry Peach Cobbler: Add a cup of mixed berries (blueberries, raspberries) for an explosion of flavor and color.
-
Nutty Delight: Mix in half a cup of chopped walnuts or pecans into the cobbler batter for a delightful crunch.
-
Chocolate Drizzle: Drizzle some melted dark chocolate on top right before serving for a luxurious twist!
-
Spiced Pear Cobbler: Swap peaches for ripe pears and enhance with nutmeg for a warm, cozy flavor.
Chef’s Notes
This recipe holds a special place in my kitchen evolution. Over the years, I’ve played with the ingredients, substituting based on what I had on hand or what was in season. One time, I accidentally added too much cinnamon, and instead of disaster, I discovered a warm, spiced miracle! It’s those kitchen adventures and accidents that make cooking so joyful.
Also, I find that the longer the cobbler jars sit after baking, the more all the flavors meld together. If you’re a meal prepper, make these ahead of time and treat yourself throughout the week!
FAQs and Troubleshooting
-
Can I make this gluten-free?
Absolutely! Just use gluten-free rolled oats and almond flour in place of regular flour. The flavor and texture will still be delightful! -
What if I don’t have mason jars?
No problem! Any oven-safe ramekin or baking dish will work. Just adjust the baking time, as larger dishes might take a bit longer. -
Why did my cobbler turn out dry?
Make sure you’re measuring accurately! And remember, every oven is different—some may bake hotter than others. If you’re not sure, check for doneness a few minutes earlier to avoid overbaking. -
How can I store leftovers?
These jars can be covered with lids or plastic wrap and stored in the fridge for up to 3 days. Reheat in the oven or microwave before serving.
Nutritional Info
Per serving (based on 4 servings):
Calories: 300
Protein: 12g
Carbohydrates: 45g
Fat: 10g
Fiber: 5g
Sugar: 12g
For a sweet dessert that’s both filling and nourishing, you can’t go wrong with these Protein Peach Cobbler Jars. I hope they bring you as much joy and cozy comfort as they do for me! Happy baking and sharing, friends!
Print
Protein Peach Cobbler Jar
- Total Time: 45 minutes
- Yield: 4 servings
- Diet: Vegetarian
Description
A healthy and delicious protein-packed dessert made with fresh peaches and a crumbly topping, perfect for any time of day.
Ingredients
- Fresh Peaches (4-5 large or 6-8 medium)
- Protein Powder (1 scoop)
- Oats (1 cup)
- Flour (1/2 cup)
- Brown Sugar (1/3 cup)
- Cinnamon (1 tsp)
- Butter (1/4 cup or coconut oil for dairy-free)
- Vanilla Extract (1 tsp)
- Almond Milk (1/2 cup or any milk of your choice)
Instructions
- Prepare the Peaches: Wash, peel (if preferred), and slice the peaches. Place them in a medium bowl, and sprinkle them with a tablespoon of brown sugar and a dash of cinnamon. Let them sit for about 15 minutes.
- Make the Cobbler Batter: In another bowl, combine the oats, flour, protein powder, remaining brown sugar, cinnamon, and salt. In a separate bowl, whisk together the melted butter (or coconut oil), vanilla extract, and almond milk until well combined. Gradually stir the wet mixture into the dry ingredients.
- Layering the Jars: Grab your favorite mason jars. Start with a layer of prepared peaches followed by a layer of cobbler batter. Repeat until jars are filled three-quarters of the way.
- Bake to Perfection: Preheat your oven to 350°F (175°C). Bake for about 25-30 minutes, or until the top is golden brown and the peaches are bubbly.
- Cool and Serve: Allow the jars to cool for about 10-15 minutes. Serve warm or at room temperature, topped with Greek yogurt or ice cream.
Notes
These jars can be made gluten-free by using gluten-free rolled oats and almond flour. They can be stored in the fridge for up to 3 days.
- Prep Time: 15 minutes
- Cook Time: 30 minutes
- Category: Dessert
- Method: Baking
- Cuisine: American
Nutrition
- Serving Size: 1 jar
- Calories: 300
- Sugar: 12g
- Sodium: 150mg
- Fat: 10g
- Saturated Fat: 4g
- Unsaturated Fat: 6g
- Trans Fat: 0g
- Carbohydrates: 45g
- Fiber: 5g
- Protein: 12g
- Cholesterol: 30mg
Keywords: peach cobbler, protein dessert, healthy dessert, summer dessert, mason jar dessert
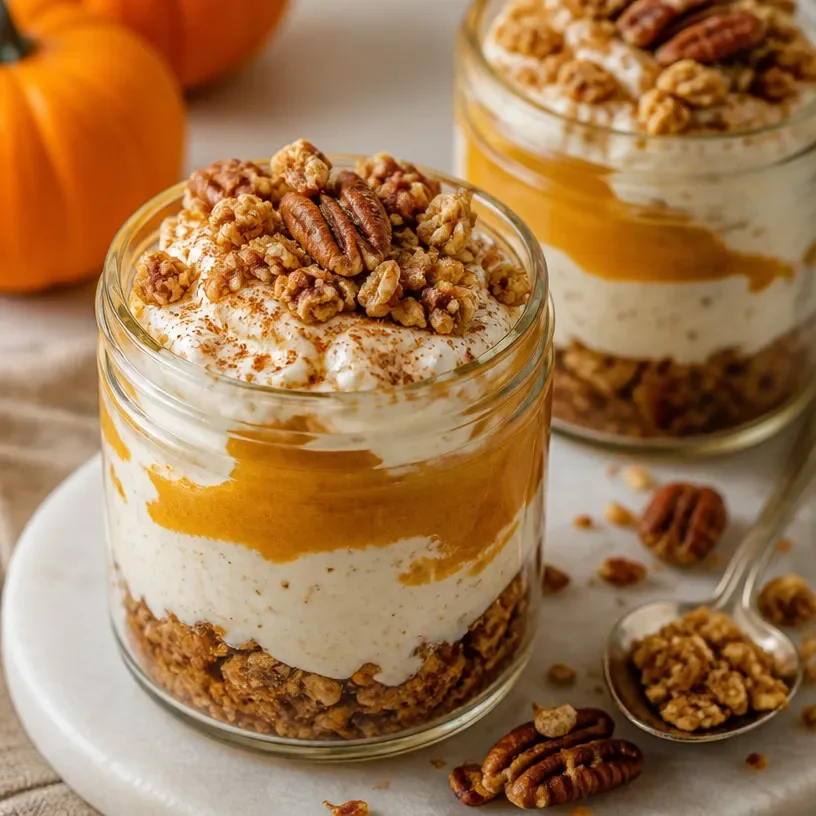
High-Protein Pumpkin Pie Jars for Easy Weeknight Meal Prep
Protein Pumpkin Pie Jar: The Cozy Dessert You Need in Your Life
Welcome to my kitchen! Today, we’re diving into a dessert that brings together the cozy fall flavors of pumpkin pie and the wholesome goodness of protein—all packed into a delightful jar! Whether you’re a fitness fanatic, a pumpkin pie lover, or just someone who enjoys a treat that feels both indulgent and nutritious, this Protein Pumpkin Pie Jar is for you.
Imagine this: the sun is setting, casting a golden hue over the kitchen, and the smell of warm spices fills the air. You take a moment to breathe it all in, feeling cozy in your favorite oversized sweater. This is the essence of fall, and my Protein Pumpkin Pie Jar captures all the cozy vibes beautifully. This recipe is not just about satisfying your sweet tooth; it’s about creating a moment, sharing with loved ones, and adding a playful twist to an age-old classic.
So, grab your mixing bowl and let’s get to work! This recipe is quick, simple, and incredibly rewarding. And remember, cooking is all about having fun and making memories, so let your spirit shine as we embark on this tasty adventure together.
A Slice of History
Growing up, my family celebrated fall with a pumpkin pie that was the centerpiece of our Thanksgiving dinner. I can still remember the excitement in the kitchen as my mom rolled out the flaky crust, and my siblings and I would sneak spoonfuls of the spiced pumpkin filling while she wasn’t looking. That first bite of warm pie, topped with a dollop of whipped cream, was nothing short of magic.
As I ventured into my culinary journey, I wanted to keep that nostalgia alive while giving it a fun twist. That’s how the idea for the Protein Pumpkin Pie Jar was born! Not only does it bring back those cherished memories, but it’s also a healthier option that allows me to indulge in pumpkin pie flavors without guilt.
Now, with every spoonful of this delicious jar, I’m reminded of family gatherings and the power of good food to bring us together, creating new memories along the way. Plus, it’s an enjoyable way to sneak in some protein—perfect for those who are active and on the go!
Ingredients
Here’s what you’ll need to create this deliciously cozy Protein Pumpkin Pie Jar:
-
Canned Pumpkin Puree:
- Use 100% pure pumpkin, not pumpkin pie filling, for better flavor control. It’s rich in vitamins and has a lovely creamy texture.
-
Protein Powder:
- Choose your favorite flavor—vanilla, chocolate, or even unflavored works wonders for this recipe! If you’re vegan, plant-based protein powders are also great alternatives.
-
Greek Yogurt:
- Substitute with dairy-free yogurt or cottage cheese for a similar creaminess and added protein boost.
-
Maple Syrup:
- This natural sweetener gives your pie jars the warmth of fall. You can swap it with honey, agave, or stevia; adjust the quantity based on your sweetness preference.
-
Pumpkin Pie Spice:
- A blend of cinnamon, nutmeg, ginger, and cloves. If you don’t have this, create your own mix or use cinnamon as a substitute.
-
Vanilla Extract:
- Always opt for pure vanilla extract over artificial flavoring for the best flavor and aroma.
-
Almond Milk:
- Unsweetened almond milk is a perfect binder. You can also use coconut milk, cashew milk, or regular dairy milk; adjust based on dietary needs.
-
Crushed Graham Crackers or Oats:
- For the crust layer, use crushed graham crackers for a traditional taste or oats for a healthier twist. Gluten-free options are available too!
Chef Insight:
Always taste along the way! Adjust the sweetness as needed since everyone’s palate is different.
Step-by-Step Instructions
-
Prepare your jars: Start by gathering your favorite glass jars or dessert cups. This is where the beauty of your protein pumpkin pie jars will be displayed, so choose something you love!
-
Mix the Filling: In a bowl, combine 1 cup of canned pumpkin puree, 1 scoop of protein powder, 1 cup of Greek yogurt, 2 tablespoons of maple syrup, 1 teaspoon of pumpkin pie spice, and a splash of vanilla extract. Stir everything together until smooth. Feel free to adjust the sweetness by adding more maple syrup or sweetener to taste.
Chef Tip: Tasting the mixture at this point will give you the chance to adjust flavors—make it as spiced and sweet as you like!
-
Add the Milk: If the mixture seems too thick, add a little almond milk (about 1–2 tablespoons) until you reach a desired creamy consistency. Fold in any extra spices if you wish!
-
Prepare the Crust: In a separate bowl, crush your graham crackers or oats. If using graham crackers, about ½ cup crushed should be good. Mix with a tablespoon of melted butter or coconut oil for added flavor.
Chef Hack: If you want to keep it lighter, skip the butter! Oats bind well on their own with a dash of almond milk mixed in.
-
Layer the Jars: Begin layering your jars! Start with a layer of the crust (about a tablespoon), followed by a generous layer of the pumpkin filling. Repeat the process, ending with filling on top. Make sure to leave space at the top if you want whipped cream or other toppings later.
-
Chill the Jars: Cover the jars and let them chill in the refrigerator for at least an hour. This step isn’t mandatory, but it helps the flavors meld and gets everything deliciously cold.
-
Serve: When you’re ready to dig in, top with whipped cream, a sprinkle of cinnamon, or even some toasted pecans or walnuts for that extra crunch.
Serving Suggestion: Get creative with how you present these jars! Layering them visually appealing can turn something simple into a show-stopping dessert.
Recipe Variations
-
Chocolate Pumpkin Pie Jar: Use chocolate protein powder and add a tablespoon of cocoa powder to the pumpkin mixture for a chocolatey twist!
-
Nutty Delight: Incorporate almond or peanut butter in the filling for a richer flavor and even more protein!
-
Spiced Up: Try adding a dash of cayenne pepper or more ginger to give your jars an unexpected kick!
-
Nut-Free Option: If you need to avoid nuts, simply skip the almond milk and use more Greek yogurt or a nut-free dairy option.
-
Vegan Delight: Swap Greek yogurt for a plant-based yogurt and use maple syrup or agave for sweetening. A vegan protein powder will keep it fully plant-based!
Chef’s Notes
This Protein Pumpkin Pie Jar has been a fun trial-and-error experience in my kitchen. The first time I made it, I got a bit overzealous with the spices and ended up with something that was more “one-note” than harmonious. It reminded me that balance is everything in cooking.
I now love to experiment with layers and textures, making each jar personal and unique to the taste of whoever I’m serving! And who doesn’t love a dessert you can prep ahead of time? It’s great for those busy weeks when you want something sweet at the end of the day but don’t have the energy to bake a full pie.
FAQs and Troubleshooting
-
Can I use fresh pumpkin instead of canned?
- Absolutely! Just make sure it’s well cooked and blended until smooth. Fresh pumpkin can be more watery, so you might want to adjust your almond milk accordingly.
-
What should I do if my mixture is too thick?
- Add a little more almond milk, one tablespoon at a time, until it reaches your desired creaminess.
-
How long do these keep?
- These jars can be stored in the fridge for up to 4–5 days. Just make sure to keep them sealed!
-
Can I freeze them?
- While freezing might alter the texture, you can freeze the filling in airtight containers and thaw before layering them in jars.
Nutritional Info
Each Protein Pumpkin Pie Jar contains approximately:
- Calories: 200
- Protein: 20g
- Carbs: 25g
- Fat: 5g
And there you have it! A cozy, healthy twist on the classic pumpkin pie that’s perfect for sharing or keeping all to yourself. I hope you enjoy making these Protein Pumpkin Pie Jars as much as I do. Cheers to warm flavors, lovely memories, and the joy of cooking! Grab a spoon and dig into those layers—you’ve earned it! 🍂🥧
Print
Protein Pumpkin Pie Jar
- Total Time: 1 hour 15 minutes
- Yield: 4 servings 1x
- Diet: Vegetarian
Description
A cozy dessert combining the flavors of pumpkin pie with protein goodness, packed in a delightful jar.
Ingredients
- 1 cup canned pumpkin puree
- 1 scoop protein powder (vanilla, chocolate, or unflavored)
- 1 cup Greek yogurt (or dairy-free yogurt)
- 2 tablespoons maple syrup (or honey/agave)
- 1 teaspoon pumpkin pie spice
- 1 teaspoon vanilla extract
- 1–2 tablespoons almond milk (unsweetened)
- ½ cup crushed graham crackers or oats
- 1 tablespoon melted butter or coconut oil (optional)
Instructions
- Prepare your jars: Gather your favorite glass jars or dessert cups.
- Mix the filling: In a bowl, combine pumpkin puree, protein powder, Greek yogurt, maple syrup, pumpkin pie spice, and vanilla extract. Stir until smooth.
- Add the milk: If thick, add almond milk until a creamy consistency is reached.
- Prepare the crust: Crush graham crackers or oats and mix with melted butter or almond milk.
- Layer the jars: Start with a layer of crust, followed by pumpkin filling. Repeat, finishing with filling on top.
- Chill the jars: Cover and refrigerate for at least 1 hour.
- Serve: Top with whipped cream, cinnamon, or nuts before enjoying.
Notes
Adjust sweetness and spices based on personal preference. Perfect for prepping ahead of time.
- Prep Time: 15 minutes
- Cook Time: 0 minutes
- Category: Dessert
- Method: No-Bake
- Cuisine: American
Nutrition
- Serving Size: 1 jar
- Calories: 200
- Sugar: 10g
- Sodium: 50mg
- Fat: 5g
- Saturated Fat: 2g
- Unsaturated Fat: 2g
- Trans Fat: 0g
- Carbohydrates: 25g
- Fiber: 3g
- Protein: 20g
- Cholesterol: 10mg
Keywords: pumpkin pie, protein dessert, healthy dessert, no-bake dessert, fall flavors
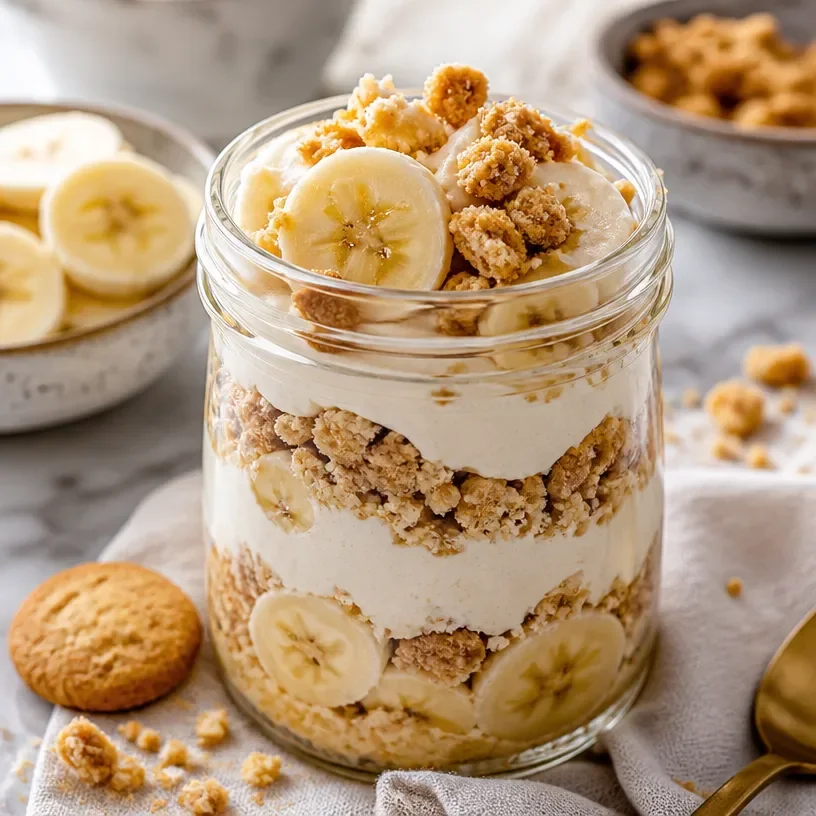
High-Protein Banana Pudding Jar (No-Bake Meal Prep)
Protein Banana Pudding Jars: A Wholesome Twist on a Classic Treat
Welcome, fellow food lovers! Today, we’re diving into a delicious dessert that captures the comforting essence of classic banana pudding while giving it a protein-packed twist. Introducing the Protein Banana Pudding Jar! If you’ve ever savored the creamy richness of banana pudding, you’ll adore this fresh take that not only satisfies your sweet tooth but also fuels your body.
Life can be a whirlwind, and sometimes, we need a little reminder that dessert can be wholesome, too. I created this recipe while trying to find a balance between indulgence and nutrition. And honestly, it was during a cozy afternoon in my kitchen, blending flavors and textures, that I truly fell in love with this delightful treat. The beauty of the Protein Banana Pudding Jar is that it’s layered with love (and some scoops of protein), making it perfect for brunch gatherings or a sweet midnight snack!
Imagine this: you’re excitedly peeling ripe bananas, the sweet aroma wafting through the air. As you whip up a silky-smooth pudding, you realize you’re not just making a dessert; you’re creating a moment of joy. Whether it’s for your family or simply for yourself, there’s something profoundly satisfying about holding a jar of homemade goodness. Ready to make your own? Let’s jump into the nostalgic adventure of crafting Protein Banana Pudding Jars!
A Slice of Nostalgia
Growing up, my grandma used to whip up her famous banana pudding every Sunday for our family get-togethers. She believed that the secret ingredient was love, but I suspect it was her magical ability to create curious layers of flavor and texture. I fondly remember gathering around the dining table, impatiently waiting for the pudding to cool. The anticipation of digging in was almost unbearable as we tried to sneak spoonfuls before it was time to serve.
One particularly memorable Sunday, she caught me in the act, spoon halfway up to my mouth. Instead of scolding me, she burst into laughter and said, “If you want it, you might as well learn how to make it!” And so began my journey into the kitchen. Grandma taught me each step, explaining the importance of flavor balance, watching for just the right ripeness of bananas, and how to whip cream to airy perfection. Those lessons turned into treasured memories that now inspire me to share my own takes on her classic.
Ingredients
To create your Protein Banana Pudding Jars, you’ll need the following ingredients. I’ve included some notes to help you navigate substitutions and make the dish your own!
-
Ripe Bananas (2-3): The star of the dish! Look for bananas with plenty of yellow skin and just a hint of brown spots for optimal sweetness. For a twist, you can substitute with ripe mango or even cooked apples.
-
Vanilla Protein Powder (1 scoop): This adds a protein boost! Use your favorite brand—just ensure it’s clean and not too sweet! If you prefer a non-protein version, go ahead and eliminate it; the pudding will still be delicious.
-
Milk of Choice (1 cup): Dairy, almond, oat, or coconut milk all work beautifully. For a creamier texture, go for whole milk or full-fat coconut milk.
-
Vanilla Extract (1 teaspoon): An essential flavor enhancer! Always opt for pure vanilla extract over imitation for the best taste.
-
Cornstarch (2 tablespoons): This is what thickens our pudding! You can swap it with arrowroot powder or even use a gluten-free thickener if needed.
-
Heavy Whipping Cream (1 cup): To achieve that luscious whipped topping texture! You can also use a non-dairy whipping cream alternative; just make sure it can be whipped.
-
Brown Sugar or Maple Syrup (2 tablespoons): For sweetness! If you’re avoiding sugar, a sugar substitute like stevia works well, or simply omit it if you love the natural sweetness of bananas.
-
Graham Cracker Crumbs (1/2 cup): These are our crunchy layers! For a gluten-free option, use crushed almond flour or any gluten-free cookie of your choice.
Step-by-Step Instructions
-
Prep Your Ingredients: Start by gathering all your ingredients and equipment. You’ll need a medium saucepan, a whisk, and your favorite jars or dessert cups for assembling. Trust me, having everything ready makes the process smoother and more enjoyable!
-
Create the Pudding Base: In the saucepan, combine the milk, vanilla extract, and cornstarch over medium heat. Whisk continuously until the mixture begins to thicken—this should take about 4-5 minutes. It should coat the back of a spoon. And don’t worry if it seems lumpy at first; keep whisking until smooth!
-
Add the Sweetness: Once thickened, reduce the heat and stir in the vanilla protein powder and brown sugar (or maple syrup). Continue whisking until everything is well-combined and silky. If it feels too thick, you can add a splash more milk to reach your desired consistency.
-
Cool It Down: Remove the pudding from heat and let it sit at room temperature for about 10 minutes before transferring it to the fridge to cool completely. This helps it set up just right for our magical layering.
-
Whip the Cream: While the pudding cools, grab your electric mixer and start whipping the heavy cream in a clean bowl until soft peaks form. Be cautious not to over-whip; you want a fluffy texture, not butter!
-
Layer Your Jars: When the pudding is cool, you’re ready to assemble! Start with a layer of pudding at the bottom of your jar, followed by sliced bananas, a dollop of whipped cream, and a sprinkle of graham cracker crumbs. Repeat the layers until your jars are full, finishing with a generous swirl of whipped cream on top.
-
Chill and Enjoy: Pop the jars into the fridge for at least 30 minutes to set. The flavors meld together beautifully, making the wait totally worth it!
Serving Suggestions
When it’s time to dig in, a sprinkle of additional graham cracker crumbs or a drizzle of chocolate sauce on top adds a fun finishing touch. These Protein Banana Pudding Jars are perfect for brunch gatherings, meal prep, or as a delightful dessert. Serve them right from the jar for a casual vibe, or transfer them to fancy dessert bowls for an elegant touch.
Recipe Variations
Here are a few fun twists to customize your Protein Banana Pudding Jars:
-
Chocolate Lovers: Add 2 tablespoons of cocoa powder to the pudding mixture for a chocolatey treat! You can also layer in chocolate chips if you’re feeling indulgent.
-
Nutty Delight: Stir in some almond butter or peanut butter into the pudding for a rich, nutty flavor.
-
Tropical Twist: Replace some bananas with diced pineapple or coconut for a fresh, tropical vibe.
-
Vegan Version: Swap out the heavy cream for coconut whipping cream, use plant-based protein powder, and sweeten with dates for a delicious vegan take.
-
Spiced Up: A pinch of cinnamon or nutmeg in the pudding adds a warm spice that pairs wonderfully with bananas.
Chef’s Notes
Navigating the kitchen is an adventure that’s often sprinkled with laughter and the occasional mishap! One time, I accidentally knocked over an entire jar of peanut butter while trying to measure it, and let’s just say my kitchen had a sticky makeover. But that day also inspired my love for experimenting with flavors in unexpected ways. Whenever I make these Protein Banana Pudding Jars, I can’t help but smile, reminiscing about the joy of cooking and the wonderful memories we create through food. This recipe has evolved over the years, but its foundation remains the same—bringing comfort and joy, one layer at a time.
FAQs and Troubleshooting
Q: My pudding turned out lumpy. What happened?
A: No worries! This can happen if the heat is too high or if the cornstarch isn’t fully dissolved. Make sure to whisk continuously and keep the heat moderate.
Q: Can I make this vegan?
A: Absolutely! Swap the heavy cream for coconut whipping cream, use plant-based milk, and opt for a vegan protein powder.
Q: Can I store these jars in the fridge?
A: Yes! They keep well in the fridge for up to 3 days. Just be sure to cover them tightly with lids or plastic wrap.
Q: How can I prevent the bananas from browning?
A: You can toss the banana slices with a teaspoon of lemon juice before layering them to help keep their vibrant color.
Nutritional Info
- Calories: Approximately 240 per jar
- Protein: 15g
- Carbohydrates: 30g
- Fat: 10g
- Sugars: 12g
There you have it, my friends! Deliciously wholesome Protein Banana Pudding Jars that are as much fun to make as they are to eat. I hope this recipe brings a bit of joy to your table, just as it does in mine. Happy cooking, and don’t forget to share your beautiful creations with me!
Print
Protein Banana Pudding Jars
- Total Time: 25 minutes
- Yield: 4 servings
- Diet: Vegetarian
Description
A wholesome twist on classic banana pudding, layered with protein and love, perfect for indulgence or nutrition.
Ingredients
- Ripe Bananas (2-3)
- Vanilla Protein Powder (1 scoop)
- Milk of Choice (1 cup)
- Vanilla Extract (1 teaspoon)
- Cornstarch (2 tablespoons)
- Heavy Whipping Cream (1 cup)
- Brown Sugar or Maple Syrup (2 tablespoons)
- Graham Cracker Crumbs (1/2 cup)
Instructions
- Prep your ingredients: Start by gathering all your ingredients and equipment.
- Create the pudding base: In the saucepan, combine the milk, vanilla extract, and cornstarch over medium heat. Whisk continuously until thickened (4-5 minutes).
- Add the sweetness: Reduce heat and stir in the vanilla protein powder and brown sugar (or maple syrup) until silky.
- Cool it down: Remove from heat and let sit for 10 minutes, then refrigerate to cool completely.
- Whip the cream: Use an electric mixer to whip the heavy cream until soft peaks form.
- Layer your jars: Start with pudding, followed by sliced bananas, whipped cream, and graham cracker crumbs. Repeat layers.
- Chill and enjoy: Refrigerate for at least 30 minutes before serving.
Notes
For additional flavor, consider adding cocoa powder, nut butter, or spices. Keeps well in the fridge for up to 3 days.
- Prep Time: 15 minutes
- Cook Time: 10 minutes
- Category: Dessert
- Method: Chilling
- Cuisine: American
Nutrition
- Serving Size: 1 jar
- Calories: 240
- Sugar: 12g
- Sodium: 50mg
- Fat: 10g
- Saturated Fat: 5g
- Unsaturated Fat: 3g
- Trans Fat: 0g
- Carbohydrates: 30g
- Fiber: 2g
- Protein: 15g
- Cholesterol: 30mg
Keywords: banana pudding, protein dessert, healthy dessert, easy pudding recipe, brunch recipe
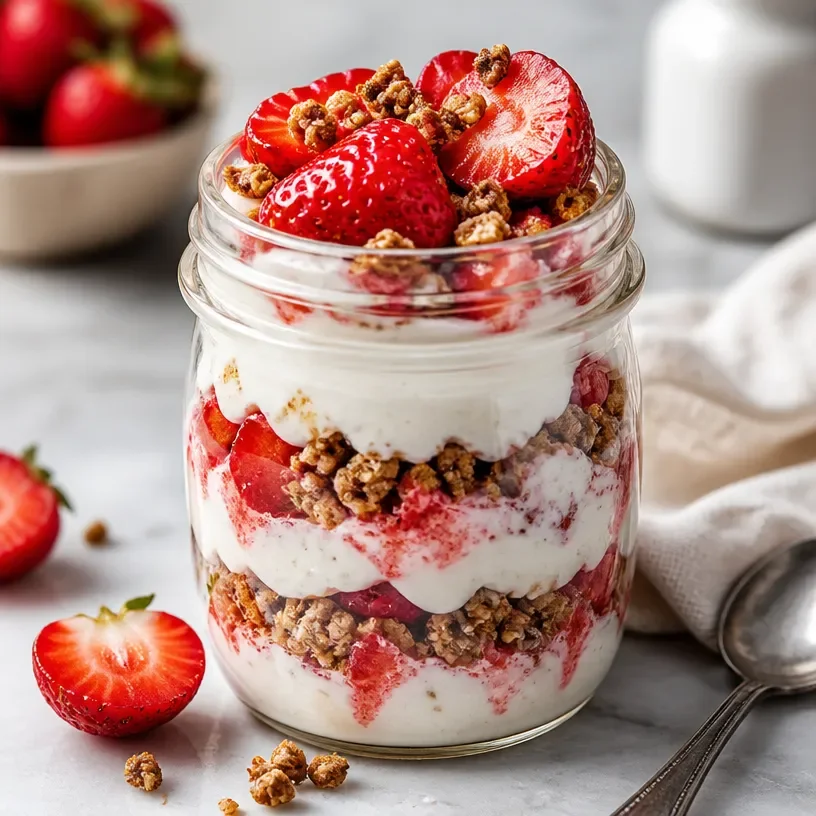
High-Protein Strawberry Cheesecake Jar for Quick Meal Prep
Deliciously Decadent: Protein Strawberry Cheesecake Jars
Welcome to my kitchen! I’m Olivia Bennett — a passionate home cook, flavor enthusiast, and lover of all things cozy and homemade. Today, I’m bringing you one of my all-time favorite desserts: Protein Strawberry Cheesecake Jars. This delightful treat combines the creamy goodness of cheesecake with the refreshing sweetness of strawberries, all while packing a protein punch. Whether you’re looking to satisfy a sweet tooth or fuel up post-workout, these jars are the perfect blend of indulgence and nutrition!
Picture this: a warm summer day, the sun shining bright, and the scent of strawberries wafting through the air. Not too long ago, I found myself at a charming farmers’ market, surrounded by vibrant stalls filled with plump, juicy strawberries. I picked a handful, eager to create something special in my kitchen. The idea of a cheesecake had been on my mind, but how could I make it a little healthier while still keeping it utterly delicious? That’s when it hit me! I could blend the classic flavors of cheesecake with a protein twist, creating something that feels indulgent but also fuels my day.
Every layer of these Protein Strawberry Cheesecake Jars tells a story— the creamy cheesecake filling, the sweet and tangy strawberry compote, and the crunchy graham cracker topping. Plus, they’re super easy to whip up! If you’re someone who lights up at the smell of something sweet baking or enjoys feeding loved ones, you’ll absolutely adore this recipe. Let’s get started on your journey to cheesecake bliss!
Personal Story
I still vividly remember the first time I attempted to make a classic cheesecake. It was for my best friend’s birthday, and I had promised to bake her favorite dessert. The kitchen was filled with laughter, flour flew everywhere, and my dog, Benny, attempted to steal a piece of my graham cracker crust (he did succeed a few times!). My first cheesecake was a little lopsided but oh-so-delicious. It was so satisfying to see everyone enjoying it!
Fast forward a few years, and my culinary adventures pushed me to think outside the box. I wanted to create something lighter yet equally delicious. That day at the farmers’ market sparked inspiration, and the Protein Strawberry Cheesecake Jar was born! Every time I make it, it takes me back to that special birthday, reminding me that cooking is not just about food— it’s about memories, joy, and connection.
Ingredients
Now, let’s dive into what you’ll need for the Protein Strawberry Cheesecake Jars. Here’s the full list of ingredients to get you started!
-
1 cup Greek yogurt: A fantastic source of protein that adds creaminess. You can substitute with low-fat or dairy-free yogurt if desired.
-
1/2 cup cream cheese: Traditional cheesecake flavor definitely comes from this! Opt for light cream cheese for a lower-fat version.
-
1/4 cup powdered sugar or a sugar substitute: Sweetness is key! Powdered sugar mixes smoothly, but feel free to use honey or agave syrup as a natural alternative.
-
1/2 teaspoon vanilla extract: For a rich and warming flavor that ties everything together. Sometimes, I even add almond extract for a twist!
-
1 cup fresh strawberries, hulled and sliced: These juicy gems are essential! If strawberries aren’t in season, feel free to use frozen ones—just thaw and drain excess moisture.
-
1/2 cup graham cracker crumbs: The crunch factor! You can make your own by blending whole graham crackers or use gluten-free options if needed.
-
2 tablespoons melted butter: Helps bind the graham cracker crust. Coconut oil can be a great substitute for a healthier twist.
-
Protein powder (optional): If you want an extra protein boost, adding a scoop of your favorite protein powder to the filling works great!
Step-by-Step Instructions
Ready to create your own Protein Strawberry Cheesecake Jars? Let’s gather all your ingredients and get cooking!
Step 1: Prepare your jars
Select a few cute jars or containers—about 4 to 6 if you’re feeling generous! Giving them a good wash and letting them dry can be a great start. This not only makes your presentation delightful but also adds a personal touch.
Step 2: Make the crust
In a medium mixing bowl, combine the graham cracker crumbs with the melted butter, mixing until you have a sandy consistency. You know it’s ready when it holds between your fingers. If the mixture feels a bit dry, add a touch more melted butter. Press a layer of this mixture into the bottom of each jar (about 2 tablespoons per jar) and pack it tightly. A small measuring cup works wonders for this!
Step 3: Prepare the cheesecake filling
In another bowl, mix the Greek yogurt, cream cheese, powdered sugar, and vanilla extract. Use an electric mixer, or a whisk if you’re feeling adventurous! Beat until it’s smooth, creamy, and oh-so-inviting. You can fold in a scoop of protein powder here if you’d like. This is where you’ll see the magic happen, transforming a simple mix into something truly luscious!
Step 4: Make the strawberry topping
In a small saucepan over medium heat, add your fresh strawberries. Stir them gently until they begin to soften; this typically takes about 5-7 minutes. If you’re craving a bit more sweetness, sprinkle a teaspoon of sugar over the top. Allow it to thicken slightly, creating a delightful strawberry compote. Remove from heat and let it cool.
Step 5: Assemble the jars
Now comes the fun part! Grab your jars and start layering. Add a generous spoonful of the cheesecake filling atop the graham cracker crust, smoothing it out with a spatula. Then, layer in that luscious strawberry compote over the cheesecake filling. Repeat the layering process, finishing with the cheesecake layer on top.
Step 6: Chill
Once assembled, cover your jars with lids or plastic wrap and refrigerate for at least 1-2 hours (or overnight if you can resist!). This chilling time allows flavors to meld beautifully and the cheesecake to set up, making it even more enjoyable.
Step 7: Serve
When you’re ready to indulge, grab your jars, remove the lids, and dig in! For a lovely finishing touch, garnish with a whole strawberry or a sprig of mint on top.
Serving Suggestions
These Protein Strawberry Cheesecake Jars are adorable will look fantastic on a picnic blanket or your kitchen table. Consider serving them after a summer BBQ or as a delightful dessert for your next brunch gathering. They’re also fantastic as meal prep for the week—just grab a jar while heading out the door!
Recipe Variations
Want to make this recipe your own? Here are some fun twists you can consider:
-
Mixed Berry Delight: Substitute strawberries with a mix of raspberries, blueberries, and blackberries for a wholesome berry medley.
-
Chocolate Lovers’: Add cocoa powder to the cream cheese mixture for a dreamy chocolate cheesecake flavor—it’s heavenly!
-
Lemon Zest Twist: Add a teaspoon of lemon zest to the filling for a bright, zesty punch and a fresher flavor profile.
-
Almond Joy: Incorporate shredded coconut and almond extract for a tropical cheesecake experience.
-
Nutty Crunch: Mix in your favorite nuts or seeds into the crust for an added healthy crunch and flavor boost!
Chef’s Notes
Let me tell you a little secret—these jars have become my go-to dessert for almost every occasion. I love how they bring smiles and satisfaction, yet still fit into an active lifestyle with their protein boost. I remember making them for a friend’s surprise party and watching everyone ooh and aah over how cute they looked. And the best part? They can be made ahead of time, so you can enjoy the party instead of worrying over the last-minute dessert! Just remember, the longer you let them chill, the more delicious they become as the flavors marry.
FAQs and Troubleshooting
1. Can I make this keto-friendly?
Absolutely! You can use keto-certified sweeteners and almond flour instead of graham crackers for a low-carb crust.
2. My cheesecake mixture is lumpy! What did I do wrong?
Make sure your cream cheese is at room temperature before mixing. Cold cream cheese doesn’t blend smoothly and can lead to lumps.
3. How do I store leftovers?
These jars can be kept in the fridge for up to 4-5 days. Just make sure they’re sealed properly to prevent them from drying out!
4. Can I freeze them?
While the cheesecake jars can technically be frozen, the texture may change upon thawing. It’s best enjoyed fresh or refrigerated.
Nutritional Info
Here’s a rough estimate of the nutritional info per jar (excluding optional protein powder):
- Calories: 240
- Protein: 15g
- Carbohydrates: 30g
- Fats: 9g
Grab your jars, channel your inner chef, and let’s create a little bit of magic in the kitchen today! Happy cooking, friends!
I hope you enjoy making these Protein Strawberry Cheesecake Jars as much as I do! Remember, every time you step into the kitchen, it’s another opportunity to create cherished memories. Whether you’re cooking for yourself or sharing with loved ones, food is a beautiful way to connect and celebrate the simple pleasures of life. Let’s keep cooking and sharing those flavors together!
Print
Protein Strawberry Cheesecake Jars
- Total Time: 30 minutes
- Yield: 4 servings 1x
- Diet: High Protein
Description
A delightful dessert that combines creamy cheesecake and sweet strawberries while packing a protein punch, perfect for satisfying your sweet tooth or fueling up post-workout.
Ingredients
- 1 cup Greek yogurt
- 1/2 cup cream cheese
- 1/4 cup powdered sugar or sugar substitute
- 1/2 teaspoon vanilla extract
- 1 cup fresh strawberries, hulled and sliced
- 1/2 cup graham cracker crumbs
- 2 tablespoons melted butter
- Protein powder (optional)
Instructions
- Prepare your jars by selecting 4 to 6 containers, washing, and drying them.
- Make the crust by mixing graham cracker crumbs with melted butter until sandy, then press into the bottom of each jar.
- Prepare the cheesecake filling by mixing Greek yogurt, cream cheese, powdered sugar, and vanilla until smooth, adding protein powder if desired.
- Make the strawberry topping by gently cooking fresh strawberries in a saucepan over medium heat for 5-7 minutes until softened, then let it cool.
- Assemble the jars by layering cheesecake filling and strawberry compote, finishing with a layer of cheesecake.
- Chill the assembled jars for at least 1-2 hours or overnight to allow flavors to meld.
- Serve when ready, garnishing with a whole strawberry or mint if desired.
Notes
These jars are perfect for a summer dessert, picnic, or brunch gathering. They can also be made ahead of time for convenience.
- Prep Time: 20 minutes
- Cook Time: 10 minutes
- Category: Dessert
- Method: Chilling
- Cuisine: American
Nutrition
- Serving Size: 1 jar
- Calories: 240
- Sugar: 8g
- Sodium: 200mg
- Fat: 9g
- Saturated Fat: 4g
- Unsaturated Fat: 4g
- Trans Fat: 0g
- Carbohydrates: 30g
- Fiber: 1g
- Protein: 15g
- Cholesterol: 30mg
Keywords: cheesecake, dessert, strawberries, high protein, healthy treat, meal prep




