

Protein Cottage Cheese White Chocolate Raspberry Loaf
A Joyful Journey into Baking: Protein Cottage Cheese White Chocolate Raspberry Loaf
Welcome to my vibrant kitchen, where aromas tantalize and warmth surrounds every dish! I’m Olivia Bennett, your devoted culinary companion, here to bring you deliciously cozy and unforgettable recipes that spark joy and camaraderie. Today, we’re diving into a delightful treat that perfectly balances health and indulgence: the Protein Cottage Cheese White Chocolate Raspberry Loaf.
Now, I know what you might be thinking—cottage cheese in a loaf? Trust me, it’s a game-changer! This recipe showcases how we can turn simple ingredients into something that feels luxurious without sacrificing health. Imagine a loaf that embraces the creaminess of cottage cheese, the sweetness of white chocolate, and the tartness of fresh raspberries! It’s comfort food that you can feel good about, perfect for breakfast, an afternoon snack, or a sweet dessert.
The Story Behind the Loaf
Let me whisk you away to a Saturday morning from my childhood. It was a sunny day, and I could hear the gentle clattering of pots and pans as my mom whipped up something special just for us. The kitchen was a flurry of activity—it was our family tradition to bake something sweet together every weekend! My mom had this magical ability to turn pantry staples into mouthwatering treats.
One particular Saturday, she introduced me to the joys of mixing sweet with savory. That day, we made a fruity loaf so vibrant and bursting with flavor that I knew I had to replicate it someday. Fast forward a few years, and here we are! Inspired by those sunny mornings, I crafted this Protein Cottage Cheese White Chocolate Raspberry Loaf concept. It’s not just a recipe; it’s a reminder of those fond memories filled with laughter, because every bite carries the warmth of a kitchen shared with loved ones.
Ingredients
Here’s what you’ll need to whip up your own Protein Cottage Cheese White Chocolate Raspberry Loaf:
-
1 cup cottage cheese: The star of the show! This provides moisture and protein. If you’re not a fan of cottage cheese, Greek yogurt makes an excellent substitute for a creamier texture.
-
2 large eggs: For binding and richness. If you’re looking for a vegan option, try flax eggs (1 tablespoon of ground flaxseed + 2.5 tablespoons of water per egg—let it sit for a few minutes until it thickens).
-
1/2 cup unsweetened applesauce: This adds natural sweetness and moisture. You can use mashed bananas if you want an extra fruity twist.
-
1/3 cup honey or maple syrup: A touch of sweetness fine-tunes the flavors. Feel free to reduce the amount to your taste or substitute with agave syrup.
-
1 cup all-purpose flour or whole wheat flour: The foundation of the loaf. Whole wheat flour provides additional fiber. For a gluten-free version, almond or oat flour can be great alternatives, just adjust the liquid slightly.
-
1 teaspoon baking powder and 1/2 teaspoon baking soda: These leavening agents give the loaf its fluffy texture. Double-check their freshness for the best rise!
-
1/4 teaspoon salt: A pinch to enhance all the flavors.
-
1/2 cup white chocolate chips: These melt into sweet pockets that elevate the loaf. Dark chocolate can also be used if you prefer a slightly less sweet treat.
-
1 cup fresh raspberries: For tartness and color! If you can’t find fresh ones, frozen raspberries work too—just be sure to thaw and drain them before folding into the batter.
Step-by-Step Instructions
-
Preheat your oven: Start by preheating your oven to 350°F (175°C). This ensures that by the time you’ve mixed your batter, your oven is ready and waiting!
-
Prepare your loaf pan: Grease a standard loaf pan (9×5 inches) or line it with parchment paper to help with easy removal later. I’d recommend using parchment paper—it makes the clean-up oh-so-easy!
-
Mix the wet ingredients: In a large mixing bowl, combine the cottage cheese, eggs, applesauce, and honey (or maple syrup). Whisk until smooth, and don’t worry if there are a few cottage cheese lumps—those will bake up nicely!
-
Combine the dry ingredients: In another bowl, whisk together the flour, baking powder, baking soda, and salt. This helps to evenly distribute the leavening agents throughout the flour.
-
Incorporate the dry with the wet: Gradually stir the flour mixture into your wet ingredients. Take care not to overmix—this keeps your loaf tender! Gently fold in the white chocolate chips and raspberries, ensuring they’re evenly scattered throughout the batter.
-
Pour and distribute the batter: Transfer your batter into the prepared loaf pan, smoothing the top with a spatula. Remember to tap the pan gently on the counter to remove any air bubbles, which is a little trick to ensure an even bake.
-
Bake to perfection: Place your loaf in the preheated oven and bake for 45–55 minutes, or until a toothpick inserted into the center comes out clean. If the top starts browning too quickly, loosely cover it with foil.
-
Cool down: Once baked, remove it from the oven and let it cool in the pan for about 10 minutes before transferring it to a wire rack. Let it cool completely before slicing to keep it tender.
Serving Suggestions
To serve this delightful Protein Cottage Cheese White Chocolate Raspberry Loaf, slice it into generous pieces and serve warm or at room temperature. You can drizzle a little extra honey on top or add a dollop of yogurt for creaminess. A sprinkle of powdered sugar adds a beautiful touch and makes it presentation-ready if you’re hosting brunch!
Recipe Variations
- Berry Medley Twist: Swap out the raspberries for blueberries or chopped strawberries for a delicious change.
- Nutty Delight: Add 1/2 cup of chopped almonds or walnuts for a crunch and additional healthy fats.
- Cocoa Infusion: Stir in 1/4 cup of cocoa powder to give the loaf a chocolatey base, and sub in dark chocolate chips for a delightful contrast.
- Zesty Limoncello: Add the zest of one lemon into the batter for a bright, zesty flavor that compliments the sweetness perfectly.
Chef’s Notes
This Protein Cottage Cheese White Chocolate Raspberry Loaf has become a go-to recipe for me, especially during berry season! I love to make it in large batches and gift some to friends and family—it’s always a hit. Live a little and experiment with what you have on hand; it’s okay if the first loaf isn’t perfect. I promise, the next one will be!
One little kitchen mishap I still chuckle about was when I first made this recipe and accidentally swapped salt for sugar. The loaf, as you could imagine, tasted like a savory surprise! No one ever wants to meet a loaf like that again!
FAQs and Troubleshooting
1. Why did my loaf sink in the middle?
A sunken loaf often means it was underbaked. Make sure you bake it all the way through, keeping an eye on the edges—they should be golden brown and firm to the touch.
2. Can I use frozen raspberries?
Absolutely! Just ensure you thaw and drain them beforehand, so the batter doesn’t become too wet. A quick pat with paper towels can help.
3. My batter looks too thick! Is that normal?
Yes! The cottage cheese will add to the density. If you feel it’s too thick, add a tablespoon of milk or water at a time until it reaches a slightly pourable consistency.
4. How should I store leftovers?
Once cooled, wrap your loaf tightly in plastic wrap or store it in an airtight container. It’ll last for about 3 days at room temperature or up to a week in the fridge. You can also freeze slices for up to 3 months for a quick snack later!
Nutritional Information
This Protein Cottage Cheese White Chocolate Raspberry Loaf is not only delicious; it’s also packed with protein from the cottage cheese, making it a great post-workout snack or a healthy breakfast option. Each slice contains approximately:
- Calories: 180
- Protein: 6g
- Carbohydrates: 27g
- Sugar: 10g
- Fat: 4g
Whether you’re looking to impress at brunch or simply seeking a cozy treat for yourself, this Protein Cottage Cheese White Chocolate Raspberry Loaf will not disappoint. Get ready to savor every slice—happy baking!
Print
Protein Cottage Cheese White Chocolate Raspberry Loaf
- Total Time: 65 minutes
- Yield: 8 servings 1x
- Diet: Vegetarian
Description
A deliciously cozy and healthy loaf that combines cottage cheese, white chocolate, and fresh raspberries for a delightful treat.
Ingredients
- 1 cup cottage cheese
- 2 large eggs
- 1/2 cup unsweetened applesauce
- 1/3 cup honey or maple syrup
- 1 cup all-purpose flour or whole wheat flour
- 1 teaspoon baking powder
- 1/2 teaspoon baking soda
- 1/4 teaspoon salt
- 1/2 cup white chocolate chips
- 1 cup fresh raspberries
Instructions
- Preheat your oven to 350°F (175°C).
- Prepare a standard loaf pan (9×5 inches) by greasing it or lining it with parchment paper.
- Mix the cottage cheese, eggs, applesauce, and honey (or maple syrup) in a bowl until smooth.
- Combine the flour, baking powder, baking soda, and salt in another bowl.
- Incorporate the dry ingredients into the wet ingredients, being careful not to overmix.
- Fold in the white chocolate chips and raspberries.
- Pour the batter into the prepared loaf pan, smoothing the top.
- Bake for 45–55 minutes, or until a toothpick comes out clean.
- Cool the loaf in the pan for 10 minutes before transferring it to a wire rack.
Notes
This loaf can be served warm or at room temperature. You can drizzle honey or add yogurt on top for an extra touch.
- Prep Time: 15 minutes
- Cook Time: 50 minutes
- Category: Dessert
- Method: Baking
- Cuisine: American
Nutrition
- Serving Size: 1 slice
- Calories: 180
- Sugar: 10g
- Sodium: 200mg
- Fat: 4g
- Saturated Fat: 2g
- Unsaturated Fat: 2g
- Trans Fat: 0g
- Carbohydrates: 27g
- Fiber: 1g
- Protein: 6g
- Cholesterol: 40mg
Keywords: protein, cottage cheese, white chocolate, raspberry, loaf, baking, healthy dessert

Protein-Packed Cottage Cheese Cinnamon Coffee Cake
A Slice of Heaven: Protein Cottage Cheese Cinnamon Coffee Cake
Welcome to my cozy corner of the kitchen, where the aroma of freshly baked goodies fills the air, and joy is sprinkled into every bite. Today, I am beyond excited to share with you a recipe that truly deserves a place in your recipe box: Protein Cottage Cheese Cinnamon Coffee Cake! If you’re a fan of comfort food that not only satisfies your sweet tooth but also packs a nutritional punch, then you’re in for a treat.
Imagine sitting down with a steaming cup of coffee in hand, the sunlight streaming through the window as you take a moment to enjoy life’s simple pleasures. That warm feeling in your heart? That’s what this cake brings—perfect for breakfast, brunch, or that mid-afternoon slump! The combination of protein-rich cottage cheese, warm cinnamon, and a tender cake base creates an irresistible harmony that makes every slice an experience to savor.
But before we dive into the nitty-gritty of baking, let me take you on a little journey back in time. There’s a personal story behind this recipe that makes it even more special and close to my heart!
A Little Story from the Heart
I remember the first time I stumbled upon a cottage cheese coffee cake recipe. I was in college, juggling classes, part-time work, and the inevitable surge of late-night cravings. My roommate, Jess, was the ultimate foodie, always experimenting with ingredients in our tiny shared kitchen. One rainy afternoon, she whipped up a cottage cheese cinnamon coffee cake that quite literally stopped time.
As the cake cooled on the countertop, the enchanting aroma wafted through our little apartment, tempting our taste buds. We gathered around the table with our textbooks on one side and this delightful cake on the other. Every bite was fluffy, subtly sweet, and framed by a magnificent swirl of cinnamon.
That day, we bonded over coffee, cake, and a few silly mistakes (like forgetting to preheat the oven!). It was a moment that turned into a tradition; whenever we needed a pick-me-up or a study break, this cake was our go-to. Fast forward years later, and I’ve put my twist on that beloved recipe, making it not just delicious but packed with protein. Let’s bring that nostalgic joy into your kitchen!
Ingredients
Ready to start your baking adventure? Here’s everything you’ll need to whip up this delightful Protein Cottage Cheese Cinnamon Coffee Cake:
-
1 cup cottage cheese
A protein powerhouse, cottage cheese adds moisture and a creamy texture. If you prefer a dairy-free option, feel free to swap it with silken tofu or vegan cream cheese. -
1 cup all-purpose flour
This supplies the cake’s structure. For a healthier option, consider using whole wheat flour—just be mindful that it may yield a denser cake. -
½ cup granulated sugar
Sweetness is key! You can replace this with coconut sugar or even a sugar substitute like stevia, adjusting the quantity to taste. -
2 large eggs
They help bind everything together and provide richness. If you’re looking for an egg-free option, you can replace each egg with ¼ cup of unsweetened applesauce. -
½ cup unsalted butter, melted
Butter brings flavor and moisture. You can try coconut oil for a dairy-free option if preferred! -
1 teaspoon vanilla extract
A little bit goes a long way in enhancing sweetness and aroma. You can also use almond extract for a different flavor profile. -
1 teaspoon baking powder
This will give your cake that perfect rise. If you’re out, baking soda can work in a pinch, just remember to balance with an acid like vinegar or lemon juice. -
1 teaspoon cinnamon
Earthy and warming, it gives the cake its signature flavor! To amp up the spice, you could toss in nutmeg or cardamom for a unique twist. -
¼ teaspoon salt
This enhances all the other flavors! -
For the topping:
- 1 tablespoon cinnamon
- 2 tablespoons brown sugar
- 1 tablespoon softened butter
Mix these together to create a delightful crumb topping for that extra crunch and sweetness!
Step-by-Step Instructions
Alright, let’s dive into the baking process! Follow along, and don’t hesitate to get a little messy. It’s all part of the fun!
-
Preheat your oven: Set your oven temperature to 350°F (175°C). Preheating is super important because it sets the stage for even baking. A cold oven can lead to uneven rising, and you definitely don’t want that!
-
Prepare your baking pan: Grab an 8-inch square baking pan (or a round one if you prefer). Grease it with a little butter or use parchment paper for easy removal later on. Trust me, you’ll want every crumb!
-
Mix wet ingredients: In a large mixing bowl, combine the cottage cheese, melted butter, eggs, and vanilla extract. Whisk until it’s smooth and creamy. Oh, that’s going to be good! The cottage cheese has fantastic moisture content, which translates to a deliciously soft cake.
-
Combine dry ingredients: In another bowl, whisk together the flour, sugar, baking powder, cinnamon, and salt. This step helps distribute the leavening agents evenly. It’s a small but mighty step—no one wants an odd lump of baking powder in their slice!
-
Combine wet and dry: Gradually mix the dry ingredients into the wet mixture until just combined—don’t overmix! A few lumps are totally fine. It’s all about keeping that cake tender and airy.
-
Prepare the topping: In a small bowl, combine the brown sugar, cinnamon, and softened butter with a fork until crumbly. This topping is what takes your coffee cake to the next level!
-
Layer and bake: Pour half of the batter into the prepared pan, then sprinkle half of the cinnamon-sugar topping over it. Pour the remaining batter on top and sprinkle with the rest of the mixture. Don’t be shy with that topping; it’s the cherry on top of your cake!
-
Bake it: Pop it in the oven and bake for 30-35 minutes, or until a toothpick comes out clean from the center. The smell will be out of this world!
-
Cool and Serve: Once baked, let it cool in the pan for about 10 minutes before transferring it to a wire rack to cool completely. This helps it retain moisture and makes slicing easier.
-
Slice & Enjoy: Cut into pieces, serve it up, and watch your friends and family fall in love with it, just like I did so many years ago!
Serving Suggestions
Now that your delightful Protein Cottage Cheese Cinnamon Coffee Cake is out of the oven, it’s time to present this beauty! Serve warm or at room temperature, drizzled with a bit of honey or a dusting of powdered sugar for a sweet finish. It pairs beautifully with a hot cup of coffee or a comforting tea, making for a lovely brunch or afternoon snack.
Recipe Variations
Looking to mix things up? Here are a few delicious variations to play with:
-
Chocolate Chip Delight: Fold in a generous handful of chocolate chips into the batter for a sweet, fudgy twist!
-
Fruit-Infused: Add a layer of fresh berries or sliced bananas in between the batter layers for bursts of flavor.
-
Nutty Crunch: Toss in some chopped walnuts or pecans for an added crunch and earthy flavor.
-
Dairy-Free Option: Use dairy-free cottage cheese or the silken tofu alternative that matches the texture without compromising the deliciousness.
-
Spiced Up: Experiment with chai spice or pumpkin spice in the batter for a seasonal flavor that’s sublime!
Chef’s Notes
As I reflect on the evolution of this recipe, I can’t help but smile. It’s been a journey full of flour-covered countertops and countless taste tests. I’ve tried adding everything from pumpkin purée to matcha powder—each version leading to delightful discoveries. Remember that cooking is not just about following recipes; it’s an adventure! Feel free to infuse your personality into the mixing bowl.
If you happen to drop an ingredient or set off the smoke alarm (trust me, I’ve been there), don’t get discouraged. Cooking is meant to be messy and joyful. The kitchen is a canvas, and you’re the artist—so paint it with flavors and stories that warm your heart!
FAQs and Troubleshooting
1. Why is my coffee cake dense?
If your cake turned out too dense, it’s likely due to overmixing the batter. Remember, gentle is key! Just mix until the flour is incorporated for a light and airy cake.
2. Can I make this cake ahead of time?
Absolutely! You can bake it a day or two in advance. Just be sure to store it in an airtight container at room temperature. It can also be frozen—simply wrap it well and thaw when you’re ready to enjoy a slice!
3. What if I don’t have cottage cheese?
No worries! You can substitute it with plain Greek yogurt or silken tofu for a similar texture.
4. Can I use different flour?
While all-purpose and whole wheat flour work best, you can experiment with almond flour or gluten-free flour blends, but make sure to check for specific conversions, as these may require additional adjustments.
With this protein-packed, cozy cake in your arsenal, you’re bound to impress friends and family (and maybe even yourself!). Now, roll up those sleeves, preheat your oven, and let’s make some magic happen in the kitchen. Happy baking!
Print
Protein Cottage Cheese Cinnamon Coffee Cake
- Total Time: 50 minutes
- Yield: 9 servings 1x
- Diet: Vegetarian
Description
A delightful coffee cake made with protein-rich cottage cheese and warm cinnamon, perfect for breakfast or a sweet afternoon treat.
Ingredients
- 1 cup cottage cheese
- 1 cup all-purpose flour
- ½ cup granulated sugar
- 2 large eggs
- ½ cup unsalted butter, melted
- 1 teaspoon vanilla extract
- 1 teaspoon baking powder
- 1 teaspoon cinnamon
- ¼ teaspoon salt
- For the topping:
- 1 tablespoon cinnamon
- 2 tablespoons brown sugar
- 1 tablespoon softened butter
Instructions
- Preheat your oven: Set your oven temperature to 350°F (175°C).
- Prepare your baking pan: Grease an 8-inch square baking pan.
- Mix wet ingredients: Combine the cottage cheese, melted butter, eggs, and vanilla extract in a large mixing bowl, whisk until smooth.
- Combine dry ingredients: Whisk together the flour, sugar, baking powder, cinnamon, and salt in another bowl.
- Combine wet and dry: Gradually mix the dry ingredients into the wet mixture until just combined.
- Prepare the topping: Combine brown sugar, cinnamon, and softened butter in a small bowl until crumbly.
- Layer and bake: Pour half of the batter into the prepared pan, sprinkle half of the topping over it, then top with remaining batter and sprinkle with the rest of the mixture.
- Bake it: Bake for 30-35 minutes until a toothpick comes out clean.
- Cool and Serve: Let it cool for about 10 minutes before transferring to a wire rack to cool completely.
- Slice & Enjoy: Cut into pieces and serve warm or at room temperature.
Notes
Serve with a drizzle of honey or a dusting of powdered sugar, perfect with coffee or tea.
- Prep Time: 15 minutes
- Cook Time: 35 minutes
- Category: Dessert
- Method: Baking
- Cuisine: American
Nutrition
- Serving Size: 1 serving
- Calories: 280
- Sugar: 10g
- Sodium: 320mg
- Fat: 11g
- Saturated Fat: 6g
- Unsaturated Fat: 4g
- Trans Fat: 0g
- Carbohydrates: 36g
- Fiber: 1g
- Protein: 8g
- Cholesterol: 55mg
Keywords: coffee cake, cottage cheese, dessert, protein, brunch

One-Bowl Protein-Packed Cottage Cheese Honey Oat Bread
Protein Cottage Cheese Honey Oat Bread: A Heartwarming Favorite
Welcome to my cozy corner of the kitchen! Today, we’re diving into a recipe that’s not only delicious but also packed with goodness—Protein Cottage Cheese Honey Oat Bread! This unique bread combines the wholesome flavors of oats and honey with the creamy texture of cottage cheese, resulting in a delightful loaf that’s perfect for breakfast, snacks, or alongside your favorite soup.
As the smell of freshly baked bread wafts through your home, memories of childhood afternoons spent baking with loved ones will surely come rushing back. The beauty of cooking lies in its ability to connect us and create lasting memories, and this recipe is the epitome of that sentiment!
Now, let’s roll up our sleeves and get started on this delightful journey to baking your very own Protein Cottage Cheese Honey Oat Bread!
A Slice of Nostalgia
Before we jump into the ingredients and steps, I want to share a little story that’s close to my heart. Growing up, my grandmother was the queen of the kitchen. Her home was our family’s hub, filled with laughter, warmth, and the irresistible aroma of baked goods. I remember one rainy Sunday afternoon when we decided to make bread together. With flour dusting our aprons and hands in a sticky mess, we experimented without a recipe.
One of our best creations was a simple yet hearty bread that used whatever we had on hand—oats, honey, and cottage cheese. We were having so much fun that we didn’t mind the mess around us! When it finally came out of the oven, golden and warm, it felt like victory. We slathered it with butter and ate every crumb. That bread brought us closer and became a staple in our family gatherings.
Years later, I decided to formalize that delicious mix of ingredients into this Protein Cottage Cheese Honey Oat Bread recipe to honor those cherished memories. I promise this bread will inspire your kitchen adventures and bring a little love into your home too!
Ingredients
Here’s what you’ll need to whip up this delightful bread:
-
1 cup cottage cheese
Creamy and protein-packed, cottage cheese is the star of this recipe. It adds moisture and structure to the bread. If you prefer a vegan option, try using silken tofu blended until smooth. -
2 tablespoons honey
Sweet and natural, honey enhances the flavor of the bread while aiding in browning. If you’re vegan, agave syrup or maple syrup can be substituted without compromising taste. -
2 cups rolled oats
Rolled oats not only add texture but also provide a hearty, nutty flavor. You can also use quick oats, but avoid steel-cut oats as they’ll not work so well in this recipe. -
1 cup whole wheat flour
Adds fiber and nutrients while keeping the crumb hearty. You can swap with all-purpose flour if you prefer a lighter texture, but I recommend the whole wheat for added goodness. -
1 tablespoon baking powder
This is your leavening agent, making the bread rise nicely. Ensure it’s fresh for the best results! -
½ teaspoon salt
Enhances the overall flavor. Don’t skip this; it balances the sweetness of the honey. -
1/2 cup milk (or plant-based milk)
This helps to achieve the right batter consistency. Feel free to use almond milk, oat milk, or any milk of your choice.
Quick Chef Insights:
- Cottage Cheese: Look for low-fat versions or whole milk, depending on your dietary preferences. The larger curds contribute a chunkier texture, while smaller curds give a smoother finish.
- Flour Swaps: For gluten-free options, almond or oat flour can work, but you might need to adjust the liquid content slightly.
Step-by-Step Instructions
Let’s bake this lovely loaf together! Follow these detailed steps, and don’t forget, it’s all about having fun in the kitchen!
-
Preheat Your Oven
Preheat your oven to 350°F (175°C). This step is crucial for getting that lovely rise. Don’t rush this part; let your oven do its thing! -
Mix the Wet Ingredients
In a large mixing bowl, combine the cottage cheese, honey, and milk. Use a whisk or fork to break up the cottage cheese—don’t worry about making it completely smooth; a few lumps are okay! This adds to the rustic feel of the bread. -
Prepare the Dry Ingredients
In another bowl, mix the rolled oats, whole wheat flour, baking powder, and salt. Give these a good stir to ensure everything is evenly distributed. This step helps your loaf rise evenly, so please don’t skip it! -
Combine Wet and Dry Ingredients
Gradually fold the dry mixture into the wet one. Use a spatula or wooden spoon to bring everything together. The batter will be thick and pourable but not too runny. If you find it’s too thick, add a splash more milk. -
Add Flavor Tweaks (Optional)
Here’s where you can get creative! Consider adding chopped nuts, seeds, or dried fruit for extra texture and flavor. Give it another gentle fold to distribute those goodies. -
Prepare Your Baking Pan
Lightly grease a loaf pan (9×5 inch is perfect) or line it with parchment paper for easy removal. Pour the batter into the prepared pan. Smooth the top with your spatula for an even bake. -
Bake the Bread
Place the loaf in the preheated oven and bake for about 45-50 minutes, or until the top is golden brown and a toothpick inserted into the center comes out clean. The aroma will fill your kitchen, and trust me, it’s hard to wait! -
Cool Before Slicing
Once baked, remove the loaf from the oven and let it cool in the pan for 10 minutes. Then, transfer it to a wire rack to cool completely. Letting it cool is essential; if you cut it too early, it might crumble!
Serving Suggestions
Once your Protein Cottage Cheese Honey Oat Bread is cool, slice it up and serve! I love to toast slices and smear them with almond butter or a drizzle of honey. It’s equally delightful paired with a bowl of warm, homemade soup for a cozy lunch. You can also cut it into smaller pieces and serve it as part of a brunch spread—perfect for impressing guests!
Recipe Variations
Looking to switch things up? Here are a few creative twists you can try:
- Herbed Bread: Add fresh herbs like rosemary or thyme to the batter for a savory take.
- Cinnamon Swirl: Incorporate ground cinnamon and a sprinkle of brown sugar for a warm, comforting flavor.
- Fruit-Infused: Fold in fresh berries or sliced bananas for a fruity twist.
- Cheese Lover’s Option: Add shredded cheese for a yummy savory version—you could use cheddar or feta!
- Nutty Crunch: Mix in walnuts or pecans for added texture and nutrition.
Chef’s Notes
This recipe has traveled with me through various kitchen adventures. The first time I made it, I was keen to recreate the golden memories of baking with my grandmother. Each time I bake it, I tweak the spices, adjust the sweetness, or throw in some seasonal ingredients like pumpkin puree in the fall or shredded zucchini in summer.
Don’t be surprised if you find yourself adding new inspirations—cooking is all about expressing yourself and enjoying the process.
FAQs and Troubleshooting
1. Why is my bread dense?
If your bread turns out dense, it may be due to over-mixing or using too much flour. Make sure to fold the mixtures gently and avoid packing your flour when measuring!
2. Can I freeze this bread?
Absolutely! This bread freezes beautifully. Wrap it tightly in plastic wrap or foil and store it in an airtight container. It should keep well for up to three months. Thaw it at room temperature or toast slices directly from the freezer!
3. What can I use instead of cottage cheese?
Cottage cheese can be substituted with Greek yogurt for a similar texture and tangy flavor. For dairy-free, silken tofu blended until smooth works well!
4. How do I store leftovers?
Store leftover bread in an airtight container or a zip-top bag at room temperature for a day or two. You can also refrigerate it to extend shelf life, but make sure to toast it before serving for the best taste!
Nutritional Info
While I haven’t provided specific nutritional values, this recipe is high in protein thanks to the cottage cheese, making it a great option for a wholesome breakfast or snack. The oats provide fiber, keeping you satisfied throughout the day!
There you have it! Protein Cottage Cheese Honey Oat Bread is not just a recipe; it’s a tradition, a memory, and a wholesome delight. I hope you create your own beautiful moments in the kitchen with this warm loaf. Happy baking, foodies!
Print
Protein Cottage Cheese Honey Oat Bread
- Total Time: 65 minutes
- Yield: 8 servings 1x
- Diet: Vegetarian
Description
A delightful loaf of bread made with cottage cheese, honey, and rolled oats, perfect for breakfast or as a snack.
Ingredients
- 1 cup cottage cheese
- 2 tablespoons honey
- 2 cups rolled oats
- 1 cup whole wheat flour
- 1 tablespoon baking powder
- ½ teaspoon salt
- ½ cup milk (or plant-based milk)
Instructions
- Preheat your oven to 350°F (175°C).
- Mix the cottage cheese, honey, and milk in a large mixing bowl.
- Prepare the dry ingredients by mixing the rolled oats, whole wheat flour, baking powder, and salt in another bowl.
- Combine the dry mixture into the wet mixture gradually.
- Add any optional flavor tweaks like nuts or dried fruit.
- Prepare a 9×5 inch loaf pan by greasing it or lining it with parchment paper.
- Bake for about 45-50 minutes until golden brown.
- Cool in the pan for 10 minutes then transfer to a wire rack.
Notes
Great served toasted with almond butter or enjoyed with soup. Freezes well for up to three months.
- Prep Time: 15 minutes
- Cook Time: 50 minutes
- Category: Bread
- Method: Baking
- Cuisine: American
Nutrition
- Serving Size: 1 slice
- Calories: 220
- Sugar: 6g
- Sodium: 350mg
- Fat: 6g
- Saturated Fat: 2g
- Unsaturated Fat: 4g
- Trans Fat: 0g
- Carbohydrates: 34g
- Fiber: 4g
- Protein: 10g
- Cholesterol: 10mg
Keywords: cottage cheese bread, honey oat bread, healthy baking, protein bread

High-Protein Lemon Cottage Cheese Muffins with Poppy Seeds
Protein Cottage Cheese Lemon Poppy Seed Muffins
Welcome to my cozy kitchen, friends! Today, we’re diving into a recipe that combines the comfort of freshly baked muffins with a delightful burst of flavor. I’m talking about Protein Cottage Cheese Lemon Poppy Seed Muffins! Whether you’re looking for a quick breakfast on the go or a nutritious snack to enjoy throughout your day, these muffins are here to brighten your mornings and give you a boost of protein to keep you energized.
The star of the show? Cottage cheese! It not only adds protein but also keeps these muffins moist and fluffy. And let me tell you, the sweet and zesty lemon combined with the nutty crunch of poppy seeds creates a flavor profile that sings—it’s like a little sunshine in every bite. Get ready to fall in love with this recipe, as we whip up a batch that’s sure to be a hit with everyone in your household!
A Dash of Nostalgia
Let me take you back to my childhood kitchen, where my love for baking (and cooking) truly began. My grandmother had a way of turning ordinary moments into extraordinary memories, especially when she pulled out her muffin tin. One of my favorite recipes was her lemon poppy seed muffins, which filled the air with a bright, citrusy aroma that still makes my heart flutter today.
I remember racing home from school, eager to find her cooling rack set up on the countertop, topped with golden brown muffins just begging to be devoured. On rainy days, she’d encourage me to get involved—scooping the batter, sprinkling in poppy seeds, and waiting impatiently as the muffins rose and transformed in the oven. Those afternoons ignited my passion for cooking, and now I’m thrilled to bring you my lean protein version of those classic muffins, using cottage cheese for a nutritious twist. Let’s relive those cozy moments as we bake together!
Ingredients
Here’s what you’ll need to make your Protein Cottage Cheese Lemon Poppy Seed Muffins:
- 1 cup cottage cheese: This protein-packed ingredient is the foundation of our muffins. Use low-fat or full-fat based on your preference. If dairy-free, swap with a silken tofu blended until smooth.
- 1 cup whole wheat flour: Whole wheat flour adds fiber and depth of flavor. Feel free to substitute with all-purpose flour or an alternative gluten-free flour blend.
- 1/2 cup honey or maple syrup: This natural sweetener gives the muffins a lovely sweetness. If you’re aiming for less sugar, try using mashed bananas or unsweetened applesauce.
- 2 large eggs: Eggs help bind the ingredients and offer moisture. You can replace them with flax eggs (1 tablespoon of ground flaxseed mixed with 3 tablespoons of water) for a vegan option.
- 1/4 cup unsweetened applesauce: Adds moisture without extra fat. If you prefer, you can switch it with more cottage cheese or yogurt.
- Zest of 1 lemon: The lemon zest brings a bright flavor. Always zest the lemon before juicing!
- 1/4 cup fresh lemon juice: Fresh juice brightens the flavor. If you’re in a pinch, bottled lemon juice works, but fresh is always best!
- 1 tablespoon poppy seeds: These little seeds add a delightful crunch and visual appeal. Feel free to use chia seeds for a similar texture or leave them out if you prefer.
- 1 teaspoon baking powder: This leavening agent helps our muffins rise.
- 1 teaspoon baking soda: Ensures a nice lift and fluffiness.
- 1/2 teaspoon salt: Balances out the sweetness.
- 1 teaspoon vanilla extract: This brings everything together for a lovely aroma and flavor. Don’t skip it!
Step-by-Step Instructions
Now that we’ve got our ingredients ready, let’s get to the fun part: baking! Here’s how you can whip up these delightful muffins:
-
Preheat the Oven: First things first, preheat your oven to 350°F (175°C). A hot oven is crucial for that perfect rise. While it’s heating up, you can prepare your muffin pan by lining it with paper liners or lightly greasing each cup.
-
Mix Wet Ingredients: In a large mixing bowl, combine your cottage cheese, honey (or maple syrup), eggs, applesauce, lemon juice, and vanilla extract. Stir until well blended. One of my favorite tricks here is to use a whisk to whip the mixture a little; it adds air and helps make the muffins fluffier!
-
Combine Dry Ingredients: In a separate bowl, whisk together the whole wheat flour, baking powder, baking soda, poppy seeds, zest, and salt. Whisking these dry ingredients separately ensures even distribution of the leavening agents and the poppy seeds.
-
Mix Dry with Wet: Gradually add the dry ingredients to the wet mixture. Gently fold them together using a spatula. Be careful not to overmix—it’s okay if there are a few lumps. Overmixing can lead to dense muffins, and we want them fluffy and light.
-
Scoop the Batter: Using a muffin scoop or spoon, fill each muffin cup about 3/4 full. This gives the muffins enough room to rise, but won’t overflow.
-
Bake: Place the muffin pan in the preheated oven and bake for 15-20 minutes. You’ll know they’re done when the tops are golden brown and a toothpick inserted into the center comes out clean. I like to rotate my muffin pan halfway through baking for even cooking.
-
Cool and Enjoy: Remove the muffins from the oven and let them cool in the pan for about 5 minutes before transferring them to a wire rack. It’s hard to resist the warm aroma—but let them cool a bit to avoid burning your fingers! Once they’re cooled, you can enjoy them as is or with a dollop of your favorite spread.
Serving Suggestions
These Protein Cottage Cheese Lemon Poppy Seed Muffins are delicious on their own, but you can elevate them even more! Try serving them with a generous spread of cream cheese, Greek yogurt, or a drizzle of honey for added sweetness. They’re also perfect with a fresh fruit salad or alongside your morning coffee or tea. If you’re feeling extra indulgent, a light dusting of powdered sugar or a lemon glaze can take them to the next level of yum!
Recipe Variations
Feeling creative? Here are some fun twists on this classic muffin recipe:
- Berry-Infused: Add a cup of blueberries or raspberries to the batter for a fruity addition.
- Chia Seed Swap: Replace poppy seeds with chia seeds for added nutrition.
- Glazed Muffins: Mix powdered sugar with lemon juice to create a zesty glaze.
- Coconut Twist: Add shredded coconut for a tropical surprise!
- Spiced Up: Sprinkle in a teaspoon of cinnamon or nutmeg for a warm, cozy flavor.
Chef’s Notes
These muffins have a special place in my heart, and they’ve evolved quite a bit since I first attempted the recipe! When I first started, I used all-purpose flour and regular sugar, but I soon realized how wonderful whole wheat flour and natural sweeteners can be. It’s been a journey to discover the balance of flavor and nutrition. I still chuckle when I think of the time my muffins overflowed in the oven—let’s just say I learned that a little less batter goes a long way.
FAQs and Troubleshooting
Q1: Why are my muffins dense?
- A: Overmixing is often to blame! Mix just until combined to keep them light and fluffy.
Q2: Can I make these muffins ahead of time?
- A: Absolutely! You can make them a day ahead and store them in an airtight container. They freeze well too—just pop them in the microwave for a quick reheat!
Q3: How can I make these muffins sweeter?
- A: Feel free to adjust the sweetener to your preference! You can also add chocolate chips or dried fruit to amp up the sweetness.
Q4: Can I use low-fat cottage cheese?
- A: You can! While it may slightly alter the texture, they will still turn out delicious.
Nutritional Info (Optional)
If you’re counting macros or calories, here’s a general breakdown per muffin (based on the recipe yielding 12 muffins):
- Calories: 150
- Protein: 6g
- Carbohydrates: 20g
- Fat: 5g
- Fiber: 2g
- Sugar: 5g
And there you have it! These Protein Cottage Cheese Lemon Poppy Seed Muffins are not just baked goods; they’re a lovely blend of nostalgia and nutritious joy. I hope you’ll try making them and share in the cozy moments they bring. Happy baking, and remember, cooking is all about love and fun—so enjoy every step of the process!
Print
Protein Cottage Cheese Lemon Poppy Seed Muffins
- Total Time: 35 minutes
- Yield: 12 muffins 1x
- Diet: Healthy
Description
Delightful muffins combining protein-rich cottage cheese with zesty lemon and crunchy poppy seeds, perfect for breakfast or a snack.
Ingredients
- 1 cup cottage cheese
- 1 cup whole wheat flour
- 1/2 cup honey or maple syrup
- 2 large eggs
- 1/4 cup unsweetened applesauce
- Zest of 1 lemon
- 1/4 cup fresh lemon juice
- 1 tablespoon poppy seeds
- 1 teaspoon baking powder
- 1 teaspoon baking soda
- 1/2 teaspoon salt
- 1 teaspoon vanilla extract
Instructions
- Preheat the oven to 350°F (175°C). Prepare your muffin pan with liners or grease.
- Mix the cottage cheese, honey (or maple syrup), eggs, applesauce, lemon juice, and vanilla in a bowl.
- Combine the whole wheat flour, baking powder, baking soda, poppy seeds, zest, and salt in another bowl.
- Mix the dry ingredients into the wet mixture, folding gently.
- Scoop the batter into muffin cups, filling them 3/4 full.
- Bake for 15-20 minutes until golden, and a toothpick comes out clean.
- Cool for 5 minutes in the pan, then transfer to a wire rack.
Notes
These muffins can be served with cream cheese or honey. They freeze well for future enjoyment.
- Prep Time: 15 minutes
- Cook Time: 20 minutes
- Category: Breakfast
- Method: Baking
- Cuisine: American
Nutrition
- Serving Size: 1 muffin
- Calories: 150
- Sugar: 5g
- Sodium: 250mg
- Fat: 5g
- Saturated Fat: 1g
- Unsaturated Fat: 4g
- Trans Fat: 0g
- Carbohydrates: 20g
- Fiber: 2g
- Protein: 6g
- Cholesterol: 50mg
Keywords: muffins, lemon, poppy seeds, cottage cheese, healthy snacks
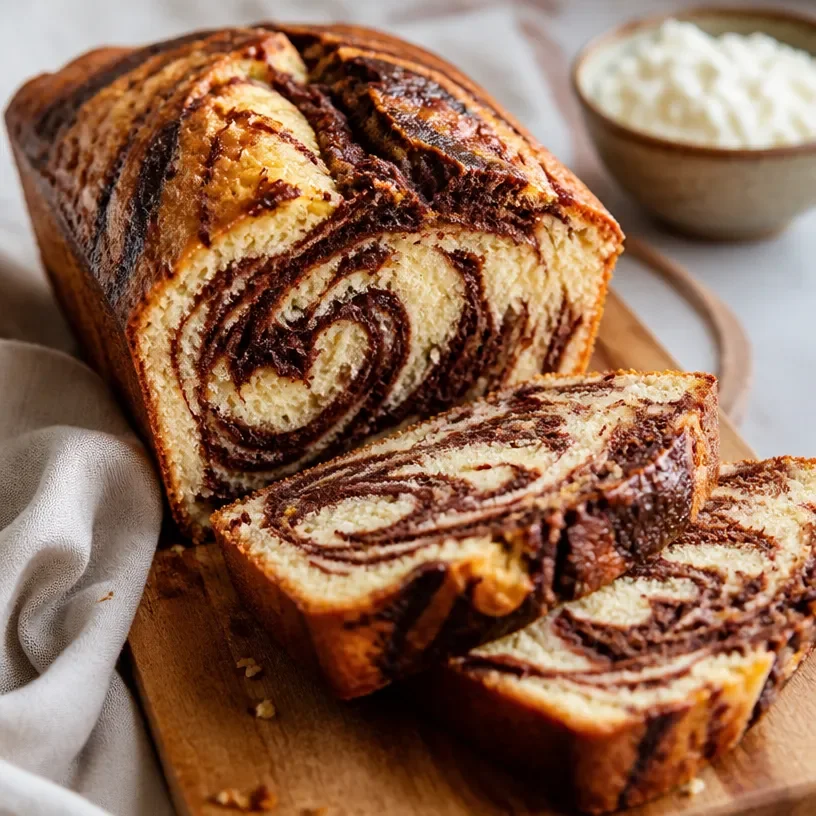
High-Protein Cottage Cheese Marble Cake: Easy 1-Bowl Recipe
The Joy of Baking: Protein Cottage Cheese Marble Cake
Welcome to my kitchen, my fellow food lovers! Today, I am thrilled to take you on a delicious journey of baking that will not only tantalize your taste buds but also fill your home with the warm, comforting aroma of something wonderful coming out of the oven. We’re making a delightful Protein Cottage Cheese Marble Cake!
Marble cake has always had a special place in my heart. It’s the perfect blend of flavors and textures, merging rich chocolate with a light, fluffy vanilla base, creating a dessert that’s as beautiful as it is delicious. But this isn’t just any marble cake; today, we’re adding cottage cheese to the mix to boost the protein content, making this cake not only a treat but a slightly healthier choice too!
Picture this: a rainy afternoon, the sky heavy with clouds, and you’re huddled in the kitchen, mixing together the ingredients for this glorious cake. The moment you swirl that chocolate batter into the vanilla, you’re creating art, and perhaps even a little magic. Each slice unveils a ripple of flavors, enticing your loved ones to gather around the table, savoring each bite while sharing stories and laughter.
So, grab your apron, put on your favorite tunes, and let’s dive into this cozy baking adventure!
A Trip Down Memory Lane
Before we cook up this wonderful cake, let me share a little something from my childhood that makes this recipe even more special. When I was a little girl, my grandmother would often bake marble cake for our family get-togethers. She had this magical ability to whip up desserts that everybody raved about, and her marble cake was the highlight. I remember standing on my tiptoes, eager to help her in the kitchen, my little hands trying to measure out flour as she guided me with her gentle smile.
She was never one for exact measurements—just a sprinkle of this, a dash of that, and her love mixed in. When I got old enough to bake by myself, that recipe became my go-to for birthdays and celebrations. Over the years, I decided to give it a twist by adding cottage cheese, infusing my beloved childhood treat with a protein-packed upgrade, making it perfect for any occasion!
Ingredients You’ll Need
Let’s gather our ingredients! Here’s what you’ll need to whip up this delicious Protein Cottage Cheese Marble Cake:
-
1 ½ cups all-purpose flour
This forms the base of our cake. If you want to make it gluten-free, substitute with almond flour or a gluten-free all-purpose blend. -
1 cup cottage cheese
The star of our show, cottage cheese adds moisture and protein. You can use low-fat or full-fat cottage cheese, depending on your preference. If you want a dairy-free option, try using silken tofu blended until smooth! -
1 cup granulated sugar
Sweetness is key! If you’re looking to cut down on sugar, you can use coconut sugar or a sugar substitute like stevia or monk fruit. -
½ cup unsalted butter, softened
This adds richness! For a dairy-free option, coconut oil or vegan butter works perfectly. -
3 large eggs
They help bind everything together! If you’re vegan, you can use flax eggs (1 tablespoon ground flaxseed mixed with 3 tablespoons water = 1 egg). -
1 teaspoon baking powder
This makes the cake rise, giving it that fluffy texture. -
½ teaspoon baking soda
Another leavening agent that ensures our cake is light and airy. -
½ teaspoon salt
Salt is essential to enhance all the flavors. -
1 teaspoon vanilla extract
It adds depth and warmth to our cake. -
¼ cup cocoa powder
This gives us that rich chocolate layer. Use unsweetened cocoa to balance the sweetness of the cake. -
1 tablespoon milk (dairy or non-dairy)
For adjusting the consistency of the batter if needed.
Make sure to have everything ready before we start baking. It makes the process smoother and more enjoyable—trust me!
Let’s Bake This Cake!
Now that we have all our ingredients ready, it’s time to get down to business! Here’s how we create this Protein Cottage Cheese Marble Cake step by step.
Step 1: Preheat and Prepare
Preheat your oven to 350°F (175°C). Grease and flour a 9-inch round cake pan, or alternatively, line it with parchment paper. This ensures an easy release and a beautiful cake.
Step 2: Mix the Wet Ingredients
In a large mixing bowl, beat the softened butter and sugar together until they’re light and fluffy—about 3-4 minutes. You want to incorporate air into the mixture. Adding cottage cheese at this stage gives a creamy texture, so mix it in thoroughly. Follow with the eggs one at a time, beating well after each addition, and finally, add the vanilla extract.
Chef’s Tip: Make sure your ingredients are at room temperature for the best emulsification. This helps with the texture of your cake!
Step 3: Combine the Dry Ingredients
In another bowl, whisk together the flour, baking powder, baking soda, and salt. Gradually add this dry mixture to the wet ingredients, alternating with the milk, starting and ending with the flour mixture. Combine until just mixed—overmixing can lead to a dense cake.
Step 4: Separate the Batter
Divide the batter evenly into two bowls. In one bowl, sift in the cocoa powder and mix until fully integrated. You’ll have a beautiful chocolate batter and a lovely vanilla batter!
Step 5: Create the Marble Effect
Now comes the fun part! In your prepared cake pan, dollop spoonfuls of vanilla and chocolate batter randomly. Using a knife or a toothpick, gently swirl the batters together to create a marbled effect. Don’t overdo it—less is more for that beautiful swirl!
Step 6: Bake
Pop the cake into your preheated oven and bake for 30-35 minutes, or until a toothpick inserted into the center comes out clean. Keep an eye on it in the last few minutes of baking.
Step 7: Cool and Enjoy
Once baked, remove the cake from the oven and allow it to cool in the pan for about 10 minutes before transferring it to a wire rack to cool completely. Resist the temptation to dig in too soon—letting it cool will give you cleaner slices!
Serving Suggestions
To serve, place the cake on a lovely serving plate and dust with a bit of powdered sugar for a touch of elegance. You could also add fresh berries or a dollop of Greek yogurt on the side for a delightful contrast. It pairs beautifully with a cup of coffee or tea, making it a perfect accompaniment for afternoon gatherings with friends or family.
Recipe Variations
Feeling adventurous? Here are some variations you can try with this Protein Cottage Cheese Marble Cake:
- Nutty Addition: Fold in some chopped walnuts or almonds into the batter for added crunch and flavor.
- Fruit Swirl: Add some pureed strawberries or raspberries into the batter for a fruity marble cake.
- Chocolate Chunk Delight: Mix in dark chocolate chips for a richer chocolate experience.
- Spice it Up: Sprinkle in some cinnamon or nutmeg for a warm, spicy twist.
- Zesty Lemon: Add a tablespoon of lemon zest to the vanilla batter for a refreshing hint of citrus.
Chef’s Notes
As I’ve experimented with this recipe over the years, it has evolved into my go-to cake for any occasion! When I first started experimenting with cottage cheese, I was concerned about the texture, but surprisingly, it came out beautifully! The added protein gives it a unique twist that delights everyone who tries it. And let’s be honest here—one of my favorite things about baking is that it doesn’t always have to look perfect. Embrace the messiness of it all; it’s a sign of a home filled with love, laughter, and, of course, delicious baked goods!
FAQ and Troubleshooting
-
My cake didn’t rise, what did I do wrong?
It’s likely that your baking powder or baking soda is old. Always check the expiration date. Also, make sure to mix the batter just enough; overmixing can result in a dense cake. -
Why did my cake stick to the pan?
Be sure to grease and flour your pan thoroughly before adding the batter. Parchment paper can be a lifesaver in ensuring it releases smoothly. -
Can I freeze this cake?
Absolutely! Allow the cake to cool completely, wrap it tightly in plastic wrap, and then store it in an airtight container. It keeps well for up to three months. Just thaw it in the fridge overnight before serving. -
Is this cake suitable for different diets?
Yes! With simple substitutions, you can easily make it dairy-free, gluten-free, or even vegan. Just use the recommended alternatives in the ingredients list!
Nutritional Info
While I love baking for the joy it brings, I also appreciate the benefits of mindful eating. This Protein Cottage Cheese Marble Cake provides a good dose of protein and essential nutrients, making it a perfect treat to enjoy on special occasions or when you need a pick-me-up!
I hope this recipe brings as much joy to your kitchen as it has to mine. Remember, cooking is all about having fun, experimenting, and sharing. So, have a blast baking away, and I can’t wait to hear how your Protein Cottage Cheese Marble Cake turns out! Happy baking!
Print
Protein Cottage Cheese Marble Cake
- Total Time: 50 minutes
- Yield: 8 servings 1x
- Diet: Vegetarian
Description
A delightful marble cake combining rich chocolate and light vanilla layers, enhanced with protein-packed cottage cheese.
Ingredients
- 1 ½ cups all-purpose flour
- 1 cup cottage cheese
- 1 cup granulated sugar
- ½ cup unsalted butter, softened
- 3 large eggs
- 1 teaspoon baking powder
- ½ teaspoon baking soda
- ½ teaspoon salt
- 1 teaspoon vanilla extract
- ¼ cup cocoa powder
- 1 tablespoon milk (dairy or non-dairy)
Instructions
- Preheat your oven to 350°F (175°C) and grease and flour a 9-inch round cake pan.
- Mix the softened butter and sugar together until light and fluffy, then mix in the cottage cheese, followed by the eggs and vanilla extract.
- Combine the flour, baking powder, baking soda, and salt in another bowl, then gradually add to the wet mixture, alternating with the milk.
- Separate the batter into two bowls, adding cocoa powder to one, mixing well.
- Create the marble effect by dolloping spoonfuls of vanilla and chocolate batter in the prepared pan and swirling together gently.
- Bake for 30-35 minutes, or until a toothpick inserted comes out clean.
- Cool the cake in the pan for 10 minutes before transferring to a wire rack to cool completely.
Notes
For a lighter texture, ensure all ingredients are at room temperature before mixing.
- Prep Time: 15 minutes
- Cook Time: 35 minutes
- Category: Dessert
- Method: Baking
- Cuisine: American
Nutrition
- Serving Size: 1 slice
- Calories: 320
- Sugar: 18g
- Sodium: 270mg
- Fat: 12g
- Saturated Fat: 7g
- Unsaturated Fat: 4g
- Trans Fat: 0g
- Carbohydrates: 45g
- Fiber: 2g
- Protein: 10g
- Cholesterol: 70mg
Keywords: cake, marble cake, protein dessert, cottage cheese cake, baking

High-Protein Cottage Cheese Brioche Rolls for Meal Prep
Protein Cottage Cheese Brioche Rolls: The Perfect Comfort Food
Welcome to my cozy corner of the culinary world! I’m thrilled you’re here, ready to dive into a delightful kitchen adventure with me. Today, we’re whipping up something special: Protein Cottage Cheese Brioche Rolls. Trust me, you’re going to want to keep this recipe close at hand, whether you’re hosting brunch, prepping for a snack, or looking to impress at your next family gathering. These rolls are soft, buttery, and packed with protein, making them not just a treat for your taste buds but also a wholesome addition to your week.
But let’s be real; what’s not to love about a warm roll straight out of the oven? The aroma wafting through your kitchen, the moment you pull those golden beauties out, and the satisfaction of breaking one open to reveal its fluffy interior. If you share my obsession with baked goods, you know exactly what I mean.
Personal Story
I’ll never forget the first time I attempted to bake brioche. I was a wide-eyed novice in my mom’s kitchen, filled with flour and questions. We were gearing up for our family Easter brunch, and my mom, ever the master baker, decided it was time for me to get my hands doughy and discover the magic of yeast. Alongside her, we tackled a classic brioche recipe, and I was absolutely captivated by how simple yet transformative this dough could be. It quickly became a cherished bonding moment between us—one filled with laughter, flour fights, and lots of taste-testing.
Fast forward to today, I’ve incorporated a healthy twist into that cherished recipe by using cottage cheese, adding a punch of protein and a deliciously unique texture. So, whenever I bake these rolls, it feels like I’m wrapping my memories in warm, fluffy layers of nostalgia.
Ingredients
Before we roll up our sleeves and get started, let’s talk ingredients! Here’s what you’ll need:
-
All-Purpose Flour (4 cups): The backbone of any bread recipe, this flour offers the right balance of protein for structure. If you’re looking for a whole grain option, feel free to substitute up to half with whole wheat flour for a nuttier flavor.
-
Cottage Cheese (1 cup): This creamy gem brings moisture and a protein boost to the rolls. Use low-fat or full-fat depending on your preference, and for a vegan option, try silken tofu blended until smooth.
-
Butter (1/2 cup): For that classic brioche richness, butter is key! You could substitute with coconut oil or a plant-based butter to make these dairy-free, but I recommend sticking with real butter for the ultimate flavor.
-
Sugar (1/4 cup): This sweetener helps activate the yeast and balances the flavors. You could swap it with honey or maple syrup; just remember to adjust your liquids accordingly.
-
Yeast (2 1/4 teaspoons, active dry): The magic that makes your rolls rise! Make sure your yeast is fresh for the best results. If you use instant yeast, you can toss it straight into the dry ingredients without proofing.
-
Salt (1 teaspoon): Essential for enhancing flavors. Don’t skip this step!
-
Eggs (2 large): These act as binding agents and add a beautiful golden color. For an egg-free alternative, try using flax eggs (1 tbsp ground flaxseed mixed with 2.5 tbsp water per egg) as a perfect replacer.
-
Milk (1/2 cup): This adds a lovely richness and helps the dough come together. Any milk—dairy or non-dairy—can work here!
Step-by-Step Instructions
Alright, let’s get on with the star of the show—baking those lovelies!
-
Activate Your Yeast: Start by combining the yeast, warm milk, and a teaspoon of sugar in a small bowl. Let this mixture sit for about 5-10 minutes until it bubbles and becomes frothy. This means your yeast is alive and kicking—get excited!
-
Make the Dough: In a large mixing bowl, combine the flour, remaining sugar, and salt. Give it a good whisk to blend everything together. Create a well in the center and add cottage cheese, butter, eggs, and the frothy yeast mixture.
-
Mix It Up: Use your hands or a spatula to mix everything until a shaggy dough forms. It’s okay if the dough seems sticky at first; that’s all part of the brioche magic.
-
Knead: Transfer the dough to a floured surface and knead for about 8-10 minutes until smooth and elastic. If it gets too sticky, sprinkle a little more flour as needed. An easy trick to know you’re done is to do the “windowpane test”—pull a small piece of dough; it should stretch without breaking!
-
First Rise: Place the kneaded dough into a greased bowl, cover it with plastic wrap or a damp cloth, and let it rise in a warm place for about 1-2 hours, or until it has doubled in size. This is when the real magic happens!
-
Shape the Rolls: Once risen, punch down the dough to release the air. Divide it into 12 equal pieces. Roll each piece into a ball and place them in a greased baking dish, leaving a little room for them to expand.
-
Second Rise: Cover the dish and let the rolls rise for another 30-60 minutes. They should puff up nicely, ready to bake!
-
Preheat and Prepare: Preheat your oven to 375°F (190°C). Brush the tops of the rolls with an egg wash (one egg beaten with a tablespoon of water) to give them that gorgeous golden finish.
-
Bake: Pop the rolls into the oven and bake for 20-25 minutes, or until they are golden brown and sound hollow when tapped on the bottom. Your kitchen is about to smell heavenly!
-
Cool and Serve: Remove the rolls from the oven and allow them to cool slightly before transferring them to a wire rack. These beauties are best served warm!
Serving Suggestions
To serve these Protein Cottage Cheese Brioche Rolls, simply place them on a rustic wooden board with a small dish of softened butter or your favorite jam for spreading. You can enjoy them fresh out of the oven as a side to your breakfast, or you can turn them into delightful sliders or sandwiches!
Recipe Variations
-
Herbed Cheese Rolls: Add a tablespoon of your favorite herbs like rosemary or thyme to the dough for a savory twist.
-
Sweet Cinnamon Rolls: Before shaping, sprinkle brown sugar and cinnamon over the dough, roll it up, and slice to create mouth-watering cinnamon rolls!
-
Cheddar & Chive Brioche Rolls: Mix in shredded sharp cheddar cheese and chopped chives for a tangy, flavorful addition.
-
Spiced Pumpkin Rolls: In the fall, stir in some pumpkin puree and spices like nutmeg and allspice for a seasonal delight that’s perfect for autumn gatherings.
-
Chocolate Chip Brioche Rolls: Fold in mini chocolate chips for a sweet treat that’ll please dessert lovers of all ages!
Chef’s Notes
Baking these rolls has become one of my favorite weekend rituals. There’s something so satisfying about watching them rise, and the best part? The opportunity to share them with friends and family, creating memories around the table. The recipe has evolved over time as I’ve incorporated different flavors, but the joy remains the same. Just promise me you’ll save a few rolls to enjoy with a cup of coffee or tea!
FAQs and Troubleshooting
-
What if my dough isn’t rising?
- If your dough isn’t rising, it could be that your yeast is no longer active. Check the expiration date and ensure your milk was warm (not hot) when you added it.
-
Can I make this dough ahead of time?
- Absolutely! You can make the dough the night before and let it rise in the fridge. Just remember to bring it back to room temperature before baking.
-
Why are my rolls dense?
- Dense rolls can come from over-kneading or not enough rising time. Pay attention to the texture of your dough, and allow it enough time to rise.
-
How do I store leftover rolls?
- Store any leftover rolls in an airtight container at room temperature for up to 2 days. They can also be frozen for longer shelf life; just wrap them tightly in plastic wrap and store in a freezer bag.
Nutritional Info
While exact nutritional information can vary, you can expect these Protein Cottage Cheese Brioche Rolls to be a wholesome addition to your meal. Each roll has approximately 150 calories, with a good amount of protein thanks to the cottage cheese and eggs, accompanied by healthy fats from butter.
So there you have it, food lovers! My journey with these Protein Cottage Cheese Brioche Rolls brings back fond memories while offering a tasty treat for everyone. I hope you enjoy baking (and eating) these as much as I do! Let me know in the comments how your rolls turned out or what delicious variations you’ve tried! Happy baking!
Print
Protein Cottage Cheese Brioche Rolls
- Total Time: 45 minutes
- Yield: 12 servings 1x
- Diet: Vegetarian
Description
Deliciously soft and buttery brioche rolls packed with protein from cottage cheese.
Ingredients
- 4 cups All-Purpose Flour
- 1 cup Cottage Cheese
- 1/2 cup Butter
- 1/4 cup Sugar
- 2 1/4 teaspoons Yeast (active dry)
- 1 teaspoon Salt
- 2 large Eggs
- 1/2 cup Milk
Instructions
- Activate your yeast: Combine the yeast, warm milk, and a teaspoon of sugar in a small bowl. Let it sit for about 5-10 minutes until frothy.
- Make the dough: In a large bowl, combine flour, remaining sugar, and salt. Create a well and add cottage cheese, butter, eggs, and the yeast mixture.
- Mix it up: Use your hands to mix everything until a shaggy dough forms.
- Knead: Transfer the dough to a floured surface and knead for 8-10 minutes until smooth and elastic.
- First rise: Place the dough in a greased bowl, cover, and let rise for 1-2 hours until doubled in size.
- Shape the rolls: Punch down the dough, divide into 12 pieces, and roll each into a ball.
- Second rise: Cover and let the rolls rise for another 30-60 minutes.
- Preheat the oven to 375°F (190°C) and prepare an egg wash.
- Bake: Bake for 20-25 minutes until golden brown.
- Cool and serve: Allow to cool slightly then transfer to a wire rack.
Notes
These rolls are best served warm with softened butter or jam. They can also be used for sliders or sandwiches.
- Prep Time: 15 minutes
- Cook Time: 25 minutes
- Category: Bread
- Method: Baking
- Cuisine: French
Nutrition
- Serving Size: 1 roll
- Calories: 150
- Sugar: 3g
- Sodium: 200mg
- Fat: 7g
- Saturated Fat: 4g
- Unsaturated Fat: 3g
- Trans Fat: 0g
- Carbohydrates: 18g
- Fiber: 1g
- Protein: 5g
- Cholesterol: 35mg
Keywords: brioche, rolls, protein, cottage cheese, baking
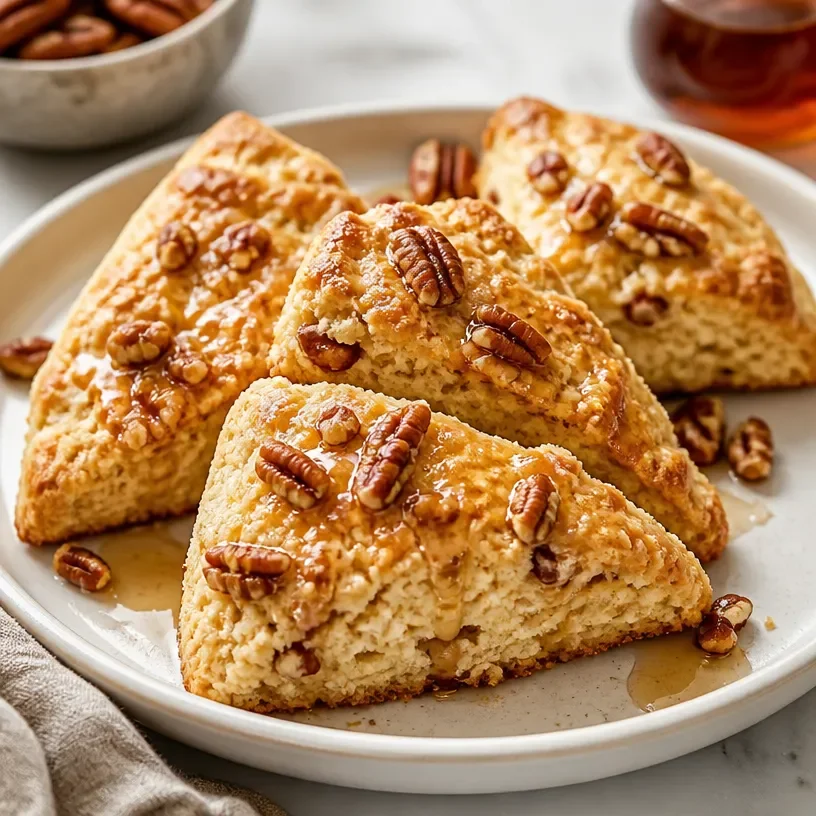
Protein Cottage Cheese Maple Pecan Scones
Protein Cottage Cheese Maple Pecan Scones: A Cozy Kitchen Delight
Welcome to my kitchen, where I’m thrilled to share one of my absolute favorite recipes with you — Protein Cottage Cheese Maple Pecan Scones! There’s something just so magical about the combination of cozy flavors and delightful textures that scones bring to the table. They’re the perfect treat for a sunny Sunday brunch or even an afternoon pick-me-up. Imagine the smell of fresh scones wafting through your home, enticing everyone to gather around the table. Ah, the memories!
Scones, in all their glory, have been a staple in my kitchen for years. I remember the first time I made them. It was a crisp fall morning, and the leaves were turning golden outside. I was in my small kitchen, trying to avoid the baking disaster that seemed to haunt me in my early days. Out came the flour, sugar, and butter, and soon enough, I had a beautiful batch of scones. As they baked, friends stopped by, drawn in by the irresistible aroma. We ended up sharing those warm, crumbly treats over cups of steaming tea. From that moment on, scones became a symbol of connection and warmth, reminding me that cooking is not just about feeding people — it’s about bringing joy and togetherness.
Today’s scone recipe features protein-packed cottage cheese, which not only enhances the nutritional value but also gives the scones that moist and tender crumb we all love. Add in the sweetness of pure maple syrup and the crunch of pecans, and you’ve got a delicious variation that might just replace your morning muffin routine. Are you ready to embark on this culinary adventure? Let’s get started!
Personal Story
In the early days of my cooking journey, I had a few favorite go-to recipes. Among them was a classic scone recipe passed down from my grandmother. It was her secret weapon for any family gathering. I remember how she would gather us as kids in the kitchen, and we would take turns mixing, folding, and shaping the dough into the charming little triangles we all loved. It was never just about the scones; it was about the stories we’d share, the laughter that would fill the air, and the love that went into every perfectly crafted bite.
Years later, while living on my own and trying to adapt my recipes to fit my busy lifestyle, I found myself experimenting with ingredients to create healthier versions of our family favorites. That’s when I discovered the joy of cottage cheese in baking. It adds protein, moisture, and a delightful tang that elevates standard scones into something truly special.
And as I perfected my Protein Cottage Cheese Maple Pecan Scones, I couldn’t help but think of those afternoons with my grandmother. With every bite, I’m transported back to those moments filled with sweet nostalgia. Let’s make some memories together in your kitchen!
Ingredients
Here’s what you’ll need to create these delightful scones:
-
2 cups all-purpose flour: The base of your scone. For a gluten-free option, try using a 1:1 gluten-free baking blend.
-
1 tbsp baking powder: This will give your scones that lovely lift. Make sure it’s fresh for best results.
-
1/4 tsp salt: Just enough to enhance the flavors—don’t skip it!
-
1/4 cup maple syrup: Use pure maple syrup for a rich sweetness and depth of flavor. Honey or agave nectar can be suitable substitutes.
-
1 cup cottage cheese: This will not only boost the protein but also keep things soft and tender. If you’re looking for a non-dairy option, consider using a plant-based yogurt, though it will change the flavor slightly.
-
1/2 cup chopped pecans: These nuts add crunch and nuttiness. Feel free to replace them with walnuts or almonds if you prefer.
-
1/2 tsp vanilla extract: This subtly enhances the overall flavor of the scones. You can also use almond extract for a different twist.
-
1 large egg: For binding everything together. You can use a flax egg (1 tablespoon of ground flaxseed mixed with 2.5 tablespoons of water) if you want a vegan version.
-
1/4 cup cold butter, cut into small pieces: Butter is essential for that flaky texture, but you can substitute it with coconut oil or a vegan butter alternative for a dairy-free option.
With these ingredients, you’re just a few steps away from baking something special and deliciously cozy!
Step-by-Step Instructions
Ready to dive into the kitchen? Here’s how to create your Protein Cottage Cheese Maple Pecan Scones, step by step!
-
Preheat Your Oven:
Start by preheating your oven to 400°F (200°C). This ensures that your scones bake evenly and develop that perfect golden crust. -
Mix Dry Ingredients:
In a large mixing bowl, whisk together the flour, baking powder, and salt until evenly combined. This simple step is crucial to ensure that the baking powder is distributed well throughout the flour. Nobody likes an unevenly risen scone! -
Cut in the Butter:
Add the cold butter to the flour mixture. Using a pastry cutter or your fingertips, cut the butter into the flour until the mixture resembles coarse crumbs. This step creates those flaky layers we love! If you don’t have a pastry cutter, a fork will do the trick as well. -
Incorporate Wet Ingredients:
In another bowl, combine the cottage cheese, maple syrup, egg, and vanilla extract. Stir until smooth and well combined. The cottage cheese will add moisture to the scone dough while also providing that protein kick. -
Combine Mixtures:
Pour the wet ingredients into the dry ingredients. Gently fold the mixture with a spatula until just combined. It’s important not to overmix — a few lumps are totally okay! Overmixing can lead to tough scones, and nobody wants that. -
Add Pecans:
Fold in the chopped pecans gently. They’ll add delightful crunch and flavor. If you’re feeling adventurous, you could even toss in some chocolate chips! -
Shape the Dough:
Transfer the dough to a lightly floured surface and gently pat it into a circle about 1 inch thick. Use a sharp knife to cut the dough into 8 wedges, just like slicing a pizza. You can also use a biscuit cutter if you prefer round scones. -
Bake:
Place the scones onto a parchment-lined baking sheet, leaving some space between each one. Bake in your preheated oven for about 15-20 minutes or until they are lightly golden on top. The kitchen will smell heavenly, and you won’t be able to resist peeking as they bake! -
Cool and Serve:
Once baked, let the scones cool on a wire rack for a few minutes before serving — they’re best enjoyed warm!
Tips & Tricks: You can brush the tops with a little milk or an egg wash (1 egg mixed with 1 teaspoon of water) before baking for a lovely sheen. And remember, baking is about finding your groove, so feel free to adjust the flavors to match your taste!
Serving Suggestions
These Protein Cottage Cheese Maple Pecan Scones are perfect for any occasion. Serve them warm, straight from the oven, with a dollop of whipped cream or a pat of butter for a luxurious touch. A drizzle of additional maple syrup can elevate the sweetness, or pair them with your favorite jam for an extra burst of flavor. They also go well alongside a steaming cup of coffee, tea, or a glass of fresh juice. You can even slice them in half and turn them into delightful breakfast sandwiches with eggs and avocado!
Recipe Variations
The best part about cooking is the freedom to experiment! Here are a few fun twists to try with this recipe:
-
Cheddar & Chive Scones: Swap the pecans for shredded cheddar cheese and finely chopped chives for a savory version perfect for brunch.
-
Cranberry Orange Scones: Add dried cranberries and a teaspoon of orange zest to the dough for a delightful holiday treat.
-
Chocolate Chip: Craving something sweeter? Toss in some dark chocolate chips for a gooey, rich experience.
-
Spiced Apple: Fold in diced apples and a teaspoon of cinnamon for a fall-inspired twist.
-
Gluten-free version: Just substitute the all-purpose flour with a gluten-free blend and ensure your baking powder is gluten-free as well.
The possibilities are endless, so let your creativity shine!
Chef’s Notes
Every recipe has a story, and these scones are tied to many memories in my kitchen. Over the years, I’ve tweaked and adjusted this recipe to make it what it is today. From trying different sweeteners to experimenting with various add-ins, each iteration has been a delicious adventure. One of my funniest moments in the kitchen was forgetting the baking powder altogether and wondering why my scones turned out flat! The good news is they still tasted good — just not quite the fluffy texture I was aiming for! Every baking mishap has taught me something new, and I love sharing these experiences with you to remind you that it’s all part of the journey. Cooking is about enjoying the process and not stressing over perfection.
FAQs and Troubleshooting
-
Why are my scones dense?
Dense scones can result from overmixing the dough or using too much flour. Be gentle and just mix until combined for the best results. -
Can I prepare the dough ahead of time?
Absolutely! You can prepare the dough, cut the scones, and freeze them on a baking sheet. Once they’re solid, transfer them to a freezer bag and bake them straight from frozen. Just add a couple of extra minutes to the baking time. -
How do I store leftover scones?
Store cooled scones in an airtight container at room temperature for up to 3 days. For longer storage, freeze them and reheat in the oven before serving. -
My scones turned out too dry. What happened?
This can occur if they were overbaked or if there wasn’t enough moisture in the dough. Always check them a couple of minutes before the suggested baking time.
Cooking is as much about exploring and learning as it is about feeding our loved ones. So, roll up your sleeves, embrace the mess, and enjoy the process.
Nutritional Info
- Serving Size: 1 scone
- Calories: 175
- Protein: 6g
- Fat: 8g
- Carbs: 22g
- Fiber: 1g
(Nutritional values are estimates and may vary based on specific ingredients used.)
I hope you feel inspired to dive into this delightful recipe. Remember, whether you’re baking for yourself or feeding a crowd, the joy is in the journey and the connections made around the table. Happy baking!
Print
Protein Cottage Cheese Maple Pecan Scones
- Total Time: 35 minutes
- Yield: 8 servings 1x
- Diet: Vegetarian
Description
Delightfully moist scones packed with protein from cottage cheese, sweetened with maple syrup and enhanced with crunchy pecans.
Ingredients
- 2 cups all-purpose flour
- 1 tbsp baking powder
- 1/4 tsp salt
- 1/4 cup maple syrup
- 1 cup cottage cheese
- 1/2 cup chopped pecans
- 1/2 tsp vanilla extract
- 1 large egg
- 1/4 cup cold butter, cut into small pieces
Instructions
- Preheat your oven to 400°F (200°C).
- Mix together the flour, baking powder, and salt in a large bowl.
- Cut in the cold butter until the mixture resembles coarse crumbs.
- Incorporate the cottage cheese, maple syrup, egg, and vanilla extract in a separate bowl.
- Combine the wet ingredients with the dry ingredients until just mixed.
- Add the chopped pecans and fold gently.
- Shape the dough into a circle about 1 inch thick and cut into 8 wedges.
- Bake for 15-20 minutes or until lightly golden.
- Cool on a wire rack before serving.
Notes
Brush tops with milk or egg wash before baking for a lovely sheen.
- Prep Time: 15 minutes
- Cook Time: 20 minutes
- Category: Breakfast
- Method: Baking
- Cuisine: American
Nutrition
- Serving Size: 1 scone
- Calories: 175
- Sugar: 6g
- Sodium: 200mg
- Fat: 8g
- Saturated Fat: 4g
- Unsaturated Fat: 4g
- Trans Fat: 0g
- Carbohydrates: 22g
- Fiber: 1g
- Protein: 6g
- Cholesterol: 35mg
Keywords: scones, cottage cheese, maple syrup, pecans, breakfast

Protein Cottage Cheese Pumpkin Muffins
Embrace Fall with Protein-Packed Cottage Cheese Pumpkin Muffins
Welcome to my cozy kitchen, dear friends! As the leaves start to turn golden and the air carries that familiar crispness of fall, my heart does a little happy dance. There’s something so comforting about this season—the air gets cooler, sweaters come out of hiding, and baking becomes the top priority on my to-do list. Today, I’m thrilled to share a recipe that perfectly blends all the warm flavors of fall into portable, delectable bites: Protein Cottage Cheese Pumpkin Muffins.
These muffins are not just a treat for your taste buds—they’re also a satisfying way to fuel your day. Whether enjoyed as a post-workout snack, a hearty breakfast, or a cozy afternoon pick-me-up, they encapsulate everything I love about fall: warmth, comfort, and a sprinkle of nostalgia. Let’s dive in!
A Slice of Nostalgia
I still remember the first time I had a pumpkin muffin. It was during a family road trip to a cozy little town known for its autumn festivals. We stumbled into a quaint café, where the owner, an elderly lady with a heartwarming smile, served us the fluffiest pumpkin muffins with a dollop of cream cheese frosting. With every bite, I was transported to my grandmother’s kitchen, where the aroma of freshly baked goods mingled with the laughter of family gathered around the table. Those moments stayed with me, and since then, I’ve been on a quest to recreate that same feeling in my own kitchen.
Fast forward a few years, and I’ve learned to incorporate healthier ingredients into my baking. Enter cottage cheese—a protein powerhouse that transforms these muffins into a filling, nutritious treat. So gear up, fellow food lovers! Let’s make these Protein Cottage Cheese Pumpkin Muffins that are bound to bring smiles to all your loved ones.
Ingredients
-
1 cup pumpkin puree: The star of the show! Rich in vitamins and minerals, and adds moisture. For a twist, you can substitute it with sweet potato puree!
-
1 cup cottage cheese: Packed with protein, this dairy delight makes the muffins airy and rich. If you’re dairy-free, try silken tofu for a similar texture.
-
2 eggs: These help bind the ingredients together. If you’re vegan, a flaxseed meal or chia seed mixture (1 tablespoon of seeds with 2.5 tablespoons of water) works like magic!
-
1/3 cup honey or maple syrup: For natural sweetness! Replace with agave syrup or coconut sugar if you prefer.
-
1 cup whole wheat flour: For a healthy dose of fiber. You can also swap it for oat flour or almond flour for gluten-free options.
-
1 teaspoon baking powder: This gives our muffins that perfect rise. Make sure it’s fresh for the best results!
-
1/2 teaspoon baking soda: Works in conjunction with the baking powder for a fluffy texture.
-
1 teaspoon ground cinnamon: A warm spice that reminds me of cozy nights by the fire. Try adding nutmeg or pumpkin spice for a flavor twist!
-
1/2 teaspoon salt: Balances sweetness and enhances flavors.
-
1/2 cup walnuts or pecans (optional): For added crunch. Feel free to omit if you’re looking for a nut-free option!
Step-by-Step Instructions
-
Preheat your oven: First things first, let’s get that oven preheated to 350°F (175°C). A well-warmed oven ensures your muffins bake evenly with that delightful golden hue.
-
Combine wet ingredients: In a large mixing bowl, whisk together the pumpkin puree, cottage cheese, eggs, and honey/maple syrup. Take a moment to appreciate the beautiful colors—it’s like autumn in a bowl! Be sure to mix well until you achieve a smooth consistency. This is where the magic starts!
-
Mix dry ingredients: In a separate bowl, whisk the flour, baking powder, baking soda, cinnamon, and salt. Whisking ensures that the leavening agents are evenly distributed throughout the flour, leading to evenly risen muffins.
-
Combine wet and dry mixtures: Gently fold the dry ingredients into the wet mixture using a spatula. Be careful not to over-mix—just until it’s barely combined. A few lumps are perfectly fine; they will disappear during baking!
-
Add the nuts: If you’re opting for walnuts or pecans, now’s the time to fold them in. This adds a wonderful texture and nuttiness that contrasts beautifully with the soft muffin base.
-
Scoop into muffin tin: Line a muffin tin with paper liners or grease it lightly. Using a scoop or ladle, fill each muffin cup about three-quarters full. This gives them room to rise without overflowing—nobody likes muffin overflow!
-
Bake to perfection: Place your muffin tin in the preheated oven and bake for about 20-25 minutes. Your home will soon be filled with delightful pumpkin aromas that’ll have everyone flocking to the kitchen! Test doneness by inserting a toothpick into the center—if it comes out clean, they’re ready.
-
Cool and enjoy: Once baked, let the muffins cool in the tin for about 5 minutes before transferring them to a wire rack. Allowing them to cool prevents sogginess and preserves that lovely texture!
Serving Suggestions
These muffins are fabulous on their own, but if you want to elevate the experience, serve them warm with a smear of cream cheese or your favorite nut butter. Pair them with a cup of spiced chai tea or a warm latte for a cozy brunch vibe. You could even arrange them on a rustic wooden platter and sprinkle a little cinnamon on top for that Pinterest-perfect presentation!
Recipe Variations
- Chocolate Chip Cottage Cheese Pumpkin Muffins: Add a cup of dark chocolate chips to the batter for a sweet twist!
- Pumpkin Spice Latte Muffins: Add a shot of espresso or a tablespoon of instant coffee granules to the wet mix for a caffeinated kick!
- Banana-Pumpkin Hybrid: Swap half of the pumpkin puree for ripe mashed bananas for extra moistness and a buttery flavor.
- Nut-Free Version: Omit the nuts and add a handful of dried cranberries or chocolate pieces for a fruity bite!
- Savory Spin: Replace the cinnamon with savory spices like cumin and add shredded cheese for a delightful cheese muffin!
Chef’s Notes
Cooking is often a messy adventure in my kitchen, and that’s just how I like it! The best stories often come from kitchen mishaps. I once had a batch of pumpkin muffins that overflowed all over the oven—oh, what a sight! After a good cleanup, I learned to be more mindful about filling the muffin cups and now keep an eye on them in the oven, just in case. Every recipe has a personality of its own, and these muffins have taught me to embrace messiness with grace.
Over the years, I’ve also adjusted this recipe to suit the preferences of my friends and family. It has evolved from a simple treat to something that can accommodate a variety of dietary needs!
FAQs and Troubleshooting
Q: Why are my muffins dense?
A: Dense muffins can be a sign of overmixing the batter. Remember, mix just until combined for the fluffiest muffins!
Q: Can I use fresh pumpkin instead of canned puree?
A: Absolutely! Just make sure to roast or steam the pumpkin and then puree it until smooth.
Q: How do I store leftover muffins?
A: Let them cool completely, then store in an airtight container at room temperature for up to 3 days, or freeze for up to a month.
Q: Can I replace the flour with a gluten-free option?
A: Yes! You can use a 1:1 gluten-free flour blend to replace the whole wheat flour, and it should work just fine.
Nutritional Info (per muffin, approx.)
- Calories: 150
- Protein: 6g
- Carbohydrates: 22g
- Fat: 5g
- Fiber: 3g
- Sugar: 5g
These Protein Cottage Cheese Pumpkin Muffins are more than just a treat; they’re a cozy reminder that cooking can be a delightful journey filled with stories, creativity, and love. I hope you find joy in making them as much as I do! Happy baking, friends! 🍂🥯
Print
Protein Cottage Cheese Pumpkin Muffins
- Total Time: 40 minutes
- Yield: 12 muffins 1x
- Diet: Vegetarian
Description
These protein-packed pumpkin muffins are perfect for a hearty breakfast or snack, combining cozy fall flavors with nutritious ingredients.
Ingredients
- 1 cup pumpkin puree
- 1 cup cottage cheese
- 2 eggs
- 1/3 cup honey or maple syrup
- 1 cup whole wheat flour
- 1 teaspoon baking powder
- 1/2 teaspoon baking soda
- 1 teaspoon ground cinnamon
- 1/2 teaspoon salt
- 1/2 cup walnuts or pecans (optional)
Instructions
- Preheat your oven to 350°F (175°C).
- Combine the pumpkin puree, cottage cheese, eggs, and honey/maple syrup in a large mixing bowl.
- Mix the flour, baking powder, baking soda, cinnamon, and salt in a separate bowl.
- Combine the dry ingredients into the wet mixture gently.
- Add the nuts if using, folding them in carefully.
- Scoop the batter into muffin cups, filling each about three-quarters full.
- Bake for about 20-25 minutes until a toothpick comes out clean.
- Cool for 5 minutes in the tin before transferring to a wire rack.
Notes
Serve warm with cream cheese or nut butter. Great for brunch or as a snack!
- Prep Time: 15 minutes
- Cook Time: 25 minutes
- Category: Breakfast
- Method: Baking
- Cuisine: American
Nutrition
- Serving Size: 1 muffin
- Calories: 150
- Sugar: 5g
- Sodium: 200mg
- Fat: 5g
- Saturated Fat: 1g
- Unsaturated Fat: 4g
- Trans Fat: 0g
- Carbohydrates: 22g
- Fiber: 3g
- Protein: 6g
- Cholesterol: 30mg
Keywords: pumpkin muffins, healthy muffins, cottage cheese muffins
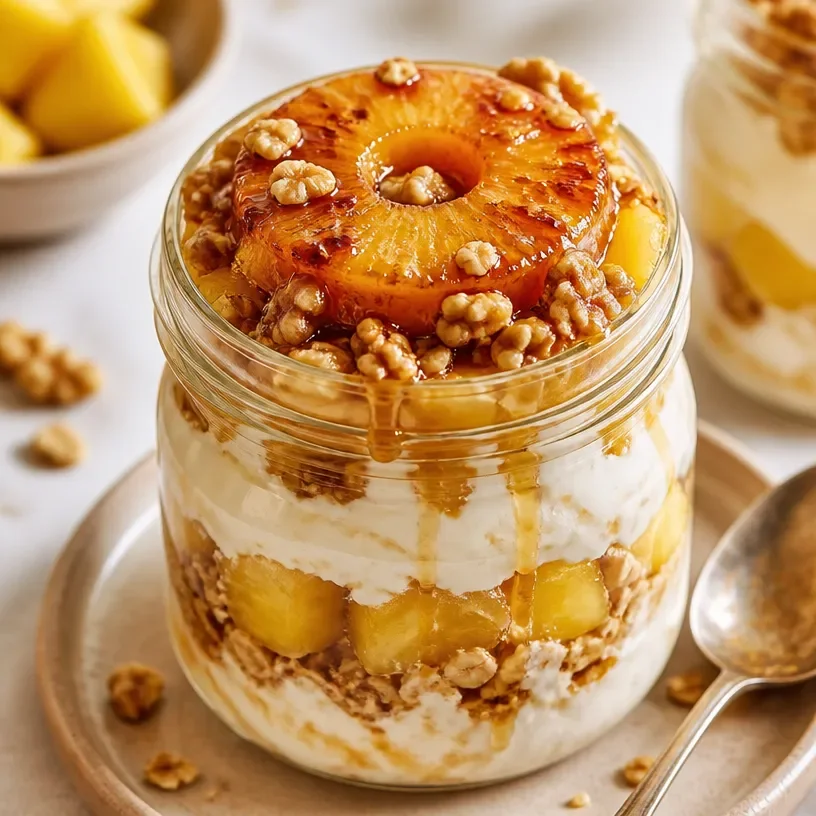
Ingredient Protein Pineapple Upside-Down Cake Jars
A Sweet Twist on Tradition: Protein Pineapple Upside-Down Cake Jars
Welcome to my kitchen, friends! Today, we’re whipping up a delightful treat that’s just as nostalgic as it is modern—a Protein Pineapple Upside-Down Cake Jar! As someone who loves to blend classic flavors with a contemporary twist, this recipe strikes the perfect balance between indulgence and health. If you’re a fan of moist, fruity desserts but also want a protein-packed punch, then you’ve landed in the right spot.
Growing up, my family had a tradition of making pineapple upside-down cake during special celebrations. I can vividly remember my grandmother standing in front of the oven, peering through the glass, her apron dusted with flour and smiles. Each cake emerged with a golden, caramelized pineapple topping—a sweet aroma that filled our home. We’d gather around the dining table, forks at the ready, digging into the delectable layers of cake and fruit, laughter echoing with each bite. This dessert was more than just a treat; it was a way to create memories, bond, and share our love of food.
Fast forward to today, and while I still cherish those childhood memories, I wanted to create a version that aligns with my current lifestyle—a dessert that could double as a snack or a post-workout treat. Enter the Protein Pineapple Upside-Down Cake Jar! This updated version keeps the nostalgia intact while adding a protein boost that won’t make you feel guilty. Plus, with the charming little jars, you can easily make portions for everyone. Let’s get to it!
Personal Story
One of the vivid memories I have associated with pineapple upside-down cake was my first attempt at making it solo. I was around twelve years old, and my mom was busy in the garden, tending to her flowers. Feeling a surge of independence, I decided it was the perfect time to surprise her with a homemade cake. While I followed her handwritten recipe, I accidentally swapped the sugar and salt—whoops! The look on my family’s faces when they tasted my creation was priceless. To this day, we laugh about that salty cake, but it taught me a valuable lesson about paying attention to detail in the kitchen. In essence, cooking is about experimenting, making mistakes, and learning—just like life. So, let’s avoid that salty scenario together and dive into this delicious Protein Pineapple Upside-Down Cake Jar, shall we?
Ingredients
Here’s what you’ll need for your Protein Pineapple Upside-Down Cake Jar:
-
Canned Pineapple Slices
The classic star of the dish, pineapple adds a juicy sweetness to your cake! Opt for canned in juice (not syrup) to keep it healthier. Substitution tips: fresh pineapple works wonderfully if you prefer to go fresh. -
Brown Sugar
This gives that signature caramel flavor when it melts with the pineapple. You can substitute it with coconut sugar for a healthier option. Tip: lightly pack it into your measuring cup for extra richness! -
Unsalted Butter
A must-have for moist, flavorful cake. If you’re watching your dairy intake, try using a vegan butter substitute or unsweetened applesauce. Insight: using room temperature butter helps it blend better with the sugar. -
Self-Rising Flour
This flour already contains baking powder and salt, making it a convenient choice. For a gluten-free option, replace it with oat flour or a gluten-free all-purpose blend. Tip: sift the flour for lightness! -
Protein Powder
The star of our healthy twist! You can use whey protein or your favorite plant-based powder. Insight: flavors like vanilla or coconut work best! -
Eggs
These keep the cake moist and help it rise. For a vegan option, applesauce, mashed bananas, or flax eggs can do the trick! Chef’s tip: make sure they’re at room temperature for better mixing! -
Vanilla Extract
Enhances the overall flavor profile. Use pure extract if possible, or consider almond extract for a nutty twist. -
Cinnamon
A savory addition that complements the sweetness of the pineapple. Feel free to add more if you love that warm spice! -
Greek Yogurt (optional)
This adds protein and moisture to the cake. You can substitute it with any plain yogurt or even silken tofu for a vegan alternative.
Step-by-Step Instructions
Step 1: Prepare the Jars
Before we dive into mixing, let’s set the stage! Preheat your oven to 350°F (175°C). While that’s warming up, grab your cute glass jars—these will be our charming individual servings. Lightly butter the insides of each jar and sprinkle a bit of brown sugar at the bottom. This forms a delightful caramel layer once the cakes bake!
Tip: If you’re lucky enough to have mini cast iron skillets, they could work perfectly for an individual serving too!
Step 2: Arrange the Pineapple
After placing the sugar and butter, lay one pineapple slice on top, or if you’re feeling fancy, cut the slices into smaller pieces and arrange them artfully. You can even throw in some maraschino cherries for an extra nostalgic flair!
Pro tip: Feel free to add a touch of coconut flakes for some tropical vibes.
Step 3: Mix the Batter
In a mixing bowl, cream together the butter and brown sugar until fluffy. This usually takes about 3-5 minutes with an electric mixer. Add in your eggs and vanilla extract, mixing until fully combined.
Chef’s hack: You can always substitute one egg with ¼ cup of Greek yogurt for added moisture!
Step 4: Dry Ingredients Unite!
In another bowl, whisk together the self-rising flour, protein powder, cinnamon, and a pinch of salt. Gradually fold this dry mixture into the wet ingredients. Be careful not to overmix here! You want it all combined but don’t mind a few lumps; they will bake out perfectly.
Note: If your batter feels too thick, mix in a splash of milk (dairy or plant-based) to achieve the desired consistency.
Step 5: Fill the Jars
Now, it’s time to scoop the batter into your prepared jars—about two-thirds full should do (remember, they need room to rise!).
Tip: Using an ice cream scoop can make this part a breeze!
Step 6: Bake Until Perfect
Pop those jars in the oven and bake for about 20–25 minutes or until a toothpick inserted comes out clean. The smell that fills your kitchen during this time will have you tapping your toes in excitement!
Note: Keep an eye on them to avoid overbaking; we want moist, fluffy goodness!
Step 7: Cool and Serve
Once baked, let the jars cool for about 10 minutes. Carefully run a knife around the edge of the cake, then flip it over to reveal the gorgeous caramelized pineapple topping. If the cake doesn’t gently release, give it a nudge with a spoon.
Pro chef tip: Serve warm with a dollop of Greek yogurt or a scoop of your favorite ice cream on top for a wonderful indulgence!
Serving Suggestions
These Protein Pineapple Upside-Down Cake Jars are beautiful on their own, but presentation is key! Serve them directly in the jars for a rustic vibe. You can add a sprig of fresh mint on top for a pop of color. Or, if you want to take it a step further, a drizzle of honey or a sprinkle of toasted coconut will elevate the look and flavor!
Recipe Variations
- Coconut Cream Twist: Mix shredded coconut into both the batter and as a topping for a tropical flair!
- Berry Blend: Swap the pineapple for mixed berries—think blueberries, strawberries, and raspberries for a twist on a classic.
- Spiced Variations: Add nutmeg or cardamom along with the cinnamon for a more complex flavor profile.
- Sugar-Free Option: Use stevia or monk fruit sweetener in place of brown sugar for a lower-calorie treat.
- Nutty Goodness: Toss in some walnut or pecan pieces for added crunch and nutrition.
Chef’s Notes
This recipe has a special place in my heart, not just for its nostalgic flavors but because it represents a journey—a blend of my childhood love for cooking with my current focus on health. The idea of turning a traditional dessert into something more nourishing is a reflection of growth and creativity in the kitchen. Remember, the best part about cooking is making it your own. If you find yourself having too many missed moments with measuring cups or flour dust, know that those are the stories worth telling around the table!
FAQs and Troubleshooting
Q1: My cake is too dense, what went wrong?
A: Dense cakes can occur if the batter is overmixed or if there’s too much flour. Be sure to gently fold the flour into the wet ingredients and measure accurately.
Q2: How can I make these jars ahead of time?
A: You can prepare the batter the night before and store it in the fridge. Fill the jars just before baking for the freshest outcome.
Q3: What if my jars crack in the oven?
A: Make sure you avoid sudden temperature changes—never place a cold jar in a hot oven! Let them come to room temperature to prevent shock.
Q4: How do I store leftovers?
A: These cakes can be stored in an airtight container in the refrigerator for up to three days. Simply reheat them for a quick treat any time!
Nutritional Info
While specific nutritional information will depend on your exact ingredients and measurements, here’s a general rundown of what you can expect:
- Calories: Approximately 180 per serving (1 jar)
- Protein: About 10-15g (depending on the protein powder used)
- Carbs: Roughly 25g
- Fats: Around 6g
Thank you for joining me on this delightful journey into the world of Protein Pineapple Upside-Down Cake Jars! With a touch of nostalgia and a dose of modern creativity, I hope this recipe inspires you to create your own memories in the kitchen. Whether for a brunch with friends or a special treat for yourself, these little jars are sure to bring joy. Happy baking! 🍍✨
Print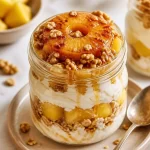
Protein Pineapple Upside-Down Cake Jars
- Total Time: 40 minutes
- Yield: 4 servings
- Diet: Gluten-Free, Vegetarian
Description
A delightful and healthy twist on the classic pineapple upside-down cake, these protein-packed cake jars are perfect for a nostalgic treat.
Ingredients
- Canned Pineapple Slices
- Brown Sugar
- Unsalted Butter
- Self-Rising Flour
- Protein Powder
- Eggs
- Vanilla Extract
- Cinnamon
- Greek Yogurt (optional)
Instructions
- Preheat your oven to 350°F (175°C) and butter the insides of glass jars with brown sugar at the bottom.
- Arrange the pineapple slices on top of the butter and sugar in the jars.
- Cream together the butter and brown sugar until fluffy, then add the eggs and vanilla extract.
- Whisk the self-rising flour, protein powder, cinnamon, and salt in another bowl, then fold it into the wet ingredients.
- Scoop the batter into the jars, filling them about two-thirds full.
- Bake for 20-25 minutes, or until a toothpick comes out clean.
- Cool the jars for 10 minutes before flipping them over to serve.
Notes
Serve warm with Greek yogurt or ice cream for an indulgent touch.
- Prep Time: 15 minutes
- Cook Time: 25 minutes
- Category: Dessert
- Method: Baking
- Cuisine: American
Nutrition
- Serving Size: 1 serving
- Calories: 180
- Sugar: 10g
- Sodium: 200mg
- Fat: 6g
- Saturated Fat: 3g
- Unsaturated Fat: 3g
- Trans Fat: 0g
- Carbohydrates: 25g
- Fiber: 2g
- Protein: 15g
- Cholesterol: 30mg
Keywords: pineapple upside-down cake, protein dessert, healthy baking, nostalgic dessert
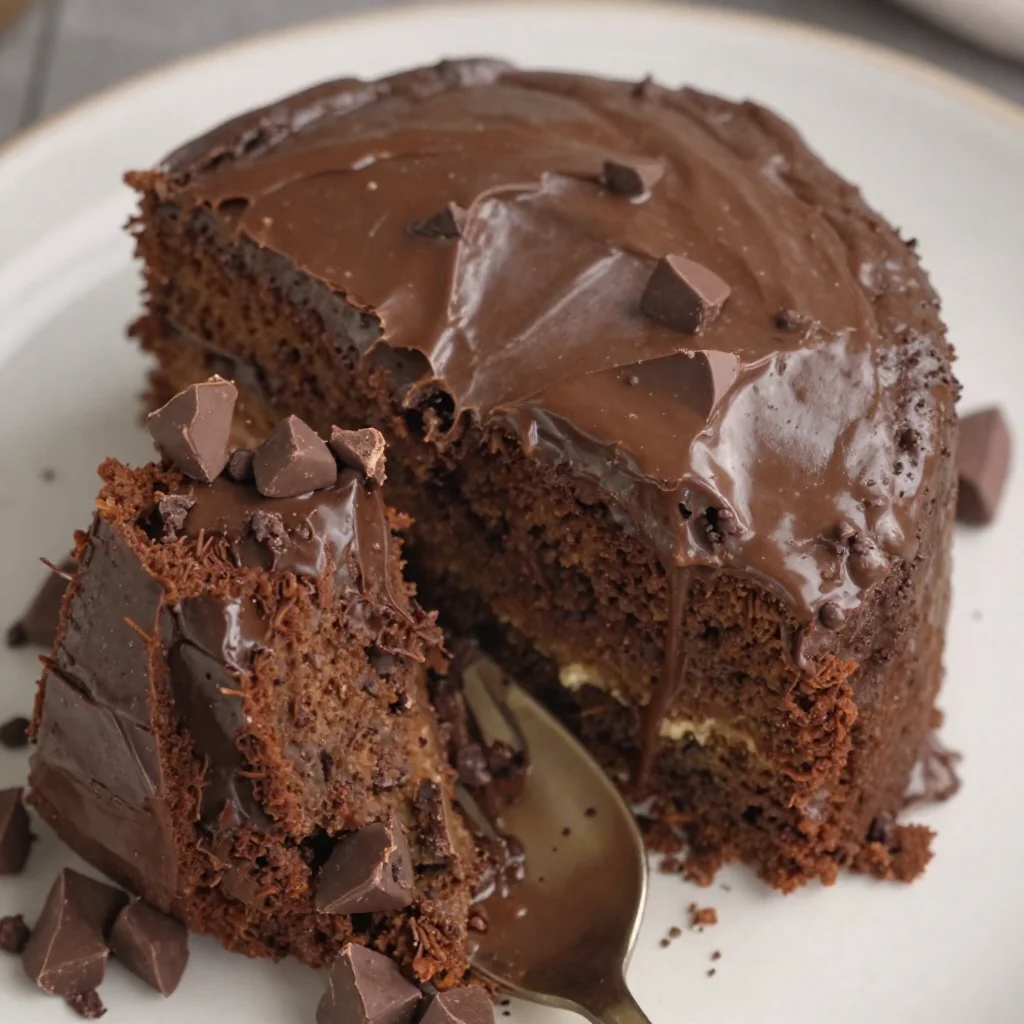
Gluten Free Chocolate Zucchini Cake
Gluten Free Chocolate Zucchini Cake: A Sweet Slice of Nostalgia
Welcome to my cozy kitchen, where the delightful aroma of chocolate and warm spices creates a comforting embrace. Today, we’re diving into a recipe that’s not just a treat for the taste buds but also resonates with fond memories—chocolate zucchini cake! Yes, you heard that right! Combining the indulgent richness of chocolate with the subtle earthiness of zucchini results in a cake that’s incredibly moist, utterly delicious, and surprisingly healthy.
You know, as a kid, my summers were filled with visits to my grandmother’s garden, where she would grow the most beautiful zucchini. I remember the towering plants, their big green leaves sprawled out, and how I would sneak bites of warm, freshly-picked zucchini while spattering dirt on my knees. My grandmother was a wizard in the kitchen. Every time she’d whip up her famous chocolate zucchini cake, it was like magic! Friends and family would gather, laughter filling the air as the cake disappeared faster than you could say “yum.”
That’s why I love sharing this recipe with you—it’s packed with nostalgia, love, and a great story. Plus, it’s an amazing way to use up those abundant summer zucchinis that seem to multiply overnight. Let’s get our aprons on and embrace the joy of cooking something scrumptious from scratch—because in my kitchen, every recipe is a celebration!
Ingredients
Let’s gather everything we need to make this heavenly chocolate zucchini cake! Each ingredient plays a crucial role, so pay close attention:
-
2 cups grated zucchini: Roughly one medium-sized zucchini is perfect! Zucchini adds moisture and a subtle flavor without overpowering the chocolate. You can substitute with shredded carrots for a different twist.
-
1 cup granulated sugar: This sweetener provides that delightful sugar rush we all crave. If you’re looking for a healthier alternative, coconut sugar works nicely.
-
¾ cup unsweetened cocoa powder: The star of the show! This rich cocoa not only gives the cake its decadent color but also its deep chocolate flavor. If you want a less intense chocolatey taste, you might reduce it to ½ cup.
-
1 cup gluten-free all-purpose flour: This blend usually contains a mix of flours and starches which mimic traditional flour. You can create your own blend using almond flour, rice flour, and tapioca starch if you prefer.
-
1/2 teaspoon baking soda: This reacts with the acidic components, giving the cake a nice rise. Make sure it’s fresh for the best results! Baking powder can be used as a substitute, but you’ll need to adjust the quantity slightly.
-
1/2 teaspoon baking powder: Like baking soda, it helps the cake rise, making it fluffy and light.
-
1/4 teaspoon salt: A pinch of salt enhances all flavors while balancing out the sweetness. I recommend using sea salt for a lovely bite.
-
2 large eggs: They act as a binding agent to hold everything together. If you’re vegan, you can replace these with flax eggs (1 tablespoon ground flaxseed mixed with 2.5 tablespoons water for each egg).
-
1/2 cup vegetable oil: It keeps the cake moist and tender. For a healthier swap, try using unsweetened applesauce, or for an even richer flavor, melted coconut oil works wonderfully too!
-
1 teaspoon vanilla extract: This little drop of magic adds depth and a lovely aroma. Always go for pure vanilla extract over imitation for the best flavor.
-
1/2 cup chocolate chips (optional): Go ahead and sprinkle these in if you want little bursts of melty chocolate throughout your cake. You can go for dark, semi-sweet, or even dairy-free chips based on your preference.
Gather all these ingredients, and let’s have a baking party!
Step-by-Step Instructions
Now that we have everything, let’s make chocolate zucchini cake together! Here’s how:
-
Preheat Your Oven: Preheat your oven to 350°F (175°C) and generously grease a 9-inch round cake pan (or line it with parchment paper for easy removal). This step is crucial; nobody likes a cake stuck to the pan!
-
Grate Your Zucchini: In a large bowl, grate your zucchini. Don’t forget to squeeze out excess moisture using a clean kitchen towel or cheesecloth. Too much moisture can make the cake dense, and we want it to be light and fluffy.
-
Mix the Dry Ingredients: In another bowl, whisk together the gluten-free all-purpose flour, cocoa powder, baking soda, baking powder, and salt. This helps to evenly distribute the leavening agents and prevents any lumps.
-
Whisk the Eggs and Sugar Together: In a separate mixing bowl, beat the eggs and granulated sugar until fluffy and combined. This step adds air to the mix, resulting in a nice rise!
-
Combine the Wet Ingredients: Pour in the vegetable oil and vanilla extract into the egg-sugar mix. Mix them well until fully incorporated. I love this part because the aroma is simply divine!
-
Blend the Ingredients: Now, introduce the dry mixture into the wet ingredients, stirring gently with a spoon or spatula until just combined. You don’t want to overmix; a few lumps are okay.
-
Fold in the Zucchini: Add in the grated zucchini and chocolate chips (if using), folding them gently into the batter. This is where things start to look scrumptious!
-
Pour the Batter into the Pan: Gently pour the batter into your prepared pan, smoothing it out evenly.
-
Bake: Place the cake in the preheated oven and bake for about 30-35 minutes, or until a toothpick inserted in the center comes out with a few moist crumbs. Every oven is different, so keep an eye on it!
-
Let It Cool: Once baked, remove the cake from the oven and allow it to cool in the pan for 10 minutes before transferring it to a wire rack to cool completely. The smell wafting through your kitchen will make it hard to resist!
-
Frosting (Optional): If you want to elevate your cake experience, whip up a simple chocolate frosting to spread on top. You can make a vegan frosting by blending together some avocados, cocoa powder, maple syrup, and a hint of vanilla—so delicious!
Now your chocolate zucchini cake is ready to be devoured!
Serving Suggestions
Serving this cake is an absolute pleasure! You can dust it with powdered sugar or drizzle it with a simple chocolate frosting. Slice it into generous pieces and serve with a scoop of vanilla ice cream or a dollop of whipped cream for an extra indulgent touch. Pair it with a hot cup of coffee or cold glass of milk, and watch as everyone gathers around for a slice (or two)!
Recipe Variations
To keep things exciting, here are a few creative variations you can try:
-
Nuts Galore: Add a cup of chopped walnuts or pecans for a delightful crunch.
-
Spicy Twist: Spice things up by adding a teaspoon of cinnamon or a pinch of cayenne pepper for a surprise kick.
-
Coconut Flour Variation: Swap in coconut flour for half of the all-purpose flour for a delightful flavor twist, keeping in mind to reduce the total flour quantity.
-
Fruit Fusion: Replace half of the zucchini with mashed ripe bananas for a banana-chocolate combo. It adds natural sweetness and moisture!
-
Gluten-Free Flour Blend: If you’re experimenting, try a store-bought gluten-free flour blend that contains xanthan gum for improved texture.
Chef’s Notes
Every time I bake this chocolate zucchini cake, I’m reminded of my grandmother. The recipe has subtly evolved over the years, with me adding a few tweaks here and there. But at its heart, it remains the same—a delicious, easy cake that invites everyone to the table. I even remember once, in a cake-making frenzy, mistaking the salt for sugar! It was an unfortunate mishap but taught me the importance of keeping the ingredients organized. Let’s learn from those moments—they always create a funny kitchen story to share!
FAQs and Troubleshooting
1. Why is my cake too dense?
The zucchini might have had too much moisture. Ensure you squeeze out excess liquid before adding it to the mixture, and don’t overmix the batter.
2. Can I use frozen zucchini?
Absolutely! Just make sure to thaw it and drain any excess water before adding it to the batter.
3. How can I store my leftover cake?
Wrap it tightly in plastic wrap or store it in an airtight container at room temperature for up to three days, or in the fridge for about a week.
4. What can I substitute for eggs?
Flax eggs are an excellent alternative! Mix 1 tablespoon of flaxseed with 2.5 tablespoons of water for each egg needed, allowing it to thicken for about 5 minutes before incorporating it.
Nutritional Info
While I focus primarily on deliciousness, here’s a rough estimate of the nutritional breakdown per slice (based on 12 slices):
- Calories: 240
- Total Fat: 12g
- Saturated Fat: 2g
- Carbohydrates: 33g
- Fiber: 2g
- Sugars: 16g
- Protein: 3g
Remember, these numbers can vary depending on specific brands and ingredient choices, so use them as a guide!
And there you have it—a joyful journey into the world of chocolate zucchini cake! I can’t wait for you to try this recipe and share it with your loved ones. As you gather around for that first bite, remember that cooking is not just about the end result; it’s about the delightful moments we create in the kitchen. Happy baking!
Print
Gluten Free Chocolate Zucchini Cake
- Total Time: 50 minutes
- Yield: 12 servings 1x
- Diet: Gluten-Free
Description
A moist and delicious chocolate zucchini cake that’s surprisingly healthy and packed with nostalgia.
Ingredients
- 2 cups grated zucchini
- 1 cup granulated sugar
- ¾ cup unsweetened cocoa powder
- 1 cup gluten-free all-purpose flour
- ½ teaspoon baking soda
- ½ teaspoon baking powder
- ¼ teaspoon salt
- 2 large eggs
- ½ cup vegetable oil
- 1 teaspoon vanilla extract
- ½ cup chocolate chips (optional)
Instructions
- Preheat your oven to 350°F (175°C) and grease a 9-inch round cake pan or line it with parchment paper.
- Grate your zucchini and squeeze out excess moisture using a clean kitchen towel or cheesecloth.
- Mix the gluten-free flour, cocoa powder, baking soda, baking powder, and salt in a separate bowl.
- Whisk the eggs and granulated sugar together until fluffy and combined.
- Combine the vegetable oil and vanilla extract into the egg-sugar mixture.
- Blend the dry mixture into the wet ingredients gently until just combined.
- Fold in the grated zucchini and chocolate chips if using.
- Pour the batter into your prepared pan, smoothing it out evenly.
- Bake for about 30-35 minutes, or until a toothpick comes out with a few moist crumbs.
- Let the cake cool in the pan for 10 minutes before transferring it to a wire rack to cool completely.
Notes
For optional frosting, blend avocados, cocoa powder, maple syrup, and a hint of vanilla for a vegan option.
- Prep Time: 15 minutes
- Cook Time: 35 minutes
- Category: Dessert
- Method: Baking
- Cuisine: American
Nutrition
- Serving Size: 1 slice
- Calories: 240
- Sugar: 16g
- Sodium: 150mg
- Fat: 12g
- Saturated Fat: 2g
- Unsaturated Fat: 8g
- Trans Fat: 0g
- Carbohydrates: 33g
- Fiber: 2g
- Protein: 3g
- Cholesterol: 30mg
Keywords: chocolate zucchini cake, gluten free dessert, healthy cake

