
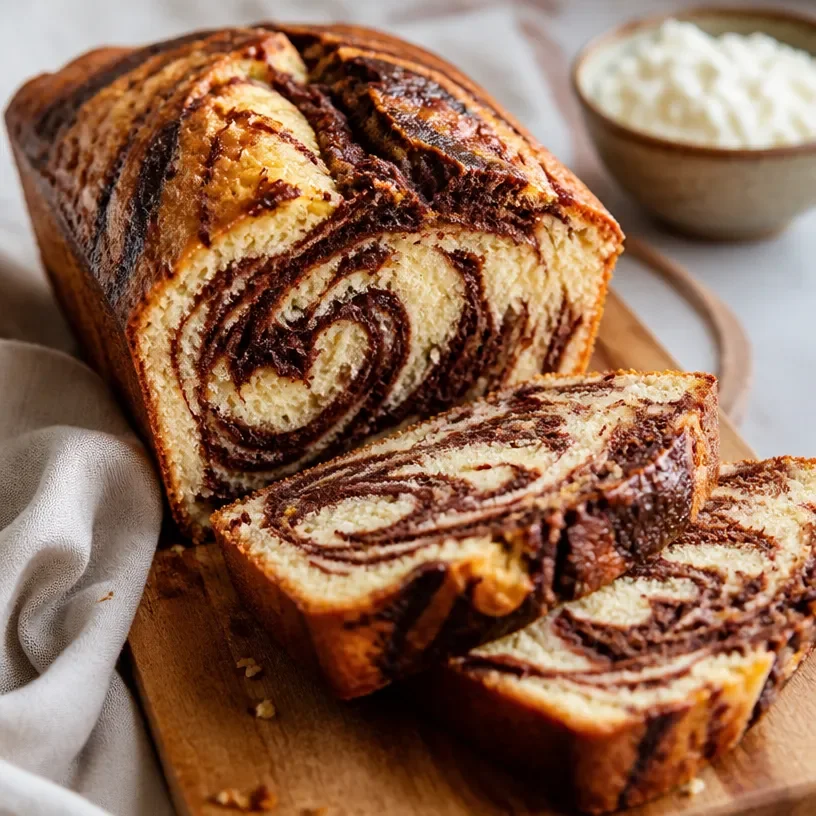
High-Protein Cottage Cheese Marble Cake: Easy 1-Bowl Recipe
The Joy of Baking: Protein Cottage Cheese Marble Cake
Welcome to my kitchen, my fellow food lovers! Today, I am thrilled to take you on a delicious journey of baking that will not only tantalize your taste buds but also fill your home with the warm, comforting aroma of something wonderful coming out of the oven. We’re making a delightful Protein Cottage Cheese Marble Cake!
Marble cake has always had a special place in my heart. It’s the perfect blend of flavors and textures, merging rich chocolate with a light, fluffy vanilla base, creating a dessert that’s as beautiful as it is delicious. But this isn’t just any marble cake; today, we’re adding cottage cheese to the mix to boost the protein content, making this cake not only a treat but a slightly healthier choice too!
Picture this: a rainy afternoon, the sky heavy with clouds, and you’re huddled in the kitchen, mixing together the ingredients for this glorious cake. The moment you swirl that chocolate batter into the vanilla, you’re creating art, and perhaps even a little magic. Each slice unveils a ripple of flavors, enticing your loved ones to gather around the table, savoring each bite while sharing stories and laughter.
So, grab your apron, put on your favorite tunes, and let’s dive into this cozy baking adventure!
A Trip Down Memory Lane
Before we cook up this wonderful cake, let me share a little something from my childhood that makes this recipe even more special. When I was a little girl, my grandmother would often bake marble cake for our family get-togethers. She had this magical ability to whip up desserts that everybody raved about, and her marble cake was the highlight. I remember standing on my tiptoes, eager to help her in the kitchen, my little hands trying to measure out flour as she guided me with her gentle smile.
She was never one for exact measurements—just a sprinkle of this, a dash of that, and her love mixed in. When I got old enough to bake by myself, that recipe became my go-to for birthdays and celebrations. Over the years, I decided to give it a twist by adding cottage cheese, infusing my beloved childhood treat with a protein-packed upgrade, making it perfect for any occasion!
Ingredients You’ll Need
Let’s gather our ingredients! Here’s what you’ll need to whip up this delicious Protein Cottage Cheese Marble Cake:
-
1 ½ cups all-purpose flour
This forms the base of our cake. If you want to make it gluten-free, substitute with almond flour or a gluten-free all-purpose blend. -
1 cup cottage cheese
The star of our show, cottage cheese adds moisture and protein. You can use low-fat or full-fat cottage cheese, depending on your preference. If you want a dairy-free option, try using silken tofu blended until smooth! -
1 cup granulated sugar
Sweetness is key! If you’re looking to cut down on sugar, you can use coconut sugar or a sugar substitute like stevia or monk fruit. -
½ cup unsalted butter, softened
This adds richness! For a dairy-free option, coconut oil or vegan butter works perfectly. -
3 large eggs
They help bind everything together! If you’re vegan, you can use flax eggs (1 tablespoon ground flaxseed mixed with 3 tablespoons water = 1 egg). -
1 teaspoon baking powder
This makes the cake rise, giving it that fluffy texture. -
½ teaspoon baking soda
Another leavening agent that ensures our cake is light and airy. -
½ teaspoon salt
Salt is essential to enhance all the flavors. -
1 teaspoon vanilla extract
It adds depth and warmth to our cake. -
¼ cup cocoa powder
This gives us that rich chocolate layer. Use unsweetened cocoa to balance the sweetness of the cake. -
1 tablespoon milk (dairy or non-dairy)
For adjusting the consistency of the batter if needed.
Make sure to have everything ready before we start baking. It makes the process smoother and more enjoyable—trust me!
Let’s Bake This Cake!
Now that we have all our ingredients ready, it’s time to get down to business! Here’s how we create this Protein Cottage Cheese Marble Cake step by step.
Step 1: Preheat and Prepare
Preheat your oven to 350°F (175°C). Grease and flour a 9-inch round cake pan, or alternatively, line it with parchment paper. This ensures an easy release and a beautiful cake.
Step 2: Mix the Wet Ingredients
In a large mixing bowl, beat the softened butter and sugar together until they’re light and fluffy—about 3-4 minutes. You want to incorporate air into the mixture. Adding cottage cheese at this stage gives a creamy texture, so mix it in thoroughly. Follow with the eggs one at a time, beating well after each addition, and finally, add the vanilla extract.
Chef’s Tip: Make sure your ingredients are at room temperature for the best emulsification. This helps with the texture of your cake!
Step 3: Combine the Dry Ingredients
In another bowl, whisk together the flour, baking powder, baking soda, and salt. Gradually add this dry mixture to the wet ingredients, alternating with the milk, starting and ending with the flour mixture. Combine until just mixed—overmixing can lead to a dense cake.
Step 4: Separate the Batter
Divide the batter evenly into two bowls. In one bowl, sift in the cocoa powder and mix until fully integrated. You’ll have a beautiful chocolate batter and a lovely vanilla batter!
Step 5: Create the Marble Effect
Now comes the fun part! In your prepared cake pan, dollop spoonfuls of vanilla and chocolate batter randomly. Using a knife or a toothpick, gently swirl the batters together to create a marbled effect. Don’t overdo it—less is more for that beautiful swirl!
Step 6: Bake
Pop the cake into your preheated oven and bake for 30-35 minutes, or until a toothpick inserted into the center comes out clean. Keep an eye on it in the last few minutes of baking.
Step 7: Cool and Enjoy
Once baked, remove the cake from the oven and allow it to cool in the pan for about 10 minutes before transferring it to a wire rack to cool completely. Resist the temptation to dig in too soon—letting it cool will give you cleaner slices!
Serving Suggestions
To serve, place the cake on a lovely serving plate and dust with a bit of powdered sugar for a touch of elegance. You could also add fresh berries or a dollop of Greek yogurt on the side for a delightful contrast. It pairs beautifully with a cup of coffee or tea, making it a perfect accompaniment for afternoon gatherings with friends or family.
Recipe Variations
Feeling adventurous? Here are some variations you can try with this Protein Cottage Cheese Marble Cake:
- Nutty Addition: Fold in some chopped walnuts or almonds into the batter for added crunch and flavor.
- Fruit Swirl: Add some pureed strawberries or raspberries into the batter for a fruity marble cake.
- Chocolate Chunk Delight: Mix in dark chocolate chips for a richer chocolate experience.
- Spice it Up: Sprinkle in some cinnamon or nutmeg for a warm, spicy twist.
- Zesty Lemon: Add a tablespoon of lemon zest to the vanilla batter for a refreshing hint of citrus.
Chef’s Notes
As I’ve experimented with this recipe over the years, it has evolved into my go-to cake for any occasion! When I first started experimenting with cottage cheese, I was concerned about the texture, but surprisingly, it came out beautifully! The added protein gives it a unique twist that delights everyone who tries it. And let’s be honest here—one of my favorite things about baking is that it doesn’t always have to look perfect. Embrace the messiness of it all; it’s a sign of a home filled with love, laughter, and, of course, delicious baked goods!
FAQ and Troubleshooting
-
My cake didn’t rise, what did I do wrong?
It’s likely that your baking powder or baking soda is old. Always check the expiration date. Also, make sure to mix the batter just enough; overmixing can result in a dense cake. -
Why did my cake stick to the pan?
Be sure to grease and flour your pan thoroughly before adding the batter. Parchment paper can be a lifesaver in ensuring it releases smoothly. -
Can I freeze this cake?
Absolutely! Allow the cake to cool completely, wrap it tightly in plastic wrap, and then store it in an airtight container. It keeps well for up to three months. Just thaw it in the fridge overnight before serving. -
Is this cake suitable for different diets?
Yes! With simple substitutions, you can easily make it dairy-free, gluten-free, or even vegan. Just use the recommended alternatives in the ingredients list!
Nutritional Info
While I love baking for the joy it brings, I also appreciate the benefits of mindful eating. This Protein Cottage Cheese Marble Cake provides a good dose of protein and essential nutrients, making it a perfect treat to enjoy on special occasions or when you need a pick-me-up!
I hope this recipe brings as much joy to your kitchen as it has to mine. Remember, cooking is all about having fun, experimenting, and sharing. So, have a blast baking away, and I can’t wait to hear how your Protein Cottage Cheese Marble Cake turns out! Happy baking!
Print
Protein Cottage Cheese Marble Cake
- Total Time: 50 minutes
- Yield: 8 servings 1x
- Diet: Vegetarian
Description
A delightful marble cake combining rich chocolate and light vanilla layers, enhanced with protein-packed cottage cheese.
Ingredients
- 1 ½ cups all-purpose flour
- 1 cup cottage cheese
- 1 cup granulated sugar
- ½ cup unsalted butter, softened
- 3 large eggs
- 1 teaspoon baking powder
- ½ teaspoon baking soda
- ½ teaspoon salt
- 1 teaspoon vanilla extract
- ¼ cup cocoa powder
- 1 tablespoon milk (dairy or non-dairy)
Instructions
- Preheat your oven to 350°F (175°C) and grease and flour a 9-inch round cake pan.
- Mix the softened butter and sugar together until light and fluffy, then mix in the cottage cheese, followed by the eggs and vanilla extract.
- Combine the flour, baking powder, baking soda, and salt in another bowl, then gradually add to the wet mixture, alternating with the milk.
- Separate the batter into two bowls, adding cocoa powder to one, mixing well.
- Create the marble effect by dolloping spoonfuls of vanilla and chocolate batter in the prepared pan and swirling together gently.
- Bake for 30-35 minutes, or until a toothpick inserted comes out clean.
- Cool the cake in the pan for 10 minutes before transferring to a wire rack to cool completely.
Notes
For a lighter texture, ensure all ingredients are at room temperature before mixing.
- Prep Time: 15 minutes
- Cook Time: 35 minutes
- Category: Dessert
- Method: Baking
- Cuisine: American
Nutrition
- Serving Size: 1 slice
- Calories: 320
- Sugar: 18g
- Sodium: 270mg
- Fat: 12g
- Saturated Fat: 7g
- Unsaturated Fat: 4g
- Trans Fat: 0g
- Carbohydrates: 45g
- Fiber: 2g
- Protein: 10g
- Cholesterol: 70mg
Keywords: cake, marble cake, protein dessert, cottage cheese cake, baking
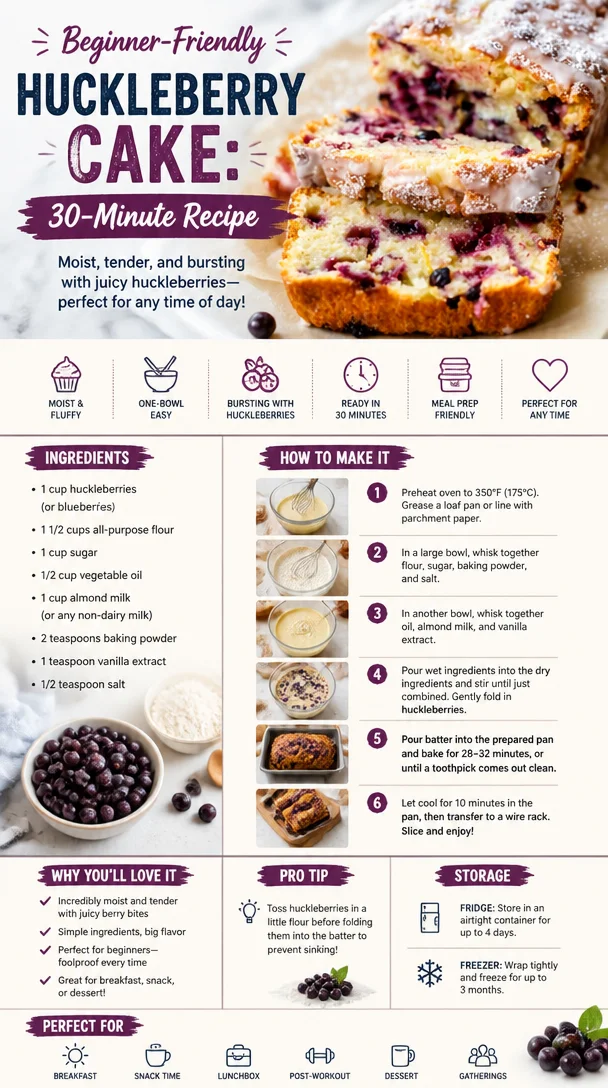
Beginner-Friendly Huckleberry Cake: 30-Minute Recipe
Welcome to Huckleberry Heaven: A Cozy Huckleberry Cake Recipe
Hello, foodie friends! It’s Olivia Bennett here, your go-to kitchen confidante and flavor enthusiast. Today, I’m thrilled to share a recipe that’s near and dear to my heart—the delightful Huckleberry Cake. This cake isn’t just a treat; it’s a flavor-packed journey through memories, nature’s bounty, and that special feeling of being at home. So, let’s roll up our sleeves, preheat that oven, and dive into this huckleberry-infused adventure!
A Slice of Nostalgia: My Huckleberry Memories
Growing up in the Pacific Northwest, my summers were often spent exploring lush forests and wandering along winding trails. The sweet, wild scent of huckleberries would beckon me closer, and I’d find myself in a berry-stained frenzy, plucking these little gems right off the bushes. My grandmother, an exceptional home cook, introduced me to huckleberries not just as delicious snacks, but as precious ingredients in her kitchen.
One summer afternoon, we decided to turn our freshly picked huckleberries into a cake that whispered sweet nothings of summer sunshine. The kitchen was alive with laughter, the chatter of memories, and the irresistible aroma of butter and sugar mingling in the air. That cake not only tasted heavenly but also solidified my love for creating comforting dishes that bring people together. Each bite was a reminder that food has the power to connect us to our roots, to our family, and to the wild, beautiful treasures of nature.
Ingredients: What You’ll Need
To create this huckleberry magic, you’ll need the following ingredients:
-
2 cups fresh huckleberries: The star of the show! If you can’t find fresh huckleberries, blueberries or blackberries are fantastic substitutes. Just know that huckleberries have a unique, sweet-tart flavor!
-
1 ½ cups all-purpose flour: The backbone of our cake. If you’re gluten-free, try using a 1:1 gluten-free flour blend; the texture will still be delightful.
-
1 cup granulated sugar: For sweetness! You can swap it out for coconut sugar or even maple syrup for a deeper flavor.
-
½ cup unsalted butter, softened: This gives our cake a rich, creamy texture. If you want to make it dairy-free, coconut oil or vegan butter does the trick!
-
2 large eggs: For binding and moisture. If you want to keep it egg-free, try using flax eggs (1 tablespoon ground flaxseed mixed with 2.5 tablespoons water = 1 egg).
-
1 tsp vanilla extract: This adds warmth and depth. Always opt for pure vanilla extract for the best flavor.
-
1 tsp baking powder: This helps the cake rise and gives it a light texture. Ensure your baking powder is fresh for the best results!
-
½ tsp baking soda: This is our secret weapon for a fluffy cake. It works beautifully alongside the baking powder.
-
½ tsp salt: Balances out the sweetness and enhances the flavors.
-
¾ cup milk: For richness. You can also use almond milk, oat milk, or any milk substitute you love!
Step-by-Step Instructions: Let’s Bake!
Now that we have our ingredients lined up, let’s jump into the step-by-step process to create this scrumptious huckleberry cake!
-
Preheat Your Oven: Preheat your oven to 350°F (175°C). This is important for ensuring even baking, so don’t skip this step!
-
Prepare Your Pan: Grease a 9-inch round cake pan with butter and dust it lightly with flour, or line it with parchment paper. This will help the cake come out easily once baked.
-
Mix the Dry Ingredients: In a medium bowl, whisk together the flour, baking powder, baking soda, and salt. This step ensures that everything is evenly distributed throughout the batter.
-
Cream the Butter and Sugar: In a large mixing bowl, beat the softened butter and granulated sugar until light and fluffy—about 3-4 minutes with a hand mixer. This process is key for incorporating air into your batter for a fluffy cake!
-
Add the Eggs and Vanilla: Beat in the eggs one at a time, mixing well after each addition. Then, add the vanilla extract and mix until combined.
-
Combine Dry and Wet Ingredients: Gradually add the dry ingredients into the butter mixture, alternating with the milk. Start and end with the flour mixture. This helps to create a well-balanced batter without overmixing!
-
Fold in the Huckleberries: Gently fold in the fresh huckleberries using a spatula. Be careful not to overmix here—this will help keep those little berries intact and brighten up every bite!
-
Pour and Smooth: Transfer the batter into your prepared cake pan. Use the spatula to smooth the top and create an even layer.
-
Bake It to Perfection: Pop your cake into the preheated oven and bake for 30-35 minutes, or until a toothpick inserted into the center comes out clean. Your kitchen will start to smell heavenly—this is the best part!
-
Cool Down: Once baked, remove the cake from the oven and let it cool in the pan for about 10 minutes. Then, turn it out onto a wire rack to cool completely. This prevents it from becoming soggy in the pan.
Serving Suggestions: Time to Delight!
Once your huckleberry cake is cool, you can serve it up simply or fancy it up. Dust a little powdered sugar on top, or drizzle with a simple lemon glaze made from powdered sugar and lemon juice for a zesty kick. Pair it with a dollop of whipped cream or a scoop of vanilla ice cream for an extra special touch. This cake is perfect for afternoon tea, a bright brunch spread, or as a sweet ending to any dinner!
Recipe Variations: Add Your Own Twist!
The beauty of this huckleberry cake lies in its versatility! Here are a few creative twists you might consider:
-
Lemon Zest: Add the zest of one lemon to the batter for a refreshing, citrusy flavor that complements the huckleberries beautifully.
-
Nutty Crunch: Toss in ½ cup of chopped walnuts or pecans for added texture and nuttiness.
-
Spiced Version: Add ½ tsp of ground cinnamon or nutmeg for a warm spice twist.
-
Swirl in Cream Cheese: Create a delicious cream cheese swirl by mixing 4 oz of softened cream cheese with ¼ cup of sugar and 1 egg, and then dolloping this into the batter before baking.
-
Fruit Fusion: Mix huckleberries with other berries like raspberries or strawberries for a mixed berry cake that celebrates all the summer flavors!
Chef’s Notes: A Little Love from My Kitchen
This huckleberry cake is more than just a recipe; it’s a love letter to summer days spent in the wild, and a reminder of the sweet moments spent in the kitchen with family. Over the years, I’ve experimented with this cake and have fallen in love with its adaptability. Every time I make it, I’m reminded of my grandmother’s laughter and the sunny afternoons we shared.
One of my funniest kitchen stories involves a huckleberry-staining incident. Let’s just say that berry juice can be quite the culprit! I once had huckleberry handprints all over the kitchen—even the ceiling! It’s these little mishaps that make cooking such a joy and creates lasting memories. So, embrace the mess; it means you’re cooking with love!
FAQs and Troubleshooting: Let’s Clear Things Up!
1. Why did my cake sink in the middle?
A sinking cake usually indicates that it didn’t bake long enough or was too wet. Make sure your oven is at the correct temperature, bake it until a toothpick comes out clean, and avoid opening the oven door too early!
2. How do I store leftovers?
Keep any leftover cake in an airtight container at room temperature for up to 3 days. If you wish to store it longer, you can freeze it! Just wrap it tightly in plastic wrap and then foil. It will stay fresh for about 2-3 months.
3. Can I use frozen huckleberries?
Absolutely! Just make sure not to thaw them before mixing them into the batter. This helps prevent too much purple bleeding and keeps your cake looking delightful.
4. What if I want to make a layered cake?
To make a layered huckleberry cake, simply double the recipe and bake in two 9-inch pans. Once cooled, you can layer them and add your favorite frosting or whipped cream between the layers for a showstopper dessert!
Nutritional Info (Optional)
For those who like to keep an eye on their dietary needs, here’s a quick glance at the nutritional breakdown for one slice of huckleberry cake, based on standard serving (assuming approximately 12 slices):
- Calories: 220
- Protein: 3g
- Fat: 8g
- Carbohydrates: 36g
- Fiber: 1g
- Sugar: 10g
This little treat is certainly indulgent, but it’s made with love and nature’s treasures—so enjoy every delicious bite!
Thank you for joining me on this huckleberry cake journey! I hope you find joy, warmth, and a splash of grandmother’s love in every bite. Happy baking, and as always, remember that the best ingredient in any recipe is a pinch of passion and a sprinkle of joy!
Print
Huckleberry Cake
- Total Time: 50 minutes
- Yield: 12 servings 1x
- Diet: Vegetarian
Description
A delightful huckleberry cake that captures the essence of summer with its sweet-tart flavor and nostalgic memories.
Ingredients
- 2 cups fresh huckleberries
- 1 ½ cups all-purpose flour
- 1 cup granulated sugar
- ½ cup unsalted butter, softened
- 2 large eggs
- 1 tsp vanilla extract
- 1 tsp baking powder
- ½ tsp baking soda
- ½ tsp salt
- ¾ cup milk
Instructions
- Preheat your oven to 350°F (175°C).
- Prepare a 9-inch round cake pan with butter and flour or parchment paper.
- Mix the dry ingredients in a medium bowl.
- Cream the butter and sugar until light and fluffy.
- Add the eggs one at a time and then mix in the vanilla.
- Combine dry and wet ingredients, alternating with milk.
- Fold in the huckleberries gently.
- Pour the batter into the prepared cake pan.
- Bake for 30-35 minutes until a toothpick comes out clean.
- Cool the cake for 10 minutes, then turn out to cool completely.
Notes
Dust with powdered sugar or drizzle with lemon glaze. Enjoy with whipped cream or vanilla ice cream.
- Prep Time: 15 minutes
- Cook Time: 35 minutes
- Category: Dessert
- Method: Baking
- Cuisine: American
Nutrition
- Serving Size: 1 slice
- Calories: 220
- Sugar: 10g
- Sodium: 200mg
- Fat: 8g
- Saturated Fat: 5g
- Unsaturated Fat: 3g
- Trans Fat: 0g
- Carbohydrates: 36g
- Fiber: 1g
- Protein: 3g
- Cholesterol: 60mg
Keywords: huckleberry cake, dessert, summer recipe, baking




