
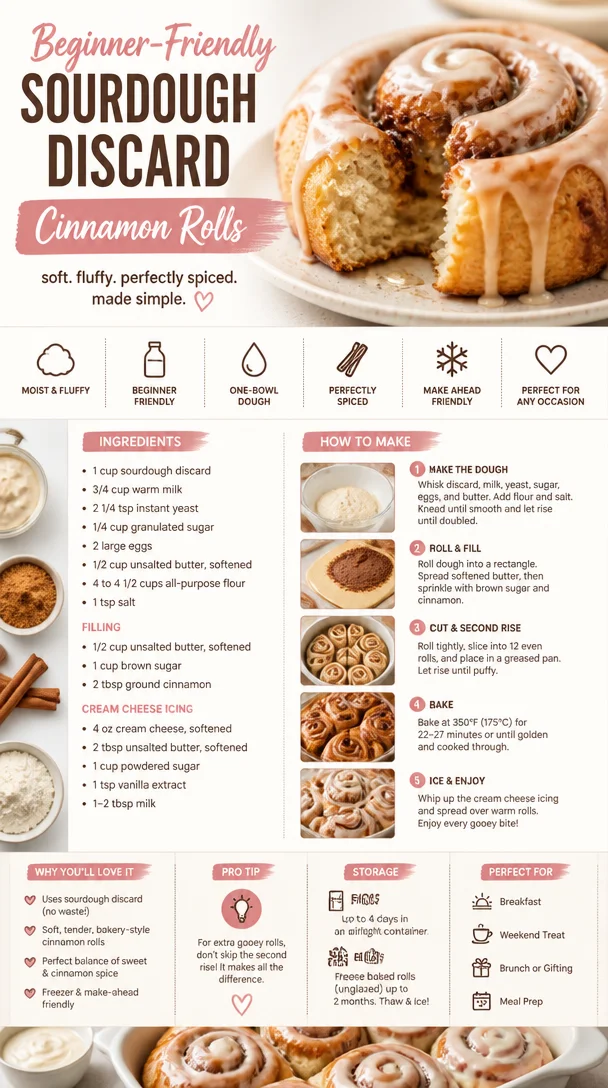
Beginner-Friendly Sourdough Discard Cinnamon Rolls
Sourdough Discard Cinnamon Rolls: The Sweet Way to Reduce Waste
Welcome back to my kitchen, fellow foodies! Today, we’re diving into a delicious way to not just indulge in sweet, fluffy cinnamon rolls but also make the most of your sourdough starter. Yes, you heard me right! If you’ve ever found yourself staring at that excess sourdough discard after feeding your starter, I’ve got the perfect solution. Let’s transform that potential kitchen waste into something scrumptious that everyone will love.
Cinnamon rolls have a nostalgic hold on my heart. I remember the first time my grandmother let me help her roll out the dough, cheekily sneaking bites of cinnamon sugar while attempting to create the perfect swirl. The smell of cinnamon wafting through the air, combined with the warmth of the kitchen, created a cozy atmosphere that I still strive to replicate today. Baking cinnamon rolls isn’t just a recipe; it’s a full-on hug for your taste buds and a great way to gather those you love around the table.
Today, I’m sharing my go-to recipe for Sourdough Discard Cinnamon Rolls. With this recipe, you’ll not only minimize waste, but you’ll also create soft, fluffy rolls that are indulgently filled with a rich cinnamon-sugar mixture. So, grab that apron, and let’s get started!
Personal Story
Let me take you back in time to my childhood kitchen, where flour dusted the countertops and laughter danced in the air. I can vividly recall Saturday mornings spent with my grandmother, our trusty stand mixer whirring away as we crafted batches of her famous cinnamon rolls. I’d always stand on my tiptoes, peeking over the counter, totally entranced by the way she coaxed the dough into the perfect texture.
One morning, she turned to me with a twinkle in her eye and said, “Olivia, the secret ingredient in these rolls is love.” I took that message to heart, and it became a core belief in my cooking journey. While my rolls may not always turn out perfectly—sometimes they rise too high, other times they get a bit too gooey—the joy in baking and sharing them with friends and family remains unmatched. It’s the stories we share and the memories we create over a warm plate of cinnamon rolls that keep bringing us back to the kitchen.
Ingredients
Here’s what you’ll need to whip up these delightful Sourdough Discard Cinnamon Rolls:
-
Sourdough Discard (1 cup): This is the heart of the recipe! Using discard helps create a unique flavor profile. If you don’t have discard, you can substitute with all-purpose flour and water, but you’ll miss that tangy sourdough goodness.
-
All-Purpose Flour (3 cups): Essential for structure, the flour will help create a fluffy exterior. If you prefer a healthier option, whole wheat flour works too, but you may need to add a bit more liquid.
-
Instant Yeast (2 teaspoons): This helps in the rising process. If you only have active dry yeast, simply activate it in warm water with a touch of sugar before using.
-
Milk (1 cup): Adds richness to the dough. Feel free to use almond milk, oat milk, or any plant-based milk for a dairy-free version.
-
Egg (1 large): Acts as a binder and adds moisture. If you’re looking for an egg-free alternative, ground flaxseed mixed with water can do wonders!
-
Butter (1/3 cup, softened): This provides a deliciously rich flavor to the rolls. If you’d like to keep it dairy-free, coconut oil is a great substitute!
-
Brown Sugar (1/2 cup): This sweetens the cinnamon filling and adds a lovely caramel flavor. Light brown sugar works, but dark brown sugar will give you a deeper taste.
-
Cinnamon (2 tablespoons): The star of the filling, adding that warm, comforting taste we all crave. You can play around with other spices like nutmeg or cardamom for a different twist.
-
Vanilla Extract (1 teaspoon): A hint of vanilla enhances all the sweet flavors. If you want to elevate this even more, try almond extract!
-
Salt (1 teaspoon): Balances the sweetness and enhances the overall flavor of the rolls.
Tips & Insights
Every ingredient plays a role in creating that perfect cinnamon roll. Don’t skip out on the butter; it’s essential for achieving that soft, tender crumb. Additionally, feel free to get creative and customize your filling or glaze—maybe throw in some nuts or dried fruit!
Step-by-Step Instructions
Alright, let’s get those little beauties baking! Here’s how to bring this recipe to life:
-
Mix the Dough:
In a large mixing bowl, combine the sourdough discard, warm milk, softened butter, and sugar. Stir until well blended. Add in the egg and mix until fully incorporated. Now it’s time to bring in the flour! Gradually add the all-purpose flour and salt. Mix until a rough dough forms. -
Knead the Dough:
Turn the dough out onto a floured surface. Knead it for about 5-7 minutes until it’s smooth and elastic. If the dough feels sticky, sprinkle a little extra flour—but don’t go overboard; we want those rolls to be soft and pillowy! -
First Rise:
Place the kneaded dough in a lightly greased bowl, cover it with a clean kitchen towel, and let it rise in a warm spot for about 1-2 hours, or until it doubles in size. This is my favorite part—smelling the gentle fermentation of that sourdough. -
Prepare the Filling:
While the dough rises, mix together the brown sugar, cinnamon, and a pinch of salt in a bowl. This glorious mixture will create that sweet, spiraled filling. Set it aside! -
Roll Out the Dough:
After the dough has risen, punch it down to release the air. On a floured surface, roll out the dough into a large rectangle (about 12” x 18”). Aim for an even thickness; we want our rolls to be nice and uniform. -
Add the Filling:
Spread a generous layer of softened butter across the rolled-out dough, leaving a small border on the edges. Then, sprinkle your cinnamon-sugar mixture evenly across the buttery dough. Don’t hold back; the more the merrier! -
Roll It Up:
Starting from the long end of the rectangle, carefully roll the dough tightly into a log. Gently pinch the seam to seal it. If you encounter any resistance, take a moment to relax and don’t force it—let’s keep that dough happy! -
Slice the Rolls:
Using a sharp knife or dental floss (seriously, it works wonders!), cut the log into about 12 slices. They should be about 1.5 inches thick. Arrange them in a greased baking dish, giving them some room to expand on their second rise. -
Second Rise:
Cover the rolls with a kitchen towel and allow them to rise for another 30-45 minutes. During this time, they’ll puff up beautifully. Preheat your oven to 350°F (175°C) so it’s nice and hot for baking! -
Bake:
Pop those rolls in the oven and let them bake for 20-25 minutes, or until they’re golden-brown and your kitchen is filled with the intoxicating aroma of cinnamon. Keep an eye on them after the 20-minute mark to avoid over-baking. -
Glaze and Enjoy:
To make the glaze, simply whisk together powdered sugar, a splash of milk, and vanilla extract until creamy and smooth. Drizzle it over the warm rolls right out of the oven, and watch them shine.
Serving Suggestions
These cinnamon rolls are meant for sharing, so don’t be shy! Serve them warm on a festive platter, drizzled with glaze. Pair them with a steaming cup of coffee or your favorite herbal tea. For an extra cozy touch, add a dollop of whipped cream cheese or a scoop of vanilla ice cream for a delightful dessert twist.
Recipe Variations
-
Nutty Addition: Add chopped walnuts or pecans to the cinnamon-sugar filling for a delightful crunch.
-
Dried Fruit: Incorporate raisins or dried cranberries for an added layer of texture and sweetness.
-
Maple Glaze: Swap the vanilla glaze for a maple syrup glaze for an extra burst of flavor that complements the cinnamon beautifully.
-
Chocolate Chip: Mix in some chocolate chips to the filling for a sweet surprise in every bite.
-
Spiced Twist: Experiment with spices! A pinch of cardamom or nutmeg in the filling could elevate the flavor to a whole new level.
Chef’s Notes
I must confess, my first few attempts at perfecting cinnamon rolls didn’t go as planned. I remember baking a batch for a family brunch, and they ended up being more like cinnamon bricks than fluffy rolls. After some trial and error—and a few lessons learned about dough hydration and sugar ratios—I finally nailed it!
The beauty of baking is that it’s always a journey. Sometimes a little distraction leads to something wonderfully unexpected, so don’t sweat the small stuff! Embrace the process, and remember that every little mishap is just another story to share when you gather around the table.
FAQs and Troubleshooting
1. My rolls didn’t rise! What went wrong?
There are a few culprits here. Your yeast might be expired, or the environment wasn’t warm enough for rising. Always check the expiration date on your yeast and create a cozy spot for your dough to rise.
2. The dough is too sticky! What should I do?
If your dough feels overly sticky, try adding a small amount of flour, but be careful not to add too much; you want to keep that soft texture.
3. What can I do with leftover icing?
Leftover icing can be stored in an airtight container in the fridge for up to a week. It’s great as a dip for fruit or drizzled over pancakes!
4. Can I freeze these rolls?
Absolutely! You can freeze the unbaked, sliced rolls. Just pop them into a greased pan, cover, and freeze. When you’re ready to bake them, let them thaw and rise before baking as usual.
Nutritional Info (per roll, approx.)
- Calories: 250
- Total Fat: 9g
- Saturated Fat: 5g
- Cholesterol: 50mg
- Sodium: 150mg
- Total Carbohydrates: 38g
- Dietary Fiber: 1g
- Sugars: 10g
- Protein: 4g
And there you have it! Sourdough Discard Cinnamon Rolls that are not only a delicious treat but a fantastic way to utilize every bit of your sourdough starter to its fullest potential. I can’t wait to hear how your rolls turn out! Happy baking, and remember—keep it cozy in the kitchen!
Print
Sourdough Discard Cinnamon Rolls
- Total Time: 45 minutes
- Yield: 12 servings 1x
- Diet: Vegetarian
Description
Delicious cinnamon rolls that make the most of your sourdough starter, transforming kitchen waste into a scrumptious treat.
Ingredients
- 1 cup Sourdough Discard
- 3 cups All-Purpose Flour
- 2 teaspoons Instant Yeast
- 1 cup Milk
- 1 large Egg
- 1/3 cup Butter (softened)
- 1/2 cup Brown Sugar
- 2 tablespoons Cinnamon
- 1 teaspoon Vanilla Extract
- 1 teaspoon Salt
Instructions
- Mix the Dough: In a large mixing bowl, combine the sourdough discard, warm milk, softened butter, and sugar. Stir until well blended. Add in the egg and mix until fully incorporated. Gradually add the all-purpose flour and salt. Mix until a rough dough forms.
- Knead the Dough: Turn the dough out onto a floured surface. Knead it for about 5-7 minutes until it’s smooth and elastic. If the dough feels sticky, sprinkle a little extra flour.
- Place the kneaded dough in a lightly greased bowl, cover it with a clean kitchen towel, and let it rise in a warm spot for about 60-120 minutes, or until it doubles in size.
- Mix the Filling: While the dough rises, mix together the brown sugar, cinnamon, and a pinch of salt in a bowl.
- Roll Out the Dough: After the dough has risen, punch it down to release the air. Roll out the dough into a large rectangle (about 12” x 18”).
- Spread softened butter across the rolled-out dough, leaving a small border on the edges. Then, sprinkle your cinnamon-sugar mixture evenly across the buttery dough.
- Roll it Up: Starting from the long end of the rectangle, carefully roll the dough tightly into a log. Pinch the seam to seal it.
- Slice the Rolls: Cut the log into about 12 slices (1.5 inches thick). Arrange them in a greased baking dish.
- Cover the rolls with a kitchen towel and allow them to rise for another 30-45 minutes. Preheat your oven to 350°F (175°C).
- Bake: Bake the rolls for 20-25 minutes until golden-brown.
- Make the Glaze: Whisk together powdered sugar, a splash of milk, and vanilla extract until creamy. Drizzle over warm rolls.
Notes
Serve warm, and feel free to customize with nuts or dried fruits. Perfect to pair with coffee or tea.
- Prep Time: 15 minutes
- Cook Time: 30 minutes
- Category: Dessert
- Method: Baking
- Cuisine: American
Nutrition
- Serving Size: 1 roll
- Calories: 250
- Sugar: 10g
- Sodium: 150mg
- Fat: 9g
- Saturated Fat: 5g
- Unsaturated Fat: 3g
- Trans Fat: 0g
- Carbohydrates: 38g
- Fiber: 1g
- Protein: 4g
- Cholesterol: 50mg
Keywords: sourdough, cinnamon rolls, baking, sweet, dessert
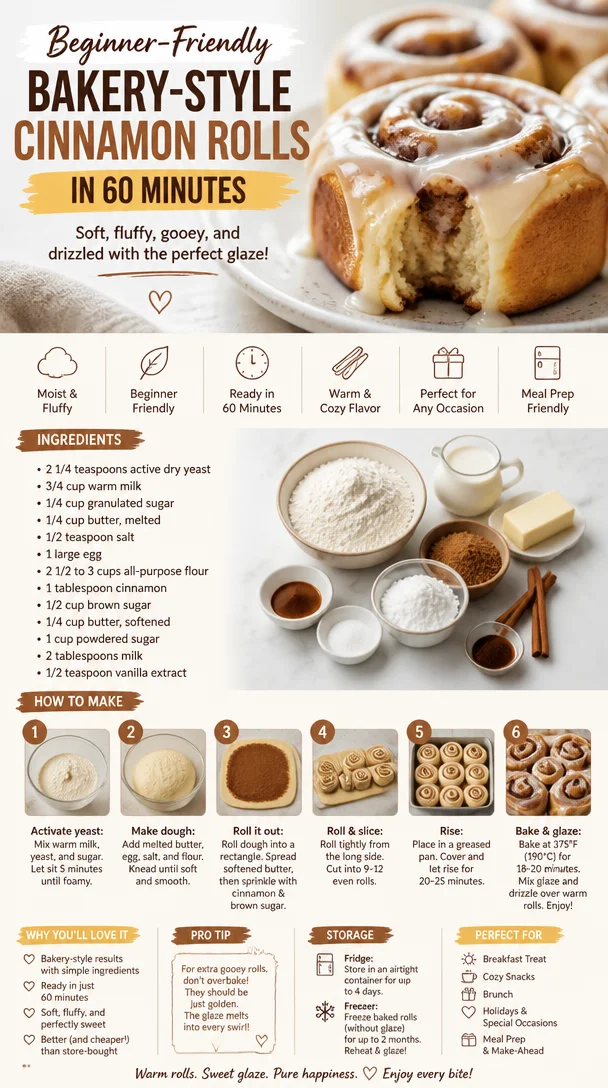
Beginner-Friendly Bakery-Style Cinnamon Rolls in 60 Minutes
Bakery-Style Cinnamon Rolls: The Ultimate Comfort Food
Welcome to my kitchen! If you’ve never experienced the intoxicating aroma of freshly baked cinnamon rolls wafting through your home, you’re in for a real treat. There’s something undeniably magical about these soft, gooey spirals of sweetness that can uplift the mood of anyone walking through your door. So, roll up your sleeves, put on your favorite apron (the messier, the better!), and let’s dive into the world of bakery-style cinnamon rolls.
Imagine a cozy Sunday morning. The sun is just peeking through the kitchen window, and you’re surrounded by the warmth of your loved ones. As you pull a tray of golden-brown cinnamon rolls from the oven, the world feels a little brighter. Each roll, a masterpiece of fluffy dough, rich cinnamon, and buttery sweetness, is perfect for sharing over a strong cup of coffee or a frothy hot chocolate. The best part? You get to savor every gooey bite together, turning a simple meal into an unforgettable family experience.
While these rolls might seem intimidating at first, I promise they are super approachable! My goal is always to inspire you to bake with confidence, even if you think you’re just a “dabbler” in the kitchen. The magic of cinnamon rolls lies in their simplicity and the joy they bring to the table. Let’s roll up our sleeves and get baking; I promise you, it’ll be worth every second!
A Memory to Savor
One of my fondest memories is baking cinnamon rolls with my grandmother every holiday season. She had this incredible way of turning the kitchen into a cozy, aromatic haven filled with laughter and stories. I can still recall how she’d give me the "dough" to knead, her gentle hands guiding mine as we added flour to prevent sticking. As we waited for the dough to rise, we’d talk about everything from family traditions to secret ingredients—just the two of us in our little world.
Those moments were special, and they linger in my heart long after the last roll has been devoured. Each time I make cinnamon rolls, I’m transported back to that warm kitchen filled with love and the sweet scent of cinnamon. It’s not just about the rolls; it’s about creating memories that stay with you long after the oven timer dings.
Ingredients
Here’s what you’ll need to create these dreamy cinnamon rolls:
- All-Purpose Flour: The backbone of your dough. You can substitute with bread flour for a chewier texture.
- Granulated Sugar: Adds sweetness and helps the dough rise. For a deeper flavor, try using brown sugar.
- Salt: Enhances flavor and balances the sweetness. Don’t skip this—it’s crucial!
- Instant Yeast: Helps the dough rise quickly. Active dry yeast can work, but give it a little extra time to bubble up.
- Milk: Provides moisture and richness. Whole milk is best; if you’re dairy-free, try almond milk or oat milk.
- Butter: Creates a tender, flavorful roll. Unsalted is preferred, but you can use margarine or coconut oil if needed.
- Egg: Binds the dough and creates a lovely texture. Replace with a flax egg (1 tbsp flaxseed meal + 2.5 tbsp water) for a vegan option.
- Brown Sugar: For the filling! It caramelizes nicely for a gooey inside.
- Ground Cinnamon: The star of the show! Try adding cardamom or nutmeg for a unique twist.
- Cream Cheese: For the frosting! You can substitute with ricotta or a dairy-free cream cheese for a lighter version.
Step-by-Step Instructions
Step 1: Prepare the Dough
-
Warm the Milk: In a small saucepan, warm 1 cup of milk to about 110°F (44°C). It should feel warm to the touch but not hot enough to burn. This will help activate the yeast.
Chef Tip: Check the temperature with your finger. If it’s comfortable, it’s perfect for the yeast!
-
Activate the Yeast: In a mixing bowl, combine 2 ¼ teaspoons of instant yeast with the warm milk and ¼ cup of granulated sugar. Let it sit for about 5-10 minutes until it’s frothy.
Chef Insight: If your mixture doesn’t foam, it might be due to expired yeast. Just grab a new packet!
-
Mix in the Ingredients: Add 4 cups of all-purpose flour, 1 teaspoon of salt, 1 egg, and ½ cup of melted unsalted butter to the yeast mixture.
Chef Hack: Use a dough hook if you have a stand mixer to save elbow grease!
-
Knead the Dough: Mix until a shaggy dough forms, then knead by hand for about 6-8 minutes until it’s smooth and elastic. If it’s too sticky, add a little flour—just remember, the dough should be soft and tacky.
Step 2: First Rise
-
Let it Rise: Place the dough in a lightly greased bowl, cover it with a clean kitchen towel or plastic wrap, and let it rise in a warm place until it doubles in size, about 1 hour.
Little Chef Note: Preheat your oven to the lowest setting for a few minutes, then turn it off and place the dough inside. It creates the perfect warm spot for rising!
Step 3: Prepare the Filling
-
Mix the Filling: While the dough is rising, prepare the filling by combining ¾ cup of packed brown sugar, 2 tablespoons of ground cinnamon, and ¼ cup of softened butter in a bowl. Mix until it forms a paste.
Chef Tip: Feel free to throw in some chopped nuts or raisins for an extra texture!
Step 4: Shape the Rolls
-
Roll Out the Dough: Once the dough has risen, punch it down gently to release the air. Roll it out on a floured surface into a rectangle, about 16×12 inches.
-
Spread the Filling: Evenly spread the cinnamon-sugar mixture over the rolled-out dough, leaving a small border around the edges.
-
Roll It Up: Starting from one long edge, roll the dough tightly into a log. Pinch the seam to seal it.
Chef Hack: Think of it like tucking in a cozy blanket!
Step 5: Slice the Rolls
-
Cut the Rolls: Using a sharp knife or dental floss (yes, really!), slice the log into 12 equal pieces.
Chef Insight: Floss is great for cutting dough neatly without squishing it!
-
Place in a Pan: Arrange the slices in a greased baking dish, leaving some space between them for expansion. Cover and let the rolls rise again for about 30 minutes.
Step 6: Bake
-
Preheat and Bake: Preheat your oven to 350°F (175°C). Bake the rolls for 25-30 minutes or until golden brown.
Little Chef Note: If the tops are browning too quickly, loosely cover them with aluminum foil halfway through baking.
Step 7: Frost and Serve
-
Frost the Rolls: While the rolls cool slightly, whip up the frosting by mixing 4 oz of cream cheese, 1 cup of powdered sugar, 2 tablespoons of milk, and a splash of vanilla extract until smooth.
-
Spread the Frosting: Slather it over the warm rolls and let the icing melt into all those nooks and crannies.
Serving Suggestions
Serve your cinnamon rolls warm, drizzled generously with cream cheese frosting. Pair them with a hot cup of coffee or tea for an indulgent breakfast or sweet treat. They also make a lovely addition to a brunch spread alongside fruits and pastries.
To make it extra special, garnish with a sprinkle of chopped pecans or a dusting of powdered sugar. Trust me; it adds just the right touch!
Recipe Variations
- Chocolate Cinnamon Rolls: Add mini chocolate chips to the filling for a decadent twist!
- Maple Pecan Rolls: Replace the brown sugar with maple syrup and toss in some chopped pecans.
- Pumpkin Spice Rolls: Stir in some pumpkin puree and pumpkin spice into the dough for a fall-inspired treat.
- Vegan Cinnamon Rolls: Substitute the milk with almond milk, the butter with coconut oil, and the egg with a flax egg.
Chef’s Notes
This recipe has been a cherished part of my baking repertoire for years and has evolved over time. I remember the first time I attempted to make these—it was a rainy afternoon, and my grandma called me to lend a hand. We had flour everywhere, and I accidentally used way too much cinnamon! The rolls turned out a bit bolder than intended, but you know what? They were still delicious!
The beauty of cinnamon rolls is that they’re forgiving. Whether you grow excited and add your favorite twist or stay true to the classic recipe, they always come out beautifully. Plus, nothing beats the satisfaction of savoring something you made from scratch.
FAQs and Troubleshooting
1. My dough isn’t rising. What’s wrong?
This could be due to expired yeast or too cold of an environment. Make sure your yeast is fresh and try placing it in a warm area.
2. Why are my rolls dense?
They might have been over-kneaded or you added too much flour. Aim for a soft, tacky dough.
3. Can I make these ahead of time?
Absolutely! You can assemble the rolls, refrigerate them overnight, and bake them fresh in the morning. Just allow them to rise for a bit before baking.
4. How do I store leftovers?
Keep the rolls in an airtight container at room temperature for 2-3 days. For longer storage, freeze them in an airtight bag, and reheat as needed.
Nutritional Info (if applicable)
While exact nutrition will depend on serving size and specific ingredients, a typical cinnamon roll (with frosting) can be around 300-400 calories each. Modifications can easily adjust this number, so you can enjoy these tasty treats guilt-free!
And there you have it! A cozy, delicious journey into the world of bakery-style cinnamon rolls. I hope this recipe inspires you to get in the kitchen, whip up a batch of your own, and create some lovely memories along the way. Happy baking!
Print
Bakery-Style Cinnamon Rolls
- Total Time: 45 minutes
- Yield: 12 servings 1x
- Diet: Vegetarian
Description
Delicious, soft, and gooey cinnamon rolls perfect for cozy mornings and family gatherings.
Ingredients
- 4 cups all-purpose flour
- ¼ cup granulated sugar
- 1 teaspoon salt
- 2 ¼ teaspoons instant yeast
- 1 cup milk (whole preferred)
- ½ cup unsalted butter (melted)
- 1 egg
- ¾ cup packed brown sugar (for filling)
- 2 tablespoons ground cinnamon
- ¼ cup softened butter (for filling)
- 4 oz cream cheese (for frosting)
- 1 cup powdered sugar (for frosting)
- 2 tablespoons milk (for frosting)
- Vanilla extract (for frosting)
Instructions
- Warm the milk to about 110°F (44°C) in a saucepan.
- Activate the yeast with warm milk and sugar; let sit until frothy.
- Mix in the flour, salt, egg, and melted butter.
- Knead the dough until smooth, about 6-8 minutes.
- Let it rise in a warm place until doubled, about 1 hour.
- Mix the filling ingredients into a paste.
- Roll out the dough into a rectangle.
- Spread the cinnamon-sugar mixture over the dough.
- Roll the dough tightly into a log and slice into 12 pieces.
- Arrange slices in a greased pan and let rise again for 30 minutes.
- Preheat your oven to 350°F (175°C) and bake for 25-30 minutes.
- Frost the cooled rolls with the cream cheese frosting.
Notes
Serve warm with coffee or tea. Can be made ahead and refrigerated overnight.
- Prep Time: 15 minutes
- Cook Time: 30 minutes
- Category: Breakfast
- Method: Baking
- Cuisine: American
Nutrition
- Serving Size: 1 roll
- Calories: 350
- Sugar: 16g
- Sodium: 400mg
- Fat: 12g
- Saturated Fat: 7g
- Unsaturated Fat: 5g
- Trans Fat: 0g
- Carbohydrates: 50g
- Fiber: 2g
- Protein: 6g
- Cholesterol: 30mg
Keywords: cinnamon rolls, breakfast, baking, comfort food
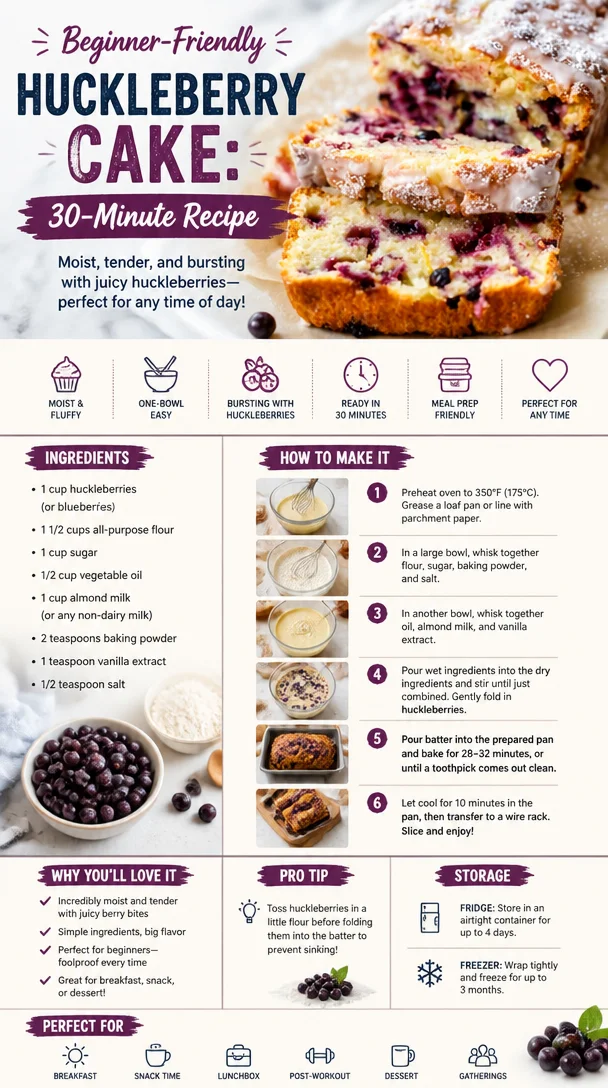
Beginner-Friendly Huckleberry Cake: 30-Minute Recipe
Welcome to Huckleberry Heaven: A Cozy Huckleberry Cake Recipe
Hello, foodie friends! It’s Olivia Bennett here, your go-to kitchen confidante and flavor enthusiast. Today, I’m thrilled to share a recipe that’s near and dear to my heart—the delightful Huckleberry Cake. This cake isn’t just a treat; it’s a flavor-packed journey through memories, nature’s bounty, and that special feeling of being at home. So, let’s roll up our sleeves, preheat that oven, and dive into this huckleberry-infused adventure!
A Slice of Nostalgia: My Huckleberry Memories
Growing up in the Pacific Northwest, my summers were often spent exploring lush forests and wandering along winding trails. The sweet, wild scent of huckleberries would beckon me closer, and I’d find myself in a berry-stained frenzy, plucking these little gems right off the bushes. My grandmother, an exceptional home cook, introduced me to huckleberries not just as delicious snacks, but as precious ingredients in her kitchen.
One summer afternoon, we decided to turn our freshly picked huckleberries into a cake that whispered sweet nothings of summer sunshine. The kitchen was alive with laughter, the chatter of memories, and the irresistible aroma of butter and sugar mingling in the air. That cake not only tasted heavenly but also solidified my love for creating comforting dishes that bring people together. Each bite was a reminder that food has the power to connect us to our roots, to our family, and to the wild, beautiful treasures of nature.
Ingredients: What You’ll Need
To create this huckleberry magic, you’ll need the following ingredients:
-
2 cups fresh huckleberries: The star of the show! If you can’t find fresh huckleberries, blueberries or blackberries are fantastic substitutes. Just know that huckleberries have a unique, sweet-tart flavor!
-
1 ½ cups all-purpose flour: The backbone of our cake. If you’re gluten-free, try using a 1:1 gluten-free flour blend; the texture will still be delightful.
-
1 cup granulated sugar: For sweetness! You can swap it out for coconut sugar or even maple syrup for a deeper flavor.
-
½ cup unsalted butter, softened: This gives our cake a rich, creamy texture. If you want to make it dairy-free, coconut oil or vegan butter does the trick!
-
2 large eggs: For binding and moisture. If you want to keep it egg-free, try using flax eggs (1 tablespoon ground flaxseed mixed with 2.5 tablespoons water = 1 egg).
-
1 tsp vanilla extract: This adds warmth and depth. Always opt for pure vanilla extract for the best flavor.
-
1 tsp baking powder: This helps the cake rise and gives it a light texture. Ensure your baking powder is fresh for the best results!
-
½ tsp baking soda: This is our secret weapon for a fluffy cake. It works beautifully alongside the baking powder.
-
½ tsp salt: Balances out the sweetness and enhances the flavors.
-
¾ cup milk: For richness. You can also use almond milk, oat milk, or any milk substitute you love!
Step-by-Step Instructions: Let’s Bake!
Now that we have our ingredients lined up, let’s jump into the step-by-step process to create this scrumptious huckleberry cake!
-
Preheat Your Oven: Preheat your oven to 350°F (175°C). This is important for ensuring even baking, so don’t skip this step!
-
Prepare Your Pan: Grease a 9-inch round cake pan with butter and dust it lightly with flour, or line it with parchment paper. This will help the cake come out easily once baked.
-
Mix the Dry Ingredients: In a medium bowl, whisk together the flour, baking powder, baking soda, and salt. This step ensures that everything is evenly distributed throughout the batter.
-
Cream the Butter and Sugar: In a large mixing bowl, beat the softened butter and granulated sugar until light and fluffy—about 3-4 minutes with a hand mixer. This process is key for incorporating air into your batter for a fluffy cake!
-
Add the Eggs and Vanilla: Beat in the eggs one at a time, mixing well after each addition. Then, add the vanilla extract and mix until combined.
-
Combine Dry and Wet Ingredients: Gradually add the dry ingredients into the butter mixture, alternating with the milk. Start and end with the flour mixture. This helps to create a well-balanced batter without overmixing!
-
Fold in the Huckleberries: Gently fold in the fresh huckleberries using a spatula. Be careful not to overmix here—this will help keep those little berries intact and brighten up every bite!
-
Pour and Smooth: Transfer the batter into your prepared cake pan. Use the spatula to smooth the top and create an even layer.
-
Bake It to Perfection: Pop your cake into the preheated oven and bake for 30-35 minutes, or until a toothpick inserted into the center comes out clean. Your kitchen will start to smell heavenly—this is the best part!
-
Cool Down: Once baked, remove the cake from the oven and let it cool in the pan for about 10 minutes. Then, turn it out onto a wire rack to cool completely. This prevents it from becoming soggy in the pan.
Serving Suggestions: Time to Delight!
Once your huckleberry cake is cool, you can serve it up simply or fancy it up. Dust a little powdered sugar on top, or drizzle with a simple lemon glaze made from powdered sugar and lemon juice for a zesty kick. Pair it with a dollop of whipped cream or a scoop of vanilla ice cream for an extra special touch. This cake is perfect for afternoon tea, a bright brunch spread, or as a sweet ending to any dinner!
Recipe Variations: Add Your Own Twist!
The beauty of this huckleberry cake lies in its versatility! Here are a few creative twists you might consider:
-
Lemon Zest: Add the zest of one lemon to the batter for a refreshing, citrusy flavor that complements the huckleberries beautifully.
-
Nutty Crunch: Toss in ½ cup of chopped walnuts or pecans for added texture and nuttiness.
-
Spiced Version: Add ½ tsp of ground cinnamon or nutmeg for a warm spice twist.
-
Swirl in Cream Cheese: Create a delicious cream cheese swirl by mixing 4 oz of softened cream cheese with ¼ cup of sugar and 1 egg, and then dolloping this into the batter before baking.
-
Fruit Fusion: Mix huckleberries with other berries like raspberries or strawberries for a mixed berry cake that celebrates all the summer flavors!
Chef’s Notes: A Little Love from My Kitchen
This huckleberry cake is more than just a recipe; it’s a love letter to summer days spent in the wild, and a reminder of the sweet moments spent in the kitchen with family. Over the years, I’ve experimented with this cake and have fallen in love with its adaptability. Every time I make it, I’m reminded of my grandmother’s laughter and the sunny afternoons we shared.
One of my funniest kitchen stories involves a huckleberry-staining incident. Let’s just say that berry juice can be quite the culprit! I once had huckleberry handprints all over the kitchen—even the ceiling! It’s these little mishaps that make cooking such a joy and creates lasting memories. So, embrace the mess; it means you’re cooking with love!
FAQs and Troubleshooting: Let’s Clear Things Up!
1. Why did my cake sink in the middle?
A sinking cake usually indicates that it didn’t bake long enough or was too wet. Make sure your oven is at the correct temperature, bake it until a toothpick comes out clean, and avoid opening the oven door too early!
2. How do I store leftovers?
Keep any leftover cake in an airtight container at room temperature for up to 3 days. If you wish to store it longer, you can freeze it! Just wrap it tightly in plastic wrap and then foil. It will stay fresh for about 2-3 months.
3. Can I use frozen huckleberries?
Absolutely! Just make sure not to thaw them before mixing them into the batter. This helps prevent too much purple bleeding and keeps your cake looking delightful.
4. What if I want to make a layered cake?
To make a layered huckleberry cake, simply double the recipe and bake in two 9-inch pans. Once cooled, you can layer them and add your favorite frosting or whipped cream between the layers for a showstopper dessert!
Nutritional Info (Optional)
For those who like to keep an eye on their dietary needs, here’s a quick glance at the nutritional breakdown for one slice of huckleberry cake, based on standard serving (assuming approximately 12 slices):
- Calories: 220
- Protein: 3g
- Fat: 8g
- Carbohydrates: 36g
- Fiber: 1g
- Sugar: 10g
This little treat is certainly indulgent, but it’s made with love and nature’s treasures—so enjoy every delicious bite!
Thank you for joining me on this huckleberry cake journey! I hope you find joy, warmth, and a splash of grandmother’s love in every bite. Happy baking, and as always, remember that the best ingredient in any recipe is a pinch of passion and a sprinkle of joy!
Print
Huckleberry Cake
- Total Time: 50 minutes
- Yield: 12 servings 1x
- Diet: Vegetarian
Description
A delightful huckleberry cake that captures the essence of summer with its sweet-tart flavor and nostalgic memories.
Ingredients
- 2 cups fresh huckleberries
- 1 ½ cups all-purpose flour
- 1 cup granulated sugar
- ½ cup unsalted butter, softened
- 2 large eggs
- 1 tsp vanilla extract
- 1 tsp baking powder
- ½ tsp baking soda
- ½ tsp salt
- ¾ cup milk
Instructions
- Preheat your oven to 350°F (175°C).
- Prepare a 9-inch round cake pan with butter and flour or parchment paper.
- Mix the dry ingredients in a medium bowl.
- Cream the butter and sugar until light and fluffy.
- Add the eggs one at a time and then mix in the vanilla.
- Combine dry and wet ingredients, alternating with milk.
- Fold in the huckleberries gently.
- Pour the batter into the prepared cake pan.
- Bake for 30-35 minutes until a toothpick comes out clean.
- Cool the cake for 10 minutes, then turn out to cool completely.
Notes
Dust with powdered sugar or drizzle with lemon glaze. Enjoy with whipped cream or vanilla ice cream.
- Prep Time: 15 minutes
- Cook Time: 35 minutes
- Category: Dessert
- Method: Baking
- Cuisine: American
Nutrition
- Serving Size: 1 slice
- Calories: 220
- Sugar: 10g
- Sodium: 200mg
- Fat: 8g
- Saturated Fat: 5g
- Unsaturated Fat: 3g
- Trans Fat: 0g
- Carbohydrates: 36g
- Fiber: 1g
- Protein: 3g
- Cholesterol: 60mg
Keywords: huckleberry cake, dessert, summer recipe, baking
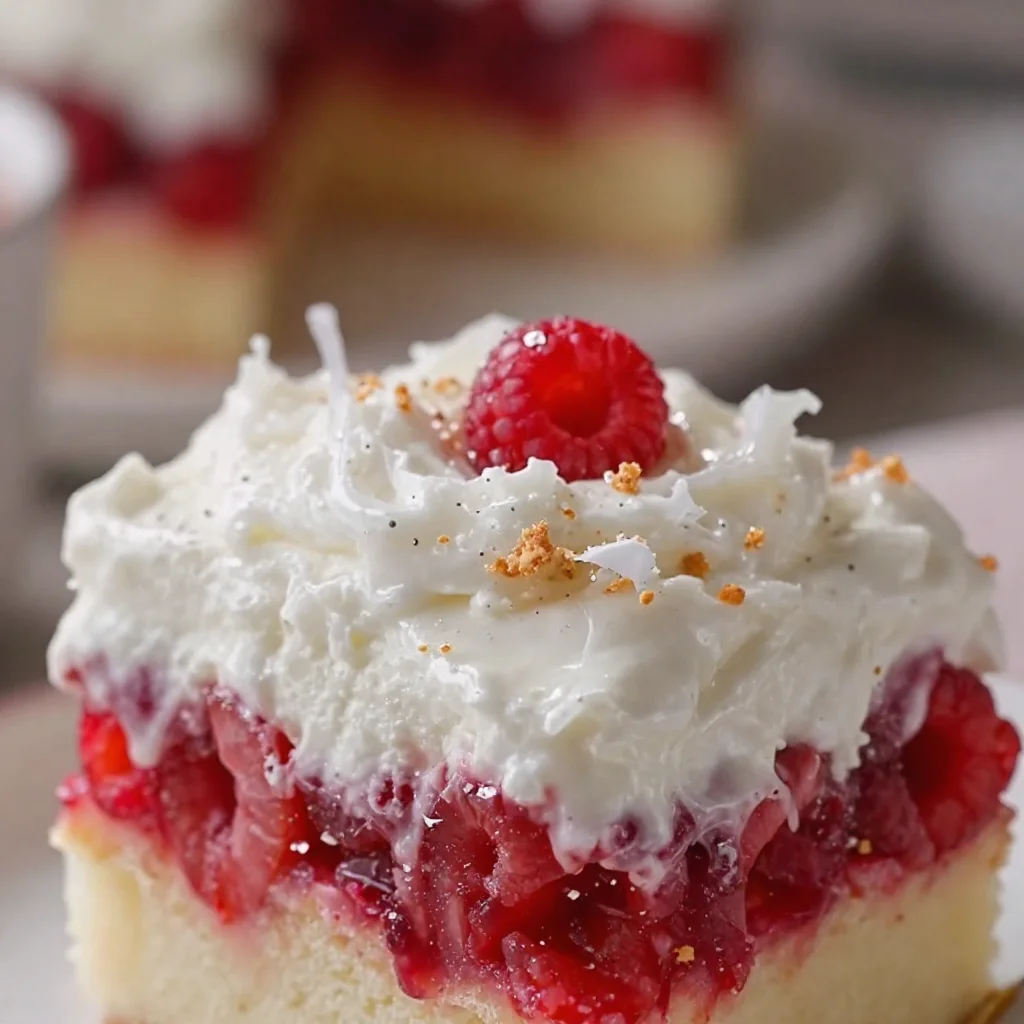
Beginner-Friendly Raspberry Zinger Poke Cake (No-Bake)
Delicious Raspberry Zinger Poke Cake
Introduction
Welcome, fellow food lovers! Today, I’m beyond excited to share a recipe that has been a lingering favorite in my kitchen—the mouthwatering Raspberry Zinger Poke Cake! 🍰 This delightful dessert is not only a feast for the eyes but also a symphony of flavors. Imagine a soft, fluffy cake drenched in raspberry goodness, topped with a creamy layer that’ll make your taste buds dance. It’s perfect for any occasion, whether you’re hosting a cozy get-together or simply satisfying a sweet craving after a long day.
There’s something particularly special about poke cakes—they’re easy to make, often use simple ingredients, and offer a surprising burst of flavor with each slice. This Raspberry Zinger version is inspired by the classic raspberry zinger cakes that some of us might remember from childhood, with a fun twist that adds a modern touch. A cake that brings back fond memories while introducing new flavors? Now that’s what I call a winner!
As we delve into this recipe, I’ll guide you step-by-step, sharing tips, tricks, and a sprinkle of love along the way. By the end, you’ll not only have a stunning cake to share with friends and family but also the confidence to whip it up any time the mood strikes. So, aprons on, let’s get baking and make some Raspberry Zinger magic happen!
Personal Story
Growing up, my family had this tradition of gathering every Sunday for a big dinner, complete with laughter, stories, and of course, dessert. One particular Sunday, I remember my grandmother brought over her famous raspberry zinger cake. The kitchen filled with the sweet, tangy scent of raspberries, and I could hardly wait to sink my fork into that fluffy goodness. It was like a warm hug in cake form!
I remember watching her carefully poke holes into the cake, the anticipation bubbling up inside me. "This will make it even more delicious," she said with a twinkle in her eye. The cake was always a hit, bringing everyone to the dinner table with gleeful smiles.
Years later, as I started my cooking journey, I realized how much those moments meant to me—they were filled with love, connection, and of course, delicious food. This Raspberry Zinger Poke Cake not only represents those cherished memories but also reminds me to carry that warmth and joy into my own kitchen today. Let’s recreate that nostalgic feeling together!
Ingredients
Here are the ingredients you’ll need to make this scrumptious Raspberry Zinger Poke Cake:
-
1 box of yellow cake mix
This is the base of our cake. Using a yellow cake mix results in a light, fluffy texture. Feel free to substitute with a homemade vanilla cake mix if you’re feeling adventurous! -
3 large eggs
Eggs add richness and moisture to the cake. You can use flax eggs as a vegan alternative or substitute with applesauce (1/4 cup per egg). -
1 cup of water
Water helps to bind the mix together. If you want to elevate the flavor, substitute with milk or raspberry juice for an extra zing! -
1 cup of raspberry preserves
This is the star of the show! Raspberry preserves provide sweetness and tartness. You can swap this with strawberry or blueberry preserves if you want to play with flavors. -
1 box of instant vanilla pudding mix
This adds creaminess and depth to our cake’s topping. You can also experiment with other flavors like coconut or lemon. -
2 cups of cold milk
You’ll need this to prepare the pudding mix. Almond milk or coconut milk works perfectly for a dairy-free option. -
8 oz of whipped topping (like Cool Whip)
This gives our cake its light and fluffy texture. If you prefer homemade, feel free to whip some cream with a bit of sugar! -
Fresh raspberries (for garnish)
Fresh fruit is a must for a delightful presentation and added flavor. You can also use strawberries or blueberries. -
Optional: Shredded coconut
If you’re feeling adventurous and want that tropical twist, coconut is a fabulous addition to the top of the cake for added texture!
Step-by-Step Instructions
-
Preheat the Oven
Start by preheating your oven to 350°F (175°C). This step is crucial, so make sure it’s nice and hot before you pop the cake in! -
Prepare the Cake Mix
In a large mixing bowl, combine the yellow cake mix, eggs, and water. Use an electric mixer to beat the mixture until it’s smooth and combined—about 2 minutes. Tip: Be careful not to overmix; just until combined is perfect! -
Bake the Cake
Grease a 9×13-inch baking dish or pan (you want this baby to slide right out later). Pour in the batter and spread it evenly. Bake for 25 to 30 minutes until the cake is golden and a toothpick comes out clean. Don’t forget to let it cool in the pan for about 10 minutes before transferring it to a wire rack to cool completely! -
Poke the Holes
Once the cake has cooled completely (trust me, you don’t want a hot cake for this part), take a fork or skewer and poke holes all over the top of the cake. Make sure to poke deep enough for the raspberry preserves to seep in—this is where the magic happens! -
Add the Raspberry Preserves
In a small bowl, slightly warm the raspberry preserves in the microwave for about 10-15 seconds—just enough to make it easier to pour. Then, pour the preserves evenly over the cake, ensuring it seeps into all those lovely holes. -
Prepare the Pudding Topping
In another bowl, whisk together the instant vanilla pudding mix and cold milk. Beat it for about 2 minutes until it thickens up nicely. It should have a smooth, creamy consistency that’ll top our cake perfectly! -
Combine with Whipped Topping
Gently fold in the whipped topping into your pudding mixture. This will create a light, fluffy layer that’s going to sit atop your poke cake beautifully. It’s like a cloud of sweetness! -
Spread the Pudding Mixture
Carefully spread the pudding and whipped topping mixture over the raspberry-soaked cake. Make sure to cover all areas so every slice has that creamy delight. -
Chill the Cake
Cover the cake with plastic wrap and place it in the fridge for at least 2 hours. I know it feels like waiting forever, but this step allows the flavors to meld together beautifully! -
Serve and Enjoy
Just before serving, garnish your Raspberry Zinger Poke Cake with fresh raspberries and a sprinkle of shredded coconut if you’re using it. Take a moment to appreciate your masterpiece before slicing. Serve with a generous dollop of whipped cream on the side if desired!
Serving Suggestions
This Raspberry Zinger Poke Cake is not just a feast for the taste buds but also a visual delight! For a simple yet elegant presentation, serve it on a lovely platter garnished with fresh raspberries and mint leaves. You can cut the cake into squares and serve on individual dessert plates with a scoop of vanilla ice cream for an indulgent treat. Trust me, your guests will be impressed!
Recipe Variations
- Chocolate Raspberry Zinger: Swap out a chocolate cake mix for the yellow cake to create a rich, decadent version of this dessert.
- Vegan Delight: Use a vegan cake mix, substitute the eggs with flaxseed or applesauce, and whip up some coconut cream instead of whipped topping for a guilt-free treat.
- Nutty Surprise: Add chopped nuts (like almonds or walnuts) to the topping for an added crunch and depth of flavor.
- Lemon Twist: Incorporate a lemon pudding mix instead of vanilla for a refreshing citrusy-sweet flavor that pairs beautifully with raspberries.
- Berry Medley: Mix in other berries, like blueberries or strawberries, with the raspberry preserves for a colorful, fruit-packed cake!
Chef’s Notes
Do you know the beautiful part about baking? It’s ever-evolving! This Raspberry Zinger Poke Cake has seen many transformations in my kitchen. There were times when I added orange zest for a refreshing tang, or even a splash of almond extract for warmth. Each batch brings a bit of nostalgia but also the excitement of trying something new. And let’s not forget those delightful kitchen disasters—like the time I accidentally mixed up salt with sugar! 😅 It turned into a funny memory rather than a dessert disaster, all in the spirit of home cooking and experimenting.
Remember, cooking is always about having fun and making it your own!
FAQs and Troubleshooting
Q: Why is my cake sinking in the middle?
A: A common reason for cake sinking is opening the oven door too soon, which can disrupt the rising process. Make sure to wait until the minimum baking time is up before peeking!
Q: Can I make this a day in advance?
A: Absolutely! In fact, making it a day ahead allows the flavors to meld beautifully. Just ensure it’s well covered to keep it fresh.
Q: How do I store leftovers?
A: Store any leftover cake in the fridge, covered tightly with plastic wrap. It should last for about 3-4 days, although I doubt it’ll last that long!
Q: Can I freeze this cake?
A: Yes! However, I recommend freezing it before adding the pudding layer. Wrap the cooled cake well in plastic and aluminum foil, and it will keep in the freezer for up to 2 months. When you’re ready to enjoy it, thaw it in the fridge, add your layers, and dig in!
Nutritional Info (optional)
While it’s important to enjoy your desserts, it’s also good to know what you’re indulging in! This Raspberry Zinger Poke Cake serves about 12 and each serving contains approximately 300 calories, 6g of fat, 54g of carbohydrates, and 3g of protein. Always remember to balance your sweet treats with wholesome meals!
And there you have it—your guide to making an outstanding Raspberry Zinger Poke Cake! I hope you find joy in every bite and every moment spent in the kitchen. Happy baking and enjoy every slice with your loved ones! 🍰❤️
Print
Delicious Raspberry Zinger Poke Cake
- Total Time: 50 minutes
- Yield: 12 servings 1x
- Diet: Vegetarian
Description
A delightful Raspberry Zinger Poke Cake that combines fluffy yellow cake with raspberry preserves and a creamy topping, perfect for any occasion.
Ingredients
- 1 box of yellow cake mix
- 3 large eggs
- 1 cup of water
- 1 cup of raspberry preserves
- 1 box of instant vanilla pudding mix
- 2 cups of cold milk
- 8 oz of whipped topping (like Cool Whip)
- Fresh raspberries (for garnish)
- Optional: Shredded coconut
Instructions
- Preheat your oven to 350°F (175°C).
- Combine the yellow cake mix, eggs, and water in a large mixing bowl and mix until smooth.
- Bake the batter in greased 9×13-inch pan for 25 to 30 minutes.
- Poke holes all over the cooled cake using a fork or skewer.
- Warm the raspberry preserves in the microwave and pour over the cake.
- Whisk together instant vanilla pudding mix and cold milk until thickened.
- Fold in whipped topping to the pudding mixture.
- Spread the pudding mixture over the raspberry-soaked cake.
- Chill the cake in the fridge for at least 2 hours.
- Garnish with fresh raspberries and optional shredded coconut before serving.
Notes
For variations, try using different flavors of pudding or cake mix, or add nuts for extra texture!
- Prep Time: 20 minutes
- Cook Time: 30 minutes
- Category: Dessert
- Method: Baking
- Cuisine: American
Nutrition
- Serving Size: 1 slice
- Calories: 300
- Sugar: 25g
- Sodium: 200mg
- Fat: 6g
- Saturated Fat: 3g
- Unsaturated Fat: 2g
- Trans Fat: 0g
- Carbohydrates: 54g
- Fiber: 1g
- Protein: 3g
- Cholesterol: 50mg
Keywords: Raspberry, Cake, Dessert, Poke Cake, Easy Dessert

Minute Raspberry Galette for Beginners (No-Fuss Crust)
Easy Raspberry Galette: A Simple Yet Stunning Dessert!
Welcome to my kitchen, dear friends! Today, I’m thrilled to share a delightful recipe that not only brings a splash of vibrant flavor but also a touch of rustic charm to your dessert table: the Easy Raspberry Galette. When I think of galettes, I envision sunny afternoons spent savoring the sweet-tart notes of fresh fruits, mixed with a buttery crust, all while enjoying good company. The beauty of this dish lies in its simplicity—you don’t need to be a pastry chef to impress your friends and family with this stunning dessert.
There’s something magical about the way a galette allows the fruit to take center stage, enveloped in a flaky, tender crust that seems to sing of home. Whether it’s fresh raspberries reminding you of warm summer days or a cozy gathering with loved ones, every bite tells a story. And guess what? This rustic dessert is incredibly forgiving; it doesn’t need to be perfect. The charm is in its imperfect shape, the golden edges, and the bubbling fruit that peeks through. So, let’s roll up those sleeves and dive into this joyfully messy kitchen adventure!
To make an Easy Raspberry Galette, you’ll be working with a handful of wholesome ingredients. I promise, you’ll find it therapeutic to create something so beautiful with your own two hands. And not only will your kitchen smell divine, but you’ll also fill the hearts of those around you with a little love and sweetness. Whether you’re enjoying it on a Sunday brunch, a family gathering, or just a self-care treat, this galette is sure to create memories and smiles.
A Sweet Memory: My First Galette
Let me take you back to a warm summer evening a few years ago. My grandma, the queen of all things baked and buttery, invited me over for what she called a “fancy dessert night.” I remember walking into her cozy kitchen, the delicious aroma of fresh baked goods wafting through the air, making my stomach growl in anticipation.
That evening, she introduced me to the galette. As she rolled out the dough—flour clouds gently dancing around us—she explained, “It’s just a free-form pie, darling.” With a wink and a wink of her flour-dusted nose, she showed me how to fold the edges, leaving a beautiful rustic border. We chose plump, ripe raspberries from her garden that day, and watching those bright jewels come alive in the oven was pure magic.
Sitting together at her kitchen table, we savored every slice, the tart raspberries beautifully balancing the sweet, buttery crust. I learned that day that cooking is not just about flavors—it’s about connections. Now, every time I whip up a galette, I am reminded of those special moments shared in that cozy kitchen and the sense of warmth that good food brings to the table.
Ingredients
Before we jump into the cooking, let’s gather our ingredients! Here’s what you’ll need to create this delightful Easy Raspberry Galette:
-
All-purpose flour (1 1/4 cups): The foundation of our buttery crust. You can substitute with whole wheat flour for a nuttier flavor or gluten-free flour for a gluten-free version.
-
Unsalted butter (1/2 cup, chilled, chopped): Butter brings a rich flavor and flaky texture to the crust. If you’re in a pinch, you can use cold coconut oil or margarine, although the taste will vary.
-
Granulated sugar (1/4 cup, plus more for sprinkling): This sweetness helps balance the tartness of the raspberries. Feel free to swap in brown sugar for a more caramel-like flavor or to use honey or maple syrup in moderation.
-
Salt (1/4 tsp): A pinch of salt enhances and balances the flavors beautifully.
-
Ice water (3-4 tbsp): This helps bring the dough together without melting the butter. You can use club soda for a bubbly crust!
-
Fresh raspberries (2 cups): The star of the show! Use fresh for the best flavor and texture; if you’re using frozen, thaw them first and drain excess liquid.
-
Cornstarch (1 tbsp): This helps absorb moisture from the raspberries, keeping the crust from getting soggy.
-
Vanilla extract (1 tsp): This adds a lovely layer of flavor. Feel free to substitute with almond extract for something a bit different!
-
Egg wash (1 egg beaten with a splash of water): This gives the galette a beautiful, shiny glaze. If you’re going vegan, a plant-based milk works too.
With all these wonderful ingredients, you’ll be ready to create something deliciously rustic and totally Instagram-worthy!
Step-by-Step Instructions
Let’s get into the fun part! Here’s a detailed guide to making your own Easy Raspberry Galette, along with some little chef hacks to make the process easier and even more enjoyable.
Step 1: Prepare the Dough
-
Mix the Flour and Butter: In a mixing bowl, combine the all-purpose flour and salt. Add the chilled, chopped unsalted butter. Using a pastry cutter or your fingers, work the butter into the flour until it resembles coarse crumbs. You want little bits of butter to remain—this is what makes the crust flaky!
-
Add the Sugar and Water: Stir in the granulated sugar. Then, slowly add the ice water, one tablespoon at a time, mixing until the dough comes together. It should be moist but not sticky. If it feels too dry, add a tiny bit more water.
-
Chill the Dough: Form the dough into a disk, wrap it in plastic wrap, and chill for at least 30 minutes. This step is crucial for the butter to firm up and will make rolling out easier.
Step 2: Prepare the Filling
- Mix the Berries: In a medium bowl, gently toss the fresh raspberries with cornstarch, sugar, and vanilla extract. Let the mixture sit for about 10-15 minutes for the juices to meld together. During this time, you can preheat your oven to 400°F (200°C).
Step 3: Roll Out the Dough
-
Flour Your Surface: Once the dough has chilled, remove it from the refrigerator. On a lightly floured surface, roll out the dough into a rough 12-inch circle. Don’t stress about it being perfectly round—remember, rustic is the name of the game!
-
Transfer It: Carefully transfer the dough to a lined baking sheet. You can use parchment paper for easy cleanup and to prevent sticking.
Step 4: Assemble the Galette
-
Add the Filling: Spoon the raspberry filling into the center of the dough, leaving about a 2-inch border.
-
Fold the Edges: Gently fold the edges of the dough over the filling, creating a pleasing border. It doesn’t have to be perfect. The goal is to contain the berries while allowing the top to be exposed.
-
Egg Wash Time: Brush the crust with the egg wash (or plant-based milk), and sprinkle a bit of sugar over the crust for a sparkling finish.
Step 5: Bake
-
Bake to Perfection: Bake the galette in your preheated oven for about 25-30 minutes or until the crust is golden brown and the berries are bubbling.
-
Cool and Enjoy: Allow the galette to cool for at least 10 minutes before slicing. This gives the juices time to settle, making for a cleaner cut.
Serving Suggestions
When serving the Easy Raspberry Galette, presentation is key! Slice it into wedges and serve warm, perhaps with a generous dollop of whipped cream or a scoop of vanilla ice cream on the side. A sprinkle of powdered sugar on top can elevate its beauty even more. Enjoy this delightful treat with a cup of tea or coffee for a perfect afternoon pick-me-up!
Recipe Variations
- Berry Galette: Swap out raspberries for strawberries, blueberries, or even a mix of berries for a colorful twist.
- Peach Raspberry Galette: Combine sweet peaches with raspberries for a delightful summer flavor.
- Nutty Crust: Add ground almonds to the crust for a nutty flavor that pairs beautifully with the fruit.
- Herb-Infused: Add a touch of fresh thyme or basil to the raspberry filling for a unique and aromatic flavor.
- Vegan Option: Use coconut oil instead of butter and a flax egg in place of the egg wash!
Chef’s Notes
This Easy Raspberry Galette has been a staple in my kitchen for years, and it evolves with the seasons, just like life itself. I remember one summer trying out different fillings, and oh boy, the combinations were endless! My favorite deviation was adding a splash of balsamic vinegar to the filling for a lovely depth of flavor.
Don’t be afraid to experiment and use whatever fruits are in season—this recipe is all about creativity, joy, and a bit of delicious messiness! Every time I make it, I’m reminded of those lovely afternoons with my grandma.
FAQs and Troubleshooting
-
My dough is too sticky! What should I do?
If your dough feels overly sticky when rolling it out, don’t panic! Simply add a light sprinkle of flour to your work surface and your rolling pin. Alternatively, chill the dough for another 15 minutes to firm it up. -
Why is my galette soggy?
Soggy galette can happen if the filling is too wet. Make sure to drain any excess liquid from thawed frozen berries, and don’t skip the cornstarch—it helps absorb moisture during baking. -
How do I store leftovers?
Store any leftover galette covered in an airtight container in the fridge for up to 2 days. For the best texture when reheating, place it in the oven to warm up rather than the microwave. -
Can I make the dough ahead of time?
Absolutely! You can make the dough up to 2 days ahead. Just make sure it’s wrapped well and chilled in the fridge. You can also freeze it for up to a month.
Nutritional Info
Note: Nutritional values are estimates and may vary depending on specific brands and preparation methods.
- Serving Size: 1 slice (based on 8 servings)
- Calories: ~210
- Protein: 2g
- Fat: 10g
- Carbohydrates: 29g
- Sugar: 8g
And there you have it! A charming and incredibly easy Raspberry Galette recipe that’s as enjoyable to make as it is to eat. So, gather your loved ones, don that apron, and bake up a storm! I can’t wait to hear about your creations and the sweet moments they inspire. Happy baking, friends!
Print
Easy Raspberry Galette
- Total Time: 45 minutes
- Yield: 8 servings 1x
- Diet: Vegetarian
Description
A delightful and simple dessert featuring a flaky crust and fresh raspberries, perfect for any gathering.
Ingredients
- 1 1/4 cups All-purpose flour
- 1/2 cup Unsalted butter, chilled, chopped
- 1/4 cup Granulated sugar, plus more for sprinkling
- 1/4 tsp Salt
- 3–4 tbsp Ice water
- 2 cups Fresh raspberries
- 1 tbsp Cornstarch
- 1 tsp Vanilla extract
- 1 Egg wash (1 egg beaten with a splash of water)
Instructions
- Mix the flour and butter: Combine flour and salt in a bowl. Add the chopped butter and work it into the flour until it resembles coarse crumbs.
- Add the sugar and water: Stir in sugar and slowly mix in ice water until the dough comes together.
- Chill the dough: Form the dough into a disk, wrap in plastic, and chill for at least 30 minutes.
- Mix the berries: Gently toss raspberries with cornstarch, sugar, and vanilla in a bowl and let sit for 10-15 minutes.
- Flour your surface: Roll out chilled dough into a rough 12-inch circle on a floured surface.
- Transfer it: Move the dough to a lined baking sheet.
- Add the filling: Place raspberry filling in the center of the dough, leaving a 2-inch border.
- Fold the edges: Fold the dough edges over the filling to create a border.
- Brush with egg wash: Apply egg wash and sprinkle sugar over the crust.
- Bake to perfection: Bake in a preheated oven at 400°F for 25-30 minutes until golden brown and bubbling.
- Cool and enjoy: Let cool for 10 minutes before slicing.
Notes
Serve warm with whipped cream or vanilla ice cream. You can substitute with different berries or make it vegan.
- Prep Time: 15 minutes
- Cook Time: 30 minutes
- Category: Dessert
- Method: Baking
- Cuisine: French
Nutrition
- Serving Size: 1 slice
- Calories: 210
- Sugar: 8g
- Sodium: 100mg
- Fat: 10g
- Saturated Fat: 6g
- Unsaturated Fat: 4g
- Trans Fat: 0g
- Carbohydrates: 29g
- Fiber: 2g
- Protein: 2g
- Cholesterol: 70mg
Keywords: galette, raspberry dessert, easy dessert, rustic pie
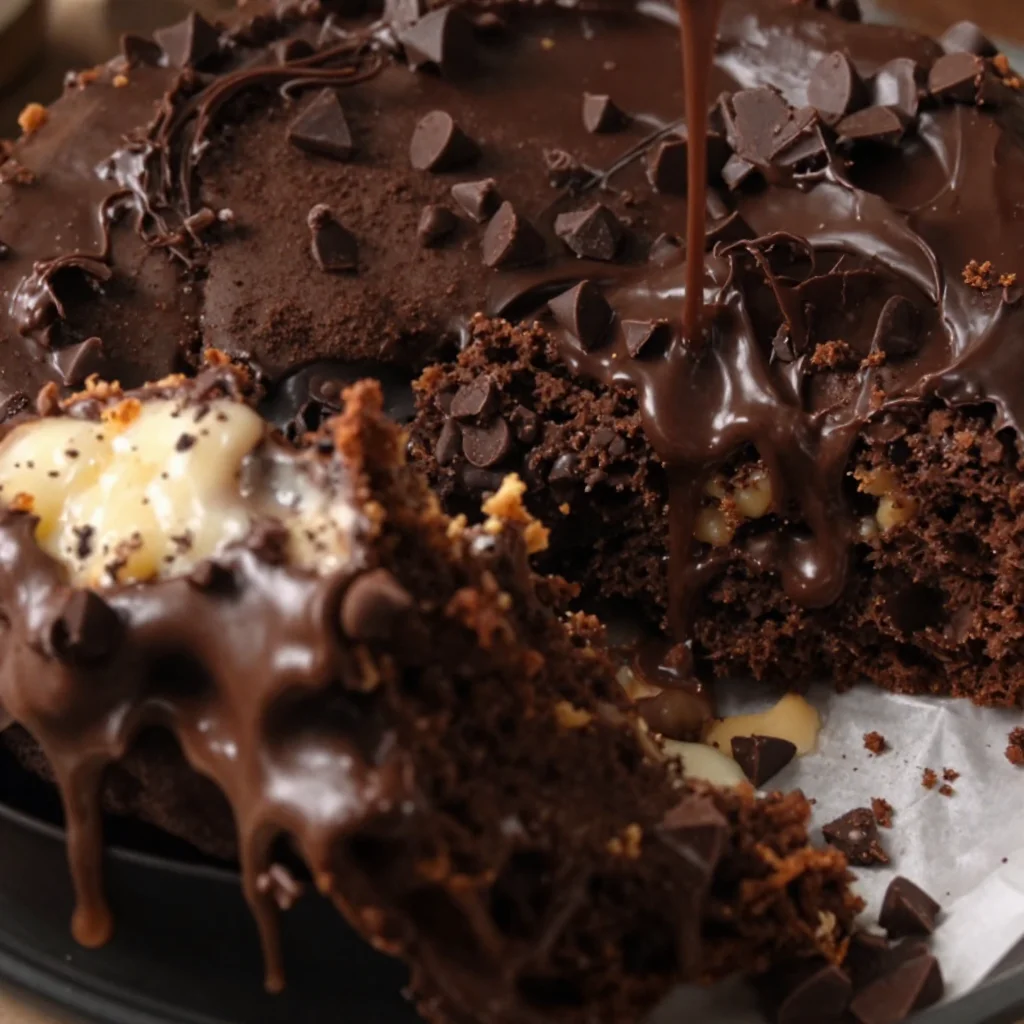
Beginner-friendly fudgy chocolate cake from scratch
The Ultimate Super Rich and Fudgy Chocolate Cake
Welcome to my kitchen! Today we’re diving deep into the world of chocolate—a sweet escape that speaks to all of us. I’m thrilled to share with you my Super Rich and Fudgy Chocolate Cake, a luscious dessert that feels like a warm hug on a plate. This cake is perfect for celebrations, cozy get-togethers, or just because you deserve it! Imagine sinking your fork into a moist, decadent slice filled with intense chocolate flavor. Doesn’t that make your heart sing?
Growing up, chocolate cake was a staple at every family gathering. My mom would whip up her famous recipe for birthdays, holidays, and even the random Tuesday just because. I can still picture her standing over the mixing bowl, her apron dusted with flour, humming a tune while the rich aroma of melting chocolate enveloped our cozy kitchen. This cake was a family favorite, not just for its flavor, but for the memories it created around the dinner table. It was in those sweet moments of laughter and love, sharing a slice of cake with family, that I learned how food can connect us in the most powerful ways.
Now, it’s your turn to create your own memories with this delicious treat! So, let’s get started!
Ingredients
To make the best Super Rich and Fudgy Chocolate Cake, you’ll need the following ingredients:
-
1 ¾ cups all-purpose flour
A must-have in any cake, flour gives structure. If you need a gluten-free option, swap half of it with almond flour for a nutty twist! -
2 cups granulated sugar
Sugar adds sweetness and moisture. For a caramel touch, use brown sugar or try coconut sugar for a healthier alternative. -
¾ cup unsweetened cocoa powder
This is the star of the show! It brings that deep chocolate flavor. Look for Dutch-processed cocoa for a smoother taste, or use raw cacao for health benefits. -
1 ½ teaspoons baking powder
Helps the cake rise. If you’re out of baking powder, you can use baking soda, but double the amount using a bit of vinegar or yogurt for a tender crumb. -
1 teaspoon baking soda
Critical for a fluffy texture. Make sure it’s fresh! A little expired baking soda can leave your cake dense. -
1 teaspoon salt
A pinch of salt enhances the flavors. Kosher salt works well, but sea salt adds a lovely crunch when sprinkled on top! -
2 large eggs
They provide moisture and help bind. For a vegan twist, use flax eggs (1 tablespoon ground flaxseed mixed with 3 tablespoons water per egg). -
1 cup whole milk
Rich buttermilk can be substituted if you want extra richness, or use almond milk for a plant-based version. -
½ cup vegetable oil
Oil keeps the cake moist. Canola oil or melted coconut oil are fantastic alternatives. -
2 teaspoons vanilla extract
Adds depth to flavor. Don’t skip this! Use pure vanilla extract for the best taste. -
1 cup boiling water
Surprised? Adding boiling water helps the cocoa bloom, enhancing the chocolate flavor. You can replace it with brewed coffee for a mocha taste (trust me, it’s magic!).
Step-by-Step Instructions
-
Preheat the Oven: Preheat your oven to 350°F (175°C). Greasing and lining two 9-inch round cake pans with parchment paper will make it easier to remove the cakes later. A quick swipe of non-stick spray or butter works wonders!
-
Mix Dry Ingredients: In a large mixing bowl, combine the flour, sugar, cocoa powder, baking powder, baking soda, and salt. Whisk together until well combined. Pro tip: Sifting the cocoa powder can help eliminate any lumps!
-
Combine Wet Ingredients: In another bowl, whisk together the eggs, milk, oil, and vanilla until smooth and frothy. This step infuses air into your batter, which adds to the fluffiness of the cake.
-
Blend Together: Pour the wet ingredients into the dry ingredients and mix until just combined. Be careful not to overmix; a few lumps are fine. Your stiff batter will loosen up with the next step!
-
Add Boiling Water: Slowly pour in the boiling water and stir. This will thin out your batter, which might look a little strange, but trust me—it’s supposed to be this way! This step is key—it makes for an ultra-moist cake.
-
Bake: Divide the batter evenly between the prepared cake pans. Tap them lightly on the counter to release any air bubbles. Bake for 30-35 minutes or until a toothpick inserted in the center comes out clean.
-
Cool: Let the cakes cool in the pans for about 10 minutes, then transfer them to wire racks to cool completely. This cooling step is essential for making your frosting spreadable!
-
Frost and Serve: Once the cakes have cooled, layer and frost with your favorite chocolate frosting (I’ll share my easy recipe soon). You can also sprinkle some sea salt on top for a sweet-salty contrast.
Serving Suggestions
Serve slices of this decadent cake on a beautiful plate with a scoop of vanilla ice cream on the side. Drizzle a little chocolate sauce or a berry compote over the top for that extra “wow” factor. It’s perfect for impressing guests or indulging on a cozy night in.
Recipe Variations
-
Chocolate Mint Cake: Add a teaspoon of peppermint extract to the batter for a refreshing twist!
-
Espresso Delight: Stir in a tablespoon of instant espresso powder to deepen the chocolate flavor.
-
Nutty Chocolate Cake: Fold in half a cup of chopped nuts (walnuts or pecans) for an added crunch.
-
Fruit-Filled Indulgence: Add in a cup of fresh raspberries or cherries for a fruity contrast.
-
Vegan Variation: Use plant-based milk, flax eggs, and coconut oil to make this cake completely vegan without sacrificing flavor!
Chef’s Notes
This recipe is a cherished hit among friends and family. I’ve evolved it over the years, experimenting with different flours and extracts until I found the perfect balance. One of my funniest kitchen disasters happened when I accidentally swapped the sugar for salt—let’s just say that cake did NOT make it out of the pan! But every baking misstep has taught me so much about the magic happening behind the scenes. That’s the beauty of cooking—you learn, you grow, and you develop a passion that’s truly unique.
FAQs and Troubleshooting
-
Why is my cake dense?
A dense cake can result from overmixing the batter or using old leavening agents. Make sure to mix just until combined and check the expiration dates on your baking powder and soda. -
How do I store the cake?
If you have leftovers (which is rare!), store them in an airtight container at room temperature for 3-4 days. You can also refrigerate it, but bring it to room temperature before serving for the best texture. -
Can I make this cake ahead of time?
Absolutely! You can bake and cool the cake a day in advance. Just keep it tightly wrapped. Frosting can also be made a day in advance and stored in the fridge—just give it a quick whisk before using. -
What can I do if my frosting is too thick?
If your frosting is too thick to spread, you can thin it out by adding a tablespoon of milk or cream. Mix in a little at a time until you get the right consistency.
Nutritional Info
While this cake is a special treat and not necessarily a “health food,” it’s all about balance, right? Each slice (without frosting) typically contains about 350 calories, with a good amount of richness that’s worth every bite.
So there you have it—my Super Rich and Fudgy Chocolate Cake recipe! With every step, I hope you filled your kitchen with warmth and love, just like my mother did. Don’t forget to enjoy the little moments—the laughter, the smells, and the taste of success. Happy baking!
Print
Super Rich and Fudgy Chocolate Cake
- Total Time: 50
- Yield: 8 servings 1x
- Diet: Vegetarian
Description
A luscious chocolate cake that’s moist, decadent, and filled with intense chocolate flavor.
Ingredients
- 1 ¾ cups all-purpose flour
- 2 cups granulated sugar
- ¾ cup unsweetened cocoa powder
- 1 ½ teaspoons baking powder
- 1 teaspoon baking soda
- 1 teaspoon salt
- 2 large eggs
- 1 cup whole milk
- ½ cup vegetable oil
- 2 teaspoons vanilla extract
- 1 cup boiling water
Instructions
- Preheat the Oven: Preheat your oven to 350°F (175°C) and prepare two 9-inch round cake pans.
- Mix Dry Ingredients: In a large bowl, combine the flour, sugar, cocoa powder, baking powder, baking soda, and salt.
- Combine Wet Ingredients: In another bowl, whisk together the eggs, milk, oil, and vanilla.
- Blend Together: Pour the wet ingredients into the dry ingredients and mix until just combined.
- Add Boiling Water: Slowly pour in the boiling water and stir until smooth.
- Bake: Divide the batter between the prepared pans and bake for 30-35 minutes.
- Cool: Let the cakes cool in the pans for 10 minutes before transferring them to wire racks.
- Frost and Serve: Layer and frost with your favorite chocolate frosting.
Notes
For extra flavor variations, consider adding peppermint extract, espresso powder, or fresh fruits.
- Prep Time: 15
- Cook Time: 35
- Category: Dessert
- Method: Baking
- Cuisine: American
Nutrition
- Serving Size: 1 slice
- Calories: 350
- Sugar: 35g
- Sodium: 400mg
- Fat: 12g
- Saturated Fat: 3g
- Unsaturated Fat: 7g
- Trans Fat: 0g
- Carbohydrates: 54g
- Fiber: 3g
- Protein: 6g
- Cholesterol: 40mg
Keywords: chocolate cake, dessert, rich cake, fudgy cake, baking




