
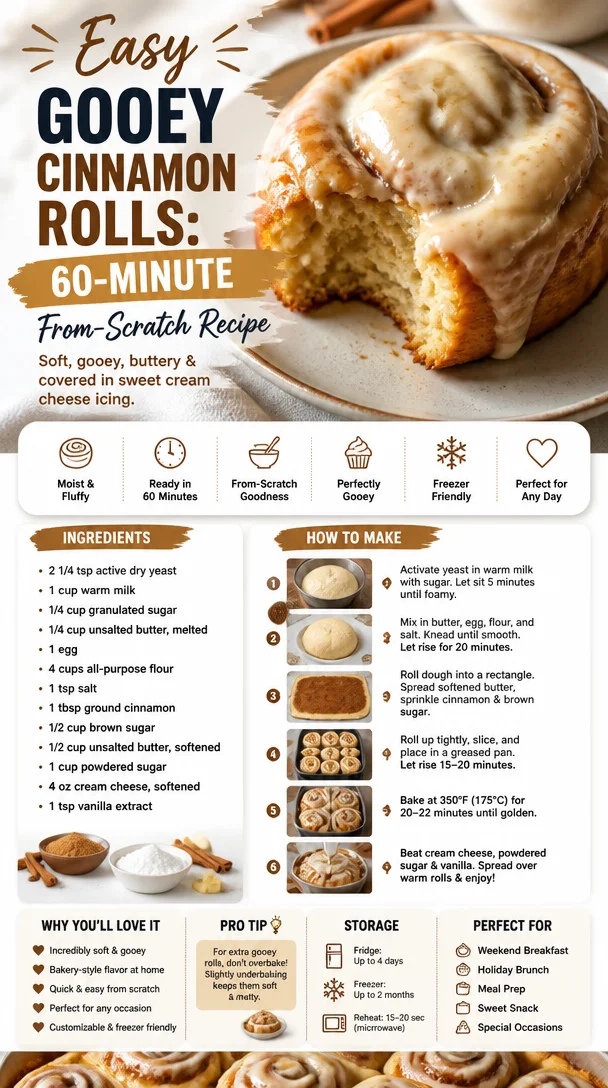
Easy Gooey Cinnamon Rolls: 60-Minute From-Scratch Recipe
Gooey Cinnamon Rolls: The Ultimate Comfort Food
Welcome back to my cozy kitchen! Today, we’re diving into a timeless treat that warms the heart and satisfies the soul—gooey cinnamon rolls! Oh, the smell of sweet cinnamon mingling with freshly baked dough is like a warm hug on a chilly morning. Whether you’re indulging on a lazy Sunday or celebrating a special occasion, these rolls are sure to bring cheer to your table.
There’s something so magical about homemade cinnamon rolls. They remind me of the countless weekends I spent in my grandmother’s kitchen. I can still hear her squeaking wooden chair as she whisked up the dough, her laughter filling the air as she told stories about her youth. The process was a team effort; I would be her little sous-chef, sprinkling cinnamon sugar on the dough with a seriousness only an eight-year-old can muster. We would wait together, peering into the oven, as the sweet aroma enveloped us, making our mouths water in anticipation.
These gooey little delights aren’t just food; they’re a celebration of love, warmth, and togetherness. So roll up your sleeves, put on your favorite apron (yes, the one splattered with flour, just like mine), and let’s get baking! Trust me; you’ll want to save this recipe—it’s guaranteed to become a family favorite.
Personal Story
One crisp autumn morning, with leaves falling outside and a light chill in the air, I decided to recreate my grandmother’s famous cinnamon rolls for our family breakfast. As I kneaded the dough, I felt her presence with me, guiding my hands. The recipe was almost tattooed onto my brain, but there was an element of magic that came with her storytelling and laughter.
As the rolls baked, I set the table and brewed a pot of coffee. The scent wafted through the house, coaxing my loved ones from their cozy corners. When the timer went off, revealing a pan of golden, puffed-up rolls, we all gathered around the kitchen island, eager to dig in. But before we could take a bite, I realized I needed to snap a picture—these gooey beauties took a lot of love to create!
With one bite, we were transported back to that old kitchen, and we shared stories that made us laugh and reminisce. Moments like these are why I love cooking. The joy of feeding those I love and sharing laughter over good food is truly the heart of every gathering.
Ingredients
Here’s what you’ll need for your gooey cinnamon rolls:
-
For the Dough:
- 4 cups all-purpose flour
Tip: For a lighter texture, you can substitute 1 cup of it with bread flour. - 1 packet (2 ¼ tsp) active dry yeast
Chef Insight: Always check the expiration date—active yeast is key to fluffy rolls! - ½ cup granulated sugar
Substitution: Use coconut sugar for a healthier option with caramel notes. - 1 cup whole milk (warm)
Tip: If you’re out of milk, almond or oat milk works too! - ⅓ cup unsalted butter (melted)
Make sure it’s melted but not hot to prevent killing the yeast! - 2 large eggs
Substitution: Ground flaxseed mixed with water (1 tbsp flaxseed + 2.5 tbsp water) makes a great vegan substitute! - 1 teaspoon salt
- 4 cups all-purpose flour
-
For the Filling:
- ¾ cup brown sugar (packed)
Tip: Light brown sugar works, but dark brown gives a richer flavor! - 2 tablespoons ground cinnamon
For a twist, try adding cardamom for an exotic hint! - ⅓ cup unsalted butter (softened)
Don’t melt the butter for spreading; it should be soft enough to spread easily!
- ¾ cup brown sugar (packed)
-
For the Cream Cheese Frosting:
- 4 oz cream cheese (softened)
Tip: For a dairy-free option, try using cashew cream! - ¼ cup unsalted butter (softened)
- 2 cups powdered sugar
For an extra hit of flavor, add a dash of vanilla extract! - 2 tablespoons milk (or plant-based milk)
Adjust the milk quantity for desired consistency!
- 4 oz cream cheese (softened)
Step-by-Step Instructions
Alright, it’s time to turn those ingredients into something truly scrumptious! Here’s how we do it:
-
Activate the Yeast:
- In a small bowl, combine the warm milk with the yeast and a pinch of sugar. Let it sit for about 5-10 minutes until it’s frothy and bubbly. This means your yeast is alive and ready to do its magic!
-
Mix the Dough:
- In a large mixing bowl, combine the flour, sugar, and salt. Create a well in the center, and pour in the melted butter, eggs, and the activated yeast mixture. Stir until a shaggy dough forms, then turn it out onto a floured surface.
-
Knead the Dough:
- Knead the dough for about 8-10 minutes until it’s smooth and elastic. This is a great arm workout, so feel free to take out any stress from the week! If the dough is sticky, sprinkle a little more flour as needed.
-
Let It Rise:
- Place the kneaded dough into a greased bowl, cover it with a kitchen towel, and let it rise in a warm spot (like your kitchen—thank you, oven) for about 1 to 1.5 hours, or until it doubles in size. Patience is key—you want that fluff!
-
Prepare the Filling:
- While the dough is rising, mix together the brown sugar, cinnamon, and softened butter in a medium bowl until well combined—it should resemble a spreadable paste. Set aside.
-
Roll Out the Dough:
- After the dough has risen, punch it down gently (no need to be rough!) and turn it out onto a floured surface. Roll it into a large rectangle about ¼ inch thick.
-
Spread the Filling:
- Evenly spread the cinnamon filling over the dough rectangle, leaving about a ½ inch border at the edges. This is where the goodies will ooze from!
-
Roll It Up:
- Starting from one long edge, roll the dough tightly into a log. Make sure it’s snug but not overly tight—your rolls need room to expand!
-
Cut the Rolls:
- Using a sharp knife or dental floss (yes, you read that right!), slice the log into 12-15 equal pieces, about 1.5 inches thick. Arrange them in a greased baking dish, cut side up, leaving a little space between each for rising.
-
Second Rise:
- Cover the dish with a towel and let the rolls rest for another 30-45 minutes until they’ve puffed up beautifully.
-
Preheat the Oven:
- About 15 minutes before the rolls are ready, preheat your oven to 350°F (175°C).
-
Bake:
- Once the rolls have risen, pop them into the oven and bake for 20-25 minutes until golden brown. If they’re browning too quickly, loosely cover with aluminum foil during the last few minutes.
-
Make the Frosting:
- While the rolls are baking, whip together the softened cream cheese and butter in a mixing bowl until light and fluffy. Gradually add the powdered sugar and mix until smooth, then add milk until you reach the desired consistency.
-
Frost and Serve:
- As soon as the rolls come out of the oven, generously slather them with the cream cheese frosting. Let the frosting melt into the nooks and crannies for maximum gooey goodness.
Serving Suggestions
Ready to serve those tantalizing gooey cinnamon rolls? Place them on a large plate or, for a rustic touch, a wooden board. Drizzle some extra frosting over the top, and sprinkle with chopped nuts or a dusting of powdered sugar for that perfect presentation. Pair them with a steaming cup of coffee or a glass of freshly squeezed orange juice. Your family and friends will be flocking to your kitchen in no time!
Recipe Variations
If you’re feeling adventurous, here are a few fun twists you can try with your cinnamon rolls:
- Nutty Add-In: Fold in some chopped walnuts or pecans for a delicious crunch.
- Fruit-Filled Rolls: Add sliced apples or pears with the cinnamon filling for a fruity surprise!
- Spicy Kick: Mix in a touch of cayenne pepper into the cinnamon filling for a sweet and spicy twist.
- Chocolate Drizzle: After frosting, drizzle some melted chocolate over the rolls for a decadent dessert.
- Pumpkin Spice: Swap some of the sugar for pumpkin puree and add pumpkin spice to the filling for a fall-themed treat!
Chef’s Notes
These gooey cinnamon rolls have been a staple in my kitchen for years, and they continue to evolve. I often play around with the spices, occasionally adding nutmeg or ginger for a seasonal twist. And let’s talk about the frosting—it’s the cherry on top! Some days, I skip the cream cheese for a simple glaze of powdered sugar and milk, while other days I indulge in extra frosting. That’s the beauty of this recipe; you can make it your own!
And let’s not forget those kitchen mishaps—one time, I mistook baking powder for baking soda and ended up with a flat, cookie-like mess! But even then, it turns into a funny story shared over cups of coffee and leftover rolls. Remember, cooking is as much about joy and creativity as it is about precision.
FAQs and Troubleshooting
-
Why are my rolls dense?
- If your rolls didn’t rise properly, it may be due to old yeast or not allowing enough time to rise. Always test your yeast before baking!
-
How do I make my rolls gooey?
- The key to gooeyness lies in the butter and sugar content. Make sure your filling is generous, and fresh out of the oven, slather on that cream cheese frosting!
-
How do I store leftover rolls?
- Store any leftover rolls in an airtight container at room temperature for up to 3 days. You can also freeze them for up to a month; just reheat in the oven for a cozy treat!
-
Can I make the dough ahead of time?
- Absolutely! You can prepare the dough and refrigerate it overnight. Just let it come to room temperature and rise before baking the next day.
Nutritional Info
Here’s a rough estimate per roll (without frosting):
- Calories: 280
- Protein: 4g
- Carbohydrates: 45g
- Fat: 10g
- Fiber: 1g
(Note: Nutrition can vary based on specific brands and measurements used)
Now that you have this deliciously cozy recipe in your hands, go ahead and spread the love—share your newly baked gooey cinnamon rolls with your family and friends. Enjoy the process, embrace the mess, and remember that the best moments happen around the kitchen table. Happy baking, my fellow foodies! 🍽️
Print
Gooey Cinnamon Rolls
- Total Time: 120 minutes
- Yield: 12 servings 1x
- Diet: Vegetarian
Description
Delicious and cozy gooey cinnamon rolls perfect for any occasion.
Ingredients
- 4 cups all-purpose flour
- 1 packet (2 ¼ tsp) active dry yeast
- ½ cup granulated sugar
- 1 cup whole milk (warm)
- ⅓ cup unsalted butter (melted)
- 2 large eggs
- 1 teaspoon salt
- ¾ cup brown sugar (packed)
- 2 tablespoons ground cinnamon
- ⅓ cup unsalted butter (softened)
- 4 oz cream cheese (softened)
- ¼ cup unsalted butter (softened)
- 2 cups powdered sugar
- 2 tablespoons milk (or plant-based milk)
Instructions
- Activate the yeast: In a small bowl, combine the warm milk with the yeast and a pinch of sugar. Let it sit for about 5-10 minutes until frothy.
- Mix the dough: In a large bowl, combine flour, sugar, and salt. Create a well, then add melted butter, eggs, and activated yeast mixture. Stir until shaggy dough forms.
- Knead the dough: Knead for about 8-10 minutes until smooth and elastic. Sprinkle flour if necessary.
- Let it rise: Place dough in a greased bowl, cover, and let it rise for about 1 to 1.5 hours until doubled in size.
- Prepare the filling: Mix brown sugar, cinnamon, and softened butter until well combined.
- Roll out the dough: Punch down the risen dough, turn it out onto a floured surface, and roll it into a large rectangle about ¼ inch thick.
- Spread the filling: Evenly spread the cinnamon filling over the dough, leaving a ½ inch border.
- Roll it up: Starting from one long edge, roll the dough tightly into a log.
- Cut the rolls: Slice the log into 12-15 equal pieces and arrange in a greased baking dish.
- Second rise: Cover and let the rolls rest for 30-45 minutes until puffed up.
- Preheat the oven: About 15 minutes before the rolls are ready, preheat oven to 350°F (175°C).
- Bake: Once risen, bake for 20-25 minutes until golden brown.
- Make the frosting: Whip together cream cheese and butter, then add powdered sugar and milk until desired consistency.
- Frost and serve: Generously slather the frosting on the rolls as soon as they come out of the oven.
Notes
For a healthier twist, consider using coconut sugar and substituting almond or oat milk for whole milk.
- Prep Time: 15 minutes
- Cook Time: 25 minutes
- Category: Dessert
- Method: Baking
- Cuisine: American
Nutrition
- Serving Size: 1 roll
- Calories: 280
- Sugar: 10g
- Sodium: 200mg
- Fat: 10g
- Saturated Fat: 4g
- Unsaturated Fat: 4g
- Trans Fat: 0g
- Carbohydrates: 45g
- Fiber: 1g
- Protein: 4g
- Cholesterol: 30mg
Keywords: cinnamon rolls, gooey cinnamon rolls, desserts, baking, comfort food
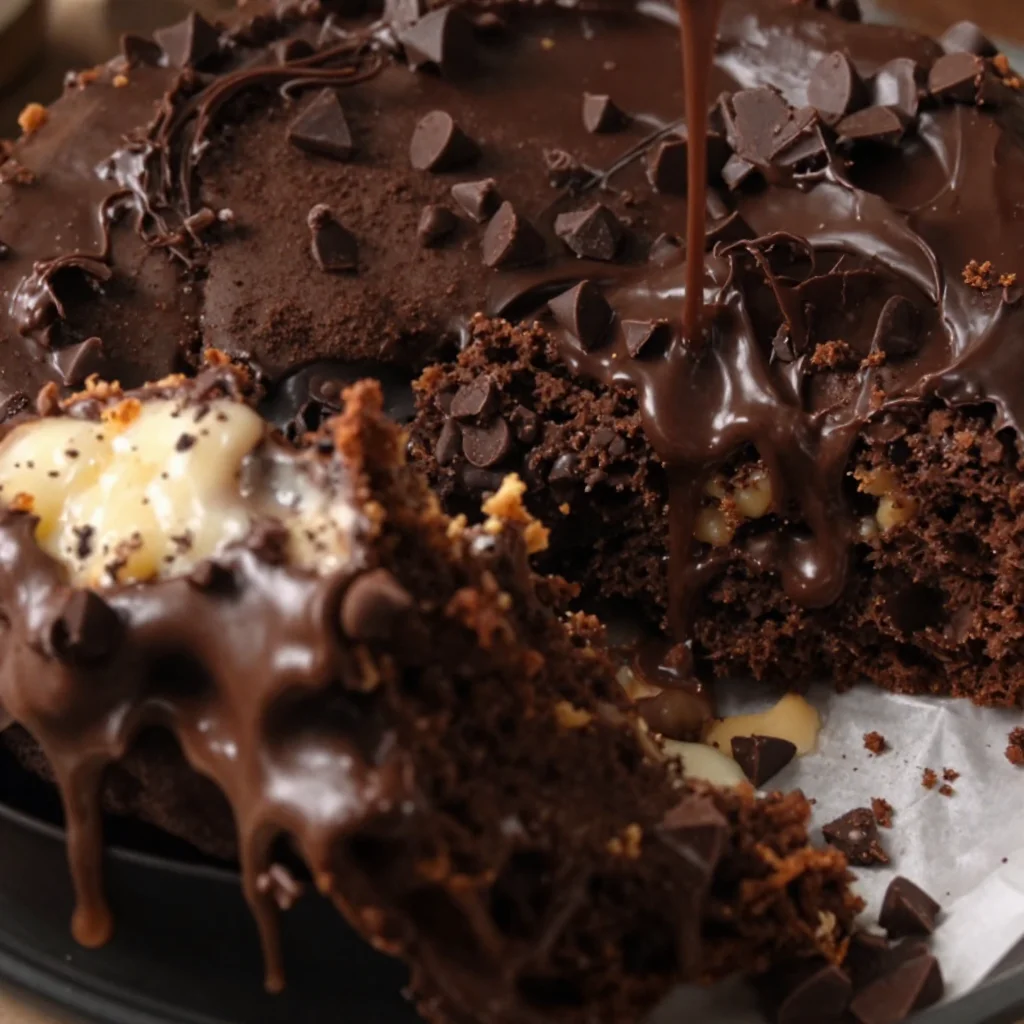
Beginner-friendly fudgy chocolate cake from scratch
The Ultimate Super Rich and Fudgy Chocolate Cake
Welcome to my kitchen! Today we’re diving deep into the world of chocolate—a sweet escape that speaks to all of us. I’m thrilled to share with you my Super Rich and Fudgy Chocolate Cake, a luscious dessert that feels like a warm hug on a plate. This cake is perfect for celebrations, cozy get-togethers, or just because you deserve it! Imagine sinking your fork into a moist, decadent slice filled with intense chocolate flavor. Doesn’t that make your heart sing?
Growing up, chocolate cake was a staple at every family gathering. My mom would whip up her famous recipe for birthdays, holidays, and even the random Tuesday just because. I can still picture her standing over the mixing bowl, her apron dusted with flour, humming a tune while the rich aroma of melting chocolate enveloped our cozy kitchen. This cake was a family favorite, not just for its flavor, but for the memories it created around the dinner table. It was in those sweet moments of laughter and love, sharing a slice of cake with family, that I learned how food can connect us in the most powerful ways.
Now, it’s your turn to create your own memories with this delicious treat! So, let’s get started!
Ingredients
To make the best Super Rich and Fudgy Chocolate Cake, you’ll need the following ingredients:
-
1 ¾ cups all-purpose flour
A must-have in any cake, flour gives structure. If you need a gluten-free option, swap half of it with almond flour for a nutty twist! -
2 cups granulated sugar
Sugar adds sweetness and moisture. For a caramel touch, use brown sugar or try coconut sugar for a healthier alternative. -
¾ cup unsweetened cocoa powder
This is the star of the show! It brings that deep chocolate flavor. Look for Dutch-processed cocoa for a smoother taste, or use raw cacao for health benefits. -
1 ½ teaspoons baking powder
Helps the cake rise. If you’re out of baking powder, you can use baking soda, but double the amount using a bit of vinegar or yogurt for a tender crumb. -
1 teaspoon baking soda
Critical for a fluffy texture. Make sure it’s fresh! A little expired baking soda can leave your cake dense. -
1 teaspoon salt
A pinch of salt enhances the flavors. Kosher salt works well, but sea salt adds a lovely crunch when sprinkled on top! -
2 large eggs
They provide moisture and help bind. For a vegan twist, use flax eggs (1 tablespoon ground flaxseed mixed with 3 tablespoons water per egg). -
1 cup whole milk
Rich buttermilk can be substituted if you want extra richness, or use almond milk for a plant-based version. -
½ cup vegetable oil
Oil keeps the cake moist. Canola oil or melted coconut oil are fantastic alternatives. -
2 teaspoons vanilla extract
Adds depth to flavor. Don’t skip this! Use pure vanilla extract for the best taste. -
1 cup boiling water
Surprised? Adding boiling water helps the cocoa bloom, enhancing the chocolate flavor. You can replace it with brewed coffee for a mocha taste (trust me, it’s magic!).
Step-by-Step Instructions
-
Preheat the Oven: Preheat your oven to 350°F (175°C). Greasing and lining two 9-inch round cake pans with parchment paper will make it easier to remove the cakes later. A quick swipe of non-stick spray or butter works wonders!
-
Mix Dry Ingredients: In a large mixing bowl, combine the flour, sugar, cocoa powder, baking powder, baking soda, and salt. Whisk together until well combined. Pro tip: Sifting the cocoa powder can help eliminate any lumps!
-
Combine Wet Ingredients: In another bowl, whisk together the eggs, milk, oil, and vanilla until smooth and frothy. This step infuses air into your batter, which adds to the fluffiness of the cake.
-
Blend Together: Pour the wet ingredients into the dry ingredients and mix until just combined. Be careful not to overmix; a few lumps are fine. Your stiff batter will loosen up with the next step!
-
Add Boiling Water: Slowly pour in the boiling water and stir. This will thin out your batter, which might look a little strange, but trust me—it’s supposed to be this way! This step is key—it makes for an ultra-moist cake.
-
Bake: Divide the batter evenly between the prepared cake pans. Tap them lightly on the counter to release any air bubbles. Bake for 30-35 minutes or until a toothpick inserted in the center comes out clean.
-
Cool: Let the cakes cool in the pans for about 10 minutes, then transfer them to wire racks to cool completely. This cooling step is essential for making your frosting spreadable!
-
Frost and Serve: Once the cakes have cooled, layer and frost with your favorite chocolate frosting (I’ll share my easy recipe soon). You can also sprinkle some sea salt on top for a sweet-salty contrast.
Serving Suggestions
Serve slices of this decadent cake on a beautiful plate with a scoop of vanilla ice cream on the side. Drizzle a little chocolate sauce or a berry compote over the top for that extra “wow” factor. It’s perfect for impressing guests or indulging on a cozy night in.
Recipe Variations
-
Chocolate Mint Cake: Add a teaspoon of peppermint extract to the batter for a refreshing twist!
-
Espresso Delight: Stir in a tablespoon of instant espresso powder to deepen the chocolate flavor.
-
Nutty Chocolate Cake: Fold in half a cup of chopped nuts (walnuts or pecans) for an added crunch.
-
Fruit-Filled Indulgence: Add in a cup of fresh raspberries or cherries for a fruity contrast.
-
Vegan Variation: Use plant-based milk, flax eggs, and coconut oil to make this cake completely vegan without sacrificing flavor!
Chef’s Notes
This recipe is a cherished hit among friends and family. I’ve evolved it over the years, experimenting with different flours and extracts until I found the perfect balance. One of my funniest kitchen disasters happened when I accidentally swapped the sugar for salt—let’s just say that cake did NOT make it out of the pan! But every baking misstep has taught me so much about the magic happening behind the scenes. That’s the beauty of cooking—you learn, you grow, and you develop a passion that’s truly unique.
FAQs and Troubleshooting
-
Why is my cake dense?
A dense cake can result from overmixing the batter or using old leavening agents. Make sure to mix just until combined and check the expiration dates on your baking powder and soda. -
How do I store the cake?
If you have leftovers (which is rare!), store them in an airtight container at room temperature for 3-4 days. You can also refrigerate it, but bring it to room temperature before serving for the best texture. -
Can I make this cake ahead of time?
Absolutely! You can bake and cool the cake a day in advance. Just keep it tightly wrapped. Frosting can also be made a day in advance and stored in the fridge—just give it a quick whisk before using. -
What can I do if my frosting is too thick?
If your frosting is too thick to spread, you can thin it out by adding a tablespoon of milk or cream. Mix in a little at a time until you get the right consistency.
Nutritional Info
While this cake is a special treat and not necessarily a “health food,” it’s all about balance, right? Each slice (without frosting) typically contains about 350 calories, with a good amount of richness that’s worth every bite.
So there you have it—my Super Rich and Fudgy Chocolate Cake recipe! With every step, I hope you filled your kitchen with warmth and love, just like my mother did. Don’t forget to enjoy the little moments—the laughter, the smells, and the taste of success. Happy baking!
Print
Super Rich and Fudgy Chocolate Cake
- Total Time: 50
- Yield: 8 servings 1x
- Diet: Vegetarian
Description
A luscious chocolate cake that’s moist, decadent, and filled with intense chocolate flavor.
Ingredients
- 1 ¾ cups all-purpose flour
- 2 cups granulated sugar
- ¾ cup unsweetened cocoa powder
- 1 ½ teaspoons baking powder
- 1 teaspoon baking soda
- 1 teaspoon salt
- 2 large eggs
- 1 cup whole milk
- ½ cup vegetable oil
- 2 teaspoons vanilla extract
- 1 cup boiling water
Instructions
- Preheat the Oven: Preheat your oven to 350°F (175°C) and prepare two 9-inch round cake pans.
- Mix Dry Ingredients: In a large bowl, combine the flour, sugar, cocoa powder, baking powder, baking soda, and salt.
- Combine Wet Ingredients: In another bowl, whisk together the eggs, milk, oil, and vanilla.
- Blend Together: Pour the wet ingredients into the dry ingredients and mix until just combined.
- Add Boiling Water: Slowly pour in the boiling water and stir until smooth.
- Bake: Divide the batter between the prepared pans and bake for 30-35 minutes.
- Cool: Let the cakes cool in the pans for 10 minutes before transferring them to wire racks.
- Frost and Serve: Layer and frost with your favorite chocolate frosting.
Notes
For extra flavor variations, consider adding peppermint extract, espresso powder, or fresh fruits.
- Prep Time: 15
- Cook Time: 35
- Category: Dessert
- Method: Baking
- Cuisine: American
Nutrition
- Serving Size: 1 slice
- Calories: 350
- Sugar: 35g
- Sodium: 400mg
- Fat: 12g
- Saturated Fat: 3g
- Unsaturated Fat: 7g
- Trans Fat: 0g
- Carbohydrates: 54g
- Fiber: 3g
- Protein: 6g
- Cholesterol: 40mg
Keywords: chocolate cake, dessert, rich cake, fudgy cake, baking




