
Easy Gooey Cinnamon Rolls: 60-Minute From-Scratch Recipe
Gooey Cinnamon Rolls: The Ultimate Comfort Food
Welcome back to my cozy kitchen! Today, we’re diving into a timeless treat that warms the heart and satisfies the soul—gooey cinnamon rolls! Oh, the smell of sweet cinnamon mingling with freshly baked dough is like a warm hug on a chilly morning. Whether you’re indulging on a lazy Sunday or celebrating a special occasion, these rolls are sure to bring cheer to your table.
There’s something so magical about homemade cinnamon rolls. They remind me of the countless weekends I spent in my grandmother’s kitchen. I can still hear her squeaking wooden chair as she whisked up the dough, her laughter filling the air as she told stories about her youth. The process was a team effort; I would be her little sous-chef, sprinkling cinnamon sugar on the dough with a seriousness only an eight-year-old can muster. We would wait together, peering into the oven, as the sweet aroma enveloped us, making our mouths water in anticipation.
These gooey little delights aren’t just food; they’re a celebration of love, warmth, and togetherness. So roll up your sleeves, put on your favorite apron (yes, the one splattered with flour, just like mine), and let’s get baking! Trust me; you’ll want to save this recipe—it’s guaranteed to become a family favorite.
Personal Story
One crisp autumn morning, with leaves falling outside and a light chill in the air, I decided to recreate my grandmother’s famous cinnamon rolls for our family breakfast. As I kneaded the dough, I felt her presence with me, guiding my hands. The recipe was almost tattooed onto my brain, but there was an element of magic that came with her storytelling and laughter.
As the rolls baked, I set the table and brewed a pot of coffee. The scent wafted through the house, coaxing my loved ones from their cozy corners. When the timer went off, revealing a pan of golden, puffed-up rolls, we all gathered around the kitchen island, eager to dig in. But before we could take a bite, I realized I needed to snap a picture—these gooey beauties took a lot of love to create!
With one bite, we were transported back to that old kitchen, and we shared stories that made us laugh and reminisce. Moments like these are why I love cooking. The joy of feeding those I love and sharing laughter over good food is truly the heart of every gathering.
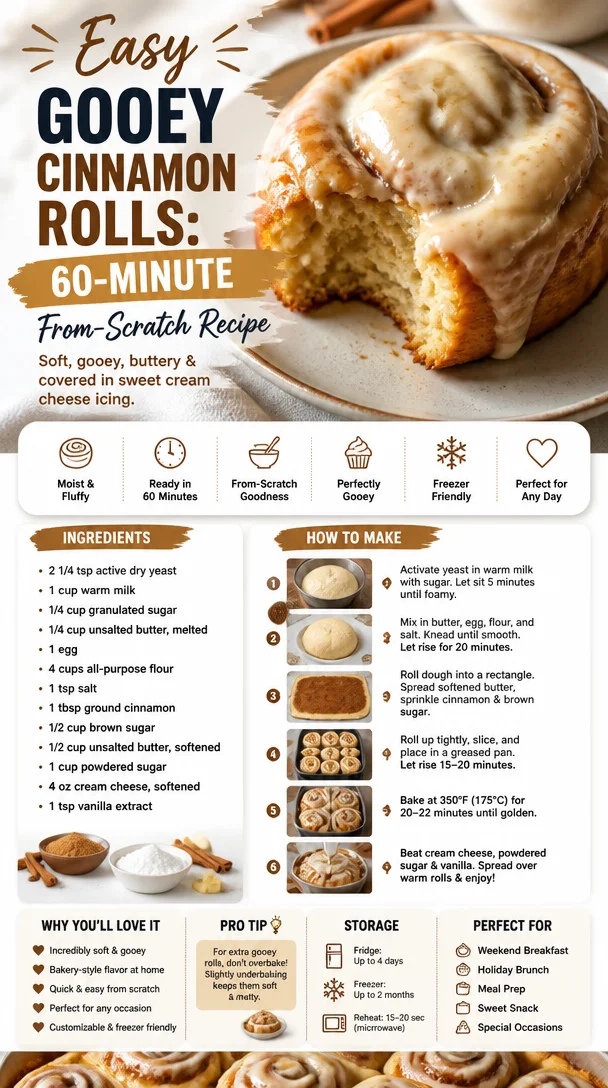
Ingredients
Here’s what you’ll need for your gooey cinnamon rolls:
-
For the Dough:
- 4 cups all-purpose flour
Tip: For a lighter texture, you can substitute 1 cup of it with bread flour. - 1 packet (2 ¼ tsp) active dry yeast
Chef Insight: Always check the expiration date—active yeast is key to fluffy rolls! - ½ cup granulated sugar
Substitution: Use coconut sugar for a healthier option with caramel notes. - 1 cup whole milk (warm)
Tip: If you’re out of milk, almond or oat milk works too! - ⅓ cup unsalted butter (melted)
Make sure it’s melted but not hot to prevent killing the yeast! - 2 large eggs
Substitution: Ground flaxseed mixed with water (1 tbsp flaxseed + 2.5 tbsp water) makes a great vegan substitute! - 1 teaspoon salt
- 4 cups all-purpose flour
-
For the Filling:
- ¾ cup brown sugar (packed)
Tip: Light brown sugar works, but dark brown gives a richer flavor! - 2 tablespoons ground cinnamon
For a twist, try adding cardamom for an exotic hint! - ⅓ cup unsalted butter (softened)
Don’t melt the butter for spreading; it should be soft enough to spread easily!
- ¾ cup brown sugar (packed)
-
For the Cream Cheese Frosting:
- 4 oz cream cheese (softened)
Tip: For a dairy-free option, try using cashew cream! - ¼ cup unsalted butter (softened)
- 2 cups powdered sugar
For an extra hit of flavor, add a dash of vanilla extract! - 2 tablespoons milk (or plant-based milk)
Adjust the milk quantity for desired consistency!
- 4 oz cream cheese (softened)
Step-by-Step Instructions
Alright, it’s time to turn those ingredients into something truly scrumptious! Here’s how we do it:
-
Activate the Yeast:
- In a small bowl, combine the warm milk with the yeast and a pinch of sugar. Let it sit for about 5-10 minutes until it’s frothy and bubbly. This means your yeast is alive and ready to do its magic!
-
Mix the Dough:
- In a large mixing bowl, combine the flour, sugar, and salt. Create a well in the center, and pour in the melted butter, eggs, and the activated yeast mixture. Stir until a shaggy dough forms, then turn it out onto a floured surface.
-
Knead the Dough:
- Knead the dough for about 8-10 minutes until it’s smooth and elastic. This is a great arm workout, so feel free to take out any stress from the week! If the dough is sticky, sprinkle a little more flour as needed.
-
Let It Rise:
- Place the kneaded dough into a greased bowl, cover it with a kitchen towel, and let it rise in a warm spot (like your kitchen—thank you, oven) for about 1 to 1.5 hours, or until it doubles in size. Patience is key—you want that fluff!
-
Prepare the Filling:
- While the dough is rising, mix together the brown sugar, cinnamon, and softened butter in a medium bowl until well combined—it should resemble a spreadable paste. Set aside.
-
Roll Out the Dough:
- After the dough has risen, punch it down gently (no need to be rough!) and turn it out onto a floured surface. Roll it into a large rectangle about ¼ inch thick.
-
Spread the Filling:
- Evenly spread the cinnamon filling over the dough rectangle, leaving about a ½ inch border at the edges. This is where the goodies will ooze from!
-
Roll It Up:
- Starting from one long edge, roll the dough tightly into a log. Make sure it’s snug but not overly tight—your rolls need room to expand!
-
Cut the Rolls:
- Using a sharp knife or dental floss (yes, you read that right!), slice the log into 12-15 equal pieces, about 1.5 inches thick. Arrange them in a greased baking dish, cut side up, leaving a little space between each for rising.
-
Second Rise:
- Cover the dish with a towel and let the rolls rest for another 30-45 minutes until they’ve puffed up beautifully.
-
Preheat the Oven:
- About 15 minutes before the rolls are ready, preheat your oven to 350°F (175°C).
-
Bake:
- Once the rolls have risen, pop them into the oven and bake for 20-25 minutes until golden brown. If they’re browning too quickly, loosely cover with aluminum foil during the last few minutes.
-
Make the Frosting:
- While the rolls are baking, whip together the softened cream cheese and butter in a mixing bowl until light and fluffy. Gradually add the powdered sugar and mix until smooth, then add milk until you reach the desired consistency.
-
Frost and Serve:
- As soon as the rolls come out of the oven, generously slather them with the cream cheese frosting. Let the frosting melt into the nooks and crannies for maximum gooey goodness.
Serving Suggestions
Ready to serve those tantalizing gooey cinnamon rolls? Place them on a large plate or, for a rustic touch, a wooden board. Drizzle some extra frosting over the top, and sprinkle with chopped nuts or a dusting of powdered sugar for that perfect presentation. Pair them with a steaming cup of coffee or a glass of freshly squeezed orange juice. Your family and friends will be flocking to your kitchen in no time!
Recipe Variations
If you’re feeling adventurous, here are a few fun twists you can try with your cinnamon rolls:
- Nutty Add-In: Fold in some chopped walnuts or pecans for a delicious crunch.
- Fruit-Filled Rolls: Add sliced apples or pears with the cinnamon filling for a fruity surprise!
- Spicy Kick: Mix in a touch of cayenne pepper into the cinnamon filling for a sweet and spicy twist.
- Chocolate Drizzle: After frosting, drizzle some melted chocolate over the rolls for a decadent dessert.
- Pumpkin Spice: Swap some of the sugar for pumpkin puree and add pumpkin spice to the filling for a fall-themed treat!
Chef’s Notes
These gooey cinnamon rolls have been a staple in my kitchen for years, and they continue to evolve. I often play around with the spices, occasionally adding nutmeg or ginger for a seasonal twist. And let’s talk about the frosting—it’s the cherry on top! Some days, I skip the cream cheese for a simple glaze of powdered sugar and milk, while other days I indulge in extra frosting. That’s the beauty of this recipe; you can make it your own!
And let’s not forget those kitchen mishaps—one time, I mistook baking powder for baking soda and ended up with a flat, cookie-like mess! But even then, it turns into a funny story shared over cups of coffee and leftover rolls. Remember, cooking is as much about joy and creativity as it is about precision.
FAQs and Troubleshooting
-
Why are my rolls dense?
- If your rolls didn’t rise properly, it may be due to old yeast or not allowing enough time to rise. Always test your yeast before baking!
-
How do I make my rolls gooey?
- The key to gooeyness lies in the butter and sugar content. Make sure your filling is generous, and fresh out of the oven, slather on that cream cheese frosting!
-
How do I store leftover rolls?
- Store any leftover rolls in an airtight container at room temperature for up to 3 days. You can also freeze them for up to a month; just reheat in the oven for a cozy treat!
-
Can I make the dough ahead of time?
- Absolutely! You can prepare the dough and refrigerate it overnight. Just let it come to room temperature and rise before baking the next day.
Nutritional Info
Here’s a rough estimate per roll (without frosting):
- Calories: 280
- Protein: 4g
- Carbohydrates: 45g
- Fat: 10g
- Fiber: 1g
(Note: Nutrition can vary based on specific brands and measurements used)
Now that you have this deliciously cozy recipe in your hands, go ahead and spread the love—share your newly baked gooey cinnamon rolls with your family and friends. Enjoy the process, embrace the mess, and remember that the best moments happen around the kitchen table. Happy baking, my fellow foodies! 🍽️
Print
Gooey Cinnamon Rolls
- Total Time: 120 minutes
- Yield: 12 servings 1x
- Diet: Vegetarian
Description
Delicious and cozy gooey cinnamon rolls perfect for any occasion.
Ingredients
- 4 cups all-purpose flour
- 1 packet (2 ¼ tsp) active dry yeast
- ½ cup granulated sugar
- 1 cup whole milk (warm)
- ⅓ cup unsalted butter (melted)
- 2 large eggs
- 1 teaspoon salt
- ¾ cup brown sugar (packed)
- 2 tablespoons ground cinnamon
- ⅓ cup unsalted butter (softened)
- 4 oz cream cheese (softened)
- ¼ cup unsalted butter (softened)
- 2 cups powdered sugar
- 2 tablespoons milk (or plant-based milk)
Instructions
- Activate the yeast: In a small bowl, combine the warm milk with the yeast and a pinch of sugar. Let it sit for about 5-10 minutes until frothy.
- Mix the dough: In a large bowl, combine flour, sugar, and salt. Create a well, then add melted butter, eggs, and activated yeast mixture. Stir until shaggy dough forms.
- Knead the dough: Knead for about 8-10 minutes until smooth and elastic. Sprinkle flour if necessary.
- Let it rise: Place dough in a greased bowl, cover, and let it rise for about 1 to 1.5 hours until doubled in size.
- Prepare the filling: Mix brown sugar, cinnamon, and softened butter until well combined.
- Roll out the dough: Punch down the risen dough, turn it out onto a floured surface, and roll it into a large rectangle about ¼ inch thick.
- Spread the filling: Evenly spread the cinnamon filling over the dough, leaving a ½ inch border.
- Roll it up: Starting from one long edge, roll the dough tightly into a log.
- Cut the rolls: Slice the log into 12-15 equal pieces and arrange in a greased baking dish.
- Second rise: Cover and let the rolls rest for 30-45 minutes until puffed up.
- Preheat the oven: About 15 minutes before the rolls are ready, preheat oven to 350°F (175°C).
- Bake: Once risen, bake for 20-25 minutes until golden brown.
- Make the frosting: Whip together cream cheese and butter, then add powdered sugar and milk until desired consistency.
- Frost and serve: Generously slather the frosting on the rolls as soon as they come out of the oven.
Notes
For a healthier twist, consider using coconut sugar and substituting almond or oat milk for whole milk.
- Prep Time: 15 minutes
- Cook Time: 25 minutes
- Category: Dessert
- Method: Baking
- Cuisine: American
Nutrition
- Serving Size: 1 roll
- Calories: 280
- Sugar: 10g
- Sodium: 200mg
- Fat: 10g
- Saturated Fat: 4g
- Unsaturated Fat: 4g
- Trans Fat: 0g
- Carbohydrates: 45g
- Fiber: 1g
- Protein: 4g
- Cholesterol: 30mg
Keywords: cinnamon rolls, gooey cinnamon rolls, desserts, baking, comfort food

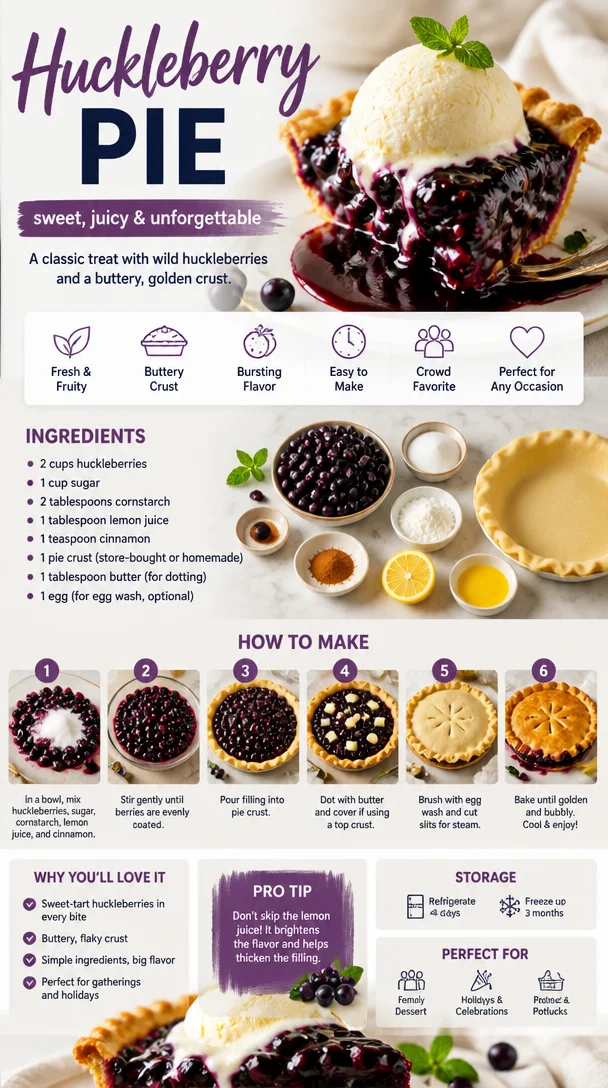
Wild Huckleberry Pie
The Joy of Wild Huckleberry Pie: A Slice of Nostalgia
Welcome to my kitchen! Today, we’re diving into one of my all-time favorites: Wild Huckleberry Pie. There’s something truly magical about this dessert that not only tantalizes your taste buds but also stirs up warm, loving memories of summers spent in nature’s embrace. Picture this: plump, juicy huckleberries, vibrant in color, bursting with sweet-tart goodness, and enveloped by a flaky, buttery crust. It’s like a hug in dessert form, and I can’t wait to share my love of this pie with you.
Let’s rewind to the summer I turned ten years old. My family decided to escape the hustle and bustle of city life for a week in the woods. My parents packed the car with camping gear, and my siblings and I packed our excitement. Little did I know, this adventure would kick off my lifelong obsession with huckleberries. Nestled near our campsite was a hidden patch of dark purple berries, and with my mother’s guidance, I learned to spot the ripest ones. Eventually, we returned to our campsite with buckets overflowing with huckleberries, our hands stained with juice, our laughter echoing through the trees.
That night, we baked our first pie outdoors over a campfire. With the smell of that sweet aroma wafting through the air, we gathered around the flickering flames, sharing stories and making memories that still bring a smile to my face. As we dove into that pie, I could see the joy on everyone’s faces; it was a simple symbol of togetherness, a bond forged in the kitchen and warmed by the spirit of family.
Now that I’ve recounted this delightful memory, let’s roll up our sleeves and jump into this recipe! I promise it’s easy and rewarding, perfect for any occasion, whether you’re in search of a simple weeknight dessert or looking to impress your friends at a summer gathering.
Ingredients
Before we start, let’s gather our ingredients. Here’s what you’ll need to make this delicious Wild Huckleberry Pie:
-
2 cups fresh wild huckleberries
These little gems are the star of the show! If you can’t find wild huckleberries, blueberries make a fantastic substitute. Just remember to adjust the sugar slightly, as blueberries tend to be sweeter. -
1 cup granulated sugar
This will sweeten our filling. You can use coconut sugar or honey for a healthier alternative. If you enjoy less sweetness, feel free to scale back on the sugar. -
1 tablespoon cornstarch
This acts as a thickener, ensuring your pie filling has that perfect luscious texture. If you prefer a gluten-free option, tapioca starch does the trick beautifully. -
1 teaspoon lemon juice
A splash of acidity balances the sweetness of the berries. Fresh lemon juice is ideal, but bottled juice will work if you’re in a pinch! -
1 teaspoon vanilla extract
Vanilla adds a warm depth to the flavor. You can switch it up with almond extract for a different nutty twist or skip it entirely if you want to keep it simple. -
1 tablespoon butter (for dotting)
Just a little pat of butter adds richness to the filling. You can use margarine if you’re looking for a dairy-free option. -
1 homemade or store-bought pie crust
I usually go for a homemade, flaky pie crust. But if time is short, don’t shy away from the convenience of pre-made crusts! -
Egg wash (1 egg beaten with a tablespoon of water)
This is optional but gives your pie that beautiful golden finish.
Step-by-Step Instructions
Now, let’s get to the fun part! Here’s a detailed guide on how to make your Wild Huckleberry Pie:
-
Preheat Your Oven:
Start by preheating your oven to 425°F (220°C). A hot oven ensures that your crust will be flaky and perfectly cooked. Trust me, a well-preheated oven is the key to baking success! -
Prepare the Filling:
In a large mixing bowl, combine your huckleberries, sugar, cornstarch, lemon juice, and vanilla extract. Gently toss to coat the berries and let them sit for about 15 minutes. This step allows the juices to be released and helps the flavors meld together beautifully. I love taking this moment to reminisce about that camping trip while I wait! -
Roll Out the Pie Crust:
Whether you’re using store-bought or homemade crust, roll it out on a lightly floured surface to about 1/8-inch thick. Carefully transfer it to your pie dish, pressing gently to fit into the corners. If using store-bought dough, follow the package instructions for thawing and placement. -
Fill the Pie:
Pour the huckleberry mixture into the prepared crust, making sure it fills all the nooks and crannies. Dot the filling with little bits of butter for added richness—trust me, it’s worth it! -
Top with Another Crust:
If you love a double-crust pie, roll out your second dough and place it over the filling. Cut slits in the top to allow steam to escape. This is where you can get creative: make a lattice pattern or cut out shapes for fun! -
Brush with Egg Wash:
If you’re feeling fancy, brush the crust with the egg wash. This will give it a glorious golden sheen. Not only does it make your pie look professional, but it also adds a slight richness when you bite into it. -
Bake the Pie:
Place your pie on a baking sheet (to catch any drips) and slide it into the oven. Bake for 15 minutes at 425°F (220°C), then reduce the temperature to 350°F (175°C) and continue baking for 30–35 minutes, or until the crust is golden brown and the filling is bubbling beautifully. -
Cool and Enjoy:
Once baked to perfection, remove your pie from the oven and let it cool for at least an hour before slicing. This allows the filling to set. Plus, it gives you a moment to enjoy that incredible aroma filling your kitchen!
Serving Suggestions
When it comes to serving your Wild Huckleberry Pie, let your creativity shine! A generous scoop of vanilla ice cream or a dollop of whipped cream on the side adds a delightful creamy contrast to the tartness of the berries. For a seasonal twist, top it with a sprinkle of fresh mint or powdered sugar for a pop of color and flavor.
Recipe Variations
-
Huckleberry Blueberry Mix: Combine huckleberries and blueberries for a fun flavor twist! The blueberries will naturally sweeten the pie.
-
Lemon Huckleberry: Enhance the filling with extra zest from a lemon for a more pronounced citrus flavor that brightens up the berries!
-
Spiced Huckleberry: Add a pinch of cinnamon or nutmeg to the filling for a warm, cozy flavor that’s perfect for fall gatherings.
-
Gluten-Free Crust: Use a gluten-free pie crust or a mixture of almond flour and coconut flour for a deliciously different base.
-
Vegan Twist: Substitute butter with coconut oil and the egg wash with a mixture of almond milk and maple syrup for a scrumptious vegan pie.
Chef’s Notes
Huckleberry pie holds a special place in my heart, and I’ve tinkered with this recipe over the years. Your instincts as a cook will guide you. If you taste the filling and think it needs a little more sweetness, feel free to adjust! And here’s a funny kitchen story for you: the first time I made this pie solo, I forgot to dot the filling with butter. I ended up with a delicious yet slightly dry pie! It was a great reminder that every misstep in the kitchen is an opportunity to learn and evolve. Feel free to put your own twist on this pie and make it your own!
FAQs and Troubleshooting
-
Why is my pie filling runny?
Runny filling can happen if you undercooked the cornstarch or didn’t allow the pie to cool before serving. Ensure you mix the cornstarch thoroughly with the berries, and patience is key—let it cool properly! -
How can I prevent my crust from getting soggy?
For a flakier crust, you can blind bake it for about 10 minutes before adding the filling! This helps seal off the bottom and ensures it stays crisp. -
What should I do if I can’t find huckleberries?
Blueberries, blackberries, or even cranberries can serve as excellent alternatives. Each brings its own unique flavor that will still create a delightful dessert! -
How do I store leftover pie?
Cover your pie loosely with plastic wrap or aluminum foil and store it in the fridge for up to 3 days. You can also freeze slices for up to 3 months—just make sure they’re well-wrapped to avoid freezer burn.
Remember, cooking is all about enjoyment, exploration, and sharing with others. I hope you’ll be inspired to try this Wild Huckleberry Pie recipe, whether it’s for yourself or to share with loved ones. Happy baking, and may your kitchen always be filled with laughter and delightful aromas!
Print
Wild Huckleberry Pie
- Total Time: 1 hour 5 minutes
- Yield: 8 servings 1x
- Diet: Vegetarian
Description
A delightful Wild Huckleberry Pie recipe that evokes nostalgic summer memories, featuring sweet-tart huckleberries in a flaky buttery crust.
Ingredients
- 2 cups fresh wild huckleberries
- 1 cup granulated sugar
- 1 tablespoon cornstarch
- 1 teaspoon lemon juice
- 1 teaspoon vanilla extract
- 1 tablespoon butter (for dotting)
- 1 homemade or store-bought pie crust
- 1 egg beaten with a tablespoon of water (for egg wash)
Instructions
- Preheat your oven to 425°F (220°C).
- Combine huckleberries, sugar, cornstarch, lemon juice, and vanilla extract in a large mixing bowl. Let sit for 15 minutes.
- Roll out the pie crust to about 1/8-inch thick and transfer it to your pie dish.
- Pour the huckleberry mixture into the prepared crust and dot with butter.
- Top with another crust, cutting slits for steam to escape.
- Brush with egg wash for a golden finish.
- Bake for 15 minutes at 425°F, then reduce to 350°F (175°C) and bake for 30–35 minutes.
- Cool for at least an hour before slicing.
Notes
Serve with a scoop of vanilla ice cream or whipped cream for a delightful contrast. Consider variations like a Huckleberry Blueberry mix or a spiced version with cinnamon.
- Prep Time: 20 minutes
- Cook Time: 45 minutes
- Category: Dessert
- Method: Baking
- Cuisine: American
Nutrition
- Serving Size: 1 slice
- Calories: 300
- Sugar: 24g
- Sodium: 200mg
- Fat: 14g
- Saturated Fat: 7g
- Unsaturated Fat: 6g
- Trans Fat: 0g
- Carbohydrates: 40g
- Fiber: 3g
- Protein: 3g
- Cholesterol: 70mg
Keywords: huckleberry, pie, dessert, summer, baking
Huckleberry Pie
The Delights of Huckleberry Pie: A Slice of Nostalgia
Welcome back to my kitchen, friends! Today, we’re diving into one of my favorite desserts that brings a smile to my face every time I make it — huckleberry pie. Whether you’re a huckleberry aficionado or someone who has yet to be introduced to these tiny, tart beauties, this pie is bursting with flavor and love.
Imagine this: it’s a splendid summer day, and you’re surrounded by the lush greenery of the forest. You’ve got a basket in hand, and you’re on a quest to gather wild huckleberries. One by one, you pluck these plump little gems from their leafy homes, their sweet-tart aroma filling the air. The thrill of foraging them with loved ones, the laughter that floats through the trees, and the storytelling that follows those harvests make these moments truly special. And when we get back home? Well, it’s time to transform those huckleberries into a pie that’s sure to spark joy and nostalgia.
For me, making huckleberry pie is more than just a cooking process; it’s a tradition that connects me to the moments spent with my family. My grandmother had her special recipe, and every summer, she’d invite us into her cozy kitchen to help her with the filling. I remember standing on a stool to reach the countertop, rolling out dough with my tiny hands, laughing with my siblings, and occasionally sneaking a huckleberry or two! Those memories are ingrained in my heart and have become a cherished part of my culinary journey.
So, whether you’re dusting off grandma’s old recipe or trying your hand at making this delightful dessert for the first time, I promise that huckleberry pie is an experience that will create sweet memories. Let’s get started, so you can fill your home with that irresistible scent of baking pie!
Ingredients
To make this huckleberry pie, here’s what you’ll need:
- Fresh Huckleberries (4 cups): The star of our show! Fresh huckleberries are deep purple and burst with flavor. If you can’t find them, blueberries or blackberries can be fantastic substitutes. Just make sure to adjust the sugar level depending on the sweetness of the fruit.
- Granulated Sugar (1 cup): This balances the tartness of the huckleberries. For a healthier option, feel free to use coconut sugar or honey, but keep in mind that it might change the texture slightly.
- All-Purpose Flour (1/4 cup): This is a thickening agent that helps form a beautiful filling. If you need a gluten-free option, you can replace it with a gluten-free flour blend.
- Lemon Juice (2 tablespoons): This brightens the flavors and enhances the huckleberries’ natural tartness. You can also experiment with lime juice for a fun twist.
- Butter (2 tablespoons, unsalted): For richness, this ingredient brings a lovely flavor to the filling. You can quickly swap with coconut oil for a dairy-free version.
- Ground Cinnamon (1 teaspoon): A sprinkle of this adds warmth to the pie’s flavor. If you’re feeling adventurous, cardamom or nutmeg could be a delightful touch!
- Pie Crust (1 double-crust recipe): You can use either a homemade pie crust or store-bought, depending on your time situation. For a twist, try a graham cracker crust for a sweeter, crunchier base.
Step-by-Step Instructions
1. Preheat Your Oven
First things first, let’s set the vibe for your kitchen! Preheat your oven to 425°F (220°C). This will ensure your pie bakes beautifully with that perfect golden crust and bubbling filling.
2. Prepare the Pie Crust
If you’re making your own crust, roll it out to fit your 9-inch pie dish. Make sure to keep it thick enough for structure but thin enough to enjoy that buttery goodness. Don’t worry if it doesn’t look perfect; we’re going for homemade charm here! If you’re using a store-bought crust, just follow the instructions on the package. Once you have your bottom crust in place, trim the edges and set it aside.
3. Mix the Filling
In a large mixing bowl, combine your huckleberries, sugar, flour, lemon juice, butter, and cinnamon. Gently fold the ingredients together to avoid squishing those lovely berries. Take a moment to relish the vibrant colors and enchanting smell — it’s all about those little joys in the kitchen!
Chef Tip: Make sure your huckleberries are clean! Rinse them gently under cold water and pat them dry to avoid excess moisture in the filling.
4. Fill the Pie
Pour the huckleberry mixture into the prepared bottom crust, giving it a little shake to settle everything. It should look luscious and inviting! If you like, you can add some lattice work on top or simply cover it with another sheet of pie crust. If you choose to go with the latter, make sure to cut a few slits for steam to escape — we don’t want it to explode in the oven!
5. Bake Your Pie
Place the pie on a baking sheet (to catch any drips) and pop it in the oven. Bake for 15 minutes at 425°F, then reduce the temperature to 350°F (175°C) and continue baking for an additional 30-35 minutes. You want that crust to be a delightful golden brown, and the filling to be bubbling up through the openings.
Chef Hack: If you notice the crust browning too fast, you can gently cover the edges with aluminum foil to protect them from burning.
6. Cool and Serve
Once your huckleberry pie is beautifully baked, remove it from the oven and let it cool for at least 1-2 hours. This cooling time allows the filling to set perfectly. It’s tough to wait, but trust me, it’ll be worth it when you slice into it later!
Serving Suggestions
For that extra cozy touch, serve your huckleberry pie warm with a scoop of vanilla ice cream or a dollop of freshly whipped cream. You can even sprinkle a bit of cinnamon on top for a charming finish. If you’re feeling fancy, pair it with a pot of herbal tea or a cup of freshly brewed coffee — it’s a match made in culinary heaven!
Recipe Variations
Here are some creative twists you might like to try with this huckleberry pie:
- Huckleberry-Lemon Pie: Add a bit more lemon zest for a refreshing zing that elevates the flavor profile.
- Mixed Berry Pie: Combine huckleberries with blueberries, raspberries, or chopped strawberries for a delightful mixed berry experience.
- Nutty Crust: Use ground almonds or pecans in your pie crust for a nutty flavor that pairs perfectly with the huckleberries.
- Vegan Version: Substitute butter with vegan margarine and use a vegan pie crust; swap out sugar for your favorite vegan-friendly sweetener!
- Spiced Huckleberry Pie: Add a touch of ginger or cardamom to the filling for a warm and inviting flavor.
Chef’s Notes
As I’ve made this pie over the years, I’ve learned a few things along the way. One of my favorite moments was when I decided to throw in a hint of almond extract into the filling, and oh my goodness! The twist was simply delightful. Watching smiles spread across my family’s faces as they tasted my latest creation is what keeps me going in the kitchen. Every batch is an opportunity for a sweet surprise and a new memory in making!
FAQs and Troubleshooting
Q1: Why did my huckleberry pie become runny?
Sometimes, it’s all about moisture in the fruit. If your huckleberries were too juicy, adding an extra tablespoon of flour in the filling can help absorb that excess moisture.
Q2: How do I keep my crust from getting soggy?
Use a light brush of egg wash or melted butter on the bottom of your crust before adding the filling. This helps create a barrier and keeps it crisp.
Q3: Can I freeze huckleberry pie?
Absolutely! Just make sure it’s completely cooled, wrap it tightly in plastic wrap and then in foil. It should hold up nicely for about 2-3 months. To serve, bake directly from the freezer, just add a few extra minutes to the baking time.
Q4: Is there a way to make my huckleberry pie less sweet?
You can reduce the amount of sugar you use in the filling. I recommend gradually reducing it instead of cutting it out completely to maintain a balance of flavors.
Nutritional Info
Each slice of huckleberry pie (1/8 of the pie) typically contains around 200-250 calories, depending on your crust and ingredients. It’s packed with antioxidants from the huckleberries and can absolutely be part of a balanced diet!
Now that you have all the tips and tricks, it’s time for you to grab your apron and get to baking! I can’t wait to hear about your huckleberry pie adventures. Remember, cooking is about joy, share it, and create those beautiful moments. Happy baking!
Print
Huckleberry Pie
- Total Time: 1 hour 5 minutes
- Yield: 8 servings
- Diet: Vegetarian
Description
This delightful huckleberry pie is bursting with flavor and nostalgia, perfect for summer gatherings and creating sweet memories.
Ingredients
- Fresh Huckleberries (4 cups)
- Granulated Sugar (1 cup)
- All-Purpose Flour (1/4 cup)
- Lemon Juice (2 tablespoons)
- Butter (2 tablespoons, unsalted)
- Ground Cinnamon (1 teaspoon)
- Pie Crust (1 double-crust recipe)
Instructions
- Preheat your oven to 425°F (220°C).
- Prepare the pie crust by rolling it out to fit a 9-inch pie dish.
- Mix the huckleberries, sugar, flour, lemon juice, butter, and cinnamon in a large mixing bowl.
- Fill the prepared bottom crust with the huckleberry mixture.
- Bake the pie: Bake for 15 minutes at 425°F, then reduce the temperature to 350°F (175°C) for an additional 30-35 minutes.
- Cool the pie for at least 1-2 hours before serving.
Notes
For a twist, serve warm with ice cream or whipped cream. Can substitute huckleberries with blueberries or blackberries if necessary.
- Prep Time: 20 minutes
- Cook Time: 45 minutes
- Category: Dessert
- Method: Baking
- Cuisine: American
Nutrition
- Serving Size: 1 slice
- Calories: 225
- Sugar: 20g
- Sodium: 50mg
- Fat: 8g
- Saturated Fat: 5g
- Unsaturated Fat: 3g
- Trans Fat: 0g
- Carbohydrates: 36g
- Fiber: 3g
- Protein: 2g
- Cholesterol: 15mg
Keywords: huckleberry, pie, dessert, summer, berries
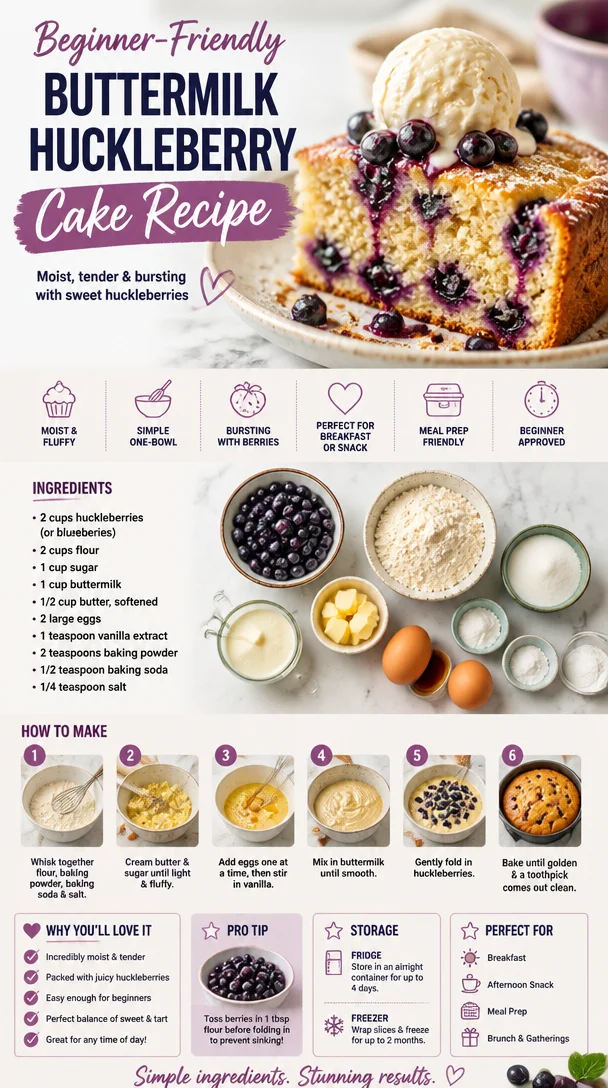
Beginner-Friendly Buttermilk Huckleberry Cake Recipe
Buttermilk Huckleberry Cake: A Slice of Happiness
Welcome to my kitchen! I’m so glad you’re here, and I can’t wait to share a delicious recipe that’s truly close to my heart: Buttermilk Huckleberry Cake. This cake is not just a dessert; it’s a celebration of summer, family gatherings, and sweet nostalgia. With its moist, tender crumb and the burst of juicy huckleberries, this cake makes for the perfect centerpiece at any occasion—from Sunday brunch to cozy family dinners.
Picture this: the sun is shining, and the air is warm with the sweet scent of wild berries. As a child, I spent countless afternoons in the woods behind my grandmother’s house, foraging for huckleberries. Those charming little blue-black gems were always a delight to find, hiding among the leaves, waiting to be picked. I remember my grandmother’s laugh as she whisked up her famous huckleberry pancakes in the mornings, reminding us of the timeless connection between food and memories.
One beautiful summer day, she decided to surprise us all with something special—a huckleberry cake! That day in her cozy kitchen, filled with the sounds of whisking and laughter, ignited my love for baking and the sheer joy of sharing food with those I love. Now, every time I whip up this Buttermilk Huckleberry Cake, I’m reminded of those precious moments spent with her, and I hope this recipe brings as much joy to your kitchen as it has to mine.
Let’s dive into the ingredients and get cooking!
Ingredients
-
2 cups all-purpose flour
Perfect for creating a light and tender cake. You can substitute with whole wheat flour for a nuttier flavor, but keep in mind that it might make the cake denser. -
1 cup granulated sugar
This adds the right amount of sweetness. For a lower-calorie option, consider using coconut sugar or a sugar substitute; just remember to adjust the quantity according to the substitution guidelines. -
1/2 teaspoon baking powder
A vital ingredient that helps your cake rise and prevents it from being too dense. -
1 teaspoon baking soda
This interacts with the acidity of buttermilk to create a wonderfully fluffy texture. -
1/2 teaspoon salt
Balances the sweetness and enhances the flavors of the cake. -
1 cup buttermilk
Adds moisture and a slight tang. If you don’t have buttermilk on hand, you can make your own by mixing one cup of milk with a tablespoon of vinegar or lemon juice and letting it sit for about 10 minutes. -
1/2 cup vegetable oil
Keeps the cake moist and tender. Melted butter can also be used for a richer flavor. -
2 large eggs
Essential for binding the ingredients together and adding a bit of richness. Flaxseed eggs (1 tablespoon flaxseed meal mixed with 2.5 tablespoons water) could be a great vegan substitute. -
1 ½ cups fresh huckleberries
Deliciously sweet and tart—they make this cake sing! If you can’t find huckleberries, blueberries work beautifully as well. -
1 teaspoon vanilla extract
Adds warmth and rounds out the flavors. Use pure vanilla extract for the best results.
Ready to embark on your baking adventure? Let’s mix up this delicious Buttermilk Huckleberry Cake together!
Step-by-Step Instructions
-
Preheat Your Oven
Start by preheating your oven to 350°F (175°C). This ensures that your cake will bake evenly and create that perfect golden crust. -
Prepare Your Cake Pan
Grease a 9×13-inch baking dish (or two 8-inch round pans, if you prefer layers) with butter or cooking spray. For an extra non-stick guarantee, you can also dust the pan with a bit of flour—this helps the cake slide right out. -
Combine Dry Ingredients
In a large mixing bowl, whisk together the flour, sugar, baking powder, baking soda, and salt. This is where we bring together all those dry ingredients, ensuring they’re well-mixed for even flavor and texture. -
Mix Wet Ingredients
In a separate bowl, whisk together the buttermilk, vegetable oil, eggs, and vanilla extract until thoroughly combined. You want these ingredients to blend smoothly—don’t be afraid to put some elbow grease into it! -
Combine Wet and Dry Ingredients
Pour the wet mixture into the dry ingredients, and stir gently until just combined. Be careful not to overmix; this will keep your cake light and fluffy. You might see some lumps, and that’s perfectly fine! -
Fold in the Huckleberries
Now for the star of the show! Gently fold in the huckleberries, taking care not to break them apart too much—they should remain intact to create those lovely bursts of fruit in every slice. -
Transfer to the Pan
Pour the batter into your prepared baking dish, spreading it evenly. If you want a little extra flair, you can save a handful of huckleberries to sprinkle on top before baking! -
Bake the Cake
Place the cake in your preheated oven and bake for about 30-35 minutes. You’ll know it’s done when a toothpick inserted in the center comes out clean or with just a few moist crumbs clinging to it. -
Cooling Time
Once baked, remove the cake from the oven and allow it to cool in the pan for about 10 minutes. Then, transfer it to a wire rack to cool completely. This step is crucial as it helps set the cake and prevents it from becoming soggy. -
Slice and Serve!
Once the cake has cooled, it’s time for the best part—enjoying a slice (or two) of your Buttermilk Huckleberry Cake. Feel free to serve it plain, dusted with powdered sugar, or topped with a dollop of whipped cream for an extra indulgence!
Serving Suggestions
To serve your Buttermilk Huckleberry Cake, slice it into generous squares and place them on colorful dessert plates. A light dusting of powdered sugar makes for an appealing presentation, or add fresh huckleberries and mint leaves for that extra pop of color. If you’re feeling fancy, serve it alongside a scoop of vanilla ice cream or a drizzle of cream cheese frosting—trust me, you can’t go wrong with that!
Recipe Variations
Looking to switch things up? Here are a few ideas:
-
Lemon Zest: Add a tablespoon of lemon zest to the batter for a refreshing citrus twist.
-
Spices: Incorporate cinnamon or nutmeg for a warm spice profile, perfect for those cozy autumn days.
-
Coconut Flakes: Stir in some sweetened coconut flakes for an exotic flair and added texture.
-
Nuts: Chopped walnuts or pecans could add a delightful crunch and a nutty flavor contrast.
-
Gluten-Free Option: Substitute in a 1:1 gluten-free flour blend to make it gluten-free without sacrificing flavor.
Chef’s Notes
Every time I make this cake, it takes me back to my grandmother’s kitchen. I often find myself reminiscing about those carefree summer afternoons spent berry-picking and the laughter shared over delicious food. The beauty of this recipe is in its simplicity; it’s a canvas for your creativity! Over the years, I’ve tried different flavors and variations. One fun memory is when I surprised my grandmother with a ‘Huckleberry Lemon Cheesecake’ for her birthday, inspired by this very cake. She took one bite and it was like I had transported her back to her own childhood. That’s the magic of cooking—it connects generations and creates a tapestry of memories.
FAQs and Troubleshooting
1. My cake turned out too dense; what did I do wrong?
This could be due to overmixing the batter or using too much flour. Be gentle when combining wet and dry ingredients and measure flour accurately (spoon it into your measuring cup and level it off!).
2. I can’t find huckleberries; how can I substitute?
You can use fresh or frozen blueberries, blackberries, or even raspberries. Just adjust the quantity if the substitute is more or less sweet.
3. Can I make this cake ahead of time?
Absolutely! This cake stores well. Just make sure to keep it wrapped in an airtight container at room temperature for up to 3 days (or refrigerate for longer freshness).
4. How can I make the cake gluten-free?
Simply substitute the all-purpose flour with a gluten-free 1:1 flour blend. Make sure to check that other ingredients (like baking powder) are gluten-free too.
Nutritional Info
While this cake is definitely a treat, here’s a quick glance at the estimated nutritional info per slice (based on 12 slices per cake):
- Calories: 220
- Protein: 3g
- Total Fat: 10g
- Saturated Fat: 1g
- Dietary Fiber: 1g
- Total Sugars: 12g
As always, adjust based on your serving size and ingredients used, and enjoy every delicious bite guilt-free!
There you have it: my beloved Buttermilk Huckleberry Cake recipe, filled with love, memories, and loads of flavor! I hope you find as much joy in baking it as I do. Happy baking, and may your kitchen always be filled with warmth and laughter!
Print
Buttermilk Huckleberry Cake
- Total Time: 50 minutes
- Yield: 12 servings 1x
- Diet: Vegetarian
Description
A delightful cake celebrating summer with juicy huckleberries and a tender crumb, perfect for family gatherings.
Ingredients
- 2 cups all-purpose flour
- 1 cup granulated sugar
- 1/2 teaspoon baking powder
- 1 teaspoon baking soda
- 1/2 teaspoon salt
- 1 cup buttermilk
- 1/2 cup vegetable oil
- 2 large eggs
- 1 ½ cups fresh huckleberries
- 1 teaspoon vanilla extract
Instructions
- Preheat your oven to 350°F (175°C).
- Grease a 9×13-inch baking dish with butter or cooking spray.
- Combine the flour, sugar, baking powder, baking soda, and salt in a large bowl.
- Mix the buttermilk, vegetable oil, eggs, and vanilla extract in another bowl until blended.
- Pour the wet mixture into the dry ingredients and stir gently until just combined.
- Fold in the huckleberries carefully.
- Transfer the batter to your prepared pan, spreading it evenly.
- Bake for about 30-35 minutes, until a toothpick comes out clean.
- Cool in the pan for 10 minutes, then transfer to a wire rack.
- Slice and serve with powdered sugar or whipped cream.
Notes
This cake can be made ahead of time and stored in an airtight container for up to 3 days. You can substitute various fruits if huckleberries are unavailable.
- Prep Time: 15 minutes
- Cook Time: 35 minutes
- Category: Dessert
- Method: Baking
- Cuisine: American
Nutrition
- Serving Size: 1 slice
- Calories: 220
- Sugar: 12g
- Sodium: 200mg
- Fat: 10g
- Saturated Fat: 1g
- Unsaturated Fat: 9g
- Trans Fat: 0g
- Carbohydrates: 32g
- Fiber: 1g
- Protein: 3g
- Cholesterol: 35mg
Keywords: cake, huckleberry, dessert, summer, baking, family
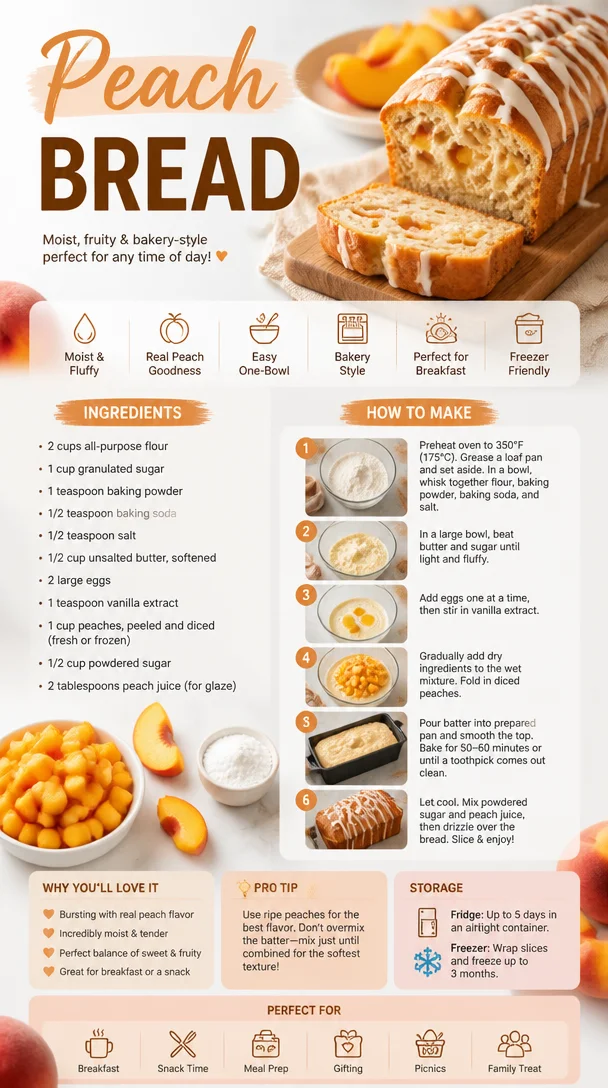
Peach Bread
The Ultimate Peach Bread Recipe: A Slice of Summer in Every Bite
Welcome to my kitchen! Today, I’m excited to share a recipe that brings me back to my childhood summers spent chasing fireflies and devouring fresh fruit straight from the tree — it’s Peach Bread! There’s something utterly magical about the aroma of peaches baking in the oven, wafting through my kitchen and making my heart swell with nostalgia. As much as I adore summer barbecues and sun-soaked afternoons, nothing beats enjoying a slice of this delightful Peach Bread with a drizzle of honey and a dollop of whipped cream.
Peach Bread combines the sweetness of ripe, juicy peaches with a cozy, warm bread base, creating a comforting treat perfect for breakfast, brunch, or even dessert. It’s easy enough to whip up on a lazy weekend morning, yet impressive enough to serve at your next gathering. Trust me, the blend of soft bread and succulent peaches will have your friends asking for the recipe while you bask in the glory of your culinary masterpiece.
In this blog post, I’m going to take you through every step of making Peach Bread, share some personal stories, and give you lots of tips and tricks along the way. Whether you’re an experienced baker or simply trying to impress your family with a delicious homemade treat, you’ll find everything you need right here!
So, roll up those sleeves, don your favorite apron, and let’s get baking some Peach Bread that will make your taste buds dance!
A Sweet and Juicy Memory
Growing up in the sunny countryside, my family had an orchard filled with lush, round peach trees. Each summer, my siblings and I would clamor to help our grandparents harvest ripe peaches, turning the experience into a competitive game. I still remember the feeling of sticky hands and sweet juice dripping down my chin, accompanied by lots of laughter and chatter. At the end of the day, my grandmother would pull together a peach dessert, and one of my favorites was her unforgettable Peach Bread.
Her recipe lacked any fancy techniques, yet it always turned out perfectly moist and fragrant. We would gather around the kitchen table, eager for the first warm slice slathered with butter. That joy of sharing a meal made with love and fresh ingredients is what has inspired me to create my own version of Peach Bread, one that echoes my childhood memories while inviting new ones to be made.
The beauty of this recipe is its simplicity. Whether you’re making it at home for your family or sharing with friends at a gathering, it’s meant to foster connection and joy. Let’s dive deeper into what you’ll need to create this delectable Peach Bread!
Ingredients
To make this delightful Peach Bread, you’ll need the following ingredients:
-
Fresh Peaches (2-3 large, about 2 cups diced)
Look for peaches that are ripe and fragrant. If they’re slightly green, leave them to ripen on your counter for a day or two. If you’re in a pinch, canned peaches can work as a substitute — just be sure to drain and pat them dry to prevent excess moisture. -
All-Purpose Flour (2 cups)
This is your base! If you’re looking to kick up the nutritional content, you can substitute half of it with whole wheat flour. Just be mindful that it may alter the texture slightly. -
Granulated Sugar (1 cup)
This sugar not only sweetens the bread but also keeps it moist. For a healthier option, you can use coconut sugar or even a sugar alternative like stevia, though it may affect the bread’s taste and moisture. -
Baking Powder (2 teaspoons)
The leavening agent is key to giving your bread a nice rise. Make sure it’s fresh — if it’s been sitting around for too long, it might not give you the lift you need! -
Salt (½ teaspoon)
A pinch of salt enhances the flavor of your bread, highlighting the sweetness of the peaches. It’s a small but mighty ingredient! -
Eggs (2 large)
Eggs provide structure and moisture. For an egg-free alternative, you can use a flaxseed meal mixture (1 tablespoon of flaxseed meal mixed with 2.5 tablespoons of water, let it sit until gelatinous). -
Vegetable Oil or Melted Butter (⅓ cup)
Using oil will yield a light and fluffy bread, while melted butter will give an extra rich flavor. Choose based on your mood! -
Vanilla Extract (1 teaspoon)
Ah, vanilla! This flavor enhancer makes everything taste better. If you’re feeling adventurous, try using almond extract instead for a twist. -
Cinnamon (1 teaspoon)
This is optional, but a sprinkle of cinnamon adds warmth and depth, complementing the sweetness of the peaches perfectly.
Now that we have our ingredients, let’s get into the step-by-step process of creating this Peach Bread masterpiece!
Step-by-Step Instructions
Preheat the Oven and Prepare Your Pan
- Preheat your oven to 350°F (175°C). While the oven is heating up, grab a 9×5-inch loaf pan and grease it with either butter or a non-stick cooking spray. This will prevent your beautiful bread from sticking. If you want more assurance against sticking, consider lining the bottom with parchment paper.
Mix the Dry Ingredients
- In a large mixing bowl, whisk together the flour, baking powder, salt, and cinnamon (if using). Mix these dry ingredients thoroughly to ensure even distribution of the leavening agent.
Prepare the Wet Ingredients
- In another bowl, beat the eggs. Once they’re frothy, add the sugar, oil (or melted butter), and vanilla extract. Whisk until everything is well combined. The mixture should be smooth and glossy.
Combine Wet and Dry Ingredients
- Gradually incorporate the dry ingredient mixture into the wet ingredients. Use a rubber spatula or wooden spoon to carefully fold them together. Be cautious not to overmix; some lumps are perfectly fine.
Add the Peaches
- Gently fold in the diced peaches. This is where the magic happens! Feel free to reserve a few peach pieces to sprinkle on top for a pretty presentation. Their juices will meld into the batter, making delicious little pockets of sweetness throughout the bread.
Pour into the Pan
- Transfer the batter into the prepared loaf pan; it should fill about two-thirds of the way to allow room for rising. Spread the top level with a spatula, and sprinkle any remaining peach pieces if you saved some.
Bake to Perfection
- Place the loaf pan in the preheated oven and bake for approximately 50-60 minutes. You’ll want to check for doneness by inserting a toothpick into the center. If it comes out clean or with just a few crumbs clinging to it, your bread is ready! If you notice it browning too quickly, cover it loosely with aluminum foil.
Cool it Down
- Once baked, remove it from the oven and let it cool in the pan for about 10-15 minutes. Afterward, gently turn it out onto a wire rack to cool completely. The aroma in your kitchen will be intoxicating.
Serving Suggestions
Now that your Peach Bread is cool and fragrant, slice it up and serve it warm with a pat of butter or a drizzle of honey. For a brunch treat, pair it with whipped cream or Greek yogurt and a dusting of powdered sugar to wow your guests! You can also enjoy it plain for a quick breakfast on-the-go.
Recipe Variations
While the classic Peach Bread is delicious on its own, here are some creative variations you can experiment with:
- Add Nuts: Throw in some chopped walnuts or pecans for a delightful crunch.
- Make it Tropical: Replace half of the peaches with diced pineapple for a tropical twist.
- Cinnamon Swirl: Swirl a cinnamon-sugar mix into your batter for a sweet surprise in every slice.
- Sourdough Version: Use sourdough starter as a base for a tangy, complex flavor.
- Gluten-Free Option: Substitute the all-purpose flour with a gluten-free baking blend, ensuring you’ve got an even balance of wet to dry for the same consistency!
Chef’s Notes
You know, this recipe has evolved over time as I experimented with different fruits, textures, and flavors. I remember the first time I swapped butter for oil and my family raved about how much they loved the moistness of the bread! I also recall one rather hilarious mishap when I grabbed salt instead of sugar. Let’s just say, the outcome was… not peachy! But every kitchen adventure only made me more determined to perfect my recipes.
Ultimately, this Peach Bread embodies the spirit of summer and family gatherings for me, and I hope it transports you to sunny moments in the kitchen just as it does for me!
FAQs and Troubleshooting
Can I use frozen peaches?
Yes! Just be sure to thaw and drain them well to avoid excess moisture in your bread, which could make it soggy.
What should I do if my bread is too dense?
If your bread turned out dense, it could be due to overmixing or using too much flour. Ensure you’re measuring flour accurately by spooning it into the measuring cup and leveling it off.
How can I tell if my bread is done baking?
Insert a toothpick into the center of the bread; if it comes out clean or with a few moist crumbs, you’re good to go! If it’s wet with batter, give it a few more minutes.
Can I make this recipe ahead of time?
Absolutely! Peach Bread keeps well in an airtight container at room temperature for about 3 days or can be stored in the fridge for up to a week. You can also freeze it; just make sure it’s well-wrapped.
Nutritional Info (if applicable)
For one slice of Peach Bread (about 1/12 of the loaf):
- Calories: ~180
- Total Fat: 7g
- Saturated Fat: 1g
- Carbohydrates: 27g
- Fiber: 1g
- Sugar: 10g
- Protein: 3g
Conclusion
And there you have it — the ultimate Peach Bread recipe, filled with sweet memories and the promise of delicious moments to come. I hope you enjoy baking and sharing this delightful treat as much as I do. Remember, cooking is all about experimentation and love, so don’t be afraid to make it your own!
Happy baking, and may your kitchen be filled with joy, laughter, and the sweet aroma of peaches! 🍑
Print
The Ultimate Peach Bread
- Total Time: 75 minutes
- Yield: 12 servings
- Diet: Vegetarian
Description
A comforting Peach Bread recipe that combines ripe peaches with a warm bread base, perfect for breakfast or dessert.
Ingredients
- Fresh Peaches (2-3 large, about 2 cups diced)
- All-Purpose Flour (2 cups)
- Granulated Sugar (1 cup)
- Baking Powder (2 teaspoons)
- Salt (½ teaspoon)
- Eggs (2 large)
- Vegetable Oil or Melted Butter (⅓ cup)
- Vanilla Extract (1 teaspoon)
- Cinnamon (1 teaspoon, optional)
Instructions
- Preheat your oven to 350°F (175°C) and grease a 9×5-inch loaf pan.
- Mix the flour, baking powder, salt, and cinnamon in a bowl.
- Prepare the eggs by beating them, then add the sugar, oil (or butter), and vanilla extract.
- Combine the dry ingredients with the wet ingredients carefully.
- Add the diced peaches to the batter and fold gently.
- Pour the batter into the prepared loaf pan.
- Bake for approximately 50-60 minutes until done.
- Cool in the pan for about 10-15 minutes, then transfer to a wire rack.
Notes
Serve with butter, honey, or whipped cream. Great for brunch or as a dessert.
- Prep Time: 15 minutes
- Cook Time: 60 minutes
- Category: Dessert
- Method: Baking
- Cuisine: American
Nutrition
- Serving Size: 1 slice
- Calories: 180
- Sugar: 10g
- Sodium: 220mg
- Fat: 7g
- Saturated Fat: 1g
- Unsaturated Fat: 4g
- Trans Fat: 0g
- Carbohydrates: 27g
- Fiber: 1g
- Protein: 3g
- Cholesterol: 60mg
Keywords: peach bread, summer recipes, quick bread, dessert, baking
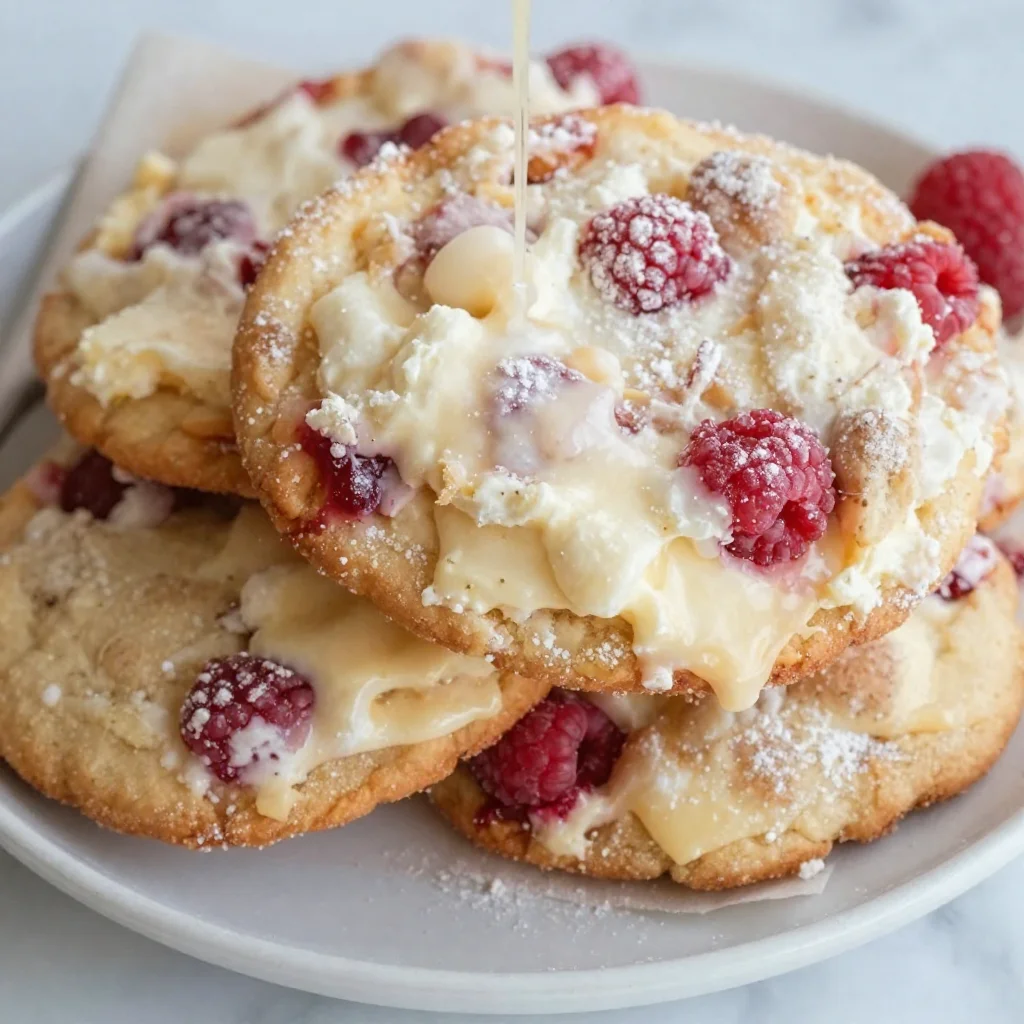
Minute Raspberry Cheesecake Cookies (Beginner-Friendly)
Raspberry Cheesecake Cookies: A Sweet Treat to Delight the Senses
Welcome to my cozy corner of the kitchen! Today, I’m thrilled to share a recipe that’s very close to my heart: Raspberry Cheesecake Cookies. If you love the tartness of fresh raspberries melded perfectly with creamy cheesecake flavors, this recipe will be your new go-to for any occasion. Whether you’re hosting a gathering or just treating yourself to something sweet, these cookies are sure to impress. So grab your apron and let’s dive into this delicious journey together!
A Sweet Memory
Growing up, my family had a tradition of baking together every Sunday afternoon. One of our favorite recipes was a classic cheesecake, but with only so much time in the day, we often decided to get creative. One sunny Sunday, my younger brother, Max, suggested we turn our beloved cheesecake into cookies—because who doesn’t love a good cookie? We spent the afternoon mixing, laughing, and throwing in raspberries that we later picked from our backyard. The moment those cookies came out of the oven, we couldn’t resist their creamy aroma. Each bite was a little piece of heaven. These Raspberry Cheesecake Cookies remind me of those warm Sundays filled with joy, laughter, and the sweet smell of home-baked goodness.
Ingredients
For this delightful Raspberry Cheesecake Cookies recipe, gather the following ingredients:
-
1 cup unsalted butter, softened
Butter is essential for creating the perfect creamy texture. You can substitute it with margarine, but keep in mind that the flavor won’t be as rich. -
1 cup granulated sugar
Sugar is the key to sweetness and helps the cookies spread. For a healthier option, consider using coconut sugar or a sugar alternative, adjusting measurements as needed. -
1 cup cream cheese, softened
The cream cheese gives these cookies their cheesecake-like flavor. Neufchâtel cheese is a great lower-fat substitute if you’re looking for a lighter option. -
1 large egg
Eggs bind the ingredients together. If you’re looking for an egg-free version, try using a flax egg (1 tablespoon ground flaxseed mixed with 2.5 tablespoons water) for similar binding properties. -
2 teaspoons vanilla extract
This adds a lovely depth of flavor. If you’re out of vanilla, try almond or coconut extract for a different twist. -
2 1/2 cups all-purpose flour
Flour provides the structure. You can swap for gluten-free flour, but be sure to check the packaging for specific recommendations on how to substitute. -
1 teaspoon baking powder
Baking powder ensures our cookies rise to fluffiness. Be careful not to confuse it with baking soda, as they are not interchangeable. -
1/2 teaspoon salt
Salt enhances the sweetness and balances flavors. It’s crucial, so don’t skip it! -
1 cup fresh raspberries (or frozen)
Raspberries give these cookies their signature tartness. If you can’t find fresh, thawed frozen berries will work perfectly—but be sure to pat them dry to avoid excess moisture. -
Powdered sugar (for dusting)
The final touch, a sprinkle of powdered sugar, adds a sweet elegance to your cookies.
Step-by-Step Instructions
Let’s get our hands doughy! Follow these steps for scrumptious Raspberry Cheesecake Cookies:
-
Preheat Your Oven
Preheat your oven to 350°F (175°C). This step is essential for getting that perfect bake! -
Cream Butter and Sugar
In a large mixing bowl, cream together the softened butter and granulated sugar until the mixture is light and fluffy, about 3-4 minutes. This process introduces air into the mixture, giving your cookies a delightful texture. If you’ve got a stand mixer, give it a whirl — otherwise, a hand mixer works just fine. -
Add the Cream Cheese
Next, add the softened cream cheese to the butter mixture. Beat until fully combined, scraping down the sides of the bowl as needed. You’ll want it to be smooth — think velvety rather than chunky! -
Incorporate the Egg and Vanilla
Add the egg and vanilla extract. Continue mixing until the batter is smooth. This is where that creamy, cheesecake flavor starts to shine! -
Combine Dry Ingredients
In another bowl, whisk together flour, baking powder, and salt. Slowly add this dry mixture to your wet ingredients, mixing on a low speed until just combined. Be careful not to over-mix, or you’ll end up with tough cookies instead of soft and chewy ones. -
Fold in the Raspberries
Gently fold in the fresh or frozen raspberries using a spatula. This is my favorite part — those bursts of berry goodness will make every cookie a delightful surprise! -
Scoop and Shape
Drop heaping tablespoons of cookie dough onto a lined baking sheet, about 2 inches apart. Flatten them slightly since they won’t spread too much as they bake. -
Bake
Bake the cookies in your preheated oven for 10-12 minutes, or until the edges are lightly golden. Keep an eye on them — you want them to look set and ever-so-slightly underbaked in the middle for that chewy center. -
Cool Down
Once out of the oven, let the cookies cool on the baking sheet for about 5 minutes before transferring them to a wire rack to cool completely. This helps them firm up a little more and allows those delicious flavors to meld. -
Dust with Powdered Sugar
Finally, before serving, dust your cookies with some powdered sugar for that wow factor!
Serving Suggestions
These Raspberry Cheesecake Cookies can be enjoyed warm, right out of the oven, or at room temperature. They look divine arranged on a beautiful platter, dusted with powdered sugar. Serve them alongside a cup of coffee or a glass of cold milk for a nostalgic treat. For a fun twist, try stacking a few with a dollop of whipped cream in between for a mini cheesecake sandwich!
Recipe Variations
Looking to mix things up? Here are some fun variations to consider:
-
Chocolate Swirl Cookies: Melt some dark chocolate and swirl it into the dough for a rich, chocolatey twist.
-
Nutty Addition: Add 1/2 cup of chopped walnuts or pecans for a crunch that contrasts beautifully with the soft texture.
-
Citrus Infusion: Add a teaspoon of lemon or orange zest into the dough for a bright, zesty flavor that pairs wonderfully with raspberries.
-
Oatmeal Twist: Substitute half of the flour with rolled oats for a chewy oatmeal raspberry treat.
-
Berry Medley: Swap raspberries for blueberries or strawberries, or use a combination of berries for a colorful, fruity delight!
Chef’s Notes
I have to admit, I’ve had my fair share of kitchen mishaps. One time, I was so eager to bake these cookies that I mistakenly added salt instead of sugar. Let’s just say the batch got relegated to the compost bin! What I’ve learned over time is patience and paying attention to details always pays off. These cookies have become a staple in my home and have evolved into a family favorite—especially when they’re fresh out of the oven and still warm. Enjoy every batch; they are as much about the process as they are about the end product!
FAQs and Troubleshooting
Q: Why are my cookies flat?
A: Cookies can flatten if the butter isn’t properly creamed or if the dough is too warm. Make sure your butter is softened, not melted. If your dough feels too soft, pop it in the fridge for 15-30 minutes before baking.
Q: Can I freeze the dough?
A: Absolutely! You can freeze the cookie dough in balls and bake them fresh, straight from the freezer. Just add an extra minute or two to your baking time.
Q: How can I store the cookies?
A: Store the cooled cookies in an airtight container at room temperature for up to a week. They can also be frozen if you want to save some for later!
Q: What’s the best way to prevent sogginess with raspberries?
A: Pat your raspberries dry with a paper towel before adding them to the dough. Excess moisture can lead to sogginess, so take a moment to ensure they’re nice and dry.
Nutritional Info
Calories per cookie (estimated): 120
Total Fat: 7g (Saturated Fat: 4g)
Cholesterol: 30mg
Sodium: 75mg
Total Carbohydrates: 14g (Dietary Fiber: 0.5g, Sugars: 8g)
Protein: 1.5g
There you have it—my cherished Raspberry Cheesecake Cookies recipe! I hope it evokes as many warm memories for you as it does for me. Share your kitchen stories with me or post a picture of your baked wonders on social media. Happy baking, and remember to savor each moment in the kitchen!
Print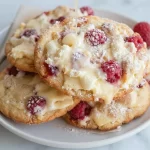
Raspberry Cheesecake Cookies
- Total Time: 27 minutes
- Yield: 24 cookies 1x
- Diet: Vegetarian
Description
Delightful cookies that combine the tartness of fresh raspberries with creamy cheesecake flavors.
Ingredients
- 1 cup unsalted butter, softened
- 1 cup granulated sugar
- 1 cup cream cheese, softened
- 1 large egg
- 2 teaspoons vanilla extract
- 2 1/2 cups all-purpose flour
- 1 teaspoon baking powder
- 1/2 teaspoon salt
- 1 cup fresh raspberries (or frozen)
- Powdered sugar (for dusting)
Instructions
- Preheat your oven to 350°F (175°C).
- Cream together the softened butter and granulated sugar until light and fluffy.
- Add the softened cream cheese to the mixture and beat until smooth.
- Incorporate the egg and vanilla extract, mixing until smooth.
- Combine flour, baking powder, and salt in another bowl, then add to the wet ingredients.
- Fold in the raspberries gently.
- Scoop heaping tablespoons of cookie dough onto a lined baking sheet.
- Bake for 10-12 minutes until the edges are lightly golden.
- Cool on the baking sheet for 5 minutes, then transfer to a wire rack.
- Dust with powdered sugar before serving.
Notes
For a healthier option, consider using coconut sugar in place of granulated sugar.
- Prep Time: 15 minutes
- Cook Time: 12 minutes
- Category: Dessert
- Method: Baking
- Cuisine: American
Nutrition
- Serving Size: 2 cookies
- Calories: 120
- Sugar: 8g
- Sodium: 75mg
- Fat: 7g
- Saturated Fat: 4g
- Unsaturated Fat: 3g
- Trans Fat: 0g
- Carbohydrates: 14g
- Fiber: 0.5g
- Protein: 1.5g
- Cholesterol: 30mg
Keywords: raspberry cookies, cheesecake cookies, dessert recipes
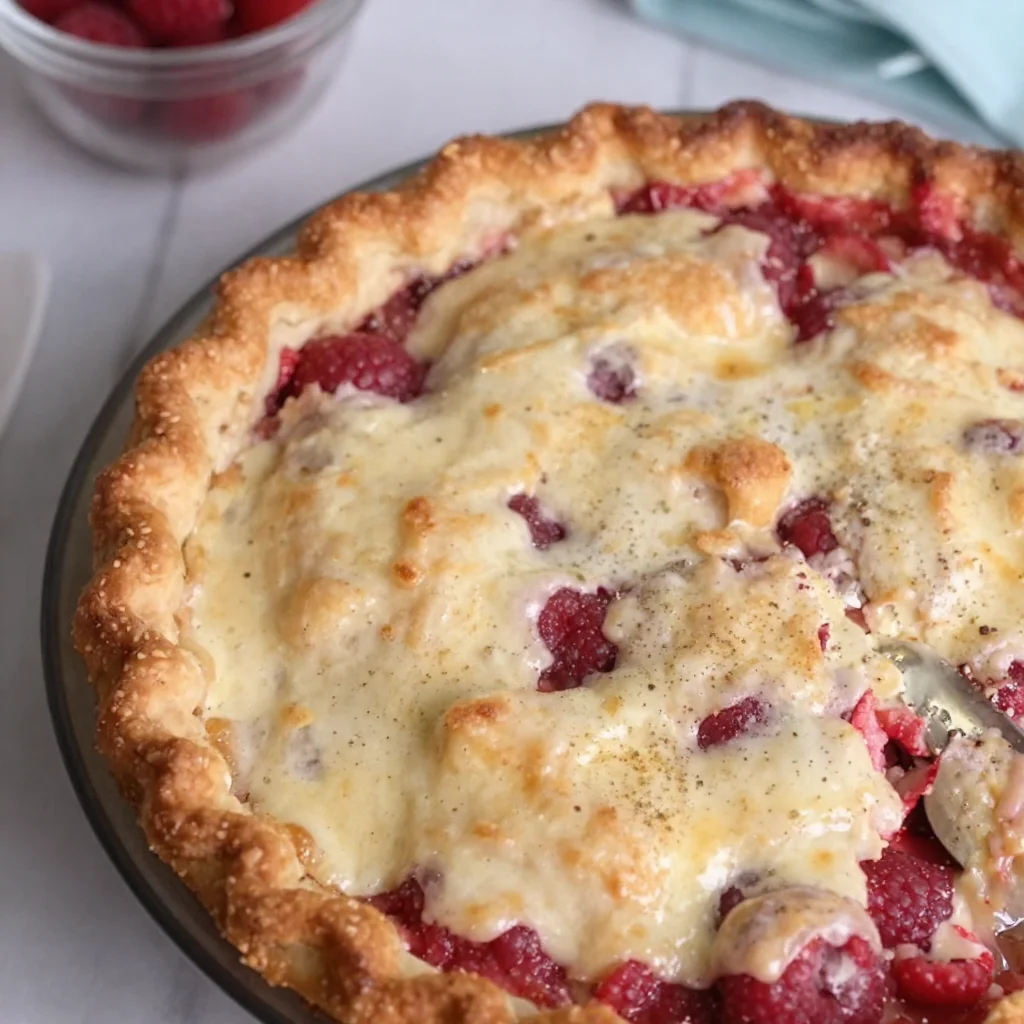
Raspberry Pie
The Joy of Baking: Raspberry Pie Love
Welcome to my kitchen, dear friends! Today, we’re diving into a dish that embodies summer, sweetness, and nostalgia: Raspberry Pie. Oh, how this pie takes me back! The delightful aroma of raspberries filling the air has always brought a smile to my face and a warmth to my heart. Whether enjoyed after a family meal or served during a backyard gathering, Raspberry Pie has a way of turning ordinary moments into cherished memories.
Picture this: a sunlit kitchen, laughter bouncing off the walls, and my grandmother expertly rolling out dough as we prepare for our favorite summer tradition—pie making! Every summer, we’d gather the juiciest raspberries from her garden, the plump little gems bursting with flavor. I can still hear her voice, mixing up the sweet filling, telling stories of pies she made as a child. The magic of those moments is what drives my passion for cooking today.
Making Raspberry Pie is not just about creating a dessert; it’s about celebrating life’s sweetest moments with those you love. Each bite is filled with memories of time spent together, and if you close your eyes, the taste takes you back to simpler times—an experience I want to share with all of you! So, let’s roll up our sleeves, grab our ingredients, and create something extraordinary. Trust me, your family and friends will thank you for it!
A Slice of Nostalgia
One summer, I was around ten years old, and my grandmother decided it was time for me to take on the sacred responsibility of pie-making. Armed with a rolling pin almost as tall as me and a heart full of enthusiasm, I was ready to dive into the world of baking. Grandma showed me how to coax the delicate dough into submission while ensuring our raspberry filling shimmered like jewels.
We scooped those ripe, tart raspberries lovingly plucked from her garden, and I learned the balance of sweetness and tartness—skills that I carry with me to this day. Little did I know then that these hours spent in the kitchen would shape my life and my passion for flavorful, homemade dishes. It was more than making a pie; it was about storytelling, connection, and the love of beautiful food. And those moments created a symphony of flavors, laughter, and memories that will forever be dear to my heart.
Ingredients for the Perfect Raspberry Pie
Now that we’re warmed up with nostalgia, let’s gather our ingredients! Here’s what you’ll need for this delightful Raspberry Pie, along with some tips to make your life easier:
-
Fresh Raspberries (6 cups)
Sweet, juicy raspberries are the star of our show! If you don’t have fresh ones on hand, you can use frozen raspberries (just don’t forget to thaw and drain them first). -
Granulated Sugar (1 cup)
This balances the tartness of the raspberries. Feel free to swap with coconut sugar or honey for a different flavor profile. -
Cornstarch (2 tablespoons)
This thickens the filling. Don’t have cornstarch? You can use tapioca starch as a one-to-one replacement. -
Lemon Juice (2 tablespoons)
Adds brightness and brings out the raspberry flavor. Stay away from bottled lemon juice—fresh is always best! -
Vanilla Extract (1 teaspoon)
A splash of vanilla enhances the raspberry flavor. If you’re in a pinch, you can substitute it with almond extract for a unique twist. -
Pie Crust (store-bought or homemade)
Use your favorite crust recipe or a pre-made one for convenience. If you’re going homemade, I recommend using a buttery pie crust for that perfect flaky texture. -
Egg Wash (1 egg, beaten)
For that golden, glossy finish that makes your pie shine! You can also use milk or cream if you prefer.
Step-by-Step Instructions
Let’s get down to business! Here’s how to turn those ingredients into a masterpiece.
-
Preheat Your Oven
Preheat your oven to 425°F (220°C). This step is crucial for achieving a beautifully baked pie. The high heat helps the crust get that lovely golden color while the filling bubbles away. -
Prepare the Filling
In a large bowl, gently toss the raspberries, sugar, cornstarch, lemon juice, and vanilla extract. Be careful not to mash the berries too much— we want them intact to provide that delightful burst of flavor in every bite. Let this mixture rest for 10-15 minutes. This helps the sugar draw out the juices, creating a delicious filling. -
Roll Out the Dough
If you’re making homemade dough, roll it out on a floured surface to about 1/8-inch thickness. For store-bought, let it sit at room temperature for a few minutes before unrolling. This allows it to be more pliable and easier to work with. -
Assemble the Pie
Lay half of the pie crust in a 9-inch pie pan. Pour the raspberry filling into the crust, spreading it evenly. Top it off with the remaining crust. You can make a full top crust or lattice for a more beautiful presentation—just be sure to cut slits for steam to escape! -
Brush the Crust
Brush the top crust with the beaten egg wash. This is where that golden color comes from! You can also sprinkle a little sugar on top for added crunch and sweetness. -
Bake
Place the pie in the oven and bake for 15 minutes at 425°F. After that, reduce the temperature to 350°F (175°C) and continue baking for 20-25 minutes until the filling is bubbly, and the crust is golden brown. The smell wafting through your kitchen will be pure bliss! -
Cool Down
Let your pie cool for at least 30 minutes before slicing. This step allows the filling to set, making it easier to serve those perfect slices. Patience is key here!
Serving Suggestions
When it comes to serving Raspberry Pie, simplicity is key! I love to serve it warm with a scoop of vanilla ice cream or a dollop of freshly whipped cream. The creamy contrast against the tart raspberries is simply divine. For an elegant touch, sprinkle powdered sugar on top or garnish with a few fresh raspberries and a mint leaf. Voila! You’ve got a showstopper!
Recipe Variations
Fancy switching things up? Here are a few ideas to make this Raspberry Pie your own:
-
Mixed Berry Pie: Swap out some of the raspberries for blueberries or blackberries for a delightful berry medley.
-
Almond Raspberry Pie: Add a teaspoon of almond extract in addition to vanilla for a nutty flavor twist that complements the raspberries beautifully.
-
Gluten-Free Option: Use a gluten-free pie crust to accommodate dietary needs, and don’t worry—the flavor will still shine!
-
Chocolate Raspberry Pie: Mix in a handful of chocolate chips to the filling for an indulgent chocolate twist.
-
Spiced Raspberry Pie: Sprinkle in some cinnamon and nutmeg to the filling for a warm, aromatic touch.
Chef’s Notes
It’s amazing how recipes evolve over time. This Raspberry Pie wasn’t always a summer staple in my kitchen. I’ve adapted and tweaked it to align with what’s freshest and in season, and every time I make it, I find new ways to explore flavors. Plus, there’s a certain joy that comes from getting a little messy in the kitchen! If you’re ever feeling down, I suggest rolling out dough or tossing some berries around—it’s therapeutic, I promise!
I once had a mishap where I forgot to add sugar to the filling. Let’s just say, it was a tart surprise for my family! But life in the kitchen—like life itself—sometimes you just have to roll with it and learn. That’s what makes cooking so fun!
FAQs and Troubleshooting
-
Why did my filling bubble over?
If your pie filling isn’t thick enough, it can bubble over. Make sure to add enough cornstarch and let the mixture sit before filling the pie. -
What if my crust is too dry?
If your dough feels crumbly, it may be too dry. Add a teaspoon of cold water at a time until the dough comes together nicely. -
How do I know when my pie is done?
Your pie is ready when the crust is golden, and you can see the filling bubbling through the top. If you’re unsure, use a thermometer; the filling should reach about 200°F. -
Can I make this ahead of time?
Absolutely! You can prepare the pie and refrigerate it before baking or freeze it before it goes in the oven. Just make sure to adjust baking time as needed!
Nutritional Info (Optional)
(Nutritional information can vary based on specific brands and portion sizes)
- Serving Size: 1 slice (1/8 of pie)
- Calories: Approximately 250
- Total Fat: 10g
- Saturated Fat: 5g
- Carbohydrates: 38g
- Fiber: 3g
- Sugars: 15g
- Protein: 3g
I hope you find joy in making this Raspberry Pie as much as I do. Whether you’re creating it alone or bringing friends and family into the kitchen, remember that every moment spent cooking is a moment invested in love and connection. So, go ahead, put on that messy apron, and let’s bake some magic!
Print
Raspberry Pie
- Total Time: 60 minutes
- Yield: 8 servings
- Diet: Vegetarian
Description
A delightful Raspberry Pie that embodies summer, sweetness, and nostalgia, perfect for family gatherings.
Ingredients
- Fresh Raspberries (6 cups)
- Granulated Sugar (1 cup)
- Cornstarch (2 tablespoons)
- Lemon Juice (2 tablespoons)
- Vanilla Extract (1 teaspoon)
- Pie Crust (store-bought or homemade)
- Egg Wash (1 egg, beaten)
Instructions
- Preheat your oven to 425°F (220°C).
- Prepare the filling in a large bowl by tossing raspberries, sugar, cornstarch, lemon juice, and vanilla extract gently.
- Roll out the dough on a floured surface to about 1/8-inch thickness.
- Assemble the pie by placing half the crust in a 9-inch pie pan, pouring in the filling, and topping with the remaining crust.
- Brush the top crust with the beaten egg wash.
- Bake for 15 minutes at 425°F, then reduce to 350°F (175°C) for 20-25 minutes.
- Cool down for at least 30 minutes before slicing.
Notes
Serve warmed with vanilla ice cream or whipped cream for a delightful treat. Experiment with different berries for variations.
- Prep Time: 20 minutes
- Cook Time: 40 minutes
- Category: Dessert
- Method: Baking
- Cuisine: American
Nutrition
- Serving Size: 1 slice
- Calories: 250
- Sugar: 15g
- Sodium: 100mg
- Fat: 10g
- Saturated Fat: 5g
- Unsaturated Fat: 3g
- Trans Fat: 0g
- Carbohydrates: 38g
- Fiber: 3g
- Protein: 3g
- Cholesterol: 0mg
Keywords: raspberry pie, summer dessert, pie recipe, baking, homemade pie

Minute Raspberry Filling for Pies and Desserts (Easy)
The Ultimate Raspberry Filling: A Sweet Sensation
Welcome to my cozy corner of the culinary world! I’m thrilled to share one of my absolute favorite recipes with you today that’s perfect for bringing a bit of sweetness to your kitchen: raspberry filling. This vibrant, tangy filling is a superstar in so many desserts, from danishes and pies to cakes and tarts. If you’ve ever stood in front of a bakery display, mesmerized by the colors and textures of pastries, you know that a good filling can make all the difference. So, let’s dive in and whip up something delicious together!
A Slice of Nostalgia
When I think of raspberry filling, I can’t help but remember the summers spent at my grandmother’s house. She had a little garden bursting with raspberry bushes that seemed to go on forever. Every late afternoon, we would venture out with tiny buckets, and, of course, a few handfuls would always end up in our mouths before making it into the bucket. There’s something truly magical about eating fruits straight from the garden — the flavor just hits differently.
One summer, as my grandma guided me through her time-tested recipe, I remember the excitement of waiting for the thick, glossy filling to cool. We used it to fill her famous pastries, which were flaky, buttery, and simply divine! The house was always filled with laughter and delightful aromas that wrapped around you like a warm hug. That memory has stuck with me through the years, and it inspires me to recreate that same warmth whenever I whip up a batch of raspberry filling. Trust me; once you make this filling, you’ll understand the joy that comes with sharing the fruits of your labor with the people you love.
Ingredients
To create the perfect raspberry filling, you’ll need just a few simple ingredients. Let’s take a closer look!
-
Fresh or Frozen Raspberries (2 cups): The star of our show! Fresh raspberries are flavorful but can be pricey and seasonal. Frozen raspberries are a great substitute and often just as tasty. Just be sure to thaw them and drain any excess liquid.
-
Granulated Sugar (1/2 cup): This sweetener balances the tartness of the raspberries. You can adjust this amount based on your personal taste or substitute with honey or maple syrup for a natural sweetness.
-
Cornstarch (2 tablespoons): This thickening agent helps to give the filling a lovely, spreadable consistency. If you’re looking for a gluten-free option, you can use arrowroot powder instead!
-
Lemon Juice (1 tablespoon): The acidity of lemon juice enhances the flavor of the raspberries and helps to balance the sweetness. You can use bottled lemon juice in a pinch, but fresh is always better!
-
Water (1/4 cup): This is used to help dissolve the sugar and cornstarch. If you’d like a richer taste, you can use fruit juice like apple or white grape juice.
Feel free to experiment with different flavors by infusing the filling with herbs like mint for a refreshing twist!
Step-by-Step Instructions
Ready to get cooking? Here’s a simple and straightforward guide to making your raspberry filling with little chef hacks sprinkled in!
-
Prepare Your Ingredients: Start by gathering all your ingredients. This ensures you won’t find yourself frantically searching for something halfway through the process. It’s also a great time to pre-measure your ingredients for efficiency.
-
Combine the Raspberries and Sugar: In a medium saucepan, combine the raspberries and granulated sugar over medium heat. Stir gently to coat the berries in sugar, then let them sit for a couple of minutes until they start to release their juices. This step helps to create that delicious syrupy base for your filling.
-
Makе the Cornstarch Slurry: While the raspberries are settling, mix the cornstarch with the water in a small bowl. This slurry will help thicken our filling later. For a smooth texture, ensure that there are no lumps!
-
Heat Until Bubbly: Place the saucepan over medium-high heat and bring the mixture to a gentle boil. Stir it occasionally to prevent sticking. The raspberries will break down as they simmer—this is what you want!
-
Add the Cornstarch Mixture: Once the raspberry mixture is bubbling, reduce the heat to medium and pour in the cornstarch slurry. Stir continuously until the mixture thickens, which should take about 2-3 minutes. If it seems too thick, you can always add a splash more water.
-
Add Lemon Juice: Just as the filling begins to thicken, remove it from the heat and stir in the lemon juice. The citrus will brighten the flavor and give your filling that zesty kick!
-
Cool and Store: Allow the filling to cool completely in the saucepan. If you’re not using it right away, transfer it to airtight containers. This filling can be kept in the fridge for about one week or in the freezer for up to three months. I love making a big batch, so I always have some on hand for impromptu desserts!
Serving Suggestions
Now that you have your luscious raspberry filling, it’s time to dream up some serving ideas! Spread this filling between two layers of sponge cake for a gorgeous layer cake, or fill puff pastry shells and dust them with powdered sugar for a delightful treat. You could even dollop it onto a bowl of vanilla ice cream or yogurt for a refreshing dessert. The opportunities are endless, and your friends will swoon!
Recipe Variations
-
Mixed Berry Filling: Combine raspberries with blueberries or strawberries for a delightful berry medley.
-
Lemon-Raspberry Twist: Add extra lemon zest to the filling for an invigorating twist that will brighten up any dessert.
-
Chia Raspberry Jam: Replace some of the sugar with chia seeds for a healthy, jam-like filling that’s packed full of fiber.
-
Raspberry-Lavender Fusion: Infuse the cooking mixture with dried lavender flowers for a floral flavor that pairs beautifully with raspberry.
-
Vegan Swap: Use agave nectar instead of sugar and arrowroot powder instead of cornstarch to make a completely plant-based version of this filling!
Chef’s Notes
Making raspberry filling has become a bit of a ritual for me. It’s a time to slow down and appreciate the beauty in cooking—especially when the vibrant colors of the fresh fruit remind me of all those summer days in my grandmother’s garden. I often find myself experimenting with different flavors and tweaking the recipe as needed, discovering new dimensions to an old beloved favorite! Quick tip: if using frozen raspberries, remember they will release more juice than fresh, so you might need to adjust the amount of cornstarch to achieve your desired consistency.
FAQs and Troubleshooting
Q: Why is my filling too runny?
A: If it’s too runny, it likely needs more cornstarch or a longer cooking time. Try returning it to the heat and cooking it for a few minutes longer, allowing it to thicken up properly.
Q: Can this filling be made ahead of time?
A: Absolutely! In fact, I recommend making it ahead of time for maximum flavor. Just store it in the fridge or freezer as described above.
Q: Can I use other fruits for filling?
A: Yes, feel free to experiment! Other berries or even fruits like peaches or apples can work beautifully with similar ratios, but you may need to adjust sugar levels depending on the fruit’s sweetness.
Q: What’s the best way to use this filling?
A: The best way? All of them! Use it to fill pastries, layer it into cakes, or simply enjoy it on its own—just let your creativity run wild!
Nutritional Info
This raspberry filling is naturally low in calories while being bursting with flavor! Here’s a quick breakdown per serving (1 tablespoon):
- Calories: 25
- Total Fat: 0g
- Sodium: 0mg
- Carbohydrates: 6g
- Sugars: 5g
- Fiber: 1g
- Protein: 0g
Creating your own raspberry filling has never been easier or more satisfying. I can’t wait to hear your thoughts and see what delicious treats you create with it! Whip out your apron, and let’s get cooking—your kitchen adventure awaits!
Print
The Ultimate Raspberry Filling
- Total Time: 25 minutes
- Yield: 3 cups
- Diet: Vegetarian
Description
A vibrant, tangy raspberry filling that enhances various desserts from pastries to cakes.
Ingredients
- Fresh or Frozen Raspberries (2 cups)
- Granulated Sugar (1/2 cup)
- Cornstarch (2 tablespoons)
- Lemon Juice (1 tablespoon)
- Water (1/4 cup)
Instructions
- Prepare your ingredients by gathering and pre-measuring them.
- Combine the raspberries and sugar in a medium saucepan over medium heat.
- Make the cornstarch slurry by mixing cornstarch with water in a small bowl.
- Heat the mixture over medium-high heat until bubbly, stirring occasionally.
- Add the cornstarch mixture once bubbling and stir until thickened.
- Stir in the lemon juice to enhance flavor just as it thickens.
- Cool completely before storing in airtight containers.
Notes
This filling can be kept in the fridge for about one week or in the freezer for up to three months. Adjust cornstarch if using frozen raspberries.
- Prep Time: 10 minutes
- Cook Time: 15 minutes
- Category: Dessert
- Method: Cooking
- Cuisine: American
Nutrition
- Serving Size: 1 tablespoon
- Calories: 25
- Sugar: 5g
- Sodium: 0mg
- Fat: 0g
- Saturated Fat: 0g
- Unsaturated Fat: 0g
- Trans Fat: 0g
- Carbohydrates: 6g
- Fiber: 1g
- Protein: 0g
- Cholesterol: 0mg
Keywords: raspberry, filling, dessert, pastries, jam
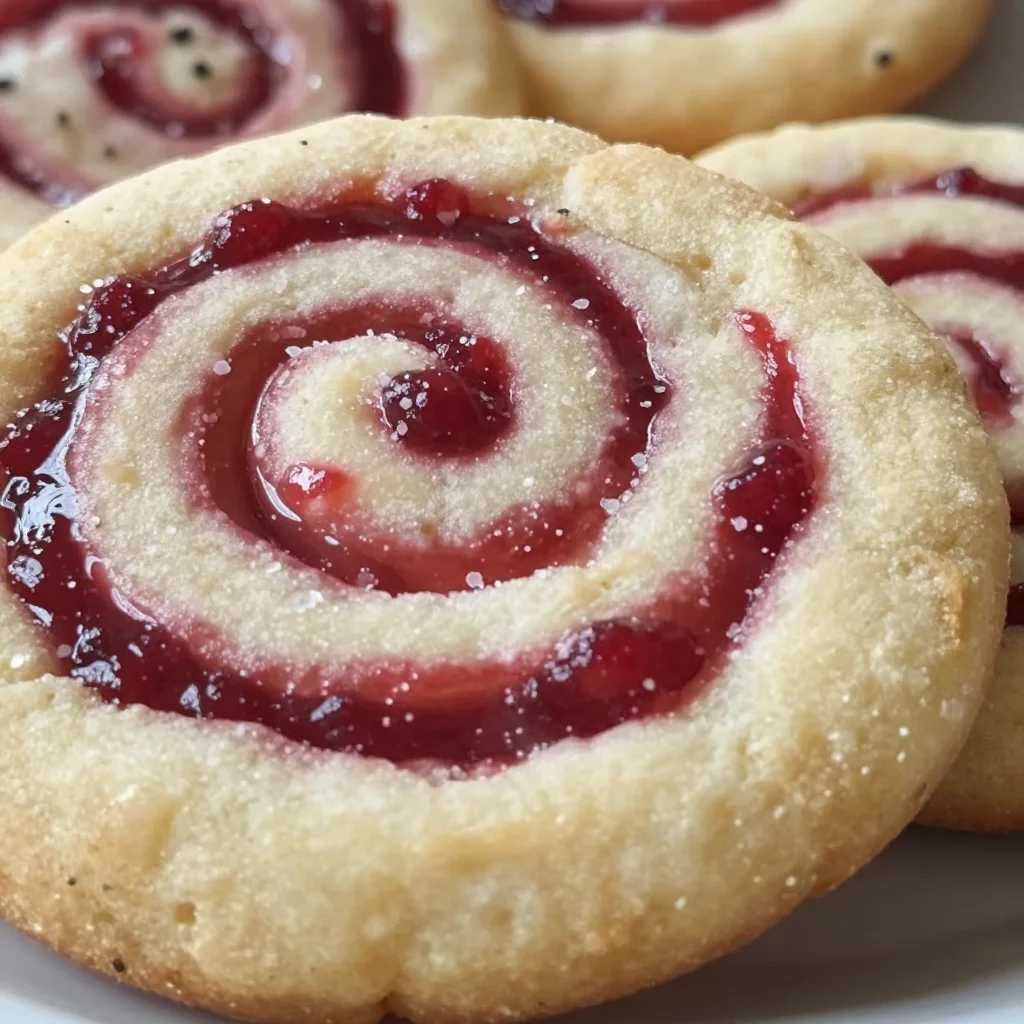
Minute Raspberry Swirl Butter Shortbread Cookies
Buttery Raspberry Swirl Shortbread Cookies: A Sweet Slice of Nostalgia
Welcome to my cozy corner of the kitchen! Today, we’re diving into a delightful treat that perfectly embodies the joys of homemade baking—Buttery Raspberry Swirl Shortbread Cookies. These cookies are not just any ordinary dessert; they encapsulate warmth, nostalgia, and a touch of creativity. Picture this: the buttery aroma wafting through your home, the vibrant red raspberry swirls dancing across each cookie, and the sound of crunching as you take your first bite. Yes, my friends, we’re about to embark on a delicious journey!
Now, why shortbread, you may ask? For me, shortbread cookies are the ultimate canvas for flavor. They have a simple base that’s both tender and crumbly, allowing other ingredients like raspberries to shine. Over the years, I have made these cookies countless times for family gatherings, friendly get-togethers, and even rainy afternoons when I need a little pick-me-up. Each batch has its own story, its own quirks, and I can’t wait to share them with you.
Baking these Buttery Raspberry Swirl Shortbread Cookies isn’t just about following a recipe; it’s about creating memories in the kitchen. When you bake, you’re not only crafting something delicious; you’re filling your home with love and laughter. So grab your apron and let’s get started on a cookie adventure that will surely charm your taste buds and the hearts of your loved ones!
A Sweet Memory from My Childhood
Let me share a little story with you. Growing up, my grandma always had a batch of something sweet resting on her kitchen counter, waiting to be nibbled on after school. I can still remember the summer afternoons spent in her sun-drenched kitchen, where the walls seemed to hum with laughter and love. One day, she decided it was time for a new treat—she had spotted a recipe for raspberry swirl cookies in an old cookbook and was eager to give it a try.
As we combined the buttery dough with vibrant raspberry jam, I was in charge of swirling it all together. My grandma guided me, sharing her wisdom as we created our masterpiece. Those cookies baked perfectly, and the sweet-tart burst of raspberry was unlike anything I had ever tasted.
After a long wait (it felt like a lifetime at the time), we delighted in the buttery bliss of those cookies. Laughter filled our kitchen as we enjoyed them fresh out of the oven with a tall glass of milk. That moment cemented my love for baking—and for these very cookies. Decades later, I still whip up a batch, carrying on that cherished memory while creating new ones in my own kitchen.
Ingredients
Here’s what you’ll need to make your own Buttery Raspberry Swirl Shortbread Cookies:
-
1 cup unsalted butter (softened)
The star of the show! Unsalted lets you control the salt in the recipe. If you’re in a pinch, you can substitute with salted butter; just reduce the added salt. -
1/2 cup powdered sugar
Powdered sugar gives the cookies their smooth texture and sweetness. You could use granulated sugar as a substitute, but the texture will differ slightly. -
1 teaspoon vanilla extract
A touch of vanilla enhances the flavor profile beautifully. Feel free to use almond or lemon extract for a different twist. -
2 cups all-purpose flour
This creates the structure of your cookies. If you want a gluten-free option, try using a 1:1 gluten-free flour blend. -
1/4 teaspoon salt
Salt amplifies the sweetness and balances the flavors. This can be omitted if using salted butter. -
3/4 cup raspberry jam
The vibrant swirl! You can swap for strawberry or blackberry jam if you prefer. Homemade jam also works splendidly here. -
Optional: Fresh raspberries
For a burst of fresh flavor, you can add chopped fresh raspberries to the dough, but be careful not to overmix as it can affect the dough’s texture.
Step-by-Step Instructions
Let’s roll up our sleeves and get baking! Here’s how to whip up these delightful cookies step by step:
-
Preheat Your Oven
Start by preheating your oven to 350°F (175°C). This ensures your cookies bake evenly. While that’s heating up, you can prepare your baking sheets by lining them with parchment paper. A little prep goes a long way! -
Cream Butter and Sugar
In a large mixing bowl, place your softened unsalted butter and powdered sugar. Beat them together using an electric mixer on medium speed until the mixture is light and fluffy. This should take about 2-3 minutes. Don’t skip this step; it incorporates air and gives your cookies that melt-in-your-mouth texture! -
Add Vanilla
Mix in the vanilla extract, scraping down the sides of the bowl to make sure everything is evenly combined. You want that delightful aroma to fill your kitchen! -
Combine Dry Ingredients
In another bowl, whisk together the all-purpose flour and salt. Gradually add this mixture to the butter mixture, mixing just until combined. Avoid overmixing, as this can make your cookies tough. The dough will be a bit crumbly—don’t worry, this is normal! -
Incorporate the Jam
Take the raspberry jam and gently swirl it into the dough using a spatula or a clean hand. You want pretty swirls, not a fully mixed color. This gives you those gorgeous raspberry streaks in each cookie! -
Scoop and Roll
Using a cookie scoop or tablespoon, portion out a tablespoon of dough. Roll it into a ball and place it on the prepared baking sheet, spacing them about 2 inches apart. Flatten each ball slightly with the back of a fork or your hand, just to create a nice shape. -
Bake
Pop the baking sheet into your preheated oven and bake for 12-15 minutes, or until the edges are a lovely golden brown. Keep an eye on them—oven temperatures can vary! -
Cool and Enjoy
Once baked, remove the cookies from the oven and let them sit on the baking sheet for about 5 minutes. This allows them to firm up before transferring them to a wire rack to cool completely. Try not to munch on them straight away… though, let’s be honest, I can’t resist!
Serving Suggestions
Once your Buttery Raspberry Swirl Shortbread Cookies have completely cooled, it’s time to serve them up! I love to stack a few on a beautiful plate, dust them lightly with powdered sugar for a touch of elegance, and serve them alongside a steaming cup of tea or coffee. They’re perfect for sharing at gatherings or simply for enjoying during a quiet moment alone.
Recipe Variations
- Chocolate Dipped Cookies: Melt some dark or white chocolate and dip half of each cookie for an extra indulgent treat!
- Lemon Zest: Add the zest of one lemon to the dough for a bright, citrusy flavor.
- Nuts: Fold in some chopped almonds or walnuts for an added crunch.
- Herbs: For a unique twist, try adding a teaspoon of finely chopped fresh basil or thyme to the dough; it pairs surprisingly well with raspberries!
- Gluten-Free Version: Use a gluten-free baking flour blend to make these cookies suitable for gluten-sensitive friends.
Chef’s Notes
Every recipe is a canvas for creativity, and this one is no exception! I’ve been known to experiment with various jams over the years—raspberry will always have my heart, but peach and apricot have also made a glorious appearance on my cookie platter. One mishap that cracked me up? I accidentally used a savory herb jelly once—I’ll spare you the details, but let’s just say not all experiments are successful!
FAQs and Troubleshooting
-
Why are my cookies too crumbly?
If your dough feels crumbly, it might need a touch more moisture. Try adding a teaspoon of milk or water to help bind it together without overmixing. -
My cookies spread too much while baking. What happened?
This could be due to the butter being too soft. Make sure your butter is softened to room temperature but not melted. If your cookies spread, chill the dough for about 30 minutes before baking. -
Can I freeze the dough?
Yes! You can freeze the dough before baking. Just wrap it in plastic wrap and store it in an airtight container. When ready to bake, let it thaw in the fridge overnight and then proceed with rolling out and baking. -
How do I store leftover cookies?
Store your cookies in an airtight container at room temperature for up to a week. If you want them to last longer, pop them in the fridge for up to two weeks, or freeze them for up to three months!
Nutritional Info
These delightful shortbread cookies offer a satisfying taste without all the guilt, but if you’re curious about the nutritional info per cookie, here’s a general breakdown:
- Calories: Approximately 120
- Total Fat: 7g
- Saturated Fat: 4g
- Carbohydrates: 14g
- Sugars: 5g
- Protein: 1g
So, there you have it—my recipe for Buttery Raspberry Swirl Shortbread Cookies, brimming with heart and sweet memories. It’s time to gather your ingredients, get in the kitchen, and create some magic of your own! Happy baking!
Print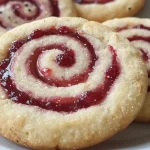
Buttery Raspberry Swirl Shortbread Cookies
- Total Time: 30 minutes
- Yield: 24 cookies 1x
- Diet: Vegetarian
Description
Delightful homemade cookies with a buttery base and vibrant raspberry swirls, perfect for sharing and creating sweet memories.
Ingredients
- 1 cup unsalted butter (softened)
- 1/2 cup powdered sugar
- 1 teaspoon vanilla extract
- 2 cups all-purpose flour
- 1/4 teaspoon salt
- 3/4 cup raspberry jam
- Optional: Fresh raspberries
Instructions
- Preheat your oven to 350°F (175°C) and prepare baking sheets with parchment paper.
- Cream the butter and powdered sugar together until light and fluffy.
- Add the vanilla extract and mix until combined.
- Combine the flour and salt in another bowl, then gradually add to the butter mixture until just combined.
- Incorporate the raspberry jam gently into the dough.
- Scoop tablespoon-sized balls of dough onto the baking sheet, flattening them slightly.
- Bake for 12-15 minutes until the edges are golden brown.
- Cool on a wire rack before enjoying.
Notes
For variations, try chocolate dipping, adding lemon zest, or incorporating nuts and herbs into the dough.
- Prep Time: 15 minutes
- Cook Time: 15 minutes
- Category: Dessert
- Method: Baking
- Cuisine: American
Nutrition
- Serving Size: 1 cookie
- Calories: 120
- Sugar: 5g
- Sodium: 50mg
- Fat: 7g
- Saturated Fat: 4g
- Unsaturated Fat: 2g
- Trans Fat: 0g
- Carbohydrates: 14g
- Fiber: 0g
- Protein: 1g
- Cholesterol: 30mg
Keywords: cookies, raspberry, dessert, holiday baking, shortbread
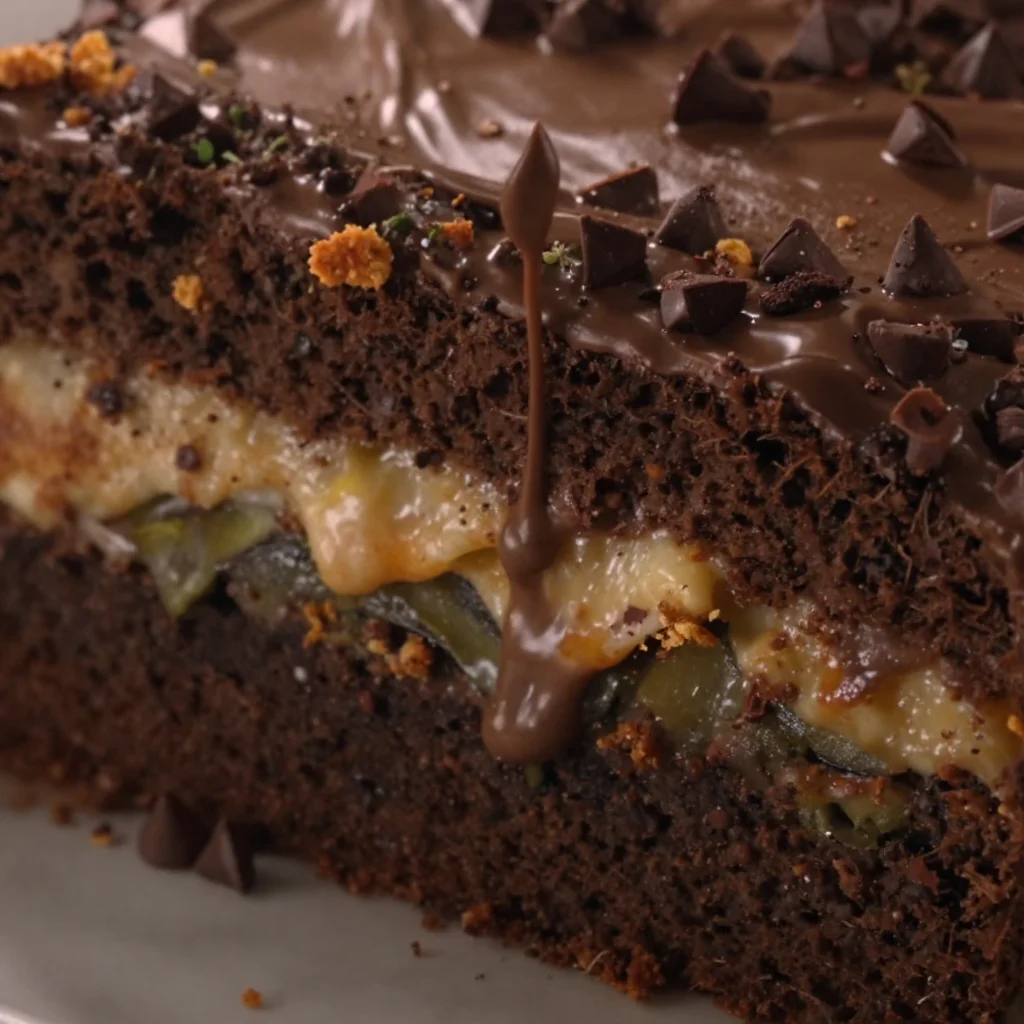
One-Bowl Chocolate Zucchini Cake with Fudgy Frosting
The Ultimate Chocolate Zucchini Cake with Chocolate Frosting
Welcome to my cozy kitchen! I’m so glad you’re here. Today, we’re diving into the rich, fudgy world of chocolate zucchini cake. Now, before you raise an eyebrow at the thought of pairing chocolate with zucchini, let me assure you that this delightful dish is a game-changer. This recipe transforms the humble zucchini into a luscious treat that’s so moist and decadent, you’ll forget it even has veggies in it!
When you take a bite of this cake, you’re not just tasting chocolate—you’re experiencing a symphony of flavors and textures. The zucchini adds moisture without overwhelming the cake with vegetable flavor, creating a lightness that perfectly complements the rich chocolate. And that chocolate frosting? It’s like a cherry on top of an already perfect sundae. Trust me; you’re going to want to make this for every occasion—birthdays, potlucks, or just because it’s Tuesday!
Whether you’re a seasoned baker or a novice looking to impress at your next brunch, this recipe is simple enough to encourage even the most hesitant cooks to dive in. So, grab your apron and let’s stir up some magic together!
A Sweet Slice of Nostalgia
Growing up, my grandmother had a garden filled with the most beautiful zucchinis. Every summer, she would invite our family over for a harvest party where zucchini reigns supreme. The highlight was always her famous chocolate zucchini cake. I remember watching her grate the zucchini, her hands moving deftly as she whispered little tips passed down through generations. The excitement in the air was palpable as we all gathered around the dining table, eager to taste her creation.
It was beyond delicious—a moist, rich cake topped with creamy chocolate frosting. Even as a child, I didn’t care that it had vegetables; I only cared about the blissful chocolatey goodness. With each bite, it was like a hug for my taste buds. Fast forward to today, and I can still feel that joy whenever I bake this cake. It’s more than just a recipe; it’s a vessel of memories, laughter, and love—the kind of cake that brings people together.
Ingredients
Here’s what you’ll need for this luscious Chocolate Zucchini Cake, along with tips for each ingredient!
-
Zucchini (2 cups, grated): This is our star ingredient! The moisture and subtle sweetness of zucchini enhance the cake’s texture without making it taste like vegetables. Use freshly grated zucchini for the best results. No zucchini handy? Shredded carrots work as a great substitute.
-
All-purpose flour (1 ¾ cups): This gives our cake structure. If you’re looking for a gluten-free option, substitute with a blend of almond flour and coconut flour (check ratios on the pack to ensure a good texture).
-
Granulated sugar (1 ½ cups): Sweeten the deal! You can adjust the sugar to your liking or use coconut sugar for a healthier twist.
-
Cocoa powder (¾ cup): For that intense chocolate flavor! Opt for unsweetened cocoa powder, or dark cocoa powder if you want a deeper taste.
-
Baking soda (1 tsp): This is our leavening agent that makes the cake rise beautifully. Make sure your baking soda is fresh for the best results.
-
Salt (½ tsp): A pinch of salt elevates the sweetness, creating a balanced flavor profile.
-
Eggs (2 large): These bind everything together and help with the rise. For a vegan swap, use flax eggs (1 tbsp ground flaxseed + 3 tbsp water = 1 egg).
-
Vegetable oil (½ cup): Adds moisture to our cake. You can use melted coconut oil or applesauce as a lighter alternative.
-
Vanilla extract (2 tsp): For a lovely aromatic flavor, enhancing the chocolate. Use pure vanilla extract for the best taste; imitation vanilla just doesn’t compare!
-
Chocolate chips (½ cup, optional): Because more chocolate is always a good idea! If you want to make it dairy-free, choose vegan chocolate chips.
Step-by-Step Instructions
Let’s get cooking!
-
Preheat your oven: Start by preheating your oven to 350°F (175°C). This ensures that your cake bakes evenly from the get-go.
-
Prepare the pan: Grease and flour a 9×13-inch baking pan. Alternatively, you can line the bottom with parchment paper for easy removal and a perfect presentation.
-
Grate the zucchini: Using a box grater or food processor, grate your zucchini. Squeeze out excess moisture using a clean kitchen towel—this prevents the cake from becoming too soggy!
-
Mix the dry ingredients: In a large mixing bowl, combine your flour, cocoa powder, baking soda, and salt. Whisk it together until well blended—this helps to distribute the baking soda evenly throughout.
-
Combine the wet ingredients: In another bowl, whisk together the eggs, sugar, vegetable oil, and vanilla extract until they’re blended nicely. The mixture should be smooth and creamy.
-
Incorporate the zucchini: Fold the grated zucchini into the wet mixture—it’s a great way to ensure every moist bite includes veggie goodness.
-
Combine wet and dry ingredients: Gradually add the dry mixture to your wet mixture, stirring until just combined. Be careful not to overmix—overworking the batter can lead to a dense cake.
-
Add chocolate chips: If you’re using chocolate chips, fold them into the batter now. This is where the magic happens!
-
Pour the batter: Transfer the batter into your prepared baking pan, smoothing the top with a spatula. This step is crucial for a beautifully baked top.
-
Bake: Pop the pan into the preheated oven and bake for 30-35 minutes, or until a toothpick inserted in the center comes out clean. The kitchen will smell heavenly during this time!
-
Cool the cake: Once baked, remove the pan from the oven and let it cool in the pan for about 10 minutes. Then, gently turn it out onto a wire rack to cool completely.
-
Make the frosting: While your cake cools, whip up your chocolate frosting. Combine softened butter, cocoa powder, powdered sugar, milk, and vanilla extract in a bowl, and mix until smooth and creamy.
-
Frost the cake: Once your cake is completely cool, slather on that chocolate frosting with a generous hand. Don’t worry about being perfect—it’s about the love you put into it!
Serving Suggestions
Slice your delicious chocolate zucchini cake into squares and serve it warm or at room temperature. Pair it with a dollop of whipped cream or a scoop of vanilla ice cream for an indulgent treat. If you’re feeling fancy, garnish with fresh raspberries or a sprinkle of confectioners’ sugar for a delightful presentation. Trust me; it’s a showstopper!
Recipe Variations
Feel free to mix things up! Here are a few creative twists you can try:
- Spiced Zucchini Cake: Add 1 tsp of cinnamon and 1/2 tsp of nutmeg for a fall-inspired flavor.
- Nutty Delight: Toss in 1/2 cup of chopped nuts (walnuts or pecans) for added crunch and flavor.
- Orange Chocolate Fusion: Add 1 tbsp of orange zest to the batter for a refreshing kick.
- Caramel Drizzle: Top your cake with a caramel drizzle for an indulgent sweetness.
- Gluten-Free Option: Substitute all-purpose flour with a 1:1 gluten-free baking blend for a safe treat.
Chef’s Notes
This chocolate zucchini cake is proof that veggies can bring joy to dessert. Over the years, I’ve adapted this recipe, and each time it evolves just a little—sometimes I’ll replace half the oil with applesauce for a lighter version, or I’ll play around with different frostings. The best part? Each version has its own special place in my heart (and stomach!).
Don’t fret if things get a little messy in the kitchen; that’s part of the fun! I once accidentally used baking powder instead of baking soda and ended up with a chocolate soufflé instead of a cake. Still delicious—just a different style!
FAQs and Troubleshooting
1. Why is my cake dense?
This could be because the batter was overmixed or too much flour was added. Make sure to fold gently and measure accuracy. Use a kitchen scale if you’re unsure!
2. Can I use frozen zucchini?
Yes! Just make sure to thaw and drain excess moisture from the frozen zucchini before using it in the recipe.
3. How do I know when my cake is done?
The toothpick test works like a charm! Insert a toothpick in the center, and it should come out clean or with a few moist crumbs attached. If it’s wet, give it a few more minutes.
4. How should I store leftover cake?
Store leftovers in an airtight container at room temperature for up to 3 days. You can refrigerate it for a week, but you might prefer it at room temp for the best texture.
Nutritional Info (optional)
Calories: 300 per slice (may vary based on ingredients and servings). This cake is a delightful blend of wholesome veggies and rich chocolate—perfect for satisfying those sweet cravings without a hint of guilt!
There you have it! Your ultimate guide to baking a deliciously moist Chocolate Zucchini Cake with dreamy chocolate frosting. I hope this recipe ignites your passion for cooking and brings a bit of joy into your kitchen. Happy baking! 🍫✨
Print
The Ultimate Chocolate Zucchini Cake with Chocolate Frosting
- Total Time: 55 minutes
- Yield: 12 servings 1x
- Diet: Vegetarian
Description
A moist, rich chocolate zucchini cake topped with creamy chocolate frosting, perfect for any occasion.
Ingredients
- 2 cups Zucchini, grated
- 1 ¾ cups All-purpose flour
- 1 ½ cups Granulated sugar
- ¾ cup Cocoa powder
- 1 tsp Baking soda
- ½ tsp Salt
- 2 large Eggs
- ½ cup Vegetable oil
- 2 tsp Vanilla extract
- ½ cup Chocolate chips (optional)
Instructions
- Preheat your oven to 350°F (175°C).
- Prepare a 9×13-inch baking pan by greasing and flouring it.
- Grate the zucchini and squeeze out excess moisture using a kitchen towel.
- Mix the flour, cocoa powder, baking soda, and salt in a large bowl.
- Combine eggs, sugar, vegetable oil, and vanilla extract in another bowl and whisk until smooth.
- Incorporate the grated zucchini into the wet mixture.
- Combine the dry ingredients into the wet mixture gradually, stirring until just combined.
- Add chocolate chips, if using.
- Pour the batter into the prepared baking pan and smooth the top with a spatula.
- Bake for 30-35 minutes, or until a toothpick comes out clean.
- Cool the cake in the pan for 10 minutes, then turn it out onto a wire rack to cool completely.
- Make the frosting by combining softened butter, cocoa powder, powdered sugar, milk, and vanilla extract until smooth.
- Frost the cooled cake with chocolate frosting.
Notes
Store leftovers in an airtight container at room temperature for up to 3 days.
- Prep Time: 20 minutes
- Cook Time: 35 minutes
- Category: Dessert
- Method: Baking
- Cuisine: American
Nutrition
- Serving Size: 1 slice
- Calories: 300
- Sugar: 18g
- Sodium: 290mg
- Fat: 15g
- Saturated Fat: 3g
- Unsaturated Fat: 6g
- Trans Fat: 0g
- Carbohydrates: 40g
- Fiber: 3g
- Protein: 5g
- Cholesterol: 70mg
Keywords: chocolate cake, zucchini cake, dessert, baking, chocolate frosting


