
Cinnamon Rolls
The Ultimate Cinnamon Roll Recipe that Will Warm Your Heart
Welcome to my cozy kitchen, where the scent of cinnamon wafts through the air like a warm hug! I’m Olivia Bennett, and today, I’m bursting with excitement to share a cherished recipe that has been a staple in my home for years: my delectable cinnamon rolls. These sweet, fluffy beauties are not just a treat; they’re a delicious memory wrapped in a gooey glaze, ready to bring joy to your family and friends.
There’s something magical about cinnamon rolls. They evoke nostalgia, perhaps because they remind us of lazy Sunday mornings spent lingering over breakfast, the kind that draws everyone to the kitchen with sleepy eyes and hopeful hearts. Picture this: warm coffee brewing, the sun streaming through the window, and the tantalizing aroma of cinnamon swirling through the air. It’s a sensory experience that speaks to the soul, and that’s exactly what I want to recreate for you today.
My love for baking cinnamon rolls started in my childhood, standing on a stool beside my grandmother, who had the knack for creating magic in the kitchen. I remember mixing the dough, sprinkling what felt like an endless mountain of cinnamon sugar, and watching in awe as those rolls blossomed into golden, pillowy clouds in the oven. That anticipation, that sense of warmth and belonging, is what has fueled my passion over the years, and it’s why I’m thrilled to guide you through this journey.
So, grab your apron (and maybe a few extra napkins because things might get sticky), and let’s dive into the world of cinnamon rolls—a place where flour flies, smiles abound, and hearts grow a little fonder with every bite!
A Special Memory: Cinnamon Rolls and Sunday Morning Bliss
Every Sunday during my childhood was carefully marked on the calendar with one simple yet joyous activity: grandma’s cinnamon roll mornings. It wasn’t just about eating; it was an experience filled with laughter, the clink of coffee mugs, and stories that seemed to float through the air like the scent of baking cinnamon.
I vividly recall my grandma’s habit of sneaking a little extra cinnamon and brown sugar into the filling—her secret touch for making them extra special. While we waited for the dough to rise, she would share tales of her own culinary adventures, introducing me to the magic of baking and the happiness it brings.
After what felt like an eternity, the oven timer would ding, a sound that could summon the whole family in an instant. The first bite of those sticky, warm rolls was sheer bliss, a reminder that love is often found in the simplest of pleasures. It was a connection, a way to gather and create memories that have stuck with me through the years.
As I bake these cinnamon rolls today, I channel that same joy and excitement, hoping to share a piece of my past with each person who tries this recipe. Trust me—after just one bite, you’re bound to make your own cherished memories!
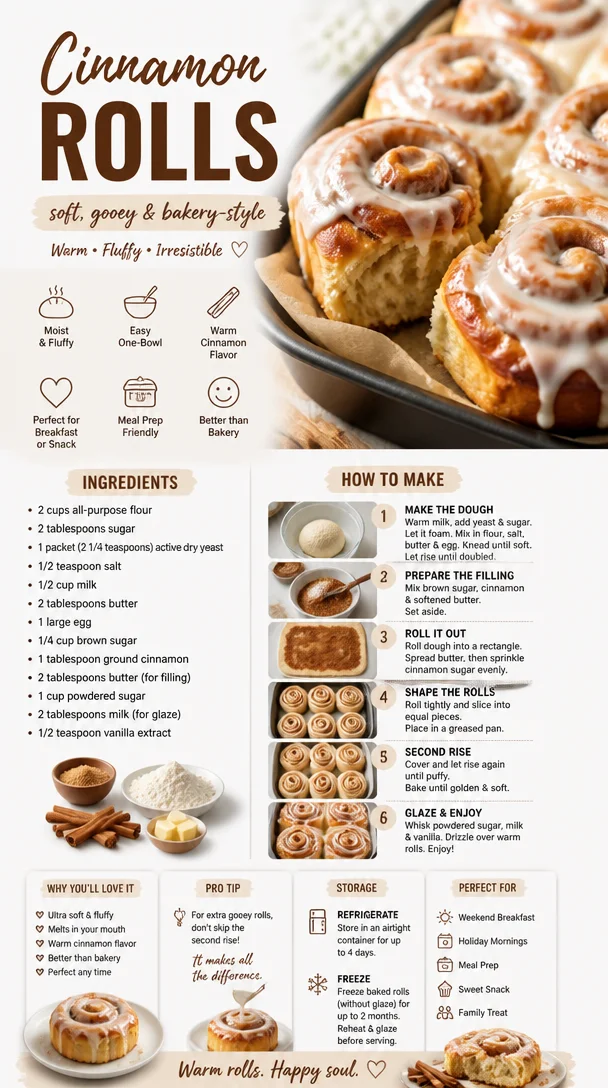
Ingredients: What You’ll Need
To make these fluffy cinnamon rolls, gather the following ingredients and let’s create some magic in the kitchen!
-
All-purpose flour (4 cups): This is the base for our dough. It provides structure and fluffiness. If you’re looking for a gluten-free option, you can use a 1:1 gluten-free flour blend.
-
Granulated sugar (½ cup): This sweetens the dough and balances out the spices. For a less sweet option, you can reduce the sugar to ¼ cup.
-
Active dry yeast (2 ¼ teaspoons): This little powerhouse helps the dough rise and become wonderfully fluffy. If you’re using instant yeast, you can use the same amount without needing to activate it in water.
-
Warm milk (1 cup): It activates the yeast and adds richness to the dough. If you’re dairy-free, feel free to use almond milk or oat milk. Just ensure it’s slightly warm, not hot.
-
Unsalted butter (½ cup, melted): Butter brings a lovely flavor and richness to the rolls. You could replace it with coconut oil for a dairy-free version!
-
Large egg (1): This binds the dough together and gives a slight richness. For a vegan alternative, try using a flax egg (1 tablespoon of ground flaxseed mixed with 3 tablespoons of water).
-
Cinnamon (2 tablespoons): The star of our show! It’s warm and aromatic, making these rolls irresistible. If you want a little kick, try adding a pinch of nutmeg or allspice to the mix.
-
Brown sugar (¾ cup): This adds moisture and deep, caramel-like flavor. You can substitute with coconut sugar if preferred.
-
Cream cheese (for frosting): You can’t have cinnamon rolls without icing! Cream cheese gives a tangy sweetness that complements the cinnamon perfectly. For a dairy-free option, try using cashew cream or a non-dairy cream cheese alternative.
Step-by-Step Instructions: How to Make the Perfect Cinnamon Rolls
Ready to roll up those sleeves? Let’s get baking!
Step 1: Prepare the Dough
-
Activate the Yeast: In a small bowl, combine warm milk (about 110°F) with the granulated sugar and yeast. Stir gently and let it sit for about 10 minutes until it’s frothy. This means your yeast is happy and active!
-
Create the Dough: In a large bowl, mix together the flour and a pinch of salt. In a separate bowl, whisk the melted butter, egg, and the bubbly yeast mixture until well combined.
-
Combine Wet and Dry Ingredients: Pour the wet ingredients into the flour mixture, stirring until a shaggy dough forms. Don’t worry about being too precise—this is meant to be a little messy!
Step 2: Knead the Dough
-
Kneading Time: Transfer the dough to a lightly floured surface and knead for about 8-10 minutes. Your dough should be smooth and elastic. If it’s too sticky, sprinkle a little more flour as needed.
-
Let it Rise: Place your kneaded dough in a greased bowl, cover it with a warm towel, and let it rise in a warm spot for about 1-2 hours, or until it has doubled in size. Take this time to sip some coffee and daydream about how amazing these rolls will be!
Step 3: Fill and Roll
-
Prepare your Filling: In a small bowl, mix together the brown sugar and cinnamon. It’s like a sweet spice hug just waiting to be nestled in those rolls!
-
Roll it Out: Once the dough has risen, punch it down gently and turn it out onto a floured surface. Roll it into a rectangle about 1/4-inch thick, aiming for a size of 12×18 inches.
-
Spread the Goodness: Brush the rolled-out dough with melted butter, leaving a small border around the edges. Sprinkle the cinnamon-sugar mixture evenly on top.
Step 4: Shape the Rolls
-
Roll it Up: Starting from the long edge, tightly roll the dough into a log. Pinch the seam to seal it, and keep that delicious filling inside!
-
Slice and Arrange: Cut the log into 12 even slices (you can use dental floss for a clean cut!). Place the rolls in a greased 9×13 inch baking dish, leaving a little space for them to rise, and cover with a towel.
Step 5: Second Rise
- Final Rise: Let those beauties rise for about 30 minutes. Preheat your oven to 350°F (175°C), and take a moment to appreciate the sweet smell wafting through your kitchen.
Step 6: Bake
- Baking Time: After the second rise, pop the rolls in the oven and bake for 20-25 minutes, or until they’re golden brown. Your kitchen will be filled with the irresistible aroma of cinnamon and sweet dough—it’s pure magic!
Step 7: Frost and Enjoy
-
Cream Cheese Frosting: While the rolls are baking, prepare the frosting by mixing softened cream cheese with powdered sugar, a splash of vanilla extract, and a little milk until creamy.
-
Glaze Those Rolls: Once the rolls are out of the oven and slightly cooled, drizzle the creamy frosting over the top. Feel free to go big or go home—there’s no such thing as too much frosting in this house!
Serving Suggestions: The Perfect Way to Enjoy
To serve, simply pull apart the rolls (that’s half the fun!) and place them on a large platter or simply keep them in the baking dish. They’re delicious both warm and at room temperature, so don’t worry if you can’t devour them all at once! And if you’re feeling extra fancy, why not pair them with a steaming cup of coffee or homemade hot chocolate? They’ll elevate your cinnamon roll experience to new heights!
Recipe Variations: Get Creative with Your Rolls
- Nutty Delight: Add chopped nuts (like pecans or walnuts) to the filling for a delicious crunch.
- Fruit-Infused: Incorporate dried fruit, such as raisins or cranberries, for a sweet and tangy twist.
- Spiced Up: Experiment with different spices—try adding cardamom or ginger for a unique flavor profile.
- Dairy-Free: Substitute all dairy products with their non-dairy alternatives to keep things cozy and inclusive.
- Chocolate Chip: Sprinkle chocolate chips into the filling for a gooey, melty treat that’s sure to delight!
Chef’s Notes: Memories and Mischief in the Kitchen
As I bake these cinnamon rolls, I can’t help but recount the times I got a little too eager and accidentally made a flour explosion! It was a mess, but let’s be real—those moments are always the most entertaining. My first batch turned into “cinnamon roll puddles,” but it’s these mishaps that make our kitchen journeys memorable.
Over the years, I’ve tweaked this recipe to perfection, ensuring that every bite is soft, sweet, and gooey. And while I might have thought I was the star chef as a kid, it turns out my grandma was the real genius here!
FAQs and Troubleshooting
Q1: My rolls didn’t rise! What happened?
A: If your yeast is old or the milk was too hot, it might not activate properly. Always check your yeast’s expiration and ensure the milk is just warm to the touch.
Q2: Can I make the dough ahead of time?
A: Absolutely! You can make the dough, let it rise, punch it down, and refrigerate it overnight. Just take it out to warm up before rolling it out.
Q3: How do I store leftovers?
A: Store any leftovers in an airtight container at room temperature for up to 2 days or in the fridge for up to a week. Reheat in the microwave for a few seconds to enjoy that fresh-baked goodness!
Q4: Can I freeze the rolls?
A: Yes! You can freeze unbaked rolls after slicing. Just freeze them on a baking sheet, then transfer to a freezer-safe bag. When you’re ready, let them rise and bake as directed.
Nutritional Information (Optional)
These cinnamon rolls are a delightful treat, but if you’re curious about nutritional content, a single roll (without frosting) contains roughly:
- Calories: 230
- Total Fat: 7g
- Carbohydrates: 36g
- Protein: 4g
Remember, these rolls are about joy, warmth, and sharing, so indulge guilt-free and enjoy every bite!
So there you have it, my dear friends: the ultimate cinnamon roll recipe to fill your kitchen with warmth and your hearts with joy. Whether you’re sharing them with loved ones or savoring them solo, each roll is a little hug that says, “You are loved.” Join me on this delicious journey, and don’t forget to make a few sticky memories along the way! Happy baking!
Print
The Ultimate Cinnamon Roll Recipe that Will Warm Your Heart
- Total Time: 55 minutes
- Yield: 12 servings
- Diet: Vegetarian
Description
Delight in the warmth of homemade cinnamon rolls, filled with sweet, fluffy dough and a gooey glaze, perfect for sharing with family and friends.
Ingredients
- All-purpose flour (4 cups)
- Granulated sugar (½ cup)
- Active dry yeast (2 ¼ teaspoons)
- Warm milk (1 cup)
- Unsalted butter (½ cup, melted)
- Large egg (1)
- Cinnamon (2 tablespoons)
- Brown sugar (¾ cup)
- Cream cheese (for frosting)
Instructions
- Activate the yeast: In a small bowl, combine warm milk with the granulated sugar and yeast. Stir gently and let it sit for about 10 minutes until it’s frothy.
- Create the dough: In a large bowl, mix together the flour and a pinch of salt. In a separate bowl, whisk the melted butter, egg, and the bubbly yeast mixture until well combined.
- Combine wet and dry ingredients: Pour the wet ingredients into the flour mixture, stirring until a shaggy dough forms.
- Knead the dough: Transfer the dough to a lightly floured surface and knead for about 8-10 minutes until smooth and elastic.
- Let it rise: Place your kneaded dough in a greased bowl, cover it with a warm towel, and let it rise for about 1-2 hours until doubled in size.
- Prepare your filling: Mix together the brown sugar and cinnamon in a small bowl.
- Roll it out: Once the dough has risen, punch it down gently and turn it out onto a floured surface. Roll it into a rectangle about 1/4-inch thick.
- Spread the goodness: Brush the rolled-out dough with melted butter and sprinkle the cinnamon-sugar mixture evenly on top.
- Roll it up: Starting from the long edge, tightly roll the dough into a log, pinching the seam to seal it.
- Slice and arrange: Cut the log into 12 even slices and place them in a greased baking dish, covering with a towel.
- Final rise: Let those beauties rise for about 30 minutes and preheat your oven to 350°F.
- Bake: Pop the rolls in the oven and bake for 20-25 minutes until golden brown.
- Prepare the frosting: While the rolls are baking, mix cream cheese with powdered sugar, a splash of vanilla extract, and a little milk until creamy.
- Glaze those rolls: Once baked, drizzle the creamy frosting over the top before serving.
Notes
Feel free to add nuts, dried fruit, or chocolate chips for variation. Make it dairy-free by substituting with non-dairy alternatives.
- Prep Time: 30 minutes
- Cook Time: 25 minutes
- Category: Dessert
- Method: Baking
- Cuisine: American
Nutrition
- Serving Size: 1 roll
- Calories: 350
- Sugar: 10g
- Sodium: 300mg
- Fat: 15g
- Saturated Fat: 8g
- Unsaturated Fat: 5g
- Trans Fat: 0g
- Carbohydrates: 45g
- Fiber: 2g
- Protein: 6g
- Cholesterol: 30mg
Keywords: cinnamon rolls, dessert, baking, sweet rolls, comfort food

Chocolate Brigadeiro Treats
Indulge in Decadence: Making Chocolate Brigadeiro Treats
Welcome to my kitchen! Today, I’m thrilled to dive into one of my all-time favorite treat recipes—Chocolate Brigadeiro. If you haven’t experienced these delightful little bites of heaven, you’re in for a treat (quite literally)! Brigadeiro is a traditional Brazilian sweet, known for its rich, fudgy texture and bombastic chocolatey flavor. They are perfect for any occasion, from birthday parties and holiday gatherings to cozy nights in with friends. Plus, they’re incredibly easy to make, which makes them an absolute win in my book!
When the kitchen is filled with the aroma of melting chocolate and sweetened condensed milk, it’s hard not to feel all warm and cozy inside, isn’t it? It reminds me of the countless times I’ve gathered around the kitchen with friends and family, crafting these delicious confections and sharing laughter and stories. Today, I want to share that joy with you so you can bring a piece of Brazil into your home, one chocolatey bite at a time.
So, roll up your sleeves and get ready to whip up a batch of these scrumptious Brigadeiros. Whether you’re making them for a special occasion or just treating yourself (because, why not?), I promise they won’t last long once they’re in your hands!
A Sweet Memory: The First Time I Made Brigadeiros
I’ll never forget the first time I made Brigadeiros. I was a curious teenager, spending the summer with my Brazilian pen pal, Ana, who became more like family during those unforgettable weeks. One sunny afternoon, as we gathered in her vibrant kitchen, she introduced me to the world of Brigadeiros. I was immediately captivated by the simplicity of the ingredients and the transformation that happened with just a little patience and stirring.
Ana and I giggled as we melted together sweetened condensed milk and cocoa powder while debating the proper technique for rolling the chocolate balls—should they be perfectly round, or did it matter if they were a little rustic? After all, I was just a teen learning to cook! The sticky mixture was everywhere—on our hands, the countertop, even on my cheek after an enthusiastic taste test. As we coated our Brigadeiros in chocolate sprinkles, a mess of giggles and smiles filled the air. The first bite was pure ecstasy—a soft, fudgy explosion of chocolate goodness that brought an immediate smile.
To this day, Brigadeiros make me think of that warm summer filled with laughter, friendship, and way too much sugar. I hope as you make them, you’ll create your beautiful memories that you can cherish forever!
Ingredients: What You’ll Need for Perfect Brigadeiros
Let’s gather our supplies! Here’s what you’ll need to make Chocolate Brigadeiro Treats:
-
Sweetened Condensed Milk: The star of the show! This ingredient combines with cocoa powder to create the creamy, fudge-like texture. If you’re in a pinch, you can make your own by simmering milk and sugar, but I must say, the canned version is ridiculously easy and just as delicious!
-
Cocoa Powder: Unsweetened cocoa powder gives Brigadeiros their rich chocolate flavor. Use high-quality cocoa for the best results. You can substitute it with carob powder for a caffeine-free option, and it still tastes delightful!
-
Butter: A little butter helps achieve that silky smooth texture. If you need a dairy-free alternative, coconut oil works wonders as well!
-
Chocolate Sprinkles: These add a delightful crunch and true Brigadeiro charm to the treats. If you want to mix it up, try using crushed nuts or coconut flakes for rolling them instead.
-
Pinch of Salt: Just a pinch enhances the overall flavor and balances the sweetness. Never underestimate the power of salt in desserts!
Step-by-Step Instructions: Let’s Get Cooking!
Ready to bring some magic to your kitchen? Here’s how to whip up your very own Brigadeiros:
-
Combine Ingredients in a Pan: In a medium saucepan, combine the sweetened condensed milk, cocoa powder, and butter. You’ll want to use a non-stick pan; it makes the cleanup a breeze and minimizes the risk of burning!
-
Heat Slowly: Place the saucepan over medium heat. Stir continuously with a wooden spoon or a silicone spatula. It’s crucial to stir often to prevent sticking and burning. This will seem tedious, but trust me—your patience will pay off.
-
Cook Until Thickened: After about 10 minutes, you’ll notice the mixture starts to thicken and pull away from the sides of the pan. Look for the consistency where it forms a ball when stirred. That’s the sweet spot, but don’t get too impatient! Cooking longer ensures that fudgy texture we all love!
-
Cool the Mixture: Once you’ve reached the desired consistency, remove the pan from the heat and transfer the mixture to a greased plate. Allow it to cool for about 15-20 minutes; I know, it’s the hardest part!
-
Roll into Balls: Once the mixture is cool enough to handle, grease your hands with a bit of butter (seriously, it helps) and scoop about a tablespoon of the mixture. Roll it into a ball shape. If it’s sticky, just add a little more butter to your hands.
-
Coat those babies: Roll each Brigadeiro in chocolate sprinkles until fully coated. Have fun with this part—get creative with different toppings!
-
Chill and Serve: Place the Brigadeiros in mini cupcake liners or on a plate and chill them in the fridge for about 30 minutes to firm up. But honestly, if you can’t wait that long, I won’t judge you!
Serving Suggestions: Prettying Up Your Brigadeiros
Now for the fun part—serving! You can arrange your Brigadeiros on a lovely platter with some colorful sprinkles or edible flowers for a pop of color. Mini cupcake liners are also super cute and make them easy to grab. If you’re feeling festive, consider adding a little drizzle of melted chocolate on top for an extra touch of elegance. Your guests will be impressed by both your skills and presentation!
Recipe Variations: Get Creative!
While the classic Brigadeiro is a winner on its own, here are some fun variations to switch things up:
-
Nutty Brigadeiro: Roll the Brigadeiros in crushed nuts, like almonds or walnuts, instead of sprinkles for a crunchy twist.
-
Coconut Brigadeiro: Swap out the chocolate sprinkles for shredded coconut for a tropical flair!
-
Espresso Brigadeiro: Add a teaspoon of instant coffee or espresso powder to the mixture for a delightful coffee kick.
-
Flavored Brigadeiro: Experiment with different extracts (like vanilla, orange, or peppermint) mixed into the base for extra flavor excitement.
-
White Chocolate Brigadeiro: Use white chocolate in place of cocoa powder for a sweeter, decadent treat!
Chef’s Notes: Personal Reflections
Over the years, I’ve sweetened up this recipe with love, finding little tweaks to enhance the experience. The simplicity of Brigadeiros makes them irresistible for every occasion, but it’s the memories that truly add sweetness. It brings me joy to experiment with different flavors and toppings, and each batch is a little story I get to tell. Every time I make these treats, I think of my summer with Ana and the laughter that filled her kitchen.
These Brigadeiros have become a staple in my kitchen, and I love making them for gatherings, potlucks, or just a random Wednesday night! I encourage you to not only collect your own memories while making them but also try inviting friends to join you. It’s an experience made even sweeter when shared!
FAQs and Troubleshooting
-
My Brigadeiros are too sticky—what did I do wrong?
- It sounds like they may have undercooked. Ensure you’re cooking the mixture long enough for it to thicken properly. Cooking until it pulls away from the sides of the pan is key!
-
What if I overcooked the mixture?
- If it’s too hard and crumbly, don’t fret! Just add a bit of butter or cream into the mixture and reheat it gently, stirring to combine until smooth again.
-
Can I freeze Brigadeiros?
- Absolutely! Brigadeiros freeze well. Just store them in an airtight container, and when you’re ready to eat them, let them thaw in the fridge.
-
Can I adjust the sweetness?
- Of course! You can adjust the amount of cocoa powder or sweetened condensed milk according to your preference. Remember, the flavors will deepen as they chill.
Nutritional Info
While Brigadeiros are undeniably a treat meant for indulgence, here’s a rough estimate for one Brigadeiro (around 20g):
- Calories: 77
- Fat: 4.2g
- Carbohydrates: 9.6g
- Protein: 0.6g
(Nutritional content can vary based on the exact ingredients and proportions you use.)
So there you have it! Your guide to the love, laughter, and joy that comes with making Chocolate Brigadeiro treats. As you whip up this decadent dessert, I hope the sweetness fills your kitchen and brings you as much joy as it has brought me. Happy cooking, friends!
Print
Chocolate Brigadeiro Treats
- Total Time: 30 minutes
- Yield: 20 servings 1x
- Diet: Vegetarian
Description
Delight in these traditional Brazilian Chocolate Brigadeiros, rich and fudgy bites that are perfect for any occasion.
Ingredients
- 1 can Sweetened Condensed Milk
- 1/4 cup Cocoa Powder
- 2 tbsp Butter
- Chocolate Sprinkles for rolling
- Pinch of Salt
Instructions
- Combine ingredients in a pan: In a medium saucepan, combine the sweetened condensed milk, cocoa powder, and butter.
- Heat slowly: Place the saucepan over medium heat and stir continuously.
- Cook until thickened: After about 10 minutes, the mixture should start thickening and pull away from the sides of the pan.
- Cool the mixture: Remove from heat and transfer to a greased plate, allowing it to cool for about 15-20 minutes.
- Roll into balls: Once cool, grease hands and scoop about a tablespoon of mixture. Roll into a ball shape.
- Coat those babies: Roll each Brigadeiro in chocolate sprinkles until fully coated.
- Chill and serve: Place Brigadeiros in mini cupcake liners or on a plate and chill in the fridge for about 30 minutes.
Notes
Feel free to experiment with different toppings like crushed nuts or shredded coconut for a twist.
- Prep Time: 20 minutes
- Cook Time: 10 minutes
- Category: Dessert
- Method: Stovetop
- Cuisine: Brazilian
Nutrition
- Serving Size: 1 Brigadeiro
- Calories: 77
- Sugar: 8g
- Sodium: 20mg
- Fat: 4.2g
- Saturated Fat: 2.5g
- Unsaturated Fat: 1.7g
- Trans Fat: 0g
- Carbohydrates: 9.6g
- Fiber: 0g
- Protein: 0.6g
- Cholesterol: 10mg
Keywords: Brigadeiro, Brazilian dessert, chocolate treat, easy dessert
Peach Bread
The Ultimate Peach Bread Recipe: A Slice of Summer in Every Bite
Welcome to my kitchen! Today, I’m excited to share a recipe that brings me back to my childhood summers spent chasing fireflies and devouring fresh fruit straight from the tree — it’s Peach Bread! There’s something utterly magical about the aroma of peaches baking in the oven, wafting through my kitchen and making my heart swell with nostalgia. As much as I adore summer barbecues and sun-soaked afternoons, nothing beats enjoying a slice of this delightful Peach Bread with a drizzle of honey and a dollop of whipped cream.
Peach Bread combines the sweetness of ripe, juicy peaches with a cozy, warm bread base, creating a comforting treat perfect for breakfast, brunch, or even dessert. It’s easy enough to whip up on a lazy weekend morning, yet impressive enough to serve at your next gathering. Trust me, the blend of soft bread and succulent peaches will have your friends asking for the recipe while you bask in the glory of your culinary masterpiece.
In this blog post, I’m going to take you through every step of making Peach Bread, share some personal stories, and give you lots of tips and tricks along the way. Whether you’re an experienced baker or simply trying to impress your family with a delicious homemade treat, you’ll find everything you need right here!
So, roll up those sleeves, don your favorite apron, and let’s get baking some Peach Bread that will make your taste buds dance!
A Sweet and Juicy Memory
Growing up in the sunny countryside, my family had an orchard filled with lush, round peach trees. Each summer, my siblings and I would clamor to help our grandparents harvest ripe peaches, turning the experience into a competitive game. I still remember the feeling of sticky hands and sweet juice dripping down my chin, accompanied by lots of laughter and chatter. At the end of the day, my grandmother would pull together a peach dessert, and one of my favorites was her unforgettable Peach Bread.
Her recipe lacked any fancy techniques, yet it always turned out perfectly moist and fragrant. We would gather around the kitchen table, eager for the first warm slice slathered with butter. That joy of sharing a meal made with love and fresh ingredients is what has inspired me to create my own version of Peach Bread, one that echoes my childhood memories while inviting new ones to be made.
The beauty of this recipe is its simplicity. Whether you’re making it at home for your family or sharing with friends at a gathering, it’s meant to foster connection and joy. Let’s dive deeper into what you’ll need to create this delectable Peach Bread!
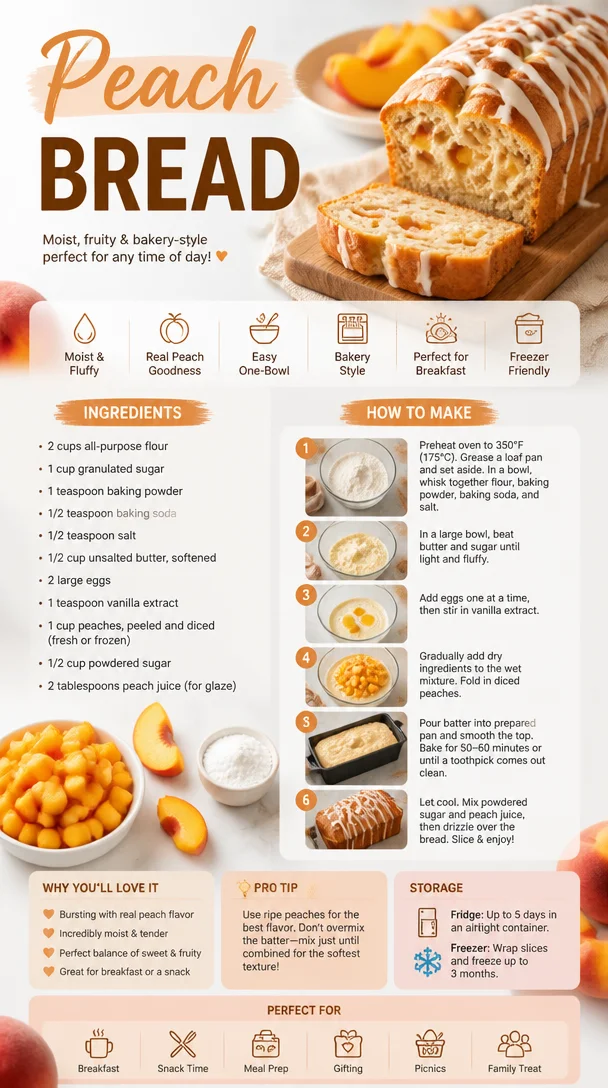
Ingredients
To make this delightful Peach Bread, you’ll need the following ingredients:
-
Fresh Peaches (2-3 large, about 2 cups diced)
Look for peaches that are ripe and fragrant. If they’re slightly green, leave them to ripen on your counter for a day or two. If you’re in a pinch, canned peaches can work as a substitute — just be sure to drain and pat them dry to prevent excess moisture. -
All-Purpose Flour (2 cups)
This is your base! If you’re looking to kick up the nutritional content, you can substitute half of it with whole wheat flour. Just be mindful that it may alter the texture slightly. -
Granulated Sugar (1 cup)
This sugar not only sweetens the bread but also keeps it moist. For a healthier option, you can use coconut sugar or even a sugar alternative like stevia, though it may affect the bread’s taste and moisture. -
Baking Powder (2 teaspoons)
The leavening agent is key to giving your bread a nice rise. Make sure it’s fresh — if it’s been sitting around for too long, it might not give you the lift you need! -
Salt (½ teaspoon)
A pinch of salt enhances the flavor of your bread, highlighting the sweetness of the peaches. It’s a small but mighty ingredient! -
Eggs (2 large)
Eggs provide structure and moisture. For an egg-free alternative, you can use a flaxseed meal mixture (1 tablespoon of flaxseed meal mixed with 2.5 tablespoons of water, let it sit until gelatinous). -
Vegetable Oil or Melted Butter (⅓ cup)
Using oil will yield a light and fluffy bread, while melted butter will give an extra rich flavor. Choose based on your mood! -
Vanilla Extract (1 teaspoon)
Ah, vanilla! This flavor enhancer makes everything taste better. If you’re feeling adventurous, try using almond extract instead for a twist. -
Cinnamon (1 teaspoon)
This is optional, but a sprinkle of cinnamon adds warmth and depth, complementing the sweetness of the peaches perfectly.
Now that we have our ingredients, let’s get into the step-by-step process of creating this Peach Bread masterpiece!
Step-by-Step Instructions
Preheat the Oven and Prepare Your Pan
- Preheat your oven to 350°F (175°C). While the oven is heating up, grab a 9×5-inch loaf pan and grease it with either butter or a non-stick cooking spray. This will prevent your beautiful bread from sticking. If you want more assurance against sticking, consider lining the bottom with parchment paper.
Mix the Dry Ingredients
- In a large mixing bowl, whisk together the flour, baking powder, salt, and cinnamon (if using). Mix these dry ingredients thoroughly to ensure even distribution of the leavening agent.
Prepare the Wet Ingredients
- In another bowl, beat the eggs. Once they’re frothy, add the sugar, oil (or melted butter), and vanilla extract. Whisk until everything is well combined. The mixture should be smooth and glossy.
Combine Wet and Dry Ingredients
- Gradually incorporate the dry ingredient mixture into the wet ingredients. Use a rubber spatula or wooden spoon to carefully fold them together. Be cautious not to overmix; some lumps are perfectly fine.
Add the Peaches
- Gently fold in the diced peaches. This is where the magic happens! Feel free to reserve a few peach pieces to sprinkle on top for a pretty presentation. Their juices will meld into the batter, making delicious little pockets of sweetness throughout the bread.
Pour into the Pan
- Transfer the batter into the prepared loaf pan; it should fill about two-thirds of the way to allow room for rising. Spread the top level with a spatula, and sprinkle any remaining peach pieces if you saved some.
Bake to Perfection
- Place the loaf pan in the preheated oven and bake for approximately 50-60 minutes. You’ll want to check for doneness by inserting a toothpick into the center. If it comes out clean or with just a few crumbs clinging to it, your bread is ready! If you notice it browning too quickly, cover it loosely with aluminum foil.
Cool it Down
- Once baked, remove it from the oven and let it cool in the pan for about 10-15 minutes. Afterward, gently turn it out onto a wire rack to cool completely. The aroma in your kitchen will be intoxicating.
Serving Suggestions
Now that your Peach Bread is cool and fragrant, slice it up and serve it warm with a pat of butter or a drizzle of honey. For a brunch treat, pair it with whipped cream or Greek yogurt and a dusting of powdered sugar to wow your guests! You can also enjoy it plain for a quick breakfast on-the-go.
Recipe Variations
While the classic Peach Bread is delicious on its own, here are some creative variations you can experiment with:
- Add Nuts: Throw in some chopped walnuts or pecans for a delightful crunch.
- Make it Tropical: Replace half of the peaches with diced pineapple for a tropical twist.
- Cinnamon Swirl: Swirl a cinnamon-sugar mix into your batter for a sweet surprise in every slice.
- Sourdough Version: Use sourdough starter as a base for a tangy, complex flavor.
- Gluten-Free Option: Substitute the all-purpose flour with a gluten-free baking blend, ensuring you’ve got an even balance of wet to dry for the same consistency!
Chef’s Notes
You know, this recipe has evolved over time as I experimented with different fruits, textures, and flavors. I remember the first time I swapped butter for oil and my family raved about how much they loved the moistness of the bread! I also recall one rather hilarious mishap when I grabbed salt instead of sugar. Let’s just say, the outcome was… not peachy! But every kitchen adventure only made me more determined to perfect my recipes.
Ultimately, this Peach Bread embodies the spirit of summer and family gatherings for me, and I hope it transports you to sunny moments in the kitchen just as it does for me!
FAQs and Troubleshooting
Can I use frozen peaches?
Yes! Just be sure to thaw and drain them well to avoid excess moisture in your bread, which could make it soggy.
What should I do if my bread is too dense?
If your bread turned out dense, it could be due to overmixing or using too much flour. Ensure you’re measuring flour accurately by spooning it into the measuring cup and leveling it off.
How can I tell if my bread is done baking?
Insert a toothpick into the center of the bread; if it comes out clean or with a few moist crumbs, you’re good to go! If it’s wet with batter, give it a few more minutes.
Can I make this recipe ahead of time?
Absolutely! Peach Bread keeps well in an airtight container at room temperature for about 3 days or can be stored in the fridge for up to a week. You can also freeze it; just make sure it’s well-wrapped.
Nutritional Info (if applicable)
For one slice of Peach Bread (about 1/12 of the loaf):
- Calories: ~180
- Total Fat: 7g
- Saturated Fat: 1g
- Carbohydrates: 27g
- Fiber: 1g
- Sugar: 10g
- Protein: 3g
Conclusion
And there you have it — the ultimate Peach Bread recipe, filled with sweet memories and the promise of delicious moments to come. I hope you enjoy baking and sharing this delightful treat as much as I do. Remember, cooking is all about experimentation and love, so don’t be afraid to make it your own!
Happy baking, and may your kitchen be filled with joy, laughter, and the sweet aroma of peaches! 🍑
Print
The Ultimate Peach Bread
- Total Time: 75 minutes
- Yield: 12 servings
- Diet: Vegetarian
Description
A comforting Peach Bread recipe that combines ripe peaches with a warm bread base, perfect for breakfast or dessert.
Ingredients
- Fresh Peaches (2-3 large, about 2 cups diced)
- All-Purpose Flour (2 cups)
- Granulated Sugar (1 cup)
- Baking Powder (2 teaspoons)
- Salt (½ teaspoon)
- Eggs (2 large)
- Vegetable Oil or Melted Butter (⅓ cup)
- Vanilla Extract (1 teaspoon)
- Cinnamon (1 teaspoon, optional)
Instructions
- Preheat your oven to 350°F (175°C) and grease a 9×5-inch loaf pan.
- Mix the flour, baking powder, salt, and cinnamon in a bowl.
- Prepare the eggs by beating them, then add the sugar, oil (or butter), and vanilla extract.
- Combine the dry ingredients with the wet ingredients carefully.
- Add the diced peaches to the batter and fold gently.
- Pour the batter into the prepared loaf pan.
- Bake for approximately 50-60 minutes until done.
- Cool in the pan for about 10-15 minutes, then transfer to a wire rack.
Notes
Serve with butter, honey, or whipped cream. Great for brunch or as a dessert.
- Prep Time: 15 minutes
- Cook Time: 60 minutes
- Category: Dessert
- Method: Baking
- Cuisine: American
Nutrition
- Serving Size: 1 slice
- Calories: 180
- Sugar: 10g
- Sodium: 220mg
- Fat: 7g
- Saturated Fat: 1g
- Unsaturated Fat: 4g
- Trans Fat: 0g
- Carbohydrates: 27g
- Fiber: 1g
- Protein: 3g
- Cholesterol: 60mg
Keywords: peach bread, summer recipes, quick bread, dessert, baking
Milkshake
Creamy Dreamy Milkshake: Your Ultimate Guide to Bliss in a Glass
Hey there, fellow food lovers! Welcome back to my cozy kitchen, where today we’re about to embark on a sweet adventure that will take you right back to those carefree summer days when the sun kissed your skin and a thick, creamy milkshake was the ultimate treat. If you’re like me, you know that nothing beats the joy of sipping a chilled milkshake while lounging with friends or family (bonus points if you’re outdoors).
Milkshakes are the quintessential comfort food that span generations. Whether you’re feeling nostalgic about those trips to the local diner in your childhood or looking to recreate that magical moment at home, I’ve got you covered. With just a few simple ingredients, we’ll whip up a shake so delicious, you’ll wonder why you ever settled for anything bottled. Plus, I promise it’ll be a cinch—trust me, if I can make it with flour on one hand and a whisk in the other, you can totally do this!
Today, I will guide you step-by-step to make a classic milkshake with heaps of flavor and inspiration drawn from my fondest memories in the kitchen. So grab your favorite glass and let’s get ready to create a deliciously creamy milkshake that’s perfect any time of year!
Personal Story
Whenever I think of milkshakes, I’m transported back to my childhood summer vacations spent at Grandma’s house. The moment we arrived, there would be the unmistakable sound of her old blender whirring and the sweet aroma of vanilla wafting through the air. Grandma had a knack for creating creamy delights that brought everyone together, and the milkshakes were the highlight. Her secret? A little bit of love and a lot of laughter blended right in!
One particular memory stands out—I remember sitting on her porch with my cousins, big sun hats perched on our heads, giggling and making a mess as we tried to finish those towering milkshakes topped with whipped cream and maraschino cherries. We’d make bets on who could finish first while the ice cream dripped down our arms. It was a chaotic, sticky mess, but in that moment, I felt so alive, so connected. That’s the magic of food; it transcends the plate and creates bonds that last a lifetime.
Now, every time I make a milkshake, I think of those sunny days and the timeless joy they brought. Let’s create some new memories together, shall we?
Ingredients
Here’s what you’ll need to make a classic milkshake:
-
Ice Cream (2 cups): The star of the show! I love using vanilla for a classic shake, but feel free to experiment with rich flavors like chocolate or strawberry. Pro tip: For a sundae-style shake, go for chunks of ice cream!
-
Milk (1 cup): Whole milk gives it a creamy texture, but you can use any milk you prefer (almond, oat, or soy) for a dairy-free option. Just adjust the amount based on your desired thickness.
-
Flavorings (optional): A splash of vanilla extract (1 tsp) or chocolate syrup can elevate your milkshake to another level. Don’t skip this if you want a pop of extra flavor!
-
Toppings: Whipped cream, chocolate shavings, sprinkles, or even a drizzle of caramel are excellent choices! Feel free to go wild—this is your shake!
Each ingredient plays a crucial role in achieving a milkshake that not only satisfies your sweet tooth but also invites creativity from your heart.
Step-by-Step Instructions
Step 1: Gather Your Ingredients
Start by prepping your work area. Measure out your ice cream and milk, and have your toppings ready. Having everything in arms reach makes the process smoother. Trust me, nothing is worse than mid-blend chaos!
Step 2: Blend It Up!
In a blender, combine the ice cream and milk. If you’re adding any flavorings or extras, toss them in now! For a thicker shake, start with about ½ cup of milk, and add more as needed.
Tip: Blend until just mixed; you want to see some chunks of ice cream still visible. It makes for a creamier texture rather than a soupy shake.
Step 3: Taste Test
Here’s a fun chef hack—use a spoon (or a straw!) to taste a little of your creation before pouring it out. This is where you can decide if it needs more chocolate or maybe a touch more milk for a thinner consistency!
Step 4: Serve It Up
Pour the milkshake into your favorite glass. Halfway through, consider adding layers of whipped cream or sprinkles for a fun treat. Such an easy way to impress your guests!
Step 5: Top It Off
Finish your shake with a generous dollop of whipped cream on top, a sprinkle of chocolate shavings, and a cherry. Don’t forget the straw—this is a milkshake, after all!
Step 6: Enjoy!
Savor every sip! There’s nothing like sitting back and enjoying something you’ve created yourself. Let each sip take you back to those sun-soaked memories and savor that sweet nostalgic bliss.
Serving Suggestions
For an added touch of elegance (and fun!), consider serving your milkshake in mason jars or unique glassware. Garnish with whipped cream and a sprinkle of your favorite toppings, and if you’re feeling adventurous, add a homemade cookie on the side. Instant happiness!
Recipe Variations
-
Chocolate Banana Shake: Add half a ripe banana to the blender for a fruity twist. Delicious!
-
Mint Chocolate Chip Shake: Swap the vanilla for mint chocolate chip ice cream and top with crushed mint candies. Perfect for mint lovers!
-
Peanut Butter Cup Shake: Throw in a couple of tablespoons of peanut butter and a handful of crushed chocolate peanut butter candies for a decadent treat.
-
Protein Power Shake: Swap ice cream with a scoop of vanilla/yogurt protein powder and use Greek yogurt for a healthy pick-me-up.
-
Coffee Lover’s Shake: Add a scoop of coffee ice cream and a splash of brewed coffee for a pick-me-up after dinner.
Chef’s Notes
Over the years, my milkshake recipe has transformed as I’ve experimented with different flavor profiles and toppings. I’ve tried everything from crushed cookies to fresh fruit and even savory spices! Each iteration, though different, always reminds me of Grandma’s kitchen—the heart of our family celebrations.
I remember one fateful summer when cousin Beta thought it would be fun to make a “spicy milkshake” and added cinnamon. Surprisingly, it became a hit! It was quirky ideas like that, born out of spontaneity, that added a new twist to my classic recipe. Always remember, the kitchen is a space for creativity and experimentation!
FAQs and Troubleshooting
-
Why is my milkshake too thin?
- You might need more ice cream! A dash more should help thicken it right up. If you’ve added too much milk, don’t panic; simply add a scoop of ice cream to balance it out.
-
Can I make it ahead of time?
- Sure! Blend the ingredients together but store it in the freezer. However, you’ll want to give it a quick blend again before serving, as it can harden quite a bit.
-
What’s the best way to clean my blender?
- Fill your blender with warm water and a drop of dish soap. Blend on high for 30 seconds and rinse. Voila!
-
How can I make my milkshake vegan?
- Simply swap regular milk for almond, soy, or oat milk and use dairy-free ice cream. You won’t lose any deliciousness!
Nutritional Info (if applicable)
Each serving (based on the classic recipe) contains approximately:
- Calories: 350
- Total Fat: 18g
- Saturated Fat: 10g
- Carbohydrates: 45g
- Sugars: 35g
- Protein: 7g
Note: Nutritional values will vary based on ingredient choices.
And there you have it, my deliciously creamy milkshake adventure! I hope the nostalgia inspired you to create your own memories in the kitchen, not to mention enjoying every creamy sip along the way. Remember, cooking isn’t just about the food—it’s about the love, laughter, and memories you share. Happy blending, friends!
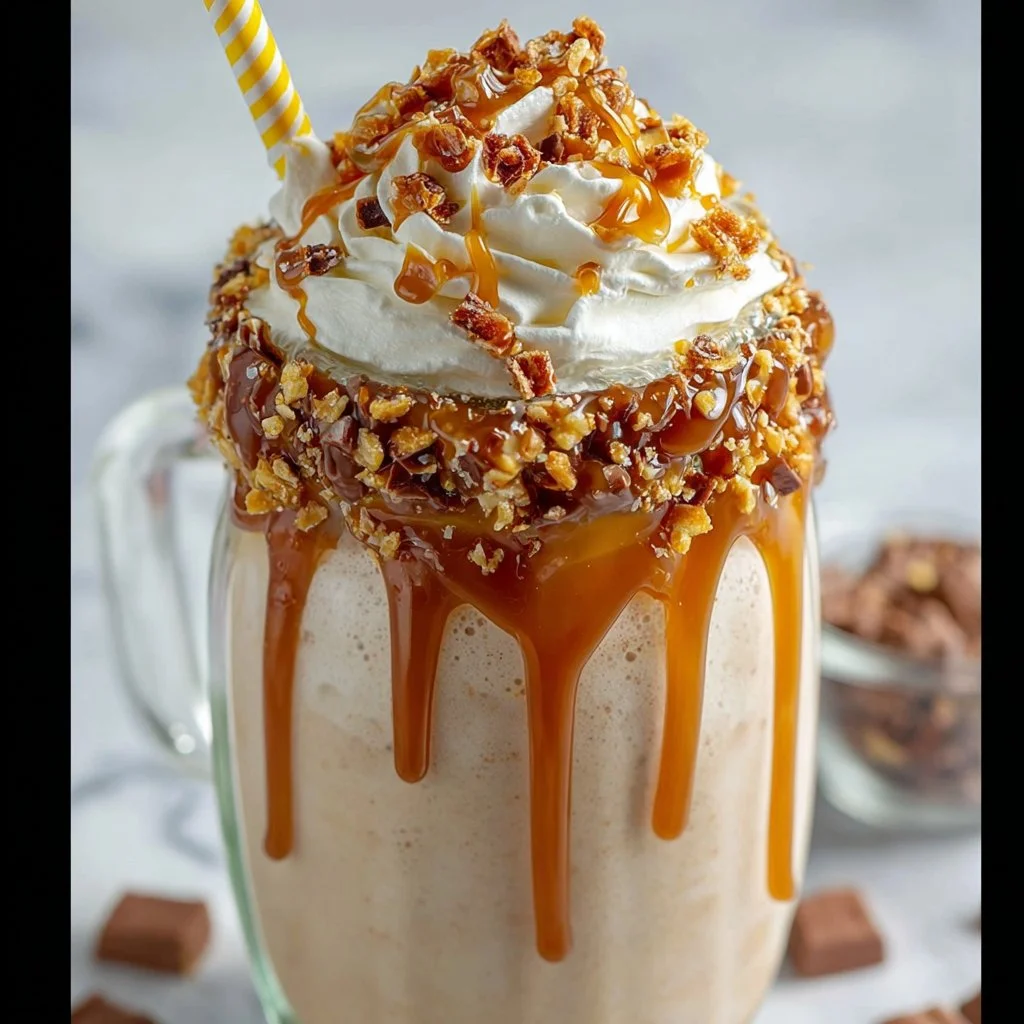
Salted Caramel Milkshake
The Ultimate Salted Caramel Milkshake Recipe: A Sweet Journey Through Flavor
Welcome back to my cozy kitchen, friends! Today, I’m beyond excited to take you on a delicious journey through one of my all-time favorite treats: the salted caramel milkshake. Picture this: a creamy, dreamy concoction that’s rich with the goodness of homemade salted caramel, perfectly blended with ice cream, and finished with whipped cream and a sprinkle of crunchy sea salt. Now tell me that doesn’t make your sweet tooth tingle!
Milkshakes have a special place in my heart. They remind me of lazy summer afternoons spent at the local diner, where the clinking of glasses and joyful chatter filled the air. As an enthusiastic home cook, there’s something magical about creating a dessert that instantly transports you back in time. The salted caramel milkshake, in particular, combines the nostalgia of childhood with the sophisticated touch of salty sweetness, making it perfect for any occasion or just a little treat for yourself!
In this post, I’ll walk you through every step of crafting the ideal salted caramel milkshake, complete with my personal stories, tips, and tricks in the kitchen. Whether you’re looking to impress friends at a summer BBQ or indulge your cravings on a cozy night at home, you’re in for a deliciously smooth ride. So grab your apron and let’s get started on making this dreamy milkshake that will, without a doubt, bring a smile to your face!
Personal Story
Growing up, my family had a weekend tradition of going to this delightful little ice cream shop down the street. Every Saturday, without fail, we’d pile into the car and head there, excitement filling the air as we flipped through the vibrant menu filled with flavors, all promising instant joy in a cup. But there was one flavor that always won me over: the salted caramel. The blend of sweet and salty was something I looked forward to every week, a delicious little ritual that sparked laughter and shared stories.
Fast forward to today, and I can’t help but bring those sunny memories into my kitchen. The first time I attempted to recreate that unforgettable salted caramel milkshake at home, I felt a flutter of nostalgia. I whipped up a batch for my friends, and as we sipped our homemade creations, I was flooded with laughter and stories from yesteryears. That day, I realized that cooking is not just about ingredients but about emotions, memories, and shared experiences. That’s the beauty I want to share with you in this recipe!
Ingredients
Before we dive headfirst into this delightful experience, let’s gather our ingredients. Here’s what you’ll need for the ultimate salted caramel milkshake:
-
Ice Cream (4 cups): The foundation of any milkshake! Vanilla ice cream works beautifully here, but you could swap it with salted caramel ice cream for an extra flavor punch! If you’re looking for a healthier option, try using frozen yogurt or dairy-free ice cream.
-
Milk (1 cup): Any milk will do! Whole milk adds creaminess, while almond or oat milk caters to dairy-free needs without sacrificing the flavor. Adjust the quantity based on how thick you like your shakes.
-
Homemade Salted Caramel Sauce (1/2 cup): This is the star of the show! You can either make it from scratch following my easy recipe below or grab a jar at the store if you’re in a pinch. Just be sure to look for one with high-quality ingredients!
-
Whipped Cream (for topping): Who said you can’t go extra? A generous dollop of whipped cream adds sweetness and beauty. Use store-bought or whip up your own fresh cream for that added homemade touch.
-
Sea Salt (a pinch for garnish): The key to bringing out that sweet caramel flavor! Use flaky sea salt for the best crunch and flavor. A sprinkle on top before serving elevates your milkshake to new heights.
-
Optional Add-Ins: Feel free to throw in chocolate chips, crushed pretzels, or even a shot of espresso to amp up the flavor and texture!
Step-by-Step Instructions
So, let’s jump into making this delightful salted caramel milkshake! Follow these steps, and your taste buds will be thanking you.
-
Make the Salted Caramel Sauce: If you’re going for homemade, in a medium saucepan over medium heat, melt 1 cup of granulated sugar, stirring constantly until it turns golden brown. Soon after reaching the desired color, carefully add 1/2 cup of heavy cream (watch out for splattering!). Stir in a pinch of salt and 2 tablespoons of butter until smooth. Let it cool. (Tip: Make extra to drizzle on other desserts!)
-
Blend the Ingredients: In a blender, combine the vanilla ice cream, milk, and 1/2 cup of the cooled salted caramel sauce. (Hint: Start with less milk if you want a thicker shake.) Blend on high until creamy and well combined, stopping to scrape down the sides if necessary. You should be left with a luscious mixture that makes your heart sing!
-
Taste Test: Here comes the fun part! Grab a spoon and taste. Adjust the caramel sauce to suit your sweetness preference. Want it a little sweeter? Add more caramel. Want more saltiness? A tiny pinch of sea salt goes a long way!
-
Prepare to Serve: Grab your favorite glasses (the more whimsical, the better!). Drizzle some of the leftover salted caramel sauce down the insides of each glass so that it coats the sides. This adds visual flair and a flavor bonus with every sip!
-
Pour & Assemble: Pour the blended milkshake into the prepared glasses, filling them about three-quarters full to make room for the whipped cream. Don’t hold back; you deserve this delicious sweet treat!
-
Top It Off: Finish off that lovely milkshake with a generous mountain of whipped cream. Top it off with an extra drizzle of salted caramel and a sprinkle of sea salt. Because, let’s be honest, you can never have too much caramel!
-
Enjoy Every Sip: Grab a straw or a long spoon and dive in with delight. Don’t forget to share (if you want, that is)!
Serving Suggestions
When it comes to serving, presentation is key! I love to place my salted caramel milkshake in tall, frosty glasses to enhance that nostalgic diner vibe. Drizzle extra salted caramel inside each glass before pouring the shake in for a stunning effect. You can accompany this sweet treat with a plate of chocolate chip cookies or mini brownies for a mini dessert spread that your friends (and yourself!) will adore.
Recipe Variations
Every good recipe has room for creativity, and this salted caramel milkshake is no exception! Here are a few fun variations to consider:
-
Nutty Delight: Add a tablespoon of nut butter—like almond or peanut butter—into the mix for a nutty twist that goes beautifully with the caramel flavor.
-
Chocolate Lovers: Incorporate chocolate ice cream instead of vanilla for a decadent chocolate salted caramel shake. You could even blend in some cocoa powder!
-
Dairy-Free Option: Use coconut milk ice cream and almond milk for a smooth, dairy-free alternative. You won’t miss the dairy one bit!
-
Coffee Caramel: For those who love coffee, add a shot of espresso or cold brew to the shake for a sweet pick-me-up!
-
Pumpkin Spice Bliss: Around fall, mix in some pumpkin puree and pumpkin spice for a seasonal twist that’s perfect for cozy vibes.
Chef’s Notes
The salted caramel milkshake has evolved in my kitchen over the years. There was a time I thought I’d never get the caramel sauce right, often ending up with a burnt mess. After a few attempts, I realized that patience is crucial—and so is the alarm on my timer! Now, it’s a go-to recipe that never fails to impress. Plus, I love how it can adapt to the seasons. It feels so fulfilling to share this with friends, reminiscing about simpler times while creating new memories. So, grab your loved ones, and let’s shake up some fun in the kitchen!
FAQs and Troubleshooting
1. My caramel sauce didn’t turn out right. What did I do wrong?
Common issues include not stirring the sugar constantly or cooking it too long. Keep an eye on the color! When it turns amber, it’s ready. If it’s grainy, you may have cooked it too long or added the cream too quickly. Don’t worry, practice makes perfect!
2. Can I use store-bought salted caramel sauce?
Absolutely! While homemade has its charm, store-bought options can save you a lot of time. Just be sure to choose one made with quality ingredients!
3. How can I make this milkshake thicker?
To achieve a thicker consistency, reduce the amount of milk or add more ice cream. You could also throw in some frozen bananas or extra ice to help shape it up.
4. Can I make this milkshake ahead of time?
While best enjoyed fresh, you can blend the ingredients and store them in the refrigerator for a few hours. Just give it a good stir before serving, as it’ll thicken up in the fridge.
Nutritional Info (Optional)
Calories: Approximately 350-450 calories per serving (depending on specific ingredients used).
Fat: 20g
Carbohydrates: 50g
Protein: 8g
Sodium: 150mg
And there you have it, friends! Your very own salted caramel milkshake recipe that’s bound to add a sprinkle of joy to your day. I hope you enjoy making this indulgent treat as much as I do. I can’t wait to hear about your experiences in the kitchen! Happy blending!
Print
The Ultimate Salted Caramel Milkshake
- Total Time: 30 minutes
- Yield: 4 servings 1x
- Diet: Vegetarian
Description
A creamy, dreamy salted caramel milkshake with homemade salted caramel, rich ice cream, and whipped cream.
Ingredients
- 4 cups vanilla ice cream
- 1 cup milk
- 1/2 cup homemade salted caramel sauce
- Whipped cream (for topping)
- A pinch of sea salt (for garnish)
- Optional add-ins: chocolate chips, crushed pretzels, or a shot of espresso
Instructions
- Make the Salted Caramel Sauce: In a medium saucepan over medium heat, melt 1 cup of granulated sugar, stirring constantly until it turns golden brown. Add 1/2 cup of heavy cream carefully, then stir in a pinch of salt and 2 tablespoons of butter until smooth. Let it cool.
- Blend the Ingredients: In a blender, combine the vanilla ice cream, milk, and 1/2 cup of the cooled salted caramel sauce. Blend on high until creamy.
- Taste Test: Adjust the caramel sauce to suit your sweetness preference.
- Prepare to Serve: Drizzle some of the leftover salted caramel sauce down the insides of each glass.
- Pour & Assemble: Pour the blended milkshake into the prepared glasses.
- Top It Off: Finish with whipped cream, an extra drizzle of salted caramel, and a sprinkle of sea salt.
- Enjoy Every Sip: Dive in with delight.
Notes
Consider adding nut butter or using different ice cream flavors for variations.
- Prep Time: 15 minutes
- Cook Time: 15 minutes
- Category: Dessert
- Method: Blending
- Cuisine: American
Nutrition
- Serving Size: 1 serving
- Calories: 400
- Sugar: 40g
- Sodium: 150mg
- Fat: 20g
- Saturated Fat: 10g
- Unsaturated Fat: 8g
- Trans Fat: 0g
- Carbohydrates: 50g
- Fiber: 0g
- Protein: 8g
- Cholesterol: 50mg
Keywords: salted caramel, milkshake, dessert, sweet treat, nostalgia

Peanut Butter Cup Milkshake
The Ultimate Peanut Butter Cup Milkshake: A Cozy Kitchen Creation
Welcome back to my cozy kitchen, my fellow food lovers! Today, we’re diving into a treat that blends nostalgia with pure joy—a Peanut Butter Cup Milkshake. If the mere mention of this creamy delight doesn’t tug at your heartstrings, let me invite you to join me on this adventure of flavor and sweetness.
The inspiration for this milkshake comes from countless afternoons spent in my childhood kitchen, where my siblings and I would eagerly await the arrival of summer. The sun would pour through the windows, lighting up our tiny space like a scene from a movie. It was during those blissful months that our mom would treat us to ice cream milkshakes made from whatever delicious ingredients were within reach. Peanut butter cups were a special occasion, a feast woven into the fabric of our family traditions. The peanut butter’s creamy richness pairing with chocolate was the ultimate treat that marked a day of fun and laughter.
Milkshakes may seem like a simple indulgence, but for me, they carry so much more meaning. They remind us to slow down, savor each bite, and relish the moments spent with the ones we love. Today, I’m excited to share this Peanut Butter Cup Milkshake recipe with you so you can recreate that same smile-inducing experience in your own kitchen. Grab your blender and let’s get to work!
Personal Story
I remember a summer afternoon when my siblings and I took it upon ourselves to take our milkshake-making skills to the next level. The backyard was alive with laughter and excitement, and little did we know we were about to embark on a deliciously messy adventure. With a stash of peanut butter cups scavenged from a recent candy haul, we decided to create our very own milkshake masterpiece.
Armed with a blender and a somewhat questionable understanding of proper milkshake ratios, we started throwing in everything: ice cream, whole milk, chocolate syrup, and of course—those glorious peanut butter cups. The blender roared to life, and we giggled as it sent a sugary cyclone swirling, transforming our colorful concoction into a thick milkshake. We poured our creations into mismatched cups, topped them with whipped cream (of course), and had a glorious taste-test — each sip filled with laughter and rewards for our chaotic kitchen expedition.
That day, amidst the sticky counters and laughter-filled blurs, I realized that food could be a beautiful way to forge memories. And though we may have been racing against melting ice cream in the hot sun, each sip was filled with the essence of summer—sweetness, joy, and a hint of sibling rivalry. Those blissful moments inspire me to recreate this Peanut Butter Cup Milkshake and share it with you, so you can create your own delicious, joyful kitchen stories.
Ingredients
Now that you’re ready to blend up some magic, here’s what you’ll need for this epic Peanut Butter Cup Milkshake:
- Ice Cream (2 cups): I recommend vanilla or chocolate for a classic taste. If you’re feeling adventurous, you could use cookie dough or peanut butter ice cream!
- Milk (1 cup): Whole milk will give you a rich, creamy texture, but feel free to use almond, oat, or soy milk for dairy-free options.
- Peanut Butter Cups (4-5 pieces): The real star of the show! A classic, but feel free to experiment with dark chocolate or white chocolate versions for a twist.
- Peanut Butter (2 tablespoons): Uses natural peanut butter for a richer, creamier flavor or hit up those flavored options like chocolate peanut butter for an extra kick.
- Chocolate Syrup (2 tablespoons): This is where we get the indulgent chocolatey goodness! You can make your own or substitute with a dairy-free version if needed.
- Whipped Cream (for topping): Nothing says milkshake like a generous dollop of whipped cream on top. You can use store-bought or homemade for more cozy vibes.
- Extra Peanut Butter Cups (for garnish): Because one can never have too many peanut butter cups, right? Chop them up and sprinkle them on top!
Chef Insights:
- Ingredient Swaps: Don’t have peanut butter cups? Use crushed Oreos or cookie dough for a different flavor profile.
- Milk: Adjust the milk according to your desired thickness—less for a thick shake, more for a thinner one!
Step-by-Step Instructions
Alright, let’s get those blenders buzzing! Here’s how to whip up this Peanut Butter Cup Milkshake step-by-step.
-
Gather Your Ingredients: First things first! Get all your ingredients ready and within reach. Trust me; it makes the blending process easier when everything is prepped and ready to go.
-
Add Ice Cream & Milk: In your blender, start by adding the ice cream. The foundation of a great milkshake! Follow it up with the milk. If you want a thicker shake, use less milk. For a thinner consistency, go for the full cup.
-
Crush the Peanut Butter Cups: Time to get those peanut butter cups in there! Break them up into smaller pieces so they blend more easily. You can add them whole if you prefer chunks in your shake. Toss them into the blender.
-
Spoon in the Peanut Butter: Measure out two tablespoons of peanut butter and add it to the mix. If you’re using any flavored peanut butter, you’re about to elevate this shake to new heights!
-
Drizzle in Chocolate Syrup: Drizzling the chocolate syrup into the blender will add a touch of sweetness and indulgence. Go ahead and shake it up a bit, and save some for the garnish later.
-
Blend Away: Put the lid on your blender and blend everything until smooth and creamy. Give it a few bursts to make sure everything is well combined. If you want a thicker shake, stop here, and if you want a thinner shake, add a splash more milk and blend again!
-
Taste Test: It’s essential to make sure your creation is on point. Grab a spoon, taste a little, and adjust to your liking! Want it sweeter? Add more chocolate syrup. More peanut butter flavor? Toss in a tad more.
-
Serve It Up: Pour your milkshake into glasses. Take a moment to admire the creamy goodness swirling within, and let the anticipation build!
-
Top It Off: This is a crucial step: top your milkshakes with whipped cream, and add a drizzle of chocolate syrup for that visual wow factor. And don’t forget to sprinkle those extra chopped peanut butter cups on top!
-
Enjoy: Grab a straw, sip, and enjoy the beautiful marriage of chocolate and peanut butter, reminiscent of your childhood summer afternoons!
Serving Suggestions
For an extra special touch, serve your Peanut Butter Cup Milkshake in tall glasses with striped straws for that classic milkshake diner feel. Feel free to add some chocolate shavings on top of the whipped cream or even a sprinkle of sea salt to balance the sweetness and elevate the flavors. If you’re feeling fancy, couple it with a couple of extra peanut butter cups on a small plate on the side for a delightful treat.
Recipe Variations
- Banana Peanut Butter Cup Shake: Add a ripe banana into the mix for a creamier texture and an added layer of fruity sweetness.
- Minty Chocolate Twist: Add a few drops of peppermint extract for a refreshing mint chocolate experience—think holidays in a glass!
- Protein-Packed Version: Incorporate a scoop of your favorite protein powder for a filling, post-workout treat. Choose vanilla for a subtle flavor profile.
- Dairy-Free Delight: Substitute all dairy products with coconut milk ice cream and almond milk for a delightful lactose-free option!
- Cinnamon Peanut Butter Variation: Add a pinch of ground cinnamon for a warm, inviting flavor twist that makes the shake truly unique.
Chef’s Notes
Over the years, my Peanut Butter Cup Milkshake recipe has continuously evolved. Initially, I used whatever was in the freezer—often leading to some “interesting” combinations! Now, I’ve learned to focus on balance. I still chuckle at the time I attempted to add caramel for extra sweetness. Let’s just say it was an experience!
And of course, no milkshake brings the joy quite like doing it with friends. It’s become a tradition for my friends and me to have cozy nights in where we whip up different versions of milkshakes, competing for the ultimate flavor combination! So don’t hesitate to invite a friend into your kitchen for this—sharing is really where the magic happens!
FAQs and Troubleshooting
Q1: My milkshake is too thick! What can I do?
A1: Don’t fret! Just add a splash of milk and give it another blend. If you want to keep it thick but still drinkable, try using a thicker straw or using a spoon to scoop it out.
Q2: What if I don’t have a blender?
A2: A hand mixer can do the trick just fine! Just whisk the ingredients together until well combined. It might take a little extra effort, but it’ll be worth it!
Q3: Can I prepare this ahead of time?
A3: I suggest enjoying it fresh, but you can prepare the ingredients in advance and store them separately in the fridge. Just blend when you’re ready for your treat!
Q4: Can I make this dairy-free?
A4: Absolutely! Just stick with dairy-free ice cream options and substitute milk with almond, soy, or oat milk for a delicious dairy-free treat!
Nutritional Info
- Calories: Approximately 600 per serving (this can vary based on portions and specific ingredients)
- Fat: 30g (mostly healthy fats from peanut butter)
- Carbohydrates: 70g
- Protein: 10g (especially if you add in protein powder)
So there you have it—your guide to creating the ultimate Peanut Butter Cup Milkshake! Dive into this delightful recipe and share the love with those around you. As always, my kitchen is a place for joy, creativity, and heartwarming memories, and I hope this milkshake brings a touch of that to your home. Happy blending!
Print
The Ultimate Peanut Butter Cup Milkshake
- Total Time: 10 minutes
- Yield: 2 servings 1x
- Diet: Vegetarian
Description
A rich and creamy Peanut Butter Cup Milkshake that blends nostalgia with pure joy, perfect for sharing with loved ones.
Ingredients
- 2 cups Ice Cream (vanilla or chocolate)
- 1 cup Milk (whole, almond, oat, or soy)
- 4–5 pieces Peanut Butter Cups
- 2 tablespoons Peanut Butter
- 2 tablespoons Chocolate Syrup
- Whipped Cream (for topping)
- Extra Peanut Butter Cups (for garnish)
Instructions
- Gather your ingredients: Get all your ingredients ready and within reach.
- Add ice cream and milk: Start by adding the ice cream to your blender, followed by the milk.
- Crush the peanut butter cups: Break them up into smaller pieces and toss into the blender.
- Spoon in the peanut butter: Measure out two tablespoons of peanut butter and add it to the mix.
- Drizzle in chocolate syrup: Add a drizzle of chocolate syrup into the mixture.
- Blend away: Blend everything until smooth and creamy.
- Taste test: Taste your milkshake and adjust sweetness as desired.
- Serve it up: Pour your milkshake into glasses.
- Top it off: Top with whipped cream, drizzle with chocolate syrup, and add chopped peanut butter cups.
- Enjoy: Sip and enjoy the delightful combination of chocolate and peanut butter!
Notes
For a thicker shake, reduce milk; for a thinner shake, add more milk. Experiment with different flavored peanut butters!
- Prep Time: 10 minutes
- Cook Time: 0 minutes
- Category: Dessert
- Method: Blending
- Cuisine: American
Nutrition
- Serving Size: 1 serving
- Calories: 600
- Sugar: 50g
- Sodium: 250mg
- Fat: 30g
- Saturated Fat: 12g
- Unsaturated Fat: 15g
- Trans Fat: 0g
- Carbohydrates: 70g
- Fiber: 3g
- Protein: 10g
- Cholesterol: 10mg
Keywords: milkshake, peanut butter cup, dessert, summer treat, nostalgia

Strawberry Cheesecake Cookies (Pretty & Delicious!)
Strawberry Cheesecake Cookies: Pretty & Delicious!
Welcome back to my kitchen, friends! Today, I’m thrilled to share a recipe that’s near and dear to my heart: Strawberry Cheesecake Cookies. Just saying the name brings a smile to my face, and I can almost smell the sweet, creamy aroma wafting through my kitchen. Picture this: tender, chewy cookies infused with rich cream cheese and bursting with the vibrant sweetness of fresh strawberries. They are a little bite of cloud-like bliss that’s not only visually captivating but also perfect for any occasion.
Whether you’re looking for a fun treat to brighten up your week or a fabulous dessert to impress at your next gathering, these cookies deliver that “wow” factor with every bite. What I love most about them is the delightful fusion of textures and flavors. The creaminess of the cheesecake-inspired dough, coupled with the juicy strawberries, creates a cookie experience that transcends your regular baked goods. Plus, they’re a great way to celebrate strawberry season!
The idea of turning a classic cheesecake into a cookie form was inspired by those lovely warm afternoons where the sun shines just right, and the world feels just a little bit more magical. For me, it’s about finding joy in baking and sharing delicious treats with loved ones. So, pull up a chair, put on your apron, and let’s get baking! I promise these cookies will bring a smile to your face and a sweet taste to your day.
Personal Story
Growing up, my family had a beautiful tradition of gathering for Sunday brunch. It was a time when we would savor delightful homemade dishes, engage in lively conversations, and share stories that still make us laugh today. One Sunday, my grandmother surprised us all with her famous cheesecake — a dish that everyone in the family loved. The creamy filling paired with the bright tartness of strawberries was simply irresistible.
As we gathered around the table, I remember watching her whip up the cheesecake with such ease, telling stories as she effortlessly folded in the strawberries. I was captivated. Inspired by that cherished memory, I decided to create a unique version of that classic treat: Strawberry Cheesecake Cookies! Not only do they evoke nostalgia, but they also bring my family together in the same way. Every time I bake them, I can’t help but think of those cozy brunches filled with laughter, love, and lots of cheesecake!
Ingredients
Let’s gather our ingredients! Here’s what you’ll need to create your Strawberry Cheesecake Cookies, along with a few helpful insights:
-
1 cup unsalted butter, softened
Butter adds richness and moisture to the cookies. If you’re in a pinch, feel free to substitute with margarine or coconut oil for a dairy-free option. -
1 cup cream cheese, softened
This is the star of the show! Cream cheese gives that iconic cheesecake flavor. For a lower-fat option, try Neufchâtel cheese, which has less fat but a similar taste! -
1 cup granulated sugar
Sugar adds sweetness and helps with the cookie structure. You can use coconut sugar for a more caramel-like flavor or a sugar substitute for a healthier option. -
1 large egg
Eggs provide moisture and bind the ingredients together. For a vegan option, you can use a flax egg (1 tablespoon of ground flaxseed mixed with 2.5 tablespoons of water) to achieve the binding effect! -
2 cups all-purpose flour
This forms the base of the cookies. For a gluten-free version, substitute with gluten-free all-purpose flour, and add a touch of xanthan gum to help with the texture! -
1 teaspoon vanilla extract
Vanilla enhances the flavor profile, giving it that comforting aroma. Consider using almond extract for a nuttier flavor or leave it out completely if preferred. -
1 teaspoon baking powder
This gives your cookies that lift and fluffiness. Baking soda can also be used if you’re out of baking powder; just adjust the acidity with a touch of vinegar! -
½ teaspoon salt
A pinch of salt balances the sweetness and brings out the flavors. Sea salt or Himalayan salt can be great alternatives for a different flavor. -
1 cup fresh strawberries, diced
Fresh strawberries bring sweetness and a burst of flavor. You can also use freeze-dried strawberries for a more concentrated flavor if fresh ones aren’t available!
Step-by-Step Instructions
Now, let’s dive into the fun part — baking those Strawberry Cheesecake Cookies! Here’s how to make them step-by-step:
Step 1: Preheat the Oven
Start by preheating your oven to 350°F (175°C). This initial heat is crucial for achieving that perfect, chewy texture in your cookies. A hot oven means that the cookies will rise beautifully!
Step 2: Cream the Butter and Cream Cheese
In a large mixing bowl, beat together the softened butter and cream cheese until the mixture is creamy and smooth. This should take about 2-3 minutes of beating. You want that lovely, light texture to form!
Chef’s Tip: Use an electric mixer for this step if you want to save time and energy! You can also mix by hand with a strong spatula, but it may take a bit longer.
Step 3: Add Sugar and Egg
Now, add the granulated sugar and egg to the mixture. Beat again until everything is well combined. This will create a wonderfully fluffy base for your cookie dough.
Little Hack: Don’t just crack the egg directly into the bowl! Crack it into a separate dish first to avoid getting any shell bits in your mixture.
Step 4: Combine Dry Ingredients
In another bowl, mix together the flour, baking powder, and salt. This ensures that the flour is evenly distributed and the cookies have a nice rise. Gradually add this dry mixture to the wet ingredients, mixing until just combined. Over-mixing can lead to tough cookies, so be gentle!
Step 5: Fold in Strawberries
Once your dough is ready, gently fold in the diced fresh strawberries. You should see vibrant bits of red speckle throughout — this makes the cookies extra pretty!
Chef’s Note: If your strawberries are particularly juicy, consider patting them dry with a paper towel before mixing them in. This prevents the dough from becoming overly wet.
Step 6: Scoop and Bake
Line your baking sheet with parchment paper. Using a cookie scoop (or two spoons), drop heaping tablespoons of dough onto the sheet, leaving enough space between each cookie to allow for spreading. Bake in your preheated oven for 12-15 minutes, or until the edges are lightly golden.
Pro Tip: If you want an extra burst of strawberry flavor, reserve a few pieces to sprinkle on top before baking.
Step 7: Cool and Enjoy
Once they’re done, remove the cookies from the oven, and let them cool on the baking sheet for 5 minutes before transferring them to a wire rack to cool completely. The cooling process allows the cookies to set up perfectly — you don’t want to bite into a gooey mess!
Serving Suggestions
Serve these gorgeous Strawberry Cheesecake Cookies on a beautiful platter or in a fun, rustic basket lined with a cloth napkin. They pair perfectly with a cup of coffee, tea, or even a tall glass of milk! For a little added flair, dust the cookies with powdered sugar before serving for a hint of elegance.
Recipe Variations
Feeling adventurous? Here are a few creative twists you can try with your Strawberry Cheesecake Cookies:
-
Chocolate Chips: Add a handful of semi-sweet or white chocolate chips to the dough for a decadent chocolate-strawberry combo.
-
Lemon Zest: Incorporate zest from one lemon into the dough for a zesty kick that complements the strawberries beautifully.
-
Nuts: Fold in some chopped pecans or walnuts for an extra crunch and delightful flavor.
-
Dried Fruits: Swap strawberries for dried cranberries or cherries for a tart flavor twist.
-
Coconut Flakes: Add unsweetened coconut flakes for a tropical flair!
Chef’s Notes
As with all recipes, this one has evolved over time. Originally, I just made a basic cheesecake but quickly realized I wanted something that was a bit more fun and portable. Cookies seemed like the perfect solution! Whenever I bake these, I always think of Grandma, who never shyed away from adding her personal touch. Sometimes, I even leave a few unbaked cookies in the fridge overnight — they taste even better the next day when the flavors have had time to meld!
Oh, and let me share a funny little kitchen blunder! One time, I got so caught up in nostalgia that I accidentally added salt instead of sugar. Let’s just say those batch didn’t make it very far! But hey, the lesson learned? Always double-check the labels!
FAQs and Troubleshooting
1. Why are my cookies flat?
If your cookies spread too much, it could be due to melted butter. Ensure your butter is softened, not melted. Additionally, chilling the dough for about 30 minutes before baking can help them hold their shape better!
2. Can I use frozen strawberries?
Yes, you can use frozen strawberries! Just be sure to thaw them first and pat them dry to remove excess moisture before adding them to the dough.
3. How do I store leftover cookies?
Store your cookies in an airtight container at room temperature for up to 5 days. For longer storage, you can freeze them for up to 3 months. Just make sure to separate layers with parchment paper to prevent sticking!
4. Can I make the dough ahead of time?
Absolutely! You can prepare the dough ahead of time and keep it in the fridge for up to 24 hours. Just scoop and bake when you’re ready!
Nutritional Info (Optional)
Calories per cookie (estimated): 150
Total Fat: 7g
Carbohydrates: 20g
Protein: 2g
(Values may vary based on ingredient brands and amounts used.)
There you have it, my friends — a delightful recipe that will add a pop of color and joy to your baking repertoire! I hope you enjoy making these Strawberry Cheesecake Cookies as much as I do. Remember, baking is all about the love you put into it, so let that heart shine through every cookie you make. Happy baking! 🍓🧁
Print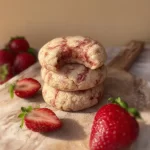
Strawberry Cheesecake Cookies
- Total Time: 30 minutes
- Yield: 24 servings 1x
- Diet: Vegetarian
Description
Delicious and visually captivating cookies infused with rich cream cheese and fresh strawberries.
Ingredients
- 1 cup unsalted butter, softened
- 1 cup cream cheese, softened
- 1 cup granulated sugar
- 1 large egg
- 2 cups all-purpose flour
- 1 teaspoon vanilla extract
- 1 teaspoon baking powder
- ½ teaspoon salt
- 1 cup fresh strawberries, diced
Instructions
- Preheat the oven to 350°F (175°C).
- Cream the butter and cream cheese in a large mixing bowl until smooth.
- Add sugar and egg to the mixture and beat until well combined.
- Combine dry ingredients (flour, baking powder, and salt) in another bowl.
- Gradually add the dry mixture to the wet ingredients, mixing until just combined.
- Fold in the diced strawberries.
- Scoop heaping tablespoons of dough onto a lined baking sheet and bake for 12-15 minutes.
- Cool on a wire rack before serving.
Notes
Chill the dough for about 30 minutes before baking for a better cookie shape.
- Prep Time: 15 minutes
- Cook Time: 15 minutes
- Category: Dessert
- Method: Baking
- Cuisine: American
Nutrition
- Serving Size: 1 cookie
- Calories: 150
- Sugar: 8g
- Sodium: 80mg
- Fat: 7g
- Saturated Fat: 4g
- Unsaturated Fat: 2g
- Trans Fat: 0g
- Carbohydrates: 20g
- Fiber: 1g
- Protein: 2g
- Cholesterol: 30mg
Keywords: cookies, cheesecake, strawberry, dessert, sweet treats

Strawberry Mochi
Delightful Strawberry Mochi: A Sweet Journey into Soft, Chewy Bliss
Welcome, fellow food lovers! I’m thrilled you’ve joined me in my cozy corner of the kitchen today. If you’re here, you probably share my infatuation with that delightful chewy goodness known as mochi. Specifically, we’re going to whip up a batch of luscious Strawberry Mochi, a treat that combines the sweetness of strawberries with the delightful texture that makes mochi irresistible.
Mochi has always held a special place in my heart. It’s the type of dessert that marries tradition and creativity, offering endless possibilities for flavor. Whether it’s the chewy texture or the burst of flavor from the filling, mochi never fails to make me smile. Plus, who doesn’t adore a dessert that doubles as a fun activity? Making mochi allows you to get your hands a bit messy, which, if you know me, is often my favorite part of cooking!
Now, I know what you might be thinking, “Mochi sounds complicated!” But trust me, it’s not as daunting as it seems. With a few simple ingredients and a touch of enthusiasm, you’ll be on your way to creating these delightful, chewy morsels in no time. So, gather your ingredients and get ready to unleash your inner chef as we embark on this sweet culinary adventure together!
Personal Story
Let me take you back to a sunny afternoon in my childhood, where the air was filled with sweet fragrance and laughter. It was a hot summer day, perfect for a picnic in the park. My family decided on a fun outing, complete with homemade treats. That day, my grandmother brought along her famous strawberry mochi.
I remember biting into that colorful, chewy delight for the first time—exploding with the juicy sweetness of fresh strawberries. It was a revelation! We sat on our picnic blanket, soaking in the sun and sharing stories while devouring those delightful bites.
To this day, the memory of that picnic is firmly etched in my heart. It’s more than just a sugary treat; it’s a reminder of family, joy, and the simple pleasures found in sharing good food. Now, I’ve transformed that cherished recipe into something I can’t wait to share with you. Let’s relive those sweet moments together as we create our own strawberry mochi magic!
Ingredients
Here’s what you’ll need to create your very own Strawberry Mochi. I’ve included some handy tips and substitutions for each item to make your cooking experience even better!
-
Sweet Rice Flour (Mochiko): This is your star ingredient! Mochiko is a fine, glutenous rice flour that gives mochi its signature chewy texture. You can find it at Asian grocery stores or online. If you’re in a pinch, you can use regular glutinous rice flour, but the texture might differ slightly.
-
Sugar: A bit of sweetness goes a long way! You’ll need granulated sugar for sweetness and to balance the earthy flavors of the rice flour. If you’re looking for alternatives, consider coconut sugar or honey, but you may need to adjust liquid measurements.
-
Water: Just plain water! It helps blend the flour and sugar into a smooth, workable dough. Use room temperature water for the best results.
-
Fresh Strawberries: Juicy and ripe, strawberries infuse flavor and a colorful punch to your mochi. If strawberries aren’t in season, feel free to substitute with other berries like raspberries or blueberries, or even fruits like mango or kiwi!
-
Cornstarch: We need this to dust our surface and prevent the mochi from sticking as we work with it. You can also use potato starch as a substitute if you have that on hand.
-
Sweet Red Bean Paste (optional): Many mochi recipes call for sweet fills, but it’s totally optional when making strawberry mochi. For a traditional twist, you can use sweet red bean paste or even chocolate ganache for a fun variation.
Let’s dive in and start creating!
Step-by-Step Instructions
-
Prepare Your Strawberries:
- Begin by washing your strawberries under cold water. Pat them dry and remove the stems. If they’re large, slice them in half. Set them aside on a plate to prepare for wrapping later. Make sure they are perfectly ripe; this will enhance the flavor of the mochi!
-
Mix the Mochiko Dough:
- In a large microwave-safe bowl, combine 1 cup of sweet rice flour, 1/4 cup granulated sugar, and 3/4 cup water. Stir well until the mixture is smooth and free of lumps. If you have time, let it sit for about 10-15 minutes to allow the ingredients to meld—you’ll notice a richer flavor!
-
Cook the Mixture:
- Now it’s time to head to the microwave! Cover the bowl with plastic wrap, leaving a small vent to allow steam to escape. Microwave the mixture for 1 minute. Open the microwave, stir well, then cover and microwave for an additional minute. Repeat this process for about 3-4 minutes or until the dough becomes semi-translucent and sticky. It should resemble a thick, gooey paste at this stage. (Note: cooking times may vary depending on your microwave’s wattage!)
-
Cool the Dough:
- Once it’s done, carefully remove the bowl from the microwave. Flour your work surface generously with cornstarch to avoid stickiness when handling the dough. Let the mixture cool for a few minutes before transferring it to your floured surface.
-
Shape the Mochi:
- Dust your hands with cornstarch to prevent sticking, then scoop a small portion of the dough—about the size of a tablespoon. Flatten it gently in the palm of your hand. Place a strawberry (or a dollop of sweet red bean paste if you’re using it) right in the center. Fold the mochi around the strawberry and pinch to seal it. Roll it between your hands to form a smooth ball.
-
Repeat the Process:
- Continue this process until all your strawberries are wrapped up deliciously! Dust each finished mochi lightly with cornstarch to keep them from sticking together.
-
Chill and Serve:
- Once you’ve shaped all your mochi, place them on a plate and chill them in the refrigerator for at least 30 minutes. This helps them firm up a bit more and enhances the texture.
Chef Tip: If you’re making these for a gathering, feel free to prepare them a day in advance! They’ll keep well in an airtight container in the fridge.
Serving Suggestions
When serving, place the mochi on a beautiful platter and dust with some extra cornstarch for a sophisticated finish. Feel free to drizzle with a little melted chocolate or serve with a side of sweet sauce for dipping. And don’t forget to pair it with a steaming cup of green tea for a delightful afternoon treat!
Recipe Variations
Get creative with your Strawberry Mochi! Here are a few fun variations to inspire your culinary imagination:
-
Chocolate-Covered Mochi: After making your mochi, dip them in melted chocolate and then sprinkle some crushed nuts on top for added flavor and crunch.
-
Fruit Fusion: Instead of just strawberries, try mixing in other fruits like diced mango or matcha-flavored mochi for a Japanese twist.
-
Sweet Surprise: Add a bit of sweet red bean paste or ice cream in the center before wrapping to create an added flavor surprise!
-
Vegan Version: Use agave syrup instead of honey for a plant-based option that satisfies everyone at the table.
-
Nutty Delight: Try adding some crushed nuts, like almonds or hazelnuts, into the dough for an extra crunch and flavor boost!
Chef’s Notes
I must admit, the first time I attempted to make strawberry mochi, it didn’t turn out as perfect as I’d hoped. Picture this—mochi dough everywhere, strawberries peeking out like stubborn gremlins! But you know what? It taught me that cooking is about the journey as much as the destination. I refined my process over time, and now I enjoy every step, including the messy ones.
My friends absolutely love these little treats, and they never fail to ask for more. It’s a wonderful thing to gather around the table, sharing stories over a batch of homemade Strawberry Mochi. The satisfaction I get from making these delicious bites is beyond words. So, don’t be afraid to dive in and play around with the flavors—who knows what new creation you might inspire!
FAQs and Troubleshooting
Q1: My mochi dough turned out too sticky; what should I do?
- This can happen if there’s too much water in your initial mixture. Try adding a bit more flour to thicken it. And remember, dusting your hands and work surface generously with cornstarch will help!
Q2: Can I freeze the mochi?
- Absolutely! These little treats freeze remarkably well. Just layer them with parchment paper between each piece in an airtight container. Thaw them at room temperature before serving for the best texture.
Q3: What if my mochi cracked when shaping?
- If your mochi cracks, it might need a little more moisture—try adding a bit of water and mixing again. Overcooking can also lead to crackly mochi, so make sure not to overdo it in the microwave.
Q4: Do I have to use strawberries?
- Not at all! Feel free to experiment with other fruits or even sweet fillings to customize your mochi to your liking. The possibilities are endless!
Nutritional Info (if applicable)
While I love to indulge in delicious treats, it’s nice to keep track of what we’re munching on! Each piece of strawberry mochi contains approximately:
- Calories: 70-80 per piece (depending on size and fillings)
- Carbohydrates: 15g
- Protein: 1g
- Fat: 0.5g
Remember, these numbers may vary based on ingredient brands and portion sizes.
And there you have it—your very own homemade Strawberry Mochi! I hope you’re as excited about this recipe as I am. The chewy texture combined with the sweet burst of fresh strawberries is an experience worth sharing. So gather your friends and family, follow this simple guide, and bring a little slice of joy into your kitchen! Happy cooking!
Print
Delightful Strawberry Mochi
- Total Time: 45 minutes
- Yield: 12 pieces 1x
- Diet: Vegetarian
Description
A sweet and chewy treat combining the deliciousness of strawberries with the unique texture of mochi.
Ingredients
- 1 cup Sweet Rice Flour (Mochiko)
- 1/4 cup Granulated Sugar
- 3/4 cup Water
- Fresh Strawberries
- Cornstarch (for dusting)
- Sweet Red Bean Paste (optional)
Instructions
- Prepare your strawberries by washing them, removing stems, and slicing large ones in half.
- Mix the mochiko dough by combining sweet rice flour, sugar, and water in a microwave-safe bowl.
- Cook the mixture in the microwave for 3-4 minutes, stirring every minute until semi-translucent and sticky.
- Cool the dough slightly on a cornstarch-dusted surface.
- Shape the mochi by flattening a portion of dough, adding a strawberry, and sealing it.
- Repeat until all strawberries are wrapped.
- Chill the mochi in the refrigerator for at least 30 minutes before serving.
Notes
Dust the mochi with cornstarch to prevent sticking. These can be made a day in advance and stored in an airtight container.
- Prep Time: 15 minutes
- Cook Time: 10 minutes
- Category: Dessert
- Method: Microwave
- Cuisine: Japanese
Nutrition
- Serving Size: 1 piece
- Calories: 75
- Sugar: 12g
- Sodium: 2mg
- Fat: 0.5g
- Saturated Fat: 0g
- Unsaturated Fat: 0g
- Trans Fat: 0g
- Carbohydrates: 15g
- Fiber: 1g
- Protein: 1g
- Cholesterol: 0mg
Keywords: strawberry, mochi, dessert, Japanese dessert, sweet treat
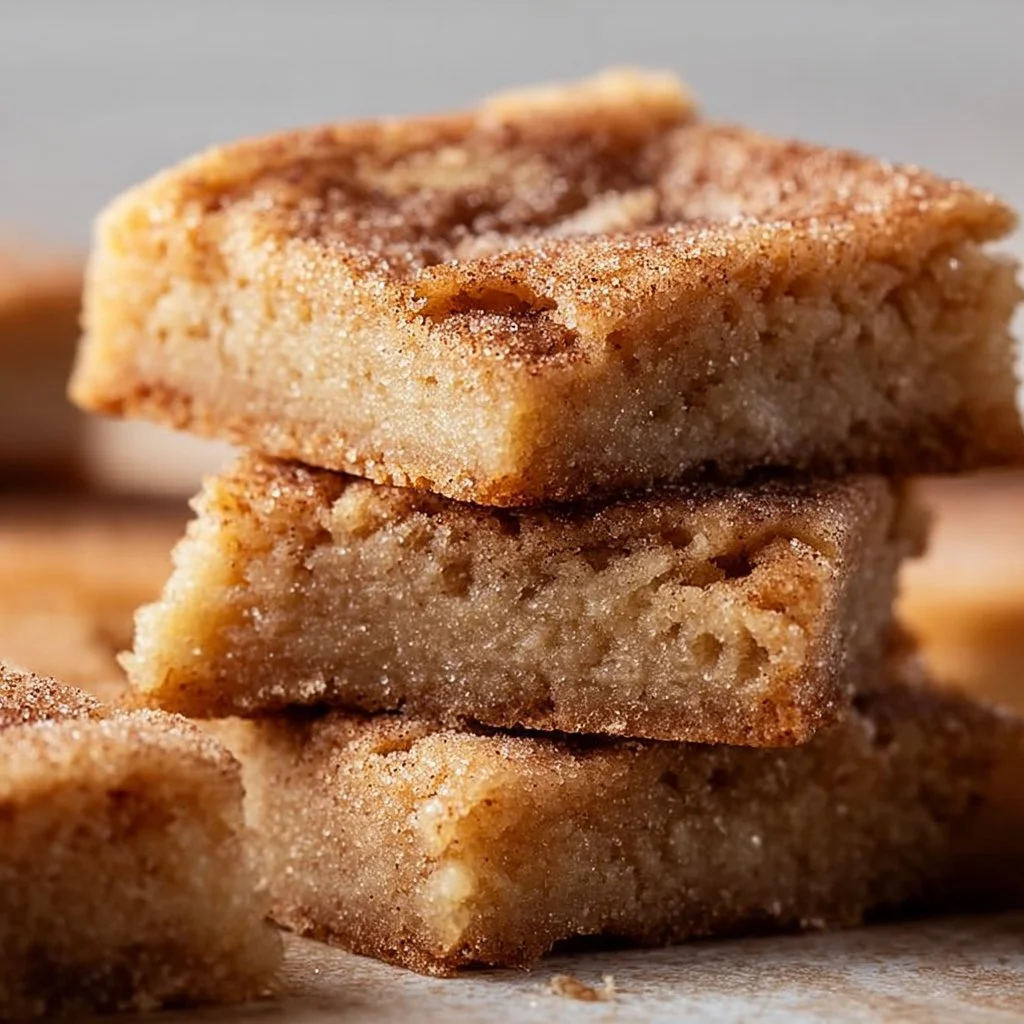
Cinnamon Sugar Blondies
The Sweet Delight of Cinnamon Sugar Blondies
Welcome to my cozy corner of the kitchen! Today, we’re diving into a treat that warms the heart and tickles the taste buds: Cinnamon Sugar Blondies. Picture this: golden bars, soft in the middle yet slightly crisp on the edges, enveloped in a heavenly blanket of cinnamon sugar. There’s something undeniably magic about these blondies – they’re the perfect blend of buttery goodness and spiced sweetness. Whether you’re enjoying a quiet afternoon at home or entertaining friends at a gathering, these blondies will surely steal the show.
Baking has this incredible ability to transform our spaces and moods, doesn’t it? The aroma of something sweet wafting through the air can instantly lift spirits and bring smiles. That’s precisely why I can’t wait to share this recipe with you! It’s so wonderfully simple yet so incredibly satisfying. And the best part? You don’t have to be a master chef to whip these up. With just a handful of pantry staples and a pinch of love, you’ll have everyone asking for seconds! So, grab your apron, and let’s get to it!
A Nostalgic Kitchen Memory
Every time I bake these blondies, I’m transported back to my childhood kitchen. I can still remember the delightful chaos of my family gatherings—everyone bustling about, laughter echoing, and the smell of something sweet wafting from the oven. My grandma, with her flour-dusted apron and twinkling eyes, was the mastermind behind our sweet treats.
One afternoon, as I watched her prepare for a family get-together, she casually tossed ingredients into a bowl, her eyes lighting up as she sprinkled in spices. “It’s all about the love you put in, dear,” she’d say. While I didn’t fully grasp what she meant then, each bite I took of her creations spoke volumes. The cinnamon-sugar blend she used became a staple in our desserts, including this very recipe.
These Cinnamon Sugar Blondies encapsulate not just flavor but also the warmth of those cherished moments spent in the kitchen. I still use her rhythm of mixing, her secret love for cinnamon, and the fun of sharing good food with those I love. Ready to create your own magical moments? Let’s get baking!
Ingredients
-
Unsalted Butter (1 cup, melted)
Butter is the backbone of many desserts. For a richer flavor, you can use brown butter, which adds a nutty taste. If you need a dairy-free option, coconut oil works well too. -
Brown Sugar (1 cup, packed)
Brown sugar gives these blondies their signature chewiness and depth. If you’re out of brown sugar, you can make a substitute by mixing white sugar with a bit of molasses. -
Granulated Sugar (½ cup)
This sugar helps create that slightly crispy edge. If you’re looking to cut back on sugar, you could reduce the granulated sugar by a couple of tablespoons, though the texture may change a bit. -
Eggs (2 large)
Eggs act as a binding agent, giving structure and moisture. If you’re vegan, unsweetened applesauce or flaxseed gel (1 tablespoon of flaxseed meal mixed with 2.5 tablespoons of water) can be great substitutes. -
Vanilla Extract (1 tsp)
Vanilla enhances all the flavors in your blondies. If you want a twist, consider using almond extract instead for a unique flavor profile. -
All-Purpose Flour (2 cups)
The base of your blondies! For gluten-free options, you can substitute with a 1:1 gluten-free flour blend. -
Baking Powder (1 tsp)
This gives the blondies a slight lift. Ensure your baking powder is fresh for the best texture. -
Salt (½ tsp)
A pinch of salt enhances the flavor profile. If you’re using salted butter instead of unsalted, you can cut back a bit on the added salt. -
Ground Cinnamon (2 tsp)
Cinnamon is the star here! You can try different spices, like nutmeg or cardamom, for a twist. -
Cinnamon Sugar Mixture (¼ cup granulated sugar + 1 tbsp ground cinnamon)
This is what you’ll sprinkle on top to create that crunchy, dreamy finish.
Step-by-Step Instructions
1. Preheat the Oven
Start by preheating your oven to 350°F (175°C). This ensures that the blondies bake evenly. Don’t forget to grease and line an 8×8-inch baking pan with parchment paper for easy removal afterward.
2. Mix Your Wet Ingredients
In a large bowl, combine the melted butter, brown sugar, and granulated sugar. Whisk them together until smooth and silky. You’ll want to beat it until it’s lighter in color and creamy in texture. This step is crucial since it incorporates air into the mix, leading to a lovely, chewy blondie.
3. Add Eggs and Vanilla
Once the mixture is creamy, add in the eggs one at a time, beating well after each addition. Next, stir in the vanilla extract. This added step helps bring out the flavors even more. You should notice your batter becoming rich and glossy!
4. Combine Your Dry Ingredients
In another bowl, whisk together the flour, baking powder, ground cinnamon, and salt. Mixing these dry ingredients separately ensures even distribution throughout the blondies.
5. Fold Dry Ingredients into Wet Ingredients
Gently fold the dry ingredients into your wet mixture with a spatula. Be careful not to overmix; we want to keep those blondies tender! Mix just until you see no dry flour left—lumps are totally okay!
6. Pour and Spread in the Pan
Transfer the batter into the prepared baking pan. Use your spatula to spread it out evenly. Feel free to give it a little shake to smooth it out. Now, this is where the magic happens!
7. Create Your Cinnamon Sugar Top
In a small bowl, mix together your granulated sugar and ground cinnamon. Sprinkle this heavenly mixture generously over the top of the blondie batter. The cinnamon sugar will create a deliciously crunchy exterior as they bake.
8. Bake ‘Em Up!
Pop the pan into your preheated oven and bake for 25-30 minutes. Keep an eye on them! You’re looking for a slightly golden top; a toothpick inserted should come out clean with just a few moist crumbs. Once done, let them cool in the pan for about 10 minutes before transferring them to a wire rack.
9. Slice and Enjoy!
After letting them cool a bit, slice your blondies into squares (or rectangles, if you’re feeling adventurous!). These delicious bites are now ready to impress! Serve warm or let them cool completely—either way, they’ll be a hit!
Serving Suggestions
When it comes to serving these blondies, let your creativity soar! They’re delightful on their own, but you can also serve them with a scoop of vanilla ice cream on top for that melty goodness. Drizzle some caramel sauce or a sprinkle of sea salt for an extra flavor punch. Present them on a beautiful platter or stack them high and tie with a ribbon for a sweet gift idea!
Recipe Variations
-
Add-Ins Galore: Try folding in chocolate chips, nuts, or even dried fruits like cranberries for a fun twist!
-
Pumpkin Spice Blondies: Replace some flour with pumpkin puree and add pumpkin spice to create a seasonal delight.
-
Nutty Brown Butter: Use brown butter instead of melted butter to deepen the flavor and aroma.
-
Frosted Delight: Top with a cream cheese frosting or a sweet glaze for an indulgent dessert option.
-
Coconut Dream: Add shredded coconut to the batter for a tropical vibe!
Chef’s Notes
Every time I whip up these blondies, I can’t help but reminisce about those happy kitchen moments with my grandma. They always remind me that cooking is about the joy we create along the way. A few years back, I decided to experiment by adding nutty brown butter to the base, and oh boy! It took these blondies to a whole new level. Don’t be afraid to play around with flavors and textures – this recipe serves as a canvas for your culinary creativity!
FAQs and Troubleshooting
Q: My blondies came out too dense; what did I do wrong?
A: It’s possible you overmixed the batter or added too much flour. Remember, gentle mixing is key!
Q: Can I double this recipe?
A: Absolutely! Just use a larger baking pan and adjust the baking time, checking for doneness.
Q: How do I store leftover blondies?
A: Store them in an airtight container at room temperature for up to three days. For longer storage, freeze them tightly wrapped for up to three months!
Q: What if I don’t have cinnamon?
A: No worries! Try experimenting with other spices like pumpkin spice or even cocoa powder for a chocolaty treat.
Nutritional Info
While I believe dessert is all about balance, if you’re curious, a typical serving of these blondies (assuming 16 servings) contains approximately:
- Calories: 200
- Total Fat: 9g
- Saturated Fat: 5g
- Carbohydrates: 30g
- Sugars: 15g
- Protein: 2g
There you have it! These Cinnamon Sugar Blondies are not just a recipe but a delightful journey back to cherished moments. I hope you find as much joy in making them as I do, and may they become a beloved part of your own kitchen tales! Happy baking, my friend!
Print
Cinnamon Sugar Blondies
- Total Time: 45 minutes
- Yield: 16 servings 1x
- Diet: Vegetarian
Description
Indulge in these soft and slightly crisp cinnamon sugar blondies, a perfect blend of buttery goodness and spiced sweetness.
Ingredients
- 1 cup Unsalted Butter (melted)
- 1 cup Brown Sugar (packed)
- ½ cup Granulated Sugar
- 2 large Eggs
- 1 tsp Vanilla Extract
- 2 cups All-Purpose Flour
- 1 tsp Baking Powder
- ½ tsp Salt
- 2 tsp Ground Cinnamon
- ¼ cup Granulated Sugar + 1 tbsp Ground Cinnamon (for topping)
Instructions
- Preheat the oven to 350°F (175°C) and line an 8×8-inch baking pan with parchment paper.
- Mix the melted butter, brown sugar, and granulated sugar in a large bowl until smooth and creamy.
- Add the eggs one at a time, beating well after each addition, then stir in the vanilla extract.
- Combine the flour, baking powder, ground cinnamon, and salt in a separate bowl.
- Fold the dry ingredients into the wet mixture with a spatula, mixing just until no dry flour remains.
- Pour the batter into the prepared baking pan and spread it evenly.
- Create the topping by mixing granulated sugar and ground cinnamon, and sprinkle it over the batter.
- Bake for 25-30 minutes, or until lightly golden, and a toothpick comes out clean with a few moist crumbs.
- Slice once cooled slightly and enjoy warm or let cool completely.
Notes
Consider adding chocolate chips, nuts, or dried fruits for variations. Store leftovers in an airtight container for up to three days.
- Prep Time: 15 minutes
- Cook Time: 30 minutes
- Category: Dessert
- Method: Baking
- Cuisine: American
Nutrition
- Serving Size: 1 blondie
- Calories: 200
- Sugar: 15g
- Sodium: 100mg
- Fat: 9g
- Saturated Fat: 5g
- Unsaturated Fat: 3g
- Trans Fat: 0g
- Carbohydrates: 30g
- Fiber: 1g
- Protein: 2g
- Cholesterol: 30mg
Keywords: blondies, dessert, baking, cinnamon sugar, sweet treats

Lemon Brownies
Sweet Sunshine on a Plate: The Ultimate Lemon Brownies Recipe
Welcome to my kitchen! Today, we’re diving into a delightful treat that’s perfect for those times when you’re craving something sweet yet refreshing — Lemon Brownies! You might be wondering, “What on earth are Lemon Brownies?” Well, let me tell you, they are a delightful twist on traditional brownies, infusing zesty lemon flavor into a chewy, rich base that’s simply irresistible.
Imagine biting into a soft, fudgy square with a bright citrus kick that dances across your taste buds. It’s like springtime in your mouth, and it will have you pressing repeat faster than you can say “lemon zest!” These Lemon Brownies are the perfect blend of sweet and tangy, and I promise they’ll make your kitchen smell heavenly.
In this post, I’ll share my cherished Lemon Brownies recipe that combines comfort with a splash of sunshine, along with tips and tricks to make them extra special. Whether you’re baking for a crowd or simply indulging in a treat for yourself, these brownies are sure to bring joy to your day. So, roll up your sleeves, grab your apron (a little messiness is part of the fun), and let’s get baking!
Personal Story
I can never think of Lemon Brownies without recalling a charming afternoon spent in my grandmother’s kitchen. Each spring, as the days grew longer and warmer, she would invite me over to help her bake. The sun would beam through the windows, casting a golden glow on the countertops, and that’s where the magic happened.
One day, we decided to try our hand at something new. Instead of her usual chocolate brownies, she pulled out a tattered cookbook and flipped to a recipe for something called Lemon Brownies. I was skeptical; after all, chocolate was her signature! But as we mixed the ingredients, the bright scent of lemon filled the air, and my doubts began to melt away.
When they came out of the oven, they didn’t look like the brownies I was used to, but the moment we took a bite, I fell in love. Each square was a burst of sunshine, and it felt like a celebration of spring right at home. The best part? Sharing them with family, bringing smiles and laughter around the dining table. That day solidified my passion for baking, and every time I make Lemon Brownies, I’m transported back to that cozy kitchen with my grandmother, laughing and creating something beautiful.
Ingredients
Here’s what you’ll need to whip up these delightful Lemon Brownies:
-
1 cup unsalted butter, melted
This provides a rich, buttery base. You can substitute it with coconut oil for a dairy-free option, but it may alter the flavor slightly. -
2 cups granulated sugar
Sweetness is key! You can reduce the sugar slightly for a less sweet brownie or use a sugar substitute like coconut sugar for a different flavor profile. -
4 large eggs
Eggs add structure and moisture. For an egg-free version, consider using a flax egg (1 tablespoon of ground flaxseed mixed with 3 tablespoons of water per egg). -
1 tablespoon lemon zest
The zest is where the flavor magic happens! Don’t skip it. You can use lime zest for a fun twist. -
1 cup fresh lemon juice (about 4-5 lemons)
Fresh juice gives the best flavor! Bottled juice lacks the vibrant zing, but if you must use it, opt for a quality one. -
2 cups all-purpose flour
This is the backbone of the brownie. For a gluten-free version, use a 1:1 gluten-free baking mix. -
1 teaspoon baking powder
A must to make the brownies rise! If you’re out, you can use baking soda, but adjust the quantity accordingly. -
1/2 teaspoon salt
Balances the sweetness! You can use sea salt or kosher salt. -
Powdered sugar (for dusting)
Adds a lovely finish! If you’re looking for a health-conscious option, try using a sugar-free powdered alternative.
Step-by-Step Instructions
Ready to get baking? Let’s break this down into simple steps. Get your ingredients ready, and let’s embark on this lemony journey!
Step 1: Preheat Your Oven
Preheat your oven to 350°F (175°C). This may seem like a small step, but it’s super important! A properly preheated oven ensures even baking, so don’t skip it.
Step 2: Prepare Your Baking Pan
Grease a 9×13 inch baking pan with a little butter or line it with parchment paper. If you’re using parchment, leave some overhanging for easy removal later. That’ll save you from any brownie warfare during the extraction!
Step 3: Melt the Butter
In a large mixing bowl, melt the butter. You can do this in the microwave or on the stovetop. Just be sure not to overheat it to prevent it from cooking the eggs later!
Step 4: Mix the Sugar and Butter
Add the granulated sugar to the melted butter and whisk until combined. You’re looking for that silky, smooth texture! This mixture should be glossy, and the sugar will start dissolving.
Step 5: Add the Eggs
Crack your eggs into the butter-sugar mixture, one at a time. Whisk well after each addition. The mixture will turn frothy and pale — this is what we want! It’s like magic happening in your bowl.
Step 6: Infuse with Lemon
Now, it’s time to amp up the flavor! Add in the lemon zest and fresh lemon juice, and give it a good stir. Close your eyes as you do it — that bright scent is pure bliss!
Step 7: Add Dry Ingredients
In a separate bowl, mix the flour, baking powder, and salt. Gradually add this to the wet mixture. Gently fold everything together with a spatula until just combined. Be careful not to overmix! You want those chewy brownie bites, not tough cookies.
Step 8: Pour and Bake
Pour the brownie batter into your prepared pan and spread it evenly. Pop it into the oven and bake for about 25-30 minutes. You’ll know they’re done when a toothpick inserted in the center comes out with a few moist crumbs but not raw batter. Those little crumbs are key; they mean you’ve got that perfect brownie texture!
Step 9: Cool
Once baked, remove the brownies from the oven and let them cool in the pan for about 15-20 minutes. If you’re too impatient, you can slide them into the fridge to speed up the cooling process!
Step 10: Dust with Powdered Sugar
Once cooled, remove the brownies from the pan using the parchment (if you used it), and dust the top with powdered sugar for that elegant finish. Slice them into squares, and you’re ready to serve!
Serving Suggestions
These Lemon Brownies are fabulous served as is, but you can elevate the experience by pairing them with a dollop of whipped cream or a scoop of vanilla ice cream for a party on your plate. For those hot summer days, consider serving them with fresh berries on the side — they complement the lemon flavor perfectly and add a pop of color!
Recipe Variations
Feel like getting creative? Here are a few fun variations you can try:
- Lemon Blueberry Brownies: Fold in a cup of fresh or frozen blueberries for an extra fruity twist.
- Lemon Poppy Seed Brownies: Add 2 tablespoons of poppy seeds to the batter for that delightful crunch!
- Lemon Cream Cheese Brownies: Swirl in a cream cheese filling made with softened cream cheese, sugar, and an egg before baking.
- Gluten-Free Option: Swap the all-purpose flour for a gluten-free blend for everyone to enjoy.
- Lemon Coconut Brownies: Add shredded unsweetened coconut to the batter for a tropical flavor.
Chef’s Notes
As I reflect on this recipe, I can’t help but smile thinking of all the times I’ve served these Lemon Brownies at gatherings, picnics, and even just as a simple treat after a long day! Each batch brings back cherished memories and has evolved a little each time I made it. Sometimes I’ll get creative and top them with a lemon glaze or drizzle (mix powdered sugar with lemon juice), adding that extra zesty flair.
And let’s be real, no kitchen adventure is without its hiccups. I once mistook salt for sugar, and let’s say the face of my poor sister when she took a bite of those brownies was one I won’t forget! Just a friendly reminder to always double-check your ingredients!
FAQs and Troubleshooting
Q: What if my brownies come out too dry?
A: Overbaking is often the culprit! Keep an eye on them towards the end and do the toothpick test. If they’re dry, reduce your baking time next time around.
Q: Can I use bottled lemon juice?
A: Absolutely! But fresh lemons will give you a more vibrant flavor. If using bottled, opt for a high-quality brand for the best taste.
Q: How should I store my brownies?
A: Store them in an airtight container at room temperature for 3-4 days. You can also refrigerate them if you prefer a denser brownie texture.
Q: Can I freeze Lemon Brownies?
A: Yes! Wrap them tightly in plastic wrap, then in aluminum foil, and they can be frozen for up to 3 months. Just thaw at room temperature before enjoying.
Nutritional Info
(Note: Nutritional values are estimated and can vary based on ingredients used.)
- Serving Size: 1 Brownie
- Calories: 180
- Total Fat: 8g
- Saturated Fat: 5g
- Cholesterol: 50mg
- Sodium: 100mg
- Total Carbohydrates: 26g
- Dietary Fiber: 1g
- Sugars: 18g
- Protein: 2g
There you have it! A little sunshine on your plate and a delightful way to bring a taste of spring into your kitchen, no matter the season. Enjoy the baking process, and don’t forget to share your creations with those you love! Happy baking! 🍋✨
Print
Sweet Sunshine on a Plate: The Ultimate Lemon Brownies Recipe
- Total Time: 45 minutes
- Yield: 12 servings 1x
- Diet: Vegetarian
Description
Delightful Lemon Brownies combining sweet and tangy flavors in a fudgy, rich base, perfect for any occasion.
Ingredients
- 1 cup unsalted butter, melted
- 2 cups granulated sugar
- 4 large eggs
- 1 tablespoon lemon zest
- 1 cup fresh lemon juice (about 4–5 lemons)
- 2 cups all-purpose flour
- 1 teaspoon baking powder
- 1/2 teaspoon salt
- Powdered sugar (for dusting)
Instructions
- Preheat your oven to 350°F (175°C).
- Prepare a 9×13 inch baking pan by greasing it or lining with parchment paper.
- Melt the butter in a large mixing bowl.
- Add the granulated sugar to the melted butter and whisk until combined.
- Add the eggs into the butter-sugar mixture, whisking well after each addition.
- Infuse with lemon by adding lemon zest and fresh lemon juice, stirring well.
- Mix the flour, baking powder, and salt in a separate bowl, then gradually add to the wet mixture.
- Pour the batter into the prepared pan and spread evenly.
- Bake for about 25-30 minutes or until a toothpick comes out with a few moist crumbs.
- Cool in the pan for about 15-20 minutes before dusting with powdered sugar and slicing into squares.
Notes
Serve with whipped cream or a scoop of vanilla ice cream for an elevated dessert experience.
- Prep Time: 15 minutes
- Cook Time: 30 minutes
- Category: Dessert
- Method: Baking
- Cuisine: American
Nutrition
- Serving Size: 1 brownie
- Calories: 180
- Sugar: 18g
- Sodium: 100mg
- Fat: 8g
- Saturated Fat: 5g
- Unsaturated Fat: 2g
- Trans Fat: 0g
- Carbohydrates: 26g
- Fiber: 1g
- Protein: 2g
- Cholesterol: 50mg
Keywords: Lemon Brownies, Dessert, Spring Dessert, Citrus Desserts, Baking


