
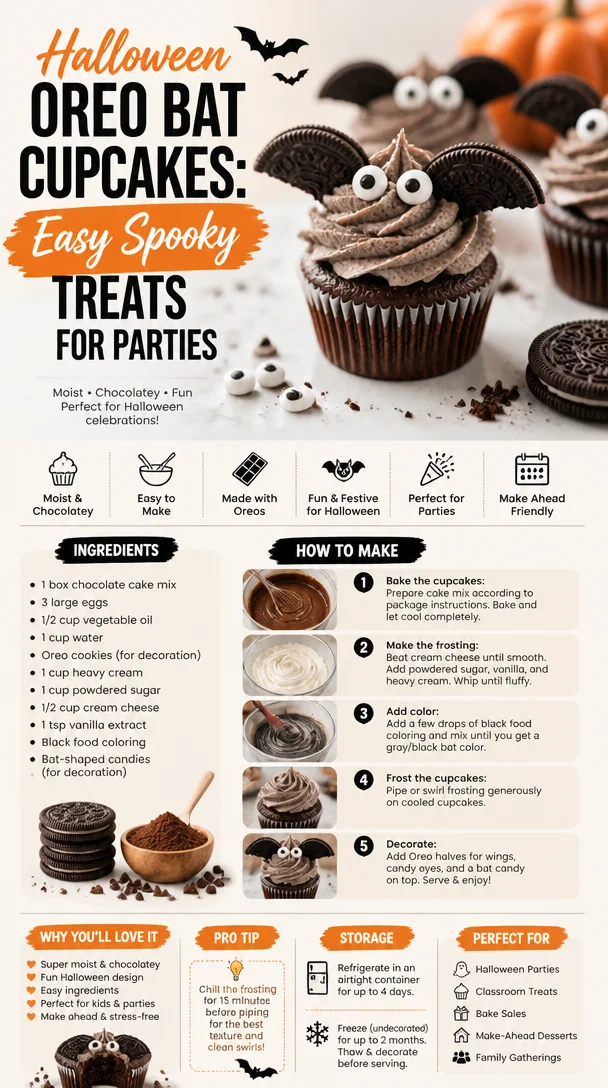
Halloween Oreo Bat Cupcakes: Easy Spooky Treats for Parties
Whip Up Some Magic with Festive Halloween Bats Oreo Cupcakes!
Welcome to my cozy kitchen, my fellow food enthusiasts! 🎃 I’m thrilled you’re here because today, we’re diving into a delightful Halloween treat: Festive Halloween Bats Oreo Cupcakes! Just the thought of these chocolatey wonders topped with cute little bat decorations gets me giddy with excitement. If you love the haunting spirit of Halloween as much as I do, you’re in for a wickedly good time.
Picture this: the sun sets behind the trees, shadows start dancing, and the air is filled with the smell of something sweet baking in the oven. There’s something truly magical about bringing the season’s spooky vibe into our kitchens, especially when it involves gathering friends and family for a frightfully fun feast! These cupcakes are not only delicious but also a whimsical way to celebrate the season, spark conversation, and create sweet memories.
As you treat yourself to these festive delights, let me share a bit of my own Halloween nostalgia. I remember vividly the thrill of choosing the perfect pumpkin each year at the local patch, scooping out its insides, and decorating it to share with friends. And how about those epic Halloween parties filled with themed treats, bubbling cauldrons of punch, and spooky sounds of laughter echoing through the night? Oh, the joy of creating together! Now, I too wanted to craft something memorable — and what better way than with chocolate cupcakes that have a hint of mischief in their design?
So whether you’re gearing up for a Halloween party, a cozy night in, or simply want to delight your loved ones with a touch of sweetness, gather your baking gear, and let’s get ready for some spook-tacular baking! These Oreo Cupcakes are a guaranteed hit, and trust me, they’ll brighten anyone’s day — even if it’s a bit haunted.
A Sweet Memory to Savor
The inspiration for these cupcakes came from my childhood, where Halloween felt like an enchanting fairytale. My family always made sure that we carved pumpkins and baked festive treats together. One year, I remember making some basic chocolate cupcakes for a school Halloween party, but they were missing that wow factor. Fast forward to the following year when I stumbled upon the magical ingredient: Oreos! I snuck a few into the batter and topped each cupcake with a dollop of frosting, an Oreo, and some spooky decorations. I remember the smile on my classmates’ faces as they devoured these treats. It was in that moment I realized how a simple cookie could elevate something so basic into pure joy. Today’s Festive Halloween Bats Oreo Cupcakes are a celebration of that memory and the magic of food that brings us together, just like those childhood celebrations.
Ingredients
Here’s what you’ll need to whip up these enchanting cupcakes:
-
1 box of chocolate cake mix (plus ingredients listed on the box)
- Use your favorite brand — opting for a rich chocolate flavor will bring out the best in these cupcakes.
-
1/2 cup vegetable oil
- This keeps the cupcakes moist and fluffy. You can substitute with melted coconut oil or melted unsalted butter for flavor!
-
3 large eggs
- These bring rich texture. For a vegan option, use flax eggs (1 tbsp flaxseed meal mixed with 2.5 tbsp water per egg).
-
1 cup water or milk
- Milk adds richness, but water will keep them lighter. Try almond milk or oat milk for a dairy-free version!
-
1 package of Oreo cookies
- These are the secret ingredient! Stuff them in the batter and on the top. Swap for gluten-free Oreos if needed.
-
1-2 cups of vanilla frosting (store-bought or homemade)
- The sky’s the limit! A homemade buttercream or cream cheese frosting works wonders, but store-bought saves time.
-
Black food coloring (optional)
- For that dark, spooky vibe! You can also use chocolate frosting for a more natural look.
-
Bat cupcake toppers or decorations
- You can get creative here! Use pre-made bat-shaped cookies, fondant, or even cut-out silhouettes from black paper.
Step-by-Step Instructions
Ready to bring these cupcakes to life? Here’s how you whip up these delicious treats:
-
Preheat Your Oven
- Preheat your oven to 350°F (175°C). This is super important for getting that perfect rise, so don’t skip this step!
-
Prepare Your Cupcake Liners
- Line your muffin tin with Halloween-themed cupcake liners. Whether they’re orange or adorned with spooky designs, they’ll set the tone.
-
Mix the Cake Batter
- In a large mixing bowl, combine the chocolate cake mix, vegetable oil, eggs, and water or milk using a hand mixer until smooth.
- Chef Hack: Don’t overmix! A few lumps are okay; it keeps the cupcakes light and airy.
-
Add in the Oreos
- Gently fold in roughly crushed Oreos — you want to see those delightful pieces!
- Tip: Reserve a few whole Oreos for decorating the tops if you wish.
-
Fill the Liners
- Pour the batter into the lined cupcake tins, filling each cup about 2/3 full.
- Chefs’ Tip: Use a cookie scoop for even distribution and clean hands.
-
Bake
- Pop those beauties into your preheated oven and bake for 18-20 minutes, or until a toothpick comes out clean.
- Pop Quiz: Did you remember to set a timer? No one wants to forget during a haunted baking session!
-
Cool Completely
- Once baked, let the cupcakes cool in the pan for about 5 minutes before transferring them to a wire rack. Allow them to cool completely before frosting.
-
Frosting Time
- If you want to make spooky black frosting, use the black food coloring to tint your frosting. Frost each cupcake generously — let your inner artist shine here!
-
Decorating Like a Pro
- Top each frosted cupcake with a whole Oreo and add bat decorations on top. Feel free to get creative here! Bonus points for using edible glitter or spooky sprinkles!
-
Serve and Enjoy
- Parcels of joy on a plate! Serve them at your Halloween soirée, and watch everyone smile.
Serving Suggestions
Plating these adorable cupcakes is half the fun! Arrange them on a spooky cake stand, sprinkle with edible glitter, or place them in a haunted-themed box. Pair these treats with a glass of chilled pumpkin spice milk or whipped cream to really wow your guests. Enjoy the delightful chaos of Halloween with each bite!
Recipe Variations
Want to mix things up? Here are a few creative twists on these cupcakes:
-
Chocolate Ganache Topping: Create an ooey-gooey experience by drizzling chocolate ganache over your frosting.
-
Pumpkin Spice Cupcakes: Substitute the chocolate cake mix for pumpkin spice cake mix to give a seasonal flair.
-
Batch of Mini Cupcakes: Use a mini muffin tin and adjust baking time for adorable bite-sized treats.
-
Dairy-Free Delight: Use coconut oil, almond milk, and dairy-free Oreos for a delicious dairy-free version.
-
Vegan-friendly Options: Swap heavy egg-based ingredients for flax eggs and enjoy creamy vegan frosting for a guilt-free treat!
Chef’s Notes
Creating these cupcakes takes me back to those days of whimsy and wonder, and I find that each batch is a new adventure. Sometimes I mix up the frosting flavors or even experiment with different cookie bases for a twist! A funny memory for me was once frosting cupcakes while wearing a bat costume. Let’s just say the messy flour-covered apron didn’t quite match the outfit!
These cupcakes have also evolved over the years — originally a simple affair, they became a Halloween staple in my kitchen. The addition of Oreos took them from ordinary to extraordinary!
FAQs and Troubleshooting
-
Why are my cupcakes flat?
- Make sure to check that your baking powder is fresh. Also, avoid overmixing the batter; this can create dense cupcakes.
-
Can I use homemade frosting?
- Absolutely! I often whip up a quick buttercream frosting. Feel free to experiment with flavors like cream cheese or chocolate if you’re feeling adventurous.
-
What if I don’t have black food coloring?
- Don’t worry! You can use dark cocoa powder in your frosting to achieve a darker shade, or simply use traditional white frosting, garnishing with black sprinkles.
-
How do I store leftovers?
- Keep leftover cupcakes in an airtight container at room temperature for up to 3 days. For prolonged freshness, store them in the fridge for about 5-6 days.
Nutritional Info (optional)
While the magical taste is what we care about most, here’s a rough estimate of the nutritional information per cupcake:
- Calories: 290
- Protein: 3g
- Fat: 12g
- Carbohydrates: 44g
- Sugars: 20g
There you have it, my food-loving friends! I hope you’re as excited about the Festive Halloween Bats Oreo Cupcakes as I am. With just a bit of love and creativity, you can make these spook-tastic treats that will have everyone raving. Happy baking, and may your Halloween be filled with laughter, joy, and lots of delectable goodies! 🎉👻🍰
Print
Festive Halloween Bats Oreo Cupcakes
- Total Time: 35 minutes
- Yield: 12 servings 1x
- Diet: Vegetarian
Description
Delight your friends and family with these chocolatey Oreo cupcakes topped with spooky decorations, perfect for Halloween festivities.
Ingredients
- 1 box chocolate cake mix (plus ingredients listed on the box)
- 1/2 cup vegetable oil
- 3 large eggs
- 1 cup water or milk
- 1 package Oreo cookies
- 1–2 cups vanilla frosting (store-bought or homemade)
- Black food coloring (optional)
- Bat cupcake toppers or decorations
Instructions
- Preheat your oven to 350°F (175°C).
- Prepare your muffin tin with Halloween-themed cupcake liners.
- Mix the chocolate cake mix, vegetable oil, eggs, and water or milk until smooth.
- Add in roughly crushed Oreos and fold gently.
- Fill the lined cupcake tins about 2/3 full with the batter.
- Bake for 18-20 minutes or until a toothpick comes out clean.
- Cool for 5 minutes in the pan before transferring to a wire rack.
- Frost each cooled cupcake with your desired frosting.
- Decorate with a whole Oreo and bat decorations on top.
- Serve and enjoy!
Notes
These cupcakes can be made dairy-free and vegan by using appropriate substitutes. Get creative with your decorations for an extra spooky touch!
- Prep Time: 15 minutes
- Cook Time: 20 minutes
- Category: Dessert
- Method: Baking
- Cuisine: American
Nutrition
- Serving Size: 1 cupcake
- Calories: 290
- Sugar: 20g
- Sodium: 200mg
- Fat: 12g
- Saturated Fat: 2g
- Unsaturated Fat: 10g
- Trans Fat: 0g
- Carbohydrates: 44g
- Fiber: 1g
- Protein: 3g
- Cholesterol: 30mg
Keywords: Halloween, cupcakes, Oreo, dessert, festive, chocolate
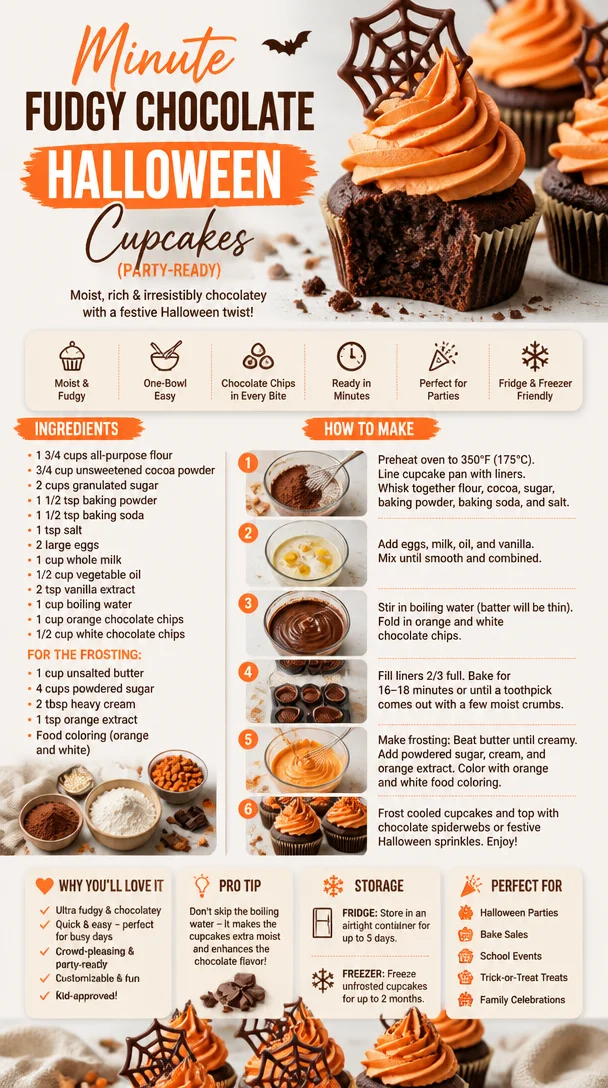
Minute Fudgy Chocolate Halloween Cupcakes (Party-Ready)
The Spooktacular Delight of Chocolate Halloween Cupcakes
Welcome back to my cozy kitchen! As the leaves turn that beautiful shade of amber and the air gets a hint of chill, I can’t help but get excited about one of my favorite holidays—Halloween! It’s a delightful time when we can embrace all things spooky, playful, and, of course, delicious. And what better way to celebrate than with a batch of rich, chocolate Halloween cupcakes? These little treats aren’t just tasty; they’re a canvas for creativity, allowing you to unleash your inner artist and celebrate the season in style.
Picture this: You smell the warm, comforting aroma of chocolate wafting through your home, pulling you into the kitchen like a friendly ghost. You grab your mixing bowl, toss in your ingredients, and dance to your favorite Halloween playlist while whisking it all together. Whether you’re whipping these up for a spooky soirée, a school bake sale, or just to indulge in some festive fun, these cupcakes are perfect for spreading joy and chills alike.
These cupcakes are wonderfully moist and decadent, offering a sumptuous chocolate flavor that’s totally irresistible. Topped with fluffy, orange-tinged frosting and adorned with eerie sprinkles, they not only taste heavenly but also look hauntingly adorable! So, let’s dive into this spooky culinary adventure together and make some memories—because nothing brings people together like a homemade treat (especially one filled with chocolate goodness!). Grab your apron, tie it on, and let’s get baking!
A Sweet Memory from My Childhood
As a young girl, Halloween was always a magical time in our household. I remember eagerly anticipating the moment when my mom would bring out her collection of spooky-themed recipes. The front of our kitchen would transform into a miniature bakery, and I’d often steal bites of cookie dough, doused in semi-sweet chocolate chips, as I helped her prepare for our neighborhood Halloween party.
One year, we decided to host a ‘witches and wizards’ theme, complete with flying broomsticks and floating ghosts hanging from the ceiling. My mom made her famous chocolate cupcakes and turned them into mummies with white frosting and chocolate chip eyes. It was a huge hit, and the joy on the kids’ faces as they devoured the treats is a memory I cherish to this day. That experience sparked my love for baking and the idea that food can ignite joy and connection. Now, every time I make chocolate cupcakes, I’m taken back to those thrilling Halloween nights, excited laughter, and treats that brought us all together.
Ingredients
To create these scrumptious chocolate Halloween cupcakes, you’re going to need the following ingredients:
-
1 cup all-purpose flour
A staple in most desserts! This gives the cupcakes their structure. You can substitute with gluten-free flour if needed. -
1 cup granulated sugar
This lends sweetness and helps the cupcakes rise beautifully. Feel free to use coconut sugar for a less refined option. -
1/2 cup unsweetened cocoa powder
The star of the show! Use the highest quality you can find for rich, chocolatey goodness. Dutch-processed cocoa gives a deeper flavor if you like. -
1 teaspoon baking powder
This helps your cupcakes rise and become fluffy. Ensure it’s fresh for the best results. -
1/2 teaspoon baking soda
Works in conjunction with the baking powder for a perfectly aerated cupcake. -
1/4 teaspoon salt
A pinch of salt enhances the sweetness and balances the chocolate flavor. -
2 large eggs
Eggs add moisture and richness. For a vegan version, try flaxseed eggs (1 tbsp ground flaxseed + 2.5 tbsp water = 1 egg). -
1/2 cup vegetable oil
Keeps the cupcakes moist and flavorful. Substitute with melted coconut oil or applesauce for a lighter version. -
1 teaspoon vanilla extract
Adds a delightful aroma and depth of flavor. Use pure vanilla for the best quality. -
1/2 cup milk
This helps to brighten the chocolate flavor. You can use almond milk or oat milk as a dairy-free alternative. -
1/4 cup boiling water
This may seem odd, but it intensifies the cocoa flavor and creates a moist texture. -
Orange food coloring (optional)
To give your frosting that festive Halloween hue! -
Sprinkles or decorations
Get creative with spooky sprinkles, edible eyes, or gummy worms to top your cupcakes and bring them to life (or death!).
Step-by-Step Instructions
Alright, let’s roll up those sleeves and get mixing! Follow these steps for baking your delectable Halloween cupcakes:
-
Preheat the Oven
First things first—preheat your oven to 350°F (175°C). This ensures your cupcakes bake evenly and rise perfectly. -
Line the Cupcake Tin
Prepare a 12-cup muffin tin by lining it with festive cupcake liners. I often go for orange and black to get into the Halloween spirit! -
Mix the Dry Ingredients
In a large mixing bowl, whisk together the flour, sugar, cocoa powder, baking powder, baking soda, and salt. This blending of dry ingredients ensures an even distribution of those flavors. -
Combine the Wet Ingredients
In a separate bowl, combine the eggs, vegetable oil, milk, and vanilla extract. Whisk them until nice and smooth. This is where you can add a drop or two of orange food coloring for a vibrant splash. -
Create the Batter
Gradually pour the wet mixture into the dry mixture and whisk until well combined. Careful not to overmix! A few lumps are okay—you want those cupcakes to be tender, not tough. -
Boiling Water Magic
Stir in the boiling water slowly. This may make your batter seem more runny, but trust me, it’s going to yield some moist, delectable cupcakes. -
Fill the Liners
Use a spoon or an ice cream scoop to fill each liner about two-thirds full. This helps to give them room to rise without overflowing. -
Bake Away!
Pop your cupcake tin into the preheated oven and bake for 18-20 minutes, or until a toothpick inserted in the center comes out clean. The smell will be incredible—prepare for the “ooohs” and “aaahs” from anyone within sniffing distance! -
Cool Down
Once baked, let the cupcakes cool in the tin for about 5 minutes before transferring them to a wire rack to cool completely. They need to be cool for frosting—otherwise, it’ll melt! -
Frost and Decorate
Now comes the fun part! Use a piping bag to swirl your favorite cupcake frosting on top (I suggest a classic buttercream dyed orange) and finish with spooky decorations. Get creative!
Serving Suggestions
When it comes to serving these delightful treats, presentation is key! Place your frosted Halloween cupcakes on a fun, themed platter—think spiderweb designs or pumpkin motifs. Add some additional decorations to your serving area, perhaps miniature pumpkins or spooky props, to really set the atmosphere. If you’re handing them out as treats, consider placing each cupcake in its own little clear cellophane bag, tied with a cute Halloween ribbon.
Recipe Variations
-
Pumpkin Chocolate Swirl: Add a layer of pumpkin purée to your batter for a delicious swirl and a touch of fall spice.
-
Minty Monster Cupcakes: Swap out the vanilla for peppermint extract in the frosting for a refreshing twist!
-
Spider Web Frosting: Use a piping bag to drizzle white frosting over the orange icing to create a spooky spider web design.
-
Nutty Crunch: Fold in some chopped walnuts or pecans into the batter for a crunchy texture throughout.
-
Gluten-Free Delight: Simply swap the all-purpose flour for a gluten-free blend, and you’re all set for those with gluten sensitivities!
Chef’s Notes
Making these chocolate Halloween cupcakes always feels like an adventure! They’ve evolved from a simple recipe I first learned to a canvas for creativity and seasonal delight. I’ve tried them with various toppings, from edible glitter to more advanced fondant decorations, and each iteration brings back those warm memories of baking in the kitchen with my mom. One of the funniest moments involved our family cat sneaking onto the counter and pawing at the frosting—yes, that didn’t end well! Remember to guard your creations from eager paws or curious hands!
FAQs and Troubleshooting
1. My cupcakes didn’t rise! What went wrong?
This could be due to using expired baking powder or baking soda. Always check the expiration dates—fresh leavening agents are essential for fluffy cupcakes!
2. Why are my cupcakes dry?
Overmixing the batter or baking them for too long can lead to dryness. Be gentle when mixing, and keep an eye on the timer!
3. How can I store leftovers?
Store any uneaten cupcakes in an airtight container at room temperature for up to 3 days. If you want to preserve them longer, freeze them without frosting and thaw when you’re ready to serve.
4. Can I make these ahead of time?
Absolutely! You can bake the cupcakes a day in advance. Just frost them the day of your event to keep the frosting fresh and fluffy.
With this easy-to-follow recipe, you’re ready to bake the most delightful chocolate Halloween cupcakes that will make everyone’s taste buds dance. So gather your ingredients, channel your inner culinary spirit, and let’s create something truly spooktacular together! Happy baking and enjoy every bite!
Print
Chocolate Halloween Cupcakes
- Total Time: 40 minutes
- Yield: 12 servings 1x
- Diet: Vegetarian
Description
Delightful and moist chocolate cupcakes topped with fluffy orange frosting, perfect for Halloween celebrations.
Ingredients
- 1 cup all-purpose flour
- 1 cup granulated sugar
- 1/2 cup unsweetened cocoa powder
- 1 teaspoon baking powder
- 1/2 teaspoon baking soda
- 1/4 teaspoon salt
- 2 large eggs
- 1/2 cup vegetable oil
- 1 teaspoon vanilla extract
- 1/2 cup milk
- 1/4 cup boiling water
- Orange food coloring (optional)
- Sprinkles or decorations
Instructions
- Preheat the oven to 350°F (175°C).
- Line a 12-cup muffin tin with festive cupcake liners.
- Mix the flour, sugar, cocoa powder, baking powder, baking soda, and salt in a large mixing bowl.
- Combine the eggs, vegetable oil, milk, and vanilla extract in a separate bowl.
- Create the batter by gradually pouring the wet mixture into the dry mixture and whisk until well combined.
- Stir in the boiling water slowly.
- Fill each liner about two-thirds full with batter.
- Bake for 18-20 minutes, or until a toothpick inserted in the center comes out clean.
- Cool in the tin for about 5 minutes before transferring to a wire rack to cool completely.
- Frost with your favorite cupcake frosting and decorate as desired.
Notes
Enjoy decorating your cupcakes with spooky sprinkles or themed decorations to enhance the Halloween spirit.
- Prep Time: 20 minutes
- Cook Time: 20 minutes
- Category: Dessert
- Method: Baking
- Cuisine: American
Nutrition
- Serving Size: 1 cupcake
- Calories: 280
- Sugar: 22g
- Sodium: 220mg
- Fat: 10g
- Saturated Fat: 1g
- Unsaturated Fat: 8g
- Trans Fat: 0g
- Carbohydrates: 42g
- Fiber: 2g
- Protein: 3g
- Cholesterol: 40mg
Keywords: Halloween, chocolate cupcakes, festive baking, dessert recipes, spooky decorations
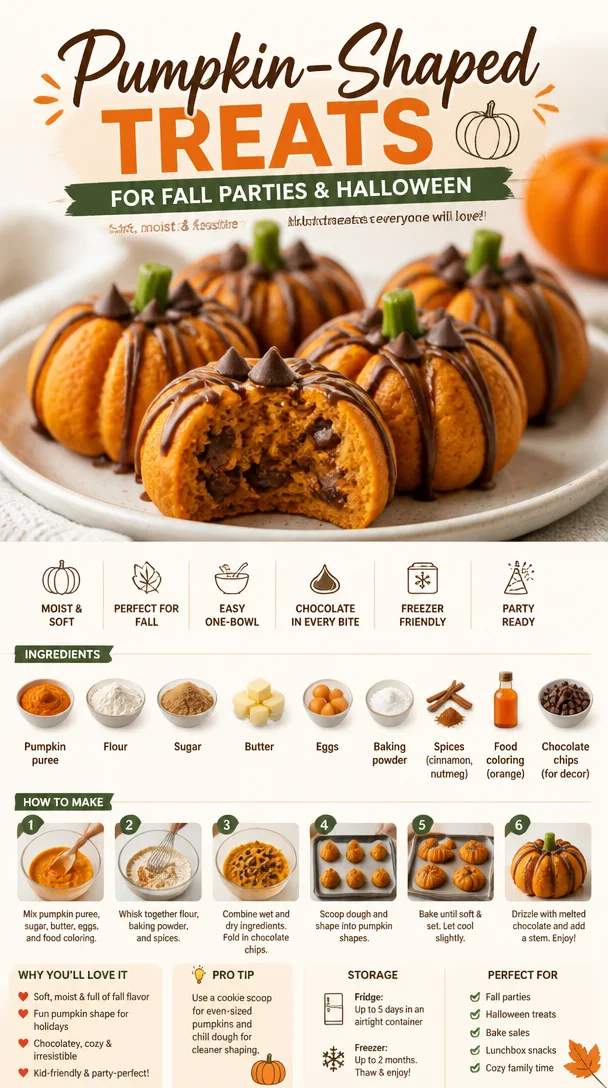
Pumpkin-Shaped Treats for Fall Parties & Halloween
Pumpkin-Shaped Food Ideas: A Fun and Festive Cooking Adventure!
Welcome to my cozy corner of the kitchen, fellow food lovers! I’m Olivia Bennett, your go-to culinary guide, and today, we’re diving into a delightful and playful adventure with pumpkin-shaped food ideas. As the leaves start to turn and the air gets a little crisper, there’s something undeniably magical about creating dishes that celebrate the spirit of fall. From adorable pumpkin-shaped cakes to savory delights that look like the iconic gourd, this post will inspire you to get creative in the kitchen.
Imagine the laughter that fills your home as you and your loved ones gather around a table adorned with charming, pumpkin-shaped treats. Whether it’s for Halloween, Thanksgiving, or simply to add a little whimsy to a mundane weekday, these recipes are perfect for making every meal feel special. So, roll up your sleeves, grab that trusty apron, and let’s whip up some festive fun!
A Fond Memory in the Kitchen
I can’t help but reminisce about the first time I made pumpkin-shaped cookies. I was only eight years old, shoulders barely peeking over the counter as I stood beside my grandmother, who was a fabulous baker. The smell of warm spices filled our tiny kitchen as we mixed the dough together, her hands guiding mine to create the perfect pumpkin shapes. We used a cookie cutter, and soon enough, the entire kitchen was filled with laughter and flour dust!
After we baked and iced those little treats, my grandmother and I decorated each one with tiny chocolate chips for eyes and a green frosting stem. They were absolutely charming—tiny orange pumpkins sitting proudly on our kitchen countertop, just waiting to be devoured. That moment sparked my love for cooking and baking, teaching me that food is not just about flavor but also about bringing people together. Each pumpkin-shaped creation holds a piece of nostalgia, and I can’t wait to share that joy with you!
Ingredients List
Let’s gather our ingredients! Below are the essentials you’ll need to make delicious pumpkin-shaped treats, whether they’re cookies, cakes, or savory snacks:
-
All-purpose flour: The backbone of many recipes, providing structure. If you’re gluten-free, substitute with a gluten-free blend.
-
Pumpkin puree: This gives moisture and flavor. Canned pumpkin works well, but fresh roasted pumpkin is even better!
-
Brown sugar: For warmth and depth of sweetness. You can swap it for coconut sugar for a hint of caramel flavor.
-
Granulated sugar: To balance the richness. Feel free to use a sugar substitute for a lower-calorie version.
-
Baking powder: This leavening agent will help your treats rise and become fluffy. Baking soda can be used, but adjust the acids accordingly.
-
Pumpkin pie spice: A delightful blend that typically includes cinnamon, nutmeg, and ginger. You can make your own if you’re feeling adventurous!
-
Eggs: They bind everything together. If you need a vegan option, you can use flax eggs or applesauce!
-
Butter or coconut oil: For richness and flavor. Coconut oil is an excellent alternative for a dairy-free version.
-
Vanilla extract: A must for flavor; always go for pure extract if you can find it!
-
Chocolate chips: Optional, but highly recommended for decoration or added sweetness. You can use dark chocolate or white chocolate for a different flavor.
With these ingredients in hand, you’re on your way to creating pumpkin-shaped culinary wonders.
Step-by-Step Instructions
Now for the exciting part—let’s get cooking! Follow the steps below to create your pumpkin-shaped treats.
-
Preheat Your Oven: Set your oven to 350°F (175°C) so it’s ready for baking.
Chef Tip: Make sure your oven is fully preheated to ensure even baking!
-
Mix Dry Ingredients: In a large bowl, whisk together 2 cups of all-purpose flour, 1 teaspoon of baking powder, and 2 teaspoons of pumpkin pie spice.
Chef Hack: Sifting the flour can help reduce lumps and give your treats a lighter texture!
-
Combine Wet Ingredients: In another bowl, cream together 1 cup of softened butter (or coconut oil) and 1 cup of brown sugar and ½ cup of granulated sugar until fluffy. Add 1 cup of pumpkin puree and 2 eggs (or flax eggs), along with 2 teaspoons of vanilla extract.
Chef Insight: Don’t skip creaming the butter and sugars; it creates air pockets that make your treats lighter!
-
Blend It Together: Gradually add the dry ingredients to the wet mixture, mixing until just combined. If you’re including chocolate chips, fold them in at this point.
Tip: Overmixing can lead to tough cookies, so mix gently!
-
Shape Your Pumpkins: Scoop portions of dough and roll them into balls. Gently flatten the tops a bit to achieve more of a pumpkin shape, then use your hands to make slight indentations to mimic pumpkin ridges.
Chef’s Secret: A fork can help you create those cute lines!
-
Bake: Place your pumpkin shapes on a parchment-lined baking sheet and bake for about 10-12 minutes, or until the edges are lightly golden.
Remember: They’ll continue to cook a bit from residual heat after you take them out, so don’t overbake!
-
Cool and Decorate: Allow them to cool completely on a wire rack before decorating with frosting or more chocolate chips to create stems and eyes.
Tip: For frosting, a simple cream cheese frosting works fantastically, and you can tint it green for added fun!
Serving Suggestions
Once your adorable pumpkin-shaped treats are out of the oven and decorated, it’s time for presentation! Try arranging them on a rustic wooden platter for a cozy vibe. You can even add some leaves or mini pumpkins around for that extra autumnal touch. These treats shine brightly on dessert tables or as charming gifts for friends—it’s truly all about the presentation!
Recipe Variations
Now that you have the basic recipe down, let’s play! Here are a few creative twists you might consider for your pumpkin-shaped delights:
-
Pumpkin Spice and Everything Nice: Add chopped nuts or dried cranberries for extra texture and flavor.
-
Chocolate Pumpkin Delight: Substitute half of the flour with cocoa for a chocolaty version and frost with chocolate ganache.
-
Savory Spin: Use the same shaping technique but make a savory blend with cheese, herbs, and spices for pumpkin-shaped cheese puffs.
-
Gluten-Free Fun: Use a gluten-free flour blend for your pumpkin treats; they’ll be just as fun and delicious!
-
Vegan Version: Replace the eggs and butter with flax eggs and plant-based butter for a plant-friendly option.
Chef’s Notes
This pumpkin-shaped recipe has become a staple in my kitchen, especially during the fall! It’s incredible to see how a simple recipe can evolve over time. I recall experimenting with it at my son’s kindergarten Halloween party, and the kids loved them so much I felt like a superhero for the day!
Another funny kitchen story: One time, I got a little too into the spirit and tried to decorate them with a pumpkin carving kit. Let’s just say, I learned that cookie dough doesn’t hold up under a carving knife! Nevertheless, it’s these quirky kitchen moments that remind us to enjoy the process and not take ourselves too seriously.
FAQs and Troubleshooting
-
Why are my cookies spreading too much?
- This might be due to excess butter or not chilling the dough. Try refrigerating your cookie dough for 30 minutes before baking!
-
What if my cookies are too dry?
- Make sure you’re measuring your flour correctly—not too packed! You can also try adding a tablespoon of milk or additional pumpkin puree to moisten the dough.
-
How can I decorate them without frosting?
- You can use melted chocolate or simply dust them with powdered sugar for a lovely finish. A sprinkle of cinnamon sugar is a nice touch too!
-
Can I make the dough ahead of time?
- Definitely! You can prepare the dough, shape it into a ball, wrap it in plastic, and store it in the fridge for up to 3 days or freeze it for up to a month.
Nutritional Info
Nutritional values vary based on specific ingredients and portion sizes, but a typical pumpkin cookie (without icing) is around 150 calories, 7 grams of fat, and 2 grams of protein. Adjust based on your modifications!
With these pumpkin-shaped food ideas, you’re all set to add a touch of whimsy and a bucket full of flavor to your fall festivities. Cooking should always be about fun and creativity, and I hope these recipes inspire you to gather your loved ones and create lasting memories in your kitchen. Happy cooking, and may your pumpkins always be delicious! 🍂🎃
Print
Pumpkin-Shaped Treats
- Total Time: 32 minutes
- Yield: 24 servings 1x
- Diet: Vegetarian
Description
Delicious pumpkin-shaped cookies and treats perfect for fall festivities, bringing cheerful whimsy to your table.
Ingredients
- 2 cups all-purpose flour
- 1 teaspoon baking powder
- 2 teaspoons pumpkin pie spice
- 1 cup softened butter (or coconut oil)
- 1 cup brown sugar
- ½ cup granulated sugar
- 1 cup pumpkin puree
- 2 eggs (or flax eggs)
- 2 teaspoons vanilla extract
- Optional: chocolate chips for decoration
Instructions
- Preheat your oven to 350°F (175°C).
- Mix dry ingredients in a bowl.
- Combine wet ingredients in another bowl.
- Blend the wet and dry ingredients together until just combined.
- Shape the dough into balls and flatten slightly.
- Bake for 10-12 minutes or until edges are golden.
- Cool and decorate as desired.
Notes
Use a fork to create the ridges of the pumpkins. Allow the cookies to cool completely before decorating.
- Prep Time: 20 minutes
- Cook Time: 12 minutes
- Category: Dessert
- Method: Baking
- Cuisine: American
Nutrition
- Serving Size: 1 cookie
- Calories: 150
- Sugar: 15g
- Sodium: 150mg
- Fat: 7g
- Saturated Fat: 4g
- Unsaturated Fat: 2g
- Trans Fat: 0g
- Carbohydrates: 20g
- Fiber: 1g
- Protein: 2g
- Cholesterol: 30mg
Keywords: pumpkin, cookies, fall treats, baking, festive desserts
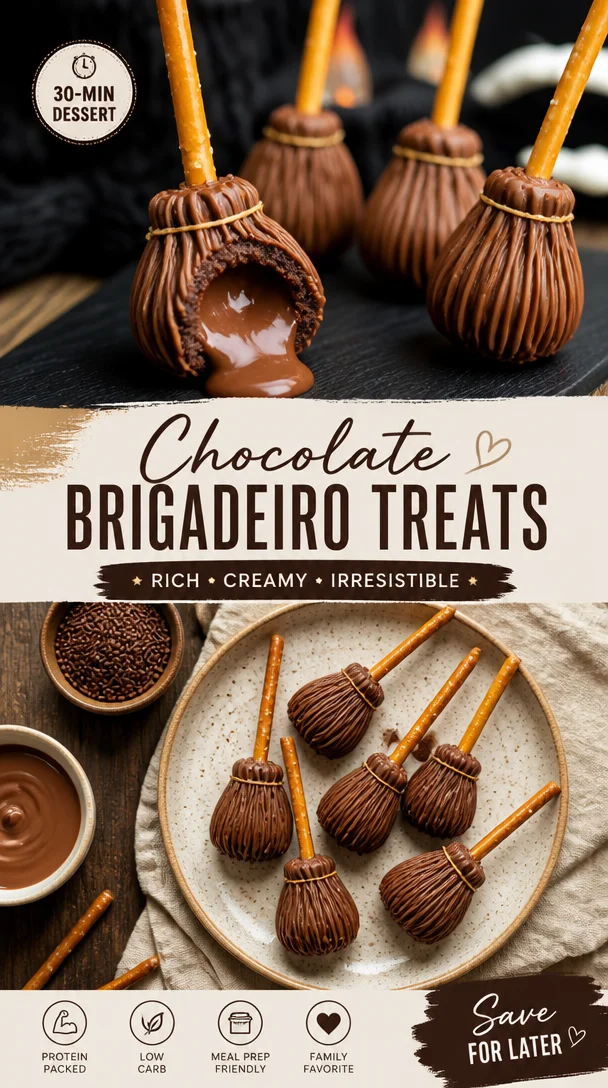
Chocolate Brigadeiro Treats
Indulge in Decadence: Making Chocolate Brigadeiro Treats
Welcome to my kitchen! Today, I’m thrilled to dive into one of my all-time favorite treat recipes—Chocolate Brigadeiro. If you haven’t experienced these delightful little bites of heaven, you’re in for a treat (quite literally)! Brigadeiro is a traditional Brazilian sweet, known for its rich, fudgy texture and bombastic chocolatey flavor. They are perfect for any occasion, from birthday parties and holiday gatherings to cozy nights in with friends. Plus, they’re incredibly easy to make, which makes them an absolute win in my book!
When the kitchen is filled with the aroma of melting chocolate and sweetened condensed milk, it’s hard not to feel all warm and cozy inside, isn’t it? It reminds me of the countless times I’ve gathered around the kitchen with friends and family, crafting these delicious confections and sharing laughter and stories. Today, I want to share that joy with you so you can bring a piece of Brazil into your home, one chocolatey bite at a time.
So, roll up your sleeves and get ready to whip up a batch of these scrumptious Brigadeiros. Whether you’re making them for a special occasion or just treating yourself (because, why not?), I promise they won’t last long once they’re in your hands!
A Sweet Memory: The First Time I Made Brigadeiros
I’ll never forget the first time I made Brigadeiros. I was a curious teenager, spending the summer with my Brazilian pen pal, Ana, who became more like family during those unforgettable weeks. One sunny afternoon, as we gathered in her vibrant kitchen, she introduced me to the world of Brigadeiros. I was immediately captivated by the simplicity of the ingredients and the transformation that happened with just a little patience and stirring.
Ana and I giggled as we melted together sweetened condensed milk and cocoa powder while debating the proper technique for rolling the chocolate balls—should they be perfectly round, or did it matter if they were a little rustic? After all, I was just a teen learning to cook! The sticky mixture was everywhere—on our hands, the countertop, even on my cheek after an enthusiastic taste test. As we coated our Brigadeiros in chocolate sprinkles, a mess of giggles and smiles filled the air. The first bite was pure ecstasy—a soft, fudgy explosion of chocolate goodness that brought an immediate smile.
To this day, Brigadeiros make me think of that warm summer filled with laughter, friendship, and way too much sugar. I hope as you make them, you’ll create your beautiful memories that you can cherish forever!
Ingredients: What You’ll Need for Perfect Brigadeiros
Let’s gather our supplies! Here’s what you’ll need to make Chocolate Brigadeiro Treats:
-
Sweetened Condensed Milk: The star of the show! This ingredient combines with cocoa powder to create the creamy, fudge-like texture. If you’re in a pinch, you can make your own by simmering milk and sugar, but I must say, the canned version is ridiculously easy and just as delicious!
-
Cocoa Powder: Unsweetened cocoa powder gives Brigadeiros their rich chocolate flavor. Use high-quality cocoa for the best results. You can substitute it with carob powder for a caffeine-free option, and it still tastes delightful!
-
Butter: A little butter helps achieve that silky smooth texture. If you need a dairy-free alternative, coconut oil works wonders as well!
-
Chocolate Sprinkles: These add a delightful crunch and true Brigadeiro charm to the treats. If you want to mix it up, try using crushed nuts or coconut flakes for rolling them instead.
-
Pinch of Salt: Just a pinch enhances the overall flavor and balances the sweetness. Never underestimate the power of salt in desserts!
Step-by-Step Instructions: Let’s Get Cooking!
Ready to bring some magic to your kitchen? Here’s how to whip up your very own Brigadeiros:
-
Combine Ingredients in a Pan: In a medium saucepan, combine the sweetened condensed milk, cocoa powder, and butter. You’ll want to use a non-stick pan; it makes the cleanup a breeze and minimizes the risk of burning!
-
Heat Slowly: Place the saucepan over medium heat. Stir continuously with a wooden spoon or a silicone spatula. It’s crucial to stir often to prevent sticking and burning. This will seem tedious, but trust me—your patience will pay off.
-
Cook Until Thickened: After about 10 minutes, you’ll notice the mixture starts to thicken and pull away from the sides of the pan. Look for the consistency where it forms a ball when stirred. That’s the sweet spot, but don’t get too impatient! Cooking longer ensures that fudgy texture we all love!
-
Cool the Mixture: Once you’ve reached the desired consistency, remove the pan from the heat and transfer the mixture to a greased plate. Allow it to cool for about 15-20 minutes; I know, it’s the hardest part!
-
Roll into Balls: Once the mixture is cool enough to handle, grease your hands with a bit of butter (seriously, it helps) and scoop about a tablespoon of the mixture. Roll it into a ball shape. If it’s sticky, just add a little more butter to your hands.
-
Coat those babies: Roll each Brigadeiro in chocolate sprinkles until fully coated. Have fun with this part—get creative with different toppings!
-
Chill and Serve: Place the Brigadeiros in mini cupcake liners or on a plate and chill them in the fridge for about 30 minutes to firm up. But honestly, if you can’t wait that long, I won’t judge you!
Serving Suggestions: Prettying Up Your Brigadeiros
Now for the fun part—serving! You can arrange your Brigadeiros on a lovely platter with some colorful sprinkles or edible flowers for a pop of color. Mini cupcake liners are also super cute and make them easy to grab. If you’re feeling festive, consider adding a little drizzle of melted chocolate on top for an extra touch of elegance. Your guests will be impressed by both your skills and presentation!
Recipe Variations: Get Creative!
While the classic Brigadeiro is a winner on its own, here are some fun variations to switch things up:
-
Nutty Brigadeiro: Roll the Brigadeiros in crushed nuts, like almonds or walnuts, instead of sprinkles for a crunchy twist.
-
Coconut Brigadeiro: Swap out the chocolate sprinkles for shredded coconut for a tropical flair!
-
Espresso Brigadeiro: Add a teaspoon of instant coffee or espresso powder to the mixture for a delightful coffee kick.
-
Flavored Brigadeiro: Experiment with different extracts (like vanilla, orange, or peppermint) mixed into the base for extra flavor excitement.
-
White Chocolate Brigadeiro: Use white chocolate in place of cocoa powder for a sweeter, decadent treat!
Chef’s Notes: Personal Reflections
Over the years, I’ve sweetened up this recipe with love, finding little tweaks to enhance the experience. The simplicity of Brigadeiros makes them irresistible for every occasion, but it’s the memories that truly add sweetness. It brings me joy to experiment with different flavors and toppings, and each batch is a little story I get to tell. Every time I make these treats, I think of my summer with Ana and the laughter that filled her kitchen.
These Brigadeiros have become a staple in my kitchen, and I love making them for gatherings, potlucks, or just a random Wednesday night! I encourage you to not only collect your own memories while making them but also try inviting friends to join you. It’s an experience made even sweeter when shared!
FAQs and Troubleshooting
-
My Brigadeiros are too sticky—what did I do wrong?
- It sounds like they may have undercooked. Ensure you’re cooking the mixture long enough for it to thicken properly. Cooking until it pulls away from the sides of the pan is key!
-
What if I overcooked the mixture?
- If it’s too hard and crumbly, don’t fret! Just add a bit of butter or cream into the mixture and reheat it gently, stirring to combine until smooth again.
-
Can I freeze Brigadeiros?
- Absolutely! Brigadeiros freeze well. Just store them in an airtight container, and when you’re ready to eat them, let them thaw in the fridge.
-
Can I adjust the sweetness?
- Of course! You can adjust the amount of cocoa powder or sweetened condensed milk according to your preference. Remember, the flavors will deepen as they chill.
Nutritional Info
While Brigadeiros are undeniably a treat meant for indulgence, here’s a rough estimate for one Brigadeiro (around 20g):
- Calories: 77
- Fat: 4.2g
- Carbohydrates: 9.6g
- Protein: 0.6g
(Nutritional content can vary based on the exact ingredients and proportions you use.)
So there you have it! Your guide to the love, laughter, and joy that comes with making Chocolate Brigadeiro treats. As you whip up this decadent dessert, I hope the sweetness fills your kitchen and brings you as much joy as it has brought me. Happy cooking, friends!
Print
Chocolate Brigadeiro Treats
- Total Time: 30 minutes
- Yield: 20 servings 1x
- Diet: Vegetarian
Description
Delight in these traditional Brazilian Chocolate Brigadeiros, rich and fudgy bites that are perfect for any occasion.
Ingredients
- 1 can Sweetened Condensed Milk
- 1/4 cup Cocoa Powder
- 2 tbsp Butter
- Chocolate Sprinkles for rolling
- Pinch of Salt
Instructions
- Combine ingredients in a pan: In a medium saucepan, combine the sweetened condensed milk, cocoa powder, and butter.
- Heat slowly: Place the saucepan over medium heat and stir continuously.
- Cook until thickened: After about 10 minutes, the mixture should start thickening and pull away from the sides of the pan.
- Cool the mixture: Remove from heat and transfer to a greased plate, allowing it to cool for about 15-20 minutes.
- Roll into balls: Once cool, grease hands and scoop about a tablespoon of mixture. Roll into a ball shape.
- Coat those babies: Roll each Brigadeiro in chocolate sprinkles until fully coated.
- Chill and serve: Place Brigadeiros in mini cupcake liners or on a plate and chill in the fridge for about 30 minutes.
Notes
Feel free to experiment with different toppings like crushed nuts or shredded coconut for a twist.
- Prep Time: 20 minutes
- Cook Time: 10 minutes
- Category: Dessert
- Method: Stovetop
- Cuisine: Brazilian
Nutrition
- Serving Size: 1 Brigadeiro
- Calories: 77
- Sugar: 8g
- Sodium: 20mg
- Fat: 4.2g
- Saturated Fat: 2.5g
- Unsaturated Fat: 1.7g
- Trans Fat: 0g
- Carbohydrates: 9.6g
- Fiber: 0g
- Protein: 0.6g
- Cholesterol: 10mg
Keywords: Brigadeiro, Brazilian dessert, chocolate treat, easy dessert




