
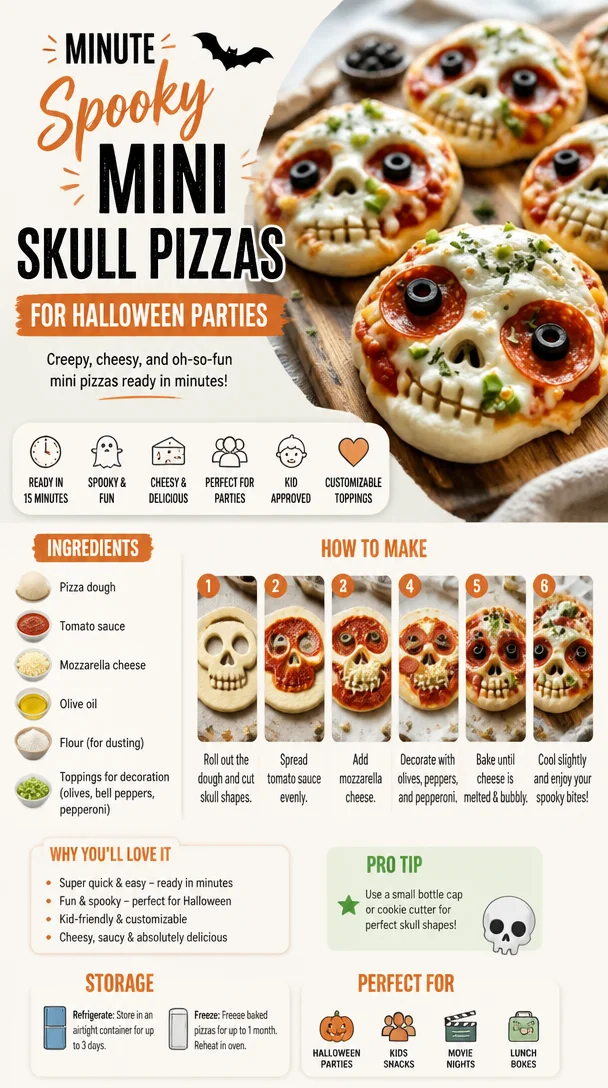
Minute Spooky Mini Skull Pizzas for Halloween Parties
Mini Skull Pizzas: A Spooky Treat for Every Occasion
Welcome to my kitchen! Today, I’m super excited to share a fun and festively whimsical recipe that’s perfect for both Halloween parties and cozy family nights. Yes, we’re diving into the world of Mini Skull Pizzas! Picture this: bite-sized pizza skulls that not only taste amazing but also create an impressive centerpiece for any gathering. These little treats are sure to get everyone in the mood for some spooky fun, and they’re surprisingly easy to whip up—making this a dish that even your little ones can assist with!
Let’s embark on this culinary adventure filled with cheese, toppings, and a bit of creativity. Don’t worry if you feel a little intimidated; my goal is to guide you through the process with joy and excitement. Grab your aprons, and let’s make some delicious skull-shaped pizzas!
A Slice of Nostalgia
When I was a kid, Halloween was one of the highlight events of the year. My family would decorate the house with cobwebs and ghoulish décor while the kitchen filled with the irresistible aroma of pumpkin spice and baking treats. One year, my mom decided to make a special Halloween dinner, and that’s when I first tasted her quirky mini pizza creations. She would shape them into little pumpkins and ghosts, but my favorite was always her skull pizza.
The memory of gathering around the table with my family, laughing and enjoying each other’s company over these cheeky, spooky dinners has stuck with me. Seeing my siblings and friends’ faces light up when they tasted those mini pizzas was magical! From that moment on, I knew that bringing fun into food could create unforgettable memories. Fast forward to many years later, and I’m carrying on that Halloween tradition, but with my twist—these Mini Skull Pizzas!
Ingredients List
To make your Mini Skull Pizzas, you’ll need a handful of simple ingredients. Here’s what you’ll need:
-
Pizza Dough: You can use store-bought dough or make your own from scratch. If you’re short on time, a pre-made dough works beautifully!
-
Pizza Sauce: Choose your favorite brand or make a homemade version with crushed tomatoes, garlic, and herbs. Just be sure it’s packed with flavor!
-
Cheese: Mozzarella is the classic choice, but feel free to mix it up with provolone or gouda for a smoky flavor. Grated cheese melts easier than slices, so keep that in mind!
-
Toppings: Think pepperoni, olives, bell peppers, or any other favorite toppings. Use cut-out shapes for an extra spooky effect! I love using mini pepperonis for eyes.
-
Olive Oil: A touch of olive oil enhances the flavor and ensures a crispy crust. You can use flavored oil (like garlic-infused) for an extra kick!
-
Spices: Italian seasoning (oregano, basil, and thyme) and a pinch of red pepper flakes add flavor depth. You can also sprinkle garlic powder or onion powder for more taste!
-
Flour: For dusting your surface when rolling out the dough. Any all-purpose flour will do the trick.
Choosing quality ingredients is key to the flavor profile of your Mini Skull Pizzas. Don’t hesitate to get creative! If you’re feeling adventurous, try using unique ingredients like arugula, sun-dried tomatoes, or even a drizzle of pesto before serving.
Step-by-Step Instructions
Ready to dive into the kitchen? Let’s make some skull-tacular pizzas together! Here’s a detailed step-by-step guide to whip up these delightful treats:
-
Preheat your Oven:
Preheat your oven to 425°F (220°C). This will ensure your pizzas bake beautifully and get that golden, crispy crust you’ll love! -
Prepare the Dough:
If using store-bought dough, let it sit at room temperature for about 30 minutes—this will make it easier to roll out. If you’re making it from scratch, follow your favorite recipe until it reaches that perfect doughy texture. -
Roll Out the Dough:
Dust a clean surface with a bit of flour. Roll out the dough until it’s about ¼ inch thick. Use a pizza cutter or sharp knife to cut the rolled dough into skull shapes. Don’t worry about making them perfect; the fun is in their quirky designs! -
Shape the Faces:
Use a small knife to carve out eyes, a nose, and a spooky grin on each skull shape. If the dough tears a little, that’s just character; embrace the imperfections! -
Transfer to a Baking Sheet:
Line a baking sheet with parchment paper. Carefully transfer the shaped skulls onto the sheet, giving them enough space to spread out. -
Add Sauce and Cheese:
Spread a small amount of pizza sauce on each skull, leaving the edges free for that lovely crust. Then, sprinkle a generous handful of mozzarella cheese over the sauce. Don’t skimp—c’mon, who doesn’t love extra cheese? -
Toppings Galore:
Now’s the time to play! Add your preferred toppings. A mini pepperoni on each “eye” adds a fun little detail. You can even use black olives for spooky eyeballs! -
Drizzle with Olive Oil:
A light drizzle of olive oil on top of the assembled skull pizzas will help to achieve that crispy finish. -
Bake Away:
Pop the baking sheet into the preheated oven and let the pizzas bake for about 10-12 minutes, or until the cheese is bubbly and deliciously golden. -
Cool and Serve:
Once baked, remove the mini skull pizzas from the oven and let them cool for a few minutes. Serve them warm, and watch the smiles as they crowd around the table!
Serving Suggestions
These Mini Skull Pizzas are not only fabulous on their own, but there are fun ways to serve them as well. Try arranging them on a large platter, garnished with a sprinkle of fresh parsley or basil. You could serve them alongside a vibrant salad or a dipping sauce like ranch or marinara to make it even more enjoyable. Another creative idea is to use a Halloween-themed tablecloth or props to create a festive atmosphere!
Recipe Variations
Get ready to get creative! Here are a few twists you can try with your Mini Skull Pizzas:
-
Veggie Delight: Top your skulls with a mix of cooked spinach, mushrooms, and artichoke hearts for a fun and healthy option.
-
Sweet Treat: For a dessert version, use sweet dough and fill the skulls with chocolate chips or Nutella before baking. Sweet and spooky!
-
Spicy Kick: Add jalapeños, spicy sausage, or sriracha to the sauce to give it that extra heat for those who love a kick.
-
Plant-Based Option: Use vegan cheese and skip the meat toppings to cater to your vegan friends. They’ll still love the skull shape!
-
Breakfast Mini Skull Pizzas: Swap the toppings for scrambled eggs, cheese, and veggies for a breakfast twist!
Chef’s Notes
As with any recipe, the beauty lies in experimentation. One year, I discovered that a splash of balsamic glaze can add an amazing depth of flavor when drizzled over these skulls post-baking. It’s become a go-to finishing touch! I’ve also started to play around with various cheeses—such as gouda or cheddar—where each adds its own unique touch to the flavor profile.
Honestly, every time I make these Mini Skull Pizzas, I’m reminded of the joy of cooking and the memories that food creates. It’s about bringing people together and celebrating good times, no matter how silly they might seem!
FAQs and Troubleshooting
1. My skull pizzas turned out too doughy inside. What went wrong?
This usually happens if the dough is too thick or the oven temperature is too low. Make sure your dough is rolled to ¼ inch thick at most, and keep an eye on your oven temperature—every oven is different!
2. How can I keep the crust crispy?
A drizzle of olive oil before baking can work wonders! Also, baking on a preheated pizza stone or tray helps to create a beautiful, crispy crust.
3. Can I freeze these Mini Skull Pizzas?
Absolutely! You can freeze the shaped, unbaked skulls and add sauce and toppings right before baking. Just add a bit of time to the baking process if cooking from frozen—easy peasy!
4. What if I don’t have skull-shaped cookie cutters?
No worries! Use any cookie cutter shape you like or just freehand the shape using a knife. Cooking is all about creativity!
Nutritional Info
While the nutritional information can vary based on the ingredients selected, a rough estimate per Mini Skull Pizza is:
- Calories: 180
- Protein: 7g
- Carbs: 22g
- Fat: 8g
By incorporating more veggies or using whole wheat dough, you can easily adjust the nutritional profile of your Mini Skull Pizzas!
And there you have it! A fun, flavorful recipe that’s not only delicious but also brings a burst of joy to any gathering. Remember, the best part of cooking is sharing; so gather your loved ones, get into the holiday spirit, and enjoy every cheesy bite of these Mini Skull Pizzas. Happy cooking!
Print
Mini Skull Pizzas
- Total Time: 27 minutes
- Yield: 12 servings
- Diet: Vegetarian
Description
Fun and spooky mini skull-shaped pizzas perfect for Halloween parties or family nights.
Ingredients
- Pizza Dough
- Pizza Sauce
- Cheese (Mozzarella recommended)
- Toppings (pepperoni, olives, bell peppers, etc.)
- Olive Oil
- Spices (Italian seasoning, garlic powder, red pepper flakes)
- Flour (for dusting)
Instructions
- Preheat your oven to 425°F (220°C).
- Prepare the dough by letting it sit at room temperature for about 30 minutes.
- Roll out the dough to about ¼ inch thick and cut into skull shapes.
- Shape the faces using a small knife.
- Transfer the skulls to a baking sheet lined with parchment paper.
- Add a small amount of pizza sauce on each skull.
- Sprinkle mozzarella cheese over the sauce.
- Add your preferred toppings for decoration.
- Drizzle with olive oil for a crispy finish.
- Bake for about 10-12 minutes until golden.
- Cool for a few minutes before serving.
Notes
Experiment with unique toppings or sauces to create diverse flavors. These pizzas can also be made sweet for a dessert version or used for breakfast.
- Prep Time: 15 minutes
- Cook Time: 12 minutes
- Category: Appetizer
- Method: Baking
- Cuisine: American
Nutrition
- Serving Size: 1 pizza
- Calories: 180
- Sugar: 2g
- Sodium: 400mg
- Fat: 8g
- Saturated Fat: 3g
- Unsaturated Fat: 4g
- Trans Fat: 0g
- Carbohydrates: 22g
- Fiber: 1g
- Protein: 7g
- Cholesterol: 15mg
Keywords: skull pizzas, Halloween recipe, spooky appetizers, mini pizzas, fun food
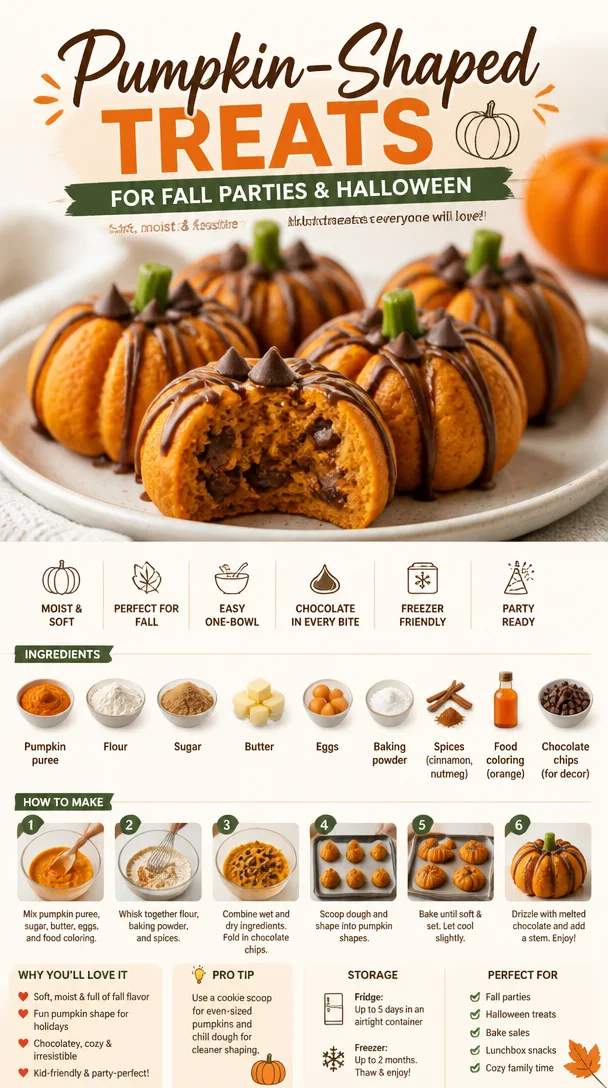
Pumpkin-Shaped Treats for Fall Parties & Halloween
Pumpkin-Shaped Food Ideas: A Fun and Festive Cooking Adventure!
Welcome to my cozy corner of the kitchen, fellow food lovers! I’m Olivia Bennett, your go-to culinary guide, and today, we’re diving into a delightful and playful adventure with pumpkin-shaped food ideas. As the leaves start to turn and the air gets a little crisper, there’s something undeniably magical about creating dishes that celebrate the spirit of fall. From adorable pumpkin-shaped cakes to savory delights that look like the iconic gourd, this post will inspire you to get creative in the kitchen.
Imagine the laughter that fills your home as you and your loved ones gather around a table adorned with charming, pumpkin-shaped treats. Whether it’s for Halloween, Thanksgiving, or simply to add a little whimsy to a mundane weekday, these recipes are perfect for making every meal feel special. So, roll up your sleeves, grab that trusty apron, and let’s whip up some festive fun!
A Fond Memory in the Kitchen
I can’t help but reminisce about the first time I made pumpkin-shaped cookies. I was only eight years old, shoulders barely peeking over the counter as I stood beside my grandmother, who was a fabulous baker. The smell of warm spices filled our tiny kitchen as we mixed the dough together, her hands guiding mine to create the perfect pumpkin shapes. We used a cookie cutter, and soon enough, the entire kitchen was filled with laughter and flour dust!
After we baked and iced those little treats, my grandmother and I decorated each one with tiny chocolate chips for eyes and a green frosting stem. They were absolutely charming—tiny orange pumpkins sitting proudly on our kitchen countertop, just waiting to be devoured. That moment sparked my love for cooking and baking, teaching me that food is not just about flavor but also about bringing people together. Each pumpkin-shaped creation holds a piece of nostalgia, and I can’t wait to share that joy with you!
Ingredients List
Let’s gather our ingredients! Below are the essentials you’ll need to make delicious pumpkin-shaped treats, whether they’re cookies, cakes, or savory snacks:
-
All-purpose flour: The backbone of many recipes, providing structure. If you’re gluten-free, substitute with a gluten-free blend.
-
Pumpkin puree: This gives moisture and flavor. Canned pumpkin works well, but fresh roasted pumpkin is even better!
-
Brown sugar: For warmth and depth of sweetness. You can swap it for coconut sugar for a hint of caramel flavor.
-
Granulated sugar: To balance the richness. Feel free to use a sugar substitute for a lower-calorie version.
-
Baking powder: This leavening agent will help your treats rise and become fluffy. Baking soda can be used, but adjust the acids accordingly.
-
Pumpkin pie spice: A delightful blend that typically includes cinnamon, nutmeg, and ginger. You can make your own if you’re feeling adventurous!
-
Eggs: They bind everything together. If you need a vegan option, you can use flax eggs or applesauce!
-
Butter or coconut oil: For richness and flavor. Coconut oil is an excellent alternative for a dairy-free version.
-
Vanilla extract: A must for flavor; always go for pure extract if you can find it!
-
Chocolate chips: Optional, but highly recommended for decoration or added sweetness. You can use dark chocolate or white chocolate for a different flavor.
With these ingredients in hand, you’re on your way to creating pumpkin-shaped culinary wonders.
Step-by-Step Instructions
Now for the exciting part—let’s get cooking! Follow the steps below to create your pumpkin-shaped treats.
-
Preheat Your Oven: Set your oven to 350°F (175°C) so it’s ready for baking.
Chef Tip: Make sure your oven is fully preheated to ensure even baking!
-
Mix Dry Ingredients: In a large bowl, whisk together 2 cups of all-purpose flour, 1 teaspoon of baking powder, and 2 teaspoons of pumpkin pie spice.
Chef Hack: Sifting the flour can help reduce lumps and give your treats a lighter texture!
-
Combine Wet Ingredients: In another bowl, cream together 1 cup of softened butter (or coconut oil) and 1 cup of brown sugar and ½ cup of granulated sugar until fluffy. Add 1 cup of pumpkin puree and 2 eggs (or flax eggs), along with 2 teaspoons of vanilla extract.
Chef Insight: Don’t skip creaming the butter and sugars; it creates air pockets that make your treats lighter!
-
Blend It Together: Gradually add the dry ingredients to the wet mixture, mixing until just combined. If you’re including chocolate chips, fold them in at this point.
Tip: Overmixing can lead to tough cookies, so mix gently!
-
Shape Your Pumpkins: Scoop portions of dough and roll them into balls. Gently flatten the tops a bit to achieve more of a pumpkin shape, then use your hands to make slight indentations to mimic pumpkin ridges.
Chef’s Secret: A fork can help you create those cute lines!
-
Bake: Place your pumpkin shapes on a parchment-lined baking sheet and bake for about 10-12 minutes, or until the edges are lightly golden.
Remember: They’ll continue to cook a bit from residual heat after you take them out, so don’t overbake!
-
Cool and Decorate: Allow them to cool completely on a wire rack before decorating with frosting or more chocolate chips to create stems and eyes.
Tip: For frosting, a simple cream cheese frosting works fantastically, and you can tint it green for added fun!
Serving Suggestions
Once your adorable pumpkin-shaped treats are out of the oven and decorated, it’s time for presentation! Try arranging them on a rustic wooden platter for a cozy vibe. You can even add some leaves or mini pumpkins around for that extra autumnal touch. These treats shine brightly on dessert tables or as charming gifts for friends—it’s truly all about the presentation!
Recipe Variations
Now that you have the basic recipe down, let’s play! Here are a few creative twists you might consider for your pumpkin-shaped delights:
-
Pumpkin Spice and Everything Nice: Add chopped nuts or dried cranberries for extra texture and flavor.
-
Chocolate Pumpkin Delight: Substitute half of the flour with cocoa for a chocolaty version and frost with chocolate ganache.
-
Savory Spin: Use the same shaping technique but make a savory blend with cheese, herbs, and spices for pumpkin-shaped cheese puffs.
-
Gluten-Free Fun: Use a gluten-free flour blend for your pumpkin treats; they’ll be just as fun and delicious!
-
Vegan Version: Replace the eggs and butter with flax eggs and plant-based butter for a plant-friendly option.
Chef’s Notes
This pumpkin-shaped recipe has become a staple in my kitchen, especially during the fall! It’s incredible to see how a simple recipe can evolve over time. I recall experimenting with it at my son’s kindergarten Halloween party, and the kids loved them so much I felt like a superhero for the day!
Another funny kitchen story: One time, I got a little too into the spirit and tried to decorate them with a pumpkin carving kit. Let’s just say, I learned that cookie dough doesn’t hold up under a carving knife! Nevertheless, it’s these quirky kitchen moments that remind us to enjoy the process and not take ourselves too seriously.
FAQs and Troubleshooting
-
Why are my cookies spreading too much?
- This might be due to excess butter or not chilling the dough. Try refrigerating your cookie dough for 30 minutes before baking!
-
What if my cookies are too dry?
- Make sure you’re measuring your flour correctly—not too packed! You can also try adding a tablespoon of milk or additional pumpkin puree to moisten the dough.
-
How can I decorate them without frosting?
- You can use melted chocolate or simply dust them with powdered sugar for a lovely finish. A sprinkle of cinnamon sugar is a nice touch too!
-
Can I make the dough ahead of time?
- Definitely! You can prepare the dough, shape it into a ball, wrap it in plastic, and store it in the fridge for up to 3 days or freeze it for up to a month.
Nutritional Info
Nutritional values vary based on specific ingredients and portion sizes, but a typical pumpkin cookie (without icing) is around 150 calories, 7 grams of fat, and 2 grams of protein. Adjust based on your modifications!
With these pumpkin-shaped food ideas, you’re all set to add a touch of whimsy and a bucket full of flavor to your fall festivities. Cooking should always be about fun and creativity, and I hope these recipes inspire you to gather your loved ones and create lasting memories in your kitchen. Happy cooking, and may your pumpkins always be delicious! 🍂🎃
Print
Pumpkin-Shaped Treats
- Total Time: 32 minutes
- Yield: 24 servings 1x
- Diet: Vegetarian
Description
Delicious pumpkin-shaped cookies and treats perfect for fall festivities, bringing cheerful whimsy to your table.
Ingredients
- 2 cups all-purpose flour
- 1 teaspoon baking powder
- 2 teaspoons pumpkin pie spice
- 1 cup softened butter (or coconut oil)
- 1 cup brown sugar
- ½ cup granulated sugar
- 1 cup pumpkin puree
- 2 eggs (or flax eggs)
- 2 teaspoons vanilla extract
- Optional: chocolate chips for decoration
Instructions
- Preheat your oven to 350°F (175°C).
- Mix dry ingredients in a bowl.
- Combine wet ingredients in another bowl.
- Blend the wet and dry ingredients together until just combined.
- Shape the dough into balls and flatten slightly.
- Bake for 10-12 minutes or until edges are golden.
- Cool and decorate as desired.
Notes
Use a fork to create the ridges of the pumpkins. Allow the cookies to cool completely before decorating.
- Prep Time: 20 minutes
- Cook Time: 12 minutes
- Category: Dessert
- Method: Baking
- Cuisine: American
Nutrition
- Serving Size: 1 cookie
- Calories: 150
- Sugar: 15g
- Sodium: 150mg
- Fat: 7g
- Saturated Fat: 4g
- Unsaturated Fat: 2g
- Trans Fat: 0g
- Carbohydrates: 20g
- Fiber: 1g
- Protein: 2g
- Cholesterol: 30mg
Keywords: pumpkin, cookies, fall treats, baking, festive desserts
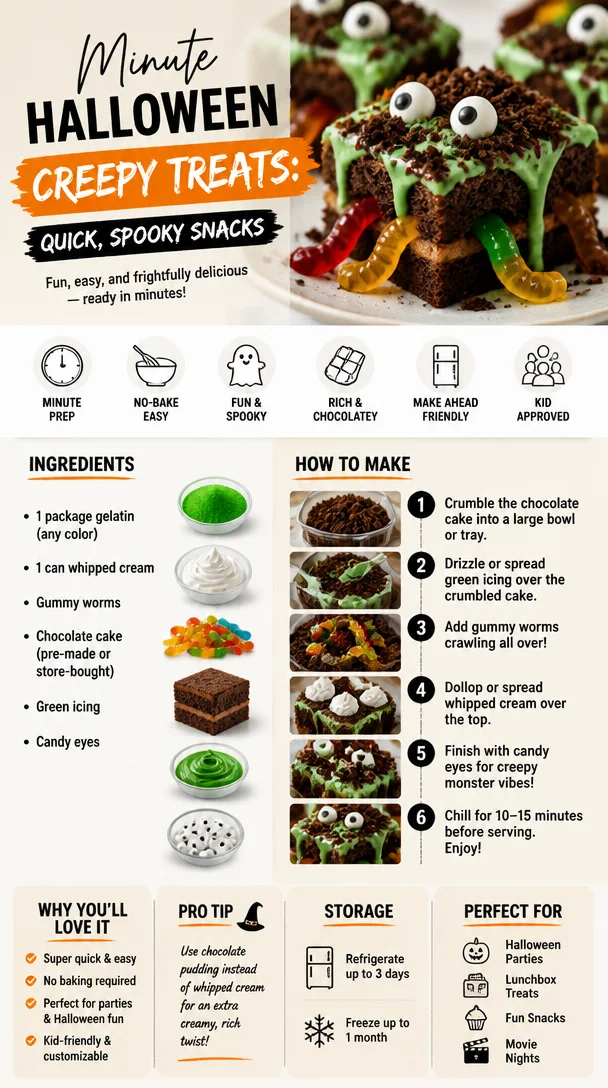
Minute Halloween Creepy Treats: Quick, Spooky Snacks
Halloween Creepy Treats: Spooky Recipes to Delight and Fright
Hello, fellow food adventurers! It’s that spine-tingling time of year again — Halloween is creeping up on us, and you know what that means: time to roll up our sleeves and whip up some deliciously eerie treats! If you’re as excited about Halloween as I am, you’ve landed in the right spot! This blog post is packed with whimsical ideas to bring fun frights to your kitchen and create lasting memories with your friends and family.
There’s something magical about this time of year. The air is crisp, the leaves are turning, and, let’s be honest, who doesn’t love a good excuse to get a little spooky in the kitchen? From ghostly cupcakes to monster brownies, Halloween treats can be as creepy or cute as you want. They spark joy and creativity, and, most importantly, they can bring everyone together in the kitchen for a fun-filled afternoon!
I remember the thrill of decorating Halloween treats with my family every year—my mom would bring home a collection of icing, sprinkles, and all the candies we could dream of. We would gather around the kitchen table, inspired by the wild ideas racing through our minds, creating our own versions of Halloween masterpieces (or masterpieces gone delightfully wrong!). That collaboration wasn’t just about food; it was about laughter, creativity, and of course, a sprinkle of friendly competition on who could come up with the scariest treat.
So, are you ready to dive into some Halloween creepy treat fun? Whether you’re hosting a haunted house party, a school gathering, or just looking to make something fun at home, I’ve got you covered with charmingly creepy treats that will steal the show. Let’s get to it!
Personal Story
One of my fondest Halloween memories dates back to when I was about ten years old, standing next to my best friend Lucy in her kitchen. It was tradition to make themed treats for our friends and families, and we decided to go all out. That year, we baked cookies, but not just any cookies — we made “witch’s fingers.” These weren’t your average Halloween treat; they were almond-infused delights that we decorated with green icing and slivered almonds for a truly ghoulish effect.
I can still hear our giggles as we shaped the dough into long digits, carefully placing the “fingernails” on each cookie. The looks on our family members’ faces as they hesitantly took a bite were priceless — half amused, half horrified! But the best part? We tricked a few of them into believing we had actually baked witch’s fingers. It became the highlight of our Halloween celebrations for years to come, and I still make those witch’s fingers today, each time with new imaginative flair! I invite you to create your own ooey-gooey memories this Halloween, and what better way to kick things off than by baking some deliciously creepy treats?
Ingredients
Here are all the ghoulish goodies you’ll need for your Halloween treats:
-
Sugar Cookies (or store-bought cookie dough):
Great as a base for any Halloween treat. Use your favorite sugar cookie recipe or a pre-made dough to save time. If you’re looking for a gluten-free option, many stores carry gluten-free cookie dough! -
Green Icing:
Use ready-made frosting or make your own with powdered sugar, milk, and a few drops of green food coloring. This will add a whimsical touch to your treats. If green isn’t your thing, how about blood-red icing for a vampire twist? -
Almonds (slivered and whole):
Slivered almonds work perfectly for “fingernails.” But if you’re nut-free, try using pumpkin seeds for a similarly eerie effect! -
Gummy Worms:
Perfect for adding a squishy bite to your treats or creating creepy scenes. Any candy store should have them, or you can find them at most supermarkets. -
Chocolate Chips:
These can be used as eyes for your treats — mix dark and white chocolate for added effect. Looking for dairy-free options? Look for vegan chocolate chips in your local grocery store. -
Marshmallows:
Use them to create marshmallow ghosts or fill in empty spaces of creativity. They are versatile and can be cut to a variety of shapes. For a healthier version, you could use dried banana chips shaped like ghostly figures! -
Sprinkles (various colors):
Grab spooky sprinkles to scatter on top of your treats. It adds color and fun! Keep an eye out for Halloween-themed mixes with tiny bats, pumpkins, and ghosts.
This ingredient list might seem overwhelming, but trust me, the fun lies in using your creativity to mix, match, and improvise!
Step-by-Step Instructions
Now, let’s get our hands dusty and dive into the cooking process! Here’s how to whip up your Halloween creepy treats:
-
Preheat Your Oven:
Begin by preheating your oven to 350°F (175°C). It’s essential to have your oven warmed up for an even baking! -
Prepare the Cookie Dough:
If you’re using homemade cookie dough, roll it out onto a floured surface to about ¼ inch thickness. If you are using store-bought, place it between two sheets of parchment paper and roll it out. This prevents sticking and makes for easier cleanup! -
Cut Out the Cookie Shapes:
Use a finger-shaped cookie cutter (or simply shape them by hand) to cut out the dough. If you’re up for Halloween-inspired shapes — think pumpkins, ghosts, and bats— the options are endless! Don’t forget to place those on a lined baking sheet. -
Bake the Cookies:
Slide those bad boys into the oven and let them bake for about 10-12 minutes, or until the edges are lightly golden. Watch them closely; you don’t want to overdo it! -
Cool the Cookies:
Allow the cookies to cool on a wire rack for about 5–10 minutes before transferring them to a cooling rack. This will prevent them from becoming soggy while decorating. -
Decorate, Decorate, Decorate!
Now for the fun part! Use your green icing to create a “creepy” base on top of the cooled cookies, carefully spreading it or piping it out. For the witch’s fingers, place slivered almonds at the end of each cookie to create the look of nails. Add chocolate chips as “eyes” if you’re feeling whimsical. You can even use edible markers to draw on features! -
Assemble the Creepy Scene:
Get creative! Use gummy worms and sprinkles to create creepy decorations around your cookies. Position gummy worms like they’re crawling on the cookies or hide them underneath for a surprise! -
Present Your Spooky Treats:
Arrange your creepy concoctions on a decorated platter to accentuate the Halloween theme. Maybe even add some fake cobwebs or plastic spiders for that extra touch of eeriness!
And there you have it, my friends! A delightful set of Halloween creepy treats that will thrill your guests and spark creative conversations.
Serving Suggestions
To create an unforgettable experience, serve your creepy treats on a spooky-themed platter adorned with seasonal decorations like mini pumpkins and faux cobwebs. Pair them with a spooky punch made from soda and gummy worms for a complete Halloween vibe! You can even challenge your guests to guess what they’re eating while they nibble on these delectable delights.
Recipe Variations
-
Vampire Bite Cupcakes: Top chocolate cupcakes with red frosting and place a gummy fang hanging off the edge for that extra bite!
-
Monster Brownies: Use brownie mix and decorate with chocolate frosting, candy eyes, and sprinkles to create wacky monster faces.
-
Spooky Rice Krispie Treats: Form Rice Krispie treats into ghost shapes and use chocolate chips for eyes, perfect for a no-bake snack!
-
Ghostly Meringues: Whip egg whites and sugar to shape into meringue ghosts, adding chocolate chip eyes for a sweet and spooky surprise!
-
Pumpkin Spice Cookies: Mix pumpkin puree and spices into your sugar cookie dough for a seasonal twist; they’ll taste as good as they look!
Chef’s Notes
As I mentioned earlier, my love for Halloween treats stems from those childhood baking sessions that I cherished. Each year brings about experimentation with flavors, ingredients, and of course, a sprinkle of chaos! Tradition may hold a special place in our hearts, but creativity is key! I’ve learned that sometimes the messiest kitchens produce the most delicious results. Remember, it’s all about having fun, so don’t stress over perfection — embrace the spooky mess, and most importantly, enjoy the time spent creating memories with loved ones!
FAQs and Troubleshooting
-
Why are my cookies spreading too much?
Ensure that your butter isn’t too warm when mixing; try chilling the cookie dough for about 30 minutes before baking to maintain their shape! -
How can I make my icing stiffer?
If your icing is too runny, gradually add more powdered sugar until you achieve the desired consistency. -
What if I can’t find slivered almonds?
No worries! Pumpkin seeds or even cut-up pieces of dried fruit can work as perfect substitutes for nail designs. -
Can I freeze these treats?
Absolutely! Just make sure to wrap them tightly in an airtight container or freeze them without icing. You can ice them once thawed for best freshness!
Nutritional Info
While it’s crucial to indulge on Halloween, being mindful of ingredients is also important! If you want, you can consider the following general breakdown (this will vary depending on portion sizes and ingredients used):
- Calories: Approximately 150-200 calories per cookie (varies by size and toppings).
- Fat: Around 5-8g (dependent on butter or margarine used).
- Carbohydrates: Roughly 20-25g, with an emphasis on sugar.
- Protein: About 1-2g (can increase if adding nuts).
- Fiber: Approximately 0.5g unless using whole grains for the cookies.
With these tips and recipes in hand, you’re all set to create your own spooky Halloween treats! Let the creativity and fun ignite the spirit of the season. So turn up the tunes, grab your apron, and let’s bake something together that will be the highlight of any Halloween festivity! Happy Halloween, my fellow foodies! 🎃
Print
Halloween Creepy Treats
- Total Time: 27 minutes
- Yield: 12 servings
- Diet: Vegetarian
Description
Delight in making spooky treats for Halloween with these creative recipes that transform traditional cookies into ghoulish masterpieces.
Ingredients
- Sugar Cookies (or store-bought cookie dough)
- Green Icing
- Almonds (slivered and whole)
- Gummy Worms
- Chocolate Chips
- Marshmallows
- Sprinkles (various colors)
Instructions
- Preheat your oven to 350°F (175°C).
- Prepare the cookie dough, rolling it out to about ¼ inch thickness.
- Cut out the cookie shapes using a finger-shaped cookie cutter or by hand.
- Bake the cookies for about 10-12 minutes, or until the edges are lightly golden.
- Cool the cookies on a wire rack for 5–10 minutes.
- Decorate the cooled cookies with green icing and slivered almonds to create a spooky effect.
- Assemble gummy worms and sprinkles around your cookies for creative touches.
- Present your spooky treats on a themed platter for an extra frightful display.
Notes
Embrace creativity when decorating your treats. Consider using alternative ingredients for allergies or personal preferences.
- Prep Time: 15 minutes
- Cook Time: 12 minutes
- Category: Dessert
- Method: Baking
- Cuisine: American
Nutrition
- Serving Size: 1 cookie
- Calories: 175
- Sugar: 12g
- Sodium: 100mg
- Fat: 7g
- Saturated Fat: 3g
- Unsaturated Fat: 4g
- Trans Fat: 0g
- Carbohydrates: 25g
- Fiber: 1g
- Protein: 2g
- Cholesterol: 15mg
Keywords: Halloween treats, spooky recipes, creepy cookies, festive baking, fun desserts
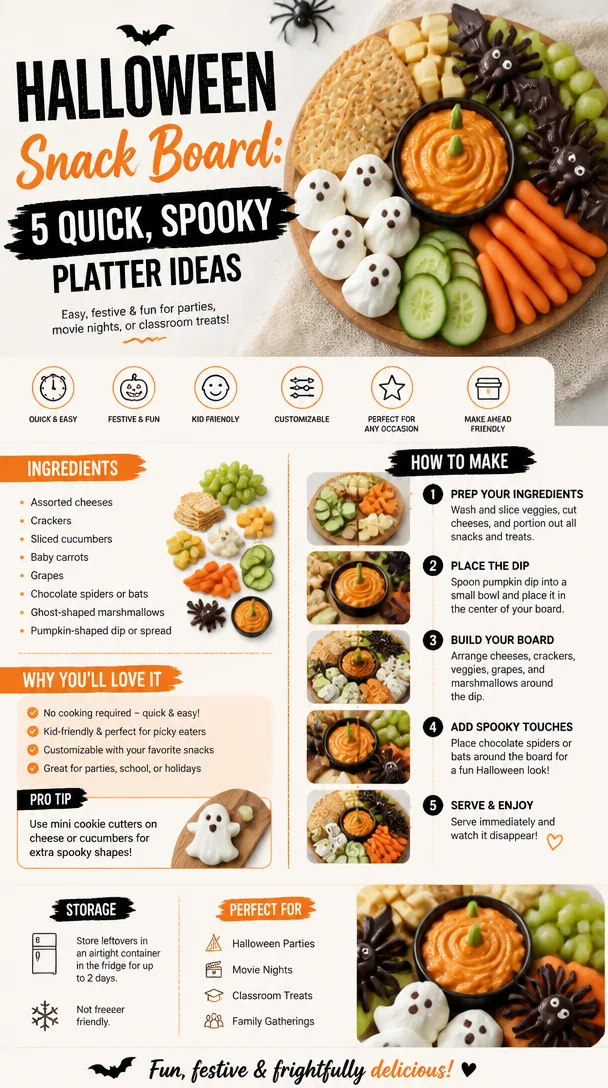
Halloween Snack Board: 5 Quick, Spooky Platter Ideas
Creepy-Cool Halloween Snack Board: A Spooktacular Feast for the Eyes and Taste Buds
Welcome to my kitchen! As the leaves start to tumble and the air turns crisp, you can bet that I’m brewing up something festive and fun to celebrate the season. Halloween is just around the corner, and what better way to celebrate than with a Halloween Snack Board that’s not only delicious but also downright delightful to look at? Whether you’re hosting a haunted gathering or simply looking for a way to enjoy October’s eerie charm, this snack board is the perfect centerpiece.
Imagine this: You’ve invited a few friends over for a spooky movie marathon, or perhaps the kids are gearing up for trick-or-treating. The excitement fills the air, and your kitchen is alive with laughter and chatter. Suddenly, you unveil a beautifully crafted Halloween Snack Board adorned with vibrant colors, playful shapes, and a mix of flavors that make everyone’s taste buds tingle with anticipation. It’s all about creating a delightful experience that gathers people together — and that’s what this festive board does so perfectly!
The joy of a snack board lies in its endless possibilities. You can use your favorite flavors, add seasonal touches, and of course, make it as spooky (or as sweet) as your heart desires. I’ll guide you through the ins and outs of assembling a Halloween Snack Board that will impress your guests and put you at the center of the fun. Let’s unleash your creativity and embrace the flavors of fall together, shall we?
A Bite of Nostalgia
When I think of Halloween, I can’t help but reminisce about my childhood. It was always such an enchanting time of the year. Dress-up costumes, bobbing for apples, and, of course, being surrounded by a mountain of candy were highlights. But it was the Halloween parties that stood out the most. My mom would whip up a monstrous spread of spooky snacks that looked as good as they tasted. I remember one year, she created a “witch’s brew” punch and shaped her famous cheese ball into a pumpkin, complete with pretzel stems.
That pumpkin cheese ball has always stuck with me, a reminder of the joy and laughter that fills the kitchen during this festive season. Years later, I found myself hosting my own Halloween parties, inspired by those cherished memories. Now, I take all of those fond flavors and whimsical designs to create snack boards — gatherings that bridge my past with my present. Each board is a canvas of horror and fun, sparking joy and nostalgia in every bite. So, let’s take a trip down memory lane and create a Halloween Snack Board that will enchant everyone who sees it!
Ingredients
To create this spooky Halloween Snack Board, you’ll need a variety of ingredients that not only provide a burst of flavors but also allow for creativity in presentation. Here’s a list of key components you’ll want to gather:
-
Cheddar Cheese (or “Pumpkin Cheese Ball”): The star of any snack board! You can use classic sharp cheddar for its bite or swap in a creamier cheese like gouda for smoothness. If you want to make it festive, mold your cheese into a pumpkin shape using a cheese ball recipe and decorate it with pretzels.
-
Salami (or any cured meats): A savory element is essential! Go for sliced salami or prosciutto. For a spicy kick, consider adding some spicy chorizo. These add a nice contrast to the cheeses.
-
Veggies (carrot sticks, cucumber slices, bell pepper ghosts): Fresh veggies provide crunch and color. You can cut cucumbers into spooky shapes with cookie cutters, and carrot sticks add a pop of color! Bell peppers can be carved like little ghosts too.
-
Fruit (grapes, figs, or apple slices): Gingerly sweet additions like grapes or figs bring balance to your snack board. You can even apple slices dotted with peanut butter to add charm!
-
Nuts (almonds, walnuts, pumpkin seeds): Nuts add a satisfying crunch and are great for nibbling. Pumpkin seeds are especially fitting for Halloween!
-
Dips (hummus, guacamole, or pumpkin dip): Dips are a must! Choose something herby and delicious like pesto hummus or create a festive pumpkin dip with cream cheese for a sweet twist.
-
Crackers and breadsticks: For serving with dips and cheese. Get creative with spooky-shaped crackers or even offer breadsticks dressed up as broomsticks!
-
Sweets (candy corn, chocolate spiders, or gummy worms): You can’t forget the sweets! They add whimsy and a touch of fun. Get creative with gummy worms trailing down like little monsters or chocolate spiders hiding among the cheese!
Creating an invitation with these ingredients allows you to mix and match according to your preferences and audience. Feel free to substitute any items you think might be more suited to the taste of your guests!
Step-by-Step Instructions
Now that you’ve got your ingredients gathered, let’s get down to the exciting part: assembling your Halloween Snack Board! Follow these steps for a frightfully fun display:
-
Choose a Board: A large wooden cutting board or a slate platter works beautifully as your base. You want something that can showcase your delicious spread, while still allowing for creativity in arrangement. If you don’t have a dedicated board, a large platter will also do!
-
Start with Cheese and Meats: Begin by placing your cheese on the board. If you’ve shaped your cheese into a pumpkin, place it front and center! For sliced cheese, arrange the slices in a corner or fan them out for an appealing display. Next, rustic fold your salami or prosciutto and add it nearby. Balance is key—try to have it on opposite sides to let the eye travel across the board.
-
Add Veggies: Next, fill in the spaces with your colorful veggies. Place carrot sticks standing up like spooky trees, and scatter cucumber rounds nearby. Don’t forget to include those bell pepper ghosts! Their varying colors will brighten up the board beautifully.
-
Create Clusters with Fruits and Nuts: Time to add sweet and salty! Let’s create little clusters of fruits and nuts to fill those gaps. Arrange grapes in a little pile near the veggies and sprinkle nuts in a couple of spots. This gives the board more texture and keeps everything from looking too organized.
-
Dips and Crackers: Set bowls of dips on the board, spacing them out for easy access. Now it’s time to add your crackers and breadsticks. Arrange them around your dips and cheese to invite people in to munch away!
-
Finish with Sweets: Last but not least, finish your board with those delightful sweets. Scatter candy corn and creepy gummy worms across the board, tucking them into the nooks and crannies. Maybe even dot some chocolate spiders around for an extra fright!
-
Add Decorative Touches: If you want to make it even more festive, add little decorative elements like pumpkin spice shakers or a tiny spooky scarecrow. These little touches help elevate your board from merely delicious to truly thematic!
And voila! You have yourself a visually stunning and delicious Halloween Snack Board. Don’t forget to step back and admire your artwork before your guests dig in!
Serving Suggestions
When it’s time to serve your Halloween Snack Board, make it all about the experience! Encourage your guests to gather around the board, inviting them to mix and match their own bites. You could even provide small plates or napkins and some festive toothpicks for easy snacking. I like to let everyone get creative, layering their favorite ingredients into delicious bites that represent the flavors they crave.
Remember, this board is a show-stopper. Keep it at the center of your dining room table or coffee table while the laughter and chatter flow, creating an inviting atmosphere. It’s the perfect way to keep your guests munching throughout the night!
Recipe Variations
While the classic Halloween Snack Board has its charm, you can switch things up with these variations:
-
Spooky Charcuterie: Amp up your meats with different charcuterie options and complement with gourmet cheeses and preserves. Add figs and olives for an extra gourmet touch.
-
Healthy Harvest Board: Swap the sweets for things like apple slices with almond butter, popcorn drizzled in white chocolate, and a few seasonal veggies with a light dip—perfect for health-conscious guests!
-
Chocolate Lovers’ Board: Create an all-sweets version filled with chocolates, cookies, dried fruits, and marshmallows. Include nut butter for dipping and chocolate snacks such as chocolate-covered pretzels!
-
Mexican Fiesta Board: Incorporate nacho chips, guacamole, salsa, spicy sausage, and jalapeños for a southwest-inspired snack board.
-
Kid-Friendly Fun Board: Make it more wholesome by including slices of cheese shaped like bats, mini sandwiches cut into spooky shapes, and lots of fruit pieces for the little trick-or-treaters!
Chef’s Notes
Over the years, I’ve watched this Halloween Snack Board evolve beautifully. What started with just candy and cheese transformed into a delightful cluster of flavors and experiences, just like the seasons themselves. I remember one Halloween where my only goal was to create a snack board that my nephews would love. I decided to involve them in the process! We baked pumpkin-spice cookies together and decorated them, and suddenly, that Halloween became a cherished memory.
Each year, as I craft my board, I allow myself a bit of whimsy. I like to keep the mood light, encouraging friends and family to get their hands into this creation. The joy is in the collaboration, all of us together, sharing flavors that remind us of simpler times. So, don’t take a snack board too seriously—have some fun with it. The more laughter shared, the better the flavors!
FAQs and Troubleshooting
-
How do I keep the fruits and veggies from browning? To prevent your apple slices from browning, soak them in a solution of water and lemon juice for about 5-10 minutes. This keeps them fresh and crunchy for serving!
-
What if I have dietary restrictions to consider? No problem! Be mindful of your guests’ dietary needs by incorporating gluten-free crackers, nut-free dips, or vegan cheeses. You can customize the board to accommodate everyone.
-
How can I make a larger board for a big gathering? Scale up by adding more of each component — consider a wider variety of cheese and meats, larger bowls for dips, and plenty of colors to keep things inviting and exciting!
-
What if I have leftovers? Snack boards are infinitely flexible. Leftovers can be repurposed into wraps, salads, or even a filling for quesadillas. Store any extra independently in airtight containers to keep them fresh.
Final Thoughts
Creating a Halloween Snack Board is a joyful adventure filled with flavors, creativity, and togetherness. It’s a way to celebrate not only the season but also the people we share it with. I hope you find as much joy in crafting your own version as I do in sharing mine. Don’t forget to embrace the laughter, the memories, and a bit of Halloween magic along the way. Happy snacking! 🎃
I hope you enjoy making your own Halloween Snack Board! It’s a celebration of flavors, togetherness, and the warmth of the season. Happy cooking, and let your creativity run wild!
Print
Creepy-Cool Halloween Snack Board
- Total Time: 20 minutes
- Yield: 8 servings
- Diet: Vegetarian
Description
A festive and delicious Halloween Snack Board perfect for gatherings, featuring a mix of cheeses, meats, veggies, fruits, and delightful sweets.
Ingredients
- Cheddar Cheese (or Pumpkin Cheese Ball)
- Salami (or any cured meats)
- Veggies (carrot sticks, cucumber slices, bell pepper ghosts)
- Fruit (grapes, figs, or apple slices)
- Nuts (almonds, walnuts, pumpkin seeds)
- Dips (hummus, guacamole, or pumpkin dip)
- Crackers and breadsticks
- Sweets (candy corn, chocolate spiders, or gummy worms)
Instructions
- Choose a board: A large wooden cutting board or a slate platter works beautifully.
- Start with cheese and meats: Place your cheese on the board, and add salami or prosciutto nearby.
- Add veggies: Fill the spaces with colorful veggies like carrot sticks and bell pepper ghosts.
- Create clusters with fruits and nuts: Arrange grapes and sprinkle nuts in spots for texture.
- Dips and crackers: Set bowls of dips on the board and arrange crackers around them.
- Finish with sweets: Scatter candy corn and gummy worms for a festive touch.
- Add decorative touches: Enhance the board with seasonal decor for extra flair.
Notes
Encourage guests to mix and match their own bites for a fun experience. Customize ingredients to suit dietary preferences.
- Prep Time: 20 minutes
- Cook Time: 0 minutes
- Category: Appetizer
- Method: No Cooking Required
- Cuisine: American
Nutrition
- Serving Size: 1 plate
- Calories: 400
- Sugar: 15g
- Sodium: 600mg
- Fat: 25g
- Saturated Fat: 10g
- Unsaturated Fat: 12g
- Trans Fat: 0g
- Carbohydrates: 35g
- Fiber: 4g
- Protein: 15g
- Cholesterol: 30mg
Keywords: Halloween, Snack Board, Party Food, Appetizer, Festive Snacks
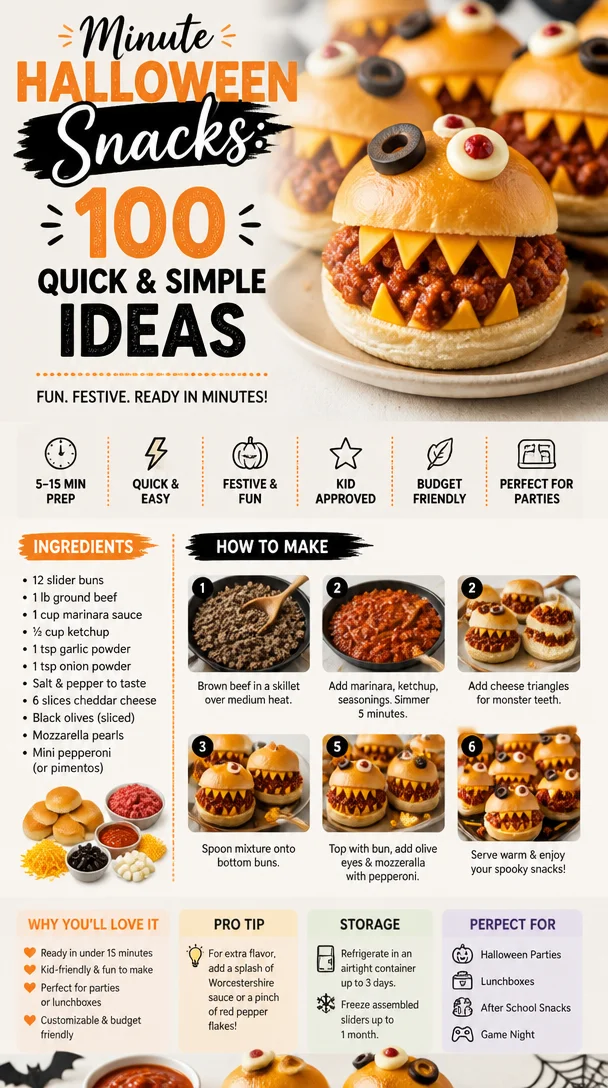
Minute Halloween Snacks: 100 Quick & Simple Ideas
100 Easy Halloween Food Ideas: Spooktacular Treats for All Ages!
Welcome to the most delightful time of the year when everything turns a little spooky and a whole lot festive—Halloween! Whether you’re planning a haunted gathering, a cozy night in, or a lively trick-or-treat, I’m here to help make your Halloween a treat (without the trick!).
I’ve always found that what makes Halloween truly special are the fun and creative foods that brighten the usually dark and chilly celebrations. Halloween isn’t just about frightful costumes—no, no! It’s about gathering around the table, sharing laughs, and, most importantly, indulging in scrumptious delights that are just as whimsical as they are delicious.
From spooky finger foods that’ll make you giggle to creepy desserts that’ll put a smile on any little ghost or goblin’s face, I’ve curated a list of 100 easy Halloween food ideas that are simple to make and guaranteed to impress!
So, grab your favorite apron, channel your inner witch or wizard, and let’s conjure up some delicious dishes that will turn your Halloween gathering into an unforgettable affair.
A Little Personal Halloween Magic
Ah, Halloween—the season of costumes, candy, and somehow, a whole lot of fun in the kitchen! One of my fondest memories is when my family used to throw a monster bash every Halloween. I’ll never forget the year my mom decided to host an “adults and kids” potluck, where everyone brought their spookiest dishes, and the dining table was an eerie buffet of treats and horrors in good fun!
My personal contribution to the feast? Pumpkin-shaped cheese balls and “witches’ fingers” cookies, made with a rich almond dough and topped with a luscious, gooey raspberry jam for that frightful touch. Every year, I learned the art of creating spooky delights from scratch, and those memories have become cherished traditions that I now carry forward to my own family and friends.
Today, I aim to inspire you with the same enthusiasm and joy I felt back then. I want to show you that creating Halloween treats is not only easy but can also spark laughter and love around your table. Let’s dive into some deliciously haunted creations!
Ingredients: Spooktacular Essentials for Halloween Cooking
Here’s what you’ll need to get started on your Halloween adventure. Don’t sweat if you don’t have everything—substitutions abound!
-
Pumpkin Puree: The star of many fall recipes! Use canned pumpkin puree for convenience or roast your own fresh pumpkin for a wholesome twist. If you’re not a pumpkin fan, sweet potato works great!
-
Almond Flour: Perfect for those with gluten sensitivities. It gives your treats a nutty flavor and tender texture. If you don’t have it, regular all-purpose flour is a suitable swap.
-
Cream Cheese: This adds creaminess and richness to your dips and spreads. You can substitute with Greek yogurt for a healthier version or non-dairy cream cheese if you’re looking for a vegan option.
-
Chocolate Chips: Great for baking and decorating! You can use dark, milk, or white chocolate based on your preference. For a healthier alternative, try dark chocolate or cocoa nibs.
-
Food Coloring: Black, orange, and purple food dyes can help in creating a Halloween-themed presentation. Natural options such as beet juice or activated charcoal might be of interest if you’re avoiding artificial colors.
-
Ghost Peppers: Just a pinch adds that fiery touch to savory dips! If heat isn’t your friend, opt for smoked paprika for flavor without the burn.
-
Candy Corn: A classic Halloween treat! Use as decoration or a sweet surprise within cookies. If candy corn isn’t your style, consider M&M’s or chocolate-covered pretzels for that festive crunch.
Gather these ingredients, and you’re ready to create a spread that will enchant your guests!
Step-by-Step Instructions: Creating Your Halloween Feast
Let’s jump into the fabulous world of Halloween cooking with step-by-step instructions for a variety of spooky treats! Below, I’ll walk you through some of my top ideas:
Spooky Pumpkin Cheese Ball
-
Mix Ingredients: In a bowl, combine 8 oz of softened cream cheese, 1 cup of shredded cheddar cheese, 1/4 cup of pumpkin puree, and 1 tsp of garlic powder. Mix until creamy and smooth using a spatula.
Chef Tip: Make sure your cream cheese is at room temperature for easier mixing!
-
Shape into Pumpkins: Form the mixture into a pumpkin shape. To add a texture, take a fork and depress small lines into the ball to mimic pumpkin grooves.
-
Coat: Roll your pumpkin cheese ball into crushed cheesy crackers or a mix of almond flour and spices for an added crunch.
-
Add a Stem: Place a piece of green bell pepper or a pretzel stick on top for the stem.
-
Serve: Surround your cheese ball with crunchy veggies or crackers for dipping.
Presentation Tip: Use a decorative platter, and add some mini pumpkins around the cheese ball for a festive finish!
Witch’s Finger Cookies
-
Prepare Dough: In a large mixing bowl, cream 1 cup of butter, which is softened, with 1 cup of powdered sugar. Mix in 2 tsp of almond extract and 1 egg yolk.
-
Combine Dry Ingredients: Gradually add in 2 1/2 cups of almond flour and 1 cup of all-purpose flour, mixing until a dough forms.
Quick Chef Hack: If your dough is crumbly, a tablespoon of milk will help bind it together.
-
Shape Fingers: Roll dough into finger shapes. Create knuckles by pinching the dough slightly.
-
Nail it: Press a blanched almond at the tip of each finger for a spooky “nail” and bake at 350°F (175°C) for 10-12 minutes until lightly golden.
-
Add a Gory Touch: After cooling, drizzle with raspberry jam to create that creepy blood effect.
Serve Tip: Arrange your cookies in an old Halloween-themed dish or cauldron for maximum impact!
Gory Guacamole
-
Avocado Base: Mash 3 ripe avocados in a bowl until smooth. Mix in 2 tbsp of lime juice, 1 diced tomato, and 1 tsp of garlic powder.
-
Add the Spook: Incorporate crumbled feta cheese for a ghostly look. Add green food coloring to intensify the creepiness!
Chef Tip: Use a fork to get that perfectly blended guacamole without over-mashing!
-
Serve the Guac: Use a round bowl as your serving dish, allowing room for chips. You can create a “flesh-eating” mouth by placing red salsa around the edges and using tortilla chips as the “teeth”!
Mini Mummy Dogs
-
Wrap It Up: Roll crescent dough into thin strips and wrap them around mini hot dogs. Leave space for eyes.
-
Bake: Place mummies on a baking sheet and bake according to dough package instructions (usually 12-15 minutes at 375°F).
-
Dress it Up: Once cooked, use mustard or ketchup to create little eyeballs.
Monster Fruit Cups
-
Cut your Favorites: Take assorted fruit like grapes, kiwi, and strawberries. Place them in cups or bowls.
-
Face Time: Use mini chocolate chips or candies to make monster faces on your fruit.
-
Serve Chilled: Chill in the fridge before serving for a refreshing treat!
By following these steps, you’ll have a fantastic array of festive foods ready to charm all your guests and give them that Halloween joy they crave!
Serving Suggestions: Presenting Your Spooky Spread
When it comes to serving your Halloween spread, presentation is key! Use colorful platters or even spooky-themed serving trays to bring your food to life (or death!). Arrange your treats in ghostly layers, create fun little “labels” with names like "Spider Dip" or "Witch’s Brew," and don’t forget to add some seasonal decorations.
Use faux cobwebs on your tables, strategically place battery-operated candles, and throw in a few mini pumpkins for that extra touch.
Recipe Variations: Spice Up Your Halloween
The beauty of Halloween cooking is that there’s always room to mix and match! Here are some tasty variations to inspire your creativity:
-
Savory Ghosts: Use puff pastry to create savory ghost shapes filled with your favorite cheese and herb blend.
-
Eerie Eyeball Pasta: Create meatballs with mozzarella "eyeballs" where you place an olive or pepper in the center, atop a bed of dark spaghetti!
-
Vampire Bat Wings: Use chicken or cauliflower wings, baked with a spicy, smoky glaze for a “fang-tastic” treat!
-
Pumpkin Spice Everything: Add pumpkin spice to your cookies, muffins, or even pancakes to keep your Halloween flavors on point!
-
Vegan Options: Swap ingredients in cookies or dips with plant-based alternatives for a cruelty-free approach.
Chef’s Notes: Memories and Whims
Oh, how I love witnessing the little smiles and shrieks of delight when serving Halloween food! Behind every Witch’s Finger Cookie or Spooky Pumpkin Cheese Ball, there are memories, laughter, and perhaps a little chaos, too. Those moments when the dough ends up on your nose or when your mischievous ghost child tries to sneak an extra chocolate chip; those are the real treat!
Over the years, I’ve learned that food doesn’t have to be perfect; it just has to be made with love and a sprinkle of fun. My recipes are not just about flavors; they are about creating memories and stories shared around the table.
FAQs and Troubleshooting
How can I make my Halloween treats more colorful?
Consider using natural food colors or fruit purees. Mixing different shades into your batter or frosting can create a vibrant array of colors!
My cookies spread too much while baking; what went wrong?
This is often a result of either too much butter or not enough flour. Make sure to chill your dough initially, especially for cut-out cookies!
Can I make these treats ahead of time?
Absolutely! Many of these dishes can be made a day in advance. Just make sure to store them in airtight containers and add any fresh elements, like fruits, just before serving.
What should I do if my guacamole turns brown?
To keep guac fresh, store it in an airtight container with plastic wrap pressed directly onto the surface. A splash of lime juice helps too!
Nutritional Info
(Depends on specific recipes prepared—typically not necessary for Halloween treats but feel free to add a note about balance and moderation with festive foods.)
That’s a wrap on your ultimate guide for 100 Easy Halloween Food Ideas! I hope you discovered some delightful recipes to conjure up for your festivities and that they inspire you to create your own spooky magic in the kitchen. Remember, the best part of Halloween is sharing those creations with loved ones, so roll up those sleeves and enjoy the delicious adventure ahead. Happy Halloween cooking!
Print
Spooky Pumpkin Cheese Ball
- Total Time: 15 minutes
- Yield: 8 servings 1x
- Diet: Vegetarian
Description
A delightful and spooky cheese ball shaped like a pumpkin, perfect for Halloween gatherings.
Ingredients
- 8 oz cream cheese, softened
- 1 cup shredded cheddar cheese
- 1/4 cup pumpkin puree
- 1 tsp garlic powder
- Crushed cheesy crackers or almond flour for coating
- Green bell pepper or pretzel stick for the stem
Instructions
- Mix ingredients in a bowl until creamy and smooth.
- Shape into a pumpkin shape, using a fork to add grooves.
- Coat with crushed cheesy crackers or almond flour for crunch.
- Add a green bell pepper or pretzel stick on top as a stem.
- Serve with crunchy veggies or crackers.
Notes
For presentation, surround the cheese ball with mini pumpkins.
- Prep Time: 15 minutes
- Cook Time: 0 minutes
- Category: Appetizer
- Method: No Cook
- Cuisine: American
Nutrition
- Serving Size: 1 serving
- Calories: 150
- Sugar: 2g
- Sodium: 300mg
- Fat: 12g
- Saturated Fat: 7g
- Unsaturated Fat: 3g
- Trans Fat: 0g
- Carbohydrates: 5g
- Fiber: 0g
- Protein: 5g
- Cholesterol: 30mg
Keywords: Halloween, cheese ball, spooky food, party appetizer, pumpkin
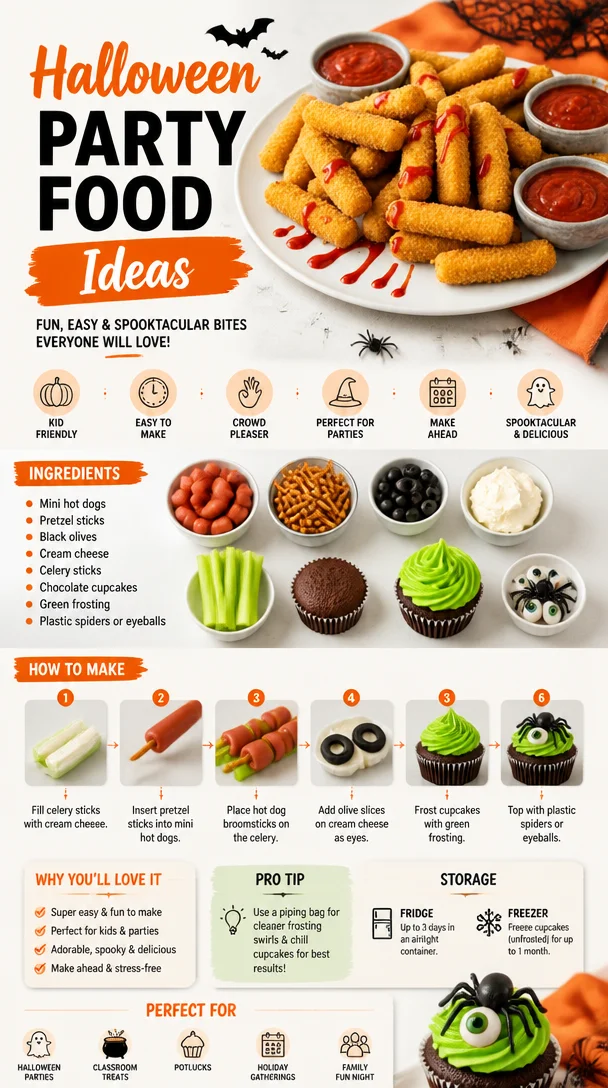
Halloween Party Food Ideas
Spook-tacular Halloween Party Food Ideas to Thrill Your Guests!
As the days grow shorter and the nights turn crisp, it’s time to embrace the cozy vibes of fall and prepare for one of the most delightful nights of the year: Halloween! This isn’t just any holiday; it’s a carnival of creativity, whimsy, and unapologetic fun — especially when it comes to food. Whether you’re hosting a frightful feast for family or a spirited soirée for friends, the key ingredient to a memorable Halloween gathering is the food.
Imagine dimmed lights, jack-o’-lanterns glowing on the table, and plates filled with creepy yet delicious delights. Picture your loved ones indulging in dishes that ignite a sense of nostalgia and spark laughter. In today’s post, I’m sharing an array of Halloween party food ideas that are not only spooky but also utterly delicious—perfect for satisfying your guests’ cravings and creating a festive atmosphere. So grab your cauldron (or just a big pot) because we’re diving into the world of ghoulishly good eats!
A Bite of Nostalgia: My Halloween Memories
Every Halloween brings back a wave of nostalgia for me. I can still recall the thrill of trick-or-treating as a child, my pillowcase growing heavier with each step a little more exciting than the last. But perhaps my most cherished memories revolve around gathering in the kitchen with my family to create an array of Halloween treats. My mom had her own twist on classic recipes—like transforming regular cupcakes into frightful monsters with colorful frosting and candy eyes.
One year, we decided to feature “witch’s fingers” made of almond-flavored cookies that truly had everyone buzzing. They were creepy, cute, and a big hit! As I grew older, my passion for cooking evolved into a love for creating fun, festive dishes that brought people together. Today, I’m excited to share some of those playful inspirations that can easily become the highlight of your Halloween party. Ready to unleash your inner kitchen magician? Let’s go!
Ingredients You’ll Need
Here’s a helpful list of ingredients that will make your Halloween party menus a hit. Each ingredient comes with tips and swaps to keep your cooking flexible and fun!
-
Crescent Roll Dough: This versatile dough makes for an excellent base for a variety of Halloween treats! Substitute with puff pastry for a flakier result, or use phyllo dough for a lighter option.
-
Hot Dogs: They’re a favorite among party-goers of all ages! You can swap in veggie dogs for a plant-based option, or even sausages for a more flavorful punch.
-
Cheese: A must for elevating your dishes! You can use cheddar (for a classic), mozzarella (for melting), or even vegan cheeses for dairy-free guests.
-
Mustard and Ketchup: Not just for dipping! These can be your ghoulish “blood” sauces for the pretzel bites. Experiment with spicy mustard for a kick, or use beet juice for an all-natural dye.
-
Mini Marshmallows: These fluffy delights make quirky additions to desserts. If you prefer less sugar, try using yogurt-covered raisins as a sweet alternative.
-
Chocolate: Perfect for coating and creating spooky treats! White chocolate can be dyed to create creepy colors, while dark chocolate adds sophistication.
Remember, cooking should be fun and free of stress, so feel free to play around with these ingredients based on what you have on hand!
Step-by-Step Instructions
Alright, let’s get cooking! Here’s a simple yet fantastically fun recipe you can incorporate into your Halloween festivities—Mummy Hot Dogs!
-
Preheat Your Oven: Set the temperature to 375°F (190°C). This ensures that your mummies get all nice and crispy!
-
Unroll the Crescent Dough: Carefully unroll the crescent roll dough and separate the triangles. You can use a roller or your hands to gently stretch each triangle into a longer strip. The length will help create those elegant mummy wrappings!
-
Cut Strips: Using a pizza cutter or sharp knife, cut the dough into long strips—about 1/2 inch wide. These will be your mummy bandages. It’s okay if they’re a bit uneven; the rustic look adds to the charm!
-
Wrap Those Hot Dogs: Take a hot dog, and start wrapping those dough strips around it, leaving a little gap for the “face.” Be sure to overlap the strips slightly for that authentic mummy look. The more chaotic the wrap, the more fun they’ll appear!
-
Bake Until Golden: Place the wrapped hot dogs on a baking sheet lined with parchment paper, and pop them in the oven for about 12-15 minutes—or until they’re golden brown and your kitchen is filled with mouthwatering aromas.
-
Dress Them Up: Let them cool slightly. Now’s your time to get creative! Use mustard to dot on “eyes” and ketchup as blood.
Tip: Smile as you hand them out; your guests will love the spooky surprise!
Serving Suggestions
These Mummy Hot Dogs are best served warm and fresh from the oven. Arrange them on a platter with mini bowls of mustard and ketchup for dipping. Add some fun garnishes like fresh parsley or chives for a pop of color. For a festive touch, create a spooky backdrop using cobwebs or Halloween-themed plates.
Recipe Variations
If you want to mix it up, here are a few creative variations to try:
- Veggie Mummies: Use veggie dogs for a plant-based version. They hold up beautifully and are just as fun!
- Cheesy Mummies: Insert a small stick of cheese into the hot dog before wrapping it in dough for an extra gooey surprise.
- Jalapeño Popper Mummies: Add jalapeños to the hot dog mix for a spicy kick!
- Sweet Mummy Twists: Swap hot dogs for cream cheese-filled crescent rolls wrapped into mummy shapes—perfect for dessert!
Chef’s Notes
I must confess: the first time I made Mummy Hot Dogs, I attempted to make them look picture-perfect, but they ended up looking more like abstract art than mummies! Over time, I learned that the more whimsical, the better. Halloween is all about fun—so don’t stress about presentation! Embrace the chaos of the kitchen. Also, one of my favorite Halloween gatherings featured these mummies, and we shared laughs as guests tried to guess what I’d used for the eyes. It’s these little moments that make cooking so special.
FAQs and Troubleshooting
-
Can I make these ahead of time?
Yes! You can prepare the mummies ahead of time, wrap them in plastic wrap, and refrigerate. Bake them just before serving for the best texture. -
What if I don’t have crescent dough?
No worries! You can use any type of dough you have, such as pizza dough or even phyllo. Just be mindful of the baking time, as it may vary. -
How do I store leftovers?
Store any leftovers in an airtight container in the fridge. Simply reheat in the oven before serving for the best results. -
Can I make these gluten-free?
Absolutely! Look for gluten-free crescent rolls or dough alternatives, as many brands offer delicious options these days.
Nutritional Info
While I love indulging during Halloween, keep in mind that balance is key. Mummy Hot Dogs can be enjoyed in moderation, and it’s always lovely to complement them with some fresh fruits or veggies!
So there you have it—an exciting, spook-tacular set of Halloween party food ideas that will leave your guests raving! Remember, cooking is about sparking joy and creativity. Roll up those sleeves and let’s prepare to make some magical memories together around the table! Happy Halloween! 🎃
Print
Mummy Hot Dogs
- Total Time: 25 minutes
- Yield: 8 servings
- Diet: Omnivore
Description
Delicious and spooky Mummy Hot Dogs perfect for your Halloween festivities!
Ingredients
- Crescent Roll Dough
- Hot Dogs
- Cheese
- Mustard
- Ketchup
- Mini Marshmallows
- Chocolate
Instructions
- Preheat your oven to 375°F (190°C).
- Unroll the crescent dough and separate the triangles.
- Cut the dough into long strips, about 1/2 inch wide.
- Wrap the hot dogs with the dough strips, leaving a gap for the face.
- Bake for about 12-15 minutes until golden brown.
- Dress them up with mustard and ketchup for eyes and blood.
Notes
These are best served warm. Feel free to personalize them with your own creative twists!
- Prep Time: 10 minutes
- Cook Time: 15 minutes
- Category: Appetizer
- Method: Baking
- Cuisine: American
Nutrition
- Serving Size: 1 hot dog
- Calories: 250
- Sugar: 4g
- Sodium: 650mg
- Fat: 16g
- Saturated Fat: 6g
- Unsaturated Fat: 8g
- Trans Fat: 0g
- Carbohydrates: 20g
- Fiber: 1g
- Protein: 7g
- Cholesterol: 30mg
Keywords: Halloween, party food, mummy hot dogs, spooky recipes, festive food
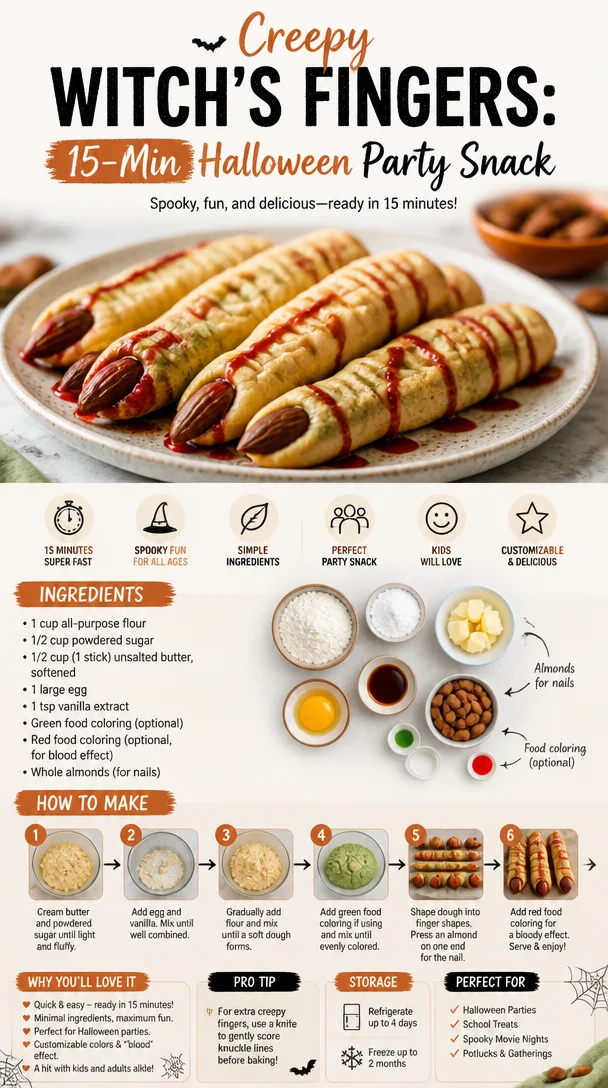
Creepy Witch’s Fingers: 15-Min Halloween Party Snack
Witch’s Fingers: A Spooktacular Halloween Treat
Welcome to my kitchen, food lovers! With Halloween lurking just around the corner, it’s the perfect time to whip up some delightfully creepy treats that will thrill and chill your friends and family. Today, I’m excited to share my enchanting recipe for Witch’s Fingers. These eerie snacks are not just visually fun; they are also incredibly delicious and easy to make, bringing together flavors and textures that everyone will love. So, let’s get our cauldrons bubbling and dive into this fantastically creepy culinary adventure!
Now, I know what you’re thinking: “Witch’s Fingers? Really?!" But trust me, these treats are nothing to be afraid of. Picture it: a buttery, melt-in-your-mouth almond cookie shaped like, well, a witch’s finger! Topped with a spooky almond “nail” and dusted with just the right amount of innocence, these cookies bring just the right amount of whimsy to your Halloween festivities.
Whether you’re hosting a Halloween party, attending a spooky potluck, or just want to surprise your kids with something extra special, Witch’s Fingers are the perfect go-to treat. And let me tell you, they are as much fun to make as they are to eat!
So, grab your favorite apron and get ready to conjure up some sweets that will have even the most discerning ghosts and goblins coming back for more!
A Trip Down Memory Lane
I remember the first time I made Witch’s Fingers with my younger sister, Emily. It was a cold October afternoon, and the leaves outside were painted in hues of orange, yellow, and red—like nature itself was preparing for Halloween. We decided to have a little baking competition, and I was determined to impress her with my culinary wizardry.
With bowls overflowing with flour and sugar, we giggled and experimented in the kitchen. I used my mom’s old rolling pin to form the cookie dough into strange, elongated shapes and topped them with almonds, hoping they would look spooky enough to frighten our neighborhood friends. When we pulled them out of the oven, the cookies were just the right shade of golden brown, and Emily’s eyes lit up with delight.
That Halloween, we set up a little corner in our living room to display our spooky creations, and I can still hear the laughter and shrieks from the kids who dared to take a bite of those witchy snacks! Cooking was more than just about the end result; it was about the journey, the creativity, and the joy of sharing it with those we love. Those memories, combined with the enchanting flavors of these cookies, hold a special place in my heart, and I can’t wait to share this spooky delight with you!
Ingredients
Here’s everything you’ll need to create your own Witch’s Fingers. Don’t worry; these ingredients are easy to find and mostly staples in your kitchen pantry!
-
Unsalted Butter (1 cup): Butter makes these cookies incredibly rich and gives them that melt-in-your-mouth texture. If you’re looking for a dairy-free option, feel free to swap in coconut oil or a vegan butter alternative.
-
Granulated Sugar (1 cup): Sugar sweetens the deal and helps create a lovely golden color in the cookies. You could use brown sugar for a richer flavor; just note that it might darken the cookies slightly.
-
Egg (1 large): This binds everything together! You can use a flaxseed meal or chia seed mix (1 tablespoon flaxseed with 3 tablespoons water) if you want to make it vegan.
-
Vanilla Extract (2 teaspoons): This is where the magic happens! Vanilla adds a beautiful depth of flavor. For a twist, you could try almond extract instead for a nutty variation.
-
All-Purpose Flour (2 ½ cups): The base of your cookies! If you’re gluten-free, look for a 1:1 gluten-free flour blend that includes xanthan gum.
-
Almonds (20 pieces): Whole blanched almonds work perfectly for the “nails” of the fingers. If you have nut allergies, you can use pumpkin seeds or chocolate chips cut into the shape of a nail.
-
Powdered Sugar (for dusting): This is optional, but a light sprinkle gives a sweet touch and can mimic the look of powdered "witch dust." Use granulated sugar if you’d like a little more crunch.
Step-by-Step Instructions
Let’s get to the good part! Here’s how to whip up these ghoulish goodies step by step:
Step 1: Preheat Your Cauldron
Preheat your oven to 325°F (160°C). It’s crucial that your oven is at the right temperature so your cookies bake correctly!
Step 2: Cream the Butter and Sugar
In a large bowl, use a hand mixer or stand mixer to beat together the softened unsalted butter and granulated sugar until the mixture is creamy and pale. This should take about 2-3 minutes. Be sure to scrape down the sides of the bowl for even mixing. This process incorporates air into the dough, making your cookies light and tender.
Step 3: Add Egg and Vanilla
Add the egg and vanilla extract to the butter-sugar mixture. Beat until well combined. The mixture should be smooth and luscious. When you crack the egg, be sure to check for any shell fragments – they don’t belong in our witch’s concoction!
Step 4: Mix in Dry Ingredients
In a separate bowl, whisk together the flour and a pinch of salt. Gradually add the dry mix into the wet ingredients, mixing until just combined. Be careful not to overmix; you want the flour to be just incorporated. Too much mixing can lead to tough cookies—nobody wants that!
Step 5: Shape the Cookies
Now comes the fun part! Take a small amount of dough (about a tablespoon) and roll it into a finger shape. You want them to be about 3-4 inches long and slightly thick to withstand the “nail.” Flatten one end to create a fingertip. Use a butter knife to make knuckle indentations to add detail. Place each finger on a parchment-lined baking sheet, leaving some space between each one.
Step 6: Add the Almond "Nails"
Gently press an almond into the flattened end of each finger. This is where your Witch’s Fingers come to life! If you want extra creepiness, you can use melted chocolate to “glue” the almond on, allowing it to ooze over the edges.
Step 7: Bake!
Pop those fingers in the preheated oven and bake for 15-18 minutes or until they’re lightly golden. The aroma that fills your kitchen? Pure magic! Allow them to cool on the baking sheet for about 5 minutes before transferring them to a wire rack to cool completely.
Step 8: Dust with Powdered Sugar
Once cooled, feel free to give your cookies a light dusting of powdered sugar if you like. It adds an extra special touch and just the right hint of sweetness. Don’t dust too heavily—you want them to look “witchy,” not fluffy!
Serving Suggestions
These Witch’s Fingers are best served on a spooky platter adorned with Halloween-like decorations. Consider surrounding them with fake spiders or adding some eerie green-colored candies for an extra festive touch. They also make a fantastic centerpiece for Halloween-themed gatherings, or simply stack them vertically in a jar for a fun grab-and-go treat!
Recipe Variations
Now, let’s get those creative juices flowing! Here are some fun variations you can try with your Witch’s Fingers:
- Chocolate Chip Fingers: Mix in some chocolate chips for an extra burst of flavor.
- Spiced Pumpkin Fingers: Substitute part of the flour with pumpkin puree and add warm spices like cinnamon and nutmeg!
- Blood-Spattered Fingers: Drizzle some red icing over the fingers for a gory twist—perfect for horror-loving friends!
- Gluten-Free Version: Use gluten-free flour and ensure your baking powder is gluten-free!
- Nut-Free Option: Swap out the almonds for pumpkin seeds or a small piece of chocolate to mimic the nail.
Chef’s Notes
As with any recipe, I welcome you to make these Witch’s Fingers your own! This recipe has evolved over the years from a simple butter cookie into this spooktacular delight folks rave about. I remember trying it with different flavors, and it turns out pumpkin spice is a total winner for the fall season! My kitchen was full of laughter, flour-covered counters, and far too many cookie tastings (not that I’m complaining!). Just remember, the best recipes are made with love, creativity, and a sprinkle of fun!
FAQs and Troubleshooting
Here are some common questions you might have when diving into making these treats:
-
Why are my cookies spreading too much?
If your cookies are spreading too much, it could be that your butter was too warm or you didn’t chill your dough before baking. Always use softened butter, not melted! -
How can I make my cookies crispier?
If you prefer a crisper cookie, you can bake them a little longer. Just keep a close eye on them, so they don’t burn. -
Can I freeze these cookies?
Absolutely! Just make sure they are completely cooled before freezing. You can store them in an airtight container for up to a month. Perfect for future spooky gatherings! -
How can I store my Witch’s Fingers?
Store them in an airtight container at room temperature for up to a week. Just know they might lose some of their initial crispiness.
Nutritional Info
For all my health-conscious friends out there, here’s a quick breakdown of a single Witch’s Finger cookie:
- Calories: 120
- Total Fat: 8g
- Saturated Fat: 4g
- Carbohydrates: 11g
- Protein: 1g
- Sugar: 4g
Feel free to adjust this recipe to your personal taste and dietary needs, and enjoy every delicious bite.
There you have it! Witch’s Fingers, a spooktacular Halloween treat, overflowing with flavor and nostalgia. Get ready to impress your friends with these delightful cookies while creating new memories in the kitchen. Happy Halloween baking! 🌕🕷️
Print
Witch’s Fingers
- Total Time: 33 minutes
- Yield: 24 servings 1x
- Diet: Vegetarian
Description
Delightfully spooky almond cookies shaped like witch’s fingers, perfect for Halloween parties.
Ingredients
- 1 cup Unsalted Butter
- 1 cup Granulated Sugar
- 1 large Egg
- 2 teaspoons Vanilla Extract
- 2 ½ cups All-Purpose Flour
- 20 pieces Almonds
- Powdered Sugar (for dusting)
Instructions
- Preheat your oven to 325°F (160°C).
- Cream the butter and sugar in a large bowl until creamy and pale.
- Add the egg and vanilla extract; beat until combined.
- Mix in the dry ingredients until just incorporated.
- Shape the dough into finger shapes, about 3-4 inches long.
- Add an almond into the flattened end of each cookie.
- Bake for 15-18 minutes or until lightly golden.
- Dust with powdered sugar if desired.
Notes
Store in an airtight container at room temperature for up to a week.
- Prep Time: 15 minutes
- Cook Time: 18 minutes
- Category: Dessert
- Method: Baking
- Cuisine: American
Nutrition
- Serving Size: 1 cookie
- Calories: 120
- Sugar: 4g
- Sodium: 100mg
- Fat: 8g
- Saturated Fat: 4g
- Unsaturated Fat: 4g
- Trans Fat: 0g
- Carbohydrates: 11g
- Fiber: 0g
- Protein: 1g
- Cholesterol: 30mg
Keywords: Halloween, cookies, Witch's Fingers, dessert, spooky treats
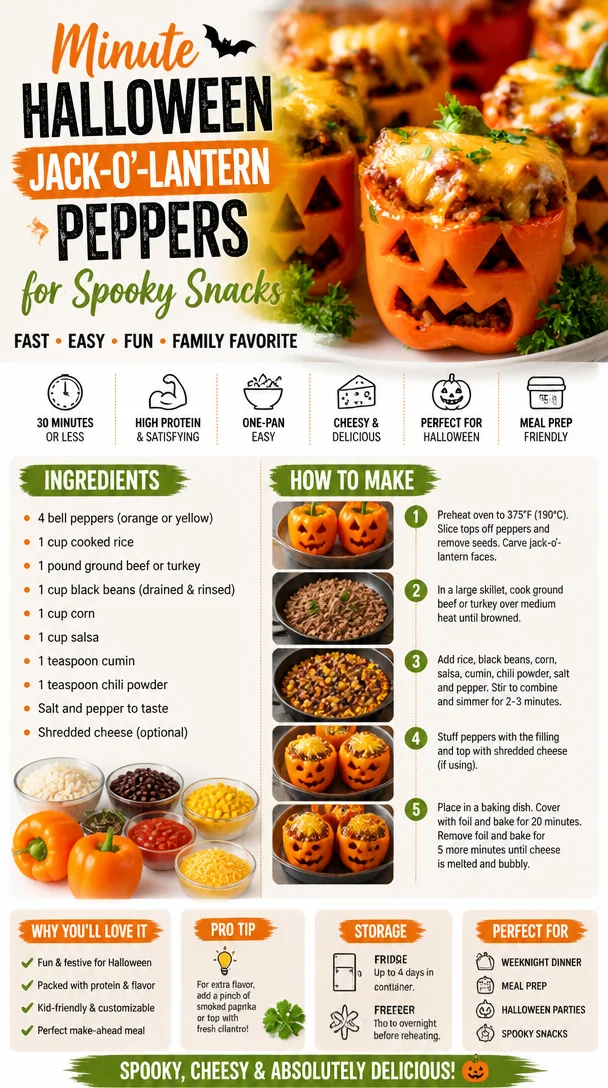
Minute Halloween Jack-O’-Lantern Peppers for Spooky Snacks
Jack-O’-Lantern Peppers: A Whimsical Fall Recipe to Share with Loved Ones
Welcome back to my cozy kitchen, dear friends! As the leaves turn golden brown and the air gets that delightful chill, we know one thing for sure: it’s time for fall flavors and all things pumpkin spice (and everything nice). One of my absolute favorite ways to celebrate this magical season is with a dish that is not only delicious but also nostalgic—let me introduce you to my Jack-O’-Lantern Peppers. 🎃
Why Jack-O’-Lantern Peppers, you ask? Well, these adorable stuffed bell peppers are like a canvas for your creativity. They’re the perfect centerpiece for a Halloween get-together, a fun family dinner, or a captivating dish to impress your friends. And the best part? They’re as delicious as they are cute! Imagine vibrant orange and green peppers carved with joyful little faces, filled with savory goodness. My heart just skips a beat at the thought!
Each fall, I transform my kitchen into a bustling hub of creativity, scenting the air with spices and simmering sauces, all while carving playful expressions into my peppers. This dish not only lights up the dinner table but also ignites cherished memories with loved ones. So, grab your favorite apron, and let’s dive into this festive recipe together. 🎉
A Memory Steeped in Spice
I still remember the first time I made these Jack-O’-Lantern Peppers. It was the height of autumn, and my niece, Ella, had just turned four. The excitement of Halloween was palpable, and I wanted to create something magical for our family dinner. We gathered in the kitchen, the air filled with laughter, the sound of Ella’s giggles ringing in my ears as we carved silly faces into orange and green bell peppers.
As we cooked together, she eagerly stuffed the peppers with a blend of ground turkey, cheese, and spices. I taught her how to mix the filling, and she was so proud to decorate our spooky dinner. That night, we not only shared a meal but created memories that I hold dear to my heart. The joy of seeing her giggle as she took a bite of her creation was simply priceless. It’s moments like these that remind us how food has this incredible power to bring us together.
Ingredients
Here’s what you’ll need to create your own Jack-O’-Lantern Peppers. Don’t worry if you don’t have everything on hand; I’ve got tips for substitutions too!
-
Bell Peppers (4 orange and 2 green): These are the stars of our show! Orange peppers scream Halloween, while green adds a bit of color contrast. If you can’t find orange peppers, yellow ones work beautifully too!
-
Ground Turkey or Beef (1 pound): I like using ground turkey as a healthier option. However, feel free to swap it with ground beef, chicken, or even plant-based alternatives like lentils or mushrooms for a vegetarian twist.
-
Cooked Rice (1 cup): This helps bulk up the filling and gives it a wonderful texture. Leftover rice from your previous meals works perfectly. You can also use quinoa or cauliflower rice for a grain-free option.
-
Shredded Cheese (1 cup): Cheddar is my go-to, but feel free to experiment with peppers or mozzarella! To make it dairy-free, use vegan cheese.
-
Onion (1 small, diced): Onions add sweetness and depth to the filling. Swap it for shallots or skip it altogether if you prefer a milder flavor.
-
Garlic (2 cloves, minced): A necessary flavor boost! If you’re not a garlic fan, just reduce the amount or use garlic powder as a substitute.
-
Tomato Sauce (1/2 cup): This adds moisture and tanginess to our filling. You can use fresh tomatoes, salsa, or even canned diced tomatoes if you’re in a pinch.
-
Spices: (1 tsp each of cumin, paprika, salt, and pepper): These will warm your filling with layers of flavor. Feel free to add any other spices you love, like chili powder for a kick!
Step-by-Step Instructions
Now that we have our ingredients lined up, let’s get cooking! Follow along with these steps, and don’t hesitate to add your own flair.
-
Preheat your oven to 375°F (190°C). This step is important; we want our peppers to roast perfectly, softening while we prepare the filling.
-
Cut the tops off the peppers and scoop out the seeds. Use a small knife to carve out fun Jack-O’-Lantern faces on the front. Remember to make them as silly or spooky as you like! Once you’re done carving, set these cute little guys aside.
-
Sauté the onion and garlic. In a skillet over medium heat, drizzle a little olive oil and add your diced onion. Sauté until translucent, about 4-5 minutes. Next, add the minced garlic and stir for another minute—it will smell heavenly.
-
Add the ground turkey (or beef) to the skillet. Cook until browned, breaking it apart with a wooden spoon for even cooking—around 7-10 minutes. This is where you’ll want to season with salt, pepper, cumin, and paprika, ensuring the meat is bursting with flavor.
-
In a large bowl, combine the meat mixture with cooked rice, tomato sauce, and half of the shredded cheese. Stir until everything is well incorporated. This is where you can taste and adjust any seasonings!
-
Stuff the peppers generously with filling. Don’t be shy—fill them until they’re overflowing! Place them upright in a baking dish. If they don’t stand upright, you can slice a tiny bit from the bottom to create a flat base.
-
Top each stuffed pepper with the remaining cheese. This cheesy goodness will melt into a delicious crust as they bake!
-
Cover with foil and bake for 30 minutes. This allows the peppers to steam a little, making them tender. Once you remove the foil, bake for an additional 15 minutes until the cheese is bubbly and golden.
-
Serve hot, garnished with fresh herbs like cilantro or parsley for a pop of color. They’re best enjoyed right out of the oven but still delicious as leftovers!
Serving Suggestions
To make your Jack-O’-Lantern Peppers even more festive, serve them with a side of vibrant mixed greens and a zesty vinaigrette. Alternatively, a bowl of creamy, homemade pumpkin soup pairs beautifully, adding to that warm, autumn vibe. For a touch of fun, place your peppers in a carved pumpkin or use spooky plates for added flair. It’s all about creating a cozy atmosphere to celebrate the season!
Recipe Variations
Want to mix things up? Here are a few creative twists to try with your Jack-O’-Lantern Peppers:
-
Fiesta Style: Swap the ground turkey for chorizo and add black beans and corn to the filling! Top with avocado for a fresh touch.
-
Italian Twist: Use Italian sausage and mix in some marinara sauce and mozzarella. Top with fresh basil for an Italian flair!
-
Vegetarian Delight: Replace the meat with a mix of black beans, quinoa, and your favorite vegetables to create a hearty plant-based filling.
-
Spicy Kick: Add diced jalapeños or crushed red pepper flakes to the filling for an extra zing!
-
Cheesy Broccoli Edition: Incorporate finely chopped broccoli and swap out some cheese for extra creaminess and a pop of color.
Chef’s Notes
One of my favorite kitchen memories with these Jack-O’-Lantern Peppers happened when I experimented with leftovers! One time, I had some roasted sweet potatoes lying around, and I decided to toss them into the filling. My family freaked out at how delicious it was! So, remember, let your creativity run wild—cooking is all about experimenting and having fun.
These peppers have evolved over the years, and now they hold a special place in my heart. They remind me of laughter, love, and shared meals with those who matter most. So don’t hesitate to adapt this recipe to your taste while creating your own beautiful memories!
FAQs and Troubleshooting
Q: Can I make these ahead of time?
Absolutely! You can prep your Jack-O’-Lantern Peppers a day in advance. Just stuff them and store them in the fridge, covered. When ready, pop them in the oven for a little longer since they’ll be chilled.
Q: What if my peppers are too tough?
No worries! If you find that your peppers are firm after baking, you can always sprinkle a tablespoon of water into the baking dish and re-cover it with foil for an additional 10 minutes in the oven to steam them.
Q: Can I freeze the stuffed peppers?
Yes! After baking, let them cool completely and then wrap each pepper in plastic wrap and store in an airtight container. They can be frozen for up to three months. Just reheat in the oven until warmed through.
Q: My filling is too dry. What can I do?
If you find your filling is on the dry side, add a splash of broth or some more tomato sauce to moisten it up! You want it to be flavorful and tender.
Nutritional Info
Per serving (1 stuffed pepper): approximately 300 calories, 20g protein, 15g carbohydrates, and 10g fats (may vary depending on ingredients used).
So there you have it! Jack-O’-Lantern Peppers that not only serve as a tasty treat but also as a celebration of creativity, nostalgia, and warmth. Happy cooking, and may your kitchen be filled with laughter and love! 🍂✨
Print
Jack-O’-Lantern Peppers
- Total Time: 60 minutes
- Yield: 6 servings 1x
- Diet: Gluten-Free
Description
Delightful stuffed bell peppers that bring festive fall flavors to your table while creating cherished memories.
Ingredients
- 4 orange bell peppers
- 2 green bell peppers
- 1 pound ground turkey (or beef)
- 1 cup cooked rice
- 1 cup shredded cheese
- 1 small onion, diced
- 2 cloves garlic, minced
- 1/2 cup tomato sauce
- 1 tsp cumin
- 1 tsp paprika
- 1 tsp salt
- 1 tsp pepper
Instructions
- Preheat your oven to 375°F (190°C).
- Cut the tops off the peppers and scoop out the seeds, carving Jack-O’-Lantern faces.
- Sauté the onion and garlic in a skillet over medium heat until translucent.
- Add the ground turkey (or beef) to the skillet and cook until browned.
- Combine the meat mixture with cooked rice, tomato sauce, and half of the shredded cheese in a large bowl.
- Stuff the peppers generously with the filling and place them upright in a baking dish.
- Top each stuffed pepper with the remaining cheese.
- Cover with foil and bake for 30 minutes, then remove foil and bake for another 15 minutes.
- Serve hot, garnished with fresh herbs.
Notes
These peppers can be prepped a day in advance and stored in the fridge, or frozen for up to three months.
- Prep Time: 15 minutes
- Cook Time: 45 minutes
- Category: Main Course
- Method: Baking
- Cuisine: American
Nutrition
- Serving Size: 1 stuffed pepper
- Calories: 300
- Sugar: 4g
- Sodium: 500mg
- Fat: 10g
- Saturated Fat: 4g
- Unsaturated Fat: 4g
- Trans Fat: 0g
- Carbohydrates: 15g
- Fiber: 3g
- Protein: 20g
- Cholesterol: 70mg
Keywords: Halloween, stuffed peppers, fall recipe, family dinner, cozy cooking
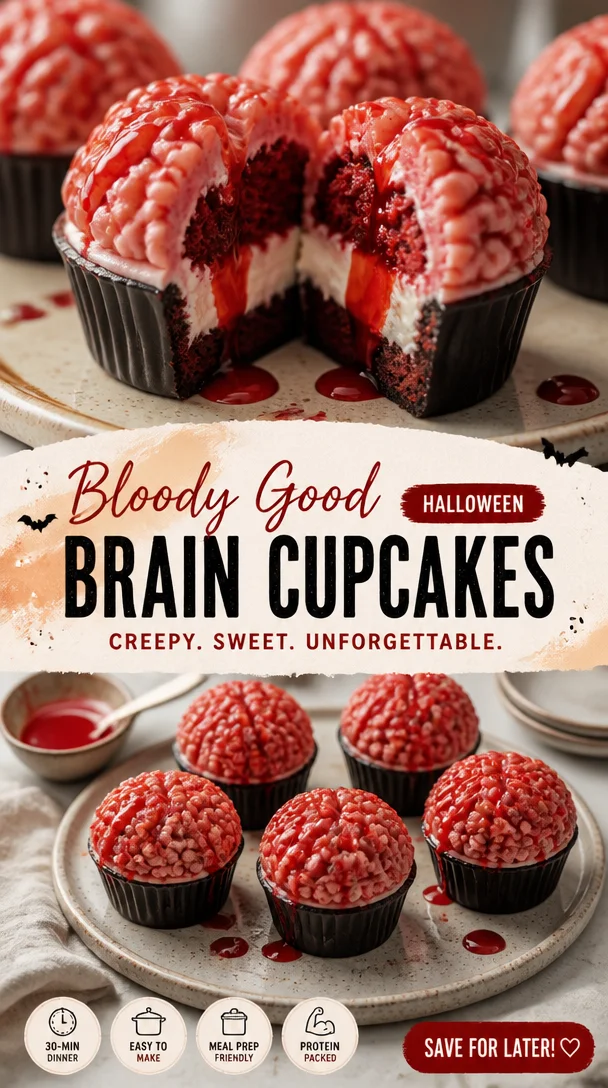
Halloween 🎃 #viral [Video] | Edible candy decorations for halloween, Frankenstein themed snacks, Halloween bake off
Spooktacular Candy-Covered Delights: Your Guide to Halloween Treats 🎃
Welcome to my kitchen, my fellow food enthusiasts! Halloween is just around the corner, and the excitement in the air is almost palpable. As I whip up my favorite spooky delights, I can’t help but reminisce about the joy that this festive season brings. The smell of pumpkins being carved, the vibrant colors of candy corns mingling with black and orange decorations, and, of course, the delightful anticipation of sweets galore!
This time of year is not just about costumes and haunted houses; it’s about gathering with family and friends, creating sweet memories, and sharing delicious treats that light up faces and spark conversations. That’s precisely why today, I’m going to share enticing recipes that will have you baking, decorating, and celebrating Halloween like a pro. Trust me, there’s nothing like a kitchen filled with laughter and the aroma of baked goodies to make the holiday truly special!
Whether you’re planning a whimsical Halloween party, a spooky bake-off with friends, or just some fun activities with the kiddos, these edible candy decorations and Frankenstein-themed snacks are bound to bring joy and smiles to everyone around. So, grab your aprons and let’s dive into the world of Halloween baking!
A Sweet Walk Down Memory Lane
Let me take you on a little journey back to my childhood. I remember the crisp autumn evenings spent at my grandma’s house, where she would always prepare her famous Halloween treats with the kind of enthusiasm that only a true foodie possesses. With her trusty apron tied around her waist, she brought out the candy, sprinkles, and, our absolute favorite—chocolate!
One year, she introduced us to the idea of decorating cookies with edible eyes to create the most delightfully creepy creatures. We laughed and squealed as we transformed simple cookies into zombies and ghosts. Those memories of vibrant colors, sticky fingers, and laughter echoing throughout her kitchen are forever etched in my heart. Through the years, our cozy Halloween baking tradition only grew stronger, leading to epic kitchen experiments every October. That’s the magic I strive for in every recipe I create and share—a way to connect, celebrate, and make memories over something delicious!
Ingredients You’ll Need for Spooktacular Treats
To create these Halloween delights, you’ll need a delightful array of ingredients. Here’s your shopping list, along with some handy tips:
-
All-Purpose Flour: The cornerstone of any baking recipe. If you’re looking to go gluten-free, you can substitute it with almond or coconut flour, but keep in mind that may alter the texture a bit.
-
Granulated Sugar: For that sweet touch! If you want a healthier alternative, consider coconut sugar or even maple syrup (though it might affect the dough consistency).
-
Butter: Use unsalted butter for a controlled flavor, but if you’re vegan or dairy-free, try coconut oil or a plant-based butter substitute.
-
Eggs: They bind everything together. For an egg-free option, you can use a flax or chia seed egg (1 tablespoon ground flaxseed or chia seeds mixed with 2.5 tablespoons of water), which is particularly nice for a vegetarian twist.
-
Vanilla Extract: Adds a beautiful depth and warmth to the flavor. Extract is ideal, but you can use vanilla powder too if that’s what you’ve got on hand.
-
Baking Soda & Baking Powder: These leavening agents are essential for fluffiness. Don’t mix them up—baking soda is for spreading, while baking powder gives height!
-
Edible Candy Decorations: Think eyes, sprinkles, and spooky shapes! You can find a variety at local stores or online, and they’re perfect for letting your creativity shine!
-
Chocolate (dark or white): For coating and decorating, you can substitute chocolate chips with carob chips for a different flavor profile.
-
Food Coloring: Vital for bringing your spooky creations to life! Gel coloring works best for vibrant hues without watering down the batter.
For a little chef insight, always check your pantry before heading out to shop—you might be surprised how many of these essentials you already have!
Step-by-Step Instructions for Spooky Treats
Now that we’ve got our ingredients prepped, it’s time to get to the best part: baking! Here’s how to whip up your magical Halloween treats step-by-step:
-
Preheat the Oven: Start by preheating your oven to 350°F (175°C). This is key to ensuring our goodies bake perfectly.
-
Mix the Dry Ingredients: In a large mixing bowl, combine 3 cups of all-purpose flour with 1 teaspoon of baking soda and 1 teaspoon of baking powder. Whisk them together until well combined. This step helps avoid clumps of baking agents in your final mix. The mixing helps even out the flavors and ensures every bite has that perfect blend.
-
Cream the Butter and Sugar: In another bowl, cream together 1 cup of softened unsalted butter and 1 ¾ cups of granulated sugar until light and fluffy. Use an electric mixer on medium speed, and don’t rush through it—this airing gives your treats a light texture!
-
Add the Eggs and Vanilla: Beat in two eggs, one at a time, mixing well after each addition. Then, add 1 tablespoon of vanilla extract. The mixture should look shiny and fluffy, really bringing out that sweet scent.
-
Combine Dry Ingredients with Wet Ingredients: Gradually add your flour mixture to the butter mixture, stirring until just combined. Avoid overmixing here! We want tender cookies, not tough ones.
-
Add in Your Chocolaty Magic: Fold in 1 cup of chocolate chips (or more, if you’re feeling indulgent). This is where you have the freedom to throw in any extras you love—nuts, dried fruits, or even crushed Halloween candies!
-
Scoop and Shape: Using a tablespoon or scoop, drop dollops of dough onto a lined baking sheet, leaving enough space for them to spread out. For a fun twist, roll some of the balls in colorful sprinkles before placing them down on the sheet.
-
Bake and Watch Them Rise: Pop them into your preheated oven and let them bake for 10-12 minutes. Keep an eye on them! You want the edges to be golden while the center remains soft and slightly underbaked. They’ll firm up as they cool.
-
Decorate with Style: As the cookies cool, melt some chocolate in the microwave or a double boiler. Dip the cookies halfway in the melted chocolate, and then get creative! Use edible eyes, sprinkles, or drizzled chocolate to transform them into spooky creatures. Let them set on wax paper.
-
Serve and Enjoy!: Once set, arrange your creations on a festive platter, and get ready for the oohs and aahs!
Serving Suggestions
To add a cozy vibe to your Halloween spread, consider placing your treats on a rustic wooden platter or a decorative tray. Set the scene with dark-colored napkins, sprigs of rosemary for a witchy touch, or even some faux cobwebs sprinkled around. Don’t forget a cute label or fun sign declaring your treats as “Witch’s Bites” or “Zombie Cookies” to pique interest!
Recipe Variations
Get creative with these variations to make your Halloween treats unique:
- Pumpkin Spice Twist: Incorporate 1 tablespoon of pumpkin pie spice into your dry ingredients and use pumpkin puree instead of half a cup of the butter for a seasonal flavor.
- Creepy-Crawly Cookies: Add edible gummy worms or bugs atop your cookies before baking for a fun, shocking surprise!
- Vegan Adaptation: Swap butter for coconut oil, use plant-based milk, and substitute eggs with your preferred egg replacer. Perfect for all your plant-loving friends!
- Chocolate-Covered Marshmallow Pops: Use large marshmallows, dip them in melted chocolate, and decorate with sprinkles and edible eyes. Easy and fun for the kids!
Chef’s Notes
While creating these treats, I remembered the time I mistakenly grabbed salt instead of sugar when measuring for my cookies! The kitchen turned into a hub of flavors as I had to whip up another batch to fix my mistake. It taught me to always double-check and embrace the chaos of cooking—the messes often lead to the best stories.
This Halloween treat recipe has evolved over time, influenced by trial and error, family traditions, and of course, my unwavering love for creativity. As I put on my messy apron, I remind myself that it’s the joy and love poured into cooking that ultimately makes every creation special.
FAQs and Troubleshooting
Q: My cookies came out too flat. What did I do wrong?
A: Flat cookies are often a result of not enough flour or overmixing the butter and sugar. Try chilling your dough for at least 30 minutes before baking so they don’t spread too much.
Q: Can I freeze the cookie dough?
A: Absolutely! You can freeze the cookie dough in individual balls or as a whole. Just wrap them tightly in plastic wrap and store them in an airtight bag. When you’re ready to bake, let them thaw slightly before popping them in the oven.
Q: What can I use if I don’t have baking soda?
A: You can use baking powder instead! However, remember that you’ll need to use about three times as much baking powder as you would baking soda.
Q: Can I make these in advance? How long do they stay fresh?
A: Yes, you can make them a few days in advance and store them in an airtight container. They’ll stay fresh for about a week. For long-term storage, freezing is best!
Nutritional Info (Optional)
For a rough idea, one cookie has approximately 150 calories with 6g of fat, 22g of carbohydrates, and 2g of protein. Nutritional values may vary based on the specific ingredients used.
So there you have it, my delightful friends! This spooky season, don’t hesitate to embrace the spirit of baking with these fun, easy treats that are sure to delight anyone who crosses your doorstep. Remember, it’s not just about the end product, but the journey of creating with love and laughter. Now, let your Halloween baking adventures begin! 🎃✨
Print
Spooktacular Candy-Covered Delights
- Total Time: 42 minutes
- Yield: 24 servings 1x
- Diet: Vegetarian
Description
A delightful collection of Halloween treats that combines baking and creativity to create spooky and fun edible decorations.
Ingredients
- 3 cups All-Purpose Flour
- 1 teaspoon Baking Soda
- 1 teaspoon Baking Powder
- 1 cup Unsalted Butter, softened
- 1 ¾ cups Granulated Sugar
- 2 Eggs
- 1 tablespoon Vanilla Extract
- 1 cup Chocolate Chips
- Edible Candy Decorations
- Food Coloring
Instructions
- Preheat the oven to 350°F (175°C).
- Mix the dry ingredients: combine flour, baking soda, and baking powder in a large bowl.
- Cream together butter and sugar in another bowl until light and fluffy.
- Add eggs, one at a time, mixing well after each addition, then stir in vanilla.
- Combine the flour mixture with the butter mixture until just combined.
- Add in chocolate chips and any desired extras.
- Scoop dough onto a lined baking sheet, spacing them out.
- Bake for 10-12 minutes until edges are golden and center is slightly underbaked.
- Decorate cooled cookies with melted chocolate and candy decorations.
- Serve and enjoy!
Notes
Make sure to check your pantry before shopping for the ingredients. Feel free to get creative with the decorations!
- Prep Time: 30 minutes
- Cook Time: 12 minutes
- Category: Dessert
- Method: Baking
- Cuisine: American
Nutrition
- Serving Size: 1 cookie
- Calories: 150
- Sugar: 12g
- Sodium: 150mg
- Fat: 6g
- Saturated Fat: 4g
- Unsaturated Fat: 2g
- Trans Fat: 0g
- Carbohydrates: 22g
- Fiber: 1g
- Protein: 2g
- Cholesterol: 30mg
Keywords: Halloween treats, spooky cookies, candy decorations, baking, family recipes




