
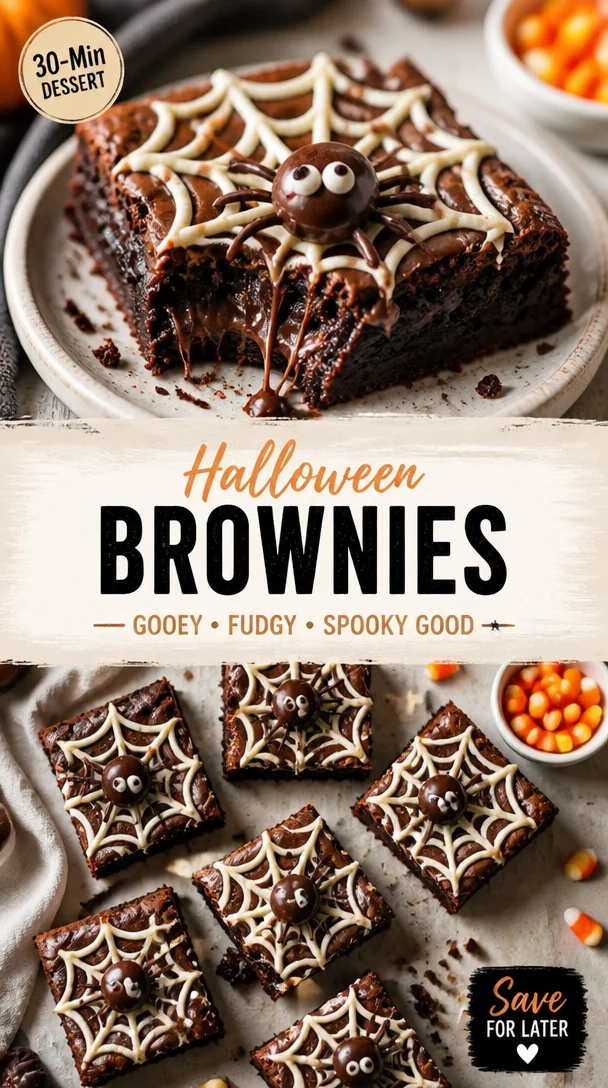
Halloween Brownies Recipe: Gooey Spider Web Swirls
Halloween Brownies: A Spooktacular Delight
Welcome, fellow foodies! It’s that enchanting time of year when the air gets cool, the leaves change colors, and spooky decorations adorn our homes. Yes, it’s Halloween season! 🎃 While candy corn and ghost-shaped gummies are sure to charm any trick-or-treater, I believe that the highlight of any Halloween gathering deserves to be something decadent, gooey, and rich—my Halloween brownies! These aren’t just any brownies; they’re delightfully chocolatey and topped with festive sprinkles that can make even the spookiest night feel warm and inviting.
Imagine it: the intoxicating aroma of warm chocolate wafts through your kitchen as you prepare these brownies, and the anticipation builds as friends and family gather around, eager to dig in. Today, I’m excited to share not just the recipe, but also little tidbits and stories that’ll help you create the most memorable Halloween treat. So grab your favorite apron (and maybe a little pumpkin spice latte), and let’s get baking!
A Nostalgic Halloween Memory
Growing up, Halloween was one of my favorite holidays—not just for the candy, but for the family traditions we created around it. Every year, my mom would set up a "haunted kitchen" where the sweet smell of baking filled the air, and I’d help her whip up a batch of brownies. I remember one year, we decided to add a spooky twist: we dropped candy eyes into the batter before baking. When they came out of the oven, those little eyes peeking up at us transformed ordinary brownies into an eerie treat that had us giggling.
That night, we invited our neighborhood friends for a spooky movie marathon, and those brownies were the main event. We devoured them while watching classic Halloween flicks, and each bite was a reminder—sweet treats can create unforgettable memories. It’s this same magic I hope to bring to your kitchen with this recipe.
Ingredients
To make these Halloween brownies truly special, we’ll need the following ingredients:
-
1 cup unsalted butter
Tip: Using unsalted butter gives you control over the salt in your recipe. If you only have salted butter, reduce the added salt in the recipe. -
2 cups granulated sugar
This adds the sweetness that offsets the rich cocoa flavor. You can substitute half with brown sugar for a richer taste! -
4 large eggs
Eggs help bind everything together and give your brownies that chewy texture we love. An egg substitute for vegans would be 1/4 cup applesauce per egg. -
1 teaspoon vanilla extract
Vanilla is key to enhancing the chocolate flavor. Choose pure vanilla extract for the best taste! -
1 cup all-purpose flour
It’s important to measure your flour correctly to avoid dry brownies. Scoop and level with a knife! -
1 cup cocoa powder
Go for unsweetened cocoa powder to really let the chocolate shine through! A dark cocoa powder can elevate the richness. -
1/2 teaspoon baking powder
This ensures our brownies rise just enough to create a fluffy center. -
1/2 teaspoon salt
Salt enhances the sweetness and balances the flavors beautifully. -
1 cup chocolate chips (optional)
For extra gooeyness, mix in semi-sweet or dark chocolate chips! White chocolate chips can be a fun variation. -
Halloween-themed sprinkles
These are the crowning glory! Use any mix of spooky sprinkles like bats, ghosts, or pumpkin shapes to make it festive.
Step-by-Step Instructions
Now that we’ve got our spooky ingredients ready, let’s dive into making these Halloween brownies! Here’s how to whip them up, step by step.
-
Preheat Your Oven:
Start by preheating your oven to 350°F (175°C). This allows for even baking and ensures our brownies have that delicious crust on top! -
Prepare Your Baking Dish:
Grease a 9×13 inch baking pan and line it with parchment paper. This will make it much easier to lift the brownies out later for cutting. Plus, who doesn’t love a clean release? -
Melt the Butter:
In a medium saucepan, melt the unsalted butter over low heat. As it’s melting, stir it a bit to help it along. You can also do this in the microwave. Just melt in 30-second bursts and stir in between to avoid splattering! -
Mix Sugar and Butter:
Remove the melted butter from heat and whisk in the granulated sugar until well combined. This process helps dissolve the sugar, which leads to beautifully fudgy brownies. -
Add in Eggs and Vanilla:
Quickly whisk in the eggs, one at a time, followed by the vanilla extract. Mixing these in thoroughly gives your brownies that luscious texture. Don’t be afraid to give it a good whisk here! -
Combine Dry Ingredients:
In a separate bowl, whisk together the flour, cocoa powder, baking powder, and salt. Gradually add this dry mix to the wet ingredients, stirring gently until just combined. Be careful not to overmix—lumps are okay! -
Incorporate Chocolate Chips:
If you’re using chocolate chips or other add-ins, fold them into the batter now. This is where your brownies get that delightful melt-in-your-mouth texture! -
Bake the Brownies:
Pour the brownie batter into your prepared baking dish, using a spatula to spread it evenly. Bake for 20-25 minutes or until a toothpick inserted into the center comes out with a few moist crumbs. -
Cool and Decorate:
After baking, let your brownies cool in the pan for a few minutes before lifting them out using the parchment paper. Once they’re completely cool, it’s time to decorate with your favorite Halloween sprinkles! -
Cut and Enjoy:
Use a sharp knife to cut into squares (or spooky shapes if you’re feeling extra). Serve them up and watch the smiles light up!
Serving Suggestions
To make your Halloween brownies extra festive, consider serving them on a platter adorned with mini pumpkins or spider decorations. You could even pair them with a scoop of vanilla ice cream—with a drizzle of warm caramel sauce for a haunt-worthy dessert. For a true spooky effect, you might want to dust some powdered sugar on top, creating a ghostly appearance!
Recipe Variations
Feel free to have fun with this brownie recipe! Here are a few variations to consider:
-
Peppermint Bark Swirl: Fold in crushed peppermint candies and swirl some melted white chocolate into the brownie batter before baking for a festive minty kick.
-
Nutty Surprise: Add a cup of chopped nuts like walnuts or pecans for an extra layer of texture. Toast them beforehand for a deeper flavor!
-
Vegan Version: Substitute with vegan butter and replace eggs with flaxseed meal mixed with water (1 tablespoon flaxseed mixed with 3 tablespoons water = 1 egg).
-
Gluten-Free Brownies: Use a 1:1 gluten-free baking flour in place of all-purpose flour for a gluten-free treat that everyone can enjoy.
-
Caramel Drizzle: Drizzle melted caramel over the top before serving for a gooey upgrade that’s to die for!
Chef’s Notes
As I reflect on my kitchen adventures, I can assure you that experimentation is the name of the game. The first time I made these Halloween brownies, I forgot to add the baking powder. They ended up like a deliciously dense chocolate fudge rather than brownies! Instead of being upset, I leaned in and started calling them "fudge brownies." Sometimes the best moments in the kitchen come from mistakes—the key is to have fun and not take yourself too seriously. So, even if your brownies don’t turn out as planned, they’ll still end up tasting amazing!
FAQs and Troubleshooting
-
Why are my brownies dry?
Overbaking could be the culprit! Keep an eye on them, and try to remove them once a toothpick comes out with a few moist crumbs, not dry. -
My brownies didn’t rise! What went wrong?
Ensure your baking powder is fresh. If it’s expired, your brownies won’t rise properly. Also, check that you mixed your wet and dry ingredients just enough—overmixing can lead to tough brownies! -
Can I freeze brownies?
Absolutely! Cut your brownies into squares, wrap them individually in plastic wrap, and place them in an airtight container. They’ll last for a few months in the freezer! -
How do I get clean cuts on brownies?
Run your knife under hot water, wipe it dry, and then cut. The heat will help make cleaner cuts through the fudgy brownies!
Nutritional Info
While we focus on flavors and fun, here’s a quick overview of some nutritional information per serving (based on a 2-inch square cut):
- Calories: 250
- Total Fat: 12g
- Saturated Fat: 7g
- Cholesterol: 70mg
- Sodium: 80mg
- Total Carbohydrates: 35g
- Dietary Fiber: 2g
- Sugars: 20g
- Protein: 3g
Making these Halloween brownies is more than just whipping up a treat; it’s about creating memories filled with joy and laughter with friends and family. I hope these brownies spark joy in your kitchen as they have in mine. So roll up those sleeves, get messy, and embrace the spirit of Halloween! Happy baking!
Print
Halloween Brownies: A Spooktacular Delight
- Total Time: 40 minutes
- Yield: 16 servings 1x
- Diet: Vegetarian
Description
Delightfully chocolatey brownies topped with festive sprinkles, perfect for Halloween gatherings.
Ingredients
- 1 cup unsalted butter
- 2 cups granulated sugar
- 4 large eggs
- 1 teaspoon vanilla extract
- 1 cup all-purpose flour
- 1 cup cocoa powder
- 1/2 teaspoon baking powder
- 1/2 teaspoon salt
- 1 cup chocolate chips (optional)
- Halloween-themed sprinkles
Instructions
- Preheat your oven to 350°F (175°C).
- Prepare a 9×13 inch baking pan by greasing and lining it with parchment paper.
- Melt the unsalted butter in a medium saucepan over low heat.
- Mix the melted butter with the granulated sugar until well combined.
- Add in the eggs, one at a time, followed by the vanilla extract.
- Combine the dry ingredients: flour, cocoa powder, baking powder, and salt in a separate bowl.
- Incorporate the dry ingredients into the wet mixture, stirring gently until just combined.
- Fold in the chocolate chips, if using.
- Pour the batter into the prepared baking dish and spread it evenly.
- Bake for 20-25 minutes, until a toothpick comes out with a few moist crumbs.
- Cool and decorate with Halloween sprinkles.
- Cut into squares and enjoy!
Notes
These brownies can also be topped with mini pumpkins or served with vanilla ice cream and caramel sauce for extra festivity.
- Prep Time: 15 minutes
- Cook Time: 25 minutes
- Category: Dessert
- Method: Baking
- Cuisine: American
Nutrition
- Serving Size: 1 square
- Calories: 250
- Sugar: 20g
- Sodium: 80mg
- Fat: 12g
- Saturated Fat: 7g
- Unsaturated Fat: 3g
- Trans Fat: 0g
- Carbohydrates: 35g
- Fiber: 2g
- Protein: 3g
- Cholesterol: 70mg
Keywords: Halloween, brownies, dessert, baking, festive treats
Ces gâteaux d’Halloween faciles mais horriblement bons – Elle à Table
Spooktacular Halloween Treats: Delightfully Easy Yet Horribly Delicious Cakes
Welcome to the most spine-chilling, yet utterly delightful celebration of the year—Halloween! As the leaves turn crisp and the air grows colder, my love for baking kicks into high gear. There’s just something magical about this time of year: the scent of caramel apples, the crunch of fallen leaves, and of course, the delightful thrill of creating eerie yet scrumptious treats to share. If you’re ready to add a dash of creativity and a pinch of spookiness to your baking, you’re in for a treat (pun intended!).
In today’s post, we’re diving into the world of Halloween cakes. These are not just any cakes—they’re hauntingly good, easy to whip up, and perfect for all ages! Whether you’re hosting a monster mash or simply want to scare up some fun at home, these cakes will enchant your family and friends, offering both flavors that delight and decorations that astonish.
Baking during Halloween is always a blast! I remember the first time I made Halloween-themed treats with my mother. We donned our aprons, popped on some spooky tunes, and transformed our kitchen into a playful lab of fright with flour flying and sprinkles everywhere. The anticipation in the air was electric as we waited for our delicious creations to emerge from the oven—each one transforming into a ghoul or goblin before our eyes, all while filling our abode with delightful aromas. Those moments of giggling and creating are still some of my fondest memories, and I hope this recipe will bring a dash of joy to your kitchen as well!
So let’s conjure up some magic and get started. Ready your spatulas, and let’s bake some cakes that even the bravest of souls will adore.
Ingredient List
To whip up these ghoulishly delightful cakes, you’ll need a simple lineup of ingredients. Here’s what you’ll need for one of the classic Halloween cake recipes, along with some tips to help you along the way:
-
All-purpose flour (2 cups)
The backbone of your cake. For a gluten-free option, you can substitute with a 1:1 gluten-free baking blend, which works beautifully! -
Granulated sugar (1 ½ cups)
This brings sweetness to your treats. If you want to cut down on sugar, try using coconut sugar for a lower glycemic index sweetness. -
Unsweetened cocoa powder (¾ cup)
This is what gives our cake that deep chocolate flavor. If you’re not a chocolate fan, you can use vanilla extract or simple vanilla cake mix instead! -
Baking powder (2 tsp)
The magic leavening agent! Always fresh ensures you get the best rise; if yours is older than six months, it’s time to replace it. -
Baking soda (1 tsp)
Another leavening agent that works wonders alongside baking powder for that perfect fluffy texture. -
Salt (½ tsp)
A crucial ingredient that makes the flavors pop. Don’t skip it, or your cake might taste flat! -
Eggs (2 large)
They provide moisture and richness. For a plant-based option, try substituting with a "flax egg" (1 tablespoon ground flaxseed + 2.5 tablespoons water). Let it sit for a few minutes to thicken! -
Whole milk (1 cup)
Adds moisture and creaminess to the cake. You can swap it with almond milk or any unsweetened dairy alternative for a lighter version. -
Vegetable oil (½ cup)
This keeps the cake moist. You can use melted coconut oil for a different flavor profile! -
Vanilla extract (1 tsp)
It elevates all the flavors in baking. Use pure vanilla for the best results! -
Meringue powder (optional, for frosting)
If you’re feeling adventurous and want a firmer frosting, a pinch of meringue powder will help achieve that.
Step-by-Step Instructions
Now that we’ve gathered our ingredients, let’s get to the fun part: baking our Halloween cakes! Follow these detailed steps to ensure your treats come out perfect.
-
Preheat the Oven
First and foremost, preheat your oven to 350°F (175°C). This is super important because it sets the stage for a beautifully risen cake. While that’s heating up, you can grease and flour your cake pans (I suggest two 9-inch round pans) or line them with parchment paper. -
Mix the Dry Ingredients
In a big bowl, whisk together the all-purpose flour, granulated sugar, cocoa powder, baking powder, baking soda, and salt. This step is crucial because it ensures even distribution of your leavening agents throughout the cake.Chef Tip: Use a fine-mesh sieve to shift your cocoa powder; it’ll reduce clumps and keep your cake silky smooth.
-
Combine the Wet Ingredients
In another bowl, mix together the eggs, whole milk, vegetable oil, and vanilla extract until well combined.Tip: For a fun twist, toss in a hint of almond extract for an eerily delightful flavor!
-
Combine Wet and Dry Ingredients
Pour the wet mixture into the dry ingredients. Gently stir with a spatula or a wooden spoon until just combined. Don’t over-mix—lumps are okay! Over-mixing can lead to a dense cake, and we want light and fluffy goodness here. -
Bake the Cakes
Divide the batter evenly between your prepared pans and pop them in the oven. Bake for about 30-35 minutes, or until a toothpick inserted in the center comes out clean.Chef Hack: Check for doneness at the 25-minute mark, as oven temperatures may vary!
-
Cool the Cakes
Once baked, remove them from the oven and let them cool in the pans for about 10 minutes. Then, carefully transfer them to a wire rack to cool completely.Tip: If you’re feeling extra spooky, consider carving out little sections once they’re cool to create “cavern” spaces for fillings or treats!
-
Frost and Decorate
Here comes the fun part—decorating! You can use a simple buttercream frosting, heavy cream, or even a hauntingly green tinted glaze. Go wild with sprinkles, edible glitter, or even candy eyes to give an (un)earthly touch!Note: If you want a super smooth finish, consider chilling your cakes before applying the frosting.
Serving Suggestions
Serve your Halloween cakes on a festive platter adorned with creepy décor like plastic spiders or fake cobwebs. Slice them into triangular pieces and sprinkle edible glitter to mimic stardust or spooky dust. For a refreshing twist, throw in a dollop of whipped cream or serve alongside a scoop of vanilla ice cream—everyone loves that combo!
Recipe Variations
-
Vegan Cake: Use plant-based milk, flax eggs, and apple sauce instead of oil for a vegan version that’s still indulgent.
-
Pumpkin Chocolate Hybrid: Replace half the cocoa powder with pumpkin puree for a moist, spiced twist on the classic chocolate cake!
-
Ghostly Vanilla Cake: Switch to a vanilla base instead of chocolate and top with white frosting for a ghostly look.
-
Layered Cakes: Make it a showstopper by creating a tiered cake, alternating between the chocolate and a vibrant green or orange vanilla layer!
-
Gluten-Free Option: Use almond or coconut flour instead of all-purpose flour, or go for a 1:1 gluten-free flour mix.
Chef’s Notes
Baking these Halloween cakes has always been a blast for me! My fondest moment was when I made these with my kids for their school parties—their eyes lit up when they saw the finished product. We laughed about the time the frosting turned an unintentional shade of green because we decided to “experiment.” It didn’t matter; we just called it “monster frosting!” It’s moments like these that make cooking a shared adventure. Each time I bake these cakes, they evolve a little. Sometimes I toss in leftover Halloween candies or go for different color schemes depending on what’s in my pantry.
FAQs and Troubleshooting
Q1: My cakes sunk in the middle. What went wrong?
This usually means they might have been undercooked or the oven temperature was too low. Always check for doneness, and trust your oven thermometer!
Q2: My frosting is too runny. How do I fix it?
Add more powdered sugar until you achieve the desired consistency. If you’re working with cream cheese frosting, chilling it for about 20 minutes can help thicken it up.
Q3: Can I bake this as a sheet cake?
Absolutely! Simply adjust the baking time to around 25-30 minutes for a 9×13-inch sheet pan.
Q4: Is it okay to freeze the cake?
Yes! Bake the cakes, let them cool completely, then wrap them in plastic wrap before freezing. Thaw in the fridge overnight when you’re ready to frost and serve.
Nutritional Info
For those curious about the figures behind these spooky treats, a standard slice of the chocolate Halloween cake tends to be around 250 calories, with approximately 12g of fat, 34g of carbs, and 3g of protein. Keep in mind that toppings and frostings will add to these values, so feel free to adjust as necessary for your dietary needs.
There you have it, my friends! A delightful, easy-to-make Halloween cake recipe that promises to bring joy and a sprinkle of spookiness to your kitchen. So put on your chef’s hat, grab your favorite cookie cutters, and get ready to bake up something memorable this Halloween season! Happy Cooking!
Print
Spooktacular Halloween Treats: Delightfully Easy Yet Horribly Delicious Cakes
- Total Time: 50 minutes
- Yield: 8 servings 1x
- Diet: Vegetarian
Description
These hauntingly good Halloween cakes are easy to whip up and perfect for all ages, combining delightful flavors and spooky decorations.
Ingredients
- 2 cups all-purpose flour
- 1 ½ cups granulated sugar
- ¾ cup unsweetened cocoa powder
- 2 tsp baking powder
- 1 tsp baking soda
- ½ tsp salt
- 2 large eggs
- 1 cup whole milk
- ½ cup vegetable oil
- 1 tsp vanilla extract
- Optional: Meringue powder (for frosting)
Instructions
- Preheat the oven to 350°F (175°C) and prepare your cake pans.
- Mix the dry ingredients in a bowl until well combined.
- Combine the wet ingredients in another bowl.
- Pour the wet mixture into the dry ingredients and gently stir until just combined.
- Divide the batter between the prepared pans and bake for 30-35 minutes.
- Cool the cakes in the pans for 10 minutes, then transfer to a wire rack.
- Frost and decorate your cakes as desired!
Notes
For a moist cake, avoid over-mixing. Use fun decorations for a spooky effect!
- Prep Time: 15 minutes
- Cook Time: 35 minutes
- Category: Dessert
- Method: Baking
- Cuisine: American
Nutrition
- Serving Size: 1 slice
- Calories: 250
- Sugar: 22g
- Sodium: 400mg
- Fat: 12g
- Saturated Fat: 2g
- Unsaturated Fat: 5g
- Trans Fat: 0g
- Carbohydrates: 34g
- Fiber: 3g
- Protein: 3g
- Cholesterol: 30mg
Keywords: Halloween, cakes, baking, spooky treats, easy recipes


