

Easy Vegan Nutella Mummy Hand-Pies: Halloween Party Snack
Vegan Nutella Halloween Mummy Hand-Pies: Spooktacular Treats for Your Autumn Celebrations
Welcome to a magical corner of my kitchen, where the air is filled with the enchanting scents of chocolate and spice. If you’re anything like me, the joy of cooking isn’t just about making food; it’s about creating memories, sharing laughter, and bringing a bit of cozy warmth into the hearts of those we love. With Halloween right around the corner, what better way to celebrate than by whipping up a batch of Vegan Nutella Halloween Mummy Hand-Pies? Trust me, these delightful little pastries are sure to become a tradition that will fill your kitchen with giggles and sweet aromas!
Picture this: a crisp autumn afternoon, the leaves danced in the wind, and the sweet smell of baking wafted through my mom’s kitchen. Every year, as Halloween approached, we would set aside a weekend to create spooky treats. One of my absolute favorites was this super simple Nutella dessert pies! Except back then, we didn’t have a reliable store-bought vegan option, and we certainly didn’t know what “vegan” meant. Yet somehow, we always ended up with gooey chocolate filling enveloped in flaky, buttery pastry. Fast forward to today, and while my mom may not be in the kitchen with me, her spirit lives on in every recipe I craft. Today, I’m excited to share a plant-based twist on our childhood favorite that’s just as delicious and perfect for a Halloween gathering.
These hand-pies are not only adorable but also incredibly easy to make! Plus, they are filled with a rich, vegan Nutella equivalent – yep, it’s that luscious chocolate-hazelnut spread you’ve always loved – but made without any animal products. The flaky crust resembles the fun, ghostly bandages of a mummy, making them a wonderfully festive choice for your Halloween soirée. So grab your apron, and let’s dive into making these scrumptious treats that awaken your inner child while satisfying your sweet tooth!
A Whimsical Memory that Sparks Joy
One of my most cherished Halloween memories revolves around these hand-pies. I can still recall the gleeful chaos that unfolded in our kitchen. My siblings and I had concocted a plan to surprise our parents with a batch of spooky treats to celebrate the season. We donned our best Halloween costumes (because what’s Halloween without a little dress-up, right?), wielding spatulas and cookie cutters like our culinary swords.
There we were, flour dusting our faces, laughing uncontrollably as we tried to form little mummies from pieces of pie crust. Everything turned into a delightful mess of dough and Nutella – and the more mess we made, the more we laughed! Once they were baked, our “mummies” came to life, delightfully golden and flaky, and that first bite, revealed gooey chocolate heaven. Each hand-pie was a nostalgic nod to the magic and joy of family—just the kind of warmth you can always spread through food. It’s those kinds of memories that inspired me to recreate and share this vegan version. After all, food not only nourishes our bodies but also feeds our soul!
Ingredients
Now, let’s gather our ingredients! This recipe is straightforward and calls for items you may already have on hand. Here’s what you need to create these bewitching hand-pies:
-
Vegan Pie Crust
- What it is: This forms the flaky exterior of your hand-pies.
- Substitution tips: You can use store-bought vegan pie crust for quicker preparation. Just make sure to check the label!
-
Nutella (or Vegan Hazelnut Spread)
- What it is: The gooey, rich filling that makes these hand-pies irresistible.
- Substitution tips: If Nutella is not available, any other vegan hazelnut spread works beautifully or try making your own!
-
All-Purpose Flour
- What it is: A classic choice for the crust, lending structure and tenderness.
- Substitution tips: If you’re looking for a gluten-free option, you can substitute with a gluten-free all-purpose flour blend.
-
Confectioners’ Sugar
- What it is: This sweetens the pastry and creates a nice drizzle for the mummies.
- Substitution tips: If you’re avoiding sugar, you could use powdered monk fruit or coconut sugar.
-
Unsweetened Almond Milk (or any plant milk)
- What it is: This helps bind the pie crust and adds moisture.
- Substitution tips: Any non-dairy milk (like soy, oat, or coconut milk) works well here.
-
Salt
- What it is: A crucial flavor enhancer that brings all the elements together.
- Chef insight: Just a pinch can make all the difference!
-
Vanilla Extract
- What it is: Adds a lovely aroma and depth of flavor to both the crust and filling.
- Substitution tips: If you don’t have vanilla extract, almond extract is a great alternative.
Now that we have our ingredients ready, let’s get to the fun part: cooking!
Step-by-Step Instructions
-
Make the Dough:
In a large bowl, combine 2 cups of all-purpose flour, ½ teaspoon of salt, and 1 tablespoon of confectioners’ sugar. To bring the dough to life, add ½ cup of vegan butter (chilled and cubed) and use your fingers or a pastry cutter to mash the butter into the flour until it resembles coarse crumbs. This step is essential—it’s what gives your hand-pies that buttery, flaky texture we love! -
Add the Liquid:
Gradually pour in 4 to 6 tablespoons of almond milk and 1 teaspoon of vanilla extract, mixing until the dough just comes together. Don’t overmix—I promise, your hand-pies will thank you later! Once combined, wrap the dough in plastic wrap and refrigerate it for at least 30 minutes. This will allow the butter to firm up, ensuring a flakier crust. -
Preheat the Oven:
While the dough chills, preheat your oven to 375°F (190°C). This way, it’s ready to bake as soon as your hand-pies are assembled. -
Roll Out the Dough:
On a floured surface, roll out the dough to about ⅛ inch thick. Use a round cookie cutter (or any circular object) to cut out circles about 4 inches in diameter. Transfer them to a parchment-lined baking sheet. -
Fill the Mummies:
Place about a tablespoon of Nutella (or your favorite hazelnut spread) in the center of each round. Be sure to leave some space around the edges to seal the pies later. -
Seal the Pies:
To form the mummies, take a smaller circle of dough and cut it into thin strips (about ½ inch wide). Place a few strips across the filling to resemble a mummy’s wrappings. Press the edges of the bottom dough circle with a fork or pinch them to seal, ensuring nothing leaks out while baking. -
Brush with Almond Milk:
To help achieve that golden, mouthwatering finish, brush the top of your mummies with a little almond milk. This little chef hack makes a significant difference in creating that bakery-style sheen. -
Bake the Hand-Pies:
Pop those beauties into the preheated oven for 20-25 minutes, or until they are golden brown and puffed. Keep a close eye on them—they bake quickly and you want them to be perfectly golden! -
Cool and Decorate:
Once baked, allow the hand-pies to cool for at least 10 minutes. When you’re ready, create a quick glaze by mixing a couple of tablespoons of almond milk with confectioners’ sugar until you reach a drizzling consistency. Drizzle it over the cooled hand-pies to give them some adorable mummy eyes (you can use mini chocolate chips if you want them to look especially spooky!).
Serving Suggestions
These Vegan Nutella Halloween Mummy Hand-Pies are perfect for serving at a Halloween party, Halloween-themed brunch, or even as a fun after-school treat. Arrange them on a festive platter and add some spooky decorations, like small plastic spiders or Halloween-themed napkins. They also pair wonderfully with a cup of tea or coffee for those chilly fall evenings!
Recipe Variations
If you’re looking to switch things up and add a personal flair, here are a few fun twists to your mummies:
- Berry Mummies: Swap out the Nutella for your favorite berry jam or preserves for a delightful fruity surprise!
- Pumpkin Spice Fill: Try filling your hand-pies with a mix of pumpkin puree, vegan cream cheese, and pumpkin spice for an autumnal taste explosion.
- Peanut Butter Surprise: Change it up by using a vegan peanut butter spread for a nutty twist on the classic!
- Chocolate Chip Spillover: Add a handful of dairy-free chocolate chips to the Nutella for extra chocolaty goodness!
- Cinnamon Sugar Dust: Dust the hand-pies with cinnamon sugar post-baking for a sweet crunch.
Chef’s Notes
As with any recipe, feel free to have fun with it! Get creative with the filling, play with shapes (who says mummies can’t be ghosts on Halloween?), and don’t be afraid to let your personality shine through the kitchen chaos! I’ll often throw in whatever leftover candies or nuts I have lying around. The recipe has beautifully evolved from my childhood kitchen memories into a recipe that adapts to the seasons and my ever-changing cravings. Remember, the magic of cooking lies not in perfection but in the joyful experience of making something delicious!
FAQs and Troubleshooting
1. My dough is too crumbly; what did I do wrong?
A crumbly dough could be a sign that there wasn’t enough liquid added during mixing or the butter got too warm. Make sure your butter is chilled, and add a bit more almond milk if it feels too dry.
2. Why did my hand-pies leak filling while baking?
If the filling leaks, it might be that the pies weren’t sealed securely. Ensure that you press down firmly around the edges and check for any punctures in the crust.
3. Can I freeze the hand-pies?
Absolutely! Just bake them, then allow them to cool completely. Place them in airtight containers or freezer bags, and they’ll last up to three months in the freezer. Reheat them in the oven straight from frozen—you may need to add a few extra minutes to the baking time.
4. How do I store leftovers?
These are best eaten fresh, but you can store them in an airtight container at room temperature for 1-2 days. If you’ve made a large batch (because who could resist?), consider putting some in the fridge for a longer shelf life.
Nutritional Info
Calories: Approx. 150 per hand-pie
Fat: 7g
Carbohydrates: 20g
Protein: 2g
Vegan and nut-free options available based on ingredient choices.
So there you have it! A playful and heartfelt recipe to bring those warm Halloween vibes right into your kitchen. These Vegan Nutella Halloween Mummy Hand-Pies are more than just a delightful treat; they’re a celebration of memories, creativity, and, most importantly, good food! Happy baking!
Print
Vegan Nutella Halloween Mummy Hand-Pies
- Total Time: 40 minutes
- Yield: 12 hand-pies 1x
- Diet: Vegan
Description
Delightful vegan hand-pies filled with rich hazelnut spread, perfect for Halloween celebrations.
Ingredients
- 2 cups all-purpose flour
- ½ teaspoon salt
- 1 tablespoon confectioners’ sugar
- ½ cup vegan butter, chilled and cubed
- 4 to 6 tablespoons unsweetened almond milk (or any plant milk)
- 1 teaspoon vanilla extract
- Nutella (or vegan hazelnut spread)
- Mini chocolate chips (optional, for decoration)
Instructions
- Combine the flour, salt, and confectioners’ sugar in a large bowl.
- Add the vegan butter and mix until you get coarse crumbs.
- Pour in the almond milk and vanilla extract, mixing until the dough comes together.
- Wrap the dough in plastic wrap and refrigerate for at least 30 minutes.
- Preheat your oven to 375°F (190°C).
- Roll out the dough to about ⅛ inch thick and cut into 4-inch circles.
- Place one tablespoon of Nutella in the center of each round.
- Cut smaller circles into strips to form the mummy wrappings and seal the edges.
- Brush the top with almond milk for a golden finish.
- Bake for 20-25 minutes until golden brown.
- Allow to cool, then drizzle with a glaze made from almond milk and confectioners’ sugar.
Notes
These hand-pies can be customized with different fillings like berry jam or pumpkin puree. Perfect for any Halloween party!
- Prep Time: 15 minutes
- Cook Time: 25 minutes
- Category: Dessert
- Method: Baking
- Cuisine: Vegan
Nutrition
- Serving Size: 1 hand-pie
- Calories: 150
- Sugar: 5g
- Sodium: 200mg
- Fat: 7g
- Saturated Fat: 1g
- Unsaturated Fat: 5g
- Trans Fat: 0g
- Carbohydrates: 20g
- Fiber: 1g
- Protein: 2g
- Cholesterol: 0mg
Keywords: Vegan Halloween dessert, Nutella hand-pies, spooky treats, Halloween recipes
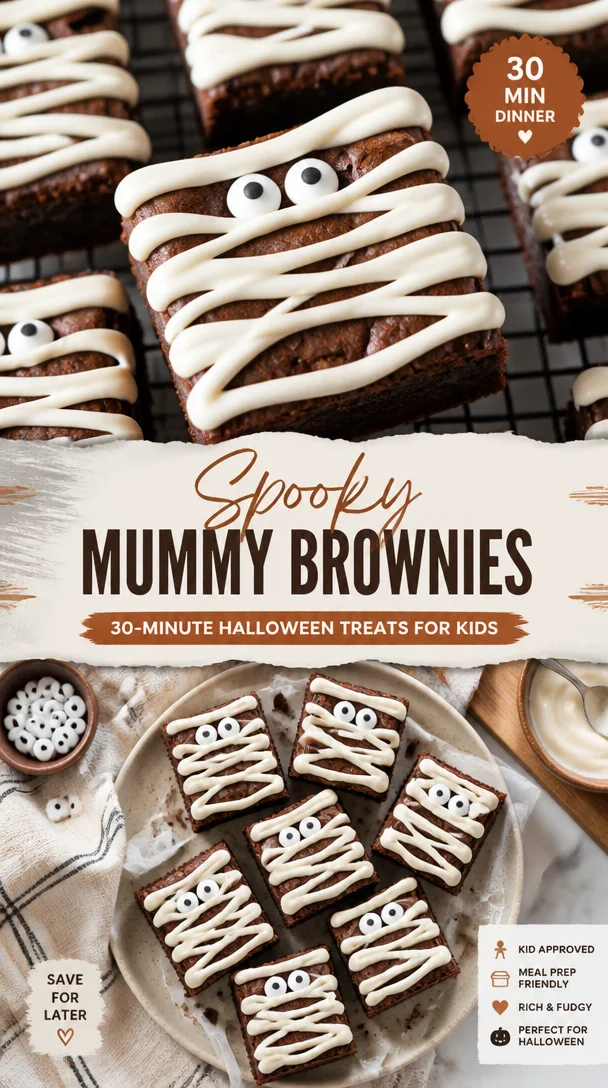
Spooky Mummy Brownies: 30-Minute Halloween Treats for Kids
Spooky Mummy Brownies: A Halloween Treat to Delight
Welcome to my kitchen, food friends! I’m so thrilled to have you here today. As we approach Halloween, the air becomes crisp, leaves crunch underfoot, and the scent of baked goods wafts through homes everywhere. There’s something truly magical about this time of year — it’s all about treats, spooky vibes, and the joy of creating something delightful to share with friends and family. Today, I’m sharing a recipe that’s near and dear to my heart: Spooky Mummy Brownies.
These brownies are not just fudgy and decadent; they’re irresistibly cute with their mummy-like appearance. Perfect for both kids and adults, these treats may just become your new Halloween tradition. Imagine this: a cozy kitchen filled with laughter and the warm aroma of chocolate as you whip up a batch of these spooky brownies. It’s a recipe that combines the fun of crafting with the joy of cooking — and who could say no to that?
When I think of Halloween, I can’t help but remember the excitement shared with my family as we prepped for the spooky season. We’d gather together, donned in our costumes, with bowls of candy and stacks of decorations piled high. One year, we decided to throw a Halloween-themed dinner party, complete with ghoulish decorations and a dessert table that had everyone buzzing. That’s when I first served these Mummy Brownies, and their popularity skyrocketed. They became the highlight of the evening, and the kids couldn’t get enough of them. The best part? The scaredy-cats among us loved that they were surprisingly satisfying and indulgent, despite their eerie look.
So, ready to dive into the creation of these delightful mummies? Let’s get baking!
Ingredients
For your Spooky Mummy Brownies, you will need the following ingredients:
-
1 cup (2 sticks) unsalted butter: Butter adds richness to your brownies; feel free to use a dairy-free alternative if you’re looking for a vegan option.
-
2 cups granulated sugar: This sweetens your brownies wonderfully. For a less sweet version, try using coconut sugar.
-
4 large eggs: Eggs provide moisture and help bind everything together. If you’re vegan, you can substitute ground flaxseed (1 tablespoon of flaxseed with 3 tablespoons of water for one egg).
-
1 teaspoon vanilla extract: Vanilla enhances the flavors. Use pure vanilla for the best taste, or sub with almond extract for a different twist!
-
1 cup all-purpose flour: This gives structure to your brownies. For gluten-free options, a 1:1 gluten-free flour blend works great.
-
1 cup unsweetened cocoa powder: Cocoa is key for that rich chocolate flavor. Dutch-process cocoa can be used for a deeper taste.
-
1 teaspoon baking powder: This helps the brownies rise slightly during baking. If you’re out, baking soda works in a pinch—just use half the amount.
-
½ teaspoon salt: A little salt balances the sweetness. You can reduce it slightly if you are watching your sodium intake.
-
Candy eyes: These bring the mummies to life! Use small chocolate chips if you can’t find candy eyes.
-
White chocolate melts or candy coating: For wrapping your brownies like mummies. If you want to keep it dairy-free, look for vegan white chocolate.
Step-by-Step Instructions
Let’s jump right into making these spooky delights! Follow these steps for brownie perfection:
-
Preheat the oven to 350°F (175°C). This is essential, as it allows for even cooking right from the start. While it heats, prepare your baking pan.
-
Prepare your baking pan: Grease a 9×13 inch baking dish or line it with parchment paper. This will prevent sticking and make it easier to remove the brownies after baking. I always recommend parchment paper for ease of lifting out the brownies.
-
Melt the butter: In a medium saucepan over low heat, melt the butter. Stir it gently until it has fully melted, making sure it doesn’t brown. If you do overheat and brown it, don’t worry — just let it cool a bit before proceeding.
-
Combine sugar and eggs: In a large mixing bowl, whisk together the melted butter and sugar until well blended. Then, add the eggs one at a time, mixing thoroughly after each. The mixture should be creamy and smooth.
-
Add the vanilla: Stir in the vanilla extract. This is where the magic happens, as the aroma fills your kitchen, making it feel cozier.
-
Incorporate dry ingredients: Now, sift together the flour, cocoa powder, baking powder, and salt in another bowl. This step is key to ensuring there are no lumps in your brownies and the flavors mix well. Gradually add this dry mixture to the wet ingredients and stir until just combined. Be careful not to overmix. We want fudgy brownies, not cake-like ones!
-
Pour into the pan: Transfer the brownie batter into the prepared baking dish and spread it evenly. A spatula works great for this step.
-
Bake for 25-30 minutes: You know your brownies are done when a toothpick inserted into the center comes out with a few moist crumbs. No batter, but a little gooey is exactly what we’re aiming for.
-
Cool completely: Once baked, let the brownies cool in the pan on a wire rack. This allows them to firm up before cutting.
-
Cut into pieces: Once cooled, cut the brownies into rectangles or squares, depending on your preference.
-
Mummify them up!: Melt your white chocolate melts according to the package instructions. Use a piping bag or a zip-top bag with the corner snipped off to drizzle the melted chocolate over the brownies, creating mummy bandages. Place two candy eyes on each brownie while the chocolate is still soft.
Serving Suggestions
Serve your Spooky Mummy Brownies on a rustic wooden board or a vibrant Halloween-themed platter. They look fantastic with miniature pumpkins or autumn leaves scattered around for decor. These brownies are perfect for Halloween parties, school events, or simply to enjoy with your family on a cozy movie night. Pair them with a scoop of vanilla ice cream or a drizzle of caramel for an added treat!
Recipe Variations
Want to mix things up? Here are a few creative twists you can try:
-
Peanut Butter Swirl: Before baking, drop spoonfuls of peanut butter into the brownie batter and swirl it lightly for a delicious twist.
-
Fruity Add-ins: Add chopped cherries or raspberries for a tart surprise within the brownies.
-
Spicy Kick: A pinch of cinnamon or cayenne pepper can give your brownies a unique flavor profile with a little warmth.
-
Nutty Crunch: Toss in some chopped nuts like walnuts or pecans to add texture—just make sure your guests are nut-friendly!
-
Oreo Surprise: Crush some Oreo cookies and fold them into the batter. The cookies will create delightful pockets of flavor.
Chef’s Notes
As with any beloved recipe, mine has seen many iterations over the years. The chocolate drizzle was born from my love for decoration, and every Halloween party I host somehow ends with these brownies being the star! I remember an autumn night when I forgot to buy candy eyes, and we ended up using mini chocolate chips instead. The kids loved them just as much and even named them “Choco-Mummies!”
Every time I make these brownies, I reminisce about those cozy family gatherings and how the simple act of cooking can bring everyone together. These brownies aren’t just a treat; they’re a medium for laughter and connection!
FAQs and Troubleshooting
Here are some common questions I’ve received, along with answers:
1. Why are my brownies cakey?
- Ensure you’re not overmixing the batter. Also, be cautious with your baking time; check your brownies a few minutes early. Fudgy brownie perfection lies just under the “done” threshold.
2. What’s the best way to store leftover brownies?
- Store them in an airtight container at room temperature for up to three days. They also freeze beautifully for up to three months!
3. Can I make these brownies ahead of time?
- Absolutely! You can make them a day or two before your event. Just keep them covered to maintain freshness.
4. What if I want vegan brownies?
- You can easily substitute the eggs with ground flaxseed and use plant-based butter and chocolate. Just check that your chocolate and candy eyes are dairy-free!
Nutritional Info
While I usually focus on enjoyment over nutrition when it comes to indulging, I believe it’s helpful to know what you’re eating! Each brownie (out of about 24 servings) contains approximately:
- Calories: 200-250
- Total Fat: 10g
- Carbohydrates: 30g
- Protein: 2g
Feel free to adjust portions based on your serving size and dietary needs!
Conclusion
There you have it! Spooky Mummy Brownies that are not only scrumptious but also add a playful twist to your Halloween festivities. I hope this recipe fills your kitchen with warmth and laughter, making memories with every bite. So, gather your loved ones, crank up your favorite Halloween tunes, and have a blast while baking!
Happy Halloween, and may your kitchen always smell like something delicious! If you make these brownies, I’d love to hear how they turn out. Share your spooky creations with me!
Print
Spooky Mummy Brownies
- Total Time: 45 minutes
- Yield: 24 brownies 1x
- Diet: Vegetarian
Description
These fudgy and decadent Spooky Mummy Brownies are irresistibly cute and perfect for Halloween celebrations.
Ingredients
- 1 cup (2 sticks) unsalted butter
- 2 cups granulated sugar
- 4 large eggs
- 1 teaspoon vanilla extract
- 1 cup all-purpose flour
- 1 cup unsweetened cocoa powder
- 1 teaspoon baking powder
- ½ teaspoon salt
- Candy eyes
- White chocolate melts or candy coating
Instructions
- Preheat the oven to 350°F (175°C).
- Prepare your baking pan: Grease a 9×13 inch baking dish or line it with parchment paper.
- Melt the butter in a medium saucepan over low heat.
- Combine the melted butter and sugar in a large mixing bowl until well blended.
- Add the eggs one at a time, mixing thoroughly after each.
- Stir in the vanilla extract.
- Incorporate dry ingredients: sift flour, cocoa powder, baking powder, and salt in another bowl.
- Gradually add the dry mixture to the wet ingredients and stir until just combined.
- Pour the brownie batter into the prepared baking dish and spread it evenly.
- Bake for 25-30 minutes until a toothpick comes out with a few moist crumbs.
- Cool completely in the pan on a wire rack.
- Cut into rectangles or squares.
- Mummify the brownies with melted white chocolate and place candy eyes on top.
Notes
Store leftover brownies in an airtight container at room temperature for up to three days or freeze for up to three months.
- Prep Time: 15 minutes
- Cook Time: 30 minutes
- Category: Dessert
- Method: Baking
- Cuisine: American
Nutrition
- Serving Size: 1 brownie
- Calories: 225
- Sugar: 25g
- Sodium: 85mg
- Fat: 10g
- Saturated Fat: 6g
- Unsaturated Fat: 4g
- Trans Fat: 0g
- Carbohydrates: 30g
- Fiber: 2g
- Protein: 3g
- Cholesterol: 30mg
Keywords: Halloween, brownies, dessert, spooky, treats
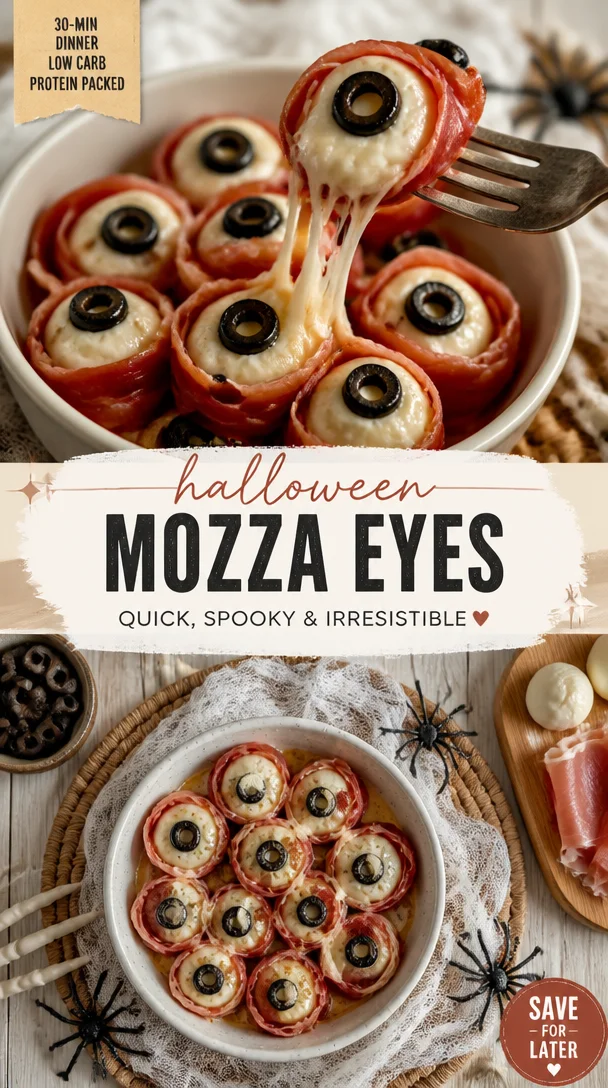
Halloween Mozza Eyes: Quick, Spooky Mozzarella Eyeballs
Halloween Mozza Eyes
Introduction
Welcome to my kitchen, fellow food lovers! As the air turns crisp and the nights grow longer, there’s an undeniable excitement that creeps in. Halloween isn’t just a day for candy and costumes; it’s a chance to get a little creative in the kitchen and whip up some whimsically spooky treats! Today, I’m thrilled to share one of my favorite Halloween snacks: Mozza Eyes.
These adorable bites are not only fun to make but equally delightful to eat. Imagine creamy mozzarella balls staring back at you, complete with playful olives and cherry tomatoes, ready to make any gathering a hit. The best part? They come together in no time, allowing you to spend more time enjoying the festivities and less time fretting over complicated recipes. Whether you’re hosting a pumpkin-carving party or simply seeking a festive treat for your family’s Halloween movie night, Mozza Eyes are sure to turn heads—and stomachs!
I’ve always believed that the kitchen is a space for creativity and laughter. Over the years, I’ve explored countless recipes, but nothing quite compares to the joy of sharing a dish that simply screams fun! Let’s dive right in, and I’ll guide you through making these spooky snacks that are not only delicious but also a fantastic way to kick off the Halloween spirit.
Personal Story
Let me take you back to my childhood, where my love for Halloween first blossomed. I remember stringing fake cobwebs in the living room, surrounded by pumpkins, and preparing for the ghoulish trick-or-treaters. It was during one of these joyful afternoons that I decided to get my little hands into the kitchen with my mom. We whipped up a pot of her famous tomato soup, and just for fun, she had the brilliant idea of crafting eerie "eyeball" mozzarella balls to float in the soup.
As we crafted our mozzarella eyes, we laughed and shared stories about the spookiest pranks we had pulled on friends and family. The balance of laughter, delicious flavors, and the thrill of Halloween made that memory one I cherish deeply. Fast forward to today, and that playful spirit remains. Now it’s my turn to not only create memories with family and friends but to inspire others to find joy in their kitchens. So let’s put on our aprons and get to work on turning ordinary ingredients into extraordinary Halloween delights!
Ingredients
For our Halloween Mozza Eyes, you’ll need a few simple, yet crucial ingredients. Here’s what you’ll need:
-
Mozzarella Balls: Use bocconcini or ciliegine mozzarella. They’re bite-sized, creamy, and will mimic the eyeball effect wonderfully. Tip: If mozzarella isn’t available, ricotta balls can work too!
-
Black Olives: These will serve as the “pupil” of our eyes. You can use whole olives or sliced, depending on how eerie you want them to look. Substitution: Substitute with dark grapes for a sweet twist!
-
Cherry Tomatoes: Their red color adds a pop of festivity, plus they go perfectly with mozzarella. You could even use heirloom tomatoes for a more unique aesthetic. Insight: Opt for firm tomatoes to keep their shape in the dish.
-
Fresh Basil: This isn’t just for decoration; a hint of freshness elevates the flavor profile of our dish. Tip: If you can’t find fresh basil, you can use arugula or spinach for added color.
-
Balsamic Glaze: A drizzle here and there can elevate these Mozza Eyes by adding a touch of sweetness that plays off the savory mozzarella. Note: Feel free to make your own by reducing balsamic vinegar over low heat!
Step-by-Step Instructions
Now that we have our ingredients ready, it’s time for the fun part—creating these spooky Mozza Eyes! Follow along with these simple steps:
-
Prep Your Ingredients: Rinse the mozzarella balls and cherry tomatoes under cool water, then pat them dry. Slice the cherry tomatoes in half if you want a more even balance between the mozzarella and the tomato.
Chef Tip: A paring knife is great for slicing tomatoes without squishing them!
-
Make the Eyes: For each eye, take one mozzarella ball and place it in the center of your serving platter. Then, take a sliced or whole black olive and push it into the center of the mozzarella ball. This will create that uncanny "pupil" dynamic!
Commentary: Don’t be afraid to mix and match; some eyes can be more expressive with half olives pointing in different directions.
-
Add the Cherry Tomato: Next, take a halved cherry tomato and place it right beside (or on top of) the mozzarella eye. This will mimic the surrounding tissue and enhance the spooky presentation.
Chef Hack: For a more grotesque look, try using slightly smaller cherry tomatoes!
-
Give Them Life: Once you’ve laid out your mozzarella eyes, finely chop some fresh basil and sprinkle it around the edges—this adds a pop of color amidst the array of white and red.
-
Drizzle with Balsamic Glaze: To finish off your spooktacular creation, drizzle some balsamic glaze over the mozzarella eyes and the basil. This adds a delightful tang that balances everything out.
Personal Note: I love to reserve some balsamic glaze for dipping—because who doesn’t love a good dressing?
Serving Suggestions
When it comes to serving your Mozza Eyes, presentation is key! Use a large, beautiful platter that allows your lively creations to shine. You can also set them alongside some crackers or toasted baguette slices for added crunch. Arrange the mozzarella eyes close together to create a cohesive eyeball effect, and perhaps place some extra cherry tomato halves, olives, or basil leaves around the serving tray for color.
Recipe Variations
Feeling adventurous? Here are a few creative twists to elevate your Mozza Eyes:
-
Spicy Version: Use jalapeño slices instead of olives for a fiery kick!
-
Caprese Style: Layer fresh mozzarella and cherry tomatoes on skewers with basil for a more substantial bite.
-
Gluten-Free Option: Serve these eyes with gluten-free crackers or cucumber slices for a refreshing crunch.
-
Vegan Alternative: Swap mozzarella for marinated tofu balls (they’ll soak up the flavors beautifully!).
-
Flavor Experimentalist: Try infusing your mozzarella with garlic or herbs before assembling for an extra flavor burst!
Chef’s Notes
This recipe has become a Halloween staple in my house, evolving from my childhood memories into a festive tradition. I often find myself experimenting with the presentation—sometimes I make an entire plate of “freaky” eyes, and other times I incorporate them into Halloween-themed charcuterie boards.
One of my favorite moments happened last Halloween when my son’s friends came over. As I served these Mozza Eyes, their ecstatic reactions—from squeals to laughter—cracked me up! It reminded me how food can transform a simple gathering into a cherished memory, full of flavor and fun.
FAQs and Troubleshooting
1. My mozzarella balls are oozing liquid, how do I fix this?
Occasionally, mozzarella can release some liquid. Just be sure to drain them well or pat them dry with a paper towel before using to minimize the mess.
2. Can I prepare these in advance?
Absolutely! You can assemble the Mozza Eyes a few hours ahead. However, I recommend waiting to drizzle the balsamic glaze until just before serving to maintain freshness.
3. What if I’m not a fan of olives?
No problem! You can leave them out entirely or use pickles, capers, or even small dollops of avocado for a unique twist.
4. How do I store leftovers?
Keep any leftovers in an airtight container in the refrigerator for up to 2 days. Just know that the texture may change a bit as time goes on.
Nutritional Info
While I recommend enjoying these Mozza Eyes in moderation as a delightful snack, here’s a rough estimate of what you might expect per serving (approx. 4 Mozza Eyes):
- Calories: 150
- Protein: 10g
- Carbohydrates: 6g
- Fat: 9g
- Sodium: 400mg
So there you have it—all the ingredients, insights, and tips needed to whip up your own Halloween Mozza Eyes! I hope this recipe sparks joy in your kitchen and becomes a favorite tradition for you, too. Happy cooking, and may your Halloween be filled with spooky fun and delicious treats!
Print
Halloween Mozza Eyes
- Total Time: 10 minutes
- Yield: 4 servings
- Diet: Vegetarian
Description
Adorable mozzarella bites resembling spooky eyes, perfect for Halloween gatherings.
Ingredients
- Bocconcini or ciliegine mozzarella balls
- Black olives
- Cherry tomatoes
- Fresh basil
- Balsamic glaze
Instructions
- Prep your ingredients: Rinse the mozzarella balls and cherry tomatoes under cool water, then pat them dry. Slice the cherry tomatoes in half if you want a more even balance between the mozzarella and the tomato.
- Make the eyes: For each eye, take one mozzarella ball and place it in the center of your serving platter. Then, take a sliced or whole black olive and push it into the center of the mozzarella ball.
- Add the cherry tomato: Next, take a halved cherry tomato and place it right beside (or on top of) the mozzarella eye.
- Give them life: Once you’ve laid out your mozzarella eyes, finely chop some fresh basil and sprinkle it around the edges.
- Drizzle with balsamic glaze: To finish off your spooktacular creation, drizzle some balsamic glaze over the mozzarella eyes and the basil.
Notes
Assemble a few hours ahead but wait to drizzle with balsamic glaze until just before serving for freshness.
- Prep Time: 10 minutes
- Cook Time: 0 minutes
- Category: Appetizer
- Method: No-Cook
- Cuisine: Italian
Nutrition
- Serving Size: 4 Mozza Eyes
- Calories: 150
- Sugar: 3g
- Sodium: 400mg
- Fat: 9g
- Saturated Fat: 3g
- Unsaturated Fat: 5g
- Trans Fat: 0g
- Carbohydrates: 6g
- Fiber: 1g
- Protein: 10g
- Cholesterol: 25mg
Keywords: Halloween, Mozza Eyes, Spooky Snack, Appetizer
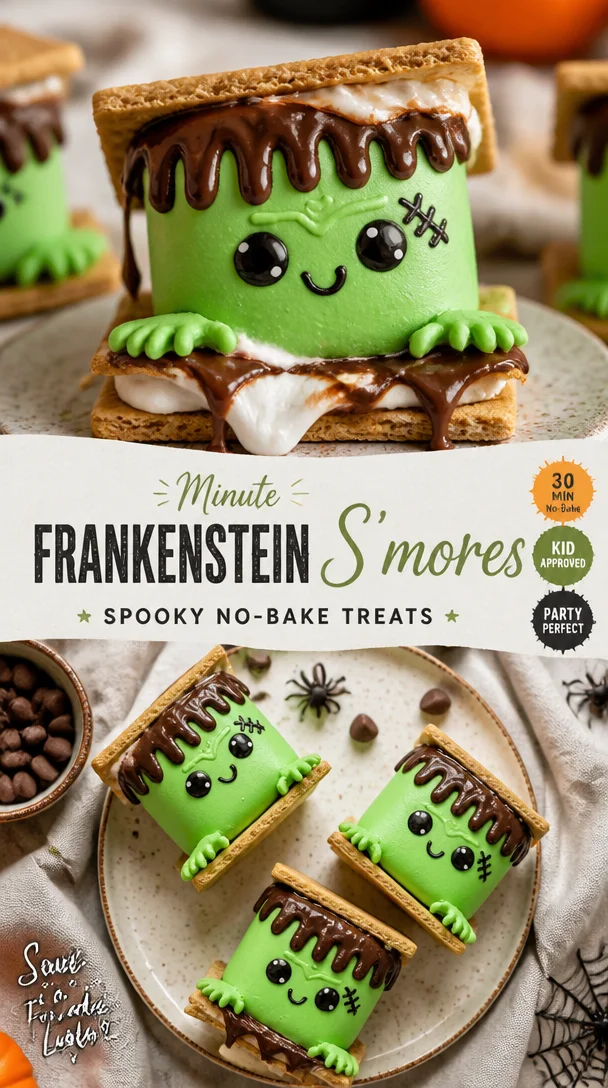
Minute Frankenstein S’mores: Spooky No-Bake Treats
Frankenstein S’mores: A Spooktacular Twist on a Classic Treat
Welcome, my fellow food lovers! Today, we’re diving into a fun kitchen adventure that’s perfect for anyone looking to add a little spooky flair to their dessert table. Inspired by the beloved campfire classic, I’m excited to introduce you to my Frankenstein S’mores: a ghoulishly green twist that’s just as delicious as the original without losing that playful charm we all adore. Whether you’re hosting a Halloween party, a cozy movie night, or just in the mood for some treats that will impress friends and family, these s’mores are sure to steal the show!
Let’s face it: there’s something magical about the combination of melted chocolate, sticky marshmallows, and crispy graham crackers. They transport us back to our childhood, reminding us of laughter around the campfire and sticky fingers at sleepovers. Now, imagine taking that nostalgic recipe and adding a modern, monstrous twist. Trust me, your taste buds will thank you!
As we embark on this sugary journey, I’ll be your guide, sharing personal stories, essential tips, and every step of the way to ensure your Frankenstein S’mores are a hit. So grab your apron (or don’t; I know how messy things can get), and let’s get cooking!
A Sweet Memory
I have a particularly fond memory that revolves around s’mores. It takes me back to those summer nights spent at my grandparents’ cabin in the woods. You could smell the pine trees mingling with the smoke from the campfire as my siblings and I giggled, dodging around the flickering firelight. My grandmother would always station herself at the fire, expertly roasting marshmallows to achieve that perfect golden-brown texture. I remember eagerly waiting for my turn, clutching my graham crackers and chocolate.
One night, in a cheeky spirit of culinary creativity, we decided to switch things up. Instead of regular chocolate, we rummaged through the pantry and found some colorful candies. We dubbed our creation “witches’ s’mores” that night, and it sparked an idea that never truly left me. Now, as an adult, I love taking simple recipes and putting a whimsical spin on them, just like that night. With Halloween around the corner, I thought it was time to breathe new life into my childhood nostalgia with these Frankenstein S’mores!
Ingredients
Here’s what you’ll need to whip up these delightful treats:
-
Graham Crackers:
- Explanation: The classic base for s’mores! Their crunchy texture and honey sweetness are essential.
- Substitution Tips: You can swap them with chocolate graham crackers for a chocolatey boost or use gluten-free options if needed.
-
Green Marshmallows (or regular plus food coloring):
- Explanation: These are crucial for that Frankenstein vibe.
- Quick Chef Insight: You can actually use white marshmallows and dip them in green candy melts for an even more vibrant look!
-
Chocolate Bars:
- Explanation: Mini chocolate bars work best for easy melting and layering.
- Substitution Tips: Use dark, milk, or even white chocolate, depending on your preference, or try flavored chocolates like peppermint for a fun twist.
-
Vanilla Frosting:
- Explanation: This will act as our “green goo” to make these s’mores extra creepy.
- Chef Insight: If you’d like a healthier option, try Greek yogurt mixed with a bit of green food coloring.
-
Plastic “Monster” Eyeballs (optional):
- Explanation: These are purely for decoration and fun!
- Fun Tip: You can find edible candy eyeballs for a sweet touch instead!
-
Cooking Spray (optional):
- Explanation: Helps prevent sticking if you’re using a pan method.
- Chef Insight: Just a light spray will do; we don’t want our marshmallows to slide off!
Step-by-Step Instructions
Now that we’ve got our ingredients lined up, let’s dive right into making these spooky treats! Follow along and don’t hesitate to get messy—after all, kitchen magic often comes with a sprinkle of chaos.
-
Prep Your Ingredients:
- Gather all your ingredients and preheat your oven to 350°F (175°C) if you’re using it. This will make the s’mores nice and gooey inside!
-
Line Your Baking Tray:
- If going the oven route, line a baking tray with parchment paper. Be generous with that spray to avoid any sticky situations.
-
Layer the Graham Crackers:
- Take a graham cracker and place it on the tray. You can break them in half if you prefer smaller s’mores or keep them whole for a substantial bite.
-
Add the Chocolate:
- Place a piece of your chosen chocolate bar on top of the graham cracker. Feel free to use layers if you’re feeling adventurous!
-
Melt the Marshmallows:
- Now, either roast marshmallows over the fire, use a kitchen torch, or pop them in the microwave for about 10-15 seconds just until they start to puff up. Try not to overdo it!
-
Assemble the S’mores:
- Top those gooey marshmallows with a second graham cracker. Press down gently so they stick together, and let the melted chocolate do its magic.
-
Frost with Green Goo:
- Smear vanilla frosting on top of the assembled s’mores to create that creepy effect. Don’t skimp on the “goo”—this is what makes them Frankenstein!
-
Decorate with Eyeballs:
- If using edible eyeballs, now’s the time to stick them on for that perfectly frightening look!
-
Chill or Serve Warm:
- You can serve these immediately for that gooey factor or pop them in the fridge for a bit if you prefer them a bit firm.
Serving Suggestions
To really make these Frankenstein S’mores pop, consider arranging them on a platter alongside some fake spider webs and mini plastic spiders for a fun Halloween touch. You could even place a few candles around them for that perfect ambiance. For a cozy movie night, serve them on a rustic wooden board, paired with your favorite film snacks. And don’t forget to have napkins on hand—these treats can get a little messy (in the best way possible)!
Recipe Variations
Looking to put your own spin on these Frankenstein S’mores? Here are a few fun variations to consider:
- Nutty Crunch: Add crushed nuts like almonds or peanuts for a delightful crunch.
- Spooky Spices: A sprinkle of cinnamon or cayenne can add a warm bite to the frosting!
- Different Flavors: Replace the chocolate with caramel squares for a sweet twist, or use flavored marshmallows, such as strawberry or mint.
- Vegan Version: Swap regular marshmallows for vegan options and use dairy-free chocolate for a plant-based treat.
- Mini-Mores: Use mini graham crackers and marshmallows for bite-sized treats perfect for parties.
Chef’s Notes
When I created these Frankenstein S’mores, I was reminded of how fun and creative the kitchen can be, especially when you’re not afraid to experiment. I remember one year I attempted a “Monster Marshmallow Cake” for a Halloween party, which ended in a flour explosion and a lot of laughter. The best part of cooking is embracing the mess and madness that comes with it. This recipe has evolved over time, wandering from traditional s’mores to something a little more whimsical and spooky.
FAQs and Troubleshooting
Q: Can I make these s’mores in advance?
Absolutely! You can prepare the components separately and assemble them right before serving to maintain that gooey goodness.
Q: My marshmallows aren’t melting! What did I do wrong?
Make sure your marshmallows are puffed up and soft before adding them to the s’mores. If they seem stiff, try microwaving them for an extra few seconds.
Q: Can I use different flavors for the frosting?
Of course! Feel free to experiment with chocolate, strawberry, or even mint frosting to match your flavor preferences. The sky’s the limit!
Q: How do I store leftovers?
If you have any s’mores left (unlikely!), store them in an airtight container at room temperature for up to three days. Just be aware they may lose some of their delicious gooeyness.
Nutritional Info
While indulgent, these Frankenstein S’mores can be a fun treat! Though I don’t typically offer nutritional info, a single treat will usually clock in around 150-200 calories depending on your ingredients—sugar is a devilish friend.
And there you have it—your ultimate guide to making irresistible Frankenstein S’mores! I hope this recipe not only brings a hint of spookiness to your kitchen but also stirs up fond memories of your own. Remember, cooking is about joy, exploration, and perhaps a touch of creative madness. Now roll up your sleeves, get those ingredients ready, and let’s make some food memories together! Happy cooking, and may your treats be as delightful as your kitchen tales!
Print
Frankenstein S’mores
- Total Time: 30 minutes
- Yield: 12 servings
- Diet: Vegetarian
Description
A spooktacular twist on the classic s’mores, featuring green marshmallows and chocolate goo.
Ingredients
- Graham Crackers
- Green Marshmallows (or regular plus food coloring)
- Chocolate Bars
- Vanilla Frosting
- Plastic “Monster” Eyeballs (optional)
- Cooking Spray (optional)
Instructions
- Prep Your Ingredients: Gather all your ingredients and preheat your oven to 350°F (175°C) if you’re using it.
- Line Your Baking Tray: If going the oven route, line a baking tray with parchment paper and spray it lightly.
- Layer the Graham Crackers: Place a graham cracker on the tray, breaking them in half if desired.
- Add the Chocolate: Place a piece of chocolate bar on top of the graham cracker.
- Melt the Marshmallows: Roast marshmallows, use a kitchen torch, or microwave them until puffy.
- Assemble the S’mores: Top marshmallows with a second graham cracker and press down gently.
- Frost with Green Goo: Apply vanilla frosting on top of the assembled s’mores.
- Decorate with Eyeballs: Stick on edible eyeballs if using.
- Chill or Serve Warm: Serve immediately or chill in the fridge for a firmer texture.
Notes
Feel free to customize with nuts, spices, or different chocolates to match personal taste.
- Prep Time: 15 minutes
- Cook Time: 15 minutes
- Category: Dessert
- Method: Baking
- Cuisine: American
Nutrition
- Serving Size: 1 s'more
- Calories: 200
- Sugar: 15g
- Sodium: 150mg
- Fat: 7g
- Saturated Fat: 3g
- Unsaturated Fat: 4g
- Trans Fat: 0g
- Carbohydrates: 29g
- Fiber: 1g
- Protein: 2g
- Cholesterol: 0mg
Keywords: Halloween, dessert, s'mores, fun, easy recipes, spooky treats

Spooky Halloween Desserts for Quick Party Prep Ideas
75 Best Halloween Desserts: A Spooktacular Guide to Sweet Treats
Welcome to my kitchen, my fellow food lovers! I’m Olivia Bennett, your enthusiastic guide to everything cozy, delicious, and a bit spooky this Halloween season. If you’re like me, the crisp autumn air and the scent of cinnamon and nutmeg signal it’s time for some fun in the kitchen. Halloween is not just about costumes and trick-or-treating; it’s a fantastic occasion for whipping up some delightful desserts that will impress friends and family, and create sweet memories that will last a lifetime.
In today’s blog post, we’re diving into a treasure trove of 75 Halloween desserts that are fun to make, stunning to look at, and absolutely delectable to taste! Whether you’re hosting a haunted gathering, heading to a costume party, or just looking to bring some festive cheer to your kitchen, I’ve got homemade treats that are sure to be the highlight of the season.
Personal Story
Growing up, Halloween was always my favorite time of the year, and it wasn’t just about the candy. I have vivid memories of my mom and I spending the weekend before Halloween in our cozy kitchen. We’d put on our favorite fall music, roll up our sleeves, and dive into an array of spooky baking projects. One year, we decided to create our very own pumpkin patch with cake pops that looked like little pumpkins, complete with green frosting tendrils. Each tiny creation came with its own charm, and the kitchen was filled with laughter and the kind of sweet scent only freshly baked goods can bring.
That experience laid the foundation for my love of seasonal baking. Today, nothing excites me more than sharing spooky treats that will brighten your gathering or create a little magic in your home. Trust me; your friends will be talking about these sweets long after the last piece has been devoured!
Ingredients
Before we roll up our sleeves and get baking, let’s gather the staples you’ll need for these spooky desserts. While we’ll touch on some specific treats, here’s a handy list of common ingredients you’ll find across many Halloween delights:
- All-Purpose Flour: The backbone of most sweets. You can substitute with a gluten-free blend if needed.
- Granulated Sugar: This sweetener is used in nearly every dessert. For a darker flavor, consider using brown sugar.
- Eggs: They provide structure and moisture. If you’re baking vegan treats, applesauce or flaxseed meal can work as substitutes.
- Butter: This adds richness and creaminess. Try using coconut oil for a dairy-free option.
- Baking Powder and Baking Soda: These leavening agents help our sweets rise.
- Vanilla Extract: Always a great flavor enhancer! You can also use almond extract for a different twist.
- Cocoa Powder: Essential for chocolatey treats. If you’re looking for extra depth, try using Dutch-processed cocoa.
- Pumpkin Puree: The star of many autumn recipes—great for flavor and moisture!
- Candy Corn, Sprinkles, or Edible Glitter: For that Halloween flair. They’re also perfect for decorating!
Each ingredient plays a vital role in creating the sweet masterpieces we’ll whip up. Remember, experimenting can lead to some of the best flavors—don’t hesitate to get creative and swap ingredients based on your taste and dietary needs.
Step-by-Step Instructions
Now that we’ve gathered our ingredients, let’s dig into making some fabulous Halloween desserts! Here’s how to whip up my crowd-pleasing Pumpkin Spice Cupcakes (one of many fantastic options among our 75 treats):
1. Preheat the Oven
- Preheat your oven to 350°F (175°C). This ensures a perfectly baked cupcake. Remember, a hot oven helps in achieving that coveted dome shape!
2. Prepare the Pan
- Line a cupcake pan with fun Halloween-themed liners. You can’t have Halloween without themed decorations, right? If you don’t have liners, just grease the pan well!
3. Mix the Dry Ingredients
- In a large bowl, whisk together 1 ½ cups of all-purpose flour, 1 cup of granulated sugar, 1 tsp of baking powder, ½ tsp of baking soda, ½ tsp of salt, and 1 tbsp of pumpkin pie spice. This blend will create a flavorful base for your cupcakes.
4. Combine the Wet Ingredients
- In another bowl, whisk together ½ cup of melted butter, 2 large eggs, and 1 cup of pumpkin puree. Tip: use room temperature eggs to ensure a smoother batter!
5. Mix It All Together
- Gradually add your wet ingredients to the dry mixture. Stir until just combined. Overmixing can lead to dense cupcakes—nobody wants that!
6. Fill the Liners
- Fill each cupcake liner about ¾ full with the batter. Use a cookie scoop for even portions and less mess!
7. Bake
- Pop the pan in the preheated oven and bake for 18-20 minutes, or until you can poke a toothpick in the center and it comes out clean. Let them cool in the pan for a few minutes before transferring them to a wire rack. Pro Tip: The aroma will be irresistible—try not to eat them all!
8. Decorate
- Once cooled, top your cupcakes with cream cheese frosting (and maybe a sprinkle of orange and black sprinkles for that Halloween flair). You can even pipe little pumpkin faces on them—get creative!
This recipe is a delightful representation of the many charming desserts you can make during the spooky season. The process is simple and allows for creativity and joy, much like my childhood baking adventures.
Serving Suggestions
When serving your Halloween desserts, presentation is everything! Arrange your cupcakes on a spooky platter, and feel free to add little decorations like plastic spiders or faux cobwebs. Beautifully decorated cupcakes deserve to be on full display, making them the centerpiece of your Halloween table.
Recipe Variations
- Gingerbread Cookies: Switch it up with a gingerbread cookie recipe, perfect for spooky decor.
- Spooky Brownies: Top brownies with green buttercream skulls for a ghoulish twist.
- Ghost Meringues: Use egg whites and sugar to whip up light and airy ghost-shaped meringues.
- Witch Hat Cupcakes: Place a cookie on top of a frosted cupcake to resemble a witch’s hat!
- Vegan Pumpkin Bars: Swap ingredients for a vegan-friendly version using almond milk and flax eggs.
Chef’s Notes
The beauty of Halloween desserts is their versatility! I remember one year, a friend brought over her take on spider web cookies using melted chocolate and a bit of white frosting. We had a blast creating our spooky masterpieces, and it sparked endless fun ideas for our next baking sessions. Halloween is the perfect excuse to let your imagination run wild, and what better way to do that than by baking together?
FAQs and Troubleshooting
1. My cupcakes didn’t rise. What happened?
- This can happen if your baking soda or powder is old. Always check the freshness before using, and remember to preheat your oven!
2. How do I store my Halloween desserts?
- Keep them in an airtight container at room temperature for about 2-3 days or refrigerate for longer freshness.
3. Can I freeze these desserts?
- Absolutely! Most treats can be frozen. Just make sure they’re in an airtight container or freezer bag. They’ll be great for last-minute festivities.
4. What if I overmix my batter?
- Don’t worry too much—while it may be denser than intended, it’ll still taste delightful! Next time, just mix until combined.
Nutritional Info (Optional)
If you’re looking for nutritional information, here’s a quick reference for our Pumpkin Spice Cupcakes (per cupcake):
- Calories: 200
- Fat: 8g
- Carbohydrates: 30g
- Protein: 2g
(Note: Nutritional values can vary based on specific ingredients used and portion sizes.)
So there you have it, a spooktacular guide to making delightful Halloween desserts! I hope you feel inspired to dive into your kitchen this season. Remember, the best part about baking is not only the treats you’ll create but the memories you’ll make along the way. Happy Halloween baking!
Print
Pumpkin Spice Cupcakes
- Total Time: 35 minutes
- Yield: 12 servings 1x
- Diet: Vegetarian
Description
Deliciously spiced pumpkin cupcakes, perfect for Halloween festivities.
Ingredients
- 1 ½ cups all-purpose flour
- 1 cup granulated sugar
- 1 tsp baking powder
- ½ tsp baking soda
- ½ tsp salt
- 1 tbsp pumpkin pie spice
- ½ cup melted butter
- 2 large eggs
- 1 cup pumpkin puree
- Cream cheese frosting
- Orange and black sprinkles (for decoration)
Instructions
- Preheat the oven to 350°F (175°C).
- Prepare the pan by lining it with Halloween-themed cupcake liners.
- Mix the dry ingredients in a large bowl: flour, sugar, baking powder, baking soda, salt, and pumpkin pie spice.
- Combine the wet ingredients in another bowl: melted butter, eggs, and pumpkin puree.
- Mix the wet ingredients into the dry ingredients until just combined.
- Fill each cupcake liner about ¾ full with batter.
- Bake for 18-20 minutes, until a toothpick comes out clean.
- Decorate the cooled cupcakes with cream cheese frosting and sprinkles.
Notes
Feel free to get creative with decorations and flavors! Consider adding different types of frosting or toppings.
- Prep Time: 15 minutes
- Cook Time: 20 minutes
- Category: Dessert
- Method: Baking
- Cuisine: American
Nutrition
- Serving Size: 1 cupcake
- Calories: 200
- Sugar: 12g
- Sodium: 200mg
- Fat: 8g
- Saturated Fat: 5g
- Unsaturated Fat: 3g
- Trans Fat: 0g
- Carbohydrates: 30g
- Fiber: 1g
- Protein: 2g
- Cholesterol: 30mg
Keywords: Halloween, cupcakes, pumpkin spice, dessert, festive baking
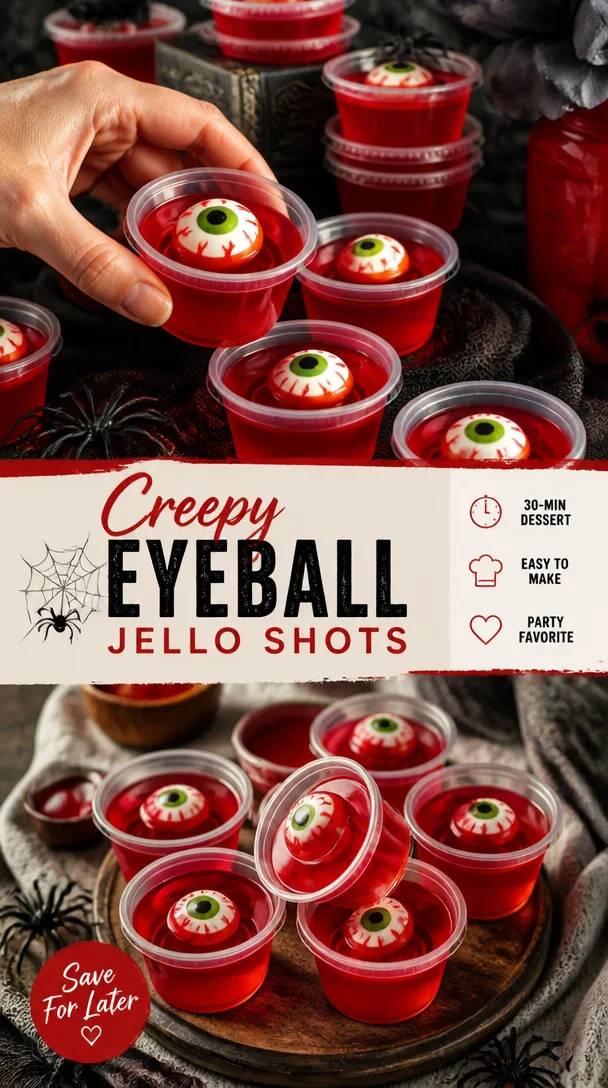
Creepy Eyeball Jello Shots
Creepy Eyeball Jello Shots: A Spooktacular Treat!
Welcome to my kitchen, my fellow food lovers! Olivia Bennett here, and today we’re diving into a delightfully creepy, oh-so-fun, and totally delicious treat that will impress both kids and adults alike: Creepy Eyeball Jello Shots! Perfect for Halloween parties, spooky gatherings, or just a fun night in, these gelatin treats are not only a feast for the eyes but also tantalizingly tasty—just the right combination to make your next bash a hit!
Picture this: bright red and green Jello features with ghoulish eyeballs that make your guests do a double-take. Jello shots have been a party favorite for years, but why not take it up a notch and create something truly eye-catching (pun totally intended)? Don’t worry; these adorable yet creepy snacks are not as complicated as they may appear. In fact, I promise you’ll find joy in crafting these spooky delights.
Let’s talk about what makes these Jello shots so special. They stand out with a playful and daring twist on a classic favorite, filled with fun surprises. Plus, they’re incredibly easy to make, require minimal ingredients, and can be adapted to suit a variety of tastes and dietary preferences. So put on your favorite apron, and let’s get started!
A Little Bit of Nostalgia
I’ll never forget the first time I created these creepy eyeball Jello shots. It was a Halloween party at my good friend Sarah’s house, and we were all scrambling to come up with something that would wow the crowd. We decided to challenge ourselves and whip up something unusual—after all, what’s Halloween without a dash of horror and a sprinkle of humor?
As I poured the Jello into the cups, giggles filled the kitchen. I still remember the expression on Sarah’s face when I plopped in these adorable little googly-eyed candies to create the “eyeballs.” We both erupted into laughter as we posed for photos, deliberately making creepy faces. Believe me, it’s not just about the spooky looks—we had fun, made memories, and united everyone in the spirit of the season.
It turned out to be one of the highlights of that night! The reactions of our friends when trying them for the first time were priceless. Ever since then, I’ve made it a tradition to whip up these delightful spooky treats and share them with all my friends each year. Now it’s your turn to create your own creepy memories in the kitchen!
Ingredients
To bring these ghoulish delights to life, you’ll need the following ingredients:
-
Gelatin (flavored Jello):
- The star of the show! Use your favorite flavors. I recommend cherry or strawberry for that blood-red hue that screams spooky.
-
Water:
- Essential for rehydrating the gelatin. You can use cold water to set it up faster—a little chef hack for those impatient cooks among us!
-
Whipped cream (optional):
- For topping! Adds a lovely richness. This can be omitted for a lighter version or replaced with dairy-free alternatives.
-
Googly eyes candy:
- These adorable little candies will elevate your shot from ordinary to spooky in seconds! If you can’t find these, you could use chocolate-covered almonds or even blueberries for a more natural look.
-
Gummy worms or creepy candies (optional):
- For added drama, drop one or two into each shot before serving.
-
Empty shot glasses or small plastic cups:
- This is where the magic happens! You can find fun Halloween-themed cups online or at your local party store.
-
Ice cubes (optional):
- For a quicker chilling process. Nothing like a little icy coolness to help speed things up!
Step-by-Step Instructions
Now that you’ve gathered all your ingredients, let’s start crafting these gruesome goodies! Follow these step-by-step instructions, and I promise you’ll wow your guests.
Step 1: Prepare the Jello
-
Boil Water:
Begin by boiling 1 cup of water. This will be part of your Jello-making process. -
Dissolve the Gelatin:
Once the water is boiling, pour it into a mixing bowl. Add your flavored Jello powder. Stir well until fully dissolved—this will usually take about 2-3 minutes. The vibrant color and aroma will fill the kitchen, setting the perfect mood!Chef Tip: If you want an extra kick, consider mixing in a little vodka or rum as your second cup of liquid instead of water—just be mindful of your guests and their limits!
Step 2: Add Cold Water
- Mix in Cold Water:
Next, add 1 cup of cold water to the Jello mixture. This helps to bring down the temperature and gets it ready to set. Stir well for about a minute.
Step 3: Pour Into Shot Glasses
- Ready the Shot Glasses:
Grab your shot glasses or plastic cups and place them on a steady surface. Slowly pour the Jello mixture into each shot glass, filling them about three-quarters full. You can wiggle or gently tap the glasses to ensure they’re leveled, so the ‘eyes’ sit at the top!
Step 4: Add the Eyeballs
- Pop Those Eyeballs In:
Here comes the fun part! Carefully add a few googly eyes candy into each shot. You can also drop a gummy worm or two if you’re feeling especially naughty. This is the point where the cute meets creepy!
Step 5: Chill
-
Refrigerate:
Place the filled shot glasses in the refrigerator for at least 4-6 hours or until the Jello is fully set. Patience is key, but you can make them ahead of time—and believe me, they’ll be the first to disappear!Chef Hack: To speed up chilling, you can place your shot glasses on a baking tray filled with ice for about half an hour.
Step 6: Add a Whipped Touch
- Top It Off:
If you choose to use whipped cream, whip it up while your Jello sets! Just before serving, add a dollop on top of the shots for that extra creamy touch.
Step 7: Serve with Style
- Set Up for Serving:
Arrange your creepy creations on a cake stand, surrounded by faux spider webs and plastic spiders for an even more eerie vibe! Your guests will be howling with delight.
Serving Suggestions
For presentation, place the shot glasses on a dark serving tray or cake stand. Surround it with some spooky decorations like fake spiders or cobwebs. Serve them chilled for the best experience. When your guests take their first bite, watch their expressions transform from excitement to playful horror! Consider passing them around during a scary movie or at the height of your Halloween party for maximum laughs and screams.
Recipe Variations
Feel free to mix things up with these fun variations:
- Layered Jello Shots: Alternate layers of colored Jello (e.g., green and red) to create spine-chilling stripes.
- Vegan Option: Use agar-agar as a gelatin substitute for a plant-based version that everyone can enjoy.
- Flavored Vodka: Infuse a bit of flavor with fruit-flavored vodka or flavored schnapps to enhance the taste.
- Non-alcoholic: You can make these entirely non-alcoholic by just avoiding alcohol altogether, perfect for the kiddos!
- Fruit-Filled Eyeballs: Instead of using candy eyeballs, consider fresh fruit pieces—such as blueberries or halved cherries—to help add a fresher taste while still resembling creepy eyeballs!
Chef’s Notes
Cooking is all about creativity! I once made a batch where I splashed some food coloring for an extra gory effect—let’s just say they turned devastatingly fun! Experimenting can lead to exciting surprises, so don’t be shy!
These creepy eyeball Jello shots may have started as a playful Halloween project, but they have become a beloved favorite in my kitchen! From birthdays to random get-togethers, it’s fascinating to see how they always bring joy. You might even decide to create your own fun stories while whipping these up!
FAQs and Troubleshooting
1. How long do Jello shots take to set?
Typically, it will take around 4-6 hours in the refrigerator. For best results, make them the day before.
2. Can I make these without alcohol?
Absolutely! Just use water for the entire recipe, and they’ll still be equally delightful.
3. What if my Jello isn’t setting?
Ensure you’re using the right gelatin ratio—too little may result in a runny texture. Follow the package directions closely.
4. How do I store leftovers?
You can keep them in the fridge for 3-4 days, just be sure to cover them to keep freshness intact!
Nutritional Info (optional)
Each Jello shot contains approximately 50 calories and 10 grams of sugar (varies based on size and ingredients).
With such irresistible charm and fun visuals, these creepy eyeball Jello shots are more than just a treat—they’re a reason to gather, laugh, and celebrate the joyous and mischievous spirit of Halloween. So gather your friends, delve into the spooky atmosphere, and enjoy the delightful thrill of the season—one delightful shot at a time! Cheers to a frightfully fun kitchen adventure!
Print
Creepy Eyeball Jello Shots
- Total Time: 360 minutes
- Yield: 12 servings 1x
- Diet: Vegetarian
Description
Delightfully creepy and fun, these Jello shots are perfect for Halloween parties with ghoulish eyeballs that impress both kids and adults alike.
Ingredients
- 1 cup flavored Jello (cherry or strawberry recommended)
- 1 cup boiling water
- 1 cup cold water
- Whipped cream (optional)
- Googly eyes candy
- Gummy worms or creepy candies (optional)
- Empty shot glasses or small plastic cups
- Ice cubes (optional)
Instructions
- Boil Water: Begin by boiling 1 cup of water.
- Dissolve the Gelatin: Pour boiling water into a mixing bowl and add Jello powder. Stir until fully dissolved.
- Mix in Cold Water: Add 1 cup of cold water to the mixture and stir well.
- Ready the Shot Glasses: Place shot glasses on a steady surface and pour in Jello mixture, filling them about three-quarters full.
- Pop Those Eyeballs In: Add googly eyes candy and optional gummy worms into each shot.
- Refrigerate: Chill in the refrigerator for 4-6 hours until fully set.
- Top It Off: If using, add a dollop of whipped cream before serving.
- Set Up for Serving: Arrange on a serving tray with spooky decorations.
Notes
You can mix in flavors like vodka or schnapps for an adult twist, and substitute with agar-agar for a vegan version.
- Prep Time: 15 minutes
- Cook Time: 0 minutes
- Category: Dessert
- Method: Chilling
- Cuisine: American
Nutrition
- Serving Size: 1 shot
- Calories: 50
- Sugar: 10g
- Sodium: 5mg
- Fat: 0g
- Saturated Fat: 0g
- Unsaturated Fat: 0g
- Trans Fat: 0g
- Carbohydrates: 12g
- Fiber: 0g
- Protein: 0g
- Cholesterol: 0mg
Keywords: Halloween, Jello shots, festive treats
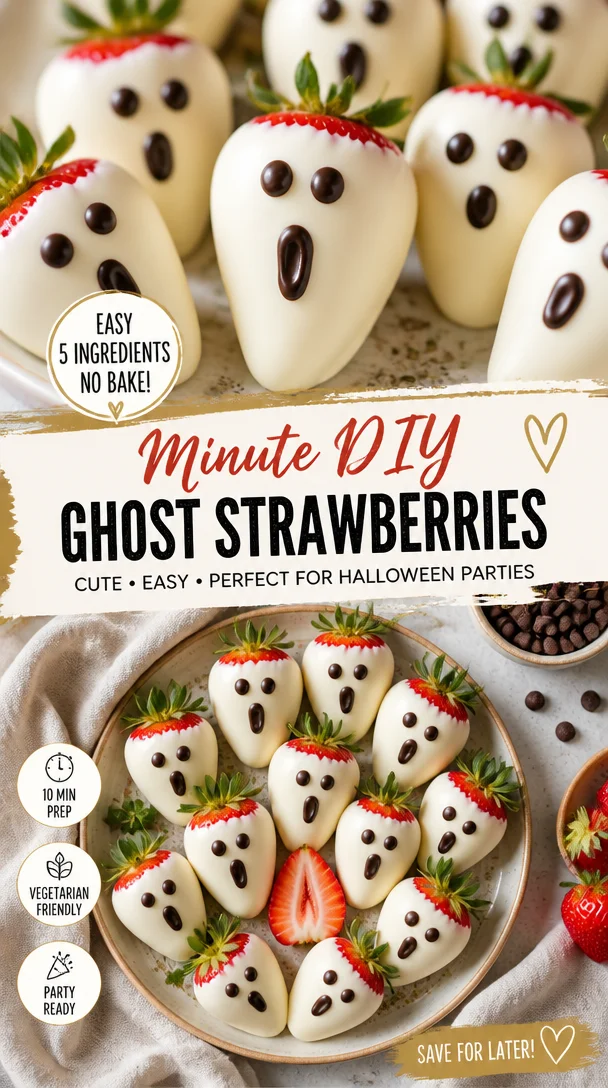
Minute DIY Ghost Strawberries for Halloween Parties
Spooky Ghost Strawberries: A Delightfully Boo-tiful Treat!
Welcome to my kitchen, friend! As the leaves change and we’re gradually swept into the whirlwind of fall festivities, there’s something absolutely magical about this time of year. The air gets crisp, the pumpkins come out, and I start dreaming up delicious ways to celebrate Halloween! This year, I’m thrilled to share a treat that’s both adorable and super easy to whip up: Spooky Ghost Strawberries! These little ghostly delights are perfect for parties, school events, or just an afternoon snack with a twist.
Imagine stepping into your home and being greeted by the sweet, earthy aroma of fresh strawberries mixed with rich chocolate. It instantly transports you to a nostalgic place where you’re snuggled under a blanket with a good book, and a cozy spirit fills your heart. That’s exactly the vibe we want to create with these spooky treats. They’re not just fun to make but also a delight to see and taste!
In my own kitchen, these ghostly wonders have become a staple. I remember the first time I surprised my family with them a few Halloweens ago. My niece, who was around five at the time, squealed with joy at the sight of these little strawberries transformed into ghosts. We spent the afternoon giggling as we decorated them together, creating unique and adorable faces out of melting chocolate. Since then, they’ve become a family tradition and a fun way to bring everyone together for some delicious creativity.
So, grab your apron and let’s dive into creating a treat that’s sure to bring smiles in the spirit of Halloween!
Ingredients
Here’s what you’ll need to create these Spooky Ghost Strawberries:
-
Fresh Strawberries (12-15)
- Look for plump, ripe berries with bright green leaves. They’re the stars of this dish! Choose organic if possible to keep them pesticide-free.
-
White Chocolate Chips (1 cup)
- White chocolate adds a sweet and creamy finish that beautifully contrasts with the fresh strawberries. If you prefer a different flavor profile, feel free to use almond bark or even white chocolate melts!
-
Chocolate Chips (1/4 cup)
- These will be used for decorating the ghost faces. You can use mini chocolate chips for a more cartoon-like expression, or go for regular-sized ones for a bit more drama!
-
Coconut Oil (1 teaspoon)
- This helps the white chocolate melt smoothly and stay glossy. If you’re in a pinch, vegetable oil can work too, but coconut oil adds the perfect touch of flavor.
-
Sprinkles (optional)
- Halloween-themed sprinkles can add a fun flair to your spooky strawberries and make them extra festive! Go wild with colors and shapes that fit the haunt!
Step-by-Step Instructions
-
Prep the Strawberries:
- Rinse the strawberries gently under cold water. Pat them dry carefully with paper towels.
Chef Tip: Make sure the strawberries are completely dry to ensure the chocolate adheres well.
-
Melt the White Chocolate:
- In a microwave-safe bowl, combine the white chocolate chips and coconut oil. Heat in 30-second intervals, stirring in between, until completely melted and smooth.
Hack: If the mixture is too thick, add a little more coconut oil to thin it out until it’s the right consistency for dipping.
-
Dip the Strawberries:
- Holding the green top of each strawberry, dip it into the melted white chocolate to coat it thoroughly.
Tip: Shake off any excess chocolate gently and place the dipped strawberry on a parchment-lined baking sheet.
-
Chill the Coated Strawberries:
- Place the dipped strawberries in the fridge for about 15-20 minutes or until the chocolate hardens.
Little Note: This is a great time to clean up the kitchen or maybe sip on some hot cocoa while you wait!
-
Create Ghost Faces:
- While the white chocolate coating sets, melt the chocolate chips in a microwave-safe bowl. Use the same melting method, heating in intervals until smooth.
Fun Tip: You can pour the melted chocolate into a ziplock bag, snip the tip, and pipe on little eyes and mouths for a fun ghostly expression!
-
Decorate the Ghosts:
- Once the white chocolate is set, take the melted chocolate and add eyes and mouths to your ghosts. Get creative with expressions!
Chef Hack: To achieve different looks, try making some ghosts with exaggerated eyes and grinning mouths, while others can be sweet and simple!
-
Serve and Enjoy:
- Once decorated, allow the chocolate faces to harden. Then, serve them on a spooky platter and watch the smiles appear!
Serving Suggestions
To truly embrace the Halloween spirit, serve your Spooky Ghost Strawberries on a spooky-themed platter or tray. You could scatter some Halloween candies around them, like candy corn or gummy worms, for a festive touch. If you want an interactive element, consider presenting them alongside some homemade pumpkin spice dip for added flavor. A nice touch is to garnish the plate with some fresh mint leaves for a pop of color!
Recipe Variations
-
Chocolate-Dipped Ghosts: Use dark or milk chocolate instead of white chocolate for a different flavor twist; they’ll still look adorable with the ghostly decor!
-
Fruit Variations: Try dipping other fruits like bananas or pretzels for a fun combo play that suits everyone at the table.
-
Flavor Amplification: Mix in some flavor extracts to the white chocolate, like orange or almond, for a festive twist!
-
Vegan Version: Substitute the white chocolate with dairy-free chocolate chips, and use a plant-based coconut oil for a ghostly treat that anyone can enjoy!
-
Nutty Ghosts: Add finely chopped nuts to the coconut oil mixture for texture, offering a yummy crunch that contrasts beautifully with the smooth chocolate.
Chef’s Notes
Making Spooky Ghost Strawberries is about more than just cooking; it’s about creating lasting memories. The first time I made these, my niece used a heaping amount of chocolate for eyes, leading to some really funny expressions! In the end, we affectionately named one of our ghosts “Uncle Fester” because of his odd appearance! The beauty of this recipe is that it’s a blank canvas for your creativity. As you invite friends or family to help decorate, you’ll create more than just delicious snacks—you’ll craft moments that will stay with you long after the Halloween season is over.
FAQs and Troubleshooting
-
What if my white chocolate won’t melt smoothly?
- If your chocolate clumps, try adding just a tiny bit more coconut oil and stirring continuously over low heat. Be sure not to overheat!
-
Can I store leftovers?
- Absolutely! Keep the strawberries in an airtight container in the fridge for up to two days, but I warn you—they’re usually devoured quickly!
-
The chocolate decorations keep breaking; what do I do?
- If your chocolate has cooled too much and solidified, simply melt it down again. Make sure it’s still pourable, and use a steady hand to pipe delicate features.
-
Can I make Spooky Ghost Strawberries ahead of time?
- You sure can! Just wait to decorate them until you’re ready to serve. The fresh strawberries are best when they’re made within a day of serving for optimal freshness!
Nutritional Info
While these treats are all about the fun and spirit of Halloween, it’s worth noting that they’re not just tasty but can also be a healthier dessert choice! Strawberries are packed with vitamins and antioxidants, while white chocolate offers a little indulgence without the guilt. Just keep in mind moderation is key with treats like these!
There you have it! A friendly guide to creating the most delicious Spooky Ghost Strawberries that bring warmth and laughter to your fall festivities! I hope you enjoy making these special delights and creating wonderful memories with your loved ones in the kitchen. Happy Haunting!
Print
Spooky Ghost Strawberries
- Total Time: 25 minutes
- Yield: 4 servings
- Diet: Vegetarian
Description
A delightful Halloween treat featuring fresh strawberries coated in white chocolate and decorated to resemble spooky ghosts.
Ingredients
- Fresh Strawberries (12-15)
- White Chocolate Chips (1 cup)
- Chocolate Chips (1/4 cup)
- Coconut Oil (1 teaspoon)
- Sprinkles (optional)
Instructions
- Prep the strawberries: Rinse gently under cold water and pat dry with paper towels.
- Melt the white chocolate: Combine white chocolate chips and coconut oil in a microwave-safe bowl and heat in 30-second intervals until smooth.
- Dip the strawberries: Holding the green top, dip each strawberry into the melted white chocolate.
- Chill the coated strawberries: Place them in the fridge for about 15-20 minutes until the chocolate hardens.
- Create ghost faces: Melt chocolate chips and pipe on eyes and mouths for expressions.
- Decorate the ghosts: Add chocolate faces to set white chocolate-coated strawberries.
- Serve and enjoy: Present on a spooky platter and watch the smiles appear!
Notes
Making these strawberries is about more than just cooking; it’s about creating memories. Feel free to get creative with decorations and enjoy the process!
- Prep Time: 15 minutes
- Cook Time: 10 minutes
- Category: Dessert
- Method: No-Cook
- Cuisine: American
Nutrition
- Serving Size: 1 serving
- Calories: 180
- Sugar: 25g
- Sodium: 30mg
- Fat: 8g
- Saturated Fat: 5g
- Unsaturated Fat: 3g
- Trans Fat: 0g
- Carbohydrates: 30g
- Fiber: 2g
- Protein: 2g
- Cholesterol: 0mg
Keywords: Halloween, Strawberries, Desserts, Spooky Treats, Chocolate Recipes

Ces gâteaux d’Halloween faciles mais horriblement bons – Elle à Table
Spooktacular Halloween Treats: Delightfully Easy Yet Horribly Delicious Cakes
Welcome to the most spine-chilling, yet utterly delightful celebration of the year—Halloween! As the leaves turn crisp and the air grows colder, my love for baking kicks into high gear. There’s just something magical about this time of year: the scent of caramel apples, the crunch of fallen leaves, and of course, the delightful thrill of creating eerie yet scrumptious treats to share. If you’re ready to add a dash of creativity and a pinch of spookiness to your baking, you’re in for a treat (pun intended!).
In today’s post, we’re diving into the world of Halloween cakes. These are not just any cakes—they’re hauntingly good, easy to whip up, and perfect for all ages! Whether you’re hosting a monster mash or simply want to scare up some fun at home, these cakes will enchant your family and friends, offering both flavors that delight and decorations that astonish.
Baking during Halloween is always a blast! I remember the first time I made Halloween-themed treats with my mother. We donned our aprons, popped on some spooky tunes, and transformed our kitchen into a playful lab of fright with flour flying and sprinkles everywhere. The anticipation in the air was electric as we waited for our delicious creations to emerge from the oven—each one transforming into a ghoul or goblin before our eyes, all while filling our abode with delightful aromas. Those moments of giggling and creating are still some of my fondest memories, and I hope this recipe will bring a dash of joy to your kitchen as well!
So let’s conjure up some magic and get started. Ready your spatulas, and let’s bake some cakes that even the bravest of souls will adore.
Ingredient List
To whip up these ghoulishly delightful cakes, you’ll need a simple lineup of ingredients. Here’s what you’ll need for one of the classic Halloween cake recipes, along with some tips to help you along the way:
-
All-purpose flour (2 cups)
The backbone of your cake. For a gluten-free option, you can substitute with a 1:1 gluten-free baking blend, which works beautifully! -
Granulated sugar (1 ½ cups)
This brings sweetness to your treats. If you want to cut down on sugar, try using coconut sugar for a lower glycemic index sweetness. -
Unsweetened cocoa powder (¾ cup)
This is what gives our cake that deep chocolate flavor. If you’re not a chocolate fan, you can use vanilla extract or simple vanilla cake mix instead! -
Baking powder (2 tsp)
The magic leavening agent! Always fresh ensures you get the best rise; if yours is older than six months, it’s time to replace it. -
Baking soda (1 tsp)
Another leavening agent that works wonders alongside baking powder for that perfect fluffy texture. -
Salt (½ tsp)
A crucial ingredient that makes the flavors pop. Don’t skip it, or your cake might taste flat! -
Eggs (2 large)
They provide moisture and richness. For a plant-based option, try substituting with a "flax egg" (1 tablespoon ground flaxseed + 2.5 tablespoons water). Let it sit for a few minutes to thicken! -
Whole milk (1 cup)
Adds moisture and creaminess to the cake. You can swap it with almond milk or any unsweetened dairy alternative for a lighter version. -
Vegetable oil (½ cup)
This keeps the cake moist. You can use melted coconut oil for a different flavor profile! -
Vanilla extract (1 tsp)
It elevates all the flavors in baking. Use pure vanilla for the best results! -
Meringue powder (optional, for frosting)
If you’re feeling adventurous and want a firmer frosting, a pinch of meringue powder will help achieve that.
Step-by-Step Instructions
Now that we’ve gathered our ingredients, let’s get to the fun part: baking our Halloween cakes! Follow these detailed steps to ensure your treats come out perfect.
-
Preheat the Oven
First and foremost, preheat your oven to 350°F (175°C). This is super important because it sets the stage for a beautifully risen cake. While that’s heating up, you can grease and flour your cake pans (I suggest two 9-inch round pans) or line them with parchment paper. -
Mix the Dry Ingredients
In a big bowl, whisk together the all-purpose flour, granulated sugar, cocoa powder, baking powder, baking soda, and salt. This step is crucial because it ensures even distribution of your leavening agents throughout the cake.Chef Tip: Use a fine-mesh sieve to shift your cocoa powder; it’ll reduce clumps and keep your cake silky smooth.
-
Combine the Wet Ingredients
In another bowl, mix together the eggs, whole milk, vegetable oil, and vanilla extract until well combined.Tip: For a fun twist, toss in a hint of almond extract for an eerily delightful flavor!
-
Combine Wet and Dry Ingredients
Pour the wet mixture into the dry ingredients. Gently stir with a spatula or a wooden spoon until just combined. Don’t over-mix—lumps are okay! Over-mixing can lead to a dense cake, and we want light and fluffy goodness here. -
Bake the Cakes
Divide the batter evenly between your prepared pans and pop them in the oven. Bake for about 30-35 minutes, or until a toothpick inserted in the center comes out clean.Chef Hack: Check for doneness at the 25-minute mark, as oven temperatures may vary!
-
Cool the Cakes
Once baked, remove them from the oven and let them cool in the pans for about 10 minutes. Then, carefully transfer them to a wire rack to cool completely.Tip: If you’re feeling extra spooky, consider carving out little sections once they’re cool to create “cavern” spaces for fillings or treats!
-
Frost and Decorate
Here comes the fun part—decorating! You can use a simple buttercream frosting, heavy cream, or even a hauntingly green tinted glaze. Go wild with sprinkles, edible glitter, or even candy eyes to give an (un)earthly touch!Note: If you want a super smooth finish, consider chilling your cakes before applying the frosting.
Serving Suggestions
Serve your Halloween cakes on a festive platter adorned with creepy décor like plastic spiders or fake cobwebs. Slice them into triangular pieces and sprinkle edible glitter to mimic stardust or spooky dust. For a refreshing twist, throw in a dollop of whipped cream or serve alongside a scoop of vanilla ice cream—everyone loves that combo!
Recipe Variations
-
Vegan Cake: Use plant-based milk, flax eggs, and apple sauce instead of oil for a vegan version that’s still indulgent.
-
Pumpkin Chocolate Hybrid: Replace half the cocoa powder with pumpkin puree for a moist, spiced twist on the classic chocolate cake!
-
Ghostly Vanilla Cake: Switch to a vanilla base instead of chocolate and top with white frosting for a ghostly look.
-
Layered Cakes: Make it a showstopper by creating a tiered cake, alternating between the chocolate and a vibrant green or orange vanilla layer!
-
Gluten-Free Option: Use almond or coconut flour instead of all-purpose flour, or go for a 1:1 gluten-free flour mix.
Chef’s Notes
Baking these Halloween cakes has always been a blast for me! My fondest moment was when I made these with my kids for their school parties—their eyes lit up when they saw the finished product. We laughed about the time the frosting turned an unintentional shade of green because we decided to “experiment.” It didn’t matter; we just called it “monster frosting!” It’s moments like these that make cooking a shared adventure. Each time I bake these cakes, they evolve a little. Sometimes I toss in leftover Halloween candies or go for different color schemes depending on what’s in my pantry.
FAQs and Troubleshooting
Q1: My cakes sunk in the middle. What went wrong?
This usually means they might have been undercooked or the oven temperature was too low. Always check for doneness, and trust your oven thermometer!
Q2: My frosting is too runny. How do I fix it?
Add more powdered sugar until you achieve the desired consistency. If you’re working with cream cheese frosting, chilling it for about 20 minutes can help thicken it up.
Q3: Can I bake this as a sheet cake?
Absolutely! Simply adjust the baking time to around 25-30 minutes for a 9×13-inch sheet pan.
Q4: Is it okay to freeze the cake?
Yes! Bake the cakes, let them cool completely, then wrap them in plastic wrap before freezing. Thaw in the fridge overnight when you’re ready to frost and serve.
Nutritional Info
For those curious about the figures behind these spooky treats, a standard slice of the chocolate Halloween cake tends to be around 250 calories, with approximately 12g of fat, 34g of carbs, and 3g of protein. Keep in mind that toppings and frostings will add to these values, so feel free to adjust as necessary for your dietary needs.
There you have it, my friends! A delightful, easy-to-make Halloween cake recipe that promises to bring joy and a sprinkle of spookiness to your kitchen. So put on your chef’s hat, grab your favorite cookie cutters, and get ready to bake up something memorable this Halloween season! Happy Cooking!
Print
Spooktacular Halloween Treats: Delightfully Easy Yet Horribly Delicious Cakes
- Total Time: 50 minutes
- Yield: 8 servings 1x
- Diet: Vegetarian
Description
These hauntingly good Halloween cakes are easy to whip up and perfect for all ages, combining delightful flavors and spooky decorations.
Ingredients
- 2 cups all-purpose flour
- 1 ½ cups granulated sugar
- ¾ cup unsweetened cocoa powder
- 2 tsp baking powder
- 1 tsp baking soda
- ½ tsp salt
- 2 large eggs
- 1 cup whole milk
- ½ cup vegetable oil
- 1 tsp vanilla extract
- Optional: Meringue powder (for frosting)
Instructions
- Preheat the oven to 350°F (175°C) and prepare your cake pans.
- Mix the dry ingredients in a bowl until well combined.
- Combine the wet ingredients in another bowl.
- Pour the wet mixture into the dry ingredients and gently stir until just combined.
- Divide the batter between the prepared pans and bake for 30-35 minutes.
- Cool the cakes in the pans for 10 minutes, then transfer to a wire rack.
- Frost and decorate your cakes as desired!
Notes
For a moist cake, avoid over-mixing. Use fun decorations for a spooky effect!
- Prep Time: 15 minutes
- Cook Time: 35 minutes
- Category: Dessert
- Method: Baking
- Cuisine: American
Nutrition
- Serving Size: 1 slice
- Calories: 250
- Sugar: 22g
- Sodium: 400mg
- Fat: 12g
- Saturated Fat: 2g
- Unsaturated Fat: 5g
- Trans Fat: 0g
- Carbohydrates: 34g
- Fiber: 3g
- Protein: 3g
- Cholesterol: 30mg
Keywords: Halloween, cakes, baking, spooky treats, easy recipes
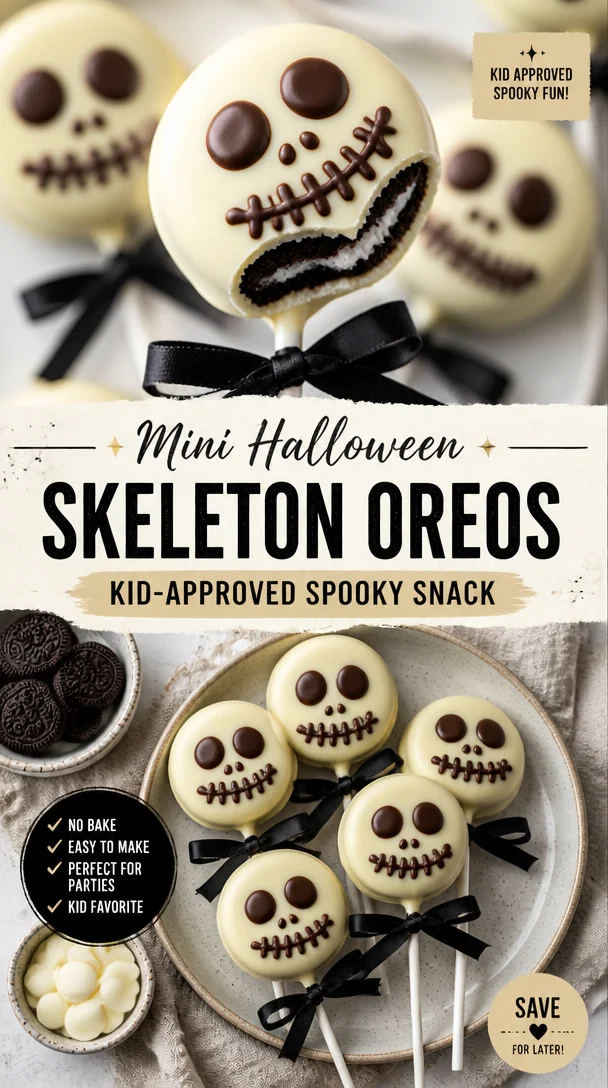
Min Halloween Skeleton Oreos: Kid-Approved Spooky Snack
Spooky Skeleton Oreos: The Perfect Halloween Treat!
Welcome, fellow food lovers, to my cozy kitchen! Halloween is just around the corner, and you know what that means—it’s time for treats that are frightfully fun and delicious! Today, I’m excited to share a recipe that combines two of my favorite things: Oreos and spooky vibes. Say hello to Spooky Skeleton Oreos, your new go-to Halloween delight!
Just imagine the scene: a crisp autumn evening, the air filled with the scent of fallen leaves, and your favorite Halloween movie playing in the background. Now, picture a platter of these adorable Skelly Oreos, all decked out in white chocolate and spooky designs. Whether you’re hosting a Halloween party, attending a potluck, or simply want to treat your family, these delightful cookies are sure to impress and bring a smile to faces of all ages.
What I love about this recipe is that it bridges the gap between the creativity of cooking and the joy of sharing. You don’t have to be a professional pastry chef to whip up these cuties, just a bit of imagination and the willingness to get a little messy in the kitchen—my favorite pastime!
Let’s dive into this sweet and spooky experience together. I promise these Spooky Skeleton Oreos will not only be a treat but also a fun-filled activity to enjoy with friends and family. So, gather your ingredients, roll up your sleeves, and let’s get started on making some memorable Halloween treats!
A Trip Down Memory Lane
I have to tell you, one of my fondest memories is intertwined with Halloween and, of course—cookies! Every year, my mom and I would transform our kitchen into a spooky bakery. It was a tradition; we’d crank up the Halloween playlist, don our festive aprons, and begin mixing, baking, and decorating.
One year, inspired by the skeletons from the Halloween decorations, we decided to create our own spooky treats. We dipped Oreos in white chocolate and drew ghoulish faces on them with icing. I remember giggling as I tried to create the perfect ‘skull’ face, but they ended up looking more like cartoon characters! Still, we had a blast and the cookies were a hit at our neighborhood block party. Each bite was filled with laughter, and they disappeared faster than we could keep up with them.
That experience has stayed with me and inspired me to create these Spooky Skeleton Oreos with my own little twist. So let’s channel that nostalgia, dive into our creative juices, and make some skeleton friends of our own!
Ingredients
To whip up your spooky skeleton cookies, you’ll need a handful of fun and simple ingredients. Here’s what you’ll need:
-
Oreos: The star of our show! You can use classic Oreos or try Golden Oreos for a different flavor profile. If you’re looking for a gluten-free option, try using gluten-free chocolate sandwich cookies instead.
-
White Chocolate Melts: These will give our skeletons a spooky glow! Consider using almond bark if you prefer, as it melts smoothly and sets quickly. If you want to color it, feel free to add gel food coloring.
-
Black Food Coloring Gel: Essential for creating those spooky details. Gel coloring is best as it doesn’t water down the chocolate.
-
Decorating Icing: Look for piping icing in a tube—it’s perfect for detailed designs. It makes it easy to create expressions and patterns. If you’re feeling adventurous, make your own icing with powdered sugar, egg whites, and a dash of lemon juice for a more homemade touch.
-
Candy Eyes: Because every skeleton needs to see! You can find these at most craft stores or online, or opt for chocolate chips if you’d like something more straightforward.
-
Lollipop Sticks (optional): If you want to create skeleton pops, grab some lollipop sticks to insert into your Oreos before dipping them. This adds a fun presentation touch!
Step-by-Step Instructions
Now that we’ve gathered our ingredients, let’s get cooking! Here’s your step-by-step guide to crafting your Spooky Skeleton Oreos.
-
Prepare Your Workspace: Start by setting up a clean workspace. Lay down some parchment paper on a baking tray where you’ll place your finished Oreos. This will make clean-up a breeze.
-
Melt the White Chocolate: In a microwave-safe bowl, melt the white chocolate melts. Heat them in 30-second intervals, stirring well after each. This helps prevent burning. You want the chocolate to be smooth and entirely melted—think of it as a velvety pool of sweetness.
-
Dip the Oreos: Once the chocolate is melted, take each Oreo and dip it in the melted chocolate, ensuring it’s wholly coated. Use a fork to lift it out, letting the excess chocolate drip off before placing it on the prepared parchment. If you’re using lollipop sticks, dip them into the chocolate before inserting them into the Oreo for that pop effect.
-
Chill to Set: Place your dipped Oreos in the fridge for about 15-20 minutes to allow the chocolate to harden. This step is crucial; you want the chocolate to be firm before you start decorating.
-
Get Creative with Decorating: Once the white chocolate is set, it’s time to create our spooky faces! Take your decorating icing and pipe on eyes, noses, and smiles to form the skeleton’s visage. Remember, they don’t have to be perfect—let your creativity flow and enjoy the process!
-
Add Candy Eyes: While the icing is still wet, place the candy eyes in position on each Oreo for a fun, whimsical touch. This step adds personality and is bound to bring giggles!
-
Rest and Enjoy: Allow the decorative icing to set for another 10-15 minutes before carefully transferring the Spooky Skeleton Oreos to a serving dish.
And voila! You have crafted some eye-catching, fun, and festive Skelly Oreos just in time for Halloween!
Serving Suggestions
When it comes to serving your Spooky Skeleton Oreos, keep it simple yet fun! Arrange them on a festive platter and add some Halloween-themed decorations like mini pumpkins or spooky confetti for extra flair. If you’re feeling extra festive, you can even place them in clear cellophane bags tied with orange ribbons—perfect for giving away as treats!
Recipe Variations
Want to put your own twist on these delightful cookies? Here are a few creative ideas:
-
Dark Chocolate Dipped: Try dipping Oreos in dark chocolate for a richer flavor. The contrast with the white decorations will create a striking look.
-
Flavored Oreos: Use specialty flavored Oreos like Pumpkin Spice or Peppermint to mix things up! These seasonal selections can add a delightful surprise!
-
Nut Butter Dip: For a twist on the classic, why not dip Oreos in melted peanut butter or almond butter? Once set, drizzle with white chocolate for a fun fusion!
-
Sugar Skull Inspiration: Go wild with colors by using various colored chocolate melts, mixing and matching the designs, mimicking the beautiful sugar skulls seen in Dia de los Muertos celebrations.
-
Spooky Sprinkles: Add some texture with festive sprinkles after the chocolate dip—think orange, black, and purple shapes. They can provide a fun pop!
Chef’s Notes
Looking back, this recipe has evolved a bit from when my mom and I first dipped our Oreos all those years ago. I’ve learned to create more detailed designs and make them even more fun and festive. The laughter shared while decorating is what I cherish the most when I think of creating these treats. Don’t stress about making them perfect; embrace a bit of messiness—it adds to the charm!
I once had a little mishap when a batch of chocolate seized up on me, not wanting to melt. Instead of tossing it, I added a splash of coconut oil and it turned into an amazing creamy texture that worked perfectly for dipping! Who knew that ‘disaster’ would lead to deliciousness? Always be open to a little kitchen improv!
FAQs and Troubleshooting
-
What if the chocolate is too thick?
If your melted chocolate is too thick, you can thin it out by adding a small amount of coconut oil or vegetable oil. This will help achieve a smoother consistency for dipping. -
How do I store leftover cookies?
Store your decorated Spooky Skeleton Oreos in an airtight container at room temperature for up to one week. If you need them for longer, consider freezing them—layer them between parchment paper to avoid sticking. -
Can I use a different type of cookie?
Absolutely! Feel free to experiment with different cookies—try vanilla wafers, graham crackers, or chocolate chip cookies for a fun variation! -
What if I don’t have decorating icing?
If you don’t have piping icing, you can make a quick icing using powdered sugar and water or milk. Combine until you achieve a drizzling consistency!
Nutritional Information
(If applicable: Include a brief table or summary of calories, fat content, etc. If you choose to omit, that is fine! Just note it here.)
And that’s a wrap on our Spooky Skeleton Oreos! I hope you enjoyed this recipe and that it inspires creativity and laughter in your kitchen this Halloween season. Don’t forget, cooking should be fun, so gather your loved ones, get a little messy, and whip up some delightful treats to share! Happy Halloween, and happy baking! 🎃👻
Print
Spooky Skeleton Oreos
- Total Time: 30 minutes
- Yield: 20 servings 1x
- Diet: Vegetarian
Description
Delightfully spooky Oreos dipped in white chocolate, perfect for Halloween.
Ingredients
- 1 package Oreos (classic or Golden)
- 1 cup White Chocolate Melts
- Black Food Coloring Gel
- Decorating Icing (or homemade)
- Candy Eyes
- Lollipop Sticks (optional)
Instructions
- Prepare your workspace with parchment paper on a baking tray.
- Melt the white chocolate in a microwave-safe bowl at 30-second intervals, stirring well.
- Dip each Oreo into the melted chocolate, ensuring it’s fully coated.
- Chill dipped Oreos in the fridge for 15-20 minutes until the chocolate sets.
- Get creative and pipe on decorating icing to form spooky faces.
- Add candy eyes while the icing is still wet.
- Rest the decorated Oreos for another 10-15 minutes before serving.
Notes
These treats can be presented on festive platters with Halloween decorations. If desired, customize with different Oreos and decorations.
- Prep Time: 20 minutes
- Cook Time: 10 minutes
- Category: Dessert
- Method: Dipping
- Cuisine: American
Nutrition
- Serving Size: 1 cookie
- Calories: 120
- Sugar: 12g
- Sodium: 50mg
- Fat: 6g
- Saturated Fat: 4g
- Unsaturated Fat: 2g
- Trans Fat: 0g
- Carbohydrates: 15g
- Fiber: 0g
- Protein: 1g
- Cholesterol: 5mg
Keywords: Halloween, spooky treats, Oreo recipes, festive cookies, easy desserts


