
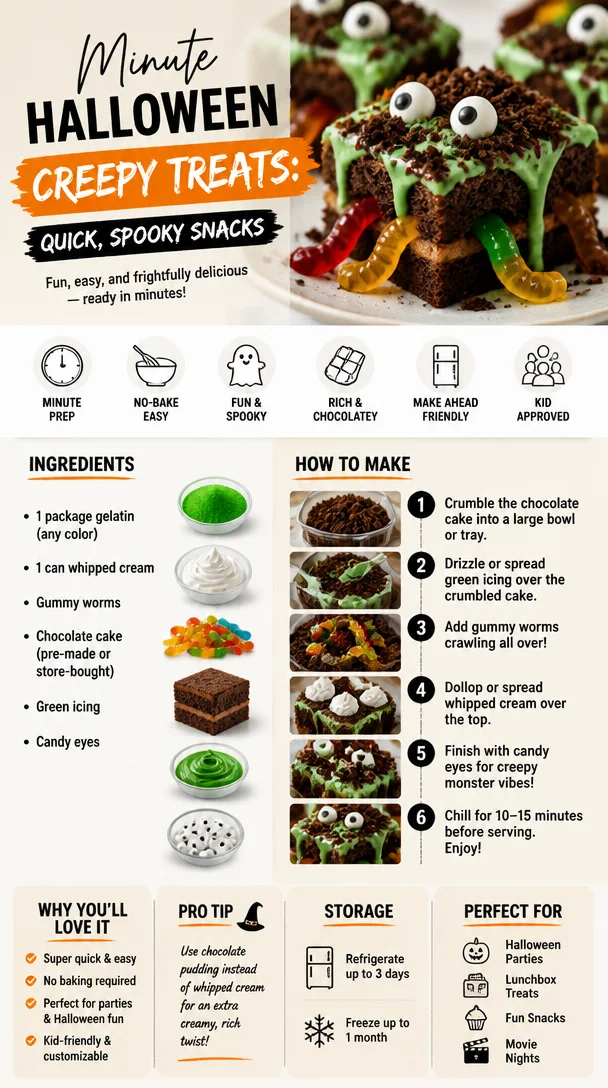
Minute Halloween Creepy Treats: Quick, Spooky Snacks
Halloween Creepy Treats: Spooky Recipes to Delight and Fright
Hello, fellow food adventurers! It’s that spine-tingling time of year again — Halloween is creeping up on us, and you know what that means: time to roll up our sleeves and whip up some deliciously eerie treats! If you’re as excited about Halloween as I am, you’ve landed in the right spot! This blog post is packed with whimsical ideas to bring fun frights to your kitchen and create lasting memories with your friends and family.
There’s something magical about this time of year. The air is crisp, the leaves are turning, and, let’s be honest, who doesn’t love a good excuse to get a little spooky in the kitchen? From ghostly cupcakes to monster brownies, Halloween treats can be as creepy or cute as you want. They spark joy and creativity, and, most importantly, they can bring everyone together in the kitchen for a fun-filled afternoon!
I remember the thrill of decorating Halloween treats with my family every year—my mom would bring home a collection of icing, sprinkles, and all the candies we could dream of. We would gather around the kitchen table, inspired by the wild ideas racing through our minds, creating our own versions of Halloween masterpieces (or masterpieces gone delightfully wrong!). That collaboration wasn’t just about food; it was about laughter, creativity, and of course, a sprinkle of friendly competition on who could come up with the scariest treat.
So, are you ready to dive into some Halloween creepy treat fun? Whether you’re hosting a haunted house party, a school gathering, or just looking to make something fun at home, I’ve got you covered with charmingly creepy treats that will steal the show. Let’s get to it!
Personal Story
One of my fondest Halloween memories dates back to when I was about ten years old, standing next to my best friend Lucy in her kitchen. It was tradition to make themed treats for our friends and families, and we decided to go all out. That year, we baked cookies, but not just any cookies — we made “witch’s fingers.” These weren’t your average Halloween treat; they were almond-infused delights that we decorated with green icing and slivered almonds for a truly ghoulish effect.
I can still hear our giggles as we shaped the dough into long digits, carefully placing the “fingernails” on each cookie. The looks on our family members’ faces as they hesitantly took a bite were priceless — half amused, half horrified! But the best part? We tricked a few of them into believing we had actually baked witch’s fingers. It became the highlight of our Halloween celebrations for years to come, and I still make those witch’s fingers today, each time with new imaginative flair! I invite you to create your own ooey-gooey memories this Halloween, and what better way to kick things off than by baking some deliciously creepy treats?
Ingredients
Here are all the ghoulish goodies you’ll need for your Halloween treats:
-
Sugar Cookies (or store-bought cookie dough):
Great as a base for any Halloween treat. Use your favorite sugar cookie recipe or a pre-made dough to save time. If you’re looking for a gluten-free option, many stores carry gluten-free cookie dough! -
Green Icing:
Use ready-made frosting or make your own with powdered sugar, milk, and a few drops of green food coloring. This will add a whimsical touch to your treats. If green isn’t your thing, how about blood-red icing for a vampire twist? -
Almonds (slivered and whole):
Slivered almonds work perfectly for “fingernails.” But if you’re nut-free, try using pumpkin seeds for a similarly eerie effect! -
Gummy Worms:
Perfect for adding a squishy bite to your treats or creating creepy scenes. Any candy store should have them, or you can find them at most supermarkets. -
Chocolate Chips:
These can be used as eyes for your treats — mix dark and white chocolate for added effect. Looking for dairy-free options? Look for vegan chocolate chips in your local grocery store. -
Marshmallows:
Use them to create marshmallow ghosts or fill in empty spaces of creativity. They are versatile and can be cut to a variety of shapes. For a healthier version, you could use dried banana chips shaped like ghostly figures! -
Sprinkles (various colors):
Grab spooky sprinkles to scatter on top of your treats. It adds color and fun! Keep an eye out for Halloween-themed mixes with tiny bats, pumpkins, and ghosts.
This ingredient list might seem overwhelming, but trust me, the fun lies in using your creativity to mix, match, and improvise!
Step-by-Step Instructions
Now, let’s get our hands dusty and dive into the cooking process! Here’s how to whip up your Halloween creepy treats:
-
Preheat Your Oven:
Begin by preheating your oven to 350°F (175°C). It’s essential to have your oven warmed up for an even baking! -
Prepare the Cookie Dough:
If you’re using homemade cookie dough, roll it out onto a floured surface to about ¼ inch thickness. If you are using store-bought, place it between two sheets of parchment paper and roll it out. This prevents sticking and makes for easier cleanup! -
Cut Out the Cookie Shapes:
Use a finger-shaped cookie cutter (or simply shape them by hand) to cut out the dough. If you’re up for Halloween-inspired shapes — think pumpkins, ghosts, and bats— the options are endless! Don’t forget to place those on a lined baking sheet. -
Bake the Cookies:
Slide those bad boys into the oven and let them bake for about 10-12 minutes, or until the edges are lightly golden. Watch them closely; you don’t want to overdo it! -
Cool the Cookies:
Allow the cookies to cool on a wire rack for about 5–10 minutes before transferring them to a cooling rack. This will prevent them from becoming soggy while decorating. -
Decorate, Decorate, Decorate!
Now for the fun part! Use your green icing to create a “creepy” base on top of the cooled cookies, carefully spreading it or piping it out. For the witch’s fingers, place slivered almonds at the end of each cookie to create the look of nails. Add chocolate chips as “eyes” if you’re feeling whimsical. You can even use edible markers to draw on features! -
Assemble the Creepy Scene:
Get creative! Use gummy worms and sprinkles to create creepy decorations around your cookies. Position gummy worms like they’re crawling on the cookies or hide them underneath for a surprise! -
Present Your Spooky Treats:
Arrange your creepy concoctions on a decorated platter to accentuate the Halloween theme. Maybe even add some fake cobwebs or plastic spiders for that extra touch of eeriness!
And there you have it, my friends! A delightful set of Halloween creepy treats that will thrill your guests and spark creative conversations.
Serving Suggestions
To create an unforgettable experience, serve your creepy treats on a spooky-themed platter adorned with seasonal decorations like mini pumpkins and faux cobwebs. Pair them with a spooky punch made from soda and gummy worms for a complete Halloween vibe! You can even challenge your guests to guess what they’re eating while they nibble on these delectable delights.
Recipe Variations
-
Vampire Bite Cupcakes: Top chocolate cupcakes with red frosting and place a gummy fang hanging off the edge for that extra bite!
-
Monster Brownies: Use brownie mix and decorate with chocolate frosting, candy eyes, and sprinkles to create wacky monster faces.
-
Spooky Rice Krispie Treats: Form Rice Krispie treats into ghost shapes and use chocolate chips for eyes, perfect for a no-bake snack!
-
Ghostly Meringues: Whip egg whites and sugar to shape into meringue ghosts, adding chocolate chip eyes for a sweet and spooky surprise!
-
Pumpkin Spice Cookies: Mix pumpkin puree and spices into your sugar cookie dough for a seasonal twist; they’ll taste as good as they look!
Chef’s Notes
As I mentioned earlier, my love for Halloween treats stems from those childhood baking sessions that I cherished. Each year brings about experimentation with flavors, ingredients, and of course, a sprinkle of chaos! Tradition may hold a special place in our hearts, but creativity is key! I’ve learned that sometimes the messiest kitchens produce the most delicious results. Remember, it’s all about having fun, so don’t stress over perfection — embrace the spooky mess, and most importantly, enjoy the time spent creating memories with loved ones!
FAQs and Troubleshooting
-
Why are my cookies spreading too much?
Ensure that your butter isn’t too warm when mixing; try chilling the cookie dough for about 30 minutes before baking to maintain their shape! -
How can I make my icing stiffer?
If your icing is too runny, gradually add more powdered sugar until you achieve the desired consistency. -
What if I can’t find slivered almonds?
No worries! Pumpkin seeds or even cut-up pieces of dried fruit can work as perfect substitutes for nail designs. -
Can I freeze these treats?
Absolutely! Just make sure to wrap them tightly in an airtight container or freeze them without icing. You can ice them once thawed for best freshness!
Nutritional Info
While it’s crucial to indulge on Halloween, being mindful of ingredients is also important! If you want, you can consider the following general breakdown (this will vary depending on portion sizes and ingredients used):
- Calories: Approximately 150-200 calories per cookie (varies by size and toppings).
- Fat: Around 5-8g (dependent on butter or margarine used).
- Carbohydrates: Roughly 20-25g, with an emphasis on sugar.
- Protein: About 1-2g (can increase if adding nuts).
- Fiber: Approximately 0.5g unless using whole grains for the cookies.
With these tips and recipes in hand, you’re all set to create your own spooky Halloween treats! Let the creativity and fun ignite the spirit of the season. So turn up the tunes, grab your apron, and let’s bake something together that will be the highlight of any Halloween festivity! Happy Halloween, my fellow foodies! 🎃
Print
Halloween Creepy Treats
- Total Time: 27 minutes
- Yield: 12 servings
- Diet: Vegetarian
Description
Delight in making spooky treats for Halloween with these creative recipes that transform traditional cookies into ghoulish masterpieces.
Ingredients
- Sugar Cookies (or store-bought cookie dough)
- Green Icing
- Almonds (slivered and whole)
- Gummy Worms
- Chocolate Chips
- Marshmallows
- Sprinkles (various colors)
Instructions
- Preheat your oven to 350°F (175°C).
- Prepare the cookie dough, rolling it out to about ¼ inch thickness.
- Cut out the cookie shapes using a finger-shaped cookie cutter or by hand.
- Bake the cookies for about 10-12 minutes, or until the edges are lightly golden.
- Cool the cookies on a wire rack for 5–10 minutes.
- Decorate the cooled cookies with green icing and slivered almonds to create a spooky effect.
- Assemble gummy worms and sprinkles around your cookies for creative touches.
- Present your spooky treats on a themed platter for an extra frightful display.
Notes
Embrace creativity when decorating your treats. Consider using alternative ingredients for allergies or personal preferences.
- Prep Time: 15 minutes
- Cook Time: 12 minutes
- Category: Dessert
- Method: Baking
- Cuisine: American
Nutrition
- Serving Size: 1 cookie
- Calories: 175
- Sugar: 12g
- Sodium: 100mg
- Fat: 7g
- Saturated Fat: 3g
- Unsaturated Fat: 4g
- Trans Fat: 0g
- Carbohydrates: 25g
- Fiber: 1g
- Protein: 2g
- Cholesterol: 15mg
Keywords: Halloween treats, spooky recipes, creepy cookies, festive baking, fun desserts
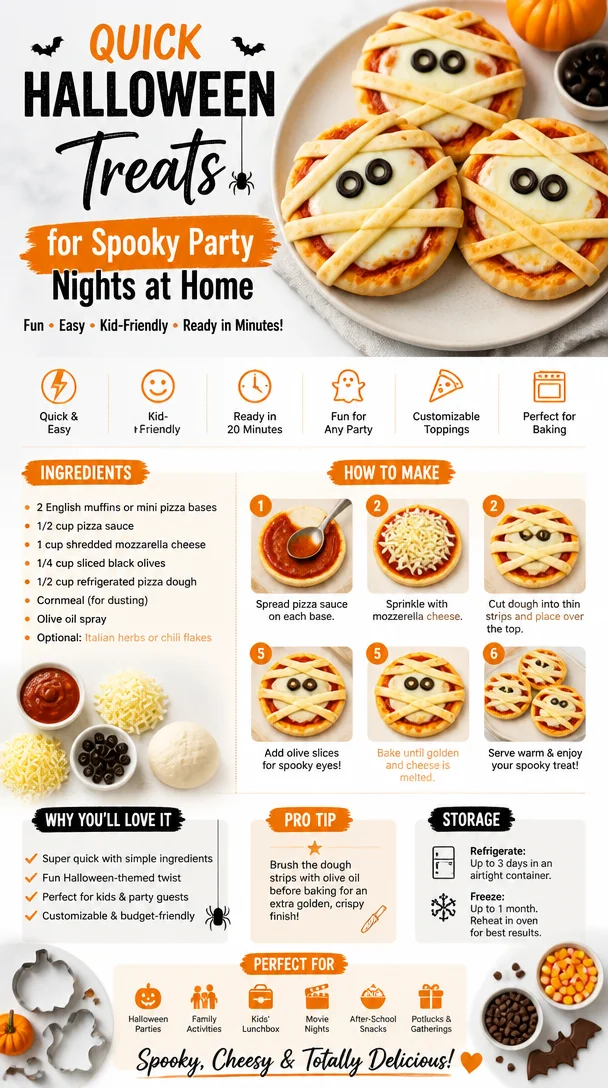
Quick Halloween Treats for Spooky Party Nights at Home
Spooktacular Halloween Treats: Sweet and Simple Recipes for a Fang-tastic Celebration
Welcome to my kitchen, fellow foodies! As the leaves turn golden and the air gets a crisp bite, it’s time to celebrate one of my favorite seasons—Halloween! It’s a time for spooky decorations, creative costumes, and, of course, scrumptious treats that make your taste buds tingle with delight. There’s something magical about this time of year; a hint of nostalgia fills the air, reminding us of the excitement of trick-or-treating and the joy of gathering around a table filled with themed goodies.
Halloween treats are not just about candy (though I won’t be turning down a chocolate bar anytime soon!). They’re about fun creativity in the kitchen, turning simple ingredients into delightfully eerie delights that will bring smiles to faces young and old. And don’t worry if you’re not a seasoned chef—I promise that my recipes are easy, approachable, and designed to add a sprinkle of enchantment to your Halloween parties.
Whether you’re planning a haunted gathering, helping with school events, or just want to surprise your family with a delightfully spooky snack, I’ve got you covered! From ghostly marshmallow pops to wickedly fun pumpkin cupcakes, we’re diving into a treasure trove of treats that will impress and inspire.
So, put on your favorite apron, grab your mixing bowls and spatulas, and let’s scare up some deliciousness together!
A Whimsical Memory
To really get into the spooky spirit, I can’t help but reminisce about my childhood Halloween parties. One of my favorite memories is gathering around the kitchen table with my family, concocting our Halloween goodies. We’d always make popcorn balls, covered in gooey caramel and colorful sprinkles, transforming them into whimsical creations—sometimes they were ghosts, other times they were just colorful blobs of sweetness!
The kitchen would fill with laughter, and the air would be thick with delicious fragrances. “Not too sticky!” Mom would yell with a glint of mischief in her eye, while we’d all giggle trying to shape the sticky popcorn into the perfect ball. These moments were so magical. It’s that same enthusiasm and passion for creating memorable experiences that I hope to channel in today’s recipes. Let’s recreate that sense of joy and deliciousness in our own kitchens this Halloween!
Ingredients
Here’s what you’ll need to whip up these Halloween treats. Each ingredient plays a unique role in bringing together flavors and textures:
-
Popcorn: The base of our treat. Light and crunchy, it serves as the perfect canvas for all your spooky designs. You can substitute with rice cereal for a different texture altogether.
-
Granulated Sugar: This sweetener is essential for creating a divine caramel. Brown sugar can give your caramel a deeper flavor if you’re feeling adventurous!
-
Butter: Essential for richness in flavor. Use unsalted butter to have better control over the seasoning, or try coconut oil for a dairy-free option.
-
Mini Marshmallows: They add a chewy texture and sweetness. You can swap them for chocolate chips or even dried fruits like cranberries for a chewy surprise.
-
Food Coloring: For all those vibrant hues! Use gel food coloring to get more vibrant colors without adding too much liquid. Natural coloring can be made from beet juice or turmeric for yellow.
-
Sprinkles: These little pops of color are non-negotiable for fun Halloween treats! Use themed sprinkles or colored sugar to add spookiness. For a healthier option, try crushed nuts or seeds.
Step-by-Step Instructions
-
Pop the Popcorn:
Start by popping the popcorn. You can use a popcorn maker, an air popper, or the old-fashioned pot method on the stove. If you’re using the stovetop, heat about 2 tablespoons of oil in a large pot, add 1/2 cup of popcorn kernels, cover with a lid, and shake occasionally until popping slows down. Remove from heat and let it cool.Chef Tip: Toss in a pinch of salt while it’s still warm for extra flavor, or experiment with your favorite seasonings!
-
Make the Caramel:
In a saucepan over medium heat, combine 1 cup of granulated sugar, 1/2 cup of butter, and 1/4 cup of corn syrup (optional but adds a lovely sheen). Stir continuously until the butter melts, and the mixture bubbles. You want to reach a beautiful amber color, which should take about 5-7 minutes.Chef Tip: Watch this closely—it goes from perfect to burnt in seconds!
-
Add the Marshmallows:
Once the caramel is ready, reduce the heat to low and mix in 2 cups of mini marshmallows. Stir continually until they are fully melted and smooth. -
Combine with Popcorn:
Pour the warm caramel mixture over your popped popcorn in a large bowl. Quickly mix it gently with a spatula, making sure all the popcorn gets coated in that glorious caramel goodness. This part is messy—the sticky fingers are the best part of baking, right?Chef Tip: You can wear rubber gloves for easier handling if you don’t want sticky fingers!
-
Shape Your Treats:
Once combined, let the mixture cool slightly. Then, using your hands (grab those gloves if you like), form the mixture into balls or whatever spooky shape your imagination conjures (think pumpkins or ghosts)! Place them on a parchment-lined baking sheet to set. -
Decorate:
While still slightly tacky, drizzle with melted chocolate and sprinkle with your choice of fun decorations! Use red for an eerie blood effect or green for a witchy vibe.Chef Tip: For an extra spook element, add edible glitter for a magical shimmer!
-
Set and Serve:
Allow the treats to cool completely until set. If you’re not serving them immediately, store them in an airtight container to maintain their freshness.
Serving Suggestions
These treats are best served at room temperature. For a fun presentation, create a Halloween-themed dessert table! Use colorful platters, decorate with fake spider webs, and display your treats in a cauldron for a spooky delight. If you’re feeling crafty, wrap them individually in cellophane tied with ghostly ribbons for party favors.
Recipe Variations
Want to put a twist on your Halloween treats? Here are a few fun variations to consider:
-
Chocolate Drizzled Corn Treats: Instead of decorating with colorful icing, drench your treats in melted dark or white chocolate for an extra delightful layer.
-
Pumpkin Spice Popcorn Balls: Add a teaspoon of pumpkin spice to your caramel mixture for a seasonal kick that’s sure to delight spice lovers.
-
Ghostly Meringues: Use the same mixture but pipe shapes onto a baking sheet and bake until crisp, then decorate with mini chocolate chips as eyes for cute ghostly figures!
Chef’s Notes
I remember the first time I made popcorn balls on my own—it was a glorious sticky disaster that ended up with popcorn stuck to the ceiling! But these non-fussy treats don’t have to be perfect to be fun. Feel free to experiment with different shapes, colors, and flavors. And remember, the best part of cooking is sharing your creations and memories with friends and family!
FAQs and Troubleshooting
Q: My caramel turned out too hard—what happened?
A: If your caramel cools too fast or cooks too long, it can harden. Keep an eye on the temperature and don’t overcook!
Q: Can I use microwave popcorn?
A: Absolutely, just make sure it’s plain popcorn without too much butter or seasoning. You’ll be coating it in delicious caramel!
Q: What if I can’t find mini marshmallows?
A: You can chop up regular marshmallows into smaller pieces or substitute with crunchy cereal like Rice Krispies for a different texture!
Q: How do I store leftover treats?
A: Keep them in an airtight container at room temperature. If you refrigerate them, they might become too hard, and we don’t want that spooky situation!
Now that you have everything you need to create fantastic Halloween treats, gather your loved ones, turn on some spooky tunes, and get ready for a fun-filled evening in the kitchen! So, let’s make this Halloween spooktacular, one treat at a time! Happy cooking!
Print
Spooktacular Halloween Treats
- Total Time: 25 minutes
- Yield: 4 servings 1x
- Diet: Vegetarian
Description
Celebrate Halloween with these fun and easy popcorn ball treats that are perfect for all ages.
Ingredients
- 1/2 cup Popcorn kernels
- 1 cup Granulated sugar
- 1/2 cup Butter (unsalted)
- 1/4 cup Corn syrup (optional)
- 2 cups Mini marshmallows
- Food coloring
- Sprinkles
Instructions
- Pop the popcorn using your preferred method and let it cool.
- Combine sugar, butter, and corn syrup in a saucepan and cook until caramel forms.
- Add the mini marshmallows to the caramel and stir until melted.
- Pour the caramel mixture over popcorn and mix until coated.
- Shape the mixture into balls or spooky shapes and place on a baking sheet.
- Decorate with melted chocolate and sprinkles.
- Allow to cool completely before serving.
Notes
Feel free to experiment with different shapes and themes for your Halloween treats! Store leftovers in an airtight container.
- Prep Time: 15 minutes
- Cook Time: 10 minutes
- Category: Dessert
- Method: Baking
- Cuisine: American
Nutrition
- Serving Size: 1 serving
- Calories: 250
- Sugar: 22g
- Sodium: 200mg
- Fat: 10g
- Saturated Fat: 6g
- Unsaturated Fat: 4g
- Trans Fat: 0g
- Carbohydrates: 36g
- Fiber: 1g
- Protein: 2g
- Cholesterol: 30mg
Keywords: Halloween treats, popcorn balls, spooky snacks, easy desserts

Minute Halloween Snacks: 100 Quick & Simple Ideas
100 Easy Halloween Food Ideas: Spooktacular Treats for All Ages!
Welcome to the most delightful time of the year when everything turns a little spooky and a whole lot festive—Halloween! Whether you’re planning a haunted gathering, a cozy night in, or a lively trick-or-treat, I’m here to help make your Halloween a treat (without the trick!).
I’ve always found that what makes Halloween truly special are the fun and creative foods that brighten the usually dark and chilly celebrations. Halloween isn’t just about frightful costumes—no, no! It’s about gathering around the table, sharing laughs, and, most importantly, indulging in scrumptious delights that are just as whimsical as they are delicious.
From spooky finger foods that’ll make you giggle to creepy desserts that’ll put a smile on any little ghost or goblin’s face, I’ve curated a list of 100 easy Halloween food ideas that are simple to make and guaranteed to impress!
So, grab your favorite apron, channel your inner witch or wizard, and let’s conjure up some delicious dishes that will turn your Halloween gathering into an unforgettable affair.
A Little Personal Halloween Magic
Ah, Halloween—the season of costumes, candy, and somehow, a whole lot of fun in the kitchen! One of my fondest memories is when my family used to throw a monster bash every Halloween. I’ll never forget the year my mom decided to host an “adults and kids” potluck, where everyone brought their spookiest dishes, and the dining table was an eerie buffet of treats and horrors in good fun!
My personal contribution to the feast? Pumpkin-shaped cheese balls and “witches’ fingers” cookies, made with a rich almond dough and topped with a luscious, gooey raspberry jam for that frightful touch. Every year, I learned the art of creating spooky delights from scratch, and those memories have become cherished traditions that I now carry forward to my own family and friends.
Today, I aim to inspire you with the same enthusiasm and joy I felt back then. I want to show you that creating Halloween treats is not only easy but can also spark laughter and love around your table. Let’s dive into some deliciously haunted creations!
Ingredients: Spooktacular Essentials for Halloween Cooking
Here’s what you’ll need to get started on your Halloween adventure. Don’t sweat if you don’t have everything—substitutions abound!
-
Pumpkin Puree: The star of many fall recipes! Use canned pumpkin puree for convenience or roast your own fresh pumpkin for a wholesome twist. If you’re not a pumpkin fan, sweet potato works great!
-
Almond Flour: Perfect for those with gluten sensitivities. It gives your treats a nutty flavor and tender texture. If you don’t have it, regular all-purpose flour is a suitable swap.
-
Cream Cheese: This adds creaminess and richness to your dips and spreads. You can substitute with Greek yogurt for a healthier version or non-dairy cream cheese if you’re looking for a vegan option.
-
Chocolate Chips: Great for baking and decorating! You can use dark, milk, or white chocolate based on your preference. For a healthier alternative, try dark chocolate or cocoa nibs.
-
Food Coloring: Black, orange, and purple food dyes can help in creating a Halloween-themed presentation. Natural options such as beet juice or activated charcoal might be of interest if you’re avoiding artificial colors.
-
Ghost Peppers: Just a pinch adds that fiery touch to savory dips! If heat isn’t your friend, opt for smoked paprika for flavor without the burn.
-
Candy Corn: A classic Halloween treat! Use as decoration or a sweet surprise within cookies. If candy corn isn’t your style, consider M&M’s or chocolate-covered pretzels for that festive crunch.
Gather these ingredients, and you’re ready to create a spread that will enchant your guests!
Step-by-Step Instructions: Creating Your Halloween Feast
Let’s jump into the fabulous world of Halloween cooking with step-by-step instructions for a variety of spooky treats! Below, I’ll walk you through some of my top ideas:
Spooky Pumpkin Cheese Ball
-
Mix Ingredients: In a bowl, combine 8 oz of softened cream cheese, 1 cup of shredded cheddar cheese, 1/4 cup of pumpkin puree, and 1 tsp of garlic powder. Mix until creamy and smooth using a spatula.
Chef Tip: Make sure your cream cheese is at room temperature for easier mixing!
-
Shape into Pumpkins: Form the mixture into a pumpkin shape. To add a texture, take a fork and depress small lines into the ball to mimic pumpkin grooves.
-
Coat: Roll your pumpkin cheese ball into crushed cheesy crackers or a mix of almond flour and spices for an added crunch.
-
Add a Stem: Place a piece of green bell pepper or a pretzel stick on top for the stem.
-
Serve: Surround your cheese ball with crunchy veggies or crackers for dipping.
Presentation Tip: Use a decorative platter, and add some mini pumpkins around the cheese ball for a festive finish!
Witch’s Finger Cookies
-
Prepare Dough: In a large mixing bowl, cream 1 cup of butter, which is softened, with 1 cup of powdered sugar. Mix in 2 tsp of almond extract and 1 egg yolk.
-
Combine Dry Ingredients: Gradually add in 2 1/2 cups of almond flour and 1 cup of all-purpose flour, mixing until a dough forms.
Quick Chef Hack: If your dough is crumbly, a tablespoon of milk will help bind it together.
-
Shape Fingers: Roll dough into finger shapes. Create knuckles by pinching the dough slightly.
-
Nail it: Press a blanched almond at the tip of each finger for a spooky “nail” and bake at 350°F (175°C) for 10-12 minutes until lightly golden.
-
Add a Gory Touch: After cooling, drizzle with raspberry jam to create that creepy blood effect.
Serve Tip: Arrange your cookies in an old Halloween-themed dish or cauldron for maximum impact!
Gory Guacamole
-
Avocado Base: Mash 3 ripe avocados in a bowl until smooth. Mix in 2 tbsp of lime juice, 1 diced tomato, and 1 tsp of garlic powder.
-
Add the Spook: Incorporate crumbled feta cheese for a ghostly look. Add green food coloring to intensify the creepiness!
Chef Tip: Use a fork to get that perfectly blended guacamole without over-mashing!
-
Serve the Guac: Use a round bowl as your serving dish, allowing room for chips. You can create a “flesh-eating” mouth by placing red salsa around the edges and using tortilla chips as the “teeth”!
Mini Mummy Dogs
-
Wrap It Up: Roll crescent dough into thin strips and wrap them around mini hot dogs. Leave space for eyes.
-
Bake: Place mummies on a baking sheet and bake according to dough package instructions (usually 12-15 minutes at 375°F).
-
Dress it Up: Once cooked, use mustard or ketchup to create little eyeballs.
Monster Fruit Cups
-
Cut your Favorites: Take assorted fruit like grapes, kiwi, and strawberries. Place them in cups or bowls.
-
Face Time: Use mini chocolate chips or candies to make monster faces on your fruit.
-
Serve Chilled: Chill in the fridge before serving for a refreshing treat!
By following these steps, you’ll have a fantastic array of festive foods ready to charm all your guests and give them that Halloween joy they crave!
Serving Suggestions: Presenting Your Spooky Spread
When it comes to serving your Halloween spread, presentation is key! Use colorful platters or even spooky-themed serving trays to bring your food to life (or death!). Arrange your treats in ghostly layers, create fun little “labels” with names like "Spider Dip" or "Witch’s Brew," and don’t forget to add some seasonal decorations.
Use faux cobwebs on your tables, strategically place battery-operated candles, and throw in a few mini pumpkins for that extra touch.
Recipe Variations: Spice Up Your Halloween
The beauty of Halloween cooking is that there’s always room to mix and match! Here are some tasty variations to inspire your creativity:
-
Savory Ghosts: Use puff pastry to create savory ghost shapes filled with your favorite cheese and herb blend.
-
Eerie Eyeball Pasta: Create meatballs with mozzarella "eyeballs" where you place an olive or pepper in the center, atop a bed of dark spaghetti!
-
Vampire Bat Wings: Use chicken or cauliflower wings, baked with a spicy, smoky glaze for a “fang-tastic” treat!
-
Pumpkin Spice Everything: Add pumpkin spice to your cookies, muffins, or even pancakes to keep your Halloween flavors on point!
-
Vegan Options: Swap ingredients in cookies or dips with plant-based alternatives for a cruelty-free approach.
Chef’s Notes: Memories and Whims
Oh, how I love witnessing the little smiles and shrieks of delight when serving Halloween food! Behind every Witch’s Finger Cookie or Spooky Pumpkin Cheese Ball, there are memories, laughter, and perhaps a little chaos, too. Those moments when the dough ends up on your nose or when your mischievous ghost child tries to sneak an extra chocolate chip; those are the real treat!
Over the years, I’ve learned that food doesn’t have to be perfect; it just has to be made with love and a sprinkle of fun. My recipes are not just about flavors; they are about creating memories and stories shared around the table.
FAQs and Troubleshooting
How can I make my Halloween treats more colorful?
Consider using natural food colors or fruit purees. Mixing different shades into your batter or frosting can create a vibrant array of colors!
My cookies spread too much while baking; what went wrong?
This is often a result of either too much butter or not enough flour. Make sure to chill your dough initially, especially for cut-out cookies!
Can I make these treats ahead of time?
Absolutely! Many of these dishes can be made a day in advance. Just make sure to store them in airtight containers and add any fresh elements, like fruits, just before serving.
What should I do if my guacamole turns brown?
To keep guac fresh, store it in an airtight container with plastic wrap pressed directly onto the surface. A splash of lime juice helps too!
Nutritional Info
(Depends on specific recipes prepared—typically not necessary for Halloween treats but feel free to add a note about balance and moderation with festive foods.)
That’s a wrap on your ultimate guide for 100 Easy Halloween Food Ideas! I hope you discovered some delightful recipes to conjure up for your festivities and that they inspire you to create your own spooky magic in the kitchen. Remember, the best part of Halloween is sharing those creations with loved ones, so roll up those sleeves and enjoy the delicious adventure ahead. Happy Halloween cooking!
Print
Spooky Pumpkin Cheese Ball
- Total Time: 15 minutes
- Yield: 8 servings 1x
- Diet: Vegetarian
Description
A delightful and spooky cheese ball shaped like a pumpkin, perfect for Halloween gatherings.
Ingredients
- 8 oz cream cheese, softened
- 1 cup shredded cheddar cheese
- 1/4 cup pumpkin puree
- 1 tsp garlic powder
- Crushed cheesy crackers or almond flour for coating
- Green bell pepper or pretzel stick for the stem
Instructions
- Mix ingredients in a bowl until creamy and smooth.
- Shape into a pumpkin shape, using a fork to add grooves.
- Coat with crushed cheesy crackers or almond flour for crunch.
- Add a green bell pepper or pretzel stick on top as a stem.
- Serve with crunchy veggies or crackers.
Notes
For presentation, surround the cheese ball with mini pumpkins.
- Prep Time: 15 minutes
- Cook Time: 0 minutes
- Category: Appetizer
- Method: No Cook
- Cuisine: American
Nutrition
- Serving Size: 1 serving
- Calories: 150
- Sugar: 2g
- Sodium: 300mg
- Fat: 12g
- Saturated Fat: 7g
- Unsaturated Fat: 3g
- Trans Fat: 0g
- Carbohydrates: 5g
- Fiber: 0g
- Protein: 5g
- Cholesterol: 30mg
Keywords: Halloween, cheese ball, spooky food, party appetizer, pumpkin


