
Spooky Mummy Brownies: 30-Minute Halloween Treats for Kids
Spooky Mummy Brownies: A Halloween Treat to Delight
Welcome to my kitchen, food friends! I’m so thrilled to have you here today. As we approach Halloween, the air becomes crisp, leaves crunch underfoot, and the scent of baked goods wafts through homes everywhere. There’s something truly magical about this time of year — it’s all about treats, spooky vibes, and the joy of creating something delightful to share with friends and family. Today, I’m sharing a recipe that’s near and dear to my heart: Spooky Mummy Brownies.
These brownies are not just fudgy and decadent; they’re irresistibly cute with their mummy-like appearance. Perfect for both kids and adults, these treats may just become your new Halloween tradition. Imagine this: a cozy kitchen filled with laughter and the warm aroma of chocolate as you whip up a batch of these spooky brownies. It’s a recipe that combines the fun of crafting with the joy of cooking — and who could say no to that?
When I think of Halloween, I can’t help but remember the excitement shared with my family as we prepped for the spooky season. We’d gather together, donned in our costumes, with bowls of candy and stacks of decorations piled high. One year, we decided to throw a Halloween-themed dinner party, complete with ghoulish decorations and a dessert table that had everyone buzzing. That’s when I first served these Mummy Brownies, and their popularity skyrocketed. They became the highlight of the evening, and the kids couldn’t get enough of them. The best part? The scaredy-cats among us loved that they were surprisingly satisfying and indulgent, despite their eerie look.
So, ready to dive into the creation of these delightful mummies? Let’s get baking!
Ingredients
For your Spooky Mummy Brownies, you will need the following ingredients:
-
1 cup (2 sticks) unsalted butter: Butter adds richness to your brownies; feel free to use a dairy-free alternative if you’re looking for a vegan option.
-
2 cups granulated sugar: This sweetens your brownies wonderfully. For a less sweet version, try using coconut sugar.
-
4 large eggs: Eggs provide moisture and help bind everything together. If you’re vegan, you can substitute ground flaxseed (1 tablespoon of flaxseed with 3 tablespoons of water for one egg).
-
1 teaspoon vanilla extract: Vanilla enhances the flavors. Use pure vanilla for the best taste, or sub with almond extract for a different twist!
-
1 cup all-purpose flour: This gives structure to your brownies. For gluten-free options, a 1:1 gluten-free flour blend works great.
-
1 cup unsweetened cocoa powder: Cocoa is key for that rich chocolate flavor. Dutch-process cocoa can be used for a deeper taste.
-
1 teaspoon baking powder: This helps the brownies rise slightly during baking. If you’re out, baking soda works in a pinch—just use half the amount.
-
½ teaspoon salt: A little salt balances the sweetness. You can reduce it slightly if you are watching your sodium intake.
-
Candy eyes: These bring the mummies to life! Use small chocolate chips if you can’t find candy eyes.
-
White chocolate melts or candy coating: For wrapping your brownies like mummies. If you want to keep it dairy-free, look for vegan white chocolate.
Step-by-Step Instructions
Let’s jump right into making these spooky delights! Follow these steps for brownie perfection:
-
Preheat the oven to 350°F (175°C). This is essential, as it allows for even cooking right from the start. While it heats, prepare your baking pan.
-
Prepare your baking pan: Grease a 9×13 inch baking dish or line it with parchment paper. This will prevent sticking and make it easier to remove the brownies after baking. I always recommend parchment paper for ease of lifting out the brownies.
-
Melt the butter: In a medium saucepan over low heat, melt the butter. Stir it gently until it has fully melted, making sure it doesn’t brown. If you do overheat and brown it, don’t worry — just let it cool a bit before proceeding.
-
Combine sugar and eggs: In a large mixing bowl, whisk together the melted butter and sugar until well blended. Then, add the eggs one at a time, mixing thoroughly after each. The mixture should be creamy and smooth.
-
Add the vanilla: Stir in the vanilla extract. This is where the magic happens, as the aroma fills your kitchen, making it feel cozier.
-
Incorporate dry ingredients: Now, sift together the flour, cocoa powder, baking powder, and salt in another bowl. This step is key to ensuring there are no lumps in your brownies and the flavors mix well. Gradually add this dry mixture to the wet ingredients and stir until just combined. Be careful not to overmix. We want fudgy brownies, not cake-like ones!
-
Pour into the pan: Transfer the brownie batter into the prepared baking dish and spread it evenly. A spatula works great for this step.
-
Bake for 25-30 minutes: You know your brownies are done when a toothpick inserted into the center comes out with a few moist crumbs. No batter, but a little gooey is exactly what we’re aiming for.
-
Cool completely: Once baked, let the brownies cool in the pan on a wire rack. This allows them to firm up before cutting.
-
Cut into pieces: Once cooled, cut the brownies into rectangles or squares, depending on your preference.
-
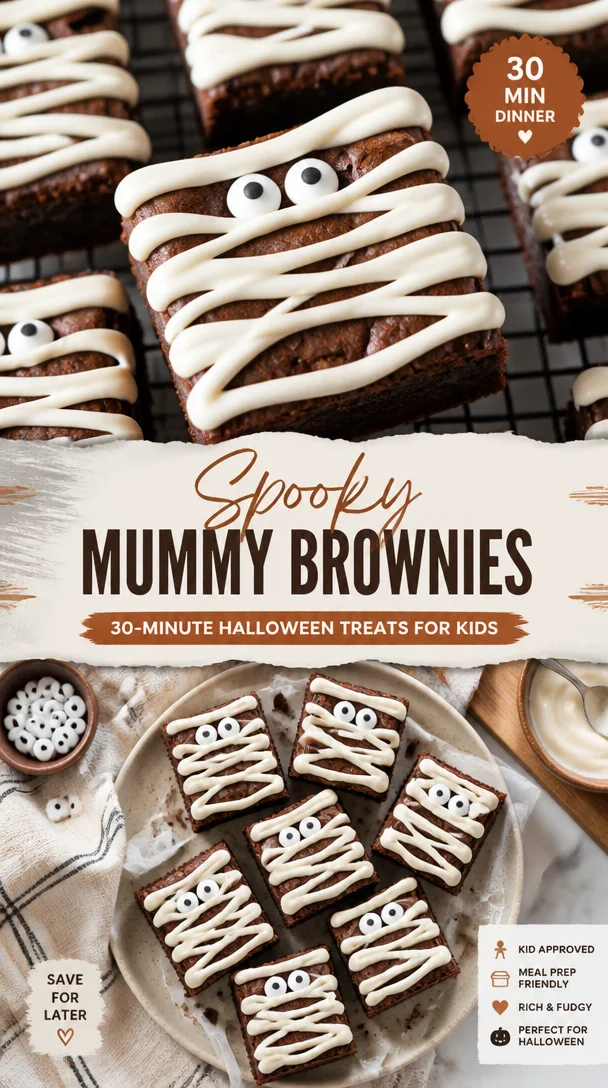
Mummify them up!: Melt your white chocolate melts according to the package instructions. Use a piping bag or a zip-top bag with the corner snipped off to drizzle the melted chocolate over the brownies, creating mummy bandages. Place two candy eyes on each brownie while the chocolate is still soft.
Serving Suggestions
Serve your Spooky Mummy Brownies on a rustic wooden board or a vibrant Halloween-themed platter. They look fantastic with miniature pumpkins or autumn leaves scattered around for decor. These brownies are perfect for Halloween parties, school events, or simply to enjoy with your family on a cozy movie night. Pair them with a scoop of vanilla ice cream or a drizzle of caramel for an added treat!
Recipe Variations
Want to mix things up? Here are a few creative twists you can try:
-
Peanut Butter Swirl: Before baking, drop spoonfuls of peanut butter into the brownie batter and swirl it lightly for a delicious twist.
-
Fruity Add-ins: Add chopped cherries or raspberries for a tart surprise within the brownies.
-
Spicy Kick: A pinch of cinnamon or cayenne pepper can give your brownies a unique flavor profile with a little warmth.
-
Nutty Crunch: Toss in some chopped nuts like walnuts or pecans to add texture—just make sure your guests are nut-friendly!
-
Oreo Surprise: Crush some Oreo cookies and fold them into the batter. The cookies will create delightful pockets of flavor.
Chef’s Notes
As with any beloved recipe, mine has seen many iterations over the years. The chocolate drizzle was born from my love for decoration, and every Halloween party I host somehow ends with these brownies being the star! I remember an autumn night when I forgot to buy candy eyes, and we ended up using mini chocolate chips instead. The kids loved them just as much and even named them “Choco-Mummies!”
Every time I make these brownies, I reminisce about those cozy family gatherings and how the simple act of cooking can bring everyone together. These brownies aren’t just a treat; they’re a medium for laughter and connection!
FAQs and Troubleshooting
Here are some common questions I’ve received, along with answers:
1. Why are my brownies cakey?
- Ensure you’re not overmixing the batter. Also, be cautious with your baking time; check your brownies a few minutes early. Fudgy brownie perfection lies just under the “done” threshold.
2. What’s the best way to store leftover brownies?
- Store them in an airtight container at room temperature for up to three days. They also freeze beautifully for up to three months!
3. Can I make these brownies ahead of time?
- Absolutely! You can make them a day or two before your event. Just keep them covered to maintain freshness.
4. What if I want vegan brownies?
- You can easily substitute the eggs with ground flaxseed and use plant-based butter and chocolate. Just check that your chocolate and candy eyes are dairy-free!
Nutritional Info
While I usually focus on enjoyment over nutrition when it comes to indulging, I believe it’s helpful to know what you’re eating! Each brownie (out of about 24 servings) contains approximately:
- Calories: 200-250
- Total Fat: 10g
- Carbohydrates: 30g
- Protein: 2g
Feel free to adjust portions based on your serving size and dietary needs!
Conclusion
There you have it! Spooky Mummy Brownies that are not only scrumptious but also add a playful twist to your Halloween festivities. I hope this recipe fills your kitchen with warmth and laughter, making memories with every bite. So, gather your loved ones, crank up your favorite Halloween tunes, and have a blast while baking!
Happy Halloween, and may your kitchen always smell like something delicious! If you make these brownies, I’d love to hear how they turn out. Share your spooky creations with me!
Print
Spooky Mummy Brownies
- Total Time: 45 minutes
- Yield: 24 brownies 1x
- Diet: Vegetarian
Description
These fudgy and decadent Spooky Mummy Brownies are irresistibly cute and perfect for Halloween celebrations.
Ingredients
- 1 cup (2 sticks) unsalted butter
- 2 cups granulated sugar
- 4 large eggs
- 1 teaspoon vanilla extract
- 1 cup all-purpose flour
- 1 cup unsweetened cocoa powder
- 1 teaspoon baking powder
- ½ teaspoon salt
- Candy eyes
- White chocolate melts or candy coating
Instructions
- Preheat the oven to 350°F (175°C).
- Prepare your baking pan: Grease a 9×13 inch baking dish or line it with parchment paper.
- Melt the butter in a medium saucepan over low heat.
- Combine the melted butter and sugar in a large mixing bowl until well blended.
- Add the eggs one at a time, mixing thoroughly after each.
- Stir in the vanilla extract.
- Incorporate dry ingredients: sift flour, cocoa powder, baking powder, and salt in another bowl.
- Gradually add the dry mixture to the wet ingredients and stir until just combined.
- Pour the brownie batter into the prepared baking dish and spread it evenly.
- Bake for 25-30 minutes until a toothpick comes out with a few moist crumbs.
- Cool completely in the pan on a wire rack.
- Cut into rectangles or squares.
- Mummify the brownies with melted white chocolate and place candy eyes on top.
Notes
Store leftover brownies in an airtight container at room temperature for up to three days or freeze for up to three months.
- Prep Time: 15 minutes
- Cook Time: 30 minutes
- Category: Dessert
- Method: Baking
- Cuisine: American
Nutrition
- Serving Size: 1 brownie
- Calories: 225
- Sugar: 25g
- Sodium: 85mg
- Fat: 10g
- Saturated Fat: 6g
- Unsaturated Fat: 4g
- Trans Fat: 0g
- Carbohydrates: 30g
- Fiber: 2g
- Protein: 3g
- Cholesterol: 30mg
Keywords: Halloween, brownies, dessert, spooky, treats
Cauldron Cookies: 5 Spooky Halloween Treats in Minutes
Get Ready to Indulge: Cauldron Cookies That Enchant Your Taste Buds!
Welcome to my kitchen, where the aromas of baking and the spirit of cozy cooking swirl together in perfect harmony! Today, I’m excited to share a family recipe that holds a special place in my heart: Cauldron Cookies. These delightful bites bring a sense of magic with every crunch and chew, perfect for all those who seek comforting flavors and fun memories.
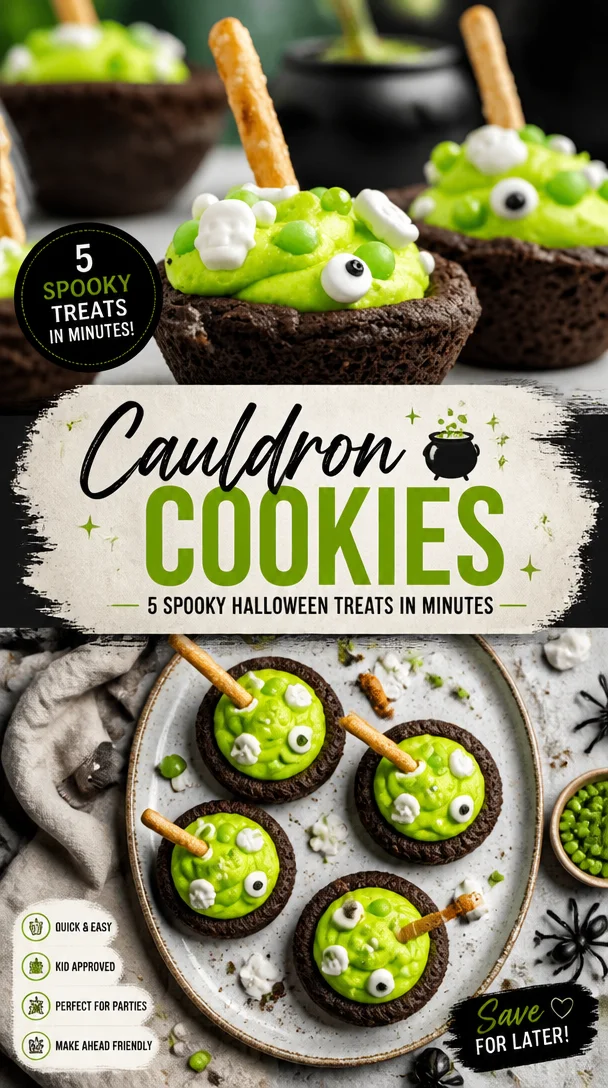
Picture this: the first crisp days of autumn drift in, and there’s a certain magic in the air. It’s that time of year again when Halloween decorations start to pop up, pumpkins sit proudly on doorsteps, and the leaves transform into vibrant shades of orange and gold. This is the same season that my late grandmother, a formidable wizard in the kitchen, would bring out her legendary cookie cauldron. Picture a giant dungeon-like pot bubbling with molten chocolate, gooey marshmallows, and a sprinkle of enchanting spices — those Cauldron Cookies paired with a warm glass of milk were a staple in our household.
As a child, I’d race home from school with the sweet anticipation of indulging in these precious treats. The kitchen would be filled with laughter, and we would get our hands sticky as we rolled out the dough and added ingredients to our cauldron. It wasn’t just about the cookies; it was about the joy of creation and the bonds formed over mixing, baking, and—let’s be honest—sampling all the delicious bits that didn’t quite make it into the oven.
The beauty of these cookies is that they can easily become a tradition in your own home. They’re perfect for sharing, too, whether you’re welcoming friends over for a cozy autumn evening or simply treating yourself to an after-dinner delight. Let’s dive into the magical world of Cauldron Cookies, shall we?
Ingredients to Create Cookie Magic
To conjure up a batch of these delightful Cauldron Cookies, you’ll need the following ingredients. Each of them has a role in crafting the perfect cookie experience:
-
1 cup unsalted butter: The base of any good cookie. Don’t have unsalted butter? No problem! You can use salted butter; just watch the added salt in the recipe.
-
1 cup brown sugar: This adds that rich, caramel-like depth. Dark brown sugar is a great substitute for more molasses flavor, while white sugar can be used if you’re in a pinch.
-
1 cup granulated sugar: Balances the flavors for that perfect sweet spot. If you want to reduce the sugar, consider using half the amount or substituting with coconut sugar.
-
2 large eggs: Bind the ingredients together. If you’re looking for an egg-free option, you can use flax eggs (1 tablespoon ground flaxseed mixed with 2.5 tablespoons water per egg) to keep that texture.
-
2 teaspoons vanilla extract: Adds a warm, nostalgic flavor. Feel free to use almond extract for a twist!
-
2.5 cups all-purpose flour: This is the structure of your cookies. You could swap some or all of it for whole wheat flour for a nutty flavor.
-
1 teaspoon baking soda: This is your leavening agent, giving the cookies that soft, fluffy texture. Baking powder can be used as a substitute but will alter the final texture slightly.
-
1/2 teaspoon salt: Balances the sweetness wonderfully. Skip it if using salted butter.
-
1 cup chocolate chips (or any mix, like butterscotch or white chocolate): Chocolate chips are the star of the show! Mix and match with your favorite kinds for an exciting flavor twist.
-
1 cup mini marshmallows: These give a delightful gooey texture. If you’re not a marshmallow fan, you can replace them with dried fruit or nuts for added chewiness.
-
1 cup crushed pretzels (optional): For a delightful crunch! If gluten-free, swap with gluten-free pretzels or skip entirely.
Gather these ingredients, and let the magic begin!
Step-by-Step Instructions to Conjure Up Your Cookies
-
Preheat the oven: Set your oven to 350°F (175°C). Preheating ensures that your cookies bake evenly.
-
Cream the butter and sugars: In a large mixing bowl, beat the unsalted butter, brown sugar, and granulated sugar together until light and fluffy—about 2-3 minutes. This process incorporates air into the mixture, contributing to a nice chewy texture.
-
Add eggs and vanilla: Crack the eggs into the bowl, followed by the vanilla extract. Mix until fully integrated; don’t worry if it looks a bit curdled!
-
Combine dry ingredients: In a separate bowl, whisk together the all-purpose flour, baking soda, and salt. This helps to evenly distribute the leavening agent and ensures no lumps in your cookies.
-
Slowly introduce dry to wet: Gradually add the dry ingredients to the wet mixture. Mix until just combined; be careful not to overwork the dough! If you prefer, you can use a spatula here for a gentle fold.
-
Stir in the goodies: Gently fold in the chocolate chips, mini marshmallows, and crushed pretzels (if using). This is where the cookie’s magic happens! Those little chunks of joy will melt and create pockets of goodness in every bite.
-
Scoop the dough: Use a cookie scoop or tablespoon to portion the dough onto a parchment-lined baking sheet. Make sure to leave enough space between them as they will spread!
-
Bake: Pop those cookie-filled trays in the oven and bake for 10-12 minutes or until the edges are lightly golden. The secret? Take them out when they still look a bit soft; they’ll continue to set as they cool.
-
Cool down: Let the cookies rest on the baking sheet for about 5 minutes before transferring them to a wire rack. This helps to enhance their chewy texture.
-
Dive In: Once they’ve cooled (if you can resist!), indulge in a warm Cauldron Cookie and enjoy those unbeatable flavors!
Serving Suggestions to Make Your Cookies Shine
These Cauldron Cookies are absolutely divine on their own, but to elevate your cookie experience, I recommend serving them warm alongside a tall glass of milk or a cozy cup of hot cocoa. For a fun twist, pair them with a scoop of vanilla ice cream for an unforgettable dessert treat that will impress every guest! You could also try drizzling some melted chocolate or caramel over the top for an extra touch of sweetness.
Recipe Variations: Switch Up the Magic
Feeling adventurous? Here are a few fun twists to make this recipe uniquely yours:
-
Nutty Considerations: Add chopped nuts like pecans or walnuts for an extra crunch and nutty flavor.
-
Spiced Up: Incorporate a teaspoon of cinnamon or pumpkin spice for a cozy fall twist that enhances the overall flavor.
-
Fruit Fusion: Swap the chocolate chips for dried cherries, cranberries, or apricots for a fruity variation.
-
Buttercream Delight: Use frosting as a dip! Make a simple frosting with cream cheese and powdered sugar to pair alongside your cookies.
-
Dairy-Free Option: Substitute all butter with coconut oil and make sure to use dairy-free chocolate chips for a fantastic dairy-free treat.
Chef’s Notes: A Cookie Journey
Every recipe has its story, and the evolution of these Cauldron Cookies is no exception. I remember experimenting with all kinds of mix-ins, from M&M’s to leftover Halloween candies. Each variation brought something new to the table, and I can still hear my family laughing as we created our own version of the recipe together.
What started as a simple butter and sugar base has now metamorphosed into a gooey, textured treat with depths of flavor and an array of textures, thanks to the added bits I’ve discovered along the way. This recipe has become a symbol of togetherness in my home—an excuse to gather around the kitchen and share stories over warm cookies!
FAQs and Troubleshooting: Common Cookie Conundrums
Q: My cookies spread too much during baking. What happened?
A: This could be due to the butter being too warm or if the dough was not chilled before baking. A quick fix? Chill the dough for 30 minutes before scooping it onto the baking sheet.
Q: Why are my cookies hard?
A: Overbaking or overmixing the dough can lead to tough cookies. One way to ensure they’re soft is to take them out of the oven while they’re still slightly underbaked—remember, they will continue cooking as they cool.
Q: Can I freeze these cookies?
A: Absolutely! You can freeze the baked cookies in an airtight container for up to three months. To reheat, pop them in the oven for about 5 minutes at 350°F (175°C).
Q: How can I make these cookies gluten-free?
A: Substituting all-purpose flour with your favorite gluten-free flour blend should work well! Just make sure that it includes xanthan gum to maintain the cookie’s structure.
Nutritional Info (Optional)
Feel free to calculate the nutritional values based on your ingredient modifications, but keep in mind, these cookies are best enjoyed in moderation as a sweet treat to delight your taste buds!
And there you have it—a complete journey into the world of Cauldron Cookies! I hope you enjoy making these treats as much as I love sharing them with you. Whether you’re creating new family memories or indulging in a little self-care with a sweet, warm cookie, I wish you all the delicious joy these cookies bring. Happy baking!
Print
Cauldron Cookies
- Total Time: 27 minutes
- Yield: 24 servings 1x
- Diet: Vegetarian
Description
Delightful Cauldron Cookies that bring magical flavors with every bite, perfect for an autumn treat.
Ingredients
- 1 cup unsalted butter
- 1 cup brown sugar
- 1 cup granulated sugar
- 2 large eggs
- 2 teaspoons vanilla extract
- 2.5 cups all-purpose flour
- 1 teaspoon baking soda
- 1/2 teaspoon salt
- 1 cup chocolate chips
- 1 cup mini marshmallows
- 1 cup crushed pretzels (optional)
Instructions
- Preheat the oven: Set your oven to 350°F (175°C).
- Cream the butter and sugars: In a large mixing bowl, beat the unsalted butter, brown sugar, and granulated sugar together until light and fluffy—about 2-3 minutes.
- Add eggs and vanilla: Crack the eggs into the bowl, followed by the vanilla extract. Mix until fully integrated.
- Combine dry ingredients: In a separate bowl, whisk together the all-purpose flour, baking soda, and salt.
- Slowly introduce dry to wet: Gradually add the dry ingredients to the wet mixture. Mix until just combined.
- Stir in the goodies: Gently fold in the chocolate chips, mini marshmallows, and crushed pretzels (if using).
- Scoop the dough: Use a cookie scoop or tablespoon to portion the dough onto a parchment-lined baking sheet.
- Bake: Bake for 10-12 minutes or until the edges are lightly golden.
- Cool down: Let the cookies rest on the baking sheet for about 5 minutes before transferring them to a wire rack.
- Dive In: Enjoy a warm Cauldron Cookie!
Notes
These cookies are best enjoyed warm, ideally served with milk or hot cocoa. Consider adding nuts or spices for variations.
- Prep Time: 15 minutes
- Cook Time: 12 minutes
- Category: Dessert
- Method: Baking
- Cuisine: American
Nutrition
- Serving Size: 1 cookie
- Calories: 150
- Sugar: 10g
- Sodium: 100mg
- Fat: 7g
- Saturated Fat: 4g
- Unsaturated Fat: 2g
- Trans Fat: 0g
- Carbohydrates: 20g
- Fiber: 0g
- Protein: 2g
- Cholesterol: 30mg
Keywords: cookies, Halloween, baking, dessert
Halloween Mozza Eyes: Quick, Spooky Mozzarella Eyeballs
Halloween Mozza Eyes
Introduction
Welcome to my kitchen, fellow food lovers! As the air turns crisp and the nights grow longer, there’s an undeniable excitement that creeps in. Halloween isn’t just a day for candy and costumes; it’s a chance to get a little creative in the kitchen and whip up some whimsically spooky treats! Today, I’m thrilled to share one of my favorite Halloween snacks: Mozza Eyes.
These adorable bites are not only fun to make but equally delightful to eat. Imagine creamy mozzarella balls staring back at you, complete with playful olives and cherry tomatoes, ready to make any gathering a hit. The best part? They come together in no time, allowing you to spend more time enjoying the festivities and less time fretting over complicated recipes. Whether you’re hosting a pumpkin-carving party or simply seeking a festive treat for your family’s Halloween movie night, Mozza Eyes are sure to turn heads—and stomachs!
I’ve always believed that the kitchen is a space for creativity and laughter. Over the years, I’ve explored countless recipes, but nothing quite compares to the joy of sharing a dish that simply screams fun! Let’s dive right in, and I’ll guide you through making these spooky snacks that are not only delicious but also a fantastic way to kick off the Halloween spirit.
Personal Story
Let me take you back to my childhood, where my love for Halloween first blossomed. I remember stringing fake cobwebs in the living room, surrounded by pumpkins, and preparing for the ghoulish trick-or-treaters. It was during one of these joyful afternoons that I decided to get my little hands into the kitchen with my mom. We whipped up a pot of her famous tomato soup, and just for fun, she had the brilliant idea of crafting eerie "eyeball" mozzarella balls to float in the soup.
As we crafted our mozzarella eyes, we laughed and shared stories about the spookiest pranks we had pulled on friends and family. The balance of laughter, delicious flavors, and the thrill of Halloween made that memory one I cherish deeply. Fast forward to today, and that playful spirit remains. Now it’s my turn to not only create memories with family and friends but to inspire others to find joy in their kitchens. So let’s put on our aprons and get to work on turning ordinary ingredients into extraordinary Halloween delights!
Ingredients
For our Halloween Mozza Eyes, you’ll need a few simple, yet crucial ingredients. Here’s what you’ll need:
-
Mozzarella Balls: Use bocconcini or ciliegine mozzarella. They’re bite-sized, creamy, and will mimic the eyeball effect wonderfully. Tip: If mozzarella isn’t available, ricotta balls can work too!
-
Black Olives: These will serve as the “pupil” of our eyes. You can use whole olives or sliced, depending on how eerie you want them to look. Substitution: Substitute with dark grapes for a sweet twist!
-
Cherry Tomatoes: Their red color adds a pop of festivity, plus they go perfectly with mozzarella. You could even use heirloom tomatoes for a more unique aesthetic. Insight: Opt for firm tomatoes to keep their shape in the dish.
-
Fresh Basil: This isn’t just for decoration; a hint of freshness elevates the flavor profile of our dish. Tip: If you can’t find fresh basil, you can use arugula or spinach for added color.
-
Balsamic Glaze: A drizzle here and there can elevate these Mozza Eyes by adding a touch of sweetness that plays off the savory mozzarella. Note: Feel free to make your own by reducing balsamic vinegar over low heat!
Step-by-Step Instructions
Now that we have our ingredients ready, it’s time for the fun part—creating these spooky Mozza Eyes! Follow along with these simple steps:
-
Prep Your Ingredients: Rinse the mozzarella balls and cherry tomatoes under cool water, then pat them dry. Slice the cherry tomatoes in half if you want a more even balance between the mozzarella and the tomato.
Chef Tip: A paring knife is great for slicing tomatoes without squishing them!
-
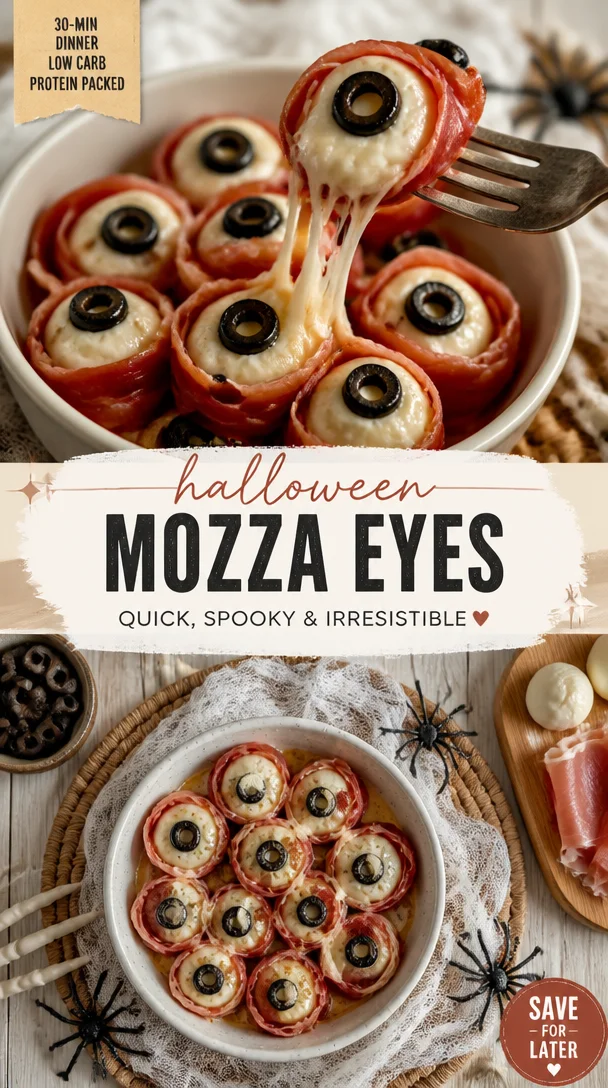
Make the Eyes: For each eye, take one mozzarella ball and place it in the center of your serving platter. Then, take a sliced or whole black olive and push it into the center of the mozzarella ball. This will create that uncanny "pupil" dynamic!
Commentary: Don’t be afraid to mix and match; some eyes can be more expressive with half olives pointing in different directions.
-
Add the Cherry Tomato: Next, take a halved cherry tomato and place it right beside (or on top of) the mozzarella eye. This will mimic the surrounding tissue and enhance the spooky presentation.
Chef Hack: For a more grotesque look, try using slightly smaller cherry tomatoes!
-
Give Them Life: Once you’ve laid out your mozzarella eyes, finely chop some fresh basil and sprinkle it around the edges—this adds a pop of color amidst the array of white and red.
-
Drizzle with Balsamic Glaze: To finish off your spooktacular creation, drizzle some balsamic glaze over the mozzarella eyes and the basil. This adds a delightful tang that balances everything out.
Personal Note: I love to reserve some balsamic glaze for dipping—because who doesn’t love a good dressing?
Serving Suggestions
When it comes to serving your Mozza Eyes, presentation is key! Use a large, beautiful platter that allows your lively creations to shine. You can also set them alongside some crackers or toasted baguette slices for added crunch. Arrange the mozzarella eyes close together to create a cohesive eyeball effect, and perhaps place some extra cherry tomato halves, olives, or basil leaves around the serving tray for color.
Recipe Variations
Feeling adventurous? Here are a few creative twists to elevate your Mozza Eyes:
-
Spicy Version: Use jalapeño slices instead of olives for a fiery kick!
-
Caprese Style: Layer fresh mozzarella and cherry tomatoes on skewers with basil for a more substantial bite.
-
Gluten-Free Option: Serve these eyes with gluten-free crackers or cucumber slices for a refreshing crunch.
-
Vegan Alternative: Swap mozzarella for marinated tofu balls (they’ll soak up the flavors beautifully!).
-
Flavor Experimentalist: Try infusing your mozzarella with garlic or herbs before assembling for an extra flavor burst!
Chef’s Notes
This recipe has become a Halloween staple in my house, evolving from my childhood memories into a festive tradition. I often find myself experimenting with the presentation—sometimes I make an entire plate of “freaky” eyes, and other times I incorporate them into Halloween-themed charcuterie boards.
One of my favorite moments happened last Halloween when my son’s friends came over. As I served these Mozza Eyes, their ecstatic reactions—from squeals to laughter—cracked me up! It reminded me how food can transform a simple gathering into a cherished memory, full of flavor and fun.
FAQs and Troubleshooting
1. My mozzarella balls are oozing liquid, how do I fix this?
Occasionally, mozzarella can release some liquid. Just be sure to drain them well or pat them dry with a paper towel before using to minimize the mess.
2. Can I prepare these in advance?
Absolutely! You can assemble the Mozza Eyes a few hours ahead. However, I recommend waiting to drizzle the balsamic glaze until just before serving to maintain freshness.
3. What if I’m not a fan of olives?
No problem! You can leave them out entirely or use pickles, capers, or even small dollops of avocado for a unique twist.
4. How do I store leftovers?
Keep any leftovers in an airtight container in the refrigerator for up to 2 days. Just know that the texture may change a bit as time goes on.
Nutritional Info
While I recommend enjoying these Mozza Eyes in moderation as a delightful snack, here’s a rough estimate of what you might expect per serving (approx. 4 Mozza Eyes):
- Calories: 150
- Protein: 10g
- Carbohydrates: 6g
- Fat: 9g
- Sodium: 400mg
So there you have it—all the ingredients, insights, and tips needed to whip up your own Halloween Mozza Eyes! I hope this recipe sparks joy in your kitchen and becomes a favorite tradition for you, too. Happy cooking, and may your Halloween be filled with spooky fun and delicious treats!
Print
Halloween Mozza Eyes
- Total Time: 10 minutes
- Yield: 4 servings
- Diet: Vegetarian
Description
Adorable mozzarella bites resembling spooky eyes, perfect for Halloween gatherings.
Ingredients
- Bocconcini or ciliegine mozzarella balls
- Black olives
- Cherry tomatoes
- Fresh basil
- Balsamic glaze
Instructions
- Prep your ingredients: Rinse the mozzarella balls and cherry tomatoes under cool water, then pat them dry. Slice the cherry tomatoes in half if you want a more even balance between the mozzarella and the tomato.
- Make the eyes: For each eye, take one mozzarella ball and place it in the center of your serving platter. Then, take a sliced or whole black olive and push it into the center of the mozzarella ball.
- Add the cherry tomato: Next, take a halved cherry tomato and place it right beside (or on top of) the mozzarella eye.
- Give them life: Once you’ve laid out your mozzarella eyes, finely chop some fresh basil and sprinkle it around the edges.
- Drizzle with balsamic glaze: To finish off your spooktacular creation, drizzle some balsamic glaze over the mozzarella eyes and the basil.
Notes
Assemble a few hours ahead but wait to drizzle with balsamic glaze until just before serving for freshness.
- Prep Time: 10 minutes
- Cook Time: 0 minutes
- Category: Appetizer
- Method: No-Cook
- Cuisine: Italian
Nutrition
- Serving Size: 4 Mozza Eyes
- Calories: 150
- Sugar: 3g
- Sodium: 400mg
- Fat: 9g
- Saturated Fat: 3g
- Unsaturated Fat: 5g
- Trans Fat: 0g
- Carbohydrates: 6g
- Fiber: 1g
- Protein: 10g
- Cholesterol: 25mg
Keywords: Halloween, Mozza Eyes, Spooky Snack, Appetizer
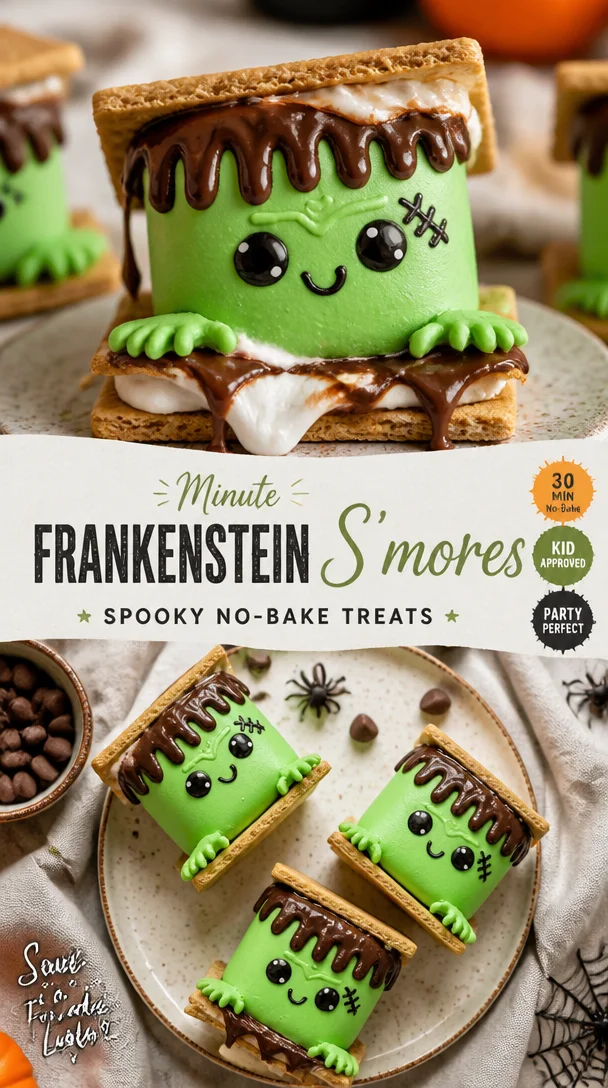
Minute Frankenstein S’mores: Spooky No-Bake Treats
Frankenstein S’mores: A Spooktacular Twist on a Classic Treat
Welcome, my fellow food lovers! Today, we’re diving into a fun kitchen adventure that’s perfect for anyone looking to add a little spooky flair to their dessert table. Inspired by the beloved campfire classic, I’m excited to introduce you to my Frankenstein S’mores: a ghoulishly green twist that’s just as delicious as the original without losing that playful charm we all adore. Whether you’re hosting a Halloween party, a cozy movie night, or just in the mood for some treats that will impress friends and family, these s’mores are sure to steal the show!
Let’s face it: there’s something magical about the combination of melted chocolate, sticky marshmallows, and crispy graham crackers. They transport us back to our childhood, reminding us of laughter around the campfire and sticky fingers at sleepovers. Now, imagine taking that nostalgic recipe and adding a modern, monstrous twist. Trust me, your taste buds will thank you!
As we embark on this sugary journey, I’ll be your guide, sharing personal stories, essential tips, and every step of the way to ensure your Frankenstein S’mores are a hit. So grab your apron (or don’t; I know how messy things can get), and let’s get cooking!
A Sweet Memory
I have a particularly fond memory that revolves around s’mores. It takes me back to those summer nights spent at my grandparents’ cabin in the woods. You could smell the pine trees mingling with the smoke from the campfire as my siblings and I giggled, dodging around the flickering firelight. My grandmother would always station herself at the fire, expertly roasting marshmallows to achieve that perfect golden-brown texture. I remember eagerly waiting for my turn, clutching my graham crackers and chocolate.
One night, in a cheeky spirit of culinary creativity, we decided to switch things up. Instead of regular chocolate, we rummaged through the pantry and found some colorful candies. We dubbed our creation “witches’ s’mores” that night, and it sparked an idea that never truly left me. Now, as an adult, I love taking simple recipes and putting a whimsical spin on them, just like that night. With Halloween around the corner, I thought it was time to breathe new life into my childhood nostalgia with these Frankenstein S’mores!
Ingredients
Here’s what you’ll need to whip up these delightful treats:
-
Graham Crackers:
- Explanation: The classic base for s’mores! Their crunchy texture and honey sweetness are essential.
- Substitution Tips: You can swap them with chocolate graham crackers for a chocolatey boost or use gluten-free options if needed.
-
Green Marshmallows (or regular plus food coloring):
- Explanation: These are crucial for that Frankenstein vibe.
- Quick Chef Insight: You can actually use white marshmallows and dip them in green candy melts for an even more vibrant look!
-
Chocolate Bars:
- Explanation: Mini chocolate bars work best for easy melting and layering.
- Substitution Tips: Use dark, milk, or even white chocolate, depending on your preference, or try flavored chocolates like peppermint for a fun twist.
-
Vanilla Frosting:
- Explanation: This will act as our “green goo” to make these s’mores extra creepy.
- Chef Insight: If you’d like a healthier option, try Greek yogurt mixed with a bit of green food coloring.
-
Plastic “Monster” Eyeballs (optional):
- Explanation: These are purely for decoration and fun!
- Fun Tip: You can find edible candy eyeballs for a sweet touch instead!
-
Cooking Spray (optional):
- Explanation: Helps prevent sticking if you’re using a pan method.
- Chef Insight: Just a light spray will do; we don’t want our marshmallows to slide off!
Step-by-Step Instructions
Now that we’ve got our ingredients lined up, let’s dive right into making these spooky treats! Follow along and don’t hesitate to get messy—after all, kitchen magic often comes with a sprinkle of chaos.
-
Prep Your Ingredients:
- Gather all your ingredients and preheat your oven to 350°F (175°C) if you’re using it. This will make the s’mores nice and gooey inside!
-
Line Your Baking Tray:
- If going the oven route, line a baking tray with parchment paper. Be generous with that spray to avoid any sticky situations.
-
Layer the Graham Crackers:
- Take a graham cracker and place it on the tray. You can break them in half if you prefer smaller s’mores or keep them whole for a substantial bite.
-
Add the Chocolate:
- Place a piece of your chosen chocolate bar on top of the graham cracker. Feel free to use layers if you’re feeling adventurous!
-
Melt the Marshmallows:
- Now, either roast marshmallows over the fire, use a kitchen torch, or pop them in the microwave for about 10-15 seconds just until they start to puff up. Try not to overdo it!
-
Assemble the S’mores:
- Top those gooey marshmallows with a second graham cracker. Press down gently so they stick together, and let the melted chocolate do its magic.
-
Frost with Green Goo:
- Smear vanilla frosting on top of the assembled s’mores to create that creepy effect. Don’t skimp on the “goo”—this is what makes them Frankenstein!
-
Decorate with Eyeballs:
- If using edible eyeballs, now’s the time to stick them on for that perfectly frightening look!
-
Chill or Serve Warm:
- You can serve these immediately for that gooey factor or pop them in the fridge for a bit if you prefer them a bit firm.
Serving Suggestions
To really make these Frankenstein S’mores pop, consider arranging them on a platter alongside some fake spider webs and mini plastic spiders for a fun Halloween touch. You could even place a few candles around them for that perfect ambiance. For a cozy movie night, serve them on a rustic wooden board, paired with your favorite film snacks. And don’t forget to have napkins on hand—these treats can get a little messy (in the best way possible)!
Recipe Variations
Looking to put your own spin on these Frankenstein S’mores? Here are a few fun variations to consider:
- Nutty Crunch: Add crushed nuts like almonds or peanuts for a delightful crunch.
- Spooky Spices: A sprinkle of cinnamon or cayenne can add a warm bite to the frosting!
- Different Flavors: Replace the chocolate with caramel squares for a sweet twist, or use flavored marshmallows, such as strawberry or mint.
- Vegan Version: Swap regular marshmallows for vegan options and use dairy-free chocolate for a plant-based treat.
- Mini-Mores: Use mini graham crackers and marshmallows for bite-sized treats perfect for parties.
Chef’s Notes
When I created these Frankenstein S’mores, I was reminded of how fun and creative the kitchen can be, especially when you’re not afraid to experiment. I remember one year I attempted a “Monster Marshmallow Cake” for a Halloween party, which ended in a flour explosion and a lot of laughter. The best part of cooking is embracing the mess and madness that comes with it. This recipe has evolved over time, wandering from traditional s’mores to something a little more whimsical and spooky.
FAQs and Troubleshooting
Q: Can I make these s’mores in advance?
Absolutely! You can prepare the components separately and assemble them right before serving to maintain that gooey goodness.
Q: My marshmallows aren’t melting! What did I do wrong?
Make sure your marshmallows are puffed up and soft before adding them to the s’mores. If they seem stiff, try microwaving them for an extra few seconds.
Q: Can I use different flavors for the frosting?
Of course! Feel free to experiment with chocolate, strawberry, or even mint frosting to match your flavor preferences. The sky’s the limit!
Q: How do I store leftovers?
If you have any s’mores left (unlikely!), store them in an airtight container at room temperature for up to three days. Just be aware they may lose some of their delicious gooeyness.
Nutritional Info
While indulgent, these Frankenstein S’mores can be a fun treat! Though I don’t typically offer nutritional info, a single treat will usually clock in around 150-200 calories depending on your ingredients—sugar is a devilish friend.
And there you have it—your ultimate guide to making irresistible Frankenstein S’mores! I hope this recipe not only brings a hint of spookiness to your kitchen but also stirs up fond memories of your own. Remember, cooking is about joy, exploration, and perhaps a touch of creative madness. Now roll up your sleeves, get those ingredients ready, and let’s make some food memories together! Happy cooking, and may your treats be as delightful as your kitchen tales!
Print
Frankenstein S’mores
- Total Time: 30 minutes
- Yield: 12 servings
- Diet: Vegetarian
Description
A spooktacular twist on the classic s’mores, featuring green marshmallows and chocolate goo.
Ingredients
- Graham Crackers
- Green Marshmallows (or regular plus food coloring)
- Chocolate Bars
- Vanilla Frosting
- Plastic “Monster” Eyeballs (optional)
- Cooking Spray (optional)
Instructions
- Prep Your Ingredients: Gather all your ingredients and preheat your oven to 350°F (175°C) if you’re using it.
- Line Your Baking Tray: If going the oven route, line a baking tray with parchment paper and spray it lightly.
- Layer the Graham Crackers: Place a graham cracker on the tray, breaking them in half if desired.
- Add the Chocolate: Place a piece of chocolate bar on top of the graham cracker.
- Melt the Marshmallows: Roast marshmallows, use a kitchen torch, or microwave them until puffy.
- Assemble the S’mores: Top marshmallows with a second graham cracker and press down gently.
- Frost with Green Goo: Apply vanilla frosting on top of the assembled s’mores.
- Decorate with Eyeballs: Stick on edible eyeballs if using.
- Chill or Serve Warm: Serve immediately or chill in the fridge for a firmer texture.
Notes
Feel free to customize with nuts, spices, or different chocolates to match personal taste.
- Prep Time: 15 minutes
- Cook Time: 15 minutes
- Category: Dessert
- Method: Baking
- Cuisine: American
Nutrition
- Serving Size: 1 s'more
- Calories: 200
- Sugar: 15g
- Sodium: 150mg
- Fat: 7g
- Saturated Fat: 3g
- Unsaturated Fat: 4g
- Trans Fat: 0g
- Carbohydrates: 29g
- Fiber: 1g
- Protein: 2g
- Cholesterol: 0mg
Keywords: Halloween, dessert, s'mores, fun, easy recipes, spooky treats

Mummy Brownies
Mummy Brownies: A Spooktacular Treat for Halloween!
Welcome to my kitchen, fellow food lovers! I’m Olivia Bennett, your go-to home cook who believes that every meal can create a memory and every dessert tells a story. As Halloween creeps around the corner, it’s time to unleash your inner culinary ghoul and whip up something delightfully spooky. Today, I’m sharing my beloved Mummy Brownies that are ooey-gooey, chocolatey, and just the right amount of festive. Whether you’re hosting a Halloween party, need a fun treat for your kids’ school, or just want to spice up your snack table, these brownies will bring out the joy of the season.
What I love most about these Mummy Brownies is not just their captivating appearance but the warmth they bring to gatherings. Imagine your guests oohing and aahing as they spot these adorable mummies nestled among other treats. Plus, who can resist a rich brownie topped with a ghostly drizzle? So grab your spatula, put on your apron (preferably one that’s messy like mine!), and let’s get baking!
A Memory to Cherish
Let me take you back to the first Halloween I made these Mummy Brownies. My daughter, Mia, was just eight years old and was bursting with excitement to decorate our front porch with cobwebs and jack-o’-lanterns. With Halloween approaching, we decided to make something special together for her school’s spooky celebration. It was one of those beautiful fall afternoons where the crisp air and rustling leaves set the perfect backdrop for baking.
We turned on some fun Halloween tunes, gathered our ingredients, and dove head-first into our culinary adventure. As we mixed, poured, and decorated, giggles mixed with the rich scent of melting chocolate. Mia’s playful side came out as she attempted to create the mummies’ faces, each one more whimsical than the last. The moment she placed the first brownie on a plate and drizzled the white chocolate with absolute concentration, I knew I had to document this recipe for future Halloweens.
That year, the kids loved the brownies so much that they declared Mia a “Mummy Brownie Queen.” The laughter, the collaboration, and the sweet mess we created together have stayed with us as one of our favorite Halloween traditions. Now, it’s your turn to create those magical moments in your kitchen!
Ingredients: What You’ll Need
Here’s a quick rundown of the ingredients that make these Mummy Brownies so delightful:
-
1 cup unsalted butter: The foundation of every great brownie. Use for richness and moisture. If you’re in a pinch, you can substitute with margarine or coconut oil, but the flavor will differ slightly.
-
2 cups granulated sugar: Sweetness is key! This balances the richness of the butter and chocolate. If you prefer, you could use brown sugar for a deeper molasses flavor.
-
4 large eggs: Eggs add structure and richness. If you’re looking for an egg-free version, you can use flaxseed meal (1 tablespoon mixed with 2.5 tablespoons of water per egg) or applesauce.
-
1 teaspoon vanilla extract: The aromatic boost that brings everything together. You can use almond extract for a twist or even a dash of espresso for depth.
-
1 cup all-purpose flour: This gives the brownies a chewy texture. Gluten-free flour blends work great as a substitute for a gluten-free version.
-
1 cup unsweetened cocoa powder: The star ingredient for that rich chocolate flavor! Dutch-processed cocoa will give a more robust chocolate taste, while natural cocoa powder will make it lighter.
-
1 teaspoon baking powder: It helps the brownies rise and get fluffy. If you’re out, replace it with baking soda, though the texture may vary slightly.
-
1/2 teaspoon salt: Enhances the sweetness and balances the flavors. Don’t skip this one!
-
1 cup white chocolate chips: For the mummy’s bandages. If you’d like a dairy-free version, sub with dairy-free white chocolate or melted coconut butter.
-
Candy eyes: These tiny decorations bring the mummies to life! You can use any edible eyeball candy or chocolate chips for a simpler version.
Gather these pantry staples, and let’s create some spooky magic!
Step-by-Step Instructions
-
Preheat the Oven: Start by preheating your oven to 350°F (175°C). This is a crucial step because the brownies need to bake evenly. While the oven warms up, I like to line a 9×13-inch baking pan with parchment paper, leaving some overhang. This makes it super easy to lift the brownies out later!
-
Melt the Butter: In a microwave-safe bowl, melt the unsalted butter until it’s just melted but not boiling. A good tip here is to microwave it in short bursts of 30 seconds to prevent it from splattering everywhere. You want it smooth and silken!
-
Mix the Sugars: In a large mixing bowl, combine the melted butter with granulated sugar. Whisk until it’s light and fluffy. This step is essential for incorporation and will help create that lovely, chewy brownie texture!
-
Add Eggs and Vanilla: Next, whisk in the eggs one at a time, ensuring each is fully incorporated before adding the next. Don’t forget the vanilla extract! This adds a wonderful aroma and flavor.
-
Combine Dry Ingredients: In another bowl, sift together the flour, cocoa powder, baking powder, and salt. This sifting step is often overlooked, but it helps prevent clumps of cocoa and ensures that your brownies have a smooth consistency.
-
Combine Wet and Dry Mixtures: Gradually fold the dry ingredients into the wet ingredients using a spatula. Be gentle here—overmixing can lead to dense brownies! Just mix until no more dry flour is visible.
-
Add Delicious Bits: At this point, feel free to fold in chocolate chips or nuts if you want to add a little extra texture. But since we’re going for a mummy look, let’s keep it simple!
-
Bake: Pour the brownie batter into your prepared baking pan and spread evenly. Bake in the preheated oven for about 25-30 minutes. Keep an eye on them; you want the edges set while the center is still slightly fudgy. A toothpick should come out with a few moist crumbs.
-
Cool and Cut: Once those brownies are out of the oven, let them cool in the pan for about 10 minutes. Carefully lift them out (using the parchment paper) and allow them to cool completely on a wire rack before cutting them into squares.
-
Decorate Your Mummies: Now for the fun part! In a microwave-safe bowl, melt the white chocolate chips until smooth. Drizzle the melted chocolate over each brownie to create “bandages.” Place two candy eyes on each brownie, and voila! You’ve assembled your adorable mummy brownies!
Serving Suggestions
These Mummy Brownies are perfect for any Halloween gathering! To create a spooktacular presentation, you might consider serving them on a rustic wooden board with other Halloween-themed treats like pumpkin spice cupcakes or ghostly marshmallow pops. You could also sprinkle some edible glitter or serve them alongside a scoop of vanilla ice cream for a deliciously witchy dessert!
Recipe Variations
Feeling adventurous? Here are a few variations you can try to personalize your Mummy Brownies:
-
Chocolate Mint Mummies: Add a few drops of peppermint extract to the brownie batter for a refreshing twist. Top with crushed mint chocolate candies instead of eyes for a festive touch.
-
Nutty Brownies: Add 1/2 cup of chopped nuts (like walnuts or pecans) to the batter for extra crunch and richness. Make sure to adjust your brownie structure slightly with a touch more flour if needed.
-
Pumpkin Spice Mummies: Substituting half of the cocoa powder with pumpkin puree (not the spiced kind) can give a delicious pumpkin flavor while still keeping the chocolatey essence. Add 1 teaspoon of pumpkin spice, and that’s a seasonal winner!
-
Caramel Stuffed: Place small dollops of caramel sauce on top of the brownie batter before baking for gooey surprises in every bite!
-
Peanut Butter Swirl: Drizzle peanut butter on top of the brownie before baking and use a knife to create a beautiful swirl. This classic combo will transport you straight to dessert heaven!
Chef’s Notes
With every recipe I share, I find that there’s a story evolving from my initial attempts. The Mummy Brownies have been a hit at countless family gatherings, evolving from simple chocolate treats to an annual tradition. One year, while making these, I accidentally mixed up my baking soda for salt! But instead of tossing them out, we tasted them and found they added a strangely delightful flavor! It just goes to show that the kitchen is often a place for happy accidents.
So, don’t stress if things don’t go according to plan; embrace the creativity and spontaneity of cooking! Each batch of Mummy Brownies has a little piece of love and laughter embedded in them, and now it’s your turn to add your unique touch!
FAQs and Troubleshooting
Q: My brownies turned out cakey instead of fudgy. What happened?
A: If your brownies are cakey, it might be due to overmixing the batter or baking them too long. Try to fold just until the dry ingredients disappear and keep a close watch while they bake.
Q: How do I store leftover brownies?
A: Store them in an airtight container at room temperature for up to 3 days or in the fridge for up to a week. You can also freeze individual servings wrapped in plastic wrap for a quick treat later!
Q: Can I use a different type of chocolate?
A: Of course! While the original recipe calls for unsweetened cocoa powder and white chocolate for decoration, feel free to experiment with dark chocolate or milk chocolate according to your taste preferences.
Q: What can I do if I don’t have candy eyes?
A: No worries! You can make “eyes” with small chocolate chips, mini marshmallows, or even use icing to draw pupils on a white chocolate base. The charm is all in the creativity!
Nutritional Info
If you’re curious about the nutritional info, a standard serving of these Mummy Brownies (one brownie) roughly has:
- Calories: 180
- Total Fat: 9g
- Saturated Fat: 5g
- Cholesterol: 40mg
- Sodium: 100mg
- Total Carbohydrates: 24g
- Dietary Fiber: 1g
- Sugars: 15g
- Protein: 2g
(Please note that these values can vary based on specific brands and ingredient variations!)
So there you have it! A fun, festive, and foolproof recipe for Mummy Brownies that will delight both young and old this Halloween season. Remember, cooking is about creating memories, so let your personality shine through each step. Enjoy baking, and don’t forget to have fun—after all, that’s what it’s all about in my cozy little kitchen! Happy haunting!
Print
Mummy Brownies
- Total Time: 50 minutes
- Yield: 12 servings 1x
- Diet: Vegetarian
Description
Delightfully spooky Mummy Brownies perfect for Halloween gatherings, combining rich chocolatey flavor with festive decoration.
Ingredients
- 1 cup unsalted butter
- 2 cups granulated sugar
- 4 large eggs
- 1 teaspoon vanilla extract
- 1 cup all-purpose flour
- 1 cup unsweetened cocoa powder
- 1 teaspoon baking powder
- 1/2 teaspoon salt
- 1 cup white chocolate chips
- Candy eyes for decoration
Instructions
- Preheat the oven to 350°F (175°C) and line a 9×13-inch baking pan with parchment paper.
- Melt the unsalted butter in a microwave-safe bowl until just melted.
- Mix the melted butter with granulated sugar until light and fluffy.
- Add eggs one at a time, mixing in vanilla extract.
- Combine flour, cocoa powder, baking powder, and salt in another bowl.
- Fold the dry ingredients into the wet ingredients gently until no dry flour is visible.
- Pour the brownie batter into the prepared baking pan and spread evenly.
- Bake for 25-30 minutes until edges are set and center is slightly fudgy.
- Cool in the pan for 10 minutes, then lift out and allow to cool completely on a wire rack.
- Decorate with melted white chocolate chips to create “bandages” and place two candy eyes on each brownie.
Notes
Store leftover brownies in an airtight container at room temperature for up to 3 days or in the fridge for up to a week.
- Prep Time: 20 minutes
- Cook Time: 30 minutes
- Category: Dessert
- Method: Baking
- Cuisine: American
Nutrition
- Serving Size: 1 brownie
- Calories: 180
- Sugar: 15g
- Sodium: 100mg
- Fat: 9g
- Saturated Fat: 5g
- Unsaturated Fat: 4g
- Trans Fat: 0g
- Carbohydrates: 24g
- Fiber: 1g
- Protein: 2g
- Cholesterol: 40mg
Keywords: Mummy Brownies, Halloween treats, chocolate brownies, festive desserts
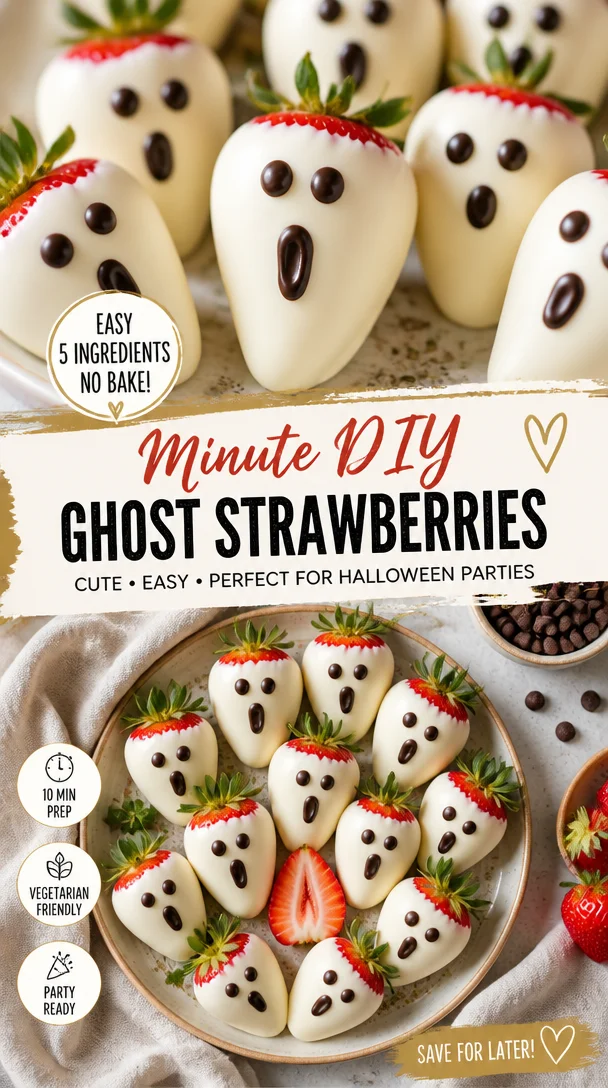
Minute DIY Ghost Strawberries for Halloween Parties
Spooky Ghost Strawberries: A Delightfully Boo-tiful Treat!
Welcome to my kitchen, friend! As the leaves change and we’re gradually swept into the whirlwind of fall festivities, there’s something absolutely magical about this time of year. The air gets crisp, the pumpkins come out, and I start dreaming up delicious ways to celebrate Halloween! This year, I’m thrilled to share a treat that’s both adorable and super easy to whip up: Spooky Ghost Strawberries! These little ghostly delights are perfect for parties, school events, or just an afternoon snack with a twist.
Imagine stepping into your home and being greeted by the sweet, earthy aroma of fresh strawberries mixed with rich chocolate. It instantly transports you to a nostalgic place where you’re snuggled under a blanket with a good book, and a cozy spirit fills your heart. That’s exactly the vibe we want to create with these spooky treats. They’re not just fun to make but also a delight to see and taste!
In my own kitchen, these ghostly wonders have become a staple. I remember the first time I surprised my family with them a few Halloweens ago. My niece, who was around five at the time, squealed with joy at the sight of these little strawberries transformed into ghosts. We spent the afternoon giggling as we decorated them together, creating unique and adorable faces out of melting chocolate. Since then, they’ve become a family tradition and a fun way to bring everyone together for some delicious creativity.
So, grab your apron and let’s dive into creating a treat that’s sure to bring smiles in the spirit of Halloween!
Ingredients
Here’s what you’ll need to create these Spooky Ghost Strawberries:
-
Fresh Strawberries (12-15)
- Look for plump, ripe berries with bright green leaves. They’re the stars of this dish! Choose organic if possible to keep them pesticide-free.
-
White Chocolate Chips (1 cup)
- White chocolate adds a sweet and creamy finish that beautifully contrasts with the fresh strawberries. If you prefer a different flavor profile, feel free to use almond bark or even white chocolate melts!
-
Chocolate Chips (1/4 cup)
- These will be used for decorating the ghost faces. You can use mini chocolate chips for a more cartoon-like expression, or go for regular-sized ones for a bit more drama!
-
Coconut Oil (1 teaspoon)
- This helps the white chocolate melt smoothly and stay glossy. If you’re in a pinch, vegetable oil can work too, but coconut oil adds the perfect touch of flavor.
-
Sprinkles (optional)
- Halloween-themed sprinkles can add a fun flair to your spooky strawberries and make them extra festive! Go wild with colors and shapes that fit the haunt!
Step-by-Step Instructions
-
Prep the Strawberries:
- Rinse the strawberries gently under cold water. Pat them dry carefully with paper towels.
Chef Tip: Make sure the strawberries are completely dry to ensure the chocolate adheres well.
-
Melt the White Chocolate:
- In a microwave-safe bowl, combine the white chocolate chips and coconut oil. Heat in 30-second intervals, stirring in between, until completely melted and smooth.
Hack: If the mixture is too thick, add a little more coconut oil to thin it out until it’s the right consistency for dipping.
-
Dip the Strawberries:
- Holding the green top of each strawberry, dip it into the melted white chocolate to coat it thoroughly.
Tip: Shake off any excess chocolate gently and place the dipped strawberry on a parchment-lined baking sheet.
-
Chill the Coated Strawberries:
- Place the dipped strawberries in the fridge for about 15-20 minutes or until the chocolate hardens.
Little Note: This is a great time to clean up the kitchen or maybe sip on some hot cocoa while you wait!
-
Create Ghost Faces:
- While the white chocolate coating sets, melt the chocolate chips in a microwave-safe bowl. Use the same melting method, heating in intervals until smooth.
Fun Tip: You can pour the melted chocolate into a ziplock bag, snip the tip, and pipe on little eyes and mouths for a fun ghostly expression!
-
Decorate the Ghosts:
- Once the white chocolate is set, take the melted chocolate and add eyes and mouths to your ghosts. Get creative with expressions!
Chef Hack: To achieve different looks, try making some ghosts with exaggerated eyes and grinning mouths, while others can be sweet and simple!
-
Serve and Enjoy:
- Once decorated, allow the chocolate faces to harden. Then, serve them on a spooky platter and watch the smiles appear!
Serving Suggestions
To truly embrace the Halloween spirit, serve your Spooky Ghost Strawberries on a spooky-themed platter or tray. You could scatter some Halloween candies around them, like candy corn or gummy worms, for a festive touch. If you want an interactive element, consider presenting them alongside some homemade pumpkin spice dip for added flavor. A nice touch is to garnish the plate with some fresh mint leaves for a pop of color!
Recipe Variations
-
Chocolate-Dipped Ghosts: Use dark or milk chocolate instead of white chocolate for a different flavor twist; they’ll still look adorable with the ghostly decor!
-
Fruit Variations: Try dipping other fruits like bananas or pretzels for a fun combo play that suits everyone at the table.
-
Flavor Amplification: Mix in some flavor extracts to the white chocolate, like orange or almond, for a festive twist!
-
Vegan Version: Substitute the white chocolate with dairy-free chocolate chips, and use a plant-based coconut oil for a ghostly treat that anyone can enjoy!
-
Nutty Ghosts: Add finely chopped nuts to the coconut oil mixture for texture, offering a yummy crunch that contrasts beautifully with the smooth chocolate.
Chef’s Notes
Making Spooky Ghost Strawberries is about more than just cooking; it’s about creating lasting memories. The first time I made these, my niece used a heaping amount of chocolate for eyes, leading to some really funny expressions! In the end, we affectionately named one of our ghosts “Uncle Fester” because of his odd appearance! The beauty of this recipe is that it’s a blank canvas for your creativity. As you invite friends or family to help decorate, you’ll create more than just delicious snacks—you’ll craft moments that will stay with you long after the Halloween season is over.
FAQs and Troubleshooting
-
What if my white chocolate won’t melt smoothly?
- If your chocolate clumps, try adding just a tiny bit more coconut oil and stirring continuously over low heat. Be sure not to overheat!
-
Can I store leftovers?
- Absolutely! Keep the strawberries in an airtight container in the fridge for up to two days, but I warn you—they’re usually devoured quickly!
-
The chocolate decorations keep breaking; what do I do?
- If your chocolate has cooled too much and solidified, simply melt it down again. Make sure it’s still pourable, and use a steady hand to pipe delicate features.
-
Can I make Spooky Ghost Strawberries ahead of time?
- You sure can! Just wait to decorate them until you’re ready to serve. The fresh strawberries are best when they’re made within a day of serving for optimal freshness!
Nutritional Info
While these treats are all about the fun and spirit of Halloween, it’s worth noting that they’re not just tasty but can also be a healthier dessert choice! Strawberries are packed with vitamins and antioxidants, while white chocolate offers a little indulgence without the guilt. Just keep in mind moderation is key with treats like these!
There you have it! A friendly guide to creating the most delicious Spooky Ghost Strawberries that bring warmth and laughter to your fall festivities! I hope you enjoy making these special delights and creating wonderful memories with your loved ones in the kitchen. Happy Haunting!
Print
Spooky Ghost Strawberries
- Total Time: 25 minutes
- Yield: 4 servings
- Diet: Vegetarian
Description
A delightful Halloween treat featuring fresh strawberries coated in white chocolate and decorated to resemble spooky ghosts.
Ingredients
- Fresh Strawberries (12-15)
- White Chocolate Chips (1 cup)
- Chocolate Chips (1/4 cup)
- Coconut Oil (1 teaspoon)
- Sprinkles (optional)
Instructions
- Prep the strawberries: Rinse gently under cold water and pat dry with paper towels.
- Melt the white chocolate: Combine white chocolate chips and coconut oil in a microwave-safe bowl and heat in 30-second intervals until smooth.
- Dip the strawberries: Holding the green top, dip each strawberry into the melted white chocolate.
- Chill the coated strawberries: Place them in the fridge for about 15-20 minutes until the chocolate hardens.
- Create ghost faces: Melt chocolate chips and pipe on eyes and mouths for expressions.
- Decorate the ghosts: Add chocolate faces to set white chocolate-coated strawberries.
- Serve and enjoy: Present on a spooky platter and watch the smiles appear!
Notes
Making these strawberries is about more than just cooking; it’s about creating memories. Feel free to get creative with decorations and enjoy the process!
- Prep Time: 15 minutes
- Cook Time: 10 minutes
- Category: Dessert
- Method: No-Cook
- Cuisine: American
Nutrition
- Serving Size: 1 serving
- Calories: 180
- Sugar: 25g
- Sodium: 30mg
- Fat: 8g
- Saturated Fat: 5g
- Unsaturated Fat: 3g
- Trans Fat: 0g
- Carbohydrates: 30g
- Fiber: 2g
- Protein: 2g
- Cholesterol: 0mg
Keywords: Halloween, Strawberries, Desserts, Spooky Treats, Chocolate Recipes
Oreo Halloween: 10 Easy, Tested Recipes to Wow Guests
10 Easy Halloween Recipe Ideas Featuring Oreos That Are Sure to Delight Your Guests! 🎃💀
Welcome to my kitchen! As the vibrant shades of autumn creep in and Halloween approaches, there’s something undeniably cozy about whipping up treats that not only taste great but also capture the spirit of the season. From spooky gatherings to delightful family celebrations, I believe that baking should be both fun and a little whimsical. It’s the perfect opportunity to gather friends and family around some delicious and creative goodies — especially when Oreos are involved!
I can’t tell you how many times I’ve reached for a package of Oreos when brainstorming dessert ideas. These iconic cookies are not just a sweet treat on their own; they make the perfect base for a variety of Halloween-themed recipes! Whether you’re a cookie monster or just looking for ways to impress your guests with minimal effort, this blog post has something special for you. We’ll dive into 10 easy Halloween recipe ideas that feature Oreos as a star ingredient, and I’ll share tips and tricks to make them even more delightful. So, grab your favorite apron, turn up the tunes, and let’s create some fun and spooky treats!
A Sweet Memory in the Kitchen
Growing up, Halloween was always a big deal at our house. My mom would transform our kitchen into a baking lab, and my sisters and I would be her eager little helpers. My favorite part? The sugar rush from all the sweet creations, especially when we dove into making spooky treats for our Halloween party. One year, we decided to incorporate those delightful, cream-filled Oreos into our recipes.
I’ll never forget the giggles we shared while designing “monster” cupcakes topped with crushed Oreos and gummy eyes. It was messy, chaotic, and downright hilarious — flour in our hair, vanilla frosting on our faces, but the result was pure magic! Those sweet, silly moments not only filled our bellies but created memories that I cherish to this day. Now, as I share these easy Oreo-inspired Halloween recipes with you, I hope you’ll create your own special moments in the kitchen!
Ingredients
Before we dig into the recipes, let’s check out the necessary ingredients that will help turn Oreos into something truly exciting!
- Oreos: The classic! Whether you prefer regular or double-stuffed, these will make up the base of many recipes. Not a fan of Oreos? Try any chocolate sandwich cookie!
- Cream Cheese: This adds richness and creaminess to our treats. If you’re looking for a lighter alternative, go for Greek yogurt.
- Candy Melts: These are great for dipping and decorating. They come in various colors — use orange and black for a Halloween vibe! You can also substitute with chocolate chips.
- Sprinkles: From spooky-themed to autumn colors, sprinkles can take your dessert to the next level. Feel free to swap them for nuts or crushed candies!
- Whipped Topping: This provides a nice light texture. Want to make it healthier? You can use whipped coconut cream.
- Licorice: Great for spider legs or other spooky decorations! If you’re not a fan, you could use pretzel sticks for an unexpected crunch.
- Mini Marshmallows: Perfect for creating ghostly shapes or adding texture. You can skip the marshmallows or use meringue for a firmer structure.
- Gel Food Coloring: Use this to tint your batters or frosting for that vibrant Halloween spirit. If food coloring isn’t your thing, natural colorings from beet juice or turmeric can work as substitutes.
- Nuts: Chopped nuts make a fantastic addition for extra crunch. Swap them for seeds if there are allergies.
- Sugar: An essential ingredient for sweetness. If trying for a healthier option, consider using maple syrup or agave nectar.
Ready to start creating some yummy, creepy, and delightful treats? Let’s get to the step-by-step instructions!
Step-by-Step Instructions
Now that we have our ingredients lined up, it’s time to create some eerie and mouth-watering treats. Here are a few recipes, so let’s roll up our sleeves and get to work!
1. Oreo Spider Cookies
What You’ll Need:
- 1 package of Oreos
- Candy melts (black)
- Licorice
- Mini candy eyes
Instructions:
-
Melt the Candy Melts: Start by melting your black candy melts according to package instructions. Make sure to stir them gently to achieve a smooth consistency.
-
Prepare the Oreos: Carefully separate the Oreos to expose the cream filling.
-
Dip the Cookie Halves: Using a fork, dip each half into the melted candy. Let excess drip off.
-
Reassemble and Decorate: Place the halves together to recreate the Oreo and stick on the mini candy eyes using some melted candy as glue.
-
Create Spider Legs: Cut the licorice into strips and insert three on each side of the Oreo to create a spider! Allow them to sit for a few minutes for the candy to set.
-
Serve: These creepy crawly creations can be displayed on a platter lined with spooky spiderweb decorations!
2. Oreo Graveyard Cups
What You’ll Need:
- 1 package of Oreos
- Cream cheese
- Sugar
- Whipped topping
- Mini marshmallows (for ghosts)
Instructions:
-
Crush the Oreos: In a zip-top bag, crush the Oreos until they resemble dirt. Set aside.
-
Make the Cream Mixture: In a bowl, mix cream cheese, sugar, and whipped topping until smooth and creamy.
-
Layer in Cups: Start layering in clear cups — begin with a layer of the cream mixture, followed by the broken Oreo pieces for dirt. Repeat until cups are filled!
-
Add Ghosts: For added flair, stick mini marshmallows on top, creating little ghost decorations. Use gel food coloring to draw eyes if desired.
-
Final Touches: Garnish with an extra sprinkle of crushed Oreos on top.
-
Serve: Present these fun cups in your Halloween setup, and watch those eerie smiles appear!
3. Oreo Mummy Cupcakes
What You’ll Need:
- 1 box of cupcake mix (your choice)
- Oreos
- White frosting
- Candy melts (for eyes)
- Sprinkles or edible glitter (optional)
Instructions:
-
Bake Your Cupcakes: Follow the directions on your cupcake mix box and allow them to cool once baked.
-
Prepare Oreos: While cupcakes are cooling, melt some candy melts for eyes. Dip mini marshmallows into the melted candy, let them cool, and place them on the Oreos as eyes.
-
Frost the Cupcakes: Use white frosting to cover the cupcakes. Create zig-zag patterns to mimic mummy wrappings.
-
Attach Oreos: Place your Oreo mummies on top of the frosting for the finishing touch.
-
Optional Sprinkles: If desired, sprinkle edible glitter or sprinkles for added fun!
-
Serve and Enjoy: These look amazing presented on a spooky platter!
4. Oreo Halloween Bark
What You’ll Need:
- 1 package of Oreos
- Candy melts (orange and black)
- Halloween sprinkles
Instructions:
-
Melt Candy Melts: Melt orange and black candy melts in separate bowls.
-
Crush Oreos: Chop the Oreos into large chunks and spread them out evenly on a parchment-lined baking sheet.
-
Drizzle: Drizzle the melted candy over the chopped Oreos, alternating colors for a festive look.
-
Sprinkle Topping: While the candy is still wet, sprinkle with festive Halloween sprinkles.
-
Set: Allow the candy bark to cool and harden completely before breaking into pieces.
-
Serve: This bark makes for an easy grab-and-go treat!
5. Oreo Pumpkin Truffles
What You’ll Need:
- 1 package of Oreos
- Cream cheese
- Orange candy melts
- Pumpkin spice (optional)
Instructions:
-
Crush Oreos: Crush the Oreos finely in a food processor.
-
Mix with Cream Cheese: In a bowl, combine the crushed Oreos with cream cheese until mixture is fully combined.
-
Shape into Balls: Roll the mixture into small balls and place them on a parchment-lined tray.
-
Melt and Dip: Melt orange candy melts and dip the balls in for a pumpkin-like appearance.
-
Add Decoration: Use a toothpick to create a small stem with melted chocolate if desired.
-
Serve: Let these sit in the fridge until set, then enjoy your pumpkin truffles!
Serving Suggestions
When it comes to serving these spooky Halloween treats, presentation is key! Use colorful plates or trays adorned with Halloween decorations like cobwebs, mini pumpkins, or ghosts to create a festive display. You can also prepare small treat bags for your guests to take home, which makes it even more special! Remember to embrace the fun of the occasion — it’s not just about the sweets but the joy-filled moments shared over good food!
Recipe Variations
Now that I’ve shared some classic recipes, here are a few creative variations to play around with:
- Vegan Versions: Substitute traditional cream cheese and whipped topping with non-dairy options for plant-based treats.
- Gluten-Free Options: Use gluten-free cookie alternatives to make these spooky desserts friendly for everyone.
- Flavored Oreos: Experiment with different Oreo flavors like Mint, Pumpkin Spice, or Red Velvet for unique twists on these recipes.
- Savory Halloween Treats: Incorporate crushed Oreos into savory presentations such as topping for a cheeseball — playfully designing it as a monster!
Chef’s Notes
As a passionate home cook, I adore the evolution of recipes over time. These Oreo Halloween treats have become a staple in my kitchen, and I love experimenting with seasonal flavors and ingredients. I remember one year when I tried adding peppermint to my Oreos in an effort to bring a fresh flavor dimension. While it didn’t go as planned – let’s just say peppermint and chocolate sometimes clash instead of harmonize! But hey, that’s the beauty of cooking — some experiments flop, and others lead to delicious discoveries. Each mishap is a humorous kitchen story that brings friends and family closer together.
Isn’t it fun to add a little twist and see where it takes you?
FAQs and Troubleshooting
-
Can I use other cookies instead of Oreos?
Absolutely! Any chocolate sandwich cookie will work just fine, or you can get creative with your favorite treats! -
How do I get the perfect texture for my Oreo mix?
It’s all about the smooth blend of cream cheese with crushed Oreos. If it’s too crumbly, add more cream cheese; if it’s too wet, sprinkle more crushed Oreos. -
What should I do if my melted chocolate is too thick?
If your melted candy melts are too thick, you can thin them out with a little bit of coconut oil or vegetable shortening. -
How long do these treats last?
Most Oreo treats can last about 4-5 days when stored properly in an airtight container or in the fridge.
If you follow these tips and instructions, you are bound to create some vibrant and tasty Halloween treats. So gather your friends, roll up your sleeves, and let the spooky baking begin! Happy Halloween! 🎃💀
Print
10 Easy Halloween Treats Featuring Oreos
- Total Time: 25 minutes
- Yield: 20 servings
- Diet: Vegetarian
Description
Delight your guests this Halloween with these easy and fun Oreo-inspired treats. Perfect for spooky gatherings!
Ingredients
- Oreos: 1 package
- Cream Cheese: 8 oz
- Candy Melts: black, orange
- Sprinkles: assorted Halloween-themed
- Whipped Topping: 8 oz
- Licorice: for decoration
- Mini Marshmallows: for ghostly shapes
- Gel Food Coloring: for coloring
- Nuts: chopped (optional)
- Sugar: 1/2 cup
Instructions
- Melt the Candy Melts according to package instructions.
- Prepare the Oreos by separating them to expose the cream filling.
- Dip each half into the melted candy and let excess drip off.
- Reassemble and place mini candy eyes on top using melted candy as glue.
- Create spider legs with licorice strips and insert them into the sides of the cookie.
- Serve on a spooky platter.
Notes
These treats can last about 4-5 days in an airtight container. Feel free to substitute ingredients according to dietary preferences.
- Prep Time: 15 minutes
- Cook Time: 10 minutes
- Category: Dessert
- Method: No-bake
- Cuisine: American
Nutrition
- Serving Size: 1 piece
- Calories: 150
- Sugar: 12g
- Sodium: 90mg
- Fat: 7g
- Saturated Fat: 3g
- Unsaturated Fat: 4g
- Trans Fat: 0g
- Carbohydrates: 20g
- Fiber: 1g
- Protein: 2g
- Cholesterol: 5mg
Keywords: Halloween, Oreo, spooky treats, desserts, easy recipes


