

Quick Halloween Appetizers for Spooky Party Bites
25 Best Halloween Appetizer Ideas to Wow Your Guests
Ah, Halloween! A time when the nights get longer, the air feels a little crisper, and the little ones (and big ones) get to indulge in all things spooky and sweet. But let’s not forget about one of my favorite parts of this ghoulish holiday: the food! Halloween calls for more than just candy; it’s the perfect opportunity to create some spine-tingling appetizers that will leave your guests both delighted and a little creeped out.
Imagine hosting a cozy gathering, the flicker of candles casting shadows on the walls as laughter fills the air. Your table is adorned with fantastically fun appetizers that will have everyone buzzing with excitement. From pumpkin-shaped cheese balls to mummy wraps, these creative bites will be the centerpiece of your Halloween festivities.
In this post, I’m thrilled to share 25 of the best Halloween appetizer ideas that are not only easy to make but also packed full of flavor. Whether you’re throwing a big Halloween bash or enjoying a cozy evening with family, these recipes will ensure your appetizers are on theme, mouthwatering, and a hit with everyone around the table.
So grab that broomstick and let’s get cooking in your haunted kitchen!
A Whimsical Halloween Memory
One of my fondest Halloween memories was the year my mom decided to throw a spooky-themed party for our neighborhood. I remember being tasked with helping her prepare the appetizers while my little brother dressed up as Dracula. The kitchen was chaotic —think flour everywhere, the smell of herbs filling the air, and my not-so-subtle attempts to sneak in candy corn while my mom wasn’t looking.
The highlight was our signature dish, “Witch’s Brew Meatballs.” They were surprisingly delicious, simmering in a deep green sauce that looked creepily like swamp muck but tasted heavenly. My friends couldn’t get enough! That party taught me that festive food doesn’t have to be traditional; it can be playful, creative, and most importantly — fun. Since then, I’ve always aimed to replicate that magical atmosphere with my Halloween appetizers, bringing joy and deliciousness to parties, just like my mom did.
Ingredients
Here’s a quick rundown of the ingredients you might use for some of these delightful appetizers. Each ingredient brings its unique flair, and I’ve included some handy substitution tips to make your life easier!
-
Cream Cheese: Rich and creamy, this is a staple in many Halloween appetizers. If you want to lighten it up, you can use Greek yogurt, which will also add a tangy flavor.
-
Mozzarella Sticks: Perfect for creating ooey-gooey “bones” in mummified appetizers. If you prefer a dairy-free option, try using plant-based cheese or alternative breadsticks.
-
Olives: They add a briny touch and are great for creating “eyeballs.” If olives aren’t your thing, consider using grapes or cherry tomatoes as a sweet twist.
-
Tortillas: These are versatile and can be used to make wraps or cut out shapes for mini monsters. Whole wheat or spinach tortillas can be fun alternatives.
-
Pumpkin Puree: The star of many fall dishes, this ingredient adds natural sweetness and a festive orange hue. Canned sweet potato puree works well in a pinch too.
-
Spices (Garlic Powder, Paprika, etc.): The right spices can elevate your appetizers. Don’t skimp — fresh herbs like chives or parsley can brighten things up if dried herbs are not on hand.
-
Chopped Vegetables (Bell Peppers, Carrots): They add crunch and color, enhancing the appeal of your platters. Try cucumbers for a refreshing twist!
These ingredients are just a starting point, but I promise you’ll discover a world of flavor when you start mixing and matching!
Step-by-Step Instructions
Now that we have our ingredients sorted, let’s dive into some of these delightful Halloween appetizer recipes. I’ll give you a detailed recipe for a classic favorite: Mummy Wrapped Hot Dogs. Don’t worry; I’ll sprinkle in some tips along the way!
Mummy Wrapped Hot Dogs
What You Need:
- 8 Hot Dogs
- 1 can of crescent roll dough
- Mustard or ketchup (for the eyes)
Instructions:
-
Preheat the Oven: Start by preheating your oven to 375°F (190°C). This will ensure that your mummies bake up nice and crispy.
-
Prepare the Crescent Rolls: Open the can of crescent roll dough and unroll it onto a clean surface. You can use a rolling pin to flatten it slightly, making cutting easier.
-
Cut Strips: Using a sharp knife (be careful, chef!), cut the crescent dough into thin strips about ½ inch wide. You don’t need to be perfect here, as the unevenness will give the mummies a charming, rustic look!
-
Wrap the Hot Dogs: Take your hot dog and start wrapping it with the crescent dough strips, leaving a small gap for the “face.” Don’t stress about keeping it too neat — a little entanglement adds to the spooky effect!
-
Arrange on a Baking Sheet: Place your wrapped hot dogs on a baking sheet lined with parchment paper. Give them space so they can expand while baking.
-
Bake Away: Pop the tray into the oven and bake for about 12-15 minutes or until the dough is golden brown. Keep an eye on them; every oven is different!
-
Create the Faces: Once baked, let your mummies cool slightly before using a toothpick to dab mustard or ketchup for eyes. It’s the final touch that brings them to life!
-
Serve Them Up: Plate your mummies on a festive tray and watch them disappear! You might want to serve them with a side of ketchup or spicy mustard for dipping.
Tips & Tricks:
- Get Creative: Consider using different types of sausages or even veggie dogs for a healthier option!
- Try Different Dough: For something a little different, you can use puff pastry instead of crescent roll dough — it elevates the flaky factor!
- Make Them in Advance: Prep the hot dogs in advance and refrigerate them, only baking when your guests arrive.
Serving Suggestions
These Mummy Wrapped Hot Dogs are best served warm, so make sure to pop them in the oven just before your guests arrive. You can serve them on a spooky black platter with cobwebs (made from cotton candy or cheese strings) for an added dramatic effect. Pair them with themed napkins featuring ghosts or pumpkins, and don’t forget a colorful display of dipping sauces!
Recipe Variations
- Veggie Mummies: Swap out hot dogs for zucchini or carrots for a fresh, crunchy option.
- Spicy Mummies: Use spicy sausages to give your mummies a kick, and drizzle with sriracha for added flair.
- Sweet Mummies: Instead of hot dogs, use banana slices wrapped in crescent dough for a fun dessert twist, adorned with chocolate chips for eyes!
Chef’s Notes
Halloween appetizers are all about creativity, and this dish is a testament to how a simple ingredient can transform delightfully spooky. I started making mummy dogs because I loved how they brought back fun memories from my own childhood. As time went on, I added different spices and discovered how to make them healthier, while always keeping the playful element that makes them so fun.
FAQs and Troubleshooting
Q: What if my dough won’t stick?
A: Make sure you’re wrapping tightly, and a quick brush of water can help seal the edges.
Q: Can I make these ahead of time?
A: Absolutely! Wrap them and refrigerate, then bake just before serving.
Q: What if I don’t have crescent roll dough?
A: You can use puff pastry or even biscuit dough if you’re in a pinch. Just keep an eye on baking times!
Q: How can I make this vegetarian-friendly?
A: There are numerous meatless sausage options on the market today, or you can substitute with veggies as mentioned above.
Nutritional Info
(Nutritional information will vary based on the ingredients used. Here’s a rough estimate per serving):
- Calories: 150
- Protein: 5g
- Carbs: 15g
- Fat: 8g
And there you have it! This Halloween, create a spread of deliciously spooky appetizers that will have your guests laughing, talking, and coming back for more. I hope these recipes inspire you to let your creativity shine in the kitchen as you celebrate the most chilling night of the year! Happy cooking, and enjoy the haunting festivities!
Print
Mummy Wrapped Hot Dogs
- Total Time: 25 minutes
- Yield: 4 servings 1x
- Diet: Vegetarian
Description
Delightfully spooky Mummy Wrapped Hot Dogs that are a perfect appetizer for your Halloween gathering.
Ingredients
- 8 Hot Dogs
- 1 can of crescent roll dough
- Mustard or ketchup (for the eyes)
Instructions
- Preheat the oven to 375°F (190°C).
- Prepare the crescent rolls by unrolling the dough onto a clean surface.
- Cut the dough into thin strips about ½ inch wide.
- Wrap each hot dog with the crescent dough strips, leaving space for the ‘face’.
- Arrange on a baking sheet lined with parchment paper.
- Bake for 12-15 minutes until golden brown.
- Create faces by using a toothpick to dab mustard or ketchup for eyes.
- Serve warm on a festive tray with dipping sauces.
Notes
Consider using different sausage types or veggie dogs, or swap crescent roll dough for puff pastry for a different texture.
- Prep Time: 10 minutes
- Cook Time: 15 minutes
- Category: Appetizer
- Method: Baking
- Cuisine: American
Nutrition
- Serving Size: 1 serving
- Calories: 150
- Sugar: 1g
- Sodium: 500mg
- Fat: 8g
- Saturated Fat: 2g
- Unsaturated Fat: 6g
- Trans Fat: 0g
- Carbohydrates: 15g
- Fiber: 0g
- Protein: 5g
- Cholesterol: 20mg
Keywords: Halloween, Appetizer, Mummy Wrapped Hot Dogs, Spooky Food, Party Food
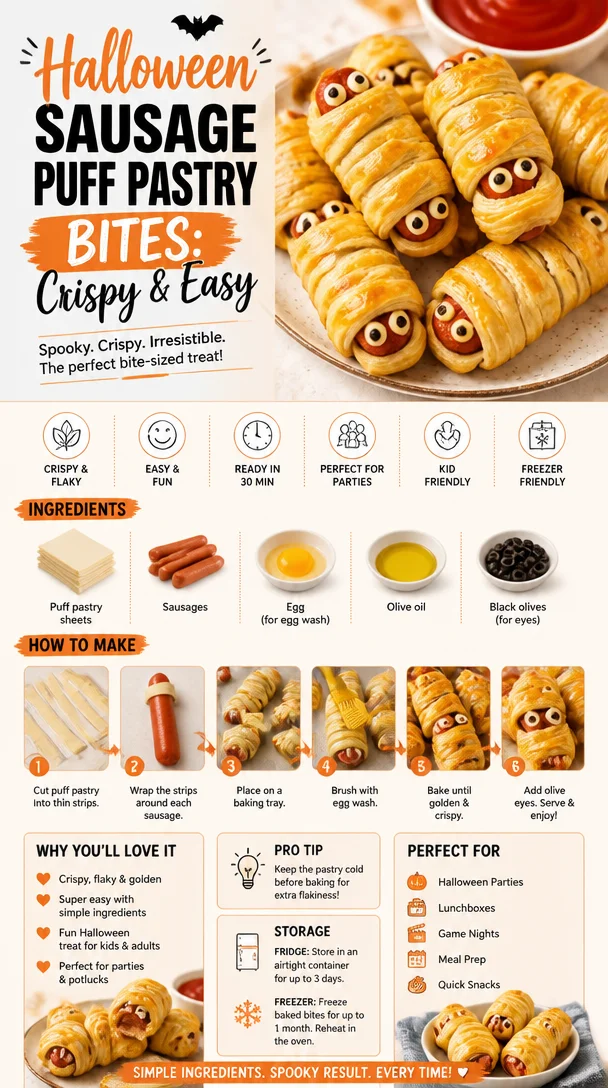
Halloween Sausage Puff Pastry Bites: Crispy & Easy
Feuilletés Saucisse: A Spooky Culinary Delight for Halloween
Welcome to my kitchen, friends! With the leaves turning crimson and pumpkin patches popping up everywhere, Halloween is upon us — a time not just for costumes and candy, but for fun, festive cooking! Today, I’m thrilled to share a recipe that’s close to my heart and perfect for your Halloween gatherings: Feuilletés Saucisse. These little savory pastries, filled with delicious sausage and wrapped in flaky pastry, are sure to be a hit at any spooky soirée.
Picture this: it’s Halloween night, and the air is filled with the scent of crisp autumn leaves. You’re gathered with friends and family, enjoying laughter and stories, the flickering candlelight casting playful shadows. You’ve just pulled a tray of Feuilletés Saucisse from the oven, their golden-brown tops gleaming. As you take that first bite, the delightful crunch of the pastry gives way to a juicy, flavorful filling, and suddenly, it feels like a scene straight out of a cozy movie.
I created this recipe with joy and a touch of nostalgia. Growing up, my family had a tradition of making these crispy pastries, especially during fall celebrations. My grandmother would whip them up for every Halloween party, and I’d help her roll out the dough. Standing on a stool, flour dusting the air, I felt like a little chef, eagerly anticipating the moment we’d take them out of the oven and feast together. Now, I’m thrilled to pass that tradition on to you!
Feuilletés Saucisse are not just easy to make; they are incredibly versatile and can be customized to cater to your taste buds. Whether you’re hosting a Halloween bash or creating a cozy night in, these savory delights will bring warmth and nostalgia to your table. Now, let’s dive into this easy-peasy, crowd-pleasing recipe!
Ingredients
To make these delightful feuilletés, you’ll need the following ingredients:
-
Puff Pastry
- This is the magical ingredient that gives these pastries their flaky texture. You can find it in the frozen section of most grocery stores. If you prefer a homemade touch, you can make your own puff pastry, but store-bought is perfectly delightful!
-
Sausages
- Choose your favorite type — pork, chicken, or even a vegan alternative work beautifully. For a twist, try spiced or herb-infused sausages to add an exciting flavor.
-
Mustard
- A classic choice for dipping, mustard adds a lovely zing! Use Dijon for a slight kick or whole grain for extra texture. You could even mix in a hint of honey for a sweet twist.
-
Egg (for egg wash)
- This is what gives your pastries that beautiful golden color. If you’re in a pinch, you can substitute a sprinkle of milk for an equally nice finish.
-
Herbs and Spices (optional)
- Fresh herbs like parsley or thyme can elevate your filling. Feel free to experiment with spices like paprika or black pepper for added depth!
Step-by-Step Instructions
Ready to get cooking? Let’s make some Feuilletés Saucisse that will inspire gasps of delight!
-
Preheat Your Oven:
- Preheat your oven to 400°F (200°C). This will ensure a perfectly crispy pastry. You’ll want your oven to be nice and hot, so those pastries puff up beautifully!
-
Prepare the Puff Pastry:
- If you’re using frozen puff pastry, remove it from the freezer and let it thaw on the counter for about 30 minutes. Once thawed, gently roll it out on a floured surface to prevent sticking. This step isn’t crucial, but it allows for a little extra flakiness!
-
Sausage Filling:
- While the pastry is thawing, let’s prep the filling. Remove the sausage casings and crumble the meat into a mixing bowl. You can also use pre-cooked sausage; just chop it into small pieces. Add your herbs and spices if you’re using them for added flavor!
-
Cut the Pastry:
- Cut the puff pastry into rectangles, about 4×6 inches. This size allows for a nice portion without being overwhelming.
-
Fill with Sausage:
- Place a small spoonful of your sausage mixture in the center of each pastry rectangle. Be careful not to overfill; a little goes a long way!
-
Fold and Seal:
- Fold the pastry over the filling to create a pocket. Press the edges with a fork to seal them nice and tight! You want to keep all that juicy goodness inside.
-
Egg Wash:
- In a small bowl, beat the egg, then brush it over the top of each filled pastry. This step ensures a beautiful golden glow when they bake.
-
Bake:
- Pop those beauties onto a baking sheet lined with parchment paper and bake for about 20-25 minutes, or until they’re golden brown and flaky. Your kitchen will start to smell irresistible!
-
Cool and Serve:
- Once they’re out of the oven, let them cool for a few minutes — if you can resist! You can serve them warm or at room temperature.
Serving Suggestions
To plate your Feuilletés Saucisse beautifully, arrange them on a festive platter. You can garnish with fresh herbs or serve with a side of dipping sauces like mustard or ketchup. For a Halloween twist, use a creepy cloth or a cutting board decorated with mini pumpkins and faux cobwebs for a spooky look. They’ll be the centerpiece of your Halloween spread!
Recipe Variations
Here are a few creative twists you can consider:
- Cheesy Delight: Add grated cheese into the sausage mixture for a gooey, savory treat.
- Veggie Medley: Mix in sautéed onions, peppers, or mushrooms into your filling for an extra boost of flavor.
- Spicy Kick: Add jalapeños or a pinch of cayenne pepper to the sausage for a spicy version.
- Herbed Up: Experiment with different herbs! Fennel or rosemary can give a fresh twist.
- Sweet and Savory: Blend in some caramelized apples or fig jam into the filling for a sweet contrast to the savory sausage.
Chef’s Notes
Feuilletés Saucisse has traveled through time in my kitchen. I first learned the art of making them with my grandmother, and over the years, I’ve adapted the recipe to suit my tastes and, of course, those of my friends. Sometimes, I toss in whatever veggies I have lying around — there’s never a bad time to be resourceful in the kitchen! I even remember one Halloween where we made them themed to look like little mummies, wrapping the sausage filling with strips of pastry and drawing eyes with mustard! The laughter and delight those little creations brought were unforgettable!
FAQs and Troubleshooting
1. My pastry isn’t puffing up — what went wrong?
- Make sure your oven is preheated and that your pastry is cold before it goes in. Puff pastry thrives on high heat!
2. Can I make these ahead of time?
- Absolutely! You can prepare them up to the baking stage, cover them, and refrigerate. Bake them just before your guests arrive for that fresh-out-of-the-oven experience.
3. Can I freeze them?
- Yes! Freeze the unbaked Feuilletés on a baking sheet, and once frozen solid, place them in a freezer bag. Bake directly from frozen, adding a few minutes to the cooking time.
4. What’s the best way to reheat them?
- The oven is your best bet for reheating. Place them in a preheated oven at 350°F (175°C) for about 10–15 minutes until warmed through.
Nutritional Info (Optional)
While I’m not a nutritionist, I like to remind everyone to enjoy these delicious treats in moderation, especially during the festive season! They’re a wonderful treat filled with flavor, and sharing them with others is what truly makes them special.
So there you have it—your ultimate guide to making Feuilletés Saucisse this Halloween! I hope these savory delights sprinkle some warmth and joy into your celebrations. Remember, cooking is all about fun, experimentation, and savoring the company of those you love. So roll up those sleeves, get that kitchen messy, and enjoy every delicious bite! Happy cooking!
Print
Feuilletés Saucisse
- Total Time: 55 minutes
- Yield: 12 servings 1x
- Diet: Omnivore
Description
Delicious savory pastries filled with sausage, perfect for Halloween gatherings.
Ingredients
- Puff Pastry
- Sausages (pork, chicken, or vegan)
- Mustard (Dijon or whole grain)
- 1 Egg (for egg wash)
- Herbs and Spices (optional)
Instructions
- Preheat your oven to 400°F (200°C).
- Prepare the puff pastry by thawing and rolling it out.
- Remove sausage casings and crumble meat into a bowl.
- Cut puff pastry into 4×6 inch rectangles.
- Place a spoonful of the sausage mixture in the center of each pastry.
- Fold the pastry over the filling and seal edges with a fork.
- Beat the egg and brush it over the top of each pastry.
- Bake for 20-25 minutes, or until golden brown.
- Cool for a few minutes before serving.
Notes
Serve with mustard or ketchup for dipping. These can be customized with various fillings or toppings.
- Prep Time: 30 minutes
- Cook Time: 25 minutes
- Category: Appetizer
- Method: Baking
- Cuisine: French
Nutrition
- Serving Size: 1 serving
- Calories: 280
- Sugar: 1g
- Sodium: 450mg
- Fat: 16g
- Saturated Fat: 6g
- Unsaturated Fat: 8g
- Trans Fat: 0g
- Carbohydrates: 26g
- Fiber: 1g
- Protein: 9g
- Cholesterol: 40mg
Keywords: Feuilletés Saucisse, Halloween recipes, savory pastries, puff pastry, sausage snacks
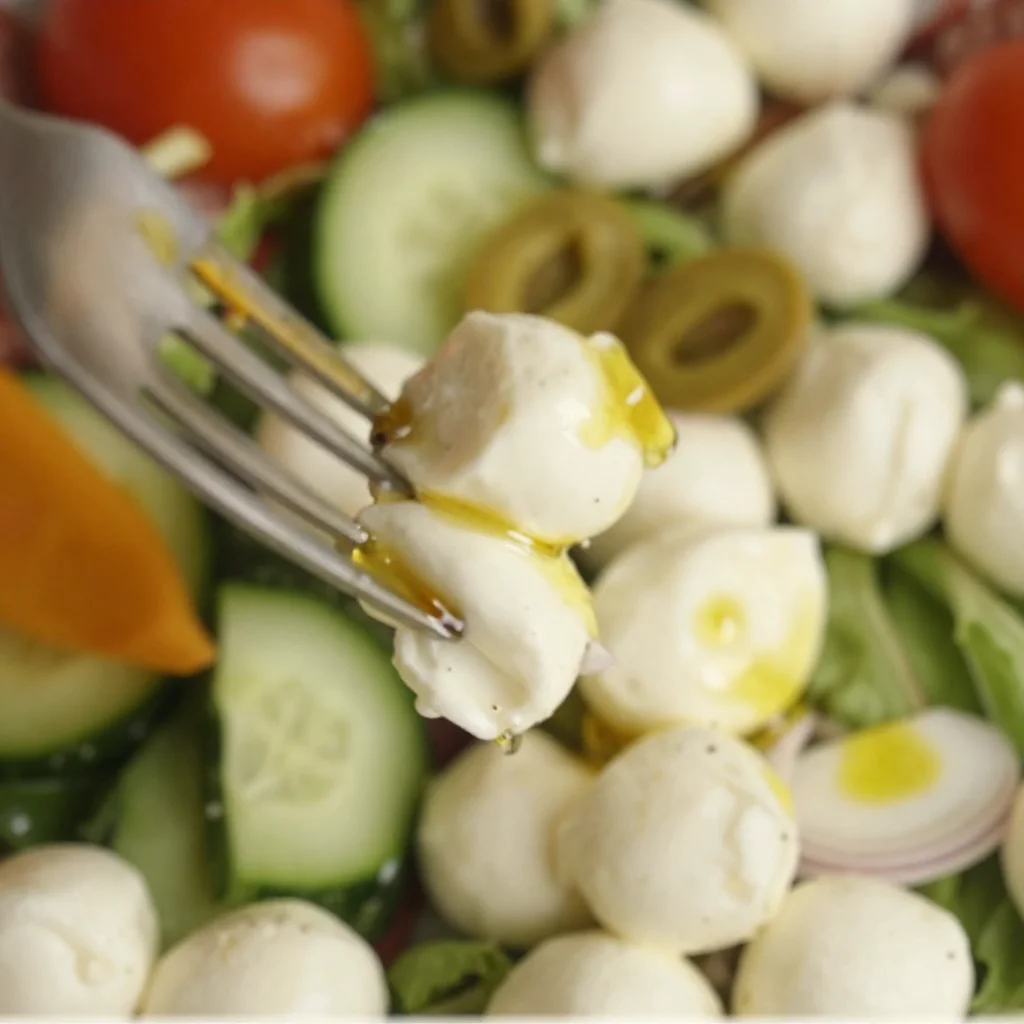
Antipasto Salad
An Irresistible Antipasto Salad Recipe That Brings Joy to Your Table
Welcome, my kitchen-loving friends! Today, we’re exploring the delightful world of antipasto salad, a dish so vibrant and full of flavor that it practically dances off the plate. Picture this: crispy greens, juicy olives, flavorful cured meats, and a bounty of colorful veggies coalescing into a harmonious celebration of taste. Whether you’re preparing for a cozy family meal or throwing together a lively gathering of friends, this antipasto salad is sure to impress and keep everyone coming back for more.
Antipasto salad is not just any salad; it’s like a delicious invitation to indulge in the wonderful variety of flavors found in Italian cuisine. Antipasto, which translates to "before the meal," is typically a spread of appetizers offered before the main course. However, when transformed into a salad, it becomes a hearty, satisfying dish that can take center stage. Plus, it’s bursting with fresh ingredients that nourish the body and soul—all while being incredibly easy to toss together!
In my home, food is more than just sustenance; it’s a language of love. Whenever I prepare this salad, the aromas and colors bring back warm memories of summer picnics with my family, where we would gather on our sun-drenched porch enjoying laughter, stories, and, of course, the best homemade dishes. That’s the spirit I want to encapsulate in this recipe: a blend of comfort, warmth, and vibrancy that makes every bite a joyful experience.
So grab your apron, roll up your sleeves, and let’s channel our inner chefs as we whip up this gorgeous antipasto salad!
A Nostalgic Memory
Growing up, family gatherings were a big deal in my household. I remember my Grandma Rosa’s get-togethers, where the table would overflow with platters of antipasto: marinated artichokes, tangy pepperoncini, olives of every variety, and thinly sliced salami. I would sit cross-legged on the floor, eagerly helping to assemble the vibrant spread. One summer evening, the sun dipped low in the sky, casting a golden hue over our outdoor table, and I discovered the joy of combining all those flavors into a simple salad.
That day, the magic of fresh basil and mozzarella mingling with smoky prosciutto became etched in my memory. I realized how these little moments, filled with laughter and good food, shaped my love for cooking and the desire to bring people together through it. This antipasto salad is a tribute to those cherished summer nights—an ode to the flavors, the joy, and the love shared around the table.
Fresh Ingredients for Your Antipasto Salad
Now, let’s gather our ingredients! This salad is a fiesta of flavors, and each component plays a crucial role. Here’s what you’ll need:
- Mixed Greens (4 cups): Choose a combination of spinach, arugula, and romaine for a refreshing base. If you prefer, you can substitute with kale or spring mix.
- Grape Tomatoes (1 cup, halved): Sweet and juicy, they add a burst of color. Cherry tomatoes work great too; just make sure they’re ripe!
- Cucumbers (1 medium, diced): Crisp and refreshing! You can swap out for radishes or bell peppers for a different crunch.
- Cured Meats (6 oz): Prosciutto, salami, or pepperoni—pick your faves! For a vegetarian option, try marinated tofu or grilled eggplant.
- Cheese (4 oz): Fresh mozzarella, provolone, or feta—each brings a unique flavor. Dairy-free cheese alternatives are a great substitute here.
- Olives (1/2 cup): A mix of black and green olives adds briny goodness. If you’re not a fan, consider using capers for a punchy alternative.
- Roasted Red Peppers (1/2 cup, sliced): Sweet and smoky, these can be jarred or homemade. Fresh bell peppers can work too for that crunch.
- Marinated Artichoke Hearts (1 cup): Tender and flavorful, these are a must! If unavailable, simply add more olives or pickles.
- Fresh Basil (1/4 cup, chopped): The aroma of fresh basil elevates the dish. Dried basil can work in a pinch, but the flavors won’t be the same.
- Balsamic Dressing (1/4 cup): A drizzle to tie it all together; make your own for a personalized touch! Substitute with Italian dressing or a simple olive oil and vinegar mix.
Step-by-Step: Create Your Antipasto Salad
Let’s dive into the process! Follow these easy steps, and you’ll have a stunning antipasto salad to serve in no time.
Step 1: Prepare the Base
Start by washing and drying your mixed greens. Having a dry base is key to maintaining that crispness. Pat them down gently with a clean kitchen towel or use a salad spinner if you have one. You want those greens to shine!
Step 2: Chop and Dice
Next, grab your cutting board! Chop the cucumbers into bite-sized pieces, slice the grape tomatoes in half, and do the same for the roasted red peppers if they’re whole. You want all your ingredients roughly the same size for even distribution in the salad. This step is a great opportunity to unleash your knife skills!
Step 3: Layer on the Delights
In a large mixing bowl, start layering: add in the mixed greens first, followed by the cucumbers, tomatoes, roasted red peppers, and artichoke hearts. As you layer, feel free to give little comments like “Oh my gosh, look at those colors!” It makes the process even more enjoyable.
Step 4: Meat and Cheese, Oh My!
Now for the fun part—meats and cheeses! Tear or slice your cured meats and scatter them on top of the veggies. Crumble or break up your cheese and sprinkle it over the salad. This colorful mix creates a visually appealing dish.
Step 5: Add the Olives and Seasonings
Drizzle the olives over the top, and don’t forget to include that aromatic fresh basil. Toss everything gently. You want an even mix without bruising the greens or smashing the tomatoes. As you mix, imagine all those flavors coming together—it’s pure magic!
Step 6: The Grand Finale—Dress It Up!
Last but not least, drench your salad with balsamic dressing. Start with half and toss, then add more as needed to coat all the ingredients without drowning them. Taste a small bite to see if it needs more seasoning. Sometimes, a pinch of salt, pepper, or even a sprinkle of red pepper flakes amps up the flavor even further.
Step 7: Plate It Up!
Transfer the salad onto a large serving platter or individual bowls. Garnishing with a sprig of basil or a sprinkle of freshly cracked pepper adds an extra touch that makes it feel gourmet!
Serving Suggestions
When it comes to serving this antipasto salad, let your creativity shine! For a rustic touch, serve it in a large wooden salad bowl where guests can help themselves. Pair it with sliced crusty bread or cold, toasted focaccia for a delightful textural contrast. Alternatively, you can portion it into individual bowls for a chic, modern presentation! Add a glass of chilled white wine, and you’ve got a feast that’s sure to impress.
Recipe Variations
Feeling adventurous? Here are some tasty twists you can try:
- Mediterranean Flair: Add chickpeas, feta cheese, and diced red onion for a hearty make-ahead option.
- Grilled Goodness: Incorporate grilled zucchini and eggplant for a smoky flavor, perfect for summer.
- Spicy Kick: Toss in some jalapeños or spicy soppressata for those who love a heat factor in their salads!
- Savory-Sweet Addition: Diced apples or pears offer a delightful sweet crunch that surprisingly complements the savory elements.
- Vegan Delight: Swap the cheese and meats for marinated tempeh and avocado slices, keeping all the amazing flavors intact.
Chef’s Notes
This antipasto salad has gone through many delightful iterations in my kitchen. One afternoon, I decided to host a potluck, and guests brought their favorite items. We ended up with a rainbow of flavors—each person added their own twist with unique ingredients. It turned into an unforgettable feast! Whenever I make this dish now, I reflect on that wonderful day and the community that came together through food.
And let’s get real; my kitchen is often filled with the scent of basil and the laughter of friends. One time, I accidentally added too many olives (hey, who can resist?), and while it was a little salty, we all loved it anyway! Cooking should feel playful, so don’t stress about perfection!
FAQs and Troubleshooting
-
How do I keep my salad fresh if I’m making it in advance?
- Keep the dressing separate until just before serving to avoid soggy greens. Store all salad ingredients in airtight containers in the fridge.
-
What if I can’t find fresh mozzarella?
- No worries! You can use shredded mozzarella or even cottage cheese as a substitute.
-
Can I make this salad ahead of time?
- Absolutely! However, it’s best to add ingredients like tomatoes and cucumbers just before serving to maintain their crunch.
-
What do I do if I have leftover salad?
- Store leftovers in an airtight container and enjoy within a day or two. You can incorporate them into wraps or grain bowls for a quick lunch!
Nutritional Info
This antipasto salad is not only delicious but also packed with nutrients. Each serving is a rich source of vitamins from the vegetables, healthy fats from the olives and cheese, and protein from the meats. To keep it lighter, opt for more veggies and less cheese. Enjoy your salad as a perfect balance of flavors and nutrition!
And there you have it, my flavorful fans! This antipasto salad is more than just a recipe; it’s an experience—an opportunity to connect with loved ones and create new memories right in your kitchen. So embrace the joy of cooking, dive into those flavors, and let your creativity shine! I can’t wait to hear how your antipasto salad turns out; don’t forget to share your stories and fun variations with me! Happy cooking!
Print
Irresistible Antipasto Salad
- Total Time: 15 minutes
- Yield: 4 servings 1x
- Diet: Vegetarian
Description
A vibrant and flavorful antipasto salad packed with crispy greens, juicy olives, and flavorful cured meats, perfect for any gathering.
Ingredients
- 4 cups Mixed Greens (spinach, arugula, and romaine)
- 1 cup Grape Tomatoes (halved)
- 1 medium Cucumber (diced)
- 6 oz Cured Meats (prosciutto, salami, or pepperoni)
- 4 oz Cheese (fresh mozzarella, provolone, or feta)
- 1/2 cup Olives (mixed black and green)
- 1/2 cup Roasted Red Peppers (sliced)
- 1 cup Marinated Artichoke Hearts
- 1/4 cup Fresh Basil (chopped)
- 1/4 cup Balsamic Dressing
Instructions
- Prepare the base by washing and drying your mixed greens.
- Chop the cucumbers, halve the grape tomatoes, and slice the roasted red peppers.
- Layer the mixed greens in a large mixing bowl, followed by cucumbers, tomatoes, roasted red peppers, and artichoke hearts.
- Add the torn or sliced cured meats and crumbled cheese on top.
- Drizzle the olives and fresh basil over the salad, then toss gently.
- Drench the salad with balsamic dressing, tossing to coat without overwhelming the ingredients.
- Transfer the salad to a large serving platter or individual bowls and garnish as desired.
Notes
Keep the dressing separate until serving to maintain salad freshness. Customize ingredients for your taste!
- Prep Time: 15 minutes
- Cook Time: 0 minutes
- Category: Salad
- Method: Mixing
- Cuisine: Italian
Nutrition
- Serving Size: 1 serving
- Calories: 350
- Sugar: 5g
- Sodium: 400mg
- Fat: 12g
- Saturated Fat: 4g
- Unsaturated Fat: 6g
- Trans Fat: 0g
- Carbohydrates: 45g
- Fiber: 3g
- Protein: 15g
- Cholesterol: 30mg
Keywords: antipasto salad, Italian salad, healthy salad, fresh ingredients, summer salad, easy recipe

Minute Cowboy Caviar Dip: Tangy, Creamy Crowd-Pleaser
Cowboy Caviar Dip: A Flavorful Fiesta in Every Bite!
Welcome to my kitchen, friends! Today, we’re diving into a vibrant and delicious dish that will not only brighten your snack table but also make you the star of your next gathering! If you’ve never heard of Cowboy Caviar, you’re in for a treat — and if you’ve enjoyed it before, I promise my take on it will rekindle all those tasty memories.
Cowboy Caviar, also known as Texas Caviar, is a zesty and colorful dip influenced by the flavors of the South. It’s rich in texture, filled with beans, fresh veggies, and a tangy dressing that dances on your taste buds. Best of all? It comes together in a flash, making it perfect for impromptu get-togethers or cozy nights at home. This dip is a delicious marriage of flavors that celebrates the simplicity of home cooking — just what I love!
As I reminisce about my culinary journey, I can’t help but think about the first time I made this dip. It was a sunny Saturday, and my best friend was hosting a backyard BBQ. I was on snack duty, and with a head full of ideas and a pantry stocked with fresh produce, Cowboy Caviar quickly became the star of the show. With each scoop of that colorful goodness, laughter and stories flowed around the table, reminding me of how food creates connections. You could see the sparkle in everyone’s eyes as they dove into the dip with crispy tortilla chips, and that moment solidified my love for sharing meals with those I adore.
Ready to make some delicious memories of your own? Let’s gather our ingredients and start cooking!
Ingredients
Here’s what you need to whip up my delightful Cowboy Caviar Dip:
-
1 can black beans – A great source of protein and fiber, black beans add a hearty base to our dip. If you’re looking for a different flavor profile, you can swap them for pinto or kidney beans.
-
1 can sweet corn – Sweet and crunchy, corn adds a delightful texture. You can also use fresh corn off the cob or frozen corn — just make sure to thaw it first!
-
1 red bell pepper – This sweet and crunchy vegetable adds a pop of color and flavor. Feel free to replace it with yellow or green bell pepper for a different taste.
-
1 green bell pepper – Adding another layer of crunch. If you’d like a spicier version, throw in a jalapeño, seeds removed!
-
1/2 red onion – For that zing! Red onions are slightly milder. If they’re too strong for your taste, use green onions or shallots instead.
-
1 cup cherry tomatoes – Sweet and juicy, these tomatoes bring freshness. Look for a variety of colors for more visual appeal! Substitute with diced regular tomatoes if that’s what you have.
-
1 avocado – Creamy and nourishing; avocado balances the dip beautifully. If you want to keep it lower in fat, you can leave it out completely or replace it with diced cucumbers.
-
Juice of 2 limes – The zesty citrus note brings the dip to life! If you’re out of limes, lemon juice works just as well.
-
1/4 cup fresh cilantro – This herb adds an earthy freshness. Not a cilantro fan? Parsley can be a great substitute, or skip it altogether!
-
Salt and pepper – Simply season to taste.
-
Optional: 1 teaspoon chili powder – For a little extra kick, feel free to add this! Smoked paprika is another yummy alternative for a deeper flavor.
Step-by-Step Instructions
Now that we have everything ready, let’s make this Cowboy Caviar Dip come to life!
-
Rinse and Drain the Beans: Start by rinsing your black beans under cold water. This helps to remove any extra sodium and makes them less mushy. Drain them thoroughly, then plop them into a large mixing bowl.
-
Prepare the Corn: If you’re using canned corn, just drain it as well and add it to the bowl. If you’re using fresh corn, stand the ear upright and carefully slice down to release the kernels as you go. It’s a fun way to get messy in the kitchen!
-
Chop the Veggies: Dice your red bell pepper, green bell pepper, and cherry tomatoes. For the onion, I recommend chopping it finely so its flavor mingles throughout the dip without overpowering it. If chopping onions makes you tear up, try refrigerating the onion for a few minutes or using a sharp knife to minimize the sulfuric compounds that cause tears!
-
Slice the Avocado: Cut your avocado in half, remove the pit, and scoop the flesh into the bowl. Gently fold it in with the other ingredients to avoid mashing it too much. Avocado adds that creamy goodness which we love!
-
Add Lime Juice and Seasoning: Squeeze in the freshly squeezed lime juice. Not only does it enhance the flavors, but it also helps prevent the avocado from browning — a little kitchen magic! Season with salt, pepper, and if you’re feeling adventurous, sprinkle in that chili powder or smoked paprika.
-
Toss with Cilantro: Chop up your fresh cilantro and mix it in. Don’t be shy; this adds countless flavor and vibrance. For those who want to punch it up a notch, consider adding minced garlic or diced jalapeños at this stage for an extra kick.
-
Chill and Serve: Cover your bowl with plastic wrap and let it chill in the refrigerator for at least 30 minutes. This allows the flavors to meld together beautifully. When you’re ready to serve, give it a gentle stir, taste, and adjust the seasoning if needed.
Serving Suggestions
This Cowboy Caviar Dip is best served with crispy tortilla chips, but don’t stop there! You can spoon it over tacos, use it as a topping for grilled chicken, or even throw it into a salad. A pretty serving bowl garnished with extra cilantro and lime wedges can make your presentation pop!
Recipe Variations
Feel free to get creative with Cowboy Caviar! Here are a few twists you might enjoy:
-
Spicy Twist: Add diced jalapeños or even a splash of hot sauce for those who like it fiery.
-
Mediterranean Fusion: Substitute black beans with chickpeas and mix in some diced cucumbers and feta cheese. Serve with pita chips.
-
Tropical Style: Incorporate diced mango or pineapple for a sweet and fruity version that’s perfect for summertime gatherings.
-
Vegan/Gluten-Free Delight: This dip is naturally vegan and gluten-free, but for an extra protein boost, consider mixing in some quinoa!
-
Herb Variations: Experiment with other fresh herbs like dill or basil for new flavor profiles.
Chef’s Notes
Cowboy Caviar has had a special place in my heart (and on my table) for years. It’s a dish that seems to evolve with each occasion, reminding me just how versatile cooking can be! I remember once experimenting with adding a splash of balsamic vinegar — a mistake that quickly turned into an “oh wow” moment. Cooking is all about trial and error, and sometimes the best ideas come from those little mishaps!
Every time I make Cowboy Caviar, it’s like a little culture fest in my kitchen. The colors, the crunch, and the smiles that come with it — honestly, it’s everything comforting about food, wrapped up in one bowl. I encourage you to make it your own and share it with those you love!
FAQs and Troubleshooting
-
Why is my Cowboy Caviar watery?
If you find your dip too soupy, try draining the beans and corn more thoroughly next time. You can also balance it with more solid ingredients like chopped peppers or onions. -
How long will it last in the fridge?
Cowboy Caviar can last about 3-5 days in the fridge. But be warned — it tends to disappear quickly when served! -
Can I make this ahead of time?
Absolutely! You can make it a day ahead. Just be sure to give it a good stir before serving, and you may need to add a bit more lime juice to refresh the flavors. -
What can I use instead of avocado?
If avocado isn’t your thing, consider using diced cucumber for a fresh crunch or just leave it out altogether. The dip will still be delicious!
Nutritional Info
(Optional but helpful for those who are health-conscious)
- Serving Size: 1/2 cup
- Calories: ~120 kcal
- Protein: 5g
- Carbs: 22g
- Fat: 4g
- Fiber: 6g
And there you have it! A vibrant and delicious Cowboy Caviar Dip that’s easy to make and even easier to enjoy. So roll up those sleeves, let your creativity shine, and get ready to share some joy in your kitchen! Happy cooking, friends!
Print
Cowboy Caviar Dip
- Total Time: 45 minutes
- Yield: 4 servings 1x
- Diet: Vegan
Description
A vibrant and delicious dip filled with beans, fresh veggies, and a tangy dressing, perfect for gatherings and snack tables.
Ingredients
- 1 can black beans
- 1 can sweet corn
- 1 red bell pepper
- 1 green bell pepper
- 1/2 red onion
- 1 cup cherry tomatoes
- 1 avocado
- Juice of 2 limes
- 1/4 cup fresh cilantro
- Salt and pepper to taste
- 1 teaspoon chili powder (optional)
Instructions
- Rinse and drain the beans, then add to a large mixing bowl.
- Prepare the corn by draining canned corn or slicing kernels off fresh corn.
- Chop the red bell pepper, green bell pepper, and cherry tomatoes; finely chop the red onion.
- Slice the avocado and gently fold it into the bowl.
- Add lime juice, seasoning, and optional chili powder.
- Toss in the chopped cilantro and mix well.
- Chill in the refrigerator for at least 30 minutes before serving.
Notes
Best served with crispy tortilla chips, but can also be used as a taco topping or salad addition.
- Prep Time: 15 minutes
- Cook Time: 0 minutes
- Category: Appetizer
- Method: Mixing
- Cuisine: Mexican
Nutrition
- Serving Size: 1/2 cup
- Calories: 120
- Sugar: 3g
- Sodium: 200mg
- Fat: 4g
- Saturated Fat: 1g
- Unsaturated Fat: 3g
- Trans Fat: 0g
- Carbohydrates: 22g
- Fiber: 6g
- Protein: 5g
- Cholesterol: 0mg
Keywords: Cowboy Caviar, dip, healthy snacks, party food, vegetarian recipes

Cowboy Caviar
Cowboy Caviar: A Flavorful Fiesta in a Bowl!
Welcome to my kitchen, food lovers! Today, we’re diving into a vibrant and zesty dish that embodies everything I adore about cooking: it’s simple, colorful, and packed with flavor! Yes, we’re making Cowboy Caviar — the perfect party dip or side dish that shines with fresh ingredients and a little bit of Texas charm.
If you’ve ever been to a gathering where this dish has made an appearance, you know exactly how it feels to be drawn to it, mesmerized by the mix of vibrant ingredients. Imagine creamy avocados, succulent black beans, sweet corn, and a zesty dressing that makes your taste buds dance. You can serve it with tortilla chips, as a salad topping, or simply eat it by the spoonful (no judgment here; we’ve all been there!).
A Taste of Nostalgia
The first time I made Cowboy Caviar was during a summer barbecue at my best friend’s house. It was one of those unforgettable days where laughter filled the air, and the sun brought out the best of us. I remember watching her whip up this colorful concoction in a huge mixing bowl, tossing everything together as if it were the most magical spell.
After she served it, I saw everyone flock to the table, grabbing chips and scooping up the deliciousness without a second thought. The vibrant colors and fresh flavors created a joyful buzz, and I knew I had to recreate that moment in my own kitchen. It became a staple for my gatherings and family dinners—and I guarantee it will become a favorite for you, too!
Ingredients You’ll Need
Now, let’s gather our ingredients! Here’s what you’ll need to create your very own Cowboy Caviar:
-
Black Beans: The star of the show! They add protein and stay firm when mixed. If you’re short on time, canned beans work wonderfully—just rinse them to remove excess sodium.
-
Corn: Sweet corn brings a delightful crunch. You can use fresh, frozen, or canned corn—whatever you have on hand! If using canned, just drain and rinse it first.
-
Red Bell Pepper: For a pop of color and sweetness. Green bell peppers work if you prefer, but I love the sweetness of red.
-
Tomatoes: Diced fresh tomatoes add juiciness. Any tomatoes will do, but Roma or cherry tomatoes have fewer seeds and offer great flavor.
-
Red Onion: Adds a mild, sharp bite. Soaking chopped onion in water for 10 minutes can reduce its bite if you prefer milder flavors.
-
Avocado: Creamy goodness that ties everything together. Serve immediately after slicing, or toss with lime juice to prevent browning.
-
Cilantro: Provides freshness and depth. If you’re one of those who aren’t a fan of cilantro, you can substitute with parsley or simply omit it.
-
Lime Juice: Brightens everything up! Fresh lime juice is best, but bottled will do in a pinch.
-
Olive Oil: For richness and a little extra flavor. Feel free to swap it out for avocado oil or a flavored oil for a different twist.
-
Jalapeño: Adds a touch of heat. Adjust according to your spice preference. You can remove the seeds for a milder flavor!
-
Salt and Pepper: Essential for flavoring. Always taste as you go and adjust to your liking!
Step-by-Step Instructions
Ready to get cooking? Here’s how to whip up this mouthwatering Cowboy Caviar step by step!
-
Preparation is Key: Start by gathering all your ingredients together. Pro tip: chopping everything in advance makes the process smoother and more enjoyable!
-
Chop and Dice: Dice the red bell pepper, tomatoes, red onion, and jalapeño (if using). The size is up to you, but aim for bite-sized pieces so everything blends beautifully. A chef’s knife will save time and keep your cuts clean!
-
Rinse and Drain: Rinse the black beans in a colander to wash away any canned flavor and excess sodium. If you’re using canned corn, repeat this step.
-
Mix It Up: In a large mixing bowl, combine the black beans, corn, diced bell pepper, tomatoes, red onion, cilantro, and jalapeño. It’s like a colorful party in your bowl!
-
Prepare the Dressing: In a separate small bowl, whisk together the lime juice, olive oil, salt, and pepper. If you want a kick, add a pinch of cumin or a dash of hot sauce.
-
Combine Ingredients: Pour the dressing over the vegetable mixture and toss gently until everything is well-coated. Be careful not to mash the avocado if you added it at this stage!
-
Taste and Adjust: Take a moment to taste your Cowboy Caviar. Does it need more salt or lime juice? Adjust to your liking—this is your creation!
-
Chill: Let the dip sit for about 30 minutes in the fridge. This allows the flavors to meld beautifully. It will taste even better after some time!
-
Serve: Grab your favorite tortilla chips or serve it as a side to grilled meats or fish. You’ll be the star of the show!
Serving Suggestions
When it comes to serving your Cowboy Caviar, the options are endless! You can serve it in a fun, rustic bowl with a side of crispy tortilla chips for dipping. Alternatively, spoon it over grilled chicken or fish for a fresh, colorful dinner. If you want to get fancy, layer it in a glass jar to create a beautiful presentation, perfect for parties or potlucks!
Recipe Variations
Feel free to get creative! Here are some fun variations for your Cowboy Caviar:
-
Tropical Twist: Add diced mango or pineapple for a sweet, fruity version that brings a taste of the tropics.
-
Grain-Loaded: Add cooked quinoa or rice to make it a heartier dish—perfect for meal prep!
-
Southwestern Flair: Toss in some diced avocado and a sprinkle of smoked paprika for a smoky depth.
-
Vegan Delight: It’s already vegan, but you can amp it up with nutritional yeast for a cheesy flavor without dairy.
Chef’s Notes
Cowboy Caviar is one of those dishes that feels like a hug in a bowl. I remember the first time I made it for my family picnic; the kids couldn’t get enough, and my cousin asked for the recipe to impress his friends. It’s moments like these that remind me of what cooking is all about—creating memories through food.
Over the years, my recipe has adapted based on what’s in season and what I have on hand. If you have leftover ingredients in the fridge, don’t hesitate to toss them in! That’s the beauty of this dish; it’s wonderfully forgiving and celebrated for its versatility.
FAQs and Troubleshooting
1. Can I make Cowboy Caviar ahead of time?
Absolutely! It’s often better the next day once the flavors have had time to marry. Just add the avocado right before serving to keep it fresh.
2. It’s too salty! What can I do?
If you find your dish too salty, try adding a little more lime juice or fresh veggies to dilute the saltiness.
3. How can I prevent my avocado from browning?
You can gently toss the diced avocado with lime juice to slow down oxidation. Alternatively, add the avocado just before serving.
4. Can I make it spicier?
You bet! Add more jalapeño, or throw in some diced serrano peppers. You can also add a splash of hot sauce for a kick.
Nutritional Info
Each serving (1/2 cup) of Cowboy Caviar is low in calories, typically around 150-200, depending on the amount of oil and avocado used. Packed with fiber, vitamins, and healthy fats, it’s a guilt-free delight!
So, there you have it! Your new go-to dish has arrived, ready to become a staple in your kitchen. I can’t wait for you to try this Cowboy Caviar and enjoy it as much as I have. Happy cooking, friends!
Print
Cowboy Caviar
- Total Time: 15 minutes
- Yield: 4 servings 1x
- Diet: Vegan
Description
A vibrant and zesty dish that’s perfect as a dip or a side, packed with fresh ingredients like black beans, corn, and avocado.
Ingredients
- 1 can Black Beans, rinsed
- 1 cup Corn, fresh or canned
- 1 Red Bell Pepper, diced
- 2 Tomatoes, diced
- 1/2 Red Onion, diced
- 1 Avocado, diced
- 1/4 cup Cilantro, chopped
- 2 tablespoons Lime Juice
- 2 tablespoons Olive Oil
- 1 Jalapeño, diced (optional)
- Salt and Pepper, to taste
Instructions
- Gather all your ingredients together.
- Dice the red bell pepper, tomatoes, red onion, and jalapeño.
- Rinse the black beans and corn.
- Combine the black beans, corn, diced bell pepper, tomatoes, red onion, cilantro, and jalapeño in a large mixing bowl.
- Whisk together the lime juice, olive oil, salt, and pepper in a separate bowl.
- Pour the dressing over the vegetable mixture and toss gently.
- Taste and adjust seasoning as needed.
- Chill for about 30 minutes in the fridge.
- Serve with tortilla chips or as a side dish.
Notes
Allowing the dip to sit enhances the flavors. Add avocado right before serving to maintain freshness.
- Prep Time: 15 minutes
- Cook Time: 0 minutes
- Category: Appetizer
- Method: No Cook
- Cuisine: Tex-Mex
Nutrition
- Serving Size: 1/2 cup
- Calories: 175
- Sugar: 2g
- Sodium: 250mg
- Fat: 10g
- Saturated Fat: 1.5g
- Unsaturated Fat: 8.5g
- Trans Fat: 0g
- Carbohydrates: 22g
- Fiber: 7g
- Protein: 6g
- Cholesterol: 0mg
Keywords: cowboy caviar, party dip, vegan dip, Tex-Mex, healthy appetizer, easy recipe


