
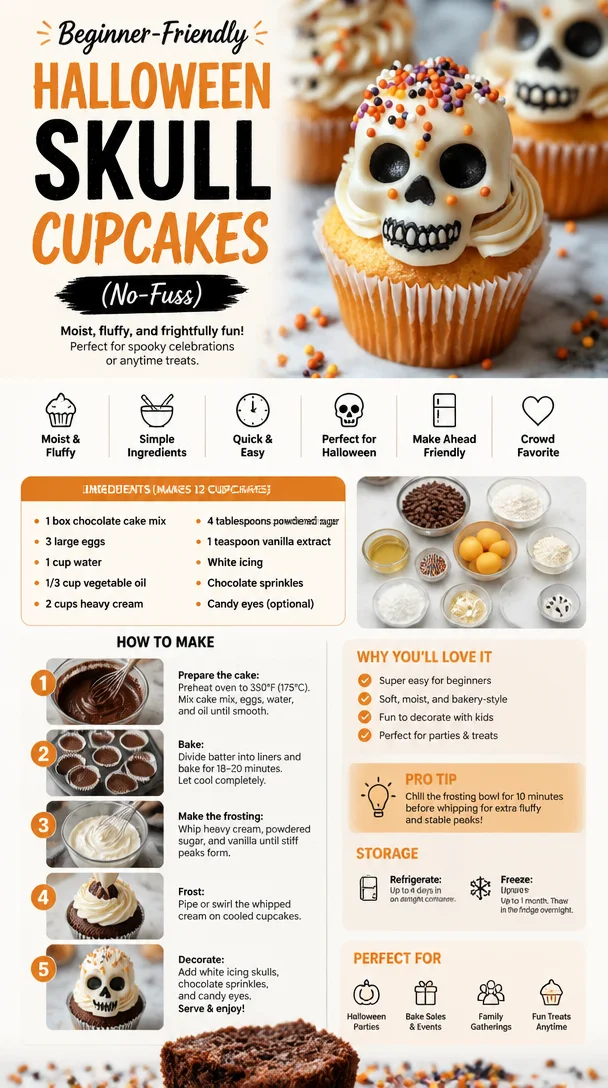
Beginner-Friendly Halloween Skull Cupcakes (No-Fuss)
Spooky Halloween Skull Cupcake Recipe: A Hauntingly Delicious Treat!
Welcome to my kitchen! I’m so excited to share a delightful recipe that’s perfect for Halloween — Spooky Halloween Skull Cupcakes! As the leaves turn crisp and the nights grow longer, there’s something magical about this season. The air is filled with the scent of pumpkin spice, and children (and adults, let’s be honest!) eagerly anticipate the joys of trick-or-treating. There’s nothing like gathering around the table with friends and family, sharing terrifying tales and indulging in deliciously spooky treats.
But let me tell you, these Skull Cupcakes aren’t just any Halloween dessert. They’re a fun and interactive way to celebrate the season while satisfying your sweet tooth. Picture this: soft, moist vanilla cupcakes topped with rich buttercream frosting, all cleverly decorated to resemble skulls. These little creatures will not only add a festive touch to your Halloween gathering, but they also make for an excellent weekend baking project.
Whether you’re planning a Halloween party, a family gathering, or just wanting to treat yourself to something extraordinary, these cupcakes are sure to be a hit. So grab your apron, and let’s dive into a spine-tingling culinary adventure together!
A Personal Story: The Halloween Tradition
Growing up, Halloween was a magical time in my household. I fondly remember my mom whipping up all sorts of spooky treats, but one year in particular stands out the most. It was the year I got to help her bake for the neighborhood Halloween party. We had our mix of ghoulish desserts, but it was her "Skull Cupcakes" that stole the show.
I remember the thrill of mixing the batter, sneaking bites of frosting, and adorning the cupcakes with glowing candy eyes. As we placed them on a tray alongside creepy cobweb cupcakes and ghostly cookies, I felt an overwhelming sense of joy — we were creating a mini-festival of treats! Everyone raved about those cupcakes. Kids laughed, parents chatted, and as the sun set, I felt warmth spread through me, a memory created not just through the food, but through the joy of sharing, laughter, and creativity.
As I grew older, I took those lessons and those flavors with me, and now, I can’t think of Halloween without these cupcakes. They remind me not just of deliciousness but of love, connection, and the passion of creating something special with my hands. And now, it’s my turn to pass this tradition on. Let’s make some spooky skull cupcakes that’ll become part of your own Halloween memories!
Ingredients: What You’ll Need
Here’s what you’ll need to whip up these hauntingly festive cupcakes. Each ingredient plays a crucial role, so let’s detail everything out:
-
For the Vanilla Cupcakes:
- 1 ½ cups all-purpose flour
- The foundation of your cupcakes! For a gluten-free alternative, you can swap this for an equal amount of gluten-free baking blend.
- 1 cup granulated sugar
- Sweetness is key! If you’d like a healthier option, feel free to use coconut sugar for a lower glycemic index.
- ½ cup unsalted butter, softened
- The moisture and flavor powerhouse! Margarine can be substituted for a dairy-free version.
- 2 large eggs
- Provides structure and tenderness. If you’re vegan, you can use flax eggs (1 tablespoon flaxseed meal + 2.5 tablespoons water equals one egg).
- ½ cup whole milk
- Makes the cupcakes stay moist! Almond or soy milk will work well if you’re avoiding dairy.
- 2 tsp baking powder
- This adds the fluffiness we all love! If you’re out, baking soda can also do the trick — just don’t forget the acid!
- 1 tsp vanilla extract
- The secret ingredient for that enchanting aroma! Consider using almond extract for a unique twist.
- 1 ½ cups all-purpose flour
-
For the Buttercream Frosting:
- 1 cup unsalted butter, softened
- The base of the frosting that gives it that creamy texture. Vegan butter is a great substitute if needed.
- 4 cups powdered sugar
- Sweetness central! For a less sugary option, try using powdered erythritol.
- 2 tbsp heavy cream or milk
- This thins out your frosting to that just-perfect consistency. Coconut cream is an excellent non-dairy substitute.
- 1 tsp vanilla extract
- The familiar flavor that brings everything together.
- 1 cup unsalted butter, softened
-
For Decoration:
- Mini chocolate candies or chocolate chips for eyes
- A fun way to bring your skulls to life (or perhaps to “unlife!”).
- Edible black gel or food coloring
- To give your cupcakes that spooky skull appearance!
- Mini chocolate candies or chocolate chips for eyes
Step-by-Step Instructions: Let’s Bake!
Now that we have all our goodies ready, let’s dive into the baking process. Follow these steps, and you’ll be well on your way to creating your spooky masterpieces!
1. Preheat the Oven
Preheat your oven to 350°F (175°C). Trust me, starting with a properly heated oven is essential for even baking!
2. Mix the Dry Ingredients
In a mixing bowl, whisk together the flour, baking powder, and sugar until combined. This will ensure that your baking powder is evenly distributed throughout the flour.
3. Cream the Butter
In another bowl, cream together the softened butter and sugar until it’s light and fluffy, about 3-4 minutes. This step is vital for creating a light texture in your cupcakes.
4. Beat in Eggs
Add the eggs one at a time, mixing well after each addition. And don’t forget the vanilla extract! Mixing in the eggs gradually ensures that they’re properly incorporated into the butter mixture.
5. Alternate Dry and Wet Ingredients
Now, add the flour mixture and milk to the butter mixture, alternating between the two. Start with a third of the flour mixture, then half the milk, another third of flour, last of the milk, and finish with the flour. This method helps maintain a smooth batter without over-mixing.
6. Scoop the Batter Into Cupcake Liners
Line a muffin tin with cupcake liners and fill each liner about two-thirds full with batter. I love using an ice cream scoop for this step — it’s mess-free and gives you consistently sized cupcakes!
7. Bake
Bake in your preheated oven for 18-20 minutes, or until a toothpick inserted into the center comes out clean. Don’t open the oven door too soon; you want your cupcakes to rise beautifully.
8. Cool Your Cupcakes
Once baked, remove them from the oven and let them cool in the pan for about 5 minutes before transferring them to a wire rack. Don’t rush this step; frosting warm cupcakes is a recipe for disaster!
9. Make the Buttercream Frosting
In a mixing bowl, beat the softened butter until creamy. Gradually add in powdered sugar, ensuring it’s mixed well before adding the next batch. Add the heavy cream and vanilla until you reach a smooth, spreadable consistency.
10. Frost Your Cupcakes
Using a piping bag, or simply a spatula, generously frost each cupcake with the buttercream. You can create different skull shapes with your piping technique — try some as classic skull shapes, and others can be a bit more avant-garde!
11. Decorate with Candy
Finally, use mini chocolate candies or chocolate chips for eyes. Create fun expressions by placing them at different angles!
12. Add the Finishing Touch
Using the black gel or food coloring, pipe small details onto the cupcakes to enhance their skull-like appearance. Get creative!
Serving Suggestions: Plate Like a Pro!
When it comes to serving, presentation is key! For Halloween, you could place these marvelous skull cupcakes on a decorated platter with spooky accents, like mini skeletons or ghostly cobwebs made with cotton candy. If you want to be extra theatrical, arrange them on a cake stand surrounded by “graveyard” decorations — think chocolate cookie crumbs for dirt and candy pumpkins for some added color.
Recipe Variations: Get Creative!
Once you’ve mastered the classic skull cupcakes, why not explore some creative variations? Here are a few ideas to mix things up:
- Red Velvet Skull Cupcakes: Swap the vanilla for red velvet for a festive color twist!
- Chocolate Cupcakes: Use a chocolate cupcake base instead. Rich and delightful!
- Spooky Flavors: Consider adding a dash of peppermint extract or corn syrup for a chewy, candy-like flavor in your frosting.
- Gluten-Free Version: Use almond flour or a gluten-free blend for an allergen-friendly take.
- Vegan Skull Cupcakes: Replace all dairy and egg ingredients with plant-based alternatives for a vegan delight.
Chef’s Notes: My Kitchen Memories
Every recipe carries a story, and these skull cupcakes are no exception. Over the years, I’ve tweaked the frosting and added my personal touches, but the essence remains the same: celebrating connection and creativity. The first time I put a skull face on a cupcake, I giggled at the fun expressions I could create — it’s such a joy to bring laughter to the table!
One Halloween years ago, I overdid the black gel details, and they turned out looking like startled skulls! But do you know what? Everyone loved them even more because of the goofy expressions, and we all shared a hearty laugh. It’s these moments that truly spark joy in the kitchen.
FAQs and Troubleshooting
1. Why did my cupcakes sink?
This could happen if the batter is over-mixed or if the oven temperature was too low. Stick to the recipe and ensure your oven is preheated properly.
2. Can I make the frosting ahead of time?
Absolutely! You can prepare the frosting up to 3 days in advance. Just keep it in an airtight container in the fridge and let it come to room temperature before frosting your cupcakes.
3. How do I keep my cupcakes from sticking to the liners?
Make sure to coat your cupcake liners with non-stick spray before pouring in the batter. This little trick ensures a smooth release and a clean look!
4. Can I freeze these cupcakes?
Yes, you can! Freeze the baked and cooled cupcakes in an airtight container for up to 2 months. Just frost them once they’re thawed to keep that fresh frosting look and taste.
Nutritional Info (if applicable)
While cupcakes are undeniably a treat, being mindful of portion sizes can help! Each vanilla skull cupcake (without frosting) generally has around 180 calories, 6g of fat, and 28g of carbs, but this can vary based on your frosting and decorations.
So there you have it — a delightful recipe for Spooky Halloween Skull Cupcakes! As you whip up these treats, remember that cooking is all about enjoyment. So embrace your creativity, share your love through food, and most importantly, have fun in the kitchen! Happy Halloween! 🎃👻
Print
Spooky Halloween Skull Cupcakes
- Total Time: 40 minutes
- Yield: 12 servings 1x
- Diet: Vegetarian
Description
A fun and delicious recipe for Halloween-themed cupcakes decorated like skulls, perfect for celebrations and gatherings.
Ingredients
- 1 ½ cups all-purpose flour
- 1 cup granulated sugar
- ½ cup unsalted butter, softened
- 2 large eggs
- ½ cup whole milk
- 2 tsp baking powder
- 1 tsp vanilla extract
- 1 cup unsalted butter, softened (for frosting)
- 4 cups powdered sugar
- 2 tbsp heavy cream or milk
- 1 tsp vanilla extract (for frosting)
- Mini chocolate candies or chocolate chips for decoration
- Edible black gel or food coloring for decoration
Instructions
- Preheat your oven to 350°F (175°C).
- Mix together the flour, baking powder, and sugar in a mixing bowl.
- Cream the softened butter and sugar until light and fluffy, about 3-4 minutes.
- Beat in the eggs one at a time, mixing well after each addition and adding the vanilla extract.
- Alternate adding the flour mixture and milk to the butter mixture, starting and ending with flour.
- Scoop the batter into muffin tins lined with cupcake liners, filling each about two-thirds full.
- Bake for 18-20 minutes, or until a toothpick comes out clean.
- Cool the cupcakes in the pan for 5 minutes, then transfer them to a wire rack.
- Make the buttercream by beating the softened butter, then gradually adding powdered sugar, heavy cream, and vanilla.
- Frost each cupcake generously with the buttercream.
- Decorate with mini chocolate candies or chocolate chips for eyes.
- Add finishing touches using black gel or food coloring for detailed skull decorations.
Notes
These cupcakes can be made gluten-free or vegan by substituting specific ingredients as mentioned. Prepare frosting ahead of time and store it in the refrigerator.
- Prep Time: 20 minutes
- Cook Time: 20 minutes
- Category: Dessert
- Method: Baking
- Cuisine: American
Nutrition
- Serving Size: 1 cupcake
- Calories: 220
- Sugar: 25g
- Sodium: 200mg
- Fat: 10g
- Saturated Fat: 5g
- Unsaturated Fat: 5g
- Trans Fat: 0g
- Carbohydrates: 28g
- Fiber: 1g
- Protein: 2g
- Cholesterol: 30mg
Keywords: Halloween, cupcakes, spooky, dessert, skull, baking
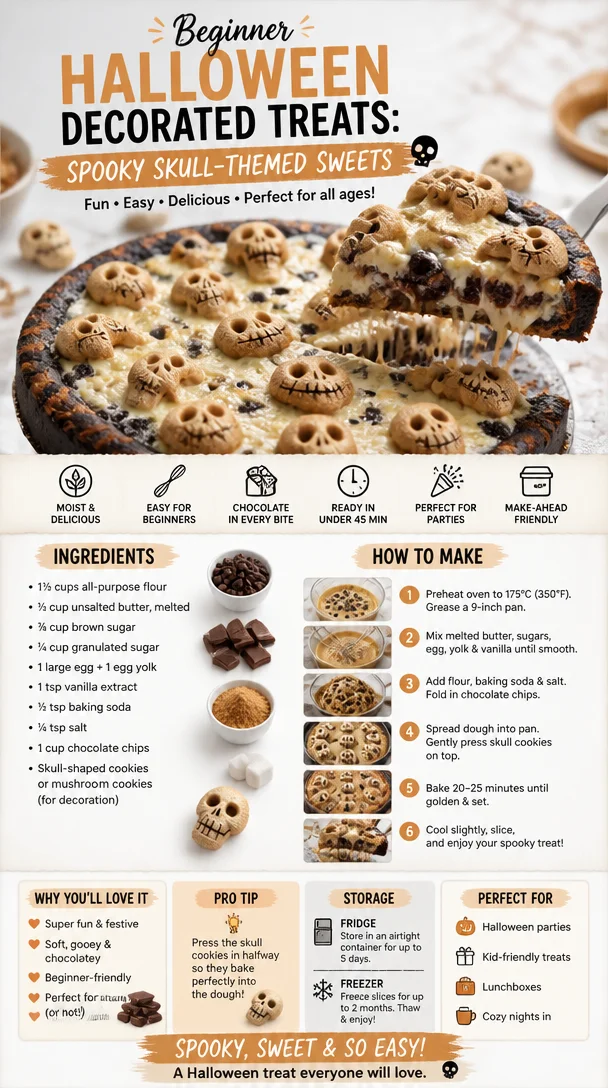
Beginner Halloween Decorated Treats: Spooky Skull-Themed Sweets
Halloween Delights: Skullhead Biscuits for a Spook-tacular Celebration
Welcome to my cozy kitchen, dear friends! As the air turns crisp and the leaves begin to tumble down, I can’t help but feel a sense of excitement for one of the most whimsical times of the year—Halloween! 🎃👻 When I think of this spook-tacular celebration, my heart fills with nostalgia and joy. Halloween isn’t just about scary costumes; it’s also about delicious treats that bring friends and family together. Today, I’m thrilled to share a recipe that not only tastes fantastic but also adds a fun twist to any Halloween gathering: Skullhead Biscuits!
These delightful treats are not just your standard cookies; they are charmingly decorated biscuits shaped like skulls that are perfect for parties, trick-or-treaters, or just indulging your sweet tooth. The blend of buttery biscuits with a hint of sweetness is like a warm hug on a chilly October evening. As you conjure these cute little skulls in your own kitchen, the delightful aroma of freshly baked biscuits will transform your home into a hauntingly beautiful bakery!
In this post, I’ll guide you through each step of making these Skullhead Biscuits, share delightful stories from my kitchen, and sprinkle in tips and tricks that might come in handy. Whether you’re baking with little ones or surprising your friends with a unique treat, these biscuits are sure to be a hit! So grab your apron, and let’s get this Halloween baking party started!
A Halloween Memory Worth Sharing 🍂
Before I delve into the nitty-gritty of the recipe, I want to share a little story that always warms my heart. Growing up, Halloween at my house was a big deal. My siblings and I often spent weeks planning our costumes while secretly plotting the best ways to trick our friends for extra candy! But what I cherished most was the post-trick-or-treat feast my mom prepared—a spread of delightful spooky treats!
One October evening, my mom decided to bake skull-shaped cookies, but they were unlike any I’ve seen before. She gave each skull a unique expression, from goofy grins to spooky frowns. We gathered around the table, giggling and decorating them with colorful icing and sprinkles. As we savored the warm biscuits fresh from the oven, it was not just about their taste but about the love poured into each bite.
This memory inspires me to recreate those joyous feelings—combining creativity, laughter, and deliciousness into my baking. So grab your loved ones, and let’s create memories together while whipping up these delightful Skullhead Biscuits!
Ingredients
Here’s what you’ll need to bring these spooky delights to life:
-
2 ½ cups all-purpose flour
The base of our biscuits! If you’re looking for a gluten-free option, you can substitute this with a 1:1 gluten-free flour blend. -
1 cup unsalted butter, softened
This is essential for that rich, buttery flavor. Make sure it’s at room temperature for best results—nobody wants cold butter in their dough! -
½ cup granulated sugar
Adds sweetness! You could replace half of this with brown sugar for a more caramel-like flavor. -
1 large egg
Acts as a binder. If you’re vegan, you can use a flax egg (1 tablespoon flaxseed meal mixed with 2.5 tablespoons water). -
1 tsp vanilla extract
Brings a warm aroma. Feel free to use almond extract for a unique twist! -
2 tsp baking powder
Helps our skulls rise just enough. Don’t substitute with baking soda; they work differently! -
½ tsp salt
A tiny pinch to balance the sweetness. -
Food coloring
Optional, but fun! Add to your icing for colorful decorations. -
Candy eyes or edible decorations
For that spooky flair! Get creative with other toppings like edible glitter or sprinkles.
This combination of ingredients will yield delightful biscuits that are easy to customize and decorate according to your Halloween whimsy!
Step-by-Step Instructions
Ready to bake? Here’s a step-by-step guide to whipping up those Skullhead Biscuits!
-
Preheat your oven to 350°F (175°C). This step is crucial! You want the oven hot and ready to give those biscuits a perfect bake.
-
In a large mixing bowl, whisk together the flour, baking powder, and salt. This will ensure even distribution of the leavening agent.
-
In another bowl, cream together the softened butter and sugar until it’s light and fluffy—about 3-5 minutes. This aeration is vital for that melt-in-your-mouth texture!
-
Add the egg and vanilla extract into the butter mixture, and beat until well combined. If you’re using a stand mixer, use the paddle attachment; it makes everything easier!
-
Gradually add the dry mixture to the wet ingredients. Mix on low until just combined; overmixing can lead to tough biscuits, and we don’t want that!
-
Chill the dough in the refrigerator for at least 30 minutes. This will make it easier to roll out and help the biscuits to retain their shape during baking.
-
Lightly flour your working surface. Roll out the chilled dough to about ¼-inch thick. Use a skull-shaped cookie cutter to cut out your biscuits.
-
Place the cutouts on a parchment-lined baking sheet. Don’t forget to leave some space between them!
-
Bake in the preheated oven for 10-12 minutes or until the edges are lightly golden. The center should still seem a bit soft, as they’ll continue to firm up outside the oven.
-
Cool the biscuits on the baking sheet for 5 minutes before transferring them to a wire rack to cool completely. Patience is key; warm biscuits are easier to decorate but can be fragile!
-
Decorate with icing and edible decorations once they’re completely cool. Turn on your spooktacular creativity here; go wild with colors and expressions!
Serving Suggestions
When it comes to serving your Skullhead Biscuits, presentation is key! Arrange them on a spooky-themed platter—perhaps with faux spider web decorations or surrounded by mini pumpkins. A sprinkle of powdered sugar can create a “ghostly” touch, or you can serve them alongside a warm cup of cider or hot cocoa to make it extra cozy. Don’t forget to take pictures; these biscuits are as much about fun as they are about taste!
Recipe Variations
Get creative with these skulls! Here are a few ideas to twist this recipe:
-
Chocolate Skullheads: Substitute 1/2 cup of flour with unsweetened cocoa powder for a chocolate version. Yum!
-
Spicy Skullheads: Add a pinch of cinnamon or ginger to the dough for a cozy autumn flavor.
-
Nutty Twist: Mix in some finely chopped nuts or use almond flour for a nutty flavor profile.
-
Gluten-Free Adventure: Use almond flour or a gluten-free baking blend for gluten-free biscuits.
-
Vegan Twist: Swap the egg for a flax egg and use coconut oil for a dairy-free version!
Chef’s Notes
As you embark on this baking adventure, don’t forget that every recipe has a life of its own! Over the years, my Skullhead Biscuit recipe has evolved from simple butter and sugar cookies to these fun, festive treats. I started decorating them with whatever I had at hand—sprinkles, chocolate chips, you name it. One year, I experimented with spooky ghost designs using whipped cream—trust me, it didn’t last long! Cooking should always be playful and adaptable.
My kitchen often reflects the joys of seasonal changes, and each Halloween reminds me to embrace the magic of creativity. So, don’t be afraid to let your imagination run wild, keeping your taste buds in mind!
FAQs and Troubleshooting
1. Why did my biscuits spread too much?
This could be due to the butter being too warm or not enough chilling time. Make sure your dough is chilled well before cutting out shapes.
2. My biscuits turned out tough! What went wrong?
Overmixing the dough is usually the culprit. Mix until just combined, and handle the dough as little as possible.
3. How can I make my icing vibrant for decorating?
Use gel food coloring instead of liquid for more concentrated color without altering the icing’s consistency.
4. Can I freeze the dough?
Absolutely! You can freeze the dough for up to three months. Wrap tightly in plastic wrap and thaw overnight in the fridge before rolling out.
Nutritional Info (if applicable)
Each Skullhead Biscuit contains approximately 150 calories, 7g of fat, 20g of carbohydrates, and 2g of protein. This may vary based on decorations and variations you choose!
Baking these Skullhead Biscuits is a fun-filled journey that not only satisfies your sweet tooth but also creates memories to cherish. So gather your loved ones, decorate to your heart’s delight, and most importantly—enjoy every moment in the kitchen! Happy Halloween, my fellow foodies! 🎃🖤
Print
Skullhead Biscuits
- Total Time: 45 minutes
- Yield: 24 servings 1x
- Diet: Vegetarian
Description
Delightful biscuits shaped like skulls, perfect for Halloween parties and trick-or-treaters.
Ingredients
- 2 ½ cups all-purpose flour
- 1 cup unsalted butter, softened
- ½ cup granulated sugar
- 1 large egg
- 1 tsp vanilla extract
- 2 tsp baking powder
- ½ tsp salt
- Food coloring (optional)
- Candy eyes or edible decorations
Instructions
- Preheat your oven to 350°F (175°C).
- Whisk together the flour, baking powder, and salt in a large mixing bowl.
- Cream together the softened butter and sugar until light and fluffy—about 3-5 minutes.
- Add the egg and vanilla extract into the butter mixture, and beat until well combined.
- Gradually add the dry mixture to the wet ingredients; mix on low until just combined.
- Chill the dough in the refrigerator for at least 30 minutes.
- Roll out the chilled dough to about ¼-inch thick and cut out biscuits using a skull-shaped cookie cutter.
- Place the cutouts on a parchment-lined baking sheet, leaving space between them.
- Bake for 10-12 minutes or until edges are lightly golden.
- Cool the biscuits on the baking sheet for 5 minutes before transferring them to a wire rack.
- Decorate with icing and edible decorations once completely cool.
Notes
You can customize biscuits with various icings and decorations for a unique Halloween touch.
- Prep Time: 15 minutes
- Cook Time: 12 minutes
- Category: Dessert
- Method: Baking
- Cuisine: American
Nutrition
- Serving Size: 1 biscuit
- Calories: 150
- Sugar: 6g
- Sodium: 100mg
- Fat: 7g
- Saturated Fat: 4g
- Unsaturated Fat: 2g
- Trans Fat: 0g
- Carbohydrates: 20g
- Fiber: 0g
- Protein: 2g
- Cholesterol: 30mg
Keywords: Halloween, biscuits, cookies, spooky treats, baking
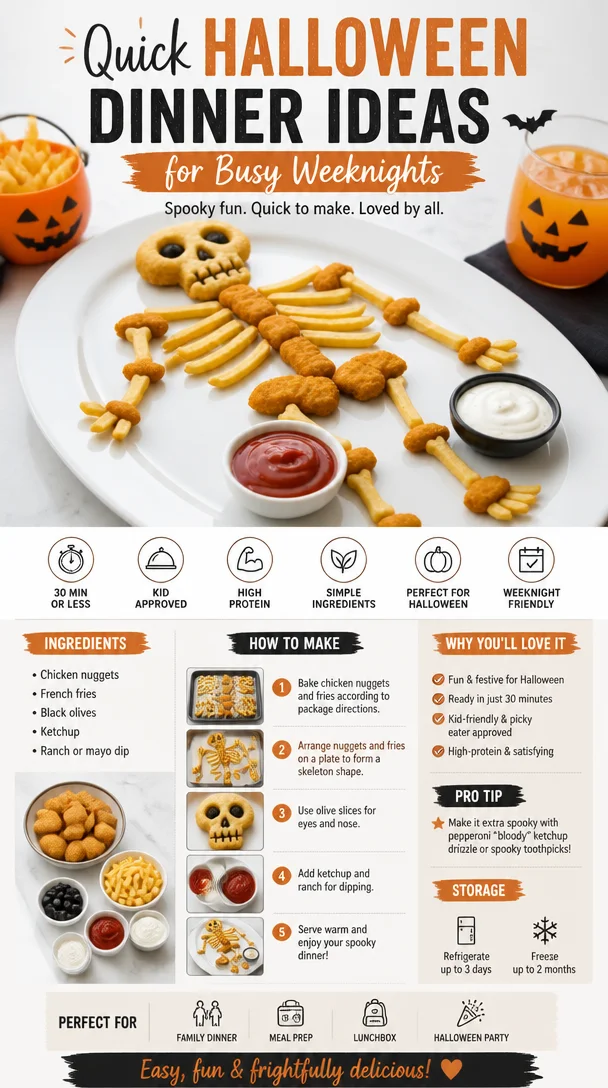
Quick Halloween Dinner Ideas for Busy Weeknights
100 Halloween Themed Dinner Ideas to Spook Up Your Feast
There’s something wonderfully enchanting about Halloween. As the air turns crisp and the days grow shorter, there’s a certain magic that makes us want to celebrate with friends, family, and, of course, a table full of delicious food. Picture a night filled with laughter, spooky decorations, and the rich aroma of delights bubbling away in the kitchen. I’m Olivia Bennett, your friendly kitchen companion, and today we’re diving into a treasure trove of Halloween-themed dinner ideas. Whether you’re planning a casual get-together, a cozy family dinner, or a full-blown Halloween party, these recipes will add a touch of whimsy and a dash of fright to your table!
Halloween is not just about the candy and costumes; it’s a wonderful opportunity to get creative in the kitchen. Each recipe is designed to be approachable, whether you’re a seasoned home cook or just starting to experiment with flavors. Here, you’ll find dishes that delight the eyes and the palate, encourage conversation, and spark joy among your loved ones. So, grab your favorite apron and let’s whip up something magical!
A Pot Full of Memories
Growing up, Halloween was a big deal in our household. My siblings and I would spend weeks planning our costumes, but the highlight of the night was always the dinner my mom made to kick off our trick-or-treating adventures. One year, she crafted the infamous "witch’s stew" — a bubbling pot of vegetable soup with a twist! She added deep green kale for "witch’s hair," spiced it with cauldron seasoning (also known as her secret blend of herbs), and served it in black bowls with some spooky eyeballs (aka meatballs) floating on top. It was such a hit that we still reminisce about it during our Halloween gatherings.
I think that’s what’s so special about food; it has a way of crafting memories. This year, let’s create some magical moments together in your kitchen. Ready to explore a hauntingly delicious realm? Let’s get started!
Ingredients
Here’s a collection of spellbinding ingredients that’ll help you concoct your Halloween feast. Some of these will make the dishes sing, while others can be swapped for delightful alternatives:
-
Pumpkin: The star of Halloween! Use fresh pumpkin or canned pumpkin puree for soups, pies, or even pastas. Tip: For a healthier twist, try butternut squash as a substitute.
-
Black Beans: Perfect for a spooky salad or chili, these little gems are packed with protein and are a great base for a scare-fest feast. Substitution: Chickpeas can add a similar hearty texture, but with a different flavor.
-
Spaghetti: An excellent choice for creating "wormy" dishes. Use whole wheat or gluten-free pasta to cater to different dietary needs. Chef Insight: Add a splash of olive oil to keep the strands from sticking together.
-
Cheddar Cheese: Grate it for a delicious topping on almost everything, especially when crafting your creepy casseroles! Tip: Try sharp cheddar for a more robust flavor — it pairs well with pumpkin!
-
Eggs: An inspiring ingredient for brunch or savory bites. Perfect for making (you guessed it!) creepy deviled eggs. Substitution: Flax eggs (1 tablespoon ground flaxseed mixed with 3 tablespoons water) work great for vegan recipes!
-
Avocado: Bring some richness to your dish, whether it’s a salad or a spooky spread. Chef Insight: When mashing, add a squeeze of lime to keep it bright and green!
This Halloween, think outside the box and let these ingredients guide your creativity!
Step-by-Step Instructions
-
Start with the Cauldron: Begin by setting out all your ingredients on your countertop. This not only keeps things organized (and fun!) but also inspires your creative juices!
-
Brew Up a Soup: For our signature witch’s stew, begin by sautéing chopped onions and garlic in a large pot over medium heat. This builds a flavorful base. Tip: If you want a little extra spice, include some chopped jalapeños or chili powder!
-
Add Your Greens: Once your onions are translucent, toss in the kale or other greens and allow them to wilt slightly. This is part of the "witches’ hair" effect!
-
Pumpkin Time: Pour in your chopped pumpkin or pumpkin puree. Don’t forget to add vegetable broth for depth. Let the mixture simmer together for about 20 minutes to let all the flavors mingle. Chef Hack: Use an immersion blender to puree the soup for a creamy texture without transferring to a blender.
-
Spooky Touches: Time to make your “eyeballs"! Roll small meatballs (using ground meat or a meat alternative) and drop them into the pot during the last 10 minutes of cooking. They’ll float to the top, looking eerily delightful.
-
Season to Taste: Don’t shy away from seasonings! Add salt, pepper, and any additional herbs that you like. A hint of nutmeg goes surprisingly well with pumpkin!
-
Serve with Style: Ladle your witch’s stew into dark-colored bowls. Top each serving with a dollop of sour cream (spooky eyeball sauce) and garnish with fresh herbs like thyme or parsley. Serve with a slice of crusty bread to soak up all those delicious flavors.
Serving Suggestions
For a visually stunning presentation, set the cauldrons (or bowls) on a spider web tablecloth, adding some miniature pumpkins and ghoulish decor around the table. Serve your stew with crusty “witches’ brooms”—think breadsticks (aka broomsticks) served alongside your bubbling pot. The perfect combination of eerie and enticing!
Recipe Variations
-
Vegetarian Twist: Swap the meatballs for quinoa or lentil “eyeballs” made with cooked lentils, spices, and breadcrumbs. This keeps it heart-healthy and oh-so-delicious!
-
Spicy Delight: Add a kick by tossing in some diced jalapeños when you sauté the onions. For garnish, use spicy roasted pumpkin seeds!
-
Creamy Version: Want an extra decadent touch? Stir in some heavy cream or coconut milk during the last few minutes of cooking for a velvety texture.
-
Add Some Grains: For an added depth of flavor and texture, throw in some cooked quinoa or rice right before serving for a more filling meal.
-
Halloween Themed Casserole: Layer the stew with a cheesy topping and bake it for a hearty casserole dish that will have everyone reaching for seconds.
Chef’s Notes
This witch’s stew has been a family recipe in various forms for years. Each Halloween, my siblings and I have fun competing to see who can make the spookiest version! Over the years, I’ve added different twist-spices and seasonal vegetables to keep things interesting. It never fails; everyone leaves the table with a smile and a full belly!
FAQs and Troubleshooting
-
What if my soup is too thick?
If your soup turns out thicker than you’d like, simply add a bit more broth or water to reach your desired consistency. Stir well and let it blend for a few moments more. -
How can I make this dish ahead of time?
Great question! You can prepare this soup a day in advance. Just rewarm it gently on the stove before serving. -
My kale is tough; what can I do?
If your kale is a bit tough, simply give it a longer sauté time or even massage it with a bit of olive oil before adding it to the soup to soften. -
What do I serve with this stew?
While it pairs excellently with crusty bread, consider serving with a light green salad or a side of cornbread for a comforting meal.
Nutritional Info
(Provide upon request, or check with additional nutrition calculators for specifics based on ingredient adjustments.)
There you have it, my fellow foodies! With these Halloween-themed dinner ideas, you’re all set to whip up a delightful feast that’s not only fun but also full of heart. Remember, cooking should be enjoyable, so embrace the messy apron, let your creativity flow, and savor every bite of your Halloween magic! Happy cooking!
Print
Witch’s Stew
- Total Time: 45 minutes
- Yield: 4 servings 1x
- Diet: Vegetarian
Description
A bubbling pot of vegetable soup with kale and spooky meatballs, perfect for Halloween celebrations.
Ingredients
- 2 cups fresh pumpkin or 1 can pumpkin puree
- 1 can black beans or chickpeas
- 1 pound spaghetti or whole wheat/gluten-free pasta
- 1 cup cheddar cheese, grated
- 4 eggs or flax eggs for vegan option
- 1 avocado
- 2 cups kale or other greens
- 1 medium onion, chopped
- 2 cloves garlic, minced
- 4 cups vegetable broth
- 1 tablespoon olive oil
- Salt and pepper to taste
- 1 teaspoon nutmeg
- Optional: jalapeños or chili powder for heat
Instructions
- Start with the cauldron: Set out all your ingredients on your countertop.
- Brew up a soup: Sauté chopped onions and garlic in a pot over medium heat.
- Add your greens: Toss in kale and allow to wilt slightly.
- Pour in the pumpkin along with the vegetable broth, then simmer for about 20 minutes.
- Roll small meatballs and add them in the last 10 minutes of cooking.
- Season to taste with salt, pepper, and any additional herbs.
- Serve with style: Ladle into bowls and garnish with sour cream and fresh herbs.
Notes
For a vegetarian twist, use lentil ‘eyeballs’ instead of meatballs. Add cream for a richer, creamy version.
- Prep Time: 15 minutes
- Cook Time: 30 minutes
- Category: Main Course
- Method: Cooking
- Cuisine: American
Nutrition
- Serving Size: 1 serving
- Calories: 350
- Sugar: 5g
- Sodium: 400mg
- Fat: 12g
- Saturated Fat: 4g
- Unsaturated Fat: 6g
- Trans Fat: 0g
- Carbohydrates: 45g
- Fiber: 10g
- Protein: 15g
- Cholesterol: 30mg
Keywords: Halloween, soup, vegetarian, witches stew, spooky recipes, Halloween dinner




