
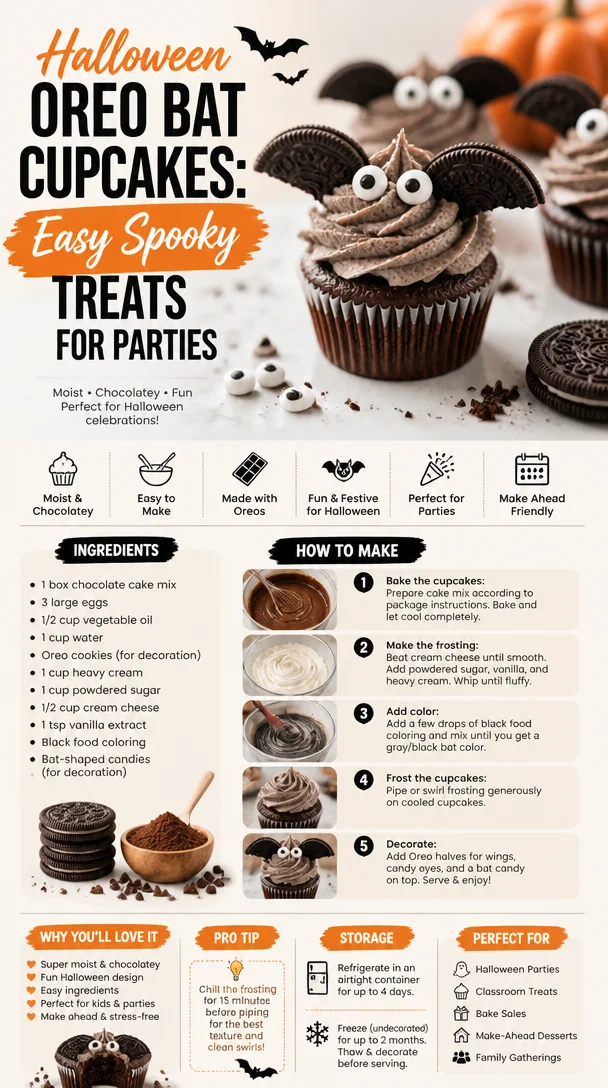
Halloween Oreo Bat Cupcakes: Easy Spooky Treats for Parties
Whip Up Some Magic with Festive Halloween Bats Oreo Cupcakes!
Welcome to my cozy kitchen, my fellow food enthusiasts! 🎃 I’m thrilled you’re here because today, we’re diving into a delightful Halloween treat: Festive Halloween Bats Oreo Cupcakes! Just the thought of these chocolatey wonders topped with cute little bat decorations gets me giddy with excitement. If you love the haunting spirit of Halloween as much as I do, you’re in for a wickedly good time.
Picture this: the sun sets behind the trees, shadows start dancing, and the air is filled with the smell of something sweet baking in the oven. There’s something truly magical about bringing the season’s spooky vibe into our kitchens, especially when it involves gathering friends and family for a frightfully fun feast! These cupcakes are not only delicious but also a whimsical way to celebrate the season, spark conversation, and create sweet memories.
As you treat yourself to these festive delights, let me share a bit of my own Halloween nostalgia. I remember vividly the thrill of choosing the perfect pumpkin each year at the local patch, scooping out its insides, and decorating it to share with friends. And how about those epic Halloween parties filled with themed treats, bubbling cauldrons of punch, and spooky sounds of laughter echoing through the night? Oh, the joy of creating together! Now, I too wanted to craft something memorable — and what better way than with chocolate cupcakes that have a hint of mischief in their design?
So whether you’re gearing up for a Halloween party, a cozy night in, or simply want to delight your loved ones with a touch of sweetness, gather your baking gear, and let’s get ready for some spook-tacular baking! These Oreo Cupcakes are a guaranteed hit, and trust me, they’ll brighten anyone’s day — even if it’s a bit haunted.
A Sweet Memory to Savor
The inspiration for these cupcakes came from my childhood, where Halloween felt like an enchanting fairytale. My family always made sure that we carved pumpkins and baked festive treats together. One year, I remember making some basic chocolate cupcakes for a school Halloween party, but they were missing that wow factor. Fast forward to the following year when I stumbled upon the magical ingredient: Oreos! I snuck a few into the batter and topped each cupcake with a dollop of frosting, an Oreo, and some spooky decorations. I remember the smile on my classmates’ faces as they devoured these treats. It was in that moment I realized how a simple cookie could elevate something so basic into pure joy. Today’s Festive Halloween Bats Oreo Cupcakes are a celebration of that memory and the magic of food that brings us together, just like those childhood celebrations.
Ingredients
Here’s what you’ll need to whip up these enchanting cupcakes:
-
1 box of chocolate cake mix (plus ingredients listed on the box)
- Use your favorite brand — opting for a rich chocolate flavor will bring out the best in these cupcakes.
-
1/2 cup vegetable oil
- This keeps the cupcakes moist and fluffy. You can substitute with melted coconut oil or melted unsalted butter for flavor!
-
3 large eggs
- These bring rich texture. For a vegan option, use flax eggs (1 tbsp flaxseed meal mixed with 2.5 tbsp water per egg).
-
1 cup water or milk
- Milk adds richness, but water will keep them lighter. Try almond milk or oat milk for a dairy-free version!
-
1 package of Oreo cookies
- These are the secret ingredient! Stuff them in the batter and on the top. Swap for gluten-free Oreos if needed.
-
1-2 cups of vanilla frosting (store-bought or homemade)
- The sky’s the limit! A homemade buttercream or cream cheese frosting works wonders, but store-bought saves time.
-
Black food coloring (optional)
- For that dark, spooky vibe! You can also use chocolate frosting for a more natural look.
-
Bat cupcake toppers or decorations
- You can get creative here! Use pre-made bat-shaped cookies, fondant, or even cut-out silhouettes from black paper.
Step-by-Step Instructions
Ready to bring these cupcakes to life? Here’s how you whip up these delicious treats:
-
Preheat Your Oven
- Preheat your oven to 350°F (175°C). This is super important for getting that perfect rise, so don’t skip this step!
-
Prepare Your Cupcake Liners
- Line your muffin tin with Halloween-themed cupcake liners. Whether they’re orange or adorned with spooky designs, they’ll set the tone.
-
Mix the Cake Batter
- In a large mixing bowl, combine the chocolate cake mix, vegetable oil, eggs, and water or milk using a hand mixer until smooth.
- Chef Hack: Don’t overmix! A few lumps are okay; it keeps the cupcakes light and airy.
-
Add in the Oreos
- Gently fold in roughly crushed Oreos — you want to see those delightful pieces!
- Tip: Reserve a few whole Oreos for decorating the tops if you wish.
-
Fill the Liners
- Pour the batter into the lined cupcake tins, filling each cup about 2/3 full.
- Chefs’ Tip: Use a cookie scoop for even distribution and clean hands.
-
Bake
- Pop those beauties into your preheated oven and bake for 18-20 minutes, or until a toothpick comes out clean.
- Pop Quiz: Did you remember to set a timer? No one wants to forget during a haunted baking session!
-
Cool Completely
- Once baked, let the cupcakes cool in the pan for about 5 minutes before transferring them to a wire rack. Allow them to cool completely before frosting.
-
Frosting Time
- If you want to make spooky black frosting, use the black food coloring to tint your frosting. Frost each cupcake generously — let your inner artist shine here!
-
Decorating Like a Pro
- Top each frosted cupcake with a whole Oreo and add bat decorations on top. Feel free to get creative here! Bonus points for using edible glitter or spooky sprinkles!
-
Serve and Enjoy
- Parcels of joy on a plate! Serve them at your Halloween soirée, and watch everyone smile.
Serving Suggestions
Plating these adorable cupcakes is half the fun! Arrange them on a spooky cake stand, sprinkle with edible glitter, or place them in a haunted-themed box. Pair these treats with a glass of chilled pumpkin spice milk or whipped cream to really wow your guests. Enjoy the delightful chaos of Halloween with each bite!
Recipe Variations
Want to mix things up? Here are a few creative twists on these cupcakes:
-
Chocolate Ganache Topping: Create an ooey-gooey experience by drizzling chocolate ganache over your frosting.
-
Pumpkin Spice Cupcakes: Substitute the chocolate cake mix for pumpkin spice cake mix to give a seasonal flair.
-
Batch of Mini Cupcakes: Use a mini muffin tin and adjust baking time for adorable bite-sized treats.
-
Dairy-Free Delight: Use coconut oil, almond milk, and dairy-free Oreos for a delicious dairy-free version.
-
Vegan-friendly Options: Swap heavy egg-based ingredients for flax eggs and enjoy creamy vegan frosting for a guilt-free treat!
Chef’s Notes
Creating these cupcakes takes me back to those days of whimsy and wonder, and I find that each batch is a new adventure. Sometimes I mix up the frosting flavors or even experiment with different cookie bases for a twist! A funny memory for me was once frosting cupcakes while wearing a bat costume. Let’s just say the messy flour-covered apron didn’t quite match the outfit!
These cupcakes have also evolved over the years — originally a simple affair, they became a Halloween staple in my kitchen. The addition of Oreos took them from ordinary to extraordinary!
FAQs and Troubleshooting
-
Why are my cupcakes flat?
- Make sure to check that your baking powder is fresh. Also, avoid overmixing the batter; this can create dense cupcakes.
-
Can I use homemade frosting?
- Absolutely! I often whip up a quick buttercream frosting. Feel free to experiment with flavors like cream cheese or chocolate if you’re feeling adventurous.
-
What if I don’t have black food coloring?
- Don’t worry! You can use dark cocoa powder in your frosting to achieve a darker shade, or simply use traditional white frosting, garnishing with black sprinkles.
-
How do I store leftovers?
- Keep leftover cupcakes in an airtight container at room temperature for up to 3 days. For prolonged freshness, store them in the fridge for about 5-6 days.
Nutritional Info (optional)
While the magical taste is what we care about most, here’s a rough estimate of the nutritional information per cupcake:
- Calories: 290
- Protein: 3g
- Fat: 12g
- Carbohydrates: 44g
- Sugars: 20g
There you have it, my food-loving friends! I hope you’re as excited about the Festive Halloween Bats Oreo Cupcakes as I am. With just a bit of love and creativity, you can make these spook-tastic treats that will have everyone raving. Happy baking, and may your Halloween be filled with laughter, joy, and lots of delectable goodies! 🎉👻🍰
Print
Festive Halloween Bats Oreo Cupcakes
- Total Time: 35 minutes
- Yield: 12 servings 1x
- Diet: Vegetarian
Description
Delight your friends and family with these chocolatey Oreo cupcakes topped with spooky decorations, perfect for Halloween festivities.
Ingredients
- 1 box chocolate cake mix (plus ingredients listed on the box)
- 1/2 cup vegetable oil
- 3 large eggs
- 1 cup water or milk
- 1 package Oreo cookies
- 1–2 cups vanilla frosting (store-bought or homemade)
- Black food coloring (optional)
- Bat cupcake toppers or decorations
Instructions
- Preheat your oven to 350°F (175°C).
- Prepare your muffin tin with Halloween-themed cupcake liners.
- Mix the chocolate cake mix, vegetable oil, eggs, and water or milk until smooth.
- Add in roughly crushed Oreos and fold gently.
- Fill the lined cupcake tins about 2/3 full with the batter.
- Bake for 18-20 minutes or until a toothpick comes out clean.
- Cool for 5 minutes in the pan before transferring to a wire rack.
- Frost each cooled cupcake with your desired frosting.
- Decorate with a whole Oreo and bat decorations on top.
- Serve and enjoy!
Notes
These cupcakes can be made dairy-free and vegan by using appropriate substitutes. Get creative with your decorations for an extra spooky touch!
- Prep Time: 15 minutes
- Cook Time: 20 minutes
- Category: Dessert
- Method: Baking
- Cuisine: American
Nutrition
- Serving Size: 1 cupcake
- Calories: 290
- Sugar: 20g
- Sodium: 200mg
- Fat: 12g
- Saturated Fat: 2g
- Unsaturated Fat: 10g
- Trans Fat: 0g
- Carbohydrates: 44g
- Fiber: 1g
- Protein: 3g
- Cholesterol: 30mg
Keywords: Halloween, cupcakes, Oreo, dessert, festive, chocolate
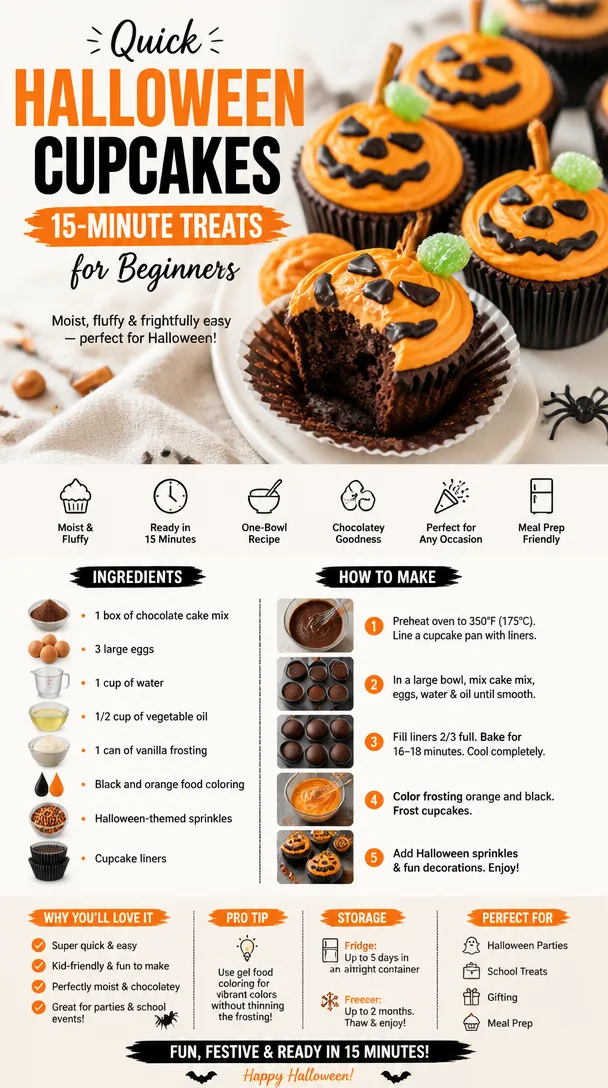
Quick Halloween Cupcakes: 15-Minute Treats for Beginners
Easy Halloween Cupcakes: Spooktacularly Delicious Treats!
Welcome to my cozy kitchen, friends! Halloween is just around the corner, and you know what that means—it’s time to whip up some ghoulish goodies that will delight trick-or-treaters and party guests alike. These easy Halloween cupcakes are not only adorable, but they also pack a punch of flavor that will leave everyone asking for seconds (or thirds!).
Imagine a group of friends gathered around a table, laughter filling the air, as you unveil your batch of these spooktacular cupcakes. The aroma of freshly baked treats wafts through the room, and the anticipation builds as everyone eyes the spooky decorations. Whether you’re an experienced baker or just getting started, this recipe is designed to make you feel confident and excited as you create something fun and festive.
In today’s post, I’ll be guiding you through every step of the process, sharing not just the recipe but also some personal stories and tips to make your Halloween baking a blast! So, grab your apron, preheat that oven, and let’s get started!
A Sweet Blast From the Past
When I think of Halloween, I can’t help but reminisce about my childhood. Growing up, our neighborhood transformed into a whimsical wonderland filled with pumpkins, spooky decorations, and the promise of sweet treats at every door. But one of my fondest memories is from the time I decided to bake my very first batch of Halloween cupcakes for my school’s Halloween party.
Armed with a bright orange apron and a head full of ideas, I eagerly gathered my ingredients. However, my ambitious plans faced a tiny challenge—my kitchen turned into a flour-dusted battleground! With the oven timer ticking away, I hurriedly mixed the batter, trying to avoid the mess while also managing to keep my little brother from "helping" too much (he had a knack for creating chaos).
The cupcakes turned out delightfully; they were frosted with swirls of orange and black icing and topped with candy corn. The pride I felt when my classmates devoured them was immeasurable. It sparked a love for baking in me, especially during the holiday season. Now, I’m thrilled to pass on that love to you with this easy Halloween cupcake recipe!
Ingredients
Here’s what you’ll need for these festive cupcakes:
-
1 ½ cups all-purpose flour
- The foundation of your cupcakes! You can substitute with whole wheat flour for a nutty flavor or gluten-free flour for a gluten-friendly option.
-
1 cup granulated sugar
- This is what gives your cupcakes that sweet, irresistible taste! Brown sugar can be used for a deeper caramel flavor.
-
½ cup unsweetened cocoa powder
- For those who love a rich, chocolatey flavor! If chocolate isn’t your thing, you can omit it and add an extra ½ cup of flour for vanilla cupcakes.
-
2 tsp baking powder
- This helps your cupcakes rise and become fluffy! Be sure to check the expiration date; old baking powder can lead to flat cupcakes.
-
½ tsp baking soda
- Another leavening agent that adds to the fluffiness. If you’re out, you can use an extra teaspoon of baking powder.
-
½ tsp salt
- A pinch of salt intensifies all the other flavors! Sea salt or pink Himalayan salt works wonderfully too for a different hint of flavor.
-
2 large eggs
- The binding agents! If you’re looking for an egg-free option, you can use ½ banana or 1/4 cup of unsweetened applesauce for each egg.
-
½ cup milk
- For moistness and richness. Any milk alternative (like almond or oat milk) will also work here.
-
1/3 cup vegetable oil
- This keeps your cupcakes moist. You can swap this for melted coconut oil for a twist.
-
1 tsp vanilla extract
- The secret ingredient for deepening the flavor! You can also try almond extract for a different flavor profile.
-
Colored frosting (orange, purple, and green)
- Get creative with colors! You can make your own buttercream or grab pre-made frosting for convenience.
-
Halloween-themed sprinkles and candy decorations
- These add that festive touch! Gummy worms, candy corn, or chocolate spiders all work great.
Step-by-Step Instructions
Now, let’s get cooking! Follow these steps to create your spooktacular Halloween cupcakes:
-
Preheat the Oven
Preheat your oven to 350°F (175°C). This is crucial—starting with a hot oven ensures that your cupcakes rise beautifully! -
Prepare Your Cupcake Liners
Line a muffin tin with cute Halloween-themed cupcake liners. This is where the fun begins—pick ones with ghosts, pumpkins, or spooky designs! -
Mix Dry Ingredients
In a large mixing bowl, whisk together the flour, sugar, cocoa powder, baking powder, baking soda, and salt until well combined. This helps to aerate the flour, ensuring a lighter texture. -
Combine Wet Ingredients
In another bowl, whisk together the eggs, milk, oil, and vanilla extract until smooth. You can even use a hand mixer for extra fluff! -
Blend the Mixtures
Pour the wet ingredients into the dry ingredients and mix until just combined. Avoid over-mixing; a few lumps are perfectly fine! Over-mixing can lead to tough cupcakes. -
Fill the Liners
Using a spoon or ice cream scoop, fill each cupcake liner about two-thirds full. This allows room for the cupcakes to rise without overflowing. -
Bake the Cupcakes
Carefully place the muffin tin in the preheated oven and bake for about 18-20 minutes. To check if they’re done, insert a toothpick into the center—if it comes out clean or with a few crumbs, they’re ready! -
Cool Down Time
Once done, remove them from the oven and allow them to cool in the tin for about 5 minutes. Then, transfer them to a wire rack to cool completely. Don’t rush this step; frosting warm cupcakes usually leads to melty messes! -
Frost Away
Once your cupcakes are completely cool, it’s time to unleash your creativity! Use a piping bag to frost your cupcakes with swirling colors. Try a mix of orange, purple, and green for that spooky aesthetic. -
Decorate
Finish off with a sprinkle of your favorite Halloween-themed toppings! The more colorful and fun, the better!
Serving Suggestions
Arrange your Halloween cupcakes on a festive platter, and for an extra spooky touch, consider adding decorative elements like spooky candles or mini pumpkins. You can also place them in whimsical cupcake holders to create a fun centerpiece for your Halloween party. Set out a variety of toppings on the side so everyone can customize their cupcake—who wouldn’t love that?
Recipe Variations
Feeling adventurous? Here are some creative twists to try for your Halloween cupcakes:
- Pumpkin Spice Cupcakes: Swap out the cocoa powder for 1 cup of pumpkin puree and add 1 tsp of pumpkin spice. Perfect for a cozy fall flavor!
- Ghostly Coconut: Top with coconut-flavored frosting and edible googly eyes to create adorable ghost cupcakes.
- Spiced Apple Cupcakes: Add finely chopped apples and cinnamon for a delightful twist on the traditional flavor.
- Vegan Version: Substitute eggs with flaxseed meal (1 tbsp ground flaxseed + 3 tbsp water = 1 egg) and use almond milk and coconut oil to create delicious vegan-friendly treats.
- Chocolate Peanut Butter: Fill the centers with peanut butter and top with chocolate frosting for a rich surprise bite!
Chef’s Notes
Baking is a journey, and every recipe carries personal touches. Over the years, I’ve experimented with countless variations of these Halloween cupcakes. At one point, I even hosted a “decorate your cupcake” night with friends, and the creativity that flowed was astounding! Some made spooky faces while others went for elegant autumn designs.
It’s incredible how something as simple as a cupcake can spark joy, laughter, and connection with friends and family. Plus, don’t be surprised if you find yourself enjoying the leftover frosting straight from the bowl—hey, it happens to the best of us!
FAQs and Troubleshooting
What should I do if my cupcakes sink in the middle?
This can happen for a couple of reasons, such as over-mixing the batter or not baking them long enough. Make sure to mix just until combined and check for doneness using the toothpick method.
How can I ensure my cupcakes are moist?
Using vegetable oil instead of butter can lead to a moister cupcake. Additionally, don’t overbake them—keeping an eye on the time will make a big difference.
Can I make these cupcakes ahead of time?
Absolutely! You can bake and cool them a day in advance. Just store them in an airtight container and frost them the day of your celebration for best results.
What if I don’t have cupcake liners?
You can bake directly in a greased muffin tin; just be sure to really grease them well to avoid sticking.
Nutritional Info (if applicable)
One cupcake (without frosting) typically contains around 200 calories, 8g fat, and 30g carbohydrates. Adjust the calculations based on the frosting and additional toppings you use!
So there you have it! You’re now ready to create your very own batch of easy Halloween cupcakes that not only taste delicious but also look spooktacular. I can’t wait to hear about your baking adventures and all the creative decorations you come up with. Happy Halloween baking—let’s make some magical memories in the kitchen! 🎃🧁
Print
Easy Halloween Cupcakes
- Total Time: 35 minutes
- Yield: 12 servings 1x
- Diet: Vegetarian
Description
Spooktacularly delicious Halloween cupcakes that are easy to make and perfect for festive gatherings.
Ingredients
- 1 ½ cups all-purpose flour
- 1 cup granulated sugar
- ½ cup unsweetened cocoa powder
- 2 tsp baking powder
- ½ tsp baking soda
- ½ tsp salt
- 2 large eggs
- ½ cup milk
- 1/3 cup vegetable oil
- 1 tsp vanilla extract
- Colored frosting (orange, purple, and green)
- Halloween-themed sprinkles and candy decorations
Instructions
- Preheat your oven to 350°F (175°C).
- Line a muffin tin with Halloween-themed cupcake liners.
- Whisk together dry ingredients: flour, sugar, cocoa powder, baking powder, baking soda, and salt.
- Whisk together wet ingredients: eggs, milk, oil, and vanilla extract until smooth.
- Pour the wet ingredients into the dry ingredients and mix until just combined.
- Fill each cupcake liner about two-thirds full.
- Bake for about 18-20 minutes, or until a toothpick comes out clean.
- Allow cooling in the tin for 5 minutes, then transfer to a wire rack to cool completely.
- Frost the cooled cupcakes with creative colored frosting.
- Decorate with Halloween-themed sprinkles and candy.
Notes
Feel free to explore variations such as pumpkin spice or vegan options for a different flavor experience.
- Prep Time: 15 minutes
- Cook Time: 20 minutes
- Category: Dessert
- Method: Baking
- Cuisine: American
Nutrition
- Serving Size: 1 cupcake
- Calories: 200
- Sugar: 15g
- Sodium: 150mg
- Fat: 8g
- Saturated Fat: 1g
- Unsaturated Fat: 7g
- Trans Fat: 0g
- Carbohydrates: 30g
- Fiber: 1g
- Protein: 3g
- Cholesterol: 40mg
Keywords: Halloween, cupcakes, baking, desserts, festive treats
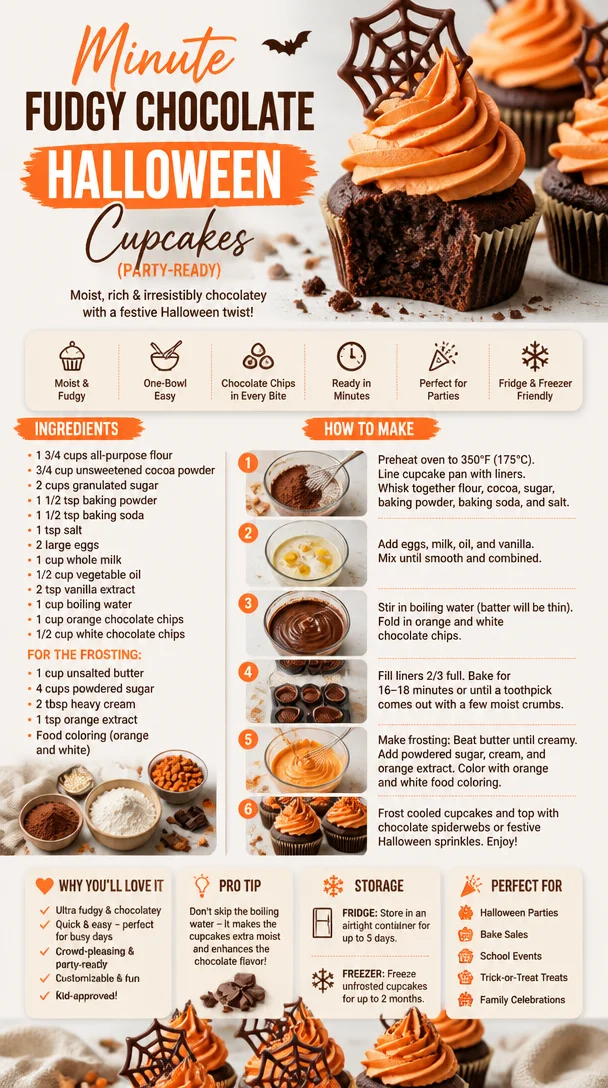
Minute Fudgy Chocolate Halloween Cupcakes (Party-Ready)
The Spooktacular Delight of Chocolate Halloween Cupcakes
Welcome back to my cozy kitchen! As the leaves turn that beautiful shade of amber and the air gets a hint of chill, I can’t help but get excited about one of my favorite holidays—Halloween! It’s a delightful time when we can embrace all things spooky, playful, and, of course, delicious. And what better way to celebrate than with a batch of rich, chocolate Halloween cupcakes? These little treats aren’t just tasty; they’re a canvas for creativity, allowing you to unleash your inner artist and celebrate the season in style.
Picture this: You smell the warm, comforting aroma of chocolate wafting through your home, pulling you into the kitchen like a friendly ghost. You grab your mixing bowl, toss in your ingredients, and dance to your favorite Halloween playlist while whisking it all together. Whether you’re whipping these up for a spooky soirée, a school bake sale, or just to indulge in some festive fun, these cupcakes are perfect for spreading joy and chills alike.
These cupcakes are wonderfully moist and decadent, offering a sumptuous chocolate flavor that’s totally irresistible. Topped with fluffy, orange-tinged frosting and adorned with eerie sprinkles, they not only taste heavenly but also look hauntingly adorable! So, let’s dive into this spooky culinary adventure together and make some memories—because nothing brings people together like a homemade treat (especially one filled with chocolate goodness!). Grab your apron, tie it on, and let’s get baking!
A Sweet Memory from My Childhood
As a young girl, Halloween was always a magical time in our household. I remember eagerly anticipating the moment when my mom would bring out her collection of spooky-themed recipes. The front of our kitchen would transform into a miniature bakery, and I’d often steal bites of cookie dough, doused in semi-sweet chocolate chips, as I helped her prepare for our neighborhood Halloween party.
One year, we decided to host a ‘witches and wizards’ theme, complete with flying broomsticks and floating ghosts hanging from the ceiling. My mom made her famous chocolate cupcakes and turned them into mummies with white frosting and chocolate chip eyes. It was a huge hit, and the joy on the kids’ faces as they devoured the treats is a memory I cherish to this day. That experience sparked my love for baking and the idea that food can ignite joy and connection. Now, every time I make chocolate cupcakes, I’m taken back to those thrilling Halloween nights, excited laughter, and treats that brought us all together.
Ingredients
To create these scrumptious chocolate Halloween cupcakes, you’re going to need the following ingredients:
-
1 cup all-purpose flour
A staple in most desserts! This gives the cupcakes their structure. You can substitute with gluten-free flour if needed. -
1 cup granulated sugar
This lends sweetness and helps the cupcakes rise beautifully. Feel free to use coconut sugar for a less refined option. -
1/2 cup unsweetened cocoa powder
The star of the show! Use the highest quality you can find for rich, chocolatey goodness. Dutch-processed cocoa gives a deeper flavor if you like. -
1 teaspoon baking powder
This helps your cupcakes rise and become fluffy. Ensure it’s fresh for the best results. -
1/2 teaspoon baking soda
Works in conjunction with the baking powder for a perfectly aerated cupcake. -
1/4 teaspoon salt
A pinch of salt enhances the sweetness and balances the chocolate flavor. -
2 large eggs
Eggs add moisture and richness. For a vegan version, try flaxseed eggs (1 tbsp ground flaxseed + 2.5 tbsp water = 1 egg). -
1/2 cup vegetable oil
Keeps the cupcakes moist and flavorful. Substitute with melted coconut oil or applesauce for a lighter version. -
1 teaspoon vanilla extract
Adds a delightful aroma and depth of flavor. Use pure vanilla for the best quality. -
1/2 cup milk
This helps to brighten the chocolate flavor. You can use almond milk or oat milk as a dairy-free alternative. -
1/4 cup boiling water
This may seem odd, but it intensifies the cocoa flavor and creates a moist texture. -
Orange food coloring (optional)
To give your frosting that festive Halloween hue! -
Sprinkles or decorations
Get creative with spooky sprinkles, edible eyes, or gummy worms to top your cupcakes and bring them to life (or death!).
Step-by-Step Instructions
Alright, let’s roll up those sleeves and get mixing! Follow these steps for baking your delectable Halloween cupcakes:
-
Preheat the Oven
First things first—preheat your oven to 350°F (175°C). This ensures your cupcakes bake evenly and rise perfectly. -
Line the Cupcake Tin
Prepare a 12-cup muffin tin by lining it with festive cupcake liners. I often go for orange and black to get into the Halloween spirit! -
Mix the Dry Ingredients
In a large mixing bowl, whisk together the flour, sugar, cocoa powder, baking powder, baking soda, and salt. This blending of dry ingredients ensures an even distribution of those flavors. -
Combine the Wet Ingredients
In a separate bowl, combine the eggs, vegetable oil, milk, and vanilla extract. Whisk them until nice and smooth. This is where you can add a drop or two of orange food coloring for a vibrant splash. -
Create the Batter
Gradually pour the wet mixture into the dry mixture and whisk until well combined. Careful not to overmix! A few lumps are okay—you want those cupcakes to be tender, not tough. -
Boiling Water Magic
Stir in the boiling water slowly. This may make your batter seem more runny, but trust me, it’s going to yield some moist, delectable cupcakes. -
Fill the Liners
Use a spoon or an ice cream scoop to fill each liner about two-thirds full. This helps to give them room to rise without overflowing. -
Bake Away!
Pop your cupcake tin into the preheated oven and bake for 18-20 minutes, or until a toothpick inserted in the center comes out clean. The smell will be incredible—prepare for the “ooohs” and “aaahs” from anyone within sniffing distance! -
Cool Down
Once baked, let the cupcakes cool in the tin for about 5 minutes before transferring them to a wire rack to cool completely. They need to be cool for frosting—otherwise, it’ll melt! -
Frost and Decorate
Now comes the fun part! Use a piping bag to swirl your favorite cupcake frosting on top (I suggest a classic buttercream dyed orange) and finish with spooky decorations. Get creative!
Serving Suggestions
When it comes to serving these delightful treats, presentation is key! Place your frosted Halloween cupcakes on a fun, themed platter—think spiderweb designs or pumpkin motifs. Add some additional decorations to your serving area, perhaps miniature pumpkins or spooky props, to really set the atmosphere. If you’re handing them out as treats, consider placing each cupcake in its own little clear cellophane bag, tied with a cute Halloween ribbon.
Recipe Variations
-
Pumpkin Chocolate Swirl: Add a layer of pumpkin purée to your batter for a delicious swirl and a touch of fall spice.
-
Minty Monster Cupcakes: Swap out the vanilla for peppermint extract in the frosting for a refreshing twist!
-
Spider Web Frosting: Use a piping bag to drizzle white frosting over the orange icing to create a spooky spider web design.
-
Nutty Crunch: Fold in some chopped walnuts or pecans into the batter for a crunchy texture throughout.
-
Gluten-Free Delight: Simply swap the all-purpose flour for a gluten-free blend, and you’re all set for those with gluten sensitivities!
Chef’s Notes
Making these chocolate Halloween cupcakes always feels like an adventure! They’ve evolved from a simple recipe I first learned to a canvas for creativity and seasonal delight. I’ve tried them with various toppings, from edible glitter to more advanced fondant decorations, and each iteration brings back those warm memories of baking in the kitchen with my mom. One of the funniest moments involved our family cat sneaking onto the counter and pawing at the frosting—yes, that didn’t end well! Remember to guard your creations from eager paws or curious hands!
FAQs and Troubleshooting
1. My cupcakes didn’t rise! What went wrong?
This could be due to using expired baking powder or baking soda. Always check the expiration dates—fresh leavening agents are essential for fluffy cupcakes!
2. Why are my cupcakes dry?
Overmixing the batter or baking them for too long can lead to dryness. Be gentle when mixing, and keep an eye on the timer!
3. How can I store leftovers?
Store any uneaten cupcakes in an airtight container at room temperature for up to 3 days. If you want to preserve them longer, freeze them without frosting and thaw when you’re ready to serve.
4. Can I make these ahead of time?
Absolutely! You can bake the cupcakes a day in advance. Just frost them the day of your event to keep the frosting fresh and fluffy.
With this easy-to-follow recipe, you’re ready to bake the most delightful chocolate Halloween cupcakes that will make everyone’s taste buds dance. So gather your ingredients, channel your inner culinary spirit, and let’s create something truly spooktacular together! Happy baking and enjoy every bite!
Print
Chocolate Halloween Cupcakes
- Total Time: 40 minutes
- Yield: 12 servings 1x
- Diet: Vegetarian
Description
Delightful and moist chocolate cupcakes topped with fluffy orange frosting, perfect for Halloween celebrations.
Ingredients
- 1 cup all-purpose flour
- 1 cup granulated sugar
- 1/2 cup unsweetened cocoa powder
- 1 teaspoon baking powder
- 1/2 teaspoon baking soda
- 1/4 teaspoon salt
- 2 large eggs
- 1/2 cup vegetable oil
- 1 teaspoon vanilla extract
- 1/2 cup milk
- 1/4 cup boiling water
- Orange food coloring (optional)
- Sprinkles or decorations
Instructions
- Preheat the oven to 350°F (175°C).
- Line a 12-cup muffin tin with festive cupcake liners.
- Mix the flour, sugar, cocoa powder, baking powder, baking soda, and salt in a large mixing bowl.
- Combine the eggs, vegetable oil, milk, and vanilla extract in a separate bowl.
- Create the batter by gradually pouring the wet mixture into the dry mixture and whisk until well combined.
- Stir in the boiling water slowly.
- Fill each liner about two-thirds full with batter.
- Bake for 18-20 minutes, or until a toothpick inserted in the center comes out clean.
- Cool in the tin for about 5 minutes before transferring to a wire rack to cool completely.
- Frost with your favorite cupcake frosting and decorate as desired.
Notes
Enjoy decorating your cupcakes with spooky sprinkles or themed decorations to enhance the Halloween spirit.
- Prep Time: 20 minutes
- Cook Time: 20 minutes
- Category: Dessert
- Method: Baking
- Cuisine: American
Nutrition
- Serving Size: 1 cupcake
- Calories: 280
- Sugar: 22g
- Sodium: 220mg
- Fat: 10g
- Saturated Fat: 1g
- Unsaturated Fat: 8g
- Trans Fat: 0g
- Carbohydrates: 42g
- Fiber: 2g
- Protein: 3g
- Cholesterol: 40mg
Keywords: Halloween, chocolate cupcakes, festive baking, dessert recipes, spooky decorations
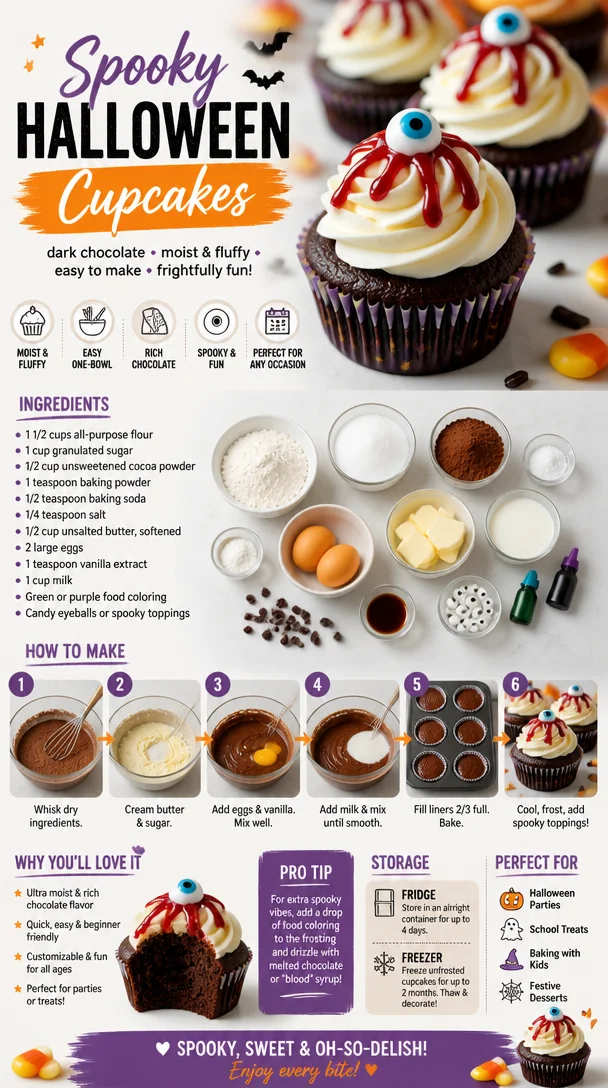
Spooky Halloween Cupcakes
Spooky Halloween Cupcakes: A Sweet & Frightful Treat
Welcome to my kitchen, dear friends! It’s that time of year again when the leaves turn crisp, the days get shorter, and the magic of Halloween fills the air. There’s something so exciting about this season, don’t you think? The decorations, the costumes, and of course, the treats! One of my absolute favorite ways to celebrate is by whipping up a batch of spooky Halloween cupcakes. Not only are they delicious, but they also bring out the inner child in all of us!
Cupcakes are the perfect canvas for creativity, and Halloween gives us a chance to get a little wild with our frosting and toppings. Whether you’re hosting a Halloween party, looking to surprise the kids after school, or simply indulging your own sweet tooth, these cupcakes are sure to be a hit!
Imagine walking into your kitchen, the aroma of baking batter wafting through the air. You pull out a tray of freshly baked cupcakes and transform them into little monsters, ghosts, or pumpkins. It’s not just about the final result; it’s about the joy of cooking, the laughter you share with others, and the memories created along the way.
So, grab your favorite apron (mine’s slightly haunted but still cozy!), and let’s embark on this delightful baking adventure together!
A Sweet Memory
Growing up, Halloween was an event my family did not take lightly. My mom had this tradition where we would bake spooky treats together every Halloween weekend. I can still picture the kitchen bustling with excitement as we whipped up batches of ooey-gooey caramel popcorn, monster cookies, and of course, the cupcakes.
One year, we decided to go all out with decorations. I remember the moment my mom unveiled a stash of edible googly eyes and neon food colorings. Our kitchen transformed into a creepy confectionary lab, complete with music from “Thriller” playing in the background. With icing tubes in hand, we turned cupcakes into mummies, witches, and the occasional adorable pumpkin. The best part? We’d invite my friends over for a cupcake decorating contest. The laughter that filled our home was worth more than any ghoulish prize.
So, every time I make Halloween cupcakes, it takes me back to those cozy moments spent with my mom. Now, I love passing on that tradition, encouraging others to create their own spooky masterpieces in the kitchen!
Ingredients
Here’s what you’ll need for these spooktacular cupcakes:
-
1 ½ cups all-purpose flour
- This is your staple ingredient. For a gluten-free version, you can swap in a gluten-free all-purpose flour blend.
-
1 cup granulated sugar
- It sweetens the batter beautifully. If you want a lower-calorie option, consider using coconut sugar or a sugar substitute, though the texture may vary slightly.
-
1 ½ teaspoons baking powder
- This helps your cupcakes rise and gives them that fluffy texture. Make sure it’s fresh for the best results!
-
½ teaspoon baking soda
- A little bit goes a long way in making your cupcakes light and airy.
-
½ teaspoon salt
- Balances out the sweetness. Don’t skip it; a pinch of salt can elevate flavors wonderfully!
-
½ cup unsalted butter, softened
- Butter adds richness. You can use vegetable oil for a dairy-free version; just remember it might yield a denser cupcake.
-
2 large eggs
- Eggs help bind everything together and add moisture. For a vegan version, you can use flax eggs or applesauce, but the texture may change a bit.
-
1 teaspoon vanilla extract
- Pure vanilla extract adds a lovely aroma and flavor. Avoid imitation vanilla for the best taste!
-
½ cup milk (or non-dairy milk)
- This keeps your batter moist. Almond milk or oat milk works beautifully if you’re avoiding dairy.
-
Black and orange food coloring
- For that spooky vibe! You can use natural alternatives, like beet juice for orange, but the colors may be more muted.
-
Edible decorations (like googly eyes, sprinkles, and fondant)
- Get creative! These are essential for ghostly facades and all kinds of creepy creatures.
Step-by-Step Instructions
Now that we have our ingredients ready, let’s get to baking! This part is so much fun, and I’ll guide you through each step.
-
Preheat your oven to 350°F (175°C).
- This helps ensure your cupcakes rise evenly. I always forget this step in my excitement—don’t be like me!
-
Line your muffin tin with cupcake liners.
- Choose festive designs to amp up the Halloween spirit! If you can’t find any, plain colors work too.
-
In a large mixing bowl, combine the flour, baking powder, baking soda, and salt.
- Whisk these ingredients together until they’re well-blended. This step ensures your leavening agents are evenly distributed.
-
In another bowl, beat the softened butter and sugar together until light and fluffy.
- Use an electric mixer for the best results, or a whisk and some elbow grease will do the job! This process incorporates air, making your cupcakes fluffy.
-
Add in the eggs, one at a time, mixing well after each addition.
- Scrape down the sides of the bowl to get all the buttery goodness mixed in!
-
Stir in the vanilla extract.
- Pure joy in liquid form!
-
Alternate adding the dry ingredients and the milk to the butter mixture.
- Start with dry, then wet, and mix until just combined. Don’t over-mix; this helps keep your cupcakes tender!
-
Now comes the fun part—divide the batter.
- Split it into two bowls. Add a few drops of black food coloring to one bowl and orange to the other. Swirl them together or layer them in the cupcake liners for a cute marbled effect!
-
Scoop the batter into the cupcake liners, filling each about 2/3 full.
- A cookie scoop is perfect for this job!
-
Bake for 18-20 minutes, or until a toothpick inserted in the center comes out clean.
- Try not to open the oven door too often; this can cause them to sink!
-
Once baked, remove from the oven and let cool in the pan for 5 minutes.
- Then transfer to a wire rack to cool completely. Waiting is the hardest part, but it’s crucial for frosting!
-
Get your frosting ready!
- You can use store-bought or make your own buttercream. To decorate, use piping bags and get creative with spooky shapes!
Serving Suggestions
These cupcakes are delightful on any Halloween-themed platter. Add a sprinkle of edible glitter for an enchanting glow, or create a “graveyard” display by using crushed chocolate cookies as “dirt” and adding gummy worms for extra fright! You could even use a cupcake stand to display them beautifully at a party.
Serve them up with a rich hot chocolate or a spooky punch for a complete Halloween treat. Your guests will love the combination—and the atmosphere you create!
Recipe Variations
Looking for ways to switch things up? Here are a few ideas:
-
Shockingly Good S’mores Cupcakes: Add graham cracker crumbs to the batter and top with toasted marshmallows and chocolate ganache for a gooey surprise!
-
Vampire Blood Velvet: Swap out food coloring for cocoa powder in the batter for a spooky chocolate twist, and use raspberry jam to create a “bloody” filling.
-
Pumpkin Spice Delight: Replace some of the flour with canned pumpkin puree and add pumpkin spice for a fall flavor infusion.
-
Witch’s Brew: Make a mint chocolate version with a hint of peppermint extract in the frosting, resembling a green witch’s potion!
Chef’s Notes
Every time I bake these cupcakes, I am reminded of the joy Halloween brings—both in the kitchen and out in the world. Over the years, this recipe has morphed and grown. I used to stick strictly to vanilla but have since learned the beauty of mixing flavors and textures.
One particularly memorable Halloween, I accidentally added too much food coloring, and instead of a festive orange, my cupcakes turned a neon shade of pumpkin. Surprisingly, everyone loved them and declared them “witch’s brew!” Now, it’s a staple in my Halloween celebrations. Remember, even mishaps can lead to the sweetest memories in the kitchen!
FAQs and Troubleshooting
Q: What should I do if my cupcakes dome too much?
A: This usually happens if the oven temperature is too high or the batter is over-mixed. Make sure to preheat your oven properly and mix just until combined to avoid excessive air in the batter.
Q: Can I make the batter ahead of time?
A: Absolutely! You can prepare the batter and store it in the fridge for up to a day. Just remember to bring it to room temperature before baking.
Q: How can I store leftover cupcakes?
A: Keep them in an airtight container at room temperature for up to three days. For longer storage, freeze them without frosting for up to three months. Just thaw and decorate when you’re ready to enjoy!
Q: Is icing necessary?
A: While it’s a lovely addition, if you’re looking for a lighter option, you can enjoy them plain or dusted with powdered sugar instead. No one’s judging if you choose simplicity!
Nutritional Info
While I don’t typically focus on nutrition, it’s good to be informed! Each spooky cupcake (without frosting) contains approximately 180 calories, with about 7 grams of fat and 25 grams of carbohydrates. Remember, it’s all about balance, and indulging on a festive occasion is part of the fun!
So, now that you’re armed with this spooky Halloween cupcake recipe and all my best secrets, it’s time to get into that kitchen! Let the sweet scents fill your home and enjoy the laughter that comes with creating something special. Can’t wait to hear about your spooky creations! Happy baking, my culinary friends!
Print
Spooky Halloween Cupcakes
- Total Time: 35 minutes
- Yield: 12 servings 1x
- Diet: Vegetarian
Description
Delicious and creative Halloween cupcakes perfect for parties or family gatherings.
Ingredients
- 1 ½ cups all-purpose flour
- 1 cup granulated sugar
- 1 ½ teaspoons baking powder
- ½ teaspoon baking soda
- ½ teaspoon salt
- ½ cup unsalted butter, softened
- 2 large eggs
- 1 teaspoon vanilla extract
- ½ cup milk (or non-dairy milk)
- Black and orange food coloring
- Edible decorations (like googly eyes, sprinkles, and fondant)
Instructions
- Preheat your oven to 350°F (175°C).
- Line your muffin tin with cupcake liners.
- In a large mixing bowl, combine the flour, baking powder, baking soda, and salt.
- In another bowl, beat the softened butter and sugar together until light and fluffy.
- Add in the eggs, one at a time, mixing well after each addition.
- Stir in the vanilla extract.
- Alternate adding the dry ingredients and the milk to the butter mixture.
- Divide the batter into two bowls and add food coloring.
- Scoop the batter into the cupcake liners, filling each about 2/3 full.
- Bake for 18-20 minutes, or until a toothpick comes out clean.
- Remove from the oven and let cool for 5 minutes before transferring to a wire rack.
- Get your frosting ready for decorating!
Notes
Consider using different festive decorations to make your cupcakes extra spooky!
- Prep Time: 15 minutes
- Cook Time: 20 minutes
- Category: Dessert
- Method: Baking
- Cuisine: American
Nutrition
- Serving Size: 1 cupcake
- Calories: 180
- Sugar: 15g
- Sodium: 200mg
- Fat: 7g
- Saturated Fat: 4g
- Unsaturated Fat: 3g
- Trans Fat: 0g
- Carbohydrates: 25g
- Fiber: 1g
- Protein: 2g
- Cholesterol: 30mg
Keywords: Halloween cupcakes, spooky treats, party dessert
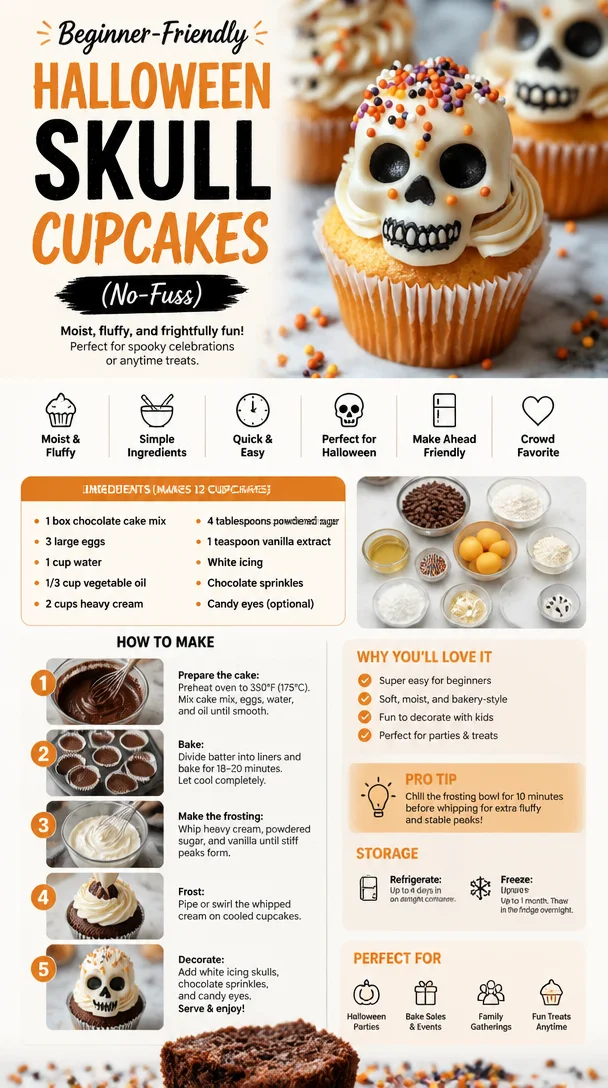
Beginner-Friendly Halloween Skull Cupcakes (No-Fuss)
Spooky Halloween Skull Cupcake Recipe: A Hauntingly Delicious Treat!
Welcome to my kitchen! I’m so excited to share a delightful recipe that’s perfect for Halloween — Spooky Halloween Skull Cupcakes! As the leaves turn crisp and the nights grow longer, there’s something magical about this season. The air is filled with the scent of pumpkin spice, and children (and adults, let’s be honest!) eagerly anticipate the joys of trick-or-treating. There’s nothing like gathering around the table with friends and family, sharing terrifying tales and indulging in deliciously spooky treats.
But let me tell you, these Skull Cupcakes aren’t just any Halloween dessert. They’re a fun and interactive way to celebrate the season while satisfying your sweet tooth. Picture this: soft, moist vanilla cupcakes topped with rich buttercream frosting, all cleverly decorated to resemble skulls. These little creatures will not only add a festive touch to your Halloween gathering, but they also make for an excellent weekend baking project.
Whether you’re planning a Halloween party, a family gathering, or just wanting to treat yourself to something extraordinary, these cupcakes are sure to be a hit. So grab your apron, and let’s dive into a spine-tingling culinary adventure together!
A Personal Story: The Halloween Tradition
Growing up, Halloween was a magical time in my household. I fondly remember my mom whipping up all sorts of spooky treats, but one year in particular stands out the most. It was the year I got to help her bake for the neighborhood Halloween party. We had our mix of ghoulish desserts, but it was her "Skull Cupcakes" that stole the show.
I remember the thrill of mixing the batter, sneaking bites of frosting, and adorning the cupcakes with glowing candy eyes. As we placed them on a tray alongside creepy cobweb cupcakes and ghostly cookies, I felt an overwhelming sense of joy — we were creating a mini-festival of treats! Everyone raved about those cupcakes. Kids laughed, parents chatted, and as the sun set, I felt warmth spread through me, a memory created not just through the food, but through the joy of sharing, laughter, and creativity.
As I grew older, I took those lessons and those flavors with me, and now, I can’t think of Halloween without these cupcakes. They remind me not just of deliciousness but of love, connection, and the passion of creating something special with my hands. And now, it’s my turn to pass this tradition on. Let’s make some spooky skull cupcakes that’ll become part of your own Halloween memories!
Ingredients: What You’ll Need
Here’s what you’ll need to whip up these hauntingly festive cupcakes. Each ingredient plays a crucial role, so let’s detail everything out:
-
For the Vanilla Cupcakes:
- 1 ½ cups all-purpose flour
- The foundation of your cupcakes! For a gluten-free alternative, you can swap this for an equal amount of gluten-free baking blend.
- 1 cup granulated sugar
- Sweetness is key! If you’d like a healthier option, feel free to use coconut sugar for a lower glycemic index.
- ½ cup unsalted butter, softened
- The moisture and flavor powerhouse! Margarine can be substituted for a dairy-free version.
- 2 large eggs
- Provides structure and tenderness. If you’re vegan, you can use flax eggs (1 tablespoon flaxseed meal + 2.5 tablespoons water equals one egg).
- ½ cup whole milk
- Makes the cupcakes stay moist! Almond or soy milk will work well if you’re avoiding dairy.
- 2 tsp baking powder
- This adds the fluffiness we all love! If you’re out, baking soda can also do the trick — just don’t forget the acid!
- 1 tsp vanilla extract
- The secret ingredient for that enchanting aroma! Consider using almond extract for a unique twist.
- 1 ½ cups all-purpose flour
-
For the Buttercream Frosting:
- 1 cup unsalted butter, softened
- The base of the frosting that gives it that creamy texture. Vegan butter is a great substitute if needed.
- 4 cups powdered sugar
- Sweetness central! For a less sugary option, try using powdered erythritol.
- 2 tbsp heavy cream or milk
- This thins out your frosting to that just-perfect consistency. Coconut cream is an excellent non-dairy substitute.
- 1 tsp vanilla extract
- The familiar flavor that brings everything together.
- 1 cup unsalted butter, softened
-
For Decoration:
- Mini chocolate candies or chocolate chips for eyes
- A fun way to bring your skulls to life (or perhaps to “unlife!”).
- Edible black gel or food coloring
- To give your cupcakes that spooky skull appearance!
- Mini chocolate candies or chocolate chips for eyes
Step-by-Step Instructions: Let’s Bake!
Now that we have all our goodies ready, let’s dive into the baking process. Follow these steps, and you’ll be well on your way to creating your spooky masterpieces!
1. Preheat the Oven
Preheat your oven to 350°F (175°C). Trust me, starting with a properly heated oven is essential for even baking!
2. Mix the Dry Ingredients
In a mixing bowl, whisk together the flour, baking powder, and sugar until combined. This will ensure that your baking powder is evenly distributed throughout the flour.
3. Cream the Butter
In another bowl, cream together the softened butter and sugar until it’s light and fluffy, about 3-4 minutes. This step is vital for creating a light texture in your cupcakes.
4. Beat in Eggs
Add the eggs one at a time, mixing well after each addition. And don’t forget the vanilla extract! Mixing in the eggs gradually ensures that they’re properly incorporated into the butter mixture.
5. Alternate Dry and Wet Ingredients
Now, add the flour mixture and milk to the butter mixture, alternating between the two. Start with a third of the flour mixture, then half the milk, another third of flour, last of the milk, and finish with the flour. This method helps maintain a smooth batter without over-mixing.
6. Scoop the Batter Into Cupcake Liners
Line a muffin tin with cupcake liners and fill each liner about two-thirds full with batter. I love using an ice cream scoop for this step — it’s mess-free and gives you consistently sized cupcakes!
7. Bake
Bake in your preheated oven for 18-20 minutes, or until a toothpick inserted into the center comes out clean. Don’t open the oven door too soon; you want your cupcakes to rise beautifully.
8. Cool Your Cupcakes
Once baked, remove them from the oven and let them cool in the pan for about 5 minutes before transferring them to a wire rack. Don’t rush this step; frosting warm cupcakes is a recipe for disaster!
9. Make the Buttercream Frosting
In a mixing bowl, beat the softened butter until creamy. Gradually add in powdered sugar, ensuring it’s mixed well before adding the next batch. Add the heavy cream and vanilla until you reach a smooth, spreadable consistency.
10. Frost Your Cupcakes
Using a piping bag, or simply a spatula, generously frost each cupcake with the buttercream. You can create different skull shapes with your piping technique — try some as classic skull shapes, and others can be a bit more avant-garde!
11. Decorate with Candy
Finally, use mini chocolate candies or chocolate chips for eyes. Create fun expressions by placing them at different angles!
12. Add the Finishing Touch
Using the black gel or food coloring, pipe small details onto the cupcakes to enhance their skull-like appearance. Get creative!
Serving Suggestions: Plate Like a Pro!
When it comes to serving, presentation is key! For Halloween, you could place these marvelous skull cupcakes on a decorated platter with spooky accents, like mini skeletons or ghostly cobwebs made with cotton candy. If you want to be extra theatrical, arrange them on a cake stand surrounded by “graveyard” decorations — think chocolate cookie crumbs for dirt and candy pumpkins for some added color.
Recipe Variations: Get Creative!
Once you’ve mastered the classic skull cupcakes, why not explore some creative variations? Here are a few ideas to mix things up:
- Red Velvet Skull Cupcakes: Swap the vanilla for red velvet for a festive color twist!
- Chocolate Cupcakes: Use a chocolate cupcake base instead. Rich and delightful!
- Spooky Flavors: Consider adding a dash of peppermint extract or corn syrup for a chewy, candy-like flavor in your frosting.
- Gluten-Free Version: Use almond flour or a gluten-free blend for an allergen-friendly take.
- Vegan Skull Cupcakes: Replace all dairy and egg ingredients with plant-based alternatives for a vegan delight.
Chef’s Notes: My Kitchen Memories
Every recipe carries a story, and these skull cupcakes are no exception. Over the years, I’ve tweaked the frosting and added my personal touches, but the essence remains the same: celebrating connection and creativity. The first time I put a skull face on a cupcake, I giggled at the fun expressions I could create — it’s such a joy to bring laughter to the table!
One Halloween years ago, I overdid the black gel details, and they turned out looking like startled skulls! But do you know what? Everyone loved them even more because of the goofy expressions, and we all shared a hearty laugh. It’s these moments that truly spark joy in the kitchen.
FAQs and Troubleshooting
1. Why did my cupcakes sink?
This could happen if the batter is over-mixed or if the oven temperature was too low. Stick to the recipe and ensure your oven is preheated properly.
2. Can I make the frosting ahead of time?
Absolutely! You can prepare the frosting up to 3 days in advance. Just keep it in an airtight container in the fridge and let it come to room temperature before frosting your cupcakes.
3. How do I keep my cupcakes from sticking to the liners?
Make sure to coat your cupcake liners with non-stick spray before pouring in the batter. This little trick ensures a smooth release and a clean look!
4. Can I freeze these cupcakes?
Yes, you can! Freeze the baked and cooled cupcakes in an airtight container for up to 2 months. Just frost them once they’re thawed to keep that fresh frosting look and taste.
Nutritional Info (if applicable)
While cupcakes are undeniably a treat, being mindful of portion sizes can help! Each vanilla skull cupcake (without frosting) generally has around 180 calories, 6g of fat, and 28g of carbs, but this can vary based on your frosting and decorations.
So there you have it — a delightful recipe for Spooky Halloween Skull Cupcakes! As you whip up these treats, remember that cooking is all about enjoyment. So embrace your creativity, share your love through food, and most importantly, have fun in the kitchen! Happy Halloween! 🎃👻
Print
Spooky Halloween Skull Cupcakes
- Total Time: 40 minutes
- Yield: 12 servings 1x
- Diet: Vegetarian
Description
A fun and delicious recipe for Halloween-themed cupcakes decorated like skulls, perfect for celebrations and gatherings.
Ingredients
- 1 ½ cups all-purpose flour
- 1 cup granulated sugar
- ½ cup unsalted butter, softened
- 2 large eggs
- ½ cup whole milk
- 2 tsp baking powder
- 1 tsp vanilla extract
- 1 cup unsalted butter, softened (for frosting)
- 4 cups powdered sugar
- 2 tbsp heavy cream or milk
- 1 tsp vanilla extract (for frosting)
- Mini chocolate candies or chocolate chips for decoration
- Edible black gel or food coloring for decoration
Instructions
- Preheat your oven to 350°F (175°C).
- Mix together the flour, baking powder, and sugar in a mixing bowl.
- Cream the softened butter and sugar until light and fluffy, about 3-4 minutes.
- Beat in the eggs one at a time, mixing well after each addition and adding the vanilla extract.
- Alternate adding the flour mixture and milk to the butter mixture, starting and ending with flour.
- Scoop the batter into muffin tins lined with cupcake liners, filling each about two-thirds full.
- Bake for 18-20 minutes, or until a toothpick comes out clean.
- Cool the cupcakes in the pan for 5 minutes, then transfer them to a wire rack.
- Make the buttercream by beating the softened butter, then gradually adding powdered sugar, heavy cream, and vanilla.
- Frost each cupcake generously with the buttercream.
- Decorate with mini chocolate candies or chocolate chips for eyes.
- Add finishing touches using black gel or food coloring for detailed skull decorations.
Notes
These cupcakes can be made gluten-free or vegan by substituting specific ingredients as mentioned. Prepare frosting ahead of time and store it in the refrigerator.
- Prep Time: 20 minutes
- Cook Time: 20 minutes
- Category: Dessert
- Method: Baking
- Cuisine: American
Nutrition
- Serving Size: 1 cupcake
- Calories: 220
- Sugar: 25g
- Sodium: 200mg
- Fat: 10g
- Saturated Fat: 5g
- Unsaturated Fat: 5g
- Trans Fat: 0g
- Carbohydrates: 28g
- Fiber: 1g
- Protein: 2g
- Cholesterol: 30mg
Keywords: Halloween, cupcakes, spooky, dessert, skull, baking
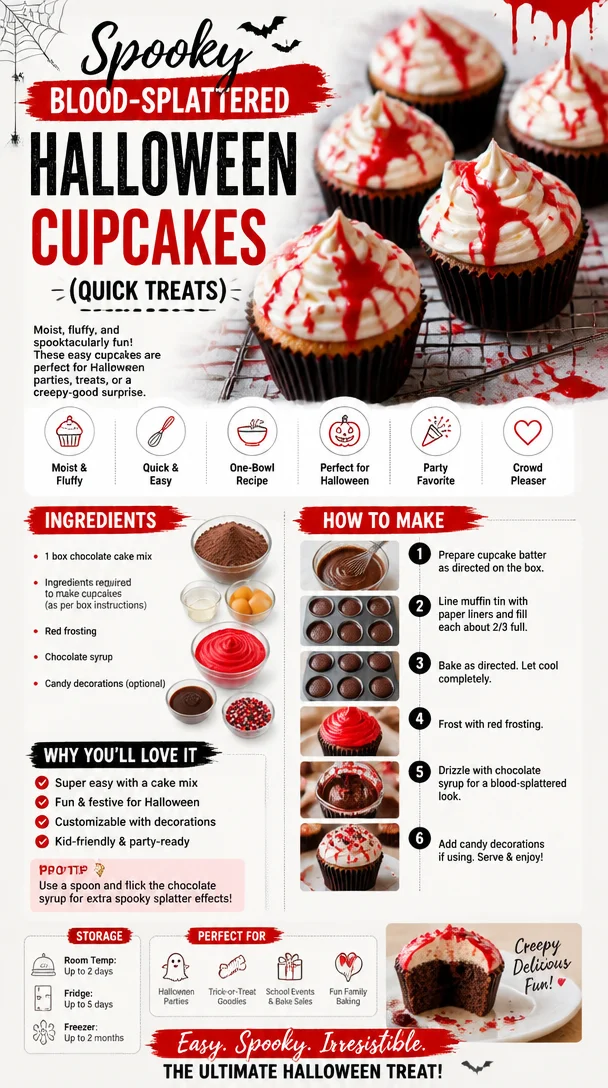
Spooky Blood-Splattered Halloween Cupcakes (Quick Treats)
Spooktacular Delight: Blood Splattered Halloween Cupcakes
Welcome to the spookiest time of the year! Halloween is just around the corner, and if you’re anything like me, you’re buzzing with excitement at the thought of all the treats you can whip up in the kitchen. As the leaves turn crisp and the air fills with anticipation for costume parties and spooky gatherings, there’s nothing quite like homemade treats to set the mood. Today, I’m going to share with you a wickedly delightful recipe that combines my love for all things cozy, festive, and a touch creepy—Blood Splattered Halloween Cupcakes!
Imagine a dessert that’s not only delicious but also adds a haunted vibe to your table. These cupcakes are moist, rich chocolatey wonders, topped with a creamy and fantastically blood-stained frosting. Trust me, they’ll be the star of your Halloween bash, garnering gasps and giggles from friends and family alike. So grab your witches’ hats and let’s dive into this eerie culinary adventure!
But beyond just being fun and festive, these cupcakes hold a special place in my heart. I can’t help but think back to the years when my kids and I would experiment in the kitchen around Halloween. We would cover the kitchen counter in flour and sprinkles while laughing and making creative messes. One specific Halloween, my daughter and I decided to craft “bloody” treats for a party. What started as a simple frosting experiment turned into a full-on kitchen adventure, complete with giggles as we deliberately went for that messily-spattered effect. The laughter and creativity we shared were truly the highlights, and I can’t help but pass that joy along to you!
Ingredients
To create these spine-tingling little treats, you’ll need the following ingredients:
-
All-Purpose Flour (1 ¾ cups)
The backbone of your cupcake. If you’re gluten-free, you can use a 1:1 gluten-free flour blend instead, which works wonderfully! -
Granulated Sugar (1 cup)
Sweetness is key! You can swap this for coconut sugar or use a sugar substitute if you prefer a lower glycemic index. -
Unsweetened Cocoa Powder (¾ cup)
This gives your cupcakes the rich chocolatey depth. If you want a more intense chocolate flavor, use dark cocoa powder. -
Baking Powder (1 ½ teaspoons)
Essential for fluffy cupcakes! Make sure it’s fresh for the best rise. -
Baking Soda (½ teaspoon)
Works in tandem with baking powder to create that perfect texture. -
Salt (½ teaspoon)
A tiny pinch to balance out the sweetness. You can use sea salt for a subtle flavor upgrade. -
Eggs (2 large)
These bind everything together. For a vegan option, substitute with flax eggs (2 tablespoons of ground flaxseed mixed with 6 tablespoons of water). -
Milk (1 cup)
Whole or 2% milk works best, but almond or oat milk can substitute nicely for a dairy-free option. -
Vegetable Oil (½ cup)
Helps keep the cupcakes moist. You can use melted coconut oil for a subtle flavor twist. -
Vanilla Extract (1 teaspoon)
For that warm, comforting aroma! Homemade vanilla extract can elevate the flavor even more. -
Red Food Coloring (for “blood” effect)
Intense red gel food coloring works best to achieve that dripping effect. -
Butter (1 cup, unsalted, room temperature)
The base for your frosting—nothing beats the richness of butter. For vegan cream cheese, use a vegan butter alternative. -
Powdered Sugar (3-4 cups)
Sweetness and texture for your frosting. If you’re looking for a lower-sugar option, try monk fruit sweetener! -
Cream Cheese (8 oz)
For a tangy twist in your frosting. Use a dairy-free cream cheese alternative if needed.
Step-by-Step Instructions
Now that your ingredients are assembled, let’s get into the nitty-gritty of making these eerie delights!
-
Preheat the Oven:
Preheat your oven to 350°F (175°C). Nothing sets the mood better than the sweet smell of cupcakes wafting through the air! -
Prep the Cupcake Liners:
Place cupcake liners in a muffin tin. I always go for spooky designs—think ghosts or pumpkins to add to the Halloween charm! -
Mix Dry Ingredients:
In a large bowl, whisk together the flour, sugar, cocoa powder, baking powder, baking soda, and salt until combined. This step is essential for ensuring even distribution of the dry ingredients. -
Combine Wet Ingredients:
In another bowl, whisk together the eggs, milk, oil, and vanilla extract. Make sure your wet ingredients are well combined; this will help achieve a moist cupcake! -
Bring It All Together:
Pour the wet mixture into the dry ingredients and mix until just combined. Be careful not to overmix. A few lumps are perfectly fine—your cupcakes will be light and fluffy! -
Fill the Liners:
Fill each cupcake liner about two-thirds full with the batter. I like to use an ice cream scoop for this—it’s neat and helps create uniform cupcakes! -
Bake to Perfection:
Bake in the preheated oven for 18-20 minutes or until a toothpick inserted into the center comes out clean. While waiting, clean your mess! You don’t want to be overwhelmed later. -
Cool Down:
Allow your cupcakes to cool in the pan for 5 minutes before transferring them to a wire rack. Let them cool completely before frosting—no one likes melted frosting! -
Prepare the Frosting:
Beat together the softened butter and cream cheese on medium speed until creamy and smooth. Add in the powdered sugar gradually and mix until well incorporated. Feel free to add a splash of vanilla for extra flavor. -
Add the Red Color:
Once your frosting is ready, add a few drops of red food coloring and mix until you achieve your preferred “blood” look. -
Frost the Cupcakes:
Using a piping bag or spatula, generously frost your cooled cupcakes. Don’t be shy; the messier it looks, the better! -
Create the Blood Splatter:
To get that spooky blood splatter effect, dip the tip of a clean paintbrush into red food coloring and flick it over the frosted cupcakes. It’s messy but oh-so-fun! Just be sure to cover your workspace—this is a messy one!
Serving Suggestions
When it comes to serving these spine-chilling cupcakes, make them the centerpiece of your Halloween dessert table! You could even arrange them in a haunted scene with Halloween figurines or spooky foliage for that extra flair. I love to serve them alongside a punch bowl filled with a fizzy, spooky drink to keep with the Halloween vibe.
Recipe Variations
If you’re feeling adventurous or accommodating to various dietary needs, here are a few twist ideas:
-
Vegan Surprise: Use flax eggs and coconut or almond milk with vegan butter for a completely dairy-free experience.
-
Gluten-Free Delight: Replace the all-purpose flour with a gluten-free flour blend, allowing everyone to join in on the fun!
-
Spooky Flavors: Add a sprinkle of cinnamon or pumpkin spice into the batter for a seasonal twist.
-
Chocolate Ganache: Instead of the cream cheese frosting, top with a rich chocolate ganache for a chocolaty overload.
-
Fruit Filling: Add a blood-red jam (like raspberry) filling to the cupcakes before frosting for a delightful surprise!
Chef’s Notes
This recipe has a delightful backstory. It began as a simple chocolate cupcake recipe, but once my kids decided to throw some fun into the mix with Halloween, we got creative—resulting in these memorable “bloody” creations. Each year, we tweak it a bit: sometimes it’s gummy worms, other times it’s edible eyeballs, making it a fun evolving tradition! The laughter and mess we create are what makes cooking so magical.
FAQs and Troubleshooting
-
Why are my cupcakes flat?
If your cupcakes turn out flat, check the freshness of your baking soda and baking powder. They should be lively and not expired! -
Can I make these a day ahead?
Absolutely! Bake the cupcakes a day in advance, but wait to frost them until the day of your event to maintain the frosty look. -
My frosting is too runny, what do I do?
If your frosting is too runny, slowly add more powdered sugar until you reach the desired consistency. For a thicker frosting, refrigerate it for a while! -
What if my cupcakes stick to the liners?
Make sure to let the cupcakes cool completely before frosting. If they are still warm, the moisture can make the liners stick. Using grease-proof cupcake liners can also help!
Nutritional Info
While I believe in indulging for the festive season, I understand the importance of being mindful. These cupcakes are best savored in moderation, but if you’re keeping track, here’s a quick glance at the nutritional breakdown (per cupcake):
- Calories: 250
- Total Fat: 10g
- Saturated Fat: 4g
- Carbohydrates: 38g
- Sugars: 24g
- Protein: 3g
So, there you have it—Blood Splattered Halloween Cupcakes that are as delightful to eat as they are fun to make! Don’t forget to invite some friends into your kitchen for a spooky baking party—you’ll create sweet memories worth savoring just as much as these cupcakes. Happy Halloween, foodies! Enjoy creating, sharing, and, most importantly, having fun in the kitchen!
Print
Blood Splattered Halloween Cupcakes
- Total Time: 40 minutes
- Yield: 12 servings 1x
- Diet: Vegetarian
Description
Delicious and festive chocolate cupcakes with blood-stained frosting perfect for Halloween celebrations.
Ingredients
- 1 ¾ cups All-Purpose Flour
- 1 cup Granulated Sugar
- ¾ cup Unsweetened Cocoa Powder
- 1 ½ teaspoons Baking Powder
- ½ teaspoon Baking Soda
- ½ teaspoon Salt
- 2 large Eggs
- 1 cup Milk
- ½ cup Vegetable Oil
- 1 teaspoon Vanilla Extract
- Red Food Coloring (for “blood” effect)
- 1 cup Butter (unsalted, room temperature)
- 3–4 cups Powdered Sugar
- 8 oz Cream Cheese
Instructions
- Preheat your oven to 350°F (175°C).
- Place cupcake liners in a muffin tin.
- Mix the flour, sugar, cocoa powder, baking powder, baking soda, and salt in a large bowl until combined.
- Combine the eggs, milk, oil, and vanilla extract in another bowl.
- Pour the wet mixture into the dry ingredients and mix until just combined.
- Fill each cupcake liner about two-thirds full with the batter.
- Bake in the preheated oven for 18-20 minutes or until a toothpick inserted comes out clean.
- Allow the cupcakes to cool in the pan for 5 minutes before transferring them to a wire rack.
- Beat together the softened butter and cream cheese until creamy. Gradually add powdered sugar and mix well.
- Add a few drops of red food coloring to your frosting and mix until you achieve your preferred color.
- Frost the cooled cupcakes with the frosting.
- Create the blood splatter effect using a clean paintbrush dipped in red food coloring.
Notes
These cupcakes can be made a day in advance, but frost them just before serving. Experiment with different fillings for fun variations!
- Prep Time: 20 minutes
- Cook Time: 20 minutes
- Category: Dessert
- Method: Baking
- Cuisine: American
Nutrition
- Serving Size: 1 cupcake
- Calories: 250
- Sugar: 24g
- Sodium: 200mg
- Fat: 10g
- Saturated Fat: 4g
- Unsaturated Fat: 6g
- Trans Fat: 0g
- Carbohydrates: 38g
- Fiber: 1g
- Protein: 3g
- Cholesterol: 30mg
Keywords: Halloween, cupcakes, chocolate, festive, spooky
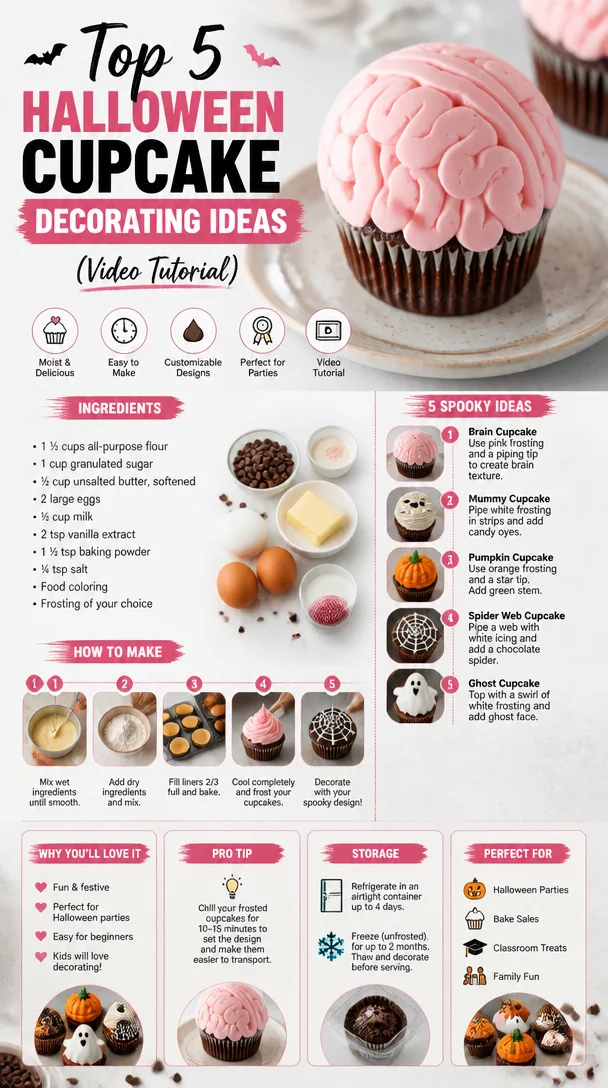
Top 5 Halloween Cupcake Decorating Ideas (Video Tutorial)
Spook-tacular Halloween Cupcake Decorating Ideas: 5 Fan Favorites from Last Year
Welcome to the haunted side of baking, my fellow food lovers! As the autumn leaves start to turn and the days get shorter, there’s a special thrill in the air. Halloween is upon us, and what better way to celebrate than by creating some wickedly delightful cupcakes? This year, I want to share five of my most popular Halloween cupcake designs from last year that’ll enchant both the young and the young-at-heart. Whether you’re hosting a ghoulish gathering, attending a spooky soirée, or just looking to brighten up your month with some festive baking, keep reading for mouthwatering flavors, fun decorating tips, and plenty of memories!
Cupcakes have that magical ability to bring people together. I reminisce about the time my best friend Jess and I baked our first batch of Halloween cupcakes during high school. Armed with silly costumes, a stack of food coloring, and the thrill of creativity, we spent hours transforming simple vanilla cupcakes into a spooky graveyard scene. We had more fun giggling and decorating than I ever thought possible! Those cupcakes became a cherished memory, a reminder of how cooking can create lasting friendships and joyous moments. Now, I want to instill that same festive spirit in you as we dive into this delectable journey!
Ingredients
Let’s gather our supplies! Here’s what you’ll need for each of these tempting cupcake designs. Don’t worry if you can’t find something; I’ve included substitution tips that will help keep your baking on track!
For the Basic Vanilla Cupcake
-
All-Purpose Flour (2 cups)
The backbone of your cupcakes. If you need a gluten-free option, use a 1:1 gluten-free flour blend! -
Granulated Sugar (1 ½ cups)
Adds sweetness and helps with moisture. For a healthier twist, you can replace half with coconut sugar. -
Butter (1 cup, softened)
Richness in flavor! If you want to lighten it up, swap in applesauce (1/2 cup) or use vegan butter. -
Baking Powder (1 tablespoon)
The magic leavening agent! Make sure it’s fresh—check the expiration date. Otherwise, swap with baking soda (use 1 teaspoon instead). -
Large Eggs (3)
They provide structure and moisture. For an egg-free option, swap with flaxseed meal mixed with water (1 tablespoon flax + 3 tablespoons water equals 1 egg). -
Vanilla Extract (2 teaspoons)
Enhances the sweetness. Homemade vanilla extract can take your cupcakes to the next level! -
Milk (1 cup)
Keeps the batter moist. You can use any type of milk you have on hand, including almond or oat milk.
Step-by-Step Instructions
Let’s bring these spooky delights to life! Here’s a detailed guide on how to make your cupcakes and bring your Halloween dreams to fruition.
-
Preheat the Oven:
Set your oven to 350°F (175°C). This is a crucial first step—an oven that’s set right from the start ensures even baking. -
Prepare Your Muffin Tin:
Line your muffin tin with Halloween-themed paper liners for that festive touch! You can find spooky designs like skeletons, ghosts, and pumpkins that can elevate your cupcakes. -
Mix the Dry Ingredients:
In a large bowl, whisk together the flour, sugar, baking powder, and a pinch of salt. This helps evenly distribute the baking powder for perfect rising every time! -
Cream the Butter:
In a separate bowl, beat the softened butter until it’s fluffy (about 2-3 minutes). A little trick? Let the butter sit out at room temperature beforehand to soften evenly. -
Add the Eggs and Vanilla:
Gradually add in the eggs, one at a time, mixing well after each addition. Then add the vanilla extract and stir until combined. Your mixture should be smooth and creamy—just like a spooky potion! -
Blend in the Dry Ingredients and Milk:
Alternate adding the flour mixture and milk to the butter mixture. Start and finish with the flour mixture for best results! Mix until just combined—overmixing can result in dense cupcakes, and we want light and fluffy! -
Fill and Bake:
Spoon the batter into your cupcake liners, filling them about two-thirds full. Bake for 18-20 minutes, or until a toothpick inserted in the center comes out clean. Pro tip: Rotate the pan halfway through baking for even results! -
Let Cool:
Once out of the oven, let the cupcakes cool in the pan for about 5 minutes, then transfer them to a wire rack to cool completely. This step is crucial to keep the frosting from melting when it’s time to decorate!
Serving Suggestions
Now that you have perfectly baked vanilla cupcakes, it’s time to channel your inner artist. Each cupcake can be a canvas for a spine-chilling masterpiece! Here are my five popular Halloween designs to inspire your creativity:
-
Ghostly Cupcakes: Top your cupcakes with white buttercream frosting, using a piping bag fitted with a round tip. Add mini chocolate chips for eyes—instant ghostly charm!
-
Pumpkin Patch Cupcakes: Using orange-tinted buttercream, swirl it on top and finish with a cute green fondant leaf. Feeling ambitious? You can even create mini edible pumpkins for an added effect!
-
Spider Web Treats: Frost your cupcakes with a base layer of white icing, then pipe black icing in a web pattern. Add a plastic spider on top, and watch your guests shriek with delight!
-
Witch’s Hat Wonders: Create a cone out of chocolate wafer cookies and place it upside down on a frosted cupcake, then add a ribbon of icing around the bottom.
-
Graveyard Cupcakes: Crumble up chocolate cookies to create “dirt” on top of your cupcakes, then insert gummy worms and mini tombstone cookies for that creepy vibe!
Recipe Variations
Looking to shake things up? Here are some creative twists on these Halloween cupcakes:
- Flavor Options: Consider infusing your cupcakes with spices like cinnamon or nutmeg to create a pumpkin or spice cake flavor that resonates with the season.
- Healthier Swaps: Swap out the all-purpose flour for almond flour or whole wheat flour for a nutritious spin.
- Vegan Fun: Replace eggs with flaxseed meal and butter with coconut oil or any plant-based option to make delicious, vegan-friendly cupcakes!
- Different Frosting Styles: Try cream cheese frosting for a tangy twist or chocolate ganache to give a rich, devilish finish.
Chef’s Notes
These Halloween cupcakes hold a special place in my heart—not just for the flavor but for the tradition they’ve become! The act of decorating each one sparks joy and creativity that is boundless. I remember once, during a friend’s Halloween party, I made cupcakes until 2 AM, fueled by sugar and enthusiasm. Though I had a light scare when the frosting exploded everywhere, they turned out to be the hit of the night! Each year, I find new ways to make them more whimsical and spooky.
FAQs and Troubleshooting
You might be wondering a few things as you embark on your cupcake journey. Here are some common questions and answers:
-
Why are my cupcakes flat?
This could be because your baking powder is old, your oven wasn’t at the right temperature, or you didn’t fill the liners enough. Make sure to check those factors! -
How do I keep my cupcakes moist?
Don’t overmix your batter, and try to enjoy them fresh. If they cool too long, consider placing them in an airtight container to lock in moisture. -
What can I do if my frosting is too runny?
If your frosting is too thin, add more powdered sugar to thicken it. You could also chill it in the fridge for a bit to firm it up. -
Can I make these cupcakes ahead of time?
Absolutely! You can bake them a day in advance and store them in an airtight container. Frost them just before serving to keep that fresh look!
Nutritional Info (Optional)
While I won’t dive too deep into the nutritional sea, each cupcake is made to be enjoyed in moderation. You can estimate that each basic vanilla cupcake (without extravagant toppings) is around 200 calories—perfect for a little treat during the chilly October nights.
I hope this guide inspires you to dive into the world of Halloween cupcake decorating! Remember, cooking is all about having fun, getting a little messy, and creating lasting memories. So grab those ingredients and utensils, and customize your spooky masterpieces. Happy Halloween baking, friends! 🎃
Print
Spook-tacular Halloween Cupcakes
- Total Time: 35 minutes
- Yield: 12 servings 1x
- Diet: Vegetarian
Description
Delightful Halloween-themed vanilla cupcakes that are sure to enchant everyone at your spooky gathering.
Ingredients
- 2 cups All-Purpose Flour
- 1 ½ cups Granulated Sugar
- 1 cup Butter, softened
- 1 tablespoon Baking Powder
- 3 Large Eggs
- 2 teaspoons Vanilla Extract
- 1 cup Milk
Instructions
- Preheat the oven to 350°F (175°C).
- Prepare your muffin tin with Halloween-themed paper liners.
- Mix the flour, sugar, baking powder, and a pinch of salt in a large bowl.
- Cream the softened butter until fluffy in a separate bowl.
- Add the eggs and vanilla, mixing until smooth.
- Blend in the dry ingredients and milk alternately.
- Fill the cupcake liners two-thirds full and bake for 18-20 minutes.
- Let cool in the pan for 5 minutes, then transfer to wire racks.
Notes
Feel free to customize your cupcakes with various toppings and frosting styles to add a spooky touch!
- Prep Time: 15 minutes
- Cook Time: 20 minutes
- Category: Dessert
- Method: Baking
- Cuisine: American
Nutrition
- Serving Size: 1 cupcake
- Calories: 200
- Sugar: 15g
- Sodium: 200mg
- Fat: 10g
- Saturated Fat: 6g
- Unsaturated Fat: 3g
- Trans Fat: 0g
- Carbohydrates: 25g
- Fiber: 1g
- Protein: 3g
- Cholesterol: 50mg
Keywords: Halloween cupcakes, spooky desserts, festive baking, vanilla cupcakes, cupcake decorating
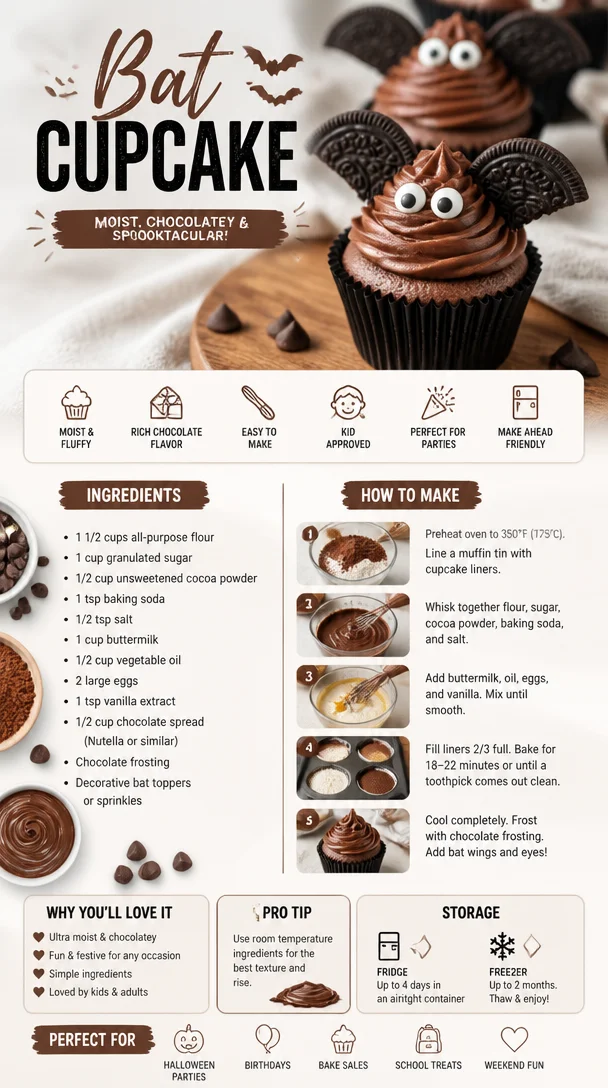
Bat Cupcake
Bat Cupcakes: A Spooktacular Treat for Any Occasion
Welcome, fellow food lovers! I’m thrilled to have you join me in this cozy corner of my kitchen, where today we’re going to whip up something that’s not only delicious but also a little spooky — Bat Cupcakes! Whether you’re planning a Halloween bash, a themed birthday party, or simply want to surprise your family with a fun treat, these cupcakes will undoubtedly bring smiles and delight. So, put on your apron (preferably with a little flour splatter) and let’s embark on this sweet adventure!
A Sweet Memory
As a child, Halloween was always one of my favorite times of the year. Pumpkins on the porch, the crispness in the air, and the exciting thrill of dressing up as my favorite character. But above all, it was the treats that made it unforgettable. I remember the first time my mom and I decided to bake something special for the neighborhood trick-or-treaters. We made spooky spider cookies, but the real treat was the moment we decided to experiment with cupcakes. Brought together by laughter and a dash of fright, we transformed ordinary chocolate cupcakes into little work-of-art bats! I still cherish those memories of not just the taste but the joy of creating something magical together.
Ingredients
Here’s what you’ll need to make these adorable Bat Cupcakes:
-
For the Cupcakes:
- 1 ¾ cups all-purpose flour
- Substitution Tip: You can use a gluten-free all-purpose mix if you want to make them gluten-free.
- 1 ½ teaspoons baking powder
- ½ teaspoon baking soda
- ½ teaspoon salt
- ¾ cup unsweetened cocoa powder
- Chef’s Insight: Use high-quality cocoa powder for a richer flavor!
- 1 cup granulated sugar
- ½ cup brown sugar
- Substitution Tip: You can use coconut sugar for a more natural sweetener.
- 2 large eggs
- 1 cup buttermilk
- Substitution Tip: You can mix one cup of milk with one tablespoon of vinegar and let sit for five minutes to create a make-shift buttermilk.
- ½ cup vegetable oil
- 2 teaspoons vanilla extract
- 1 ¾ cups all-purpose flour
-
For the Frosting:
- 1 cup unsalted butter, softened
- 3-4 cups powdered sugar
- Chef’s Insight: Start with three cups and add more if you want a thicker consistency.
- ½ cup unsweetened cocoa powder
- 2 tablespoons milk
- 1 teaspoon vanilla extract
-
For the Decorations:
- Mini chocolate chips (for eyes)
- Black fondant or chocolate bat decorations (optional)
Step-by-Step Instructions
Let’s get to baking these delightful Bat Cupcakes! Follow these steps, and soon enough, your kitchen will smell heavenly.
-
Preheat Your Oven
- Preheat your oven to 350°F (175°C). This step is crucial; it helps your cupcakes rise perfectly while they bake!
-
Prep Your Cupcake Pans
- Line your cupcake tin with paper liners. I love picking fun designs that fit the occasion — after all, we eat with our eyes first!
-
Mix the Dry Ingredients
- In a large mixing bowl, whisk together the flour, baking powder, baking soda, salt, cocoa powder, granulated sugar, and brown sugar. This is your base; take a moment to enjoy the rich, chocolate aroma wafting up!
-
Combine the Wet Ingredients
- In a separate bowl, beat the eggs, buttermilk, vegetable oil, and vanilla extract together until well-blended. It’s okay if it’s a little frothy; this means it’s mixed well!
-
Bring It All Together
- Slowly add the wet mixture to the dry ingredients, stirring gently until just combined. Be careful not to overmix; a little lumpy batter is perfectly okay when it comes to cupcakes.
-
Fill Your Liners
- Using a cookie scoop or measuring cup, fill each cupcake liner about ⅔ full with batter. This ensures they have enough space to rise without overflowing.
-
Bake Away
- Pop those cupcakes in the oven and bake for 18-20 minutes. To test doneness, insert a toothpick into the center; if it comes out clean, they’re ready!
-
Cool Time
- Once baked, let the cupcakes cool in the pan for about 5 minutes, then transfer them to a wire rack to cool completely. Patience is key — frosting warm cupcakes can lead to melty disaster!
-
Frosting Time
- While the cupcakes cool, let’s make our frosting! Beat the softened butter until creamy, then gradually add powdered sugar, cocoa powder, milk, and vanilla. Adjust the thickness to your liking!
-
Frost and Decorate
- Once cooled completely, generously frost each cupcake and set the mini chocolate chips for the eyes. Use your sweet decorations to create adorable bat features!
Serving Suggestions
These Bat Cupcakes are as delightful to display as they are to eat! Consider arranging them on a spooky-themed cake stand, draping some cobwebs around for atmosphere, or placing them in clear cellophane bags for party favors. They make a fantastic centerpiece for any gathering, inviting smiles and excitement.
Recipe Variations
- Vegan Option: Substitute eggs with flax eggs (1 tablespoon flaxseed meal + 2.5 tablespoons water per egg) and use plant-based milk and egg replacers for the frosting.
- Chocolate Mint Bats: Add a teaspoon of peppermint extract to the frosting for a refreshing minty flavor!
- Different Flavors: Try vanilla or pumpkin spice cupcakes instead of chocolate for a seasonal twist!
- Funfetti Style: Add colorful sprinkles into the batter for confetti cupcakes that pop with joy.
Chef’s Notes
I can’t tell you how many times this recipe has evolved! What started as a simple chocolate cupcake recipe became my canvas for culinary creativity. I remember an unexpected kitchen accident while testing a new frosting — I added way too much cocoa powder and my poor cupcakes ended up looking like little burnt marshmallows! But as is often the case in the kitchen, the best ideas come from mistakes. That day, bat cupcakes were born!
FAQs and Troubleshooting
1. My cupcakes came out dry! What happened?
- Overmixing the batter or baking them too long can lead to dryness. Make sure to check them a couple of minutes before the suggested time.
2. My frosting is too thin; how can I thicken it?
- Simply add more powdered sugar gradually until you achieve your desired thickness. If it’s too thick, mix in a little more milk!
3. Can I make these ahead of time?
- Absolutely! You can bake the cupcakes a day or two in advance, store them in an airtight container, and frost them just before serving.
4. How do I store leftovers?
- Store any leftovers in an airtight container at room temperature for a couple of days. If you want to keep them longer, refrigerate for up to a week or freeze them for up to three months!
Nutritional Info (optional)
For those watching their nutritional intake, here’s a rough estimate per cupcake (without frosting):
- Calories: ~200
- Fat: 8g
- Carbohydrates: 30g
- Protein: 3g
But remember, each delightful bite is worth every calorie when shared with loved ones!
So there you have it, my dear foodies! These Bat Cupcakes are not just a treat; they’re a delicious canvas for creativity, joy, and memories waiting to be made. I can’t wait for you to try this recipe and share your spooky delights. Remember to embrace the process, let your kitchen flourish with laughter, and, most importantly, have fun! Happy baking!
Print
Bat Cupcakes
- Total Time: 35 minutes
- Yield: 12 servings 1x
- Diet: Vegetarian
Description
Delicious and spooky bat-themed cupcakes perfect for Halloween and other festive occasions.
Ingredients
- 1 ¾ cups all-purpose flour
- 1 ½ teaspoons baking powder
- ½ teaspoon baking soda
- ½ teaspoon salt
- ¾ cup unsweetened cocoa powder
- 1 cup granulated sugar
- ½ cup brown sugar
- 2 large eggs
- 1 cup buttermilk
- ½ cup vegetable oil
- 2 teaspoons vanilla extract
- 1 cup unsalted butter, softened
- 3–4 cups powdered sugar
- ½ cup unsweetened cocoa powder (for frosting)
- 2 tablespoons milk
- 1 teaspoon vanilla extract (for frosting)
- Mini chocolate chips (for eyes)
- Black fondant or chocolate bat decorations (optional)
Instructions
- Preheat your oven to 350°F (175°C).
- Line your cupcake tin with paper liners.
- Mix the flour, baking powder, baking soda, salt, cocoa powder, granulated sugar, and brown sugar in a large mixing bowl.
- Combine the eggs, buttermilk, vegetable oil, and vanilla extract in a separate bowl.
- Bring the wet mixture to the dry ingredients, stirring gently until just combined.
- Fill each cupcake liner about ⅔ full with batter.
- Bake for 18-20 minutes, then test doneness with a toothpick.
- Cool in the pan for about 5 minutes, then transfer to a wire rack.
- Frost the cupcakes with the buttercream frosting made from butter, powdered sugar, cocoa powder, milk, and vanilla.
- Decorate with mini chocolate chips and other decorations.
Notes
These cupcakes can be made ahead of time and stored in an airtight container.
- Prep Time: 15 minutes
- Cook Time: 20 minutes
- Category: Dessert
- Method: Baking
- Cuisine: American
Nutrition
- Serving Size: 1 cupcake
- Calories: 200
- Sugar: 15g
- Sodium: 200mg
- Fat: 8g
- Saturated Fat: 5g
- Unsaturated Fat: 2g
- Trans Fat: 0g
- Carbohydrates: 30g
- Fiber: 2g
- Protein: 3g
- Cholesterol: 30mg
Keywords: bat cupcakes, Halloween treats, spooky desserts, chocolate cupcakes, fun baking




