
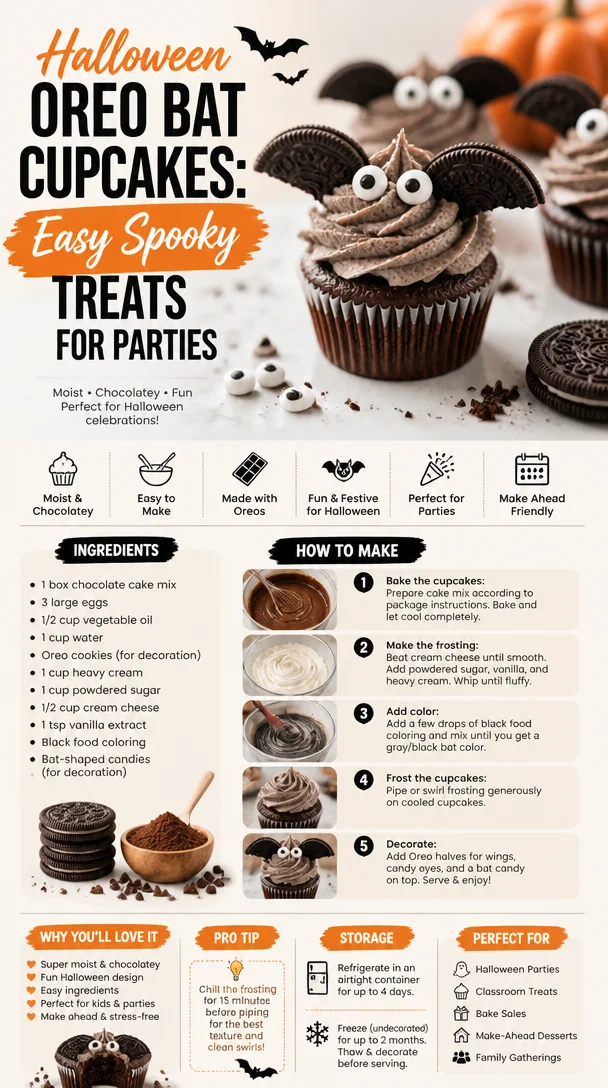
Halloween Oreo Bat Cupcakes: Easy Spooky Treats for Parties
Whip Up Some Magic with Festive Halloween Bats Oreo Cupcakes!
Welcome to my cozy kitchen, my fellow food enthusiasts! 🎃 I’m thrilled you’re here because today, we’re diving into a delightful Halloween treat: Festive Halloween Bats Oreo Cupcakes! Just the thought of these chocolatey wonders topped with cute little bat decorations gets me giddy with excitement. If you love the haunting spirit of Halloween as much as I do, you’re in for a wickedly good time.
Picture this: the sun sets behind the trees, shadows start dancing, and the air is filled with the smell of something sweet baking in the oven. There’s something truly magical about bringing the season’s spooky vibe into our kitchens, especially when it involves gathering friends and family for a frightfully fun feast! These cupcakes are not only delicious but also a whimsical way to celebrate the season, spark conversation, and create sweet memories.
As you treat yourself to these festive delights, let me share a bit of my own Halloween nostalgia. I remember vividly the thrill of choosing the perfect pumpkin each year at the local patch, scooping out its insides, and decorating it to share with friends. And how about those epic Halloween parties filled with themed treats, bubbling cauldrons of punch, and spooky sounds of laughter echoing through the night? Oh, the joy of creating together! Now, I too wanted to craft something memorable — and what better way than with chocolate cupcakes that have a hint of mischief in their design?
So whether you’re gearing up for a Halloween party, a cozy night in, or simply want to delight your loved ones with a touch of sweetness, gather your baking gear, and let’s get ready for some spook-tacular baking! These Oreo Cupcakes are a guaranteed hit, and trust me, they’ll brighten anyone’s day — even if it’s a bit haunted.
A Sweet Memory to Savor
The inspiration for these cupcakes came from my childhood, where Halloween felt like an enchanting fairytale. My family always made sure that we carved pumpkins and baked festive treats together. One year, I remember making some basic chocolate cupcakes for a school Halloween party, but they were missing that wow factor. Fast forward to the following year when I stumbled upon the magical ingredient: Oreos! I snuck a few into the batter and topped each cupcake with a dollop of frosting, an Oreo, and some spooky decorations. I remember the smile on my classmates’ faces as they devoured these treats. It was in that moment I realized how a simple cookie could elevate something so basic into pure joy. Today’s Festive Halloween Bats Oreo Cupcakes are a celebration of that memory and the magic of food that brings us together, just like those childhood celebrations.
Ingredients
Here’s what you’ll need to whip up these enchanting cupcakes:
-
1 box of chocolate cake mix (plus ingredients listed on the box)
- Use your favorite brand — opting for a rich chocolate flavor will bring out the best in these cupcakes.
-
1/2 cup vegetable oil
- This keeps the cupcakes moist and fluffy. You can substitute with melted coconut oil or melted unsalted butter for flavor!
-
3 large eggs
- These bring rich texture. For a vegan option, use flax eggs (1 tbsp flaxseed meal mixed with 2.5 tbsp water per egg).
-
1 cup water or milk
- Milk adds richness, but water will keep them lighter. Try almond milk or oat milk for a dairy-free version!
-
1 package of Oreo cookies
- These are the secret ingredient! Stuff them in the batter and on the top. Swap for gluten-free Oreos if needed.
-
1-2 cups of vanilla frosting (store-bought or homemade)
- The sky’s the limit! A homemade buttercream or cream cheese frosting works wonders, but store-bought saves time.
-
Black food coloring (optional)
- For that dark, spooky vibe! You can also use chocolate frosting for a more natural look.
-
Bat cupcake toppers or decorations
- You can get creative here! Use pre-made bat-shaped cookies, fondant, or even cut-out silhouettes from black paper.
Step-by-Step Instructions
Ready to bring these cupcakes to life? Here’s how you whip up these delicious treats:
-
Preheat Your Oven
- Preheat your oven to 350°F (175°C). This is super important for getting that perfect rise, so don’t skip this step!
-
Prepare Your Cupcake Liners
- Line your muffin tin with Halloween-themed cupcake liners. Whether they’re orange or adorned with spooky designs, they’ll set the tone.
-
Mix the Cake Batter
- In a large mixing bowl, combine the chocolate cake mix, vegetable oil, eggs, and water or milk using a hand mixer until smooth.
- Chef Hack: Don’t overmix! A few lumps are okay; it keeps the cupcakes light and airy.
-
Add in the Oreos
- Gently fold in roughly crushed Oreos — you want to see those delightful pieces!
- Tip: Reserve a few whole Oreos for decorating the tops if you wish.
-
Fill the Liners
- Pour the batter into the lined cupcake tins, filling each cup about 2/3 full.
- Chefs’ Tip: Use a cookie scoop for even distribution and clean hands.
-
Bake
- Pop those beauties into your preheated oven and bake for 18-20 minutes, or until a toothpick comes out clean.
- Pop Quiz: Did you remember to set a timer? No one wants to forget during a haunted baking session!
-
Cool Completely
- Once baked, let the cupcakes cool in the pan for about 5 minutes before transferring them to a wire rack. Allow them to cool completely before frosting.
-
Frosting Time
- If you want to make spooky black frosting, use the black food coloring to tint your frosting. Frost each cupcake generously — let your inner artist shine here!
-
Decorating Like a Pro
- Top each frosted cupcake with a whole Oreo and add bat decorations on top. Feel free to get creative here! Bonus points for using edible glitter or spooky sprinkles!
-
Serve and Enjoy
- Parcels of joy on a plate! Serve them at your Halloween soirée, and watch everyone smile.
Serving Suggestions
Plating these adorable cupcakes is half the fun! Arrange them on a spooky cake stand, sprinkle with edible glitter, or place them in a haunted-themed box. Pair these treats with a glass of chilled pumpkin spice milk or whipped cream to really wow your guests. Enjoy the delightful chaos of Halloween with each bite!
Recipe Variations
Want to mix things up? Here are a few creative twists on these cupcakes:
-
Chocolate Ganache Topping: Create an ooey-gooey experience by drizzling chocolate ganache over your frosting.
-
Pumpkin Spice Cupcakes: Substitute the chocolate cake mix for pumpkin spice cake mix to give a seasonal flair.
-
Batch of Mini Cupcakes: Use a mini muffin tin and adjust baking time for adorable bite-sized treats.
-
Dairy-Free Delight: Use coconut oil, almond milk, and dairy-free Oreos for a delicious dairy-free version.
-
Vegan-friendly Options: Swap heavy egg-based ingredients for flax eggs and enjoy creamy vegan frosting for a guilt-free treat!
Chef’s Notes
Creating these cupcakes takes me back to those days of whimsy and wonder, and I find that each batch is a new adventure. Sometimes I mix up the frosting flavors or even experiment with different cookie bases for a twist! A funny memory for me was once frosting cupcakes while wearing a bat costume. Let’s just say the messy flour-covered apron didn’t quite match the outfit!
These cupcakes have also evolved over the years — originally a simple affair, they became a Halloween staple in my kitchen. The addition of Oreos took them from ordinary to extraordinary!
FAQs and Troubleshooting
-
Why are my cupcakes flat?
- Make sure to check that your baking powder is fresh. Also, avoid overmixing the batter; this can create dense cupcakes.
-
Can I use homemade frosting?
- Absolutely! I often whip up a quick buttercream frosting. Feel free to experiment with flavors like cream cheese or chocolate if you’re feeling adventurous.
-
What if I don’t have black food coloring?
- Don’t worry! You can use dark cocoa powder in your frosting to achieve a darker shade, or simply use traditional white frosting, garnishing with black sprinkles.
-
How do I store leftovers?
- Keep leftover cupcakes in an airtight container at room temperature for up to 3 days. For prolonged freshness, store them in the fridge for about 5-6 days.
Nutritional Info (optional)
While the magical taste is what we care about most, here’s a rough estimate of the nutritional information per cupcake:
- Calories: 290
- Protein: 3g
- Fat: 12g
- Carbohydrates: 44g
- Sugars: 20g
There you have it, my food-loving friends! I hope you’re as excited about the Festive Halloween Bats Oreo Cupcakes as I am. With just a bit of love and creativity, you can make these spook-tastic treats that will have everyone raving. Happy baking, and may your Halloween be filled with laughter, joy, and lots of delectable goodies! 🎉👻🍰
Print
Festive Halloween Bats Oreo Cupcakes
- Total Time: 35 minutes
- Yield: 12 servings 1x
- Diet: Vegetarian
Description
Delight your friends and family with these chocolatey Oreo cupcakes topped with spooky decorations, perfect for Halloween festivities.
Ingredients
- 1 box chocolate cake mix (plus ingredients listed on the box)
- 1/2 cup vegetable oil
- 3 large eggs
- 1 cup water or milk
- 1 package Oreo cookies
- 1–2 cups vanilla frosting (store-bought or homemade)
- Black food coloring (optional)
- Bat cupcake toppers or decorations
Instructions
- Preheat your oven to 350°F (175°C).
- Prepare your muffin tin with Halloween-themed cupcake liners.
- Mix the chocolate cake mix, vegetable oil, eggs, and water or milk until smooth.
- Add in roughly crushed Oreos and fold gently.
- Fill the lined cupcake tins about 2/3 full with the batter.
- Bake for 18-20 minutes or until a toothpick comes out clean.
- Cool for 5 minutes in the pan before transferring to a wire rack.
- Frost each cooled cupcake with your desired frosting.
- Decorate with a whole Oreo and bat decorations on top.
- Serve and enjoy!
Notes
These cupcakes can be made dairy-free and vegan by using appropriate substitutes. Get creative with your decorations for an extra spooky touch!
- Prep Time: 15 minutes
- Cook Time: 20 minutes
- Category: Dessert
- Method: Baking
- Cuisine: American
Nutrition
- Serving Size: 1 cupcake
- Calories: 290
- Sugar: 20g
- Sodium: 200mg
- Fat: 12g
- Saturated Fat: 2g
- Unsaturated Fat: 10g
- Trans Fat: 0g
- Carbohydrates: 44g
- Fiber: 1g
- Protein: 3g
- Cholesterol: 30mg
Keywords: Halloween, cupcakes, Oreo, dessert, festive, chocolate
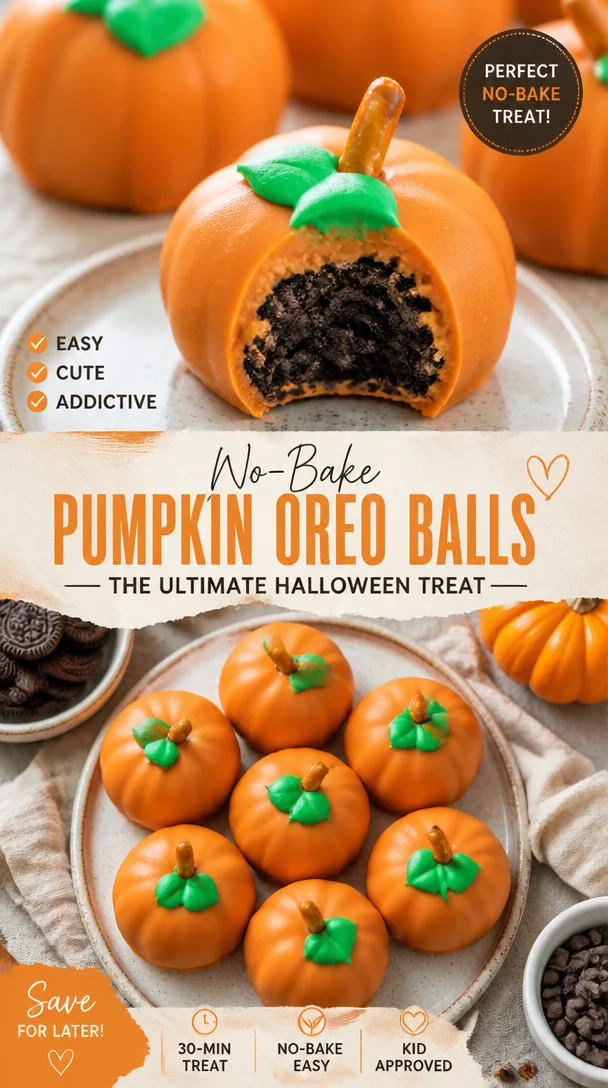
Ingredient No-Bake Pumpkin Oreo Balls for Halloween
No-Bake Pumpkin Shaped Oreo Balls: A Cozy Halloween Treat
Welcome to my kitchen! It’s that magical time of year when the leaves turn golden, the air turns crisp, and every corner of the world is filled with the pumpkin-spiced goodness that makes our hearts sing. Today, I’m sharing a delightfully easy and mouthwatering recipe for No-Bake Pumpkin Shaped Oreo Balls that will elevate your fall festivities. Whether you’re throwing a Halloween party, looking for a cozy treat to enjoy with a warm cup of cider, or simply indulging your sweet tooth, these adorable pumpkin creations are a must-try.
I don’t know about you, but there’s something special about treats that come together without the need for an oven. This recipe is not only a breeze to whip up but can also be a fun activity to share with friends or the little ones in your life. Imagine rolling those Oreo balls and shaping them into little pumpkins—it’s as delightful as it sounds!
So, grab your favorite apron, cue the upbeat music, and let’s get started on this pumpkin-shaped adventure!
A Sweet Memory with a Twist
Growing up, my family made baking a weekend tradition. I can vividly remember the warmth of the kitchen, the sound of laughter, and the scent of freshly baked goodies wafting through the air. One particular Halloween, my mom decided to shake things up by trying a new recipe that used Oreos—my all-time favorite cookie! We dubbed them “Oreo ghosts” as they were rolled into ghost shapes with white chocolate coating. That lovely experience inspired me to create a pumpkin version, which became a hit at our family gatherings.
Every bite of these No-Bake Pumpkin Shaped Oreo Balls reminds me of those sweet childhood memories spent in the kitchen. I loved the way my family would gather around the table, excited to decorate our treats with colorful sprinkles and edible eyes. Now, whenever I make these pumpkin balls, I think back to that sunny Halloween, filled with laughter and chocolate smudges on our cheeks.
Ingredients
Here’s what you’ll need to create these adorable pumpkin Oreo balls:
-
Oreo Cookies (36 cookies)
- Chef Insight: Classic Oreos work best for this recipe, but feel free to experiment with other flavored varieties. Mint Oreos add a surprising twist!
-
Cream Cheese (8 oz)
- Substitution Tip: If you’re looking for a lighter option, you can use reduced-fat cream cheese. Just make sure it’s softened for easier mixing.
-
Orange Candy Melts (1 cup)
- Chef Hack: If you can’t find orange candy melts, you can mix white and yellow candy melts in equal parts to create an orange hue.
-
Green Sprinkles or Candy (for decoration)
- Quick Insight: You can use mini chocolate chips or green M&Ms instead of sprinkles for a fun pop of color.
-
Gel Food Coloring (optional)
- Recommendation: For the perfect shade of orange, use gel food coloring to tint your white chocolate if you prefer a homemade touch.
-
Styrofoam (or similar) block for shaping
- Chef Note: This is optional, but it makes it much easier to shape and display the pumpkin balls while they set!
Step-by-Step Instructions
-
Crush the Oreos: Place the Oreo cookies in a food processor and pulse until finely crushed. If you don’t have a food processor, you can also place them in a zip-top bag and crush them with a rolling pin. This part is a great way to get the kids involved!
-
Mix in the Cream Cheese: In a large bowl, combine the crushed Oreos with the softened cream cheese. Use a spatula or your hands to mix until the mixture is well combined and forms a dough. This is the perfect time to get your hands a little dirty—trust me, it’s worth it!
-
Chill the Mixture: Cover the mixture and refrigerate for about 30 minutes. Chilling helps the mixture firm up, making it easier to shape the balls.
-
Shape the Pumpkin Balls: Once chilled, take small portions of the mixture and roll them into about 1-inch balls. Place them onto a baking sheet lined with parchment paper. If you want to make them more pumpkin-like, gently press the top of each ball to form a slight indentation.
-
Melt the Orange Candy Coating: Following the package instructions, melt the orange candy melts in a microwave-safe bowl, stirring every 30 seconds to avoid burning. If you’re using food coloring, this is where you’d add it!
-
Coat the Pumpkin Balls: Dip each ball in the melted orange coating. Let any excess chocolate drip off, and then transfer it back onto the baking sheet.
-
Add the Green Toppers: While the orange coating is still wet, place a green sprinkle or candy on the top to serve as the pumpkin stem.
-
Let Them Set: Allow the no-bake pumpkin balls to cool until the candy coating has hardened. You can speed this process up by placing them in the refrigerator.
Serving Suggestions
Once your No-Bake Pumpkin Shaped Oreo Balls are set, it’s time to serve! You can arrange them on a festive platter, perhaps sprinkled with a few autumn-themed decorations like faux leaves or mini pumpkins. Don’t forget to leave some room for little hands to come in and grab their favorites!
For an extra touch, you could place each pumpkin ball on a lollipop stick to create fun pumpkin pops that are easy to grab and enjoy.
Recipe Variations
Here are a few creative twists on my No-Bake Pumpkin Shaped Oreo Balls:
-
Spiced Pumpkin Flavor: Add a teaspoon of pumpkin pie spice to the Oreo mixture for an extra layer of fall flavor.
-
Chocolate Drizzle: After the orange coating has set, drizzle some melted dark or white chocolate over them for a decorative touch.
-
Nut Butter Swirl: Mix a tablespoon of almond or peanut butter into the Oreo and cream cheese dough for a unique, nutty flavor.
-
Different Shapes: Instead of pumpkins, you can shape these into ghosts or acorns. Just adjust the decoration accordingly!
Chef’s Notes
As someone who cherishes cozy moments in the kitchen, I’ve experimented a lot with these pumpkin Oreo balls over the years. They started as just a fun Halloween treat, but they’ve evolved into a go-to recipe for family gatherings, holiday parties, and even cozy game nights. I love how versatile they are—you can dress them up, or keep it simple!
I also remember one time forgetting to add the green decorations, and they still turned out delicious! It reminded me that perfection isn’t necessary in cooking; what truly matters is the love and joy shared around the meal.
FAQs and Troubleshooting
Q: My chocolate coating is too thick. What can I do?
A: If your candy melts feel thick, try adding a small teaspoon of vegetable oil to thin it out. This will make it easier to dip and create a nice even coating.
Q: Can I use regular cream cheese?
A: Absolutely! Just ensure that it’s softened so that it mixes well with the Oreo crumbs.
Q: How long will these last?
A: Properly stored in an airtight container in the fridge, these treats should last about a week. They’re perfect to make ahead for parties!
Q: What do I do if the pumpkin balls fall apart?
A: If your balls are too crumbly, try adding a little more cream cheese to the mixture. If they feel too soft, a spell in the refrigerator will help firm them up.
Now it’s time to gather your ingredients and bring the magic of fall into your kitchen. I can’t wait to hear how you enjoy these No-Bake Pumpkin Shaped Oreo Balls! Happy cooking and happy memories!
Print
No-Bake Pumpkin Shaped Oreo Balls
- Total Time: 45 minutes
- Yield: 24 balls 1x
- Diet: Vegetarian
Description
Delightfully easy No-Bake Pumpkin Shaped Oreo Balls, perfect for Halloween parties and cozy treats.
Ingredients
- 36 Oreo Cookies
- 8 oz Cream Cheese, softened
- 1 cup Orange Candy Melts
- Green Sprinkles or Candy (for decoration)
- Gel Food Coloring (optional)
- Styrofoam block for shaping (optional)
Instructions
- Crush the Oreos: Place the Oreo cookies in a food processor and pulse until finely crushed.
- Mix in the Cream Cheese: In a large bowl, combine the crushed Oreos with the softened cream cheese.
- Chill the Mixture: Cover the mixture and refrigerate for about 30 minutes.
- Shape the Pumpkin Balls: Once chilled, take small portions of the mixture and roll them into about 1-inch balls.
- Melt the Orange Candy Coating: Melt the orange candy melts in a microwave-safe bowl.
- Coat the Pumpkin Balls: Dip each ball in the melted orange coating and let any excess drip off.
- Add the Green Toppers: While the orange coating is still wet, place a green sprinkle or candy on the top.
- Let Them Set: Allow the no-bake pumpkin balls to cool until the candy coating has hardened.
Notes
These pumpkin Oreo balls can be decorated in various ways, and can also be shaped into other festive shapes like ghosts or acorns.
- Prep Time: 15 minutes
- Cook Time: 30 minutes
- Category: Dessert
- Method: No-Bake
- Cuisine: American
Nutrition
- Serving Size: 1 ball
- Calories: 120
- Sugar: 15g
- Sodium: 70mg
- Fat: 7g
- Saturated Fat: 4g
- Unsaturated Fat: 2g
- Trans Fat: 0g
- Carbohydrates: 14g
- Fiber: 0g
- Protein: 1g
- Cholesterol: 15mg
Keywords: no-bake, pumpkin dessert, Halloween treats, Oreo balls




