
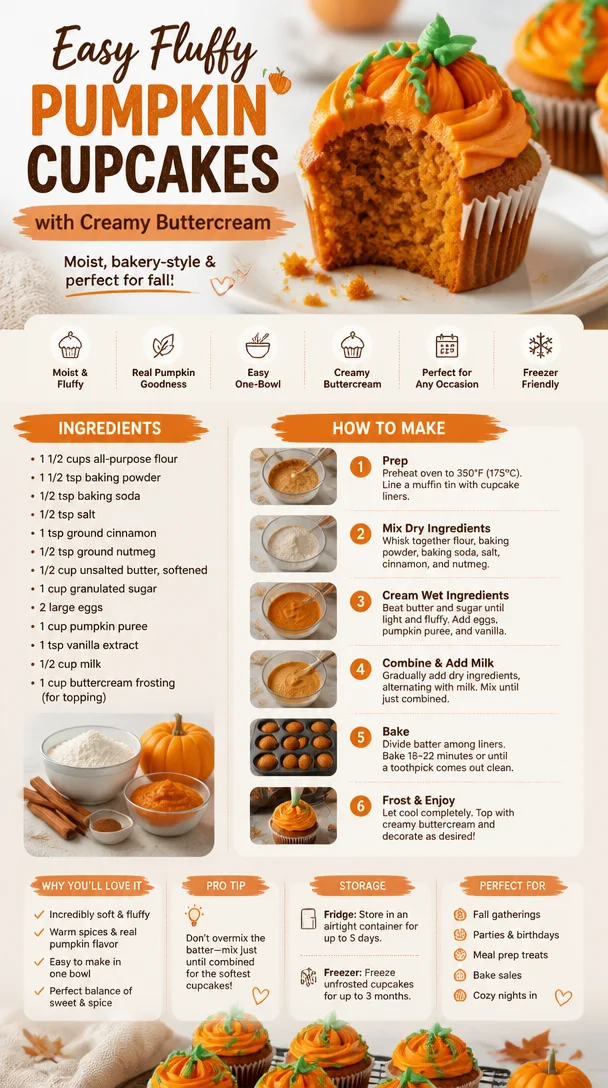
Easy Fluffy Pumpkin Cupcakes with Creamy Buttercream
The Best Buttercream Pumpkin Cupcakes: A Cozy Fall Treat
Welcome to my kitchen, fellow food enthusiasts! Today, we’re diving deep into the cozy world of sweet treats with a recipe that will warm your heart and tantalize your taste buds — Buttercream Pumpkin Cupcakes! These adorable cupcakes are the perfect embodiment of fall, wrapped up in soft, moist cake and topped with a luscious buttercream frosting that’s as dreamy as it is delicious. Whether you’re hosting a gathering, celebrating a birthday, or simply trying to bring a little cheer to a dull day, these cupcakes are here to make everything better.
Fall has a magical way of making us crave those warm flavors and comforting aromas that evoke memories of family gatherings and cozy nights in. With the scent of cinnamon, nutmeg, and of course, pumpkin wafting through the air, you can’t help but feel excited for what’s to come! Like most of my recipes, these cupcakes are not just about the end result but the joy of cooking and sharing with those you love. So, grab your apron, and let’s get whisking!
Imagine walking through a pumpkin patch, the crisp air dancing on your skin, leaves crunching underfoot, and the vibrant orange pumpkins competing with the beautiful fall foliage. One particular memory that warms my heart is when my grandmother would take me to pick pumpkins every October. We’d come home with armfuls of pumpkins, and she would whip up her famous pumpkin bread, filling the kitchen with delightful aromas. It was a time of laughter, warmth, and love, where nothing else mattered except the joy of baking together. Inspired by those moments, I created these Buttercream Pumpkin Cupcakes to recapture that same magic and ensure you create new, delicious memories with your loved ones.
Ingredients
Here’s your shopping list for these delightful Buttercream Pumpkin Cupcakes. Each ingredient plays a key role in creating that scrumptious flavor and texture.
- All-purpose flour (2 cups): The foundation of our cupcakes. For a gluten-free option, you can use a 1:1 gluten-free flour blend.
- Granulated sugar (1 cup): Sweetness is crucial! For a lower-calorie alternative, try coconut sugar or a sugar substitute like Stevia.
- Brown sugar (1/2 cup): Adds depth and moisture. If you’re out of brown sugar, you can make your own by mixing white sugar with a bit of molasses.
- Baking powder (1 teaspoon): This gives our cupcakes a nice rise. Ensure it’s fresh for the best results!
- Baking soda (1 teaspoon): Works hand-in-hand with baking powder for a fluffy texture.
- Salt (1/2 teaspoon): Balances sweetness and enhances flavors.
- Ground cinnamon (1 teaspoon): The aromatic spice that screams fall! Substitute with pumpkin pie spice for an all-in-one approach.
- Ground nutmeg (1/4 teaspoon): Adds warmth; fresh nutmeg is even more potent if you can find it!
- Pumpkin puree (1 cup): The star of the show! Avoid pumpkin pie filling as it contains sugar and spices. You can also use homemade pumpkin puree if you’re feeling adventurous.
- Eggs (2 large): Provides structure and moisture. For a vegan option, use flax eggs (1 tbsp ground flaxseeds + 3 tbsp water per egg).
- Vanilla extract (1 teaspoon): For a lovely fragrance. When possible, opt for pure vanilla extract over imitation.
- Vegetable oil (1/2 cup): Ensures moisture; for a lighter option, you can substitute unsweetened applesauce or Greek yogurt.
Buttercream Frosting Ingredients
- Unsalted butter (1 cup, softened): The base of our frosting. It’s best to allow it to come to room temperature for easy whipping.
- Powdered sugar (3–4 cups): Provides sweetness and gives our frosting the perfect consistency. Sift it for a smooth texture.
- Heavy cream (2 tablespoons): Keeps the frosting creamy. You can substitute with milk, but it won’t be as rich.
- Vanilla extract (1 teaspoon): Again, choose pure for the best flavor.
Step-by-Step Instructions
Let’s transform these ingredients into something magical! Follow along as we navigate through the cupcake process.
Step 1: Preheat and Prep
Preheat your oven to 350°F (175°C). Line a standard muffin pan with cupcake liners — choose festive colors if you like! A little bit of flair never hurt anyone!
Step 2: Mix Dry Ingredients
In a medium bowl, whisk together the flour, granulated sugar, brown sugar, baking powder, baking soda, salt, cinnamon, and nutmeg. Whisking helps combine the ingredients and aerates the mixture. This step can make a difference in the fluffiness of your cupcakes, so don’t skip it!
Step 3: Combine Liquid Ingredients
In a large bowl, combine the pumpkin puree, eggs, vegetable oil, and vanilla extract. Use a hand mixer or whisk vigorously until smooth. If you’re using a stand mixer, this is when you would switch to the paddle attachment!
Step 4: Mix Together
Gradually add the dry ingredients to the wet mixture, mixing just until combined. Overmixing can lead to dense cupcakes — we want light and fluffy! The batter might be a little thick, and that’s perfectly fine.
Step 5: Bake
Spoon the batter into the lined muffin pan, filling each cup about two-thirds full. This allows room for the cupcakes to rise without spilling over. Bake in the preheated oven for about 18–20 minutes or until a toothpick inserted in the center comes out clean. The aroma wafting through your kitchen will be absolutely heavenly!
Step 6: Cool
Remove the cupcakes from the oven and allow them to cool in the pan for about 5 minutes. Then, carefully transfer them to a wire rack to cool completely. It’s tough waiting, but frost on warm cupcakes can lead to a melty mess — and we want that buttercream to shine!
Step 7: Make the Buttercream Frosting
While the cupcakes cool, let’s make the frosting. In a medium bowl, beat the softened unsalted butter on medium speed until creamy, about 2–3 minutes. Gradually add powdered sugar one cup at a time, beating well after each addition. Mix in the heavy cream and vanilla, then increase the mixer speed to high and beat until the frosting is light and fluffy, about 3 minutes.
Step 8: Frosting Time!
Once the cupcakes are completely cool, it’s time for the fun part! Use a piping bag fitted with your desired tip (or a simple spatula) to generously frost each cupcake. No need to be perfect — a little rustic charm makes it even cozier!
Serving Suggestions
These Buttercream Pumpkin Cupcakes are delightful on their own, but you can elevate your presentation even further! Consider arranging them on a pretty platter dusted with a sprinkle of cinnamon or garnished with small pieces of caramel or chopped pecans for that extra nod to fall flavors. Pair them with a warm beverage like chai tea or spiced apple cider for a perfect cozy treat!
Recipe Variations
Feeling adventurous? Here are a few variations to mix things up:
- Chocolate Chip Surprise: Fold in mini chocolate chips into the batter before baking for a gooey, sweet addition.
- Cream Cheese Frosting: Swap the buttercream for a tangy cream cheese frosting for a decadent twist.
- Spice it Up: Add a pinch of cayenne pepper or ginger to your batter for a spicy kick.
- Nutty Crunch: Top the frosting with toasted walnuts or pecans for added texture.
- Vegan Version: Use flax eggs and coconut oil to make this recipe vegan-friendly while keeping the delicious taste!
Chef’s Notes
Oh, I have so many fond memories tied to these cupcakes! The first time I made them, I ended up with flour on my face and a puppy at my feet, eagerly waiting for crumbs. The kitchen was an absolute mess, but it was one of the most joyful experiences. My friends came over for a small gathering, and within minutes, the cupcakes were gone! It’s turned into a tradition, often requested at parties and potlucks. Every time I make them, I feel like I’m honoring the spirit of my grandmother and all the love she instilled in our kitchen.
FAQs and Troubleshooting
1. Why are my cupcakes dense?
Overmixing the batter after adding the dry ingredients can lead to dense cupcakes. Mix until just combined for the best texture.
2. How do I store leftover cupcakes?
Store them in an airtight container at room temperature for up to 3 days or in the fridge for about a week. Just be sure to keep them well-covered!
3. Can I freeze these cupcakes?
Absolutely! Make sure they’re cool, then freeze them in an airtight container. To enjoy, thaw them in the fridge overnight and frost when ready.
4. My frosting is too runny. What should I do?
If your frosting is too runny, gradually add more powdered sugar until you reach your desired consistency. If it’s too thick, a little splash of heavy cream can smooth it out.
Nutritional Info (Optional)
For those curious about the nutritional details, one Buttercream Pumpkin Cupcake (without added decorations) contains approximately 320 calories, with a nice balance of carbs, fats, and proteins to indulge in a delightful treat.
And there you have it — Buttercream Pumpkin Cupcakes that not only taste delicious but also carry a story and warmth of the season! I hope you find joy in making and sharing these delightful treats with your loved ones. Don’t forget to share your own twists and stories as we continue to create mouth-watering memories together! Happy baking! 🍂🧁
Print
Buttercream Pumpkin Cupcakes
- Total Time: 40 minutes
- Yield: 12 servings 1x
- Diet: Vegetarian
Description
Delightful Buttercream Pumpkin Cupcakes that capture the essence of fall with warm flavors and comforting aromas.
Ingredients
- 2 cups All-purpose flour
- 1 cup Granulated sugar
- 1/2 cup Brown sugar
- 1 teaspoon Baking powder
- 1 teaspoon Baking soda
- 1/2 teaspoon Salt
- 1 teaspoon Ground cinnamon
- 1/4 teaspoon Ground nutmeg
- 1 cup Pumpkin puree
- 2 large Eggs
- 1 teaspoon Vanilla extract
- 1/2 cup Vegetable oil
- 1 cup Unsalted butter, softened (for frosting)
- 3–4 cups Powdered sugar (for frosting)
- 2 tablespoons Heavy cream (for frosting)
- 1 teaspoon Vanilla extract (for frosting)
Instructions
- Preheat your oven to 350°F (175°C) and line a standard muffin pan with cupcake liners.
- Whisk together the flour, granulated sugar, brown sugar, baking powder, baking soda, salt, cinnamon, and nutmeg in a medium bowl.
- Combine the pumpkin puree, eggs, vegetable oil, and vanilla extract in a large bowl and mix until smooth.
- Add the dry ingredients to the wet mixture gradually, mixing until just combined.
- Spoon the batter into the lined muffin pan, filling each cup about two-thirds full.
- Bake for about 18–20 minutes or until a toothpick inserted comes out clean.
- Cool the cupcakes in the pan for 5 minutes, then transfer to a wire rack to cool completely.
- Beat the softened butter until creamy, then gradually add powdered sugar, heavy cream, and vanilla extract, beating until fluffy.
- Frost the cooled cupcakes with the buttercream frosting using a piping bag or spatula.
Notes
For variations, consider adding mini chocolate chips, using cream cheese frosting, or adding spices like cayenne pepper for a kick.
- Prep Time: 20 minutes
- Cook Time: 20 minutes
- Category: Dessert
- Method: Baking
- Cuisine: American
Nutrition
- Serving Size: 1 cupcake
- Calories: 350
- Sugar: 30g
- Sodium: 200mg
- Fat: 15g
- Saturated Fat: 8g
- Unsaturated Fat: 5g
- Trans Fat: 0g
- Carbohydrates: 45g
- Fiber: 1g
- Protein: 3g
- Cholesterol: 40mg
Keywords: pumpkin cupcakes, buttercream frosting, fall dessert, cozy treat, baking
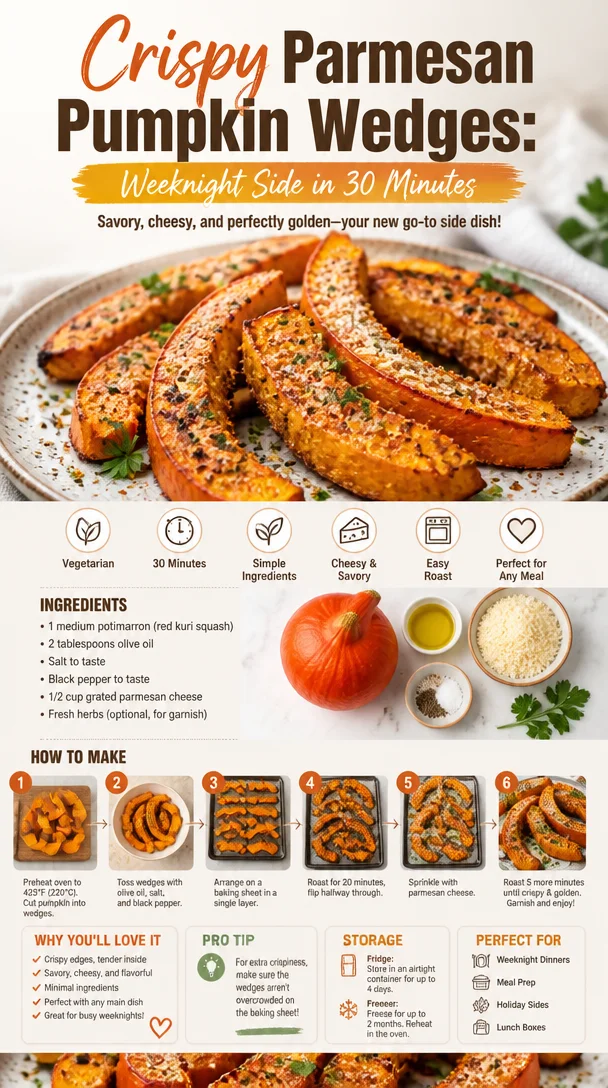
Crispy Parmesan Pumpkin Wedges: Weeknight Side in 30 Minutes
Roasted Pumpkin Wedges with Parmesan
Welcome to my cozy kitchen! I’m so glad you decided to join me today. Nothing brings warmth and comfort quite like the smell of something delicious roasting away in the oven, and that’s exactly what we’re about to dive into. Today, we’re focusing on a delightful autumn dish — Roasted Pumpkin Wedges with Parmesan. It’s the perfect blend of sweet, savory, and cheesy goodness, and let me tell you, this recipe will make your kitchen feel like a cozy haven.
When the leaves start to change and the air gets a little crisp, it’s time to break out those seasonal flavors. We’re talking pumpkins, spices, and all things that make you want to cozy up with a warm blanket and a satisfying meal. Whether you’re preparing a family dinner, a festive gathering, or just treating yourself to a soothing dish, roasted pumpkin wedges are here to steal the show.
Now, I’m not just sharing a recipe; I’m inviting you into a memory. Picture this: it was a chilly October afternoon, and I was in my grandmother’s kitchen, watching her expertly peel and chop freshly harvested pumpkins. The aroma of cinnamon and nutmeg wafted through the air, and I remember sneaking tastes of the buttery roasted wedges she’d make every year. The golden color and crispy edges were irresistible! It seems like just yesterday, but that experience shaped my love for cooking and the joy of sharing meals with loved ones.
In today’s blog, we’ll not only learn how to make these delightful pumpkin wedges, but I’ll also share tips, tricks, and everything you need to know to feel confident in your culinary journey. So, grab your favorite apron, turn on some music, and let’s get to cooking!
Personal Story
Growing up in the kitchen, my fondest memories are tied to the scents and flavors my grandmother created. Every autumn, she would prepare her famous roasted pumpkin wedges that quickly became a family favorite. I remember one autumn in particular. My cousins and I were all gathered for Thanksgiving, and the kitchen was buzzing with excitement and the aroma of spices.
As the golden pumpkin wedges browned in the oven, we waited eagerly at the table, laughing and sharing stories. When those wedges finally made their grand entrance, we all dug in, the crunchy Parmesan on top contrasting beautifully with the tender pumpkin. It wasn’t just a side dish; it was a moment of togetherness woven into the fabric of family traditions. Today, I carry that memory in my heart and in this recipe, hoping to bring a little bit of that warmth to your kitchen.
Ingredients
Here’s what you’ll need to create these scrumptious Roasted Pumpkin Wedges with Parmesan:
-
1 medium pumpkin (about 3–4 pounds): Choose a sugar pumpkin for the best flavor. While you can use any pumpkin, sugar pumpkins pack a sweeter taste. For a quicker alternative, butternut squash can be used.
-
3 tablespoons olive oil: This adds richness and helps the wedges crisp up beautifully. You can substitute avocado oil or melted coconut oil if you prefer.
-
Salt and pepper, to taste: Essential for enhancing all the flavors! Experiment with sea salt for a fine finish and fresh cracked pepper for a bit of heat.
-
1 teaspoon garlic powder: This adds a wonderful depth of flavor. Feel free to replace it with fresh minced garlic if you love that punchy freshness or smoked paprika for a twist.
-
1/2 cup grated Parmesan cheese: The magic ingredient! It gets deliciously crispy in the oven. If you’re looking for a dairy-free option, nutritional yeast can offer a cheesy flavor without the dairy.
-
1 teaspoon dried thyme or rosemary: These herbs provide a fragrant herbaceous note. Fresh herbs, if you have them, are an excellent substitute!
-
1/4 teaspoon red pepper flakes (optional): For those who like a little kick! Leave it out if you prefer a milder flavor.
Gather these simple ingredients, and we’ll be well on our way to creating something incredible!
Step-by-Step Instructions
Alright, let’s get down to business! Follow these easy steps to make your Roasted Pumpkin Wedges and elevate your kitchen skills along the way.
-
Preheat Your Oven: Start by preheating your oven to 425°F (220°C). A hot oven ensures that your pumpkin will roast beautifully and get that lovely caramelization we crave.
-
Prepare the Pumpkin: Carefully cut the pumpkin in half and scoop out the seeds and stringy insides. Don’t discard those seeds! You can roast them later for a tasty snack. Once cleaned, slice each half into wedges (about 1–2 inches thick).
-
Season the Pumpkin: In a large mixing bowl, combine the pumpkin wedges with olive oil, garlic powder, salt, pepper, and your choice of herbs. Use your hands to toss the wedges until they’re well coated. This step is crucial for ensuring each wedge is packed with flavor.
-
Arrange on a Baking Sheet: Next, lay the seasoned wedges out in a single layer on a baking sheet lined with parchment paper. Make sure they’re not overcrowded; we want them to roast, not steam.
-
Parmesan Time: Sprinkle the grated Parmesan cheese evenly over the wedges, making sure each one gets a good amount without being overloaded—balance is key!
-
Roast: Pop the baking sheet into your preheated oven and roast for about 25-30 minutes. After 15 minutes, flip the wedges over so they can crisp up nicely on all sides. Keep an eye on them towards the end; you want them golden brown but not burnt.
-
Finishing Touches: When done, the pumpkin should be fork-tender and beautifully glossy from the oil and cheese. It’s time for the final drizzle. A little more olive oil or a sprinkle of fresh herbs on top is the perfect finishing touch.
-
Let them Rest: Once you’ve taken them out of the oven, let them rest for a few minutes. They’ll continue to cook a little longer from the residual heat and be easier to handle!
And there you have it! Roasted Pumpkin Wedges with Parmesan that are not only delectable but also perfect for sharing with family and friends.
Serving Suggestions
To serve, arrange the roasted pumpkin wedges on a platter, garnishing with a sprinkle of fresh herbs like rosemary or thyme. For an added depth of flavor, you could drizzle a bit of balsamic reduction or a squeeze of fresh lemon juice over them. They make an exquisite starter or side dish next to roasted meats or as part of a vibrant autumn feast. Feel free to get creative — the presentation is part of the fun!
Recipe Variations
-
Spicy Maple Glaze: Drizzle the wedges with a mixture of maple syrup and hot sauce before roasting for a sweet and spicy flavor explosion!
-
Herbaceous Delight: Swap in different herbs such as sage or oregano for a refreshing twist that complements the pumpkin beautifully.
-
Cheesy Medley: Experiment with different cheeses like feta or goat cheese crumbled on top just before serving for a tangy finish.
-
Sweet and Savory: Add a sprinkle of cinnamon and brown sugar before roasting for a delightful sweet contrast to the savory notes.
-
Vegan Version: Omit the Parmesan cheese and enhance the flavors with a mix of nutritional yeast and a touch of soy sauce for umami goodness.
Chef’s Notes
This recipe has become one of my favorite go-to sides during the fall. It’s surprising how something so simple can evoke such warmth and nostalgia! Over the years, I’ve tweaked and played with the flavors. I even recall one Thanksgiving when I mistakenly used pumpkin pie spice instead of dried thyme! Surprisingly, the sweet aroma and flavor added a unique twist that my family still requests today.
Don’t be afraid to make this recipe your own! The kitchen is a blank canvas for creativity, and I encourage you to experiment.
FAQs and Troubleshooting
1. Why is my pumpkin mushy?
If your pumpkin turns out mushy, it may be due to overcrowding on the baking sheet, which leads to steaming instead of roasting. Ensure the wedges have enough space to roast evenly.
2. Can I use a different type of pumpkin?
Absolutely! While sugar pumpkins are ideal, you can also use butternut squash or any other variety. Just be aware that cooking times may vary depending on the pumpkin’s size.
3. How can I get my Parmesan to be crispier?
For extra crunch, try broiling the wedges for the last 2-3 minutes of cooking. Just keep a close eye on them — things can turn from golden to burnt quickly under the broiler!
4. Can I prep these ahead of time?
Yes! You can cut and toss the pumpkin wedges with seasonings a few hours ahead. Just pop them in the fridge until it’s time to roast.
Nutritional Info (optional)
While I don’t usually focus on calories when I’m enjoying my time in the kitchen, these roasted pumpkin wedges are about 120 calories per serving (for about 4 wedges), filled with vitamins A and C. They’re a deliciously nutritious addition to any meal!
I hope you’ve enjoyed this journey through the flavors of roasted pumpkin wedges! Remember, cooking is a celebration of experiences, flavors, and stories. So embrace the mess, share the love, and create beautiful memories in your kitchen! Happy cooking!
Print
Roasted Pumpkin Wedges with Parmesan
- Total Time: 45 minutes
- Yield: 4 servings 1x
- Diet: Vegetarian
Description
Delightful roasted pumpkin wedges topped with crispy Parmesan, perfect for autumn gatherings.
Ingredients
- 1 medium pumpkin (about 3–4 pounds)
- 3 tablespoons olive oil
- Salt and pepper, to taste
- 1 teaspoon garlic powder
- 1/2 cup grated Parmesan cheese
- 1 teaspoon dried thyme or rosemary
- 1/4 teaspoon red pepper flakes (optional)
Instructions
- Preheat your oven to 425°F (220°C).
- Prepare the pumpkin by cutting it in half and scooping out the seeds and stringy insides.
- Season the pumpkin wedges with olive oil, garlic powder, salt, pepper, and herbs in a mixing bowl.
- Arrange seasoned wedges in a single layer on a baking sheet lined with parchment paper.
- Sprinkle grated Parmesan cheese evenly over the wedges.
- Roast in the preheated oven for about 25-30 minutes, flipping halfway through.
- Finishing touches with olive oil or fresh herbs on top before serving.
- Let them rest for a few minutes before serving.
Notes
Experiment with different herbs or cheese for unique flavor variations.
- Prep Time: 15 minutes
- Cook Time: 30 minutes
- Category: Side Dish
- Method: Roasting
- Cuisine: American
Nutrition
- Serving Size: 4 wedges
- Calories: 120
- Sugar: 2g
- Sodium: 150mg
- Fat: 8g
- Saturated Fat: 2g
- Unsaturated Fat: 6g
- Trans Fat: 0g
- Carbohydrates: 15g
- Fiber: 3g
- Protein: 4g
- Cholesterol: 5mg
Keywords: pumpkin, roasted vegetables, autumn recipes, side dish, Parmesan
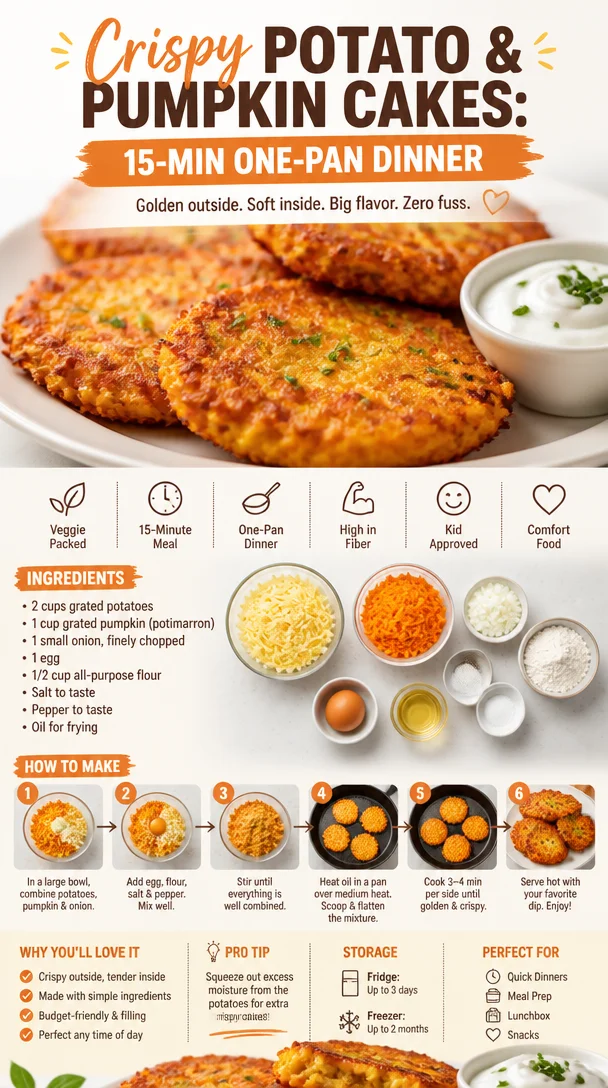
Crispy Potato & Pumpkin Cakes: 15-Min One-Pan Dinner
Crispy Potato and Pumpkin Cakes: A Cozy Culinary Delight
Welcome to my kitchen! Today, I’m taking you on a culinary journey that marries the comforting essence of potatoes with the warm, sweet notes of pumpkin. Imagine a cozy evening, the air filled with spice and warmth, and a golden brown platter of crispy potato and pumpkin cakes on the table. Ah! That’s the kind of magic we’re creating today!
I can still recall the first time I made these crispy delights. It was a chilly autumn evening, the kind that calls for comfort food, and in true Olivia fashion, I decided to whip up something special. Armed with a pumpkin I had picked from a local farm (because how could you resist?), I found myself experimenting in the kitchen. Before I knew it, the aroma of sizzling cakes filled the air, transporting me back to my grandma’s kitchen where similar flavors danced together.
Each bite is a little piece of home, a delicious burst of flavor that reminds you that cooking doesn’t have to be complicated to be extraordinary. So, roll up your sleeves, grab that apron (trust me, it’s going to get messy!), and let’s dive into the wonderful world of crispy potato and pumpkin cakes!
A Fond Memory of Flavor
One chilly evening when I was a child, my grandma invited me into her bustling kitchen while the scents of sweet cinnamon and roasted pumpkin filled the air. As she mashed and mixed, she shared stories of her childhood, her family, and the dinners they would have. I vividly remember the fun we had experimenting with potatoes and pumpkin, crafting little cakes that would later be fried to perfection. Our laughter intertwined with the sizzling sound of those cakes cooking, and the golden hue that emerged made it a picture-perfect moment.
As we sat down to eat those crispy creations, I felt a sense of belonging and warmth that only home-cooked meals can provide. It’s this very memory that inspires my love for food — the idea that every meal can be a story, a gathering of flavors, and an opportunity to bring people together. So, let’s keep that spirit alive and recreate this cozy dish together!
Ingredients
Gathering the perfect ingredients is key to bringing these crispy potato and pumpkin cakes to life. Here’s what you’ll need:
-
2 medium potatoes: For that classic fluffy texture. Russets are great for this recipe, but Yukon Golds work beautifully, too!
- Substitution Tip: If you want a creamier texture, opt for a starchy potato like Idaho.
-
1 cup pumpkin puree: This adds a sweet, earthy flavor while keeping the cakes moist.
- Chef Insight: Canned pumpkin is a time-saver, but if you have fresh pumpkin, go for it! Roast and pureé it before using.
-
1 big egg: This acts as a binder to hold everything together.
- Substitution Tip: For a vegan option, substitute with a flaxseed egg (1 tablespoon flaxseed meal + 2.5 tablespoons water, let it sit for 5 minutes).
-
1/2 cup all-purpose flour: For structure and that crispy exterior.
- Chef Insight: You can use gluten-free flour for a gluten-free version — just ensure it’s a good blend.
-
1 tsp salt: Enhances all the flavors; don’t skip it!
- Substitution Tip: Use less if you’re watching your sodium intake.
-
1/2 tsp black pepper: A little kick without overpowering the dish.
-
1/4 teaspoon paprika: Adds a hint of smokiness and color.
-
1/4 cup chopped fresh parsley: For a burst of freshness (or feel free to use cilantro if that’s your vibe!).
-
Cooking oil (for frying): I love using olive oil, but vegetable oil or avocado oil works well, too.
- Chef Insight: For deeper flavor, try bacon fat or duck fat if you’re feeling adventurous!
Step-by-Step Instructions
Now that we have our ingredients ready, it’s time to get cooking! Follow these steps, and we’ll turn that idea into a delicious reality.
-
Prep and Boil the Potatoes
Start by peeling the potatoes and cutting them into quarters. Place them in a pot of salted water and bring to a boil. Once boiling, reduce to a simmer for about 15-20 minutes or until they’re fork-tender. Here’s a little tip: you want them soft enough to mash easily but not so mushy they lose their personality!
-
Mash it Up!
Drain the potatoes and return them to the pot. With a potato masher or fork, mash them until smooth. You want no lumps here — this is your canvas! Let them cool a bit while we prepare the pumpkin.
-
Combine the Goodness
In a large mixing bowl, combine your mashed potatoes and pumpkin puree. Now here comes the fun part: crack that egg in, and sprinkle in the flour, salt, pepper, paprika, and fresh parsley. Use your hands to mix it all together until well combined. Don’t be afraid to get a little messy — that’s part of the joy of cooking!
-
Shape the Cakes
Now it’s time for creativity! Grab a handful of the mixture and shape it into patties, about 1/2 inch thick. This step is perfect for flexing your culinary muscles, so don’t worry about making them identical. You’re crafting little pieces of joy!
-
Fry, Fry, Fry!
Heat about 1/4 inch of oil in a non-stick skillet over medium heat. Once it’s shimmering (but not smoking), add the cakes in batches, making sure not to overcrowd the pan. Fry them for about 3-4 minutes on each side, or until golden brown and crispy. Flip them carefully — they have a tendency to be a bit delicate until they set!
Chef Hack: If you want to check if the oil is ready, drop a tiny bit of the batter in; if it sizzles, you’re good to go!
-
Drain Excess Oil
Once the cakes are beautifully golden, remove them from the pan and place them on a paper towel-lined plate to absorb any excess oil. This keeps them crispy and light!
Serving Suggestions
When it comes to plating, let’s keep it simple, beautiful, and inviting. Arrange the crispy potato and pumpkin cakes on a large platter, perhaps a sprinkle of fresh parsley for a pop of color. Pair them with a zesty dipping sauce, like a tangy yogurt or a spicy aioli, and don’t forget to serve them with a side of your favorite greens. A vibrant salad adds a lovely crunch and balances the richness!
Recipe Variations
Now let’s explore some fun variations to keep things exciting in the kitchen:
-
Cheesy Delight: Add 1/2 cup of shredded cheese (like cheddar or feta) to the batter for a cheesy twist.
-
Spice it Up: For those who love heat, toss in some red pepper flakes or finely chopped jalapeños.
-
Herb Infusion: Swap out the parsley for fresh thyme or rosemary for an aromatic touch.
-
Sweet Version: Go sweet by mixing in some maple syrup and a pinch of nutmeg — a perfect breakfast treat!
-
Vegetarian Protein: For an extra protein boost, mix in some cooked lentils or chickpeas into the batter; just mash them roughly for texture.
Chef’s Notes
Crispy potato and pumpkin cakes have been a part of my kitchen repertoire for years. They’ve evolved from a simple comfort dish into a refined recipe I love to share with friends and family. One time, during a family gathering, I made a gigantic batch, and believe it or not, they disappeared within minutes! It’s funny how food can create bonds; we ended up launching into stories of our childhood like it was a competition to share the best one!
Over time, I’ve learned that this recipe is not just about the ingredients, but about the love and memories that go into it. So whether you’re making it for a friend or just yourself, remember to sprinkle in some joy!
FAQs and Troubleshooting
1. My cakes are falling apart while frying. What did I do wrong?
This can happen if there isn’t enough flour or if the mixture is too wet. Always start with less pumpkin puree and gradually add more; you want a thick batter.
2. Can I bake these instead of frying?
Absolutely! Preheat your oven to 400°F (200°C), place the cakes on a parchment-lined baking sheet, and lightly spray or brush with oil. Bake for 25-30 minutes, flipping halfway through for an even crisp.
3. Can I freeze these cakes?
Yes! Once they’re cooked and cooled, place them in an airtight container between layers of parchment paper. Freeze for up to three months. Reheat in a toaster oven or skillet for best results.
4. What’s the best dipping sauce to serve with these cakes?
A creamy garlic yogurt sauce or a spicy sriracha mayo complements these cakes beautifully, balancing the flavors perfectly.
Nutritional Info
While I focus more on the joy of cooking rather than the numbers, I believe this dish offers a great balance of carbs, fiber, and protein—perfect for a hearty meal. If you’d like the specific nutritional breakdown, please let me know, and we can dive into the details together!
There you have it! A delicious recipe for crispy potato and pumpkin cakes that’ll warm your heart and fill your belly. I hope you enjoy making these as much as I do. Remember, cooking is an adventure full of flavor, love, and, most importantly, joy! Bon appétit!
Print
Crispy Potato and Pumpkin Cakes
- Total Time: 35 minutes
- Yield: 4 servings 1x
- Diet: Vegetarian
Description
A cozy blend of fluffy potatoes and sweet pumpkin, these crispy cakes are the perfect comfort food for chilly evenings.
Ingredients
- 2 medium potatoes (Russet or Yukon Gold)
- 1 cup pumpkin puree
- 1 big egg
- 1/2 cup all-purpose flour
- 1 tsp salt
- 1/2 tsp black pepper
- 1/4 tsp paprika
- 1/4 cup chopped fresh parsley
- Cooking oil (for frying)
Instructions
- Prep and boil the potatoes by peeling and cutting them into quarters; boil in salted water for 15-20 minutes until fork-tender.
- Mash the drained potatoes until smooth and let cool slightly.
- Combine the mashed potatoes with pumpkin puree, egg, flour, salt, pepper, paprika, and parsley in a large bowl.
- Shape the mixture into patties, about 1/2 inch thick.
- Fry the cakes in hot oil for 3-4 minutes on each side until golden and crispy.
- Drain excess oil on paper towels.
Notes
Feel free to add cheese, spices, or herbs to customize your cakes. Serve with a zesty sauce for extra flavor!
- Prep Time: 15 minutes
- Cook Time: 20 minutes
- Category: Main Course
- Method: Frying
- Cuisine: American
Nutrition
- Serving Size: 1 serving
- Calories: 350
- Sugar: 5g
- Sodium: 400mg
- Fat: 12g
- Saturated Fat: 4g
- Unsaturated Fat: 6g
- Trans Fat: 0g
- Carbohydrates: 45g
- Fiber: 3g
- Protein: 15g
- Cholesterol: 30mg
Keywords: potato cakes, pumpkin recipes, comfort food, vegetarian recipes, cozy meals
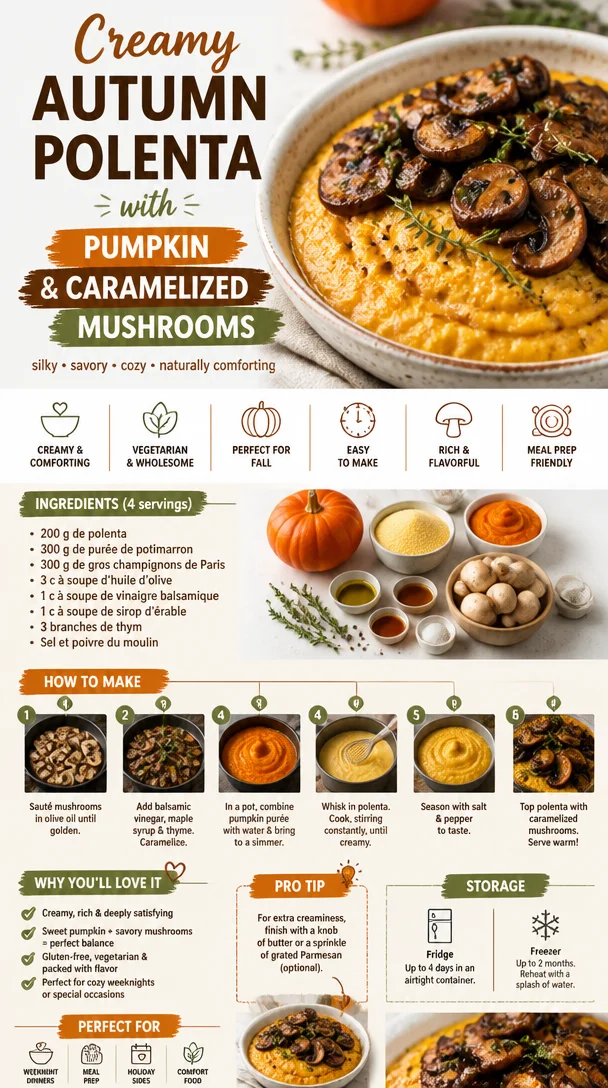
Creamy Autumn Polenta with Pumpkin and Caramelized Mushrooms
Polenta d’Automne au Potimarron et Champignons Caramélisés: A Cozy Fall Dish
Welcome to my kitchen! Today, I’m thrilled to share with you a dish that encapsulates the warm, cozy essence of fall — Polenta d’Automne au Potimarron et Champignons Caramélisés. This dish is not just a feast for the eyes; it’s a comforting embrace in a bowl, complete with creamy polenta, sweet roasted pumpkin, and savory caramelized mushrooms. If you’re someone who finds joy in culinary adventures, this recipe will surely light up your kitchen and your heart.
A Memory to Savor
Growing up, autumn meant more than just the changing leaves; it meant my grandmother’s kitchen filled with the rich aroma of roasting vegetables and the cozy warmth that only a slow-cooked meal can provide. I remember the excitement brewing in our little farmhouse as my grandma would invite us to join her in preparing her famed autumn feast. On Saturdays, we would gather to make polenta while talking about our week, sharing stories, and sometimes even sneaking bites when we thought she wasn’t looking.
Polenta was always a staple, creamy and comforting, and it paired perfectly with the seasonal produce she had picked from the garden. One year, she introduced me to potimarron, a type of pumpkin that has a uniquely sweet flavor that meshes beautifully with polenta. Paired with mushrooms, caramelized until golden and lusciously tender, it was a dish that was filled with layers of flavors and memories, nurtured with love. That’s the spirit of this Polenta d’Automne — it’s about warm kitchens, laughter, and shared moments over delicious food.
Ingredients
Let’s gather our ingredients for this delightful fall dish:
-
Polenta: This is the star of the show! Opt for coarse or medium-ground polenta; it’ll yield that delightful creamy texture. If you’re looking for a gluten-free option, this is your go-to choice!
-
Potimarron (or pumpkin): This sweet variety of pumpkin adds a hint of sweetness and earthiness. If you can’t find potimarron, butternut squash or even acorn squash are terrific substitutions.
-
Mushrooms: I love using a mix of cremini and shiitake for their rich flavors. However, button mushrooms, oyster mushrooms, or any variety you prefer will work just as well!
-
Vegetable broth: Using broth instead of water enhances the flavor of the polenta. For a vegan option, stick to a vegetable broth; chicken broth works as a tasty alternative too.
-
Onion: Sweet onions or shallots add depth to the dish. You can substitute with green onions for a fresher flavor.
-
Garlic: Fresh garlic gives a fragrant kick. You can use pre-minced garlic in a pinch, but fresh is always better.
-
Olive oil: A drizzle of high-quality extra virgin olive oil brings out the bold flavors. If you want a nuttier taste, feel free to use toasted sesame oil.
-
Thyme: Fresh thyme pairs well with both the mushrooms and the potimarron. Dried thyme can serve as a substitute, just use a little less since dried herbs are more potent.
-
Parmesan cheese (optional): For a cheesy finish, sprinkle some grated Parmesan over your polenta before serving. If you’re vegan, try nutritional yeast for that cheesy flavor without the dairy.
-
Salt and pepper: Essential seasonings to enhance all the flavors. Always taste and adjust!
Step-by-Step Instructions
Now that we’ve got our ingredients gathered, let’s dive into the process:
-
Prepare the Potimarron: Begin by preheating your oven to 400°F (200°C). Cut the potimarron in half, scoop out the seeds, and slice it into wedges. There’s no need to peel it, as the skin becomes deliciously tender when roasted. Toss the wedges in a bit of olive oil, salt, and pepper, and spread them on a baking sheet. Roast for about 25-30 minutes or until golden and soft.
Chef’s Tip: If your potimarron is particularly firm, microwave it for a few minutes before slicing. This makes it much easier to handle!
-
Cook the Polenta: In a medium saucepan, bring 4 cups of vegetable broth to a gentle boil. Slowly whisk in 1 cup of polenta, reducing the heat to low. Stir continuously for about 25-30 minutes until it thickens and becomes creamy. If it gets too thick, don’t hesitate to add a splash more broth or water.
Chef Hack: Add a little bit of butter or olive oil to the polenta and stir until melted right before serving for extra creaminess.
-
Sauté the Onions and Garlic: While your polenta is cooking, heat another splash of olive oil in a skillet over medium heat. Add diced onions and sauté them until they become translucent, about 3-5 minutes. Toss in minced garlic and sauté for an additional minute until fragrant.
Pro Tip: If you want to add an extra layer of flavor, sprinkle a pinch of sugar when you add the onions. It helps to caramelize them beautifully!
-
Cook the Mushrooms: Now, add your cleaned mushrooms to the onion and garlic mixture. Season with salt and pepper, then cook them until they’re caramelized, about 7-8 minutes, stirring occasionally. The mushrooms should be browned and juicy.
Secret: For more flavor, you can deglaze the pan with a splash of white wine or broth, letting it reduce and soak into the mushrooms.
-
Combine and Flavor: When your potimarron is roasted, mash up a few wedges into the polenta for a vibrant color and sweetness. Stir in sautéed mushrooms, thyme, and season with more salt and pepper to taste. Feel free to adjust based on your preference.
-
Serve: Once everything is combined and heated through, it’s time to get serving! Scoop the creamy polenta into bowls, top it with the remaining roasted potimarron and caramelized mushrooms, and sprinkle with Parmesan cheese if desired.
Serving Suggestions
For an inviting presentation, serve the polenta in rustic bowls topped with the caramelized mushrooms and roasted potimarron. A sprinkle of fresh thyme or chili flakes can bring a pop of color and an extra punch of flavor. You might even consider drizzling a little balsamic reduction over the top for a tangy finish. Ideal for cozy dinners with friends or as a warm dish for a chilly evening in!
Recipe Variations
-
Spicy Kick: Add chopped fresh chili or sprinkle some red pepper flakes for a spicy twist.
-
Herby Infusion: Experiment with other herbs! Sage or rosemary add a great flavor profile, especially with the autumnal ingredients.
-
Seafood Delight: Incorporate sautéed shrimp or scallops for a different protein touch.
-
Nutty Texture: Top your dish with toasted pine nuts or walnuts for a gratifying crunch.
Chef’s Notes
As I’ve made this dish over the years, I’ve learned to embrace the flexibility of polenta. It’s not just about the ingredients, but how you enjoy the cooking experience. Sometimes it’s about going off-script — adding in your favorite seasonal veggies or making it heartier with beans for protein. Once, I had my niece help me make this meal, and we laughed as we snuck bites of polenta while the kitchen filled with warmth. It’s moments like these that truly make a recipe special.
FAQs and Troubleshooting
Q: My polenta turned out too grainy. What went wrong?
A: This often happens when the polenta is added too quickly to a boiling pot of broth. To avoid this, whisk it in slowly!
Q: Can I prepare this ahead of time?
A: Yes! You can make the polenta and store it in the fridge. Reheat on the stovetop and add a little broth to loosen it back up.
Q: What if I don’t have mushrooms?
A: If mushrooms aren’t your thing, feel free to leave them out or replace them with sautéed spinach or kale for some green goodness.
Q: Can this dish be frozen?
A: Yes, the polenta can be frozen, but mushrooms should be cooked fresh for the best texture. Just note that it may slightly alter the creaminess and texture once thawed.
Nutritional Info
While specific nutritional stats can vary based on brands and serving sizes, this Polenta d’Automne is generally a great source of complex carbohydrates from the polenta, vitamins A and C from the potimarron, and protein if topped with cheese or paired with shrimp. It also carries healthy fats from the olive oil, making it a wholesome, hearty dish that’s comforting and satisfying.
So there you have it! A wholesome, heartwarming dish that’s not just a recipe but a heartfelt experience. Embrace the season, gather loved ones around the table, and let this Polenta d’Automne carry warm memories and new beginnings in every bite. Happy cooking, foodies!
Print
Polenta d’Automne au Potimarron et Champignons Caramélisés
- Total Time: 75 minutes
- Yield: 4 servings 1x
- Diet: Vegetarian
Description
A cozy fall dish featuring creamy polenta, sweet roasted pumpkin, and savory caramelized mushrooms. Perfect for warm gatherings and heartfelt moments.
Ingredients
- 1 cup polenta
- 1 small potimarron (or pumpkin)
- 2 cups mixed mushrooms (cremini and shiitake)
- 4 cups vegetable broth
- 1 onion (sweet or shallots)
- 2 cloves garlic
- 2 tablespoons olive oil
- 1 teaspoon thyme (fresh or dried)
- 1/4 cup Parmesan cheese (optional)
- Salt and pepper to taste
Instructions
- Preheat your oven to 400°F (200°C). Cut the potimarron in half, scoop out the seeds, and slice into wedges. Toss with olive oil, salt, and pepper, then roast for 25-30 minutes.
- Bring 4 cups of vegetable broth to a gentle boil. Slowly whisk in 1 cup of polenta and reduce heat to low. Stir continuously for 25-30 minutes until thick and creamy.
- Heat olive oil in a skillet over medium heat. Sauté diced onions until translucent, then add minced garlic and sauté until fragrant.
- Add cleaned mushrooms to the onion and garlic mixture. Season with salt and pepper, cooking for about 7-8 minutes until caramelized.
- Once the potimarron is roasted, mash some wedges into the polenta. Stir in the sautéed mushrooms and thyme, adjusting seasoning to taste.
- Scoop the creamy polenta into bowls and top with remaining roasted potimarron and mushrooms. Sprinkle with Parmesan cheese if desired.
Notes
For extra creaminess, stir in a bit of butter or additional olive oil into the polenta before serving.
- Prep Time: 15 minutes
- Cook Time: 60 minutes
- Category: Main Course
- Method: Baking
- Cuisine: Italian
Nutrition
- Serving Size: 1 serving
- Calories: 400
- Sugar: 6g
- Sodium: 450mg
- Fat: 15g
- Saturated Fat: 3g
- Unsaturated Fat: 8g
- Trans Fat: 0g
- Carbohydrates: 52g
- Fiber: 4g
- Protein: 12g
- Cholesterol: 10mg
Keywords: polenta, pumpkin, fall recipe, vegetarian dish, cozy meal
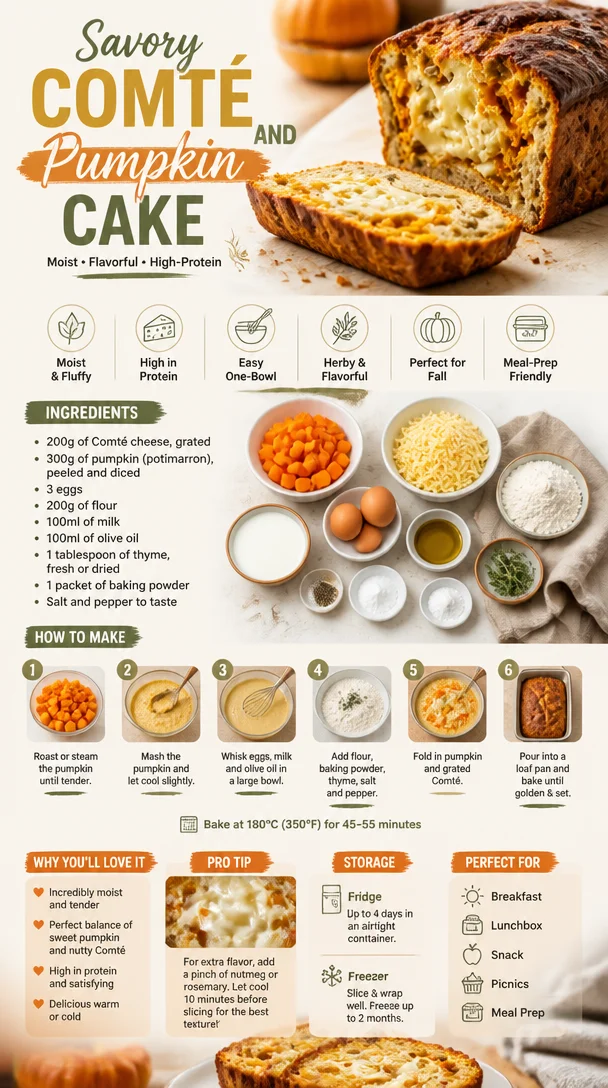
Savory Comté and Pumpkin Cake
A Homey Fall Delight: Savory Comté and Pumpkin Cake
Welcome to the cozy corner of my kitchen where the aroma of baked goods dances through the air, mingling with the comforting smell of simmering spices! If you’re like me and believe that food should be a delightful embrace for the soul and a gathering point for loved ones, then you’re in for a treat! Today, we’re diving into the delightful world of Savory Comté and Pumpkin Cake.
What makes this dish special? It’s the perfect marriage of sweet and savory—a brilliant balance that transforms the humble pumpkin into a star ingredient! Think of those crisp fall nights when the leaves crunch underfoot, and all you want is a warm slice of something that feels like a hug. This cake does just that. It’s not your everyday dessert; its rich, nutty Comté cheese and earthy pumpkin create a flavor bomb that you’ll return to again and again.
The first time I whipped up this unique cake, I was experimenting in my kitchen, trying to find a way to blend seasonal ingredients with savory flair. The blend of Comté cheese—a nutty, creamy treasure from France—and the sweet, vibrant pumpkin caught my imagination. I had the autumn spices dancing in the back of my mind, and I thought, “Why not?” The crown jewel was when I served it at a gathering with friends. They were mesmerized, taking a moment of bliss before uttering, “More, please!” That moment stuck with me, and ever since, this cake has earned a treasured place in my recipe collection.
Let’s set off on this culinary adventure together and craft a slice of warmth and flavor!
Ingredients
For this delectable Savory Comté and Pumpkin Cake, gather the following:
-
All-purpose flour (2 cups): This is the base of our cake. If you’re looking for a gluten-free alternative, a blend of almond flour and tapioca flour works wonders.
-
Pumpkin puree (1 cup): Fresh or canned will do! If you’re using fresh pumpkin, ensure it’s roasted and pureed until smooth. It’s the star ingredient, bringing moisture and sweetness.
-
Grated Comté cheese (1 cup): This French cheese adds a nutty, rich depth. If you can’t find Comté, Gruyère or a sharp cheddar can be substituted for a similar flavor.
-
Eggs (3 large): These wonderful little bundles bind our ingredients together. For a vegan version, you can use flax eggs (1 tablespoon flaxseed meal mixed with 2.5 tablespoons water = 1 egg).
-
Baking powder (2 teaspoons): This is essential for leavening, giving the cake its lightness.
-
Salt (1 teaspoon): Just enough to enhance the flavors without making it salty!
-
Olive oil (1/2 cup): Adds moisture and flavor. You can use melted butter for a richer taste.
-
Warm spices (cinnamon, nutmeg, and black pepper, 1 teaspoon each): These bring a cozy warmth—perfect for fall!
-
Chopped fresh herbs (rosemary or sage, 2 tablespoons): Dried herbs work too! They add an aromatic touch, making the flavors sing.
-
Honey or maple syrup (1/4 cup): For a hint of sweetness without being overpowering.
Step-by-Step Instructions
Step 1: Preheat Your Oven
Preheat your oven to 350°F (175°C). While your oven warms up, grease a loaf pan or line it with parchment paper for easy release.
Step 2: Combine Your Dry Ingredients
In a large mixing bowl, whisk together the flour, baking powder, salt, and spices. This step is crucial! It evenly distributes the leavening agent and spices, ensuring every bite is perfectly seasoned.
Step 3: Mix the Wet Ingredients
In another bowl, beat the eggs and slowly whisk in the pumpkin puree, olive oil, and honey or maple syrup until combined. And here’s a fun chef hack—use a hand mixer on low to really integrate these ingredients if you want a super smooth batter!
Step 4: Marry Wet and Dry
Gradually add the wet mixture to the dry ingredients, folding gently with a spatula. Be cautious here; over-mixing can lead to a dense texture—nobody wants that!
Step 5: Cheese and Herbs Time
Once mixed, fold in the grated Comté cheese and chopped herbs. This is where the flavors start to unite beautifully. If you want to sneak in a little extra goodness, add some toasted pumpkin seeds for crunch!
Step 6: Pour and Bake
Carefully pour the batter into your prepared loaf pan, smoothing the top with a spatula. Pop it in the oven, and let it work its magic for 45-55 minutes or until a toothpick inserted comes out clean.
Step 7: Cooling
Once baked, let your cake cool in the pan for 10 minutes before transferring it to a wire rack. This way, you ensure it keeps its shape and doesn’t stick!
Step 8: Slice and Serve
Now the moment we’ve all been waiting for! Slice into the loaf, and you’ll see the warm, savory aroma swirling in the air. Serve it warm or at room temperature with a pat of butter, or enjoy it on its own—the flavors are heavenly!
Serving Suggestions
Plate your delightful Savory Comté and Pumpkin Cake with a sprinkle of fresh herbs on top—a little flair never hurts! It pairs wonderfully with a side salad dressed in vinaigrette, or you could serve it as an appetizer with a warm savory spread.
Recipe Variations
Feeling adventurous? Here are a few variations to consider:
-
Spicy Kick: Toss in some finely chopped jalapeños or a dash of cayenne for a spicy twist!
-
Cheese Lovers: Experiment with different kinds of cheese, such as feta or goat cheese, for tanginess.
-
Nutty Addition: Add some chopped walnuts or pecans for added texture and flavor.
-
Herb Variations: Swap rosemary or sage for fresh thyme or chives for a different herbal profile.
-
Vegan Delight: Use plant-based substitutes for eggs and dairy while keeping the rest of the recipe the same.
Chef’s Notes
This recipe has a special place in my heart. It started as a fun experiment during pumpkin season, leading to family gatherings where everyone fought over the last slice! I remember one Thanksgiving where I presented this cake—my relatives were initially skeptical about pumpkin in a savory context, but their eyes lit up after the first bite. That’s how I knew I had something special!
Over the years, I’ve adapted the recipe, making slight adjustments based on what ingredients were available, but this version really comes together perfectly.
FAQs and Troubleshooting
1. Why is my cake dense?
If your cake turns out dense, you might have overmixed the batter or could’ve used too much flour. Always measure flour carefully—spoon it gently into your measuring cup and level it off.
2. Can I freeze this cake?
Absolutely! Let it cool completely, then wrap it tightly in plastic wrap and foil before freezing. It should last for up to 3 months. To thaw, simply leave it in the fridge overnight.
3. My cake is too dry; how can I fix this next time?
Overbaking is often the culprit for dryness. Get to know your oven and check your cake a few minutes before the suggested baking time. Once the toothpick comes out clean but not overly dry, take it out!
4. Can I use fresh pumpkin instead of canned?
Yes! Just be sure to roast it until soft and blend it into a smooth puree. The fresh flavor is delightful, adding a sweet, earthy note to your cake!
Nutritional Info
(If applicable based on recipe context)
Each slice of Savory Comté and Pumpkin Cake is not just a treat for your taste buds, but also packs a punch of nutrients from the pumpkin and healthy fats from the olive oil. A slice typically contains around:
- Calories: 250
- Protein: 5g
- Carbohydrates: 30g
- Fat: 12g
(Check specific ingredients and quantities for precise values.)
And there you have it! Your homemade Savory Comté and Pumpkin Cake, ready to fill your kitchen with warmth and love. I can’t wait to hear how your baking adventure goes! Remember, the kitchen is about experimenting, sharing joy, and creating memories—so let those aprons get messy! Enjoy every bite!
Print
Savory Comté and Pumpkin Cake
- Total Time: 70 minutes
- Yield: 8 servings 1x
- Diet: Vegetarian
Description
A delightful blend of sweet and savory, this cake features the rich flavors of Comté cheese and pumpkin, perfect for cozy fall gatherings.
Ingredients
- 2 cups All-purpose flour
- 1 cup Pumpkin puree
- 1 cup Grated Comté cheese
- 3 large Eggs
- 2 teaspoons Baking powder
- 1 teaspoon Salt
- 1/2 cup Olive oil
- 1 teaspoon Cinnamon
- 1 teaspoon Nutmeg
- 1 teaspoon Black pepper
- 2 tablespoons Chopped fresh herbs (rosemary or sage)
- 1/4 cup Honey or maple syrup
Instructions
- Preheat your oven to 350°F (175°C) and grease a loaf pan or line it with parchment paper.
- Combine the flour, baking powder, salt, and spices in a large mixing bowl.
- Mix the eggs, pumpkin puree, olive oil, and honey/maple syrup in another bowl until combined.
- Add the wet mixture to the dry ingredients, folding gently with a spatula.
- Fold in the grated Comté cheese and chopped herbs.
- Pour the batter into the prepared loaf pan and smooth the top.
- Bake for 45-55 minutes or until a toothpick inserted comes out clean.
- Let the cake cool in the pan for 10 minutes before transferring to a wire rack.
- Slice and serve warm or at room temperature.
Notes
This cake pairs well with a side salad or can be enjoyed on its own. Feel free to experiment with different cheeses and spices!
- Prep Time: 15 minutes
- Cook Time: 55 minutes
- Category: Main Course
- Method: Baking
- Cuisine: French
Nutrition
- Serving Size: 1 slice
- Calories: 250
- Sugar: 5g
- Sodium: 400mg
- Fat: 12g
- Saturated Fat: 4g
- Unsaturated Fat: 6g
- Trans Fat: 0g
- Carbohydrates: 30g
- Fiber: 2g
- Protein: 5g
- Cholesterol: 30mg
Keywords: pumpkin cake, savory cake, Comté cheese, fall recipes

Ingredient No-Bake Pumpkin Oreo Balls for Halloween
No-Bake Pumpkin Shaped Oreo Balls: A Cozy Halloween Treat
Welcome to my kitchen! It’s that magical time of year when the leaves turn golden, the air turns crisp, and every corner of the world is filled with the pumpkin-spiced goodness that makes our hearts sing. Today, I’m sharing a delightfully easy and mouthwatering recipe for No-Bake Pumpkin Shaped Oreo Balls that will elevate your fall festivities. Whether you’re throwing a Halloween party, looking for a cozy treat to enjoy with a warm cup of cider, or simply indulging your sweet tooth, these adorable pumpkin creations are a must-try.
I don’t know about you, but there’s something special about treats that come together without the need for an oven. This recipe is not only a breeze to whip up but can also be a fun activity to share with friends or the little ones in your life. Imagine rolling those Oreo balls and shaping them into little pumpkins—it’s as delightful as it sounds!
So, grab your favorite apron, cue the upbeat music, and let’s get started on this pumpkin-shaped adventure!
A Sweet Memory with a Twist
Growing up, my family made baking a weekend tradition. I can vividly remember the warmth of the kitchen, the sound of laughter, and the scent of freshly baked goodies wafting through the air. One particular Halloween, my mom decided to shake things up by trying a new recipe that used Oreos—my all-time favorite cookie! We dubbed them “Oreo ghosts” as they were rolled into ghost shapes with white chocolate coating. That lovely experience inspired me to create a pumpkin version, which became a hit at our family gatherings.
Every bite of these No-Bake Pumpkin Shaped Oreo Balls reminds me of those sweet childhood memories spent in the kitchen. I loved the way my family would gather around the table, excited to decorate our treats with colorful sprinkles and edible eyes. Now, whenever I make these pumpkin balls, I think back to that sunny Halloween, filled with laughter and chocolate smudges on our cheeks.
Ingredients
Here’s what you’ll need to create these adorable pumpkin Oreo balls:
-
Oreo Cookies (36 cookies)
- Chef Insight: Classic Oreos work best for this recipe, but feel free to experiment with other flavored varieties. Mint Oreos add a surprising twist!
-
Cream Cheese (8 oz)
- Substitution Tip: If you’re looking for a lighter option, you can use reduced-fat cream cheese. Just make sure it’s softened for easier mixing.
-
Orange Candy Melts (1 cup)
- Chef Hack: If you can’t find orange candy melts, you can mix white and yellow candy melts in equal parts to create an orange hue.
-
Green Sprinkles or Candy (for decoration)
- Quick Insight: You can use mini chocolate chips or green M&Ms instead of sprinkles for a fun pop of color.
-
Gel Food Coloring (optional)
- Recommendation: For the perfect shade of orange, use gel food coloring to tint your white chocolate if you prefer a homemade touch.
-
Styrofoam (or similar) block for shaping
- Chef Note: This is optional, but it makes it much easier to shape and display the pumpkin balls while they set!
Step-by-Step Instructions
-
Crush the Oreos: Place the Oreo cookies in a food processor and pulse until finely crushed. If you don’t have a food processor, you can also place them in a zip-top bag and crush them with a rolling pin. This part is a great way to get the kids involved!
-
Mix in the Cream Cheese: In a large bowl, combine the crushed Oreos with the softened cream cheese. Use a spatula or your hands to mix until the mixture is well combined and forms a dough. This is the perfect time to get your hands a little dirty—trust me, it’s worth it!
-
Chill the Mixture: Cover the mixture and refrigerate for about 30 minutes. Chilling helps the mixture firm up, making it easier to shape the balls.
-
Shape the Pumpkin Balls: Once chilled, take small portions of the mixture and roll them into about 1-inch balls. Place them onto a baking sheet lined with parchment paper. If you want to make them more pumpkin-like, gently press the top of each ball to form a slight indentation.
-
Melt the Orange Candy Coating: Following the package instructions, melt the orange candy melts in a microwave-safe bowl, stirring every 30 seconds to avoid burning. If you’re using food coloring, this is where you’d add it!
-
Coat the Pumpkin Balls: Dip each ball in the melted orange coating. Let any excess chocolate drip off, and then transfer it back onto the baking sheet.
-
Add the Green Toppers: While the orange coating is still wet, place a green sprinkle or candy on the top to serve as the pumpkin stem.
-
Let Them Set: Allow the no-bake pumpkin balls to cool until the candy coating has hardened. You can speed this process up by placing them in the refrigerator.
Serving Suggestions
Once your No-Bake Pumpkin Shaped Oreo Balls are set, it’s time to serve! You can arrange them on a festive platter, perhaps sprinkled with a few autumn-themed decorations like faux leaves or mini pumpkins. Don’t forget to leave some room for little hands to come in and grab their favorites!
For an extra touch, you could place each pumpkin ball on a lollipop stick to create fun pumpkin pops that are easy to grab and enjoy.
Recipe Variations
Here are a few creative twists on my No-Bake Pumpkin Shaped Oreo Balls:
-
Spiced Pumpkin Flavor: Add a teaspoon of pumpkin pie spice to the Oreo mixture for an extra layer of fall flavor.
-
Chocolate Drizzle: After the orange coating has set, drizzle some melted dark or white chocolate over them for a decorative touch.
-
Nut Butter Swirl: Mix a tablespoon of almond or peanut butter into the Oreo and cream cheese dough for a unique, nutty flavor.
-
Different Shapes: Instead of pumpkins, you can shape these into ghosts or acorns. Just adjust the decoration accordingly!
Chef’s Notes
As someone who cherishes cozy moments in the kitchen, I’ve experimented a lot with these pumpkin Oreo balls over the years. They started as just a fun Halloween treat, but they’ve evolved into a go-to recipe for family gatherings, holiday parties, and even cozy game nights. I love how versatile they are—you can dress them up, or keep it simple!
I also remember one time forgetting to add the green decorations, and they still turned out delicious! It reminded me that perfection isn’t necessary in cooking; what truly matters is the love and joy shared around the meal.
FAQs and Troubleshooting
Q: My chocolate coating is too thick. What can I do?
A: If your candy melts feel thick, try adding a small teaspoon of vegetable oil to thin it out. This will make it easier to dip and create a nice even coating.
Q: Can I use regular cream cheese?
A: Absolutely! Just ensure that it’s softened so that it mixes well with the Oreo crumbs.
Q: How long will these last?
A: Properly stored in an airtight container in the fridge, these treats should last about a week. They’re perfect to make ahead for parties!
Q: What do I do if the pumpkin balls fall apart?
A: If your balls are too crumbly, try adding a little more cream cheese to the mixture. If they feel too soft, a spell in the refrigerator will help firm them up.
Now it’s time to gather your ingredients and bring the magic of fall into your kitchen. I can’t wait to hear how you enjoy these No-Bake Pumpkin Shaped Oreo Balls! Happy cooking and happy memories!
Print
No-Bake Pumpkin Shaped Oreo Balls
- Total Time: 45 minutes
- Yield: 24 balls 1x
- Diet: Vegetarian
Description
Delightfully easy No-Bake Pumpkin Shaped Oreo Balls, perfect for Halloween parties and cozy treats.
Ingredients
- 36 Oreo Cookies
- 8 oz Cream Cheese, softened
- 1 cup Orange Candy Melts
- Green Sprinkles or Candy (for decoration)
- Gel Food Coloring (optional)
- Styrofoam block for shaping (optional)
Instructions
- Crush the Oreos: Place the Oreo cookies in a food processor and pulse until finely crushed.
- Mix in the Cream Cheese: In a large bowl, combine the crushed Oreos with the softened cream cheese.
- Chill the Mixture: Cover the mixture and refrigerate for about 30 minutes.
- Shape the Pumpkin Balls: Once chilled, take small portions of the mixture and roll them into about 1-inch balls.
- Melt the Orange Candy Coating: Melt the orange candy melts in a microwave-safe bowl.
- Coat the Pumpkin Balls: Dip each ball in the melted orange coating and let any excess drip off.
- Add the Green Toppers: While the orange coating is still wet, place a green sprinkle or candy on the top.
- Let Them Set: Allow the no-bake pumpkin balls to cool until the candy coating has hardened.
Notes
These pumpkin Oreo balls can be decorated in various ways, and can also be shaped into other festive shapes like ghosts or acorns.
- Prep Time: 15 minutes
- Cook Time: 30 minutes
- Category: Dessert
- Method: No-Bake
- Cuisine: American
Nutrition
- Serving Size: 1 ball
- Calories: 120
- Sugar: 15g
- Sodium: 70mg
- Fat: 7g
- Saturated Fat: 4g
- Unsaturated Fat: 2g
- Trans Fat: 0g
- Carbohydrates: 14g
- Fiber: 0g
- Protein: 1g
- Cholesterol: 15mg
Keywords: no-bake, pumpkin dessert, Halloween treats, Oreo balls




