
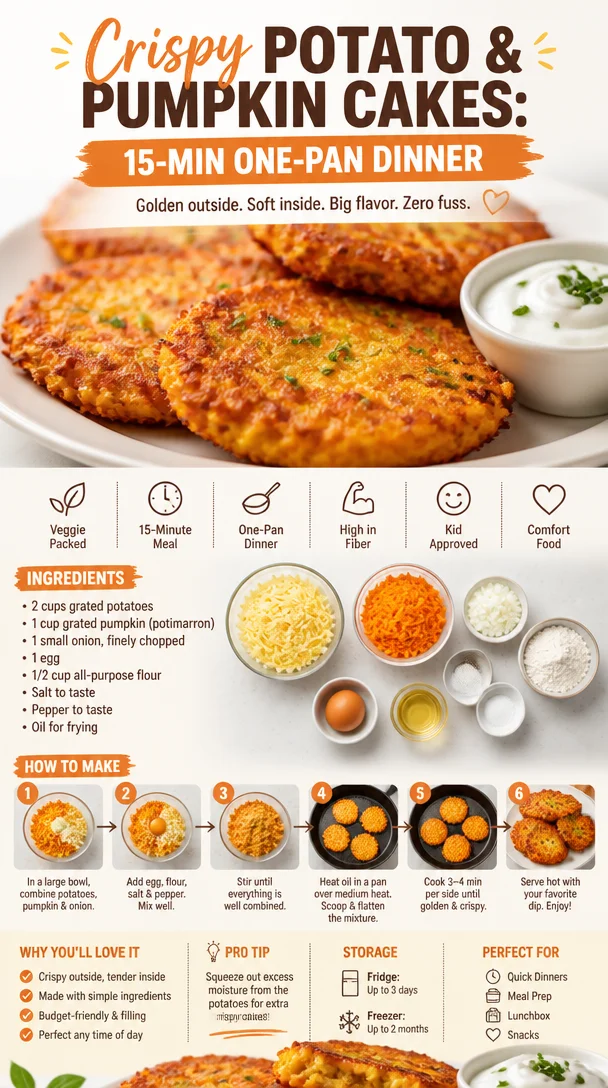
Crispy Potato & Pumpkin Cakes: 15-Min One-Pan Dinner
Crispy Potato and Pumpkin Cakes: A Cozy Culinary Delight
Welcome to my kitchen! Today, I’m taking you on a culinary journey that marries the comforting essence of potatoes with the warm, sweet notes of pumpkin. Imagine a cozy evening, the air filled with spice and warmth, and a golden brown platter of crispy potato and pumpkin cakes on the table. Ah! That’s the kind of magic we’re creating today!
I can still recall the first time I made these crispy delights. It was a chilly autumn evening, the kind that calls for comfort food, and in true Olivia fashion, I decided to whip up something special. Armed with a pumpkin I had picked from a local farm (because how could you resist?), I found myself experimenting in the kitchen. Before I knew it, the aroma of sizzling cakes filled the air, transporting me back to my grandma’s kitchen where similar flavors danced together.
Each bite is a little piece of home, a delicious burst of flavor that reminds you that cooking doesn’t have to be complicated to be extraordinary. So, roll up your sleeves, grab that apron (trust me, it’s going to get messy!), and let’s dive into the wonderful world of crispy potato and pumpkin cakes!
A Fond Memory of Flavor
One chilly evening when I was a child, my grandma invited me into her bustling kitchen while the scents of sweet cinnamon and roasted pumpkin filled the air. As she mashed and mixed, she shared stories of her childhood, her family, and the dinners they would have. I vividly remember the fun we had experimenting with potatoes and pumpkin, crafting little cakes that would later be fried to perfection. Our laughter intertwined with the sizzling sound of those cakes cooking, and the golden hue that emerged made it a picture-perfect moment.
As we sat down to eat those crispy creations, I felt a sense of belonging and warmth that only home-cooked meals can provide. It’s this very memory that inspires my love for food — the idea that every meal can be a story, a gathering of flavors, and an opportunity to bring people together. So, let’s keep that spirit alive and recreate this cozy dish together!
Ingredients
Gathering the perfect ingredients is key to bringing these crispy potato and pumpkin cakes to life. Here’s what you’ll need:
-
2 medium potatoes: For that classic fluffy texture. Russets are great for this recipe, but Yukon Golds work beautifully, too!
- Substitution Tip: If you want a creamier texture, opt for a starchy potato like Idaho.
-
1 cup pumpkin puree: This adds a sweet, earthy flavor while keeping the cakes moist.
- Chef Insight: Canned pumpkin is a time-saver, but if you have fresh pumpkin, go for it! Roast and pureé it before using.
-
1 big egg: This acts as a binder to hold everything together.
- Substitution Tip: For a vegan option, substitute with a flaxseed egg (1 tablespoon flaxseed meal + 2.5 tablespoons water, let it sit for 5 minutes).
-
1/2 cup all-purpose flour: For structure and that crispy exterior.
- Chef Insight: You can use gluten-free flour for a gluten-free version — just ensure it’s a good blend.
-
1 tsp salt: Enhances all the flavors; don’t skip it!
- Substitution Tip: Use less if you’re watching your sodium intake.
-
1/2 tsp black pepper: A little kick without overpowering the dish.
-
1/4 teaspoon paprika: Adds a hint of smokiness and color.
-
1/4 cup chopped fresh parsley: For a burst of freshness (or feel free to use cilantro if that’s your vibe!).
-
Cooking oil (for frying): I love using olive oil, but vegetable oil or avocado oil works well, too.
- Chef Insight: For deeper flavor, try bacon fat or duck fat if you’re feeling adventurous!
Step-by-Step Instructions
Now that we have our ingredients ready, it’s time to get cooking! Follow these steps, and we’ll turn that idea into a delicious reality.
-
Prep and Boil the Potatoes
Start by peeling the potatoes and cutting them into quarters. Place them in a pot of salted water and bring to a boil. Once boiling, reduce to a simmer for about 15-20 minutes or until they’re fork-tender. Here’s a little tip: you want them soft enough to mash easily but not so mushy they lose their personality!
-
Mash it Up!
Drain the potatoes and return them to the pot. With a potato masher or fork, mash them until smooth. You want no lumps here — this is your canvas! Let them cool a bit while we prepare the pumpkin.
-
Combine the Goodness
In a large mixing bowl, combine your mashed potatoes and pumpkin puree. Now here comes the fun part: crack that egg in, and sprinkle in the flour, salt, pepper, paprika, and fresh parsley. Use your hands to mix it all together until well combined. Don’t be afraid to get a little messy — that’s part of the joy of cooking!
-
Shape the Cakes
Now it’s time for creativity! Grab a handful of the mixture and shape it into patties, about 1/2 inch thick. This step is perfect for flexing your culinary muscles, so don’t worry about making them identical. You’re crafting little pieces of joy!
-
Fry, Fry, Fry!
Heat about 1/4 inch of oil in a non-stick skillet over medium heat. Once it’s shimmering (but not smoking), add the cakes in batches, making sure not to overcrowd the pan. Fry them for about 3-4 minutes on each side, or until golden brown and crispy. Flip them carefully — they have a tendency to be a bit delicate until they set!
Chef Hack: If you want to check if the oil is ready, drop a tiny bit of the batter in; if it sizzles, you’re good to go!
-
Drain Excess Oil
Once the cakes are beautifully golden, remove them from the pan and place them on a paper towel-lined plate to absorb any excess oil. This keeps them crispy and light!
Serving Suggestions
When it comes to plating, let’s keep it simple, beautiful, and inviting. Arrange the crispy potato and pumpkin cakes on a large platter, perhaps a sprinkle of fresh parsley for a pop of color. Pair them with a zesty dipping sauce, like a tangy yogurt or a spicy aioli, and don’t forget to serve them with a side of your favorite greens. A vibrant salad adds a lovely crunch and balances the richness!
Recipe Variations
Now let’s explore some fun variations to keep things exciting in the kitchen:
-
Cheesy Delight: Add 1/2 cup of shredded cheese (like cheddar or feta) to the batter for a cheesy twist.
-
Spice it Up: For those who love heat, toss in some red pepper flakes or finely chopped jalapeños.
-
Herb Infusion: Swap out the parsley for fresh thyme or rosemary for an aromatic touch.
-
Sweet Version: Go sweet by mixing in some maple syrup and a pinch of nutmeg — a perfect breakfast treat!
-
Vegetarian Protein: For an extra protein boost, mix in some cooked lentils or chickpeas into the batter; just mash them roughly for texture.
Chef’s Notes
Crispy potato and pumpkin cakes have been a part of my kitchen repertoire for years. They’ve evolved from a simple comfort dish into a refined recipe I love to share with friends and family. One time, during a family gathering, I made a gigantic batch, and believe it or not, they disappeared within minutes! It’s funny how food can create bonds; we ended up launching into stories of our childhood like it was a competition to share the best one!
Over time, I’ve learned that this recipe is not just about the ingredients, but about the love and memories that go into it. So whether you’re making it for a friend or just yourself, remember to sprinkle in some joy!
FAQs and Troubleshooting
1. My cakes are falling apart while frying. What did I do wrong?
This can happen if there isn’t enough flour or if the mixture is too wet. Always start with less pumpkin puree and gradually add more; you want a thick batter.
2. Can I bake these instead of frying?
Absolutely! Preheat your oven to 400°F (200°C), place the cakes on a parchment-lined baking sheet, and lightly spray or brush with oil. Bake for 25-30 minutes, flipping halfway through for an even crisp.
3. Can I freeze these cakes?
Yes! Once they’re cooked and cooled, place them in an airtight container between layers of parchment paper. Freeze for up to three months. Reheat in a toaster oven or skillet for best results.
4. What’s the best dipping sauce to serve with these cakes?
A creamy garlic yogurt sauce or a spicy sriracha mayo complements these cakes beautifully, balancing the flavors perfectly.
Nutritional Info
While I focus more on the joy of cooking rather than the numbers, I believe this dish offers a great balance of carbs, fiber, and protein—perfect for a hearty meal. If you’d like the specific nutritional breakdown, please let me know, and we can dive into the details together!
There you have it! A delicious recipe for crispy potato and pumpkin cakes that’ll warm your heart and fill your belly. I hope you enjoy making these as much as I do. Remember, cooking is an adventure full of flavor, love, and, most importantly, joy! Bon appétit!
Print
Crispy Potato and Pumpkin Cakes
- Total Time: 35 minutes
- Yield: 4 servings 1x
- Diet: Vegetarian
Description
A cozy blend of fluffy potatoes and sweet pumpkin, these crispy cakes are the perfect comfort food for chilly evenings.
Ingredients
- 2 medium potatoes (Russet or Yukon Gold)
- 1 cup pumpkin puree
- 1 big egg
- 1/2 cup all-purpose flour
- 1 tsp salt
- 1/2 tsp black pepper
- 1/4 tsp paprika
- 1/4 cup chopped fresh parsley
- Cooking oil (for frying)
Instructions
- Prep and boil the potatoes by peeling and cutting them into quarters; boil in salted water for 15-20 minutes until fork-tender.
- Mash the drained potatoes until smooth and let cool slightly.
- Combine the mashed potatoes with pumpkin puree, egg, flour, salt, pepper, paprika, and parsley in a large bowl.
- Shape the mixture into patties, about 1/2 inch thick.
- Fry the cakes in hot oil for 3-4 minutes on each side until golden and crispy.
- Drain excess oil on paper towels.
Notes
Feel free to add cheese, spices, or herbs to customize your cakes. Serve with a zesty sauce for extra flavor!
- Prep Time: 15 minutes
- Cook Time: 20 minutes
- Category: Main Course
- Method: Frying
- Cuisine: American
Nutrition
- Serving Size: 1 serving
- Calories: 350
- Sugar: 5g
- Sodium: 400mg
- Fat: 12g
- Saturated Fat: 4g
- Unsaturated Fat: 6g
- Trans Fat: 0g
- Carbohydrates: 45g
- Fiber: 3g
- Protein: 15g
- Cholesterol: 30mg
Keywords: potato cakes, pumpkin recipes, comfort food, vegetarian recipes, cozy meals
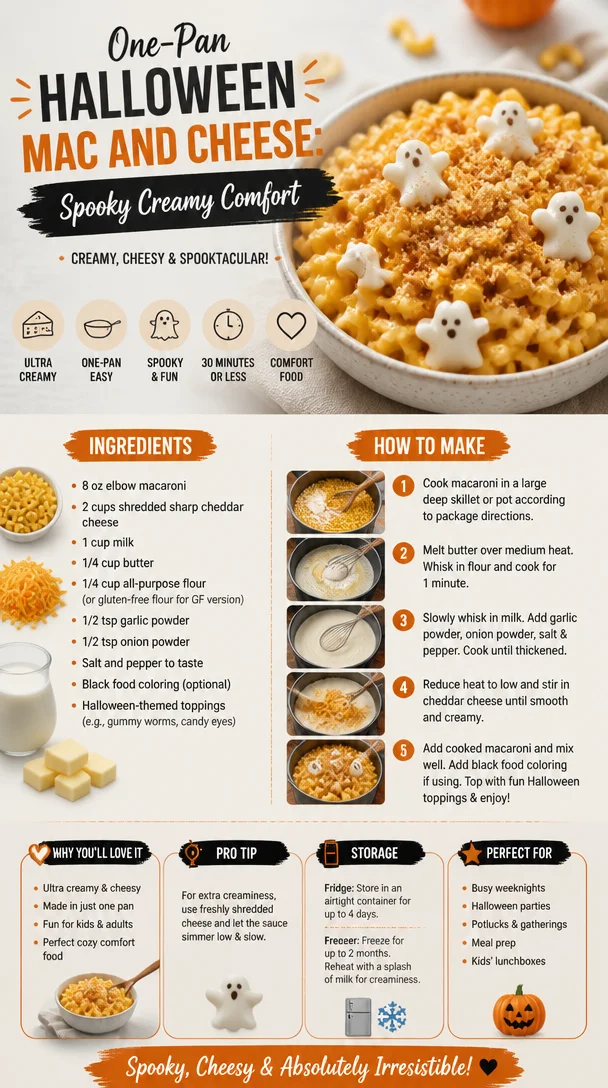
One-Pan Halloween Mac and Cheese: Spooky Creamy Comfort
Halloween Mac and Cheese: A Spooky, Delicious Twist!
Welcome back to my cozy kitchen, food friends! As the leaves change and the nights grow longer, there’s something magical about the air — crisp and fragrant with the promise of Halloween. It marks a time of gathering with friends and family, indulging in treats, and, of course, conjuring up culinary delights that fit the spooky season. Today, I’m thrilled to share a playful twist on an all-time favorite — Halloween Mac and Cheese!
Picture this: you’re at a festive gathering, laughter fills the air, and the sweet smell of pumpkin spice lingers. Just as you think you’ve tasted it all, someone brings out a bubbling dish of Halloween Mac and Cheese. With its hauntingly creamy cheese, ghosts made from mozzarella, and vibrant orange pumpkin puree, this dish is not only delicious but also a fun way to capture the spirit of Halloween. So grab your favorite mixing bowl, roll up those sleeves, and let’s dive headfirst into this magical recipe!
Personal Story
This recipe holds a special place in my heart, and it all goes back to my childhood. Every Halloween, my family would host a gathering for our closest friends. The highlight, of course, was always the food. My mom, a wizard in the kitchen, would make her classic mac and cheese, bubbling with rich cheese and buttery breadcrumbs. But on Halloween, she would spice things up — literally. She’d mix in some pumpkin puree and top it with cheese “ghosts,” and we would all giggle at her spooky creations while gobbling them down.
I fondly remember my little cousins adorning their costumes, laughing and plotting the night’s trick-or-treat scheme, while my mom worked her magic in the kitchen. Watching the joy on their faces as they dug into that hauntingly delicious dish was priceless. Fast forward a few decades, and I’ve proudly carried on this Halloween tradition — adding my own flair, but keeping that spirit of fun alive. I can’t wait for you to create your own magical memories with this Halloween Mac and Cheese recipe!
Ingredients
-
Pasta:
- Any shape will do! Elbow macaroni is classic, but if you want to be extra spooky, try using mini pumpkin-shaped pasta pieces. They’re adorable and fun!
-
Cheddar Cheese:
- Sharp or mild — your choice! Sharp will give you a bolder flavor, while mild will keep it creamy. A mix also works beautifully.
-
Mozzarella Cheese:
- For the ghostly toppings! Use fresh mozzarella for a gooey finish or shredded mozzarella for an easy melt. Want a little kick? Try pepper jack!
-
Pumpkin Puree:
- A delightful secret ingredient. Aside from being festive, it adds creaminess. Canned pumpkin is perfect, but fresh pumpkin puree is a lovely alternative. Just roast, scoop out, and blend!
-
Milk:
- Whole milk is best to keep it rich, but any milk works! Have a dairy-free household? Use almond milk or cashew milk; you’ll just need to watch the flavor balance.
-
Butter:
- To start our roux. Unsalted butter gives you control over the salt. Vegan butter works just as well if you prefer a plant-based option.
-
Flour:
- This helps thicken our cheese sauce. All-purpose flour is standard, but for a gluten-free option, reach for almond flour or a gluten-free blend.
-
Garlic Powder and Onion Powder:
- For flavor magic! If you love fresh garlic and onions, feel free to sauté some diced onions and minced garlic before mixing in the flour.
-
Salt and Pepper:
- Staples in any dish! Adjust based on your taste, and don’t be afraid to add a little pinch of nutmeg for warmth and depth.
-
Food Coloring (optional):
- For extra spooky vibes. Orange dye can brighten your mac and cheese to match the Halloween theme.
Step-by-Step Instructions
-
Cook the Pasta:
- Bring a large pot of salted water to a boil. Add the pasta and cook until al dente, following package instructions. Tip: Save a cup of pasta water before draining — you might need it later to adjust the sauce’s consistency!
-
Make the Cheese Sauce:
- In a large saucepan over medium heat, melt the butter. Once melted, whisk in the flour, stirring constantly for about 2-3 minutes until it’s a nice golden color. This roux is the base of your cheese sauce — if it’s too dark, start over!
-
Add the Milk:
- Slowly whisk in the milk, ensuring there are no lumps. Keep stirring until the mixture thickens and starts to bubble, approximately 4-5 minutes. Chef hack: to make it extra creamy, consider using half-and-half instead!
-
Incorporate the Pumpkin:
- Stir in the pumpkin puree. This step not only adds flavor but gives a lovely, subtle sweetness. Whisk it! Feel free to add some of that optional food coloring here to amp up the autumnal hue!
-
Melt in the Cheese:
- Gradually add the shredded cheddar and mozzarella, stirring until melted and smooth. Don’t be shy; taste and adjust the salt and pepper as it comes together!
-
Combine with Pasta:
- Add the cooked pasta to the cheese sauce, stirring well to coat every delicious piece. If it seems too thick, add some reserved pasta water!
-
Prepare the Dish:
- Transfer the cheesy mixture into a greased baking dish. Sprinkle with additional cheese and breadcrumbs on top for that crispy finish!
-
Bake Your Creation:
- Preheat your oven to 350°F (175°C) and bake uncovered for about 20 minutes until golden and bubbling. Chef’s tip: for an extra spooky touch, consider using pumpkin-shaped cookie cutters to make little cheese ghosts on top!
-
Add Your Ghosts:
- While it’s still hot, use bits of fresh mozzarella to create ghost shapes on top. Add mini black olive “eyes” for a fun and spooky effect!
Serving Suggestions
When it comes to serving your Halloween Mac and Cheese, the presentation can elevate your dish from tasty to truly spectacular. Serve it straight from the oven in the baking dish for a rustic feel or use hollowed-out mini pumpkins as individual servings! Garnish with a sprinkle of parsley or some crunchy, spooky-shaped crackers on the side for some crunch. And for a fun addition? Set out a platter of assorted Halloween cookies to complement your cheesy creation!
Recipe Variations
-
Veggie Boost: Add steamed broccoli or cooked pumpkin or butternut squash for added nutrition. It’s a great way to sneak in some veggies while keeping it festive!
-
Spicy Mac & Cheese: Mix in diced jalapeños or a dash of cayenne pepper for a bit of heat.
-
Meaty Twist: Brown some ground turkey or sausage to mix in before baking for some protein enhancement.
-
Cheese Lovers’ Dream: Use a mix of Gouda, Havarti, and Gruyere cheeses in addition to cheddar for a gourmet twist!
-
Gluten-Free Version: Substitute regular pasta for gluten-free pasta and use gluten-free flour for the roux.
Chef’s Notes
This Halloween Mac and Cheese recipe is a testament to how cooking can be both delicious and playful! I’ve taken my mom’s traditional dish and given it a spooky upgrade, but the heart remains the same. Each bite is a delightful blend of nostalgia and new adventures. Over the years, I’ve played around with different ingredients — sometimes adding caramelized onions or throwing in a handful of spinach — it’s all about what makes your taste buds dance!
Remember, cooking is an art! Don’t hesitate to make this recipe yours; it’s part of the joy of being in the kitchen. And trust me, nothing says “Halloween” like a heartwarming bowl of mac and cheese that brings everyone together.
FAQs and Troubleshooting
Q: My mac and cheese turned out too dry. What happened?
A: It’s likely due to cooking the pasta too long or not adding enough liquid to the sauce. Always reserve that pasta water for adjustments, and ensure your sauce is nice and creamy before mixing!
Q: Can I prepare this ahead of time?
A: Absolutely! Assemble everything, cover, and refrigerate it before baking. When you’re ready to serve, just pop it in the oven for about 25-30 minutes until heated through.
Q: My cheese sauce is lumpy. What can I do?
A: If your cheese sauce is lumpy, it might be because the cheese was added too quickly or at too high a temp. For a lump-free experience, stir in the cheese gradually while keeping the heat low.
Q: Can I use non-dairy cheese?
A: Yes, you can! There are plenty of excellent vegan cheese options. Just keep in mind that they might behave differently in terms of melting and flavor, but the end result can still be delicious!
Nutritional Info
(If applicable, include per serving):
- Calories: 450
- Protein: 20g
- Carbohydrates: 58g
- Fat: 20g
- Fiber: 3g
So there you have it, food lovers! A spooky yet scrumptious Halloween Mac and Cheese that is sure to steal the show this season. It’s a comforting dish that not only celebrates flavor but also fills your home with warmth and love. Gather your loved ones, grab your spoons, and let’s turn this Halloween into something truly unforgettable! Happy cooking and Happy Halloween!
Print
Halloween Mac and Cheese
- Total Time: 45 minutes
- Yield: 4 servings
- Diet: Vegetarian
Description
A spooky twist on traditional mac and cheese with creamy cheese, pumpkin puree, and mozzarella ghosts.
Ingredients
- Elbow macaroni or mini pumpkin-shaped pasta
- Cheddar cheese (sharp or mild)
- Mozzarella cheese (fresh or shredded)
- Pumpkin puree (canned or fresh)
- Whole milk (or dairy-free alternative)
- Unsalted butter
- All-purpose flour (or gluten-free blend)
- Garlic powder
- Onion powder
- Salt and pepper
- Food coloring (optional)
Instructions
- Cook the pasta: Bring a large pot of salted water to a boil. Add the pasta and cook until al dente, saving a cup of pasta water before draining.
- Make the cheese sauce: In a large saucepan over medium heat, melt the butter and whisk in the flour, stirring for 2-3 minutes until golden.
- Add the milk: Slowly whisk in the milk until the mixture thickens and bubbles, about 4-5 minutes.
- Incorporate the pumpkin: Stir in the pumpkin puree and optional food coloring.
- Melt in the cheese: Gradually add shredded cheddar and mozzarella, stirring until smooth.
- Combine with pasta: Mix the cooked pasta into the cheese sauce, adding reserved pasta water if needed.
- Prepare the dish: Transfer to a greased baking dish, sprinkle with cheese and breadcrumbs.
- Bake your creation: Preheat oven to 350°F (175°C) and bake for about 20 minutes until golden.
- Add your ghosts: Use bits of mozzarella to create ghost shapes on top with olive “eyes.”
Notes
For extra flavor, add diced jalapeños or caramelized onions. Can be prepared ahead and baked later.
- Prep Time: 15 minutes
- Cook Time: 30 minutes
- Category: Main Course
- Method: Baking
- Cuisine: American
Nutrition
- Serving Size: 1 serving
- Calories: 450
- Sugar: 5g
- Sodium: 400mg
- Fat: 20g
- Saturated Fat: 10g
- Unsaturated Fat: 8g
- Trans Fat: 0g
- Carbohydrates: 58g
- Fiber: 3g
- Protein: 20g
- Cholesterol: 30mg
Keywords: Halloween, Mac and Cheese, Comfort Food, Vegetarian, Pumpkin
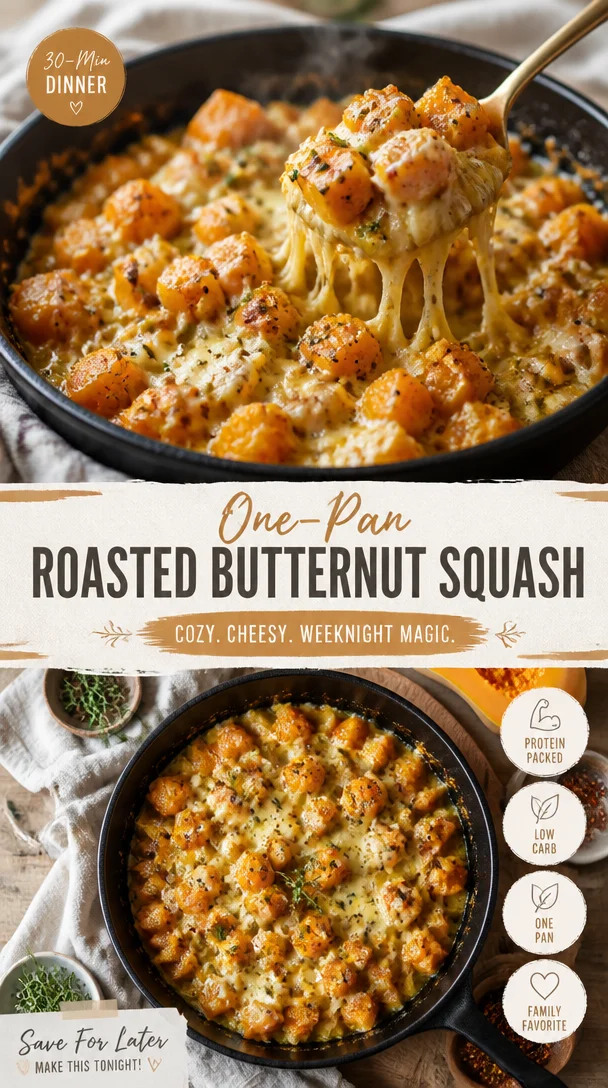
One-Pan Roasted Butternut Squash Recipe for Weeknights
Embrace the Sweetness: A Heartwarming Butternut Squash Recipe
Welcome to my cozy kitchen, food lovers! Today, we’re diving into the delightful world of butternut squash—one of fall’s most beloved ingredients. Whether you’re dodging that winter chill or seeking to impress your friends with your newfound culinary skills, this sweet, nutty gem is a fantastic ingredient to bring warmth and comfort to your table.
Butternut squash isn’t just delicious; it’s also incredibly versatile! You can roast it, mash it, or even blend it into a velvety soup. The possibilities are endless, and today, I want to show you how to create a dish that’s not only easy to make but also packed with flavor and love.
Imagine the scent of roasted butternut squash wafting through your kitchen as you prepare this dish. It’s the kind of aroma that wraps around you like a warm hug, inviting everyone to the table. Cooking for me has always been about sharing moments and creating memories, and there’s something inherently joyful about preparing a meal with love, especially when it comes to a dish as comforting as this.
In this post, we’ll whip up a savory butternut squash and sage risotto that’s bound to become a family favorite. With creamy Arborio rice, roasted squash, and fragrant sage, it’s a dish that bridges the gap between comfort food and gourmet goodness. I promise, once you try this, your loved ones will be singing your praises! So, let’s roll up our sleeves, tie on our aprons, and get cooking!
A Slice of Nostalgia
Growing up, my grandmother would make the best butternut squash soup every autumn. The whole house would fill with the aroma of spices and slow-cooked goodness. I’d watch as she peeled and chopped the squash, her hands moving with a kind of grace that came from years of experience. We’d sit together, her sharing tales from her childhood while we stirred the pot, and it quickly became a tradition I cherished.
Those cozy afternoons inspired my love for cooking, and no dish fills me with nostalgia quite like a butternut squash creation. As I experimented with various recipes over the years, I found a special love for risotto—a creamy, cheesy delight that transforms a simple meal into a memorable feast. This dish feels like a comforting embrace, and I know that with every bite, you’ll be connecting with those same laughs, stories, and cozy moments from your own life.
Ingredients
Here’s what you’ll need to whip up this delightful dish:
-
1 medium butternut squash, peeled and cubed: This serves as the star of the show! Butternut squash is naturally sweet and creamy. If you need a substitute, pumpkin or sweet potato works beautifully.
-
1 cup Arborio rice: This short-grain rice is what gives risotto its signature creaminess. If you’re in a pinch, you can use Carnaroli or even short-grain brown rice, though this will alter the texture slightly.
-
4 cups vegetable broth (or chicken broth): Homemade is ideal, but store-bought works just as well. If you want to lower the salt content, opt for low-sodium broth.
-
1 medium onion, finely chopped: This adds sweetness and depth of flavor. Shallots are great too if you want a subtler flavor.
-
2 cloves garlic, minced: A must-have for any savory dish! Fresh garlic is best, but if you have garlic powder, use about 1/2 teaspoon.
-
2 tablespoons olive oil: For sautéing and drizzling. If you’re looking for a different flavor, consider using avocado oil or even a bit of butter.
-
1/2 cup grated Parmesan cheese: This contributes to the creaminess and a little cheesy goodness. For a dairy-free version, try nutritional yeast.
-
1 tablespoon fresh sage, chopped (or 1 teaspoon dried sage): Sage pairs beautifully with squash, adding an earthy flavor. Thyme or rosemary can also work as tasty substitutes!
-
Salt and pepper to taste: Seasonings are crucial! Freshly cracked pepper adds a lovely kick.
-
Optional: A drizzle of balsamic reduction for garnishing—this adds a touch of acidity and sweetness that elevates the dish.
With these ingredients, you’re all set to prepare a comforting bowl of butternut squash risotto that will have everyone coming back for seconds!
Step-by-Step Instructions
Let’s get down to the delicious part—cooking! Here’s how you can prepare your butternut squash risotto:
-
Prep the Squash: Begin by preheating your oven to 400°F (200°C). While it heats, peel your butternut squash and cut it into 1-inch cubes. Place the cubes on a baking sheet, drizzle with olive oil, and sprinkle with a bit of salt and pepper. Toss to combine. Roast for about 25-30 minutes, or until tender and caramelized around the edges. Chef Tip: Roasting enhances sweetness and depth!
-
Warm the Broth: In a saucepan, heat your vegetable broth and keep it warm over low heat. This will help maintain the temperature when adding it to the rice.
-
Sauté the Aromatics: In a large pot or Dutch oven, heat 2 tablespoons of olive oil over medium heat. Add the chopped onion and sauté for 3-4 minutes, until translucent. Add the minced garlic and fresh sage, cooking for an additional minute until fragrant. Chef Hack: Make sure to keep an eye on the garlic—it browns quickly!
-
Toast the Rice: Stir in the Arborio rice, cooking for 1-2 minutes until it’s lightly toasted. This helps to release the nutty aroma and prepares the rice for absorbing liquids.
-
Add the Broth: Begin adding your warm broth one ladleful at a time, stirring frequently. Allow the rice to absorb most of the liquid before adding more. This will take about 18-20 minutes. Think of it as a labor of love! Tip: This slow, steady process releases the starches, giving risotto its creaminess.
-
Incorporate the Squash: After about 15 minutes of cooking, add your roasted butternut squash pieces into the pot, mixing gently. This will ensure each bite has that delicious squash flavor. Pro Tip: You can reserve a few pieces for garnishing later!
-
Finish With Cheese: Once your risotto is creamy and the rice is al dente, remove it from heat. Stir in the grated Parmesan cheese until melted. Season to taste with salt and pepper. Chef’s Note: If you want that extra creaminess, add a tablespoon of butter!
-
Serve: Your butternut squash risotto is ready! Spoon it into bowls and garnish with the reserved squash, a sprinkle of extra Parmesan, and a drizzle of balsamic reduction if you’re feeling fancy.
Serving Suggestions
For a beautiful presentation, serve your risotto in deep bowls and top with a sprinkle of fresh sage leaves and a light drizzle of olive oil or balsamic reduction. Pair it with a simple arugula salad with lemon vinaigrette to balance out the creamy rice and enrich your dining experience.
Recipe Variations
Feeling adventurous? Here are a few variations to try:
-
Creamy Vegan Version: Substitute Parmesan cheese with nutritional yeast and coconut milk for a creamy base that’s dairy-free.
-
Add Some Protein: Toss in sautéed mushrooms, spinach, or chickpeas for added texture and nutrition—perfect for a hearty meal!
-
Spice It Up: Add a pinch of red pepper flakes to the onions for a hint of heat or stir in some ground nutmeg or cinnamon for a warm spice vibe.
-
Herb Swaps: Don’t have sage? Thyme or even fresh parsley can add a delightful touch! Season according to your pantry.
-
Seasonal Greens: Stir in some kale or Swiss chard at the end of cooking for added vitamins and a colorful presentation.
Chef’s Notes
I have to confess, the first time I made this risotto, I didn’t stir it enough and ended up with a clumpy mess! It was a lesson learned—so trust me when I say that constant stirring is key! Over the years, this dish has evolved from a simple recipe to a celebration of seasonal ingredients, with each rendition evoking a different memory or experience in the kitchen. This risotto has taken me to cozy dinners at home, dinner parties with friends, and even evenings of culinary experimentation. It’s become a beloved staple in my family, and I hope it will become a cherished recipe in yours as well!
FAQs and Troubleshooting
1. Why did my risotto come out too sticky?
If risotto becomes too sticky, it’s often due to either too much stirring or not using enough broth. Remember, slow and steady is key—keep an eye on your rice and add broth gradually.
2. Can I make this risotto ahead of time?
Risotto is best served fresh, but if you have leftovers, you can store them in the refrigerator for 1-2 days. Reheat gently, adding a splash of broth to loosen it up.
3. My risotto is too bland! What can I do?
If your risotto lacks flavor, it may just need more seasoning. Don’t hesitate to add a pinch of salt or more garlic. Also, the quality of your broth matters!
4. What if I don’t have Arborio rice?
If you can’t find Arborio rice, you can use other short-grain varieties like Carnaroli or even sushi rice in a bind. Just keep in mind the texture might change!
Nutritional Info (if applicable)
On average, a serving of butternut squash risotto (without additional toppings) contains approximately:
- Calories: 350
- Protein: 12g
- Carbohydrates: 60g
- Fats: 10g
- Fiber: 4g
Now that you have all the know-how to create this delicious dish, don’t be shy—get cooking! I can’t wait to hear your thoughts and stories as you enjoy this comforting, heartwarming butternut squash risotto. Happy cooking, my friends! 🍂✨
Print
Butternut Squash and Sage Risotto
- Total Time: 45 minutes
- Yield: 4 servings 1x
- Diet: Vegetarian
Description
A comforting and creamy risotto made with roasted butternut squash and fragrant sage, perfect for sharing with loved ones.
Ingredients
- 1 medium butternut squash, peeled and cubed
- 1 cup Arborio rice
- 4 cups vegetable broth (or chicken broth)
- 1 medium onion, finely chopped
- 2 cloves garlic, minced
- 2 tablespoons olive oil
- 1/2 cup grated Parmesan cheese
- 1 tablespoon fresh sage, chopped (or 1 teaspoon dried sage)
- Salt and pepper to taste
- Optional: A drizzle of balsamic reduction for garnishing
Instructions
- Prep the squash: Preheat your oven to 400°F (200°C). Peel the butternut squash and cut it into 1-inch cubes. Place the cubes on a baking sheet, drizzle with olive oil, and sprinkle with salt and pepper. Toss to combine. Roast for about 25-30 minutes until tender and caramelized.
- Warm the broth: In a saucepan, heat the vegetable broth and keep it warm over low heat.
- Sauté the aromatics: In a large pot, heat olive oil over medium heat. Add chopped onion and sauté for 3-4 minutes until translucent. Add minced garlic and fresh sage, cooking for an additional minute until fragrant.
- Toast the rice: Stir in Arborio rice and cook for 1-2 minutes until lightly toasted.
- Add the broth: Begin adding the warm broth one ladle at a time, stirring frequently, until absorbed—this takes about 18-20 minutes.
- Incorporate the squash: After 15 minutes of cooking, add the roasted butternut squash, mixing gently.
- Finish with cheese: Remove from heat and stir in grated Parmesan cheese until melted. Season with salt and pepper.
- Serve: Spoon the risotto into bowls and garnish with reserved squash, extra Parmesan, and balsamic reduction if desired.
Notes
Stir constantly to ensure creamy consistency and avoid clumping. Serve fresh for the best flavor.
- Prep Time: 15 minutes
- Cook Time: 30 minutes
- Category: Main Course
- Method: Stovetop
- Cuisine: Italian
Nutrition
- Serving Size: 1 serving
- Calories: 350
- Sugar: 6g
- Sodium: 400mg
- Fat: 12g
- Saturated Fat: 4g
- Unsaturated Fat: 6g
- Trans Fat: 0g
- Carbohydrates: 45g
- Fiber: 4g
- Protein: 12g
- Cholesterol: 30mg
Keywords: butternut squash, risotto, comfort food, fall recipes, vegetarian
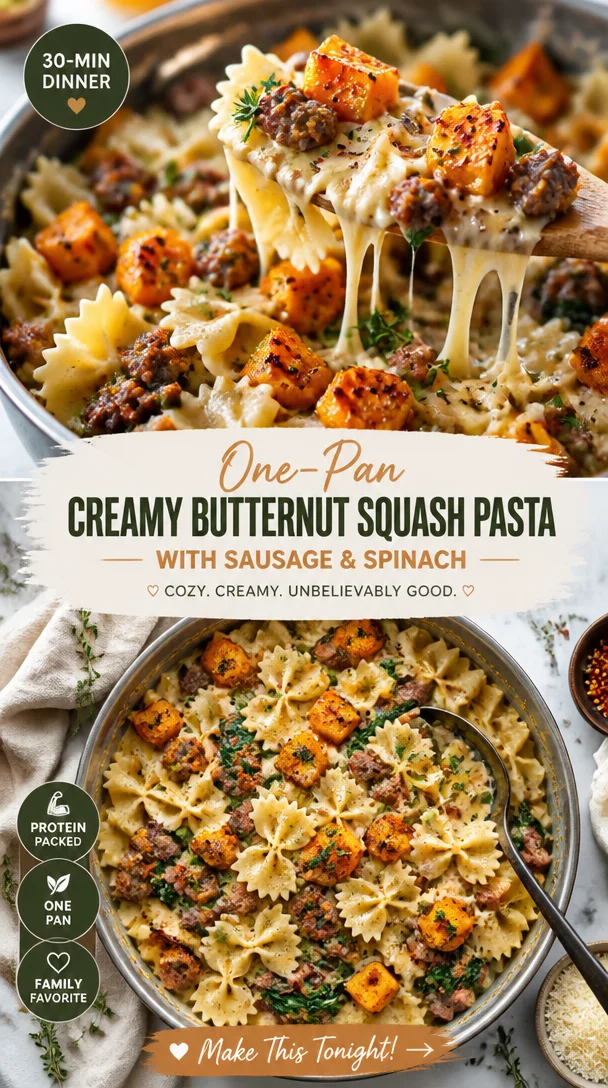
One-Pan Creamy Butternut Squash Pasta with Sausage & Spinach
Creamy Butternut Squash Pasta with Sausage and Spinach: A Cozy Favorite
Welcome to my cozy kitchen, friend! Today, we’re diving into one of my all-time favorite dishes: Creamy Butternut Squash Pasta with Sausage and Spinach. This recipe packs a punch of flavor, comfort, and vibrant color that not only brightens up your dinner plate but also warms your heart. Imagine a chilly evening, and the delicious aroma of roasted butternut squash fills the air, mingling with savory sausage and fresh spinach. It feels like a warm hug in a bowl, doesn’t it?
There’s something incredibly satisfying about creating a meal that bridges the gap between hearty and healthy. This creamy pasta dish does just that and makes an easy weeknight dinner or a fantastic dish to impress your friends during a get-together. Plus, it’s surprisingly simple to whip up, which means more time relaxing with your loved ones and less time stressed in the kitchen.
Let’s take a moment to appreciate butternut squash. It’s one of those underrated ingredients that captures the essence of autumn. Its sweet, nutty flavor pairs perfectly with the saltiness of sausage and the nuttiness of Parmesan cheese. Toss in some fresh spinach, and you get not just a pop of color but a boost of nutrients—hello, vitamins! Trust me, your taste buds will thank you, and you’ll find yourself wanting to savor every last bite.
I remember the first time I made this dish. It was a rainy evening, and I had just returned home from work, completely drenched and mentally drained. The thought of takeout crossed my mind, but something tugged at my heart to make a warm, homemade meal. I had some butternut squash sitting on my countertop and a craving for pasta. Before I knew it, the kitchen was filled with the magical aroma of sautéed garlic and onions cooking alongside the roasting butternut squash. The moment I added the creamy sauce to the pasta, I felt a surge of joy and nostalgia as if I was being enveloped by a blanket of coziness. It quickly became a staple in my recipe repertoire.
Ready to bring a touch of warmth and lots of flavor into your kitchen? Let’s get cooking!
Ingredients
Here’s what you’ll need to create this delicious pasta dish:
-
8 oz. pasta of your choice (penne, fusilli, or spaghetti work great)
- Pro Tip: Whole wheat or gluten-free pasta can be used for a healthier option, but adjust the cooking time according to the package instructions.
-
1 small butternut squash (about 4 cups cubed)
- Substitution Tips: If you can’t find butternut squash, feel free to use pumpkin or sweet potato. The flavor will vary slightly, but the creaminess will still shine through!
-
1 lb. Italian sausage (spicy or mild)
- Chef Insight: Sausage adds depth and flavor, but you can swap it with turkey sausage or make it vegetarian with sautéed mushrooms for a different taste.
-
2 cups fresh spinach
- Freshness Factor: Baby spinach is sweeter and more tender, which is what you want. Kale can be substituted for a heartier texture, though it may require a slightly longer cooking time.
-
1 medium onion, diced
- Flavor Booster: Yellow onions work best, but white or red onions can also add a nice twist to the flavor profile.
-
2-3 cloves garlic, minced
- Love for Garlic: Fresh garlic is vital, but you can use garlic powder in a pinch. Just remember, one clove equals about 1/8 teaspoon of powder.
-
1 cup heavy cream
- Richness Tip: For a lighter version, use half-and-half or a non-dairy milk like almond milk, but the creaminess will diminish slightly.
-
1/2 cup grated Parmesan cheese
- For a Twist: Try substituting with pecorino Romano or nutritional yeast for a vegan option.
-
Salt and pepper to taste
- Seasoning is Key: Don’t be shy with the seasoning. Salt enhances flavors, so taste as you go!
-
Olive oil for cooking
- Flavor Tip: Extra virgin olive oil has the best flavor for sautéing, but avocado oil or butter could also work beautifully.
Step-by-Step Instructions
Let’s roll up those sleeves because it’s time to get cooking! Here’s a detailed guide to making your wonderful creamy butternut squash pasta.
-
Prepare the butternut squash:
Start by preheating your oven to 400°F (200°C). Peel the butternut squash, cut it in half, and scoop out the seeds. Then, dice it into small cubes—about 1 inch. This allows the squash to roast evenly, getting all caramelized and sweet! Toss the cubes in olive oil, salt, and pepper, then spread them on a baking sheet. Roasting will bring out the natural sweetness, trust me! -
Roast the squash:
Once your oven is ready, pop the baking sheet in and roast the squash for about 25-30 minutes, or until fork-tender and slightly golden. This process is crucial, as it develops the sweetness. While that’s happening, let’s move on to the next step! -
Cook your pasta:
Bring a large pot of salted water to a boil. Add your pasta and cook according to package instructions until al dente. Once finished, reserve about 1 cup of the pasta cooking water (it’ll help with our sauce later) and drain the rest. Set the pasta aside, keeping it warm. -
Sauté the sausage:
In a large skillet, heat a drizzle of olive oil over medium heat. Add the diced onion and sauté for 3-4 minutes until translucent. Then, add the Italian sausage. Break it up with a spatula and cook until browned and fully cooked, about 7-10 minutes. This is where the magic happens—the aroma will transport you! -
Add garlic and spinach:
Stir in the minced garlic and sauté for an additional minute until fragrant. Add the fresh spinach, and let it wilt—this usually takes 2-3 minutes. The vibrant green color will lift your spirits instantly. -
Create the creamy sauce:
It’s time to bring in our roasted butternut squash! Add it to your skillet along with heavy cream. Use a fork or masher to carefully mash some of the squash into the sauce—this creates a wonderful creamy texture while leaving some chunks for added interest. If your sauce is too thick, add a splash of reserved pasta water until you reach the desired consistency. -
Combine pasta and sauce:
Finally, toss in your cooked pasta and Parmesan cheese, stirring gently to coat the noodles with the creamy goodness. If the sauce still feels heavy, add more pasta water a little at a time until everything is beautifully combined. There’s no such thing as too creamy when it comes to this dish! -
Taste and adjust:
Give it a taste and add salt and pepper as needed. This is crucial! You want that perfect blend of flavors—sweet, savory, and a touch of spice from the sausage.
Serving Suggestions
To serve this inviting creamy butternut squash pasta, twirl it onto warmed plates for the best presentation. A sprinkle of fresh parsley or extra Parmesan cheese on top not only enhances the look but also adds a lovely finishing touch. Serve it with a side of crusty bread for sopping up any leftover sauce—because you definitely don’t want to waste any of that glorious goodness!
Recipe Variations
Looking to mix things up? Here are a few twists you can try:
- Add a hint of spice: Throw in a pinch of red pepper flakes while sautéing the onions for a bit of heat.
- Make it vegan: Use plant-based sausage, coconut milk instead of cream, and skip the cheese or use nutritional yeast for a cheesy flavor.
- Add different veggies: Toss in sautéed mushrooms or roasted Brussels sprouts for extra texture and flavor.
- Lemon zest: A touch of lemon zest at the end gives it a refreshing brightness that elevates the entire dish.
- Nutty goodness: Add toasted pine nuts or walnuts for a lovely crunch and nutty flavor contrast.
Chef’s Notes
This creamy butternut squash pasta recipe was born out of necessity, as many wonderful dishes are. Over time, I’ve played around with different ingredients—switching out the protein, hiking up the creaminess, or adding seasonal veggies. It’s a flexible recipe that can be tailored to your taste buds. One night, feeling adventurous, I tossed in some sage, which lent an earthy flavor that paired beautifully with the squash. Ultimately, it has become one of those beloved “go-to” recipes that I can share with family and friends.
One funny story that comes to mind involved my nephew, who took one look at the orange sauce and declared it “magic pasta.” The name stuck and now, there’s always a little magic in the air whenever this dish is on the table!
FAQs and Troubleshooting
1. Can I make this dish ahead of time?
Absolutely! You can prepare the sauce and pasta in advance, but it’s best to combine them just before serving to prevent the pasta from absorbing too much sauce.
2. What if my sauce is too thick?
No worries! Just add some of the reserved pasta water a little at a time until you reach the desired consistency. It’s a simple fix!
3. Can I freeze leftovers?
Yes! This dish freezes well. Store in an airtight container, and when ready to enjoy, thaw in the refrigerator overnight and reheat gently in a pan or microwave, adding a splash of cream if needed.
4. What if my butternut squash isn’t sweet enough?
Each squash can vary. You can add a teaspoon of brown sugar or maple syrup to enhance the sweetness, or roast it for a bit longer to caramelize.
Nutritional Info
While I focus on hosting wonderful experiences around food rather than just the numbers, here’s a rough breakdown per serving (if you make 4 servings total):
- Calories: ~450
- Protein: ~18g
- Carbohydrates: ~45g
- Fat: ~22g
So there you have it—an entire journey of flavors and memories, all wrapped up in a bowl of creamy butternut squash pasta with sausage and spinach. I hope you love making this dish as much as I love sharing it with you. Cooking is all about connection, so gather your loved ones, and dive into this cozy creation together. Enjoy, my fellow foodies!
Print
Creamy Butternut Squash Pasta with Sausage and Spinach
- Total Time: 45 minutes
- Yield: 4 servings 1x
- Diet: Paleo
Description
A warm and comforting pasta dish featuring creamy butternut squash, savory sausage, and fresh spinach.
Ingredients
- 8 oz. pasta of your choice (penne, fusilli, or spaghetti)
- 1 small butternut squash (about 4 cups cubed)
- 1 lb. Italian sausage (spicy or mild)
- 2 cups fresh spinach
- 1 medium onion, diced
- 2–3 cloves garlic, minced
- 1 cup heavy cream
- 1/2 cup grated Parmesan cheese
- Salt and pepper to taste
- Olive oil for cooking
Instructions
- Prepare the butternut squash by preheating your oven to 400°F (200°C). Peel, cut, and dice the squash into small cubes. Toss with olive oil, salt, and pepper and spread on a baking sheet.
- Roast the squash for about 25-30 minutes until fork-tender and slightly golden.
- Cook your pasta in a large pot of salted boiling water according to package instructions until al dente. Reserve 1 cup of pasta cooking water, then drain and set aside.
- Sauté the sausage in a skillet with olive oil, adding the diced onion and cooking until translucent.
- Add minced garlic, followed by the spinach, and sauté until wilted.
- Create the creamy sauce by adding the roasted squash and heavy cream. Mash some squash into the sauce for creaminess.
- Combine the cooked pasta and Parmesan cheese into the sauce, adjusting consistency with reserved pasta water as needed.
- Taste and adjust seasoning with salt and pepper.
Notes
For a lighter version, substitute heavy cream with half-and-half or non-dairy milk. This dish is flexible and can accommodate various proteins and vegetables.
- Prep Time: 15 minutes
- Cook Time: 30 minutes
- Category: Main Course
- Method: Baking and Sautéing
- Cuisine: Italian
Nutrition
- Serving Size: 1 serving
- Calories: 450
- Sugar: 6g
- Sodium: 600mg
- Fat: 22g
- Saturated Fat: 10g
- Unsaturated Fat: 8g
- Trans Fat: 0g
- Carbohydrates: 45g
- Fiber: 4g
- Protein: 18g
- Cholesterol: 70mg
Keywords: pasta, butternut squash, creamy sauce, sausage, comfort food, weeknight dinner

One-Pan Honey-Glazed Chicken-Stuffed Butternut Squash
Welcome to My Cozy Kitchen: Honey Roasted Butternut Squash Stuffed with Chicken
Hello, my lovely foodies! Grab your aprons and let’s dive into the warmth and comfort that only a heavenly dish can bring. Today, we’re whipping up something truly special: Honey Roasted Butternut Squash Stuffed with Chicken. This dish has all the cozy vibes we love, with its warm, sweet, and savory flavors dancing harmoniously on your palate. Imagine sitting around the dinner table with your loved ones, the autumn air wafting through your window, and the aroma curling up your senses as this delightful dish comes together. Sounds perfect, right?
Now, if you’ve never roasted a butternut squash before, you might be in for a little adventure. It’s like unwrapping a present in the kitchen! You get to slice it open, smell the lovely caramelization as it roasts, and then stuff it full of tender, juicy chicken, accompanied by the sweetness of honey and spices. It’s a dish that not only pleases the palate but also warms the heart.
I have a particular fondness for using butternut squash in my recipes. Growing up, my grandmother would always plant a garden full of squash every summer. I remember sitting on the porch, her teaching me how to gather the squash, our laughter mixing with the humming of nearby bees. Our dinners often included squash in some way, and let me tell you, she knew how to make vegetables shine! This dish pays homage to those memories while adding my own twist. So let’s get ready to reconnect with comfort food and create some joyful moments in our kitchens!
Ingredients
Let’s gather the stars of our show! Here’s what you’ll need to create this delicious dish. Each ingredient adds a special touch, so pay close attention.
- 1 medium butternut squash: This squash will be the base of our recipe, and its slight sweetness pairs perfectly with the savory chicken. If you can’t find butternut squash, you can use acorn squash or even large sweet potatoes for a similar taste and texture.
- 2 cups cooked chicken (shredded or diced): You can use rotisserie chicken for a quick shortcut, or make your own grilled chicken breast. If you want a vegetarian option, try swapping chicken for cooked quinoa or chickpeas!
- 1/2 cup honey: This delightful elixir gives an incredible depth of flavor. If you’re looking for a substitute, agave nectar or maple syrup works beautifully, but be mindful of the sweetness balance.
- 1 teaspoon cinnamon: A warm spice that elevates the entire dish, bringing warmth and coziness. You can swap it with nutmeg or pumpkin spice if you want to change it up.
- Salt and pepper to taste: These simple but essential seasonings enhance all the flavors; don’t skip them. Feel free to experiment with garlic powder or smoked paprika for additional depth.
- 1/4 cup chopped fresh parsley (for garnish): This adds a nice pop of color and freshness. If parsley isn’t your favorite, try cilantro or green onions instead.
Step-by-Step Instructions
Now that we have our ingredients, let’s get cooking! Here’s how to create this scrumptious dish step-by-step.
-
Preheat your oven to 400°F (200°C). Preheating ensures that our butternut squash roasts evenly. Trust me, the moment you get that oven warmed up is when the magic begins!
-
Prepare the butternut squash. Carefully slice the butternut squash in half lengthwise. Use a sturdy knife and take your time; these squashes can be tough! Once halved, scoop out the seeds with a spoon (save them for toasting later if you like!). You want the squash to look like little bowls, waiting to be filled with deliciousness.
-
Roast the squash. Place the squash halves face down on a baking sheet lined with parchment paper and bake for about 30 minutes. You know it’s ready when the skin is tender and can easily be pierced with a fork. This roasting method will caramelize the sugars in the squash and develop that sweet flavor we adore.
-
Prep the chicken mixture. While the squash is roasting, grab a bowl and mix together the cooked chicken, honey, cinnamon, salt, and pepper. This sweet-and-savory blend is where the magic happens! Feel free to taste and adjust any seasonings; some days I crave a little more honey, and some days, I might add a sprinkle of chili pepper for a kick!
-
Stuff the squash. Once the squash is out of the oven and cool enough to handle, flip them over and fill each half with the chicken mixture. Pack it in there—give it some love! Making this step a bit messy only means more flavor.
-
Final roast. Return the stuffed squash to the oven and roast for another 15 to 20 minutes. This is when everything will meld together harmoniously, creating a deliciously cohesive dish that you can’t resist!
-
Garnish and serve. Once done, take them out of the oven and sprinkle fresh parsley on top. The little green flecks not only add color but also that final fresh touch!
Serving Suggestions
When it comes to serving, presentation matters! You can leave the squash halves whole for a rustic vibe or slice them into wedges for a more modern twist. Pair it with a simple salad drizzled with lemon vinaigrette to balance the sweetness or serve with warm crusty bread to soak up all that luscious goodness.
Recipe Variations
Feel free to get creative! Here are some variations that you can try based on your mood or what you have on hand:
- Mexican flair: Add some taco seasoning to your chicken mixture, and serve with avocado and salsa on the side.
- Herb-infused: Toss in some fresh rosemary or thyme to the chicken mixture for an aromatic twist.
- Cheesy goodness: Mix in some shredded cheese—mozarella or feta would be delightful—into your chicken filling for an extra creamy bite.
- Vegetarian version: Replace the chicken with a hybrid of roasted veggies or plant-based protein for a meat-free version.
- Cranberry addition: Fold in some dried cranberries or sliced apples for added sweetness and texture.
Chef’s Notes
I’ve made this dish countless times, and each time it seems to evolve just a touch. The beauty of cooking lies in the freedom to experiment—add this, take out that! One of my favorite moments was when I added a splash of apple cider to the chicken mixture. It took everything to the next level! Remember, your kitchen is your canvas; have fun and create!
FAQs and Troubleshooting
-
Why did my butternut squash not cook evenly?
Make sure to cut your squash evenly in half. If one half is larger than the other, it will roast at a different rate. Also, ensure your oven is preheated properly! -
Can I prepare this dish ahead of time?
Absolutely! You can pre-roast the squash and store them in the fridge. Then stuff and bake them fresh when you’re ready to serve! -
What can I do if the filling is too sweet?
Balance is key! If you find it too sweet, balance it with a squeeze of lemon juice or add some salt to enhance the flavors. -
Is there a way to make this dish spicier?
For a spicy kick, sprinkle in some red pepper flakes or diced jalapeños into the chicken mixture before stuffing.
Nutritional Info
This dish is rich in vitamins and healthy proteins, making it a satisfying option for any meal. One serving provides:
- Calories: Approximately 350
- Protein: 25g
- Carbohydrates: 45g
- Fat: 10g
Thanks for joining me in the kitchen today! I hope you feel inspired to make this Honey Roasted Butternut Squash Stuffed with Chicken. Remember, every meal is an opportunity to create memories and share love. Happy cooking, friends!
Print
Honey Roasted Butternut Squash Stuffed with Chicken
- Total Time: 60 minutes
- Yield: 4 servings 1x
- Diet: Gluten-Free
Description
A delightful dish featuring roasted butternut squash filled with tender chicken and a sweet honey glaze, perfect for cozy gatherings.
Ingredients
- 1 medium butternut squash
- 2 cups cooked chicken (shredded or diced)
- 1/2 cup honey
- 1 teaspoon cinnamon
- Salt and pepper to taste
- 1/4 cup chopped fresh parsley (for garnish)
Instructions
- Preheat your oven to 400°F (200°C).
- Prepare the butternut squash by slicing it in half lengthwise and scooping out the seeds.
- Roast the squash face down on a baking sheet for about 30 minutes.
- Mix together the cooked chicken, honey, cinnamon, salt, and pepper in a bowl.
- Stuff the squash with the chicken mixture.
- Return the stuffed squash to the oven and roast for another 15 to 20 minutes.
- Garnish with fresh parsley before serving.
Notes
Feel free to adjust seasonings based on personal preference and experiment with additional ingredients for variation.
- Prep Time: 15 minutes
- Cook Time: 45 minutes
- Category: Main Course
- Method: Baking
- Cuisine: American
Nutrition
- Serving Size: 1 serving
- Calories: 350
- Sugar: 22g
- Sodium: 150mg
- Fat: 10g
- Saturated Fat: 2g
- Unsaturated Fat: 6g
- Trans Fat: 0g
- Carbohydrates: 45g
- Fiber: 6g
- Protein: 25g
- Cholesterol: 60mg
Keywords: butternut squash, stuffed squash, chicken recipe, honey, autumn dish
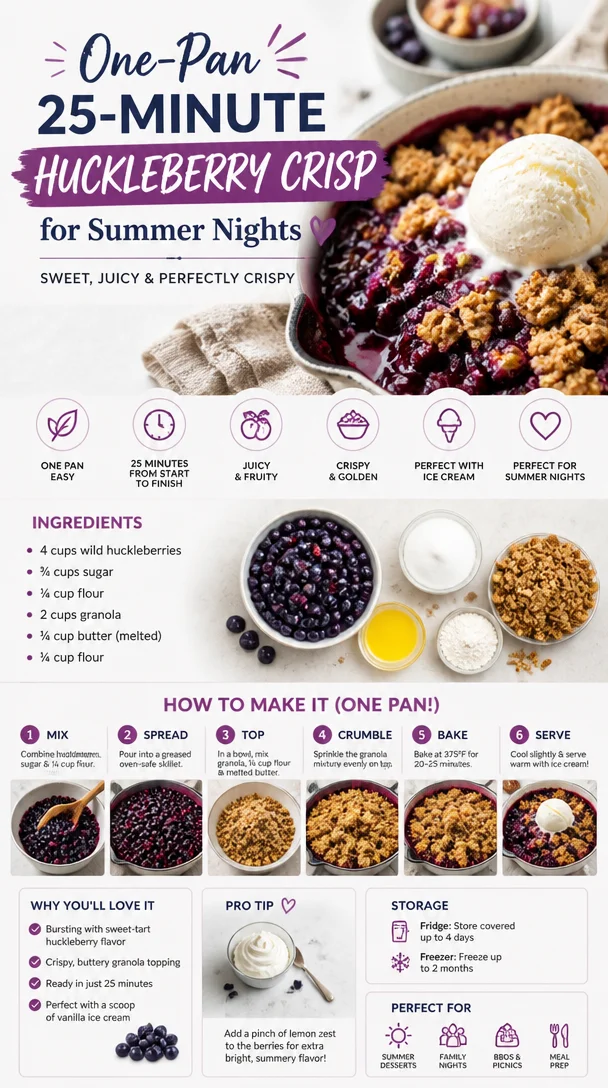
One-Pan 25-Minute Huckleberry Crisp for Summer Nights
Huckleberry Crisp Recipe: A Sweet Slice of Nature
Welcome to my kitchen, fellow food lovers! Today, we’re diving into a delightful dessert that sings with the flavors of summer and whispers nostalgic tales of foraging adventures — Huckleberry Crisp. If you’ve never tasted the juicy burst of huckleberries nestled under a crunchy topping, you are in for a real treat! This dish is more than just a dessert; it’s a warm embrace, a sweet reminder of lazy afternoons spent outdoors, and a delicious bridge connecting nature’s bounty to your kitchen table.
Imagine biting into a steaming bowl of huckleberry crisp, the tart berries mingling with a caramelized, buttery topping, served with a scoop of vanilla ice cream melting slowly on top. Are you getting cozy just thinking about it? I am! The best part? This crisp requires minimal effort and uses simple, seasonal ingredients with the kind of heartwarming magic that is sure to impress your family and friends. So, grab your apron, turn up your favorite tunes, and let’s whip up some Huckleberry Crisp together!
A Berry Memorable Moment
Growing up, there was a special summer tradition in my family: we would venture into the nearby woods, armed with buckets and excitement, searching for huckleberries. There was always something so magical about those little blue-purple gems hidden beneath the bushes. My siblings and I would race to find the biggest bunches, and there were moments when it felt like we were rich treasure hunters — each berry unique, each bite brimming with the essence of summer.
Once we gathered our haul, we would return home, our cheeks streaked with berry stains, and my mom would turn those precious fruits into jars of jam or, if we were lucky, a bubbling huckleberry crisp. The crispy topping, with its crunchy oats and the sweet aroma wafting through the air, was an irresistible invitation for everyone to come to the kitchen. Standing around the table, spooning out portions and fighting over the last bits of topping was a joyful ritual, filled with laughter and happily shared stories about the day’s berry hunt. This huckleberry crisp, a simple but classic dessert, is more than just a recipe; it’s a piece of my childhood I love to recreate and share with you today.
Ingredients
Here’s what you’ll need for your Huckleberry Crisp:
-
Huckleberries (4 cups)
The star of the show! Fresh huckleberries are best, but if you can’t find them, you can substitute with blueberries or blackberries for a different twist. -
Granulated Sugar (1 cup)
This adds sweetness to our crisp. You can adjust the amount based on your tartness preference or swap for coconut sugar for a deeper flavor. -
All-Purpose Flour (1/2 cup)
Helps to bind the filling together. If you want to go gluten-free, almond flour or oat flour can work beautifully. -
Lemon Juice (2 tbsp)
A splash of acidity to brighten the flavors. Feel free to use lime juice if you’re looking for a different zing! -
Rolled Oats (1 cup)
Adds texture and a delightful chewiness to the topping. Quick oats will work, but avoid instant oats as they’ll turn mushy. -
Brown Sugar (1/2 cup)
This contributes a rich caramel flavor. If you’re aiming for a lower-calorie option, try using a sugar alternative like monk fruit sweetener. -
Butter (1/2 cup, cold and diced)
For that irresistible crisp topping! Vegan butter or coconut oil can be convenient substitutes if you’re going dairy-free. -
Cinnamon (1 tsp)
A warm spice that enhances the berry flavors. Feel free to experiment with nutmeg or cardamom for an adventurous twist!
Step-by-Step Instructions
1. Preheat Your Oven
Preheat your oven to 350°F (175°C) so it’s ready to embrace that crisp as soon as it’s assembled. In the meantime, we have a delicious creation to whip up!
2. Prepare the Huckleberries
In a large mixing bowl, toss the huckleberries with granulated sugar, lemon juice, and flour. The flour will help absorb some of the liquid released during baking, thickening up the filling beautifully. If you’re using frozen huckleberries, there’s no need to thaw them beforehand — just add a bit more flour!
3. Assemble the Berry Filling
Once well combined, pour the berry mixture into a greased 9-inch baking dish, spreading it evenly. I love using glass dishes for baking; they help in browning the edges and give you that perfect presentation!
4. Make the Crisp Topping
In another bowl, combine the rolled oats, brown sugar, flour, cinnamon, and diced cold butter. Using a pastry cutter (or your fingers, which is what I prefer for a rustic feel!), blend the mixture until it resembles coarse crumbs. Little butter peeking through is what we’re after for that crunchy topping!
5. Top It Off
Sprinkle the oat topping generously over the huckleberry mixture. Don’t be shy; embrace that lovely layer of crunchy goodness!
6. Bake It Up
Slide your creations into the preheated oven and bake for about 30-35 minutes, or until the topping is golden brown and the berries are bubbling joyfully through the sides. It’s such a treat to see the magic happen!
7. Cool and Serve
Allow the crisp to cool for at least 10 minutes before serving. This allows the juices to thicken slightly, making it easier to scoop. If you want to get truly decadent, serve it warm with a scoop of vanilla ice cream or a dollop of whipped cream!
Serving Suggestions
Plating your Huckleberry Crisp can be just as fun as making it! Serve warm in rustic bowls with a scoop of ice cream melting on top, and sprinkle some fresh mint or huckleberries for a pop of color. You could also drizzle a bit of honey or a sprinkle of powdered sugar to elevate the visual appeal — and the flavor!
Recipe Variations
- Crisp Fruit Mix: Combine huckleberries with raspberries or strawberries for a vibrant fruit mix that’s equally delicious!
- Nutty Twist: Add chopped nuts such as pecans or walnuts to the topping for an extra crunchy bite.
- Coconut Crisp: Substitute some of the oats for unsweetened shredded coconut for a tropical twist.
- Spiced Up: Add a pinch of ginger or cardamom to the berry filling for a warm, aromatic flavor.
- Vegan Delight: Use a vegan butter substitute and replace sugar with coconut sugar for a plant-based option.
Chef’s Notes
Huckleberry Crisp has been a staple in my household for as long as I can remember. Each time I make it, nostalgia washes over me; it brings back those summer days spent hunting for berries and the sweet memories made around our family table. Over the years, I’ve tweaked the recipe slightly, adding a little more lemon juice for brightness or testing different types of oats. And yes, there’s been plenty of accidental spills and some overly adventurous attempts at adding too much cinnamon! But those mishaps make the experience more personal and memorable, a lesson in the beautiful, messy art of cooking.
FAQs and Troubleshooting
1. What can I use if I can’t find huckleberries?
If huckleberries are elusive, blueberries, blackberries, or even raspberries can work as tasty substitutes. Adjust the sugar based on the sweetness of your chosen fruit.
2. My topping is too crumbly. What did I do wrong?
If your topping crumbles too much, it might need a bit more moisture in the form of melted butter or oil. You want it to hold together but still be crumbly!
3. How do I store leftovers?
Cover and store any leftovers in the refrigerator for up to three days. Reheating in the oven or microwave is recommended for that fresh-out-of-the-oven taste!
4. Can I freeze the huckleberry crisp?
Absolutely! Be sure to cool it completely before wrapping it tightly in plastic wrap and storing it in an airtight container. It can stay in the freezer for up to three months!
Nutritional Info
(Servings: 8 | Calories per serving: 240)
- Total Fat: 10g
- Carbohydrates: 36g
- Protein: 2g
- Fiber: 4g
And that’s it! A wholesome, heartwarming Huckleberry Crisp that’s easy to whip up and perfect for cozy gatherings or quiet evenings at home. I hope this recipe brings joy to your kitchen as it has to mine. Happy baking, my foodie friends!
Print
Huckleberry Crisp
- Total Time: 50 minutes
- Yield: 8 servings
- Diet: Vegetarian
Description
A delicious dessert featuring juicy huckleberries under a crunchy topping, perfect for summer gatherings.
Ingredients
- Huckleberries (4 cups)
- Granulated Sugar (1 cup)
- All-Purpose Flour (1/2 cup)
- Lemon Juice (2 tbsp)
- Rolled Oats (1 cup)
- Brown Sugar (1/2 cup)
- Butter (1/2 cup, cold and diced)
- Cinnamon (1 tsp)
Instructions
- Preheat your oven to 350°F (175°C).
- Toss the huckleberries with granulated sugar, lemon juice, and flour in a large bowl.
- Pour the berry mixture into a greased 9-inch baking dish.
- Combine rolled oats, brown sugar, flour, cinnamon, and diced cold butter in another bowl.
- Blend the mixture until it resembles coarse crumbs.
- Sprinkle the oat topping over the huckleberry mixture.
- Bake for 30-35 minutes, until golden brown and bubbling.
- Cool for at least 10 minutes before serving.
Notes
Serve warm with a scoop of vanilla ice cream or a dollop of whipped cream for a delicious treat.
- Prep Time: 15 minutes
- Cook Time: 35 minutes
- Category: Dessert
- Method: Baking
- Cuisine: American
Nutrition
- Serving Size: 1 serving
- Calories: 240
- Sugar: 16g
- Sodium: 200mg
- Fat: 10g
- Saturated Fat: 6g
- Unsaturated Fat: 4g
- Trans Fat: 0g
- Carbohydrates: 36g
- Fiber: 4g
- Protein: 2g
- Cholesterol: 30mg
Keywords: huckleberry crisp, dessert, summer dessert, baking, berry crisp
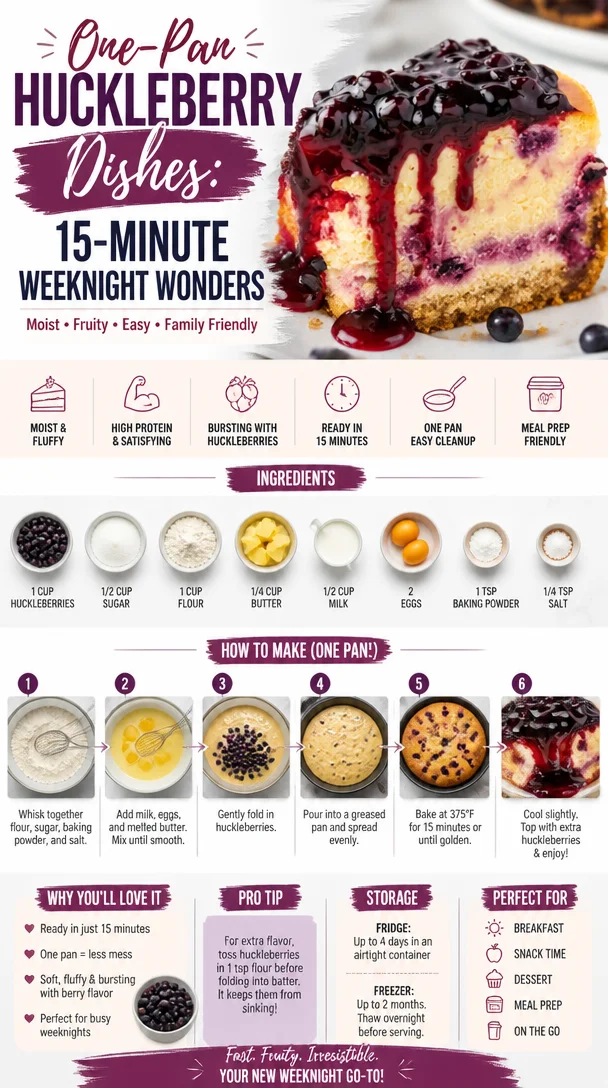
One-Pan Huckleberry Dishes: 15-Minute Weeknight Wonders
Huckleberry Heaven: A Culinary Journey with a Twist of Nostalgia
Welcome to my kitchen! Today, we’re diving into the delicious world of huckleberries—a tiny fruit that packs a punch in flavor and nostalgia. Whether you’ve foraged them in the wild or stumbled upon them at your local farmers’ market, huckleberries bring a unique sweetness and a burst of color that can elevate any dish. They remind me of my childhood summers spent in the mountains, where the skies were as blue as the juicy berries we would pick. So grab your apron, and let’s embark on this flavorful adventure together!
Huckleberries, depending on the variety, can range in color from vibrant purple to deep blue, and their flavor is often compared to that of blueberries but with a little extra sass—a tartness that dances on your palate. Their adaptability means they can be used in everything from sweet desserts to savory sauces, which is exactly why I can’t get enough of them!
In this post, I’ll guide you through one of my absolute favorite huckleberry recipes: Huckleberry Crumble. This dish is not only cozy and comforting but also incredibly simple to make. It brings back memories of cozy family gatherings where laughter and the smell of baked goods filled the air. Trust me, once you try this, you’ll find any excuse to whip it up—be it a weekend brunch with friends or an indulgent weekday dessert.
A Bit of Personal Flavor
I’ll never forget the first time I picked huckleberries. My family and I went on an adventure to the nearby mountains, armed with baskets and a sense of wonder. The thrill of spotting these plump little berries amongst the leaves was exhilarating! We all raced each other, laughing and singing as the sun danced through the trees. When we finally returned home, we turned our loot into pie, a recipe passed down from my grandmother. As we shared slices around the dinner table, the sweet-tart flavor and crumbly topping created a symphony of happiness that still warms my heart.
That love of huckleberries has evolved into many recipes over the years, and today, I am excited to show you how to capture that nostalgic flavor in this Huckleberry Crumble recipe!
Ingredients
To make our delightful Huckleberry Crumble, you’ll need the following ingredients:
-
Fresh or Frozen Huckleberries (4 cups)
Ah, the star of our show! Fresh huckleberries are ideal, but if they’re not in season (or if you just can’t find them), frozen huckleberries work perfectly as a substitution. Just ensure they’re thawed and drained before using! -
Granulated Sugar (½ cup)
This will enhance the sweetness of the huckleberries. If you prefer a lower-calorie option, feel free to use coconut sugar or a sugar substitute like Stevia, adjusting the quantity according to taste. -
Lemon Juice (2 tablespoons)
A splash of acidity will brighten up the flavors and balance the sweetness. If you’re out of lemons, lime juice is a fabulous alternative! -
All-Purpose Flour (1 cup)
This forms the base of our crumble. For a gluten-free option, substitute with almond flour or a 1:1 gluten-free baking mix. -
Old-Fashioned Rolled Oats (1 cup)
These give our crumble its wonderful texture and heartiness. If you need a gluten-free option, simply grab certified gluten-free oats. -
Brown Sugar (½ cup)
This adds depth and a touch of caramel flavor. You can also use maple syrup or agave syrup for a different sweetness that complements the berries beautifully. -
Unsalted Butter (½ cup, melted)
Butter binds everything together and gives a rich flavor to the crumble. You can substitute with coconut oil for a dairy-free variant. -
Ground Cinnamon (1 teaspoon)
A warm spice that pairs beautifully with the sweet and tart huckleberries. For a twist, try nutmeg instead!
These ingredients come together in a glorious harmony that creates a magnificent dish. Now that we’ve gathered our ingredients, let’s get cooking!
Step-by-Step Instructions
-
Preheat the Oven
Preheat your oven to 350°F (175°C). This step is crucial for achieving that perfectly crispy crumble topping. -
Prepare the Huckleberries
In a mixing bowl, combine the huckleberries with granulated sugar and lemon juice. Toss gently to coat. Allow them to sit for about 10 minutes, which allows the juices to flow out and create a natural syrup. This will add to the overall flavor and richness of the crumble. -
Mix the Crumble Topping
In another bowl, mix together the flour, rolled oats, brown sugar, and cinnamon. This is where the magic happens! As you combine the dry ingredients, you’ll want to use your fingers or a fork to break up any clumps. -
Add Butter
Pour the melted butter into the dry ingredients. Mix well until the mixture is crumbly and resembles wet sand. This step is essential; the butter ensures that each bite has that luscious crumble! -
Layer the Dish
Grease a 9×9-inch baking dish with a bit of cooking spray or butter. Pour the huckleberry mixture into the bottom of the dish, distributing it evenly. Then, sprinkle the crumble topping generously over the huckleberries. Don’t worry about making it perfect; a rustic look is what we’re aiming for here! -
Bake to Perfection
Place the baking dish in the oven and bake for 35–40 minutes, or until the top is golden brown and the huckleberries are bubbling up from the edges. My favorite part is when that heavenly aroma fills the kitchen! -
Cool Down
Once baked, remove the crumble from the oven and allow it to cool for at least 15 minutes. This cooling time is crucial; it helps to set the huckleberries and makes serving easier!
Serving Suggestions
You can serve your Huckleberry Crumble warm, right from the oven, or after it’s cooled a bit. A scoop of vanilla ice cream or a dollop of freshly whipped cream on top elevates this dish to another level of deliciousness! For extra flair, sprinkle a bit of cinnamon or fresh mint on top for presentation. Trust me; your guests will rave about this dish!
Recipe Variations
Want to add a twist to your huckleberry experience? Here are some fun ideas:
- Mixed Berry Crumble: Combine huckleberries with other berries like raspberries or blackberries for a vibrant medley of flavors.
- Nutty Crumble: Add ½ cup of chopped pecans or almonds into your crumble topping for a lovely crunch.
- Citrusy Zing: Infuse some orange zest into the huckleberry mixture for an extra layer of flavor.
- Vegan Delight: Swap out the butter for coconut oil and use flaxseed meal mixed with water as an egg substitute to make this crumble completely plant-based.
- Spiced Crumble: Mix in a pinch of ginger or cardamom into the topping for a warm, spiced aroma that blends beautifully with the huckleberries.
Chef’s Notes
Every time I bake this Huckleberry Crumble, I’m reminded of those special summer days spent in nature with family, picking berries until our fingers turned purple. Cooking really is a way to connect with our past and share our love with others. Over the years, I’ve adjusted this recipe to keep it fresh, experimenting with different spices and fruits depending on what I have on hand. I hope you feel the freedom to make this dish your own and add your personal touch!
FAQ and Troubleshooting
-
What if my huckleberries are too tart?
If you find the huckleberries too tart for your taste, don’t hesitate to add a bit more sugar to the filling. Taste as you go! -
My crumble topping isn’t browning. What do I do?
If you notice the topping isn’t browning after the recommended baking time, you can broil it for a couple of minutes. Keep a close eye on it, as it can burn quickly! -
Can I prepare this ahead of time?
Absolutely! You can prepare the huckleberry filling and crumble topping separately, refrigerate them, and then assemble and bake them when you’re ready to serve. -
Why does my crumble feel soggy?
The layer of huckleberries can release a lot of juices during baking. Ensure you let it cool adequately before serving. This will help the juices to thicken slightly!
Nutritional Info
While I believe balance is key, here’s a rough estimate per serving (for a 9×9 dish serving 8):
- Calories: 240
- Total Fat: 10g
- Carbohydrates: 34g
- Fiber: 3g
- Protein: 4g
There you have it! Your ultimate guide to creating a memorable Huckleberry Crumble that’s sure to become a staple in your kitchen. I hope you reminisce on sweet moments as you share this dish with family and friends. Let’s get cooking — can’t wait to hear about your creations! Happy cooking!
Print
Huckleberry Crumble
- Total Time: 55 minutes
- Yield: 8 servings
- Diet: Vegetarian
Description
A cozy and comforting dessert featuring sweet-tart huckleberries topped with a crumbly mixture.
Ingredients
- Fresh or Frozen Huckleberries (4 cups)
- Granulated Sugar (½ cup)
- Lemon Juice (2 tablespoons)
- All-Purpose Flour (1 cup)
- Old-Fashioned Rolled Oats (1 cup)
- Brown Sugar (½ cup)
- Unsalted Butter (½ cup, melted)
- Ground Cinnamon (1 teaspoon)
Instructions
- Preheat your oven to 350°F (175°C).
- Combine the huckleberries with granulated sugar and lemon juice in a mixing bowl. Toss gently to coat.
- Allow the mixture to sit for about 10 minutes to let the juices flow out.
- Mix together the flour, rolled oats, brown sugar, and cinnamon in another bowl.
- Pour the melted butter into the dry ingredients and mix until crumbly.
- Grease a 9×9-inch baking dish and pour the huckleberry mixture in.
- Sprinkle the crumble topping over the huckleberries.
- Bake in the oven for 35–40 minutes, until golden brown.
- Cool for at least 15 minutes before serving.
Notes
Serve warm with vanilla ice cream or whipped cream for an elevated experience.
- Prep Time: 15 minutes
- Cook Time: 40 minutes
- Category: Dessert
- Method: Baking
- Cuisine: American
Nutrition
- Serving Size: 1 serving
- Calories: 240
- Sugar: 12g
- Sodium: 150mg
- Fat: 10g
- Saturated Fat: 6g
- Unsaturated Fat: 4g
- Trans Fat: 0g
- Carbohydrates: 34g
- Fiber: 3g
- Protein: 4g
- Cholesterol: 30mg
Keywords: huckleberry crumble, dessert recipe, summer berries, baking
One-Pan Honey Garlic Kielbasa & Veggies: Easy Family Delight
# One-Pan Honey Garlic Kielbasa & Veggies: Easy Family Delight

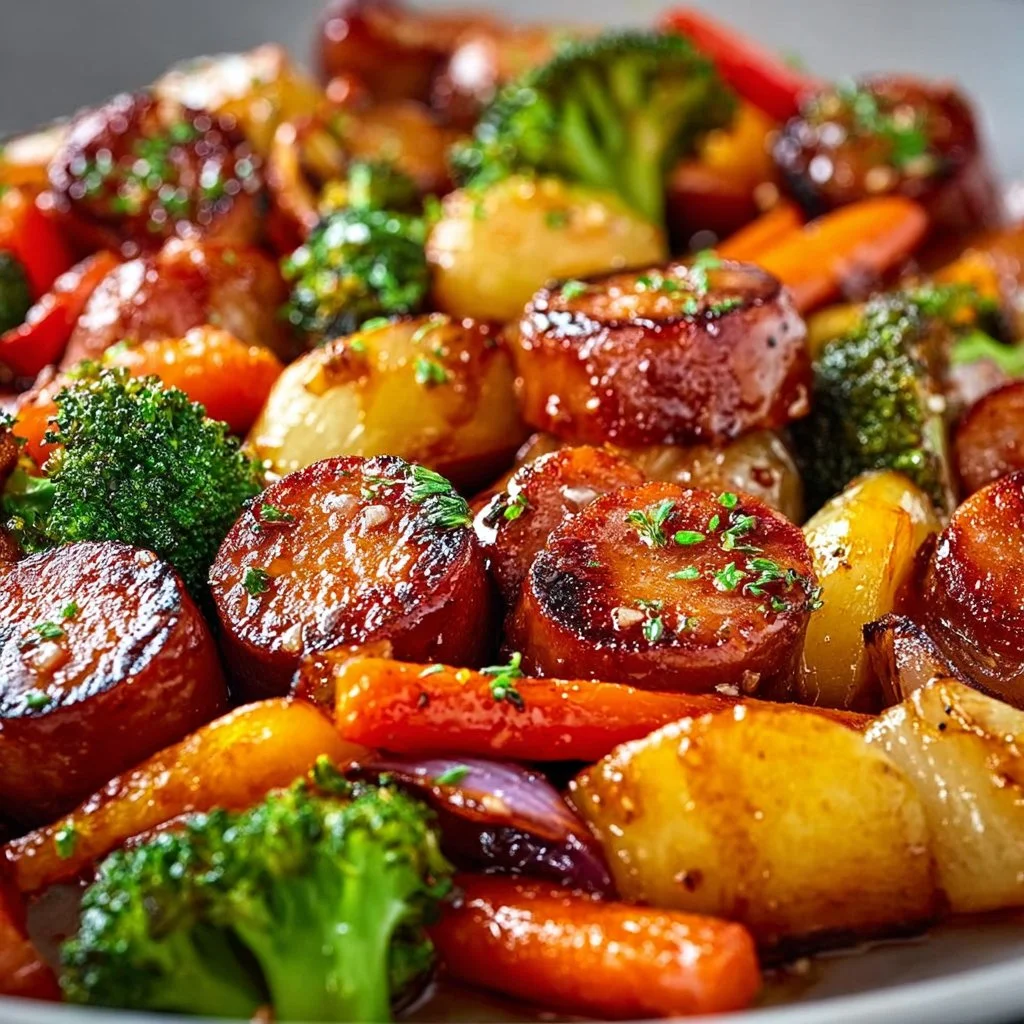
Welcome to my kitchen! If you're anything like me, the smell of something delicious wafting through the air instantly brightens your day. There's just something magical about the combination of savory and sweet—especially when it’s all nestled in one pan, making cleanup a breeze! Today, I'm sharing one of my family’s all-time favorite weeknight meals: **One-Pan Honey Garlic Kielbasa & Veggies**.

This dish is savory, sweet, and oh-so-comforting, making it perfect for those cozy evenings when you want to whip up something quick yet utterly satisfying. Imagine juicy slices of kielbasa, tossed with vibrant veggies, all simmered in a luscious honey garlic sauce. It not only tastes fantastic but also looks beautiful on the table, bringing everyone together for a heartwarming meal. So, pull up a chair, roll up your sleeves, and let’s get cooking!

## Personal Story

Every time I make this dish, I’m transported back to my childhood kitchen, filled with laughter and the warm aroma of home-cooked meals. My mom used to make sweet and savory dishes, and her honey garlic sauce was always a crowd-pleaser, whether it adorned chicken wings at family gatherings or gave a special twist to simple steamed veggies.

One particular memory stands out: my siblings and I were tasked with setting the table, racing each other to get it done before the food hit the table. When the dish was finally served, it was a beautiful explosion of colors—crimson kielbasa glistening among the bright green broccoli and red bell peppers. We would dive in eagerly, alternating between bursts of texture and flavor. With each bite, we were reminded of the love my mom poured into our meals. That’s a tradition I’ve carried with me into my kitchen, and I’m excited to pass it on to you!

## Ingredients

Here’s what you'll need to make this scrumptious One-Pan Honey Garlic Kielbasa & Veggies:

- **Kielbasa (14 oz)**
  A smoky, pre-cooked sausage that adds robust flavor. You can substitute turkey kielbasa or even smoked tofu for a vegetarian version.

- **Bell Peppers (1 red, 1 yellow)**
  Sweet and vibrant, they add beautiful color to your dish. Feel free to mix and match; any color pepper will perform beautifully.

- **Broccoli Florets (2 cups)**
  A nutritious addition packed with vitamins and minerals. If broccoli isn’t your favorite, consider substituting with green beans or zucchini for a different flair.

- **Carrots (2 medium, sliced)**
  Sweet and crunchy, they balance the savory notes. You can use frozen mixed vegetables if you're short on fresh produce.

- **Red Onion (1 medium, sliced)**
  A hint of sharpness complements the sweetness. If you prefer milder flavors, go for a sweet onion or shallots.

- **Garlic (4 cloves, minced)**
  Nothing beats the aroma of fresh garlic! If you're in a pinch, garlic powder can work, though fresh is best.

- **Honey (1/4 cup)**
  Adds that perfect touch of sweetness. You can swap it for maple syrup or agave for a vegan alternative.

- **Soy Sauce (2 tablespoons)**
  This umami powerhouse elevates the flavors. To make it gluten-free, opt for tamari or coconut aminos.

- **Olive Oil (2 tablespoons)**
  For sautéing; can replace it with avocado oil for higher heat tolerance.

- **Salt & Pepper to taste**
  Classic seasonings that are key to bringing out the flavors in your dish.

## Step-by-Step Instructions

### Step 1: Prep Your Ingredients
Start by slicing the kielbasa into bite-sized pieces, roughly 1/2 to 1-inch thick. Work your way through the veggies—slice the bell peppers and carrots, chop the broccoli into florets, and thinly slice the red onion. Be sure to mince the garlic as well, as this will be the heart of our delightful sauce!

### Step 2: Heat the Pan
In a large skillet or a deep pan over medium heat, drizzle the olive oil and let it warm up. You want it hot enough that it shimmers but not smoking—perfect time to toss in the kielbasa!

### Step 3: Sear the Kielbasa
Add your kielbasa pieces to the pan in a single layer. Allow them to brown nicely for about 5-7 minutes, turning occasionally. This step is crucial because it will give your dish that smoky flavor and irresistible crunch on the outside.

### Step 4: Add the Veggies
Once the kielbasa is beautifully browned, toss in the red onion, bell peppers, carrots, and broccoli. Stir everything around to combine and let them cook together for about 3-4 minutes. The veggies will start to soften just a bit.

### Step 5: Mince Garlic & Mix the Sauce
Stir in the minced garlic and cook for another minute. Its fragrance will fill your kitchen—trust me, it’s hard to beat! Now, in a small bowl, whisk together the honey and soy sauce. Pour this mixture into the pan, ensuring everything is well-coated.

### Step 6: Simmer and Thicken
Let the pan contents simmer for about 5-7 minutes, stirring occasionally until the veggies are tender-crisp and the sauce has thickened slightly. Reduce the heat to medium-low for this step to avoid burning the sauce while allowing the flavors to meld together.

### Step 7: Taste It!
Don’t forget to taste your masterpiece before serving! Adjust the salt and pepper, giving it a good stir.

## Serving Suggestions

For a delightful presentation, serve this honey garlic kielbasa and veggies on a large platter, ensuring the colorful veggies are beautifully displayed. Accompany it with a grain, such as fluffy rice or quinoa, to soak up the delicious sauce. You may also want to sprinkle some sesame seeds or fresh parsley over the top for a pop of color and finishing touch!

## Recipe Variations

1. **Sweet and Spicy**: Add a splash of sriracha or red pepper flakes to the honey garlic sauce for a kick.

2. **Herb-infused**: Toss in fresh herbs like thyme or rosemary for an aromatic twist.

3. **Roasted version**: Instead of sautéing, try roasting everything in the oven for an entirely different texture. Just toss everything together on a baking sheet, drizzle with olive oil, and roast at 425°F for about 30-35 minutes.

4. **Low-carb option**: Substitute the kielbasa with chicken breast or shrimp and add cauliflower rice instead of regular rice for a low-carb delight.

5. **Vegetarian Delight**: Swap kielbasa with grilled tempeh or chickpeas for a plant-based version that’s just as satisfying!

## Chef’s Notes

This recipe has come a long way since I first stumbled upon it years ago. Initially, I cooked it without any real seasoning—can you imagine? It was okay, but it was lacking that ‘wow’ factor. After test runs, addition of honey, garlic, and soy sauce turned it into my family's go-to weeknight meal.

Oh, and don’t get me started on the kitchen disasters along the way—like the time I accidentally knocked over the entire spice rack when trying to get the garlic! Let’s just say, that was a ten-minute cleanup job. And let me tell you, no amount of salt can save a dish that doesn’t have your heart in it!

## FAQs and Troubleshooting

### Q1: Can I use raw kielbasa instead of pre-cooked?
Absolutely! Just cook it a bit longer at the beginning to ensure it’s properly cooked through.

### Q2: What if my sauce is too thick?
If your sauce thickens too much, just add a splash of water or broth until it reaches your desired consistency.

### Q3: Can I make this ahead of time?
Yes, you can prep all the ingredients a day in advance and just sauté everything when you're ready to eat.

### Q4: How can I store leftovers?
Store any leftovers in an airtight container in the fridge for up to three days or freeze them for later. Reheat on the stove to keep that lovely texture!

## Nutritional Info (if applicable)

This recipe generally yields about 4 servings, with each serving roughly containing:
- Calories: 400
- Protein: 20g
- Carbs: 30g
- Fat: 25g

Note: Nutritional values can vary based on specific brands and ingredient types used.

---

There you have it! A wholesome, simple, and unbelievably tasty dish that brings joy and comfort to your table. I can't wait to see how you make it your own. Happy cooking, and remember: the kitchen is always a place for love!

One-Pan Honey Garlic Kielbasa & Veggies
- Total Time: 45 minutes
- Yield: 4 servings 1x
- Diet: Omnivore
Description
A savory and sweet one-pan dish featuring kielbasa and vibrant veggies, simmered in a luscious honey garlic sauce.
Ingredients
- 14 oz Kielbasa
- 1 red Bell Pepper
- 1 yellow Bell Pepper
- 2 cups Broccoli Florets
- 2 medium Carrots, sliced
- 1 medium Red Onion, sliced
- 4 cloves Garlic, minced
- 1/4 cup Honey
- 2 tablespoons Soy Sauce
- 2 tablespoons Olive Oil
- Salt & Pepper to taste
Instructions
- Prep Your Ingredients: Slice the kielbasa into bite-sized pieces, slice the bell peppers and carrots, chop the broccoli into florets, and thinly slice the red onion. Mince the garlic.
- Heat the Pan: In a large skillet over medium heat, drizzle the olive oil and let it warm up.
- Sear the Kielbasa: Add the kielbasa pieces to the pan and brown for about 5-7 minutes.
- Add the Veggies: Toss in the red onion, bell peppers, carrots, and broccoli and cook for about 3-4 minutes.
- Mix the Sauce: Stir in the minced garlic and cook for another minute, then whisk together the honey and soy sauce and pour into the pan.
- Simmer and Thicken: Let the contents simmer for about 5-7 minutes until tender-crisp and the sauce thickens slightly.
- Taste It: Adjust salt and pepper to taste before serving.
Notes
Serve with rice or quinoa to soak up the sauce; you can also garnish with sesame seeds or fresh parsley.
- Prep Time: 15 minutes
- Cook Time: 30 minutes
- Category: Main Course
- Method: Sautéing
- Cuisine: American
Nutrition
- Serving Size: 1 serving
- Calories: 400
- Sugar: 20g
- Sodium: 900mg
- Fat: 25g
- Saturated Fat: 8g
- Unsaturated Fat: 12g
- Trans Fat: 0g
- Carbohydrates: 30g
- Fiber: 3g
- Protein: 20g
- Cholesterol: 60mg
Keywords: kielbasa, one-pan, honey garlic, easy dinner, family meal




