
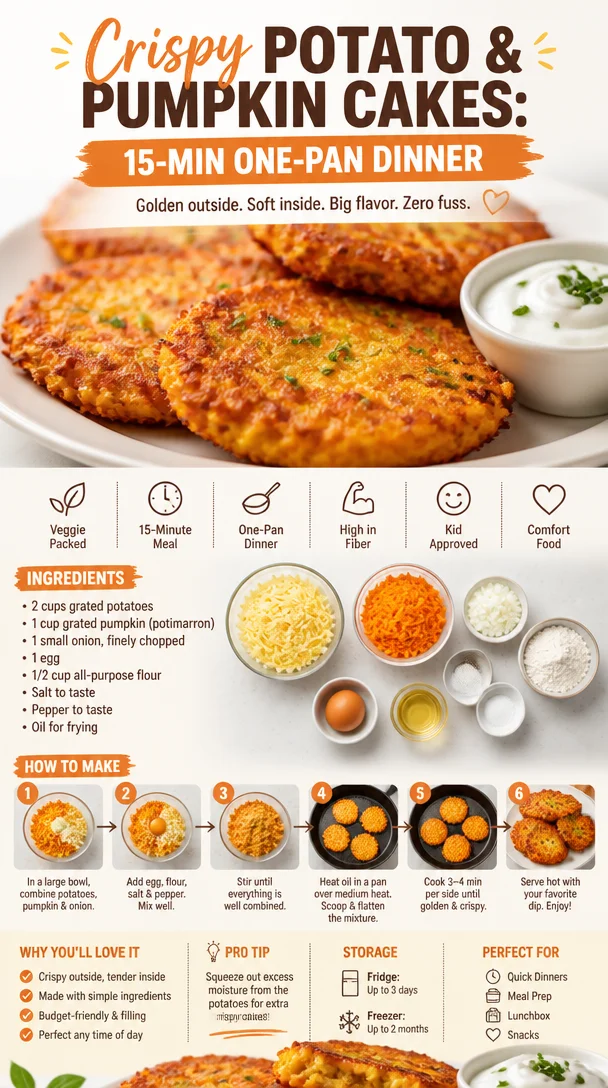
Crispy Potato & Pumpkin Cakes: 15-Min One-Pan Dinner
Crispy Potato and Pumpkin Cakes: A Cozy Culinary Delight
Welcome to my kitchen! Today, I’m taking you on a culinary journey that marries the comforting essence of potatoes with the warm, sweet notes of pumpkin. Imagine a cozy evening, the air filled with spice and warmth, and a golden brown platter of crispy potato and pumpkin cakes on the table. Ah! That’s the kind of magic we’re creating today!
I can still recall the first time I made these crispy delights. It was a chilly autumn evening, the kind that calls for comfort food, and in true Olivia fashion, I decided to whip up something special. Armed with a pumpkin I had picked from a local farm (because how could you resist?), I found myself experimenting in the kitchen. Before I knew it, the aroma of sizzling cakes filled the air, transporting me back to my grandma’s kitchen where similar flavors danced together.
Each bite is a little piece of home, a delicious burst of flavor that reminds you that cooking doesn’t have to be complicated to be extraordinary. So, roll up your sleeves, grab that apron (trust me, it’s going to get messy!), and let’s dive into the wonderful world of crispy potato and pumpkin cakes!
A Fond Memory of Flavor
One chilly evening when I was a child, my grandma invited me into her bustling kitchen while the scents of sweet cinnamon and roasted pumpkin filled the air. As she mashed and mixed, she shared stories of her childhood, her family, and the dinners they would have. I vividly remember the fun we had experimenting with potatoes and pumpkin, crafting little cakes that would later be fried to perfection. Our laughter intertwined with the sizzling sound of those cakes cooking, and the golden hue that emerged made it a picture-perfect moment.
As we sat down to eat those crispy creations, I felt a sense of belonging and warmth that only home-cooked meals can provide. It’s this very memory that inspires my love for food — the idea that every meal can be a story, a gathering of flavors, and an opportunity to bring people together. So, let’s keep that spirit alive and recreate this cozy dish together!
Ingredients
Gathering the perfect ingredients is key to bringing these crispy potato and pumpkin cakes to life. Here’s what you’ll need:
-
2 medium potatoes: For that classic fluffy texture. Russets are great for this recipe, but Yukon Golds work beautifully, too!
- Substitution Tip: If you want a creamier texture, opt for a starchy potato like Idaho.
-
1 cup pumpkin puree: This adds a sweet, earthy flavor while keeping the cakes moist.
- Chef Insight: Canned pumpkin is a time-saver, but if you have fresh pumpkin, go for it! Roast and pureé it before using.
-
1 big egg: This acts as a binder to hold everything together.
- Substitution Tip: For a vegan option, substitute with a flaxseed egg (1 tablespoon flaxseed meal + 2.5 tablespoons water, let it sit for 5 minutes).
-
1/2 cup all-purpose flour: For structure and that crispy exterior.
- Chef Insight: You can use gluten-free flour for a gluten-free version — just ensure it’s a good blend.
-
1 tsp salt: Enhances all the flavors; don’t skip it!
- Substitution Tip: Use less if you’re watching your sodium intake.
-
1/2 tsp black pepper: A little kick without overpowering the dish.
-
1/4 teaspoon paprika: Adds a hint of smokiness and color.
-
1/4 cup chopped fresh parsley: For a burst of freshness (or feel free to use cilantro if that’s your vibe!).
-
Cooking oil (for frying): I love using olive oil, but vegetable oil or avocado oil works well, too.
- Chef Insight: For deeper flavor, try bacon fat or duck fat if you’re feeling adventurous!
Step-by-Step Instructions
Now that we have our ingredients ready, it’s time to get cooking! Follow these steps, and we’ll turn that idea into a delicious reality.
-
Prep and Boil the Potatoes
Start by peeling the potatoes and cutting them into quarters. Place them in a pot of salted water and bring to a boil. Once boiling, reduce to a simmer for about 15-20 minutes or until they’re fork-tender. Here’s a little tip: you want them soft enough to mash easily but not so mushy they lose their personality!
-
Mash it Up!
Drain the potatoes and return them to the pot. With a potato masher or fork, mash them until smooth. You want no lumps here — this is your canvas! Let them cool a bit while we prepare the pumpkin.
-
Combine the Goodness
In a large mixing bowl, combine your mashed potatoes and pumpkin puree. Now here comes the fun part: crack that egg in, and sprinkle in the flour, salt, pepper, paprika, and fresh parsley. Use your hands to mix it all together until well combined. Don’t be afraid to get a little messy — that’s part of the joy of cooking!
-
Shape the Cakes
Now it’s time for creativity! Grab a handful of the mixture and shape it into patties, about 1/2 inch thick. This step is perfect for flexing your culinary muscles, so don’t worry about making them identical. You’re crafting little pieces of joy!
-
Fry, Fry, Fry!
Heat about 1/4 inch of oil in a non-stick skillet over medium heat. Once it’s shimmering (but not smoking), add the cakes in batches, making sure not to overcrowd the pan. Fry them for about 3-4 minutes on each side, or until golden brown and crispy. Flip them carefully — they have a tendency to be a bit delicate until they set!
Chef Hack: If you want to check if the oil is ready, drop a tiny bit of the batter in; if it sizzles, you’re good to go!
-
Drain Excess Oil
Once the cakes are beautifully golden, remove them from the pan and place them on a paper towel-lined plate to absorb any excess oil. This keeps them crispy and light!
Serving Suggestions
When it comes to plating, let’s keep it simple, beautiful, and inviting. Arrange the crispy potato and pumpkin cakes on a large platter, perhaps a sprinkle of fresh parsley for a pop of color. Pair them with a zesty dipping sauce, like a tangy yogurt or a spicy aioli, and don’t forget to serve them with a side of your favorite greens. A vibrant salad adds a lovely crunch and balances the richness!
Recipe Variations
Now let’s explore some fun variations to keep things exciting in the kitchen:
-
Cheesy Delight: Add 1/2 cup of shredded cheese (like cheddar or feta) to the batter for a cheesy twist.
-
Spice it Up: For those who love heat, toss in some red pepper flakes or finely chopped jalapeños.
-
Herb Infusion: Swap out the parsley for fresh thyme or rosemary for an aromatic touch.
-
Sweet Version: Go sweet by mixing in some maple syrup and a pinch of nutmeg — a perfect breakfast treat!
-
Vegetarian Protein: For an extra protein boost, mix in some cooked lentils or chickpeas into the batter; just mash them roughly for texture.
Chef’s Notes
Crispy potato and pumpkin cakes have been a part of my kitchen repertoire for years. They’ve evolved from a simple comfort dish into a refined recipe I love to share with friends and family. One time, during a family gathering, I made a gigantic batch, and believe it or not, they disappeared within minutes! It’s funny how food can create bonds; we ended up launching into stories of our childhood like it was a competition to share the best one!
Over time, I’ve learned that this recipe is not just about the ingredients, but about the love and memories that go into it. So whether you’re making it for a friend or just yourself, remember to sprinkle in some joy!
FAQs and Troubleshooting
1. My cakes are falling apart while frying. What did I do wrong?
This can happen if there isn’t enough flour or if the mixture is too wet. Always start with less pumpkin puree and gradually add more; you want a thick batter.
2. Can I bake these instead of frying?
Absolutely! Preheat your oven to 400°F (200°C), place the cakes on a parchment-lined baking sheet, and lightly spray or brush with oil. Bake for 25-30 minutes, flipping halfway through for an even crisp.
3. Can I freeze these cakes?
Yes! Once they’re cooked and cooled, place them in an airtight container between layers of parchment paper. Freeze for up to three months. Reheat in a toaster oven or skillet for best results.
4. What’s the best dipping sauce to serve with these cakes?
A creamy garlic yogurt sauce or a spicy sriracha mayo complements these cakes beautifully, balancing the flavors perfectly.
Nutritional Info
While I focus more on the joy of cooking rather than the numbers, I believe this dish offers a great balance of carbs, fiber, and protein—perfect for a hearty meal. If you’d like the specific nutritional breakdown, please let me know, and we can dive into the details together!
There you have it! A delicious recipe for crispy potato and pumpkin cakes that’ll warm your heart and fill your belly. I hope you enjoy making these as much as I do. Remember, cooking is an adventure full of flavor, love, and, most importantly, joy! Bon appétit!
Print
Crispy Potato and Pumpkin Cakes
- Total Time: 35 minutes
- Yield: 4 servings 1x
- Diet: Vegetarian
Description
A cozy blend of fluffy potatoes and sweet pumpkin, these crispy cakes are the perfect comfort food for chilly evenings.
Ingredients
- 2 medium potatoes (Russet or Yukon Gold)
- 1 cup pumpkin puree
- 1 big egg
- 1/2 cup all-purpose flour
- 1 tsp salt
- 1/2 tsp black pepper
- 1/4 tsp paprika
- 1/4 cup chopped fresh parsley
- Cooking oil (for frying)
Instructions
- Prep and boil the potatoes by peeling and cutting them into quarters; boil in salted water for 15-20 minutes until fork-tender.
- Mash the drained potatoes until smooth and let cool slightly.
- Combine the mashed potatoes with pumpkin puree, egg, flour, salt, pepper, paprika, and parsley in a large bowl.
- Shape the mixture into patties, about 1/2 inch thick.
- Fry the cakes in hot oil for 3-4 minutes on each side until golden and crispy.
- Drain excess oil on paper towels.
Notes
Feel free to add cheese, spices, or herbs to customize your cakes. Serve with a zesty sauce for extra flavor!
- Prep Time: 15 minutes
- Cook Time: 20 minutes
- Category: Main Course
- Method: Frying
- Cuisine: American
Nutrition
- Serving Size: 1 serving
- Calories: 350
- Sugar: 5g
- Sodium: 400mg
- Fat: 12g
- Saturated Fat: 4g
- Unsaturated Fat: 6g
- Trans Fat: 0g
- Carbohydrates: 45g
- Fiber: 3g
- Protein: 15g
- Cholesterol: 30mg
Keywords: potato cakes, pumpkin recipes, comfort food, vegetarian recipes, cozy meals
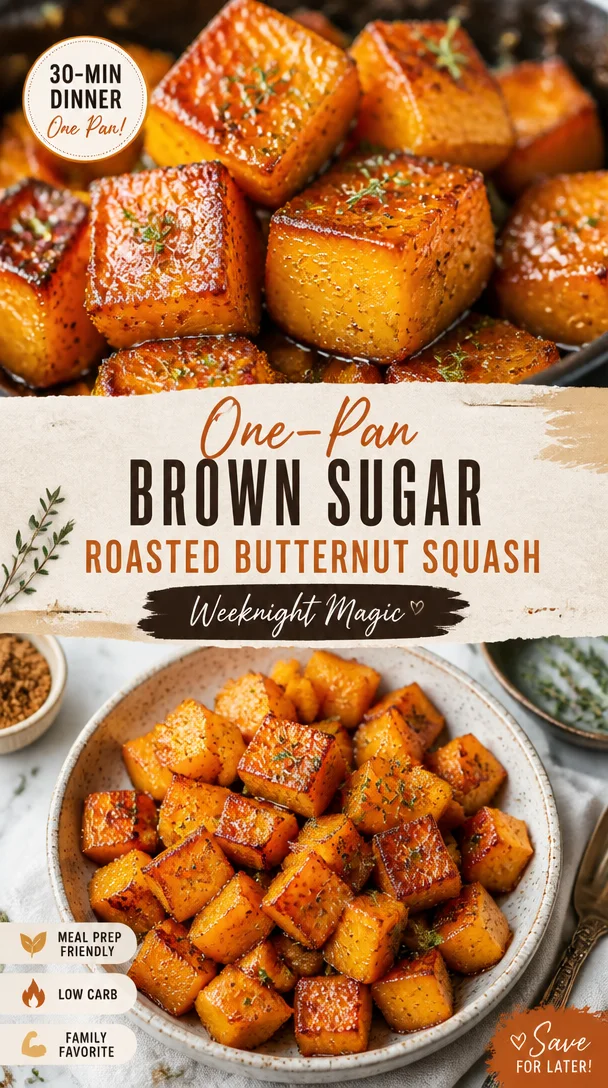
One-Pan Brown Sugar Roasted Butternut Squash (Weeknight)
Brown Sugar Roasted Butternut Squash: A Cozy Kitchen Delight
Welcome to my kitchen! Today, we’re diving into one of my all-time favorite comfort dishes: Brown Sugar Roasted Butternut Squash. As the weather starts cooling down and autumn whispers its arrival, there’s something incredibly special about cozying up with a warm, sweet, and savory dish that feels like a hug in a bowl. This roasted butternut squash recipe is rich, buttery, and kissed with the warm flavors of brown sugar and spices—perfect for adding a touch of fall magic to your dinner table or meal prep.
Imagine the sweet, caramelized aroma filling your kitchen as the squash roasts to golden perfection. Whether served as a side dish at Thanksgiving or enjoyed alongside a hearty grain bowl, this recipe is not only delicious but versatile, too! Plus, it’s so simple to make—if you can chop veggies and set a timer, you’re already halfway there!
So, grab your apron, and let’s embark on this cozy cooking adventure together. Not only will you end up with a delightful dish, but you’ll also find a space to reflect, connect, and enjoy the simple pleasures of cooking!
A Sweet Memory: The First Time I Roasted Squash
The first time I roasted butternut squash, I was a college student trying to impress my friends with my newfound cooking skills. I can still remember the day—it was chilly outside, and the leaves were swirling like dancers in the wind. Armed with my trusty old cookbook, I decided to tackle roasted butternut squash. As I chopped the vibrant orange flesh, the sweet aroma filled my small apartment kitchen, making my roommates flock in like moths to a flame.
With the oven doing its magic, I nervously paced around, waiting for those 30 minutes to pass. When the timer went off, I opened the oven door to find the squash beautifully caramelized, with that irresistible, sweet, and slightly nutty scent wafting through the air. It felt like I had unlocked a culinary treasure! That night, we all gathered around the table, laughter filling the air as we enjoyed our meal. That simple dish ignited my love for cooking and the joy of sharing homemade meals, a tradition I carry on through this blog.
Ingredients You’ll Need
Here’s the rundown of ingredients for this delicious Brown Sugar Roasted Butternut Squash. Each plays a crucial role in creating depth of flavor and that cozy vibe we crave.
-
Butternut Squash (1 medium): The star of the show! Sweet, nutty, and creamy when roasted. You can substitute with acorn or pumpkin if that’s what you have on hand.
-
Brown Sugar (¼ cup): This adds that irresistible caramel-like sweetness. If you want a healthier option, you can use coconut sugar or maple syrup in moderation.
-
Olive Oil (2 tablespoons): This helps in roasting the squash evenly. Feel free to swap it out with melted coconut oil for a different flavor profile.
-
Cinnamon (1 teaspoon): The warm spice perfectly complements the sweetness of the squash. Nutmeg or pumpkin pie spice also works beautifully here.
-
Salt (½ teaspoon): Just a pinch enhances all flavors. Remember, good quality sea salt is a chef’s best friend!
-
Black Pepper (¼ teaspoon): A little kick to offset the sweetness. Try smoked paprika for a more complex flavor twist.
-
Optional Fresh Herbs (½ teaspoon): Such as thyme or rosemary. They add an earthy freshness—perfect if you’re feeling adventurous!
Step-by-Step Instructions
Now, let’s get cooking! Follow these steps closely, and I promise you’ll end up with a stunning dish that will steal the show.
-
Prepare the Squash: Start by preheating your oven to 400°F (200°C). While it heats up, grab your butternut squash. Cutting it can be a bit challenging due to its tough skin. I recommend using a sturdy chef’s knife and being cautious—it’s easy to slip! Cut the squash in half lengthwise, scoop out the seeds with a spoon, and then chop it into bite-sized cubes. If you’re short on time, you can often find pre-cut butternut squash at the grocery store.
-
Mix the Ingredients: In a large mixing bowl, combine the cubed butternut squash, olive oil, brown sugar, cinnamon, salt, and black pepper. Smell that? It’s pure bliss! Toss everything together until the squash is well-coated, ensuring each piece is evenly dressed for roasting. Chef’s tip: Don’t be shy—use your hands for this! You’ll get a better sense of how much oil and sugar is clinging to your squash.
-
Roast, Baby, Roast: Spread the coated squash evenly on a baking sheet lined with parchment paper. This ensures easy cleanup and prevents sticking! Roast in the preheated oven for about 25-30 minutes. Halfway through, give it a good toss with a spatula so every piece gets a chance to caramelize beautifully. The goal is for your squash to be golden brown and fork-tender.
-
Cooling Down: Once ready, take the sheet out of the oven and allow the squash to cool for about 5 minutes. This will allow the flavors to settle in and avoid burning your tongue when you dive in!
-
Serving Time: Transfer the roasted squash to a beautiful serving bowl. Sprinkle with fresh herbs for that extra flair—trust me; your guests will be impressed!
Serving Suggestions
This Brown Sugar Roasted Butternut Squash is fantastic on its own, but let’s get creative! Serve it warm as a side dish alongside roasted chicken or grilled steak, or toss it over a bed of greens for a delicious salad. You can also mix it with quinoa or farro for a hearty, satisfying meal. It’s also incredible nestled into a grain bowl, topped with feta cheese, pumpkin seeds for crunch, and a drizzle of balsamic glaze.
Recipe Variations
Feeling adventurous? Here are a few creative twists to bring to this cozy dish:
-
Maple-Mustard Glaze: Replace the brown sugar with maple syrup and add a teaspoon of Dijon mustard for a sweet and tangy flavor.
-
Spicy Kick: Add a pinch of cayenne or red pepper flakes to the mixture for a delightful and warming heat.
-
Savory Spin: Swap cinnamon with cumin and toss in some chopped garlic. This will transform the squash into a fragrant, savory dish.
-
Herb Infusion: Mix in fresh sage or thyme before roasting to infuse your squash with fragrant herbal notes.
-
Sweet and Tart: Toss in some cranberries or pomegranate seeds after roasting for a burst of color and tartness that pairs perfectly with the sweetness.
Chef’s Notes
Over the years, this recipe has undergone a few transformations in my kitchen. Initially, it started with just olive oil and brown sugar, but as my palate has evolved, I’ve added spices and fresh herbs to enhance the flavors. I’ve even used this roasted squash as a filling in tacos—and let me tell you, it’s a game-changer!
And here’s a little kitchen story for you: One day, I accidentally spilled a whole jar of brown sugar into my bowl. Instead of panicking, I decided to embrace the extra sweetness and ended up with a deliciously caramelized flavor. So don’t be afraid of little accidents—sometimes they turn out to be happy accidents!
FAQs and Troubleshooting
1. My butternut squash didn’t caramelize—what went wrong?
This can happen if your oven isn’t hot enough or if the squash was packed too closely on the baking sheet. Ensure even spacing and that you preheat your oven thoroughly.
2. Can I make this dish ahead of time?
Absolutely! Roast the squash ahead of time and reheat it in the oven or microwave just before serving. It doesn’t lose its charm and flavors even as leftovers!
3. What’s the best way to cut a butternut squash?
Using a sharp knife and a cutting board with a damp towel underneath can help stabilize it. Start by cutting off both ends to create a flat surface for easier handling.
4. How can I store leftovers?
Store any leftover roasted squash in an airtight container in the fridge for up to 3-4 days. Reheat in the oven or the microwave, and enjoy!
Nutritional Information
(Per serving, approximately ½ cup)
- Calories: 150
- Protein: 2g
- Fat: 7g
- Carbohydrates: 25g
- Fiber: 3g
- Sugar: 10g
Isn’t it amazing how something so simple can evoke such joy and warmth? This Brown Sugar Roasted Butternut Squash is more than just a recipe; it’s a reminder to enjoy the little moments in the kitchen and the comfort of good food. Happy cooking, my friends, and may your kitchens always be filled with love and laughter!
Print
Brown Sugar Roasted Butternut Squash
- Total Time: 45 minutes
- Yield: 4 servings 1x
- Diet: Vegetarian
Description
A warm and sweet dish featuring roasted butternut squash caramelized with brown sugar and spices, perfect for fall!
Ingredients
- 1 medium Butternut Squash
- ¼ cup Brown Sugar
- 2 tablespoons Olive Oil
- 1 teaspoon Cinnamon
- ½ teaspoon Salt
- ¼ teaspoon Black Pepper
- ½ teaspoon Optional Fresh Herbs (thyme or rosemary)
Instructions
- Prepare the Squash: Preheat your oven to 400°F (200°C). Cut the squash in half lengthwise, scoop out the seeds, and chop into bite-sized cubes.
- Mix the Ingredients: In a large bowl, combine cubed squash, olive oil, brown sugar, cinnamon, salt, and black pepper. Toss until well-coated.
- Roast: Spread the coated squash on a lined baking sheet. Roast for 25-30 minutes, tossing halfway through, until golden and fork-tender.
- Cooling Down: Allow roasting squash to cool for about 5 minutes.
- Transfer to a serving bowl and sprinkle with fresh herbs if desired.
Notes
This dish can be made ahead of time and reheated before serving.
- Prep Time: 15 minutes
- Cook Time: 30 minutes
- Category: Side Dish
- Method: Roasting
- Cuisine: American
Nutrition
- Serving Size: ½ cup
- Calories: 150
- Sugar: 10g
- Sodium: 300mg
- Fat: 7g
- Saturated Fat: 1g
- Unsaturated Fat: 6g
- Trans Fat: 0g
- Carbohydrates: 25g
- Fiber: 3g
- Protein: 2g
- Cholesterol: 0mg
Keywords: butternut squash, roasted vegetables, fall recipes, vegetarian, cozy meals
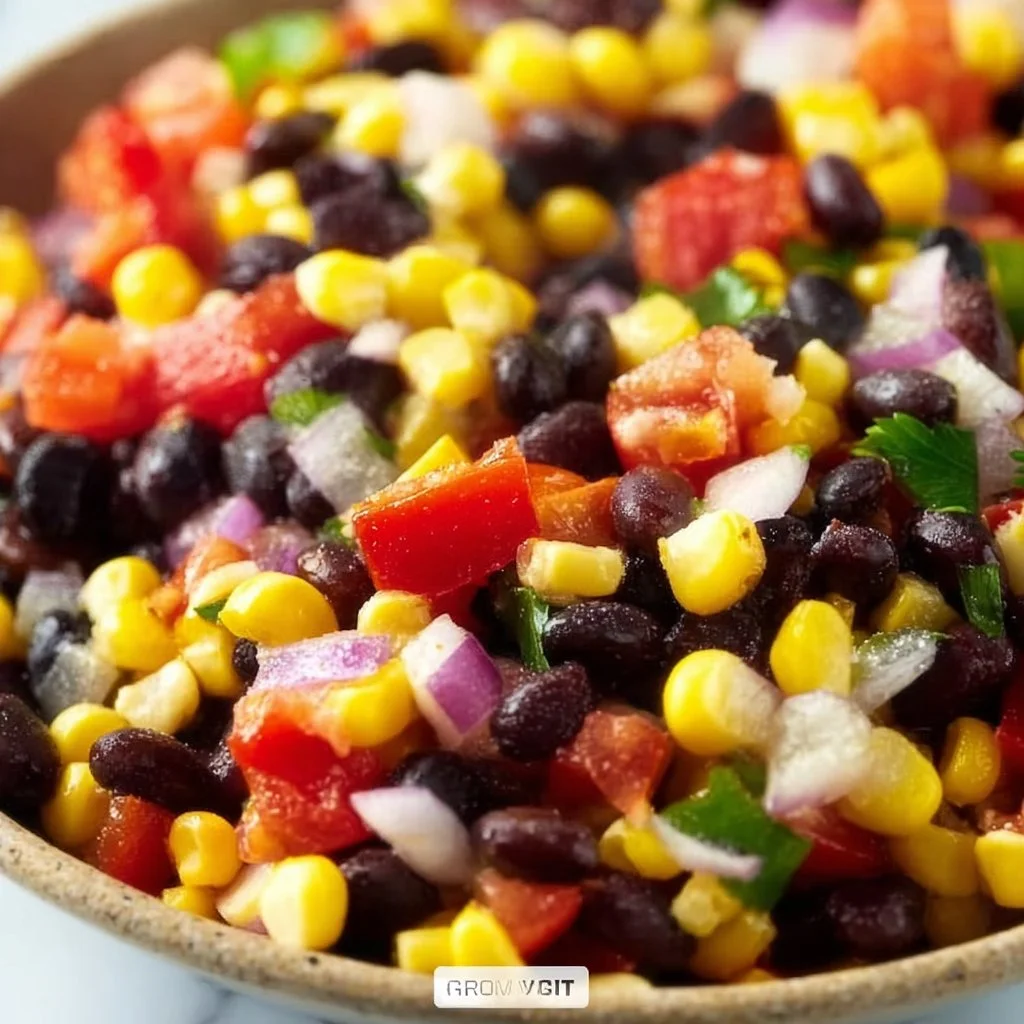
Southwest Corn and Black Bean Salad
Southwest Corn and Black Bean Salad: A Flavorful Fiesta in Every Bite!
Welcome back, dear foodies! I’m super excited to share something delicious with you today—a vibrant, hearty Southwest Corn and Black Bean Salad that will transport your taste buds straight to a festive summer fiesta! When I think of summer, fresh ingredients, and bright colors, this salad immediately pops into my mind. It’s not just a side dish; it’s a whole mood—a celebration of flavor, color, and community.
Imagine the first sunny day after a long winter, when the air is warm, and every ingredient seems to burst with flavor. That’s how I feel when I whip up this salad. You see, cooking for me is not just about feeding the body; it’s about nourishing the soul and creating memories in the kitchen. This salad, with its mix of sweet corn, hearty black beans, and a zesty lime dressing, is perfect for gatherings, picnics, or even a weekday lunch that feels like a treat!
Over the years, I’ve tweaked this recipe, adding my own special touches and flavor combos that make it truly sing. Plus, it’s as versatile as your creativity allows. You could serve it as a side, a main, or even as a filling for tacos! So grab your apron and let’s dive into this culinary adventure together! Believe me, by the end of this post, you’ll not only want to make this salad but you’ll also carry a sprinkle of kitchen magic back to your own kitchen!
Personal Story
Ah, memories of my childhood kitchen always bring a smile to my face! Growing up, we had a tradition in my family: every summer, we’d host a huge barbecue for friends and neighbors. It was a celebration of everything we loved about summer—the laughter, the sunshine, and of course, the food! One summer, my mom decided to try her hand at a Southwest-inspired spread, and among the smoky grilled meats and fiery salsas, she introduced this incredible corn and black bean salad.
The melding of flavors and vibrant colors captured everyone’s attention. I remember my dad taking the first bite and his eyes lighting up with delight, while friends gathered around the salad bowl, asking for seconds—and even thirds! It became a staple at our summer gatherings, a point of celebration and connection. As I grew older and developed my own culinary skills, I began to experiment with the recipe, adding my own twists while keeping that original spirit alive. Each bite is like a hug from my childhood, reminding me of the joy that good food can bring when shared with loved ones.
Now, as I pass this recipe along to you, I hope you create your own memories around this dish. After all, food is not just fuel; it’s the heart of every gathering, the laughter in every moment spent with loved ones.
Ingredients
Here’s what you’ll need to create your own Southwest Corn and Black Bean Salad:
-
Corn (Fresh or Frozen): 2 cups
- Tip: Fresh corn off the cob brings a juicy sweetness, but frozen corn works just as well if you’re short on time. Just make sure to thaw and drain it first!
-
Black Beans: 1 can (15 oz), rinsed and drained
- Chef Insight: Black beans are packed with protein and fiber, making them a hearty staple in this salad! If you want a different flavor, feel free to substitute with kidney beans or chickpeas.
-
Red Bell Pepper: 1, diced
- Substitution: You can swap this for yellow or orange bell pepper for a mellower sweetness or even jalapeño for some heat!
-
Red Onion: ½ small, finely chopped
- Quick Tip: Soaking the chopped onion in cold water for 10 minutes will take the bite out and make it milder.
-
Fresh Cilantro: ¼ cup, chopped
- Chef Hack: If cilantro’s not your thing, try fresh parsley or even chopped green onions for a bright flavor.
-
Cherry Tomatoes: 1 cup, halved
- Flavor Tip: You can use grape tomatoes or even swap them out for diced avocado for a creamier texture.
-
Lime Juice: 2 tablespoons (freshly squeezed)
- Chef Insight: Fresh lime juice is key to brightening up the flavors! Bottled juice just doesn’t have the same zest.
-
Olive Oil: 2 tablespoons
- Pro Tip: For a different flavor profile, use avocado oil or chili oil to add a touch of spice!
-
Chili Powder: ½ teaspoon
- Flavor Options: Want more heat? Increase the chili powder, or add a pinch of cayenne or smoked paprika!
-
Salt and Pepper: To taste
- Chef’s Note: Remember, seasoning at each stage is key! Start lightly and adjust as needed.
Step-by-Step Instructions
Let’s transform those fresh ingredients into something incredible! Follow these easy steps, and don’t hesitate to let your creativity shine.
Step 1: Prep Your Ingredients
Start by rinsing your black beans under cold water and draining them well. If you’re using fresh corn, remove it from the cob. For frozen corn, make sure it’s completely thawed and drained. Dice your bell pepper and red onion, and halve your cherry tomatoes. You should also chop the cilantro—set all your ingredients aside in separate bowls for easy access. This way, you’ll have a lovely mise en place, which, as a home cook, I can’t recommend enough. It makes cooking way more enjoyable!
Step 2: Mix the Veggies
In a large mixing bowl, combine your black beans, corn, diced bell pepper, chopped red onion, and halved cherry tomatoes. Give them a gentle toss—you want to keep the veggies whole and vibrant, not mushy! The colors will start to dance together, and that’s when the magic happens.
Step 3: Whip Up the Dressing
In a small bowl, whisk together the lime juice, olive oil, chili powder, and a pinch of salt and pepper. Taste it and adjust as needed! I always say, your dressing should pop with flavor like a party in your mouth. If you want to experiment, a dash of cumin or a sprinkle of sugar can elevate the dressing even more!
Step 4: Dress the Salad
Once you’re happy with your dressing, drizzle it over your mixed salad. Use a spatula or wooden spoon to gently combine everything, ensuring the dressing coats each ingredient beautifully. This is where the salad comes to life, soaking up all those flavors.
Step 5: Add Fresh Cilantro!
To finish off, fold in the chopped cilantro for that final touch of freshness. You can save a bit for garnish if you want to make it visually stunning on your table!
Step 6: Let It Chill
Always a good idea! Allow the salad to sit in the fridge for at least 30 minutes before serving. This will let those flavors meld together beautifully. You can totally make it ahead and let it hang out in the fridge for a few hours or even overnight!
Step 7: Serve and Enjoy!
When you’re ready to serve, give it a good stir (sometimes the dressing settles a bit), and ladle it into bowls or on a platter. You can garnish it with some additional cilantro, lime wedges, or even a sprinkle of feta cheese for a creamy touch!
Serving Suggestions
This salad is incredibly versatile! Plate it up in a vibrant, colorful bowl or serve it directly from the mixing bowl for a homey feel. For a complete meal, it pairs beautifully with grilled chicken or fish. Feeling extra adventurous? Use it as a filling for tacos, layered on top of nachos, or as a zesty topping for your favorite protein-packed salad!
Recipe Variations
Now, let’s spark some creativity! Here are a few fun twists you can explore:
- Spicy Kick: Add diced jalapeños or a splash of hot sauce to kick things up a notch.
- Taste of Summer: Mix in diced mango or pineapple for a sweet and tropical version.
- Creamy Delight: Stir in avocado or top it off with some creamy dressing or crumbled Feta cheese.
- Quinoa Boost: Add cooked quinoa for an extra protein punch!
- Herbal Flair: Try swapping cilantro with mint or basil for a fresh, unique flavor.
Chef’s Notes
This salad has come a long way in my kitchen. What started as my mom’s simple recipe has evolved into a vibrant canvas for flavors, textures, and seasonal ingredients. The best part? It’s forgiving and adapts to whatever you have on hand! I can’t tell you how many times I’ve added a random veggie or spice that turned out to be a new family favorite. And let me tell you, if you ever find yourself with leftovers (which is rare but happens sometimes!), it makes the perfect filling for a hearty wrap or burrito. Trust me, this is a dish that invites improvisation.
FAQs and Troubleshooting
Q1: My salad is too salty—what do I do?
If you find that your salad is a bit too salty after dressing it, try adding more corn, beans, or veggies to balance the flavor. A little more lime juice can help, too!
Q2: How long will the salad last in the fridge?
This salad can last about 2-3 days in the fridge, but it’s best enjoyed fresh! Make sure you store it in an airtight container to keep it crispy.
Q3: Can I make this salad ahead of time?
Absolutely! In fact, I recommend letting it chill in the fridge for at least 30 minutes before serving to let those flavors meld. You can prepare it the night before a gathering, too.
Q4: Can I freeze the salad?
I wouldn’t recommend freezing it, as the texture of the veggies (especially the tomatoes and peppers) will change once thawed. However, the dressing can be made ahead and stored in the fridge!
Nutritional Info
Though I don’t always focus on the numbers, here’s an approximate breakdown (per serving):
- Calories: 200
- Protein: 10 grams
- Carbohydrates: 30 grams
- Fiber: 8 grams
- Fat: 8 grams
(Note: Nutritional values can vary based on specific ingredients and portions used.)
And there you have it! A bright and flavorful Southwest Corn and Black Bean Salad that captures the essence of summer in every bite. I hope this recipe inspires you to gather around the table with your loved ones and create your own beautiful memories. Cooking is all about joy, connection, and a sprinkle of creativity—happy cooking, friends! 🎉
Print
Southwest Corn and Black Bean Salad
- Total Time: 45 minutes
- Yield: 4 servings 1x
- Diet: Vegetarian
Description
A vibrant and hearty salad featuring sweet corn, black beans, and a zesty lime dressing, perfect for summer gatherings.
Ingredients
- 2 cups Corn (Fresh or Frozen)
- 1 can (15 oz) Black Beans, rinsed and drained
- 1 Red Bell Pepper, diced
- ½ small Red Onion, finely chopped
- ¼ cup Fresh Cilantro, chopped
- 1 cup Cherry Tomatoes, halved
- 2 tablespoons Lime Juice (freshly squeezed)
- 2 tablespoons Olive Oil
- ½ teaspoon Chili Powder
- Salt and Pepper to taste
Instructions
- Prep Your Ingredients: Rinse black beans and dice other vegetables.
- Mix the Veggies: Combine beans, corn, bell pepper, onion, and tomatoes in a bowl.
- Whip Up the Dressing: Whisk lime juice, olive oil, chili powder, salt, and pepper.
- Dress the Salad: Drizzle dressing over salad and mix gently.
- Add Fresh Cilantro: Fold in chopped cilantro.
- Let It Chill: Refrigerate for at least 30 minutes before serving.
- Serve and Enjoy: Stir before serving and garnish with additional cilantro if desired.
Notes
This salad is versatile and can be served as a side dish or a filling for tacos. It can be made ahead of time for best flavor.
- Prep Time: 15 minutes
- Cook Time: 0 minutes
- Category: Salad
- Method: Mixing
- Cuisine: Mexican
Nutrition
- Serving Size: 1 serving
- Calories: 200
- Sugar: 3g
- Sodium: 300mg
- Fat: 8g
- Saturated Fat: 1g
- Unsaturated Fat: 7g
- Trans Fat: 0g
- Carbohydrates: 30g
- Fiber: 8g
- Protein: 10g
- Cholesterol: 0mg
Keywords: salad, corn, black beans, summer salad, healthy recipe
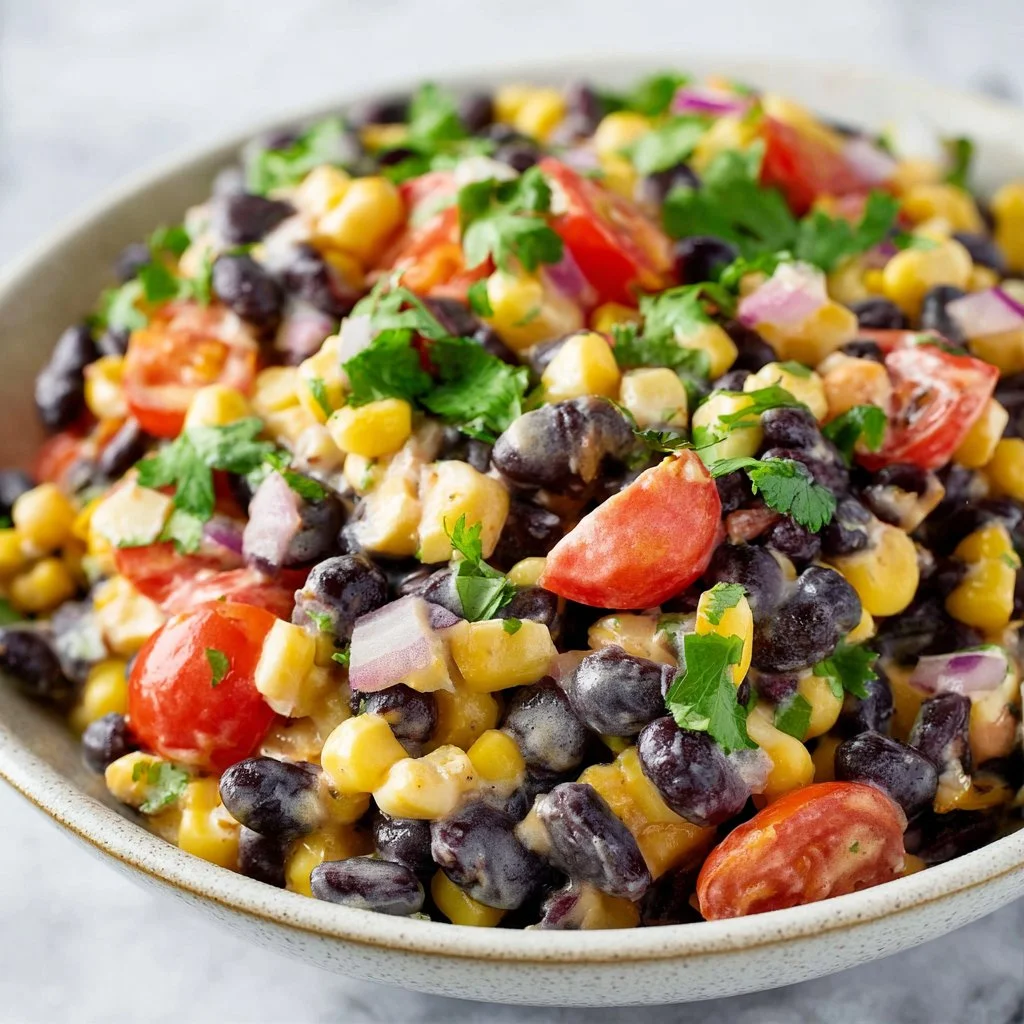
Southwest Black Bean Corn Salad
Southwest Black Bean Corn Salad: A Flavorful Fiesta in a Bowl!
Hey there, fellow food lovers! Welcome back to my kitchen, where every recipe is an invitation to spice things up and create delightful memories around the table. Today, we’re diving into a colorful and zesty dish that’s perfect for any occasion: Southwest Black Bean Corn Salad! 🌽
This salad is packed with vibrant flavors and fresh ingredients, bringing a taste of the Southwest right to your kitchen. Imagine biting into juicy corn perfectly complemented by the robust flavor of black beans, all tossed together with a zingy dressing that will make your taste buds dance! Whether you’re preparing a light lunch, a side for your next BBQ, or just looking for a healthy dish that’s absolutely bursting with flavor, this salad has got you covered.
Now, let’s take a moment to visualize this lovely creation. The tropical yellow hues of fresh corn, the deep black of the beans, and the bright greens of cilantro create a colorful palette that would make any artist envious. And trust me, once you take a few bites, you’ll find yourself wanting to dive in for more!
When I first discovered this salad, I was at a friend’s summer barbecue. As the sun was setting, we gathered around the grill, sipping cool drinks and sharing laughter. One friend brought a massive bowl of Southwest Black Bean Corn Salad, and I was instantly drawn to it. The aroma of lime, cilantro, and spices wafted through the air, igniting my curiosity. I vividly remember talking with my friends about what was in this vibrant creation as I savored each bite. From that moment on, this colorful dish became a staple in my home. Through trials and numerous recipe variations, I perfected a version that I’m excited to share with you today!
So roll up those sleeves and put on your favorite apron; it’s time to whip up something delicious in the kitchen!
Personal Story
Let me take you back to my childhood for a moment. I grew up in a small town where family gatherings were a big deal, especially during the summer months. My Aunt Maria was the queen of summer barbecues, and nothing brought our family together quite like her infamous black bean corn salad. Every time she made it, she would whisk us into the kitchen, allowing us to help with the chopping and mixing. I remember the laughter and the playful banter as we diced tomatoes and squeezed fresh lime juice.
One magical afternoon stands out in my memory. It was my cousin Jake’s birthday, and Aunt Maria decided to surprise him with a giant batch of this salad. The kitchen was filled with the aroma of sizzling fajitas, but my heart was already set on that colorful bowl. As we sat around the table, my aunt shared stories about how she had discovered this recipe while traveling through New Mexico, and the way her eyes twinkled made the salad taste even better!
From that day onwards, black bean corn salad became more than just a dish for me; it became a symbol of family, warmth, and joyous summer moments. Now, as I prepare this dish in my own kitchen, I can’t help but feel grateful for those times and the love that food has always brought to our lives. I’m excited to share this recipe with you, a dish I hope will bring as much joy to your kitchen as it has to mine.
Ingredients
Here’s what you’ll need to whip up our Southwest Black Bean Corn Salad. Get ready to gather those fresh and vibrant ingredients!
-
1 can (15 oz) black beans: Rinse and drain to get rid of excess sodium. If you’re feeling adventurous, try kidney beans or chickpeas for a twist!
-
2 cups corn (fresh, frozen, or canned): Sweet corn is the star here! If you’re using fresh corn, grill it first for a smoky flavor; if canned, make sure it’s sweet corn for that perfect sweetness.
-
1 bell pepper (red, yellow, or orange): Adds a sweet crunch and a rainbow of colors. Substitute with diced jalapeño for a spicy kick!
-
1 small red onion: The sharper taste brings depth. You can use green onions for a milder option or even some shallots!
-
1 cup diced tomatoes (cherry or regular): Freshness is key! Swap with diced avocado if you’re in the mood for some creaminess.
-
1/4 cup fresh cilantro: This herb adds a bright, fresh note. If you’re not a fan, try replacing it with parsley or basil.
-
1 lime (juiced): The zest brings all those flavors together. Swap this with lemon juice if you want a different tang!
-
2 tablespoons olive oil: A must for a rich mouthfeel. Try avocado oil for a unique flavor twist!
-
1 teaspoon cumin: This warm spice really enhances the earthy flavors. For a different depth, consider using smoked paprika.
-
Salt and pepper to taste: Essential for balancing flavors. Don’t forget to taste as you go!
Step-by-Step Instructions
Now that you have all your ingredients, let’s dive into the cooking process! 🎉 And don’t worry; I’ll sprinkle in some of my favorite tips along the way to keep things fun and flavorful.
-
Prep Your Ingredients: Start by rinsing and draining the black beans in a colander. Give them a little shake to get rid of the excess moisture. Next, if you’re using fresh corn, cut the kernels off the cob. If you have frozen corn, just let it thaw. As for the bell pepper and onion, chop them into bite-sized pieces for that perfect crunch. Get your tomatoes sliced, and don’t forget to chop up that fresh cilantro!
-
Mix the Base: Take a large mixing bowl (the bigger, the better!) and add your black beans, corn, bell pepper, diced onion, tomatoes, and cilantro. I always love a bowl that can hold a party! Toss everything gently with a spatula; you don’t want to squish those beautiful tomatoes!
-
Prepare the Dressing: In a small bowl, whisk together the lime juice, olive oil, cumin, salt, and pepper until combined. This is where the magic happens! The acidity from the lime will brighten everything up, while the cumin adds warm, earthy notes.
-
Toss & Taste: Pour the dressing over your colorful mixture and toss everything together until all the veggies are well-coated. This step is crucial for creating that harmonious flavor, so don’t be shy! Give it a taste; feel free to adjust seasoning if needed. You might like it a little saltier or zippier!
-
Let It Marinate: Here’s a little chef hack: let the salad sit for at least 20-30 minutes in the fridge before serving. This allows the flavors to meld beautifully. If you’re in a rush, just dive right in, but trust me—the wait is worth it!
-
Serve It Up: Once marinated, give your salad another gentle toss and adjust the seasoning one last time—if the salad needs a little more zing, squeeze in a bit more lime juice. Now it’s time to plate up!
Serving Suggestions
For serving, you can take a relaxed approach. Grab a big bowl, spoon in generous amounts of the salad, and allow everyone to dig in family style! For a more refined touch, serve it in individual bowls topped with a sprinkle of feta cheese or sliced avocado. If you want it to shine as a side dish, pair it with grilled chicken or shrimp, and don’t forget some crispy tortilla chips for that extra crunch!
Recipe Variations
💡 Feeling adventurous? Here are some fun twists to keep this salad fresh:
-
Spicy Southwest Kick: Add diced jalapeños for heat, or sprinkle in some chili powder for an extra flavor boost!
-
Southwestern Quinoa Bowl: Incorporate cooked quinoa for a heartier option. Quinoa adds protein and makes it even more filling!
-
Tropical Flair: Toss in some diced mango or pineapple to give a sweet and refreshing taste. They’ll add a nice contrast to the savory beans.
-
Creamy Avocado Spin: For a creamier texture, add diced avocado directly into the salad for an extra dose of healthy fats.
-
Vegan Tacos: Use this salad as a filling for tacos! Just load it up on a corn tortilla, garnish with extra lime, and enjoy!
Chef’s Notes
As with any recipe, I’ve had my fair share of kitchen misadventures while making this salad. I once made the unfortunate mistake of using expired beans (yikes!). Let’s just say that was an unforgettable evening, and pre-cooked beans became my new best friend from then on!
This recipe has evolved from Aunt Maria’s version through my culinary journey. I took her base and added my own spin with the pairing of lime and cumin, which has become the signature touch in my kitchen. Each time I make this salad, I’m reminded of family and those laughter-filled summers, which adds an extra layer of love to every bite.
FAQs and Troubleshooting
1. Can I make this salad ahead of time?
Absolutely! This salad is perfect for meal prep. Just store the salad in an airtight container in the fridge and enjoy it within 3-4 days. Allowing it to sit overnight will only deepen the flavors!
2. How can I keep the avocado from browning?
If you’re adding avocado, try to add it just before serving to avoid oxidation. If you must prepare it in advance, sprinkle some lime juice on top to slow down the browning process.
3. My salad seems too bland. What can I do?
Don’t panic! Add a pinch more salt, a squeeze of lime, or a dash of hot sauce. Seasoning layers will elevate the overall flavor. Tasting as you go will give you the best results.
4. Why is my black bean corn salad watery?
If you’re using fresh corn, be sure to pat it dry before adding it to the mix. Also, too much lime juice can create an unwanted puddle, so adjust your dressing to fit your taste preference.
Nutritional Info (optional)
While I love to focus on flavor, I also appreciate a healthy balance. This salad is rich in fiber and protein from black beans and is loaded with vitamins from the colorful veggies. Pairing it with some grilled chicken or fish, it can make a balanced, wholesome meal that is satisfying and delicious!
And there you have it! A beautiful, hearty Southwest Black Bean Corn Salad that embraces the spirit of cooking and community. I hope you find as much joy in making and sharing it as I do. Get ready to enjoy a fiesta of flavors straight from your kitchen! Happy cooking, and don’t forget to pass this recipe along to your friends! 💚🥗
Print
Southwest Black Bean Corn Salad
- Total Time: 30 minutes
- Yield: 4 servings 1x
- Diet: Vegan
Description
A colorful and zesty salad packed with black beans, corn, and a zingy dressing, perfect for any occasion.
Ingredients
- 1 can (15 oz) black beans, rinsed and drained
- 2 cups corn (fresh, frozen, or canned)
- 1 bell pepper (red, yellow, or orange), chopped
- 1 small red onion, chopped
- 1 cup diced tomatoes (cherry or regular)
- 1/4 cup fresh cilantro, chopped
- 1 lime, juiced
- 2 tablespoons olive oil
- 1 teaspoon cumin
- Salt and pepper to taste
Instructions
- Prep your ingredients by rinsing and draining the black beans and chopping the vegetables.
- Mix the black beans, corn, bell pepper, onion, tomatoes, and cilantro in a large bowl.
- Prepare the dressing by whisking together lime juice, olive oil, cumin, salt, and pepper.
- Toss the dressing with the salad mixture until well-coated.
- Let the salad marinate in the fridge for 20-30 minutes.
- Serve and enjoy!
Notes
This salad is great for meal prep and can be stored in the fridge for 3-4 days. Customize with extra ingredients like diced avocado or jalapeños for added flavor.
- Prep Time: 15 minutes
- Cook Time: 0 minutes
- Category: Salad
- Method: Mixing
- Cuisine: American
Nutrition
- Serving Size: 1 serving
- Calories: 250
- Sugar: 5g
- Sodium: 250mg
- Fat: 10g
- Saturated Fat: 1g
- Unsaturated Fat: 7g
- Trans Fat: 0g
- Carbohydrates: 32g
- Fiber: 10g
- Protein: 8g
- Cholesterol: 0mg
Keywords: black bean, corn salad, vegan salad, healthy salad, summer dish
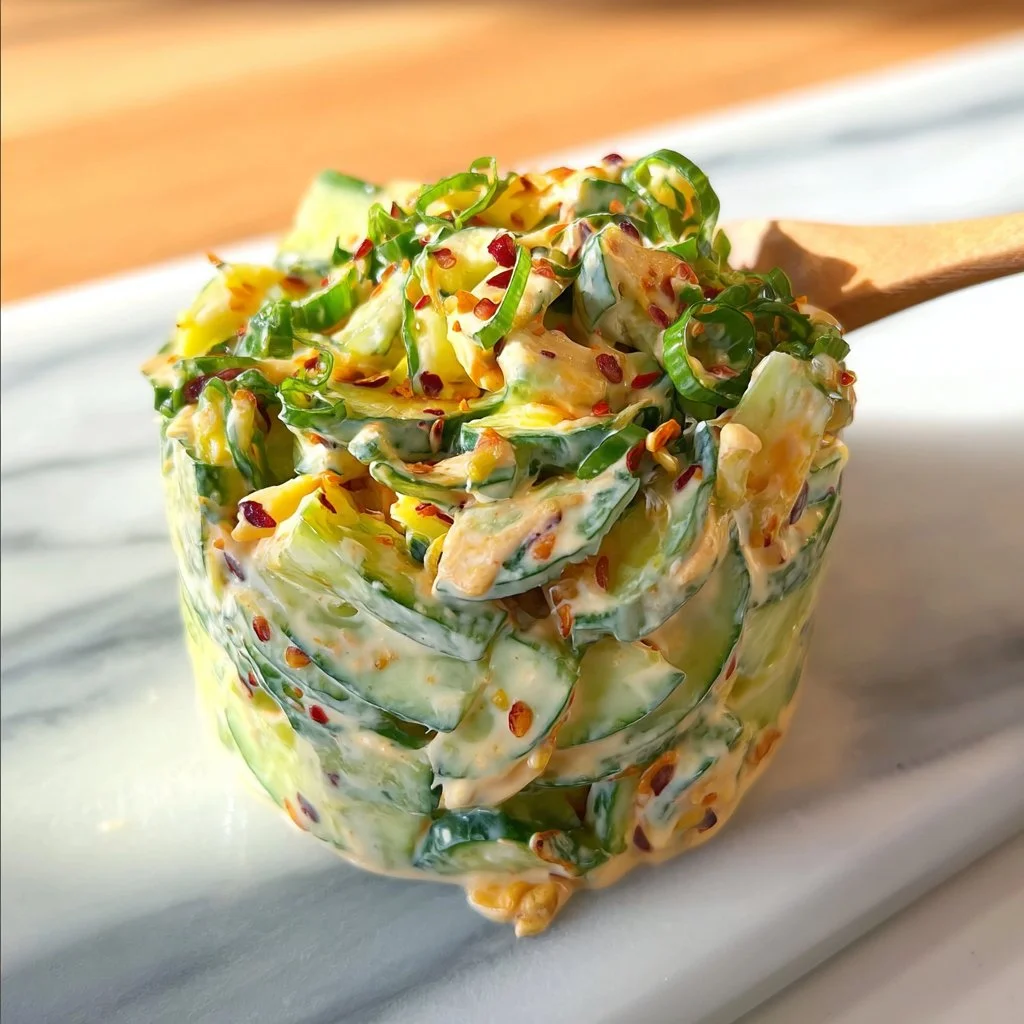
Creamy Asian Cucumber Salad
Creamy Asian Cucumber Salad: A Refreshing Twist on a Classic
Welcome back to my kitchen, my fellow food adventurers! Today, we’re diving into the world of vibrant flavors and refreshing textures with a recipe that’s bound to put a smile on your face: Creamy Asian Cucumber Salad. This dish is perfect for those hot summer days when you want something light yet satisfying, or even as a delightful side at Sunday brunch. Trust me; once you whip this up, your guests will be begging for seconds!
What I love about this salad is not only the crunchiness of the cucumbers but also the luscious dressing that brings it all together. The creamy concoction harmonizes perfectly with the crisp cucumbers, while soy sauce, sesame oil, and a hint of vinegar elevate it into a flavor sensation. And let’s be real, who doesn’t adore a dish that combines simplicity with a sophisticated palate?
When I first discovered this salad years back at a little Thai eatery in my neighborhood, I couldn’t get over how such simple ingredients could create something so glorious. It was a hot afternoon, and all I wanted was something refreshing. The moment I took my first bite, I was transported to a world of crunchy, creamy goodness. The bright, zesty flavors danced across my taste buds, and I knew I had to recreate it at home.
And now, I’m here to pass that joy onto you! Whether you’re serving it as a side dish at a barbecue, a picnic treat, or just a delightful dinner companion, this Creamy Asian Cucumber Salad will amaze your friends and family. Let’s roll up our sleeves and embark on this delicious culinary journey together!
Personal Story
I’ll never forget the first time I set foot into that little Thai restaurant tucked away in the corner of my neighborhood. It had a cozy vibe, walls adorned with quirky art and the aroma of spices wafting through the air. My best friend and I decided to share a bunch of dishes—because that’s how true food lovers do it, right?
When the waiter set down the bowl of Creamy Asian Cucumber Salad, my heart raced with excitement. The salad was a stunning cascade of green, laced with a creamy, glossy dressing. As I took my first bite, I felt like I had discovered gold! The crunch of the cucumbers mingling with the creamy dressing was nothing short of a flavor revelation.
From that day, it became a staple in my kitchen. Each time I made it, I was reminded of that sun-soaked afternoon, laughter mingling with the invigorating scents in the air. Now, I’m thrilled to share my version of this beloved dish, adding my own twists but always remaining true to its fantastic flavor. Let’s create some more memories together—ready?
Ingredients
Here’s everything you’ll need to whip up this delightful Creamy Asian Cucumber Salad:
-
Cucumbers (2 large, English preferred)
- These guys are the stars of the show! I recommend English cucumbers for their thin skin and low seed content, making them super crunchy and refreshing. If you can’t find them, Persian cucumbers are a great alternative!
-
Creamy Dressing:
-
Mayonnaise (½ cup)
- The creamy foundation of our dressing. You can use regular or light mayo, or for a vegan option, try using an egg-free mayo.
-
Rice Vinegar (2 tablespoons)
- Adds a nice acidity to balance the creaminess. If you don’t have rice vinegar, apple cider vinegar works well in a pinch.
-
Soy Sauce (2 tablespoons)
- You could go with regular soy sauce or low-sodium. Tamari is a solid gluten-free alternative!
-
Sesame Oil (1 tablespoon)
- This oil adds a lovely nutty flavor. Toasted sesame oil can enhance this impact even more, but be careful—it’s much stronger in flavor!
-
Sugar (1 teaspoon)
- Just a pinch of sweetness can elevate the flavors beautifully. You can also use honey or maple syrup for a different taste.
-
Garlic (1 clove, minced)
- Fresh garlic adds a nice bite! If you’re in a pinch, garlic powder works too (about ¼ teaspoon).
-
Salt and Pepper (to taste)
- These simple seasonings will help to elevate all the flavors in the dressing.
-
-
Toppings:
- Sesame seeds (for garnish)
- Not only do they add a delightful crunch, but they also make the dish look fancy! Feel free to toast them for extra flavor.
- Sesame seeds (for garnish)
-
Green onions (1-2, chopped)
- These provide a fresh and zesty finish. Chives could work as a substitution if that’s what you have on hand.
Step-by-Step Instructions
Now that we’ve rounded up all the ingredients, it’s time to get cooking! Here’s how to create this mouthwatering Creamy Asian Cucumber Salad step by step.
Step 1: Prep Your Cucumbers
Tip: Start by washing your cucumbers thoroughly under cold water. Slice them in half lengthwise, then remove the seeds with a small spoon to prevent the salad from being too watery.
- Next, slice them into thin half-moons (about ¼ inch thick). This creates the right texture for crunch but also allows the dressing to cling beautifully.
Step 2: Salt the Cucumbers
Why this is a key step: Lightly salting the cucumbers helps to draw out excess moisture, keeping your salad crunchy and not soggy later on.
- Sprinkle about half a teaspoon of salt over your sliced cucumbers in a colander. Let them sit for around 15 minutes, allowing time for the salt to work its magic. You’ll be amazed at how much water is released!
Step 3: Make the Creamy Dressing
Chef Hack: You can make this dressing ahead of time! Just store it in the fridge for up to a week.
- In a mixing bowl, combine the mayonnaise, rice vinegar, soy sauce, sesame oil, sugar, and minced garlic. Whisk everything together until it’s completely smooth and creamy. Taste it and adjust seasoning—adding more soy sauce if you like it saltier or more rice vinegar for brightness.
Step 4: Rinse and Dry the Cucumbers
- After 15 minutes, rinse the salted cucumbers under cold water to wash away excess salt. Pat them dry with paper towels. This step is vital to achieving the salad’s desired texture!
Step 5: Mix It All Together
- In a large bowl, toss the drained cucumbers with the creamy dressing. Make sure every piece is generously coated! This is where the delightful flavors start to come to life.
Step 6: Taste and Adjust Seasoning
- Remember to give your salad another taste! It might need a little more salt, pepper, or sweetness depending on your preferences.
Step 7: Chill and Serve
Final Tip: Letting the salad chill for at least 30 minutes (or even a couple of hours) in the fridge allows the flavors to meld beautifully.
When you’re ready to serve, give it a gentle toss, and then transfer it to a beautiful serving dish. Top with chopped green onions and a sprinkle of sesame seeds for an eye-catching finish!
Serving Suggestions
For an appealing presentation, serve your Creamy Asian Cucumber Salad in a clear glass bowl to showcase its vibrant colors. Pair it with grilled meats for a delicious dinner or alongside some crispy spring rolls for a complete Asian feast. This salad also shines tossed in a leafy green salad for added crunch!
Recipe Variations
1. Spicy Kick
Add a minced jalapeño or a drizzle of sriracha to your dressing for a spicy twist!
2. Fresh Herbs
Toss in some chopped cilantro or mint for an aromatic pop of flavor that elevates the entire dish.
3. Alternate Proteins
For a heartier salad, add in shredded chicken or cooked shrimp. It transforms into a complete meal!
4. Avocado Delight
Throw in some diced avocado for an extra creamy and rich flavor that perfectly pairs with the cucumbers.
5. Nutty Goodness
Add crushed peanuts or cashews on top for added crunch and a nutty flavor!
Chef’s Notes
Making this Creamy Asian Cucumber Salad always reminds me of summer gatherings with family and friends. It has evolved over time; I started with a simple mayo-based dressing, but I’ve experimented with different ingredients to find the perfect balance. Once, in a rush, I swapped the mayo for Greek yogurt, which added a delightful tang and made it a bit healthier!
I can’t wait to hear your kitchen stories when you try out this recipe. Every time I serve this salad, it inspires conversations about food, laughter, and a sense of togetherness.
FAQs and Troubleshooting
1. Why does my cucumber salad turn watery?
It’s all about releasing excess moisture! Make sure to salt the cucumbers and let them sit for a bit to drain out water. Rinsing and drying them thoroughly afterward is crucial.
2. Can I make this salad in advance?
Absolutely! Just keep the cucumbers and dressing separately until you’re ready to serve. This ensures the salad stays crisp and doesn’t become soggy.
3. What if my dressing is too thick?
If you find the dressing too thick, just whisk in a little bit of water, rice vinegar, or even a splash of soy sauce to reach your desired consistency.
4. How long will leftovers last?
This salad is best enjoyed fresh but can be stored in an airtight container in the refrigerator for up to 2-3 days. Just give it a stir before serving!
Nutritional Info (Optional)
Per Serving (Approx. 1 cup)
- Calories: 120
- Protein: 3g
- Fat: 9g
- Carbohydrates: 8g
- Fiber: 1g
- Sugar: 1g
Embrace the fresh flavors, make it your own, and remember: cooking is all about having fun. Keep exploring, keep tasting, and above all—enjoy the process! Happy cooking, my friends. 🥒❤️
Print
Creamy Asian Cucumber Salad
- Total Time: 45 minutes
- Yield: 4 servings 1x
- Diet: Vegetarian
Description
A light and refreshing salad with crunchy cucumbers and a creamy dressing, perfect for summer days and gatherings.
Ingredients
- 2 large cucumbers (English preferred)
- ½ cup mayonnaise
- 2 tablespoons rice vinegar
- 2 tablespoons soy sauce
- 1 tablespoon sesame oil
- 1 teaspoon sugar
- 1 clove garlic (minced)
- Salt and pepper (to taste)
- Sesame seeds (for garnish)
- 1–2 green onions (chopped)
Instructions
- Prep your cucumbers: Wash and slice in half, removing seeds, then cut into thin half-moons.
- Salt the cucumbers: Sprinkle with salt and let sit in a colander for 15 minutes.
- Make the creamy dressing: Combine mayonnaise, rice vinegar, soy sauce, sesame oil, sugar, and minced garlic in a bowl and whisk until smooth.
- Rinse and dry the cucumbers to remove excess salt.
- Mix everything together: Toss cucumbers with the dressing until evenly coated.
- Taste and adjust seasoning as needed.
- Chill for at least 30 minutes before serving.
Notes
Chill the salad to allow the flavors to meld beautifully. This salad pairs well with grilled meats or as part of an Asian feast.
- Prep Time: 15 minutes
- Cook Time: 0 minutes
- Category: Side Dish
- Method: No-Cook
- Cuisine: Asian
Nutrition
- Serving Size: 1 cup
- Calories: 120
- Sugar: 1g
- Sodium: 300mg
- Fat: 9g
- Saturated Fat: 1g
- Unsaturated Fat: 8g
- Trans Fat: 0g
- Carbohydrates: 8g
- Fiber: 1g
- Protein: 3g
- Cholesterol: 5mg
Keywords: cucumber salad, Asian salad, creamy dressing




