
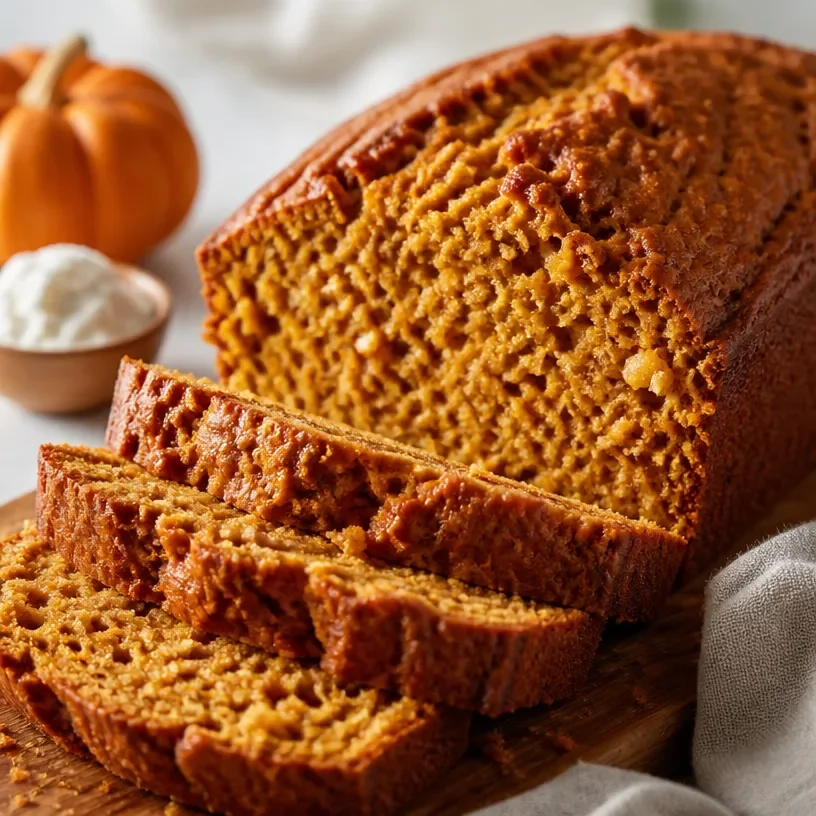
High-Protein Cottage Cheese Pumpkin Bread (Easy Recipe)
Protein Cottage Cheese Pumpkin Bread: A Cozy Delight for Every Kitchen
Welcome to my cozy corner of the kitchen! I’m so glad you’re here. Today, we’re diving into a beloved recipe that combines the warmth of home baking with the nourishing goodness of cottage cheese and pumpkin: Protein Cottage Cheese Pumpkin Bread. If you’ve ever had those crisp autumn days where the air is brisk and the leaves are crunching underfoot, this recipe is like a warm hug that draws you in, filling your kitchen with holiday aromas that make your heart sing.
Oh, pumpkin bread! It’s probably one of those recipes that any cozy home cook has tucked away, but this version is extra special. Not only does it use protein-rich cottage cheese to help you fuel your day, but it also captures the essence of fall in every bite. Picture this: you wake up on a Saturday morning, sunlight streaming through your kitchen window, and the delightful smell of cinnamon and nutmeg wafting through the air. You cut a thick slice of this loaf, butter melting on top, and enjoy it with a steaming cup of coffee. It’s heaven on a plate!
What I love most about this recipe is that it’s incredibly versatile. Whether you’re enjoying it as part of a weekend brunch spread, serving it to guests, or savoring a slice each morning for breakfast, it’s always a hit. And the best part? It’s easy! With just a few simple ingredients and steps, you’ll have a delicious loaf that’s perfect for any occasion—and the nutritional benefits make it even better.
Are you ready to step into the kitchen and whip up some magic? Let’s get baking!
A Bit of Nostalgia
I’ll never forget the first time I made pumpkin bread. It was a crisp October afternoon, and the air was filled with the scent of falling leaves. I was at my grandmother’s house, and she had a knack for creating the coziest atmosphere. She’d put on some classic jazz and bring out her well-loved cookbook. That day she decided to teach me her secret pumpkin bread recipe—her signature dish that would light up our entire family.
As we mixed the ingredients, flour dust settled everywhere, and we shared stories of our own kitchen failures and triumphs. I remember giggling over the flour-covered countertops and eagerly waiting for the timer to go off. When the bread finally emerged from the oven, perfectly golden brown and fragrant, it felt like we were holding a piece of home in our hands. This recipe has always reminded me that cooking is not just about food; it’s about weaving memories and celebrating life with the people we love. Now, I can’t help but share that warmth with you!
Ingredients You’ll Need
-
Cottage Cheese: The star of the show! It adds protein and a wonderfully moist texture. For a lighter option, you can use low-fat cottage cheese or even Greek yogurt for a creamier variation.
-
Canned Pumpkin: Make sure you use pure pumpkin puree, not pumpkin pie filling. It provides a delicious, earthy flavor. If you want to go fresh, you can roast your own pumpkin and puree it!
-
Whole Wheat Flour: I love using whole wheat flour for its nutty flavor and added fiber. You can also substitute it with all-purpose flour or a 1:1 gluten-free flour blend for those needing gluten-free options.
-
Baking Powder and Baking Soda: These leavening agents help the bread rise and create that perfect fluffy texture. Always make sure they are fresh for the best results.
-
Cinnamon and Nutmeg: These warm spices add an inviting aroma and seasonal flavor. Don’t skimp on them! You can also experiment with pumpkin pie spice for a fun twist.
-
Brown Sugar: For just the right amount of sweetness and depth. If you prefer, coconut sugar or maple syrup can serve as a lovely substitute.
-
Eggs: They bind everything together and provide moisture. For a vegan option, you can use flax eggs or applesauce instead.
-
Salt: Just a pinch! It balances flavors and enhances overall taste.
-
Chopped Nuts or Chocolate Chips: Optional but a great addition if you want some crunch or sweetness! You can also use dried fruit like cranberries for an extra chewy element.
Step-by-Step Instructions
1. Preheat Your Oven
Set your oven to preheat at 350°F (175°C). This step is crucial! A well-heated oven helps the bread rise evenly and develops a lovely crust.
2. Prepare Your Baking Pan
Grease a 9×5-inch loaf pan with cooking spray or butter. You can also line it with parchment paper for easier removal. I love using parchment paper—less hassle, more deliciousness!
3. Combine the Dry Ingredients
In a medium bowl, whisk together the whole wheat flour, baking powder, baking soda, cinnamon, nutmeg, and salt. This is your dry mix, and it’s essential to incorporate these ingredients evenly for a well-groomed loaf.
4. Mix the Wet Ingredients
In a large mixing bowl, combine the cottage cheese, pumpkin puree, brown sugar, and eggs. Use a spatula or a hand mixer to blend everything until it’s smooth and creamy. The cottage cheese can be a bit chunky, which adds a delightful texture to the bread, so don’t stress about perfectly blending every lump.
5. Combine Dry and Wet Ingredients
Gradually fold the dry mix into the wet mixture. It’s essential to do this gently! Overmixing can result in a dense loaf—nobody wants that. Just blend until everything is incorporated.
6. Add Optional Mix-Ins
If you’re throwing in nuts or chocolate chips, this is the time to fold them into the batter. It adds an exciting flavor and texture to each bite!
7. Pour the Batter Into the Pan
Spoon the batter into your prepared loaf pan and smooth the top with a spatula. You can also take a butter knife and swirl some chocolate chips or nuts on top for a decorative touch!
8. Bake
Pop the loaf in the oven, and depending on your oven, bake for about 50-60 minutes. The baking time can vary, so keep an eye on it! When a toothpick inserted into the center comes out clean, it’s ready.
9. Cool and Serve
Once baked, remove the loaf from the oven and let it cool in the pan for about 10 minutes. Then transfer it to a wire rack to cool completely—if you can resist!
Serving Suggestions
Slice up your delicious protein cottage cheese pumpkin bread and serve with a pat of butter, a drizzle of honey, or even a dollop of cream cheese frosting for a decadent treat. You can arrange the slices on a platter for a brunch spread, or simply enjoy it warm with your favorite hot beverage. Pair it with a chai latte or an herbal tea for that cozy autumn experience!
Recipe Variations
-
Chocolate Chip Pumpkin Bread: Fold in a cup of semi-sweet or dark chocolate chips to satisfy your sweet tooth.
-
Spiced Nut Addition: Mix in chopped pecans or walnuts for added crunch and nutty flavor.
-
Dried Fruit Surprise: Substitute some mix-ins with dried cranberries or raisins for a burst of fruity goodness.
-
Zest It Up: Add a teaspoon of orange or lemon zest for a fresh twist that complements the pumpkin beautifully.
-
Vegan Delight: Use flax eggs and swap the cottage cheese with silken tofu for a plant-based version that’s just as delicious!
Chef’s Notes
This recipe has a fun backstory! The originally simple pumpkin bread morphed into this protein-packed version after friends kept asking me for healthier options. After a few experiments (and a couple of fabulous kitchen failures that left flour everywhere!), I finally perfected this Protein Cottage Cheese Pumpkin Bread. Now, it’s not just the taste that fills me with joy; it’s the laughter and stories shared over meals made with love that brings a smile to my face.
I’ve also learned through the years that baking is truly a lesson in patience. It’s easy to be impatient, but let the magic unfold in its own time. Trust in the process, and the deliciousness will follow.
FAQs and Troubleshooting
1. Why is my bread dense?
This can happen if the flour is overmixed or if there’s too much liquid. Be gentle when folding the ingredients!
2. Can I freeze this bread?
Absolutely! Wrap it tightly in plastic wrap and then foil, or place it in an airtight container. It should keep well in the freezer for about 3 months.
3. Why didn’t my bread rise?
Be sure your baking powder and baking soda are fresh and active! Old leavening agents can flatline your loaf.
4. My bread cracked on top—why?
That can happen from the temperature difference. Ensure your oven is preheated well, and avoid opening the oven door too soon.
Nutritional Information (per slice, based on 12 servings)
- Calories: 180
- Protein: 6g
- Carbohydrates: 28g
- Fat: 5g
- Fiber: 3g
- Sugar: 8g
With a wholesome balance of flavors and enough protein to keep you fueled, this Protein Cottage Cheese Pumpkin Bread is sure to become a favorite in your household. So, roll up those sleeves, grab your apron, and let’s get baking! Remember, cooking is all about enjoyment, so don’t stress. Have fun in the kitchen, and share every delicious moment with those you love! Happy baking!
Print
Protein Cottage Cheese Pumpkin Bread
- Total Time: 75 minutes
- Yield: 12 servings 1x
- Diet: Vegetarian
Description
A cozy and nutritious pumpkin bread featuring cottage cheese for added protein and moisture.
Ingredients
- 1 cup cottage cheese
- 1 cup canned pumpkin puree
- 1 ½ cups whole wheat flour
- 1 tsp baking powder
- 1 tsp baking soda
- 1 tsp cinnamon
- ½ tsp nutmeg
- ½ cup brown sugar
- 2 large eggs
- ½ tsp salt
- ½ cup chopped nuts or chocolate chips (optional)
Instructions
- Preheat your oven to 350°F (175°C).
- Grease a 9×5-inch loaf pan with cooking spray or butter.
- Combine the dry ingredients: whisk together whole wheat flour, baking powder, baking soda, cinnamon, nutmeg, and salt in a medium bowl.
- Mix the wet ingredients: in a large mixing bowl, combine cottage cheese, pumpkin puree, brown sugar, and eggs until smooth.
- Combine the dry and wet ingredients gently to avoid overmixing.
- Add optional nuts or chocolate chips if desired.
- Pour the batter into the prepared loaf pan.
- Bake for 50-60 minutes or until a toothpick inserted into the center comes out clean.
- Cool in the pan for 10 minutes before transferring to a wire rack.
Notes
This bread can be frozen for up to 3 months. Be careful not to overmix the batter to avoid a dense loaf.
- Prep Time: 15 minutes
- Cook Time: 60 minutes
- Category: Dessert
- Method: Baking
- Cuisine: American
Nutrition
- Serving Size: 1 slice
- Calories: 180
- Sugar: 8g
- Sodium: 200mg
- Fat: 5g
- Saturated Fat: 2g
- Unsaturated Fat: 3g
- Trans Fat: 0g
- Carbohydrates: 28g
- Fiber: 3g
- Protein: 6g
- Cholesterol: 30mg
Keywords: pumpkin bread, cottage cheese, protein bread, fall baking, healthy dessert
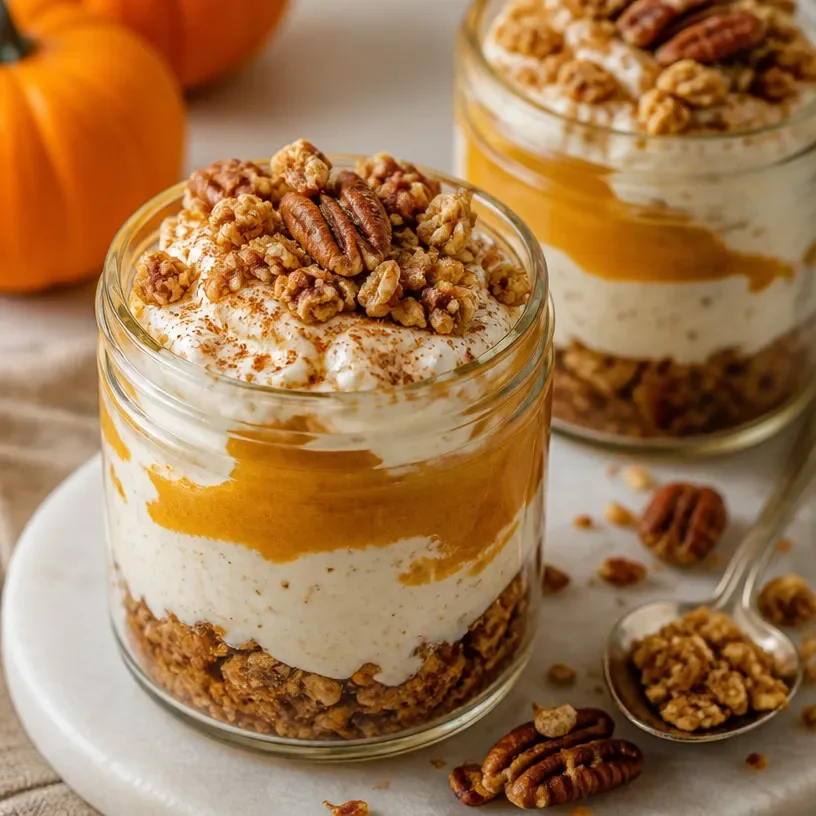
High-Protein Pumpkin Pie Jars for Easy Weeknight Meal Prep
Protein Pumpkin Pie Jar: The Cozy Dessert You Need in Your Life
Welcome to my kitchen! Today, we’re diving into a dessert that brings together the cozy fall flavors of pumpkin pie and the wholesome goodness of protein—all packed into a delightful jar! Whether you’re a fitness fanatic, a pumpkin pie lover, or just someone who enjoys a treat that feels both indulgent and nutritious, this Protein Pumpkin Pie Jar is for you.
Imagine this: the sun is setting, casting a golden hue over the kitchen, and the smell of warm spices fills the air. You take a moment to breathe it all in, feeling cozy in your favorite oversized sweater. This is the essence of fall, and my Protein Pumpkin Pie Jar captures all the cozy vibes beautifully. This recipe is not just about satisfying your sweet tooth; it’s about creating a moment, sharing with loved ones, and adding a playful twist to an age-old classic.
So, grab your mixing bowl and let’s get to work! This recipe is quick, simple, and incredibly rewarding. And remember, cooking is all about having fun and making memories, so let your spirit shine as we embark on this tasty adventure together.
A Slice of History
Growing up, my family celebrated fall with a pumpkin pie that was the centerpiece of our Thanksgiving dinner. I can still remember the excitement in the kitchen as my mom rolled out the flaky crust, and my siblings and I would sneak spoonfuls of the spiced pumpkin filling while she wasn’t looking. That first bite of warm pie, topped with a dollop of whipped cream, was nothing short of magic.
As I ventured into my culinary journey, I wanted to keep that nostalgia alive while giving it a fun twist. That’s how the idea for the Protein Pumpkin Pie Jar was born! Not only does it bring back those cherished memories, but it’s also a healthier option that allows me to indulge in pumpkin pie flavors without guilt.
Now, with every spoonful of this delicious jar, I’m reminded of family gatherings and the power of good food to bring us together, creating new memories along the way. Plus, it’s an enjoyable way to sneak in some protein—perfect for those who are active and on the go!
Ingredients
Here’s what you’ll need to create this deliciously cozy Protein Pumpkin Pie Jar:
-
Canned Pumpkin Puree:
- Use 100% pure pumpkin, not pumpkin pie filling, for better flavor control. It’s rich in vitamins and has a lovely creamy texture.
-
Protein Powder:
- Choose your favorite flavor—vanilla, chocolate, or even unflavored works wonders for this recipe! If you’re vegan, plant-based protein powders are also great alternatives.
-
Greek Yogurt:
- Substitute with dairy-free yogurt or cottage cheese for a similar creaminess and added protein boost.
-
Maple Syrup:
- This natural sweetener gives your pie jars the warmth of fall. You can swap it with honey, agave, or stevia; adjust the quantity based on your sweetness preference.
-
Pumpkin Pie Spice:
- A blend of cinnamon, nutmeg, ginger, and cloves. If you don’t have this, create your own mix or use cinnamon as a substitute.
-
Vanilla Extract:
- Always opt for pure vanilla extract over artificial flavoring for the best flavor and aroma.
-
Almond Milk:
- Unsweetened almond milk is a perfect binder. You can also use coconut milk, cashew milk, or regular dairy milk; adjust based on dietary needs.
-
Crushed Graham Crackers or Oats:
- For the crust layer, use crushed graham crackers for a traditional taste or oats for a healthier twist. Gluten-free options are available too!
Chef Insight:
Always taste along the way! Adjust the sweetness as needed since everyone’s palate is different.
Step-by-Step Instructions
-
Prepare your jars: Start by gathering your favorite glass jars or dessert cups. This is where the beauty of your protein pumpkin pie jars will be displayed, so choose something you love!
-
Mix the Filling: In a bowl, combine 1 cup of canned pumpkin puree, 1 scoop of protein powder, 1 cup of Greek yogurt, 2 tablespoons of maple syrup, 1 teaspoon of pumpkin pie spice, and a splash of vanilla extract. Stir everything together until smooth. Feel free to adjust the sweetness by adding more maple syrup or sweetener to taste.
Chef Tip: Tasting the mixture at this point will give you the chance to adjust flavors—make it as spiced and sweet as you like!
-
Add the Milk: If the mixture seems too thick, add a little almond milk (about 1–2 tablespoons) until you reach a desired creamy consistency. Fold in any extra spices if you wish!
-
Prepare the Crust: In a separate bowl, crush your graham crackers or oats. If using graham crackers, about ½ cup crushed should be good. Mix with a tablespoon of melted butter or coconut oil for added flavor.
Chef Hack: If you want to keep it lighter, skip the butter! Oats bind well on their own with a dash of almond milk mixed in.
-
Layer the Jars: Begin layering your jars! Start with a layer of the crust (about a tablespoon), followed by a generous layer of the pumpkin filling. Repeat the process, ending with filling on top. Make sure to leave space at the top if you want whipped cream or other toppings later.
-
Chill the Jars: Cover the jars and let them chill in the refrigerator for at least an hour. This step isn’t mandatory, but it helps the flavors meld and gets everything deliciously cold.
-
Serve: When you’re ready to dig in, top with whipped cream, a sprinkle of cinnamon, or even some toasted pecans or walnuts for that extra crunch.
Serving Suggestion: Get creative with how you present these jars! Layering them visually appealing can turn something simple into a show-stopping dessert.
Recipe Variations
-
Chocolate Pumpkin Pie Jar: Use chocolate protein powder and add a tablespoon of cocoa powder to the pumpkin mixture for a chocolatey twist!
-
Nutty Delight: Incorporate almond or peanut butter in the filling for a richer flavor and even more protein!
-
Spiced Up: Try adding a dash of cayenne pepper or more ginger to give your jars an unexpected kick!
-
Nut-Free Option: If you need to avoid nuts, simply skip the almond milk and use more Greek yogurt or a nut-free dairy option.
-
Vegan Delight: Swap Greek yogurt for a plant-based yogurt and use maple syrup or agave for sweetening. A vegan protein powder will keep it fully plant-based!
Chef’s Notes
This Protein Pumpkin Pie Jar has been a fun trial-and-error experience in my kitchen. The first time I made it, I got a bit overzealous with the spices and ended up with something that was more “one-note” than harmonious. It reminded me that balance is everything in cooking.
I now love to experiment with layers and textures, making each jar personal and unique to the taste of whoever I’m serving! And who doesn’t love a dessert you can prep ahead of time? It’s great for those busy weeks when you want something sweet at the end of the day but don’t have the energy to bake a full pie.
FAQs and Troubleshooting
-
Can I use fresh pumpkin instead of canned?
- Absolutely! Just make sure it’s well cooked and blended until smooth. Fresh pumpkin can be more watery, so you might want to adjust your almond milk accordingly.
-
What should I do if my mixture is too thick?
- Add a little more almond milk, one tablespoon at a time, until it reaches your desired creaminess.
-
How long do these keep?
- These jars can be stored in the fridge for up to 4–5 days. Just make sure to keep them sealed!
-
Can I freeze them?
- While freezing might alter the texture, you can freeze the filling in airtight containers and thaw before layering them in jars.
Nutritional Info
Each Protein Pumpkin Pie Jar contains approximately:
- Calories: 200
- Protein: 20g
- Carbs: 25g
- Fat: 5g
And there you have it! A cozy, healthy twist on the classic pumpkin pie that’s perfect for sharing or keeping all to yourself. I hope you enjoy making these Protein Pumpkin Pie Jars as much as I do. Cheers to warm flavors, lovely memories, and the joy of cooking! Grab a spoon and dig into those layers—you’ve earned it! 🍂🥧
Print
Protein Pumpkin Pie Jar
- Total Time: 1 hour 15 minutes
- Yield: 4 servings 1x
- Diet: Vegetarian
Description
A cozy dessert combining the flavors of pumpkin pie with protein goodness, packed in a delightful jar.
Ingredients
- 1 cup canned pumpkin puree
- 1 scoop protein powder (vanilla, chocolate, or unflavored)
- 1 cup Greek yogurt (or dairy-free yogurt)
- 2 tablespoons maple syrup (or honey/agave)
- 1 teaspoon pumpkin pie spice
- 1 teaspoon vanilla extract
- 1–2 tablespoons almond milk (unsweetened)
- ½ cup crushed graham crackers or oats
- 1 tablespoon melted butter or coconut oil (optional)
Instructions
- Prepare your jars: Gather your favorite glass jars or dessert cups.
- Mix the filling: In a bowl, combine pumpkin puree, protein powder, Greek yogurt, maple syrup, pumpkin pie spice, and vanilla extract. Stir until smooth.
- Add the milk: If thick, add almond milk until a creamy consistency is reached.
- Prepare the crust: Crush graham crackers or oats and mix with melted butter or almond milk.
- Layer the jars: Start with a layer of crust, followed by pumpkin filling. Repeat, finishing with filling on top.
- Chill the jars: Cover and refrigerate for at least 1 hour.
- Serve: Top with whipped cream, cinnamon, or nuts before enjoying.
Notes
Adjust sweetness and spices based on personal preference. Perfect for prepping ahead of time.
- Prep Time: 15 minutes
- Cook Time: 0 minutes
- Category: Dessert
- Method: No-Bake
- Cuisine: American
Nutrition
- Serving Size: 1 jar
- Calories: 200
- Sugar: 10g
- Sodium: 50mg
- Fat: 5g
- Saturated Fat: 2g
- Unsaturated Fat: 2g
- Trans Fat: 0g
- Carbohydrates: 25g
- Fiber: 3g
- Protein: 20g
- Cholesterol: 10mg
Keywords: pumpkin pie, protein dessert, healthy dessert, no-bake dessert, fall flavors
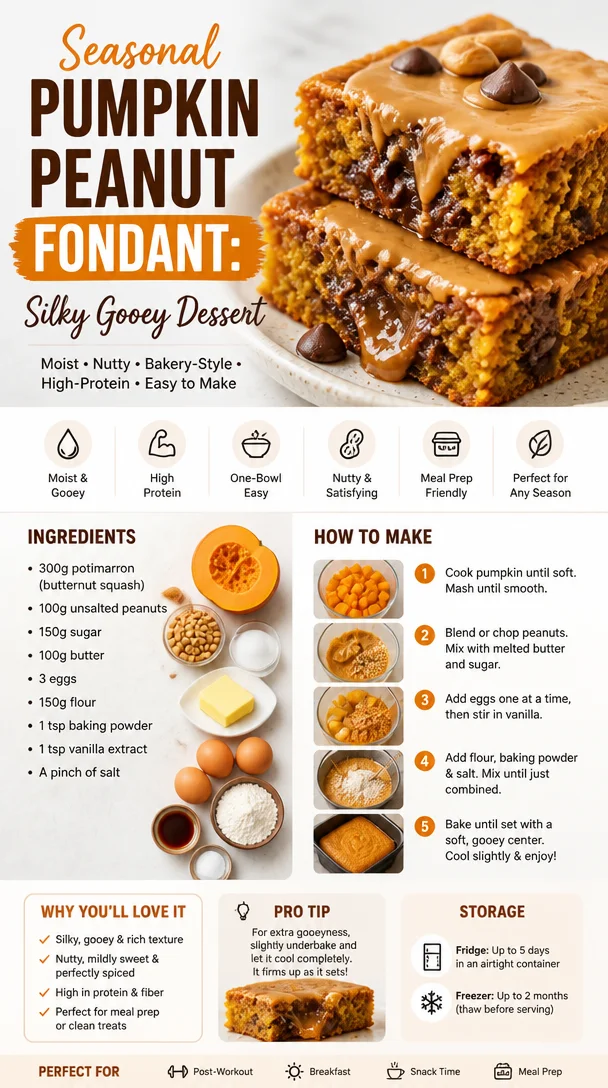
Seasonal Pumpkin Peanut Fondant: Silky Gooey Dessert
Fondant au Potimarron et aux Cacahuètes: A Cozy Autumn Delight
Welcome back to my kitchen, dear friends! Today, I’ve got a special treat that’s perfect for those crisp autumn days when you want to wrap your hands around something warm and comforting. We’re diving headfirst into a delightful, creamy dessert that’s sure to impress: Fondant au Potimarron et aux Cacahuètes, or Pumpkin and Peanut Fondant! This dish is a beautiful combination of sweet and savory, with that luscious texture that makes every bite a melt-in-your-mouth experience. So, grab your apron, and let’s get cooking!
A Slice of Nostalgia
I remember the first time I tried something similar to Fondant au Potimarron et aux Cacahuètes. It was at a little café tucked away in a bustling market in France. The scent of caramelized pumpkin wafted through the air, drawing me in like a moth to a flame. As I took my first bite, the smoothness of the fondant mingled with the crunch of roasted peanuts. It was love at first taste. I felt an instant connection to the dish—not just for the flavors but for the warmth it brought, reminiscent of cozy family gatherings around the table.
That experience ignited my passion for creating desserts that not only taste divine but carry a beautiful story. Since then, I’ve been experimenting with this delightful combination and fine-tuning the recipe to make it just right for sharing with friends and family. So, let me share my version, infused with love, nostalgia, and just the right touch of creativity.
Ingredients
Here’s what you’ll need to whip up this delightful dessert:
-
1 cup pumpkin puree
Tip: You can use store-bought pumpkin puree or roast your own. To roast, simply cut the pumpkin in half, scoop out the seeds, and bake at 350°F (175°C) for about 45 minutes or until tender. Scrape the flesh into a bowl and mash until smooth. -
1/2 cup creamy peanut butter
Chef Insight: Natural peanut butter is best for this recipe as it’s free of added sugars and preservatives. If you’re nut-free, sunflower seed butter works as a great substitute! -
1/2 cup brown sugar
Substitution Tip: If you prefer a healthier option, try coconut sugar. It has a similar caramel flavor but is less processed. -
2 large eggs
Quick Insight: Room temperature eggs will mix more evenly into your batter, helping to create a lovely, even texture in your fondant. -
1/4 cup all-purpose flour
Tip: For a gluten-free option, you can use almond flour or a 1:1 gluten-free flour blend. Just watch the texture, as gluten-free flours can yield different results. -
1 teaspoon vanilla extract
Chef Tip: Always choose pure vanilla extract for a more robust flavor. It makes a world of difference! -
1 teaspoon baking powder
Quick Insight: This ingredient helps to create that fluffy texture, ensuring just the right rise in your fondant. -
1/4 teaspoon salt
Tip: A pinch of salt can enhance the sweetness of the dessert, making the flavors pop! -
Roasted peanuts for garnish
Chef Hack: Lightly crush the peanuts for a crunchy topping that contrasts beautifully with the soft fondant.
Step-by-Step Instructions
Now, let’s get into the fun part—the cooking process! Follow these steps closely for a perfect Fondant au Potimarron et aux Cacahuètes:
-
Preheat the Oven
Begin by preheating your oven to 350°F (175°C). This gets the cooking process underway and ensures your dessert bakes evenly. -
Prepare Your Baking Dish
Grease a 9-inch round cake pan with a little butter or non-stick spray. You can also line the bottom with parchment paper for easier removal later. -
Combine the Wet Ingredients
In a large mixing bowl, combine the pumpkin puree, peanut butter, and brown sugar. Use a hand mixer or whisk to blend them until the mixture is nice and smooth. This will create a beautiful base for your fondant. -
Add Eggs and Vanilla
Crack in those room-temperature eggs and pour in the vanilla extract. Mix until fully incorporated. This is where the magic starts to happen! -
Mix the Dry Ingredients
In a separate bowl, whisk together the flour, baking powder, and salt. Gradually add this mixture to your wet ingredients. Fold everything gently with a spatula until just combined. Be careful not to overmix; you want it to remain light and fluffy. -
Pour into the Baking Dish
Pour the batter into your prepared cake pan, smoothing the top with a spatula. Don’t worry if it looks a bit thick; that’s exactly how it should be! -
Bake to Perfection
Slide your pan into the oven and bake for about 25-30 minutes. Keep an eye on it! The top should be golden brown, and a toothpick inserted into the center should come out clean or with a few moist crumbs. -
Cool and Serve
Once done, remove it from the oven and let it cool in the pan for about 10 minutes. Then, carefully invert it onto a wire rack to cool completely. -
Garnish and Enjoy
Once cool, slice into wedges and top each piece with roasted peanuts for that extra crunch. Drizzle with a little bit of melted chocolate or a dollop of whipped cream if you like—because who doesn’t love a bit of indulgence?
Serving Suggestions
For a beautiful presentation, serve each slice on a rustic wooden board or a delicate dessert plate. You can sprinkle some crushed peanuts on the side, and if you’re feeling extra fancy, a sprig of mint makes a lovely garnish. Pair it with a cup of warm chai tea or a scoop of vanilla ice cream for a sweet treat that feels like a hug in dessert form!
Recipe Variations
Want to take your Fondant au Potimarron et aux Cacahuètes to the next level? Here are some creative variations to consider:
- Spicy Kick: Add a pinch of cinnamon and nutmeg into your batter for a cozy, spiced twist.
- Chocolate Lovers: Mix in some dark chocolate chips for a decadent chocolate-peanut butter combination.
- Fruit Infusion: Toss in some dried cranberries or chopped apples for added texture and flavors.
- Nutty Swirl: Swirl in some chunky peanut butter for an extra peanut punch and lovely visual appeal.
- Vegan Version: Swap the eggs for flaxseed meal (1 tablespoon of flax mixed with 2.5 tablespoons of water) and use a plant-based buttery spread!
Chef’s Notes
This recipe holds a special place in my heart because it’s a reflection of how food can bring us together. I’ve served this fondant at dinner parties and family gatherings, and it never fails to spark conversation and smiles. As you create it in your kitchen, don’t stress the little details; allow the love for your ingredients to shine through. And remember, every time I make this fondant, I feel like I’m inviting a bit of that quaint French café vibe right into my home!
FAQs and Troubleshooting
-
Can I make this in advance?
Absolutely! You can bake the fondant a day ahead. Just store it in an airtight container at room temperature. -
Why did my fondant sink in the middle?
This can happen if the batter is overmixed, or if the oven temperature is too low. Always check to ensure your oven is properly calibrated! -
Can I freeze leftovers?
Yes! Once completely cooled, wrap the slices in plastic wrap and place them in a freezer-safe container. They will last for about a month. -
What if I don’t have pumpkin puree?
Substitute with baked butternut squash puree or even applesauce for a fruity twist!
Nutritional Info
This fondant is rich with flavors and contains healthy fats from the peanut butter and beneficial nutrients from the pumpkin, making it a delightful but nourishing treat. Each serving offers approximately:
- Calories: 200
- Protein: 5g
- Fat: 10g
- Carbohydrates: 24g
- Fiber: 3g
So grab your ingredients and let’s create some kitchen magic together! Remember, cooking is an adventure, and I’m thrilled to share this one with you. Enjoy every rich, velvety bite of your Fondant au Potimarron et aux Cacahuètes!
Print
Fondant au Potimarron et aux Cacahuètes
- Total Time: 45 minutes
- Yield: 8 servings 1x
- Diet: Vegetarian
Description
A cozy autumn dessert combining creamy pumpkin and crunchy peanuts for a delightful treat.
Ingredients
- 1 cup pumpkin puree
- 1/2 cup creamy peanut butter
- 1/2 cup brown sugar
- 2 large eggs
- 1/4 cup all-purpose flour
- 1 teaspoon vanilla extract
- 1 teaspoon baking powder
- 1/4 teaspoon salt
- Roasted peanuts for garnish
Instructions
- Preheat the oven to 350°F (175°C).
- Grease a 9-inch round cake pan.
- Combine pumpkin puree, peanut butter, and brown sugar in a large mixing bowl.
- Add the eggs and vanilla extract, mixing until fully incorporated.
- Mix the flour, baking powder, and salt in a separate bowl, then gradually combine with the wet ingredients.
- Pour the batter into the prepared cake pan.
- Bake for about 25-30 minutes until golden brown.
- Cool for 10 minutes before inverting onto a wire rack.
- Garnish with roasted peanuts and serve.
Notes
Feel free to add chocolate chips or spices for variations. This fondant can be made a day in advance.
- Prep Time: 15 minutes
- Cook Time: 30 minutes
- Category: Dessert
- Method: Baking
- Cuisine: French
Nutrition
- Serving Size: 1 serving
- Calories: 200
- Sugar: 15g
- Sodium: 100mg
- Fat: 10g
- Saturated Fat: 2g
- Unsaturated Fat: 8g
- Trans Fat: 0g
- Carbohydrates: 24g
- Fiber: 3g
- Protein: 5g
- Cholesterol: 30mg
Keywords: pumpkin, peanut butter dessert, fall recipe, cozy dessert, French dessert
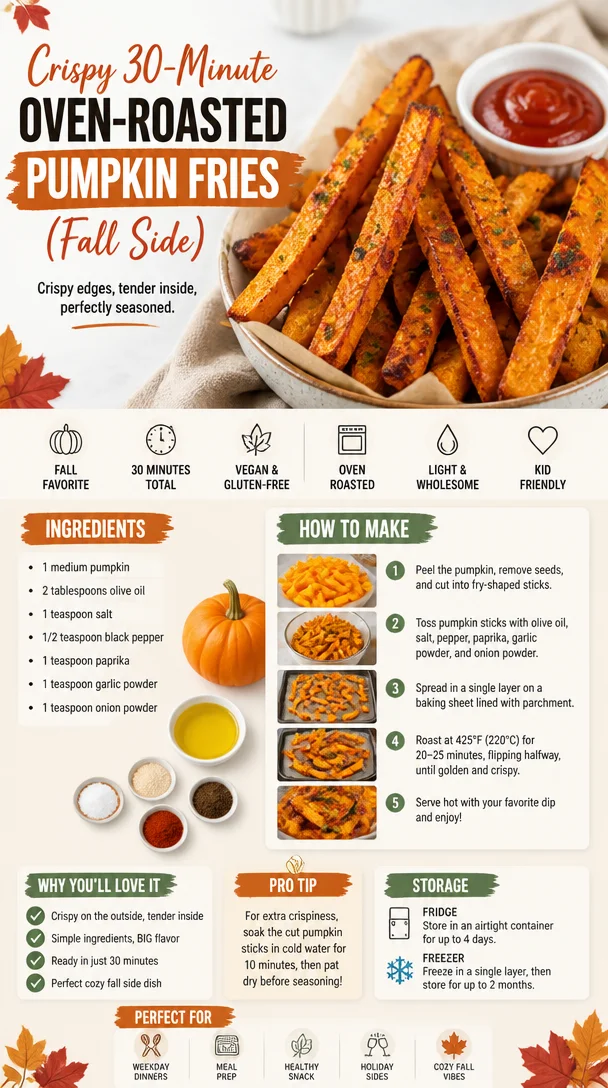
Crispy 30-Minute Oven-Roasted Pumpkin Fries (Fall Side)
The Cozy Comfort of Oven-Roasted Pumpkin Fries
Welcome back, dear friends! Today, we’re diving into the wonderful world of fall flavors with something that’s sure to make your kitchen smell divine: Oven-Roasted Pumpkin Fries! Yes, you read that right. Not only are these fries crispy and delicious, but they’re also a bit healthier than your average fry, making them a great option for a snack or a side dish. They’re the perfect combination of sweet and savory, crisp on the outside, and tender on the inside. If you’re ready to bring a little seasonal cheer into your kitchen, grab your apron and let’s get cooking!
Imagine walking through a crisp autumn breeze, the leaves crunching beneath your feet as you make your way home after a long day. It’s that fleeting moment when pumpkin spice hangs in the air, and the thought of cozy meals warms you from the inside out. That’s the magic of seasonal cooking—and it all starts with ingredients that speak to the heart. When I think of autumn, I think of pumpkins. These vibrant orange beauties have always held a special place in my heart, from carving them for Halloween to whipping up delicious pies at Thanksgiving. But who says we can’t enjoy pumpkins in new and exciting ways?
One of my fondest memories dates back to my childhood kitchen, where my mom would roast a fresh pumpkin after Halloween. Instead of throwing away our jack-o-lanterns, we’d transform those bright orange gourds into something delicious. With a sprinkle of seasoning and a drizzle of olive oil, those simple pumpkin slices baked into golden-crispy wonders. I can still hear the crunch as we dug in, savoring the nutty sweetness with each bite. That’s the spirit behind these Oven-Roasted Pumpkin Fries—it’s all about joyfully creating new memories while relishing flavors that remind us of home.
Ingredients
Now that you’re feeling the cozy vibes let’s gather our ingredients! Here’s everything you’ll need to create these delightful Oven-Roasted Pumpkin Fries:
-
Fresh Pumpkin: Choose a sugar pumpkin or pie pumpkin for the sweetest flavor. You can substitute butternut squash if pumpkin isn’t available—trust me, it’s just as delightful!
-
Olive Oil: A must for that crispy texture! Feel free to swap with avocado oil for a higher smoke point.
-
Salt: The magic seasoning that brings out all the flavors. Consider garlic salt or smoked salt for a twist!
-
Black Pepper: A dash or two for a little kick. You can use white pepper for a slightly different flavor profile.
-
Paprika: For a smoky depth, go for smoked paprika. It’s fantastic for enhancing that earthy pumpkin flavor.
-
Cinnamon: Just a pinch adds a warm undertone. Don’t have any? You can skip it—but you might miss that comforting fall flavor!
-
Chili Powder: For those craving a little heat! Or replace it with cayenne for an extra kick.
-
Fresh Herbs: Optional, but I love adding some fresh thyme or rosemary. If you use dried herbs, remember they are more concentrated than fresh, so use less!
As you gather these ingredients, take a moment to appreciate them. Picture the vibrant colors and the delightful aromas that will soon fill your kitchen. Cooking is a love language, and it starts with what we choose to bring to our tables.
Step-by-Step Instructions
Let’s dive into the cookery! Follow these simple steps to create your own batch of Oven-Roasted Pumpkin Fries that will have everyone asking for seconds:
-
Preheat Your Oven: Set the oven to 425°F (220°C). This high temperature is key to achieving that perfect golden crisp!
-
Prepare the Pumpkin: Carefully slice your pumpkin in half and scoop out the seeds. Don’t toss them! You can roast the seeds for a crunchy snack later. Once cleaned, slice the pumpkin into wedges and then into fry-shaped sticks. Aim for a consistent size to ensure even cooking!
-
Toss with Oil and Seasonings: In a large bowl, combine your pumpkin fries with olive oil, salt, black pepper, paprika, cinnamon, and chili powder. Use your hands to toss everything well, ensuring every fry is coated. Here’s a little chef hack: using your hands not only mixes them better but also adds a personal touch to your dish!
-
Spread on a Baking Sheet: Line a baking sheet with parchment paper for easy cleanup. Spread your fries in a single layer—not overcrowding them allows them to roast rather than steam. For extra crispiness, make sure the fries have a bit of space between them.
-
Roast to Perfection: Bake in the preheated oven for about 20-25 minutes, flipping halfway through. Keep an eye on them—the goal is golden brown and crispy edges!
-
Let Them Rest: Once they’re done, pull them out of the oven and let them sit for a few minutes. This helps maintain that crispy exterior!
-
Serve and Enjoy: Dig in with your favorite dipping sauce, whether it’s a spicy aioli, yogurt-based dip, or simply a sprinkle of extra sea salt!
See? Easy peasy! Cooking doesn’t have to be intimidating; every step is a chance to express your creativity. Whether you’re jamming to your favorite playlist or sharing the experience with loved ones, let the kitchen be your happy place!
Serving Suggestions
Now, let’s talk presentation! Place your crispy Oven-Roasted Pumpkin Fries in a rustic bowl or on a colorful platter. Garnish with fresh herbs for a touch of elegance. A sprinkle of sea salt or a drizzle of balsamic reduction can elevate the flavors even more. If you want to impress, serve them alongside a delightful dip—my personal favorite is a tangy lemon-thyme yogurt dip that complements the fries beautifully. Enjoy them with friends, family, or even while curling up with a good book—whatever makes your heart happy!
Recipe Variations
Feeling adventurous? Here are a few fun twists you can try on your Oven-Roasted Pumpkin Fries:
-
Sweet and Spicy Fries: Add a touch of maple syrup to the seasoning mix for a sweet twist, and a pinch of cayenne for heat.
-
Herb-Infused Fries: Mix in fresh herbs like parsley or dill for a garden-fresh flavor.
-
Cheesy Fries: Sprinkle some grated Parmesan or nutritional yeast on top of the fries during the last few minutes of baking for a cheesy delight.
-
Mediterranean Style: Season with za’atar spice mix and serve with a side of tahini sauce for a Middle Eastern flair.
-
Balsamic Glaze Drizzle: Once out of the oven, drizzle a balsamic glaze over the fries for a tangy-sweet finish.
These variations are your invitation to get creative, so don’t hesitate to play around with flavors and ingredients!
Chef’s Notes
Every recipe has its own little story, and this one is no different. I originally came up with the idea of roasted pumpkin fries after a particularly busy fall weekend. I wanted something comforting yet simple, and the result was a homey dish that has become a staple in our family. I still remember the excitement on my kids’ faces when they first tasted these fries; they couldn’t believe they were eating pumpkin!
Over time, I’ve played with the seasonings and have added my own flair, but the core recipe has remained the same—a testament to how a simple idea can blossom into something delicious and memorable. Remember, the joy of cooking lies in experimenting, so don’t be afraid to make it your own!
FAQs and Troubleshooting
-
My fries are soggy. What did I do wrong?
- Sogginess often happens if the fries are overcrowded on the baking sheet. Ensure they are in a single layer with a little breathing space between them. High heat is crucial too—don’t skip that preheat!
-
Can I make these in advance?
- Absolutely! You can prep the fries ahead of time and store them in the refrigerator. Just toss them in olive oil and seasonings before baking—perfect for a quick weeknight dinner!
-
What can I do with leftover fries?
- Leftover fries taste delicious in a salad, as a topping for soups, or reheat them in the oven for a crispy snack! They can also be tossed into a wrap or sandwich for extra texture.
-
Are there different types of pumpkins I can use?
- Yes! Besides sugar pumpkins, you can use kabocha or even acorn squash for similar textures and flavors. Each brings a unique twist to the dish!
Nutritional Information
For those curious about nutrition, pumpkin is a fantastic source of fiber, providing moisture and bulk to your meals. Additionally, it’s packed with vitamins A and C, making these fries a nutritious choice compared to traditional ones.
In conclusion, Oven-Roasted Pumpkin Fries are not only a delightful addition to your fall menu, but they’re also a way to create cherished memories and share warmth with your loved ones. From the crunch of that first bite to the heartwarming conversations around the table, this recipe invites you to celebrate comfort food with a twist. So, preheat that oven, grab your pumpkin, and let the flavor magic happen. Happy cooking! 🍂✨
Print
Oven-Roasted Pumpkin Fries
- Total Time: 35 minutes
- Yield: 4 servings 1x
- Diet: Vegetarian
Description
Crispy and delicious oven-roasted pumpkin fries, a healthier alternative to traditional fries, perfect for a snack or side dish.
Ingredients
- 1 Medium Fresh Pumpkin (or butternut squash)
- 2 tbsp Olive Oil
- 1 tsp Salt
- 1/2 tsp Black Pepper
- 1 tsp Paprika
- 1/4 tsp Cinnamon
- 1/2 tsp Chili Powder
- Fresh Thyme or Rosemary (optional)
Instructions
- Preheat your oven to 425°F (220°C).
- Prepare the pumpkin by slicing it in half, scooping out the seeds, and cutting it into fry-shaped sticks.
- Toss the pumpkin fries with olive oil, salt, black pepper, paprika, cinnamon, and chili powder in a bowl.
- Spread the fries in a single layer on a parchment-lined baking sheet.
- Roast for 20-25 minutes, flipping halfway through, until golden brown and crispy.
- Let them rest for a few minutes after baking.
- Serve with your favorite dipping sauce.
Notes
For extra crispiness, ensure fries have some space on the baking sheet. Enjoy them with a tangy yogurt dip for enhanced flavors.
- Prep Time: 10 minutes
- Cook Time: 25 minutes
- Category: Side Dish
- Method: Baking
- Cuisine: American
Nutrition
- Serving Size: 1 serving
- Calories: 250
- Sugar: 5g
- Sodium: 380mg
- Fat: 12g
- Saturated Fat: 1.5g
- Unsaturated Fat: 10g
- Trans Fat: 0g
- Carbohydrates: 32g
- Fiber: 5g
- Protein: 4g
- Cholesterol: 0mg
Keywords: pumpkin fries, roasted pumpkin, fall recipe, healthy snacks, vegetarian side dish
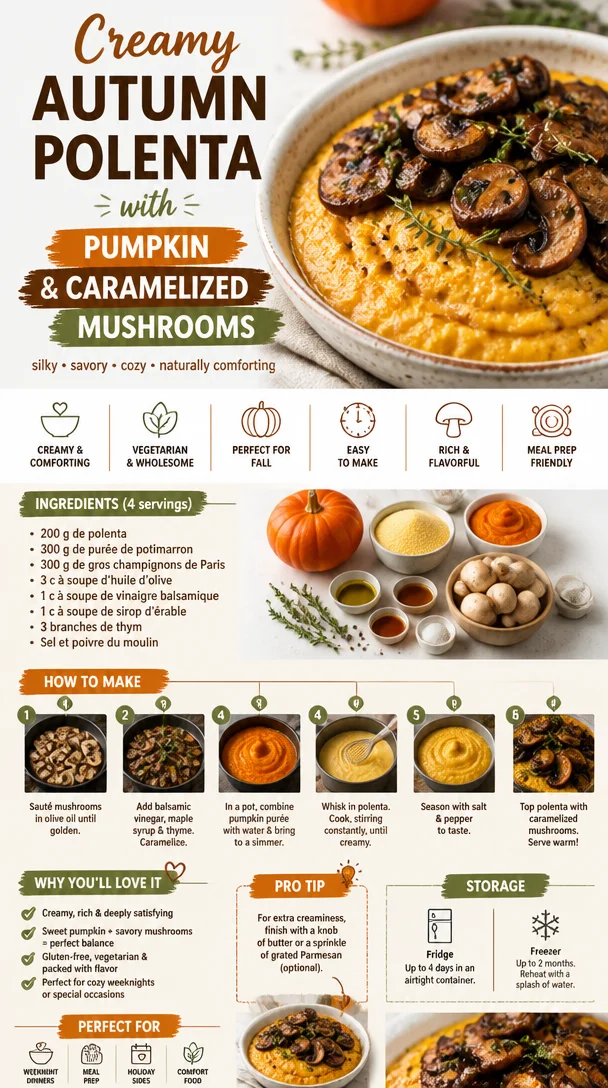
Creamy Autumn Polenta with Pumpkin and Caramelized Mushrooms
Polenta d’Automne au Potimarron et Champignons Caramélisés: A Cozy Fall Dish
Welcome to my kitchen! Today, I’m thrilled to share with you a dish that encapsulates the warm, cozy essence of fall — Polenta d’Automne au Potimarron et Champignons Caramélisés. This dish is not just a feast for the eyes; it’s a comforting embrace in a bowl, complete with creamy polenta, sweet roasted pumpkin, and savory caramelized mushrooms. If you’re someone who finds joy in culinary adventures, this recipe will surely light up your kitchen and your heart.
A Memory to Savor
Growing up, autumn meant more than just the changing leaves; it meant my grandmother’s kitchen filled with the rich aroma of roasting vegetables and the cozy warmth that only a slow-cooked meal can provide. I remember the excitement brewing in our little farmhouse as my grandma would invite us to join her in preparing her famed autumn feast. On Saturdays, we would gather to make polenta while talking about our week, sharing stories, and sometimes even sneaking bites when we thought she wasn’t looking.
Polenta was always a staple, creamy and comforting, and it paired perfectly with the seasonal produce she had picked from the garden. One year, she introduced me to potimarron, a type of pumpkin that has a uniquely sweet flavor that meshes beautifully with polenta. Paired with mushrooms, caramelized until golden and lusciously tender, it was a dish that was filled with layers of flavors and memories, nurtured with love. That’s the spirit of this Polenta d’Automne — it’s about warm kitchens, laughter, and shared moments over delicious food.
Ingredients
Let’s gather our ingredients for this delightful fall dish:
-
Polenta: This is the star of the show! Opt for coarse or medium-ground polenta; it’ll yield that delightful creamy texture. If you’re looking for a gluten-free option, this is your go-to choice!
-
Potimarron (or pumpkin): This sweet variety of pumpkin adds a hint of sweetness and earthiness. If you can’t find potimarron, butternut squash or even acorn squash are terrific substitutions.
-
Mushrooms: I love using a mix of cremini and shiitake for their rich flavors. However, button mushrooms, oyster mushrooms, or any variety you prefer will work just as well!
-
Vegetable broth: Using broth instead of water enhances the flavor of the polenta. For a vegan option, stick to a vegetable broth; chicken broth works as a tasty alternative too.
-
Onion: Sweet onions or shallots add depth to the dish. You can substitute with green onions for a fresher flavor.
-
Garlic: Fresh garlic gives a fragrant kick. You can use pre-minced garlic in a pinch, but fresh is always better.
-
Olive oil: A drizzle of high-quality extra virgin olive oil brings out the bold flavors. If you want a nuttier taste, feel free to use toasted sesame oil.
-
Thyme: Fresh thyme pairs well with both the mushrooms and the potimarron. Dried thyme can serve as a substitute, just use a little less since dried herbs are more potent.
-
Parmesan cheese (optional): For a cheesy finish, sprinkle some grated Parmesan over your polenta before serving. If you’re vegan, try nutritional yeast for that cheesy flavor without the dairy.
-
Salt and pepper: Essential seasonings to enhance all the flavors. Always taste and adjust!
Step-by-Step Instructions
Now that we’ve got our ingredients gathered, let’s dive into the process:
-
Prepare the Potimarron: Begin by preheating your oven to 400°F (200°C). Cut the potimarron in half, scoop out the seeds, and slice it into wedges. There’s no need to peel it, as the skin becomes deliciously tender when roasted. Toss the wedges in a bit of olive oil, salt, and pepper, and spread them on a baking sheet. Roast for about 25-30 minutes or until golden and soft.
Chef’s Tip: If your potimarron is particularly firm, microwave it for a few minutes before slicing. This makes it much easier to handle!
-
Cook the Polenta: In a medium saucepan, bring 4 cups of vegetable broth to a gentle boil. Slowly whisk in 1 cup of polenta, reducing the heat to low. Stir continuously for about 25-30 minutes until it thickens and becomes creamy. If it gets too thick, don’t hesitate to add a splash more broth or water.
Chef Hack: Add a little bit of butter or olive oil to the polenta and stir until melted right before serving for extra creaminess.
-
Sauté the Onions and Garlic: While your polenta is cooking, heat another splash of olive oil in a skillet over medium heat. Add diced onions and sauté them until they become translucent, about 3-5 minutes. Toss in minced garlic and sauté for an additional minute until fragrant.
Pro Tip: If you want to add an extra layer of flavor, sprinkle a pinch of sugar when you add the onions. It helps to caramelize them beautifully!
-
Cook the Mushrooms: Now, add your cleaned mushrooms to the onion and garlic mixture. Season with salt and pepper, then cook them until they’re caramelized, about 7-8 minutes, stirring occasionally. The mushrooms should be browned and juicy.
Secret: For more flavor, you can deglaze the pan with a splash of white wine or broth, letting it reduce and soak into the mushrooms.
-
Combine and Flavor: When your potimarron is roasted, mash up a few wedges into the polenta for a vibrant color and sweetness. Stir in sautéed mushrooms, thyme, and season with more salt and pepper to taste. Feel free to adjust based on your preference.
-
Serve: Once everything is combined and heated through, it’s time to get serving! Scoop the creamy polenta into bowls, top it with the remaining roasted potimarron and caramelized mushrooms, and sprinkle with Parmesan cheese if desired.
Serving Suggestions
For an inviting presentation, serve the polenta in rustic bowls topped with the caramelized mushrooms and roasted potimarron. A sprinkle of fresh thyme or chili flakes can bring a pop of color and an extra punch of flavor. You might even consider drizzling a little balsamic reduction over the top for a tangy finish. Ideal for cozy dinners with friends or as a warm dish for a chilly evening in!
Recipe Variations
-
Spicy Kick: Add chopped fresh chili or sprinkle some red pepper flakes for a spicy twist.
-
Herby Infusion: Experiment with other herbs! Sage or rosemary add a great flavor profile, especially with the autumnal ingredients.
-
Seafood Delight: Incorporate sautéed shrimp or scallops for a different protein touch.
-
Nutty Texture: Top your dish with toasted pine nuts or walnuts for a gratifying crunch.
Chef’s Notes
As I’ve made this dish over the years, I’ve learned to embrace the flexibility of polenta. It’s not just about the ingredients, but how you enjoy the cooking experience. Sometimes it’s about going off-script — adding in your favorite seasonal veggies or making it heartier with beans for protein. Once, I had my niece help me make this meal, and we laughed as we snuck bites of polenta while the kitchen filled with warmth. It’s moments like these that truly make a recipe special.
FAQs and Troubleshooting
Q: My polenta turned out too grainy. What went wrong?
A: This often happens when the polenta is added too quickly to a boiling pot of broth. To avoid this, whisk it in slowly!
Q: Can I prepare this ahead of time?
A: Yes! You can make the polenta and store it in the fridge. Reheat on the stovetop and add a little broth to loosen it back up.
Q: What if I don’t have mushrooms?
A: If mushrooms aren’t your thing, feel free to leave them out or replace them with sautéed spinach or kale for some green goodness.
Q: Can this dish be frozen?
A: Yes, the polenta can be frozen, but mushrooms should be cooked fresh for the best texture. Just note that it may slightly alter the creaminess and texture once thawed.
Nutritional Info
While specific nutritional stats can vary based on brands and serving sizes, this Polenta d’Automne is generally a great source of complex carbohydrates from the polenta, vitamins A and C from the potimarron, and protein if topped with cheese or paired with shrimp. It also carries healthy fats from the olive oil, making it a wholesome, hearty dish that’s comforting and satisfying.
So there you have it! A wholesome, heartwarming dish that’s not just a recipe but a heartfelt experience. Embrace the season, gather loved ones around the table, and let this Polenta d’Automne carry warm memories and new beginnings in every bite. Happy cooking, foodies!
Print
Polenta d’Automne au Potimarron et Champignons Caramélisés
- Total Time: 75 minutes
- Yield: 4 servings 1x
- Diet: Vegetarian
Description
A cozy fall dish featuring creamy polenta, sweet roasted pumpkin, and savory caramelized mushrooms. Perfect for warm gatherings and heartfelt moments.
Ingredients
- 1 cup polenta
- 1 small potimarron (or pumpkin)
- 2 cups mixed mushrooms (cremini and shiitake)
- 4 cups vegetable broth
- 1 onion (sweet or shallots)
- 2 cloves garlic
- 2 tablespoons olive oil
- 1 teaspoon thyme (fresh or dried)
- 1/4 cup Parmesan cheese (optional)
- Salt and pepper to taste
Instructions
- Preheat your oven to 400°F (200°C). Cut the potimarron in half, scoop out the seeds, and slice into wedges. Toss with olive oil, salt, and pepper, then roast for 25-30 minutes.
- Bring 4 cups of vegetable broth to a gentle boil. Slowly whisk in 1 cup of polenta and reduce heat to low. Stir continuously for 25-30 minutes until thick and creamy.
- Heat olive oil in a skillet over medium heat. Sauté diced onions until translucent, then add minced garlic and sauté until fragrant.
- Add cleaned mushrooms to the onion and garlic mixture. Season with salt and pepper, cooking for about 7-8 minutes until caramelized.
- Once the potimarron is roasted, mash some wedges into the polenta. Stir in the sautéed mushrooms and thyme, adjusting seasoning to taste.
- Scoop the creamy polenta into bowls and top with remaining roasted potimarron and mushrooms. Sprinkle with Parmesan cheese if desired.
Notes
For extra creaminess, stir in a bit of butter or additional olive oil into the polenta before serving.
- Prep Time: 15 minutes
- Cook Time: 60 minutes
- Category: Main Course
- Method: Baking
- Cuisine: Italian
Nutrition
- Serving Size: 1 serving
- Calories: 400
- Sugar: 6g
- Sodium: 450mg
- Fat: 15g
- Saturated Fat: 3g
- Unsaturated Fat: 8g
- Trans Fat: 0g
- Carbohydrates: 52g
- Fiber: 4g
- Protein: 12g
- Cholesterol: 10mg
Keywords: polenta, pumpkin, fall recipe, vegetarian dish, cozy meal
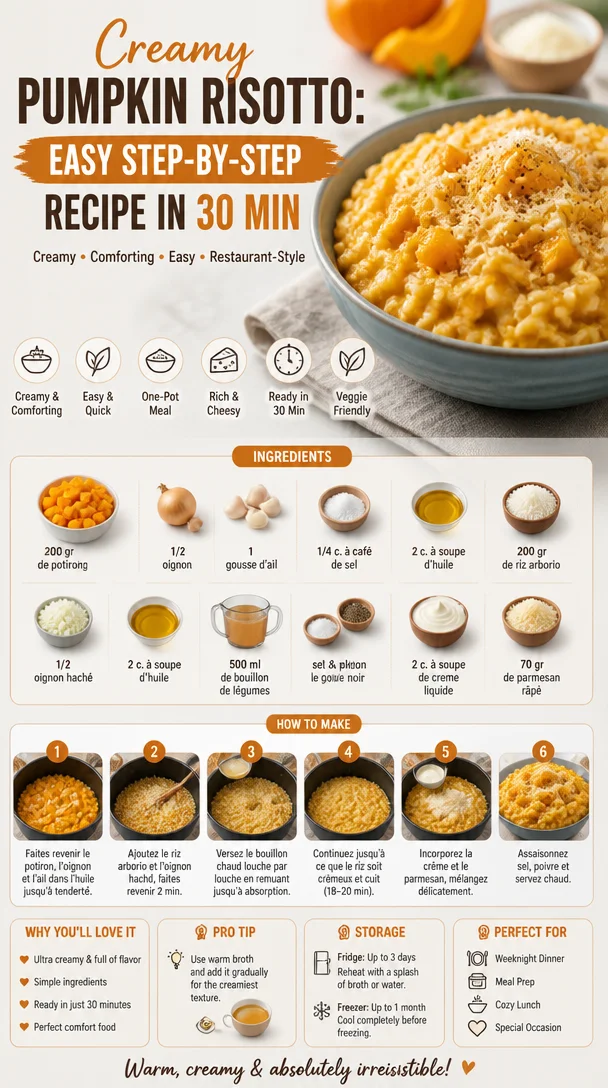
Creamy Pumpkin Risotto: Easy Step-by-Step Recipe in 30 Min
Creamy Pumpkin Risotto: A Step-by-Step Recipe
Welcome to my kitchen! I’m Olivia Bennett, your culinary companion for a delightful journey into the world of cooking. Today, I’m excited to share a recipe that’s not just a staple in my home; it also happens to be an ode to flavors that embrace the cozy vibes of the season – creamy pumpkin risotto. Just imagine the comforting aroma of sautéed onions mingling with warm, earthy pumpkin. It’s the ultimate warm hug in a bowl!
Now, you might be thinking that risotto is reserved for restaurant menus, but I’m here to tell you it’s accessible to all of us! As we dive into this creamy masterpiece, you’ll see how simple ingredients combine to create something truly dreamy. So grab your apron (and maybe a glass of wine), and let’s make some magic in the kitchen!
A Taste of Nostalgia
Growing up, my family had a tradition of gathering for special Sunday dinners, where the kitchen was filled with the scent of something delicious simmering on the stovetop. One of my fondest memories revolves around my grandmother’s risotto. She had this magical way of turning simple ingredients into a comforting meal that brought everyone together. I can still picture her standing at the stove, a wooden spoon in hand, slowly stirring the pot while sharing stories that made us laugh until our bellies hurt.
One particular autumn, she decided to surprise us with a pumpkin risotto. It was unlike anything we’d had before—a creamy, dreamy dish that perfectly showcased the flavors of the season. Each spoonful was a warm embrace, and it quickly became a family favorite. Now, I carry on that legacy, adding my own twist to her recipe. Let’s recreate that joyful moment together!
Ingredients
Here’s what you’ll need for our creamy pumpkin risotto:
-
1 cup Arborio rice
This short-grain rice is what gives risotto its creamy texture. If you can’t find Arborio, Carnaroli or Vialone Nano are great substitutes, as they have similar starch content. -
2 cups pumpkin puree
Whether you use fresh or canned, pumpkin adds a delightful sweetness. For a twist, you can use butternut squash puree, which has a similar texture and flavor. -
1 medium onion, finely chopped
Onions are the aromatic base of this dish. You can substitute with shallots for a milder flavor or leeks for something a bit sweeter. -
2 cloves garlic, minced
Garlic adds depth and a savory kick. Feel free to use garlic powder if you prefer a subtler garlic flavor or to omit it altogether for a more delicate taste. -
4 cups vegetable or chicken broth
Homemade broth is always the best choice, but store-bought works wonderfully in a pinch! You can even use bone broth for a richer flavor. -
1/2 cup dry white wine
The acidity of wine brightens the dish. If you want to skip the alcohol, use additional broth or a splash of apple cider vinegar. -
1/2 cup grated Parmesan cheese
This adds creaminess and a savory tang. For a dairy-free option, nutritional yeast can provide a cheesy flavor. -
2 tablespoons olive oil
Use high-quality extra virgin olive oil for sautéing your ingredients. For a bit of warmth, swap half with unsalted butter. -
Salt and pepper, to taste
Essential at the end for enhancing flavors. Don’t forget to taste as you go!
This combo of ingredients is the foundation of our scrumptious risotto. Each plays a critical role in creating that silky, cozy dish that’s sure to impress!
Step-by-Step Instructions
Now let’s get cooking! Here’s how to make that amazing creamy pumpkin risotto, step by step.
-
Prep your ingredients: Start by measuring out all your ingredients. Having everything ready to go makes the cooking process much smoother. Plus, it’s always a joy to see everything you’re about to create at a glance!
-
Heat the broth: In a saucepan, bring your vegetable or chicken broth to a simmer over medium heat. Keeping the broth warm while you cook the risotto helps the rice release its starch more efficiently, resulting in that lovely creamy texture.
-
Sauté the onion and garlic: In a large pan or Dutch oven, heat the olive oil over medium heat. Add the chopped onion and sauté for about 5 minutes, until it turns translucent. Toss in the minced garlic and let it cook for another minute, until fragrant. This base is the flavorful foundation of your risotto.
-
Toast the rice: Stir in the Arborio rice, ensuring it gets coated with the oil. Toast the rice for about 2-3 minutes, stirring frequently. This helps to lock in the flavors and gives the rice a nice nutty flavor. You’ll know it’s ready when the grains become slightly translucent around the edges.
-
Deglaze with wine: Pour in the dry white wine, and let it simmer until most of the liquid is absorbed. This step allows the rice to absorb that wonderful acidity and adds a depth to the flavor. Don’t rush this process; it’s essential!
-
Add the broth gradually: Now comes the most important part! Begin adding the warm broth to the rice, one ladleful at a time. Stir continuously until the liquid is almost absorbed before adding the next ladle. This helps to release the rice’s starch and gives the risotto its signature creaminess. Keep repeating this process for about 18-20 minutes.
-
Incorporate the pumpkin: Once the rice is al dente and creamy, stir in your pumpkin puree. Mixing it through will make the risotto even more luscious and add that beautiful fall color.
-
Finishing touches: Remove the pan from heat and fold in the grated Parmesan cheese. Adjust the seasoning with salt and pepper to taste. At this stage, you can add a splash more broth if it seems too thick; risotto should be creamy but not soupy.
-
Let it rest: Let the risotto sit for a minute. This resting time allows the flavors to meld perfectly and gives you just enough time to set the table and get ready to serve.
Serving Suggestions
Serve your creamy pumpkin risotto hot, garnished with a sprinkle of additional Parmesan cheese and a drizzle of olive oil for that extra touch of elegance. Pair it with fresh herbs like parsley or sage for an added pop of flavor and color. This dish works beautifully as a starter or main course, especially alongside a crisp salad or roasted vegetables.
Recipe Variations
Feeling adventurous? Here are some creative twists to make this risotto your own:
-
Add some protein: Stir in cooked sausage, shredded chicken, or roasted chickpeas for a heartier meal.
-
Herb infusions: Incorporate herbs like thyme or rosemary while cooking for a fragrant infusion.
-
Spicy kick: Add a pinch of chili flakes to the onions while sautéing for a subtle warmth.
-
Nutty richness: Mix in toasted pecans or walnuts just before serving for crunch and flavor.
-
Vegan option: Substitute the Parmesan with nutritional yeast, and use vegetable broth for a completely dairy-free version.
Chef’s Notes
Risotto has been one of those dishes that evolves every time I make it. I love experimenting with flavors, and this pumpkin version was a game changer in my kitchen! One memorable mistake happened during a busy week—I accidentally added too much broth too quickly. Instead of panicking, I turned it into a soup and garnished it with toasted pumpkin seeds! Sometimes, accidents lead to delicious discoveries in the kitchen, which is the beauty of cooking!
FAQs and Troubleshooting
-
Why did my risotto come out gummy?
If your risotto becomes too gummy, it likely means it was stirred too much or the broth was added too quickly without allowing it to absorb properly. Consistent stirring is important, but letting the rice absorb the broth is key! -
Can I make risotto ahead of time?
While risotto is best served immediately, you can make it ahead and reheat it gently over low heat, adding a bit of broth to bring back its creaminess. -
What can I do if my risotto is too thick?
If your risotto thickens too much, don’t fret! Just stir in a little more warm broth or water, a tablespoon at a time, until you reach your desired consistency. -
Can I freeze risotto?
Risotto can be frozen, but it may lose some texture upon reheating. If you plan ahead, consider making a double batch when you’re in the mood and storing leftovers for easy meals later on!
Nutritional Info
While this creamy pumpkin risotto is comforting, it’s also a great source of carbohydrates and adds fiber from the pumpkin. Here’s a rough nutritional breakdown per serving:
- Calories: 350
- Protein: 10g
- Carbohydrates: 55g
- Fat: 12g
- Fiber: 3g
And there you have it—a heartwarming dish that’s not only easy to make but brings everyone together for a cozy meal. Whether it’s a weeknight dinner or a festive gathering, creamy pumpkin risotto will surely impress your loved ones. Remember, cooking should be a joyous experience! So don your favorite apron, enjoy the process, and don’t forget to share your culinary creations with me! Happy cooking!
Print
Creamy Pumpkin Risotto
- Total Time: 45 minutes
- Yield: 4 servings 1x
- Diet: Vegetarian
Description
A cozy and creamy pumpkin risotto recipe that is simple to make and perfect for fall.
Ingredients
- 1 cup Arborio rice
- 2 cups pumpkin puree
- 1 medium onion, finely chopped
- 2 cloves garlic, minced
- 4 cups vegetable or chicken broth
- 1/2 cup dry white wine
- 1/2 cup grated Parmesan cheese
- 2 tablespoons olive oil
- Salt and pepper, to taste
Instructions
- Prep your ingredients: Start by measuring out all your ingredients. Having everything ready to go makes the cooking process much smoother.
- Heat the broth: In a saucepan, bring your vegetable or chicken broth to a simmer over medium heat.
- Sauté the onion and garlic: In a large pan, heat the olive oil over medium heat. Add the chopped onion and sauté for about 5 minutes until translucent. Toss in the minced garlic and cook for another minute.
- Toast the rice: Stir in the Arborio rice, ensuring it gets coated with the oil. Toast for about 2-3 minutes, stirring frequently.
- Deglaze with wine: Pour in the dry white wine and let it simmer until most of the liquid is absorbed.
- Add the broth gradually: Begin adding the warm broth to the rice, one ladleful at a time. Stir continuously until the liquid is almost absorbed before adding the next ladle for about 18-20 minutes.
- Incorporate the pumpkin: Once the rice is al dente and creamy, stir in the pumpkin puree.
- Finishing touches: Remove from heat and fold in the grated Parmesan cheese. Adjust seasoning with salt and pepper.
- Let it rest: Allow the risotto to sit for a minute.
Notes
Serve hot, garnished with additional Parmesan cheese and fresh herbs. Great as a starter or main course.
- Prep Time: 15 minutes
- Cook Time: 30 minutes
- Category: Main Course
- Method: Stovetop
- Cuisine: Italian
Nutrition
- Serving Size: 1 serving
- Calories: 350
- Sugar: 5g
- Sodium: 400mg
- Fat: 12g
- Saturated Fat: 4g
- Unsaturated Fat: 6g
- Trans Fat: 0g
- Carbohydrates: 55g
- Fiber: 3g
- Protein: 10g
- Cholesterol: 30mg
Keywords: risotto, pumpkin risotto, creamy risotto, fall recipes, Italian cuisine
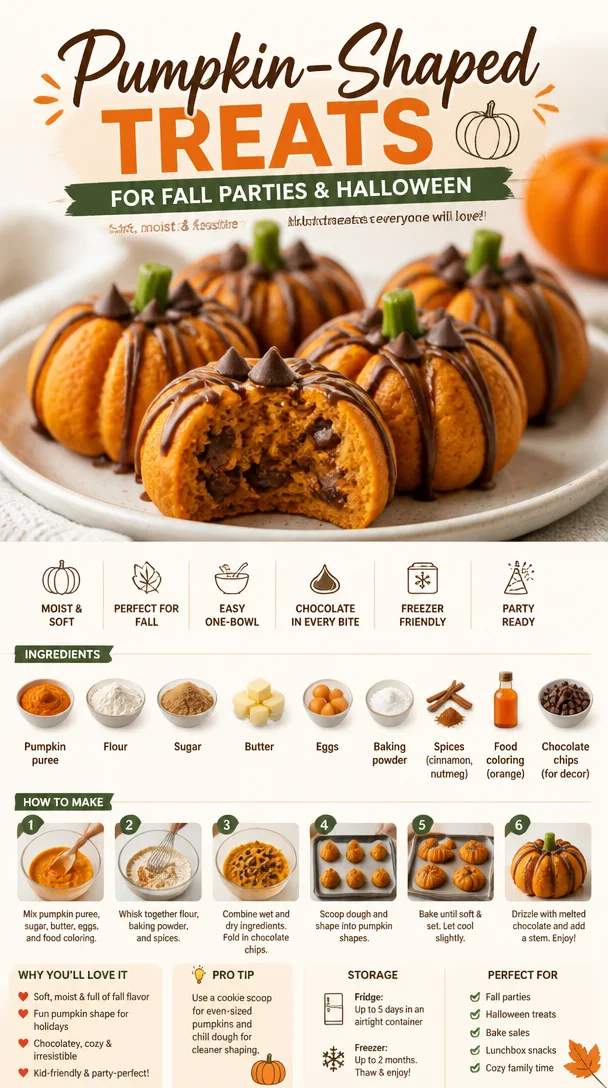
Pumpkin-Shaped Treats for Fall Parties & Halloween
Pumpkin-Shaped Food Ideas: A Fun and Festive Cooking Adventure!
Welcome to my cozy corner of the kitchen, fellow food lovers! I’m Olivia Bennett, your go-to culinary guide, and today, we’re diving into a delightful and playful adventure with pumpkin-shaped food ideas. As the leaves start to turn and the air gets a little crisper, there’s something undeniably magical about creating dishes that celebrate the spirit of fall. From adorable pumpkin-shaped cakes to savory delights that look like the iconic gourd, this post will inspire you to get creative in the kitchen.
Imagine the laughter that fills your home as you and your loved ones gather around a table adorned with charming, pumpkin-shaped treats. Whether it’s for Halloween, Thanksgiving, or simply to add a little whimsy to a mundane weekday, these recipes are perfect for making every meal feel special. So, roll up your sleeves, grab that trusty apron, and let’s whip up some festive fun!
A Fond Memory in the Kitchen
I can’t help but reminisce about the first time I made pumpkin-shaped cookies. I was only eight years old, shoulders barely peeking over the counter as I stood beside my grandmother, who was a fabulous baker. The smell of warm spices filled our tiny kitchen as we mixed the dough together, her hands guiding mine to create the perfect pumpkin shapes. We used a cookie cutter, and soon enough, the entire kitchen was filled with laughter and flour dust!
After we baked and iced those little treats, my grandmother and I decorated each one with tiny chocolate chips for eyes and a green frosting stem. They were absolutely charming—tiny orange pumpkins sitting proudly on our kitchen countertop, just waiting to be devoured. That moment sparked my love for cooking and baking, teaching me that food is not just about flavor but also about bringing people together. Each pumpkin-shaped creation holds a piece of nostalgia, and I can’t wait to share that joy with you!
Ingredients List
Let’s gather our ingredients! Below are the essentials you’ll need to make delicious pumpkin-shaped treats, whether they’re cookies, cakes, or savory snacks:
-
All-purpose flour: The backbone of many recipes, providing structure. If you’re gluten-free, substitute with a gluten-free blend.
-
Pumpkin puree: This gives moisture and flavor. Canned pumpkin works well, but fresh roasted pumpkin is even better!
-
Brown sugar: For warmth and depth of sweetness. You can swap it for coconut sugar for a hint of caramel flavor.
-
Granulated sugar: To balance the richness. Feel free to use a sugar substitute for a lower-calorie version.
-
Baking powder: This leavening agent will help your treats rise and become fluffy. Baking soda can be used, but adjust the acids accordingly.
-
Pumpkin pie spice: A delightful blend that typically includes cinnamon, nutmeg, and ginger. You can make your own if you’re feeling adventurous!
-
Eggs: They bind everything together. If you need a vegan option, you can use flax eggs or applesauce!
-
Butter or coconut oil: For richness and flavor. Coconut oil is an excellent alternative for a dairy-free version.
-
Vanilla extract: A must for flavor; always go for pure extract if you can find it!
-
Chocolate chips: Optional, but highly recommended for decoration or added sweetness. You can use dark chocolate or white chocolate for a different flavor.
With these ingredients in hand, you’re on your way to creating pumpkin-shaped culinary wonders.
Step-by-Step Instructions
Now for the exciting part—let’s get cooking! Follow the steps below to create your pumpkin-shaped treats.
-
Preheat Your Oven: Set your oven to 350°F (175°C) so it’s ready for baking.
Chef Tip: Make sure your oven is fully preheated to ensure even baking!
-
Mix Dry Ingredients: In a large bowl, whisk together 2 cups of all-purpose flour, 1 teaspoon of baking powder, and 2 teaspoons of pumpkin pie spice.
Chef Hack: Sifting the flour can help reduce lumps and give your treats a lighter texture!
-
Combine Wet Ingredients: In another bowl, cream together 1 cup of softened butter (or coconut oil) and 1 cup of brown sugar and ½ cup of granulated sugar until fluffy. Add 1 cup of pumpkin puree and 2 eggs (or flax eggs), along with 2 teaspoons of vanilla extract.
Chef Insight: Don’t skip creaming the butter and sugars; it creates air pockets that make your treats lighter!
-
Blend It Together: Gradually add the dry ingredients to the wet mixture, mixing until just combined. If you’re including chocolate chips, fold them in at this point.
Tip: Overmixing can lead to tough cookies, so mix gently!
-
Shape Your Pumpkins: Scoop portions of dough and roll them into balls. Gently flatten the tops a bit to achieve more of a pumpkin shape, then use your hands to make slight indentations to mimic pumpkin ridges.
Chef’s Secret: A fork can help you create those cute lines!
-
Bake: Place your pumpkin shapes on a parchment-lined baking sheet and bake for about 10-12 minutes, or until the edges are lightly golden.
Remember: They’ll continue to cook a bit from residual heat after you take them out, so don’t overbake!
-
Cool and Decorate: Allow them to cool completely on a wire rack before decorating with frosting or more chocolate chips to create stems and eyes.
Tip: For frosting, a simple cream cheese frosting works fantastically, and you can tint it green for added fun!
Serving Suggestions
Once your adorable pumpkin-shaped treats are out of the oven and decorated, it’s time for presentation! Try arranging them on a rustic wooden platter for a cozy vibe. You can even add some leaves or mini pumpkins around for that extra autumnal touch. These treats shine brightly on dessert tables or as charming gifts for friends—it’s truly all about the presentation!
Recipe Variations
Now that you have the basic recipe down, let’s play! Here are a few creative twists you might consider for your pumpkin-shaped delights:
-
Pumpkin Spice and Everything Nice: Add chopped nuts or dried cranberries for extra texture and flavor.
-
Chocolate Pumpkin Delight: Substitute half of the flour with cocoa for a chocolaty version and frost with chocolate ganache.
-
Savory Spin: Use the same shaping technique but make a savory blend with cheese, herbs, and spices for pumpkin-shaped cheese puffs.
-
Gluten-Free Fun: Use a gluten-free flour blend for your pumpkin treats; they’ll be just as fun and delicious!
-
Vegan Version: Replace the eggs and butter with flax eggs and plant-based butter for a plant-friendly option.
Chef’s Notes
This pumpkin-shaped recipe has become a staple in my kitchen, especially during the fall! It’s incredible to see how a simple recipe can evolve over time. I recall experimenting with it at my son’s kindergarten Halloween party, and the kids loved them so much I felt like a superhero for the day!
Another funny kitchen story: One time, I got a little too into the spirit and tried to decorate them with a pumpkin carving kit. Let’s just say, I learned that cookie dough doesn’t hold up under a carving knife! Nevertheless, it’s these quirky kitchen moments that remind us to enjoy the process and not take ourselves too seriously.
FAQs and Troubleshooting
-
Why are my cookies spreading too much?
- This might be due to excess butter or not chilling the dough. Try refrigerating your cookie dough for 30 minutes before baking!
-
What if my cookies are too dry?
- Make sure you’re measuring your flour correctly—not too packed! You can also try adding a tablespoon of milk or additional pumpkin puree to moisten the dough.
-
How can I decorate them without frosting?
- You can use melted chocolate or simply dust them with powdered sugar for a lovely finish. A sprinkle of cinnamon sugar is a nice touch too!
-
Can I make the dough ahead of time?
- Definitely! You can prepare the dough, shape it into a ball, wrap it in plastic, and store it in the fridge for up to 3 days or freeze it for up to a month.
Nutritional Info
Nutritional values vary based on specific ingredients and portion sizes, but a typical pumpkin cookie (without icing) is around 150 calories, 7 grams of fat, and 2 grams of protein. Adjust based on your modifications!
With these pumpkin-shaped food ideas, you’re all set to add a touch of whimsy and a bucket full of flavor to your fall festivities. Cooking should always be about fun and creativity, and I hope these recipes inspire you to gather your loved ones and create lasting memories in your kitchen. Happy cooking, and may your pumpkins always be delicious! 🍂🎃
Print
Pumpkin-Shaped Treats
- Total Time: 32 minutes
- Yield: 24 servings 1x
- Diet: Vegetarian
Description
Delicious pumpkin-shaped cookies and treats perfect for fall festivities, bringing cheerful whimsy to your table.
Ingredients
- 2 cups all-purpose flour
- 1 teaspoon baking powder
- 2 teaspoons pumpkin pie spice
- 1 cup softened butter (or coconut oil)
- 1 cup brown sugar
- ½ cup granulated sugar
- 1 cup pumpkin puree
- 2 eggs (or flax eggs)
- 2 teaspoons vanilla extract
- Optional: chocolate chips for decoration
Instructions
- Preheat your oven to 350°F (175°C).
- Mix dry ingredients in a bowl.
- Combine wet ingredients in another bowl.
- Blend the wet and dry ingredients together until just combined.
- Shape the dough into balls and flatten slightly.
- Bake for 10-12 minutes or until edges are golden.
- Cool and decorate as desired.
Notes
Use a fork to create the ridges of the pumpkins. Allow the cookies to cool completely before decorating.
- Prep Time: 20 minutes
- Cook Time: 12 minutes
- Category: Dessert
- Method: Baking
- Cuisine: American
Nutrition
- Serving Size: 1 cookie
- Calories: 150
- Sugar: 15g
- Sodium: 150mg
- Fat: 7g
- Saturated Fat: 4g
- Unsaturated Fat: 2g
- Trans Fat: 0g
- Carbohydrates: 20g
- Fiber: 1g
- Protein: 2g
- Cholesterol: 30mg
Keywords: pumpkin, cookies, fall treats, baking, festive desserts
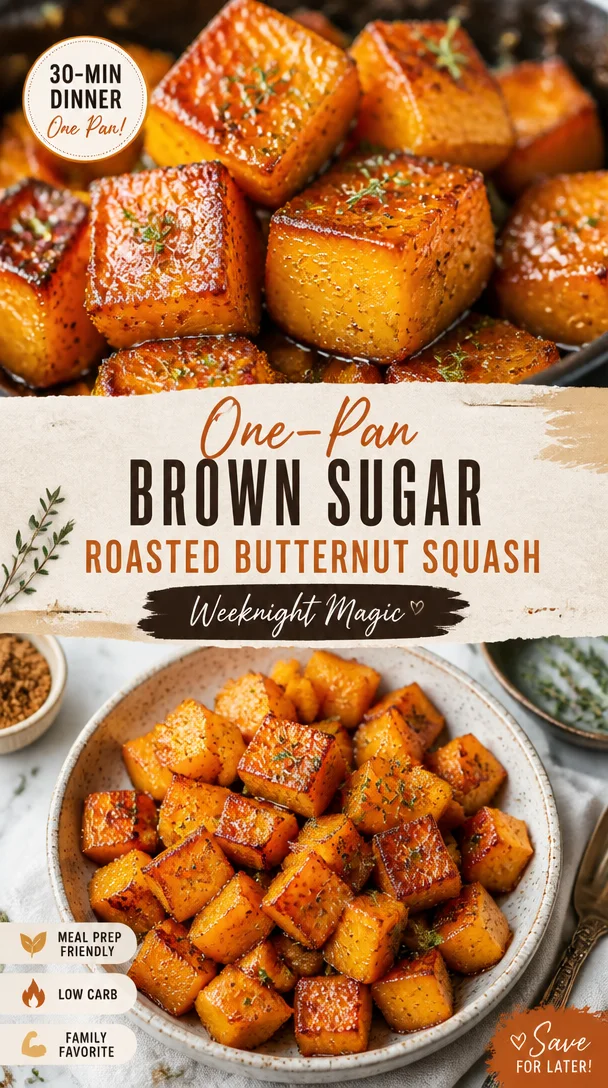
One-Pan Brown Sugar Roasted Butternut Squash (Weeknight)
Brown Sugar Roasted Butternut Squash: A Cozy Kitchen Delight
Welcome to my kitchen! Today, we’re diving into one of my all-time favorite comfort dishes: Brown Sugar Roasted Butternut Squash. As the weather starts cooling down and autumn whispers its arrival, there’s something incredibly special about cozying up with a warm, sweet, and savory dish that feels like a hug in a bowl. This roasted butternut squash recipe is rich, buttery, and kissed with the warm flavors of brown sugar and spices—perfect for adding a touch of fall magic to your dinner table or meal prep.
Imagine the sweet, caramelized aroma filling your kitchen as the squash roasts to golden perfection. Whether served as a side dish at Thanksgiving or enjoyed alongside a hearty grain bowl, this recipe is not only delicious but versatile, too! Plus, it’s so simple to make—if you can chop veggies and set a timer, you’re already halfway there!
So, grab your apron, and let’s embark on this cozy cooking adventure together. Not only will you end up with a delightful dish, but you’ll also find a space to reflect, connect, and enjoy the simple pleasures of cooking!
A Sweet Memory: The First Time I Roasted Squash
The first time I roasted butternut squash, I was a college student trying to impress my friends with my newfound cooking skills. I can still remember the day—it was chilly outside, and the leaves were swirling like dancers in the wind. Armed with my trusty old cookbook, I decided to tackle roasted butternut squash. As I chopped the vibrant orange flesh, the sweet aroma filled my small apartment kitchen, making my roommates flock in like moths to a flame.
With the oven doing its magic, I nervously paced around, waiting for those 30 minutes to pass. When the timer went off, I opened the oven door to find the squash beautifully caramelized, with that irresistible, sweet, and slightly nutty scent wafting through the air. It felt like I had unlocked a culinary treasure! That night, we all gathered around the table, laughter filling the air as we enjoyed our meal. That simple dish ignited my love for cooking and the joy of sharing homemade meals, a tradition I carry on through this blog.
Ingredients You’ll Need
Here’s the rundown of ingredients for this delicious Brown Sugar Roasted Butternut Squash. Each plays a crucial role in creating depth of flavor and that cozy vibe we crave.
-
Butternut Squash (1 medium): The star of the show! Sweet, nutty, and creamy when roasted. You can substitute with acorn or pumpkin if that’s what you have on hand.
-
Brown Sugar (¼ cup): This adds that irresistible caramel-like sweetness. If you want a healthier option, you can use coconut sugar or maple syrup in moderation.
-
Olive Oil (2 tablespoons): This helps in roasting the squash evenly. Feel free to swap it out with melted coconut oil for a different flavor profile.
-
Cinnamon (1 teaspoon): The warm spice perfectly complements the sweetness of the squash. Nutmeg or pumpkin pie spice also works beautifully here.
-
Salt (½ teaspoon): Just a pinch enhances all flavors. Remember, good quality sea salt is a chef’s best friend!
-
Black Pepper (¼ teaspoon): A little kick to offset the sweetness. Try smoked paprika for a more complex flavor twist.
-
Optional Fresh Herbs (½ teaspoon): Such as thyme or rosemary. They add an earthy freshness—perfect if you’re feeling adventurous!
Step-by-Step Instructions
Now, let’s get cooking! Follow these steps closely, and I promise you’ll end up with a stunning dish that will steal the show.
-
Prepare the Squash: Start by preheating your oven to 400°F (200°C). While it heats up, grab your butternut squash. Cutting it can be a bit challenging due to its tough skin. I recommend using a sturdy chef’s knife and being cautious—it’s easy to slip! Cut the squash in half lengthwise, scoop out the seeds with a spoon, and then chop it into bite-sized cubes. If you’re short on time, you can often find pre-cut butternut squash at the grocery store.
-
Mix the Ingredients: In a large mixing bowl, combine the cubed butternut squash, olive oil, brown sugar, cinnamon, salt, and black pepper. Smell that? It’s pure bliss! Toss everything together until the squash is well-coated, ensuring each piece is evenly dressed for roasting. Chef’s tip: Don’t be shy—use your hands for this! You’ll get a better sense of how much oil and sugar is clinging to your squash.
-
Roast, Baby, Roast: Spread the coated squash evenly on a baking sheet lined with parchment paper. This ensures easy cleanup and prevents sticking! Roast in the preheated oven for about 25-30 minutes. Halfway through, give it a good toss with a spatula so every piece gets a chance to caramelize beautifully. The goal is for your squash to be golden brown and fork-tender.
-
Cooling Down: Once ready, take the sheet out of the oven and allow the squash to cool for about 5 minutes. This will allow the flavors to settle in and avoid burning your tongue when you dive in!
-
Serving Time: Transfer the roasted squash to a beautiful serving bowl. Sprinkle with fresh herbs for that extra flair—trust me; your guests will be impressed!
Serving Suggestions
This Brown Sugar Roasted Butternut Squash is fantastic on its own, but let’s get creative! Serve it warm as a side dish alongside roasted chicken or grilled steak, or toss it over a bed of greens for a delicious salad. You can also mix it with quinoa or farro for a hearty, satisfying meal. It’s also incredible nestled into a grain bowl, topped with feta cheese, pumpkin seeds for crunch, and a drizzle of balsamic glaze.
Recipe Variations
Feeling adventurous? Here are a few creative twists to bring to this cozy dish:
-
Maple-Mustard Glaze: Replace the brown sugar with maple syrup and add a teaspoon of Dijon mustard for a sweet and tangy flavor.
-
Spicy Kick: Add a pinch of cayenne or red pepper flakes to the mixture for a delightful and warming heat.
-
Savory Spin: Swap cinnamon with cumin and toss in some chopped garlic. This will transform the squash into a fragrant, savory dish.
-
Herb Infusion: Mix in fresh sage or thyme before roasting to infuse your squash with fragrant herbal notes.
-
Sweet and Tart: Toss in some cranberries or pomegranate seeds after roasting for a burst of color and tartness that pairs perfectly with the sweetness.
Chef’s Notes
Over the years, this recipe has undergone a few transformations in my kitchen. Initially, it started with just olive oil and brown sugar, but as my palate has evolved, I’ve added spices and fresh herbs to enhance the flavors. I’ve even used this roasted squash as a filling in tacos—and let me tell you, it’s a game-changer!
And here’s a little kitchen story for you: One day, I accidentally spilled a whole jar of brown sugar into my bowl. Instead of panicking, I decided to embrace the extra sweetness and ended up with a deliciously caramelized flavor. So don’t be afraid of little accidents—sometimes they turn out to be happy accidents!
FAQs and Troubleshooting
1. My butternut squash didn’t caramelize—what went wrong?
This can happen if your oven isn’t hot enough or if the squash was packed too closely on the baking sheet. Ensure even spacing and that you preheat your oven thoroughly.
2. Can I make this dish ahead of time?
Absolutely! Roast the squash ahead of time and reheat it in the oven or microwave just before serving. It doesn’t lose its charm and flavors even as leftovers!
3. What’s the best way to cut a butternut squash?
Using a sharp knife and a cutting board with a damp towel underneath can help stabilize it. Start by cutting off both ends to create a flat surface for easier handling.
4. How can I store leftovers?
Store any leftover roasted squash in an airtight container in the fridge for up to 3-4 days. Reheat in the oven or the microwave, and enjoy!
Nutritional Information
(Per serving, approximately ½ cup)
- Calories: 150
- Protein: 2g
- Fat: 7g
- Carbohydrates: 25g
- Fiber: 3g
- Sugar: 10g
Isn’t it amazing how something so simple can evoke such joy and warmth? This Brown Sugar Roasted Butternut Squash is more than just a recipe; it’s a reminder to enjoy the little moments in the kitchen and the comfort of good food. Happy cooking, my friends, and may your kitchens always be filled with love and laughter!
Print
Brown Sugar Roasted Butternut Squash
- Total Time: 45 minutes
- Yield: 4 servings 1x
- Diet: Vegetarian
Description
A warm and sweet dish featuring roasted butternut squash caramelized with brown sugar and spices, perfect for fall!
Ingredients
- 1 medium Butternut Squash
- ¼ cup Brown Sugar
- 2 tablespoons Olive Oil
- 1 teaspoon Cinnamon
- ½ teaspoon Salt
- ¼ teaspoon Black Pepper
- ½ teaspoon Optional Fresh Herbs (thyme or rosemary)
Instructions
- Prepare the Squash: Preheat your oven to 400°F (200°C). Cut the squash in half lengthwise, scoop out the seeds, and chop into bite-sized cubes.
- Mix the Ingredients: In a large bowl, combine cubed squash, olive oil, brown sugar, cinnamon, salt, and black pepper. Toss until well-coated.
- Roast: Spread the coated squash on a lined baking sheet. Roast for 25-30 minutes, tossing halfway through, until golden and fork-tender.
- Cooling Down: Allow roasting squash to cool for about 5 minutes.
- Transfer to a serving bowl and sprinkle with fresh herbs if desired.
Notes
This dish can be made ahead of time and reheated before serving.
- Prep Time: 15 minutes
- Cook Time: 30 minutes
- Category: Side Dish
- Method: Roasting
- Cuisine: American
Nutrition
- Serving Size: ½ cup
- Calories: 150
- Sugar: 10g
- Sodium: 300mg
- Fat: 7g
- Saturated Fat: 1g
- Unsaturated Fat: 6g
- Trans Fat: 0g
- Carbohydrates: 25g
- Fiber: 3g
- Protein: 2g
- Cholesterol: 0mg
Keywords: butternut squash, roasted vegetables, fall recipes, vegetarian, cozy meals

Easy Stuffed Butternut Squash with Bacon & Goat Cheese
Butternut Squash Stuffed with Bacon and Goat Cheese | Easy Recipe
Welcome to my cozy corner of the kitchen! Today, I’m here to share a delightful recipe that perfectly balances warm, comforting flavors with a touch of sophistication — Butternut Squash Stuffed with Bacon and Goat Cheese. If you’ve ever been enchanted by the rich aroma of roasted squash mingling with crispy bacon, you’re in for a treat. This dish not only warms your heart but also serves as a beautiful centerpiece for any meal, making it perfect for family gatherings or an intimate dinner for two. Let’s dive into the world of cooking with warmth, flavor, and a sprinkle of nostalgia!
Introduction
Ah, butternut squash! This beautiful, pear-shaped gem is a staple in my autumn kitchen; its sweet, nutty flavor and velvety texture just scream comfort. Every time I slice into one, I can’t help but feel transported back to my childhood, where hearty meals made with love brought my family together around the dinner table. There’s something magical about turning simple ingredients into a scrumptious dish that evokes such warm feelings.
In today’s recipe, I’ve combined creamy goat cheese, savory bacon, and the natural sweetness of butternut squash for a dish that encapsulates all the best aspects of home cooking. But don’t worry; you don’t need to be a gourmet chef to create this masterpiece! This recipe is straightforward and packed with tips and tricks to help you recreate that cozy, homemade feeling in your own kitchen.
Whether you’re hosting friends for a cozy dinner party or just looking to warm up on a chilly night, this Butternut Squash Stuffed with Bacon and Goat Cheese will impress everyone at the table. So whip out your apron, let’s roll up our sleeves, and create a meal that not only tastes amazing but also fills your home with irresistible scents. Ready, set, cook!
Personal Story
I still remember the first time I made this dish. It was fall, and the world outside was draped in shades of gold and crimson. I had just returned home from the local farmer’s market, arms heavy with freshly harvested vegetables, when I spotted the perfect butternut squash. Instinctively, I grabbed it—knowing it would become the star of my dinner party that evening.
I remember sitting on the kitchen floor, peeling and cubing the squash, knowing that my friends would soon arrive. The smell of sautéing bacon wafted through the air, accompanied by laughter and chatter as my friends helped set the table. As we gathered around the table, the stuffed butternut squash turned heads and brought smiles. It was a moment filled with joy and connection, and every bite told the story of our shared evening. That’s the magic of food, isn’t it? It fosters love, friendship, and memories — and I can’t wait for you to create your own!
Ingredients
To make this scrumptious Butternut Squash Stuffed with Bacon and Goat Cheese, you’ll need the following ingredients:
-
1 large butternut squash
The star of the show! Choose a squash that feels heavy for its size, with a smooth skin. You can substitute with acorn squash for a different flavor and texture. -
4-6 slices of bacon
The savory goodness that adds a satisfying crunch! If you want a vegetarian option, feel free to swap it out for smoked or sundried tomatoes for a different but equally delightful flavor. -
1 cup goat cheese
Creamy and tangy, goat cheese complements the sweetness of the squash beautifully. If you’re not a fan, try feta or ricotta as alternatives depending on the flavor profile you desire. -
1 small onion, diced
For added sweetness and depth of flavor. Shallots can be a lovely substitute if you prefer a milder taste. -
2 cloves garlic, minced
A must-have for that aromatic punch! If you’re in a pinch, garlic powder works—just remember that one clove of garlic equals about 1/8 teaspoon of garlic powder. -
1/4 cup fresh parsley, chopped
For freshness and color! You can also use thyme or sage for an herbal twist. -
Salt and black pepper to taste
Always essential for enhancing the flavors of your dish. Just remember, you can always add more, but you can’t take it out—season gradually! -
Olive oil
A drizzle for roasting that helps bring all the flavors together. If you’re out, melted butter is a good substitute for a richer flavor.
Step-by-Step Instructions
Now that we have our ingredients, let’s get to the fun part — cooking! Follow these easy steps to make your butternut squash stuffed with bacon and goat cheese:
-
Preheat Your Oven:
Preheat your oven to 400°F (200°C). This ensures that your squash gets that perfect caramelization that brings out its natural sweetness. -
Prepare the Butternut Squash:
Carefully slice the butternut squash in half lengthwise. Scoop out the seeds using a spoon — try to get as much out without losing too much flesh. Drizzle a bit of olive oil, and season with salt and pepper. Place the halves, cut side up, on a baking sheet lined with parchment paper for easy cleanup!Chef’s Tip: Keeping the skin on while cooking can help the squash hold its shape and flavor better, so don’t be too eager to peel it!
-
Roast the Squash:
Pop those squash halves in the oven and roast for about 35-40 minutes, or until they are tender. You can test by poking a fork through the flesh; if it goes in easily, you’re good to go! -
Cook the Bacon:
While the squash roasts, chop the bacon into small pieces and cook in a skillet over medium heat until crispy. Transfer to a paper towel-lined plate to drain and set aside.Chef’s Hack: Reserve a tablespoon of the bacon grease if you’d like to sauté the onions in it for added flavor!
-
Sauté the Onion and Garlic:
In the same skillet (with or without the bacon grease), add the diced onion and sauté until soft and translucent, about 5-7 minutes. Add the minced garlic and cook for an additional minute, just until fragrant — you don’t want it to burn. -
Mix the Filling:
In a large mixing bowl, combine the sautéed onions, crispy bacon, goat cheese, and chopped parsley. Mix until evenly blended. Depending on your preference, you can crumble the cheese for a creamier texture or leave it chunkier for bites of gooeyness!Chef’s Insight: Mixing the filling while the squash is roasting makes your life easier and keeps everything warm!
-
Stuff the Squash:
Once the squash halves are roasted and tender, take them out of the oven and let them cool for a few minutes. Using a fork, fluff up the inside of the squash slightly to create room for the filling. Spoon the bacon and cheese mixture into each half generously. -
Final Roast:
Return the stuffed squash to the oven and bake for another 10-15 minutes, until the cheese is melted and slightly golden.Chef’s Tip: If you like a crispy cheese topping, turn on the broiler for the last couple of minutes—just keep a close eye on it to prevent burning!
-
Serve and Enjoy:
Serve warm, and watch as your family or friends’ eyes light up with delight when they see this beauty!
Serving Suggestions
When it comes to plating, simplicity is key. Place each stuffed squash half on a larger plate or serving platter. A sprinkle of fresh parsley or a drizzle of balsamic glaze on top can add a lovely final touch, elevating the dish with color and flavor. Pair it with a light salad or a warm crusty bread, and you’ve got an unforgettable meal perfect for any occasion!
Recipe Variations
Ready to shake things up? Here are a few creative twists on this classic dish:
- Quinoa Version: Substitute the bacon with cooked quinoa, toasted nuts, or seeds for a nutritious, vegetarian option.
- Cheese Variety: Swap goat cheese for sharp cheddar or a creamy blue cheese for a bold flavor kick!
- Herbal Twist: Add in a pinch of nutmeg for a warm, aromatic note, or try sage for a more robust earthiness.
- Spice It Up: Include a sprinkle of smoked paprika or some crushed red pepper flakes in your filling for a touch of heat!
- Sweet and Savory: Incorporate dried cranberries or sliced apples into the mixture for a sweet touch that pairs beautifully with the savory flavors.
Chef’s Notes
Over the years, this stuffed butternut squash has been a go-to recipe in my kitchen. I’ve made it for everything from cozy family dinners to festive celebrations. Each time, I find new ways to play with flavors and ingredients, and it never disappoints! One amusing kitchen anecdote involves my cat, Biscuit, who miraculously leaped onto the counter one Thanksgiving, targeting a platter of these beautiful squash halves. Needless to say, it was a source of laughter as I chased her around ensuring she didn’t make a mess of my hard work!
FAQs and Troubleshooting
-
What if my butternut squash is too hard to cut?
If you’re struggling with cutting your squash, try microwaving it for 2-3 minutes to soften it slightly. Just be careful when handling it! -
Can I make this ahead of time?
Absolutely! You can prepare the stuffed squash in advance, store it in the fridge, and then bake it just before serving. It’s great for meal prep! -
Why is my stuffing too dry?
This can happen if the cheese is too crumbly or if it’s overcooked. Ensure your cheese is creamy, and consider adding a splash of cream or olive oil to enrich the filling. -
Can I freeze the leftovers?
Yes, but I recommend freezing them before baking. You can keep unbaked stuffed squash in the freezer for up to 2 months. Just bake from frozen, adding a few extra minutes to the cooking time.
Nutritional Info
Each serving of Butternut Squash Stuffed with Bacon and Goat Cheese is packed with vitamins and minerals, including Vitamin A and potassium from the squash, as well as protein and healthy fats from the bacon and goat cheese. While this dish is comforting and hearty, it can also be part of a balanced diet when enjoyed in moderation.
So there you have it! A flavorful, nostalgic recipe to warm your heart and nourish your body—all while creating lovely memories in the kitchen. Enjoy the process of cooking, the joy of sharing, and most importantly, those amazing flavors in every bite! Happy cooking!
Print
Butternut Squash Stuffed with Bacon and Goat Cheese
- Total Time: 55 minutes
- Yield: 4 servings 1x
- Diet: Omnivore
Description
A delightful recipe that combines creamy goat cheese, savory bacon, and the natural sweetness of butternut squash for a warm and comforting dish.
Ingredients
- 1 large butternut squash
- 4–6 slices of bacon
- 1 cup goat cheese
- 1 small onion, diced
- 2 cloves garlic, minced
- 1/4 cup fresh parsley, chopped
- Salt and black pepper to taste
- Olive oil
Instructions
- Preheat your oven to 400°F (200°C).
- Prepare the butternut squash by slicing it in half lengthwise and scooping out the seeds. Drizzle with olive oil and season with salt and pepper.
- Roast the squash halves for about 35-40 minutes until tender.
- Cook the bacon in a skillet over medium heat until crispy.
- Sauté the onion until soft, then add the minced garlic and cook briefly.
- Mix the sautéed mixture with bacon, goat cheese, and parsley in a bowl.
- Stuff the roasted squash halves with the mixture.
- Final roast for another 10-15 minutes until the cheese is melted and slightly golden.
- Serve warm and enjoy!
Notes
You can prepare the stuffed squash in advance and bake it just before serving. Add a sprinkle of fresh parsley or balsamic glaze for extra flavor.
- Prep Time: 15 minutes
- Cook Time: 40 minutes
- Category: Main Course
- Method: Baking
- Cuisine: American
Nutrition
- Serving Size: 1 half of squash
- Calories: 350
- Sugar: 5g
- Sodium: 600mg
- Fat: 24g
- Saturated Fat: 8g
- Unsaturated Fat: 10g
- Trans Fat: 0g
- Carbohydrates: 30g
- Fiber: 6g
- Protein: 12g
- Cholesterol: 30mg
Keywords: butternut squash, stuffed squash, bacon, goat cheese, autumn recipe, comfort food
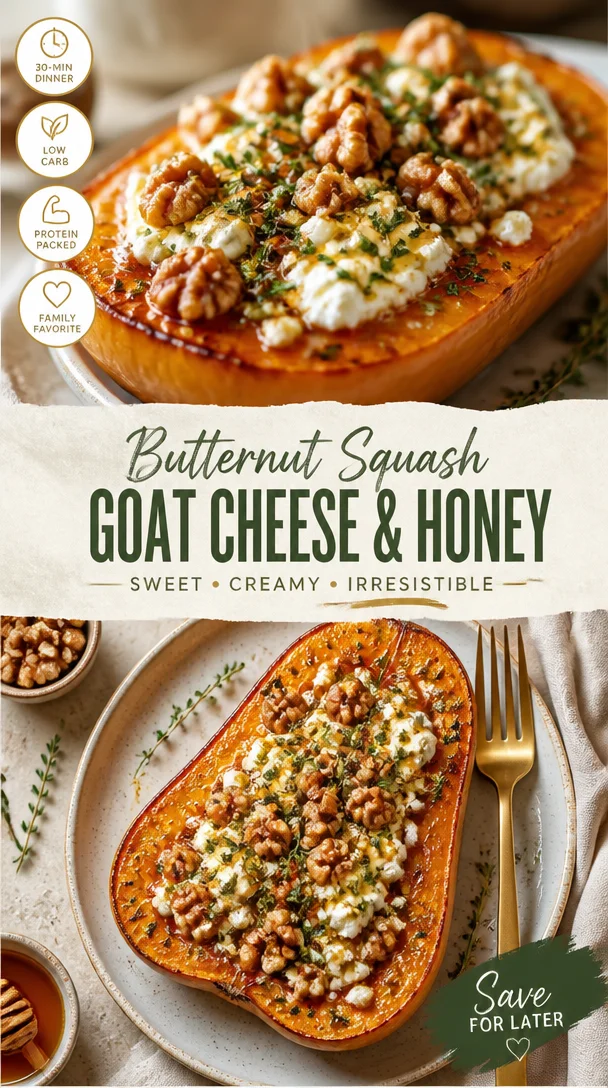
Butternut Squash with Goat Cheese and Honey
Butternut Squash with Goat Cheese and Honey: A Cozy Delight
Welcome to my kitchen, dear foodie friends! Today, I’m diving into a dish that’s not only a feast for the taste buds but also a warm hug for the soul: Butternut Squash with Goat Cheese and Honey. This recipe perfectly marries the earthy sweetness of roasted butternut squash with the creamy tang of goat cheese, all elevated with a drizzle of golden honey. As autumn rolls in, there’s nothing quite like the comforting embrace of this dish to bring friends and family together around the table.
Butternut squash is one of those ingredients that feels incredibly seasonal yet timeless. It graces our tables in the fall and winter months, filling our homes with the aroma of cozy baking. Roasting brings out its natural sweetness, while the goat cheese adds a delightful tang, creating a perfect balance that’s sure to have everyone coming back for seconds. Whether you’re hosting a lovely dinner party or simply wanting to treat yourself to something special, this dish is guaranteed to make any meal feel like a celebration.
As someone who gets giddy at the thought of cozy gatherings, this recipe holds a special place in my heart. It reminds me of chilly evenings spent with friends, gathered around the dining table, sharing laughter and stories over good food. So grab your apron, turn up the oven, and let’s create some magic in the kitchen!
A Personal Story
I still remember the first time I made butternut squash with goat cheese for my family. It was a small family gathering during the fall, and I wanted to impress everyone with my culinary skills—not just to feed them, but to carve out lasting memories. I had just discovered this amazing combination and was eager to showcase it. Armed with a recipe I’d adapted from a dusty old cookbook, I nervously prepped the ingredients, uncertain about how everyone would react.
As the squash roasted and the smell wafted through the house, I caught my mom with a smile on her face, reminiscing about her own cooking adventures. My dad couldn’t wait to dig in, and my little sister was making funny faces as she tried to figure out what butternut squash even was. When it was finally time to serve, we all gathered around the table. That first bite captured the essence of fall—sweet, savory, and utterly delightful.
What ensued was more than just a meal; it was a bonding moment, filled with joy and laughter. My loved ones loved the dish! My sister gobbled it up and declared that it was “the best thing ever!” Fast forward to today, and butternut squash with goat cheese and honey has become a cherished staple in our family gatherings, capturing those warm memories year after year.
Ingredients
Now that we’ve set the stage, let’s chat about the ingredients that will transform your kitchen into a haven of deliciousness:
-
Butternut Squash (1 medium): The star ingredient! It’s sweet, nutty, and provides that lovely golden hue. If you can’t find butternut squash, you can substitute it with other winter squash varieties like acorn or pumpkin.
-
Olive Oil (3 tablespoons): This will help caramelize the squash while roasting and add a hint of richness. Feel free to swap in melted coconut oil or avocado oil if you prefer.
-
Salt (1 teaspoon): A necessary seasoning to enhance all the flavors. You can use kosher salt, sea salt, or even try garlic salt for a twist.
-
Black Pepper (½ teaspoon): Freshly cracked black pepper adds a wonderful depth to the sweetness of the squash. If you’re feeling adventurous, a sprinkle of cayenne will give it a kick!
-
Goat Cheese (4 ounces): This creamy cheese brings a delightful tartness to the dish. If you’re not a fan of goat cheese, you can use feta or even ricotta for a milder taste.
-
Honey (2-3 tablespoons): The icing on the cake, or should I say, the drizzle on the squash! Honey adds a luscious sweetness. If you are looking for a vegan option, maple syrup works beautifully as a substitute.
-
Fresh Thyme (1 tablespoon): This herb adds an aromatic touch that complements the squash perfectly. Dried thyme can be used, but fresh will always give the best flavor.
Step-by-Step Instructions
Now, let’s get down to business and whip up this delightful dish! Follow these steps closely, and don’t forget to infuse your own love and personality into the process.
-
Preheat your oven: Start by preheating your oven to 400°F (200°C). This ensures that the butternut squash cooks evenly and develops that gorgeous caramelization we all love.
-
Prep the butternut squash: Carefully slice the butternut squash in half lengthwise. Use a sturdy knife and be careful—squash can be quite firm! Remove the seeds with a spoon, just like you would with a pumpkin. Now, chop the squash into 1-inch cubes. This size ensures even cooking.
-
Season the squash: In a large mixing bowl, toss the cubed squash with olive oil, salt, black pepper, and thyme. Make sure each piece is nicely coated. This is where the magic begins! The oil will help the squash caramelize beautifully.
-
Roast the squash: Spread the squash onto a baking sheet lined with parchment paper. Make sure it’s in a single layer—this helps it roast rather than steam. Roast for about 25-30 minutes, or until the squash is tender and golden brown. Give it a stir halfway through for even roasting.
-
Prepare the goat cheese: While the squash is roasting, crumble your goat cheese into a small bowl and set it aside. If you like your cheese extra creamy and spreadable, you could even give it a little stir with a fork.
-
Add the honey: Once the squash is done roasting, remove it from the oven and immediately drizzle it with honey. Give it a gentle toss to ensure each piece gets that sweet touch—this step makes the flavors dance together beautifully.
-
Plate it up: Transfer the squash to your favorite serving dish and sprinkle the crumbled goat cheese on top while it’s still warm. The heat will slightly melt the cheese, creating a luscious coating over the sweet squash.
-
Garnish and serve: Add a few fresh thyme sprigs for garnish—it’s all about the presentation! Serve immediately, and watch everyone devour this cozy delight.
Serving Suggestions
This Butternut Squash with Goat Cheese and Honey can be enjoyed in countless ways! Serve it as a stunning side dish at a holiday feast alongside roasted chicken or a golden-brown turkey. You can also present it as a light main course for a cozy dinner, paired with a crisp salad or warm grain like quinoa or farro.
For a rustic vibe, serve it in a cast-iron skillet or a beautiful wooden bowl—it adds that touch of charm! Don’t forget to drizzle some extra honey on the table for those who want an extra touch of sweetness.
Recipe Variations
Feeling adventurous? Here are a few fun twists to play with:
-
Add Nuts: Toss in some toasted walnuts or pecans for a crunchy texture contrast.
-
Spicy Kick: Sprinkle in some red pepper flakes with your seasoning to add a hint of heat!
-
Vegan Option: Swap out the goat cheese for a creamy vegan cheese or a homemade cashew cream for a plant-based version.
-
Herb Variations: Try rosemary or sage instead of thyme to switch up the herb profile—both bring their own unique flavors.
-
Dried Fruits: Toss in some dried cranberries or figs for a chewy, flavorful surprise that complements the squash beautifully.
Chef’s Notes
Oh, how I love this recipe! It has evolved over the years, and every time I make it, I discover new nuances. I’ve experimented with different cheeses and herbs, yet it always brings me back to that unforgettable combination. One funny story: I once forgot the honey entirely and served it as a savory dish—it still tasted great, but the sweetness is truly what elevates it!
The beauty of cooking lies in experimenting, so don’t be shy about adding your personal touch. I’ve swapped honey with maple syrup and found it to be equally delightful! Cooking is all about making memories, so let your creativity shine through!
FAQs and Troubleshooting
Can I prepare this dish ahead of time?
Absolutely! You can roast the butternut squash a few hours ahead and then reheat it gently before serving. Just remember to toss in the goat cheese and honey before serving to keep that creamy, luscious texture.
What if my squash is too hard to cut?
If you’re struggling to cut butternut squash, try microwaving it for a few minutes to soften it slightly before slicing. Just be careful, as it’ll be hot!
Why did my squash not caramelize?
If your squash doesn’t get that beautiful caramelization, it might have been too crowded on the baking sheet or not enough oil was used. Make sure the squash is in a single layer, and don’t skimp on the olive oil!
Can I use other types of cheese?
Yes, feel free to experiment with different cheeses if you’re not a fan of goat cheese! Feta adds a lovely brininess, while ricotta gives a creamy, mild flavor.
Nutritional Info
While you’re relishing this deliciousness, here’s a quick glance at what you’re enjoying:
- Calories: Approximately 180 kcal per serving
- Protein: 4g
- Fat: 10g
- Carbohydrates: 18g
- Fiber: 3g
- Sugar: 8g
(Note: Nutritional info may vary based on ingredient brands and quantities.)
So there you have it! A delightful recipe for Butternut Squash with Goat Cheese and Honey that’s perfect for gatherings, cozy evenings at home, or whenever you want to indulge in something truly comforting. Remember, cooking is about sharing joy and making memories. So, lace up that apron, invite some friends over, and dive into the wonderful world of flavor! Happy cooking! 🍂✨
Print
Butternut Squash with Goat Cheese and Honey
- Total Time: 45 minutes
- Yield: 4 servings 1x
- Diet: Vegetarian
Description
A cozy dish marrying roasted butternut squash, creamy goat cheese, and a drizzle of honey for a perfect autumn treat.
Ingredients
- 1 medium Butternut Squash
- 3 tablespoons Olive Oil
- 1 teaspoon Salt
- ½ teaspoon Black Pepper
- 4 ounces Goat Cheese
- 2–3 tablespoons Honey
- 1 tablespoon Fresh Thyme
Instructions
- Preheat your oven to 400°F (200°C).
- Prep the butternut squash by slicing it in half, removing seeds, and cutting it into 1-inch cubes.
- Season the squash by tossing it with olive oil, salt, black pepper, and thyme.
- Roast the squash on a lined baking sheet for 25-30 minutes, stirring halfway through.
- Prepare the goat cheese by crumbling it into a bowl.
- Add honey to the roasted squash and toss gently.
- Plate the squash and sprinkle the goat cheese on top.
- Garnish with fresh thyme and serve immediately.
Notes
You can prepare the squash ahead of time and reheat before serving. Swap honey with maple syrup for a vegan option.
- Prep Time: 15 minutes
- Cook Time: 30 minutes
- Category: Side Dish
- Method: Roasting
- Cuisine: American
Nutrition
- Serving Size: 1 serving
- Calories: 180
- Sugar: 8g
- Sodium: 400mg
- Fat: 10g
- Saturated Fat: 3g
- Unsaturated Fat: 5g
- Trans Fat: 0g
- Carbohydrates: 18g
- Fiber: 3g
- Protein: 4g
- Cholesterol: 10mg
Keywords: butternut squash, goat cheese, honey, vegetarian, autumn recipes




