
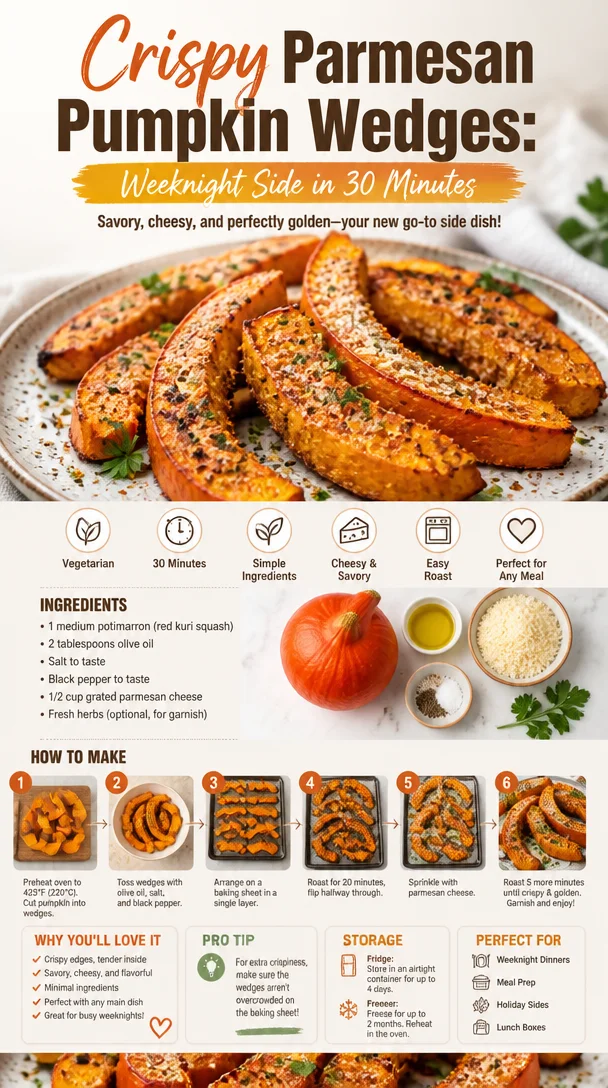
Crispy Parmesan Pumpkin Wedges: Weeknight Side in 30 Minutes
Roasted Pumpkin Wedges with Parmesan
Welcome to my cozy kitchen! I’m so glad you decided to join me today. Nothing brings warmth and comfort quite like the smell of something delicious roasting away in the oven, and that’s exactly what we’re about to dive into. Today, we’re focusing on a delightful autumn dish — Roasted Pumpkin Wedges with Parmesan. It’s the perfect blend of sweet, savory, and cheesy goodness, and let me tell you, this recipe will make your kitchen feel like a cozy haven.
When the leaves start to change and the air gets a little crisp, it’s time to break out those seasonal flavors. We’re talking pumpkins, spices, and all things that make you want to cozy up with a warm blanket and a satisfying meal. Whether you’re preparing a family dinner, a festive gathering, or just treating yourself to a soothing dish, roasted pumpkin wedges are here to steal the show.
Now, I’m not just sharing a recipe; I’m inviting you into a memory. Picture this: it was a chilly October afternoon, and I was in my grandmother’s kitchen, watching her expertly peel and chop freshly harvested pumpkins. The aroma of cinnamon and nutmeg wafted through the air, and I remember sneaking tastes of the buttery roasted wedges she’d make every year. The golden color and crispy edges were irresistible! It seems like just yesterday, but that experience shaped my love for cooking and the joy of sharing meals with loved ones.
In today’s blog, we’ll not only learn how to make these delightful pumpkin wedges, but I’ll also share tips, tricks, and everything you need to know to feel confident in your culinary journey. So, grab your favorite apron, turn on some music, and let’s get to cooking!
Personal Story
Growing up in the kitchen, my fondest memories are tied to the scents and flavors my grandmother created. Every autumn, she would prepare her famous roasted pumpkin wedges that quickly became a family favorite. I remember one autumn in particular. My cousins and I were all gathered for Thanksgiving, and the kitchen was buzzing with excitement and the aroma of spices.
As the golden pumpkin wedges browned in the oven, we waited eagerly at the table, laughing and sharing stories. When those wedges finally made their grand entrance, we all dug in, the crunchy Parmesan on top contrasting beautifully with the tender pumpkin. It wasn’t just a side dish; it was a moment of togetherness woven into the fabric of family traditions. Today, I carry that memory in my heart and in this recipe, hoping to bring a little bit of that warmth to your kitchen.
Ingredients
Here’s what you’ll need to create these scrumptious Roasted Pumpkin Wedges with Parmesan:
-
1 medium pumpkin (about 3–4 pounds): Choose a sugar pumpkin for the best flavor. While you can use any pumpkin, sugar pumpkins pack a sweeter taste. For a quicker alternative, butternut squash can be used.
-
3 tablespoons olive oil: This adds richness and helps the wedges crisp up beautifully. You can substitute avocado oil or melted coconut oil if you prefer.
-
Salt and pepper, to taste: Essential for enhancing all the flavors! Experiment with sea salt for a fine finish and fresh cracked pepper for a bit of heat.
-
1 teaspoon garlic powder: This adds a wonderful depth of flavor. Feel free to replace it with fresh minced garlic if you love that punchy freshness or smoked paprika for a twist.
-
1/2 cup grated Parmesan cheese: The magic ingredient! It gets deliciously crispy in the oven. If you’re looking for a dairy-free option, nutritional yeast can offer a cheesy flavor without the dairy.
-
1 teaspoon dried thyme or rosemary: These herbs provide a fragrant herbaceous note. Fresh herbs, if you have them, are an excellent substitute!
-
1/4 teaspoon red pepper flakes (optional): For those who like a little kick! Leave it out if you prefer a milder flavor.
Gather these simple ingredients, and we’ll be well on our way to creating something incredible!
Step-by-Step Instructions
Alright, let’s get down to business! Follow these easy steps to make your Roasted Pumpkin Wedges and elevate your kitchen skills along the way.
-
Preheat Your Oven: Start by preheating your oven to 425°F (220°C). A hot oven ensures that your pumpkin will roast beautifully and get that lovely caramelization we crave.
-
Prepare the Pumpkin: Carefully cut the pumpkin in half and scoop out the seeds and stringy insides. Don’t discard those seeds! You can roast them later for a tasty snack. Once cleaned, slice each half into wedges (about 1–2 inches thick).
-
Season the Pumpkin: In a large mixing bowl, combine the pumpkin wedges with olive oil, garlic powder, salt, pepper, and your choice of herbs. Use your hands to toss the wedges until they’re well coated. This step is crucial for ensuring each wedge is packed with flavor.
-
Arrange on a Baking Sheet: Next, lay the seasoned wedges out in a single layer on a baking sheet lined with parchment paper. Make sure they’re not overcrowded; we want them to roast, not steam.
-
Parmesan Time: Sprinkle the grated Parmesan cheese evenly over the wedges, making sure each one gets a good amount without being overloaded—balance is key!
-
Roast: Pop the baking sheet into your preheated oven and roast for about 25-30 minutes. After 15 minutes, flip the wedges over so they can crisp up nicely on all sides. Keep an eye on them towards the end; you want them golden brown but not burnt.
-
Finishing Touches: When done, the pumpkin should be fork-tender and beautifully glossy from the oil and cheese. It’s time for the final drizzle. A little more olive oil or a sprinkle of fresh herbs on top is the perfect finishing touch.
-
Let them Rest: Once you’ve taken them out of the oven, let them rest for a few minutes. They’ll continue to cook a little longer from the residual heat and be easier to handle!
And there you have it! Roasted Pumpkin Wedges with Parmesan that are not only delectable but also perfect for sharing with family and friends.
Serving Suggestions
To serve, arrange the roasted pumpkin wedges on a platter, garnishing with a sprinkle of fresh herbs like rosemary or thyme. For an added depth of flavor, you could drizzle a bit of balsamic reduction or a squeeze of fresh lemon juice over them. They make an exquisite starter or side dish next to roasted meats or as part of a vibrant autumn feast. Feel free to get creative — the presentation is part of the fun!
Recipe Variations
-
Spicy Maple Glaze: Drizzle the wedges with a mixture of maple syrup and hot sauce before roasting for a sweet and spicy flavor explosion!
-
Herbaceous Delight: Swap in different herbs such as sage or oregano for a refreshing twist that complements the pumpkin beautifully.
-
Cheesy Medley: Experiment with different cheeses like feta or goat cheese crumbled on top just before serving for a tangy finish.
-
Sweet and Savory: Add a sprinkle of cinnamon and brown sugar before roasting for a delightful sweet contrast to the savory notes.
-
Vegan Version: Omit the Parmesan cheese and enhance the flavors with a mix of nutritional yeast and a touch of soy sauce for umami goodness.
Chef’s Notes
This recipe has become one of my favorite go-to sides during the fall. It’s surprising how something so simple can evoke such warmth and nostalgia! Over the years, I’ve tweaked and played with the flavors. I even recall one Thanksgiving when I mistakenly used pumpkin pie spice instead of dried thyme! Surprisingly, the sweet aroma and flavor added a unique twist that my family still requests today.
Don’t be afraid to make this recipe your own! The kitchen is a blank canvas for creativity, and I encourage you to experiment.
FAQs and Troubleshooting
1. Why is my pumpkin mushy?
If your pumpkin turns out mushy, it may be due to overcrowding on the baking sheet, which leads to steaming instead of roasting. Ensure the wedges have enough space to roast evenly.
2. Can I use a different type of pumpkin?
Absolutely! While sugar pumpkins are ideal, you can also use butternut squash or any other variety. Just be aware that cooking times may vary depending on the pumpkin’s size.
3. How can I get my Parmesan to be crispier?
For extra crunch, try broiling the wedges for the last 2-3 minutes of cooking. Just keep a close eye on them — things can turn from golden to burnt quickly under the broiler!
4. Can I prep these ahead of time?
Yes! You can cut and toss the pumpkin wedges with seasonings a few hours ahead. Just pop them in the fridge until it’s time to roast.
Nutritional Info (optional)
While I don’t usually focus on calories when I’m enjoying my time in the kitchen, these roasted pumpkin wedges are about 120 calories per serving (for about 4 wedges), filled with vitamins A and C. They’re a deliciously nutritious addition to any meal!
I hope you’ve enjoyed this journey through the flavors of roasted pumpkin wedges! Remember, cooking is a celebration of experiences, flavors, and stories. So embrace the mess, share the love, and create beautiful memories in your kitchen! Happy cooking!
Print
Roasted Pumpkin Wedges with Parmesan
- Total Time: 45 minutes
- Yield: 4 servings 1x
- Diet: Vegetarian
Description
Delightful roasted pumpkin wedges topped with crispy Parmesan, perfect for autumn gatherings.
Ingredients
- 1 medium pumpkin (about 3–4 pounds)
- 3 tablespoons olive oil
- Salt and pepper, to taste
- 1 teaspoon garlic powder
- 1/2 cup grated Parmesan cheese
- 1 teaspoon dried thyme or rosemary
- 1/4 teaspoon red pepper flakes (optional)
Instructions
- Preheat your oven to 425°F (220°C).
- Prepare the pumpkin by cutting it in half and scooping out the seeds and stringy insides.
- Season the pumpkin wedges with olive oil, garlic powder, salt, pepper, and herbs in a mixing bowl.
- Arrange seasoned wedges in a single layer on a baking sheet lined with parchment paper.
- Sprinkle grated Parmesan cheese evenly over the wedges.
- Roast in the preheated oven for about 25-30 minutes, flipping halfway through.
- Finishing touches with olive oil or fresh herbs on top before serving.
- Let them rest for a few minutes before serving.
Notes
Experiment with different herbs or cheese for unique flavor variations.
- Prep Time: 15 minutes
- Cook Time: 30 minutes
- Category: Side Dish
- Method: Roasting
- Cuisine: American
Nutrition
- Serving Size: 4 wedges
- Calories: 120
- Sugar: 2g
- Sodium: 150mg
- Fat: 8g
- Saturated Fat: 2g
- Unsaturated Fat: 6g
- Trans Fat: 0g
- Carbohydrates: 15g
- Fiber: 3g
- Protein: 4g
- Cholesterol: 5mg
Keywords: pumpkin, roasted vegetables, autumn recipes, side dish, Parmesan
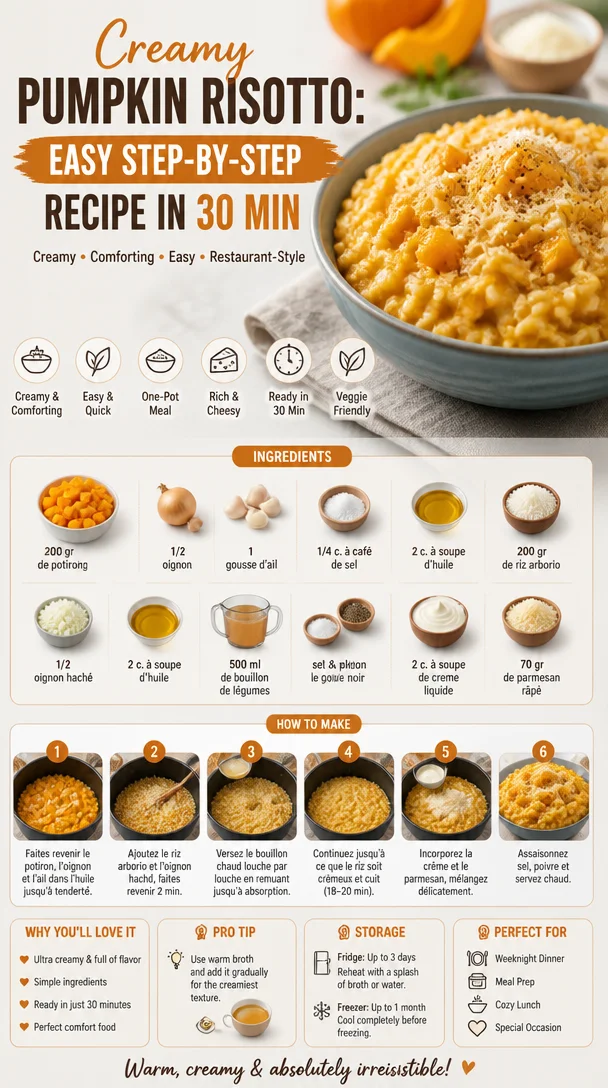
Creamy Pumpkin Risotto: Easy Step-by-Step Recipe in 30 Min
Creamy Pumpkin Risotto: A Step-by-Step Recipe
Welcome to my kitchen! I’m Olivia Bennett, your culinary companion for a delightful journey into the world of cooking. Today, I’m excited to share a recipe that’s not just a staple in my home; it also happens to be an ode to flavors that embrace the cozy vibes of the season – creamy pumpkin risotto. Just imagine the comforting aroma of sautéed onions mingling with warm, earthy pumpkin. It’s the ultimate warm hug in a bowl!
Now, you might be thinking that risotto is reserved for restaurant menus, but I’m here to tell you it’s accessible to all of us! As we dive into this creamy masterpiece, you’ll see how simple ingredients combine to create something truly dreamy. So grab your apron (and maybe a glass of wine), and let’s make some magic in the kitchen!
A Taste of Nostalgia
Growing up, my family had a tradition of gathering for special Sunday dinners, where the kitchen was filled with the scent of something delicious simmering on the stovetop. One of my fondest memories revolves around my grandmother’s risotto. She had this magical way of turning simple ingredients into a comforting meal that brought everyone together. I can still picture her standing at the stove, a wooden spoon in hand, slowly stirring the pot while sharing stories that made us laugh until our bellies hurt.
One particular autumn, she decided to surprise us with a pumpkin risotto. It was unlike anything we’d had before—a creamy, dreamy dish that perfectly showcased the flavors of the season. Each spoonful was a warm embrace, and it quickly became a family favorite. Now, I carry on that legacy, adding my own twist to her recipe. Let’s recreate that joyful moment together!
Ingredients
Here’s what you’ll need for our creamy pumpkin risotto:
-
1 cup Arborio rice
This short-grain rice is what gives risotto its creamy texture. If you can’t find Arborio, Carnaroli or Vialone Nano are great substitutes, as they have similar starch content. -
2 cups pumpkin puree
Whether you use fresh or canned, pumpkin adds a delightful sweetness. For a twist, you can use butternut squash puree, which has a similar texture and flavor. -
1 medium onion, finely chopped
Onions are the aromatic base of this dish. You can substitute with shallots for a milder flavor or leeks for something a bit sweeter. -
2 cloves garlic, minced
Garlic adds depth and a savory kick. Feel free to use garlic powder if you prefer a subtler garlic flavor or to omit it altogether for a more delicate taste. -
4 cups vegetable or chicken broth
Homemade broth is always the best choice, but store-bought works wonderfully in a pinch! You can even use bone broth for a richer flavor. -
1/2 cup dry white wine
The acidity of wine brightens the dish. If you want to skip the alcohol, use additional broth or a splash of apple cider vinegar. -
1/2 cup grated Parmesan cheese
This adds creaminess and a savory tang. For a dairy-free option, nutritional yeast can provide a cheesy flavor. -
2 tablespoons olive oil
Use high-quality extra virgin olive oil for sautéing your ingredients. For a bit of warmth, swap half with unsalted butter. -
Salt and pepper, to taste
Essential at the end for enhancing flavors. Don’t forget to taste as you go!
This combo of ingredients is the foundation of our scrumptious risotto. Each plays a critical role in creating that silky, cozy dish that’s sure to impress!
Step-by-Step Instructions
Now let’s get cooking! Here’s how to make that amazing creamy pumpkin risotto, step by step.
-
Prep your ingredients: Start by measuring out all your ingredients. Having everything ready to go makes the cooking process much smoother. Plus, it’s always a joy to see everything you’re about to create at a glance!
-
Heat the broth: In a saucepan, bring your vegetable or chicken broth to a simmer over medium heat. Keeping the broth warm while you cook the risotto helps the rice release its starch more efficiently, resulting in that lovely creamy texture.
-
Sauté the onion and garlic: In a large pan or Dutch oven, heat the olive oil over medium heat. Add the chopped onion and sauté for about 5 minutes, until it turns translucent. Toss in the minced garlic and let it cook for another minute, until fragrant. This base is the flavorful foundation of your risotto.
-
Toast the rice: Stir in the Arborio rice, ensuring it gets coated with the oil. Toast the rice for about 2-3 minutes, stirring frequently. This helps to lock in the flavors and gives the rice a nice nutty flavor. You’ll know it’s ready when the grains become slightly translucent around the edges.
-
Deglaze with wine: Pour in the dry white wine, and let it simmer until most of the liquid is absorbed. This step allows the rice to absorb that wonderful acidity and adds a depth to the flavor. Don’t rush this process; it’s essential!
-
Add the broth gradually: Now comes the most important part! Begin adding the warm broth to the rice, one ladleful at a time. Stir continuously until the liquid is almost absorbed before adding the next ladle. This helps to release the rice’s starch and gives the risotto its signature creaminess. Keep repeating this process for about 18-20 minutes.
-
Incorporate the pumpkin: Once the rice is al dente and creamy, stir in your pumpkin puree. Mixing it through will make the risotto even more luscious and add that beautiful fall color.
-
Finishing touches: Remove the pan from heat and fold in the grated Parmesan cheese. Adjust the seasoning with salt and pepper to taste. At this stage, you can add a splash more broth if it seems too thick; risotto should be creamy but not soupy.
-
Let it rest: Let the risotto sit for a minute. This resting time allows the flavors to meld perfectly and gives you just enough time to set the table and get ready to serve.
Serving Suggestions
Serve your creamy pumpkin risotto hot, garnished with a sprinkle of additional Parmesan cheese and a drizzle of olive oil for that extra touch of elegance. Pair it with fresh herbs like parsley or sage for an added pop of flavor and color. This dish works beautifully as a starter or main course, especially alongside a crisp salad or roasted vegetables.
Recipe Variations
Feeling adventurous? Here are some creative twists to make this risotto your own:
-
Add some protein: Stir in cooked sausage, shredded chicken, or roasted chickpeas for a heartier meal.
-
Herb infusions: Incorporate herbs like thyme or rosemary while cooking for a fragrant infusion.
-
Spicy kick: Add a pinch of chili flakes to the onions while sautéing for a subtle warmth.
-
Nutty richness: Mix in toasted pecans or walnuts just before serving for crunch and flavor.
-
Vegan option: Substitute the Parmesan with nutritional yeast, and use vegetable broth for a completely dairy-free version.
Chef’s Notes
Risotto has been one of those dishes that evolves every time I make it. I love experimenting with flavors, and this pumpkin version was a game changer in my kitchen! One memorable mistake happened during a busy week—I accidentally added too much broth too quickly. Instead of panicking, I turned it into a soup and garnished it with toasted pumpkin seeds! Sometimes, accidents lead to delicious discoveries in the kitchen, which is the beauty of cooking!
FAQs and Troubleshooting
-
Why did my risotto come out gummy?
If your risotto becomes too gummy, it likely means it was stirred too much or the broth was added too quickly without allowing it to absorb properly. Consistent stirring is important, but letting the rice absorb the broth is key! -
Can I make risotto ahead of time?
While risotto is best served immediately, you can make it ahead and reheat it gently over low heat, adding a bit of broth to bring back its creaminess. -
What can I do if my risotto is too thick?
If your risotto thickens too much, don’t fret! Just stir in a little more warm broth or water, a tablespoon at a time, until you reach your desired consistency. -
Can I freeze risotto?
Risotto can be frozen, but it may lose some texture upon reheating. If you plan ahead, consider making a double batch when you’re in the mood and storing leftovers for easy meals later on!
Nutritional Info
While this creamy pumpkin risotto is comforting, it’s also a great source of carbohydrates and adds fiber from the pumpkin. Here’s a rough nutritional breakdown per serving:
- Calories: 350
- Protein: 10g
- Carbohydrates: 55g
- Fat: 12g
- Fiber: 3g
And there you have it—a heartwarming dish that’s not only easy to make but brings everyone together for a cozy meal. Whether it’s a weeknight dinner or a festive gathering, creamy pumpkin risotto will surely impress your loved ones. Remember, cooking should be a joyous experience! So don your favorite apron, enjoy the process, and don’t forget to share your culinary creations with me! Happy cooking!
Print
Creamy Pumpkin Risotto
- Total Time: 45 minutes
- Yield: 4 servings 1x
- Diet: Vegetarian
Description
A cozy and creamy pumpkin risotto recipe that is simple to make and perfect for fall.
Ingredients
- 1 cup Arborio rice
- 2 cups pumpkin puree
- 1 medium onion, finely chopped
- 2 cloves garlic, minced
- 4 cups vegetable or chicken broth
- 1/2 cup dry white wine
- 1/2 cup grated Parmesan cheese
- 2 tablespoons olive oil
- Salt and pepper, to taste
Instructions
- Prep your ingredients: Start by measuring out all your ingredients. Having everything ready to go makes the cooking process much smoother.
- Heat the broth: In a saucepan, bring your vegetable or chicken broth to a simmer over medium heat.
- Sauté the onion and garlic: In a large pan, heat the olive oil over medium heat. Add the chopped onion and sauté for about 5 minutes until translucent. Toss in the minced garlic and cook for another minute.
- Toast the rice: Stir in the Arborio rice, ensuring it gets coated with the oil. Toast for about 2-3 minutes, stirring frequently.
- Deglaze with wine: Pour in the dry white wine and let it simmer until most of the liquid is absorbed.
- Add the broth gradually: Begin adding the warm broth to the rice, one ladleful at a time. Stir continuously until the liquid is almost absorbed before adding the next ladle for about 18-20 minutes.
- Incorporate the pumpkin: Once the rice is al dente and creamy, stir in the pumpkin puree.
- Finishing touches: Remove from heat and fold in the grated Parmesan cheese. Adjust seasoning with salt and pepper.
- Let it rest: Allow the risotto to sit for a minute.
Notes
Serve hot, garnished with additional Parmesan cheese and fresh herbs. Great as a starter or main course.
- Prep Time: 15 minutes
- Cook Time: 30 minutes
- Category: Main Course
- Method: Stovetop
- Cuisine: Italian
Nutrition
- Serving Size: 1 serving
- Calories: 350
- Sugar: 5g
- Sodium: 400mg
- Fat: 12g
- Saturated Fat: 4g
- Unsaturated Fat: 6g
- Trans Fat: 0g
- Carbohydrates: 55g
- Fiber: 3g
- Protein: 10g
- Cholesterol: 30mg
Keywords: risotto, pumpkin risotto, creamy risotto, fall recipes, Italian cuisine

One-Pan 30-Minute Creamy Butternut Squash Butter Chicken
Creamy Butternut Squash Butter Chicken: A Cozy Twist on a Classic
Welcome back to my kitchen, food lovers! Today, we’re diving into a soul-soothing dish that’s sure to become a favorite in your home: Creamy Butternut Squash Butter Chicken. If you’re someone who relishes that warm, inviting smell wafting through your kitchen, and the thought of an unforgettable meal excites you, you’re in for a treat!
Picture this: tender chicken simmered in a luxuriously creamy sauce filled with spices, and the unexpected sweetness of roasted butternut squash. This dish is packed with flavor, a pop of color, and a comforting vibe that’ll make you feel warm and fuzzy inside. Perfect for family dinners, special occasions, or just a cozy evening at home, this butter chicken will light up your taste buds and spark joy around your dinner table!
Personal Story
This recipe holds a special place in my heart. I remember the first time I attempted to make butter chicken; it was a chilly fall evening, and I was missing my family back home. Wanting to recreate a touch of nostalgia, I decided to experiment with my mom’s traditional recipe by adding roasted butternut squash for a creamy twist. As I tossed the squash in the oven, the vibrant orange hue brought a smile to my face, reminding me of the cozy family dinners we used to share around our table.
As the savory scents filled my kitchen, I imagined my family gathered around, laughter echoing through our home. When I took the first bite, I was transported back to those moments—weaving new memories while honoring old ones. My Butternut Squash Butter Chicken turned out to be a flavorful homage, and ever since, it has been a staple in our kitchen, bringing friends and family together for delightful gatherings. Now, I want to share this incredible recipe and the memories it captures with you!
Ingredients
Here’s what you’ll need to create this comforting dish:
-
Chicken Thighs (2 lbs): I prefer bone-in, skin-on thighs for richer flavor and moisture. If you want a lighter option, boneless, skinless thighs work too.
-
Butternut Squash (1 medium): The star of the dish! Roasting it caramelizes its natural sweetness. If you can’t find butternut squash, sweet potatoes are a great alternative.
-
Butter (4 tablespoons): For that classic buttery flavor. You can substitute with ghee or olive oil for a dairy-free version.
-
Onion (1 large): Adds depth to the sauce. You can use shallots for a sweeter taste.
-
Garlic (4 cloves): Freshly minced for the best flavor—but store-bought minced garlic can work in a pinch.
-
Ginger (1 tablespoon; grated): Adds warmth and a bit of zing. Ground ginger may be used if you don’t have fresh on hand, but adjust the quantity accordingly.
-
Coconut Milk (1 can; about 13.5 oz): For creaminess without dairy. Almond or cashew cream can substitute for a nutty twist.
-
Tomato Paste (2 tablespoons): Adds richness and balance. If you’re looking for a lower acid option, roasted red pepper puree works wonders.
-
Spices (1 tsp Garam Masala, 1 tsp Cumin, 1 tsp Coriander, and 1/2 tsp Turmeric): These warm spices provide the classic butter chicken flavor. You can adjust the spices to your taste or add a pinch of cinnamon for an extra layer.
-
Lemon Juice (2 tablespoons): For a bit of brightness to cut the creaminess. You can use lime juice for a different citrus twist.
-
Salt and Pepper: To taste, making sure everything combines beautifully.
Step-by-Step Instructions
-
Prep the Butternut Squash: Preheat your oven to 400°F (200°C). Cut the squash in half, scoop out the seeds, and peel it. Dice it into 1-inch cubes. Spread them on a baking sheet, drizzle with olive oil, and sprinkle with salt and pepper. Roast for about 25-30 minutes until tender and caramelized. (Pro tip: Don’t overcrowd the pan; give the squash enough space to roast beautifully!)
-
Cook Your Chicken: While the squash is roasting, heat a large skillet or Dutch oven over medium heat. Add 2 tablespoons of butter, then season the chicken thighs with salt and pepper. Once the butter is melted and bubbly, add your chicken to the pan, skin-side down. Cook for about 5-7 minutes until golden brown. Flip and cook for another 5-7 minutes. Remove and set aside. (Chef hack: Using chicken with skin adds richness—don’t skip this step!)
-
Sauté Aromatics: In the same skillet, add the remaining butter, then toss in the diced onion. Cook for about 5 minutes until translucent. Add the minced garlic and grated ginger, cooking for another minute until fragrant. (This is where your kitchen starts to smell heavenly!)
-
Create the Sauce: Stir in the tomato paste, letting it cook for about a minute. Then add the spices—garam masala, cumin, coriander, and turmeric. Stir continuously to toast the spices, allowing their vibrant flavors to bloom.
-
Incorporate Coconut Milk: Pour in the coconut milk, stirring gently to combine. Scrape the bottom of the pan to release any delicious brown bits. (Those bits are flavor gold!)
-
Return Chicken and Add Squash: Place the chicken back in the skillet, along with the roasted butternut squash. Bring everything to a simmer. Cover and reduce the heat, allowing it to cook for about 20-25 minutes, or until the chicken reaches an internal temperature of 165°F (75°C).
-
Finishing Touches: Once the chicken is cooked, remove it from the pan, and slice or shred it, then return it to the sauce. Stir in the lemon juice for that zesty kick, adjusting salt and pepper to your taste. (Taste as you go—this is your moment to make it truly yours!)
Serving Suggestions
To serve your Creamy Butternut Squash Butter Chicken, I love ladling the succulent chicken and sauce over a bed of fluffy basmati rice or creamy mashed potatoes. Garnish with freshly chopped cilantro or parsley for a touch of color and freshness. Serve with warm naan bread on the side to soak up all that delicious sauce—trust me, you won’t want to waste a drop!
Recipe Variations
Feeling adventurous? Here are some fun twists you can try:
- Vegan Version: Substitute the chicken with cubed tofu or chickpeas and use plant-based butter or oil.
- Spicy Kick: Add a chopped chili pepper or a pinch of cayenne in the sauce for an extra layer of heat!
- Vegetable Boost: Toss in some spinach or kale in the last few minutes of cooking for added nutrients and color.
- Nutty Flavor: Stir in some crushed peanuts or cashews for a delightful crunch.
Chef’s Notes
This recipe has become a family favorite, with my own twists evolving over the years. I once hosted a potluck and decided to serve this dish, and it was a crowd-pleaser! One friend even dubbed it “the ultimate comfort food.” There’s something magical about how a simple dish can build connections and create memories, and that’s what keeps me inspired in the kitchen. Just remember, cooking is all about having fun and making it your own, so don’t hesitate to experiment!
FAQs and Troubleshooting
-
Can I make this dish ahead of time? Absolutely! This butter chicken can be made a day in advance. Just reheat gently on the stove, adding a splash of coconut milk if it thickens too much in the fridge.
-
What if the sauce is too thick? If your sauce gets too thick, simply add a bit of chicken broth or water until it reaches your desired consistency.
-
Can I freeze this? Yes! Allow it to cool completely, then freeze it in airtight containers. It lasts about 3 months in the freezer.
-
How do I make it spicier? Add more garam masala or a dash of red pepper flakes while cooking, adjusting to your taste as you go.
Nutritional Info
While I generally avoid focusing too much on numbers, here’s a rough breakdown to consider:
- Calories per serving: Approximately 450
- Protein: 30g
- Fat: 28g (depending on the amount of butter used)
Feel free to adjust ingredient quantities according to your necessary dietary requirements!
And there you have it—my beloved Creamy Butternut Squash Butter Chicken! This dish is a true celebration of warmth and vibrant flavors, turning your kitchen into a haven of delicious memories, much like it did for me. I encourage you to gather your loved ones, try this recipe, and maybe even share a little of your own kitchen stories. Happy cooking! 🥘✨
Print
Creamy Butternut Squash Butter Chicken
- Total Time: 70 minutes
- Yield: 4 servings 1x
- Diet: Gluten-Free
Description
A cozy twist on classic butter chicken, featuring tender chicken simmered in a creamy butternut squash sauce.
Ingredients
- 2 lbs Chicken Thighs (bone-in, skin-on preferred)
- 1 medium Butternut Squash (or sweet potatoes)
- 4 tablespoons Butter (or ghee/olive oil for dairy-free)
- 1 large Onion
- 4 cloves Garlic (minced)
- 1 tablespoon Ginger (grated)
- 1 can Coconut Milk (about 13.5 oz)
- 2 tablespoons Tomato Paste
- 1 teaspoon Garam Masala
- 1 teaspoon Cumin
- 1 teaspoon Coriander
- 1/2 teaspoon Turmeric
- 2 tablespoons Lemon Juice (or lime juice)
- Salt and Pepper (to taste)
Instructions
- Prep the Butternut Squash: Preheat your oven to 400°F (200°C). Cut the squash in half, scoop out the seeds, and peel it. Dice it into 1-inch cubes. Spread them on a baking sheet, drizzle with olive oil, and sprinkle with salt and pepper. Roast for about 25-30 minutes until tender and caramelized.
- Cook Your Chicken: While the squash is roasting, heat a large skillet or Dutch oven over medium heat. Add 2 tablespoons of butter, then season the chicken thighs with salt and pepper. Once the butter is melted and bubbly, add your chicken to the pan, skin-side down. Cook for about 5-7 minutes until golden brown. Flip and cook for another 5-7 minutes. Remove and set aside.
- Sauté Aromatics: In the same skillet, add the remaining butter, then toss in the diced onion. Cook for about 5 minutes until translucent. Add the minced garlic and grated ginger, cooking for another minute until fragrant.
- Create the Sauce: Stir in the tomato paste and let it cook for about a minute. Then add the spices—garam masala, cumin, coriander, and turmeric. Stir continuously to toast the spices.
- Incorporate Coconut Milk: Pour in the coconut milk, stirring gently to combine. Scrape the bottom of the pan to release any delicious brown bits.
- Return Chicken and Add Squash: Place the chicken back in the skillet, along with the roasted butternut squash. Bring everything to a simmer. Cover and reduce the heat, allowing it to cook for about 20-25 minutes.
- Finishing Touches: Once the chicken is cooked, remove it from the pan, slice or shred it, then return it to the sauce. Stir in the lemon juice, adjusting salt and pepper to taste.
Notes
Serve over basmati rice or creamy mashed potatoes and garnish with cilantro or parsley. Naan bread pairs perfectly.
- Prep Time: 15 minutes
- Cook Time: 55 minutes
- Category: Main Course
- Method: Baking & Sautéing
- Cuisine: Indian
Nutrition
- Serving Size: 1 serving
- Calories: 450
- Sugar: 6g
- Sodium: 600mg
- Fat: 28g
- Saturated Fat: 14g
- Unsaturated Fat: 10g
- Trans Fat: 0g
- Carbohydrates: 35g
- Fiber: 5g
- Protein: 30g
- Cholesterol: 120mg
Keywords: butternut squash, butter chicken, creamy sauce




