

Butternut Squash with Goat Cheese and Honey
Butternut Squash with Goat Cheese and Honey: A Cozy Delight
Welcome to my kitchen, dear foodie friends! Today, I’m diving into a dish that’s not only a feast for the taste buds but also a warm hug for the soul: Butternut Squash with Goat Cheese and Honey. This recipe perfectly marries the earthy sweetness of roasted butternut squash with the creamy tang of goat cheese, all elevated with a drizzle of golden honey. As autumn rolls in, there’s nothing quite like the comforting embrace of this dish to bring friends and family together around the table.
Butternut squash is one of those ingredients that feels incredibly seasonal yet timeless. It graces our tables in the fall and winter months, filling our homes with the aroma of cozy baking. Roasting brings out its natural sweetness, while the goat cheese adds a delightful tang, creating a perfect balance that’s sure to have everyone coming back for seconds. Whether you’re hosting a lovely dinner party or simply wanting to treat yourself to something special, this dish is guaranteed to make any meal feel like a celebration.
As someone who gets giddy at the thought of cozy gatherings, this recipe holds a special place in my heart. It reminds me of chilly evenings spent with friends, gathered around the dining table, sharing laughter and stories over good food. So grab your apron, turn up the oven, and let’s create some magic in the kitchen!
A Personal Story
I still remember the first time I made butternut squash with goat cheese for my family. It was a small family gathering during the fall, and I wanted to impress everyone with my culinary skills—not just to feed them, but to carve out lasting memories. I had just discovered this amazing combination and was eager to showcase it. Armed with a recipe I’d adapted from a dusty old cookbook, I nervously prepped the ingredients, uncertain about how everyone would react.
As the squash roasted and the smell wafted through the house, I caught my mom with a smile on her face, reminiscing about her own cooking adventures. My dad couldn’t wait to dig in, and my little sister was making funny faces as she tried to figure out what butternut squash even was. When it was finally time to serve, we all gathered around the table. That first bite captured the essence of fall—sweet, savory, and utterly delightful.
What ensued was more than just a meal; it was a bonding moment, filled with joy and laughter. My loved ones loved the dish! My sister gobbled it up and declared that it was “the best thing ever!” Fast forward to today, and butternut squash with goat cheese and honey has become a cherished staple in our family gatherings, capturing those warm memories year after year.
Ingredients
Now that we’ve set the stage, let’s chat about the ingredients that will transform your kitchen into a haven of deliciousness:
-
Butternut Squash (1 medium): The star ingredient! It’s sweet, nutty, and provides that lovely golden hue. If you can’t find butternut squash, you can substitute it with other winter squash varieties like acorn or pumpkin.
-
Olive Oil (3 tablespoons): This will help caramelize the squash while roasting and add a hint of richness. Feel free to swap in melted coconut oil or avocado oil if you prefer.
-
Salt (1 teaspoon): A necessary seasoning to enhance all the flavors. You can use kosher salt, sea salt, or even try garlic salt for a twist.
-
Black Pepper (½ teaspoon): Freshly cracked black pepper adds a wonderful depth to the sweetness of the squash. If you’re feeling adventurous, a sprinkle of cayenne will give it a kick!
-
Goat Cheese (4 ounces): This creamy cheese brings a delightful tartness to the dish. If you’re not a fan of goat cheese, you can use feta or even ricotta for a milder taste.
-
Honey (2-3 tablespoons): The icing on the cake, or should I say, the drizzle on the squash! Honey adds a luscious sweetness. If you are looking for a vegan option, maple syrup works beautifully as a substitute.
-
Fresh Thyme (1 tablespoon): This herb adds an aromatic touch that complements the squash perfectly. Dried thyme can be used, but fresh will always give the best flavor.
Step-by-Step Instructions
Now, let’s get down to business and whip up this delightful dish! Follow these steps closely, and don’t forget to infuse your own love and personality into the process.
-
Preheat your oven: Start by preheating your oven to 400°F (200°C). This ensures that the butternut squash cooks evenly and develops that gorgeous caramelization we all love.
-
Prep the butternut squash: Carefully slice the butternut squash in half lengthwise. Use a sturdy knife and be careful—squash can be quite firm! Remove the seeds with a spoon, just like you would with a pumpkin. Now, chop the squash into 1-inch cubes. This size ensures even cooking.
-
Season the squash: In a large mixing bowl, toss the cubed squash with olive oil, salt, black pepper, and thyme. Make sure each piece is nicely coated. This is where the magic begins! The oil will help the squash caramelize beautifully.
-
Roast the squash: Spread the squash onto a baking sheet lined with parchment paper. Make sure it’s in a single layer—this helps it roast rather than steam. Roast for about 25-30 minutes, or until the squash is tender and golden brown. Give it a stir halfway through for even roasting.
-
Prepare the goat cheese: While the squash is roasting, crumble your goat cheese into a small bowl and set it aside. If you like your cheese extra creamy and spreadable, you could even give it a little stir with a fork.
-
Add the honey: Once the squash is done roasting, remove it from the oven and immediately drizzle it with honey. Give it a gentle toss to ensure each piece gets that sweet touch—this step makes the flavors dance together beautifully.
-
Plate it up: Transfer the squash to your favorite serving dish and sprinkle the crumbled goat cheese on top while it’s still warm. The heat will slightly melt the cheese, creating a luscious coating over the sweet squash.
-
Garnish and serve: Add a few fresh thyme sprigs for garnish—it’s all about the presentation! Serve immediately, and watch everyone devour this cozy delight.
Serving Suggestions
This Butternut Squash with Goat Cheese and Honey can be enjoyed in countless ways! Serve it as a stunning side dish at a holiday feast alongside roasted chicken or a golden-brown turkey. You can also present it as a light main course for a cozy dinner, paired with a crisp salad or warm grain like quinoa or farro.
For a rustic vibe, serve it in a cast-iron skillet or a beautiful wooden bowl—it adds that touch of charm! Don’t forget to drizzle some extra honey on the table for those who want an extra touch of sweetness.
Recipe Variations
Feeling adventurous? Here are a few fun twists to play with:
-
Add Nuts: Toss in some toasted walnuts or pecans for a crunchy texture contrast.
-
Spicy Kick: Sprinkle in some red pepper flakes with your seasoning to add a hint of heat!
-
Vegan Option: Swap out the goat cheese for a creamy vegan cheese or a homemade cashew cream for a plant-based version.
-
Herb Variations: Try rosemary or sage instead of thyme to switch up the herb profile—both bring their own unique flavors.
-
Dried Fruits: Toss in some dried cranberries or figs for a chewy, flavorful surprise that complements the squash beautifully.
Chef’s Notes
Oh, how I love this recipe! It has evolved over the years, and every time I make it, I discover new nuances. I’ve experimented with different cheeses and herbs, yet it always brings me back to that unforgettable combination. One funny story: I once forgot the honey entirely and served it as a savory dish—it still tasted great, but the sweetness is truly what elevates it!
The beauty of cooking lies in experimenting, so don’t be shy about adding your personal touch. I’ve swapped honey with maple syrup and found it to be equally delightful! Cooking is all about making memories, so let your creativity shine through!
FAQs and Troubleshooting
Can I prepare this dish ahead of time?
Absolutely! You can roast the butternut squash a few hours ahead and then reheat it gently before serving. Just remember to toss in the goat cheese and honey before serving to keep that creamy, luscious texture.
What if my squash is too hard to cut?
If you’re struggling to cut butternut squash, try microwaving it for a few minutes to soften it slightly before slicing. Just be careful, as it’ll be hot!
Why did my squash not caramelize?
If your squash doesn’t get that beautiful caramelization, it might have been too crowded on the baking sheet or not enough oil was used. Make sure the squash is in a single layer, and don’t skimp on the olive oil!
Can I use other types of cheese?
Yes, feel free to experiment with different cheeses if you’re not a fan of goat cheese! Feta adds a lovely brininess, while ricotta gives a creamy, mild flavor.
Nutritional Info
While you’re relishing this deliciousness, here’s a quick glance at what you’re enjoying:
- Calories: Approximately 180 kcal per serving
- Protein: 4g
- Fat: 10g
- Carbohydrates: 18g
- Fiber: 3g
- Sugar: 8g
(Note: Nutritional info may vary based on ingredient brands and quantities.)
So there you have it! A delightful recipe for Butternut Squash with Goat Cheese and Honey that’s perfect for gatherings, cozy evenings at home, or whenever you want to indulge in something truly comforting. Remember, cooking is about sharing joy and making memories. So, lace up that apron, invite some friends over, and dive into the wonderful world of flavor! Happy cooking! 🍂✨
Print
Butternut Squash with Goat Cheese and Honey
- Total Time: 45 minutes
- Yield: 4 servings 1x
- Diet: Vegetarian
Description
A cozy dish marrying roasted butternut squash, creamy goat cheese, and a drizzle of honey for a perfect autumn treat.
Ingredients
- 1 medium Butternut Squash
- 3 tablespoons Olive Oil
- 1 teaspoon Salt
- ½ teaspoon Black Pepper
- 4 ounces Goat Cheese
- 2–3 tablespoons Honey
- 1 tablespoon Fresh Thyme
Instructions
- Preheat your oven to 400°F (200°C).
- Prep the butternut squash by slicing it in half, removing seeds, and cutting it into 1-inch cubes.
- Season the squash by tossing it with olive oil, salt, black pepper, and thyme.
- Roast the squash on a lined baking sheet for 25-30 minutes, stirring halfway through.
- Prepare the goat cheese by crumbling it into a bowl.
- Add honey to the roasted squash and toss gently.
- Plate the squash and sprinkle the goat cheese on top.
- Garnish with fresh thyme and serve immediately.
Notes
You can prepare the squash ahead of time and reheat before serving. Swap honey with maple syrup for a vegan option.
- Prep Time: 15 minutes
- Cook Time: 30 minutes
- Category: Side Dish
- Method: Roasting
- Cuisine: American
Nutrition
- Serving Size: 1 serving
- Calories: 180
- Sugar: 8g
- Sodium: 400mg
- Fat: 10g
- Saturated Fat: 3g
- Unsaturated Fat: 5g
- Trans Fat: 0g
- Carbohydrates: 18g
- Fiber: 3g
- Protein: 4g
- Cholesterol: 10mg
Keywords: butternut squash, goat cheese, honey, vegetarian, autumn recipes
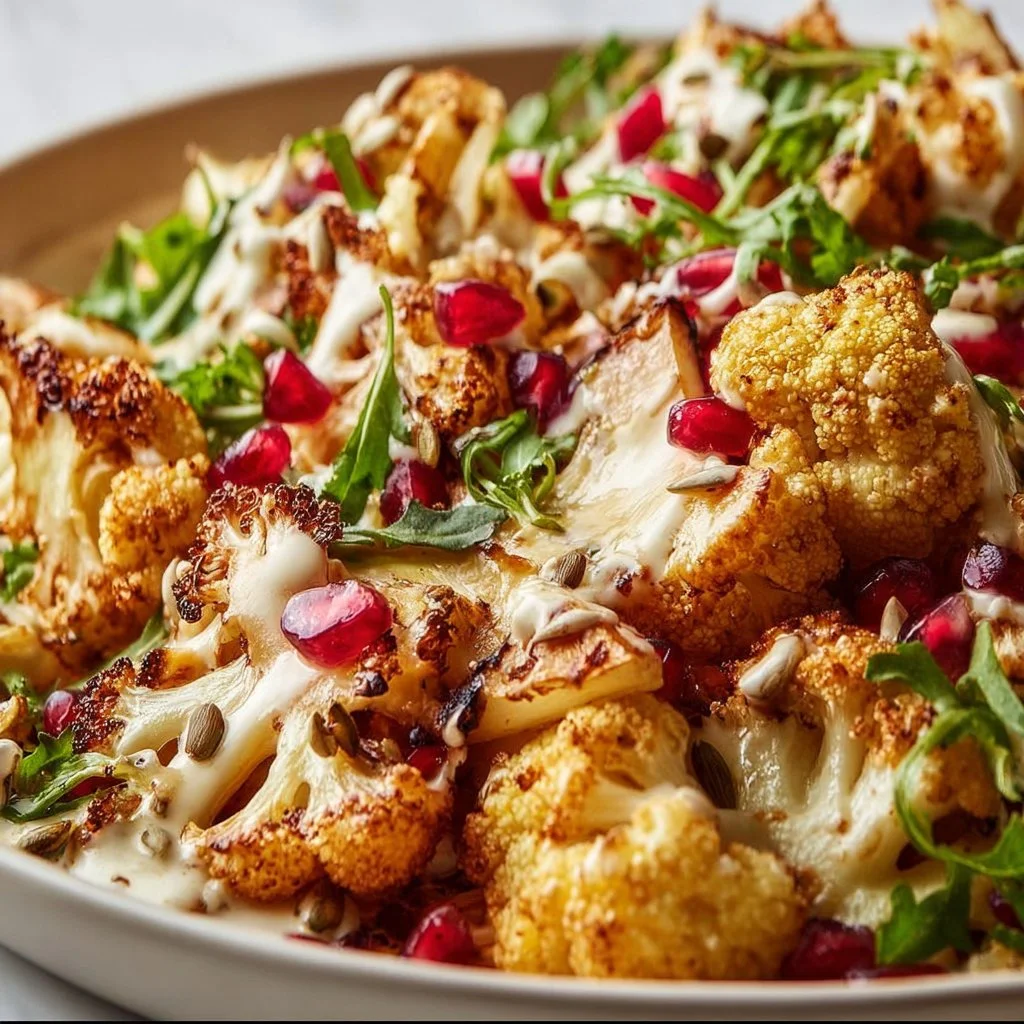
Roasted Cauliflower Tahini Salad
Roasted Cauliflower Tahini Salad: A Flavorful Journey
Hey there, fellow food lovers! Welcome back to my cozy little corner of the internet. I’m thrilled you’ve joined me today because we’re diving into a dish that is not just a salad, but a celebration of flavor and creativity—Roasted Cauliflower Tahini Salad!
Now, you might think salad is a boring side item, but trust me, this one is anything but mundane. We’re talking about golden-brown, caramelized cauliflower kissed by a drizzle of rich tahini, tossed together with vibrant greens, and topped with a burst of fresh herbs. It’s a cozy embrace for your taste buds, cozy enough to make you feel like you’re indulging in comfort food, yet light enough to leave you feeling fantastic and energized.
I remember the first time I experimented with roasted cauliflower—it was a chilly autumn evening, and I was rummaging through my fridge, trying to make something magical out of what was left. The moment that beautiful cauliflower hit the oven, my kitchen filled with that irresistible, nutty aroma, and I knew I was onto something special. It inspired me to pair it with tahini, a creamy, rich sauce that seemed to take the dish to a whole new level. I could hardly wait to dig in!
So grab your apron, and let’s embark on this flavorful journey together. Whether you’re feeding a crowd or treating yourself to a delightful meal, this Roasted Cauliflower Tahini Salad is perfect for all occasions. Ready? Let’s get cooking!
Personal Story
The love I have for roasted cauliflower connects back to my childhood when my grandmother would serve us her famous roasted vegetable medley at every Sunday family dinner. While she had a special way with all the veggies, I was particularly captivated by the cauliflower. Its flavor transformed when caramelized in the oven, and the way it mingled with herbs and seasoning was pure bliss.
One rainy day, while I was at my grandmother’s house, I decided to try my hand at her recipe. I remember every step vividly—huddled over the oven, glasses fogged up from the steam, eagerly waiting for that unmistakable aroma of toasty vegetables. She popped her head around the corner and caught me; rather than offering criticism, she shared stories of her kitchen adventures and taught me some of her best tips.
Those moments shaped my love for cooking and strengthened my belief that food is about more than just nourishment; it’s about connection, tradition, and flavor. That’s why I’m so excited to share this salad with you. Not only does it remind me of those fun culinary explorations with my grandmother, but it also embodies my desire to bring joy and togetherness through food.
Ingredients
Let’s gather our ingredients for this mouthwatering salad! Here’s what you’ll need:
-
Cauliflower (1 medium head)
The star of our show! When roasted, cauliflower takes on a nutty flavor and a caramelly sweetness. You can substitute it with broccoli or Brussels sprouts if you prefer. -
Olive Oil (3 tablespoons)
A good quality extra virgin olive oil gives a lovely richness to the dish. If you’re looking to change it up, avocado oil works just as well. -
Tahini (½ cup)
This creamy sesame paste adds depth and richness. Don’t have tahini? Try using almond butter or Greek yogurt for a different spin! -
Lemon Juice (2 tablespoons)
Freshly squeezed lemon juice brightens everything up! Lime juice works great too if you’re in a pinch. -
Garlic (2 cloves, minced)
Adds a wonderful pungency. You can use garlic powder—about a teaspoon—if you want to keep prep minimal. -
Salt & Pepper (to taste)
Essential for any recipe! Experiment with smoked salt or a pinch of cayenne for added flair. -
Fresh Parsley or Cilantro (1/4 cup, chopped)
Fresh herbs elevate the dish and provide a burst of freshness. If you’re not a fan of these, green onions or mint would be fantastic substitutes. -
Baby Spinach or Mixed Greens (4 cups)
A bed of greens gives this salad a lovely base. Kale or arugula would bring their unique flavors and textures! -
Pumpkin Seeds (½ cup, toasted)
These bring a delightful crunch! Sunflower seeds are also an excellent alternative if you have allergies.
Step-by-Step Instructions
Now that we have our ingredients ready, let’s get to the fun part—cooking! Follow these steps for a Roasted Cauliflower Tahini Salad that will wow your friends and family.
Step 1: Preheat the oven
Start by preheating your oven to 425°F (220°C). Preheating is crucial for that perfectly roasted, caramelized flavor that we’re aiming for.
Step 2: Prepare the cauliflower
While the oven heats, let’s tackle that gorgeous cauliflower. Remove the leaves and stem, then cut it into bite-sized florets. Make sure the pieces are roughly the same size so they cook evenly. You want to achieve that luscious caramelization on each piece!
Pro tip: If you have leftover stalks, don’t toss them! They can be roasted alongside the florets for added flavor and nutrition.
Step 3: Season
In a large bowl, toss your cauliflower florets with olive oil, minced garlic, salt, and pepper. Make sure each piece is well-coated! This step enhances the natural flavors and sets the stage for that delicious roasted taste.
Step 4: Roast
Spread the cauliflower on a lined baking sheet in a single layer. This allows the heat to circulate properly and promotes even cooking. Roast for about 25–30 minutes, or until the florets are golden brown and tender. Halfway through, give them a little stir to ensure they caramelize beautifully on all sides.
Chef hack: If you want even more flavor, sprinkle some smoked paprika or chili powder on the florets just before roasting!
Step 5: Make the tahini dressing
While the cauliflower roasts, let’s prepare the tahini dressing. In a small bowl, combine tahini, lemon juice, a pinch of salt, and a tablespoon of water. Whisk until you achieve a creamy texture. If it’s too thick, add more water a teaspoon at a time until it reaches your desired consistency. This dressing can also be made ahead of time and stored in the fridge for up to a week.
Step 6: Assemble the salad
In a large serving bowl, layer your greens. Once the cauliflower is out of the oven, let it cool for a few minutes before layering it on the bed of greens. Drizzle your tahini dressing generously over everything and sprinkle with fresh herbs and toasted pumpkin seeds for an added crunch.
Step 7: Toss & Serve
Gently toss the salad to combine all those fantastic flavors, and serve immediately. This salad is fantastic warm, but it also makes a great make-ahead option for lunch the next day!
Serving Suggestions
To plate the Roasted Cauliflower Tahini Salad, I love to serve it in large, rustic bowls that highlight the vibrant colors of the ingredients. Add an extra drizzle of tahini on top for presentation, and don’t forget to sprinkle with some extra herbs. Serve alongside crusty bread or grilled chicken for a complete meal that’s sure to impress.
Recipe Variations
-
Spicy Kick: Add a pinch of crushed red pepper flakes or drizzle Sriracha over the salad for a spicy twist!
-
Mediterranean Flair: Toss in some chopped olives and feta cheese for a delightful Mediterranean vibe.
-
Autumn Harvest: Swap in roasted sweet potatoes or butternut squash in place of the cauliflower for a seasonal variation.
-
Nutty Boost: Add some toasted pine nuts alongside pumpkin seeds for an extra layer of crunch and flavor.
-
Vegan Delight: Keep it entirely plant-based, and try using a cashew-based tahini dressing for a creamier, dreamy experience.
Chef’s Notes
Creating this Roasted Cauliflower Tahini Salad truly has been a delightful culinary journey for me. Initially, I hesitated about the tahini dressing, as I wasn’t sure how it would meld with the roasted veggies. However, the first bite changed everything; the nutty notes of tahini combined with the roasted flavor of cauliflower was transformational!
Over the years, I’ve played around with this recipe, adding and swapping ingredients based on seasonal availability. No matter how you customize it, the heart of this salad remains the same: love and connection through cooking and sharing food with those we cherish.
FAQs and Troubleshooting
1. My cauliflower isn’t browning—what gives?
This might be due to overcrowding. Make sure to spread the florets out on the baking sheet in a single layer, allowing them room to roast evenly!
2. How long can I store leftover salad?
You can store the salad in an airtight container in the fridge for 2-3 days. However, I recommend keeping the dressing separate to avoid sogginess.
3. The tahini dressing is too thick—what can I do?
This is a common issue! Simply whisk in a little bit of water, lemon juice, or olive oil a teaspoon at a time until you reach the desired consistency.
4. Can I make this salad ahead of time?
Absolutely! Roast the cauliflower and prepare the dressing in advance; just assemble it right before serving for the freshest taste.
Nutritional Info
While the nutritional content can vary based on your specific ingredients and portion sizes, this Roasted Cauliflower Tahini Salad is generally a low-calorie yet nutrient-dense dish. It’s rich in vitamins, minerals, and healthy fats, making it a fantastic option for a balanced meal.
And there you have it—a recipe that marries nostalgia and innovation, bringing forth a stunning Roasted Cauliflower Tahini Salad. I hope this dish fills your home with echoes of laughter and warmth, just as it does in mine. Happy cooking! 🍽️✨
Print
Roasted Cauliflower Tahini Salad
- Total Time: 45 minutes
- Yield: 4 servings 1x
- Diet: Vegan
Description
A flavorful salad featuring roasted cauliflower, rich tahini, vibrant greens, and fresh herbs, perfect for any occasion.
Ingredients
- 1 medium head Cauliflower
- 3 tablespoons Olive Oil
- ½ cup Tahini
- 2 tablespoons Lemon Juice
- 2 cloves Garlic, minced
- Salt & Pepper, to taste
- ¼ cup Fresh Parsley or Cilantro, chopped
- 4 cups Baby Spinach or Mixed Greens
- ½ cup Pumpkin Seeds, toasted
Instructions
- Preheat the oven to 425°F (220°C).
- Prepare the cauliflower by removing the leaves and stem, and cutting it into bite-sized florets.
- Toss the cauliflower florets with olive oil, minced garlic, salt, and pepper in a large bowl.
- Spread the cauliflower on a lined baking sheet in a single layer and roast for about 25–30 minutes or until golden brown and tender.
- Make the tahini dressing by combining tahini, lemon juice, a pinch of salt, and a tablespoon of water in a small bowl. Whisk until creamy.
- Layer the greens in a large serving bowl, then add the roasted cauliflower on top.
- Drizzle the tahini dressing over the salad and sprinkle with fresh herbs and toasted pumpkin seeds.
- Toss gently to combine and serve immediately.
Notes
This salad can be made ahead; just store the dressing separately to avoid sogginess. Add a pinch of red pepper flakes for a spicy kick!
- Prep Time: 15 minutes
- Cook Time: 30 minutes
- Category: Salad
- Method: Roasting
- Cuisine: Mediterranean
Nutrition
- Serving Size: 1 serving
- Calories: 340
- Sugar: 4g
- Sodium: 320mg
- Fat: 27g
- Saturated Fat: 4g
- Unsaturated Fat: 20g
- Trans Fat: 0g
- Carbohydrates: 24g
- Fiber: 7g
- Protein: 9g
- Cholesterol: 0mg
Keywords: roasted cauliflower, tahini salad, vegan salad, healthy salad, Mediterranean dish




