
Spooky Coffin Sandwiches for a Halloween Party Platter
Coffin Sandwiches: A Comforting Culinary Hug from the Past
Welcome to my cozy kitchen, dear foodie friends! Today, I’m excited to share with you a recipe that’s not just a sandwich but a nostalgic culinary experience wrapped in layers of flavor and warmth: Coffin Sandwiches. I know, you might be scratching your head and wondering, “What on earth are Coffin Sandwiches?” Well, let me tell you, they’re a delightful creation that’s sure to bring both comfort and curiosity to your meal table.
You see, Coffin Sandwiches have a history that intertwines with family gatherings, festive celebrations, and comfort food traditions. Think of a sandwich that elevates the classic to something special. These sandwiches are often filled generously and baked to a crispy, golden perfection, turning a simple lunch into a memorable feast. Just envision layers of smoked meats, creamy cheeses, and tangy spreads all nestled between slices of bread that have undergone a glorious transformation in the oven.
My own journey with Coffin Sandwiches began years ago at a family reunion. My great-aunt Martha—an absolutely fabulous cook with a zest for life—always made these sandwiches when we gathered, and I can still recall the aroma wafting through the air as the family laughed and reminisced. The sandwiches were always the highlight, and there was a delicious competition about who would take the last bite!
So, grab your apron, and let’s create some Coffin Sandwiches that could rival those from my family gatherings. Whether you’re prepping for a casual family dinner or hosting a weekend get-together, these sandwiches are here to satisfy everyone’s cravings.
Personal Story: A Childhood Memory
I’ll never forget the summer family reunion at my great-aunt Martha’s house when I was about ten years old. The sun was shining, and the scent of freshly cut grass mixed with something absolutely mouthwatering wafting from the kitchen. Aunt Martha had promised her famed Coffin Sandwiches would make an appearance, and my heart raced with excitement.
When I finally caught a glimpse of those glorious sandwiches lined up on the picnic table, they were warm from the oven, the cheese bubbling enticingly at the edges, and each bite promising a flavor explosion that lingered long after. I remember gripping my sandwich in eager hands, the crusty exterior giving way to gooey cheese and smokey ham. Each bite was filled with laughter and chatter around the table, creating memories I cherish to this day.
As I grew older, Aunt Martha entrusted me with her secret recipe, and I’ve cherished making these sandwiches for my friends and family ever since. Each time I whip them up, I’m reminded of those joyful gatherings—the laughter, the love, and the ultimate comfort that good food brings. Now, it’s my turn to pass on this cherished recipe to you. Let’s dive into making some unforgettable Coffin Sandwiches!
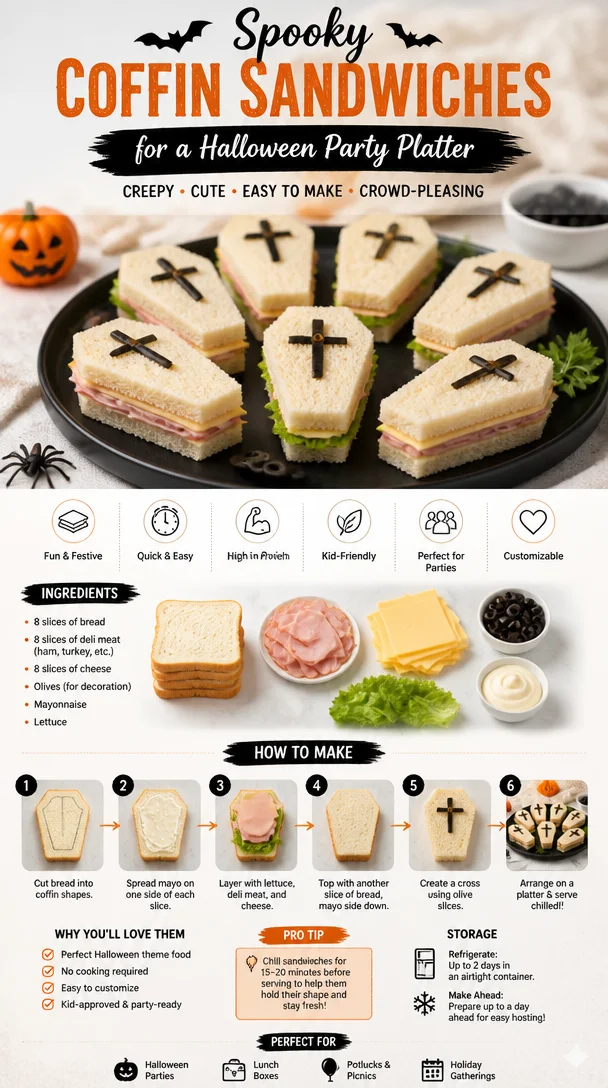
Ingredients
To make Coffin Sandwiches that are sure to impress, you’ll need:
- Bread (1 loaf, preferably white or whole wheat): The base of your sandwich! You can substitute with gluten-free bread or a hearty sourdough if you’re feeling fancy.
- Meats (1 pound, thinly sliced; ham, turkey, or roast beef): Choose your favorite or mix and match! For a vegetarian option, consider using roasted vegetables or marinated tofu.
- Cheese (8 ounces; Swiss or cheddar): Cheese is essential for that melty goodness! Feel free to use your favorite cheese, such as provolone or even pepper jack for a spicy kick.
- Butter (1/2 cup, melted): This will give the sandwich that golden crispy exterior. For a lighter option, use olive oil or a dairy-free substitute.
- Dijon mustard (1/4 cup): This adds a lovely tangy flavor. You can swap it for honey mustard or even a spicy mustard for an extra zing!
- Garlic powder (1 teaspoon): A sprinkle to create depth of flavor. Fresh minced garlic can be a great alternative if you want a stronger garlic kick!
- Optional extras (pickles, spinach, or olives): These bits can elevate your sandwich to a whole new level. Feel free to get creative!
Step-by-Step Instructions
Let’s create these delightful Coffin Sandwiches together! Follow these steps and sprinkle in your own personal touches along the way.
-
Preheat Your Oven: Start by preheating your oven to 350°F (175°C). This will ensure that your sandwiches come out perfectly golden and crispy.
-
Prepare Your Bread: Take your loaf of bread and slice it in half horizontally. This forms the top and bottom of your sandwich. If you’re feeling adventurous, consider using a mix of different breads for added flavor and texture!
-
Create the Base: Spread a generous layer of Dijon mustard on the bottom half of the bread. Remember, this is where the flavor begins, so don’t skimp on it!
-
Layer Your Meats: Begin layering your choice of meats evenly over the mustard-slathered bread. Get creative here! Try adding a few slices of each type of meat for a flavor party.
-
Cheese, Please: Sprinkle an even layer of cheese on top of the meat. It’s the glue that will hold your glorious sandwich together.
-
Seasoning Magic: If you’re adding any optional extras (like pickles or spinach), now is the time! Feel free to get creative with the ingredients and add your personal twist.
-
Top It Off: Place the top half of the bread on the assembled sandwich. Now, you can press down a bit to help everything meld together beautifully.
-
Brush with Butter: Melt your butter and mix in the garlic powder, then brush it generously over the top of the sandwich. Ah, the aroma already starts to waft in the air!
-
Wrap It Up: Wrap your sandwich in aluminum foil, leaving it a bit loose to allow airflow. This ensures even cooking.
-
Bake Away: Place the wrapped sandwich in your preheated oven and let it bake for about 20-25 minutes. You want it to be heated through and golden brown.
-
The Golden Reveal: Remove it from the oven, and carefully unwrap the foil. Be cautious of the steam! Let it cool for a minute, and you’ll see that melty cheese and crispy exterior that’s simply irresistible.
Serving Suggestions
When it comes to serving Coffin Sandwiches, you can keep it simple or jazz it up! Slice the sandwiches into generous squares or rectangles and serve them on a rustic wooden board for a comfy, homey vibe. Pair them with a side of crunchy pickles or a fresh green salad for a light addition. You could even serve them at room temperature during gatherings for that effortless charm.
Recipe Variations
There’s always room for creativity in the kitchen! Here are some fun variations to try:
-
Italian Twist: Use Italian meats like salami, capicola, and provolone, and layer in some roasted red peppers for that Italian flair.
-
Mediterranean Delight: Swap the meats for grilled vegetables, add feta cheese, and top with tzatziki sauce for a refreshing twist.
-
BBQ Bliss: For a barbeque-inspired version, swap out the mustard for BBQ sauce and add pulled pork along with coleslaw, giving your sandwich a smoky flavor.
-
Veggie Heaven: Load up on grilled zucchini, mushrooms, and bell peppers, replacing cheese with a cashew cream for a vegan option.
-
Sweet and Savory: Add caramelized onions and apple slices for a sweet twist alongside your regular fillings for a delicious contrast.
Chef’s Notes
As with any family recipe, this Coffin Sandwich has seen its fair share of tweaks over the years! I remember the first time I tried to make them on my own—let’s just say it didn’t go as planned. My family still jokes about the time I accidentally used powdered sugar instead of garlic powder! Who knew that could turn a savory sandwich into a sweet disaster?
Now, I cherish every bite I take, remembering the laughter and love that came with those family gatherings. Each new batch I create is a tribute to Aunt Martha, and I hope you enjoy making and sharing them as much as I do!
FAQs and Troubleshooting
1. Can I make Coffin Sandwiches ahead of time?
Absolutely! You can assemble the sandwiches, wrap them tightly, and store them in the fridge for a day. Just be sure to reheat them in the oven to maintain that crispy texture.
2. What if my sandwiches are soggy?
To avoid soggy sandwiches, ensure your ingredients, especially any spreads or veggies, are well-drained. You can also toast the bread lightly before assembling!
3. I don’t like mustard. What can I use instead?
No problem! You can simply omit the mustard and use creamy mayonnaise or a flavorful pesto as a substitute to keep it delicious.
4. How do I know when my sandwich is done?
The sandwich is perfect when it’s golden brown and the cheese is fully melted. If you’re unsure, a quick peek inside will do!
Nutritional Info
While Coffin Sandwiches are a delightful indulgence, it’s always best to enjoy them as part of a balanced meal. Each serving can vary, but generally, you’re looking at approximately 400-500 calories per serving, depending on your fillings and portions.
Now that you’ve got all the tools you need to embark on your Coffin Sandwich adventure, I can’t wait to hear about your experiences! Share your creations with friends and family, and know that every bite is filled with warmth, love, and joyful memories. Happy cooking!
Print
Coffin Sandwiches
- Total Time: 40 minutes
- Yield: 4 servings 1x
- Diet: Omnivore
Description
Coffin Sandwiches are a nostalgic culinary experience wrapped in layers of flavor, combining smoked meats, creamy cheeses, and tangy spreads, all baked to a crispy perfection.
Ingredients
- 1 loaf of bread (preferably white or whole wheat)
- 1 pound of thinly sliced meats (ham, turkey, or roast beef)
- 8 ounces of cheese (Swiss or cheddar)
- 1/2 cup of melted butter
- 1/4 cup of Dijon mustard
- 1 teaspoon of garlic powder
- Optional extras (pickles, spinach, or olives)
Instructions
- Preheat your oven to 350°F (175°C).
- Prepare the bread by slicing it in half horizontally.
- Spread a generous layer of Dijon mustard on the bottom half of the bread.
- Layer your choice of meats evenly over the mustard-slathered bread.
- Sprinkle an even layer of cheese on top of the meat.
- Add any optional extras as desired.
- Place the top half of the bread on the sandwich and press down gently.
- Brush the top with melted butter mixed with garlic powder.
- Wrap the sandwich in aluminum foil, leaving it a bit loose.
- Bake in the preheated oven for about 20-25 minutes.
- Remove from the oven and unwrap, letting cool for a minute before serving.
Notes
Feel free to get creative with the ingredients and add your personal twist. You can also make these sandwiches ahead of time and store them in the fridge.
- Prep Time: 15 minutes
- Cook Time: 25 minutes
- Category: Main Course
- Method: Baking
- Cuisine: American
Nutrition
- Serving Size: 1 sandwich
- Calories: 450
- Sugar: 2g
- Sodium: 600mg
- Fat: 25g
- Saturated Fat: 10g
- Unsaturated Fat: 10g
- Trans Fat: 0g
- Carbohydrates: 40g
- Fiber: 3g
- Protein: 25g
- Cholesterol: 70mg
Keywords: Coffin Sandwiches, comfort food, baked sandwiches, family recipe
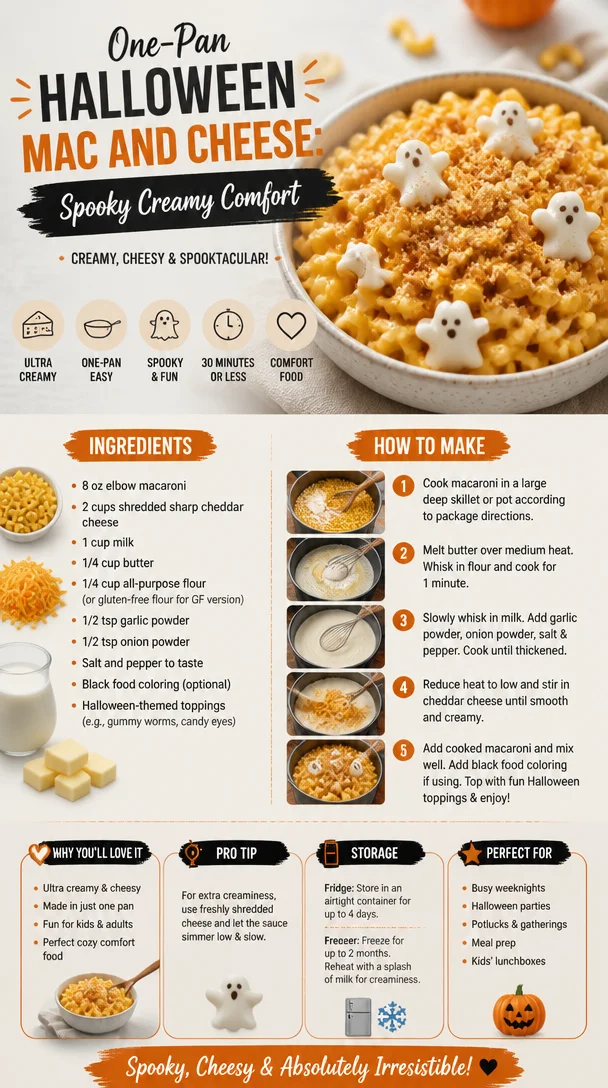
One-Pan Halloween Mac and Cheese: Spooky Creamy Comfort
Halloween Mac and Cheese: A Spooky, Delicious Twist!
Welcome back to my cozy kitchen, food friends! As the leaves change and the nights grow longer, there’s something magical about the air — crisp and fragrant with the promise of Halloween. It marks a time of gathering with friends and family, indulging in treats, and, of course, conjuring up culinary delights that fit the spooky season. Today, I’m thrilled to share a playful twist on an all-time favorite — Halloween Mac and Cheese!
Picture this: you’re at a festive gathering, laughter fills the air, and the sweet smell of pumpkin spice lingers. Just as you think you’ve tasted it all, someone brings out a bubbling dish of Halloween Mac and Cheese. With its hauntingly creamy cheese, ghosts made from mozzarella, and vibrant orange pumpkin puree, this dish is not only delicious but also a fun way to capture the spirit of Halloween. So grab your favorite mixing bowl, roll up those sleeves, and let’s dive headfirst into this magical recipe!
Personal Story
This recipe holds a special place in my heart, and it all goes back to my childhood. Every Halloween, my family would host a gathering for our closest friends. The highlight, of course, was always the food. My mom, a wizard in the kitchen, would make her classic mac and cheese, bubbling with rich cheese and buttery breadcrumbs. But on Halloween, she would spice things up — literally. She’d mix in some pumpkin puree and top it with cheese “ghosts,” and we would all giggle at her spooky creations while gobbling them down.
I fondly remember my little cousins adorning their costumes, laughing and plotting the night’s trick-or-treat scheme, while my mom worked her magic in the kitchen. Watching the joy on their faces as they dug into that hauntingly delicious dish was priceless. Fast forward a few decades, and I’ve proudly carried on this Halloween tradition — adding my own flair, but keeping that spirit of fun alive. I can’t wait for you to create your own magical memories with this Halloween Mac and Cheese recipe!
Ingredients
-
Pasta:
- Any shape will do! Elbow macaroni is classic, but if you want to be extra spooky, try using mini pumpkin-shaped pasta pieces. They’re adorable and fun!
-
Cheddar Cheese:
- Sharp or mild — your choice! Sharp will give you a bolder flavor, while mild will keep it creamy. A mix also works beautifully.
-
Mozzarella Cheese:
- For the ghostly toppings! Use fresh mozzarella for a gooey finish or shredded mozzarella for an easy melt. Want a little kick? Try pepper jack!
-
Pumpkin Puree:
- A delightful secret ingredient. Aside from being festive, it adds creaminess. Canned pumpkin is perfect, but fresh pumpkin puree is a lovely alternative. Just roast, scoop out, and blend!
-
Milk:
- Whole milk is best to keep it rich, but any milk works! Have a dairy-free household? Use almond milk or cashew milk; you’ll just need to watch the flavor balance.
-
Butter:
- To start our roux. Unsalted butter gives you control over the salt. Vegan butter works just as well if you prefer a plant-based option.
-
Flour:
- This helps thicken our cheese sauce. All-purpose flour is standard, but for a gluten-free option, reach for almond flour or a gluten-free blend.
-
Garlic Powder and Onion Powder:
- For flavor magic! If you love fresh garlic and onions, feel free to sauté some diced onions and minced garlic before mixing in the flour.
-
Salt and Pepper:
- Staples in any dish! Adjust based on your taste, and don’t be afraid to add a little pinch of nutmeg for warmth and depth.
-
Food Coloring (optional):
- For extra spooky vibes. Orange dye can brighten your mac and cheese to match the Halloween theme.
Step-by-Step Instructions
-
Cook the Pasta:
- Bring a large pot of salted water to a boil. Add the pasta and cook until al dente, following package instructions. Tip: Save a cup of pasta water before draining — you might need it later to adjust the sauce’s consistency!
-
Make the Cheese Sauce:
- In a large saucepan over medium heat, melt the butter. Once melted, whisk in the flour, stirring constantly for about 2-3 minutes until it’s a nice golden color. This roux is the base of your cheese sauce — if it’s too dark, start over!
-
Add the Milk:
- Slowly whisk in the milk, ensuring there are no lumps. Keep stirring until the mixture thickens and starts to bubble, approximately 4-5 minutes. Chef hack: to make it extra creamy, consider using half-and-half instead!
-
Incorporate the Pumpkin:
- Stir in the pumpkin puree. This step not only adds flavor but gives a lovely, subtle sweetness. Whisk it! Feel free to add some of that optional food coloring here to amp up the autumnal hue!
-
Melt in the Cheese:
- Gradually add the shredded cheddar and mozzarella, stirring until melted and smooth. Don’t be shy; taste and adjust the salt and pepper as it comes together!
-
Combine with Pasta:
- Add the cooked pasta to the cheese sauce, stirring well to coat every delicious piece. If it seems too thick, add some reserved pasta water!
-
Prepare the Dish:
- Transfer the cheesy mixture into a greased baking dish. Sprinkle with additional cheese and breadcrumbs on top for that crispy finish!
-
Bake Your Creation:
- Preheat your oven to 350°F (175°C) and bake uncovered for about 20 minutes until golden and bubbling. Chef’s tip: for an extra spooky touch, consider using pumpkin-shaped cookie cutters to make little cheese ghosts on top!
-
Add Your Ghosts:
- While it’s still hot, use bits of fresh mozzarella to create ghost shapes on top. Add mini black olive “eyes” for a fun and spooky effect!
Serving Suggestions
When it comes to serving your Halloween Mac and Cheese, the presentation can elevate your dish from tasty to truly spectacular. Serve it straight from the oven in the baking dish for a rustic feel or use hollowed-out mini pumpkins as individual servings! Garnish with a sprinkle of parsley or some crunchy, spooky-shaped crackers on the side for some crunch. And for a fun addition? Set out a platter of assorted Halloween cookies to complement your cheesy creation!
Recipe Variations
-
Veggie Boost: Add steamed broccoli or cooked pumpkin or butternut squash for added nutrition. It’s a great way to sneak in some veggies while keeping it festive!
-
Spicy Mac & Cheese: Mix in diced jalapeños or a dash of cayenne pepper for a bit of heat.
-
Meaty Twist: Brown some ground turkey or sausage to mix in before baking for some protein enhancement.
-
Cheese Lovers’ Dream: Use a mix of Gouda, Havarti, and Gruyere cheeses in addition to cheddar for a gourmet twist!
-
Gluten-Free Version: Substitute regular pasta for gluten-free pasta and use gluten-free flour for the roux.
Chef’s Notes
This Halloween Mac and Cheese recipe is a testament to how cooking can be both delicious and playful! I’ve taken my mom’s traditional dish and given it a spooky upgrade, but the heart remains the same. Each bite is a delightful blend of nostalgia and new adventures. Over the years, I’ve played around with different ingredients — sometimes adding caramelized onions or throwing in a handful of spinach — it’s all about what makes your taste buds dance!
Remember, cooking is an art! Don’t hesitate to make this recipe yours; it’s part of the joy of being in the kitchen. And trust me, nothing says “Halloween” like a heartwarming bowl of mac and cheese that brings everyone together.
FAQs and Troubleshooting
Q: My mac and cheese turned out too dry. What happened?
A: It’s likely due to cooking the pasta too long or not adding enough liquid to the sauce. Always reserve that pasta water for adjustments, and ensure your sauce is nice and creamy before mixing!
Q: Can I prepare this ahead of time?
A: Absolutely! Assemble everything, cover, and refrigerate it before baking. When you’re ready to serve, just pop it in the oven for about 25-30 minutes until heated through.
Q: My cheese sauce is lumpy. What can I do?
A: If your cheese sauce is lumpy, it might be because the cheese was added too quickly or at too high a temp. For a lump-free experience, stir in the cheese gradually while keeping the heat low.
Q: Can I use non-dairy cheese?
A: Yes, you can! There are plenty of excellent vegan cheese options. Just keep in mind that they might behave differently in terms of melting and flavor, but the end result can still be delicious!
Nutritional Info
(If applicable, include per serving):
- Calories: 450
- Protein: 20g
- Carbohydrates: 58g
- Fat: 20g
- Fiber: 3g
So there you have it, food lovers! A spooky yet scrumptious Halloween Mac and Cheese that is sure to steal the show this season. It’s a comforting dish that not only celebrates flavor but also fills your home with warmth and love. Gather your loved ones, grab your spoons, and let’s turn this Halloween into something truly unforgettable! Happy cooking and Happy Halloween!
Print
Halloween Mac and Cheese
- Total Time: 45 minutes
- Yield: 4 servings
- Diet: Vegetarian
Description
A spooky twist on traditional mac and cheese with creamy cheese, pumpkin puree, and mozzarella ghosts.
Ingredients
- Elbow macaroni or mini pumpkin-shaped pasta
- Cheddar cheese (sharp or mild)
- Mozzarella cheese (fresh or shredded)
- Pumpkin puree (canned or fresh)
- Whole milk (or dairy-free alternative)
- Unsalted butter
- All-purpose flour (or gluten-free blend)
- Garlic powder
- Onion powder
- Salt and pepper
- Food coloring (optional)
Instructions
- Cook the pasta: Bring a large pot of salted water to a boil. Add the pasta and cook until al dente, saving a cup of pasta water before draining.
- Make the cheese sauce: In a large saucepan over medium heat, melt the butter and whisk in the flour, stirring for 2-3 minutes until golden.
- Add the milk: Slowly whisk in the milk until the mixture thickens and bubbles, about 4-5 minutes.
- Incorporate the pumpkin: Stir in the pumpkin puree and optional food coloring.
- Melt in the cheese: Gradually add shredded cheddar and mozzarella, stirring until smooth.
- Combine with pasta: Mix the cooked pasta into the cheese sauce, adding reserved pasta water if needed.
- Prepare the dish: Transfer to a greased baking dish, sprinkle with cheese and breadcrumbs.
- Bake your creation: Preheat oven to 350°F (175°C) and bake for about 20 minutes until golden.
- Add your ghosts: Use bits of mozzarella to create ghost shapes on top with olive “eyes.”
Notes
For extra flavor, add diced jalapeños or caramelized onions. Can be prepared ahead and baked later.
- Prep Time: 15 minutes
- Cook Time: 30 minutes
- Category: Main Course
- Method: Baking
- Cuisine: American
Nutrition
- Serving Size: 1 serving
- Calories: 450
- Sugar: 5g
- Sodium: 400mg
- Fat: 20g
- Saturated Fat: 10g
- Unsaturated Fat: 8g
- Trans Fat: 0g
- Carbohydrates: 58g
- Fiber: 3g
- Protein: 20g
- Cholesterol: 30mg
Keywords: Halloween, Mac and Cheese, Comfort Food, Vegetarian, Pumpkin


