
Crispy Almond-Parmesan Crumble for Weeknight Dinners
Discovering the Joy of Crumble aux Amandes et Parmesan
Welcome to my kitchen, friends! Today, I’m excited to take you on a flavor-packed journey that celebrates one of my ultimate comfort foods: Crumble aux Amandes et Parmesan. Imagine a dish that flawlessly marries the nutty crunch of almonds with the rich, umami depth of Parmesan. It’s a delightful creation that transforms a few humble ingredients into a cozy crowd-pleaser, whether served as a side or a main dish.
I’ll never forget the first time I encountered this delightful dish. I was visiting a charming bistro nestled in the heart of Paris—you know, the kind where the tables spill out onto the cobblestone streets and the aroma of baking bread invites you in like a warm hug. I ordered a vegetable crumble topped with the most luxurious almond and Parmesan mixture. When the servers brought it to my table, I could hardly contain my excitement; that golden-brown crust looked like a masterpiece! Just one bite sent me soaring to comfort food heaven—crunchy, creamy, rich, and utterly satisfying.
The beauty of Crumble aux Amandes et Parmesan is that it’s as versatile as it is delicious. It can elevate a classic vegetable medley into something extraordinary, or it can act as a stand-alone dish worthy of a celebratory dinner. Whether you are looking for an impressive side to share or a heartwarming meal to enjoy after a long day, this crumble will fit the bill beautifully. So grab your apron—let’s dive into the recipe and create something unforgettable, just like that day in Paris!
A Cozy Memory in the Kitchen
It was a chilly autumn afternoon, and I was at my grandmother’s house, surrounded by her eclectic collection of cookbooks and the warmth of her well-loved kitchen. She was the queen of bringing family together through food. I remember her teaching me how to make a similar crumble with whatever vegetables were leftover in the fridge. As we chopped carrots, zucchini, and potatoes, she spoke about the importance of not wasting food. That day, she introduced me to the concept of transforming simple ingredients into a delightful dish topped with a crumbly, cheesy mixture.
Her secret? A generous handful of toasted almonds and that magical ingredient, freshly grated Parmesan, layered thick on top. As we pulled our creation from the oven, the aroma wafting through the air was nothing short of magical. I still remember the crunch of that topping paired with the roasted vegetables beneath. That memory has stayed with me, and now I recreate it in my own kitchen, adding touches of my own while keeping that special warmth and love alive in each bite.
Ingredients: What You’ll Need
To create a mouthwatering Crumble aux Amandes et Parmesan, gather these ingredients:
-
Vegetables (about 4 cups mixed):
- Zucchini: A great base vegetable, it adds moisture and a subtle sweet flavor. If you’re out of zucchini, yellow squash or even eggplant work beautifully.
- Carrots: They add a touch of sweetness and vibrant color. Substitute with sweet potatoes for a richer flavor.
- Bell Peppers: Choose any color you like! If you prefer, you can swap them out for leeks for a milder taste.
-
Almonds (1 cup, sliced or slivered):
- Almonds provide a lovely crunch and nutty flavor. No almonds? Go for walnuts or pecans for a different texture and taste.
-
Parmesan cheese (1 cup, grated):
- Parmesan lends a savory umami kick to the crumble. Pecorino Romano can be a fun substitute that offers a tangier flavor profile.
-
Breadcrumbs (1 cup):
- Use plain or seasoned breadcrumbs for added flavor; panko breadcrumbs give extra crunch. For a gluten-free option, try almond flour.
-
Olive oil (1/4 cup):
- Extra virgin olive oil enhances the flavors and helps the crumble reach that golden perfection. For a flavored twist, consider using garlic-infused olive oil.
-
Salt and pepper (to taste):
- Essential seasonings! Always taste as you go to get a perfect balance. You can add herbs like thyme or rosemary for extra warmth.
These ingredients blend together to create a dish that’s not just about flavor but about creativity and making the most of what you have on hand.
Step-by-Step Instructions: Let’s Get Cooking!
Follow this detailed guide to whip up your Crumble aux Amandes et Parmesan:
-
Preheat your oven to 375°F (190°C). This sets the stage for an evenly cooked crumble with that beautifully crispy top.
-
Prepare your vegetables: Chop your zucchini, carrots, and bell peppers into bite-sized pieces. Aim for uniformity so that they cook evenly. If you’re using carrots, consider shaving them into thin ribbons for a tender texture; they’ll soak up the flavors beautifully.
-
Sauté the veggies: In a large skillet, heat about 2 tablespoons of olive oil over medium heat. Toss in your chopped vegetables, seasoning them lightly with salt and pepper. Cook for about 5-7 minutes, just until they start to soften. This step brings out their flavors and prevents the dish from becoming watery.
-
Spread the veggie mixture: Transfer your sautéed vegetables to a greased baking dish. You want them to be in an even layer; it makes for a more beautiful presentation.
-
Prepare the crumble topping: In a separate bowl, combine the sliced almonds, grated Parmesan, breadcrumbs, the remaining olive oil, a pinch of salt, and pepper. Your goal is to create a crumbly mixture that clumps together slightly. If it looks too dry, drizzle in a bit more olive oil.
-
Top it off: Sprinkle the almond and cheese mixture generously over the sautéed vegetables. Make sure it’s evenly distributed for that perfect bake.
-
Bake: Pop the baking dish into the oven and let it bake for 25-30 minutes until the topping is golden brown and the vegetables are bubbling beneath. If you’re feeling adventurous, you can turn on the broiler for a minute or two at the end to get that topping extra crispy—just keep a close eye on it to avoid burning.
-
Cool and serve: Once done, take it out of the oven and let it cool for about 5 minutes before digging in. This allows the flavors to meld.
Chefs Tip: Use this time to set the table or brew a cup of your favorite tea. There’s nothing better than enjoying a warm, home-cooked dish with a cozy beverage!
Serving Suggestions: Time to Plate!
When it’s time to serve your Crumble aux Amandes et Parmesan, consider these delightful presentation tips:
- Use a large spoon to scoop generous portions onto each plate, ensuring everyone gets their fair share of that crunchy topping.
- For a fresh twist, add a squeeze of lemon juice or a sprinkle of fresh herbs like parsley or basil on top before serving. This adds a lovely brightness that complements the rich flavors beautifully.
- Serve it alongside a simple green salad drizzled with balsamic vinaigrette for a well-rounded meal.
Enjoy with your loved ones, and savor the joy of conversation and togetherness that good food brings!
Recipe Variations: Mix It Up!
Get creative with your Crumble aux Amandes et Parmesan! Here are a few variations to consider:
-
Add Protein: Toss in some cooked chicken, turkey, or chickpeas for a heartier dish.
-
Spice It Up: Sprinkle in some red pepper flakes or smoked paprika for a kick.
-
Cheesy Delight: Experiment with different cheeses like goat cheese for a tangy twist, or a mix of cheddar for that super cheesy topping.
-
Seasonal Favorites: Swap out the vegetables based on what’s in season—think roasted squash in the fall or fresh asparagus in the spring!
-
Gluten-Free Option: Substitute breadcrumbs with crushed gluten-free crackers or almond flour to make this dish gluten-free without sacrificing taste.
Chef’s Notes: A Reminder of Love in Cooking
Cooking should always evoke a sense of joy, warmth, and nostalgia. This recipe for Crumble aux Amandes et Parmesan has evolved from my grandmother’s insightful teachings to a dish I can enjoy with my family and friends. Over time, I’ve learned to incorporate newer flavors, like a dash of balsamic vinegar, to create a delightful tang in my vegetable medley. For me, every crumble carries a memory—the laughter shared, the ingredients swapped, and the conversations that flow freely over delicious food.
I hope you create your own cherished memories as you enjoy this delightful dish. The kitchen is a place for love and creativity, so don’t hesitate to put your twist on it!
FAQs and Troubleshooting: Answers to Common Questions
-
What if my topping is too dry?
- If your crumble topping seems too dry, add a touch more olive oil or melted butter to help it clump together. You want that perfect crispy, golden crunch!
-
Can I make this dish ahead of time?
- Absolutely! You can prepare your vegetables and topping in advance, then assemble and bake them when you’re ready. Just add an extra few minutes to the baking time if cooking from a cold state.
-
How can I store leftovers?
- Store any leftovers in an airtight container in the fridge for up to 3 days. Reheat in the oven or microwave until warmed through. The topping may lose a little crunch, but it will still be delicious!
-
What if I don’t have any Parmesan?
- No problem! Feel free to use any hard cheese you have on hand, like aged Gouda or even vegan cheese! Just ensure it has a good flavor to complement the dish.
Nutritional Info (Optional)
While I believe in enjoying food, here’s a rough nutritional breakdown to be mindful:
- Portions: 6
- Calories: 320 per serving
- Protein: 12g
- Carbohydrates: 25g
- Fat: 20g
Nutrition values are approximate and can vary based on exact ingredients used and portion sizes.
As we wrap up this delicious journey together, I hope you feel inspired to whip up your own version of Crumble aux Amandes et Parmesan! It’s more than just a recipe; it’s a celebration of food, memories, and shared experiences. Happy cooking!
Print
Crumble aux Amandes et Parmesan
- Total Time: 45 minutes
- Yield: 6 servings 1x
- Diet: Vegetarian
Description
A comforting dish that combines the nutty crunch of almonds with the rich flavors of Parmesan, transforming simple vegetables into a delightful culinary experience.
Ingredients
- 4 cups mixed vegetables (zucchini, carrots, bell peppers)
- 1 cup sliced or slivered almonds
- 1 cup grated Parmesan cheese
- 1 cup breadcrumbs
- 1/4 cup olive oil
- Salt and pepper to taste
Instructions
- Preheat your oven to 375°F (190°C).
- Prepare your vegetables: Chop zucchini, carrots, and bell peppers into bite-sized pieces.
- Sauté the veggies: Heat 2 tablespoons of olive oil in a large skillet, add chopped vegetables, and season with salt and pepper for about 5-7 minutes.
- Spread the veggie mixture in a greased baking dish in an even layer.
- Prepare the crumble topping: In a bowl, mix sliced almonds, grated Parmesan, breadcrumbs, remaining olive oil, salt, and pepper.
- Top the sautéed vegetables with the almond and cheese mixture.
- Bake for 25-30 minutes until the topping is golden brown and vegetables are bubbling.
- Cool for 5 minutes before serving.
Notes
Experiment with different vegetables or cheeses to create your own variation. For a gluten-free option, use almond flour instead of breadcrumbs.
- Prep Time: 15 minutes
- Cook Time: 30 minutes
- Category: Main Course
- Method: Baking
- Cuisine: French
Nutrition
- Serving Size: 1 serving
- Calories: 320
- Sugar: 5g
- Sodium: 350mg
- Fat: 20g
- Saturated Fat: 4g
- Unsaturated Fat: 12g
- Trans Fat: 0g
- Carbohydrates: 25g
- Fiber: 3g
- Protein: 12g
- Cholesterol: 30mg
Keywords: vegetable crumble, almond, parmesan, comfort food, baking
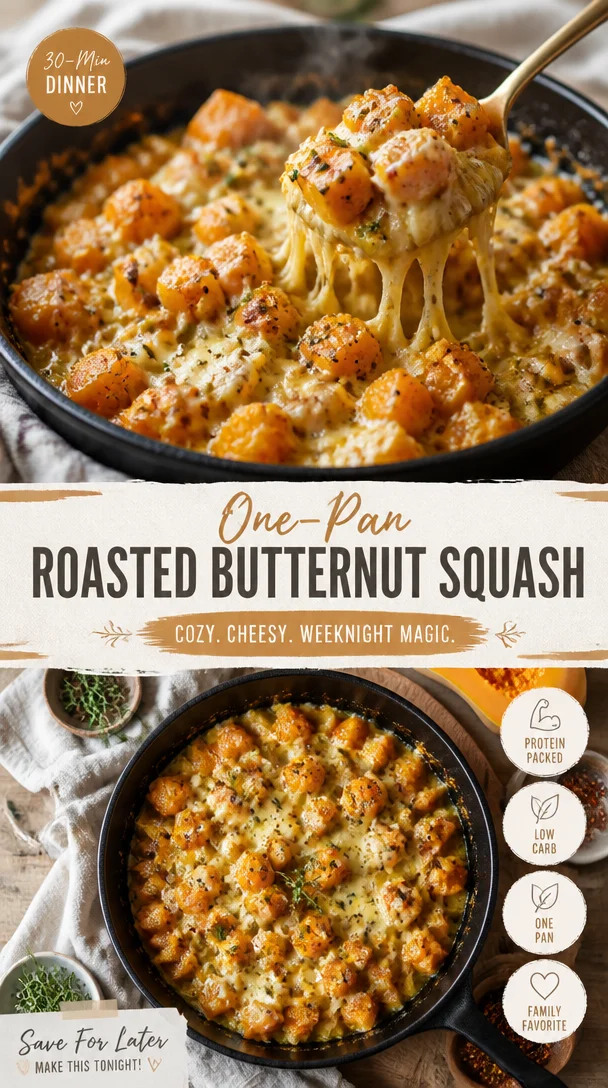
One-Pan Roasted Butternut Squash Recipe for Weeknights
Embrace the Sweetness: A Heartwarming Butternut Squash Recipe
Welcome to my cozy kitchen, food lovers! Today, we’re diving into the delightful world of butternut squash—one of fall’s most beloved ingredients. Whether you’re dodging that winter chill or seeking to impress your friends with your newfound culinary skills, this sweet, nutty gem is a fantastic ingredient to bring warmth and comfort to your table.
Butternut squash isn’t just delicious; it’s also incredibly versatile! You can roast it, mash it, or even blend it into a velvety soup. The possibilities are endless, and today, I want to show you how to create a dish that’s not only easy to make but also packed with flavor and love.
Imagine the scent of roasted butternut squash wafting through your kitchen as you prepare this dish. It’s the kind of aroma that wraps around you like a warm hug, inviting everyone to the table. Cooking for me has always been about sharing moments and creating memories, and there’s something inherently joyful about preparing a meal with love, especially when it comes to a dish as comforting as this.
In this post, we’ll whip up a savory butternut squash and sage risotto that’s bound to become a family favorite. With creamy Arborio rice, roasted squash, and fragrant sage, it’s a dish that bridges the gap between comfort food and gourmet goodness. I promise, once you try this, your loved ones will be singing your praises! So, let’s roll up our sleeves, tie on our aprons, and get cooking!
A Slice of Nostalgia
Growing up, my grandmother would make the best butternut squash soup every autumn. The whole house would fill with the aroma of spices and slow-cooked goodness. I’d watch as she peeled and chopped the squash, her hands moving with a kind of grace that came from years of experience. We’d sit together, her sharing tales from her childhood while we stirred the pot, and it quickly became a tradition I cherished.
Those cozy afternoons inspired my love for cooking, and no dish fills me with nostalgia quite like a butternut squash creation. As I experimented with various recipes over the years, I found a special love for risotto—a creamy, cheesy delight that transforms a simple meal into a memorable feast. This dish feels like a comforting embrace, and I know that with every bite, you’ll be connecting with those same laughs, stories, and cozy moments from your own life.
Ingredients
Here’s what you’ll need to whip up this delightful dish:
-
1 medium butternut squash, peeled and cubed: This serves as the star of the show! Butternut squash is naturally sweet and creamy. If you need a substitute, pumpkin or sweet potato works beautifully.
-
1 cup Arborio rice: This short-grain rice is what gives risotto its signature creaminess. If you’re in a pinch, you can use Carnaroli or even short-grain brown rice, though this will alter the texture slightly.
-
4 cups vegetable broth (or chicken broth): Homemade is ideal, but store-bought works just as well. If you want to lower the salt content, opt for low-sodium broth.
-
1 medium onion, finely chopped: This adds sweetness and depth of flavor. Shallots are great too if you want a subtler flavor.
-
2 cloves garlic, minced: A must-have for any savory dish! Fresh garlic is best, but if you have garlic powder, use about 1/2 teaspoon.
-
2 tablespoons olive oil: For sautéing and drizzling. If you’re looking for a different flavor, consider using avocado oil or even a bit of butter.
-
1/2 cup grated Parmesan cheese: This contributes to the creaminess and a little cheesy goodness. For a dairy-free version, try nutritional yeast.
-
1 tablespoon fresh sage, chopped (or 1 teaspoon dried sage): Sage pairs beautifully with squash, adding an earthy flavor. Thyme or rosemary can also work as tasty substitutes!
-
Salt and pepper to taste: Seasonings are crucial! Freshly cracked pepper adds a lovely kick.
-
Optional: A drizzle of balsamic reduction for garnishing—this adds a touch of acidity and sweetness that elevates the dish.
With these ingredients, you’re all set to prepare a comforting bowl of butternut squash risotto that will have everyone coming back for seconds!
Step-by-Step Instructions
Let’s get down to the delicious part—cooking! Here’s how you can prepare your butternut squash risotto:
-
Prep the Squash: Begin by preheating your oven to 400°F (200°C). While it heats, peel your butternut squash and cut it into 1-inch cubes. Place the cubes on a baking sheet, drizzle with olive oil, and sprinkle with a bit of salt and pepper. Toss to combine. Roast for about 25-30 minutes, or until tender and caramelized around the edges. Chef Tip: Roasting enhances sweetness and depth!
-
Warm the Broth: In a saucepan, heat your vegetable broth and keep it warm over low heat. This will help maintain the temperature when adding it to the rice.
-
Sauté the Aromatics: In a large pot or Dutch oven, heat 2 tablespoons of olive oil over medium heat. Add the chopped onion and sauté for 3-4 minutes, until translucent. Add the minced garlic and fresh sage, cooking for an additional minute until fragrant. Chef Hack: Make sure to keep an eye on the garlic—it browns quickly!
-
Toast the Rice: Stir in the Arborio rice, cooking for 1-2 minutes until it’s lightly toasted. This helps to release the nutty aroma and prepares the rice for absorbing liquids.
-
Add the Broth: Begin adding your warm broth one ladleful at a time, stirring frequently. Allow the rice to absorb most of the liquid before adding more. This will take about 18-20 minutes. Think of it as a labor of love! Tip: This slow, steady process releases the starches, giving risotto its creaminess.
-
Incorporate the Squash: After about 15 minutes of cooking, add your roasted butternut squash pieces into the pot, mixing gently. This will ensure each bite has that delicious squash flavor. Pro Tip: You can reserve a few pieces for garnishing later!
-
Finish With Cheese: Once your risotto is creamy and the rice is al dente, remove it from heat. Stir in the grated Parmesan cheese until melted. Season to taste with salt and pepper. Chef’s Note: If you want that extra creaminess, add a tablespoon of butter!
-
Serve: Your butternut squash risotto is ready! Spoon it into bowls and garnish with the reserved squash, a sprinkle of extra Parmesan, and a drizzle of balsamic reduction if you’re feeling fancy.
Serving Suggestions
For a beautiful presentation, serve your risotto in deep bowls and top with a sprinkle of fresh sage leaves and a light drizzle of olive oil or balsamic reduction. Pair it with a simple arugula salad with lemon vinaigrette to balance out the creamy rice and enrich your dining experience.
Recipe Variations
Feeling adventurous? Here are a few variations to try:
-
Creamy Vegan Version: Substitute Parmesan cheese with nutritional yeast and coconut milk for a creamy base that’s dairy-free.
-
Add Some Protein: Toss in sautéed mushrooms, spinach, or chickpeas for added texture and nutrition—perfect for a hearty meal!
-
Spice It Up: Add a pinch of red pepper flakes to the onions for a hint of heat or stir in some ground nutmeg or cinnamon for a warm spice vibe.
-
Herb Swaps: Don’t have sage? Thyme or even fresh parsley can add a delightful touch! Season according to your pantry.
-
Seasonal Greens: Stir in some kale or Swiss chard at the end of cooking for added vitamins and a colorful presentation.
Chef’s Notes
I have to confess, the first time I made this risotto, I didn’t stir it enough and ended up with a clumpy mess! It was a lesson learned—so trust me when I say that constant stirring is key! Over the years, this dish has evolved from a simple recipe to a celebration of seasonal ingredients, with each rendition evoking a different memory or experience in the kitchen. This risotto has taken me to cozy dinners at home, dinner parties with friends, and even evenings of culinary experimentation. It’s become a beloved staple in my family, and I hope it will become a cherished recipe in yours as well!
FAQs and Troubleshooting
1. Why did my risotto come out too sticky?
If risotto becomes too sticky, it’s often due to either too much stirring or not using enough broth. Remember, slow and steady is key—keep an eye on your rice and add broth gradually.
2. Can I make this risotto ahead of time?
Risotto is best served fresh, but if you have leftovers, you can store them in the refrigerator for 1-2 days. Reheat gently, adding a splash of broth to loosen it up.
3. My risotto is too bland! What can I do?
If your risotto lacks flavor, it may just need more seasoning. Don’t hesitate to add a pinch of salt or more garlic. Also, the quality of your broth matters!
4. What if I don’t have Arborio rice?
If you can’t find Arborio rice, you can use other short-grain varieties like Carnaroli or even sushi rice in a bind. Just keep in mind the texture might change!
Nutritional Info (if applicable)
On average, a serving of butternut squash risotto (without additional toppings) contains approximately:
- Calories: 350
- Protein: 12g
- Carbohydrates: 60g
- Fats: 10g
- Fiber: 4g
Now that you have all the know-how to create this delicious dish, don’t be shy—get cooking! I can’t wait to hear your thoughts and stories as you enjoy this comforting, heartwarming butternut squash risotto. Happy cooking, my friends! 🍂✨
Print
Butternut Squash and Sage Risotto
- Total Time: 45 minutes
- Yield: 4 servings 1x
- Diet: Vegetarian
Description
A comforting and creamy risotto made with roasted butternut squash and fragrant sage, perfect for sharing with loved ones.
Ingredients
- 1 medium butternut squash, peeled and cubed
- 1 cup Arborio rice
- 4 cups vegetable broth (or chicken broth)
- 1 medium onion, finely chopped
- 2 cloves garlic, minced
- 2 tablespoons olive oil
- 1/2 cup grated Parmesan cheese
- 1 tablespoon fresh sage, chopped (or 1 teaspoon dried sage)
- Salt and pepper to taste
- Optional: A drizzle of balsamic reduction for garnishing
Instructions
- Prep the squash: Preheat your oven to 400°F (200°C). Peel the butternut squash and cut it into 1-inch cubes. Place the cubes on a baking sheet, drizzle with olive oil, and sprinkle with salt and pepper. Toss to combine. Roast for about 25-30 minutes until tender and caramelized.
- Warm the broth: In a saucepan, heat the vegetable broth and keep it warm over low heat.
- Sauté the aromatics: In a large pot, heat olive oil over medium heat. Add chopped onion and sauté for 3-4 minutes until translucent. Add minced garlic and fresh sage, cooking for an additional minute until fragrant.
- Toast the rice: Stir in Arborio rice and cook for 1-2 minutes until lightly toasted.
- Add the broth: Begin adding the warm broth one ladle at a time, stirring frequently, until absorbed—this takes about 18-20 minutes.
- Incorporate the squash: After 15 minutes of cooking, add the roasted butternut squash, mixing gently.
- Finish with cheese: Remove from heat and stir in grated Parmesan cheese until melted. Season with salt and pepper.
- Serve: Spoon the risotto into bowls and garnish with reserved squash, extra Parmesan, and balsamic reduction if desired.
Notes
Stir constantly to ensure creamy consistency and avoid clumping. Serve fresh for the best flavor.
- Prep Time: 15 minutes
- Cook Time: 30 minutes
- Category: Main Course
- Method: Stovetop
- Cuisine: Italian
Nutrition
- Serving Size: 1 serving
- Calories: 350
- Sugar: 6g
- Sodium: 400mg
- Fat: 12g
- Saturated Fat: 4g
- Unsaturated Fat: 6g
- Trans Fat: 0g
- Carbohydrates: 45g
- Fiber: 4g
- Protein: 12g
- Cholesterol: 30mg
Keywords: butternut squash, risotto, comfort food, fall recipes, vegetarian

Minute Stuffed Butternut Squash: Weeknight Meal Prep
Stuffed Butternut Squash: A Cozy Fall Delight
Welcome back to my kitchen, friends! Today, we’re diving into a recipe that’s as warm and inviting as a hug on a chilly day: Stuffed Butternut Squash. If you’ve ever walked through a farmers’ market in the fall, those creamy orange beauties just call out to you, don’t they? With their sweet, nutty flavor and stunning presentation, stuffed butternut squash has become a staple in my home, especially during cozy dinners with loved ones.
But before we get into the nitty-gritty of the recipe, let me set the scene for you. Picture this: it’s a cool autumn evening, the leaves are a tapestry of golden yellows and rustic oranges, and the air is filled with the fragrance of spices wafting through the kitchen. I often reminisce about Sundays at my grandmother’s house, where we’d gather around a table brimming with her delicious home-cooked meals. It was more than just the food; it was the love that filled those moments. Those cherished memories inspired me to create warm dishes that bring people together, and this stuffed butternut squash recipe is a perfect reflection of that spirit.
Stuffed butternut squash is not just a vibrant centerpiece; it’s a canvas to showcase all your favorite flavors. Whether you’re looking for a vegetarian option to impress guests or a comforting dish to warm your soul, this recipe is versatile and so easy to make. So, roll up your sleeves, grab that apron, and let’s get cooking!
Personal Story
One of my fondest kitchen memories involves my dear friend Sarah and her adventurous spirit. A few years back, she decided to host an autumn dinner party and invited me to help with the menu. Always up for a challenge, I suggested stuffed butternut squash because it epitomizes everything wonderful about fall.
We made it a fun day of cooking together—laughing, sipping on warm apple cider, and, of course, taste-testing! I remember the first time we pulled the squash out of the oven; the aroma was intoxicating, wrapping us in a warm embrace that made our kitchen feel like a haven. As we sat around the table with our friends that night, the stuffed squash became the centerpiece of joy, fueled by stories, laughter, and introspective conversations. This dish holds a special place in my heart, reminding me of not just the delightful flavors, but the timeless connections created through shared meals.
Ingredients
Here’s what you’ll need for your Stuffed Butternut Squash:
For the Squash:
- 1 large butternut squash: The star of the show! Look for a squash that feels heavy for its size, with a smooth skin. You can substitute acorn squash or a sweet pumpkin if you can’t find butternut squash.
For the Filling:
-
1 cup quinoa (or rice): A healthy whole grain that brings texture and nuttiness. If you’re gluten-free, ensure you use certified gluten-free quinoa.
-
1 can of black beans, drained and rinsed: Provides protein and creaminess. You can swap them for lentils, chickpeas, or even ground turkey for a heartier option.
-
1 bell pepper, diced: Adds crunch and color to the mix. Feel free to interchange with any color of bell pepper or even some sautéed mushrooms for an earthy twist.
-
1 small onion, diced: For sautéing and adding sweetness. If you can’t do onions, shallots or leeks will work beautifully.
-
2 cloves garlic, minced: Because what’s cooking without garlic, right? You can omit it or use garlic powder if necessary.
-
1 teaspoon cumin: Elevates the flavor profile with a warm, earthy note. Ground coriander or chili powder could also be used for a more vibrant taste.
-
Salt and pepper, to taste: Always crucial to bring out the natural flavors of your ingredients!
-
1 cup shredded cheese (optional): I love using a sharp cheddar or feta for tanginess. You can skip the cheese for a vegan take or try nutritional yeast as a cheesy alternative.
Toppings:
- Fresh cilantro or parsley, for garnish: Adds a pop of freshness. Try using green onions for a subtle onion flavor!
In total, these ingredients blend beautifully to create a colorful and nutritious dish that’s perfect for sharing.
Step-by-Step Instructions
Step 1: Preheat the Oven
Preheat your oven to 400°F (200°C). This step is crucial: a properly preheated oven ensures an even roast on the squash, giving it a beautiful caramelization that enhances the flavor.
Step 2: Prepare the Squash
- Carefully cut the butternut squash in half lengthwise using a sharp knife (be cautious, it’s tough!). Scoop out the seeds with a spoon—this can also be a fun activity to include little ones if you have them around!
- Brush the insides with olive oil, and sprinkle with salt and pepper. This adds flavor and helps with the roasting process.
Step 3: Roast the Squash
- Place the squash halves on a baking sheet cut-side up and roast for about 40-50 minutes, or until fork-tender. Keep an eye on them – you want that beautiful caramelization without burning! Perfect timing can be tough as every oven is slightly different, so check your squash after 30 minutes.
Step 4: Cook the Quinoa
While the squash roasts, rinse the quinoa under cold water to eliminate any bitterness. In a pot, combine 1 cup of quinoa with 2 cups of water. Bring it to a boil, reduce to a simmer, cover, and cook for about 15 minutes, or until all water is absorbed. Fluff with a fork and set aside.
Step 5: Sauté the Veggies
In a skillet, heat up a tablespoon of olive oil over medium heat. Add the diced onion and bell pepper. Sauté for about 5 minutes until they start to soften and turn golden. Then add the minced garlic and cook for an additional minute.
Step 6: Combine the Filling
In a large bowl, combine the cooked quinoa, sautéed vegetables, black beans, cumin, and cheese if using. Mix well, adding salt and pepper to taste. This filling is where you can get creative—feel free to taste along the way and adjust flavors!
Step 7: Stuff the Squash
Once the squash is roasted to perfection and cool enough to handle, generously fill each half with the veggie-quinoa mixture. Pack it in tight—they’re gonna get cozy in there!
Step 8: Bake Again
Return the stuffed squash to the oven for an additional 15-20 minutes. During this time, the flavors meld beautifully, and the edges of the stuffing can get delightfully crispy.
Step 9: Garnish and Serve
After baking, let the squash cool for a few minutes. Before serving, sprinkle with fresh herbs for a burst of color and freshness. This little detail elevates the dish both in presentation and taste!
Serving Suggestions
When it comes to plating, serve each half of the stuffed butternut squash on individual plates, accompanied by a vibrant salad or some crusty bread to balance the meal. A dollop of Greek yogurt or a drizzle of balsamic glaze on top can add an extra layer of flavor. This dish is hearty enough to be a main course but lovely as a side too!
Recipe Variations
- Mediterranean Twist: Replace black beans with chickpeas, add some sun-dried tomatoes, and top with feta cheese and olives.
- Mexican Flair: Combine taco seasoning with the filling and top with salsa and avocado after baking.
- Nutty & Sweet: Mix in some dried cranberries or apricots with nuts like pecans for a delightful sweet and crunchy combination.
- Vegan Delight: Skip the cheese, replace with nutritional yeast, and add some diced zucchini for extra nutrition.
- Hearty Protein Boost: Incorporate shredded chicken or turkey for a filling, meatier version of this dish.
Chef’s Notes
This stuffed butternut squash recipe has been on my menu for years now, and it has evolved so much over time. What started as a simple quinoa and black bean filling has turned into a well-loved, custom dish that changes with whatever’s in season or what I have on hand.
One fun story is how often I forget to set a timer while I’m cooking! Recently, I got sidetracked with a phone call while my squash was in the oven. When I finally remembered, I dashed to the kitchen only to find perfectly charred, slightly over-friendly squash! The nice thing about cooking is that there’s always something new to learn while having fun.
FAQs and Troubleshooting
1. My squash is tough to cut! Any tips?
Absolutely! Try microwaving the whole squash for 2-3 minutes to soften it slightly before cutting. Just be careful—it will be hot!
2. Can I prep this dish ahead of time?
Yes! You can roast the squash and prepare the filling the day before. Just stuff it when you’re ready to bake for a quick meal!
3. What if my filling seems too dry?
If you find your filling a bit dry, add a splash of vegetable broth or a drizzle of olive oil to bring everything together.
4. How can I tell when the squash is done?
You’ll know it’s ready when a fork easily pierces through the flesh, and it should have a lovely caramelized appearance.
Nutritional Info (if applicable)
Each serving of stuffed butternut squash is loaded with nutrients, providing an excellent source of fiber, protein, and healthy carbs. It’s moderately rich in calories, depending on added ingredients like cheese.
Per serving (half squash):
- Calories: Approx. 350
- Protein: 12g
- Carbs: 50g
- Dietary Fiber: 10g
- Fat: 10g
I hope you enjoy making this Stuffed Butternut Squash as much as I do! Remember, cooking is about experimentation and joy, so have fun and make it your own. Happy cooking!
Print
Stuffed Butternut Squash
- Total Time: 85 minutes
- Yield: 4 servings 1x
- Diet: Vegetarian
Description
A warm and inviting stuffed butternut squash recipe perfect for cozy dinners.
Ingredients
- 1 large butternut squash
- 1 cup quinoa (or rice)
- 1 can of black beans, drained and rinsed
- 1 bell pepper, diced
- 1 small onion, diced
- 2 cloves garlic, minced
- 1 teaspoon cumin
- Salt and pepper, to taste
- 1 cup shredded cheese (optional)
- Fresh cilantro or parsley, for garnish
Instructions
- Preheat your oven to 400°F (200°C).
- Carefully cut the butternut squash in half lengthwise and scoop out the seeds.
- Brush the insides with olive oil and sprinkle with salt and pepper.
- Place the squash halves on a baking sheet cut-side up and roast for about 40-50 minutes.
- While the squash roasts, rinse the quinoa under cold water and combine it with 2 cups of water in a pot. Bring to a boil, then reduce to a simmer, cover, and cook for about 15 minutes.
- In a skillet, heat olive oil and sauté the diced onion and bell pepper for about 5 minutes, then add garlic for an additional minute.
- In a bowl, combine the cooked quinoa, sautéed vegetables, black beans, cumin, and cheese (if using). Mix well.
- Generously fill each squash half with the veggie-quinoa mixture.
- Return the stuffed squash to the oven for an additional 15-20 minutes.
- After baking, let the squash cool slightly, then garnish with fresh herbs before serving.
Notes
Can prep ahead by roasting squash and preparing filling a day before. Just stuff and bake later.
- Prep Time: 15 minutes
- Cook Time: 70 minutes
- Category: Main Course
- Method: Baking
- Cuisine: American
Nutrition
- Serving Size: 1 half squash
- Calories: 350
- Sugar: 5g
- Sodium: 400mg
- Fat: 10g
- Saturated Fat: 4g
- Unsaturated Fat: 6g
- Trans Fat: 0g
- Carbohydrates: 50g
- Fiber: 10g
- Protein: 12g
- Cholesterol: 30mg
Keywords: stuffed butternut squash, fall recipes, vegetarian dinner, cozy meals, healthy recipes
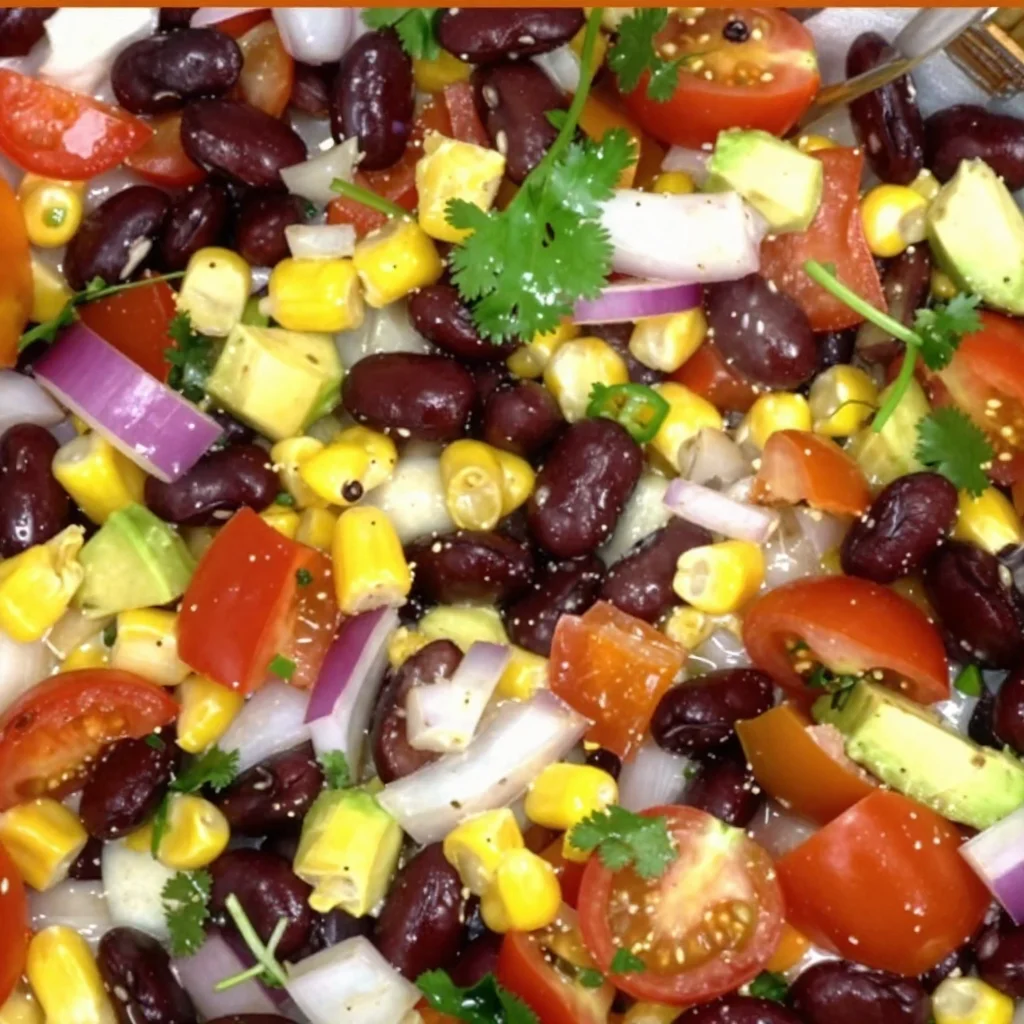
Minute Cowboy Caviar Salad for Weeknight Meal Prep
Cowboy Caviar Salad: A Flavorful Fiesta in a Bowl
Welcome to my kitchen! I’m so excited to share one of my absolute favorite salads with you today—Cowboy Caviar Salad. This vibrant dish is not just a salad; it’s a party in a bowl! Bursting with fresh vegetables, beans, and a zesty dressing, it’s perfect for any gathering, from casual get-togethers to festive celebrations. The best part? It’s super easy to whip up and is guaranteed to impress your friends and family.
Picture this: you’re kicking back at a summer barbecue, the sun is shining, and the aroma of grilled veggies wafts through the air. A big bowl of Cowboy Caviar Salad sits front and center on the picnic table, shimmering with colors that beckon everyone to dig in. As soon as you take a bite, the crunch of the veggies combined with the tangy dressing brings a wave of fresh flavors that instantly brightens your day. This dish is all about celebration—celebrating good food, good company, and the joy of sharing comforting meals that people will rave about long after the last bite.
Now that I’ve whetted your appetite, let me tell you a little story about how I fell in love with Cowboy Caviar Salad. One summer, I traveled to a friend’s ranch in Texas. It was my first time experiencing authentic cowboy culture, and I was on cloud nine. My friend’s mom made this incredible salad for a barbecue, and I was instantly hooked. The combination of black beans, corn, and fresh veggies was unlike anything I’d ever tasted, and the addition of a tantalizing dressing brought everything together perfectly. That moment sparked a journey into perfecting my own version of Cowboy Caviar Salad, filled with a few personal touches and a whole lot of love.
So grab your apron, and let’s get cooking!
Ingredients
Here’s what you’ll need to make this delicious Cowboy Caviar Salad. Each ingredient plays a vital role in creating those exciting flavors that keep everyone coming back for more.
-
Black Beans (1 can, drained and rinsed)
Black beans are the protein powerhouse of this dish! They add a creamy texture and a hearty flavor. You can substitute with kidney beans or pinto beans if you’re looking for a little twist. -
Corn (1 cup, fresh, frozen, or canned)
Corn brings a sweetness and crunch that lighten the salad. If fresh corn is out of season, frozen corn works just as well—just thaw it out before adding! Canned corn is also fine; just remember to drain and rinse it first. -
Cherry Tomatoes (1 cup, halved)
These little gems burst with tangy flavor and add a pop of color. If you can’t find cherry tomatoes, diced regular tomatoes will also do the trick. -
Red Bell Pepper (1, diced)
Red bell pepper adds sweetness and crunch. You can swap it for a yellow or orange bell pepper if you prefer. -
Red Onion (1/2, finely chopped)
It brings a sharp bite that balances the other flavors. You could substitute with green onions for a milder taste or even use shallots for sweetness. -
Avocado (1, diced)
Creamy avocado elevates the entire dish and adds a healthy fat component. If you’re looking to reduce calories, you can skip this or replace it with a dollop of Greek yogurt for creaminess. -
Cilantro (1/2 cup, chopped)
Fresh cilantro adds a burst of herbaceous flavor. If you’re not a fan, feel free to switch it out for parsley or omit it altogether. -
Lime Juice (from 2 limes)
This brightens everything up! Fresh lime juice works best; bottled lime juice won’t have the same vibrant flavor. -
Olive Oil (3 tablespoons)
Helps to marry the flavors and adds richness. You can use avocado oil for a different flavor profile. -
Salt and Pepper (to taste)
Always taste as you go! A pinch of salt and fresh cracked black pepper brings out the taste of all the ingredients. -
Cumin (1 teaspoon)
A pinch of cumin adds an earthy warmth that ties everything together. If you’re not a fan, you can skip it or use smoked paprika instead for a bit of a kick.
Step-by-Step Instructions
Alright, let’s get down to business and make this Cowboy Caviar Salad! Follow these steps, and I promise you’ll be enjoying a beautiful bowl of yum in no time.
Step 1: Prep Your Ingredients
First things first, let’s get everything washed, diced, and ready! Rinse the black beans and corn (if using canned), chop your tomatoes, bell pepper, onion, and cilantro, and dice your avocado. The key here is to get everything bite-sized so that every spoonful is a perfect mix of flavors and textures.
Step 2: Mix It All Together
Once your ingredients are prepped, it’s time to combine them. In a large mixing bowl, toss together the black beans, corn, cherry tomatoes, bell pepper, red onion, avocado, and cilantro. This is where the colorful magic happens! I love using a wooden spoon to gently mix everything, being careful not to mash the avocado too much.
Step 3: Whip Up the Dressing
Next, let’s elevate this salad with a zesty dressing! In a small bowl, whisk together the lime juice, olive oil, cumin, salt, and pepper. You want this dressing to be bold and bright! Drizzle it over your salad and toss everything together until it’s nicely coated. If you’re feeling adventurous, add a touch of hot sauce for an extra kick!
Step 4: Taste and Adjust
This is one of my favorite parts! Give your salad a taste and adjust the flavors as needed. Maybe it needs a pinch more salt or a squeeze of lime. Trust your palate; it knows what it wants! If the salad is too robust, you can always add a touch of honey or agave to balance it out.
Step 5: Chill and Serve
For the flavors to meld beautifully, let the Cowboy Caviar Salad chill in the fridge for at least 30 minutes. This is how the magic happens! When you finally serve it, it’s bursting with flavor. Feel free to add a sprinkle of extra cilantro on top for a pretty presentation.
Serving Suggestions
Cowboy Caviar Salad is incredibly versatile! Serve it in a large bowl with tortilla chips for dipping, as a side dish to your favorite grilled proteins, or even as a topping for tacos or burrito bowls. You can also layer it in a mason jar for a fun grab-and-go lunch. However you choose to enjoy it, it’s guaranteed to bring smiles to the table.
Recipe Variations
Here are some creative twists you can try with your Cowboy Caviar Salad:
- Spicy Cowboy Caviar: Add diced jalapeños for a spicy kick. Adjust the amount based on your heat tolerance!
- Southwestern Twist: Incorporate diced grilled chicken or shrimp for a heartier meal.
- Mediterranean Style: Swap out the beans for chickpeas and add feta cheese and olives for a Greek-inspired vibe.
- Quinoa Cowboy Caviar: Mix in cooked quinoa for added protein and a different texture.
- Fruit Fusion: Toss in some chopped mango or pineapple for a sweet twist that complements the savory ingredients beautifully.
Chef’s Notes
This Cowboy Caviar Salad has evolved over the years with my own personal touches! The original recipe I had in Texas was pretty basic, but I love adding different ingredients based on what’s in season or what I have in my fridge. Each batch has its own flair and story—some with an extra kick from chili powder or others with a touch of honey for sweetness. It’s all about experimenting and making it your own!
Whenever I make this salad, it reminds me of that fantastic summer in Texas and the memories made around the table with friends and family. Food has a wonderful way of connecting us, doesn’t it?
FAQs and Troubleshooting
1. Can I use canned beans?
Absolutely! Canned black beans work perfectly. Just make sure to drain and rinse them to remove excess sodium.
2. How long will it last in the fridge?
This salad is best enjoyed fresh, but it can last about 2-3 days in the fridge. The longer it sits, the softer the avocado will become. If you anticipate leftovers, consider adding avocado just before serving.
3. Can I make it ahead of time?
Definitely! Just make sure to add any avocado right before serving to prevent browning. The flavor will actually improve as it sits and chills.
4. What should I do if it’s too salty?
If your salad ends up being too salty, add a little bit of extra lime juice or a touch of sugar to balance it out. A little more corn or beans can also help dilute the saltiness.
Nutritional Info
(If applicable, please add the nutritional info for calculations based on your specific ingredients.)
This Cowboy Caviar Salad is not just delicious but also colorful and nutritious, packing in proteins, healthy fats, and fiber. Plus, it’s naturally gluten-free and vegan!
Thank you for joining me in my kitchen today! I hope you feel inspired to whip up this Cowboy Caviar Salad and share it with your loved ones. Remember, cooking is all about joy and creativity, so don’t be afraid to make it your own. Happy cooking, foodie friend!
Print
Cowboy Caviar Salad
- Total Time: 45 minutes
- Yield: 4 servings 1x
- Diet: Vegan
Description
A vibrant and flavorful salad bursting with fresh vegetables, beans, and a zesty dressing, perfect for any gathering.
Ingredients
- 1 can Black Beans, drained and rinsed
- 1 cup Corn (fresh, frozen, or canned)
- 1 cup Cherry Tomatoes, halved
- 1 Red Bell Pepper, diced
- 1/2 Red Onion, finely chopped
- 1 Avocado, diced
- 1/2 cup Cilantro, chopped
- Juice of 2 Limes
- 3 tablespoons Olive Oil
- Salt and Pepper, to taste
- 1 teaspoon Cumin
Instructions
- Prep your ingredients by washing, dicing, and getting everything ready.
- Mix all prepped ingredients in a large mixing bowl.
- Whip up the dressing by whisking together lime juice, olive oil, cumin, salt, and pepper.
- Taste and adjust flavors as needed.
- Chill the salad in the fridge for at least 30 minutes before serving.
Notes
Customize the salad with added ingredients like jalapeños for spice or grilled chicken for heartiness.
- Prep Time: 15 minutes
- Cook Time: 0 minutes
- Category: Salad
- Method: Mixing
- Cuisine: Tex-Mex
Nutrition
- Serving Size: 1 serving
- Calories: 250
- Sugar: 4g
- Sodium: 300mg
- Fat: 12g
- Saturated Fat: 1.5g
- Unsaturated Fat: 10g
- Trans Fat: 0g
- Carbohydrates: 30g
- Fiber: 8g
- Protein: 10g
- Cholesterol: 0mg
Keywords: salad, cowboy caviar, Tex-Mex, black beans, healthy recipes

Chimichurri Chicken Thighs
Chimichurri Chicken Thighs: A Flavorful Journey
Hey there, fellow food lovers! Welcome back to my cozy corner of the culinary world where the oven is always warm, and the aroma of delicious flavors fills the air. Today, I’m super excited to share a recipe that’s not just a winner in my home but one that’s sure to spice up your meals — Chimichurri Chicken Thighs! You might be wondering what makes this dish stand out. Well, let me tell you; it’s a vibrant dance between juicy chicken, zesty herbs, and a splash of unforgettable Argentinian flair.
Chimichurri, a sauce born from the sun-soaked landscapes of Argentina, is the real star here! It’s packed with fresh parsley, garlic, and just the right amount of tangy goodness. When paired with succulent, tender chicken thighs, it creates a perfect balance that’s fragrant and downright irresistible. Whether you’re feeding a crew of hungry friends or enjoying a quiet night in, this dish is an absolute showstopper.
Beyond its bold flavors, what I love most about making Chimichurri Chicken Thighs is how quick and easy it is to whip up. Trust me, no fancy-schmancy skills are required here! A little chopping, a little marinating, and before you know it, you’re basking in the sweet glory of a delightful homemade meal that impresses without the stress.
So, grab your apron and let’s dive into the world of Chimichurri Chicken Thighs! This recipe is not just about cooking; it’s about creating joyful memories around the table. Ready? Let’s go!
Personal Story
Whenever I think of Chimichurri Chicken Thighs, my mind drifts back to one summer evening spent with my family in my grandmother’s backyard. The sun was setting, painting the sky with shades of pink and orange, and the air was filled with laughter, the smell of grilled meats, and chimichurri sauce that had been generously drizzled over everything. Grandma had a magic touch with her cooking, and her chimichurri was unmatched.
That evening, we were all gathered around a rustic wooden table, swapping stories while devouring dish after dish, each bite transporting us to the heart of Argentina. Everyone had their own opinion on the best way to enjoy chimichurri: some preferred it drizzle over grilled vegetables, others liked it thick on their steak, while I was loyal to my love for chicken thighs. With each mouthful, I felt the warmth of family and passion for cooking come alive. It was more than just a meal; it was a gathering of hearts and flavors, a feast that sparked joy and connection.
Fast forward to today, and I find myself recreating that magical evening. Every time I make Chimichurri Chicken Thighs, I can almost hear my grandmother’s laughter and feel that summer warmth all over again. So, let’s bring that nostalgia back to life, shall we?
Ingredients
Now that we’ve set the mood, let’s gather our ingredients! Below is a list of what you’ll need to whip up these scrumptious Chimichurri Chicken Thighs, along with some handy insights to make your cooking experience even smoother:
-
Bone-in, skin-on chicken thighs (4 pieces)
These are juicy and flavorful, making for a perfect canvas for our chimichurri marinade. If you prefer a healthier option, boneless, skinless thighs work well too! Just adjust the cooking time slightly. -
Fresh parsley (1 cup, chopped)
This is the heart and soul of the chimichurri! Use flat-leaf parsley for its vibrant flavor. If you’re feeling adventurous, mix in some cilantro for a fresh twist. -
Garlic cloves (4 cloves, minced)
Garlic adds that irresistible punch! Feel free to reduce this amount if you’re not a fan of strong garlic flavors, or even try roasted garlic for a sweeter, milder taste. -
Red wine vinegar (1/3 cup)
This tangy vinegar balances the richness of the chicken beautifully, adding a fragrant zing. If you don’t have red wine vinegar on hand, apple cider vinegar is a great substitute. -
Olive oil (1/3 cup)
A good quality olive oil takes the sauce to another level. You can also use avocado oil for a different flavor profile. Just make sure to keep that bottle in the pantry ready for your next recipe! -
Red pepper flakes (¼ teaspoon, or to taste)
This offers a delightful kick! Adjust the amount based on your spice tolerance — you can always start with less and add more as you taste. -
Kosher salt and freshly ground pepper (to taste)
Don’t skip this! Seasoning enhances every flavor. I suggest using kosher salt for a balanced salinity! -
Lemon juice (from half a lemon)
Add a pop of freshness with this! If you’re in a pinch, bottled lemon juice also works — but fresh is always best!
Step-by-Step Instructions
Alright, time to get down to business! Here’s how to make these magical Chimichurri Chicken Thighs step by step — don’t worry, I’ll guide you through every moment so you can feel like a rockstar in your kitchen!
Step 1: Prepare the Chimichurri Sauce
-
Chop the parsley and garlic:
Start by finely chopping the fresh parsley and mincing the garlic cloves. You want those fresh aromas to come together beautifully! I often use a chef’s knife because it makes the chopping more efficient and fun. Plus, it’s a great way to channel your inner culinary ninja! -
Mix the ingredients:
In a small bowl or a food processor, combine the chopped parsley, minced garlic, red wine vinegar, olive oil, red pepper flakes, and a good pinch of salt and pepper. If you’re using a food processor, pulse until the mixture is well-combined but still slightly chunky. If doing it by hand, just stir well until everything is combined. The colors should be vibrant — just like your cooking spirit! -
Taste and adjust:
Here’s where you add your chef’s magic touch! Give it a taste and adjust for salt, acidity, and spice. If it tastes a little flat, a squeeze of lemon juice can brighten it right up!
Step 2: Marinate the Chicken
-
Prepare the chicken:
Rinse and pat the chicken thighs dry with paper towels. This helps to achieve that perfect crispness when cooking. Then, place the chicken thighs in a large bowl or a resealable bag. -
Add the chimichurri sauce:
Pour half of the chimichurri sauce over the chicken thighs, making sure they’re well-coated. Save the other half for serving — trust me, you’ll want it on the side! Marinate the chicken for at least 30 minutes if you’re in a hurry, or up to overnight in the fridge for maximum flavor.
Step 3: Cook the Chicken
-
Preheat the grill or oven:
If you’re grilling, preheat it to medium-high heat (around 425°F). If you’re baking, preheat your oven to 375°F. Both methods work great, so choose what suits your vibe today! -
Grill or bake the chicken:
On a grill, place the marinated chicken thighs skin-side down. Grill for about 6-8 minutes per side, or until the internal temperature reaches 165°F. If baking, place them in a greased baking dish and bake for about 35-40 minutes. -
Crisp the skin:
If you’re grilling, check back often to avoid flare-ups from the fat! If you’re baking, to create the crispy skin, turn the oven broiler on for the last 5 minutes of cooking — just keep an eye on it to prevent burning!
Step 4: Serve and Enjoy
-
Let it rest:
Once cooked, remove the chicken from the heat and let it rest for about 5-10 minutes. This allows those juices to redistribute and keeps your chicken juicy! -
Plate it up:
Serve those glorious chicken thighs with a generous drizzle of the reserved chimichurri sauce over the top. Adding some roasted veggies or a fresh salad on the side makes for a beautiful presentation!
Serving Suggestions
For a cozy family meal, arrange your Chimichurri Chicken Thighs on a large platter, drizzling the chimichurri sauce all over and garnishing with lemon slices and sprigs of fresh parsley. Serve alongside your favorite sides like roasted garlic potatoes or a vibrant quinoa salad to complement the dish. Don’t forget a glass of red wine or sparkling water to round off the experience. Cheers to good food and great company!
Recipe Variations
-
Grilled Chimichurri Shrimp: Swap out the chicken thighs for succulent shrimp. Marinate for about 15-20 minutes and grill just until pink, for a quick seafood twist!
-
Chimichurri Tofu: For a vegetarian version, use firm tofu. Marinate, grill, and serve with chimichurri — it’s just as tasty!
-
Pasta with Chimichurri Chicken: After preparing the chicken, chop it up and toss it with al dente pasta, a drizzle of olive oil, and a sprinkle of Parmesan for a delectable, hearty meal.
-
Chimichurri Meatballs: Create flavorful meatballs using beef or turkey and bake them, topped with chimichurri sauce for a fun twist on the classic.
Chef’s Notes
As I’ve experimented with this recipe over the years, I’ve discovered the beauty of cooking is its adaptability. The original chimichurri serves beautifully as a marinade, but you can enjoy it in so many ways! I’ll never forget the time I tried to impress a group of friends and accidentally over-marinated the chicken. It was on the saltier side but surprisingly delicious! That’s when I learned the importance of balance in flavors.
Food is meant to be fun and exciting! Don’t hesitate to mix things up according to your cravings. Throw in some nuts or even a hint of honey to the chimichurri for a sweeter touch, and I promise, the results will surprise you.
FAQs and Troubleshooting
1. My chicken turned out dry. What happened?
This could be due to overcooking. Always use a meat thermometer to check the internal temperature (165°F is ideal!). If you’re unsure, err on the side of caution and take it off early; it can always cook a tad more while resting.
2. Can I make the chimichurri sauce in advance?
Absolutely! You can prep the sauce a day ahead and store it in the fridge. Just let it sit at room temperature for a bit before serving, as olive oil can solidify when cold!
3. Is it okay if I don’t have fresh herbs?
While fresh herbs deliver maximum flavor, you can use dried herbs in a pinch! Just remember that dried herbs are more concentrated — a teaspoon per tablespoon of fresh.
4. How long can I store leftover chicken and chimichurri?
If you have leftovers (which might be unlikely, but great if you do!), store them in an airtight container in the fridge for 3-4 days. The chimichurri sauce can last up to a week.
Nutritional Info
Chimichurri Chicken Thighs (per serving, without sides):
- Calories: ~350
- Protein: ~25g
- Fat: ~25g
- Carbohydrates: ~4g
- Fiber: ~1g
So there you have it! A flavorful journey through Chimichurri Chicken Thighs that’s guaranteed to warm your heart and fill your tummy. I hope you enjoy every savory bite as much as I do and make memories that linger long after the last plate is cleared. Happy cooking, and remember to always cook with love!
Print
Chimichurri Chicken Thighs
- Total Time: 55 minutes
- Yield: 4 servings 1x
- Diet: Paleo
Description
Juicy chicken thighs marinated in vibrant chimichurri sauce, embodying the flavors of Argentina.
Ingredients
- 4 bone-in, skin-on chicken thighs
- 1 cup fresh parsley, chopped
- 4 garlic cloves, minced
- 1/3 cup red wine vinegar
- 1/3 cup olive oil
- ¼ teaspoon red pepper flakes (or to taste)
- Kosher salt and freshly ground pepper (to taste)
- Juice from half a lemon
Instructions
- Prepare the Chimichurri Sauce: Chop the parsley and garlic. Mix in a bowl with parsley, minced garlic, red wine vinegar, olive oil, red pepper flakes, and a pinch of salt and pepper. Taste and adjust flavors.
- Marinate the Chicken: Rinse and pat chicken thighs dry. Place in a bowl, pour half of the chimichurri sauce over and marinate, refrigerating for at least 30 minutes or overnight.
- Cook the Chicken: Preheat grill to medium-high (425°F) or oven to 375°F. Grill chicken skin-side down for 6-8 minutes per side until reaching 165°F, or bake for 35-40 minutes. Broil for crisp skin if desired.
- Serve and Enjoy: Let the chicken rest for 5-10 minutes, then drizzle with reserved chimichurri sauce before serving.
Notes
Add roasted vegetables or a fresh salad to your meal for a complete experience. Adjust the chimichurri spice level per your taste.
- Prep Time: 15 minutes
- Cook Time: 40 minutes
- Category: Main Course
- Method: Grilling, Baking
- Cuisine: Argentinian
Nutrition
- Serving Size: 1 chicken thigh
- Calories: 350
- Sugar: 1g
- Sodium: 500mg
- Fat: 25g
- Saturated Fat: 6g
- Unsaturated Fat: 15g
- Trans Fat: 0g
- Carbohydrates: 4g
- Fiber: 1g
- Protein: 25g
- Cholesterol: 100mg
Keywords: chimichurri, chicken thighs, Argentinian, grilling, main course


