
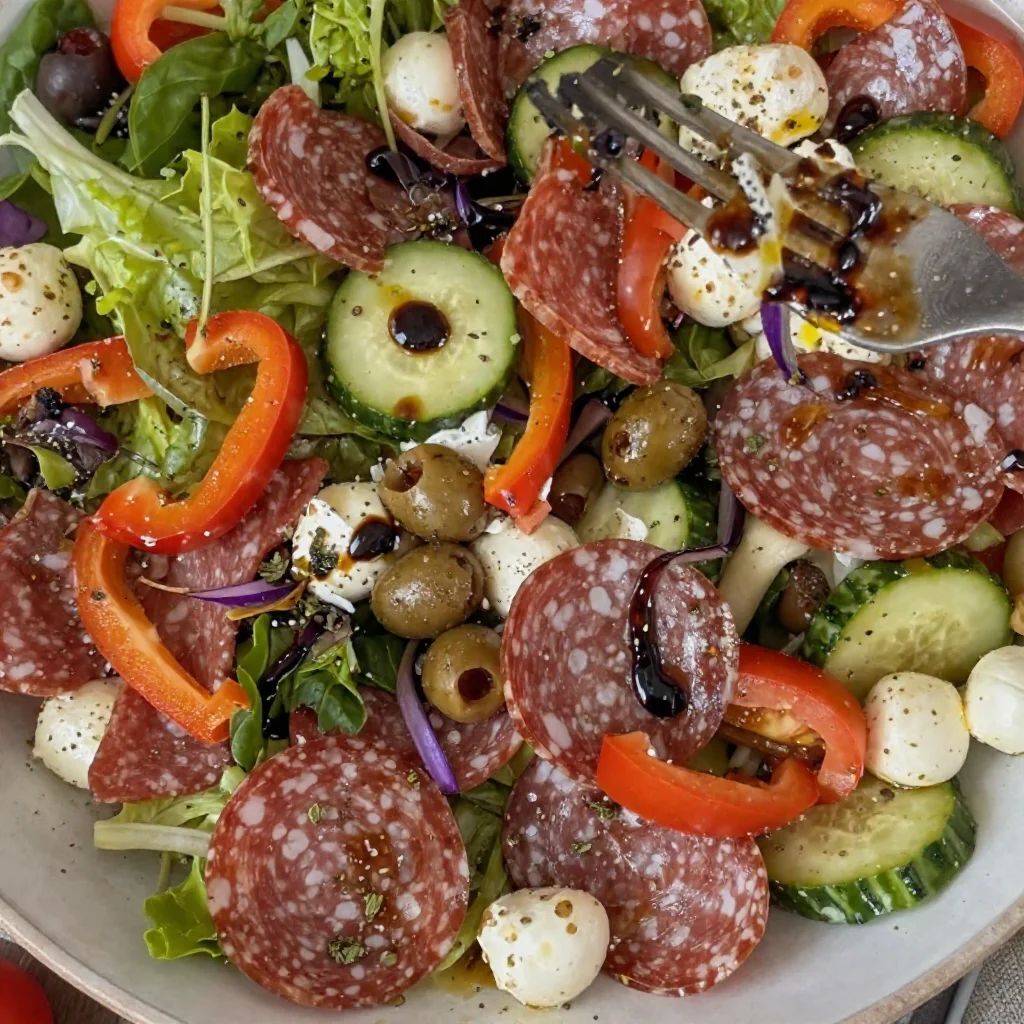
Antipasto Salad
Antipasto Salad: A Symphony of Flavor in a Bowl
Welcome to my cozy corner of culinary magic! Today, I’m beyond excited to share one of my all-time favorite dishes—Antipasto Salad. Now, you might be wondering, “What’s so special about a salad?” But let me tell you, this isn’t just any salad; it’s a vibrant, mouthwatering medley of flavors and textures that brings a fresh twist to your dining table. Think of it as a summer picnic in a bowl or a stylish appetizer that can steal the show at any gathering.
One of the coolest things about this Antipasto Salad is that it’s incredibly versatile. You can customize it to include your favorite ingredients, and it makes for the perfect addition to any meal or occasion. Whether you’re hosting a casual get-together with friends, planning a romantic dinner, or simply craving a colorful, satisfying dish, this salad has you covered.
Picture this: crisp greens, juicy olives, savory salami, rich cheeses, and a symphony of fresh vegetables, all drizzled with a tangy homemade dressing. My mouth is watering just thinking about it! So, grab your chopping board and an apron, and let’s dive into this delicious experience together!
A Taste of Nostalgia
Before we get into the nitty-gritty of preparing this delightful salad, let me take you on a little trip down memory lane. The first time I fell head over heels for antipasto was during a summer family gathering at my Aunt Margherita’s house. Every year, she would throw an Italian feast that felt like a warm hug. Amidst the laughter and the sounds of pasta sizzling away, a large platter of antipasto graced the table— vibrant colors, enticing aromas, and an array of delectable treats.
I remember standing on tiptoes next to the table, trying to reach for the spicy pepperoni and the sharp provolone. As I sampled the goods, my aunt would tell tales of our Italian heritage while encouraging me to mix and match flavors. The joy of discovering new combinations stuck with me. It wasn’t just a dish; it was a celebration of family, culture, and creativity. This Antipasto Salad is my homage to that unforgettable day. It allows me to recreate those feelings of warmth and togetherness, and I’m thrilled to share that sense with all of you!
Ingredients
Let’s gather our ingredients! Here’s what you’ll need to whip up this fabulous Antipasto Salad:
-
Mixed Greens (4 cups)
- Insight: Use a combination of romaine, arugula, and spinach for a variety of flavors. Feel free to swap with any leafy greens you prefer!
-
Cherry Tomatoes (1 cup, halved)
- Substitution Tips: If cherry tomatoes aren’t in season, you can use chopped regular tomatoes. Their juicy sweetness is non-negotiable!
-
Cucumber (1 large, diced)
- Chef Insight: For added crunch, choose English cucumbers, which have fewer seeds and a crisper texture.
-
Olives (½ cup, mixed varieties)
- Insight: Kalamata, green, and black olives add complexity. If you’re a fan of something less salty, try sweet Hungarian pepper or even artichoke hearts!
-
Salami (6 oz, sliced)
- Substitution Tips: Prosciutto or pepperoni work equally well, or make it vegetarian by swapping in marinated mushrooms.
-
Mozzarella Balls (1 cup, halved)
- Chef Insight: Fresh mozzarella brings a creamy texture. You can also use feta for a tangier taste!
-
Roasted Red Peppers (½ cup, sliced)
- Substitution Tips: You can use fresh bell peppers if you prefer a bit of crunch and sweetness.
-
Red Onion (¼ cup, thinly sliced)
- Chef Insight: Soaking the slices in cold water for a few minutes can mellow out their sharpness.
-
Basil (¼ cup, fresh, chopped)
- Insight: Fresh herbs are crucial! If basil isn’t available, try substituting with parsley or even arugula for a peppery kick.
-
Olive Oil (3 tablespoons)
-
Red Wine Vinegar (2 tablespoons)
-
Dried Oregano (1 teaspoon)
-
Salt & Pepper (to taste)
Step-by-Step Instructions
Step 1: Prep Your Greens
Start by washing and thoroughly drying your mixed greens. If you’re like me and love the art of a beautifully arranged salad, take a moment to chop them into bite-sized pieces. Don’t forget a splash of crispiness! If you have a salad spinner, now’s the time to show it off; those greens will thank you later.
Step 2: Dice Your Veggies
Next, grab that cucumber! Chop it into half-moons, then slice your cherry tomatoes in half. Just like that, these ingredients are ready to join the party! These colorful veggies are the backbone of your salad, delivering both flavor and crunch. If you want an even more robust flavor, sprinkle a bit of salt on the tomatoes to enhance their innate sweetness.
Step 3: Prepare the Dressing
Now, let’s make our tangy dressing! In a small bowl or a mason jar, combine the olive oil, red wine vinegar, dried oregano, salt, and pepper. Give it a good whisk or shake until everything is combined! Here’s a chef hack: taste it before you serve! If you want more bite, a splash more of vinegar will do the trick. Adjust based on your preference—it’s your creation, after all!
Step 4: Combine Ingredients
In a large bowl, combine the mixed greens, diced cucumbers, halved cherry tomatoes, and olives. Toss gently to combine. Here’s where you can start visualizing your masterpiece! Once you add the salami, mozzarella, roasted red peppers, and red onion, your salad will start coming together beautifully.
Step 5: Dress It Up!
Now it’s time for the magic! Pour your homemade dressing over the salad—don’t be shy; you want every leaf to be coated! Gently toss until everything is well coated. If you’re feeling fancy, add a few extra sprigs of basil on top for a splash of color.
Step 6: Serve it Up!
Transfer your wonderfully vibrant salad into a large serving bowl or arrange it on plates. You can garnish it with remaining olives or a sprinkle of Parmesan if you’re feeling indulgent. Antipasto Salad is at its best when served fresh, but you can make it ahead of time! Just keep the dressing separate until it’s time to serve, so everything remains crisp.
Serving Suggestions
Antipasto Salad shines when served alongside crusty bread or homemade focaccia. Picture this: a slice of warm bread, a generous scoop of your colorful salad, and a drizzle of that zesty dressing—heavenly! It also complements grilled chicken or seafood beautifully, making it a versatile addition to any meal.
Recipe Variations
- Mediterranean Twist: Add chickpeas and crumbled feta cheese for a heartier, plant-based vibe.
- Cobb-Style: Incorporate hard-boiled eggs and avocado to create a protein-packed version.
- Spicy Kick: Toss in jalapeño slices or a drizzle of hot sauce for an extra zing!
- Sweet and Savory: Include roasted butternut squash and walnuts for a sweeter, seasonal take.
- Family Style: Serve the ingredients deconstructed, allowing everyone to build their perfect salad.
Chef’s Notes
This Antipasto Salad has come a long way from the basic recipes I first encountered. I’ve experimented with countless ingredients over time. One of my most memorable kitchen stories involves a giant jar of sun-dried tomatoes that my friend gifted me; it went into every dish for a week! That experiment ignited my love for bold flavors, and now, I often toss in whatever strikes my fancy!
FAQs and Troubleshooting
Q1: Can I make this salad ahead of time?
Absolutely! You can prep all your ingredients and store them in the fridge for up to a day. Just keep the dressing separate to ensure the greens stay crisp.
Q2: What if I don’t like olives?
No problem! Feel free to omit olives and replace them with something you enjoy, like sliced radishes for crunch or additional veggies, such as artichoke hearts.
Q3: How do I prevent my salad from getting soggy?
For the freshest salad, add the dressing right before you’re ready to serve. Store the salad and dressing separately if prepping in advance!
Q4: Can I add protein?
Definitely! Grilled chicken, shrimp, or even some beans are great options to bulk up this salad for a more filling meal.
Nutritional Info
While nutritional values can vary based on the specific ingredients used, this Antipasto Salad is packed with nutrients, healthy fats, fiber, and protein, making it a well-rounded dish that’s perfect for any meal.
There you have it—a vibrant, delicious, and truly customizable Antipasto Salad that brings a little Italian flair to your kitchen! I hope you enjoy making this recipe as much as I loved sharing it with you. So, roll up your sleeves, throw on that apron, and let’s make some delicious memories in the kitchen together! Happy cooking!
Print
Antipasto Salad
- Total Time: 15 minutes
- Yield: 4 servings 1x
- Diet: Vegetarian
Description
A vibrant, mouthwatering medley of flavors and textures, perfect for any meal or occasion.
Ingredients
- 4 cups Mixed Greens (romaine, arugula, spinach)
- 1 cup Cherry Tomatoes, halved
- 1 large Cucumber, diced
- ½ cup Olives, mixed varieties
- 6 oz Salami, sliced
- 1 cup Mozzarella Balls, halved
- ½ cup Roasted Red Peppers, sliced
- ¼ cup Red Onion, thinly sliced
- ¼ cup Fresh Basil, chopped
- 3 tablespoons Olive Oil
- 2 tablespoons Red Wine Vinegar
- 1 teaspoon Dried Oregano
- Salt & Pepper, to taste
Instructions
- Prep your greens by washing and drying them, then chop into bite-sized pieces.
- Dice your cucumber and halve the cherry tomatoes.
- Prepare the dressing in a small bowl by combining olive oil, red wine vinegar, dried oregano, salt, and pepper.
- Combine the mixed greens, diced cucumber, halved tomatoes, and olives in a large bowl.
- Dress the salad by pouring the dressing over it and gently tossing to combine.
- Serve in a large bowl or on plates, garnished with additional olives or Parmesan if desired.
Notes
Make ahead by preparing all ingredients and storing them, but keep the dressing separate until serving to maintain freshness.
- Prep Time: 15 minutes
- Cook Time: 0 minutes
- Category: Salad
- Method: No-Cook
- Cuisine: Italian
Nutrition
- Serving Size: 1 serving
- Calories: 350
- Sugar: 6g
- Sodium: 900mg
- Fat: 24g
- Saturated Fat: 10g
- Unsaturated Fat: 10g
- Trans Fat: 0g
- Carbohydrates: 20g
- Fiber: 3g
- Protein: 12g
- Cholesterol: 30mg
Keywords: salad, antipasto, Italian, fresh ingredients, summer dish, easy recipe, vegetarian
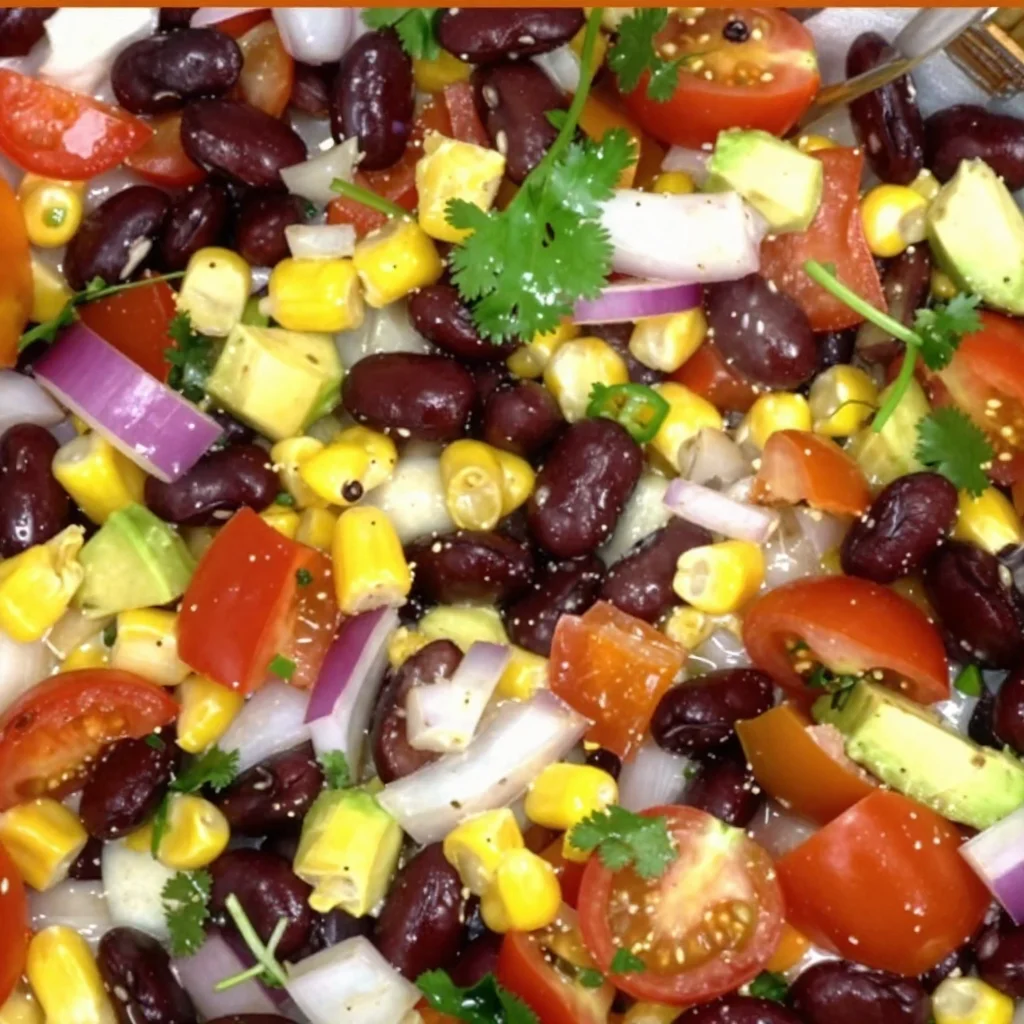
Minute Cowboy Caviar Salad for Weeknight Meal Prep
Cowboy Caviar Salad: A Flavorful Fiesta in a Bowl
Welcome to my kitchen! I’m so excited to share one of my absolute favorite salads with you today—Cowboy Caviar Salad. This vibrant dish is not just a salad; it’s a party in a bowl! Bursting with fresh vegetables, beans, and a zesty dressing, it’s perfect for any gathering, from casual get-togethers to festive celebrations. The best part? It’s super easy to whip up and is guaranteed to impress your friends and family.
Picture this: you’re kicking back at a summer barbecue, the sun is shining, and the aroma of grilled veggies wafts through the air. A big bowl of Cowboy Caviar Salad sits front and center on the picnic table, shimmering with colors that beckon everyone to dig in. As soon as you take a bite, the crunch of the veggies combined with the tangy dressing brings a wave of fresh flavors that instantly brightens your day. This dish is all about celebration—celebrating good food, good company, and the joy of sharing comforting meals that people will rave about long after the last bite.
Now that I’ve whetted your appetite, let me tell you a little story about how I fell in love with Cowboy Caviar Salad. One summer, I traveled to a friend’s ranch in Texas. It was my first time experiencing authentic cowboy culture, and I was on cloud nine. My friend’s mom made this incredible salad for a barbecue, and I was instantly hooked. The combination of black beans, corn, and fresh veggies was unlike anything I’d ever tasted, and the addition of a tantalizing dressing brought everything together perfectly. That moment sparked a journey into perfecting my own version of Cowboy Caviar Salad, filled with a few personal touches and a whole lot of love.
So grab your apron, and let’s get cooking!
Ingredients
Here’s what you’ll need to make this delicious Cowboy Caviar Salad. Each ingredient plays a vital role in creating those exciting flavors that keep everyone coming back for more.
-
Black Beans (1 can, drained and rinsed)
Black beans are the protein powerhouse of this dish! They add a creamy texture and a hearty flavor. You can substitute with kidney beans or pinto beans if you’re looking for a little twist. -
Corn (1 cup, fresh, frozen, or canned)
Corn brings a sweetness and crunch that lighten the salad. If fresh corn is out of season, frozen corn works just as well—just thaw it out before adding! Canned corn is also fine; just remember to drain and rinse it first. -
Cherry Tomatoes (1 cup, halved)
These little gems burst with tangy flavor and add a pop of color. If you can’t find cherry tomatoes, diced regular tomatoes will also do the trick. -
Red Bell Pepper (1, diced)
Red bell pepper adds sweetness and crunch. You can swap it for a yellow or orange bell pepper if you prefer. -
Red Onion (1/2, finely chopped)
It brings a sharp bite that balances the other flavors. You could substitute with green onions for a milder taste or even use shallots for sweetness. -
Avocado (1, diced)
Creamy avocado elevates the entire dish and adds a healthy fat component. If you’re looking to reduce calories, you can skip this or replace it with a dollop of Greek yogurt for creaminess. -
Cilantro (1/2 cup, chopped)
Fresh cilantro adds a burst of herbaceous flavor. If you’re not a fan, feel free to switch it out for parsley or omit it altogether. -
Lime Juice (from 2 limes)
This brightens everything up! Fresh lime juice works best; bottled lime juice won’t have the same vibrant flavor. -
Olive Oil (3 tablespoons)
Helps to marry the flavors and adds richness. You can use avocado oil for a different flavor profile. -
Salt and Pepper (to taste)
Always taste as you go! A pinch of salt and fresh cracked black pepper brings out the taste of all the ingredients. -
Cumin (1 teaspoon)
A pinch of cumin adds an earthy warmth that ties everything together. If you’re not a fan, you can skip it or use smoked paprika instead for a bit of a kick.
Step-by-Step Instructions
Alright, let’s get down to business and make this Cowboy Caviar Salad! Follow these steps, and I promise you’ll be enjoying a beautiful bowl of yum in no time.
Step 1: Prep Your Ingredients
First things first, let’s get everything washed, diced, and ready! Rinse the black beans and corn (if using canned), chop your tomatoes, bell pepper, onion, and cilantro, and dice your avocado. The key here is to get everything bite-sized so that every spoonful is a perfect mix of flavors and textures.
Step 2: Mix It All Together
Once your ingredients are prepped, it’s time to combine them. In a large mixing bowl, toss together the black beans, corn, cherry tomatoes, bell pepper, red onion, avocado, and cilantro. This is where the colorful magic happens! I love using a wooden spoon to gently mix everything, being careful not to mash the avocado too much.
Step 3: Whip Up the Dressing
Next, let’s elevate this salad with a zesty dressing! In a small bowl, whisk together the lime juice, olive oil, cumin, salt, and pepper. You want this dressing to be bold and bright! Drizzle it over your salad and toss everything together until it’s nicely coated. If you’re feeling adventurous, add a touch of hot sauce for an extra kick!
Step 4: Taste and Adjust
This is one of my favorite parts! Give your salad a taste and adjust the flavors as needed. Maybe it needs a pinch more salt or a squeeze of lime. Trust your palate; it knows what it wants! If the salad is too robust, you can always add a touch of honey or agave to balance it out.
Step 5: Chill and Serve
For the flavors to meld beautifully, let the Cowboy Caviar Salad chill in the fridge for at least 30 minutes. This is how the magic happens! When you finally serve it, it’s bursting with flavor. Feel free to add a sprinkle of extra cilantro on top for a pretty presentation.
Serving Suggestions
Cowboy Caviar Salad is incredibly versatile! Serve it in a large bowl with tortilla chips for dipping, as a side dish to your favorite grilled proteins, or even as a topping for tacos or burrito bowls. You can also layer it in a mason jar for a fun grab-and-go lunch. However you choose to enjoy it, it’s guaranteed to bring smiles to the table.
Recipe Variations
Here are some creative twists you can try with your Cowboy Caviar Salad:
- Spicy Cowboy Caviar: Add diced jalapeños for a spicy kick. Adjust the amount based on your heat tolerance!
- Southwestern Twist: Incorporate diced grilled chicken or shrimp for a heartier meal.
- Mediterranean Style: Swap out the beans for chickpeas and add feta cheese and olives for a Greek-inspired vibe.
- Quinoa Cowboy Caviar: Mix in cooked quinoa for added protein and a different texture.
- Fruit Fusion: Toss in some chopped mango or pineapple for a sweet twist that complements the savory ingredients beautifully.
Chef’s Notes
This Cowboy Caviar Salad has evolved over the years with my own personal touches! The original recipe I had in Texas was pretty basic, but I love adding different ingredients based on what’s in season or what I have in my fridge. Each batch has its own flair and story—some with an extra kick from chili powder or others with a touch of honey for sweetness. It’s all about experimenting and making it your own!
Whenever I make this salad, it reminds me of that fantastic summer in Texas and the memories made around the table with friends and family. Food has a wonderful way of connecting us, doesn’t it?
FAQs and Troubleshooting
1. Can I use canned beans?
Absolutely! Canned black beans work perfectly. Just make sure to drain and rinse them to remove excess sodium.
2. How long will it last in the fridge?
This salad is best enjoyed fresh, but it can last about 2-3 days in the fridge. The longer it sits, the softer the avocado will become. If you anticipate leftovers, consider adding avocado just before serving.
3. Can I make it ahead of time?
Definitely! Just make sure to add any avocado right before serving to prevent browning. The flavor will actually improve as it sits and chills.
4. What should I do if it’s too salty?
If your salad ends up being too salty, add a little bit of extra lime juice or a touch of sugar to balance it out. A little more corn or beans can also help dilute the saltiness.
Nutritional Info
(If applicable, please add the nutritional info for calculations based on your specific ingredients.)
This Cowboy Caviar Salad is not just delicious but also colorful and nutritious, packing in proteins, healthy fats, and fiber. Plus, it’s naturally gluten-free and vegan!
Thank you for joining me in my kitchen today! I hope you feel inspired to whip up this Cowboy Caviar Salad and share it with your loved ones. Remember, cooking is all about joy and creativity, so don’t be afraid to make it your own. Happy cooking, foodie friend!
Print
Cowboy Caviar Salad
- Total Time: 45 minutes
- Yield: 4 servings 1x
- Diet: Vegan
Description
A vibrant and flavorful salad bursting with fresh vegetables, beans, and a zesty dressing, perfect for any gathering.
Ingredients
- 1 can Black Beans, drained and rinsed
- 1 cup Corn (fresh, frozen, or canned)
- 1 cup Cherry Tomatoes, halved
- 1 Red Bell Pepper, diced
- 1/2 Red Onion, finely chopped
- 1 Avocado, diced
- 1/2 cup Cilantro, chopped
- Juice of 2 Limes
- 3 tablespoons Olive Oil
- Salt and Pepper, to taste
- 1 teaspoon Cumin
Instructions
- Prep your ingredients by washing, dicing, and getting everything ready.
- Mix all prepped ingredients in a large mixing bowl.
- Whip up the dressing by whisking together lime juice, olive oil, cumin, salt, and pepper.
- Taste and adjust flavors as needed.
- Chill the salad in the fridge for at least 30 minutes before serving.
Notes
Customize the salad with added ingredients like jalapeños for spice or grilled chicken for heartiness.
- Prep Time: 15 minutes
- Cook Time: 0 minutes
- Category: Salad
- Method: Mixing
- Cuisine: Tex-Mex
Nutrition
- Serving Size: 1 serving
- Calories: 250
- Sugar: 4g
- Sodium: 300mg
- Fat: 12g
- Saturated Fat: 1.5g
- Unsaturated Fat: 10g
- Trans Fat: 0g
- Carbohydrates: 30g
- Fiber: 8g
- Protein: 10g
- Cholesterol: 0mg
Keywords: salad, cowboy caviar, Tex-Mex, black beans, healthy recipes

Ina Garten Black Bean Salad
Ina Garten’s Black Bean Salad: A Colorful, Flavorful Feast!
Welcome to my kitchen! I’m Olivia Bennett, and today, we’re diving into a vibrant, healthy dish that’s perfect for any occasion: Ina Garten’s Black Bean Salad. This isn’t just a salad—it’s a celebration of flavor, texture, and color that brings joy to your table and heart. Whether you enjoy it as a main dish, a side, or a filling addition to your next BBQ, this salad is all about simplicity and deliciousness.
There’s something incredibly comforting about a meal that ticks all the boxes of taste, nutrition, and nostalgia. For me, Ina Garten’s Black Bean Salad encompasses that perfectly. Bright, fresh ingredients come together to create a dish that is as photogenic as it is delectable. When I first discovered this recipe, I was captivated by its vibrant colors and the simplicity with which it came together. It became a staple in my cooking repertoire, perfect for summer gatherings, family dinners, and even cozy nights in.
This salad is not just about the ingredients; it’s a testament to the joy of cooking and sharing good food. Every time I make this salad, I think about those sunny afternoons spent barbecuing with friends, laughter echoing through the yard, and the tantalizing mix of aromas that wafted through the air. This isn’t just food; it’s a memory, a connection, and an experience.
What’s wonderful about this dish is that it’s incredibly versatile. Packed with protein, fiber, and vibrant veggies, a black bean salad invites everyone to dig in—whether you are a health nut, a busy parent, or a culinary explorer seeking new flavors. It’s not just a salad; it’s a conversation starter, a gathering point, and a delicious option for those embracing a plant-based lifestyle. So, grab your knives, put on your apron, and let’s make magic happen in the kitchen!
Personal Story
I still remember the first time I tasted Ina Garten’s Black Bean Salad at a friend’s outdoor barbecue. It was a sunny Saturday, and the scent of grilled veggies filled the air. Among the dishes laid out on the picnic table, this colorful salad caught my eye. I took a spoonful hesitantly, unsure of whether black beans could really be the star of the show. But as soon as I took that first bite, it was love at first taste!
The crunchy bell peppers, fresh cilantro, and zesty lime vinaigrette danced on my palate, and I soon found myself heading back for seconds (and thirds). The simplicity of the ingredients made it even more remarkable—how could something so easy be so delicious? That day marked my introduction to not just a recipe, but a cooking philosophy: good food doesn’t have to be complicated.
From that moment on, I’ve made this salad countless times, always adding my personal twist or two and sharing it with family and friends. Every time I pull this recipe out, I’m reminded of that joyful barbeque and the happiness that good food can bring into our lives.
Ingredients
Here are the ingredients you’ll need to create this delicious black bean salad, along with some helpful notes and substitution tips:
-
Black Beans (2 cans, drained and rinsed): The star of the salad! High in protein and fiber, black beans add a hearty touch. If you prefer, you can use cooked black beans—just make sure they’re tender!
-
Red Bell Pepper (1, diced): Adds sweetness and crunch. Prefer a bit more spice? Swap for a jalapeño or any other pepper you like!
-
Red Onion (½, diced): This gives a lovely sharpness and color. For a milder taste, soak the diced onion in cold water for 10 minutes before adding it to the salad.
-
Corn (1 cup, fresh or canned): Sweet corn adds a delightful crunch. If it’s not corn season, frozen corn works beautifully; just thaw it before using.
-
Cilantro (½ cup, chopped): Fresh cilantro brings a burst of brightness. If you’re not a fan of cilantro, parsley or green onions make excellent substitutes.
-
Lime (1, juiced): A squeeze of lime brightens all the flavors. You can use lemon juice in a pinch for a different citrusy kick.
-
Olive Oil (¼ cup): A good quality extra virgin olive oil enhances the salad’s richness. For a different flavor profile, try avocado oil!
-
Cumin (1 tsp): This spice adds depth to the salad. If you love heat, consider adding smoked paprika or chili powder for an extra kick!
-
Salt and Pepper (to taste): Essential for bringing out all the flavors. Remember, you can always adjust the seasoning to match your preference!
With these simple ingredients, you’ll create a stunning salad that not only tastes amazing but also looks beautiful on your table. Cooking is all about using what you love and adapting to fit your palate!
Step-by-Step Instructions
Now, let’s dive into the cooking process! Follow these steps to prepare Ina Garten’s Black Bean Salad, and I promise you’ll be showered with compliments.
Step 1: Prep Your Ingredients
Get everything ready before you start mixing. This makes the process smooth and enjoyable!
- Drain and rinse the black beans under cold water to remove excess sodium and prevent a gritty texture.
- Dice up your red bell pepper and red onion, and chop the fresh cilantro. Keep your ingredients in separate bowls for easy mixing later.
Step 2: Whip Up the Dressing
This salad deserves a flavorful dressing that ties everything together!
- In a small bowl, combine the fresh lime juice, olive oil, cumin, salt, and pepper. Whisk until fully emulsified.
- For an added punch, taste it and adjust the seasoning based on your preference. Sometimes I sneak in a dash of hot sauce for an extra kick!
Step 3: Mix the Salad
The fun part! Watch those colors blend together beautifully.
- In a large mixing bowl, add the black beans, diced red bell pepper, corn, and red onion. Toss them gently so they mingle without breaking the beans.
- Pour in your dressing, and sprinkle in the chopped fresh cilantro. Toss again until everything is well-coated in that zesty goodness.
Step 4: Let It Chill
This step is totally optional, but trust me, it’s worth it!
- Cover the salad and let it sit in the fridge for 20-30 minutes before serving. This will allow the flavors to meld together and create a more harmonious taste.
Step 5: Serve and Enjoy
Now, it’s time for the grand unveiling!
- When you’re ready to serve, give the salad one last toss. Scoop into a beautiful serving bowl, and watch as everyone gathers around.
- Pair it with grilled chicken, on top of tacos, or even all by itself! This black bean salad is sure to steal the show!
Chef’s Tip: If you’re preparing this dish for a gathering, consider making a double batch—it vanishes quickly!
Serving Suggestions
This black bean salad is incredibly versatile! Serve it in a vibrant bowl to showcase the colors. You can also use it as a filling for tacos or as a refreshing topping for grilled meats. It pairs beautifully with lime wedges on the side for that extra citrusy zest as guests can customize their portions. Accompany it with tortilla chips for a crunchy contrast or nestle it into crisp lettuce leaves for a light, healthy wrap.
Recipe Variations
Feel like changing things up? Here are a few creative twists you can try:
-
Avocado Add-In: Dice ripe avocados for a creamy texture that brings an extra layer of flavor and health benefits.
-
Quinoa Twist: Add cooked quinoa for a grainy component that boosts the protein and makes it a filling meal by itself.
-
Tropical Flair: Swap out some of the bell peppers for diced mango or pineapple for a sweet, tropical vibe.
-
Spicy Kick: Toss in diced jalapeños or chipotle powder for a zesty, fiery version of this salad!
-
Mediterranean Style: Use chickpeas instead of black beans, and add feta cheese, diced cucumber, and a drizzle of balsamic reduction. Totally different but equally delightful!
Chef’s Notes
Cooking is always an adventure, and what I love about this black bean salad is its adaptability. The original recipe from Ina Garten has always been a hit, but I like to take inspiration from whatever ingredients are on hand or in season. The beauty of home cooking is that it evolves with you!
One time, while preparing this salad for a family reunion, I miscalculated the lime and accidentally added too much. At first, I was horrified, but then I decided to balance out the acidity with a splash of honey! That unexpected change created a delightful variation that everyone adored. The best kitchen moments often come from “mistakes” that turn into delicious recipes!
FAQs and Troubleshooting
1. What if my black beans are mushy?
If your beans are overcooked or mushy, consider using them in a creamy dip or soup where they can blend right in! If they’re just slightly soft, avoid stirring too vigorously as you mix your ingredients.
2. How long will this salad last in the fridge?
This salad can last for about 3-5 days when stored in an airtight container. Just remember to give it a good stir before serving again, as the flavors may settle.
3. Can I prepare the salad in advance?
Absolutely! You can prep the ingredients and assemble the salad the day before. Just wait to add the dressing until about 30 minutes before serving to keep everything fresh and crunchy.
4. What should I do if I don’t like black beans?
No problem at all! You can swap out the black beans for pinto beans, kidney beans, or chickpeas. Each type brings its own unique flavor and texture to the dish!
Nutritional Info (optional)
This vibrant salad is not just a treat for your taste buds but also a powerhouse packed with nutrition:
- Calories: Approximately 250 per serving
- Protein: 10g
- Fiber: 8g
- Fat: 11g (healthy fats from olive oil and avocado if used)
- Carbohydrates: 30g
This salad is a fantastic way to boost your veggie intake while enjoying a hearty, flavor-packed dish!
And there you have it—a delicious adventure through Ina Garten’s Black Bean Salad! I hope this recipe finds a cozy spot in your kitchen and helps create memories around your table—just like it has for me. Happy cooking!
Print
Ina Garten’s Black Bean Salad
- Total Time: 15 minutes
- Yield: 4 servings 1x
- Diet: Vegan
Description
A vibrant, healthy black bean salad that celebrates flavor, texture, and nutrition, perfect for any occasion.
Ingredients
- 2 cans Black Beans, drained and rinsed
- 1 Red Bell Pepper, diced
- ½ Red Onion, diced
- 1 cup Corn, fresh or canned
- ½ cup Cilantro, chopped
- 1 Lime, juiced
- ¼ cup Olive Oil
- 1 tsp Cumin
- Salt and Pepper, to taste
Instructions
- Prep your ingredients by draining and rinsing the black beans, diced red bell pepper, and red onion, and chopping the cilantro.
- Whip up the dressing by combining lime juice, olive oil, cumin, salt, and pepper in a small bowl and whisk until emulsified.
- Mix the salad by adding black beans, diced red bell pepper, corn, and red onion to a large bowl. Toss gently.
- Pour in the dressing and sprinkle the cilantro, tossing again to coat.
- Let it chill in the fridge for 20-30 minutes to enhance flavors.
- Serve in a nice bowl and enjoy!
Notes
For a twist, you can add diced avocado, cooked quinoa, or swap black beans with chickpeas.
- Prep Time: 15 minutes
- Cook Time: 0 minutes
- Category: Salad
- Method: Mixing
- Cuisine: Mexican
Nutrition
- Serving Size: 1 serving
- Calories: 250
- Sugar: 5g
- Sodium: 200mg
- Fat: 11g
- Saturated Fat: 1.5g
- Unsaturated Fat: 9.5g
- Trans Fat: 0g
- Carbohydrates: 30g
- Fiber: 8g
- Protein: 10g
- Cholesterol: 0mg
Keywords: black bean salad, vegetarian salad, summer salad, healthy recipes

Hawaiian Chicken Salad
Hawaiian Chicken Salad: A Taste of Aloha Right at Home
Introduction
Hello, fellow food lovers! Welcome back to my cozy kitchen, where the magic of cooking unfolds and delicious aromas dance in the air. Today, we’re making something that transports me right to the beautiful beaches of Hawaii with just one bite—Hawaiian Chicken Salad! This dish is a delightful mélange of flavors that harmonize perfectly, combining the savory comfort of chicken with the refreshing touches of pineapple, crunchy nuts, and vibrant veggies.
Let me tell you—this isn’t just any salad. It’s a celebration of sunshine, warmth, and tropical vibes, even on the grayest of days. I remember the very first time I tasted Hawaiian Chicken Salad. I was at a small beachside café, the kind where the wind tousles your hair and the ocean breeze carries the scent of salt and pine. I sat with a group of friends, sharing laughter as we dug into this incredible salad that perfectly balanced savory and sweet. The crunch of the macadamia nuts, the juicy bursts of pineapple, and the tender chicken just sang together in perfect harmony.
As you can probably guess, I couldn’t get that dish out of my mind! When I came home, I immediately set to work trying to replicate those vibrant flavors in my own kitchen. After some tinkering and tweaking (because we all know that every great recipe starts with a little bit of love, creativity, and sometimes a dash of trial and error!), I finally nailed it.
Whether you’re planning a family barbecue, a picnic in the park, or just want to stir up something fabulous for your next lunch, this Hawaiian Chicken Salad hits all the right notes. So, roll up those sleeves and let’s dive into this delicious journey together. Grab a seat at my kitchen table, and let’s cook up some aloha!
Personal Story
Growing up, my family had a tradition of hosting summer barbecues in our backyard. The warmth of the sun, the laughter of family, and of course, the smell of good food grilling filled the air. One summer, my Auntie Lila, the ultimate home cook, introduced us to her version of Hawaiian Chicken Salad. As she mixed shredded chicken with fresh pineapple, crisp celery, and crunchy macadamia nuts, the whole family gathered around her, captivated by her effortless charm and the vibrant colors of the dish.
I can still picture her in the kitchen, wearing her favorite floral apron, her laughter filling the space as she shared funny stories about her travels to Hawaii. She always emphasized how food brings people together, and this salad was no exception. It became the star of our summer parties, with everyone making their own little adjustments—some added mango, others swore by swapping out the chicken for chickpeas.
In those moments, I learned that cooking isn’t just about the flavors but the memories and connections we create around the table. The Hawaiian Chicken Salad became more than a recipe; it transformed into a symbol of joy, laughter, and love. That’s why I love sharing it with you today!
Ingredients
Let’s gather our lovely ingredients! Each component is essential to the the delightful fusion of flavors we’re creating. Here’s what you need:
-
Shredded Chicken
Use shredded rotisserie chicken for convenience or poach your own chicken breast for a fresher taste. It’s an excellent source of protein! Prefer a lighter option? Swap it with canned chickpeas for a vegetarian version. -
Fresh Pineapple
Choose ripe pineapple for the best sweetness. If fresh isn’t available, you can use canned pineapple chunks in juice—just be sure to drain them well. Bonus points if you grill your pineapple for an amazing smoky flavor! -
Celery Stalks
Celery adds a lovely crunch to the salad. If you want a bit more flavor, finely chop bell peppers or even jicama as alternatives. -
Green Onions
These add a mild onion flavor and a pop of color. If you’re not a fan, try using red onion sparingly or chives for a subtle alternative. -
Macadamia Nuts
Essential for that perfect crunch! If macadamia nuts are hard to find, feel free to use almonds or walnuts. They’ll bring a different flavor profile but still delicious! -
Mayonnaise
A creamy base for the dressing! For a lighter touch, Greek yogurt works wonderfully as a substitute. You can also explore mixing in avocado for a richer taste. -
Lime Juice
Fresh lime juice brightens the entire dish! In a pinch, you can use lemon juice, but lime truly captures that tropical vibe. -
Seasoning
Salt and pepper to taste, and consider a sprinkle of garlic powder or even a dash of cayenne pepper for a kick!
Now that we have our roster of ingredients ready, let’s get cooking!
Step-by-Step Instructions
-
Prepare the Chicken
If you’re using a rotisserie chicken, start by shredding it. Just hold onto the chicken with one hand and use a fork in the other to pull apart the meat. It’s super easy and requires no fussy cutting. If cooking your own chicken, poach a boneless breast in boiling water with a pinch of salt until it’s cooked through (about 15-20 minutes), then shred. -
Chop the Veggies
Dice your celery stalks and slice the green onions. Aim for uniform sizes—they make for a prettier salad and distribute flavors evenly. If you’re feeling adventurous, toss in additional veggies like diced bell peppers for a splash of color. -
Mango Time (Optional)
If you’re adding mango, peel and cube it at this point. The sweet and juicy addition is simply delightful in this salad! -
The Pineapple Love
If using fresh pineapple, peel, core, and cut it into small chunks. As mentioned earlier, canned pineapple can also be a great shortcut. Drain and pat dry with a paper towel to avoid extra moisture. -
Mix It All Together
In a large mixing bowl, combine shredded chicken, chopped celery, green onions, and pineapple. Gently toss them together using a spatula or your hands. Embrace your inner chef and enjoy the tactile experience! -
Add the Creaminess
In a separate bowl, whisk together your mayonnaise, lime juice, and any additional seasoning you prefer. If using Greek yogurt instead, this mixture will still stay creamy and delicious! Once it’s well blended, fold it gently into the chicken mixture until everything is coated evenly. -
Incorporate Those Nuts
Add macadamia nuts last so they stay crunchy. Give everything a gentle toss—be careful not to squish them. -
Chill It Out
Cover the bowl with plastic wrap and refrigerate the salad for at least 30 minutes before serving. This resting time allows all the flavors to mingle beautifully—trust me, patience is a virtue here! -
Taste Test
Before serving, taste your salad and adjust seasoning if necessary. A sprinkle of salt or a squeeze of fresh lime juice can really elevate the dish.
Serving Suggestions
When it’s time to dig in, serve this Hawaiian Chicken Salad on a bed of fresh greens like arugula or spinach for added nutrients and vibrancy. It also works beautifully in a sandwich, on a croissant, or even wrapped in lettuce leaves for a lighter option. Garnish with additional chopped green onions and a few more macadamia nuts to impress your guests—and yourself!
Recipe Variations
Feel free to have fun with this recipe! Here are some creative twists you might want to try:
- Tropical Twist: Add diced mango or kiwi for an extra layer of sweetness and color.
- Spicy Hawaiian: Toss in some diced jalapeños for those who enjoy a spicy kick.
- Nut-Free Version: Omit the macadamia nuts and use sunflower seeds for a satisfying crunch.
- Curry Infusion: Stir in a teaspoon of curry powder for a unique spin on the classic flavor profile.
- Dairy-Free: Substitute mayonnaise with avocado or tahini for a creamy texture without the dairy.
Chef’s Notes
Isn’t it funny how recipes can evolve over time? I often look back at my original version of Hawaiian Chicken Salad and chuckle. I started with a simple mayo base and chicken, but as I experimented more, it became this delicious celebration of flavors! I’m always learning something new—whether it’s a new trick to cut down on prep time or a fresh ingredient I stumbled upon at the farmer’s market.
Every time I make this dish, I’m reminded of that summer barbecue and how a simple salad can become a cherished family recipe. Cooking in my kitchen still fills me with joy, and I hope you feel the same when you make this dish!
FAQs and Troubleshooting
-
What if I don’t have rotisserie chicken?
You can always poach or grill your own chicken! Just make sure to season it well before cooking for the best flavor. -
Can I prep this salad ahead of time?
Absolutely! Just keep the salad in the refrigerator for up to 2 days. To prevent sogginess, avoid adding the macadamia nuts until you’re ready to serve. -
How can I make this salad more filling?
Serve it over a bed of grains like quinoa or brown rice, or toss in some cooked pasta for a heartier meal. -
Why is my salad too soggy?
If you find your salad is too wet, try straining the pineapple or cutting back on the mayonnaise. Also, ensure that your veggies, especially the celery, are well-drained.
Nutritional Info (Optional)
While the nutritional values can vary based on specific ingredient brands and quantities, a general serving of this Hawaiian Chicken Salad is approximately:
- Calories: 350
- Protein: 20g
- Fat: 24g
- Carbohydrates: 15g
- Fiber: 2g
There you have it—my love letter to Hawaiian Chicken Salad! I hope this recipe becomes a delightful addition to your kitchen repertoire. Let’s keep cooking, sharing stories, and spreading that cozy feeling, one delicious recipe at a time. Happy cooking! 🌺
Print
Hawaiian Chicken Salad
- Total Time: 35 minutes
- Yield: 4 servings 1x
- Diet: Paleo
Description
A delightful blend of shredded chicken, fresh pineapple, crunchy macadamia nuts, and vibrant veggies that brings a taste of Hawaii to your table.
Ingredients
- 2 cups shredded chicken (preferably rotisserie)
- 1 cup diced fresh pineapple (or canned, drained)
- 2 celery stalks, diced
- 2 green onions, chopped
- 1/2 cup macadamia nuts, chopped
- 1/2 cup mayonnaise (or Greek yogurt)
- Juice of 1 lime
- Salt and pepper to taste
- Optional: 1 mango, diced
- Optional: garlic powder and cayenne pepper for seasoning
Instructions
- Prepare the chicken by shredding it or poaching it until cooked through.
- Chop the celery and green onions into uniform sizes.
- Mango time: peel and cube the mango if using.
- Prepare the pineapple by cutting it into small chunks.
- Mix the chicken, celery, green onions, and pineapple in a large bowl.
- Add mayonnaise, lime juice, and seasoning in a separate bowl, then fold it into the chicken mixture.
- Incorporate the macadamia nuts gently.
- Chill the salad for at least 30 minutes.
- Taste and adjust seasoning before serving.
Notes
Serve over greens, in a sandwich, or wrapped in lettuce leaves. Experiment with different additions like mango or spices for variety!
- Prep Time: 15 minutes
- Cook Time: 20 minutes
- Category: Salad
- Method: Mixing
- Cuisine: Hawaiian
Nutrition
- Serving Size: 1 serving
- Calories: 350
- Sugar: 10g
- Sodium: 400mg
- Fat: 24g
- Saturated Fat: 3g
- Unsaturated Fat: 10g
- Trans Fat: 0g
- Carbohydrates: 15g
- Fiber: 2g
- Protein: 20g
- Cholesterol: 30mg
Keywords: Hawaiian Chicken Salad, tropical salad, chicken salad recipe, easy salad, summer recipe

Shrimp Salad Recipe
The Ultimate Shrimp Salad Recipe: A Flavorful Dive into Summer Freshness
Welcome to my cozy kitchen, where the appliances hum a sweet tune and the aroma of fresh ingredients wafts through the air! I’m Olivia Bennett, and today we’re diving into one of my all-time favorite recipes: a vibrant, zesty Shrimp Salad that’s perfect for any occasion. Whether you’re gearing up for a beautiful summer gathering, prepping a quick lunch, or simply craving something deliciously fresh, this salad is here to bring a smile to your face and a little sunshine to your plate.
I remember the first time I had a shrimp salad that made my heart dance. I was at a seaside restaurant, the waves crashing in the background, and I could smell the salty sea breeze mingling with the inviting aromas of grilled seafood. When my shrimp salad arrived, it was beautifully plated — a colorful array of crisp greens, succulent shrimp, and a dressing that made my taste buds sing. As I took that first bite, it felt like summer itself exploded in my mouth! It was a dish rich in flavor and nostalgia, instantly transporting me back to lazy beach days and laughter-filled gatherings.
That experience sparked my love for shrimp salads, and I took the memory home with me. With a few tweaks and personal touches over the years, I’ve crafted a recipe that is sure to bring you the same joy. Are you ready? Let’s get cooking!
Ingredients
Here’s a list of simple yet high-quality ingredients you’ll need to whip up this delightful Shrimp Salad. Each ingredient adds its own flair, and I’ll include some handy tips for substitutions and insights along the way:
-
1 lb (450g) shrimp (peeled and deveined): Choose fresh or frozen shrimp; both work well! If you’re feeling adventurous, try swapping in grilled chicken or even tofu for a vegetarian version.
-
4 cups mixed greens (spinach, arugula, and kale): Use whatever greens you love! Mixed greens add a beautiful crunch. If you’re looking for a low-carb option, opt for a bed of zucchini noodles.
-
1 cup cherry tomatoes (halved): Sweet cherry tomatoes add a burst of flavor. You can substitute these with grape tomatoes or even roasted heirlooms for a bit more depth.
-
1 avocado (sliced): Creamy avocado brings richness to the salad. If you’re avoiding avocados, try a sprinkle of sunflower seeds for crunch or a dollop of hummus on top.
-
1/2 cucumber (diced): Crisp cucumber balances the tanginess of the dressing beautifully. For a twist, try pickled cucumbers for some zesty zing.
-
1/4 red onion (thinly sliced): A little sharpness from red onions enhances the overall taste. If you’re sensitive to onion flavors, green onions or chives make a great substitute.
-
1/4 cup fresh herbs (cilantro, parsley, or dill): Fresh herbs elevate the flavors—feel free to mix and match! Basil would pair beautifully if you’re going for an Italian vibe.
-
1/3 cup olive oil: A good-quality olive oil is essential for the dressing; it adds richness. You can switch to sesame oil for an Asian twist or use a lighter oil if that’s your preference.
-
Juice of 1 lemon: Fresh lemon juice brightens everything up! Lime or even orange juice can work wonders if you’re feeling experimental.
-
Salt and pepper to taste: Always season to perfection! You can experiment with flavored salts for an added kick.
-
Optional toppings: Try goat cheese, feta, or toasted nuts for extra flavor and texture. Remember, it’s all about what you love!
Step-by-Step Instructions
Let’s get down to the nitty-gritty of making this delicious Shrimp Salad. Follow these steps, and I promise you’ll impress yourself (and maybe even a few friends)!
-
Prep Your Shrimp: If using frozen shrimp, make sure to thaw them in advance by placing them in a bowl of cold water for 15-20 minutes. While you’re at it, let’s bring some flavor to those shrimp! In a medium bowl, toss the shrimp with a drizzle of olive oil, a pinch of salt, a pinch of pepper, and a sprinkle of your favorite herbs. Let them marinate while we prepare the rest!
-
Sauté the Shrimp: Heat a skillet over medium-high heat and add a splash of olive oil. Once the pan is hot, add the seasoned shrimp. Sauté for about 2-3 minutes on each side, or until they turn pink and opaque. Be careful not to overcook them; we want them tender and juicy! Once cooked, remove the shrimp from the heat and let them cool slightly.
-
Prepare Your Greens: In a large bowl, add your mixed greens, diced cucumber, halved cherry tomatoes, and sliced red onion. Give them a gentle toss to combine. This creates a colorful base for our salad!
-
Make the Dressing: In a small bowl, whisk together olive oil, lemon juice, salt, and pepper. Taste it, and adjust the flavors to your liking. If you like an extra zing, add a touch more lemon!
-
Combine It All: Now, add the sautéed shrimp to the bowl of greens. Pour the dressing over the top and gently toss everything together until it’s well coated. Don’t be afraid to get your hands in there for this one — it’s how the magic happens!
-
Plate Your Creation: To serve, layer the salad onto plates and top with sliced avocado and fresh herbs. If you’re feeling fancy, drizzle with a bit of balsamic glaze for a beautiful finish.
Serving Suggestions
This Shrimp Salad is as beautiful as it is tasty! For an elegant presentation, consider using a large platter to showcase the colorful ingredients. Add some grilled corn, or sprinkle your favorite cheese over the top for a gourmet touch. Serve with crusty bread or delightful pita chips for crunch, and don’t forget a chilled glass of white wine or sparkling water with a splash of lemon—it’s the perfect pairing!
Recipe Variations
Get creative with your Shrimp Salad by adapting it in unique ways! Here are a few ideas to inspire you:
-
Mediterranean Shrimp Salad: Toss in Kalamata olives, feta cheese, and a splash of red wine vinegar to create a Greek twist.
-
Tropical Shrimp Salad: Add diced mango, pineapple, or fresh coconut for a refreshing summer vibe.
-
Spicy Shrimp Salad: Mix in a little sriracha or chopped jalapeños to give it some heat!
-
Pasta Shrimp Salad: Mix in cooked pasta (like orzo or penne) for a heartier dish that works great as a meal prep option.
-
Asian-Inspired Shrimp Salad: Swap the herbs for cilantro and add sesame seeds and shredded carrots, drizzled with soy sauce or a ginger dressing.
Chef’s Notes
Over the years, this Shrimp Salad has evolved in my kitchen, inspired by the seasons and the fresh produce available at the farmers’ market. Sometimes, I even sneak in leftovers from last night’s dinner for an extra flavor pop! I recall a time when I forgot the lemon juice in a batch, and it turned out to be an unexpected success with a touch of lime instead. Remember, cooking is all about experimenting and having fun. Don’t be afraid to put your spin on it!
FAQs and Troubleshooting
1. Can I make this salad ahead of time?
Absolutely! Just keep the dressing separate until you’re ready to serve, as this will prevent the greens from wilting.
2. How do I prevent shrimp from becoming rubbery?
Cooking shrimp quickly over medium-high heat keeps them tender. As soon as they turn pink, remove them from the heat. A little undercooking is okay; they’ll continue to cook after you take them off the pan!
3. What’s the best way to store leftovers?
Place any leftovers in an airtight container in the fridge. The salad will keep for 1-2 days but best enjoyed fresh.
4. I don’t like shrimp; what alternative protein can I use?
Feel free to substitute grilled chicken or chickpeas for a lean protein twist! Both will integrate seamlessly into the salad and will be just as delicious.
Nutritional Info
For those mindful of nutrition, here’s a quick breakdown per serving (without added toppings):
- Calories: Approximately 330
- Protein: 25g
- Carbohydrates: 15g
- Fats: 18g
- Fiber: 5g
Whether it’s a cozy night in or a lively gathering with friends, this Shrimp Salad is bound to become a favorite in your recipe repertoire. So roll up your sleeves, throw on that apron, and let’s savor the good moments one bite at a time! Happy cooking!
Print
Ultimate Shrimp Salad
- Total Time: 25 minutes
- Yield: 4 servings 1x
- Diet: Gluten-Free
Description
A vibrant and zesty Shrimp Salad perfect for summer gatherings or a quick lunch.
Ingredients
- 1 lb (450g) shrimp (peeled and deveined)
- 4 cups mixed greens (spinach, arugula, kale)
- 1 cup cherry tomatoes (halved)
- 1 avocado (sliced)
- 1/2 cucumber (diced)
- 1/4 red onion (thinly sliced)
- 1/4 cup fresh herbs (cilantro, parsley, or dill)
- 1/3 cup olive oil
- Juice of 1 lemon
- Salt and pepper to taste
- Optional toppings: goat cheese, feta, or toasted nuts
Instructions
- Prep your shrimp: If using frozen shrimp, thaw them in a bowl of cold water for 15-20 minutes. Toss with olive oil, salt, pepper, and herbs.
- Sauté the shrimp in a skillet over medium-high heat for 2-3 minutes on each side until pink and opaque.
- Prepare your greens in a large bowl: combine mixed greens, diced cucumber, halved cherry tomatoes, and sliced red onion.
- Make the dressing by whisking together olive oil, lemon juice, salt, and pepper in a small bowl.
- Combine the sautéed shrimp with the greens and pour the dressing over. Toss gently.
- Plate your creation with sliced avocado and fresh herbs on top.
Notes
For an elegant presentation, serve on a large platter and pair with crusty bread or pita chips.
- Prep Time: 15 minutes
- Cook Time: 10 minutes
- Category: Salad
- Method: Sautéing
- Cuisine: American
Nutrition
- Serving Size: 1 serving
- Calories: 330
- Sugar: 3g
- Sodium: 350mg
- Fat: 18g
- Saturated Fat: 3g
- Unsaturated Fat: 5g
- Trans Fat: 0g
- Carbohydrates: 15g
- Fiber: 5g
- Protein: 25g
- Cholesterol: 180mg
Keywords: shrimp salad, summer salad, healthy salad, fresh ingredients
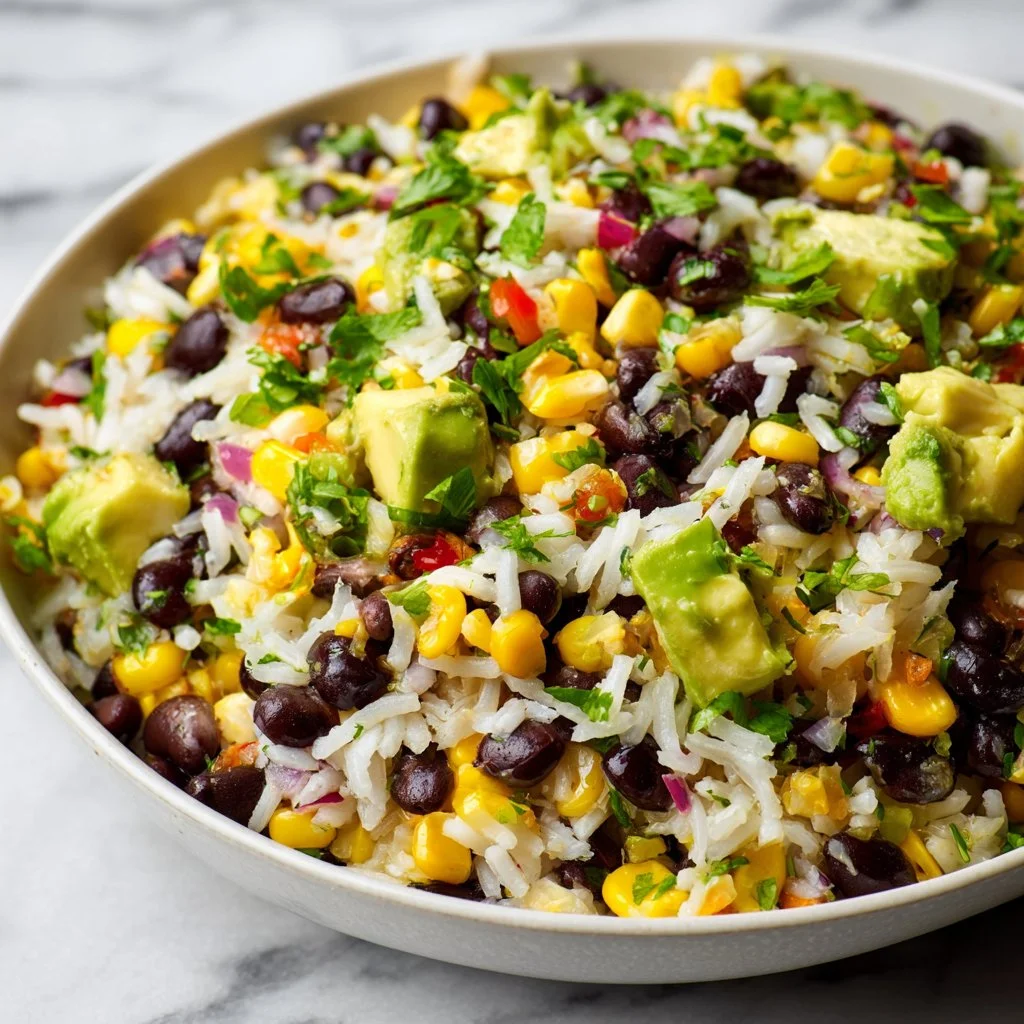
Black Bean Corn Avocado Salad with Rice
Black Bean Corn Avocado Salad with Rice: A Hearty, Flavor-Packed Celebration
Hello, lovely food enthusiasts! Welcome back to my cozy kitchen, where every meal is a chance to create memories, forge friendships, and spread joy. If you’re anything like me, you get giddy at the thought of fresh produce and vibrant flavors coming together in a delightful dish. Today, we’re diving into a recipe that encapsulates everything I love about cooking: the scrumptious Black Bean Corn Avocado Salad with Rice. It’s not just a salad; it’s a celebration of flavors, textures, and colors that will have your taste buds doing a happy dance!
This recipe is perfect for those warm, sunny days when you’re looking for something light yet filling, and it’s equally fantastic for your next gathering or meal prep for the week. With fresh ingredients like crunchy corn, creamy avocado, and hearty black beans, this salad isn’t just about sustaining yourself; it’s about savoring every delightful bite. And let’s not forget the hint of lime that brings it all together—it’s like a summery hug in a bowl!
But let’s take a step back for a moment. How did this salad become a staple in my kitchen? Picture this: A summer day full of laughter, the scent of the BBQ in the air, and friends gathering around the table, sharing stories. My best friend, Jamie, brought over her family’s BBQ spread, and this exact salad was the star of the show. I still remember biting into the rich avocado, pairing it perfectly with the sweetness of the corn and the robust flavors of black beans. It all blended together so well, and I was instantly hooked. That gathering sparked my desire to craft my version of this crowd-pleaser, and I can’t wait to share it with you!
So, grab your aprons, and let’s head into the kitchen to create a mouthwatering Black Bean Corn Avocado Salad with Rice that will leave your guests amazed and your heart full.
Personal Story
The first time I tried a version of this Black Bean Corn Avocado Salad was one of those perfect summer evenings that lingered in my memory. The sun was setting, casting warm golden hues across our backyard, and the air buzzed with laughter and music. My friend Jamie had whipped it up as a side dish for a BBQ, and it was an instant hit.
As I sat around the table with our friends, I could hardly keep my fork off Jamie’s salad, barely leaving enough for anyone else. There was something so magical about the combination of juicy corn kernels, creamy avocado, and the satisfying texture of black beans. As we bantered and reminisced, each bite was a reminder of the simple joys of good food and great company.
Eventually, I asked Jamie for the recipe, and she graciously shared her secrets and tips. With a few tweaks to make it my own, I began crafting this salad for every gathering, potluck, and family dinner. It became my go-to dish that always earned compliments and requests for seconds. Every time I make it, those fond memories come rushing back, coupled with the realization that food truly has the power to connect us.
Ingredients
Let’s gather our ingredients! Here’s what you’ll need for this delectable dish:
-
1 can (15 oz) black beans, drained and rinsed
- These little powerhouses are not just delicious; they’re also packed with protein and fiber. If you’re in a pinch, you could swap them for kidney beans, but I really recommend sticking with black beans for that perfect balance of flavor and texture.
-
1 cup corn (fresh, frozen, or canned)
- Fresh summer corn is the star of this salad, but frozen corn works just as well. If you’re using canned corn, make sure to drain it well. Sweet corn really elevates the dish, giving it that crunchy sweetness we all love.
-
1 cup cooked rice (white, brown, or quinoa)
- Cooking your rice with a bit of lime juice and salt can impart a beautiful flavor. If you want a gluten-free alternative, quinoa makes a fantastic substitute.
-
1 large ripe avocado, diced
- Avocado adds creaminess that complements the other ingredients perfectly. When choosing, look for one that gives a little when you Press gently. If you’re looking to make it lighter, feel free to adjust the amount or even use a diced cucumber for crunch.
-
1 medium red bell pepper, diced
- This adds a sweet crunch to the salad and beautiful color. You can substitute with a yellow or green bell pepper, or even switch to cherry tomatoes for a juicy bite.
-
1 small red onion, diced
- Red onions provide a zesty kick. If you find raw onions too strong, soak diced onion in cold water for a few minutes before adding it to the salad to mellow the flavor.
-
1/4 cup fresh cilantro, chopped
- Fresh herbs can elevate any dish! If cilantro isn’t your favorite, try substituting with parsley for a milder taste.
-
Juice of 2 limes
- Lime juice brings all the flavors together while adding a refreshing zest. Use fresh lime juice if you can for the best flavor—trust me, it makes a difference!
-
Salt and pepper, to taste
- Always a chef’s secret weapon! Adjust to your liking, but remember that seasoning enhances the natural taste of all ingredients.
Once you’ve gathered these wonderful components, we’re one step closer to creating a dish that’s sure to bring smiles all around the table!
Step-by-Step Instructions
Alright, my foodie friend, it’s time to get cooking! Here’s how to whip up your Black Bean Corn Avocado Salad with Rice in just a few simple steps:
Step 1: Prepare Your Rice
Cooking your rice is the first step. Rinse 1 cup of rice under running water to remove excess starch. This will lead to fluffier rice. Then, cook it according to the package instructions. For extra flavor, add 1/2 teaspoon of salt and the juice of half a lime to the water while it cooks. This little trick adds a nice zing to the rice that’s totally worth the extra effort!
Step 2: Combine the Base Ingredients
In a large mixing bowl, add your drained and rinsed black beans, corn, cooked rice, diced red bell pepper, and diced red onion. Gently mix everything together, ensuring not to mush the beans. You want those lovely textures intact for every bite!
Step 3: Prepare the Dressing
Now, let’s make our salad shine even brighter! In a separate bowl, combine the lime juice from the two limes, a generous pinch of salt, and pepper. If you like a little heat, this is an excellent moment to add a pinch of cayenne or chili powder. Whisk this together until well blended.
Step 4: Toss in Avocado and Cilantro
Chop your ripe avocado into bite-sized pieces and sprinkle with some lime juice to prevent browning. Add this to your salad mixture along with the chopped cilantro. Chef Hack: To make the mixing easier without damaging the avocado too much, toss the salad gently from the bottom up instead of stirring aggressively. This helps maintain those beautiful chunks of avocado!
Step 5: Final Toss and Taste
Pour the dressing over the salad mixture and gently fold everything together until every ingredient is nicely coated. Now’s the moment of truth—give it a taste! Adjust salt, pepper, and lime juice as needed. Remember, the dressing should be zesty, so don’t be afraid to add a little more lime juice if it needs a tangy boost.
Step 6: Chill Before Serving
For the best experience, let the salad chill in the refrigerator for at least 30 minutes. This allows the flavors to meld beautifully. It’s like a party in a bowl, and the guests (of flavors) are finally ready to mingle!
Serving Suggestions
To serve your Black Bean Corn Avocado Salad, think colorful and inviting! Present it in a large, beautiful serving bowl and garnish with an extra sprinkle of cilantro on top for a pop of color. Pair it with some tortilla chips for crunch, or serve it alongside grilled chicken or fish for a heartier meal. I also love offering lime wedges on the side for an added fresh squeeze just before serving.
Recipe Variations
-
Seasonal Swaps: In the fall, try incorporating roasted butternut squash for a cozy twist that adds sweetness and warmth!
-
Spicy Kick: Add diced jalapeños for a spicy kick that complements the sweetness of the corn.
-
Cheesy Delight: Toss in some crumbled feta cheese for a tangy creaminess that takes this salad over the top.
-
Veggie Power: Bulk it up with additional veggies like diced cucumber, cherry tomatoes, or shredded carrots for even more color and nutrients.
-
Grain-Free Option: Replace rice with cauliflower rice for a lighter, grain-free variation that’s just as delicious.
Chef’s Notes
This Black Bean Corn Avocado Salad is a recipe that has evolved beautifully over time. Each gathering brings new ideas and upgrades, and it never fails to impress guests. I once made this salad for a potluck, and I completely forgot it in the fridge at home. I panicked but ended up whipping up a quick alternative with whatever I had on hand. Surprisingly, that has sparked a new variation that has salad lovers coming back for more!
Cooking should always leave room for creativity. Feel free to adjust the recipe based on your preferences and available ingredients. Who knows? You might just create the next lovely, nostalgia-filled experience at your table!
FAQs and Troubleshooting
Q1: Why did my avocado turn brown in the salad?
Using fresh lime juice is key! The acidity helps prevent oxidation. If you add the avocado right before serving, it will stay fresher longer.
Q2: Can I make this salad ahead of time?
Absolutely! Preparing it a few hours in advance allows the flavors to meld beautifully. Just remember to add the avocado right before serving to keep it vibrant and green.
Q3: How can I store leftovers?
Store any leftover salad in an airtight container in the fridge for up to 2 days. The avocado may brown slightly, but the flavors will still be delicious.
Q4: Can I substitute the beans for another protein?
Certainly! If you’re looking for a different protein, roasted chickpeas or diced grilled chicken can work beautifully in this salad. You can even add a handful of nuts or seeds for extra crunch!
Nutritional Info
For a serving size of approximately 1 cup, here’s a rough breakdown:
- Calories: 250
- Protein: 10g
- Carbohydrates: 40g
- Fat: 9g
- Fiber: 10g
- Sodium: 200mg
(Nutritional information can vary based on the exact ingredients used.)
And there you have it! A vibrant, flavorful Black Bean Corn Avocado Salad with Rice that’s bound to become a staple in your kitchen. I hope you enjoyed making it as much as I do sharing it. Here’s to good food, cherished moments, and bringing people together—one delicious recipe at a time. Happy cooking!
Print
Black Bean Corn Avocado Salad with Rice
- Total Time: 35 minutes
- Yield: 4 servings 1x
- Diet: Vegetarian
Description
A vibrant and hearty salad packed with black beans, corn, creamy avocado, and rice, perfect for gatherings or meal prep.
Ingredients
- 1 can (15 oz) black beans, drained and rinsed
- 1 cup corn (fresh, frozen, or canned)
- 1 cup cooked rice (white, brown, or quinoa)
- 1 large ripe avocado, diced
- 1 medium red bell pepper, diced
- 1 small red onion, diced
- 1/4 cup fresh cilantro, chopped
- Juice of 2 limes
- Salt and pepper, to taste
Instructions
- Prepare your rice. Rinse 1 cup of rice under running water to remove excess starch. Then, cook it according to package instructions with a bit of salt and lime juice.
- Combine the drained and rinsed black beans, corn, cooked rice, diced red bell pepper, and diced red onion in a large mixing bowl.
- Prepare the dressing by mixing lime juice, salt, and pepper in a separate bowl.
- Toss in the diced avocado and chopped cilantro, mixing gently.
- Pour the dressing over the salad and fold together until coated.
- Chill the salad for at least 30 minutes before serving.
Notes
For a lighter version, you can substitute the avocado with diced cucumber. Adjust salt and lime juice based on taste.
- Prep Time: 15 minutes
- Cook Time: 20 minutes
- Category: Salad
- Method: Mixing
- Cuisine: Mexican
Nutrition
- Serving Size: 1 serving
- Calories: 250
- Sugar: 3g
- Sodium: 200mg
- Fat: 9g
- Saturated Fat: 1g
- Unsaturated Fat: 8g
- Trans Fat: 0g
- Carbohydrates: 40g
- Fiber: 10g
- Protein: 10g
- Cholesterol: 0mg
Keywords: salad, black beans, avocado, corn, healthy recipe, summer dish
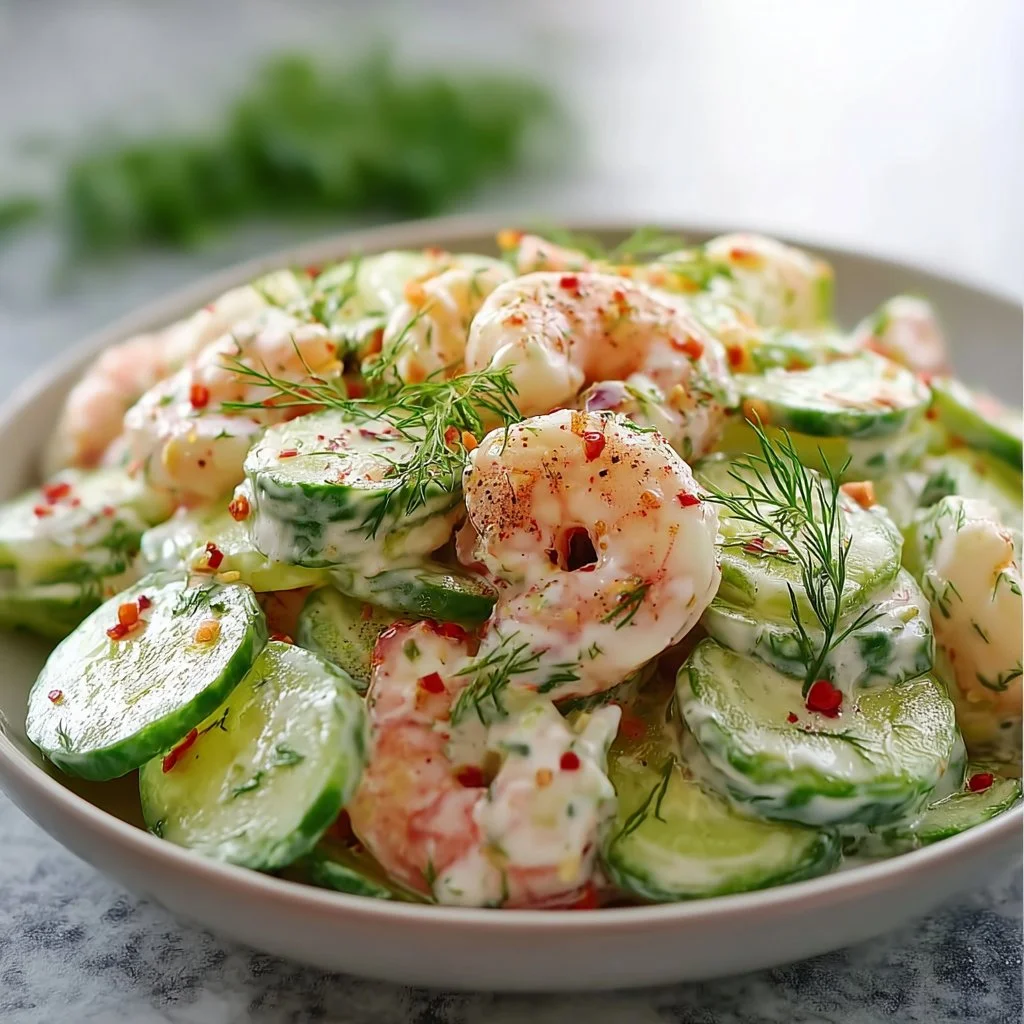
Creamy Cucumber Shrimp Salad
Creamy Cucumber Shrimp Salad: A Refreshing Delight for Any Occasion
Welcome back to my cozy corner of the kitchen, where we whip up delicious recipes that warm the heart and tantalize the taste buds! Today, I’m thrilled to share a delightful dish that combines the freshness of summer with the comforting elements of home: Creamy Cucumber Shrimp Salad. This dish is light yet satisfying, perfect for a sunny picnic or a leisurely brunch. Its creamy texture mixed with crisp cucumbers and tender shrimp just screams party on a plate!
This salad not only brings together some of my favorite flavors, but it also brings back sweet memories of summer gatherings with family and friends. Picture a sun-soaked afternoon, laughter drifting through the air, and delicious food laid out on a long table adorned with flowers. That’s the essence of this dish, and I’m excited to inspire you to create your own version of this vibrant celebration.
As we dive into this recipe, we’ll talk about everything you need to know, from the fresh ingredients that make this salad shine to my tried-and-true cooking tips that will have you feeling like a pro in no time. I promise you, by the end of this post, not only will you have a fantastic recipe in your arsenal, but you’ll also be eager to get cooking and create your own food memories. Let’s get started!
Personal Story
One of my fondest memories is from a summer family reunion when I was a little girl. The sun was shining, and my aunts were bustling around, each one bringing their special dish to share. In the middle of all the homemade goodness was my Aunt Clara, known for her incredible Creamy Cucumber Shrimp Salad. I still remember the way the shrimp looked, glimmering in the creamy dressing, surrounded by bright green cucumber slices. The moment we took a bite, it was as if summer had landed right on our plates.
It became a tradition for me to help Aunt Clara prepare the salad. We would pick fresh cucumbers from her garden, and while she taught me how to cook just right, we’d chat and laugh endlessly. Now, every time I make this salad, I can almost hear her voice, guiding me with her kitchen wisdom. It takes me back to those joyful summer days, and I hope this recipe helps you create warm memories of your own.
Ingredients
Here’s what you’ll need to whip up your Creamy Cucumber Shrimp Salad. Each ingredient plays an essential role in bringing this dish together:
- Shrimp (1 pound): Fresh or frozen shrimp work wonderfully. For a lighter option, you can use poached chicken breast!
- Cucumbers (2 medium-sized): I prefer English cucumbers for their thin skin and crunch. If you can’t find them, any cucumber variety will do—just scoop out the seeds if using regular cucumbers.
- Creamy Dressing (½ cup sour cream + ¼ cup mayo): This is the heart of the salad, creating that creamy and tangy flavor. Greek yogurt is a great substitute for a lighter version.
- Fresh Dill (2 tablespoons): Dill adds a lovely herbal note that elevates the salad. If you don’t have fresh, dried dill works in a pinch, just use about a teaspoon.
- Lemon Juice (1 tablespoon): Adds brightness! Freshly squeezed lemon juice always tastes best, but bottled works too.
- Salt and Pepper (to taste): Essential for enhancing flavor; don’t skimp on this!
- Cherry Tomatoes (1 cup, halved): Adds color and sweetness. You can substitute with bell peppers if you prefer.
Step-by-Step Instructions
Now that we’ve gathered our ingredients, let’s get cooking! Follow these detailed steps, and I promise you’ll have a scrumptious dish in no time.
-
Prepare the Shrimp:
- If you’re using frozen shrimp, make sure to thaw them in the refrigerator overnight or in a cold water bath. Pat them dry with a paper towel before cooking.
- For fresh shrimp, peel and devein if needed. In a large pot, bring about 4 cups of salted water to a boil. Add the shrimp and cook for about 2-3 minutes, or until they turn pink and opaque.
- Chef Tip: Avoid overcooking! Shrimp cooks quickly, and you want them tender, not rubbery.
-
Cool the Shrimp:
- Once cooked, immediately transfer the shrimp to an ice bath to stop the cooking process. Let them sit for a minute or two, then drain and set aside.
-
Chop the Vegetables:
- While the shrimp cools, grab the cucumbers and wash them thoroughly. I like to slice them into half-moons for a more rustic feel, but feel free to cut them into cubes!
- Dice the cherry tomatoes in half and set them aside. We’re going for a fresh, vibrant look!
-
Make the Creamy Dressing:
- In a medium mixing bowl, whisk together the sour cream, mayonnaise, fresh dill, lemon juice, salt, and pepper. Taste it—feel free to adjust any of the seasonings to your preference.
- Chef Hack: If you want an herby kick, throw in a bit of garlic powder or finely diced garlic.
-
Combine Everything:
- In a large bowl, combine the cooled shrimp, sliced cucumbers, and cherry tomatoes. Pour the creamy dressing over your shrimp salad and gently fold everything together so each piece is coated in that delicious dressing.
- Note: Don’t toss too vigorously, or you risk breaking up the shrimp!
-
Chill:
- Cover the bowl with plastic wrap and let it chill in the fridge for at least 30 minutes. This allows the flavors to meld beautifully.
-
Serve:
- When you’re ready to serve, give the salad a gentle stir and adjust seasoning one last time, if needed.
Serving Suggestions
This Creamy Cucumber Shrimp Salad is gorgeous served in a large bowl family-style, but you can also present it in individual cups or scooped onto crispy lettuce leaves for an impressive touch! A sprinkle of extra fresh dill on top adds that beautiful finishing touch.
Recipe Variations
Want to put your own creative spin on this dish? Here are a few ideas to inspire you:
- Spicy Shrimp Twist: Add a dash of hot sauce or diced jalapeños for an extra kick!
- Avocado Addition: Toss in diced avocado for a creamier texture and a healthy fat boost.
- Quinoa Base: Serve the salad over a base of cooked quinoa for added protein and heartiness.
- Fruit Infusion: Mix in diced mango or pineapple for a delightful sweetness that pairs perfectly with the shrimp.
- Vegan Version: Replace the shrimp with chickpeas and use a vegan mayo for a plant-based option.
Chef’s Notes
As with any dish, this Creamy Cucumber Shrimp Salad has evolved over the years. I started with Aunt Clara’s recipe but have adapted it based on what I have on hand and personal tastes. Sometimes, I add a sprinkle of Old Bay seasoning when cooking the shrimp to give it that classic seafood taste!
One funny story comes to mind about when I first made this dish for my friends. I tried to impress them by using homemade mayo. Let’s just say the experiment didn’t quite go as planned, and everyone laughed when I accidentally flipped the bowl, sending the salad across the table. Thankfully, we made it a running joke, and now they affectionately refer to it as “Salad on the Fly.”
FAQs and Troubleshooting
Q1: What type of shrimp should I use?
A1: Fresh shrimp is ideal, but frozen shrimp is completely acceptable. Just ensure they’re properly thawed and patted dry.
Q2: How long can I store the salad in the fridge?
A2: It’s best enjoyed within 2 days for optimal freshness, but stored properly in an airtight container, it will last up to 3 days.
Q3: Can I make this salad in advance?
A3: Yes! You can prepare it a few hours ahead of time. Just wait to add the dressing until you’re ready to serve to keep everything crunchy.
Q4: What if I can’t find dill?
A4: No worries! You can use fresh parsley or even chives for a different herbal touch.
Nutritional Info (Optional)
While it’s wise to enjoy treats in moderation, here’s a rough estimate of the nutritional info per serving (based on a recipe serving 4):
- Calories: 280
- Protein: 25g
- Fat: 15g
- Carbohydrates: 12g
- Fiber: 2g
Conclusion
And there you have it! A refreshing and delightful Creamy Cucumber Shrimp Salad that’s bound to impress at any gathering or quiet dinner at home. From the first bite to the last, this dish offers a spectrum of textures and flavors that embody the spirit of comforting, homemade food.
I hope this recipe finds a sweet spot in your heart, just like it has in mine. So, roll up those sleeves, put on that apron, and let’s create something incredible together! Don’t forget to share how your version turns out, and until next time, happy cooking!
Print
Creamy Cucumber Shrimp Salad
- Total Time: 50 minutes
- Yield: 4 servings 1x
- Diet: Seafood
Description
A refreshing shrimp salad mixed with creamy dressing and crisp cucumbers, perfect for picnics and brunch.
Ingredients
- 1 pound Shrimp (fresh or frozen)
- 2 medium-sized Cucumbers (English preferred)
- ½ cup Sour Cream
- ¼ cup Mayonnaise
- 2 tablespoons Fresh Dill
- 1 tablespoon Lemon Juice
- Salt and Pepper (to taste)
- 1 cup Cherry Tomatoes (halved)
Instructions
- Prepare the Shrimp: If using frozen shrimp, thaw them. In a pot, boil salted water and add shrimp, cooking for 2-3 minutes until pink.
- Cool the Shrimp: Transfer cooked shrimp to an ice bath for a minute, then drain.
- Chop the Vegetables: Slice cucumbers and halve cherry tomatoes.
- Make the Creamy Dressing: Whisk together sour cream, mayonnaise, dill, lemon juice, salt, and pepper.
- Combine Everything: In a large bowl, mix shrimp, cucumbers, and tomatoes, and fold in the dressing.
- Chill: Cover and refrigerate for at least 30 minutes.
- Serve: Give the salad a gentle stir and serve with a sprinkle of dill.
Notes
For a lighter option, use poached chicken instead of shrimp. Avoid overcooking the shrimp; they should be tender, not rubbery.
- Prep Time: 15 minutes
- Cook Time: 5 minutes
- Category: Salad
- Method: Mixing
- Cuisine: American
Nutrition
- Serving Size: 1 serving
- Calories: 280
- Sugar: 4g
- Sodium: 350mg
- Fat: 15g
- Saturated Fat: 3g
- Unsaturated Fat: 8g
- Trans Fat: 0g
- Carbohydrates: 12g
- Fiber: 2g
- Protein: 25g
- Cholesterol: 180mg
Keywords: Cucumber Salad, Shrimp Salad, Summer Recipes, Refreshing Salad
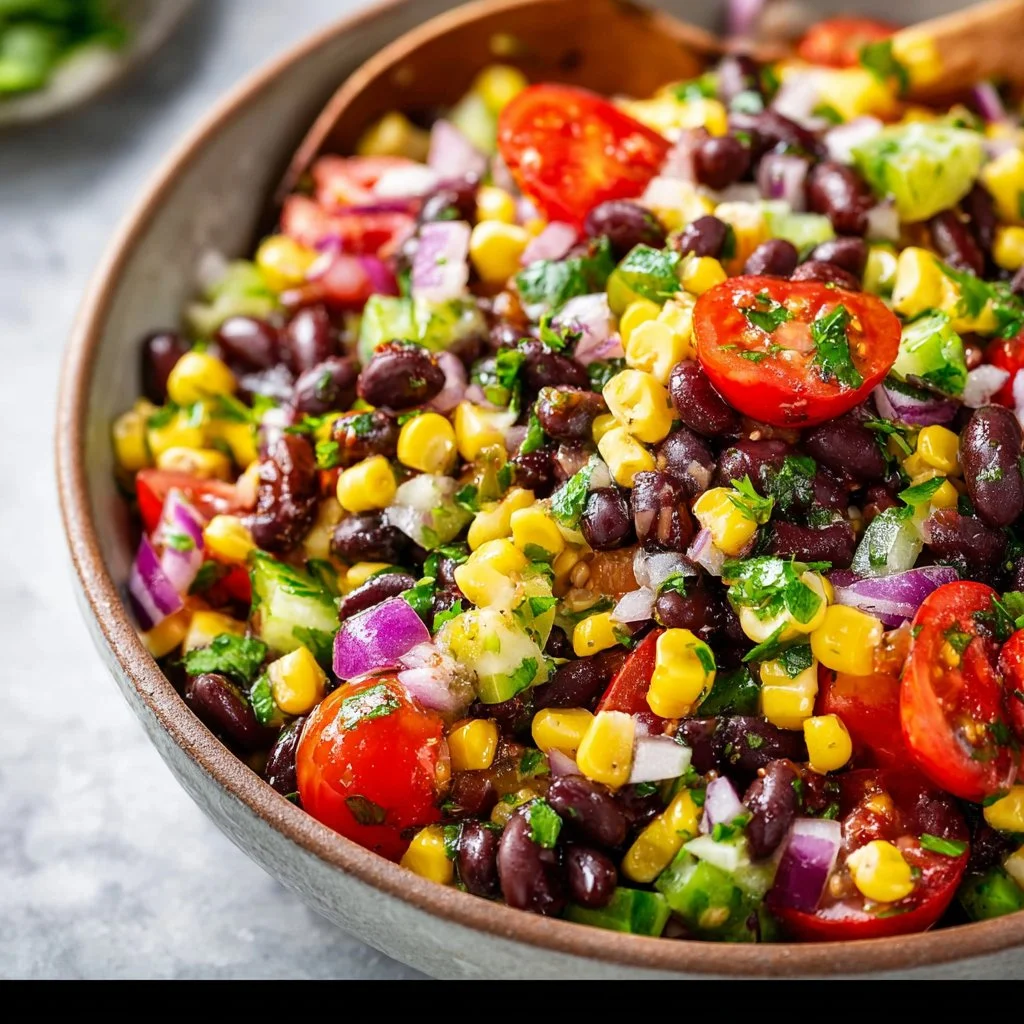
Black Bean and Corn Salsa Salad
Black Bean and Corn Salsa Salad: A Colorful Celebration of Flavor
Introduction
Welcome back to my kitchen! I’m so excited to share one of my favorite dishes with you today—Black Bean and Corn Salsa Salad. This vibrant, flavorful salad is not only a feast for the eyes but also a delightful burst of freshness in every bite. It’s the perfect side dish for summer barbecues, a fabulous topping for tacos, or a light lunch on a warm day. The best part? It’s super easy to whip up in no time!
I remember the first time I made this dish—a sun-drenched afternoon, the air filled with laughter, and the scent of freshly grilled chicken wafting in from the patio. I wanted something refreshing that could balance out the savory flavors of the grilled meats while adding a pop of color to our spread. After rummaging through my pantry and fridge, I stumbled upon some canned black beans, frozen corn, fresh cilantro, tomatoes, and a squeeze of lime. Just like that, the Black Bean and Corn Salsa Salad was born!
With its delightful medley of flavors and textures—crunchy bell peppers, sweet corn, hearty black beans, and zesty lime—this salad embodies everything I love about cooking: simplicity, nourishment, and connection. So, gather your ingredients and get ready to experience the joy of creating something delicious that your family and friends will absolutely adore!
Now, let’s dive into the story behind this delicious recipe, the ingredients, and how to make your very own Black Bean and Corn Salsa Salad.
Personal Story
Growing up, summer evenings at my grandparents’ house were nothing short of magical. My grandmother, the queen of backyard barbecues, had this uncanny ability to gather everyone around the grill, filling the air with the aroma of sizzling meats and vegetables. But amidst the smoky goodness, her signature Black Bean and Corn Salsa always stole the show.
I loved sneaking spoonfuls of the salad while it rested on the kitchen counter, impatiently waiting for it to be served. The vibrant colors glistened under the light, and each bite was a refreshing explosion of flavor. It wasn’t just a salad; it was a canvas for creativity and love.
Today, every time I whip up this recipe, I can’t help but reminisce about those carefree summer nights, the laughter surrounding me, and the feeling of being connected to my family through food. This dish is not just a salad; it’s a tribute to my family traditions and a reminder that the simplest recipes often carry the richest memories.
Ingredients
Let’s gather everything you need to create this colorful salsa salad. Here’s what you’ll need:
-
1 can (15 oz) black beans
- Packed with protein and fiber, black beans are a fantastic base for this salad. Make sure to rinse them well before adding to get rid of the excess sodium. If you’re looking for a substitute, kidney beans work beautifully too!
-
1 cup corn (fresh, frozen, or canned)
- Sweet corn adds a crunchy texture to the dish. If using fresh corn, just boil or grill it briefly to soften it up. For a twist, consider using roasted corn for a deeper flavor!
-
1 red bell pepper, diced
- This vibrant veggie adds sweetness and a lovely crunch. Feel free to swap it with a yellow or orange pepper for a different color palette, or even jalapeño for some extra heat if you’re feeling spicy!
-
1 cup cherry tomatoes, halved
- Bursting with flavor and juiciness, cherry tomatoes are my go-to choice. They’re easier to eat and add a pop of color. You can also use grape tomatoes or any ripe heirloom variety for unique flavors.
-
1/2 red onion, finely chopped
- Red onions bring a sharp bite that complements the sweetness of the corn. If you prefer a milder taste, soaking the onion in cold water for a few minutes can take the edge off!
-
1 cup fresh cilantro, chopped
- Cilantro adds a bright, herbaceous note that ties all the flavors together. If you’re not a fan, consider fresh parsley as a substitute or even a sprinkle of fresh oregano for something different.
-
Juice of 1 lime
- The acidity from lime juice is essential to brighten up the salad. You can use lemon juice in a pinch, but the lime really gives it that zesty kick we crave!
-
Salt and pepper, to taste
- Simple seasonings can make or break a dish! Start with a pinch of each, then taste and adjust as needed. I always remind my friends that it’s better to start small and add more if needed.
Step-by-Step Instructions
Now that we have our ingredients lined up, let’s make this vibrant salad! Follow these easy steps:
-
Prep the Beans and Corn
- If you’re using canned black beans, drain and rinse them under cold water until the water runs clear. This will wash away any excess sodium and improve the final flavor. For frozen corn, microwave it per the package instructions, then cool it down quickly in a bowl of ice water to stop the cooking process. This ensures your corn stays sweet and crunchy!
-
Chop the Veggies
- Dice your red bell pepper and red onion, and halve the cherry tomatoes. I like to keep the veggies pretty uniform in size so they blend well together, creating a beautiful mosaic! For the onion, remember to use a sharp knife—it helps to prevent the release of those tear-inducing compounds!
-
Mix It Up
- In a large mixing bowl, combine the black beans, corn, diced bell pepper, halved cherry tomatoes, and chopped red onion. Mix everything gently with a spatula or wooden spoon, being careful not to mash the beans!
-
Add Fresh Herbs and Lime Juice
- Toss in the chopped cilantro and squeeze the juice of one lime over the mixture. Toss everything again until well combined. The lime juice not only adds flavor but also helps marry all the ingredients together. Plus, who doesn’t love the smell of fresh lime in their kitchen?
-
Season to Taste
- Finally, sprinkle the salad with salt and pepper, mixing until evenly distributed. Now’s the time to give it a taste! If you want it zestier, feel free to add more lime juice.
-
Chill (Optional)
- Although you can serve it immediately, allowing the salad to chill in the fridge for about 30 minutes enhances the flavors as they mingle. It’s perfect for making ahead for parties!
Serving Suggestions
This Black Bean and Corn Salsa Salad can be served in various ways! You can present it in a large bowl for family-style sharing, or portion it out in individual cups for a fun, casual presentation. Garnish with additional cilantro for extra flair! Serve alongside grilled meats for a tasty contrast, scoop it up with tortilla chips for a add it as a topping for tacos, or enjoy it as a standalone dish on a hot day!
Recipe Variations
-
Add Avocado: For a creamy twist, dice up an avocado and gently fold it into the salad just before serving for added richness.
-
Spicy Kick: Chop up 1-2 jalapeño peppers (with or without seeds depending on your heat preference!) and toss them in for a fiery bite.
-
Quinoa Power: For extra protein and texture, mix in some cooked quinoa—it’s a great way to turn this salad into a more filling main dish.
-
Southwestern Flair: Sprinkle some crumbled feta or cotija cheese on top for a salty, creamy contrast. You can even use a dressing made from olive oil, cumin, and chili powder for added flavor.
-
Herb Swap: Try substituting fresh basil for cilantro, or add a handful of arugula for peppery notes that complement the sweet corn.
Chef’s Notes
This recipe has been a staple in my kitchen for years, and it has evolved with me! I’ve made it during countless summer gatherings, family picnics, and even as a light lunch when I want something refreshing. The beauty of salad is its adaptability; you can change the ingredients based on what’s in season or what flavors you’re craving.
I once had a friend add diced mango, and it was a game changer! The sweet and savory combination was incredible. There’s a certain joy in experimenting with this dish, so don’t be afraid to put your own spin on it!
FAQs and Troubleshooting
1. Can I make this salad ahead of time?
Yes! This salad can be made ahead, making it perfect for meal prepping or parties. The flavors get even better as they marinate together. Just keep it in an airtight container in the refrigerator.
2. How do I store leftover salad?
Any leftovers can be stored in an airtight container in the fridge for up to 3 days. However, if you’ve added avocado, it may brown a bit quicker. Just squeeze some extra lime juice on top before sealing!
3. Can I use dried beans instead of canned?
Absolutely! If you prefer dried beans, make sure to soak and cook them ahead of time. Just ensure they are thoroughly cooled before mixing them into your salad.
4. Why did my salad turn watery after storing?
This can happen if you’ve added ingredients that release moisture, like tomatoes. To avoid this, you can remove the seeds of the tomatoes or serve them on the side.
Nutritional Information
(Optional, as this might vary based on specific brands and quantities used. If you want, you can include an estimated breakdown based on one serving size).
And there you have it—my beloved Black Bean and Corn Salsa Salad! I hope you find as much joy in making and sharing this dish as I do. It’s not just a salad; it’s a celebration of flavors, colors, and memories waiting to be made. Happy cooking, and enjoy every bite!
Print
Black Bean and Corn Salsa Salad
- Total Time: 20 minutes
- Yield: 4 servings 1x
- Diet: Vegetarian
Description
A vibrant and flavorful salad featuring black beans, sweet corn, and fresh vegetables, perfect for summer gatherings or as a light meal.
Ingredients
- 1 can (15 oz) black beans, rinsed
- 1 cup corn (fresh, frozen, or canned)
- 1 red bell pepper, diced
- 1 cup cherry tomatoes, halved
- 1/2 red onion, finely chopped
- 1 cup fresh cilantro, chopped
- Juice of 1 lime
- Salt and pepper, to taste
Instructions
- Prep the beans and corn by draining and rinsing the black beans, and cooking the corn if needed.
- Chop the red bell pepper and red onion, and halve the cherry tomatoes.
- Mix the black beans, corn, diced bell pepper, halved cherry tomatoes, and chopped red onion in a large bowl.
- Add the chopped cilantro and lime juice to the mixture and toss to combine.
- Season with salt and pepper to taste.
- Chill in the fridge for 30 minutes or serve immediately.
Notes
This salad can be customized with avocado, jalapeños, or quinoa for added flavor and nutrition.
- Prep Time: 15 minutes
- Cook Time: 5 minutes
- Category: Salad
- Method: Mixing
- Cuisine: Mexican
Nutrition
- Serving Size: 1 serving
- Calories: 250
- Sugar: 6g
- Sodium: 300mg
- Fat: 5g
- Saturated Fat: 0.5g
- Unsaturated Fat: 4g
- Trans Fat: 0g
- Carbohydrates: 45g
- Fiber: 10g
- Protein: 12g
- Cholesterol: 0mg
Keywords: black bean salad, corn salsa, summer salad, vegetarian recipes

Classic Carol Chicken Salad
Classic Carol Chicken Salad: A Cozy Take on a Timeless Dish
Welcome back to my kitchen, foodie friends! 🌿 Today, we’re diving into the world of nostalgia and comfort with a classic that warms the heart and tantalizes the taste buds: the Classic Carol Chicken Salad!
Now, if you’re like me and hear the word “salad” and immediately shy away, fret not! This isn’t your average garden salad with sad, floppy greens. Oh no! This chicken salad, with its hearty chunks of tender chicken, a medley of colors, and a creamy dressing that hugs every ingredient, is the ultimate crowd-pleaser. It’s the kind of dish that makes you feel like you’ve wrapped yourself in a cozy blanket, even on the busiest of days.
Every bite of this salad whispers tales of summer picnics, potlucks, and family gatherings. Imagine a sun-drenched afternoon, laughter lingering in the air, and you holding a plate of this vibrant, flavorful chicken salad. It’s a dish that speaks to the kitchen’s magic—all it takes is a handful of ingredients and a little creativity!
Whether you’re throwing together a quick lunch or prepping for a big gathering, I promise this Classic Carol Chicken Salad will become a staple in your culinary repertoire. So roll up those sleeves, grab that apron (preferably a messy one!), and let’s get cooking together!
Personal Story
Whenever I make this Classic Carol Chicken Salad, my mind floats back to sunny afternoons spent at my Aunt Carol’s house. You see, Aunt Carol had this infectious passion for cooking—it was her love language. The kitchen would fill with the most delightful aromas, and everyone would gather around the table, sharing stories and laughter, as she served her famous chicken salad with pride.
I’ll never forget the first time I caught a whiff of that creamy goodness; I was instantly hooked! It had the perfect balance of richness from the mayonnaise, a hint of sweetness from the grapes, and crunch from the celery. Uncle Joe would sneak in for a second helping, while the kids would pile their plates high, secretly hoping for leftovers.
To this day, every time I make this dish, I hear Aunt Carol’s hearty laughter and feel that warm embrace of family gatherings. It’s not just a recipe; it’s a cherished memory and a delicious way to connect with loved ones—just as my Aunt Carol did for me. So let’s whip up our own batch and create some fond memories in the kitchen!
Ingredients
To make this delightful Classic Carol Chicken Salad, you’ll need the following ingredients. Each one plays a crucial role in crafting that perfect blend of flavors and textures:
- 2 cups cooked chicken, chopped: Use rotisserie chicken for convenience or poach your own chicken breasts. It’s moist and savory—perfect for salads!
- 1 cup celery, diced: The crunch factor! Celery adds a fresh, crisp bite. If you’re not a fan, try diced cucumbers instead.
- 1 cup grapes, halved: These pop with sweetness! Red grapes are ideal, but green ones work too. Substitute with diced apples if you’re after a different flavor note.
- 1/2 cup walnuts or pecans, chopped: For that earthy crunch! For a nut-free option, toasted sunflower seeds are a great swap.
- 3/4 cup mayonnaise: This creamy element binds everything together. Greek yogurt can work for a lighter version with a tangy twist.
- 1 tbsp Dijon mustard: A touch of tanginess that elevates the entire dish! If you prefer, honey mustard can lend a sweeter flavor.
- Salt and pepper to taste: Essential for bringing all the flavors together. Don’t be shy—taste as you go!
- Fresh herbs (optional): Parsley or dill can add an aromatic freshness that brightens the salad.
Now that we’ve gathered our ingredients, let’s dive into the magic of combining them!
Step-by-Step Instructions
-
Cook the Chicken:
- If using raw chicken, start by poaching or baking your chicken breasts. To poach: place the chicken in a pot, cover it with water, and bring to a gentle simmer. Cook for about 15-20 minutes until fully cooked. Alternatively, bake in a preheated oven at 375°F (190°C) for 25-30 minutes.
- Chef Insight: Poaching with herbs in the water, like thyme or bay leaves, can impart extra flavor to the chicken!
-
Prep the Ingredients:
- While the chicken is cooking, it’s time to dice your celery, halve those sweet grapes, and chop your nuts.
- Tip: To save time, use pre-chopped celery or throw the nuts into a food processor for a quick pulse.
-
Assemble the Dressing:
- In a large bowl, mix the mayo, Dijon mustard, salt, and freshly cracked pepper. Stir until your mixture is creamy and well-combined.
- Chef Hack: If you want a touch of zing, add a splash of apple cider vinegar to the dressing for depth.
-
Combine Everything:
- Once the chicken is cooked and has cooled enough to handle, chop it into bite-sized pieces and add it to the dressing. Then, gently fold in your celery, grapes, and nuts until everything is beautifully coated.
- Tip: Be cautious while mixing; you want to coat everything without turning it to mush!
-
Taste and Adjust:
- Give your salad a taste! Adjust the seasoning with more salt, pepper, or even a squeeze of lemon juice if you like it zesty.
- Chef Insight: Letting the salad sit for about 30 minutes in the fridge allows the flavors to deepen.
Serving Suggestions
When it’s time to serve, this Classic Carol Chicken Salad shines! You can serve it on a bed of crisp lettuce leaves for that elegant touch, in a buttery croissant for a delightful sandwich, or simply in a bowl with a sprinkle of fresh herbs on top. It’s colorful and inviting—perfect for any occasion!
Recipe Variations
Feeling adventurous? Here are a few fun twists you can put on the Classic Carol Chicken Salad:
- Spa Style: Swap out mayo for Greek yogurt and add a squeeze of fresh lemon juice for a lighter version.
- Tropical Vibes: Ditch the grapes for diced pineapple and add shredded coconut for a sweet twist!
- Spicy Kick: Mix in some diced jalapeños or sprinkle in a bit of cayenne for some heat.
- Herb-Infused: Add finely chopped basil or tarragon for an aromatic bouquet of flavor.
- Veggie Delight: Toss in diced bell peppers, shredded carrots, or even a handful of peas for added color and nutrition.
Chef’s Notes
This Classic Carol Chicken Salad has a special place in my heart. Over the years, I’ve played around with the recipe, adding different ingredients during various seasons or based on what’s in my pantry. Once, I experimented with adding apple slices, and it was a hit! The crunch paired beautifully with the creamy dressing.
And let’s not forget the time I might’ve had one too many glasses of wine while making it, resulting in some hilariously messy kitchen antics! I ended up with more salad on my clothes than in the bowl, but that’s the joy of the kitchen—embrace the mess!
FAQs and Troubleshooting
-
What if my chicken is dry?
- Overcooked chicken can become dry and chewy. To avoid this, ensure you monitor the temperature with a meat thermometer or use poaching for gentler cooking.
-
Can I prep this salad in advance?
- Absolutely! This salad keeps well in the fridge for about 2-3 days. However, I suggest keeping the nuts separate until serving for maximum crunch.
-
What’s a good substitute for mayonnaise?
- If you’re looking for alternatives, Greek yogurt or avocado can be excellent substitutes. They provide creaminess while cutting down on calories.
-
How do I know if it’s seasoned correctly?
- The best way to check seasoning is to taste! Start with a little salt and pepper, mix, and taste again to adjust until it’s just right.
Nutritional Info
Per serving (1 cup) – estimated:
- Calories: 350
- Protein: 25g
- Fats: 22g
- Carbohydrates: 15g
- Fiber: 2g
This Classic Carol Chicken Salad is not just a delicious meal; it’s a gateway to creativity and connection in the kitchen. So go ahead, gather your favorite people, and serve up some love with this delightful salad. Happy cooking, dear friends! 🍽️✨
Print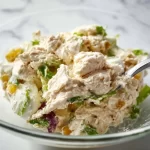
Classic Carol Chicken Salad
- Total Time: 45 minutes
- Yield: 4 servings 1x
- Diet: Gluten-Free
Description
A cozy and vibrant chicken salad that combines tender chicken, sweet grapes, crunchy celery, and a creamy dressing for a delightful dish perfect for any gathering.
Ingredients
- 2 cups cooked chicken, chopped
- 1 cup celery, diced
- 1 cup grapes, halved
- 1/2 cup walnuts or pecans, chopped
- 3/4 cup mayonnaise
- 1 tbsp Dijon mustard
- Salt and pepper to taste
- Fresh herbs (optional)
Instructions
- Cook the chicken: If using raw chicken, poach or bake your chicken breasts until fully cooked.
- Prep the ingredients: Dice celery, halve grapes, and chop nuts.
- Assemble the dressing: Mix mayo, Dijon mustard, salt, and pepper until creamy.
- Combine everything: Add chicken, celery, grapes, and nuts to the dressing and fold until coated.
- Taste and adjust: Season and let sit in the fridge for 30 minutes for flavors to deepen.
Notes
Can be served on lettuce, in a croissant, or plain. Keeps well for 2-3 days in the fridge; keep nuts separate until serving.
- Prep Time: 15 minutes
- Cook Time: 30 minutes
- Category: Salad
- Method: Mixing
- Cuisine: American
Nutrition
- Serving Size: 1 cup
- Calories: 350
- Sugar: 5g
- Sodium: 400mg
- Fat: 22g
- Saturated Fat: 4g
- Unsaturated Fat: 18g
- Trans Fat: 0g
- Carbohydrates: 15g
- Fiber: 2g
- Protein: 25g
- Cholesterol: 60mg
Keywords: chicken salad, summer dish, comfort food, easy recipe

Bacon Ranch Chicken Salad with Cheddar (Low Carb)
Bacon Ranch Chicken Salad with Cheddar (Low Carb)
Welcome to my kitchen! Cooking for loved ones and creating meaningful meals is what feeds my soul, and I’m thrilled to share one of my go-to recipes with you today: Bacon Ranch Chicken Salad with Cheddar! This dish is not just a last-minute afterthought; it’s a flavorful explosion that can elevate any lunch or dinner and keep the low-carb lovers among us happy!
Imagine tender, juicy chicken mixed with rich, crispy bacon, and paired with the zesty flavors of ranch dressing. Top it off with sharp cheddar cheese, and you’ve got yourself a winning combination that even the pickiest eaters will love.
Settle in, grab your apron, and let’s embark on a culinary adventure that promises to warm your heart and tickle your taste buds!
A Fond Kitchen Memory: The Inspiration Behind This Salad
Before diving into the nitty-gritty of this delightful recipe, let me share a little backstory. Growing up, my family had a tradition of hosting summer barbecues that would stretch long into the evening, with the aroma of grilled meat filling the air and laughter echoing all around. My mom would often whip up her famous chicken salad, tossing together whatever was on hand and sprinkling in her magic touch—a touch of ranch seasoning, her secret weapon!
As the years passed, I began to put my spin on her recipe, particularly with the addition of crispy bacon and sharp cheddar cheese. The first time I made it for a casual get-together, friends were asking for seconds before they had even taken a full bite! With every bite, I’m reminded of family gatherings, sunny afternoons, and the heartwarming connection food brings. This recipe resonates not just for its taste but for the memories it creates, and I hope it brings you a sense of joy as you share it with your loved ones.
Ingredients
To make this delicious Bacon Ranch Chicken Salad with Cheddar, gather the following ingredients:
-
Cooked Chicken Breast
Tender and juicy, shredded or cubed chicken is the main star of this salad. Remember: rotisserie chicken is a fantastic shortcut! If you’re looking for a leaner option, opt for skinless chicken breast. -
Bacon
Ah, the crispy goodness that elevates any dish! Cook until golden and crispy. If you’re looking for a lower-fat alternative, turkey bacon works well, albeit with a different crunch. -
Sharp Cheddar Cheese
The bite of the cheddar adds richness to the salad. Feel free to swap it with mozzarella or a dairy-free cheese if you need a different flavor or a vegan option. -
Ranch Dressing
Store-bought or homemade, the creamy goodness is what ties everything together. Making your own ranch dressing with yogurt and herbs makes it even lighter! Look on the internet for countless simple recipes. -
Celery
Crunchy celery adds a refreshing texture. If you’re not a celery fan, diced bell peppers or cucumber can also work great! -
Green Onions
These bring a subtle kick and color to the salad. For a milder flavor, you could use chives instead. -
Salt and Pepper
The basic seasonings that can’t be skipped! Make sure to freshly grind them to enhance the flavors.
Step-by-Step Instructions
Now that we have our ingredients ready, let’s transform them into a summery salad that’s perfect for any occasion!
-
Cook and Prepare the Chicken
- If you’re using raw chicken, start by seasoning it with salt and pepper. Place it in a skillet over medium heat and cook until no longer pink—about 6-8 minutes per side, depending on thickness. Allow it to cool, and then shred or cube the chicken.
- Chef Tip: You can boil the chicken breast for quicker prep! Just ensure it’s thoroughly cooked, and it will shred like a dream.
-
Crisp the Bacon
- In a skillet over medium-high heat, add the chopped bacon. Cook until crispy and golden brown—about 5-7 minutes. Drain on a paper towel for extra crunch.
- Kitchen Hack: Use a baking sheet lined with parchment paper to cook your bacon in the oven for mess-free crispiness!
-
Prepare the Veggies
- While your chicken and bacon are doing their thing, chop the celery and slice the green onions.
- Chef Insight: To keep the colors vibrant, try to cut the veggies just before mixing. It keeps everything fresh and crunchy!
-
Mix It Up
- In a large mixing bowl, combine the chicken, crispy bacon, cheddar cheese, celery, and green onions.
- Pour in your ranch dressing and mix it all together until everything is coated in that creamy goodness.
- Savvy Tip: Adjust the amount of dressing according to your taste. If you’re feeling adventurous, try adding a splash of lemon juice or a teaspoon of Dijon mustard to brighten the flavors!
-
Season to Taste
- Don’t forget to taste! Add any extra salt or pepper as needed.
- Little Secret: A pinch of garlic powder or smoked paprika will add an unexpected depth if you’re craving something a bit more complex.
-
Chill and Serve
- It’s optional, but chilling your salad for at least 30 minutes in the refrigerator lets the flavors meld beautifully.
- Serve it chilled or at room temperature, either on a bed of leafy greens, inside a wrap, or stuffed in a low-carb tortilla!
Serving Suggestions
Presentation is everything! For a delightful plate, serve your Bacon Ranch Chicken Salad on a bed of crisp romaine lettuce or in hollowed-out bell peppers. Sprinkle extra bacon bits and chopped green onions on top for a pop of color and crunch. Pair it with some homemade low-carb crackers or a side of sliced avocado for a complete meal. Don’t forget to pour yourself a refreshing glass of lemonade while you’re at it!
Recipe Variations
Feel free to experiment! Here are a few of my favorite twists:
- Spicy Twist: Add diced jalapeños or a splash of hot sauce for a kick!
- Mediterranean Style: Substitute the ranch dressing with tzatziki for a refreshing take. Toss in olives and sun-dried tomatoes for added flavor.
- Add Fruits: Toss in diced apples or grapes for an unexpected sweetness that contrasts beautifully with the salty bacon.
- Herbaceous Touch: Fresh herbs like dill or parsley can elevate the flavor profile—just sprinkle some in!
- Veggie-Packed Version: Add shredded carrots or diced bell peppers for an extra crunch and colorful presentation.
Chef’s Notes
Over the years, this recipe has become a beloved staple not just for me but for friends and family alike. I remember the first time I brought it to an office potluck; it was devoured within minutes! The best part? This salad holds up beautifully in the fridge, making it perfect for meal prep. Don’t be surprised if you find yourself making double batches—one for now and one for later!
And let me tell you, finding little bits of bacon hidden in the bottom of the bowl is a delightful surprise for everyone.
FAQs and Troubleshooting
1. Can I prep this salad ahead of time?
Absolutely! You can make this salad a day ahead, but I suggest storing the bacon separately until just before you serve. This keeps that glorious crunch intact!
2. How long will the salad last in the fridge?
In an airtight container, this salad stays fresh for about 3 days. Trust me; it tastes even better the next day as the flavors meld!
3. What if my salad turns out too dry?
No stress! Just add a little more ranch dressing or a splash of chicken broth to bring it back to life.
4. What’s the best way to keep the bacon crispy?
Store the bacon separately if you know you’ll have leftovers. When ready to serve, reheat in the microwave for a few seconds or pop it back in the skillet for a quick re-crisping!
Nutritional Info
(If you’re tracking your macros, here’s a quick overview!)
- Serving Size: About 1 cup
- Calories: Approximately 350 kcal
- Protein: 30g
- Fat: 25g
- Carbohydrates: 4g
- Fiber: 1g
Now that you’ve got all the details, it’s time to don your apron and give this recipe a whirl! I can’t wait for you to sit down, take a bite, and hopefully feel a warm wave of nostalgia and happiness—just like I do every time I whip up this delicious Bacon Ranch Chicken Salad with Cheddar. Happy cooking!
Print
Bacon Ranch Chicken Salad with Cheddar
- Total Time: 30 minutes
- Yield: 4 servings
- Diet: Low Carb
Description
A flavorful low-carb salad featuring tender chicken, crispy bacon, and sharp cheddar, all tossed in a creamy ranch dressing.
Ingredients
- Cooked Chicken Breast
- Bacon
- Sharp Cheddar Cheese
- Ranch Dressing
- Celery
- Green Onions
- Salt and Pepper
Instructions
- Cook and prepare the chicken by seasoning with salt and pepper, cooking in a skillet until no longer pink, then cooling and shredding.
- Crisp the bacon in a skillet until golden brown, then drain on a paper towel.
- Prepare the veggies by chopping celery and slicing green onions.
- Mix the chicken, crispy bacon, cheddar cheese, celery, and green onions in a large bowl. Pour in ranch dressing and combine.
- Season to taste with additional salt and pepper.
- Chill the salad in the refrigerator for at least 30 minutes.
- Serve the salad on a bed of leafy greens or in a low-carb tortilla.
Notes
This salad can be made ahead of time, and is best if the bacon is stored separately until serving to keep it crispy.
- Prep Time: 15 minutes
- Cook Time: 15 minutes
- Category: Salad
- Method: Mixing
- Cuisine: American
Nutrition
- Serving Size: 1 cup
- Calories: 350
- Sugar: 1g
- Sodium: 600mg
- Fat: 25g
- Saturated Fat: 10g
- Unsaturated Fat: 10g
- Trans Fat: 0g
- Carbohydrates: 4g
- Fiber: 1g
- Protein: 30g
- Cholesterol: 100mg
Keywords: chicken salad, bacon salad, low carb salad, ranch dressing, easy salad recipe


