
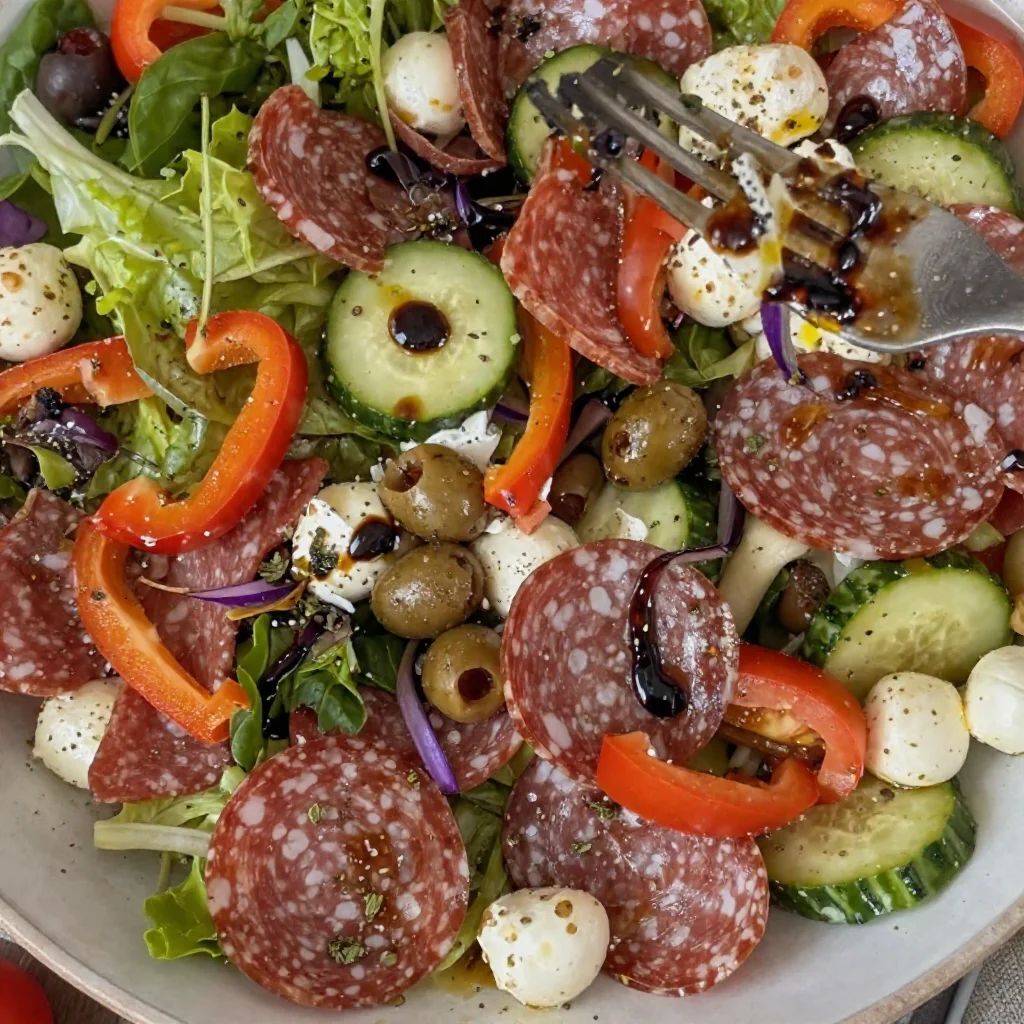
Antipasto Salad
Antipasto Salad: A Symphony of Flavor in a Bowl
Welcome to my cozy corner of culinary magic! Today, I’m beyond excited to share one of my all-time favorite dishes—Antipasto Salad. Now, you might be wondering, “What’s so special about a salad?” But let me tell you, this isn’t just any salad; it’s a vibrant, mouthwatering medley of flavors and textures that brings a fresh twist to your dining table. Think of it as a summer picnic in a bowl or a stylish appetizer that can steal the show at any gathering.
One of the coolest things about this Antipasto Salad is that it’s incredibly versatile. You can customize it to include your favorite ingredients, and it makes for the perfect addition to any meal or occasion. Whether you’re hosting a casual get-together with friends, planning a romantic dinner, or simply craving a colorful, satisfying dish, this salad has you covered.
Picture this: crisp greens, juicy olives, savory salami, rich cheeses, and a symphony of fresh vegetables, all drizzled with a tangy homemade dressing. My mouth is watering just thinking about it! So, grab your chopping board and an apron, and let’s dive into this delicious experience together!
A Taste of Nostalgia
Before we get into the nitty-gritty of preparing this delightful salad, let me take you on a little trip down memory lane. The first time I fell head over heels for antipasto was during a summer family gathering at my Aunt Margherita’s house. Every year, she would throw an Italian feast that felt like a warm hug. Amidst the laughter and the sounds of pasta sizzling away, a large platter of antipasto graced the table— vibrant colors, enticing aromas, and an array of delectable treats.
I remember standing on tiptoes next to the table, trying to reach for the spicy pepperoni and the sharp provolone. As I sampled the goods, my aunt would tell tales of our Italian heritage while encouraging me to mix and match flavors. The joy of discovering new combinations stuck with me. It wasn’t just a dish; it was a celebration of family, culture, and creativity. This Antipasto Salad is my homage to that unforgettable day. It allows me to recreate those feelings of warmth and togetherness, and I’m thrilled to share that sense with all of you!
Ingredients
Let’s gather our ingredients! Here’s what you’ll need to whip up this fabulous Antipasto Salad:
-
Mixed Greens (4 cups)
- Insight: Use a combination of romaine, arugula, and spinach for a variety of flavors. Feel free to swap with any leafy greens you prefer!
-
Cherry Tomatoes (1 cup, halved)
- Substitution Tips: If cherry tomatoes aren’t in season, you can use chopped regular tomatoes. Their juicy sweetness is non-negotiable!
-
Cucumber (1 large, diced)
- Chef Insight: For added crunch, choose English cucumbers, which have fewer seeds and a crisper texture.
-
Olives (½ cup, mixed varieties)
- Insight: Kalamata, green, and black olives add complexity. If you’re a fan of something less salty, try sweet Hungarian pepper or even artichoke hearts!
-
Salami (6 oz, sliced)
- Substitution Tips: Prosciutto or pepperoni work equally well, or make it vegetarian by swapping in marinated mushrooms.
-
Mozzarella Balls (1 cup, halved)
- Chef Insight: Fresh mozzarella brings a creamy texture. You can also use feta for a tangier taste!
-
Roasted Red Peppers (½ cup, sliced)
- Substitution Tips: You can use fresh bell peppers if you prefer a bit of crunch and sweetness.
-
Red Onion (¼ cup, thinly sliced)
- Chef Insight: Soaking the slices in cold water for a few minutes can mellow out their sharpness.
-
Basil (¼ cup, fresh, chopped)
- Insight: Fresh herbs are crucial! If basil isn’t available, try substituting with parsley or even arugula for a peppery kick.
-
Olive Oil (3 tablespoons)
-
Red Wine Vinegar (2 tablespoons)
-
Dried Oregano (1 teaspoon)
-
Salt & Pepper (to taste)
Step-by-Step Instructions
Step 1: Prep Your Greens
Start by washing and thoroughly drying your mixed greens. If you’re like me and love the art of a beautifully arranged salad, take a moment to chop them into bite-sized pieces. Don’t forget a splash of crispiness! If you have a salad spinner, now’s the time to show it off; those greens will thank you later.
Step 2: Dice Your Veggies
Next, grab that cucumber! Chop it into half-moons, then slice your cherry tomatoes in half. Just like that, these ingredients are ready to join the party! These colorful veggies are the backbone of your salad, delivering both flavor and crunch. If you want an even more robust flavor, sprinkle a bit of salt on the tomatoes to enhance their innate sweetness.
Step 3: Prepare the Dressing
Now, let’s make our tangy dressing! In a small bowl or a mason jar, combine the olive oil, red wine vinegar, dried oregano, salt, and pepper. Give it a good whisk or shake until everything is combined! Here’s a chef hack: taste it before you serve! If you want more bite, a splash more of vinegar will do the trick. Adjust based on your preference—it’s your creation, after all!
Step 4: Combine Ingredients
In a large bowl, combine the mixed greens, diced cucumbers, halved cherry tomatoes, and olives. Toss gently to combine. Here’s where you can start visualizing your masterpiece! Once you add the salami, mozzarella, roasted red peppers, and red onion, your salad will start coming together beautifully.
Step 5: Dress It Up!
Now it’s time for the magic! Pour your homemade dressing over the salad—don’t be shy; you want every leaf to be coated! Gently toss until everything is well coated. If you’re feeling fancy, add a few extra sprigs of basil on top for a splash of color.
Step 6: Serve it Up!
Transfer your wonderfully vibrant salad into a large serving bowl or arrange it on plates. You can garnish it with remaining olives or a sprinkle of Parmesan if you’re feeling indulgent. Antipasto Salad is at its best when served fresh, but you can make it ahead of time! Just keep the dressing separate until it’s time to serve, so everything remains crisp.
Serving Suggestions
Antipasto Salad shines when served alongside crusty bread or homemade focaccia. Picture this: a slice of warm bread, a generous scoop of your colorful salad, and a drizzle of that zesty dressing—heavenly! It also complements grilled chicken or seafood beautifully, making it a versatile addition to any meal.
Recipe Variations
- Mediterranean Twist: Add chickpeas and crumbled feta cheese for a heartier, plant-based vibe.
- Cobb-Style: Incorporate hard-boiled eggs and avocado to create a protein-packed version.
- Spicy Kick: Toss in jalapeño slices or a drizzle of hot sauce for an extra zing!
- Sweet and Savory: Include roasted butternut squash and walnuts for a sweeter, seasonal take.
- Family Style: Serve the ingredients deconstructed, allowing everyone to build their perfect salad.
Chef’s Notes
This Antipasto Salad has come a long way from the basic recipes I first encountered. I’ve experimented with countless ingredients over time. One of my most memorable kitchen stories involves a giant jar of sun-dried tomatoes that my friend gifted me; it went into every dish for a week! That experiment ignited my love for bold flavors, and now, I often toss in whatever strikes my fancy!
FAQs and Troubleshooting
Q1: Can I make this salad ahead of time?
Absolutely! You can prep all your ingredients and store them in the fridge for up to a day. Just keep the dressing separate to ensure the greens stay crisp.
Q2: What if I don’t like olives?
No problem! Feel free to omit olives and replace them with something you enjoy, like sliced radishes for crunch or additional veggies, such as artichoke hearts.
Q3: How do I prevent my salad from getting soggy?
For the freshest salad, add the dressing right before you’re ready to serve. Store the salad and dressing separately if prepping in advance!
Q4: Can I add protein?
Definitely! Grilled chicken, shrimp, or even some beans are great options to bulk up this salad for a more filling meal.
Nutritional Info
While nutritional values can vary based on the specific ingredients used, this Antipasto Salad is packed with nutrients, healthy fats, fiber, and protein, making it a well-rounded dish that’s perfect for any meal.
There you have it—a vibrant, delicious, and truly customizable Antipasto Salad that brings a little Italian flair to your kitchen! I hope you enjoy making this recipe as much as I loved sharing it with you. So, roll up your sleeves, throw on that apron, and let’s make some delicious memories in the kitchen together! Happy cooking!
Print
Antipasto Salad
- Total Time: 15 minutes
- Yield: 4 servings 1x
- Diet: Vegetarian
Description
A vibrant, mouthwatering medley of flavors and textures, perfect for any meal or occasion.
Ingredients
- 4 cups Mixed Greens (romaine, arugula, spinach)
- 1 cup Cherry Tomatoes, halved
- 1 large Cucumber, diced
- ½ cup Olives, mixed varieties
- 6 oz Salami, sliced
- 1 cup Mozzarella Balls, halved
- ½ cup Roasted Red Peppers, sliced
- ¼ cup Red Onion, thinly sliced
- ¼ cup Fresh Basil, chopped
- 3 tablespoons Olive Oil
- 2 tablespoons Red Wine Vinegar
- 1 teaspoon Dried Oregano
- Salt & Pepper, to taste
Instructions
- Prep your greens by washing and drying them, then chop into bite-sized pieces.
- Dice your cucumber and halve the cherry tomatoes.
- Prepare the dressing in a small bowl by combining olive oil, red wine vinegar, dried oregano, salt, and pepper.
- Combine the mixed greens, diced cucumber, halved tomatoes, and olives in a large bowl.
- Dress the salad by pouring the dressing over it and gently tossing to combine.
- Serve in a large bowl or on plates, garnished with additional olives or Parmesan if desired.
Notes
Make ahead by preparing all ingredients and storing them, but keep the dressing separate until serving to maintain freshness.
- Prep Time: 15 minutes
- Cook Time: 0 minutes
- Category: Salad
- Method: No-Cook
- Cuisine: Italian
Nutrition
- Serving Size: 1 serving
- Calories: 350
- Sugar: 6g
- Sodium: 900mg
- Fat: 24g
- Saturated Fat: 10g
- Unsaturated Fat: 10g
- Trans Fat: 0g
- Carbohydrates: 20g
- Fiber: 3g
- Protein: 12g
- Cholesterol: 30mg
Keywords: salad, antipasto, Italian, fresh ingredients, summer dish, easy recipe, vegetarian
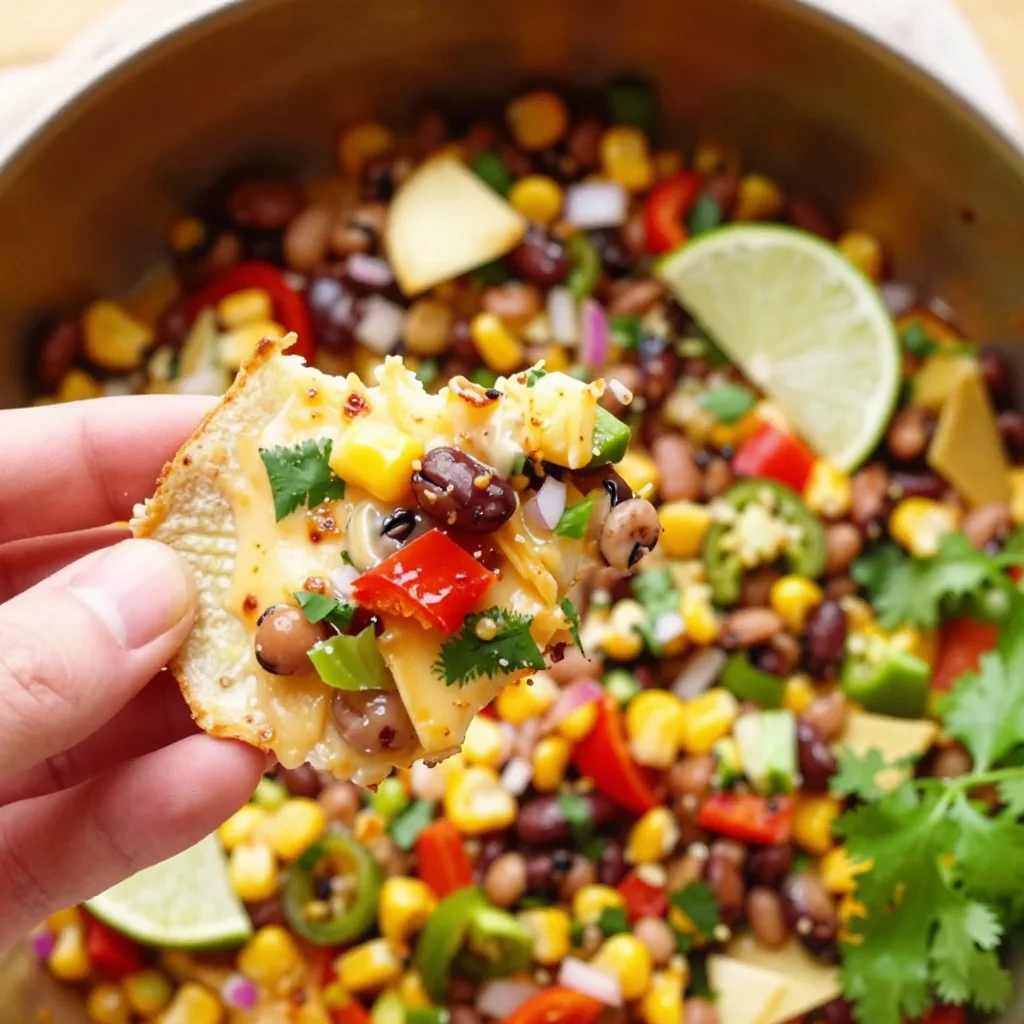
Texas Caviar
Texas Caviar: A Flavorful Dip with a Side of Southern Charm
Welcome to my kitchen, friends! Today, I’m excited to share a dish that captures the heart and soul of Texas — a vibrant, zesty creation known as Texas Caviar. If you’ve never tried this dish before, get ready for a treat! This isn’t your average dip; it’s a colorful blend of black-eyed peas, beans, and a medley of fresh vegetables, all tossed together in a tangy dressing that will leave your taste buds dancing.
You might be wondering, “What’s the story behind Texas Caviar?” Well, it all started in the 1940s in Texas (of course!). The dish was created to offer a fancy alternative to traditional caviar, using humble, everyday ingredients. Over time, Texas Caviar evolved from a simple side dish to a beloved staple at parties, potlucks, and summer cookouts. I love that it embodies the spirit of bringing people together, whether you’re enjoying it with tortilla chips on a sunny patio or serving it as a side to a backyard barbecue.
As we dive into this recipe, I want you to envision the vibrant colors of fresh veggies and the exhilarating aroma of spices wafting through your kitchen. Whether you’re making Texas Caviar for a casual afternoon snack or a special gathering with loved ones, it’s easy to whip up and always a crowd-pleaser. So without further ado, let’s grab our aprons and create a dish that’s as delightful as a Texas sunset!
A Taste of Nostalgia
One of my fondest memories associated with Texas Caviar dates back to my college days. My roommate, a proud Texan, would host Friday night gatherings where we would invite friends over to unwind after a long week of classes. She would always whip up a giant bowl of Texas Caviar, positioning it as the star of the show. The vibrant colors of the dish were captivating, and as soon as I took the first bite, I was hooked.
Each scoop was an explosion of flavors — the crunch of fresh peppers, the creaminess of avocado, and that tantalizing tang from lime juice. What I remember most is how it brought everyone together. We’d sit around our tiny kitchen table, laughter echoing off the walls, sharing stories while happily munching away on this tasty dip. That memory is forever etched in my mind, and since then, I’ve brought Texas Caviar to all my gatherings, passing down the tradition of good food and great company.
Ingredients
Here’s what you’ll need to make your own Texas Caviar:
-
1 can black-eyed peas: These little legumes are the backbone of the dish, packed with protein and flavor. If you can’t find canned black-eyed peas, you can use fresh or frozen ones. Just make sure they’re cooked and cooled before adding!
-
1 can black beans: Adds depth and richness. If you’re looking for a nutritional boost, consider using chickpeas instead!
-
1 cup corn: Fresh, frozen, or canned; corn adds sweetness and a lovely crunch. Don’t forget to drain and rinse canned corn to avoid extra sodium.
-
1 cup diced bell peppers (red, green, or yellow): These add color and crunch! Feel free to mix and match the colors for visual appeal.
-
1 cup diced tomatoes: Use fresh tomatoes for a summer vibe or canned diced tomatoes in a pinch. For a twist, try substituting sun-dried tomatoes for an extra kick!
-
1 small red onion, finely chopped: This brings a savory, bold flavor to the dish. If raw onion’s too strong for your taste, soak it in cold water for a few minutes to mellow it out.
-
1 avocado, diced: The star of the show for some! Its creaminess balances the crunch and tanginess of the other ingredients. If you’re looking for a lower-fat option, simply omit it.
-
1/4 cup fresh cilantro, chopped: For that fresh, herbal note! If you’re not a fan of cilantro, fresh parsley is a great substitute.
-
Juice of 2 limes: This crucial ingredient adds brightness and acidity. If you’re out of limes, lemon juice works well too.
-
1-2 jalapeños, finely chopped: This adds a lovely heat to the dish. Adjust to your spice tolerance! For a milder version, remove the seeds and membranes before chopping.
-
1/4 cup olive oil: Helps bring all the flavors together. For an extra zing, try infused oils like chili or garlic.
-
Salt and pepper to taste: A simple yet essential seasoning to elevate all the flavors!
Step-by-Step Instructions
Ready to bring this dish to life? Let’s get started!
-
Rinse and Drain the Beans: Open the cans of black-eyed peas and black beans. Rinse them well under cold water and drain. This step helps reduce sodium and keeps the dish from being too soggy-freshness is key!
-
Prepare the Veggies: While the beans drain, chop up your bell peppers, tomatoes, onion, jalapeños, and avocado. Aim for a uniform size so everything mixes nicely, and don’t be afraid to get colorful with your veggie choices. They’re the star of the show!
-
Mix It All Together: In a large mixing bowl, combine the drained beans, corn, bell peppers, tomatoes, onion, jalapeños, avocado, and cilantro. Use a spatula or wooden spoon to gently fold everything together. You want this step to be light — remember, you don’t want to mash the avocado!
-
Whisk the Dressing: In a small bowl, whisk together the lime juice, olive oil, and a pinch of salt and pepper. Whisking incorporates air, which helps to emulsify the dressing. Drizzle this over your veggie and bean mixture.
-
Toss, Toss, Toss!: Now for the fun part! Gently toss everything together until the dressing is well-distributed. Taste and adjust seasoning as needed. Want more zest? A dash of extra lime juice or salt can do wonders!
-
Chill: Cover the bowl with plastic wrap and let it sit in the fridge for at least 30 minutes. This resting time allows the flavors to meld beautifully. It’s tempting to dig in right away, but I promise the wait is worth it!
-
Serve It Up: After chilling, give it another light toss and serve with your favorite tortilla chips. I love using blue corn chips for a bit of extra flair, but any chip will do!
Serving Suggestions
Texas Caviar is incredibly versatile. You can serve it as a dip with crunchy tortilla chips or alongside grilled meats as a refreshing side. For something a little more fun, spoon it over soft tacos or use it to top a baked potato for a hearty, flavorful twist. Garnish with extra cilantro or lime wedges for that final touch of freshness!
Recipe Variations
Now, let’s shake things up a bit! Here are a few creative twists you can try with your Texas Caviar:
-
Add Fruits: For a sweet contrast, toss in some diced mango or pineapple. This pairs wonderfully with the heat of the jalapeños.
-
Go Vegan: Omit the avocado or try nutritional yeast for a creamy taste without dairy.
-
Zesty Pickle Relish: For a tangy twist, mix in a spoonful of pickle relish or chopped pickles. The extra zing is mouthwatering!
-
Smoky Touch: Add a dash of smoked paprika for a bit of smoky flavor that enhances the beans and corn beautifully.
-
Chipotle Kick: For even more heat, blend in a small amount of chipotle sauce or minced chipotle peppers. Your taste buds will thank you!
Chef’s Notes
Making Texas Caviar brings back the nostalgic feeling of gathering with friends. I’ll never forget one particular gathering where my friend accidentally added way too much jalapeño — we all took a bite and instantly burst into laughter! It sparked a friendly competition for the spiciest recipe version, and the stories from that night remain treasured.
Over the years, I’ve tweaked this recipe a bit — adding more citrus for brightness and swapping in seasonal veggies as they come into play. Remember, cooking is about experimenting and making the dish your own, so feel free to get creative!
FAQs and Troubleshooting
Q: How long will Texas Caviar keep?
A: If stored in an airtight container in the fridge, it can last about 3-5 days. Just keep in mind that the avocado may brown, so add it fresh if you can.
Q: Can I make Texas Caviar ahead of time?
A: Absolutely! In fact, it tastes even better after sitting for a while. Just mix everything except the avocado and add it right before serving.
Q: My dip turned out too salty. What can I do?
A: If your caviar is too salty, add a splash of lime juice or some extra diced tomatoes to balance it out.
Q: Can I use different beans?
A: Yes! Feel free to use whatever canned beans you have on hand. Pinto beans or kidney beans are great substitutes, too.
Nutritional Info
While exact nutritional values can vary, here’s a rough estimate for a serving of Texas Caviar (based on approximately 1/2 cup):
- Calories: 130
- Protein: 6g
- Carbohydrates: 22g
- Dietary Fiber: 6g
- Sugars: 2g
- Fat: 4g
Chock-full of plant-based goodness, Texas Caviar is more than just a fun dip; it’s a nutritious meal option that is as good for your heart as it is for your spirit.
So there you have it! Texas Caviar is delightful, versatile, and oh-so-easy to prepare. Whether you’re enjoying it solo or with friends, I can promise this dish will add a tasty splash of color and flavor to your gatherings! Happy cooking, and cheers to good food and great times!
Print
Texas Caviar
- Total Time: 15 minutes
- Yield: 4 servings 1x
- Diet: Vegan
Description
A vibrant and zesty dip made with black-eyed peas, beans, and fresh vegetables, perfect for parties and gatherings.
Ingredients
- 1 can black-eyed peas, rinsed and drained
- 1 can black beans, rinsed and drained
- 1 cup corn, fresh or canned
- 1 cup diced bell peppers (red, green, or yellow)
- 1 cup diced tomatoes
- 1 small red onion, finely chopped
- 1 avocado, diced
- 1/4 cup fresh cilantro, chopped
- Juice of 2 limes
- 1–2 jalapeños, finely chopped
- 1/4 cup olive oil
- Salt and pepper to taste
Instructions
- Rinse and drain the beans.
- Prepare the veggies by chopping bell peppers, tomatoes, onion, jalapeños, and avocado.
- Mix all the ingredients together in a large bowl.
- Whisk the lime juice, olive oil, salt, and pepper in a small bowl.
- Toss the dressing with the veggie mixture.
- Chill for at least 30 minutes in the fridge.
- Serve with tortilla chips.
Notes
Store in an airtight container in the fridge for 3-5 days. Add avocado just before serving to prevent browning.
- Prep Time: 15 minutes
- Cook Time: 0 minutes
- Category: Appetizer
- Method: Mixing
- Cuisine: American
Nutrition
- Serving Size: 1/2 cup
- Calories: 130
- Sugar: 2g
- Sodium: 250mg
- Fat: 4g
- Saturated Fat: 0.5g
- Unsaturated Fat: 3g
- Trans Fat: 0g
- Carbohydrates: 22g
- Fiber: 6g
- Protein: 6g
- Cholesterol: 0mg
Keywords: Texas Caviar, dip, appetizer, vegan, black-eyed peas, beans, vegetables
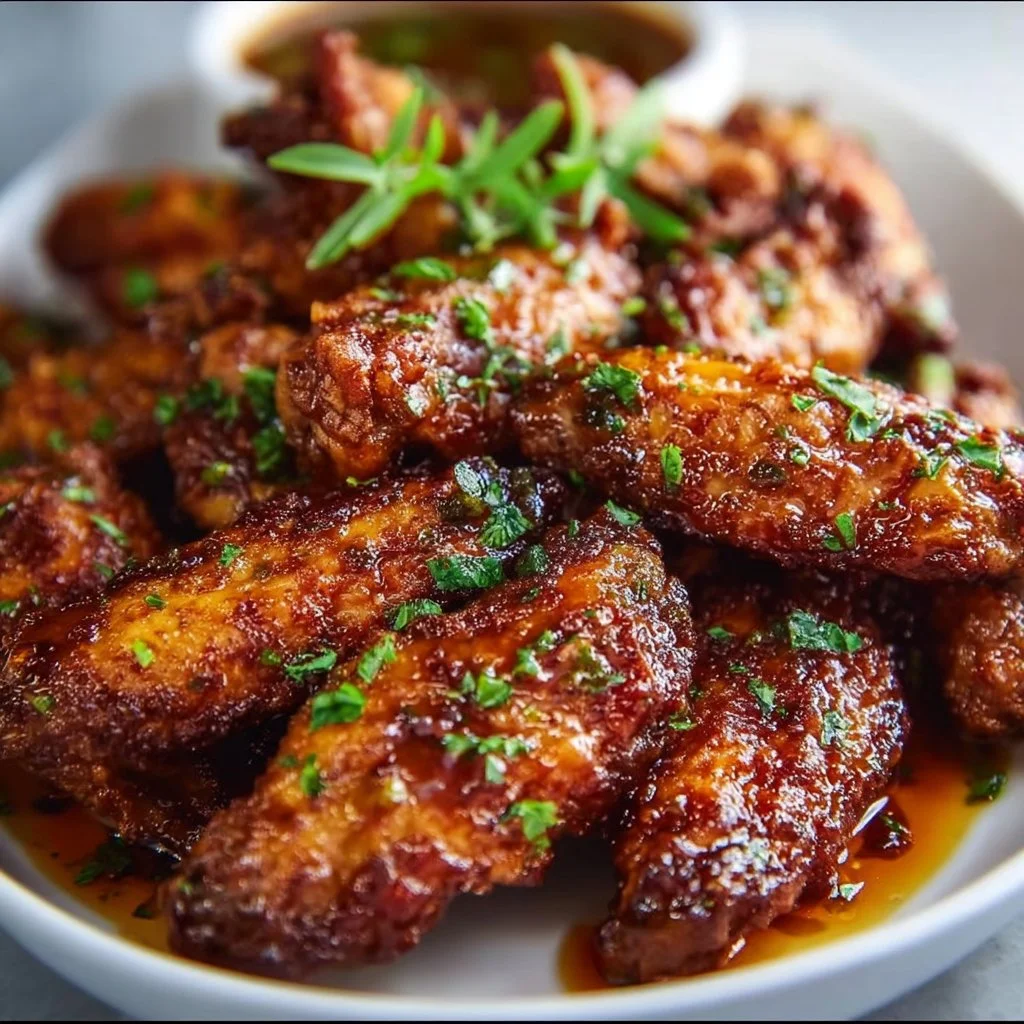
Brown Sugar Cajun Wings
Brown Sugar Cajun Wings: The Ultimate Comfort Food
Welcome back to my cozy corner of the kitchen! I’m Olivia Bennett, your enthusiastic home cook and part-time flavor magician. Today, we’re diving into a dish that might just become your new go-to for game days, casual gatherings, or even an impromptu weeknight feast: Brown Sugar Cajun Wings. These wings hit all the right notes: crispy, sweet, spicy, and utterly mouthwatering.
I don’t know about you, but for me, wings have always been a sign of good times and great company. Whether it’s the heart-pounding thrill of a football game, a family movie night, or an outdoor gathering with friends, wings have a way of bringing people together. They’re one of those magical foods that make every occasion feel special. And let’s be honest—a good set of wings can capture any crowd’s heart.
Now, what sets these Brown Sugar Cajun Wings apart? The answer lies in the blend of sweet brown sugar and bold Cajun spices that create an irresistible glaze. Picture this: tender, juicy chicken wings caramelized to perfection, with just the right amounts of sweetness and heat. It’s a flavor experience that will make you the star of your next gathering. Plus, they’re surprisingly easy to make, so let’s roll up our sleeves and get cooking because I’m here to help you feel confident and excited in your kitchen!
Ready to join me on this flavorful adventure? Let’s gather our ingredients!
Personal Story
Ah, wings! They remind me of childhood family gatherings on Sunday afternoons. Every weekend, my dad would take my siblings and me to our favorite local diner, known for its famous wings. The dining room would be buzzing with laughter, music, and the irresistible scent of sizzling chicken. My dad would always order a platter to share, expertly navigating the napkin pile for those sticky fingers. As we devoured the wings, drenching them in tangy sauce and swiping at our faces, we’d share stories, laugh, and sometimes argue over who got to pick the next movie or game.
Eventually, those diner outings transformed into a passion for cooking my own wings at home. I started experimenting with various marinades and flavors, incorporating elements from those Sunday outings. Brown Sugar Cajun Wings are one of my proudest discoveries. It’s a recipe that marries my love for sweet and spicy flavors with those nostalgic family moments.
So, when you sink into those crispy, flavorful wings, remember that they’re infused not just with spices or sugar but with a whole lot of love and memories from my kitchen to yours.
Ingredients
Let’s gather those beautiful ingredients you’ll need to create your delicious Brown Sugar Cajun Wings. Here’s what you’ll be working with:
-
Chicken Wings (2 lbs.)
Tip: You can use a mix of drumettes and flats or just flat or drumettes alone. If you’re short on wings, you can substitute with chicken drumsticks. -
Brown Sugar (1/4 cup)
Insight: Using light brown sugar adds a mild caramel flavor. For a deeper flavor, consider using dark brown sugar, which has more molasses. -
Cajun Spice Blend (2 tablespoons)
Tip: You can buy pre-made Cajun seasoning for convenience or mix your own with smoked paprika, cayenne pepper, garlic powder, and onion powder. -
Olive Oil (2 tablespoons)
Tip: If you want a neutral flavor, feel free to use canola or vegetable oil instead. Olive oil adds a lovely richness and mouthfeel. -
Garlic Powder (1 teaspoon)
Insight: If garlic isn’t your thing, you can skip it or replace it with onion powder for a different flavor profile. -
Salt and Pepper (to taste)
Tip: Season generously but remember that the Cajun spices will add sodium, so taste as you go! -
Fresh Parsley (for garnish, optional)
Tip: Fresh herbs add a pop of color and brightness. Swap out for green onions if you prefer an additional layer of flavor.
Step-by-Step Instructions
Ah, the cooking part! This is where the magic happens. Let’s get those wings sizzling!
Step 1: Prepare the Wings
Start by preheating your oven to 425°F (220°C). This high temperature is crucial for achieving that crispy outside you crave. While that’s warming up, rinse the chicken wings under cold water and pat them dry with paper towels.
Chef Hack: Drying them well is the key to crispy skin. The more moisture you eliminate, the better that crust will be!
Step 2: Prep the Seasoning
In a large mixing bowl, combine the brown sugar, Cajun spice blend, garlic powder, olive oil, salt, and pepper. Stir until you create a paste-like mixture. If you find the mixture too dry, add a drizzle more olive oil to help it coat the wings evenly.
Tip: Don’t hesitate to taste the mixture. You can always adjust the sweetness or spice level to suit your palate.
Step 3: Coat the Wings
Add the chicken wings to the bowl with your spice mixture. Using your hands, toss the wings until they are evenly coated. I recommend wearing kitchen gloves for easy cleanup!
Pro Tip: To ensure a delectably sticky glaze, let the wings marinate for 15-30 minutes if time allows—we all know that good things take time!
Step 4: Bake
Arrange the wings in a single layer on a lined baking sheet. Make sure they are not overcrowded; this allows them to crisp up properly. Bake in the preheated oven for 25-30 minutes, flipping them halfway through for even cooking.
Chef Note: Keep an eye on them towards the end; every oven is different. You want the wings golden brown and crispy!
Step 5: Glaze and Caramelize
Once your wings are beautifully browned and cooked through, remove them from the oven. For an extra touch, brush on a bit of the reserved marinade for that sticky finish. Pop them back in the oven for an additional 5 minutes to caramelize further.
Final Touch: Your wings are almost ready—don’t forget to make your home smell amazing in the process!
Step 6: Let them Rest
After taking them out of the oven, let the wings rest for a few minutes. This step is essential: it allows the flavors to settle and keeps the wings juicy.
Serving Suggestions
Now, the fun part: serving those gorgeous Brown Sugar Cajun Wings! Arrange them on a large platter, garnished with fresh chopped parsley for that pop of color. You can serve them with dipping sauces like ranch or blue cheese on the side to appeal to different tastes. I also love adding some celery sticks for that classic touch and a crunch that complements the wings beautifully.
Recipe Variations
Feeling adventurous? Here are a few fun twists to make these wings your own:
-
Honey Garlic Cajun Wings: Replace brown sugar with honey for a different sweetness that pairs beautifully with garlic.
-
Spicy Mango Cajun Wings: Add chopped dried mango to your spice mix for a fruity kick to balance out the heat.
-
Lemon Zest Cajun Wings: Mix in lemon zest with your marinade for a zesty brightness that cuts through the richness.
-
Cheesy Cajun Wings: After baking, suppose you sprinkle freshly grated parmesan cheese on top—yes, please!
-
Cajun Dry Rub Wings: If sauce isn’t your favorite, try tossing the wings in dry Cajun seasoning and roasting them for a crisper texture.
Chef’s Notes
These Brown Sugar Cajun Wings have evolved over time; they started as just a basic wing recipe and transformed into something extraordinary through trial and error. I remember a particularly chaotic kitchen disaster when I tried to put the mixing bowl in the fridge for a ‘quick chill,’ and it toppled over, leaving me with brown sugar and spices sprawled across the floor!
But that moment taught me that the kitchen is a space for experimentation. Sometimes, the best recipes come from a complete mess—seriously! Now I know to keep things stable and secure while mixing. So, if you’re up for an adventure in your cooking, embrace those cooking hiccups—they might lead to your new favorite recipe, too!
FAQs and Troubleshooting
1. Why are my wings not crispy?
Ensure you thoroughly dry the wings before applying the marinade and use a high enough temperature. If they’re overcrowded on the baking sheet, they’ll steam instead of crisp.
2. Can I use frozen wings?
Absolutely! Just make sure to thaw them completely and dry them as much as you can before seasoning.
3. How do I know when my wings are done?
The best way to check is by using an instant-read thermometer—wings should reach an internal temperature of 165°F (74°C). Look for that golden brown color, too!
4. What can I do with leftovers?
Leftover wings can be stored in an airtight container in the refrigerator for up to three days. They’re fantastic reheated in the oven for that crispiness or tossed in a spicy sauce for an upgrade!
Nutritional Info
While I believe in indulging, being informed is also essential. Here’s a rough estimate per serving (3 wings, without sauce):
- Calories: 345
- Protein: 25g
- Fat: 24g
- Carbohydrates: 5g
- Fiber: 0g
- Sugars: 4g
And there you have it, my lovely foodie friends! Brown Sugar Cajun Wings that are easy to whip up yet packed with deliciousness and adventure. I can’t wait to hear how they turn out for you, so make sure to share your kitchen successes and stories! Now go forth and get cooking—flavors await!
Print
Brown Sugar Cajun Wings
- Total Time: 45 minutes
- Yield: 4 servings 1x
- Diet: Paleo
Description
Crispy, sweet, and spicy Brown Sugar Cajun Wings that are perfect for game days and gatherings.
Ingredients
- 2 lbs. Chicken Wings
- 1/4 cup Brown Sugar
- 2 tablespoons Cajun Spice Blend
- 2 tablespoons Olive Oil
- 1 teaspoon Garlic Powder
- Salt and Pepper (to taste)
- Fresh Parsley (for garnish, optional)
Instructions
- Prepare the wings by preheating your oven to 425°F (220°C) and rinsing the wings under cold water; pat them dry.
- Combine brown sugar, Cajun spice blend, garlic powder, olive oil, salt, and pepper in a large bowl until a paste forms.
- Coat the wings with the spice mixture, tossing to ensure they are evenly covered.
- Bake the wings on a lined baking sheet for 25-30 minutes, flipping halfway through.
- Glaze the wings with reserved marinade and bake for an additional 5 minutes to caramelize.
- Let them rest for a few minutes before serving to keep them juicy.
Notes
For added flavor, let the wings marinate for 15-30 minutes before baking. Serve with dipping sauces like ranch or blue cheese.
- Prep Time: 15 minutes
- Cook Time: 30 minutes
- Category: Appetizer
- Method: Baking
- Cuisine: American
Nutrition
- Serving Size: 3 wings
- Calories: 345
- Sugar: 4g
- Sodium: 500mg
- Fat: 24g
- Saturated Fat: 4g
- Unsaturated Fat: 18g
- Trans Fat: 0g
- Carbohydrates: 5g
- Fiber: 0g
- Protein: 25g
- Cholesterol: 70mg
Keywords: wings, Cajun wings, Brown sugar, chicken wings, game day food

Asian Buffalo Wings
Asian Buffalo Wings: A Flavorful Twist on a Classic Favorite
Welcome back to my kitchen, fellow foodies! Today, I’m excited to dive into a recipe that’s sure to become a favorite in your house: Asian Buffalo Wings. These wings are a delightful fusion of spicy, savory, and tangy flavors that tickle your taste buds and keep you coming back for more. Perfect for game day, family gatherings, or just a cozy night in front of the TV, these wings combine the best of both worlds—you get the heartiness of traditional buffalo wings with a tasty twist inspired by Asian cuisine.
Now, if you’re like me, wings hold a special place in your heart. They remind me of summer barbecues, friends gathering around the dining table, and the carefree laughter that fills the air during game nights. Who doesn’t love fingers covered in sauce and the satisfaction of devouring a delicious wing? The adrenaline rush of your favorite team scoring in the background just adds to the joy of savoring these crispy delights.
This recipe is not only delicious but also simple enough to create for any occasion, whether it’s an intimate dinner for two or a bustling gathering of friends. We’ll be bathed in sweet and spicy sauce, tantalizing aromatics, and crispy textures. So, roll up your sleeves, don that apron, and let’s transform some chicken wings into a mouthwatering masterpiece. Ready? Let’s get cooking!
Personal Story
One of my fondest memories involving wings goes back to college. I lived with a group of my closest friends, and every Sunday was “Wings Day.” We turned our tiny kitchen into a makeshift sports bar, complete with funky décor, cold drinks, and, of course, plate after plate of wings. We experimented with flavors we found on the internet, varying from the classic Buffalo to honey garlic and even teriyaki.
I’ll never forget the day I decided to combine two of my favorite styles—buffalo and Asian. It all started when I got tired of my usual wing sauces and thought, “Why not mix it up?” I grabbed a bottle of sriracha and some soy sauce, threw in some ginger and garlic, and the rest is history! We called them "Asian Buffalo Wings," and the savory, spicy profile made our taste buds dance.
There we were, laughing, chatting, and devouring our wing creations while watching the game on a hot summer afternoon. As the sweat dripped from our brows—thank you, sriracha—we all shook our heads in disbelief, secretly asking if we had struck gold in the kitchen. Those moments made me fall in love with cooking even more, and I knew I had to share this recipe with you, my fellow food enthusiasts.
Ingredients
-
Chicken Wings (2 pounds)
- The main attraction! Look for fresh, organic wings if possible. You can also use frozen wings, just ensure they’re fully thawed and patted dry before cooking.
-
Soy Sauce (½ cup)
- This savory sauce adds umami depth to the wings. Feel free to swap in tamari to make this gluten-free or coconut aminos if you prefer a lighter flavor.
-
Sriracha Sauce (1/4 cup)
- This spicy, tangy condiment takes the classic buffalo flavor up a notch. If you’re sensitive to spice, reduce the amount, or use sweet chili sauce for a milder kick.
-
Honey (2 tablespoons)
- A natural sweetener balances the heat from the sriracha and adds a glossy finish to the sauce. Maple syrup can be a great alternative for a vegan version.
-
Garlic (4 cloves, minced)
- Fresh garlic provides aromatic depth. Feel free to use garlic powder in a pinch; about 1 teaspoon should suffice.
-
Ginger (1 tablespoon, minced)
- Fresh ginger adds a warm, spicy kick that amplifies the Asian flavors. You can substitute with ground ginger if necessary.
-
Rice Vinegar (2 tablespoons)
- This tangy vinegar helps cut through the richness of the wings while adding a zesty touch to the sauce. Apple cider vinegar could be used as a swap in a pinch.
-
Sesame Oil (1 teaspoon)
- A little bit of this fragrant oil goes a long way in enhancing Asian flavors. Don’t have any? Light olive oil will work in a pinch, but it won’t add that nutty aroma.
-
Green Onions (for garnish)
- Fresh green onions always liven up a dish and add a dash of color. Feel free to throw in some sesame seeds for added crunch!
Step-by-Step Instructions
Step 1: Prepare the Wings
-
Rinse and Dry: First, rinse your chicken wings under cold water and place them on a paper towel-lined baking sheet. Pat them dry thoroughly. This step is crucial—if the wings are wet, they won’t crisp up nicely!
-
Prep for Cooking: Preheat your oven to 425°F (220°C). If you prefer deep-fried wings, get your oil heated to 350°F (175°C). But for this recipe, we’ll be baking them for optimal crunch and less mess.
Step 2: Make the Marinade
-
Combine Ingredients: In a medium bowl, whisk together soy sauce, sriracha, honey, minced garlic, minced ginger, rice vinegar, and sesame oil until well combined. This sticky and spicy marinade will pack a serious punch!
-
Marinade the Wings: Place the chicken wings in a large resealable plastic bag or a bowl. Pour the marinade over the wings, ensuring they’re fully coated. Chef Tip: For best results, let them marinate for at least 30 minutes—feel free to let them sit in the fridge for up to 24 hours for deeper flavor.
Step 3: Bake the Wings
-
Arrange on Baking Sheet: Line a baking sheet with parchment paper (for easy cleanup!) or aluminum foil. Arrange the marinated wings in a single layer on the sheet, ensuring they don’t touch. If they sit too close, they’ll steam instead of crisp!
-
Bake: Pop those bad boys in the preheated oven for 40-45 minutes, flipping them halfway through. The goal is to have them golden brown and crispy. Chef Hack: For extra crispiness, toss them under the broiler for the last 5 minutes of cooking. Just keep an eye on them—no one likes burnt wings!
Step 4: Toss in the Sauce
-
Prepare a Second Batch: While the wings cook, you can strain any leftover marinade into a small saucepan. Simmer it on low heat for about 5-7 minutes until it thickens slightly. This will be your glaze!
-
Tossing Time: When the wings are done and crispy, remove them from the oven and place them in a large bowl. Pour the thickened sauce over the freshly baked wings and toss to coat evenly. Make sure each wing is beautifully glistening!
Step 5: Serve Them Up
-
Garnish: Serve the wings warm with a sprinkle of sliced green onions and sesame seeds on top. The fresh crunch complements the spicy wings perfectly.
-
Enjoy: Grab some napkins because things are about to get messy—and oh-so-delicious!
Serving Suggestions
These Asian Buffalo Wings are perfect for platters, game day, or a casual gathering. Serve them alongside cooling dips like ranch or a tangy garlic sauce to help balance out the heat. Pair your wings with a side of crispy vegetable spring rolls and Asian slaw for a complete feast, or some classic celery and carrot sticks for that crunchy detox!
Recipe Variations
-
Baked Buffalo Cauliflower Wings: For a vegetarian take, swap chicken wings for cauliflower florets and adjust the cooking time to about 25-30 minutes.
-
Spicy Honey Garlic Wings: Add extra honey and skip the sriracha for a sweeter profile.
-
Korean BBQ Wings: Replace soy sauce with gochujang (Korean chili paste) and add more sesame oil for a different kick.
-
Lemon Zest Addition: Brighten up the flavors by adding lemon zest into the marinade for a light, refreshing twist.
-
Naked Wings: Cook the wings without sauce for a classic crispy wing that can be dipped later in a variety of flavors.
Chef’s Notes
Oh, the fun I’ve had with these wings over the years! Initially, my attempts were a flavorful mess! I once miscalculated with sriracha and accidentally unleashed a firestorm that had everyone reaching for glasses of milk and running for the door. Since then, I’ve learned the importance of balance—too much heat can overshadow delicate flavors.
Over time, this recipe has evolved from mere experimentation to a family staple. I love whipping them up for get-togethers or just for a cozy movie night. There’s something magical about sharing these wings with others; they bring people together over shared laughter (and the occasional sauce-smeared face).
FAQs and Troubleshooting
Q: Why didn’t my wings get crispy?
A: Ensure the wings are thoroughly dried before cooking, and avoid overcrowding the pan. High heat also helps develop that crispy exterior!
Q: Can I use chicken breast or thighs?
A: Sure! Bone-in, skin-on chicken thighs also work well, but cooking times will vary. Thighs might take a bit longer to become tender and fully cook.
Q: What should I do if my sauce is too thick?
A: If your sauce thickens too much while simmering, just add a splash of water to achieve your desired consistency!
Q: Can these wings be made ahead of time?
A: Definitely! You can prep the wings and marinate them the day before. Just bake them before your guests arrive.
Nutritional Info
- Serving Size: 4 wings
- Calories: Approximately 350 calories
- Protein: 24g
- Carbohydrates: 14g
- Fat: 24g
So, there you have it—a labor of love and a dish that’s bound to become a new favorite. I hope you enjoy creating this delightful Asian Buffalo Wings recipe just as much as I’ve enjoyed sharing it with you. Give it a try, gather your loved ones, and make some delicious memories in the kitchen. Happy cooking!
Print
Asian Buffalo Wings
- Total Time: 75 minutes
- Yield: 4 servings
- Diet: None
Description
A flavorful fusion of spicy, savory, and tangy flavors, these Asian Buffalo Wings are perfect for game day or cozy nights in.
Ingredients
- Chicken Wings (2 pounds)
- Soy Sauce (½ cup)
- Sriracha Sauce (¼ cup)
- Honey (2 tablespoons)
- Garlic (4 cloves, minced)
- Ginger (1 tablespoon, minced)
- Rice Vinegar (2 tablespoons)
- Sesame Oil (1 teaspoon)
- Green Onions (for garnish)
Instructions
- Prepare the Wings: Rinse and dry the chicken wings under cold water and pat them dry thoroughly.
- Preheat your oven to 425°F (220°C).
- Make the Marinade: In a bowl, whisk together soy sauce, sriracha, honey, minced garlic, minced ginger, rice vinegar, and sesame oil.
- Marinade the Wings: Place wings in a large resealable bag or bowl and coat with marinade. Marinate for at least 30 minutes.
- Arrange on Baking Sheet: Line a baking sheet with parchment paper and arrange wings in a single layer.
- Bake: Bake wings for 40-45 minutes, flipping halfway through for even cooking.
- Toss in the Sauce: Remove wings and toss in thickened marinade for coating.
- Garnish: Serve warm, topped with sliced green onions and sesame seeds.
- Enjoy: Dig in and savor the flavors!
Notes
Wings can be prepared and marinated ahead of time for convenience. Adjust spice levels as per your preference.
- Prep Time: 30 minutes
- Cook Time: 45 minutes
- Category: Appetizer
- Method: Baking
- Cuisine: Asian
Nutrition
- Serving Size: 4 wings
- Calories: 350
- Sugar: 12g
- Sodium: 700mg
- Fat: 24g
- Saturated Fat: 6g
- Unsaturated Fat: 14g
- Trans Fat: 0g
- Carbohydrates: 14g
- Fiber: 0g
- Protein: 24g
- Cholesterol: 90mg
Keywords: wings, buffalo wings, Asian cuisine, game day, appetizer


