
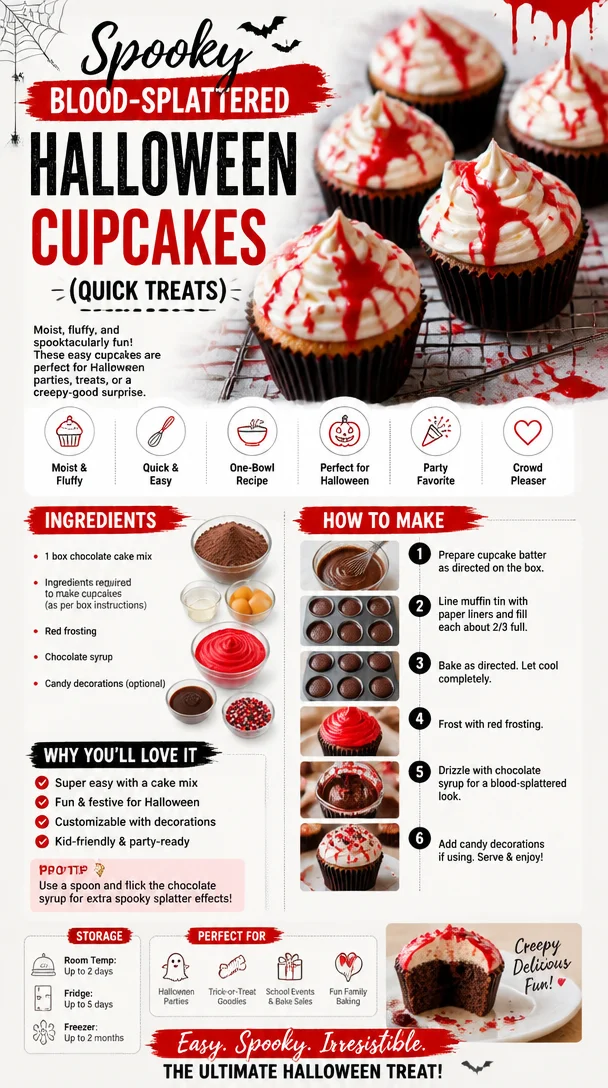
Spooky Blood-Splattered Halloween Cupcakes (Quick Treats)
Spooktacular Delight: Blood Splattered Halloween Cupcakes
Welcome to the spookiest time of the year! Halloween is just around the corner, and if you’re anything like me, you’re buzzing with excitement at the thought of all the treats you can whip up in the kitchen. As the leaves turn crisp and the air fills with anticipation for costume parties and spooky gatherings, there’s nothing quite like homemade treats to set the mood. Today, I’m going to share with you a wickedly delightful recipe that combines my love for all things cozy, festive, and a touch creepy—Blood Splattered Halloween Cupcakes!
Imagine a dessert that’s not only delicious but also adds a haunted vibe to your table. These cupcakes are moist, rich chocolatey wonders, topped with a creamy and fantastically blood-stained frosting. Trust me, they’ll be the star of your Halloween bash, garnering gasps and giggles from friends and family alike. So grab your witches’ hats and let’s dive into this eerie culinary adventure!
But beyond just being fun and festive, these cupcakes hold a special place in my heart. I can’t help but think back to the years when my kids and I would experiment in the kitchen around Halloween. We would cover the kitchen counter in flour and sprinkles while laughing and making creative messes. One specific Halloween, my daughter and I decided to craft “bloody” treats for a party. What started as a simple frosting experiment turned into a full-on kitchen adventure, complete with giggles as we deliberately went for that messily-spattered effect. The laughter and creativity we shared were truly the highlights, and I can’t help but pass that joy along to you!
Ingredients
To create these spine-tingling little treats, you’ll need the following ingredients:
-
All-Purpose Flour (1 ¾ cups)
The backbone of your cupcake. If you’re gluten-free, you can use a 1:1 gluten-free flour blend instead, which works wonderfully! -
Granulated Sugar (1 cup)
Sweetness is key! You can swap this for coconut sugar or use a sugar substitute if you prefer a lower glycemic index. -
Unsweetened Cocoa Powder (¾ cup)
This gives your cupcakes the rich chocolatey depth. If you want a more intense chocolate flavor, use dark cocoa powder. -
Baking Powder (1 ½ teaspoons)
Essential for fluffy cupcakes! Make sure it’s fresh for the best rise. -
Baking Soda (½ teaspoon)
Works in tandem with baking powder to create that perfect texture. -
Salt (½ teaspoon)
A tiny pinch to balance out the sweetness. You can use sea salt for a subtle flavor upgrade. -
Eggs (2 large)
These bind everything together. For a vegan option, substitute with flax eggs (2 tablespoons of ground flaxseed mixed with 6 tablespoons of water). -
Milk (1 cup)
Whole or 2% milk works best, but almond or oat milk can substitute nicely for a dairy-free option. -
Vegetable Oil (½ cup)
Helps keep the cupcakes moist. You can use melted coconut oil for a subtle flavor twist. -
Vanilla Extract (1 teaspoon)
For that warm, comforting aroma! Homemade vanilla extract can elevate the flavor even more. -
Red Food Coloring (for “blood” effect)
Intense red gel food coloring works best to achieve that dripping effect. -
Butter (1 cup, unsalted, room temperature)
The base for your frosting—nothing beats the richness of butter. For vegan cream cheese, use a vegan butter alternative. -
Powdered Sugar (3-4 cups)
Sweetness and texture for your frosting. If you’re looking for a lower-sugar option, try monk fruit sweetener! -
Cream Cheese (8 oz)
For a tangy twist in your frosting. Use a dairy-free cream cheese alternative if needed.
Step-by-Step Instructions
Now that your ingredients are assembled, let’s get into the nitty-gritty of making these eerie delights!
-
Preheat the Oven:
Preheat your oven to 350°F (175°C). Nothing sets the mood better than the sweet smell of cupcakes wafting through the air! -
Prep the Cupcake Liners:
Place cupcake liners in a muffin tin. I always go for spooky designs—think ghosts or pumpkins to add to the Halloween charm! -
Mix Dry Ingredients:
In a large bowl, whisk together the flour, sugar, cocoa powder, baking powder, baking soda, and salt until combined. This step is essential for ensuring even distribution of the dry ingredients. -
Combine Wet Ingredients:
In another bowl, whisk together the eggs, milk, oil, and vanilla extract. Make sure your wet ingredients are well combined; this will help achieve a moist cupcake! -
Bring It All Together:
Pour the wet mixture into the dry ingredients and mix until just combined. Be careful not to overmix. A few lumps are perfectly fine—your cupcakes will be light and fluffy! -
Fill the Liners:
Fill each cupcake liner about two-thirds full with the batter. I like to use an ice cream scoop for this—it’s neat and helps create uniform cupcakes! -
Bake to Perfection:
Bake in the preheated oven for 18-20 minutes or until a toothpick inserted into the center comes out clean. While waiting, clean your mess! You don’t want to be overwhelmed later. -
Cool Down:
Allow your cupcakes to cool in the pan for 5 minutes before transferring them to a wire rack. Let them cool completely before frosting—no one likes melted frosting! -
Prepare the Frosting:
Beat together the softened butter and cream cheese on medium speed until creamy and smooth. Add in the powdered sugar gradually and mix until well incorporated. Feel free to add a splash of vanilla for extra flavor. -
Add the Red Color:
Once your frosting is ready, add a few drops of red food coloring and mix until you achieve your preferred “blood” look. -
Frost the Cupcakes:
Using a piping bag or spatula, generously frost your cooled cupcakes. Don’t be shy; the messier it looks, the better! -
Create the Blood Splatter:
To get that spooky blood splatter effect, dip the tip of a clean paintbrush into red food coloring and flick it over the frosted cupcakes. It’s messy but oh-so-fun! Just be sure to cover your workspace—this is a messy one!
Serving Suggestions
When it comes to serving these spine-chilling cupcakes, make them the centerpiece of your Halloween dessert table! You could even arrange them in a haunted scene with Halloween figurines or spooky foliage for that extra flair. I love to serve them alongside a punch bowl filled with a fizzy, spooky drink to keep with the Halloween vibe.
Recipe Variations
If you’re feeling adventurous or accommodating to various dietary needs, here are a few twist ideas:
-
Vegan Surprise: Use flax eggs and coconut or almond milk with vegan butter for a completely dairy-free experience.
-
Gluten-Free Delight: Replace the all-purpose flour with a gluten-free flour blend, allowing everyone to join in on the fun!
-
Spooky Flavors: Add a sprinkle of cinnamon or pumpkin spice into the batter for a seasonal twist.
-
Chocolate Ganache: Instead of the cream cheese frosting, top with a rich chocolate ganache for a chocolaty overload.
-
Fruit Filling: Add a blood-red jam (like raspberry) filling to the cupcakes before frosting for a delightful surprise!
Chef’s Notes
This recipe has a delightful backstory. It began as a simple chocolate cupcake recipe, but once my kids decided to throw some fun into the mix with Halloween, we got creative—resulting in these memorable “bloody” creations. Each year, we tweak it a bit: sometimes it’s gummy worms, other times it’s edible eyeballs, making it a fun evolving tradition! The laughter and mess we create are what makes cooking so magical.
FAQs and Troubleshooting
-
Why are my cupcakes flat?
If your cupcakes turn out flat, check the freshness of your baking soda and baking powder. They should be lively and not expired! -
Can I make these a day ahead?
Absolutely! Bake the cupcakes a day in advance, but wait to frost them until the day of your event to maintain the frosty look. -
My frosting is too runny, what do I do?
If your frosting is too runny, slowly add more powdered sugar until you reach the desired consistency. For a thicker frosting, refrigerate it for a while! -
What if my cupcakes stick to the liners?
Make sure to let the cupcakes cool completely before frosting. If they are still warm, the moisture can make the liners stick. Using grease-proof cupcake liners can also help!
Nutritional Info
While I believe in indulging for the festive season, I understand the importance of being mindful. These cupcakes are best savored in moderation, but if you’re keeping track, here’s a quick glance at the nutritional breakdown (per cupcake):
- Calories: 250
- Total Fat: 10g
- Saturated Fat: 4g
- Carbohydrates: 38g
- Sugars: 24g
- Protein: 3g
So, there you have it—Blood Splattered Halloween Cupcakes that are as delightful to eat as they are fun to make! Don’t forget to invite some friends into your kitchen for a spooky baking party—you’ll create sweet memories worth savoring just as much as these cupcakes. Happy Halloween, foodies! Enjoy creating, sharing, and, most importantly, having fun in the kitchen!
Print
Blood Splattered Halloween Cupcakes
- Total Time: 40 minutes
- Yield: 12 servings 1x
- Diet: Vegetarian
Description
Delicious and festive chocolate cupcakes with blood-stained frosting perfect for Halloween celebrations.
Ingredients
- 1 ¾ cups All-Purpose Flour
- 1 cup Granulated Sugar
- ¾ cup Unsweetened Cocoa Powder
- 1 ½ teaspoons Baking Powder
- ½ teaspoon Baking Soda
- ½ teaspoon Salt
- 2 large Eggs
- 1 cup Milk
- ½ cup Vegetable Oil
- 1 teaspoon Vanilla Extract
- Red Food Coloring (for “blood” effect)
- 1 cup Butter (unsalted, room temperature)
- 3–4 cups Powdered Sugar
- 8 oz Cream Cheese
Instructions
- Preheat your oven to 350°F (175°C).
- Place cupcake liners in a muffin tin.
- Mix the flour, sugar, cocoa powder, baking powder, baking soda, and salt in a large bowl until combined.
- Combine the eggs, milk, oil, and vanilla extract in another bowl.
- Pour the wet mixture into the dry ingredients and mix until just combined.
- Fill each cupcake liner about two-thirds full with the batter.
- Bake in the preheated oven for 18-20 minutes or until a toothpick inserted comes out clean.
- Allow the cupcakes to cool in the pan for 5 minutes before transferring them to a wire rack.
- Beat together the softened butter and cream cheese until creamy. Gradually add powdered sugar and mix well.
- Add a few drops of red food coloring to your frosting and mix until you achieve your preferred color.
- Frost the cooled cupcakes with the frosting.
- Create the blood splatter effect using a clean paintbrush dipped in red food coloring.
Notes
These cupcakes can be made a day in advance, but frost them just before serving. Experiment with different fillings for fun variations!
- Prep Time: 20 minutes
- Cook Time: 20 minutes
- Category: Dessert
- Method: Baking
- Cuisine: American
Nutrition
- Serving Size: 1 cupcake
- Calories: 250
- Sugar: 24g
- Sodium: 200mg
- Fat: 10g
- Saturated Fat: 4g
- Unsaturated Fat: 6g
- Trans Fat: 0g
- Carbohydrates: 38g
- Fiber: 1g
- Protein: 3g
- Cholesterol: 30mg
Keywords: Halloween, cupcakes, chocolate, festive, spooky
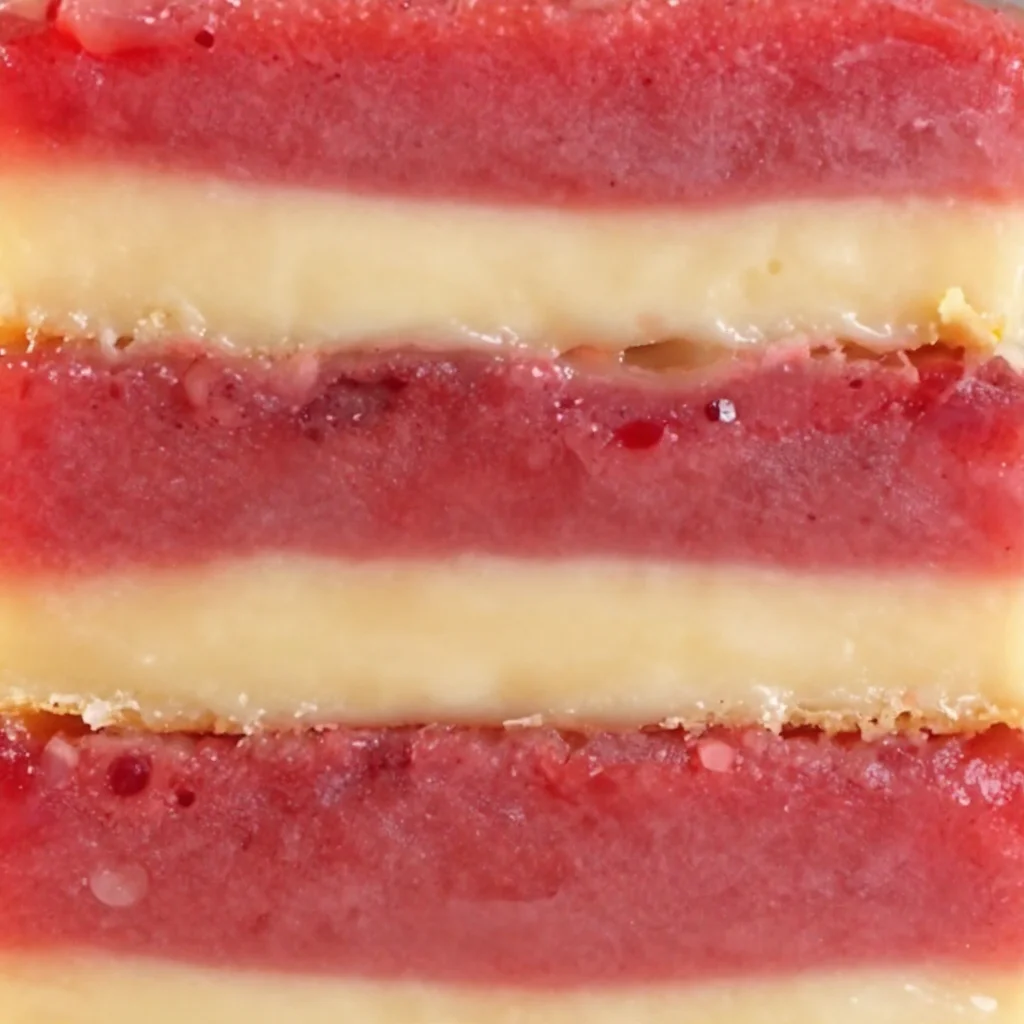
Tangy Lemon Raspberry Bars: Quick Weeknight Recipe
Lemon Raspberry Bars: A Symphony of Zest and Sweetness
Welcome to my cozy kitchen, food lovers! I’m so excited to share one of my absolute favorite recipes with you today: Lemon Raspberry Bars. They are the quintessential treat that captures the essence of sunny days and family gatherings. Picture this: a buttery, crumbly crust topped with a luscious lemon filling, punctuated by vibrant swirls of fresh raspberries. Not only are these bars a showstopper at any potluck, but they also bring a wave of nostalgia with every bite.
The Significance of Sunshine
Let me take you back to my childhood kitchen, where my love for baking truly blossomed. Every summer, my grandmother would invite me over for what she called “Cooking Adventures.” One hot afternoon, we decided to whip up some lemon bars — her specialty. She always had a way of transforming the simplest of ingredients into a masterpiece, and I was her eager sous-chef. As we zested lemons and muddled fresh raspberries, the kitchen filled with refreshing scents that danced in the air like summer itself.
Those afternoons were not just about the baking. They were about stories shared, laughter echoing, and the comfort of being together. I remember trying to sneak bites of the lemon mixture when I thought she wasn’t looking, only to be caught in the act and laughed at! That little kitchen was a treasure trove of joy and love, and it’s where I learned that cooking is more than just a method — it’s a way to connect with others and create lasting memories.
Today, I aim to recreate that magic not just for myself but for all of you. My Lemon Raspberry Bars are the perfect balance of tangy and sweet, making them irresistible and a source of joy. So, let’s roll up our sleeves and get started!
Ingredients
To make these delightful Lemon Raspberry Bars, you will need the following ingredients:
-
1 cup all-purpose flour
This is the base of your crust. If you’re looking for a gluten-free option, try almond flour or a gluten-free all-purpose blend. -
1/2 cup powdered sugar
It adds a lovely sweetness to the crust while maintaining a fine texture. For a healthier swap, use coconut sugar and blend it into a powder. -
1/2 cup unsalted butter, melted
Butter brings richness and flavor to the crust. If you’re dairy-free, coconut oil works wonderfully, providing a hint of tropical flavor. -
1/4 teaspoon salt
Don’t skip this! A pinch of salt enhances the sweetness and brings all the flavors together. -
2 large eggs
They create a fudgy texture in the lemon filling. For a vegan option, you can substitute with flax eggs (1 tablespoon flaxseed meal + 2.5 tablespoons water per egg). -
1 cup granulated sugar
This is essential for sweetening the tangy lemon filling. You can experiment with honey or maple syrup, but adjustments in quantity may be necessary. -
1/2 cup fresh lemon juice
Freshly squeezed lemon juice provides that zesty punch! Bottled lemon juice just doesn’t have the same vibrant flavor. -
Zest of 1 lemon
The zest adds a beautiful aroma and deepens the lemon flavor. You can zest the lemon before juicing it for convenience. -
1 cup fresh raspberries
These beauties add a burst of color and tartness to your bars. If you can’t find fresh raspberries, frozen works too—just make sure to thaw and drain them first!
Step-by-Step Instructions
Now that we have our ingredients prepped and ready, let’s dive into the magic of baking!
-
Preheat the Oven: Preheat your oven to 350°F (175°C). This ensures that your bars cook evenly!
-
Prepare the Crust: In a mixing bowl, combine the all-purpose flour, powdered sugar, melted butter, and salt. Mix until it resembles wet sand. Here’s a little hack: use your hands to blend it in; it’s messy, but it helps you gauge the texture better!
-
Press the Crust: Take the mixture and press it evenly into the bottom of an 8×8-inch baking dish. You want it compact so it holds together nicely after baking. Use the flat bottom of a measuring cup to help with this step.
-
Bake the Crust: Pop your crust into the preheated oven and bake for about 15-18 minutes until it’s lightly golden. While that bakes, let’s prepare the heavenly lemon filling!
-
Make the Filling: In a mixing bowl, whisk together the eggs and granulated sugar until combined. Add the lemon juice and zest, and whisk until smooth. This is when your kitchen will start smelling heavenly!
-
Add Raspberries: Gently fold in those beautiful raspberries. Take care not to break them up too much; we want some lovely pink swirls in our filling.
-
Pour and Bake Again: After the crust is done, remove it from the oven and pour the lemon-raspberry mixture over the warm crust. Return it to the oven and bake for an additional 20-25 minutes, or until the filling is set and just slightly jiggly in the center.
-
Cool Down: Once baked, let it cool completely in the pan. After that, chill it in the fridge for at least an hour. Trust me, this step is crucial for the perfect texture!
-
Slice and Serve: When you’re ready to serve, use a sharp knife to slice into bars. Dust the top with additional powdered sugar for that Instagram-worthy finish!
Serving Suggestions
These Lemon Raspberry Bars are a bright addition to any dessert platter. Serve them chilled alongside a scoop of vanilla ice cream or dollop of whipped cream for that extra indulgence. For a refreshing twist, pair them with sweet iced tea or a light Sauvignon Blanc. Trust me, layers of flavor and texture will dance on your palate!
Recipe Variations
Want to mix things up a bit? Here are some fun twists on this classic recipe:
- Blueberry Lemon Bars: Substitute the raspberries with fresh blueberries for a juicy twist.
- Ginger-Lemon Bars: Add a teaspoon of freshly grated ginger to the lemon filling for a spicy kick!
- Coconut Dream Bars: Toss in a half-cup of shredded coconut for texture and tropical flair.
- Almond Flour Crust: Swap the crust ingredients with almond flour to make it gluten-free, giving it a nutty flavor.
Chef’s Notes
Baking is all about experimenting, and I love how this recipe has evolved over the years! Initially, I made it with just lemon, but I found that incorporating berries adds such a delightful contrast in flavor and appearance. Plus, it’s a great way to use up those ripe, juicy fruits!
Oh, and one time, I accidentally used too much lemon juice, and it turned out to be a delicious disaster. The tartness was incredible — a reminder that sometimes mistakes lead to delicious surprises!
FAQs and Troubleshooting
1. Why are my bars runny in the center?
This may be due to underbaking. Make sure to bake until the filling is set and only slightly jiggly in the center.
2. Can I use bottled lemon juice?
While fresh lemon juice is best for flavor, bottled juice can work as a last resort. Just be aware that it may lack the vibrant taste of fresh!
3. How do I store leftover bars?
Store your bars in an airtight container in the refrigerator for up to a week. They also freeze well! Just wrap them tightly in plastic wrap, and they’ll stay fresh for a couple of months.
4. Can I make these bars vegan?
Absolutely! Substitute the eggs with flax eggs, use plant-based butter, and ensure your sugar is vegan-friendly.
Nutritional Info
While I’d love to provide you with the nutritional specifics, the joys of homemade baking often come from sharing with loved ones rather than counting calories! Everything in moderation can still be part of a balanced diet, right?
And there you have it, my friends! A delightful recipe for Lemon Raspberry Bars that not only brings back fond memories for me but, more importantly, will create new ones for you. So, gather your loved ones, crank up the tunes, and enjoy the sweetness of baking together! Happy cooking! 🍋🍓
Print
Lemon Raspberry Bars
- Total Time: 1 hour
- Yield: 16 servings 1x
- Diet: Vegetarian
Description
Delicious Lemon Raspberry Bars with a buttery crust and zesty filling, perfect for sunny days and family gatherings.
Ingredients
- 1 cup all-purpose flour
- 1/2 cup powdered sugar
- 1/2 cup unsalted butter, melted
- 1/4 teaspoon salt
- 2 large eggs
- 1 cup granulated sugar
- 1/2 cup fresh lemon juice
- Zest of 1 lemon
- 1 cup fresh raspberries
Instructions
- Preheat the oven to 350°F (175°C).
- Prepare the crust by combining flour, powdered sugar, melted butter, and salt in a mixing bowl.
- Press the mixture evenly into the bottom of an 8×8-inch baking dish.
- Bake the crust for about 15-18 minutes until lightly golden.
- Make the filling by whisking together the eggs and granulated sugar, then adding lemon juice and zest.
- Add the raspberries gently, folding them into the mixture.
- Pour the lemon-raspberry mixture over the baked crust and bake for another 20-25 minutes, or until set.
- Cool completely in the pan, then chill in the fridge for at least an hour.
- Slice into bars and dust with powdered sugar before serving.
Notes
Serve chilled alongside vanilla ice cream or whipped cream for a delightful treat.
- Prep Time: 20 minutes
- Cook Time: 40 minutes
- Category: Dessert
- Method: Baking
- Cuisine: American
Nutrition
- Serving Size: 1 bar
- Calories: 250
- Sugar: 18g
- Sodium: 50mg
- Fat: 12g
- Saturated Fat: 7g
- Unsaturated Fat: 5g
- Trans Fat: 0g
- Carbohydrates: 30g
- Fiber: 1g
- Protein: 3g
- Cholesterol: 30mg
Keywords: lemon, raspberry, dessert, bars, baking




